1
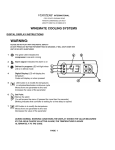
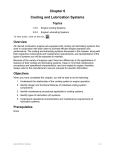
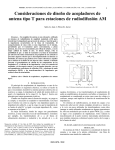
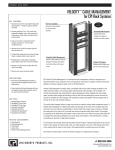
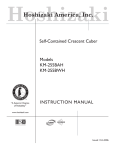
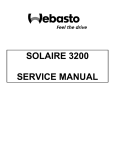
Hoshizaki
Hoshizaki America, Inc.
Ice Bin
Model
B-1150SS
B-1300SS
B-1500SS
B-1650SS
“A Superior Degree
of Reliability”
INSTRUCTION MANUAL
www.hoshizaki.com
1
Issued: 2-15-2005
Revised: 8-28-2006
FOREWORD
IMPORTANT
Only qualified service technicians should attempt to install, service or maintain
this ice bin. No such installation, service or maintenance should be undertaken
until the technician has thoroughly read this Instruction Manual. Likewise, the
owner/manager should not proceed to use this ice bin until the installer has
instructed them on its proper operation.
HOSHIZAKI provides this manual primarily to assist qualified service technicians in the
installation, maintenance and service of the ice bin.
Should the reader have any questions or concerns which have not been satisfactorily
addressed, please call, write or send an e-mail message to the HOSHIZAKI Technical
Support Department.
HOSHIZAKI AMERICA, INC.
618 Highway 74 South
Peachtree City, GA 30269
Attn: HOSHIZAKI Technical Support Department
Phone: 1-800-233-1940 Technical Service
(770) 487-2331
Fax: 1-800-843-1056
(770) 487-3360
E-mail: [email protected]
Web Site: www.hoshizaki.com
NOTE: To expedite assistance, all correspondence/communication MUST include the
following information:
• Model Number
• Serial Number
• Complete and detailed explanation of the problem
2
• Please review this manual. It should be read carefully before the ice bin is installed
and used. Only qualified service technicians should install, service and maintain the
ice bin. This manual should be made available to the technician prior to installation,
maintenance or service.
• Keep this manual with the bin for later reference.
CONTENTS
I. Specifications...................................................................................................................... 4
A. Dimensions ................................................................................................................... 4
1. B-1150SS ................................................................................................................ 4
2. B-1300SS ................................................................................................................ 5
3. B-1500SS ................................................................................................................ 6
4. B-1650SS ................................................................................................................ 7
II. Installation Instructions ...................................................................................................... 8
A. Checks Before Installation ............................................................................................ 8
B. Location......................................................................................................................... 8
C. Setup............................................................................................................................. 9
1. Unpacking the Ice Bin and Attaching the Snout Assembly ...................................... 9
2. Installing the Icemaker ........................................................................................... 10
D. Drain Connections....................................................................................................... 11
E. Final Check List........................................................................................................... 12
III. Operating Instructions..................................................................................................... 13
A. Baffle ........................................................................................................................... 13
1. Removal ................................................................................................................ 13
2. Installation ............................................................................................................. 13
B. Sliding Doors ............................................................................................................... 13
1. Removal ................................................................................................................ 13
2. Installation ............................................................................................................. 13
C. Probe (Optional Accessory) ........................................................................................ 14
IV. Cleaning and Maintenance Instructions.......................................................................... 15
A. Cleaning Instructions .................................................................................................. 15
1. Cleaning Procedure ............................................................................................... 15
2. Sanitizing Procedure - Following Cleaning Procedure .......................................... 16
B. Maintenance................................................................................................................ 16
3
I. Specifications
A. Dimensions
1. B-1150SS
units: mm [in.]
4
2. B-1300SS
units: mm [in.]
5
3. B-1500SS
units: mm [in.]
6
4. B-1650SS
units: mm [in.]
7
II. Installation Instructions
A. Checks Before Installation
IMPORTANT
1. This ice bin is designed and intended to be used in combination with a
Hoshizaki Modular Icemaker. If used with another manufacturer's icemaker,
care must be taken to properly support and secure the icemaker in
accordance with the manufacturer's recommendations.
2. Remove shipping carton, tape(s) and packing to prevent damage to the ice
bin.
3. Ensure all components and fasteners are securely in place.
1) Remove the packages containing the accessories.
2) Remove the protective plastic film from the side panels. If the ice bin has been exposed
to sunlight or direct heat, it should be allowed to cool before removing the protective
film.
B. Location
WARNING
This ice bin is not intended for outdoor use. Normal operating ambient
temperature should be within +45°F to +100°F. Extended periods of operation
at temperatures outside of these limitations may cause unsatisfactory results.
For best operating results:
• Ice bin should not be located next to ovens, grills or other high heat producing equipment.
• Location should provide a firm and level foundation for the equipment.
• Always avoid a site where dripping is not allowed.
• Allow 6" clearance at rear and sides for ease of maintenance and/or service should they
be required.
• Ice bin should not be located in an area that receives direct sunlight.
8
C. Setup
CAUTION
It is especially important that the ice bin is leveled in both left-to-right and frontto-rear directions. If it is not level, the result could be the production of smaller
or irregular shaped cubes or of overflow into the ice bin. See the "LOCATION"
instructions on the icemaker.
1. Unpacking the Ice Bin and Attaching the Snout Assembly
1) Unpack the ice bin, and remove all shipping cartons, tape(s) and packing. Remove the
two bolts holding the ice bin to the pallet. Attach four (4) adjustable legs [adjustable
within max. 6-13/32" (188 mm) to min. 6" (152 mm)] to the bottom of the ice bin. Be
careful not to damage the panels when installing the ice bin.
2) Position the ice bin in a selected permanent site.
3) Remove the snout assembly from the box.
4) Remove any packing from the snout assembly.
5) Apply the gasket (included) to the perimeter of the snout assembly where it mates with
the ice bin.
6) Position the snout assembly onto the bin by first placing the bottom of the assembly into
the lower hole on the bin's front panel and then rotating the top towards the bin.
7) Install the four screws (included) along the top of the snout assembly.
8) Clean and wipe the interior of the bin and snout assembly with a clean cloth.
Fig. 1
Snout Assembly
9
2. Installing the Icemaker
1) Unpack the icemaker, and remove all shipping cartons, tape(s) and packaging.
2) Refer to the charts below and also to the "SET UP" instructions on the icemaker when
installing the icemaker.
3) Apply the gasket (included) to the top of the bin and around the perimeter where the
icemaker will be installed. Each corner should be mitered and sealed with food-grade
silicone.
4) Use the adjustable legs to level the ice bin in both the left-to-right and front-to-rear
directions.
Single Icemaker Unit
22" WIDE UNIT
Top Kit
B-1150SS
B-1300SS
Unit
Position
48" UNIVERSAL
30" WIDE UNIT
(KML only)
48" UNIVERSAL
42" WIDE UNIT
48" WIDE UNIT
48" UNIVERSAL
48" UNIVERSAL
3"
1"
7"
Cover
(3A3198-01)
Top Kit
B-1500SS
B-1650SS
30" WIDE UNIT
(except KML & KMD)
48" UNIVERSAL
YES
NO
NO
N/A
60" UNIVERSAL
60" UNIVERSAL
*
*
NO
NO
N/A
60" UNIVERSAL
1"
Unit
Position
N/A
Cover
(3A3198-01)
N/A
N/A
YES (QTY 2)
YES (QTY 2)
N/A
YES
* One 30" wide unit on a B-1500SS or B-1650SS requires two covers (HS-2111).
Dual Icemaker Units
B-1150SS
B-1300SS
B-1500SS
B-1650SS
Top Kit
Unit
Position
Cover
Top Kit
Unit
Position
Cover
(3A3198-01)
Two 22" WIDE UNITS Two 30" WIDE UNITS Two 30" WIDE UNITS Two 30" WIDE UNITS
(except KML, KMD
(KML only)
(KMD only)
& KM-900)
N/A
N/A
N/A
N/A
N/A
N/A
N/A
N/A
N/A
60" UNIVERSAL
N/A
60" UNIVERSAL
N/A
60" UNIVERSAL
N/A
60" UNIVERSAL
4.5"
1"
3"
3"
YES
YES
YES
10
YES
D. Drain Connections
See Fig. 3
• A drain outlet, 1" female thread, is located on the bottom of the ice bin.
• The drain must have a 1/4" fall per foot on horizontal runs to get a good flow.
• The ice bin drain connection must be made separately from the icemaker drains. See the
"WATER SUPPLY AND DRAIN CONNECTIONS" instructions on the icemaker.
• A plumbing permit and services of a licensed plumber may be required in some areas.
Fig. 3
11
E. Final Check List
1) Is the icemaker/ice bin level?
2) Is the icemaker/ice bin in a site where the ambient temperature is within +45°F to
+100°F all year around? (Avoid sites with direct sunlight.)
3) Is there at least 6" clearance around the icemaker/ice bin for easy maintenance and
service, and for good ventilation?
4) Have the shipping carton, all tape(s) and packing been removed?
5) Are all components, fasteners and thumbscrews securely in place?
6) Have all piping connections been made?
7) Has the ice bin been cleaned and wiped with a clean cloth?
8) Has the end user been given the instruction manual and instructed on the operation
and use of the icemaker/ice bin and the importance of the recommended periodic
maintenance?
9) Has the end user been given the name and telephone number of the contracted service
representative?
10) Has the warranty tag been filled out and forwarded to the factory for warranty
registration?
12
III. Operating Instructions
See Fig. 4
A. Baffle
The baffle prevents ice in the bin from flowing out onto the floor while the bin door is open.
1. Removal
1) Rotate the back edge of the baffle up about 6 inches (15 cm).
2) Pull the baffle forward.
3) Raise the baffle up to remove.
2. Installation
1) Place the baffle into the bin through the snout. Raise the baffle up and engage the two
holes on the front edge of the baffle with the two tabs on the upper, inside lip of the
snout.
2) Lower the back edge of the baffle into position.
B. Sliding Doors
1. Removal
1) Slide the door you want to remove to the middle of the opening.
2) Raise the door up slightly. If it cannot be easily raised, slide it gently back and forth
while lifting until it raises.
3) Rotate the bottom of the door out for the front door or in for the rear door.
4) Pull the door down slightly and remove.
2. Installation
1) There is a vertical ridge on one side of each door. This ridge should face the rear on the
front door and the front on the rear door.
2) Place the top of the door into the appropriate track in the middle of the upper opening.
The top of the door should fit into three keyways.
3) Rotate and lower the bottom of the door into the track.
13
C. Probe (Optional Accessory)
The probe is used to break apart ice when it has bridged inside the bin and will not flow into
the snout. To break apart ice, follow the steps below.
1) Open the bin door.
2) Insert the probe through the hole in the snout (just above the baffle).
3) Carefully move the probe back and forth until ice falls into the snout.
Fig. 4
14
IV. Cleaning and Maintenance Instructions
IMPORTANT
Ensure all components, fasteners and thumbscrews are securely in place after
any maintenance or cleaning is done to the equipment.
A. Cleaning Instructions
WARNING
1. HOSHIZAKI recommends cleaning this unit at least once a year. (See the
"CLEANING INSTRUCTIONS" on the icemaker). More frequent cleaning,
however, may be required in some existing water conditions.
2. To prevent injury to individuals and damage to the icemaker/ice bin, do not
use ammonia type cleaners.
3. Always wear liquid-proof gloves to prevent the cleaning and sanitizing
solutions from coming into contact with skin.
1. Cleaning Procedure
1) Clean and sanitize the ice bin/icemaker (see the cleaning instructions on the icemaker)
as conditions require.
2) Remove all ice from the bin.
3) Disconnect electrical power to the icemaker.
4) Scrub the inside of the bin, the snout assembly and the sliding door assembly using a
nylon scouring pad, brushes and cleaning solution, such as 5 oz. of Hoshizaki "Scale
Away" or "LIME-A-WAY" (Economics Laboratories, Inc.) diluted in one gallon of water.
See Fig. 5.
5) Rinse all parts thoroughly with clean water.
Note: In areas where higher levels of chlorine are used in the water, chlorine staining
can occur on stainless steel components. This is evidenced by orange, rustcolored staining. These areas must be cleaned regularly to avoid corrosion of
the materials. Clean these areas using a non-abrasive cleaner such as Bon Ami.
(Charcoal filtration can be added to the icemaker to reduce chlorine levels and
the possibility of chlorine staining.)
15
Fig. 5
2. Sanitizing Procedure - Following Cleaning Procedure
1) Wash all parts cleaned in the cleaning procedure using the following sanitizing solution:
1/2 fl. oz. of a 5.25% sodium hypochlorite solution (chlorine bleach) diluted in 1 gallon
of water.
2) Rinse all parts thoroughly with clean water.
3) Reassemble in the reverse order of the removal procedure.
4) Turn on the icemaker.
5) Check for proper operation.
B. Maintenance
1) Exterior Panels
To prevent corrosion, wipe occasionally with a clean, soft cloth. Use a damp cloth
containing a neutral cleaner to wipe off oil or dirt build up.
2) Due to the simple design of this ice bin, very little maintenance is required.
16
HOSHIZAKI AMERICA, INC.
618 Hwy. 74 S., Peachtree City, GA 30269 USA TEL (770) 487-2331 FAX (770) 487-3360 www.hoshizaki.com 91A4LA10D
17