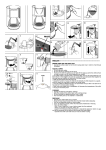
1
SELF-CONTAINED ICE MAKER
MACHINE A GLACE A BACINTEGRE
EISBEREITER MIT EINGEBAUTEM VORRATSBEHÄLTER
IJSMACHINE MET INGEBOUWDE BUNKER
MÁQUINA DE CUBITOS DE HIELO AUTÓNOMA
MACCHINA PER LA PRODUZIONE DI GHIACCIO AUTOCONTENUTA
FM-120EE
FM-120EE-N
CM-110EE
FM-120EE-50
FM-120EE-50-N
FM-80EE
FM-80EE-N
INSTALLATION MANUAL
NOTICE D’INSTALLATION
INSTALLATIONSANLEITUNG
INSTALLATIE VOORSCHRIFT
MANUAL DE INSTALACION
MANUALE PER L’INSTALLAZIONE
FOR QUALIFIED INSTALLER ONLY
RESERVE A L’INSTALLATEUR
FÜR DEN INSTALLATEUR
VOOR DE BEVOEGDE INSTALLATEUR
SOLAMENTE PARA INSTALADOR CUALIFICADO
SOLTANTO PER INSTALLATORI QUALIFICATI
92E2EB20B (101008)
ENGLISH
1) After removing the packaging, make sure that the
icemaker is in good condition. If in doubt, please
do not use the equipment but apply to professionally
qualified personnel.
IMPORTANT
1. In order to carry out safe and proper installation
of the product, please read this booklet
carefully beforehand and follow the instructions
contained within.
2) Remove the shipping tape holding the Door and
Front Panel.
2. On completion of the installation, start up the
icemaker to check for any abnormalities, and
instruct the user on how to use and maintain
the icemaker in accordance with the
Instruction Manual.
3) Open the Door, take out the package containing
accessories, and check the contents:
a) Installation Kit
Inlet Hose
1
Outlet Hose
1
Adjustable Leg
4
b) Scoop
1
3. This booklet should be handed over to the user
after the installation and be preserved by the
user together with the Instruction Manual for
any further consultation that may be
necessary.
4) Remove the Front Panel (Left) and Top Panel. See
Fig. 2.
5) Remove the protective plastic film from the panels.
If the icemaker is exposed to the sun or to heat,
remove the film after the icemaker cools.
WARNING
The installation must be carried out by
qualified personnel, in accordance with current
regulations, according to the manufacturer’s
instructions.
Top Panel
1. UNPACKING
Protective
Plastic Film
WARNING
Children should not be allowed in reach of the
packaging elements (plastic bags and expanded
polystyrene) as they are potential sources of
danger.
Front Panel
(Left)
CAUTION
Remove shipping carton, tape(s) and packing. If
packing material is left in the icemaker, it will not
work properly.
Adjustable Leg
Front Panel (Left): Remove the screws. Lift up
and pull toward you.
Top Panel:
Remove the screws and lift up.
Top Panel
Fig. 2
2. LOCATION
Door
Front Panel
(Left)
Front Cover
Power Supply
Cord
IMPORTANT
1. This icemaker is not intended for outdoor use.
Normal operating ambient temperature should
be within 5°C to 40°C. Normal operating water
temperature should be within 5°C to 35°C.
Operation of the icemaker, for extended
periods, outside of these normal temperature
ranges may affect production capacity.
2. The icemaker should not be located next to
ovens, grills or other high heat producing
equipment.
Air Filter
Fig. 1
1
ENGLISH
3. The location should provide a firm and level
foundation for the equipment.
and should only be replaced by a qualified service
engineer.
4. Allow 15 cm clearance at rear, sides and top
for proper air circulation and ease of
maintenance and/or service should they be
required.
* Usually an electrical permit and services of a
licensed electrician are required.
* If the supply cord and the plug should need to be
replaced, it should only be done by a qualified
service engineer.
5. This appliance is not suitable for installation
in an area where a water jet could be used
and where dripping is not allowed.
For the U.K. and the Republic of Ireland only
* The wires in the mains lead are coloured in
accordance with the following code:
6. Do not place anything on top of the icemaker
or in front of the Louver.
Green & Yellow = Earth
Blue = Neutral
Brown = Live
7. This icemaker will not work at subfreezing
temperatures. To prevent damage to the water
supply line, drain the icemaker when air
temperature is below zero (see “II. 2.
PREPARING THE ICEMAKER FOR LONG
STORAGE” in the instruction manual).
As the colours of the wire in the mains lead of this
appliance may not correspond with the coloured
markings identifying the terminals in your plug,
proceed as follows:
8. The noise from this icemaker is 55 dB or less.
The wire which is coloured Green-and-Yellow must
be connected to the terminal in the plug which is
marked with the letter E or by the symbol
or
coloured Green or Green-and-Yellow. The wire which
is coloured Blue must be connected to the terminal
which is marked with the letter N or coloured Black.
The wire which is coloured Brown must be connected
to the terminal which is marked with the letter L or
coloured Red.
3. INSTALLATION
* Incorrect installation can cause harm to people,
animals or things, for which the manufacturer cannot
be held responsible.
1) Position the icemaker in the selected permanent
site.
* Should the socket outlets in the installation site not
be suitable for the plug supplied with your product,
the plug must be removed (cut off if it is moulded on
plug) and an appropriate plug fitted.
2) Level the icemaker in both the left-to-right and frontto-rear directions by adjusting the legs.
4. ELECTRICAL CONNECTIONS
If the non-rewirable plug has been cut from the power
supply cord, it must be disposed of. There should
be no attempt to reuse it. Inserting such a plug into
a socket elsewhere presents a serious risk of
electrical shock.
WARNING
THIS APPLIANCE MUST BE EARTHED
This icemaker requires an earth that meets the
national and local electrical code requirements.
To prevent possible severe electrical shock to
individuals or extensive damage to equipment,
install a proper earth wire to the icemaker.
Remove the plug from the mains socket before
any maintenance, repairs or cleaning is
undertaken.
* The non-rewirable plug must never be used without
a fuse cover being fitted.
The correct replacement for the detachable fuse
cover is identifiable from the manufacturer’s reference
number stamped on the plug.
Supply of replacement fuse covers can be obtained
from Hoshizaki Parts/Service Centres.
* This icemaker must have a separate power supply
or receptacle of 220 - 240V.
Fuses should be rated at 13A and approved to BS
1362.
* The main control box circuit breaker is rated at 6A
2
ENGLISH
5. WATER SUPPLY AND DRAIN
CONNECTIONS
(For the U.K. only, the connections must be in
accordance with current requirements of the Model
Water Byelaws 1986 SI No. 1147)
Water Supply Tap
* Only potable water should be used for the icemaker.
Inlet Hose
* Water supply pressure should be minimum 0.5 bar
and maximum 8 bar. If the pressure exceeds 8 bar,
use a proper pressure reducing valve. Do NOT throttle
back the supply tap.
Fig. 4
* A plumbing permit and services of a licensed plumber
may be required in some areas.
6. START-UP PROCEDURE
1) Check that the power supply cord is disconnected.
* The icemaker drain is gravity flow, so ensure drain
pipe has an adequate pitch or fall.
2) With the Front Panel (Left) removed, check that
the Operation Switch on the Control Box is turned
on.
* Water should drain into an open trap.
1) Attach angled end of white flexible inlet hose
(accessory) to the G3/4 fitting at the top rear of the
icemaker as indicated, ensuring rubber sealing
washer is correctly positioned. Hand tighten
sufficiently to provide leak free joint.
Control Box
Front Panel
(Left)
2) Attach the other end of inlet hose to the water tap,
noting washer is correctly positioned before hand
tightening as above.
Air Filter
3) Attach grey flexible outlet hose (accessory) to the
R3/4 fitting at the bottom rear of the icemaker as
indicated, confirming fitment of rubber washer before
finally hand tightening the joint. This pipe can be
cut to length as necessary to suit position of main
drain.
Condenser
Fig. 5
Circuit
Breaker (6A)
Motor
Protector *
Operation
Switch
Water Supply
Inlet G3/4
Inlet Hose
Control Box
* 3A (FM-120EE, CM-110EE)
1A (FM-80EE)
Drain Outlet
R3/4
Fig. 6
3) Replace the Front Panel (Left) and Top Panel in
their correct position.
Outlet Hose
4) Open the water supply tap.
Fig. 3
3
ENGLISH
5) Connect the power supply and energise.
6) The following should occur in sequence:
a) Water Reservoir will fill.
b) Gear Motor will start.
c) Compressor will start.
IMPORTANT
1. Check the conditions and quality of the ice
production.
2. Do not use ice produced in the trial run. It
might be contaminated with foreign matter in
the water circuit. Discard or flush down the
drain.
3. Clean the Storage Bin before use (see “III. 1.
CLEANING” in Instruction Manual).
7. FINAL CHECKS
1) Is installation free of water leaks?
2) Is the icemaker free from vibration?
3) Are all the panels fixed and secure?
4) Has the user been instructed on correct machine
use and handed the Instruction Manual?
4
HOSHIZAKI EUROPE LTD.
UNIT A, STAFFORD PARK 18, TELFORD,
SHROPSHIRE TF3 3DJ ENGLAND
PHONE: 01952-291777
92E2EB20B
(050321)