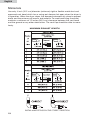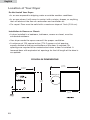
1
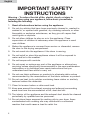
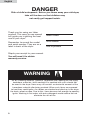
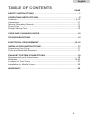
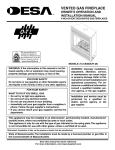
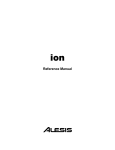
Front Load Electric Dryer
Seche-linge Electrique
Chargement de Devant
User Manual
Model # GDZ5-1C
Guide de l’Utilisateur
Modéle # GDZ5-1C
Quality ■ Innovation ■ Style
English
IMPORTANT SAFETY
INSTRUCTIONS
Warning – To reduce the risk of fire, electric shock, or injury to
persons when using your appliance, follow basic precautions,
including the following:
1. Read all instructions before using the appliance.
2. Do not dry articles that have been previously cleaned in, washed in,
soaked in, or spotted with gasoline, dry-cleaning solvents, or other
flammable or explosive substances, as they give off vapors that
could ignite or explode.
3. Do not allow children to play on or in the appliance. Close
supervision of children is necessary when the appliance is used
near children.
4. Before the appliance is removed from service or discarded, remove
the door to the drying compartment.
5. Do not reach into the appliance if the drum is moving.
6. Do not install or store this appliance where it will be exposed to
water and/or to the weather.
7. Do not tamper with controls.
8. Do not repair or replace any part of the appliance or attempt any
servicing unless specifically recommended in the user-maintenance
instructions or in published user-repair instructions that you
understand and have skills to carry out.
9. Do not use fabric softeners or products to eliminate static unless
recommended by the manufacturer of the fabric softener or product.
10. Do not use heat to dry articles containing foam rubber or similarly
textured rubber-like materials.
11. Clean lint screen before or after each load.
12. Keep area around the exhaust opening and adjacent surrounding
areas free from the accumulation of lint, dust and dirt.
13. The interior of the appliance and the exhaust duct should be cleaned
periodically by qualified service personnel.
14. Do not place items exposed to cooking oils in your dryer. Items
contaminated with cooking oils may contribute to a chemical
reaction that could cause a load to catch fire.
1
English
15. If material has been used with any flammable liquids or solids it
should not be used in the dryer until all traces of the flammable
liquids and its fumes have been removed.
16. This dryer must be properly installed in accordance with the
installation instructions before it is used. See grounding instructions
in the installation section.
17. Proper grounding must be ensured to reduce the risk of electric
shock and fire. Check with a qualified electrician or service personnel
if you are in doubt as to whether the dryer is properly grounded.
18. Use the dryer only for its intended purpose, drying clothes.
19. Always disconnect dryer from electrical supply before attempting any
service. Disconnect power cord by grasping the plug, not the cord.
20. Replace worn power cords and/or loose plugs.
21. To reduce the risk of electric shock or fire, do not use extension
cords or adapters to connect dryer to electrical power source.
SAVE THESE INSTRUCTIONS
For Future Use
2
English
DANGER
Risk of child entrapment. Before you throw away your old dryer,
take off the door so that children may
not easily get trapped inside.
Thank you for using our Haier
product. This easy-to-use manual
will guide you in getting the best
use of your dryer.
Remember to record the model
and serial number. They are on a
label in back of the dryer.
Model number
Serial number
Date of purchase
Staple your receipt to your manual.
You will need it to obtain
warranty service.
WARNING
As dry cleaning solvents, gasoline, vegetable and cooking oils are highly
hazardous materials, items soaked in or spotted with such should not
be used in the dryer. Items may still contain a substantial amount of the
hazardous material after being washed. When such items are exposed
to heat they could ignite. As clothes are stacked and piled up in the dryer
the heat cannot escape. Due to this, items become hot enough to possibly
ignite. Washing in hot water with extra detergent would reduce but not
eliminate the risk of fire.
3
English
TABLE OF CONTENTS
PAGE
SAFETY INSTRUCTIONS ..........................................................................1
OPERATING INSTRUCTIONS ....................................................................5
Features ..................................................................................................5-10
Operations ..................................................................................................11
Normal Operating Sounds ........................................................................11
Drying Tips ................................................................................................12
Energy Saving Tips ....................................................................................13
CARE AND CLEANING GUIDE ................................................................13
TROUBLESHOOTING ..............................................................................14
ELECTRICAL REQUIREMENT............................................................15-16
INSTALLATION INSTRUCTIONS..............................................................17
Unpacking Your Dryer ................................................................................17
Tools and Materials Required ....................................................................17
EXHAUST SYSTEM CONNECTIONS ......................................................18
Requirements and Instructions ..................................................................18
Materials................................................................................................19-20
Location of Your Dryer ..............................................................................21
Installation in Mobile Home........................................................................22
WARRANTY ..............................................................................................23
4
English
OPERATING INSTRUCTIONS
Features
Dryer Timer:
• Dryer Timer: The timer will let you set the time for up to 120 minutes to dry
your clothes depending on the fabric type and load size.
• Cotton/Synthetic Dry Button Setting: In order to dry COTTON clothes push
button in its outward position. This means it is on HIGH HEAT setting. In
order to dry SYNTHETIC/DELICATE clothes push button in its inward
position. This means it is on LOW HEAT setting. This convenient setting gives
you flexibility of your desired heat setting for any cycles.
Clean Filter
1. Cotton Button in OUTWARD POSITION means HIGH heat.
2. Synthetic Button in INWARD POSITION means LOW heat.
5
English
• Cotton Cycle: This can be either HIGH or LOW heat dry cycle depending on
what type of clothes you want to dry for up to 120 minutes.
• Synthetic Cycle: This cycle is used for synthetic fabrics where you can use
dry time up to 60 minutes at low heat setting.
(Please refer to Cotton/Synthetic Dry Button setting explanation, p.5)
• Delicate Cycle: This cycle is used for delicate fabrics where you can use dry
time up to 80 minutes. The low heat setting is preset in this cycle.
Understanding the Drying Temperature:
• In your dryer if the temperature goes over 117 Degree F/47 Degree C the
sensor will shut off the heat and the drum will stop spinning. At 99 Degree
F/37 Degree C temperature the heat will come on and drum will resume
spinning.
• Each cycle ends with a cool down period. The heat automatically turns off
and load continues to tumble for 5-10 minutes. This will reduce
wrinkling of your clothes.
6
English
Please follow the chart below for proper cycle/time/clothes
selections.
CYCLE TYPE
HEAT TYPE
Cotton Cycle
High
Synthetic Cycle
Low
CLOTHES/FABRICS
For heavy/lightweight cottons
and
“Tumble Dry” labeled clothes
Synthetic fabrics, Cotton knits
Synthetic Cycle
High
Synthetic fabrics: nylon, orlon,
Polyester etc
Delicate Cycle
Low
For heat sensitive clothes and for
“Tumble Dry” low and warm label
clothes, special care fabrics,
wool
Note: Cotton Cycle is also known as Regular Cycle Synthetic Cycle is also
known as Permanent Press Cycle
Note: Drying time varies depending on size, dampness of load, weight, fabric
type, room temperature, humidity and type of exhaust installation.
7
English
Start Button:
• Once you have made your selection of the cycle, time and heat setting, you
need to push start button to turn the power on. You will see the power light
comes on indicating that power is on.
Clean Filter
Note: The way this start button is designed that when you press the button, it
will return to outward position instead of staying in inward position.
Clean Filter
Note: If you want to add or remove clothes while dryer is on, simply by
pressing START button will stop the dryer. Open the door and make your
changes. Close the door and by pressing START button will reset the
dryer.
8
English
Synthetic Light:
• You must have synthetic button in its inward position in order to have the
light "ON". When cycle is about to finish and goes in cool dry at the end, you
will notice that the light will go "OFF".
Note: If the light does not come on then check the position of synthetic button.
(Please refer to Cotton/Synthetic Button setting explanation, p.5)
Clean Filter
Clean Filter Light:
• When there are last 10 minutes left in the cycle, you will see that the light will
come "ON". This is a reminder to clean the filter after the cycle is finished.
Clean Filter
Note: The light will come on automatically if the outside temperature of the
exhaust duct is higher than 117˚F/47˚C.
9
English
Lint Filter:
• It is located on middle-front behind door. The filters slides out easily for
cleaning.
• It is ok to wash the lint filter with water and/or soap.
• Check filter before each use to assure it is free of lint.
• A clean lint filter ensures efficient drying and clothes will remain lint-free when
unloading the dryer. If lint filter is full of dust and lint, it will reduce air flow
through the dryer and increase drying time.
Leveling Legs:
• Your dryer has four leveling legs which are located in the front and rear
corners of your dryer. After properly placing your dryer in its proper position,
you can level you dryer.
• Leveling legs can be adjusted by turning them clockwise to raise your dryer
or by turning them counterclockwise to lower your dryer.
10
English
Operations
1. Sort clothes for drying. Separate dark and light colored items, like you do for
washing. Check for stains that have not been removed in washing. Dryer
heat may permanently set some stains. Properly dried clothes will need
minimum of care when removed from dryer.
2. Load up dryer with washed clothes. For optimum results, use dryer load of
similar weight, fabric and construction. Place small items in a mesh bag to
prevent from tangling. Do not overload the dryer. An average load will fill up
half the drum. Add fabric softener sheet if desired.
3. Select the drying temperature depending on the fabric type.
4. Select the drying time depending on the fabric type and load size.
5. Push the start button to start the drying cycle.
6. Wait for the drying cycle to finish before opening the dryer door.
7. Clean the lint filter after every load and before each use. A clean filter
ensures sufficient drying. A layer of lint on the filter reduces airflow through
the clothes and reduces drying time.
Note: Do not over dry clothes. Over drying can cause shrinkage,
harshness and wrinkling of fabric.
Normal Operating Sounds
Following sounds are normally heard during the operation of the dryer.
• Tumbling sounds. This is normal as the heavy wet clothes in the dryer are
continuously being tossed around.
• Air rushing noise. This happens as the dryer drum spins at very high RPM
and the air is rushing through the dryer drum.
• Timer clicks may be heard.
11
English
Drying Tips
Note: The average load will fill drum 1/3 to 1/2 full. Clothes will need room to
tumble freely for even drying and less wrinkling. If you overload the dryer,
you may cause damage to motor because it will not handle overloads
and the dryer may not start at all. You may have to remove some portion
of clothes and dry that separately. Your clothes may be wrinkled and
take long time to dry. This may not be an efficient way to dry your
clothes.
Preparing clothes for drying:
• Dry items of similar fabric, weight and construction in the same load.
• Separate dark-colored clothes from light-colored clothes.
• Separate clothes that shed lint from those that attract lint.
• Balance the dryer load evenly throughout the dryer for the best results.
• If your clothes have buckles, buttons and trim, make sure that they are
HEATPROOF.
• To prevent snagging and tangling, make sure that you close zippers, fasten
hooks, tie strings and sashes.
• Check if there are any stains on clothes that may not have been removed
during washing. Sometimes dryer heat may permanently set some stains on
clothes. Remove any stains prior to drying.
• When drying small items, place them in a heatproof mesh bag to prevent
from tangling, getting stuck in small drum holes. This is very convenient for
easy removal of small items.
• Always check that the lint filter is clean and in place properly to collect the
lint from clothes.
• When drying large items such as blankets, bed sheets, draperies and curtains
try to dry 2 to 3 at a time.
• Do not over dry clothes. It can cause wrinkling, shrinkage, harshness and
static electricity.
12
English
Energy Saving Tips
• Keep the lint screen clean and exhaust the dryer properly.
• Sort load batches properly and select proper temperature and cycle settings.
• Avoid overloading, adding wet clothes to a partially dry load and over drying.
• If you have multiple loads to dry, try to dry one load after another right away
to take an advantage of a warm dryer. This way you already have a warm
dryer and you save some time for drying.
• Do not open door needlessly because it causes warm/hot air to escape;
which prolongs drying time.
• Use dryer during low humidity because it will be a normal drying time due to
very less moisture in the air than during high humidity days where the air is
very moist.
CARE AND CLEANING GUIDE
• Lint filter needs to be cleaned before and after each use for your unit to
operate at optimum efficiency. The filter can be slid out, by pulling on the tab
located on the inside of the dryer door. The filter may be washed or
vacummed. Remove the excess water from the filter by gently shaking the
filter. This will remove dust and particles trapped in the filter. Lint build-up in
screen restricts air flow, which causes longer drying times. After cleaning,
slide the filter back in place.
DO NOT USE YOUR DRYER WITHOUT THE LINT FILTER.
• Do not use any type of spray cleaner when cleaning the interior. Hazardous
fumes or electric shock could occur.
• Clean cabinet with mild soap and water. Do not use harsh or abrasive
cleaners, as this could damage the dryer.
• Clean the duct and the vent on a regular basis to avoid clogging which could
affect the efficiency of the dryer.
13
English
TROUBLESHOOTING
Dryer does not operate:
• Check if unit is plugged in. The plug may have come loose.
• Check if the electrical wall receptacle is of proper voltage.
• Check if the circuit breaker needs to be reset or if the fuse needs to be
replaced.
• Check if the unit is in “Off” mode. Press Start button again.
• Check if door is open.
Dryer is working but not drying the clothes:
•
•
•
•
Unit may be over loaded. The dryer drum should only be half full.
Check exhaust ducts and vent. Vent should be free of all obstructions.
Duct should be lint and dust free. Ducts should be cleaned regularly.
Dryer load needs to be resorted. Heavy clothes may need to be separated
from regular clothes.
• Bulky clothes may require repositioning.
• If clothes dry unevenly a higher dry setting may be required or
clothes in the dryer may need to be resorted.
Dryer making noise when drying:
• Coins, loose change, buttons and other heavy objects could make noise.
• Dryer may need to be leveled evenly. Read Operating Guide – Normal
Operating Sounds.
Static:
• Caused by over drying. Adjust for shorter drying time.
• Mixed with synthetic fabric. Sort and separate different fabrics.
• Use a fabric softener.
14
English
ELECTRICAL REQUIREMENTS
Warning
Electrical Shock Hazard
Plug into a grounded 4 prong outlet.
Failure to do so can result in death or electrical shock.
It is your responsibility
• To connect a qualified electrical installer.
• To be sure that the electrical connection is adequate and in
conformance with CAN1-B149 (.1 or .2) installation codes and/or
local codes.
• A 4 wire, single phase, 115/230-volt, 60-Hz., AC-only electrical
supply is required on a separate 30-amp circuit, fused on both sides
of the line. A time-delay fuse or circuit breaker is recommended.
Connect to an individual branch circuit.
• This dryer is equipped with a CSA International Certified Power Cord
intended to be plugged into a standard 14-30R wall receptacle.
The cord is 5 ft (1.52 m) in length. Be sure wall receptacle is within
reach of dryer’s final location.
4-wire receptacle 14-30R
If using a replacement power supply cord, it is recommended that you use
Power Supply Cord Replacement. For further infromation, please reference the
service numbers located in the “Assistance or Service” section of this manual.
15
English
Replacement Power Supply Cord must be:
• UL Listed or CSA Interantional Certified
• Marked for use with clothes dryers
• Rated 115/230 volt minimum
• 30 amp
• Type SRD or SRDT
• 4 Conductors
• At least 5 ft (1.52 m) long.
Grounding Instructions
• For a grounded, cord-connected dryer:
This dryer must be grounded. In the event of malfunction or breakdown,
grounding will reduce the risk of electric current. This dryer is equipped
with a cord having an equipment-grounding conductor and a grounging
plug. The plug must be plugged into an appropriate outlet that is properly
installed and grounded in accordance with all local codes and ordinances.
Warning: Improper connection of the equipment-grounding conductor
can result in a risk of electric shock. Check with a qualified electrician
or service representative or personnel if you are in doubt as to whether
the dryer is properly grounded. Do not modify the plug provided with
the dryer: if it will not fit the outlet, have a proper outlet installed by a
qualified electrician.
Save These Instructions
16
English
INSTALLATION INSTRUCTIONS
• Select a suitable location for the dryer on a hard even surface away from
direct sunlight or heat source e.g. radiators, baseboard heaters, cooking
appliances etc. Any floor unevenness should be corrected with the leveling
legs located on the
bottom of the dryer.
Unpacking Your Dryer
1. Remove all packaging material. This includes the foam base and all adhesive
tape holding the dryer accessories inside and outside.
2. Inspect and remove any remains of packaging, tape or printed materials
before using the dryer.
Tools and Materials Required
• Phillips head and flathead screwdrivers
• Channel-lock adjustable pliers
•
1/2
inch open end wrench
• Carpenter’s level
• Measuring tape (12ft. min.)
• Duct tape
• Rigid or flexible metal 4 inch (10.2 cm) duct
• Vent hood
17
English
EXHAUST SYSTEM CONNECTIONS
Requirements and Instructions
WARNING
The following are specific requirements for proper and safe
operation of your dryer. Failure to follow these instructions can create excessive drying times and fire hazards.
1. Do not use plastic flexible duct to exhaust the dryer. Excessive lint can build
up inside exhaust system and create a fire hazard and restrict air flow.
Restricted air flow will increase dryer times. If your present system is made
up of plastic duct or metal foil duct, replace it with a rigid or flexible metal
duct. Ensure present duct is free of any lint prior to installing dryer duct.
2. If the dryer is not exhausted out doors, some fine lint will be expelled into
the laundry area. An accumulation of lint in any area of the home can create
a health and fire hazard. To reduce risk of fire, dryer MUST BE
EXHAUSTED OUTDOORS.
3. Do not allow combustible material (for example: clothing, draperies/curtains,
paper) to come in contact with exhaust system. The dryer must not be
exhausted into a chimney, a wall, a ceiling, or any concealed space of a
building which can accumulate lint, resulting in a fire hazard.
4. Exceeding the length of duct pipe or number of elbows allowed in the
“Maximum Length” charts can cause an accumulation of lint in the exhaust
system. Plugging the system could create a fire hazard, as well as increase
drying times.
5. Do not screen the exhaust ends of the vent system, nor use any screws or
rivets to assemble the exhaust system. Lint can become caught in the
screen, on the screws or rivets, clogging the duct work and creating a fire
hazard as well as increasing drying times. Use an approved vent hood to
terminate the duct outdoors, and seal all joints with duct tape. All male duct
pipe fittings must be installed
downstream with the flow of air.
Explosion hazard:
Do not install the dryer where gasoline or other flammables are kept or
stored. If the dryer is installed in a garage, it must be minimum of 18
inches (45.7 cm) above the floor. Failure to do so can result in death,
explosion, fire or burns.
18
English
Materials
Use only 4 inch (10.2 cm) diameter (minimum) rigid or flexible metal duct and
approved vent hood which has a swing-out damper hat open when the dryer is
in operation. When the dryer stops, the dampers automatically close to prevent
drafts and the entrance of insects and rodents. To avoid restricting the outlet,
maintain a minimum of 12 inches (30.5 cm) clearance between the vent hood
and the ground or any other obstruction. The vent flap should be able to move
freely.
MAXIMUM EXHAUST LENGTH
INSTALL MALE FITTINGS IN THE CORRECT DIRECTION
19
English
After installation is completed, the following method must be used to
determine if the exhaust system is acceptable:
1. Connect an inclined or digital manometer between the dryer and the point
the exhaust connects to the dryer.
2. Set the dryer timer and temperature to air fluff (cool down)
and start the dryer.
3. Read the measurement on the manometer.
4. The system back pressure must not be higher than 0.75 inches
of water column. If the system back pressure is less than 0.75
inches of water column, the system is acceptable. If the
manometer reading is higher than 0.75 inches of water column, the system
is too restrictive and the installation is unacceptable.
Although vertical orientation of the exhaust system is acceptable, certain
extenuating circumstances could affect the performance of the dryer:
1. Only the rigid metal duct work should be used.
2. Venting vertically through a roof may expose the exhaust
system to down drafts causing an increase in vent restriction.
3. Running the exhaust system through an area not insulated
may cause condensation and faster accumulation of lint.
4. Compression or crimping of the exhaust system will
cause an increase in vent restriction.
The exhaust system should be inspected and cleaned a minimum of every 18
months with normal usage. The more the dryer is used, the more often you
should check the exhaust system and vent hood for proper operation.
20
English
Location of Your Dryer
Do Not Install Your Dryer:
• In an area exposed to dripping water or outside weather conditions.
• In an area where it will come in contact with curtains, drapes, or anything
that will obstruct the flow of combustion and ventilation air.
• On carpet. Floor must be solid with a maximum slope of 1inch (2.54 cm).
Installation in Recess or Closet:
• A dryer installed in a bedroom, bathroom, recess or closet, must be
exhausted outdoors.
• Your dryer needs the space around it for proper ventilation.
• A minimum of 120 square inches (774.2 square cm) of opening,
equally divided at the top and bottom of the door, is required. Air
openings are required to be unobstructed when a door is installed. A
louvered door with equivalent air openings for the full length of the door is
acceptable.
ROUGH-IN DIMENSIONS
36 3/4”
(93.3 cm.)
23 13/32”
(59.4 cm.)
DOOR OPEN 90˚
33 7/8”
(86 cm)
22 13/16”
(58 cm)
21
English
Installation in Mobile Home
• Dryer must be exhausted outside (outdoors, not beneath the mobile home)
using metal ducting that will not support
combustion. Metal ducting must be 4 inches (10.16 cm) in diameter with
no obstructions. Rigid metal duct is preferred.
• If dryer is exhausted through the floor and area beneath the mobile home is
enclosed, the exhaust system must terminate outside the enclosure with the
termination securely fastened to the mobile home structure.
• Refer to previous pages for other important venting requirements.
• Installation must conform to current Manufactured Home Construction &
Safety Standard (which is a Federal Regulation
Title 24 CFR-Part 32-80) or when such standard is not applicable, with
American National Standard for Mobile Homes.
Warning: The dryer is designed under ANSI Z21.5.1 standard
for home use only.
DO
DON’T
Correct
Incorrect
DO
DON’T
Correct
Incorrect
22
IMPORTANT
Do Not Return This Product To The Store
If you have a problem with this product, please contact the "Haier Customer Satisfaction
Center" at 1-877-337-3639.
DATED PROOF OF PURCHASE REQUIRED FOR WARRANTY SERVICE
IMPORTANT
Ne pas retourner cet article au magasin
En cas de problème avec cet article, veuillez contacter le « Centre satisfaction client » de Haier
au 1-877-337-3639.
UNE PREUVE D’ACHAT DATÉE, LE NUMÉRO DU MODÈLE ET LE NUMÉRO DE SÉRIE SONT
OBLIGATOIRES POUR BÉNÉFICIER DE LA COUVERTURE OFFERTE PAR LA GARANTIE.
Made in China
Fabriqué en Chine
GDZ5-1C-01
Issued: April 05
Haier America
New York, NY 10018
part #: WD-9999-34
Printed in China