1
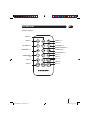
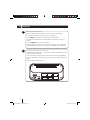
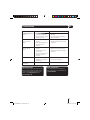
GUADAB08IP DAB Radio with iPod docking station
User Guide
IMPORTANT: Please read all instructions carefully before use and keep for future reference
GUADAB08IP_UserGuide.indd 1
18/07/2008 15:25:28
Introduction
Thank you for choosing this Grundig DAB Radio with Docking Station. Not
only can you listen to your favourite DAB radio stations, but you can also
listen to all the songs and albums on your iPod.
It’s really simple to use; you can fully operate your DAB Radio with Docking Station using the supplied
Remote Control.
Throughout this User Guide the DAB Radio with Docking Station will be referred to as the DAB Radio.
Safety is important
Use of any electrical equipment should be undertaken with care. Please read the Safety instructions
on page 17 before you operate this DAB Radio.
Key Features
DAB radio
DAB (Digital Audio Broadcasting) is the next generation of radio.
DAB was developed in Europe by a consortium of broadcasters and manufacturers.
DAB uses digital audio compression techniques to transform the source material, i.e. music and speech,
into digital code before it is transmitted. The code consists of electronic ‘ones and zeros’ called binary
digits or bits. The binary code is then multiplexed or grouped together to create a superior signal, when
compared with the older, analogue system, with the following key benefits:
• Near CD quality sound
• Interference free reception
• No need to retune
iPod Docking
Any iPod can be connected to the DAB radio to allow all your songs to be played through the DAB radio
speakers. Various adaptors are provided to allow all iPods to be connected.
2
GUADAB08IP_UserGuide.indd 2
18/07/2008 15:25:54
What’s in the box
Power Adaptor
Remote Control
DAB Radio with iPod Docking Station
8 x iPod Adaptors
Quick Start Guide
This User Guide
Contents
01 Your DAB Radio ............................4
05 Troubleshooting ..........................15
02 Get going .....................................6
06 Specifications .............................16
03 Daily use ......................................9
07 Warnings ....................................17
04 Advanced features .....................13
08 Guarantee ..................................18
3
GUADAB08IP_UserGuide.indd 3
18/07/2008 15:25:54
01 Your DAB Radio
FRONT
BASS TREBLE
Button
REMOTE CONTROL
Sensor
SCAN Button
INFO Button
MODE Button
IPOD Docking Station
SPEAKERS
LCD Display
VOL+ Button
VOL - Button
LEFT ARROW Button
SELECT Button
STANDBY Button
HEADPHONE Jack
PRESET Button
RADIO MENU Button
RIGHT ARROW Button
REAR
AERIAL
ON/OFF Switch
POWER Socket
LINE OUT Socket
BATTERY Compartment
4
GUADAB08IP_UserGuide.indd 4
18/07/2008 15:25:56
Your DAB Radio
01
REMOTE CONTROL
MENU Button
MODE Button
STANDBY Button
SELECT Button
LEFT ARROW Button
RIGHT ARROW Button
NUMERIC/PLAY/PAUSE Button
NUMERIC/RWD Button
NUMERIC/FWD Button
NUMERIC/REPEAT Button
NUMERIC/SHUFFLE
Button
SHIFT Button
INFO Button
VOL + Button
SCAN Button
TREBLE Button
BASS Button
VOL - Button
5
GUADAB08IP_UserGuide.indd 5
18/07/2008 15:25:57
02 Get going
1
Setting up the DAB Radio
Insert the connector of the Power Adaptor into the Power Socket of the DAB Radio.
Insert the Power Adaptor into the wall socket and turn the socket on.
Turn the ON/OFF Switch at the rear of the DAB Radio to the ON (I) position.
Unclip and extend the Aerial at the rear of the DAB Radio to ensure the best reception is
received.
Press the STANDBY button to turn the DAB Radio on.
When the DAB Radio is switched on for the first time, it will begin to search for all available
digital radio stations. Once the search is complete, the first available station will be heard.
2
Using the DAB Radio with Batteries
The DAB Radio can be powered by 6 ‘C’ type Batteries. This allows the DAB Radio to be used
outside or away from wall sockets.
To remove the Battery Compartment Cover, press firmly and pull away from the DAB Radio.
Insert 6 ‘C’ type batteries into the battery compartment, following the polarity diagram on the
inside.
Replace the Battery Compartment Cover.
6
GUADAB08IP_UserGuide.indd 6
18/07/2008 15:25:57
Get going
3
02
Using the Remote Control
The Remote Control can be used to operate the DAB Radio. Before using the Remote Control,
the Safety Tab should be removed.
To open the Remote Control Battery Compartment, press the Battery Compartment Cover
Tabs together and remove.
Carefully remove the Safety Tab which covers the battery.
Replace the Battery Compartment Cover.
To use the Remote Control, simply direct it towards the Remote Control Sensor on the front
of the DAB Radio and press the desired buttons.
4
iPod Docking
Any iPod can be connected to the DAB Radio to allow all your
songs to be played through the DAB Radio speakers.
To connect an iPod to the DAB Radio, select the compatible
adaptor from one of the 8 iPod Adaptors supplied. The iPod
Adaptors have markings on the bottom which clearly identify
which iPod they should be used with.
If your iPod is not compatible with any of the supplied iPod
Adaptors, use the adaptor supplied with your iPod.
Place the iPod Adaptor into the recess on the front of the DAB
Radio and the insert your iPod into the Adaptor.
DON’T FORGET! Your iPod will charge while docked with
the DAB Radio (iPod mode only).
Press the STANDBY button.
Press the MODE button repeatedly until iPod is displayed on the
LCD Display. Your iPod will automatically continue playback of
the last song played.
7
GUADAB08IP_UserGuide.indd 7
18/07/2008 15:25:57
02 Get going
5
Using Headphones
A pair of headphones (not supplied) with a 3.5mm diameter stereo plug and 8-32 ohm
impedance is required. Plug the headphones into the Headphone Socket on the front of the
DAB Radio.
When headphones are connected, the speakers are automatically disconnected.
6
Connecting to External Devices
Your DAB Radio can be connected to external devices, for example a Home Stereo. Simply
connect a suitable lead (not supplied) between the Line Out Socket on the rear of the DAB
Radio and the external device.
8
GUADAB08IP_UserGuide.indd 8
18/07/2008 15:25:58
Daily use
DONT FORGET! Some functions described
in this User Guide can only be performed
using the DAB Radio or the Remote Control.
Switching On
To turn the DAB Radio on, press the
STANDBY button.
To turn the DAB Radio off, press the
STANDBY button again.
DONT FORGET! Ensure the ON/OFF
Switch is in the on (I) position before turning
the DAB Radio on.
Adjusting the Volume
To increase the volume, press the VOL +
button.
To decrease the volume, press the
VOL - button.
Adjusting the Bass and Treble
Levels
Press the BASS TREBLE button once to
adjust the bass levels and twice to adjust the
treble. The Settings screen will be shown.
To increase or decrease the levels, press
the RIGHT and LEFT ARROW buttons
respectively. The levels will increase or
decrease in 2 decibel (dB) increments from
- 6 to +6 dB.
To accept the new level, press the
SELECT button.
Modes
The DAB Radio has three modes of operation.
These are:
• iPod
• DAB Radio
• FM Radio
03
iPod
You can dock an iPod with the DAB Radio and
listen to all your favourite songs through the DAB
Radio’s speakers. With the iPod docked, you can
control all the basic functions of the iPod using the
DAB Radio or Remote Control.
DONT FORGET! Only the functions
described in this User Guide can be
performed using the DAB Radio or Remote
Control.
Selecting the iPod Mode
Dock your iPod with the DAB Radio as
described on page 7.
Press the STANDBY button.
Press the MODE button repeatedly until iPod
is displayed on the LCD Display. Your iPod will
automatically continue playback of the last
song played.
Pausing play
To pause play during playback, press the
NUMERIC/PLAY/PAUSE button. The pause
symbol will appear on the iPod display.
To resume playback, press the
NUMERIC/PLAY/PAUSE again.
Skipping to the next/previous track
To skip to the next track, press the
NUMERIC/FWD Button.
To skip to the previous track, press the
NUMERIC/RWD Button.
Shuffle Play
To randomly play all the songs on your iPod,
press the SHUFFLE button on the remote
control.
DONT FORGET! The mode you have the
iPod set to will determine whether the DAB
Radio shuffles all the songs on the iPod or
just the album you are listening to.
9
GUADAB08IP_UserGuide.indd 9
18/07/2008 15:25:58
03 Daily use
Menu Navigation
You can access the menu system of your iPod
using the Remote Control.
favourite stations for easy access. You can preset
up to 10 DAB radio stations in the DAB Radio
memory.
To access the iPod menu system, press the
MENU button.
Select the station you want to preset using
the LEFT and RIGHT ARROW buttons.
Use the LEFT or RIGHT ARROW buttons to
highlight the menu options.
Press the SELECT button to listen to the
selected station.
Use the SELECT button to select a menu
option.
Press the PRESET button.
Repeat Play
To repeat the song you are currently listening
to, press the REPEAT button on the remote
control.
To repeat the album you are currently listening
to, press the REPEAT button twice on the
remote control.
DAB Radio
Selecting the DAB Radio Mode
Press the STANDBY button.
Press the MODE button repeatedly until
a DAB Radio station is shown on the LCD
Display.
Use the LEFT and RIGHT ARROW buttons
to select the preset number you would like to
save the station against.
Press and hold the SELECT button. The
LCD Display will show ‘Preset X Saved’. The
station is now successfully saved against the
selected preset number.
Selecting a preset station
To select a preset station, press the
appropriate NUMERIC button on the remote
control. The DAB Radio will retune to the
selected preset station.
DONT FORGET! If the preset number is
above 5, press the SHIFT button before the
NUMERIC button.
DONT FORGET! The first time you turn on
your DAB Radio it will automatically begin to
scan for DAB radio stations. A progress bar
will show the progress of the scan.
To select a preset station using the buttons on
the DAB Radio, press the PRESET button.
When the scan is complete, a list of the
available DAB stations will be displayed
on the second line of the LCD Display, in
numerical and then alphabetical order.
Press the SELECT button. The DAB Radio will
retune to the selected preset station.
If you have used the DAB Radio before, the
most recently selected DAB radio station
will be heard.
Selecting stations
Press the LEFT and RIGHT ARROW buttons
to scroll through the available stations. As you
scroll the available station names will appear
at the bottom of the LCD Display.
To listen to a selected station, press the
SELECT button.
Presetting stations
The Preset function allows you to store your
Use the LEFT and RIGHT ARROW buttons to
highlight the preset station.
DONT FORGET! If you have not preset any
stations, ‘Empty Preset X’ will be displayed
on the second line of the LCD Display.
Information Display
When listening to a DAB radio station you can
change the information that will appear on the
second line of the LCD Display. There are several
types of information that are sent by broadcasters
which can be displayed. These are:
• Dynamic Label Segment (DLS) - this is scrolling
text information supplied by the broadcaster.
Information could be the name of an artist
or music title, the DJ’s name or the contact
details for the radio station.
10
GUADAB08IP_UserGuide.indd 10
18/07/2008 15:25:59
Daily use
• Program Type (PTY) -displays the station
program type, for example ‘Pop’
• Multiplex Name - displays the broadcasting
area and collection of radio stations on this
frequency e.g.: BBC National DAB,
Digital 1 Network.
03
To perform a Full Scan, press and hold the
SCAN button. ‘Full Scanning’ will be shown
on the 1st line of the LCD Display complete
with a progress bar and the number of
stations found during the scan. Once the scan
is complete, the DAB Radio will tune back to
the last station you listened to.
• Time and Date - supplied by the broadcaster.
• Channel and Frequency - e.g.:
12B 225.64 MHz
• Signal Information - the data rate at which the
signal is being transmitted.
• Signal Error - provides details of the signal error
rate, shown as a number between
0 - 99.It will not be possible to satisfactorily
listen to a DAB radio station with a signal error
rate of 30 or above. Try adjusting the aerial or
relocating your radio to improve the reception.
To change the information shown on the
second line of the display, press the INFO
button.
Scanning for stations
It may be necessary to retune the DAB Radio
if you move it from one location to another, for
example, when you go on holiday. There are two
types of automatic scanning available. These are:
• Fast Scan - retunes the existing stations.
FM Radio
Selecting the FM Radio Mode
Press the STANDBY button.
Press the MODE button repeatedly until an
FM Radio station is shown on the LCD Display.
Scanning for FM stations
To automatically scan for an FM station, press
the SCAN button. The DAB Radio will scan
for the next available FM station.
To scan for another station, press the SCAN
button again.
To manually tune an FM station, press the
LEFT and RIGHT ARROW buttons. Each
press of the ARROW buttons will increase or
decrease the frequency by 0.05 MHz.
Presetting stations
The Preset function allows you to store your
favourite FM stations for easy access. You can
preset up to 10 FM radio stations in the DAB
Radio memory.
• Full Scan - performs a full scan to retune the
existing stations and also searches for any new
stations available.
DONT FORGET! Presetting FM radio
stations will not overwrite your DAB Radio
station resets.
To perform a Fast Scan, press the SCAN
button. ‘Fast Scanning’ will be shown on the
1st line of the LCD Display complete with a
progress bar and the number of stations found
during the scan. Once the scan is complete,
the DAB Radio will tune back to the last
station you listened to.
Scan for the FM radio station you want to
preset.
Press the PRESET button.
Use the LEFT and RIGHT ARROW buttons
to select the preset number you would like to
save the station against.
Press and hold the SELECT button. The
LCD Display will show ‘Preset X Saved’. The
station is now successfully saved against the
selected preset number.
11
GUADAB08IP_UserGuide.indd 11
18/07/2008 15:25:59
03 Daily use
Selecting a preset station
To select a preset station, press the
appropriate NUMERIC button on the remote
control. The DAB Radio will retune to the
selected preset station.
DONT FORGET! If the preset number is
above 5, press the SHIFT button before the
NUMERIC button.
To select a preset station using the buttons on
the DAB Radio, press the PRESET button.
Use the LEFT and RIGHT ARROW buttons to
highlight the preset station.
Press the SELECT button. The DAB Radio will
retune to the selected preset station.
DONT FORGET! If you have not preset any
stations, ‘Empty Preset X’ will be displayed
on the second line of the LCD Display.
Information Display
When listening to an FM radio station you can
change the information that will appear on the
second line of the LCD Display. In FM Radio mode,
the DAB Radio will receive Radio Data System
(RDS) information. RDS information includes:
• Station Name
• Program Content
• Current Time
• Station Frequency
To change the information shown on the
second line of the display, press the INFO
button.
12
GUADAB08IP_UserGuide.indd 12
18/07/2008 15:26:00
Advanced features
Radio Menu
The radio menu allows you to configure the
settings for the DAB Radio.
To access the Radio menu, press the RADIO
MENU button. The Radio menu will be shown
on the LCD Display.
Press the LEFT and RIGHT ARROW buttons
to scroll through the available features.
Press the SELECT button to select an option.
DONT FORGET! If you access the Radio
menu and do not make a selection after a
few seconds, the DAB Radio will return to
the previous display.
DONT FORGET! In FM Radio mode you
will only be able to select the ‘Clock and
SW’ version, all the other options are only
available in DAB Radio mode.
Station Order
The Station Order feature allows you to set
the way in which the DAB radio stations are
displayed.
The available options are:
• Fav Station - displays your favourite stations in
numerical then alphabetic order. As you
use the DAB Radio, the stations you listen
to most are monitored. These are saved as
favourite stations and are indicated by a heart
shaped icon.
• Alphanumeric - displays all available in
numerical then alphabetic order.
• Active Station - displays the stations which can
be received in your area first followed by the
stations which cannot be received.
• Prune Stations - displays only the stations
which can be received in your area.
With the Radio menu displayed, press the
LEFT and RIGHT ARROW buttons to
highlight ‘Station Order’.
04
Press the SELECT button to confirm the
selection. The station list will be displayed in
the chosen way.
Manual Tune
The Manual Tune feature allows you to manually
tune a specific station and add this to the
station list.
With the Radio menu displayed, press the
LEFT and RIGHT ARROW buttons to
highlight ‘Manual Tune’.
Press the SELECT button. The station
numbers and frequencies will be displayed at
the bottom of the LCD Display.
Press the LEFT and RIGHT ARROW buttons
to highlight station number you wish to
manually tune.
Press the SELECT button to confirm the
selection. The DAB Radio will scan for the
selected station. If the station is found, it will
be added to the station list.
Clock
The Clock feature allows you to manually enter
the time or to set the DAB Radio to automatically
update the clock every time the DAB Radio is
turned on.
With the Radio menu displayed, press the
LEFT and RIGHT ARROW buttons to
highlight ‘Clock’.
Press the SELECT button. The following
options are shown in the bottom of the
LCD Display.
• Auto-Set Clock
• Set Clock
Press the LEFT and RIGHT ARROW buttons
to highlight you want to set.
To set the DAB Radio to automatically update
the clock every time the DAB Radio is turned
on, choose the ‘Auto-Set Clock’ option.
Press the SELECT button.
Press the SELECT button.
Press the LEFT and RIGHT ARROW buttons
to highlight station order.
13
GUADAB08IP_UserGuide.indd 13
18/07/2008 15:26:00
04 Advanced features
To manually set the clock, choose the ‘Set
Clock’ option. The current time will be shown
in the bottom of the LCD Display with the
Hours between two arrows.
To adjust the Hours, press the LEFT and
RIGHT ARROW buttons to increase or
decrease the Hours.
Press the SELECT button. The Minutes will
be shown between two arrows.
To adjust the Minutes, press the LEFT and
RIGHT ARROW buttons to increase or
decrease the Minutes.
Press the SELECT button. The current year
will be shown in the bottom of the LCD
Display between two arrows.
To adjust the Year, press the LEFT and RIGHT
ARROW buttons to increase or decrease the
Year.
Press the SELECT button. The current Month
will be shown in the bottom of the LCD
Display between two arrows.
To adjust the Month, press the LEFT and
RIGHT ARROW buttons to increase or
decrease the Month.
Press the SELECT button. The current Day
will be shown in the bottom of the LCD
Display between two arrows.
To adjust the Day, press the LEFT and RIGHT
ARROW buttons to increase or decrease the
Day.
Press the SELECT button. The clock will be
updated and saved.
DONT FORGET! If you turn off the DAB
Radio at the ON/OFF Switch, the Clock will
automatically be updated and the preset
time will be lost.
Dynamic Range Compression (DRC)
Value
The DAB Radio is fitted with DRC. This function
is used to listen to stations at lower volumes
while maintaining subtle effects and keeping the
dialogue audible. There are three levels of DRC,
these are:
• 0 - No DRC is applied.
• ½ - 50% compression applied.
• 1 - 100% compression applied.
With the Radio menu displayed, press the
LEFT and RIGHT ARROW buttons to
highlight ‘DRC Value’.
Press the SELECT button.
Press the LEFT and RIGHT ARROW buttons
to highlight the desired DRC value.
Press the SELECT button to set the DRC
value.
SW Version
The SW Version function allows you to display
information on the current software.
With the Radio menu displayed, press the
LEFT and RIGHT ARROW buttons to
highlight ‘SW Version’. The software version
information is displayed.
Resetting the DAB Radio
The DAB Radio can be reset to the factory
defaults at any time. Once a reset has been
performed, the DAB Radio will automatically begin
to scan for all available stations.
To reset the DAB Radio, press and hold the
RADIO MENU button. After a few seconds,
‘Press SELECT to confirm reset’ will be
shown on the LCD Display.
Press the SELECT button to perform the
reset.
14
GUADAB08IP_UserGuide.indd 14
18/07/2008 15:26:00
Troubleshooting
05
Problem
Possible Cause
What to do
The DAB Radio does not
power on.
1. The Power Adaptor is not
connected to the DAB Radio
1. Connect the Power Adaptor to the
DAB Radio.
2. The wall socket is not turned on.
2. Turn on the power at the wall socket.
3. The Batteries are flat.
3. Replace the batteries.
The DAB Radio will not
receive any DAB radio
stations.
1. The Aerial is not unclipped and
extended.
1. Unclip and fully extend the Aerial.
The DAB Radio will not
receive any FM radio
stations.
1. The Aerial is not unclipped and
extended.
1. Unclip and fully extend the Aerial.
2. The FM radio station is not
correctly tuned.
3. Reposition the DAB Radio to reduce the
interference.
2. There is electrical interference
from nearby electrical
appliances.
2. Reposition the DAB Radio to reduce the
interference.
2. Perform a Scan to retune the station.
3. There is electrical interference
from nearby electrical
appliances.
No sound.
My iPod will not dock with
the DAB Radio
1. The volume is turned down.
1. Increase the volume.
2. Headphones are connected to
the DAB Radio.
2. Disconnect the headphones.
1. Incorrect iPod adaptor used.
1. Select the correct iPod Adaptor.
Need extra help?
Need a spare part?
Don’t worry we are just at the other end of the
phone. If you are experiencing problems using
your new product, before returning it to the
retailer, just call 0871 230 1777 or visit
www.grundig.co.uk
In the unlikely event of you needing spare
parts, please contact our spares department
on: 0871 230 0790
15
GUADAB08IP_UserGuide.indd 15
18/07/2008 15:26:01
06 Specifications
Power Supply (Input)
• 230 V ~ 50 Hz
• 6 x ‘C’ type batteries
Power Supply (Output)
• 9 V DC 1200 mA
Power Output
• 2 x 2 W RMS @ 10% THD output
Radio Frequency Coverage
• 174-240 MHz
• 87.5-108 MHz
IMPORTANT: This manual contains for-reference-only graphics and information that are subject to
change without prior notice.
16
GUADAB08IP_UserGuide.indd 16
18/07/2008 15:26:01
Warnings
• Unqualified attempts to repair the DAB Radio
unit will invalidate the warranty.
• Refer repairs of the DAB Radio to qualified
service personnel only.
• Do not disassemble the DAB Radio.
• Store the DAB Radio in a clean, dry
environment.
• Wipe dust off the DAB Radio with a clean, dry
and soft cloth.
• For stubborn stains use a damp (not dripping)
cloth.
• Do not expose the DAB Radio to rain or
moisture, dripping or splashing.
• Do not use any cleaning solutions on the DAB
Radio.
Servicing
The DAB Radio contains no user serviceable
parts. When servicing, refer to qualified service
personnel. Call the Grundig Helpline if you are
ever in doubt about the operation or safety of this
product.
07
WEEE
This appliance is labelled in accordance
with European Directive 2002/96/EG
concerning used electrical and
electronic appliances (Waste Electrical
and Electronic Equipment - WEEE).
The guideline determines the
framework for the return and
recycling of used appliances.
Sound levels
Your hearing is very important to you and to us,
so please take care when using the DAB Radio.
It is strongly recommended that you follow the
listed guidelines in order to prevent possible
damage or loss of hearing, especially when using
headphones.
Establish a safe sound level
Over time your hearing will adapt to continuous
loud sounds and will give the impression that the
volume has in fact been reduced. What seems
normal to you may in fact be harmful. To guard
against this before your hearing adapts, set
the volume to a low level.
Slowly increase the level until you can hear
comfortably and clearly and without distortion.
Damage to your hearing is accumulative and is
irreversible. Any ringing or discomfort in the ears
indicates that the volume is too loud.
Once you have established a comfortable listening
level, do not increase the sound level.
17
GUADAB08IP_UserGuide.indd 17
18/07/2008 15:26:01
08 Guarantee
The DAB Radio is guaranteed for twelve months from the date of original purchase. If any defect due to
faulty materials or workmanship, contact the Grundig Helpline. Have your receipt of purchase on hand.
The guarantee is subject to the following provisions:
• It is only valid within the boundaries of the country of purchase.
• The product must be correctly installed and operated in accordance with the instructions contained in
this User Guide.
• The unit must be used solely for domestic purposes.
• The guarantee will be rendered invalid if the unit is re-sold or has been damaged by inexpert repair.
• The manufacturer disclaims any liability for incidental or consequential damages.
• The guarantee is in addition to, and does not diminish, your statutory or legal rights.
18
GUADAB08IP_UserGuide.indd 18
18/07/2008 15:26:01
Technical Support: 0871 230 1777
GUADAB08IP_UserGuide.indd 20
DCS-JUL08-GUADB08IP
18/07/2008 15:26:02