1
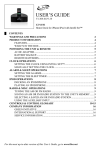
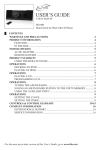
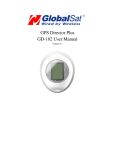
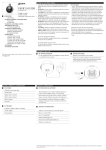
USER’S GUIDE
V:0012-0313-09
C209B
Clock Radio with Intelli Set™
█
Features
aM/FM radio
Intelli set™ auto clock set
0.9” amber LeD display with dimmer control
auxiliary input
Analog with direct tuning
Rotary volume control
Digital clock with alarm
Wake to radio or buzzer
warnInGs anD PreCatIons
• CAUTION: TO PREVENT ELECTRIC SHOCK, MATCH
WIDE BLADE OF PLUG TO WIDE SLOT, FULLY INSERT.
• warnInG:Topreventfireorshockhazards,donotexpose
this unit to rain or moisture.
• CautIon: Use of controls or adjustments or performance of
proceduresotherthanthosespecifiedmayresultinhazardous
radiationexposure.
• warnInG:Changesormodificationstothisunitnotexpressly approved by the party responsible for compliance
could void the user’s authority to operate the equipment.
• warnInG: Do not place the unit on top of any soft, porous,
or sensitive surfaces to avoid damaging the surface. Use a
protective barrier between the unit and surface to protect the
surface.
• CautIon: Dangerofexplosionifbatteryisincorrectly
replaced. Replace only with the same or equivalent type.
• PRÉCAUTION: Danger d’explosion si les piles sont remplacées de façon incorrect. Remplacer les piles seulement par le
même type de pile ou l’équivalent.
Donotmixoldandnewbatteries.
Donotmixalkaline,standard(carbon-zinc),orrechargeable
(ni-cad, ni-mh, etc) batteries.Tum que omante, vid pecesim
aximeiigingultumpubiterecomant.Casta,
Snooze and sleep function
Time zone button
Daylight savings time button
Built-in speaker
AC power
Integrated battery backup for digital clock
Keeps time during shipment or when AC power is out
Includes: AC/DC adapter
█
In the Box
C209B
AC/DC adapter
Documentation
For the most up-to-date version of this User’s Guide, go to
www.gpx.com
Power oPtIons
█
aC Power
Plug the attached AC power cord into a standard AC outlet
to power the unit.
Thelightningflashwith
arrowhead symbol,
within an equilateral
triangle, is intended
to alert the user to the
presence of uninsulated
"dangerous voltage"
within the product's
enclosure that may be of
sufficientmagnitudeto
constitute a risk of electric shock to persons.
warnInG: TO REDUCE THE RISK OF
ELECTRIC SHOCK,
DO NOT REMOVE
COVER (OR BACK).
NO USER-SERVICEABLE PARTS INSIDE.
REFER SERVICING
TO QUALIFIED SERVICE PERSONNEL.
Theexclamationpoint
within an equilateral triangle is intended to alert
the user to the presence
of important operating and maintenance
(servicing) instructions
in the literature accompanying the appliance.
additional warnings
• Theapparatusshallnotbeexposedtodrippingorsplashing
andthatnoobjectsfilledwithliquids,suchasvases,shallbe
placed on apparatus.
L'appareil ne doit pas être exposé aux écoulements ou aux
éclaboussures et aucun objet ne contenant de liquide, tel qu'un
vase, ne doit être placé sur l'objet.
• Main plug is used as disconnect device and it should remain
readily operable during intended use. In order to disconnect the
apparatus from the mains completely, the mains plug should be
disconnected form the mains socket outlet completely.
La prise du secteur ne doit pas être obstruée ou doit être facilement accessible pendant son utilisation. Pour être complètement déconnecté de l'alimentation d'entrée, la prise doit être
débranchée du secteur.
• Batteryshallnotbeexposedtoexcessiveheatsuchassunshine,fireorthelike.
Les piles ne doivent pas être exposées à de forte chaleur, tel
qu'à la lumière du soleil, au feu ou autres choses de semblable.
• Caution marking is located at the bottom of apparatus.
Les précautions d'emploi sont inscrites en bas de l'appareil.
█
Battery BaCkuP
• The marking information is located at the bottom of apparatus.
Les marquages sont inscrits en bas de l'appareil.
Requires 1 CR2032 battery (pre-installed)
CoMPany InForMatIon
The backup battery is for saving the time during brief power
outages. The unit cannot preform any of its normal functions
when powered off of the backup battery alone.
█
1.
2.
3.
4.
5.
6.
7.
IMPortant saFety
InstruCtIons
Read these Instructions.
Keep these Instructions.
Heed all Warnings.
Follow all instructions.
Do not use this apparatus near water.
Clean only with a dry cloth.
Do not block any ventilation openings. Install in accordance
with the manufacturer’s instructions.
8. Do not install near any heat sources such as radiators, heat
registers,stoves,orotherapparatus(includingamplifiers)
that produce heat.
9. Do not defeat the safety purpose of the polarized or
grounding - type plug. A polarized plug has two blades with
one wider than the other. A grounding type plug has two
blades and a third grounding prong. The wide blade or the
third prong are provided for your safety. When the provided
plugdoesnotfitintoyouroutlet,consultanelectricianfor
replacement of the obsolete outlet.
10. Protect the power cord from being walked on or pinched
particularly at plugs, convenience receptacles, and the point
wheretheyexitfromtheapparatus.
11. Onlyuseattachments/accessoriesspecifiedbythe
manufacturer.
12. Useonlywithacart,stand,tripod,bracket,ortablespecified
by the manufacturer, or sold with the apparatus. When a
cart is used, use caution when moving the cart/apparatus
combination to avoid injury from tip-over.
13. Unplug this apparatus during lightning storms or when
unused for long periods of time.
14. Referallservicingtoqualifiedservicepersonnel.Servicing
is required when the apparatus has been damaged in any
way, such as power-supply cord or plug is damaged, liquid
has been spilled or objects have fallen into the apparatus,
theapparatushasbeenexposedtorainormoisture,doesnot
operate normally, or has been dropped.
FCC warnings
NOTE: This equipment has been tested and found to comply
with the limits for a Class B digital device, pursuant to Part 15
of the FCC Rules. These limits are designed to provide reasonable protection against harmful interference in a residential
installation. This equipment generates, uses, and can radiate
radio frequency energy and, if not installed and used in accordance with the instructions, may cause harmful interference
to radio communications. However, there is no guarantee that
interference will not occur in a particular installation. If this
equipment does cause harmful interference to radio or television reception, which can be determined by turning the equipment off and on, the user is encouraged to try to correct the
interference by one or more of the following measures:
•Reorient or relocate the receiving antenna.
•Increase the separation between the equipment and receiver.
•Connect the equipment into an outlet on a circuit different from
that to which the receiver is connected.
•Consultthedealeroranexperiencedradio/TVtechnicianfor
help.
InternatIonaL suPPort
To download this User’s Guide in English, Spanish, or
French,visitthesupportsectionatwww.gpx.com.
Para transferir esta guía de usuario en inglés, español, o
francés,visitelaseccióndelaayudaenwww.gpx.com.
Pour télécharger ce guide de l’utilisateur en anglais,
espagnol, ou français, visitez la section de soutien chez
www.gpx.com.
█
servICe InForMatIon
Address: 2116 Carr Street, St. Louis MO, 63106
Phone: 1-314-621-2881
Fax:1-314-588-1805
To access the pre-installed backup battery, use a small
phillips-head screwdriver.
Email:[email protected]
Parts Email: [email protected]
Website:www.gpx.com
©2009DigitalProductsInternational(DPI,Inc.)|Allothertrademarksappearinghereinarethepropertyoftheirrespectiveowners.Specificationsaresubjectto
change without notice
C209.indd 1
3/13/2009 12:12:48 AM
settInG the CLoCk
█ settInG the CLoCk usInG InteLL set™
abbr.
1.
Plug the attached AC Cord into an AC power source.
2.
The time will automatically be set to Eastern Standard Time.
3.
Press and hold the time Zone Button, located on the back of the unit.
4.
While holding the time Zone Button, press the MIn Button to adjust the current time zone.
a-1
Refer to the Time Zone Chart to find your specific time zone.
a-3
a-4
█
ManuaLLy settInG the CLoCk
1.
Press and hold the time Button.
2.
While holding the time Button, press the hr Button to adjust the hour, and the MIn Button to
adjust the minute.
A PM Indicator Light will illuminate green when the time is in the PM.
3.
After the correct time is set, release the time Button tofinishsettingtheclock.
oPeratIons
█
1.
settInG the aLarM
Press and hold the aL Button.
2.
While holding the aL Button, press the hr Button to
adjust the hour, and the MIn Button to adjust the minute.
A PM Indicator Light will illuminate green when the time is
in the PM.
3.
While continuing to hold the aL Button, press the aL
Mode Button to set the alarm mode to BU (Buzzer), RU
(Radio), or Off.
4.
After the correct time is set, release the aL Button tofinish
setting the alarm.
•
After the alarm sounds, press the snooze Button to delay
the alarm for an additional 9 minutes.
•
After the alarm sounds, press the Power/aL off Button to
turn the alarm off until the set alarm time is reached again.
a-5
a-6
a-7
time Zone
AST
Atlantic Standard Time
UTC - 4 hours
ADT
Atlantic Daylight Time
UTC - 3 hours
EST
EDT
CST
CDT
MST
MDT
PST
PDT
Estern Standard Time
Eastern Daylight Time
Central Standard Time
Central Daylight Time
Mountain Standard Time
Mountain Daylight Time
PacificStandardTime
PacificDaylightTime
UTC - 5 hours
UTC - 4 hours
UTC - 6 hours
UTC - 5 hours
UTC - 7 hours
UTC - 6 hours
UTC - 8 hours
UTC - 7 hours
AKST
Alaska Standard Time
UTC - 9 hours
AKDT
HAST
Alaska Daylight Time
Hawaii-Aleutian Standard Time
UTC - 8 hours
UTC - 10 hours
HADT
Hawaii-Aleutian Daylight Time
UTC - 9 hours
ControLs
1
11
2
12
3
13
4
14
5
6
7
8
15
█
settInG the sLeeP tIMer
1.
Press and hold the sleep Button.
2.
While holding the sleep Button, press the hr Button
to increase the hour, and the MIn Button to decrease the
minutes.
9
The maximum sleep time is 1 hour 59 minutes.
10
3.
a-2
Full name
16
After the sleep time is set, release the sleep Buttontofinish
setting the sleep timer.
17
At anytime, you can check the remaining sleep time by
pressing and holding the SleepButton.
█
tunInG the aM/FM raDIo
1.
Press the Power/aL off Button to turn the radio on.
Turn the volume up to see if the unit is turned on or off. If
static or the radio plays, then the unit is turned on, if not,
then the unit is powered off.
2.
Adjust the FM/aM switch to AM or FM.
3.
Turn the tuning Dial to the desired station.
•
Turn the volume Dial adjust the volume of the unit.
•
To set the sleep timer when in Radio Mode, follow the
“Setting the Sleep Timer” instructions.
•
WhentheAuxiliaryInputisconnectedtoanAudioSource,
that source will override the radio.
█
usInG the auxILIary InPut
1.
Plug an MP3 Player or other Audio Source into the
auxiliary Input on the back of the unit.
2.
Press the Power/aL off Button to turn the unit on.
Turn the volume up to see if the unit is turned on or off. If
static, the radio, or the connected audio source plays, then
the unit is turned on, if not, then the unit is powered off.
•
WhentheAuxiliaryInputisconnectedtoanAudioSource,
that source will override the radio.
ControL GLossary
01. sleep Button
Press the Sleep Button to adjust the sleep timer.
02. Power/aL off Button
Press the Power Button to turn the unit on.
After the alarm sounds, press the Power/aL off Button to
turn the alarm off until the set alarm time is reached again
03. volume Dial
Turn the Volume Dial to adjust the volume of the unit.
04. time Button
Press the Time Button to adjust the unit’s time.
05. hr Button
Press the HR Button to adjust the hour of the time or alarm.
06. snooze Button
After the alarm sounds, press the Snooze Button to delay the
alarm for an additional 9 minutes.
07. MIn Button
Press the MIN Button to adjust the minute of the time or
alarm.
While holding the time Zone Button, press the MIn
Button to adjust the current time zone.
08. FM/aM switch
Adjust the FM/AM Switch to select FM or AM radio.
09. time Zone Button
Press the Time Zone Button to adjust the time zone.
11. Dimmer Button
Press the Dimmer Button to adjust the brightness of the
LED display
12. aL Button
Press the AL Button to set the alarm time.
13. tuning Dial
Turn the Tuning Dial to adjust the FM or AM radio station.
14. aL Mode Button
Press the AL Mode Button to set the alarm mode to BU
(Buzzer), RU (Radio), or Off.
15. Dst switch
Adjust the DST Switch to “On” during Daylight Savings
Time to adjust the clock forward an hour.
Adjust the DST Switch to “Off” at the end of Daylight
Savings Time to adjust the clock back an hour.
16. FM wire antenna
Adjust the FM Wire Antenna to improve the FM radio
reception.
An AM Antenna is built into the unit. Adjust the position of
the unit to improve AM radio reception.
17. aC Cord
Use the attached AC Cord to connect the unit to an AC
power source.
10. auxiliary Input
UsetheAuxiliaryInputtoconnectanMP3playerorother
audio source to the unit.
C209.indd 2
3/13/2009 12:12:48 AM