1
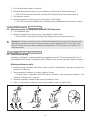
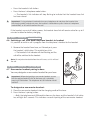
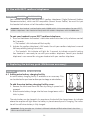
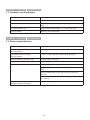
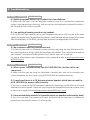
ENG
Guide for additional functions
GN Netcom (UK) Ltd.
Sales office
Runnymede House
96/97 High Street, Egham
Surrey TW20 9HG
United Kingdom
Tel: + 44 (0) 1784 220140
Fax: + 44 (0) 1784 220141
www.gnnetcom.com
GN Netcom, Inc.
77 Northeastern Boulevard
Nashua, NH 03062
USA
Tel: (800) 826 4656
Tel: +1 603 598 1100
Fax: +1 603 598 1122
www.gnnetcom.com/US/EN
©2005 GN Netcom • All rights reserved
GN 9350/GN 9330/GN 9330 USB
Guide for additional functions
This Guide for additional functions supplements the GN 9350/GN 9330/GN 9330 USB
Guides for basic set-up and use. It provides instructions and information on the GN 9350’s/
GN 9330’s/GN 9330 USB’s additional functions, features, accessories and maintenance.
The Guides for basic set-up and use provide the basic instructions for setting up and using
your GN 9350/GN 9330/GN 9330 USB.
This Guide for additional functions contains information common to the GN 9350,
GN 9330
GN 9330 and GN 9330 USB. Each subchapter is clearly marked GN 9350
GN 9330 USB , to which products they concern. When the feature does not apply, it will
simply have a wire-frame box and no grey fill, i.e. GN 9350 GN 9330 GN 9330 USB
1.
Product information . . . . . . . . . . . . . . . . . . . . . . . . . . . . . . . . . . . . . . . . . . . . . . . . . . . . 3
2.
Setting up . . . . . . . . . . . . . . . . . . . . . . . . . . . . . . . . . . . . . . . . . . . . . . . . . . . . . . . . . . . . . 4
2.1 Headset port . . . . . . . . . . . . . . . . . . . . . . . . . . . . . . . . . . . . . . . . . . . . . . . . . . . . . . . . . . . . . . . . . . . . . . . . . . .
2.2 Default Outbound Call mode . . . . . . . . . . . . . . . . . . . . . . . . . . . . . . . . . . . . . . . . . . . . . . . . . . . . . . . . . . .
2.3 Connecting to the GN 1000 RHL (Remote Handset Lifter) (GN Netcom accessory). . . . .
2.4 Connecting to external OLI (GN Netcom accessory) . . . . . . . . . . . . . . . . . . . . . . . . . . . . . . . . . . . .
2.5 LCD display . . . . . . . . . . . . . . . . . . . . . . . . . . . . . . . . . . . . . . . . . . . . . . . . . . . . . . . . . . . . . . . . . . . . . . . . . . . .
2.5.1 Transmit volume. . . . . . . . . . . . . . . . . . . . . . . . . . . . . . . . . . . . . . . . . . . . . . . . . . . . . . . . . . . . . . . . . .
2.5.2 Hookswitch selection. . . . . . . . . . . . . . . . . . . . . . . . . . . . . . . . . . . . . . . . . . . . . . . . . . . . . . . . . . . . .
2.5.3 Range/power selection . . . . . . . . . . . . . . . . . . . . . . . . . . . . . . . . . . . . . . . . . . . . . . . . . . . . . . . . . . .
2.5.4 Sound mode selection. . . . . . . . . . . . . . . . . . . . . . . . . . . . . . . . . . . . . . . . . . . . . . . . . . . . . . . . . . . .
2.5.5 Protection level selection . . . . . . . . . . . . . . . . . . . . . . . . . . . . . . . . . . . . . . . . . . . . . . . . . . . . . . . . .
3.
4
4
4
5
5
5
6
6
7
8
Wearing styles . . . . . . . . . . . . . . . . . . . . . . . . . . . . . . . . . . . . . . . . . . . . . . . . . . . . . . . . . 9
3.1 Headband wearing styles . . . . . . . . . . . . . . . . . . . . . . . . . . . . . . . . . . . . . . . . . . . . . . . . . . . . . . . . . . . . . .
3.2 Neckband wearing styles. . . . . . . . . . . . . . . . . . . . . . . . . . . . . . . . . . . . . . . . . . . . . . . . . . . . . . . . . . . . . . .
3.3 Ear hook wearing styles . . . . . . . . . . . . . . . . . . . . . . . . . . . . . . . . . . . . . . . . . . . . . . . . . . . . . . . . . . . . . . .
3.4 Changing wearing styles . . . . . . . . . . . . . . . . . . . . . . . . . . . . . . . . . . . . . . . . . . . . . . . . . . . . . . . . . . . . . .
3.5 Receive volume button reorientation . . . . . . . . . . . . . . . . . . . . . . . . . . . . . . . . . . . . . . . . . . . . . . . . . .
1
9
9
10
10
10
4.
Operating the headset . . . . . . . . . . . . . . . . . . . . . . . . . . . . . . . . . . . . . . . . . . . . . . . . 10
4.1 Making/ending calls via telephone with RHL function . . . . . . . . . . . . . . . . . . . . . . . . . . . . . . . . .
4.2 Answering calls via telephone with RHL function . . . . . . . . . . . . . . . . . . . . . . . . . . . . . . . . . . . . . .
4.3 Conference calling. . . . . . . . . . . . . . . . . . . . . . . . . . . . . . . . . . . . . . . . . . . . . . . . . . . . . . . . . . . . . . . . . . . . .
4.4 Emergency calling via VoIP . . . . . . . . . . . . . . . . . . . . . . . . . . . . . . . . . . . . . . . . . . . . . . . . . . . . . . . . . . . .
4.5 Switching a call from headset to desk telephone handset . . . . . . . . . . . . . . . . . . . . . . . . . . . . .
4.6 Switching a call from desk telephone handset to headset . . . . . . . . . . . . . . . . . . . . . . . . . . . . .
4.7 New master headset pairing to base . . . . . . . . . . . . . . . . . . . . . . . . . . . . . . . . . . . . . . . . . . . . . . . . . .
10
11
11
12
12
13
13
5.
Use with DECT cordless telephones . . . . . . . . . . . . . . . . . . . . . . . . . . . . . . . . . . . . . 14
6.
Replacing battery pack (GN Netcom accessory) . . . . . . . . . . . . . . . . . . . . . . . . . . 14
6.1 Adding extra battery charging facility. . . . . . . . . . . . . . . . . . . . . . . . . . . . . . . . . . . . . . . . . . . . . . . . . . 14
6.2 Replacing battery pack . . . . . . . . . . . . . . . . . . . . . . . . . . . . . . . . . . . . . . . . . . . . . . . . . . . . . . . . . . . . . . . . 15
7.
Audio and visual indicators . . . . . . . . . . . . . . . . . . . . . . . . . . . . . . . . . . . . . . . . . . . . 15
7.1 Headset’s audio indicators . . . . . . . . . . . . . . . . . . . . . . . . . . . . . . . . . . . . . . . . . . . . . . . . . . . . . . . . . . . . 15
7.2 Headset’s visual indicators . . . . . . . . . . . . . . . . . . . . . . . . . . . . . . . . . . . . . . . . . . . . . . . . . . . . . . . . . . . . 16
7.3 Base’s visual indicators. . . . . . . . . . . . . . . . . . . . . . . . . . . . . . . . . . . . . . . . . . . . . . . . . . . . . . . . . . . . . . . . 16
8.
Troubleshooting . . . . . . . . . . . . . . . . . . . . . . . . . . . . . . . . . . . . . . . . . . . . . . . . . . . . . . 17
9.
Maintenance, safety and disposal . . . . . . . . . . . . . . . . . . . . . . . . . . . . . . . . . . . . . . 18
2
1. Product information
The GN 9350/GN 9330/GN 9330 USB are fully wireless, robust headset solutions. They all
share hands-free working efficiency, wireless mobility, useful features, and many customizing
and accessory options.
Below is an overview of the primary features and functions offered within each model
number:
Comparison of features by model type
Features:
GN 9350
GN 9330
Desk telephone connectivity
•
•
VoIP/ USB connectivity **
•
GN 1000 RHL enabled
•
Electronic hookswitch enabled
•
Display for set-up
•
Adjustable range
•
Sound refinement (DSP)
•
Conference call
•
On-line indicator connectivity
•
DECT/GAP enabled*
•
GN 9330 USB
•
•
•
•
* not applicable for US version
** for connecting to your PC, the headsets only work with the Windows 98 (SE), Windows 2000 and
Windows XP operating systems.
Important: When using your GN 9350 or GN 9330 USB with a VoIP application, consult the
application’s user manual for complete information and instructions, or visit our web site
www.gnnetcom.com/gn9300/support.
3
2. Setting up
This section contains set-up and connection instructions for your headset’s accessories and
optional functions.
Note: Your Guide for basic set-up and use contains the primary set-up and connection instructions.
GN 9350 GN 9330
2.1 Headset port
GN 9330 USB
If your telephone has a port for headset, it is recommended to leave the handset cord in the
telephone. Connect the telephone’s headset port to the telephone port on the base. This will
enable you to use the call button on your telephone, if there is one, and will limit the number
of cords coming out of your base.
GN 9350 GN 9330 GN 9330 USB
2.2 Default Outbound Call mode
The base is default set for telephone use. If you want to use your VoIP application as default
button for 5 seconds. If you want to change it back again,
calling media, press the USB
button for 5 seconds
press the Telephone
GN 9350 GN 9330 GN 9330 USB
2.3 Connecting to the GN 1000 RHL (Remote Handset Lifter)
(GN Netcom accessory)
You may purchase a GN 1000 RHL as an accessory, which lets you answer and end telephone
calls while away from your desk. Please contact your vendor or visit
www.gnnetcom.com/gn9300/support for further details.
To connect your GN 1000:
1. Mount the GN 1000 to your telephone as described in
its user manual.
2. Plug RHL’s connection cord into headset base’s AUX port.
The GN 9350 enables you to use electronic hookswitch
(EHS) to answer and end calls while away from your desk.
Feature is described in section 2.5.2.
The remote answering and ending of calls is also available on
certain softphone/VoIP applications.
4
GN 9350
GN 9330
GN 9330 USB
2.4 Connecting to external Online Indicator (OLI) (GN Netcom accessory)
An external online indicator (accessory) can be placed on your desk or near your telephone to
indicate when you’re on a call.
To connect to an external OLI: Plug cord from OLI to base’s OLI port.
GN 9350 GN 9330
2.5 LCD display
GN 9330 USB
Your base unit has a LCD display and display control with which you control 5 settings:
Transmit volume setting
Hookswitch selection
Range/power selection
Sound mode selection
Protection level selection (IntelliTone®)
Navigation and markers
Navigate through the LCD display’s 5 menus horizontally using the display control’s34 arrows. Within each of the 5 menus, navigate vertically with the display control’s 56arrows.
Press the OK button to confirm a specific choice/value within the 5 different menus. A star (*)
beside a selected choice/value indicates the current setting.
Default/start position
The LCD display is always on and ready to use. The permanent default/start position for the
LCD display is the leftmost transmit volume setting . The LCD display will always revert to
this default/start position, if not operated for 30 seconds.
Within each of the 5 menus, there is also a factory-set default. This default remains until you
change it. The last selected choice/value (within each of the 5 menus) is always displayed in
the first line of its menu.
Changing the settings
2.5.1 Transmit volume
The transmit volume must be adjusted properly so your voice is heard clearly.
If you haven’t already adjusted the transmit volume during your initial setting up, do so now
by completing the following:
1. Put on headset.
on base display.
2. Use 34to locate transmit volume menu
5
3. Make a call to someone who will act as a test person.
4. Use 56 to scroll through 12-setting transmit volume menu
confirms your voice is at the appropriate volume.
5. Press OK to confirm new setting.
until your test person
The transmit volume menu is the permanent default/start position for the LCD display. After
adjusting any of the other settings via the display, it will revert to the transmit volume menu
position.
Important: For USB applications, the volume settings are fixed and need no adjustment.
2.5.2 Hookswitch selection
The GN 9350 enables you to answer and end calls remotely by using the GN 1000 RHL, or its
built-in electronic hookswitch (EHS) modes. EHS is only possible on certain telephone systems. In order to determine which telephones have the EHS feature enabled, please refer to our
website www.gnnetcom.com/gn9120/ehs-setup. Please also refer to your telephone´s user
manual for clarification.
4 modes are available
GN RHL
non-EHS; works with the GN 1000 RHL
DHSG
e.g. Siemens and Elmeg desk telephones
AEI
e.g. with Tenovis desk telephones
MSH
e.g. with Alcatel desk telephones
Note: By default, the GN 9350 is set to the RHL interface, which also is
the correct setting if you manually operate your handset when answering/ending calls as described in the Guide for basic set-up and use.
To select the appropriate interface:
1. Use 34to locate the hookswitch selection menu
on base display.
2. Use 56 to select one of the 4 interfaces from the menu.
3. Press OK to confirm the interface.
Note: To use the DHSG, AEI or MSH function, connect the connection cord (accessory) to your desk telephone and the AUX port of
the GN 9350.
2.5.3 Range/power selection
Your headset offers 3 range/power modes (Normal, Low and Very Low). The Normal mode
6
is ideal for most users. However, if you experience interference from other communication
devices during your calls, you may want to switch to the Low or Very Low modes. Changing to
Low or Very Low power modes will reduce the range of your headset.
Power mode
Range* DECT
Range* US DECT
Normal
Up to 100 m
Up to 300 ft
Low
Up to 50 m
Up to 150 ft
Very Low (V. low)
Up to 20 m
Up to 60 ft
* In typical office environment
Note: The Normal power mode is the default setting.
To change the range/power mode:
1. Use 34to locate the range/power mode menu
on base display.
2. Use 56 to select one of the 3 modes from the menu.
3. Press OK to confirm the new mode.
2.5.4 Sound mode selection
This menu is split into two sections: “Treble/Normal/Bass” and “Fixed/Switch”. These two
sections are separated by a blank line. It is possible to choose one mode in each of the two
sections.
Your headset offers 3 treble/bass modes (Treble, Normal and Bass). You can change these to
suit your personal preferences or needs, and seperately determine the USB sound quality.
Sound mode
Effect
Benefits
Treble
Accentuates high tones
Ideal for users with slight highfrequency hearing loss
Normal
Accentuates all tones evenly
Ideal for all users
Bass
Accentuates lower tones
Ideal for users preferring a bassrich sound
Note: The Normal mode is the default setting.
Sound mode
Effect
Fixed
Speech quality in headset loudspeaker as known Improved talk time in USB mode
from traditional telephones (narrowband)
Benefits
Switch
Automatically switches between wideband or
narrowband sound quality. In conference call
mode, automatic switching is disabled.
7
Enhanced USB sound quality
Note: Switch is the default setting.
To change the sound mode:
1. Use 34to locate the sound mode menu
on base display.
2. Use 56 to select one of the 3 modes from the menu, and choose between
fixed/switched from the menu.
3. Press OK to confirm the setting.
2.5.5 Protection level selection
Your headset offers a choice of 4 protection levels (plus its additional basic protection level).
These levels protect you against sudden, overly-loud sound spikes that may come from the
phone network (such as shrill telefax signals or network interference), and provide a limit to
the maximum noise exposure from the headset during your workday.
The number of hours (on average) you spend on the telephone per day determines the setting you should select. All 4 protection levels meet and exceed de facto global protection
levels, and are compliant with NIOSH standards, and EU health and safety codes of 85 dB(A).
The TT4 protection level is compliant with pertinent Australian recommendation.
Important: In some jurisdictions, applicable regulations or laws may mandate the required setting
you use. The Default level provides a protection level of 118 dB(A). Your headset protects you
against overly-loud sound spikes. If you use the telephone’s handset for calling, you will not have
this protection.
Protection level
Criteria for selecting
Level 0
Basic protection against overly-loud sound spikes
[118 db(A)]. Auto volume disabled
Level 1*
Less than 4 hours on telephone/day
Level 2*
4-8 hours on telephone/day
Level 3*
More than 8 hours on telephone/day
Level 4 (TT4)
Recommended Australian protection level (Telstra)
* Compliant with Directive 2003/10/EC of the European Parliament and Council of 6 February 2003.
To change the protection level:
1. Use 34to locate the protection level menu
on base display.
2. Use 56 to select one of the 5 modes from the menu.
3. Press OK to confirm the new mode.
8
Automatic volume adjustment and noise reduction
Your headset offers two built-in features which give you optimum sound levels and quality.
Both features operate automatically, so you need not make any adjustments to the headset.
Automatic volume adjustment
The automatic volume adjustment feature automatically sets the volume levels of all calls,
so that each call is heard at the same, consistent volume you have set. Autovolume is not
enabled in protection level 0.
Noise reduction
The automatic noise reduction feature improves the sound quality of incoming calls by
removing impurities transmitted with the signal, such as background noise from your caller’s
environment.
3. Wearing styles
Your headset offers headband, neckband and ear hook wearing styles.
Note: GN 9330 and GN 9330 USB come with an ear hook and a headband. Neckband is available as
an accessory.
GN 9350 GN 9330 GN 9330 USB
3.1 Headband wearing styles
You can choose to wear the headset on either the
left or right ear. The headset can be rotated 360˚.
Changing boom arm wearing side
(headband)
1. Rotate boom arm unit 90°.
GN 9350 GN 9330 GN 9330 USB
3.2 Neckband wearing style
With the neckband, the headset is worn on the right
ear.
Note: This wearing style is available as an accessory for
GN 9330 and GN 9330 USB.
9
GN 9350
GN 9330
GN 9330 USB
3.3 Ear hook wearing styles
You can choose to wear the headset on either the
left or right ear. The headset can be rotated 360˚.
Changing ear hook wearing side
1. Flip the ear hook over.
2. Rotate the ear hook 180°.
GN 9350 GN 9330 GN 9330 USB
3.4 Changing wearing styles
All wearing styles (headband, neckband and ear hook) are interchangeable.
To change any wearing style (for example, from headband to ear
hook):
1. Unclip headset from the current wearing style.
2. Affix the new wearing style.
GN 9350 GN 9330 GN 9330 USB
3.5 Receive volume button reorientation
By default, the headset is set-up for wearing on the right ear. This means the volume control is pushed up to increase the volume, and pushed down to decrease the volume. If you
change the wearing ear of the headset, you may also want to change the orientation of the
volume control so that volume is still increased by pressing the volume control up.
To change the headset’s volume control button orientation:
1. Make sure there is no link between the headset and the base, (indicator on headset is not
flashing).
2. Press the headset’s mute button for 10 seconds.
–> The headset’s link indicator will light.
3. Determine how you prefer to increase volume (pushing the control either up or down).
4. Press the volume control either up or down (according to preference) until the headset’s
link indicator turns off.
4. Operating the headset
GN 9350 GN 9330 GN 9330 USB
4.1 Making/ending calls via telephone with RHL/EHS function
10
1. Ensure telephone mode is selected.
2. Remove headset from base, or press headset’s talk button if already wearing it.
–> RHL/EHS function will activate (handset lifts/telephone line connection opens).
3. Dial desired number.
4. Replace headset in base, or press the headset’s talk button.
–> RHL/EHS function will deactivate (handset lowers/telephone line connection closes).
GN 9350 GN 9330 GN 9330 USB
4.2 Answering calls via telephone with RHL/EHS function
1. The telephone rings.
2. Remove headset from base, or press the headset’s talk button.
–> The call will be connected (handset lifts/telephone line connection opens).
Important: During an incoming call, your headset will automatically change to the required mode,
depending on whether the call is coming via the desk phone (telephone) or via VoIP (USB). After
the call, it will revert to the default mode you selected earlier. The initial factory-set mode is the
telephone mode.
GN 9350 GN 9330 GN 9330 USB
4.3 Conference calling
Conference calling lets several headsets join together for a call. The primary headset (A) + 3
extra headsets (B) can join a conference call initiated by the primary headset. (See illustration.)
Making conference calls
1. Remove primary headset from base; make sure link is established. Indicators on base and
headset are flashing.
2. Place secondary headset in primary headset’s base.
–> Primary base’s telephone and USB mode indicators, and secondary headset’s link
indicator, will light for 2 seconds.
3. Remove secondary headset from primary headset’s base.
4. After a 4-pitch tone is heard in the primary headset, press its talk button.
7
8
8
7
8
8
8
(i[Y
7
7
11
Important: Steps 2 to 4 may be repeated twice for 2 more secondary headset participants.
5. Use the primary headset’s telephone/VoIP application to dial desired number and initiate
conference call.
At any point during a call in progress, you may add secondary headsets to form a conference call.
A maximum number of 4 headsets (1 master plus up to 3 secondary) may join a conference call.
Ending conference calls for all participants
1. Place primary headset in its base, or press its talk button.
–> The conference call is now terminated for all participants.
Note: If the conference call was made via VoIP, you may need to perform additional steps to end
your call. See your VoIP application’s user instructions.
Ending conference calls for a secondary headset only
1. Place secondary headset in its own base, or press its talk button.
–> This participant is now terminated from the conference call.
GN 9350 GN 9330 GN 9330 USB
4.4 Emergency calling via VoIP
Your headset supports quicker emergency calling via VoIP applications (softphone).
If the headset is connected to a PC and the PC is screensaver-locked, you can still use the
headset to dial emergency services.
To call emergency services via VoIP:
1. Put on headset.
2. If the PC is on (even if screensaver-locked), press the base unit’s telephone mode button
and USB mode button simultaneously for 5 seconds.
–> The base will automatically dial the emergency services number.
Note: This emergency services feature works only with certain VoIP applications.
Please refer to www.gnnetcom.com/gn9300/support for more information.
GN 9350 GN 9330 GN 9330 USB
4.5 Switching a call from headset to desk telephone handset
It’s possible to switch a call in progress from the headset to the telephone’s handset:
1. Lift the telephone’s handset to your ear.
2. Do one of the following:
• Place the headset into the charging cradle.
12
•
•
Press the headset’s talk button.
Press the base’s telephone mode button.
–> The headset’s link indicator will stop flashing to indicate that the headset-base link
has been closed.
Important: If using electronic hookswitch on your telephone, do not place the headset into
the charging cradle, and do not press the headset´s talk button or press the base´s telephone
mode button, as this will disconnect the call.
If the headset runs out of battery power, the headset-base link will remain active for up to 2
minutes to allow for battery changing.
GN 9350 GN 9330 GN 9330 USB
4.6 Switching a call from desk telephone handset to headset
It’s possible to switch a call in progress from the telephone’s handset to the headset:
1. Remove the headset from base, or if already out, press
the headset’s talk button. This establishes a link.
–> The headset’s link indicator will start flashing and the
call will be switched to the headset.
'
Note: Do not place handset before the call is over, as this will end
the call.
GN 9350 GN 9330 GN 9330 USB
4.7 New master headset pairing to base
You may designate a new master headset for your base.
Important: Before designating a new master headset, ensure
that the original headset’s link to the base unit is closed by
pressing its talk button. The telephone or USB indicator should
not flash.
(
To designate a new master headset:
1. Place the new master headset into the charging cradle of the base.
2. Press the base’s pairing button.
–> Both the telephone and USB mode buttons on the base, and the headset’s link indicator, will light for 2 seconds. This indicates successful pairing of the new master headset.
13
5. Use with DECT cordless telephones
GN 9350
GN 9330
GN 9330 USB
Your headset can also be used with DECT cordless telephones (Digital Enhanced Cordless
Telecommunication), which are GAP-compatible (Generic Access Profile). You must first pair
the headset to the base unit of the cordless telephone.
Important: Your headset’s authentication code is 0000, which is the same code as for most DECT
cordless telephones. Your headset will only work with cordless telephones with the 0000 code.
To pair your headset to your DECT cordless telephone:
1. Press and hold down the headset’s talk button and mute button (at tip of volume control)
for 5 seconds.
–> The headset’s link indicator will flash rapidly.
2. Activate the cordless telephone’s GAP mode. Consult your cordless telephone’s manual
GAP compatibility/pairing instructions.
–> The headset’s link indicator will light for 2 seconds to indicate successful pairing.
Your headset is now ready to use with your cordless telephone. Consult your cordless
telephone’s user manual for using your headset with your cordless telephone.
6. Replacing the battery pack (GN Netcom accessory)
GN 9350
GN 9330
GN 9330 USB
6.1 Adding extra battery charging facility
An extra battery charging facility is available as an accessory. This
can be attached to your base to allow you to charge an extra battery.
To add the extra battery charging facility cover:
1. Remove the blind cover from the base by sliding it upward until
removed.
2. Slide the extra battery charger into the base charge tower until it
clicks in place.
The extra battery can be charged in its receptor on the back of the charge tower. An indicator
above the receptor will light when the battery is placed correctly and is charging. The indicator will turn off when battery is fully charged.
Important: During everyday use, the base’s leftmost indicator will flash when there is less than
30 minutes of talk time left.
14
GN 9350 GN 9330 GN 9330 USB
6.2 Replacing the battery pack
The headset’s battery pack can be changed when required.
To replace the battery pack on a wearing style:
1. Unclip the wearing style from the battery pack.
2. Slide the battery pack off the headset.
3. Slide the new battery pack (from the extra battery charging facility) onto the headset.
The headset’s link indicator will light for 2 seconds to confirm successful replacement of
the battery pack.
4. Replace the wearing style.
5. Recharge the empty battery by sliding it into the extra battery charging facility.
7. Audio and visual indicators
The headset and base have audio and visual indicators that represent various functions
associated with setting up and using the product.
GN 9350 GN 9330 GN 9330 USB
7.1 Headset’s audio indicator
Headset action
Audio indication
Low battery
5 rapid beeps + 20 second pause
Volume up/down
1 quick beep in increasing/decreasing intensity
Volume max/min reached
1 rapid shrill/low beep
Incoming call (with RHL functionality)
Rapid multi-tone + 2 second pause (repeats)
Incoming call (with VoIP call)
Depends on VoIP application
Conference call request
4-pitch tone
Conference call accept
1 beep
Telephone line (open/close)
1 beep
Headset out of range
3-pitch tone
Mute activation/deactivation
1 beep
Mute activated
2-pitch tone + 10 second pause (repeats)
15
GN 9350 GN 9330 GN 9330 USB
7.2 Headset’s visual indicators
Visual indication
Headset action
Link indicator (blue)
Flashing when linked up
Lit for 2 seconds
Successful pairing, including adding headsets in conference
mode
Lit (during adjustment)
Receive volume reorientation (+/-) is being adjusted
Flashing rapidly
Headset in DECT/GAP mode
GN 9350
GN 9330
GN 9330 USB
7.3 Base’s visual indicators
Base action
Visual indication
Telephone mode button’s indicator/
Base talk button
Lit when in telephone mode and flashing when linked up
USB mode button’s indicator/
Base talk button
Lit when in USB mode and flashing when linked up
Mute functionality indicator (red)
Lit when mute is activated
Battery indicator (4 green diodes)
1 indicator light = 25% of a full charge
4 indicator lights = 100% full charge
Rightmost lit diode flashes when charging, leftmost diodes
are lit
Leftmost diode flashes when <30 minutes of talk time
remaining
When headset placed in cradle for charging, all diodes light
for 1 second
Battery indicator (chargecradle for
additional battery, accessory)
Lit when charging, green diode
16
8. Troubleshooting
GN 9350
GN 9330 GN 9330 USB
Q: Nothing happens when I try to adjust the clear dialtone.
A: Make sure the base is set for telephone mode and the link is established (telephone
button’s indicator on base is flashing). Also ensure that the telephone is activated (handset is
off the hook or line button is pressed).
Q: I am getting a buzzing sound on my headset.
A: If the unit has been correctly set-up, your telephone may not be fully immune to the radio
signals the headset uses. To overcome this problem, move the headset base at least 30 cm away
from the telephone. On GN 9350, you may want to reduce the range of your unit instead.
GN 9350
GN 9330 GN 9330 USB
Q: My customers say they cannot hear me.
A: Ensure the base unit is in the correct system setting by adjusting the clear dial tone switch.
You should experience a high quality dial tone from the headset. Then call a friend and adjust
your headset’s microphone as described in the Guide for basic set-up and use.
For setting information on your telephone system, please also refer to www.gnnetcom.com/
gn9300/support.
GN 9350
GN 9330 GN 9330 USB
Q: When I press the talk button, the GN 1000 RHL lifts, but the call is not
connected.
A: Make sure that you are using the telephone’s handset port, and not the headset port
(if your telephone has one), when using a GN 1000 RHL for remote answering.
Q: I have heard there is a GN Netcom wireless headset which has no need for
a GN 1000 RHL to answer calls remotely.
A: Yes, this is known as the EHS (electronic hookswitch) feature on the GN 9350, which some
telephone systems support. Check with your supplier for compatibility with your phone, and/
or consult our support site at www.gnnetcom.com/gn9120/ehs-setup.
Q: I have moved desks at work. Is it possible to put my headset onto another base?
A: Yes, this is possible. The headset only needs to be paired to the new base. Just follow the
procedure as described in section 4.7 of this guide.
17
Q: My telephone should be able to operate with the EHS version of
GN Netcom, but I cannot make it work.
A: Please refer to www.gnnetcom.com/gn9300/support for more information, including
compatibility and the correct, clear dialtone switch setting.
9. Maintenance, safety and disposal
Maintenance
The headband, boom arm and ear hook can be wiped with a dry or slightly damp cloth.
The cords and base unit can be dry-dusted as required. The leatherette ear cushion(s) can
be cleaned or replaced. When cleaning, remove them and rinse with water. Leatherette
ear cushions and ear plates can be wiped with a damp cloth, with only a little dishwashing
liquid if required. Avoid getting moisture or liquids into any button sockets, receptors or other
openings. Avoid exposing the product to rain.
Children and product packaging
The packaging, including plastic bags and wrapping parts, are not toys for children. The bags
themselves or the many small parts they contain may cause choking if ingested.
Materials and allergies
The headband is made of stainless steel, which does not have a nickel-coated surface.
The stainless steel alloy has been tested for nickel release in accordance with the European
standard EN 1811:1998. According to EU Directive 94/27/EF, the nickel release must be below
0,50 µgram/cm2/week. The release from the headband was 0,02µgram/cm2/week.
The leatherette ear cushion(s) do not contain vinyl.
Batteries and product disposal
Do not expose batteries to heat or puncture them. Dispose of the product and/or batteries
according to local standards and regulations.
18