1
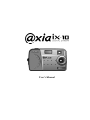
User’s Manual
About this manual
This manual is designed to assist you in using the ix-10 Digital Camera.
Information in this document has been carefully checked for accuracy;
however, no guarantee is given to the correctness of the contents. The
information in this document is subject to change without notice.
Edition
nd
2
Edition, June, 2001
Copyright
© Copyright 2001
This document contains proprietary information protected by copyright. All
rights are reserved. No part of this manual may be reproduced by any
mechanical, electronic or other means, in any form, without prior written
permission of the manufacturer.
Declaration of conformity
This device complies with part 15 of the FCC rules. Operation is subject to
the following conditions:
♦
This device may not cause harmful interference.
♦
This device must accept any interference received, including
interference that may cause undesired operation.
Trademark recognition
Microsoft, MS-DOS and Windows are registered trademarks of Microsoft
Corp.
SmartMedia is a trademark of the Toshiba Corporation
Other product names used in this manual are the properties of their
respective owners and are acknowledged.
EC Declaration of Conformity
We
Name:
FUJIFILM AXIA CO., LTD
Address:
17-5 Shibuya 2 Chome, Shibuya-ku
Tokyo 150-0002 Japan
Declare that the product
Product Name:
Is in conformity with the following standards
Safety:
EN60950
EMC:
EN55022:
1997 Class B
EN50082-1
1997
EN61000-3-2/3
1995, EN61000-4-2/3/4/6/8/11 1995
Following the provision of the EMC Directive (89/336/EEC, 92/31/EEC and
93/68/EEC) and Low Voltage Directive (73/23/EEC)
Safety and handling precautions
Camera information
♦ Do not take apart or attempt to service the camera yourself.
♦
Do not expose the camera to moisture, or extremes in
temperature.
♦
Let the camera warm up when moving from a cold to a warm
temperature.
♦
Do not touch the lenses of the camera.
♦
Do not expose the lens to direct sunlight for extended periods
of time.
Battery information
♦ Turn off the camera before installing or removing batteries.
♦
Use only AA alkaline batteries.
♦
Always replace both batteries with two new ones. Do not mix
old and new batteries.
♦
Do not use batteries that are leaking, corroded, or damaged.
♦
Remove the batteries (and any SmartMedia card) from the
camera if you are going to store the camera for extended
periods of time.
♦
When loading the batteries in the camera, ensure that the
battery polarity (+ and -) is as indicated on the camera.
♦
If any liquid leaks from the batteries, wipe the battery
compartment thoroughly and then load new batteries.
♦
If any battery fluid comes into contact with your hands or
clothing, flush the area thoroughly with water. Note that battery
fluid can cause loss of eyesight if it gets into your eyes. If this
occurs, do not rub your eyes. Flush the fluid out with clean
water and contact your doctor for treatment.
♦
When disposing of batteries, do so in accordance with your
local waste disposal regulations.
♦
Do not drop or subject the batteries to impacts.
Camera Storage
♦ Do not store or use the camera in the following types of
location:
1.
Very humid, dirty or dusty places
2.
In direct sunlight or in places subject to extreme
temperature rises, such as in a closed car in summer.
3.
Extremely cold places.
4.
Places subject to strong vibrations.
5.
Places affected by smoke of steam.
6.
Places subject to strong magnetic fields (such as near
motors, transformers or near magnets).
7.
For long periods in contact with chemicals such as
pesticides or next to rubber or vinyl products.
8.
Digital cameras like the ix-10 are particularly badly affected
by sand. In sandy locations such as beaches or deserts,
or in locations where there is wind-borne sand, ensure that
the camera is protected. This can cause faults that may be
irreparable.
Condensation
♦ If the camera is carried suddenly from a cold location into a
warm place, water droplets (condensation) may form on the
inside of the camera or on the lens. When this occurs, switch
the camera off and wait an hour before using the camera.
Condensation may also form on the SmartMedia card. In this
event, remove the SmartMedia card and wait a short time
before using it again.
Cleaning Your Camera
♦ Use a blower brush to remove dust from the lens and camera
surface and then wipe lightly with a soft, dry cloth. If any soiling
remains, apply a small amount of lens cleaning liquid to a piece
of soft tissue and wipe gently.
♦
Do not scratch hard objects against the lens, data panel or
viewfinder as these surfaces are easily damaged.
♦
Clean the body of the camera with a soft, dry, cloth. Do not use
volatile substances such as thinners, benzene or insecticide, as
these may react with the camera body and cause damage.
General Information
♦ Do not use the camera while you are walking, running, driving
or operating machinery. This can result in a serious accident.
♦
Do not use the camera in locations severely affected by oil
fumes, steam, humidity or dust. This can cause fire or electric
shock.
♦
Do not leave this camera in places subject to extremely high
temperatures such as a sealed vehicle or in direct sunlight.
This can damage the camera and in extreme cases cause fire.
♦
Do not use the flash close to anyone’s eyes. This can cause
temporary damage to eyesight.
♦
Request regular internal testing and cleaning for your camera.
Build-ups of dust in your camera can cause fire or shock.
♦
When travelling overseas, do not place your camera in the
check-in baggage. Careless or rough baggage handling at
airports may cause internal damage to the camera even when
no external damage is evident.
♦
Do not use this device in aircraft or hospitals. The use of this
device in an aircraft or hospital can cause malfunctions in the
control devices used in aircraft hospitals.
♦
This camera contains precision electronic components. To
ensure that images are recorded correctly, do not subject the
camera to impacts or shocks while an image is being recorded.
Test Shots Prior to Photography
♦ For particularly important photos (such as weddings and
overseas trips) always take a test photo to check that the
camera is functioning normally. Fuji Photo Film (UK) Ltd
cannot accept liability for any incidental losses (such as costs of
photography or the loss of income from photography) incurred
as a result of faults with this product.
Copyright
♦
Images recorded using your digital camera cannot be used in
ways that infringe copyright laws without the consent of the
owner, unless intended only for personal use. Note that some
restrictions apply to the photographing of stage events etc,
even when intended purely for personal use. Users are asked
to note that the transfer of memory cards containing images or
data protected under copyright laws is only permissible within
the restrictions imposed by those copyright laws.
Liquid Crystal
♦ If the LCD panel is damaged, take particular care with the liquid
crystal in the panel. If any of the following situations arise, take
the urgent action indicated.
♦
If the liquid crystal comes in contact with your skin, wipe the
area with a cloth and then wash thoroughly with running water
and soap.
♦
If the liquid crystal gets into your eye, flush the affected eye
with clean water for at least 15 minutes and then seek medical
assistance.
♦
If the liquid crystal is swallowed, flush your mouth thoroughly
with water. Drink large quantities of water and induce vomiting.
Then seek medical assistance.
Table of Contents
Chapter 1 ________________________________________ 1
Getting Started____________________________________ 1
Introduction ............................................................................................ 2
Key features & accessories ..................................................................... 3
System requirements............................................................................... 4
Identifying components .......................................................................... 5
Installing and removing the SmartMedia card...................................... 8
Inserting the batteries ............................................................................. 9
Chapter 2 _______________________________________ 11
Camera Setup and Operation_______________________ 11
Turning the camera on and off ............................................................ 12
Taking pictures ..................................................................................... 13
Setting the flash .................................................................................... 15
Setting the timer.................................................................................... 17
Deleting images..................................................................................... 18
Chapter 3 _______________________________________ 21
Making Connections ______________________________ 21
Installing software ................................................................................ 22
Connecting to your PC ......................................................................... 23
Connecting to your TV ......................................................................... 24
Using the software ................................................................................ 25
Appendix________________________________________ 28
Troubleshooting, Specifications, and Warranty ________ 28
Troubleshooting.................................................................................... 29
Specifications ........................................................................................ 31
Warranty ............................................................................................... 32
Introduction
Congratulations on your purchase of the ix-10 Digital Camera! Your
camera has been designed to allow you to quickly and easily take quality
digital images and to record video clips direct to your PC. You can also
play back your digital snaps via your TV.
This camera is supplied with five excellent software packages to enable
you organise or edit your pictures, and to have hours of fun with
different creative templates.
The supplied software and drivers along with the USB cable enable you
to upload your images to your PC. The ix-10 Camera can be operated in
either DSC or PC mode.
DSC mode enables you to take still pictures and store them on your PC
in albums, manipulate the images with photo editing software, and
publish images on the Web.
PC mode enables you to use the ix-10 Camera as a video conferencing
camera (you may need Windows NetMeetingTM for video conferencing).
Connect the camera to your PC and the camera’s view is displayed on
screen. You can also save the video to your PC as a Windows AVI file.
Unpacking the ix-10 Digital Camera
Upon receiving your ix-10 Digital Camera, open the package and
carefully remove the contents. If anything is missing or damaged, please
contact your dealer immediately. The shipping carton should contain the
following items:
•
•
•
•
•
•
•
•
•
ix-10 Digital Camera
2 MB SmartMediaTM Card
Camera Strap
Soft Case
USB connector cable
Video Cable
Two AA alkaline batteries
Software on CD-ROM
Camera Manual
Do not throw the carton away. You may need it later if you have to
return the ix-10 Digital Camera for repairs.
2
Key features & accessories
Features
The ix-10 Digital Camera comes with the following advanced features:
•
1/3-inch CMOS image sensor
•
LCD status panel
•
24-bit RGB JPEG image format
•
Image resolution up to 640 x 480 pixels
•
SmartMedia card (2 MB) image storage
•
Auto exposure and flash
•
Bundled software allowing you to perform advanced image
manipulation
Optional accessories
You can purchase bigger SmartMedia cards to increase the capacity of
the ix-10 Digital Camera. Please purchase only 3.3 V cards, with a
capacity of 2 MB to 64 MB.
3
System requirements
For optimal use with the ix-10 Digital Camera, your computer should
have the following minimum system requirements:
Hardware requirements
•
An IBM PC compatible with a Pentium 200 CPU or higher
•
Hard drive with 20 MB free disk space
•
A CD-ROM for driver and software installation
•
USB interface
•
32 MB memory
•
VGA card with DirectX support
Additionally, a sound card is recommended.
Software Requirements
•
Microsoft Windows 98SE, Me, Windows 2000
•
800 x 600 true color display
DirectX 7.0 or higher is recommended for optimum performance.
4
Identifying components
Please refer to the following illustrations to identify the components of
the ix-10 Digital Camera:
Front View
Flash
Viewfinder
Snapshot
Button
USB Port
Video Port
Dust Cover
Switch
Lens
5
Rear view
LED Indicator
Power On/off
Switch
Snapshot
Button
Viewfinder
Strap Hole
LCD
Display
Mode
Button
Buzzer
Hole
Strobe/Enter
Mode Button
Bottom view
Battery
Compartment
6
Tripod
Socket
SmartMedia
Card
Compartment
LCD status display
The following illustration shows all LCD status icons available in the
LCD display:
1.
2.
3.
4.
5.
6.
7.
8.
Auto Flash
Frame Counter
Flash Mode
Self-timer
Red-eye Reduction
Delete
Battery Power Indicator
Hi/Lo Resolution
The following table explains the meaning of each icon:
Icon
Meaning
The delete image function is enabled. Refer to page 18 for
information on deleting images.
The flash function. The following options are available by
repeatedly pressing the flash button:
Note: The green LED illuminates when the flash is ready.
Automatic Flash: The flash occurs automatically when
ambient lighting is insufficient for image capture.
Flash Always On: The flash is used with every image.
Use this option when you are trying to take pictures of
subjects with bright light behind.
No Flash: The flash function is disabled.
Red Eye Reduction: The flash pre-fires just before the
picture is taken to reduce red-eye effect. It functions with
all flash modes.
Display indicates the following parameters:
HI
640 x 480 fine resolution, 33 images maximum (using the
2 MB SmartMedia card). Use this setting for bigger file
sizes/higher resolution images.
LO
320 x 240 standard resolution, 133 images maximum
(using the 2 MB SmartMedia card). Use this setting for
smaller file sizes/lower resolution images.
Indicates when the self-timer function is available. Refer to page
17 for details on using the self-timer.
Indicates the battery capacity.
Indicates the number of images that have been taken.
7
Installing and removing the SmartMedia card
Refer to the following information for installing and removing the
SmartMedia card. You must insert the SmartMedia card before you can
start taking pictures.
1.
Set the main switch to
OFF.
2.
Open the SmartMedia card
cover.
3.
Inset the SmartMedia card.
Ensure the notched edge is
oriented as shown (only
use 3.3 V SmartMedia
cards).
Notched Edge
4.
8
Close the SmartMedia
cover.
Inserting the batteries
Refer to the following information for inserting the batteries:
1.
Set the main switch to
OFF.
2.
To open the battery
compartment cover, slide
the cover as shown, then
open.
3.
Note the battery polarity on
the inside cover and insert
the batteries.
4.
Close the battery
compartment cover and
slide shut.
9
Battery display
When you insert new batteries into your ix-10 Digital, the battery status
icon in the LCD display indicates a fully charged battery. Refer to the
following table:
Battery icon
Meaning
The batteries have a full charge.
The batteries are almost empty. Replace the batteries
with fresh batteries.
10
Turning the camera on and off
Refer to the following to turn the ix-10 Digital Camera on and off:
1.
Slide the on/off switch to
ON.
2.
Check the current settings
in the LED status display.
(See LED status display on
page7.)
3.
To turn the camera off, set
the main switch to OFF.
Note: If you do not press
any button for three minutes,
the camera will beep and
power off automatically. To
turn the camera back on,
slide the main switch to
OFF, wait for one second,
and then switch the camera
back on.
12
Taking pictures
Follow these instructions to take a picture with your ix-10 Digital
Camera:
1.
Turn the camera on. When
the green LED indicator
lights, the camera is ready
to take a picture.
2.
Check the current settings
in the LCD status display.
Refer to page 7 for
information on LCD status
display icons.
3.
Press the mode button to
set the image resolution;
HI (fine) and LO
(standard). Refer to page
14 for information on the
mode button.
4.
LED Indicator
Power On/off
Switch
Mode Button
Set the flash mode. (See
Setting the flash on page
15 for more information.
Flash Button
5.
Press the snapshot button
to take the picture. You
hear a beep as the picture is
taken. The LCD display
indicates the number of
pictures you have left.
Snapshot Button
13
Resolution
The following table describes the resolution settings:
HI
LO
640 x 480 fine resolution, 33 images maximum (using the 2 MB
SmartMedia card). Use this setting for sharper images.
320 x 240 standard resolution, 133 images maximum (using the
2 MB SmartMedia card). Use this setting for smaller file sizes.
The Mode button
The ix-10 Digital
Camera has six
operational modes
that can be accessed
by pressing the mode
button:
Mode Button
Pressing the mode
button scrolls through
the six operational
mode choices:
Note: The mode button has a response time of 0.2 seconds.
14
Setting the flash
Follow these instructions to set the flash for the ix-10 Digital Camera:
1.
Turn the camera on. When
the green LED indicator
lights, the camera is ready
to take a picture.
2.
Check the current settings
in the LCD status display.
Note: The ‘0000’ indicates
that the SmartMedia card is
inserted. A symbol
’
indicates that no
SmartMedia is inserted.
3.
LED Indicator
Power On/off
Switch
Current Flash Setting
Press the flash mode button
and select the mode you
want.
Flash Mode Button
Note: The flash mode button has a response time of 0.4 seconds.
15
The ix-10 Digital Camera has four flash modes:
Icon
Flash Mode
Automatic Flash
No Flash
Meaning
The flash occurs automatically when
ambient lighting is insufficient for
image capture.
The flash function is disabled.
Flash Always On
The flash is used with every image.
Use this option when you are trying to
take pictures of dark subjects and the
area behind the subjects is highly
illuminated.
Red Eye
The flash pre-fires to reduce the redeye effect. It functions with all flash
modes.
Note: The camera ready LED lights when the flash is ready.
16
Setting the timer
The self-timer enables you to include yourself in the picture. Follow
these instructions to set the self-timer:
1.
Turn the camera on.
2.
Press the mode button to
enable self-timer mode .
You can set the timer to
capture high resolution or
low resolution images. Refer
to page 14 for information
on setting the mode.
LED Indicator
3.
Align the shot through the
viewfinder. Use a tripod
(not included) for optimum
results.
4.
Press the snapshot button.
The camera begins
beeping, with the beeps
occurring faster as the time
nears ten seconds, after
which the camera takes the
picture.
Power On/off
Switch
Mode Button
Snapshot Button
Note: Use a tripod (not included) with the self-timer function for
optimal results.
17
Deleting images
You can delete unwanted images at any time and free up space.
Deleting single images
1.
Turn the camera on.
2.
Press the mode button until
delete mode is enabled.
LED Indicator
Power On/off
Switch
Mode Button
3.
The trashcan icon appears.
Refer to page 14 for
information on setting the
mode.
4.
Press the snapshot button to
delete the image and then
press the mode button twice
more.
5.
The frame counter shows the
number of remaining pictures.
18
Snapshot Button
Note: You can also delete images using the supplied software
package. Refer to page 25, Using the software and to the
software help file on the CD for information.
Deleting all images
1.
Press the mode button until
delete all mode is enabled.
Mode Button
2.
The delete all icon
appears.
3.
Press the shutter button to
delete the image.
4.
The LCD displays
5.
Press the flash mode button.
Snapshot Button
.
Flash Mode Button
19
6.
7.
20
The LCD displays
.
Press the snapshot button
again. The buzzer beeps one
time to confirm that the
pictures have been erased. The
LCD display shows that there
are no pictures stored on the
SmartMedia card.
Installing software
Follow these instructions to install the ix-10 Digital Camera drivers and
software on your system.
Note: You may be prompted to insert your Windows Installation
CD-ROM or disk.
Driver Installation
1.
At this stage, you do not need to connect your ix-10 Digital
Camera to the PC. To load the software, insert the ix-10 Digital
Camera software CD into your CD-ROM drive. The setup
program should start up automatically. If not, please click the
‘setup.exe’ icon via the CD icon in My Computer.
2.
Follow the on-screen instructions. All the software required
for the camera will be loaded automatically. The software is
loaded in two parts. One half represents the Twain drivers and
Utility software to allow the camera to ‘talk’ to the computer
via the USB cable.
The second part is a suite of five programs that allow you to
work with your pictures on your computer. The five programs
are Photo Base, Photo Suite 2.2, Photo Fantasy 2.0, Photo
Printer 2.0 and Photo Montage 1.0, and are described in more
detail on page 27. If you need help loading your software,
please call the Fujifilm Technical Hotline.
Note: You should reboot your computer before using the ix-10
Digital Camera and software. Remember that you will need to
connect your camera to the PC with the USB cable before being
able to download pictures.
22
Connecting to your PC
Use the supplied USB cable to connect your ix-10 Digital Camera to
your PC and download your images. Refer to the following illustration:
1.
Connect the small USB
connector to the USB
connector on the camera.
2.
Connect the large USB
connector to the USB
connector on the PC or
notebook computer.
The section ‘Using Your Software’ will help
you get started using the software.
23
Connecting to your TV
3.
Connect the video cable to the
video port of your camera via the
small connector and to your TV
(‘video in’) or video recorder via
the phono jack (you may need to
purchase an adapter depending on
the input ports on your TV or
video).
Use the mode button to switch
between black and white (NTSC)
and colour (PAL). Use the
snapshot button to view your
pictures in turn. Use the strobe
button to select the menu, which
enables you to delete pictures or
view them like a slide show.
24
Video Port
Using the software
Note: Before you read this section, be sure you have installed the
software. Refer to page 22 for instructions.
Follow these instructions to use the included software for downloading
images:
1.
Click Start, Programs, and ix-10 Utility. Then click the ix-10
Utility icon to open the program:
Video/camera
button
2.
Video mode is the default opening view. From video mode you
can take snapshots of the camera’s field of view and store them
directly on the camera. You also can use the camera to capture
video to your hard drive as a Windows AVI file.
3.
Click the video/camera button to switch to Digital Camera
(DSC) mode:
25
From Digital Camera mode you can upload pictures from the
camera to your PC and delete pictures on the camera.
First, select pictures by clicking on them
individually or using the ‘Select
All/DeSelect All’ button:
To transfer pictures from your camera to
your PC, click this icon. You will then be
prompted to choose a directory on your PC
to file your snaps.
Use this icon to delete all pictures on your
camera. Take care not to delete pictures
inadvertently. You will be asked to
reconfirm before the pictures are deleted.
To leave the Utility program, click this icon:
26
Using the Arcsoft Photo Suite Software
Once you have saved your pictures onto your PC via the ix-10 Utility
software, you can use the bundled software programs to further enjoy
your digital snaps. Manuals for these programs can be found on the ix10 software CD. They can be accessed via Adobe Acrobat Reader. If
you do not have this program already on your computer, it can be
downloaded free of charge from www.adobe.com.
PhotoStudio® is a powerful, full-featured, easy-to-use
photo editing application. It provides a huge collection of
photo editing and retouching tools, plus a large assortment
of enhancements and special effects with unlimited levels
of modification.
PhotoBase® is an excellent multimedia organiser that lets
you store manage and access important image, audio and
video files. Mastering PhotoBase is easy! Simply create
albums of your files and enter information into
customizable information fields. Then choose from the
wide variety of activities.
PhotoMontage™ is a unique entertainment program that
enables you to turn a regular photo into a "montage" -creating a single image out of thousands of micro-images.
You can decorate your montages with grids and borders,
and add captions and signatures, then print them on a color
inkjet or laser printer.
PhotoFantasy™ is an image entertainment program that
lets you bring your fantasies to life by combining personal
photos with a wide variety of background images. You can
also create your own fantasy templates, edit your photos
before "fantasizing" them, and add text to your creations!
PhotoPrinter™ is an easy-to-use-printing program that
enables you to lay out and print your images in multiple
sizes on a single sheet of paper. Offering a wide selection of
image editing tools and printing templates, the program also
allows you to add frames and borders to your images.
Further information on these programs can be found at www.arcsoft.com.
27
28
Troubleshooting
Problem
The camera
has no
power.
Possible cause
The camera
switch is off.
Solution
Make sure that the power on/off is set to ON.
The batteries are
discharged.
Replace the batteries with freshly ones. Refer to page 9.
The batteries are
inserted
incorrectly.
Check the battery orientation. Refer to page 9.
Ensure that the
green cameraready LED
indicator is on
and is not
flashing.
If the light is flashing, wait until it emits a steady light
before taking the picture. The camera may be waiting for
the flash to charge.
Is the camera
full?
If the camera is full, you cannot take any more pictures. If
the resolution is set to high (HI), set the resolution to
normal (LO). Otherwise, delete some pictures to free up
memory. Refer to page 18.
Is the camera
connected to a
computer?
The camera’s buttons are not functional when connected
to a PC. Disconnect the camera to take more pictures.
Is the flash on?
Ensure that the flash is set to always on or auto. Refer to
page 15.
The batteries may
be weak.
If the batteries are too weak, the flash is unable to
recharge. Turn the camera off and wait a few seconds
before turning it back on. If this doesn’t work, you need to
replace the batteries with fresh ones. Refer to page 9.
The images
are blurry.
The camera or
subject was
moving when the
shot was taken.
Hold the camera steady or put it on a tripod to take
pictures.
The image
looks too
dark.
The flash is
needed for the
shot.
Turn the flash on. Refer to page 15.
The image
is too light.
You are facing a
bright light when
taking the picture.
Change the angle of the shot so that bright lights do not
shine directly towards the camera lens.
The flash is set to
always on.
Set the flash to auto flash. Refer to page 15.
The camera
won’t take a
picture.
The flash
doesn’t
work.
29
A personal
computer
does not
recognize
the camera.
The camera was
connected to a
personal
computer by UBS
before installing
Software.
Connect the camera to a personal computer with UBS.
Open by the next order,[My computer]→ [Control
panel] → [System] → [Device manager].From
[otherdevices] in [device manager], eliminate [Composit
USB devise] or [anindistinct device]. Take the camera off
from the personal computer, install the software and then
connect the camera to a personal computer again.
Displayed
A camera cannot
recognize a
format of
SmartMedia. Or
you used
SmartMedia
initialized with the
OS except
Windows.
Switch the camera on and then off again. If it's generated
again, please initialize SmartMedia with a personal
computer of Windows OS .
with
on
LCD display
and cannot
take a
picture.
30
Specifications
CCD Image Sensor
Status LCD
External storage
media
Picture modes
Color Depth
Output file format
Optics system
Shutter speed
Exposure
White balance
USB
communication
Battery type
LCD status display
Strobe light
Compliance
Image processing
Environment
Dimensions
Weight
•
1/3” CMOS image sensor
•
350K pixels
•
Pixel dimensions: 5.6 µm x 5.6 µm
TN type LCD
SmartMedia card
Status
Image format
Storage
(2 MB card)
33 images
133 images
HI
640 x 480
LO
320 x 240
24-bit color
JPEG
•
Lens aperture: F2.2
•
Lens effective focal length: f= 6.4 mm
•
Semi-field angle: 49 degrees
•
Distortion: < 2%
•
Focus: Range/depth of field: 0.7 m ~ ∞
1/30 to 1/1,500 second
Auto exposure
Auto white balance
1 ix-10 Digital Camera baud rate USB type
Cable definition: mini USB connector, 1.8 m length, 3.5 mm mini plug.
•
2 x AA alkaline batteries
Inserting batteries incorrectly will not result in damage to the camera or
batteries.
•
Resolution mode
•
Battery status
•
Flash mode
•
Self-timer activation
•
Erase mode
•
Range: 1.2m ~ 2.5m
•
Three modes:
Auto-flash
Fill-in flash (forced activation)
Flash off (no flash)
•
Flash charge time: initial charging < 6 sec.
Regulatory compliance:
•
FCC – Class B
•
CE
•
White balance
•
Optical black subtract
•
Gamma correction
•
Bayer pattern interpolation and edge enhancement on luma
channel
•
Operating temperature: 0 ~ 35°C
•
Storage temperature: -20 ~ 60°C
•
Operating humidity: 30% ~ 90%
•
Storage humidity: 10% ~ 90%
105 x 63 x 37 mm (L x H x W)
120 grams (w/o batteries)
31
Warranty
Please see enclosed card for warranty information.
32