1
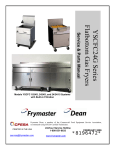
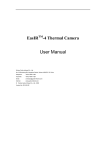
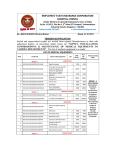
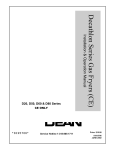
Flatbottom Series Electric Fryers
(Models 1824E, 2424E and Combinations)
Service & Parts Manual
Frymaster, a member of the Commercial Food Equipment Service Association, recommends
using CFESA Certified Technicians.
24-Hour Service Hotline 1-800-551-8633
*8196115*
JUNE 2007
NOTICE
IF, DURING THE WARRANTY PERIOD, THE CUSTOMER USES A PART FOR THIS ENODIS
EQUIPMENT OTHER THAN AN UNMODIFIED NEW OR RECYCLED PART PURCHASED
DIRECTLY FROM FRYMASTER DEAN, OR ANY OF ITS AUTHORIZED SERVICE CENTERS,
AND/OR THE PART BEING USED IS MODIFIED FROM ITS ORIGINAL CONFIGURATION, THIS
WARRANTY WILL BE VOID. FURTHER, FRYMASTER DEAN AND ITS AFFILIATES WILL NOT BE
LIABLE FOR ANY CLAIMS, DAMAGES OR EXPENSES INCURRED BY THE CUSTOMER WHICH
ARISE DIRECTLY OR INDIRECTLY, IN WHOLE OR IN PART, DUE TO THE INSTALLATION OF
ANY MODIFIED PART AND/OR PART RECEIVED FROM AN UNAUTHORIZED SERVICE CENTER.
DANGER
Copper wire suitable for at least 167°F (75°C) must be used for power connections.
DANGER
The electrical power supply for this appliance must be the same as indicated on the
rating and serial number plate located on the inside of the fryer door.
DANGER
This appliance must be connected to the voltage and phase as specified on the rating
and serial number plate located on the inside of the fryer door.
DANGER
All wiring connections for this appliance must be made in accordance with the wiring
diagrams furnished with the equipment. Wiring diagrams are located on the inside of
the fryer door.
DANGER
Do not store or use gasoline or other flammable vapors and liquids in the vicinity of this
or any other appliance.
WARNING
Do not attach accessories to this fryer unless fryer is secured from tipping. Personal
injury may result.
WARNING
Frymaster fryers equipped with legs are for permanent installations. Fryers fitted with
legs must be lifted during movement to avoid damage and possible bodily injury. For a
moveable or portable installation, Frymaster optional equipment casters must be used.
Questions? Call 1-800-551-8633
WARNING
Do not use water jets to clean this equipment.
DANGER
All wiring connections for this appliance must be made in accordance with the wiring
diagrams furnished with the equipment. Wiring diagrams are located on the inside of
the fryer door.
WARNING
This equipment is intended for indoor use only. Do not install or operate this
equipment in outdoor areas.
ii
Flatbottom Series Electric Fryers
TABLE OF CONTENTS
Page
CHAPTER 1 – SERVICE PROCEDURES
1.1 General
1.2 Calibrating the Thermatron Controller
1.3 Accessing the Control Box Electronics
1.4 Replacing an Thermatron Temperature Control Board
1.5 Replacing a Transformer
1.6 Replacing a Contactor
1.7 Replacing a Safety Drain Relay
1.8 Replacing a Breaker
1.9 Replacing a Thermatron Potentiometer
1.10 Replacing a Temperature Sensor and High-Limit Thermostat
1.11 Replacing Heating Elements inside Frypot
1.12 Replacing Heating Element under the Frypot
1.13 Replacing a Frypot
1.14 Cleaning a Seized Pump
1.15 Probe Resistance Chart
1.16 Element Wattage/Amperage Calculation Charts
1.17 Troubleshooting Guides
1.18 Wiring Diagrams
1-1
1-1
1-1
1-3
1-3
1-3
1-4
1-4
1-4
1-4
1-5
1-6
1-7
1-7
1-7
1-9
1-9
1-10
1-13
CHAPTER 2 – PARTS LIST
2.1 Accessories
2.2 Cabinetry
2.3 Control Panels, Wireways and Related Components
2.4 Electronics Components
2.5 Filter Components
2.6 Elements and Related Components
2.7 Harnesses
2.8 Oil Discharge Assembly
2.9 Oil Return Assembly
2.10 Drain Valves and Associated Parts
2.11 Drain and Oil Return Components
2.12 Wiring Connectors, Pin Terminals and Power Cords
2-1
2-1
2-2
2-8
2-10
2-12
2-16
2-17
2-19
2-20
2-21
2-22
2-25
iii
FLATBOTTOM SERIES ELECTRIC FRYERS
CHAPTER 1: SERVICE PROCEDURES
1.1
General
Before performing any maintenance on your Frymaster Dean Flatbottom Electric fryer, you must
disconnect the electrical power supply.
When electrical wires are disconnected, it is recommended that they be marked to facilitate
reassembly.
DANGER
Hot cooking oil will cause severe burns. Never attempt to move this appliance when filled
with hot cooking oil, or to transfer hot cooking oil from one container to another.
DANGER
This equipment should be unplugged when servicing, except when electrical circuit tests are
required. Use extreme care when performing such tests.
This appliance may have more than one electrical power supply connection point.
Disconnect all power cords before servicing.
Inspection, testing and repair of electrical components should be performed by an
authorized service agent only.
A Thermatron system incorporates a temperature-control circuit board, a potentiometer, and a
temperature probe.
1. Thermatron with Melt Cycle Option Enabled: Set Thermatron to the working temperature. The
elements will cycle on approximately 5 seconds, and off for approximately 15 seconds until the
temperature reaches 66°C (150°F). The Thermatron will then switch to normal operation.
1.2
Thermatron Calibration
If the Thermatron controller requires adjustment, do the following:
1. Set Thermatron controller dial to the desired shortening temperature and wait for the shortening
temperature to stabilize.
2. When shortening temperature reaches setpoint (elements will cycle on and off, indicating
setpoint temperature has been reached), check the temperature with a high-quality immersion
thermometer.
3. Loosen the knob setscrew and rotate the knob to the correct temperature setting on the
Thermatron faceplate.
4. Check the temperature again with a high-quality immersion thermometer to confirm that the
setting is correct.
5. Re-tighten the knob setscrew at the calibrated position.
1-1
IDENTIFYING PARTS
Drain
Rocker
Switch
Panel
Breakers
Control Box
Access
Thermatron
Controller
Drain Nipple
Extension
Bracket
Contactor
Safety Drain
Relay
Breaker
Transformer
Terminal Block
Control Box
Thermatron Board
1-2
1.3
Accessing the Control Box Electronics
(Interface Board, Transformer, Contactor, Breakers, Transformer and Relay)
1. Unplug all power cords.
2. Open front door of cabinet and remove the two bolts holding down the drain nipple extension
bracket.
3. Remove the three screws from bottom of control box access panel.
4. Remove the four screws in the corner of rocker switch access panel. Twist the rocker panel and
push through the access panel opening.
5. Unplug the Thermatron connector and remove access panel and set aside.
1.4
Replace Thermatron Board
1. Unplug all power cords. Perform Procedure 1.3, Steps 1-5, Accessing Control Box Electronics.
2. Remove all wiring from the terminals of the Thermatron board, ensuring that each wire is
marked for reattachment.
3. Remove the nuts from each corner of the Thermatron temperature control board and slide the
board from the studs. Ensure that standoffs remain in place on studs, prior to installing new
board. Install the new board by reversing the previous procedures. Ensure that wiring and wire
harnesses are connected to the proper terminals.
1.5
Replace Transformer
1. Unplug all power cords. Perform Procedure 1.3, Steps 1-5, Accessing Control Box Electronics.
2. Remove all wiring from the terminals of the transformer to be replaced.
3. Remove the screws that secure the transformer to the component box.
4. Install the new transformer by reversing the preceding procedures. Make sure you reconnect the
wiring to the proper terminals and the harnesses to the correct connectors.
1-3
1.6
1
Replace Contactor
Unplug all power cords. Perform Procedure 1.3, Steps 1-5, Accessing Control Box Electronics.
2. Identify faulty contactor. Remove all wiring connected to the contactor terminals inside the
component box. Tape wire-pairs together and mark each wire-set or wire for reassembly.
3. Remove contactor-mounting screws and remove the contactor.
4. Install the new contactor and connect the wiring removed in Step 2.
5. Reassemble in reverse order.
1.7
Replace Safety Drain Relay
1. Unplug all power cords. Perform Procedure 1.3, Steps 1-5, Accessing Control Box Electronics.
2. The safety drain relay is located in the top left corner of the access cabinet.
3. Carefully remove the relay hold down spring.
4. Pull relay to the left and out of the socket.
5. Install the new relay by reversing the preceding procedures.
1.8
Replace Breakers
1. Unplug all power cords. Perform Procedure 1.3, Steps 1-5, Accessing Control Box Electronics.
2. Identify faulty breaker. Remove all wiring connected to the breaker terminals inside the
component box. Tape wire-pairs together and mark each wire-set or wire for reassembly.
3. Remove breaker-mounting screws and remove the breaker.
4. Install the new breaker by reversing the preceding procedures.
1.9
Replace Thermatron Potentiometer
1. Unplug all power cords.
2. Open front door of cabinet and remove the four screws in corners of potentiometer panel.
3. Unplug connector.
4. Install the new potentiometer by reversing the preceding procedures.
1-4
1.10
Replace Temperature Sensor and High-Limit Thermostat Probes
1. Unplug all power cords.
2. Drain the cooking oil from the frypot and
leave the drain open.
3. Lift up and
guardplate.
remove
the
element
4. Remove the two screws from the bottom
of the faceplate cover.
Element Guardplate
5. After removing screws, gently tilt up and
lower faceplate. Note that when lowering
the faceplate, the door will lower and
swing out to be set aside as well.
6. Remove the six screws from the top access
cover.
7. After removing screws, remove panel by
lowering down the front of the frame and
pushing in on the high-limit reset switch
so that it will slide down. To make
reassembly easier, push out the black
grommet and snap back in when
completely reassembled.
Underside of
faceplate has
two screws.
Top access cover
has six screws.
8. Remove the screws securing the probe
bracket to the elements and remove the
probe bracket.
9. Remove the metal clamps securing the
probe to the elements.
10. Disconnect the wire plug containing the
probe wiring.
11. Using an open end wrench, loosen the
temperature probe. Thread the probe wire
through the hole and remove the probe.
Remove the screws from probe brackets.
1-5
12. Thread the new probe wire through the
hole in front of the fryer. The probe
assembly should be oriented in the same
manner as the probe being replaced. Place
the new probe assembly onto the element,
and ensure that the probe extends 1”
beyond the front of the bracket before
securing the bracket. Also ensure that the
springs are on each probe under each
bracket.
13. Apply Loctite PST567
replacement threads.
sealant
to
14. Screw the replacement probe into the
frypot and tighten 170-180 inch-pounds
torque. DO NOT OVERTIGHTEN.
High-Limit Thermostat
Temperature
Sensor
15. Reattach the connector and reassemble in
reverse order.
1.11
Replace Heating Elements inside Frypot
1. Perform Procedure 1.10, Replace
Temperature Probe, Steps 1-9.
2. Remove the four screws from the two
brackets in the rear of the frypot that
secure the element to the frypot.
3. Remove wires from the elements by
loosening and removing the nuts.
4. Remove element using an open-end
wrench or other suitable tool to loosen the
compression fitting.
Remove screws here.
5. Gently remove the element by sliding out into the frypot and lifting up as you remove it.
6. Insert new element and reassemble in reverse order.
1-6
1.12
Replace Heating Element under the Frypot
1. Perform Procedure 1.10, Replace Temperature Probe, Steps 1-9.
2. Remove the wires from the element by removing the nuts on each end of the element.
3. Remove the screws attaching the element bracket to the cabinet.
4. Gently slide the element out by pulling towards the front of the fryer.
5. Insert new element and reassemble in reverse order.
1.13
Replace Frypot
1. Perform Procedure 1.10, Replace Temperature Probe, Steps 1-9.
2. Perform Procedure 1.3, Accessing the Control Box Electronics, Steps 1-5.
3. Perform Procedure 1.8, Replace High-Limit, Steps 1-4.
4. Disconnect the element wires.
5. Remove the screws holding the back panels to the frame.
6. Remove the screws securing the frypot to the front frame of the fryer.
7. Carefully lift the frypot from the cabinet.
8. Remove the drain valve from the old frypot and install on the new frypot.
9. Apply Loctite Sealant PST 567 to the high-limit threads. Install high-limit into the new frypot.
10. Follow the preceding steps in reverse to install the new frypot into the fryer.
11. NOTE: Apply Loctite Sealant PST 567 to all pipefittings prior to installation.
1.14
Cleaning a Seized Pump
If the pump motor overloads, a circuit breaker will trip and the motor will not start until the breaker
is reset. If the pump motor does not start, press the white reset button located under the component
box, inside the cabinet.
If the pump starts after resetting the breaker, then something is causing the motor to overload. A
major cause of overload is filtering several frypots sequentially, creating thermal overload on the
motor. Allow the pump motor to cool at least 30 minutes before resuming operation, and allow time
for the motor to cool between frypots.
1-7
Motor overload can be caused by:
•
Solidified shortening in the pan or filter lines,
or
•
Attempting to filter unheated oil.
Cold oil is more viscous, causing the pump motor to trip a breaker. Always filter with the oil at
operating temperature [~350°F (177°C)].
If the motor runs but the pump does not, there is a blockage in the pump or lines. Incorrectly sized
or installed paper/pads will allow food particles and sediment to pass through the filter pan and into
the pump. When sediment enters the pump, the gears bind, causing the motor to overload, again
tripping the breaker. Shortening that has solidified in the pump will produce the same result.
A pump seized by debris or hard shortening must be disassembled, cleaned, and reassembled. Use
the following procedure:
1. Disconnect power to the filter system.
2. Remove the front cover of the pump to access the gears inside (see illustration below- 8-GPM
pump shown), if the pump is accessible inside the cabinet.
Remove bolts to remove
pump cover.
Remove debris or hardened
shortening to free gears.
3. If the front cover is not accessible, the pump must be removed from the pump motor (remove
input/output plumbing from the pump prior to removing pump). Remove three setscrews from
the pump-shaft housing to disengage the pump from the motor. Remove the gears and
thoroughly clean all internal components. Ensure the inside of the pump housing is free of any
debris or hardened shortening before reassembling. Failure to completely clean the inside
housing and ring gear will cause gear binding after reassembly.
Filter paper/pads that are the wrong size or installed incorrectly will also allow food particles and
sediment to pass through and clog the suction tube in the bottom of the filter pan. Particles large
enough to block the suction tube may indicate that the crumb tray is not being used.
1-8
1.15
Probe Resistance Chart
Use the chart below when testing temperature probes and probe circuits for proper operation.
Probe Resistance Chart
Current-Style Thermatron Systems (Probe wire
color: Two Black Wires or Two Brown Wires)
° Celsius
° Fahrenheit
Ohms (± 3%)
21
27
32
38
43
49
54
60
66
71
77
82
88
93
99
104
110
116
121
127
132
138
143
149
154
160
166
171
177
182
188
193
199
204
70
80
90
100
110
120
130
140
150
160
170
180
190
200
210
220
230
240
250
260
270
280
290
300
310
320
330
340
350
360
370
380
390
400
1-9
108130
84606
66721
53020
42452
34206
27735
22641
18588
15349
12741
10635
8925
7527
6391
5470
4705
4030
3441
2967
2583
2255
1977
1729
1496
1320
1170
1051
942
840
750
676
605
541
1.16
Element Wattage/Amperage Calculation Charts
Use the charts below when changing voltages or determining amperage for a given element
configuration.
L1
L1
Three Phase
Amperage
Three Phase
Wattage
L2
L3
L2
L3
To determine Three Phase Amperage, solve for
Single Phase first:
Wattage
Voltage
To compute the New Wattage Rating of an element if a
different voltage is applied, use the following formula:
[
= Single Phase Amps
Then divide the Single Phase Amperage by 1.73 to
determine Three Phase Amperage.
New Voltage
Old Voltage
]
2
X
kW Listed
= New Wattage Rating
Example:
Example:
If 208V supply is applied to a 17 kW element
rated for 240V, the calculation is as follows:
17,000W
240V
=
70.833 Amps
1.73
[
= 40.944 Amps per Phase
208V
240V
]
2
X
17,000 Watts
= 12.77 kW
1.17 Troubleshooting
1.17.1 Control and Heating Problems
Problem
Probable Causes
Corrective Action
A. Power cord is not plugged in or circuit A. Plug power cord in and verify that
breaker is tripped.
circuit breaker is not tripped.
B. If available, substitute a controller
known to be working for the
B. Controller has failed.
suspect controller. If the substitute
controller functions correctly, order
Controller won't
a new controller.
activate.
C. If any of the components in the
power supply system (including the
C. Power
supply
component
or
transformer and temperature control
temperature control board has failed.
board) fail, power will not be
supplied to the controller and it will
not function.
1-10
Problem
Fryer does not heat.
Fryer repeatedly
cycles on and off when
first started.
Fryer heats until highlimit trips with heat
indicator ON.
Fryer heats until highlimit trips without
heat indicator ON.
Fryer stops heating
with heat indicator
ON.
Probable Causes
Corrective Action
A. If available, substitute a controller
known to be working for the
A. Controller has failed.
suspect controller. If the substitute
controller functions correctly, order
a new controller.
B. If the circuitry in the fryer control
system cannot determine the frypot
temperature, the system will not
allow the element to be energized
B. One or more other components have
or will de-energize the element if it
failed.
is already energized.
If the
contactor, element, or associated
wiring fails, the element will not
energize.
In fryers equipped with Thermatron
controllers,
burners
cycle
on
approximately
5
seconds
and
off
for
Fryer is in melt-cycle mode.
15 seconds until the temperature
reaches 66°C (150°F).
If available, substitute a controller
known to be working for the suspect
controller. If the substitute controller
Temperature probe or controller has functions correctly, order a new
failed.
controller. If the substitution of the
controller does not resolve the
problem, the most likely cause is a
failed temperature probe.
If available, substitute a controller
known to be working for the suspect
controller. If the substitute controller
functions correctly, order a new
Contactor, element or controller has controller from FASC.
If the
failed.
substitution of the controller does not
resolve the problem, the most likely
cause is a contactor that has failed in
the closed position or an element that
has failed.
The fact that the heat indicator is ON
indicates that the controller is
functioning properly and is calling for
heat.
The high-limit thermostat
The high-limit thermostat or contactor
functions as a normally closed switch.
has failed.
If the thermostat fails, the "switch"
opens and power to the elements is
shut off. If the contactor fails to close,
no power is supplied to the elements.
1-11
1.17.2 Filtration Problems
Problem
Probable Causes
Corrective Action
A. Verify that the power cord is fully
A. Power cord is not plugged in or circuit
plugged in. If so, verify that circuit
breaker is tripped.
breaker is not tripped.
B. Pump blockages are usually caused
B. Blockage in filter pump.
by sediment buildup in the pump
Filter pump won't
due to improperly sized or installed
Test: Close the drain valve and pull
start.
filter paper and failure to use the
the filter pan out from the fryer.
crumb screen.
Activate the pump. If the pump motor
hums for a short time then stops, the
probable cause is blockage of the
pump itself.
1-12
Wiring Diagram
8051434C
1.18
1-13
FLATBOTTOM SERIES ELECTRIC FRYERS
CHAPTER 2: PARTS LIST
2.1
Accessories
1
3
2
5
6
4
Item
1
2
Part Number
210-3703
106-2840SP
106-2839SP
3
803-0197
4
823-4127
5
823-3934
6
803-0209
*
823-3660
* Not Illustrated
Description
Hanger, Basket 2424E
Cover Assembly, Frypot 1824
Cover Assembly, Frypot 2424
Fryer Friend 27” (Cleanout Rod)
Crumb Tray
Vessel Divider
Brush, Frypot Cleaning
Crumb Scoop
2-1
2.2
Cabinetry
2.2.1 Backs, Bases, Casters, Sides, Etc. (11824E, 12424E Non-Filter)
7
6
3
8
5
4
2
1
10
9
2-2
11
Item
Part Number
106-2176
106-2175
200-2903
1
200-2971
210-3341
2
823-3725
3
823-4276
823-4266
823-3727
4
823-4277
823-4267
823-4063
5
200-2005
6
200-1500
210-9276
7
210-9277
8
200-4511
9
826-1117
810-0356
*
826-1389
*
809-0191
10
826-1118
810-0357
*
826-1389
*
809-0191
810-2053
11
*
826-1362
*
826-1389
*
809-0191
* Not Illustrated
Description
Cabinet Assembly, 11824E Non-Filter
Cabinet Assembly, 12424E Non-Filter
Channel, Base 1824
Channel, Base 2424
Door, Duct Access
Side, 18 S/S LH Cabinet
Side, 24 S/S LH Cabinet
Side, 24 ALZ LH Cabinet
Side, 18 S/S RH Cabinet
Side, 24 S/S RH Cabinet
Side, 24 ALZ RH Cabinet
Support, Caster
Back, Structural
Back, Structural
Upper Cap 1824E
Upper Cap 2424E
Hinge, Door
Caster Assembly, 5” Wheel w/o Brake
5” Wheel w/o Brake
Screw, ¼-20x ¾ Hex Head ZP (Pkg. of 10)
Washer, Lock ¼ Spring ZP
Caster Assembly, 5” Wheel w/ Brake
5" Wheel w/ Brake
Screw, ¼-20x ¾ Hex Head ZP (Pkg. of 10)
Washer, Lock ¼ Spring ZP
Leg, Black Adjustable w/Mount Plate
Nut, ¼-20 Hex ZP (Pkg. of 10)
Screw, ¼-20x ¾ Hex Head ZP (Pkg. of 10)
Washer, Lock ¼ Spring ZP
2-3
2.2.2 Backs, Bases, Casters, Sides, Etc. (SCF 22424E and 32424E)
4
22
24
19
23
18
13
16
17
15
12
1
9
7
10
11
2
5
14
6
3
8
20
2-4
21
Item
Part Number
106-2206
106-2204
106-3136
1
200-2624
2
200-2632
3
200-2643
4
200-2717
5
200-2935
6
200-2971
200-4696
7
200-3356
8
200-4696
9
200-5209
10
200-5210
11
210-3341
12
823-3725
823-4276
13
823-3727
823-4277
14
823-3728
15
823-3729
16
823-3730
823-4271
17
823-3731
823-4272
18
823-4063
19
823-4064
20
826-1117
810-0356
*
826-1389
*
809-0191
21
826-1118
810-0357
*
826-1389
*
809-0191
22
200-4150
23
200-4152
24
200-4154
* Not Illustrated
Description
Cabinet Assembly, U224E
Cabinet Assembly, SCF32424E
Cabinet Assembly, 2424E SS
Upright, Rear
Support, Inner Panel
Base Frame Lower Plate
Support, Pump Motor D180
Post, 2424 Door
Channel, Base 32424
Channel, Base 2424
Cover, Lower Base Frame
Channel, Base 2424
Brace, 2424 Rear Cross Aluminized
Bridge, Base 2424
Door, Duct Access
Side W/A, 1824E S/S LH Cabinet
Side W/A, 2424E S/S LH Cabinet
Side W/A, 1824E S/S RH Cabinet
Side W/A, 2424E S/S RH Cabinet
Side W/A, 1824E LH Cabinet Aluminized
Side W/A, 1824E RH Cabinet Aluminized
Panel W/A, U224E Cabinet LH Inside
Panel, W/A, 2424E Cabinet LH Inside
Panel W/A, U224E Cabinet RH Inside
Panel, W/A, 2424E Cabinet RH Inside
Caster Support
Caster Channel Support
Caster Assembly, 5” Wheel w/o Brake
5” Wheel w/o Brake
Screw, ¼-20x ¾ Hex Head ZP (Pkg. of 10)
Washer, Lock ¼ Spring ZP
Caster Assembly, 5” Wheel w/ Brake
5” Wheel w/ Brake
Screw, ¼-20x ¾ Hex Head ZP (Pkg. of 10)
Washer, Lock ¼ Spring ZP
Back, Upper Cabinet 2424
Back, Lower Cabinet 2424
Back, Lower L/R Cabinet 2424
2-5
2.2.3 Door Assembly and Component Parts
1
8
4
2
3
5
6
9
10
11
7
Item
1
2
3
4
5
6
7
8
9
10
11
Part Number
106-2788
106-2784
106-4067SP
806-4487SP
810-0658
200-4588
200-4577
809-0191
809-0266
809-0918
810-0179
810-0180
826-1343
810-1105
816-0529
824-1150
824-1149
Description
Door Assembly 1824
Door Assembly 2424
Pin Assembly, Door
Pin, Hinge Cover & Door
Retaining Ring (Unplated)
Liner, Inner Door 1824
Liner, Inner Door 2424
Washer, ¼” Lock Spring ZP
Screw, #10-½” Phil TR Head ZP
Screw, #10-24 X ½”
Button Plug ½”
Handle, Door
Spring, Door Hinge Lock
Magnet, (Offset) Door
Bumper, Rubber Self Adhesive
Panel, W/A Outer Door 1824
Panel, W/A Outer Door 2424
2-6
2.2.4 Flue Caps, Top Caps, and Related Components
1
2
5
7
3
6
4
10
8
9
11
12
13
15
14
Item
Part Number
Description
1
2
3
4
5
6
7
8
9
10
11
12
13
14
15
823-4100
210-4317
210-4313
210-4598
823-4684
823-3474
823-4101
210-4802
823-3699
823-3622
823-4916
210-9276
106-3253SP
106-1638SP
823-4125
Deflector, 2424 Oil
End Strip, 24L 18R Oil
Joiner Strip (Joins frypots within a system)
Joiner Strip, 18/2424 (Joins one fryer system to another)
Fluecap, 2-2424
Deflector, 2424 Short Oil
Deflector, 24L 18R Oil
Fluecap, 1-2424
Top Assembly, One-Piece Standard Flue 1824 (use 823-3264 for 2424)
Top Assembly, One-Piece Short Flue 1824 (use 823-3473 for 2424)
Marine Edge 1824 (use 823-4917 for 2424)
Upper Cap 1824E (use 210-9277 for 2424)
Frame Assembly, Single Crumb Dump
Frame Assembly, Double Crumb Dump
Insert, Crumb Dump
2-7
2.3
Control Panels, Wireways, and Related Components
24
23
16
22
17
18
4
11
20
5
8
7
6
19
14
2
12
3
10
15
1
9
2-8
13
21
Item
1
Part Number
106-2046
826-2031
2
106-0165
106-2108
3
807-3748
4
810-2342
5
106-2119
6
807-3611
7
807-3613
8
807-3682
9
106-2120SP
10
807-3750
826-1988
11
200-1921
12
200-3237
13
807-0070
14
807-0074
15
807-3610
16
807-3622
17
807-3625
18
807-3744
19
826-1371
20
809-0428
21
809-0825
22
823-3694
23
823-3717
24
823-3691
*
823-3719
*
816-0574
* Not Illustrated
Description
Plate Assembly, SCF2 Thermatron PCB Component
Thermatron Kit, 115/220V includes 106-0165
PCB, SCF2 Thermatron Board 115/230
Breaker Assembly, 3-Pole 240VAC Circuit
Breaker, 3-Pole 240VAC Circuit
Plate, Circuit Breaker Mounting
Relay/Transformer Bracket Assembly, 208/240VAC (Non-CE Units)
Relay, 24 VAC Coil
Spring, Relay Hold Down
Transformer, 230V
Fuse Assembly, 5 Amp w/Leads
Fuse, 300V 5 Amp
Fuse Holder, with Fuse 300V 5 Amp
Support, Circuit Breaker
Plate, Control Box Mounting
Terminal, Ground Lug
Contactor, 3 Pole 600 V 40 Amp
Block, Dean Terminal 1501-AL-9CU
Connector, 1” X 45 Degree
Conduit, 1” Liquid-Tite Flex
Connector, 1” X 90 Degree
Screw, Drill #8 x ½ Hex HD ZP (package of 25)
Bolt, ¼-20 x ½ Hex HD ZP GR5
Nut, KEPS, ¼ -20, Hex HD SS
Control Box, 2424E
Control Box, SCF224E RH
Control Box, SCF224E LH
Control Box, 1824E
Bushing, Heyco 1.375 - 16
2-9
2.4
Electronic Components
1
2
3
4
5
6
7
8
10
9
11
12
13
2-10
Item
1
Part Number
106-2135SP
807-3574
807-3576
807-3579
2
807-3611
3
826-2031
4
106-3777
106-1955
807-3536
802-2052
*
106-3309
802-2052
816-0534
*
106-0850
802-2134
210-3377
5
807-3610
6
807-3748
7
807-0074
8
807-3682
9
807-2103
10
106-2148
11
807-3759
12
106-2607SP
807-3567
813-0617
13
807-3905
807-3906
* Not Illustrated
Description
Panel Assembly, Power/Reset/Boil-Out
Switch, Power
Switch, Reset
Switch, Boil-Out
Relay, 24VAC Coil (Optional Safety Drain Relay)
PCB Board, 115/230V (Thermatron Board Kit)
Faceplate Assembly, Thermatron
Harness Assembly, SCF32424 Potentiometer
Pot, Dean Temp Control 1k Ohm
Label, Thermatron Face Plate
Faceplate Assembly, TMT 1824E/2424E
Label, TMT Dial
Knob / Go Control (PS-125-PL-2)
Faceplate Assembly, Thermatron /14G
Label, Thermatron "Go" Face
Face Plate, Thermatron Retro
Block, Dean Terminal 1501-AL-9CU
Breaker, 3-Pole 240VAC Circuit
Contactor, 208/240VAC 50/60Hz
Transformer, 230VAC
Microswitch, CE Straight Lever
Probe Assembly, 1824E/2424E Temperature
Thermostat, High-Limit w/Manual Reset
Go Sensor Assembly (90° Bend)
Sensor Probe (Go)
Fitting 3/16 " CCX ¼ " NPT
Light, Green Indicator 250V
Light, Red Indicator 250V
2-11
2.5
Filter Components
2.5.1 Filter Pan Assembly
7
7
8
2
8
4
5
1
9
3
10
6
15
11
12
13
Refer to Section 2.5.2 for parts
breakdown of this caddy assembly.
Filter Paper Configuration
Magnasol Leaf Configuration
Item
1
Part Number
106-3675SP
810-2237
2
810-2700
3
810-2759
4
810-2760
5
813-0867
6
823-3480SP
7
823-3492
823-4885
8
823-3509
*
810-2100
*
810-2098
9
823-4280
10
823-4274
11
810-2172
12
813-0851
13
813-0006
14
813-0460
15
813-0165
16
813-0062
* Not Illustrated
16
14
Description
Filter Screen Assembly, 2424
Magnasol Leaf w/ 11x19 Retrofit includes hose
Nipple, Quick Disconnect Snaptite
Filter, Screen 2424
Compression Cap
Nipple, ⅜ X 6 ½ SS
Pan W/A, BI-18 Portable/Stationary
Lid W/A, SCF2424 LJS
Lid W/A, Flatbottom 3” Drain
Crumb Basket W/A, LJS-UFF
Motor, Pump 120/230 V 1/3 HP
Pump, 8 GPM Filter
Ring W/A, Hold Down SCF22424E
Pan W/A, Filter 2424E
Disconnect, Male Quick Release
Nipple ⅜ X 5” BM
Bushing, Hex ½ to ⅜ NPT BM
Nipple, ½ x 3” NPT BM Pipe
Elbow St ½ x ½ NPT 90° BM
Elbow, ½ BM 90°
2-12
2.5.2 Filter Pan Caddy Assembly
5
2
6
1
7
8
4
Item
Part Number
106-1693SP
1
200-2627
2
200-2641
3
200-2642
4
809-0054
5
809-0767
6
809-0823
7
810-2805
8
826-1389
* Not Illustrated
3
Description
Filter Pan Caddy Assembly SCF2424
Brace, Cross
Filter Frame Side, 2424SCF
Filter Frame Front & Rear
Nut, Elastic Stop, 10-32 Zn Pl
Screw, 10-32 X ½ Phil Tr Hd SS
Nut, Nylock, ¼-20
Caster, 2” Filter Pan
Screw, ¼-20x ¾ Hex Head ZP (package of 10)
2-13
2.5.3 Under Fryer Filter (UFF) Components
29
26
16
26
10
29
27
26
28
10
30
10
25
Right-Flush configuration
illustrated.
10
19
23
22
2
19
18
21
20
24
19
4
13
3
34
17
8
16
15
14
6
1
7
9
5
13
12
11
10
33
31
32
2-14
Item
1
2
3
4
5
6
7
8
9
10
11
12
13
14
15
16
17
18
19
20
21
22
23
24
*
25
26
27
28
29
30
31
32
33
34
Part #
810-2100
810-2098
810-2245
810-2173
813-0735
813-0869
810-2762
813-0625
813-0251
813-0614
106-3659SP
810-2125
200-6089
200-6202
106-3604SP
807-2103
816-0220
901-2348
902-2348
810-2170
813-0022
813-0165
813-0062
813-0625
813-0006
813-0613
813-0003
813-0093
813-0173
813-0673
813-0087
813-0833
813-0368
810-2270
813-0730
813-0644
813-0631
810-2262
813-0452
810-2757
816-0549
200-6135
813-0463
Component
Motor, 120-230VAC ⅓-HP Filter Pump
Pump, 8 GPM Filter
Hose, 16¾-inch Filter Pan to Pump
Disconnect- Female, ½-inch
Reducer, ½-inch to ⅜-inch NPT Bell
Elbow, ⅜-inch NPT Street
Disconnect, ⅜-inch Female with Radial Collar
Nipple, Black ⅜-inch NPT
Nipple, ½ -inch X 4.5-inch NPT
Fitting, ½-inch X ⅜-inch 37° Flare
Flush Valve Assembly, Complete
Valve, ⅜-inch Flush
Actuator Handle, Flush Valve (Left-Oriented Flush Valves Only)†
Actuator Handle, Flush Valve (Right-Oriented Flush Valves Only)†
Bracket Assembly, Microswitch
Microswitch, Straight Lever
Insulation, Microswitch
Cover, Microswitch (Left-Oriented Flush Valves Only)†
Cover, Microswitch (Right-Oriented Flush Valves Only)†
Disconnect, ½-inch Male
Nipple, ½-inch X Close NPT
Elbow, ½-inch X 90° NPT Street
Elbow, ½-inch X 90° NPT
Nipple, ⅜-inch X Close NPT
Bushing, ½-inch to ⅜-inch NPT Hex
Plug, ½-inch NPT Hex
Tee, ½-inch NPT
Nipple, ½-inch X 4-inch NPT
Union, ½-inch NPT
Nipple, ½-inch X 8.5-inch NPT
Nipple, ½-inch X 1.5-inch NPT
Nipple, ½-inch X 15.5-inch NPT
Nipple, ½-inch X 16-inch NPT
Tubing, Filter Pump to Rear Oil Return
Tee, ⅜-inch NPT
Nipple, ⅜-inch X 1.5-inch NPT
Elbow, ⅜-inch X 90° NPT
Tubing, Rear Oil Return
Plug, ⅜-inch NPT Pipe
Handle, Drain Flush
Sleeve, Blue Vinyl (Drain Flush Handle Cover)
Bracket, Flush Handle (Mounts to Inner Panel)
Plug, Pipe ½ NPT BM
* Not Illustrated
†
Valve stem pointing to left- left-oriented; Valve stem pointing to right- right oriented.
2-15
2.6
Elements and Related Components
3
1
2
4
7
6
5
9
8
Item
Part Number
1
826-1831
826-1805
2
823-3760
823-3836
3
200-1376
4
823-4573
5
210-3320
6
210-3322
7
210-3321
210-4265
8
810-2164
9
823-3885
*
809-0840
*
KIT7594
* Not Illustrated
Description
Element, 240V/6.3kw Heating (includes mounting hardware)
Element, 208V/6.3kw Heating (includes mounting hardware)
Heater W/A, 208V/6.3kw Element
Heater W/A, 240V/6.3kw Element
Bracket, Restraining
Plate, Element Retaining
Heating Element Spacer
Heater Support Plate
High Limit Clamp
Thermostat Clamp
Spacer Spring 3/16”
Plate W/A, Element Guard
Screw, 10-32 x ½ Rd SL HD ZP
Flatbottom Electric Element Bracket Modification Kit
2-16
2.7
Harnesses
1
2
5
9
13
3
6
4
7
10
11
14
12
15
2-17
8
16
Item
1
2
3
4
5
6
7
8
9
10
11
12
13
14
15
16
Part Number
106-1262
106-1652
106-1955
106-1978
106-2122
106-2132
106-2139
106-2134
106-2138
106-2141
106-2145
106-2146
106-2159
106-2191
106-2331
106-2332
106-2825
Description
Harness Assembly, Boil Out Board
Harness, Drain Valve MSW-WW
Harness Assembly, FB Thermostat
Harness Assembly, 2424 Heat Light
Harness Assembly, 208VAC Go Board
Harness Assembly, Boil Out
Wire Assembly, Power Switch
Harness Assembly, Drain Valve
Wire Assembly, Power
Harness Assembly, Element
Harness Assembly, 208VAC Ext
Harness Assembly, Potentiometer
Harness Assembly, Oil Return MSW-CBX/Add On
Harness Assembly, SCF24E Heater Strip
Harness Assembly, Oil Return MSW-CBX/Add On
Wire Assembly, 48.7 Ohms Complete
Harness Assembly, Pump Motor
2-18
2.8
Oil Discharge Assembly
12
5
10
11
9
4
6
3
1
8
2
7
Item
Part Number
106-2184
106-2194
1
810-2357
2
813-0003
3
813-0022
4
813-0087
5
813-0156
6
813-0173
7
813-0368
8
813-0613
9
813-0614
10
813-0625
11
813-0632
12
813-0730
*
816-0548
* Not Illustrated
Description
Oil Discharge Assembly, SCF 2424E includes 106-2194 and
106-2192
Oil Discharge Assembly, 2424E Component
Tubing, 24E Flush Line
Tee, ½ NPT BM
Nipple, ½ x Close NPT BM
Nipple, ½ NPT X 1 ½ BM
Plug, ½ NPT Hex Head BM Pipe
Union, ½ NPT BM
Nipple, ½ NPT X 16.00 BM
Flare Fitting ½ -37 Degree X ½
Flare Fitting, ½ -37 Degree X ⅜
Nipple, Black, ⅜ X Close NPT BM
Elbow, Street, ⅜ -90 Deg
Tee, ⅜ NPT Black
Cap, Vinyl Yellow
2-19
2.9
Oil Return Assembly
3
1
2
6
7
5
10
8
4
Oil Return Assembly 24E (P/N 106-2192) Illustrated
9
Item
Part Number
106-2188
106-2183
106-2192
106-2189
106-3130
106-3131
1
200-1143
2
810-2125
3
810-2363
810-2671
810-2362
810-2316
4
813-0452
5
813-0614
813-0613
6
813-0625
7
813-0631
8
813-0632
9
813-0730
10
823-3713
823-4270
*
810-2262
*
810-2673
* Not Illustrated
Description
Oil Return Assembly 1824E LH
Oil Return Assembly 1824E RH
Oil Return Assembly 24E LH
Oil Return Assembly 24E RH
Oil Return Assembly 2424E LH
Oil Return Assembly 2424E RH
Retainer, Oil Return Valve Nut
Ball Drain Valve ⅜”
Tubing, Rear Vessel Flush Line 24E
Tubing, Rear Vessel Flush Line 2424E
Tubing, Rear Vessel Flush Line 1824E
Tubing, Flare 14.73” 3” Drains
Plug, Pipe ⅜ NPT BM
Flare Fitting, ½-37degree X ⅜
Flare Fitting ½-37 Deg x ½ 3” drains
Nipple, Black, Close ⅜ NPT BM
Elbow ⅜ X 90 Degree
Elbow, Street, ⅜-90 Degree
Tee, ⅜ NPT Black
Lever W/A, Oil Return FB Electric
Lever, W/A, Oil Return 2424E
Tubing, Oil Drain Valve UFF 50
Tubing, Flush Line Pot-To-Pot 2424E
2-20
2.10 Drain Valve and Associated Parts
Nut
(furnished with Item 11)
1
4
2
5
6
7
8
9
3
10
Plastic Washer
(furnished with Item 11)
11
Item
1
2
3
4
5
6
Part Number
816-0211
210-8558
809-0564
200-1257
826-1366
901-2348
902-2348
7
807-2103
8
816-0220
9
809-0988
10
106-3604
11
810-2052
*
823-3463
*
814-0047
*
807-2104
* Not Illustrated
Description
Sleeve, Red Drain Valve Handle
Handle, 2424 Drain Valve
Stud, ¼ - 20 x 1 ½
Retainer, Drain Valve Nut
Nut, 4-40 KEPS HX (Pkg. of 25)
Cover, Safety Switch LH
Cover, Safety Switch RH
Switch, CE Micro Straight Lever
Insulation, RF Switch
Washer, Nylon
Bracket Assembly, Switch
Valve, Drain 1¼” w/ Nut
Valve w/ Microswitch Holder, 1¼” Drain (Older Units)
Sleeve, Red Handle Drain Valve (Older Units)
Microswitch, Drain Valve Roller Lever (Older Units)
2-21
2-22
9
10
11
17
3-2424/1824
with 1824 on Left
(Plumbing with flush on
far left cabinet.)
16
5
3-2424/1824
with 1824 on Right
(Plumbing with flush
on far left cabinet.)
4
8
10
Standard 1 ½” Drains
14
6
18
3
2
2.11.1
15
18
21
3-2424/1824
with 1824 on Right
(Plumbing with flush
on far right cabinet.)
22
Drain and Oil Return Components
8
12
13
19
20
7
1
2.11
2.11.1
ITEM
Standard 1 ½” Drain and Oil Return Components Parts List
PART #
826-1824
1
823-3732SP
823-3721SP
2
813-0768
3
810-2276
4
809-0884
5
816-0544
6
200-1845
7
810-2556
8
813-0868
9
813-0732
10
813-0765
11
813-0391
12
810-2052
13
813-0659
14
813-0143
15
813-0760
16
813-0686
17
813-0165
18
200-1838
19
813-0632
20
810-2125
*
823-3465
*
816-0548
21
813-0614
22
823-3174
* Not illustrated.
COMPONENT
Frypot Kit, 2424E (No Front Return)
Frypot Assembly, 1824ECF Electric
Frypot Assembly, 2424ECF Electric
Tee, 1824 Right Drain Flush
Nipple, UFF Drain Line
Nut, Slip-Joint
O-Ring
Tube, 1⅝-inch X 24½-inch Drain Manifold
Tube, Front Oil Return
Plug, 1½-inch NPT Pipe
Nipple, 1½-inch X 2-inch NPT Toe
Tee, 1½-inch X 1¼-inch X 1½-inch
Nipple, 1¼-inch X Close NPT
Valve, Drain 1¼-inch
Cap, 1½-inch NPT Pipe
Nipple, 1¼-inch X 2½-inch NPT Toe
Tee, 1½-inch X 1¼-inch X 1½-inch NPT Drain
Cap, Drain Flush End (1824G Left)
Elbow, ½-inch X 90° NPT Street
Tube, 1⅝-inch X 17½-inch Drain Manifold
Elbow, ⅜-inch X 90° NPT Street
Valve, ⅜-inch Oil Return Ball
Handle, UFF Oil Return
Cap, Yellow Vinyl Oil Return Handle
Fitting, ½-inch X ⅜-inch 37° Flare
Plug, Frypot Drain
2-23
2.11.2
Euro-Look 3” Round Drains and Components
3
5
1
7
6
2
4
8
Item
1
2
3
4
5
6
Part Number
823-4853
823-4876
823-4854
816-0625
809-0969
200-8131
200-8135
200-8129
7
823-4850
8
200-8128
200-8130
200-8132
*
823-4883
*
816-0630
* Not Illustrated
Description
Tube W/A, 3” Flatbottom Left Drain w/ Drain Flush
Tube W/A, 3” Flatbottom Down Spout
Tube W/A, 3” Flatbottom Middle Drain
Sleeve 3”
Clamp 3”
Tube, 2424 3” Middle Down Spout Connector 9.21”
Tube, 1824 3” Middle Connector 10.38”
Tube, 2424 3” Middle Down Spout Connector 8.71”
Tube W/A, 3” Flatbottom Right Drain w/ Drain Flush
Tube, 2424 3” Drain Connector 16½ ”
Tube, 24 3” Right Drain Connector 16”
Tube, 18 3” Right End Connector 9.88”
Handle W/A, Drain Flatbottom 3” Drains
Cap, Vinyl Black
2-24
2.12 Wiring Connectors, Pin Terminals and Power Cords
1
8
Item
3
2
9
4
5
10
11
Part Number
1
807-3530
2
807-3537
3
807-0155
4
807-0156
5
807-0157
6
807-0158
7
807-1062
8
807-1068
9
807-2135
10
807-2136
11
807-2360
12
807-3232
13
807-3557
*
807-3618
*
807-3619
*
106-3636
* Not Illustrated
Description
Terminal, Push-On Insulated
Terminal, Push-On Fully Insulated
9-Pin Male
9-Pin Female
6-Pin Male
6-Pin Female Panel Mount
3-Pin Male
2-Pin Cap 94V-2 White M&L
6-Pin Hi-Amp Male
6-Pin Hi-Amp Female
3-Pin Female
4-Pin M&L Female Cap
6-Pin Housing Cap
9-Pin Male
4-Pin Female
Power Cord Assembly
2-25
6
12
7
13
Dean Industries, 8700 Line Avenue, PO Box 51000, Shreveport, Louisiana 71135-1000
Shipping Address: 8700 Line Avenue, Shreveport, Louisiana 71106
TEL 1-318-865-1711
PRINTED IN THE UNITED STATES
FAX (Parts) 1-318-219-7140
SERVICE HOTLINE
1-800-551-8633
FAX (Tech Support) 1-318-219-7135
819-6115
JUNE 2007