1
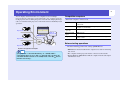
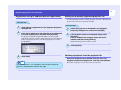
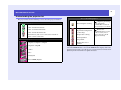
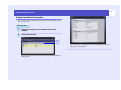
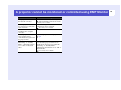
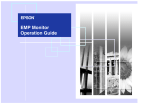
EMP Monitor
Operating Guide
Meanings of symbols used
CAUTION
TIP
Indicates something that may cause injury or damage to the projector.
Indicates information that is related to a topic or which may be useful to know.
Indicates a page where a related topic or more a detailed explanation is provided.
[ (Name) ]
Indicates the name of a projector port or a computer menu or item name.
Example: [InputA] [Start]
1
Contents
2
Meanings of symbols used
1
Operating Environment
3
Compatible computers ............................................................ 3
Before starting operations ....................................................... 3
Registering projectors for monitoring
4
Registration using automatic detection ................................... 5
Registration using IP address (Manual registration) ............... 6
Editing the manually-registered projector list .......................... 6
Deleting a projector from the projector list............................... 6
Main EMP Monitor window
7
Button functions....................................................................... 7
Understanding the projector list............................................... 8
Displaying detailed information ............................................... 9
A projector cannot be monitored or controlled using
EMP Monitor
10
Operating Environment
3
You can display status information on a computer screen for multiple
projectors that are connected to a network and also carry out batch operations
on all projectors such as turning the power on and off and changing the image
source. A maximum of 64 projectors can be monitored and controlled by batch
operations.
Compatible computers
* Macintosh computers cannot be used.
OS*
CPU
Projector A
Turn on
projector B
EMP Monitor
Projector B
Memory
capacity
Free hard disk
space
Display
98SE/Me/NT4.0/2000 Professional/XP Home Edition/XP
Professional
Pentium MMX 166 MHz or higher (Pentium II 233 MHz
or higher recommended)
64 MB or more (128 MB or more recommended)
6 MB or more
XGA (1024×768) or higher resolution, 16 bit or higher
display colour
Before starting operations
Projector C
Check the following points before starting up EMP Monitor.
System configuration example
TIP
If the projector's "Network Monitoring" or "Standby Mode"
configuration menu is set to "ON" or "Network ON", the projector
can still be monitored when it is in standby mode (when the (Power)
indicator is lit orange).
• EMP Monitor must be installed in the computer to be used for monitoring
and control.
• The computer and the projectors must be connected to the network.
• If using Windows 2000, NT4.0 or XP, the computer must be started up in
Administrator mode.
Registering projectors for monitoring
4
This operation is carried out when starting EMP Monitor for the first time after
it has been installed and when you would like to add projectors. Once a
projector has been registered, the status for the projector will be displayed
automatically each time EMP Monitor is started from that point onwards.
PROCEDURE
1
Click [Start] - [Programs] (or [All Programs]) - [EPSON
Projector] - [EMP Monitor] in that order to start EMP
Monitor.
2
Click [Register projector].
Use the "Registration using automatic detection" (
p.5) or
"Registration using IP address (Manual registration)" (
p.6)
procedure to register projectors.
Click to add a projector to be monitored
The [Register projector] dialogue box will be displayed.
5
Registering projectors for monitoring
Registration using automatic detection
PROCEDURE
1
Click [Auto detect] in the [Register projector]
dialogue box.
2
Select the projector(s) to be registered, and then click
[Add].
You can select several projectors at the same time.
If a projector does not appear in the list, use "Registration using
IP address (Manual registration)".
p.6
TIP
• Projectors that have been registered using automatic detection will be
re-detected on the basis of projector name and the IP addresses for
these projectors will be displayed each time EMP Monitor is started.
• If a password entry screen is displayed, enter the password for the
projector's Administrator and then click [OK].
If more than one projector was selected, the password entry screens
for each projector will be displayed in succession.
3
Click [Close] to return to the main EMP Monitor
window.
Refer to "Main EMP Monitor window" for details on using the
main window.
p.7
6
Registering projectors for monitoring
Registration using IP address (Manual registration)
PROCEDURE
Editing the manually-registered projector list
Use the following procedure to change the projector name or IP address for
projectors that have been registered manually.
PROCEDURE
1
Click [Manual registration] in the [Register projector]
dialogue box.
2
Enter the IP address for the projector to be registered
in the [IP address] box, and then click [Confirm].
If a projector with the specified IP address is found on the
network, the projector's name will be displayed, so check that it
is the target projector. If it is not the target projector, re-enter
the IP address.
3
Click [Add].
1
Select the projector to be edited in the [Register
projector] dialogue box, and then click [Edit].
2
If the projector name has changed, simply click
[Confirm].
If the IP address has changed, enter the new IP
address and then click [Confirm].
Check that the projector name is correct.
3
Click [Update].
Deleting a projector from the projector list
Select the projector to be deleted from the list in the
[Register projector] dialogue box, and then click [Delete].
TIP
If a password entry screen is displayed, enter the password for the
projector's Administrator and then click [OK].
More than one projector can be selected at the same time.
Main EMP Monitor window
The main window shows the status information for each projector. To carry
our operations for projectors, select the projectors from the projector list and
then click the buttons.
Buttons
7
Button functions
The power can be turned on or off and the image source can be changed for
the projectors that are selected from the projector list. The same operations
can also be carried out using the commands in the [Tools] menu.
Detail display
Power ON
Projector list
To close the window, click the
in the top-right corner.
Shows detailed information for the selected projectors.
Turns the projector power on.
Power OFF Turns the projector power off.
Switches to the images source connected to the
PC1,
[Computer] port, [Computer1] port or [InputA] port.
InputA
PC2,
InputB
Switches to the images source connected to the
[Computer 2] port or [InputB] port.
BNC
Switches the input source to the [BNC] port.
S-Video
Switches the input source to the [S-Video] port.
Video
Switches the input source to the [Video] port.
D4
Switches the input source to the [D4] port.
DVI,
HDMI
Switches to the images source connected to the [DVI]
port or [HDMI] port.
EasyMP
Switches to EasyMP or EasyMP.net.
TIP
Some connected projectors may not be equipped with all of the above
ports or functions. If you click a button for a port or function that is
not available, nothing will happen.
8
Main EMP Monitor window
Understanding the projector list
The projector list uses the following icons to show the projector statuses.
Status:Shows the projector status.
Power on and normal status
Power off and normal status
Power on and abnormal status
Power off and abnormal status
Network error (such as not connected to network or
power cord not connected)
Name:Shows the projector name.
Image source:Shows the selected image source.
Computer, Computer1 or InputA
Computer2 or InputB
S-Video
Video
D4 (Digital)
DVI or HDMI (Digital)
Error information: Uses the following icons to show the status if an
error occurs with a projector.
Replace with a new lamp.
"Replacing the Lamp"
End of lamp life warning
in the "Replacing
Consumables" section of
the accessory User's Guide.
"Reading the Indicators"
Lamp problem
Refer to the
High internal temperature
"Troubleshooting" section
(overheating)
of the accessory User's
Guide and carry out the
Temperature warning
suggested remedy.
Internal problem
Fan problem
Temperature sensor
problem
The projector information that is generated when a problem is detected is
stored until EMP Monitor is closed. The EMP Monitor displays will not be
updated automatically even if the projector status returns to normal. Click
[Refresh] in the main window to update the status.
9
Main EMP Monitor window
Displaying detailed information
You can check detailed information on the status of individual projectors
that are connected.
PROCEDURE
1
Select the projector to be checked in the main
window.
2
Click [View details].
Click to
display
details.
The details that are displayed may vary slightly depending on
the projector connected.
Detailed status information will be displayed in the [Details]
dialogue box.
A projector cannot be monitored or controlled using EMP Monitor
Cause
Remedy
Is the projector connected to Connect the network cable correctly.
the network correctly?
"Network Cable Connections" in the
accessory User's Guide
Has the projector been set
Check the settings for the "Network"
up correctly for connection configuration menu command.
to the network?
Accessory User's Guide
Has EMP Monitor been
Uninstall EMP Monitor and then re-install
installed to the computer
it.
correctly?
Have all projectors that are Register the projector in the projector list.
to be monitored and
p.4
controlled been registered in
the projector list?
Is the projector's "Network In order to use EMP Monitor to monitor
Monitoring" or "Standby
and control the projector when it is in
Mode" configuration menu standby mode, the projector's "Network
set to "ON" or "Network
Monitoring" or "Standby Mode"
ON"?
configuration menu must be set to "ON" or
"Network ON".
Accessory User's Guide
10
11
All rights reserved. No part of this publication may be reproduced,
stored in a retrieval system, or transmitted in any form or by any means,
electronic, mechanical, photocopying, recording, or otherwise, without
the prior written permission of SEIKO EPSON CORPORATION. No
patent liability is assumed with respect to the use of the information
contained herein. Neither is any liability assumed for damages resulting
from the use of the information contained herein.
General Notice:
EPSON is a registered trademark of SEIKO EPSON CORPORATION.
Windows and Windows NT are trademarks of Microsoft Corporation in
the United States of America and other countries.
Macintosh is a registered trademark of Apple Computer, Inc.
EasyMP and EasyMP.net are trademarks of SEIKO EPSON
CORPORATION.
Neither SEIKO EPSON CORPORATION nor its affiliates shall be liable
to the purchaser of this product or third parties for damages, losses,
costs, or expenses incurred by purchaser or third parties as a result of:
accident, misuse, or abuse of this product or unauthorized modifications,
repairs, or alterations to this product, or (excluding the U.S.) failure to
strictly comply with SEIKO EPSON CORPORATION’s operating and
maintenance instructions.
Other product names used herein are also for identification purposes
only and may be trademarks of their respective owners. EPSON
disclaims any and all rights in those marks.
SEIKO EPSON CORPORATION shall not be liable against any
damages or problems arising from the use of any options or any
consumable products other than those designated as Original EPSON
Products or EPSON Approved Products by SEIKO EPSON
CORPORATION.
Copyright
2003 by SEIKO EPSON CORPORATION