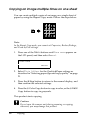
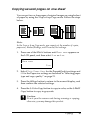
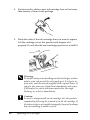
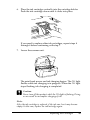
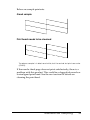
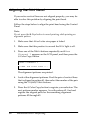
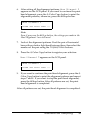
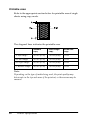
1
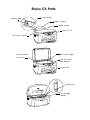
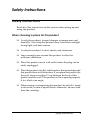
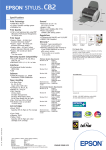
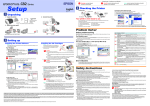
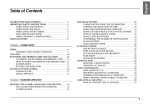
Stylus CX Parts
edge guide
sheet feeder
paper support
feeder guard
scanner unit
document cover
transportation
lock lever
document table
Control Panel
See page 6.
output tray
adjust lever
Ink cartridge
clamps
All in One Product
All rights reserved. No part of this publication may be reproduced, stored in a retrieval
system, or transmitted in any form or by any means, electronic, mechanical, photocopying,
recording, or otherwise, without the prior written permission of SEIKO EPSON
CORPORATION. The information contained herein is designed only for use with this EPSON
printer. EPSON is not responsible for any use of this information as applied to other printers.
Neither SEIKO EPSON CORPORATION nor its affiliates shall be liable to the purchaser of
this product or third parties for damages, losses, costs, or expenses incurred by the purchaser
or third parties as a result of accident, misuse, or abuse of this product or unauthorized
modifications, repairs, or alterations to this product, or (excluding the U.S.) failure to strictly
comply with SEIKO EPSON CORPORATION's operating and maintenance instructions.
SEIKO EPSON CORPORATION shall not be liable for any damages or problems arising from
the use of any options or any consumable products other than those designated as Original
EPSON Products or EPSON Approved Products by SEIKO EPSON CORPORATION.
SEIKO EPSON CORPORATION shall not be held liable for any damage resulting from
electromagnetic interference that occurs from the use of any interface cables other than those
designated as EPSON Approved Products by SEIKO EPSON CORPORATION.
EPSON is a registered trademark and EPSON Stylus is a trademark of SEIKO EPSON
CORPORATION.
General Notice: Other product names used herein are for identification purposes only and
may be trademarks of their respective owners. EPSON disclaims any and all rights in those
marks.
Copyright © 2003 by SEIKO EPSON CORPORATION, Nagano, Japan.
Copy Guide
ii
Contents
Safety Instructions
Safety Instructions . . . . . . . . . . . . . . . . . . . . . . . . . . . . . . . . . . . . . . . . . .1
Warnings, Cautions, and Notes. . . . . . . . . . . . . . . . . . . . . . . . . . . . . . .5
Control Panel Functions
LCD Panel. . . . . . . . . . . . . . . . . . . . . . . . . . . . . . . . . . . . . . . . . . . . . . . . .6
Lights . . . . . . . . . . . . . . . . . . . . . . . . . . . . . . . . . . . . . . . . . . . . . . . . . . . . .6
Buttons . . . . . . . . . . . . . . . . . . . . . . . . . . . . . . . . . . . . . . . . . . . . . . . . . . .7
Copying
Overview of the Basic Procedure . . . . . . . . . . . . . . . . . . . . . . . . . . . . .8
Loading Paper . . . . . . . . . . . . . . . . . . . . . . . . . . . . . . . . . . . . . . . . . . . .10
Placing a Document . . . . . . . . . . . . . . . . . . . . . . . . . . . . . . . . . . . . . . .12
Copying in a Variety of Formats . . . . . . . . . . . . . . . . . . . . . . . . . . . . .14
Copying without margins . . . . . . . . . . . . . . . . . . . . . . . . . . . . . .14
Copying with small margins . . . . . . . . . . . . . . . . . . . . . . . . . . .16
Copying an image multiple times on one sheet. . . . . . . . . . . .18
Copying several pages on one sheet . . . . . . . . . . . . . . . . . . . . .19
Changing the Copy Settings . . . . . . . . . . . . . . . . . . . . . . . . . . . . . . . .20
Setting the number of copies . . . . . . . . . . . . . . . . . . . . . . . . . . .20
Selecting paper type and copy quality . . . . . . . . . . . . . . . . . . .21
Selecting paper size . . . . . . . . . . . . . . . . . . . . . . . . . . . . . . . . . . .21
Making copies lighter or darker . . . . . . . . . . . . . . . . . . . . . . . . .22
Reducing or enlarging copies automatically . . . . . . . . . . . . . .22
Reducing or enlarging copies manually . . . . . . . . . . . . . . . . . .23
Canceling copying . . . . . . . . . . . . . . . . . . . . . . . . . . . . . . . . . . . . . . . . .23
iii
Replacing Ink Cartridges
About Ink Cartridges . . . . . . . . . . . . . . . . . . . . . . . . . . . . . . . . . . . . . .
Checking the Ink Supply . . . . . . . . . . . . . . . . . . . . . . . . . . . . . . . . . . .
Precautions on Ink Cartridge Replacement . . . . . . . . . . . . . . . . . . .
Replacing an Ink Cartridge . . . . . . . . . . . . . . . . . . . . . . . . . . . . . . . . .
24
24
25
26
Maintenance and Transporting
Checking the Print Head Nozzles . . . . . . . . . . . . . . . . . . . . . . . . . . .
Cleaning the Print Head . . . . . . . . . . . . . . . . . . . . . . . . . . . . . . . . . . .
Aligning the Print Head . . . . . . . . . . . . . . . . . . . . . . . . . . . . . . . . . . .
Transporting This Product . . . . . . . . . . . . . . . . . . . . . . . . . . . . . . . . .
30
32
34
36
Troubleshooting
Error Messages . . . . . . . . . . . . . . . . . . . . . . . . . . . . . . . . . . . . . . . . . . . 38
The Copied Image is Improperly Sized . . . . . . . . . . . . . . . . . . . . . . 40
Clearing the Jammed Paper . . . . . . . . . . . . . . . . . . . . . . . . . . . . . . . . 40
Contacting Customer Support
Regional Customer Services . . . . . . . . . . . . . . . . . . . . . . . . . . . . . . . . 42
Product Specifications
Product Specifications . . . . . . . . . . . . . . . . . . . . . . . . . . . . . . . . . . . . .
Electrical . . . . . . . . . . . . . . . . . . . . . . . . . . . . . . . . . . . . . . . . . . . .
Environmental . . . . . . . . . . . . . . . . . . . . . . . . . . . . . . . . . . . . . . .
Mechanical . . . . . . . . . . . . . . . . . . . . . . . . . . . . . . . . . . . . . . . . . .
Printing . . . . . . . . . . . . . . . . . . . . . . . . . . . . . . . . . . . . . . . . . . . . .
Scanning . . . . . . . . . . . . . . . . . . . . . . . . . . . . . . . . . . . . . . . . . . . .
Paper . . . . . . . . . . . . . . . . . . . . . . . . . . . . . . . . . . . . . . . . . . . . . . .
Menu Items
iv
46
46
46
47
47
47
48
Safety Instructions
Safety Instructions
Read all of the instructions in this section when setting up and
using this product.
When choosing a place for this product
❏ Avoid places subject to rapid changes in temperature and
humidity. Also, keep this product away from direct sunlight,
strong light, and heat sources.
❏ Avoid places subject to dust, shocks, and vibrations.
❏ Leave enough room around this product to allow for
sufficient ventilation.
❏ Place this product near a wall outlet where the plug can be
easily unplugged.
❏ Place this product on a flat, stable surface that extends beyond
this product base in all directions. If you place this product by
the wall, leave more than 10 cm between the back of this
product and the wall. This product will not operate properly
if it is tilted at an angle.
❏ When storing or transporting this product, do not tilt it, stand
it on its side, or turn it upside down; otherwise, ink may leak
from the cartridge.
Safety Instructions
1
When choosing a power source
❏ Use only the power cord that comes with this product. Use of
another cord may result in fire or electric shock.
❏ This product’s power cord is for use with this product only.
Use with other equipment may result in fire or electric shock.
❏ Use only the type of power source indicated on the label on
the back of this product.
❏ Be sure your AC power cord meets the relevant local safety
standards.
❏ Do not use a damaged or frayed power cord.
❏ If you use an extension cord with this product, make sure that
the total ampere rating of the devices plugged into the
extension cord does not exceed the cord's ampere rating. Also,
make sure that the total ampere rating of all devices plugged
into the wall outlet does not exceed the wall outlet's ampere
rating.
❏ If you plan to use this product in Germany, the building
installation must be protected by a 10 or 16 amp circuit
breaker to provide adequate short-circuit protection and
over-current protection for this product.
When handling ink cartridges
❏ Do not open the ink cartridge packages until just before you
install them.
❏ Before installing the new ink cartridge, shake it four or five
times before opening its package.
❏ Do not shake the ink cartridge after removing from the
package; this can cause leakage.
2
Safety Instructions
❏ Be careful not to break the hooks on the side of the ink
cartridge when you remove it from the package.
❏ Keep ink cartridges out of the reach of children. Do not allow
children to drink from or otherwise handle the cartridges.
❏ Store each ink cartridge with its label facing upward. Do not
store cartridge upside down.
❏ Do not remove or tear the blue label on the cartridge; this can
cause leakage.
❏ Be careful when you handle used ink cartridges, as there may
be some ink remaining around the ink supply port. If ink gets
on your skin, wash the area thoroughly with soap and water.
If ink gets into your eyes, flush them immediately with water.
If discomfort or vision problems remain after a thorough
flushing, see a doctor immediately.
❏ Do not touch the green IC chip on the side of the cartridge.
This can damage the ink cartridge.
Do not touch this part
Safety Instructions
3
When using this product
❏ Do not put your hand inside this product or touch the ink
cartridges during printing.
❏ Do not block or cover the openings on this product.
❏ Do not attempt to service this product yourself.
❏ Unplug this product and refer servicing to qualified service
personnel under the following conditions:
The power cord or plug is damaged; liquid has entered this
product; this product has been dropped or the cover
damaged; this product does not operate normally or exhibits
a distinct change in performance.
❏ Do not insert objects into the slots on this product.
❏ Take care not to spill liquid on this product.
❏ Leave the ink cartridges installed. Removing the cartridges
can dehydrate the print head and may prevent this product
from printing.
When using the LCD panel
❏ Only use a dry, soft cloth to clean the display. Do not use
liquid or chemical cleansers.
❏ If the display on this product is damaged, contact your dealer.
❏ If the liquid crystal solution contained in the LCD panel leaks
out and gets on your hands, wash them thoroughly with soap
and water, if the liquid crystal solution gets into your eyes,
flush them immediately with water, if discomfort or vision
problems remain after a thorough flushing, see a doctor
immediately.
4
Safety Instructions
Warnings, Cautions, and Notes
w
c
Warnings
must be followed carefully to avoid bodily injury.
Cautions
must be observed to avoid damage to your equipment.
Notes
contain important information and useful tips on the operation of this
product.
Safety Instructions
5
Control Panel Functions
LCD Panel
When you turn on this product, the LCD panel shows the current
copy settings, number of copies, and the B ink drop icon. This state
of the LCD panel is called the " normal display ".
Plain Paper-Norm
A4
100%
1B
You can also check the error messages on the LCD panel. For
details of the error messages, see “Error Messages” on page 38.
Lights
Light
Pattern
Status
On
On
This product is on.
Flashing
While Initializing, data processing, copying,
printing, scanning, charging ink and cleaning, and
replacing an ink cartridge.
On
An error occurs.
Error
6
Control Panel Functions
Buttons
Buttons
Function
P On
Turns this product on and off.
] Scan
Starts EPSON Smart Panel by default. Before using
this feature, make sure you have installed EPSON
Scan and EPSON Smart Panel from the software
CD and connect this product to your computer.
Recall
Recalls the copy settings stored in the memory.
When you press and hold the Recall button for 3
seconds, all of the settings are stored in the
memory.
Reset
Resets the number of copies to one when the LCD
panel is in normal display.
Resets the values to their defaults when a menu
item appears on the LCD panel.
When you press and hold the Reset button for 3
seconds, all of the settings except language return
to their defaults.
Menu
Display the menu items on the LCD panel.
Copies/Value
Increase or decrease the number of copies when
the LCD panel is in normal display.
Select an item or increase or decrease the
setting’s value when a menu item appears on the
LCD panel.
x B&W Copy
Copies in grayscale.
x Color Copy
Copies in color.
Performs the function indicated in “Press the Color
copy button to xxx (indicating a function)”.
y Stop
Stops copying. The sheet being copied is ejected.
Returns to the normal display when a menu item
appears on the LCD panel.
Control Panel Functions
7
Copying
Overview of the Basic Procedure
This section outlines the basic copying procedure to make copies
in the Standard Copy mode, as follows:
1. Turn on this product.
2. Load paper in the sheet feeder and then place a document on
the document table. For instructions, see the appropriate
sections described below.
“Loading Paper” on page 10
“Placing a Document” on page 12
3. Press one of the Menu buttons until Copy mode appears on
the LCD panel, and then select Standard.
Copy mode
Standard
Note:
Be sure to select the copy mode first, because other copy settings
return to their default values when the copy mode changes.
If you want to copy in aother copy mode, see “Copying in a
Variety of Formats” on page 14.
8
Copying
4. Change any necessary copy settings. For instructions, see the
appropriate sections described below.
Menu items
Setting items/values
Number of Copies
See page 20
1* to 99
Quality&Paper
See page 21
Plain Paper-Econ
Plain Paper-Norm*
Plain Paper-Fine
PQIJ Paper-Fine
PQIJ Paper-Photo
Matte Paper HW
Photo Paper
PSGP Paper
DB Photo Paper
Paper size
See page 21
A4*
A5
10 × 15
Lighter/Darker
See page 22
Five steps
Reduce/Enlarge
See page 22
Actual: 100%*
Auto Fit Page
A4 -> A5
A5 -> A4
Zoom In/Out
See page 23
25 to 400% in 1% increments
10 × 15 -> A4
A4 -> 10 × 15
4 × 6 -> A4
* indicates the default setting.
5. Press the y Stop button to return to the normal display, and
then confirm the selected settings.
Plain Paper-Norm
A4
100%
1B
6. Press the x Color Copy button to copy in color, or the x B&W
Copy button to copy in grayscale.
This product starts copying.
c
Caution:
Do not open the scanner unit during scanning or copying;
otherwise, you may damage this product.
Copying
9
Note:
❏ The copied image may not have exactly the same size as the original
image.
❏ When you select Photo Paper, PSGP Paper, or DB Photo Paper
as Quality & Paper and then press the x B&W Copy button, an
warning message appears and copying stops. If this happens, press
the y Stop button, and then change the Quality & Paper settings.
❏ While copying is in progress, if a message appears on the LCD panel
indicating ink is low, you can continue making copies until ink runs
out, or stop making copies and then change the appropriate ink
cartridge immediately.
Loading Paper
This section provides instructions on how to load paper in the
sheet feeder.
Note:
Leave enough space in front of this product for paper to be fully ejected.
1. Lower the output tray, and then slide out the extension.
10
Copying
2. Move the feeder guard towards you.
3. Fan a stack of paper, and then tap it on a flat surface to even
the edges.
4. Slide out the left edge guide. Load the stack of paper with the
printable side up so it is resting against the right side of the
feeder, and then slide the edge guide against the paper.
Note:
❏ Always load paper into the sheet feeder’s short edge first.
❏ Use the line on the feeder guard as an indicator when loading
paper. The right edge of paper is aligned with the line on the
feeder guard.
❏ Make sure that the paper stack fits under the arrow mark inside
the edge guide.
Copying
11
5. Set the feeder guard back.
Note:
If the paper is curled, flatten it or curl it slightly toward the opposite
side before loading. Printing on curled paper may cause ink to smear
on your printout.
Placing a Document
This section provides instructions on how to place a document on
the document table.
Note:
Always keep the document table clean.
1. Open the document cover and place an original document on
the document table, with the side to be copied facing down.
Make sure that the document is properly aligned.
12
Copying
Note:
❏ Make sure the document is flat against the glass surface;
otherwise the image becomes out of focus. Be sure to close the
document cover to prevent interference from any external light.
❏ An area of up to 2.5 mm from the edge of the document table
glass cannot be scanned.
2.5 mm
2.5 mm
2. Close the document cover gently so that the document does
not move.
Note:
❏ Do not leave photographs on the document table for an extended
period of time as they may stick to the glass.
❏ Do not place heavy objects on top of this product.
Copying
13
Copying in a Variety of Formats
This section provides information on how to change the copy
mode and make copies in a variety of formats. See the appropriate
section.
Note:
Be sure to select the copy mode first, because other copy settings return
to their default values when the copy mode changes.
Copying without margins
You can make a copy that covers the entire page of paper by using
the Border Free Copy mode. Follow the steps below.
1. Press one of the Menu buttons until you see Copy mode on the
LCD panel, and then select Border Free.
Copy mode
Border Free
14
Copying
2. Change any necessary copy settings. For instructions, see the
appropriate sections as described below;
Menu items
Setting items/values
Number of Copies
See page 20
1* to 99
Quality&Paper
See page 21
Matte Paper HW
Photo Paper*
Paper size
See page 21
A4*
10 × 15
Lighter/Darker
See page 22
Five steps
Reduce/Enlarge
See page 22
Actual: 100%*
Auto Fit Page
10 × 15 -> A4
A4 -> 10 × 15
5 × 7 -> 10 × 15
Zoom In/Out
See page 23
25 to 400% in 1% increments
PSGP Paper
DB Photo Paper
5 × 7 -> A4
8 × 10 -> 10 × 15
8 × 10 -> A4
4 × 6 -> 10 × 15
4 × 6 -> A4
* indicates the default setting.
3. Press the y Stop button to return to the normal display, and
then confirm the selected settings.
4. Press the x Color Copy button to copy in color, or the x B&W
Copy button to copy in grayscale.
This product starts copying.
c
Caution:
Do not open the scanner unit during scanning or copying;
otherwise, you may damage this product.
Copying
15
Note:
❏ When you select Photo Paper, PSGP Paper, or DB Photo Paper
as Quality & Paper and then press the x B&W Copy button, an
warning message appears and copying stops. If this happens, press
the y Stop button, and then change the Quality & Paper settings.
❏ Because this feature enlarges the image to a size slightly larger than
the paper size, the portion of the image that extends beyond the edges
of the paper will not be copied.
Copying with small margins
You can make a copy with a 1.5-mm margin around all edges of
paper by using the Small Margin Copy mode. Follow the steps
below.
8
8
4
11
18
25
5
12
19
26
6
13
20
27
7
14
21
28
1 2 3
8 9 10
15 16 17
22 23 24
29 30 31
4
11
18
25
5
12
19
26
6
13
20
27
7
14
21
28
1 2 3
8 9 10
15 16 17
22 23 24
29 30 31
1. Press one of the Menu buttons until Copy mode appears on
the LCD panel, and then select Small Margins.
Copy mode
Small Margins
16
Copying
2. Change any necessary copy settings. For instructions, see the
appropriate sections described below.
Menu items
Setting items/values
Number of Copies
See page 20
1* to 99
Quality&Paper
See page 21
Matte Paper HW
Photo Paper*
Paper size
See page 21
A4*
10 × 15
Lighter/Darker
See page 22
Five steps
Reduce/Enlarge
See page 22
Actual: 100%*
Auto Fit Page
10 × 15 -> A4
A4 -> 10 × 15
5 × 7 -> 10 × 15
Zoom In/Out
See page 23
25 to 400% in 1% increments
PSGP Paper
DB Photo Paper
5 × 7 -> A4
8 × 10 -> 10 × 15
8 × 10 -> A4
4 × 6 -> 10 × 15
4 × 6 -> A4
* indicates the default setting.
3. Press the y Stop button to return to the normal display, and
then confirm the selected settings.
4. Press the x Color Copy button to copy in color, or the x B&W
Copy button to copy in grayscale.
This product starts copying.
c
Caution:
Do not open the scanner unit during scanning or copying;
otherwise, you may damage this product.
Note:
When you select Photo Paper, PSGP Paper, or DB Photo Paper as
Quality & Paper and then press the x B&W Copy button, an warning
message appears and copying stops. If this happens, press the y Stop
button, and then change the Quality & Paper settings.
Copying
17
Copying an image multiple times on one sheet
You can create multiple copies of an image on a single sheet of
paper by using the Repeat Copy mode. Follow the steps below.
Note:
In the Repeat Copy mode, you cannot set Paper size, Reduce/Enlarge,
and Zoom In/Out settings.
1. Press one of the Menu buttons until Copy mode appears on
the LCD panel, and then select Repeat.
Copy mode
Repeat
2. Select Plain A4-Norm for the Quality&Paper settings as
described in “Selecting paper type and copy quality” on page
21.
3. Press the y Stop button to return to the normal display, and
then confirm the selected settings.
4. Press the x Color Copy button to copy in color, or the x B&W
Copy button to copy in grayscale.
This product starts copying.
c
18
Caution:
Do not open the scanner unit during scanning or copying;
otherwise, you may damage this product.
Copying
Copying several pages on one sheet
You can put two or four pages of original images on a single sheet
of paper by using the 2-up or 4-up Copy mode. Follow the steps
below.
Note:
In the 2-up or 4-up Copy mode, you cannot set the number of copies,
paper size, Reduce/Enlarge, and Zoom In/Out settings.
1. Press one of the Menu buttons until Copy mode appears on
the LCD panel, and then select 2-up or 4-up.
Copy mode
2-up
2. Select Plain Paper-Norm for the Paper&Quality settings and
A4 for the Paper size settings as described in “Selecting paper
type and copy quality” on page 21.
3. Press the y Stop button to return to the normal display, and
then confirm the selected settings.
4. Press the x Color Copy button to copy in color, or the x B&W
Copy button to copy in grayscale.
c
Caution:
Do not open the scanner unit during scanning or copying;
otherwise, you may damage this product.
Copying
19
5. Place the other documents on the document table, and then
press the x Color Copy button or the x B&W Copy button
again to start copying.
This product starts copying.
Changing the Copy Settings
This section provides information on how to change the copy
settings. See the appropriate section.
Note:
Make sure that the copy mode is selected, because the copy settings which
you made here return to default values when the copy mode changes. See
“Copying in a Variety of Formats” on page 14 to select the copy mode.
Setting the number of copies
Note:
In the 2-up or 4-up Copy mode, you cannot use this setting.
Press the + or - Copies/Value button. You can set up to 99 copies.
20
Copying
Selecting paper type and copy quality
Press one of the Menu buttons until you see Quality&Paper on
the LCD panel, and then press the + or - Copies/Value button to
select the paper you loaded and a copy quality appropriate for
your document.
Quality&Paper settings
Support paper
Plain Paper - Econ
Plain paper for quick copying with draft print
quality
Plain Paper - Norm
Plain paper for text copying with normal print
quality
Plain Paper - Fine
Plain paper for text and graphics copying with
high print quality
PQIJ Paper - Fine
Photo Quality Ink Jet Paper for copying with high
print quality
PQIJ Paper - Photo
Photo Quality Ink Jet Paper for copying with
photo print quality
Matte Paper HW
Matte Paper Heavy Weight
Photo Paper
Photo Paper
PSGP Paper
Premium Semi-gloss Photo
DB Photo Paper
DuraBrite Photo Paper
Selecting paper size
Note:
In the Repeat Copy mode, you cannot use this setting. In the 2-up or
4-up Copy mode, you cannot change this setting.
Press one of the Menu buttons until you see Paper size on the
LCD panel, and then press the + or - Copies/Value button to
select the size of the paper you loaded.
Copying
21
Making copies lighter or darker
Press one of the Menu buttons until you see Lighter/Darker on
the LCD panel, and then press the + or - Copies/Value button to
lighten or darken your copies.
Reducing or enlarging copies automatically
Note:
In the 2-up, 4-up, or Repeat Copy mode, you cannot use this settings.
Press one of the Menu buttons until you see Reduce/Enlarge on
the LCD panel, and then press the + or - Copies/Value button to
enlarge or reduce your document to fit on the paper you loaded.
22
Setting items
Operations
Actual: 100%
Copying in actual size
Auto Fit Page
Copying with automatically determined
reduction or enlargement required
Actual: 100%*
Auto Fit Page
A4 -> A5
A5 -> A4
10 × 15 -> A4
A4 -> 10 × 15
5 × 7 -> 10 × 15
5 × 7 -> A4
8 × 10-> 10 × 15
8 × 10-> A4
4 × 6-> 10 × 15
4 × 6 -> A4
Copying in displayed enlargement and
reduction ratio
Copying
Reducing or enlarging copies manually
Note:
In the 2-up, 4-up, or Repeat Copy mode, you cannot use this setting.
Press one of the Menu buttons until you see Zoom In/Out on the
LCD panel, and then press the + or - Copies/Value button to set
a percentage for the scanned image for copying. You can set in
the range of 25% to 400% in 1% increments.
Canceling copying
Press the y Stop button.
Copying
23
Replacing Ink Cartridges
About Ink Cartridges
You can use the following cartridges with this product.
Black ink cartridge
T0321
Color ink cartridge
Cyan
Magenta
Yellow
T0422
T0423
T0424
c
Caution:
EPSON recommends the use of genuine EPSON ink cartridges.
Other products not manufactured by EPSON may cause damage
to this product, which is not covered by EPSON's warranties.
Checking the Ink Supply
To check your ink supply on the LCD panel, use one of the
following methods. If you want to check your ink supply on your
computer monitor, see the online Reference Guide.
LCD panel
Press one of the Menu buttons repeatedly until Ink Levels
appears on the LCD panel. The amount of ink left appears.
Ink Levels
C: 80% M: 80%
24
Replacing Ink Cartridges
Ink drop icon
You can also check the B ink drop icon on the LCD panel to see
an approximate indication of the ink level.
Plain Paper-Norm
A4
c
100%
1B
Caution:
Leave the old cartridge installed in this product until you are
ready to replace it; otherwise, ink remaining in the print head
nozzles may dry out.
Precautions on Ink Cartridge Replacement
Read all of the instructions in this section when replacing the ink
cartridges.
❏ If you need to remove an ink cartridge temporarily from this
product, be sure to protect the ink supply area of the ink
cartridge from dirt and dust. Store the ink cartridge in the
same environment as this product. When storing the
cartridge, be sure that ink cartridge with its label that
identifies the color of the ink cartridge facing upward. Do not
store ink cartridge upside down.
❏ The valve in the ink supply port is designed to contain any
excess ink that may be released. However, careful handling is
recommended. Do not touch the supply port of the ink
cartridge or its surrounding area.
Replacing Ink Cartridges
25
❏ This product uses ink cartridges equipped with an IC chip.
The IC chip accurately monitors the amount of ink used by
each cartridge, so even if a cartridge is removed and then later
inserted again, all of its ink can be used. However, some ink
is consumed each time the cartridge is inserted because this
product automatically checks its reliability.
❏ When an ink cartridge becomes empty, you cannot continue
copying even if the other cartridge still contains ink. Before
copying, replace the empty cartridge.
❏ In addition to being used in document copying, ink is also
consumed in the following operations: print head cleaning,
self-cleaning cycle performed when this product is turned on,
and ink charging when an ink cartridge is installed in this
product.
❏ Do not refill the ink cartridges. This product calculates the
amount of ink remaining using an IC chip built into an ink
cartridge. Even if the cartridge is refilled, the amount of ink
remaining is not recalculated by the IC chip and therefore the
amount of ink available for use does not change.
❏ After an ink cartridge is replaced, if the ink is low it may
become empty. When a message appears to indicate the ink
is low, prepare a new ink cartridge.
Replacing an Ink Cartridge
Follow the steps below to replace an ink cartridge.
Note:
Before replacing, read the instructions “Safety Instructions” on page 1
and “Precautions on Ink Cartridge Replacement” on page 25.
1. Make sure this product is on and the On light is not flashing.
26
Replacing Ink Cartridges
2. When the ink is empty:
Refer to the panel message to determine which ink is empty,
and then press the x Color Copy button.
When the ink is low:
Press one of the Menu buttons until Change Cartridge
appears on the LCD panel, and then press the x Color Copy
button.
The ink cartridges move to the replacement position.
3. Make sure that the document cover is closed and then raise
the scanner unit.
c
Caution:
❏ Do not raise the scanner unit with the document cover
opened.
❏ Do not move the print head by hand. Doing so may
damage this product.
❏ Do not start replacing the ink cartridge before the print
head stops.
Replacing Ink Cartridges
27
4. For best results, shake a new ink cartridge four or five times,
then remove it from its the package.
5. Pinch the sides of the ink cartridge that you want to replace.
Lift the cartridge out of this product and dispose of it
properly. Do not take the used cartridge apart or try to refill it.
28
w
Warning:
Be careful when you are handling used ink cartridges, as there
may be some ink around the ink supply port. If ink gets on
your skin, wash the area thoroughly with soap and water. If
ink gets into your eyes, flush them immediately with water.
If discomfort or vision problems remain after thorough
flushing, see a doctor immediately.
c
Caution:
Be sure to always install an ink cartridge into this product
immediately following the removal of an old ink cartridge. If
the ink cartridge is not installed promptly, the print head may
dry out rendering it unable to print.
Replacing Ink Cartridges
6. Place the ink cartridge vertically into the cartridge holder.
Push the ink cartridge down until it clicks into place.
If you need to replace other ink cartridges, repeat steps 4
through 6 before continuing with step 7.
7. Lower the scanner unit.
The print head moves and ink charging begins. The On light
flashes while ink charging is in progress. When the On light
stops flashing, ink charging is completed.
c
Caution:
Never turn off this product while the On light is flashing. Doing
so can result in incomplete charging of ink.
Note:
After the ink cartridge is replaced, if the ink was low it may become
empty. In this case, replace the ink cartridge again.
Replacing Ink Cartridges
29
Maintenance and Transporting
Checking the Print Head Nozzles
If you find that the copied image is unexpectedly faint or some
dots in the copied image are missing, you may be able to identify
the problem by checking the print head nozzles.
Follow the steps below to check the print head nozzles using the
Control Panel.
Note:
When the Error light is on and a message appears on the LCD panel to
prompt you to replace the ink cartridge or to indicate the ink is low, you
cannot clean the print head. In this case, replace the appropriate ink
cartridge first.
1. Make sure that A4 or Letter size paper is loded.
2. Make sure that this product is on and the Error light is off.
3. Press one of the Menu buttons repeatedly until Nozzle Check
appears on the LCD panel, and then press the x Color Copy
button.
Nozzle Check
Press the Color copy ...
30
Maintenance and Transporting
Below are sample printouts.
Good sample
Print head needs to be cleaned
The above sample is in black and white, but the actual test prints are color
(CMYK).
If the nozzle check page does not print satisfactorily, there is a
problem with this product. This could be a clogged ink nozzle or
a misaligned print head. See the next section for details on
cleaning the print head.
Maintenance and Transporting
31
Cleaning the Print Head
If you find that the copied image is unexpectedly faint or some
dots are missing, you may be able to solve these problems by
cleaning the print head, which ensures that the nozzles are
delivering ink properly.
Follow the steps below to clean the print head using the Control
Panel.
Note:
❏ Print head cleaning uses both color and black inks. To avoid wasting
ink, clean the print head only if the copy quality drops (for example,
blurred printout, incorrect or missing color.)
❏ Use the nozzle check first to confirm that the print head needs to be
cleaned. This saves ink.
❏ When the Error light is on and a message appears on the LCD panel
to prompt you to replace the ink cartridge or to indicate the ink is
low, you cannot clean the print head. In this case, replace the
appropriate ink cartridge first.
1. Make sure that this product is on and the Error light is off.
32
Maintenance and Transporting
2. Press one of the Menu buttons repeatedly until Head
Cleaning appears on the LCD panel, and then press the x
Color Copy button.
Head Cleaning
Press the Color copy ...
Print head cleaning starts and the On light begins flashing.
c
Caution:
Never turn off this product while the On light is flashing.
Doing so may damage this product.
3. When the On light stops flashing, print a nozzle check pattern
to confirm that the head is clean and to reset the cleaning cycle.
See “Checking the Print Head Nozzles” on page 30.
Note:
❏ If the copy quality has not improved after repeating this procedure
four or five times, turn this product off and leave it alone overnight.
Then, perform the nozzle check again and repeat the head cleaning
if necessary.
❏ If the copy quality still has not improved, one or both of your ink
cartridges may be old or damaged and may need to be replaced. To
replace an ink cartridge before it is empty, see “Replacing an Ink
Cartridge” on page 26. If the copy quality remains a problem after
replacing the ink cartridges, contact your dealer.
❏ To maintain good copy quality, we recommend copying a few pages
at least once every month.
Maintenance and Transporting
33
Aligning the Print Head
If you notice vertical lines are not aligned properly, you may be
able to solve this problem by aligning the print head.
Follow the steps below to align the print head using the Control
Panel.
Note:
Do not press the y Stop button to cancel printing while printing an
alignment pattern.
1. Make sure that A4 or Letter size paper is loded.
2. Make sure that this product is on and the Error light is off.
3. Press one of the Menu buttons repeatedly until Head
Alignment 1 appears on the LCD panel, and then press the
x Color Copy button.
Head Alignment 1
Press the Color copy ...
The alignment patterns are printed.
4. Look at the alignment patterns. Find the pair of vertical lines
that is aligned in pattern #1, then select the number of the pair
using the Copies/Value buttons.
5. Press the x Color Copy button to register your selection. The
next pattern number appears. As with pattern #1, find and
register the aligned pairs for the remaining alignment
patterns #2 through #5.
34
Maintenance and Transporting
6. After setting all the alignment patterns, Head Alignment 2
appears on the LCD panel. If you want to continue the print
head alignment, press the x Color Copy button to print the
alignment patterns; otherwise, press the y Stop button.
Head Alignment 2
Press the Color copy ...
Note:
Even if you press the y Stop button, the settings you made in the
Head Alignment 1 are still saved.
7. Look at the alignment patterns. Find the pair of horizontal
bars with no dark or light band between them, then select the
number of the pair using the Copies/Value buttons.
8. Press the x Color Copy button to register your selection.
Head Alignment 3 appears on the LCD panel.
Head Alignment 3
Press the Color copy ...
9. If you want to continue the print head alignment, press the x
Color Copy button to print the alignment patterns and repeat
steps 7 and 8. If you want to stop the print head alignment,
press the y Stop button.After all patterns are set, the print
head alignment is completed.
After all patterns are set, the print head alignment is completed.
Maintenance and Transporting
35
Transporting This Product
If you need to transport this product, carefully repack it using the
original box (or a similar box that this product fits snugly into)
and packing materials as follows:
c
Caution:
❏ When storing or transporting this product, do not tilt it, put
it vertically or turn it upside down; otherwise ink may leak
from the cartridge.
❏ Leave the ink cartridges in their right (home) positions when
transporting this product; removing the cartridges for
transportation may damage this product.
1. Remove all paper from the sheet feeder and make sure that
this product is off.
2. Raise the scanner unit and make sure that the print heads are
in the right (home) position. Secure the ink cartridge to this
product with a tape, and then close the scanner unit.
36
Maintenance and Transporting
3. Open the document cover and slide the carriage lock lever, as
shown in the illustration below, to lock the scanner carriage.
4. Unplug the power cord from the electrical outlet.
5. Remove the paper support and the feeder guard. Then push
in the output extension tray.
6. Attach the protective materials to both sides of this product.
7. Repack this product and the power cord in the original box.
8. Keep this product level during transportation to prevent
shocks.
9. Be sure to remove the protective materials and tape from this
product before using it again.
Maintenance and Transporting
37
Troubleshooting
The solutions are for problems that happen when using this
product stand alone. Refer to the online Reference Guide on
detailed solutions for printing, scanning, print quality, or
computer-related problems.
Error Messages
You can identify many common problems using the Error light
and error messages on your Control Panel. If this product stops
working and the Error light is on, use the following table of error
messages to diagnose the problem, and then try the
recommended solution.
38
Error Messages
Problem
Solution
Quality&Paper
setting is not
acceptable for B&W
copy. Press the
Stop button.
B&W copy button
is pressed with the
Photo quality
setting.
Press the Stop button and
then change Quality&Paper
settings.
No XXX ink
cartridge --->
Press the Color
copy button to
install new ink
cartridge.
The ink cartridge
indicated in the
message is not
installed.
Press the x Color Copy button
and then open the scanner
unit by following the
messages to install the ink
cartridge. See the Setup
Sheet for instructions.
XXX ink out --->
Press the Color
copy button to
begin replacing
the ink cartridge.
The ink cartridge
indicated in the
message is empty.
Press the x Color Copy button
and then open the scanner
unit by following the
messages to replace the
empty cartridge. See
“Replacing an Ink Cartridge”
on page 26.
Troubleshooting
Error Messages
Problem
Solution
Ink cartridge
error ---> Press
the Color copy
button to begin
replacing the ink
cartridge.
Error occurs at the
ink cartridge.
Press the x Color Copy button
and open the scanner unit by
following the messages to
replace the empty cartridge.
See “Replacing an Ink
Cartridge” on page 26.
Paper out or miss
feed ---> Load
paper in Paper
tray and press the
Color copy button.
No paper is
loaded in the
sheet feeder.
Load paper in the sheet
feeder, and then press the x
Color Copy button.
Scanner unit open
---> Close the
scanner unit.
Scanner unit is
open.
Close the scanner unit
securely.
Paper jam --->
Press the Color
copy button and
clear the paper
jam by hand if
necessary.
Paper jams occur.
Press the x Color Copy
button. If the paper jam is not
cleared, remove the jammed
paper by hands. See
“Clearing the Jammed
Paper” on page 40.
Scanner error --->
See your
documentation and
call service if
necessary.
Scanner fails.
The transportation
lock is locked.
The fluorescent
lamp needs to be
replaced.
This product does
not work.
Turn off this product and then
make sure the transportation
lock is released. If the error
message still appears,
contact your dealer.
Printer error --->
See your
documentation and
call service if
necessary.
Printer fails.
Turn this product off, and then
back on. If the error message
still appears, contact your
dealer.
Troubleshooting
39
The Copied Image is Improperly Sized
When Auto Fit Page is selected as the Reduce/Enlarge setting
on the LCD panel and the border of the original document is white
or very light, the size of the original may not be recognized
correctly. This may cause the copied image to be improperly
sized. To correct this, select Actual: 100% as the Reduce/Enlarge
setting and then use the Zoom In/Out setting to adjust the size of
the copied image.
Clearing the Jammed Paper
If paper is jammed inside this product, an error message appears
on the LCD panel. You may be able to clear the jammed paper
using the Control Panel.
When a message appears on the LCD panel to indicate the paper
is jammed, press the x Color Copy button. The jammed paper is
ejected.
If the jammed paper is not ejected:
1. Locate where the paper is jammed.
If the paper is jammed at the paper feeding position or the
ejecting position, remove all of the paper by hand.
If the paper is jammed inside this product, press the P On
button to turn off this product. Open the scanner unit, and
then remove all of the paper inside by hand, including any
torn pieces.
40
Troubleshooting
2. After clearing the jammed paper, close the scanner unit and
then press the P On button and the x Color Copy button.
3. Load a stack of paper in the sheet feeder.
4. Press one of the Menu buttons repeatedly until Load/Eject
appears on the LCD panel, and then press the x Color Copy
button.
Troubleshooting
41
Contacting Customer Support
Regional Customer Services
If your EPSON product is not operating properly and you cannot
solve the problem using the troubleshooting information in your
product documentation, contact customer support services for
assistance. If customer support for your area is not listed below,
contact the dealer where you purchased your product.
Customer support will be able to help you much more quickly if
you give them the following information:
❏ Product serial number
(The serial number label is usually on the back of the product.)
❏ Product model
❏ Product software version
(Click About, Version Info, or similar button in the product
software.)
❏ Brand and model of your computer
❏ Your computer operating system name and version
❏ Names and versions of the software applications you
normally use with your product
Note:
For more information on Contacting Customer Support, see the Online
Reference Guide included in the software CD-ROM.
42
Contacting Customer Support
For users in the United Kingdom and the Republic of Ireland
URL
http://www.epson.co.uk
Telephone (UK)
08701 637 766
(The Republic of Ireland)
01 679 9016
For users in the Middle East
URL
http://www.epson.com
E-mail
[email protected]
Telephone
+971 4 352 4488
Fax
+971 4 351 6617
For users in Scandinavia
URL
http://www.epson.com
Telephone
Denmark 80 88 11 27
Finland 0800 523 010
Norway 800 11 828
Sweden 08 445 12 58
For users in South Africa
URL
www.epson.co.za
Telephone
(011) 444-5223 or 0800 600 578
Contacting Customer Support
43
For user in France
Support Technique EPSON France,
0 892 899 999 (0,34 E/minute)
Ouvert du lundi au samedi de 9h00 à 20h00 sans interruption
http://www.epson.fr/support/selfhelp/french.htm pour
accéder à l'AIDE EN LIGNE.
http://www.epson.fr/support/services/index.shtml pour
accéder aux SERVICES du support technique.
For user in Germany
EPSON Service Center c/o Exel Hünxe GmbH
Werner-Heisenberg-Strase 2
46569 Hünxe
For user in Italy
EPSON Italia S.p.a.
Via M. Viganò de Vizzi, 93/95
20092 Cinisello Balsamo (MI)
Tel. 02.660.321
Fax. 02.612.36.22
Assistenza e Servizio Clienti
TECHNICAL HELPDESK
02.268.300.58
http://www.epson.it
44
Contacting Customer Support
For users in Spain
URL
http://www.epson.es
E-mail
[email protected]
Telephone
902 40 41 42
Fax
93 582 15 16
For users in Portugal
URL
http://www.epson.pt
E-mail
[email protected]
Telephone
707 222 000
Fax
21 303 54 90
Contacting Customer Support
45
Product Specifications
Product Specifications
Electrical
120V Model
Input voltage range
108 to 132V
Rated frequency range
50 to 60 Hz
Power consumption
Approx. 23 W (ISO10560 Letter pattern)
Approx. 6.0 W in sleep mode
Approx. 0.6 W in power-off mode
220-240V Model
Input voltage range
198 to 264V
Rated frequency range
50 to 60 Hz
Power consumption
Approx. 23 W (ISO10560 Letter pattern)
Approx. 6.0 W in sleep mode
Approx. 0.9 W in power-off mode
Note:
Check the label on the back of this product for the voltage information.
Environmental
Temperature
46
Product Specifications
Operation: 10 to 35°C (50 to 95°F)
Mechanical
Paper path
Top feed, with one ASF
Sheet feeder capacity
About 150 sheets at 90g/m² (24 lb) paper
Dimensions*
Width: 453 mm (17.8 inches)
Depth: 434 mm (17.1 inches)
Height: 254 mm (10.0 inches)
Weight
9.0 kg (19.8 lb) without ink cartridges
* Except for rubber feet and the projection of output tray.
Printing
Printing method
On-demand ink jet
Nozzle configuration
Monochrome (black) 180 nozzles
Color (cyan, magenta, yellow) 177 nozzles
(59 nozzles per color × 3)
Scanning
Scanner type
Flatbed color image scanner
Document size
8.5 × 11.7“(216 × 297 mm) A4 or US letter size
(The reading area can be specified from your
software.)
Scanning resolution
1200 dpi (main scan)
2400dpi with Micro step (sub scan)
Product Specifications
47
Paper
Note:
Since the quality of any particular brand or type of paper may be changed
by the manufacturer at any time, EPSON cannot guarantee the quality
of any non-EPSON brand or type of paper. Always test a sample of paper
stock before purchasing large quantities or printing large jobs.
Paper specifications
Single sheets:
Size
A4 (210 × 297 mm)
A5 (148 × 210 mm)
Paper type
Plain bond paper, special paper distributed by
EPSON
Thickness (for plain
bond paper)
0.08 to 0.11 mm (0.003 to 0.004 inch)
Weight (for plain bond
paper)
64 g/m² (17 lb) to 90 g/m² (24 lb)
Photo Paper:
Size
A4 (210 × 297 mm)
4 × 6”/No Perforation (101.6 × 152.4 mm)
10 × 15”
Paper type
Special paper distributed by EPSON
Photo Quality Ink Jet Paper
48
Size
A4 (210 × 297 mm)
Paper type
Special paper distributed by EPSON
Product Specifications
Premium Semigloss Photo Paper:
Size
A4 (210 × 297 mm)
Paper type
Special paper distributed by EPSON
Matte Paper-Heavyweight:
Size
A4 (210 × 297 mm)
Paper type
Special paper distributed by EPSON
Note:
❏ Poor quality paper may reduce print quality and cause paper jams
or other problems. If you encounter quality problems, switch to a
higher grade paper.
❏ Do not load curled or folded paper.
❏ Use paper under normal conditions:
Temperature 15 to 25°C (59 to 77°F)
Humidity 40 to 60% RH
Product Specifications
49
Printable area
Refer to the appropriate section below for printable area of single
sheets using copy mode.
The diagonal lines indicates the printable area.
Standard
copy
Small margin
copy
Border free
copy
A: top margin
3.0 mm (0.12")
1.5 mm (0.06")
0 mm
B-L: left margin
3.0 mm (0.12")
1.5 mm (0.06")
0 mm
B-R: right margin
3.0 mm (0.12")
1.5 mm (0.06")
0 mm
C: bottom margin
3.0 mm (0.12")
1.5 mm (0.06")
0 mm
Note:
Depending on the type of media being used, the print quality may
deteriorate in the top and areas of the printout, or these areas may be
smeared.
50
Product Specifications
Appendix
x
nd
pe
Ap
Menu Items
Setting menu
(Using Menu Buttons)
Normal display
x
nd
pe
Ap
Setting items
(Using Copies/Value button)
Number of copies: 1 to 99
x
nd
pe
Ap
↑↓
Copy Mode
Standard/Reduced Margin/Repeat/2-up
↑↓
Quality&Paper
Plain Paper-Econ/Plain Paper-Norm/Plain Paper-Fine/PQIJ
Paper-Fine/PQIJ Paper-Photo/Matte Paper HW/Photo
Paper/PSGP Paper/DB Photo Paper
x
nd
pe
Ap
A4/A5/B5/Letter/Legal/Executive/Half-Letter/Photo Paper
x
nd
pe
Ap
↑↓
Paper size
↑↓
Lighter/Darker
- NnnonnO +
↑↓
Reduce/Enlarge
The availability of Reduce/Enlarge setting depends on the
copy mode and paper size.
↑↓
Zoom In/Out
x
nd
pe
Ap
25 to 400 % in 1 % increments
↑↓
Language
English/Spanish/Portuguese/French, German/Italian/Dutch
↑↓
Head Alignment
Press the Color copy button to print head alignment.
↑↓
Nozzle Check
Press the Color copy button to print nozzle check pattern.
↑↓
Head Cleaning
Press the Color copy button to start head cleaning.
↑↓
Change Cartridge
Press the Color copy button to replace the ink cartridge.
↑↓
Ink Levels
x
nd
pe
Ap
x
nd
pe
Ap
x
nd
pe
Ap
x
nd
pe
Ap
Display the amount of the ink level.
↑↓
Load/Eject
x
nd
pe
Ap
Press the Color copy button to load or eject the paper.
x
nd
pe
Ap
Note:
Depending on Copy mode, some setting is not available.
Menu Items
51