1
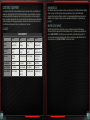
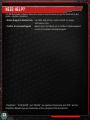
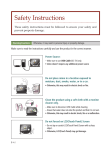
WARNING: PHOTOSENSITIVITY/EPILEPSY/SEIZURES A very small percentage of individuals may experience epileptic seizures or blackouts when exposed to certain light patterns or flashing lights. Exposure to certain patterns or backgrounds on a television screen or when playing video games may trigger epileptic seizures or blackouts in these individuals. These conditions may trigger previously undetected epileptic symptoms or seizures in persons who have no history of prior seizures or epilepsy. If you, or anyone in your family, has an epileptic condition or has had seizures of any kind, consult your physician before playing. IMMEDIATELY DISCONTINUE use and consult your physician before resuming gameplay if you or your child experience any of the following health problems or symptoms: `` dizziness eye or muscle twitches disorientation any involuntary movement `` altered vision loss of awareness seizures or convulsion. RESUME GAMEPLAY ONLY ON APPROVAL OF YOUR PHYSICIAN. Use and handling of video games to reduce the likelihood of a seizure `` Use in a well-lit area and keep as far away as possible from the television screen. `` Avoid large screen televisions. Use the smallest television screen available. `` Avoid prolonged use of the PlayStation®3 system. Take a 15-minute break during each hour of play. `` Avoid playing when you are tired or need sleep. Stop using the system immediately if you experience any of the following symptoms: lightheadedness, nausea, or a sensation similar to motion sickness; discomfort or pain in the eyes, ears, hands, arms, or any other part of the body. If the condition persists, consult a doctor. 3D GAME NOTICE: Some people may experience discomfort (such as eye strain, eye fatigue, or nausea) while watching 3D video images or playing stereoscopic 3D games on 3D televisions. If you experience such discomfort you should immediately discontinue use of your television until the discomfort subsides. SCE recommends that all viewers take regular breaks while watching 3D video, or playing stereoscopic 3D games. The length and frequency of necessary breaks may vary from person to person — please take breaks that are long enough to allow any feelings of discomfort to subside. If symptoms persist, consult your doctor. The vision of young children (especially those under six years old) is still under development. SCE recommends that you consult with a doctor (such as a pediatrician or eye doctor) before allowing a young child to watch 3D video images or play stereoscopic 3D games. Adults should supervise young children to ensure they follow the recommendations listed above. When using any 3D enabled device with your PlayStation®3 you should read the instruction manual for that device and check www.us.playstation.com/support/3D for updated information. NOTICE: Use caution when using the DUALSHOCK®3 wireless controller motion sensor function. When using the DUALSHOCK®3 wireless controller motion sensor function, be cautious of the following points. If the controller hits a person or object, this may cause accidental injury or damage. Before using, check that there is plenty of space around you. When using the controller, grip it firmly to make sure it cannot slip out of your hand. If using a controller that is connected to the PS3™ system with a USB cable, make sure there is enough space for the cable so that the cable will not hit a person or object. Also, take care to avoid pulling the cable out of the PS3™ system while using the controller. WARNING TO OWNERS OF PROJECTION TELEVISIONS: Do not connect your PS3™ system to a projection TV without first consulting the user manual for your projection TV, unless it is of the LCD type. Otherwise, it may permanently damage your TV screen. HANDLING YOUR PS3™ FORMAT DISC: `` `` `` `` 1 Do not bend it, crush it or submerge it in liquids. Do not leave it in direct sunlight or near a radiator or other source of heat. Be sure to take an occasional rest break during extended play. Keep this disc clean. Always hold the disc by the edges and keep it in its protective case when not in use. Clean the disc with a lint-free, soft, dry cloth, wiping in straight lines from center to outer edge. Never use solvents or abrasive cleaners. Contents Getting Started.. . ......................................................................................................... 2 Prophet Returns.......................................................................................................... 3 Campaign Controls.. . ................................................................................................... 3 Main Menu....................................................................................................................... 5 Playing the Game.......................................................................................................... 7 Multiplayer... ................................................................................................................. 15 Need Help?...................................................................................................................... 23 This product has been rated by the Entertainment Software Rating Board. For information about the ESRB rating please visit www.esrb.org. notices PS3™ system software v3.30 (or later), 3D display with compatible 3D active glasses and high-speed HDMI cable (all sold separately) required for 3D features. Visit www.us.playstation.com/support/3D for details. Video output in HD requires cables and an HD-compatible display, both sold separately. Voice chat requires a headset, sold separately. Compatible with most Bluetooth and USB wired headsets. Some limitations apply. Getting Started P LAY S TATION ®3 system Starting a game: Before use, carefully read the instructions supplied with the PS3™ computer entertainment system. The documentation contains information on setting up and using your system as well as important safety information. Check that the MAIN POWER switch (located on the system rear) is turned on. Insert the Crysis ® 3 disc with the label facing up into the disc slot. Select the icon for the software title under [Game] in the PS3™ system’s home menu, and then press the S button. Refer to this manual for information on using the software. Quitting a game: During gameplay, press and hold down the PS button on the wireless controller for at least 2 seconds. Then select “Quit Game” from the screen that is displayed. To remove a disc, touch the eject button after quitting the game. Trophies: Earn, compare and share trophies that you earn by making specific in-game accomplishments. Trophies access requires a PlayStation®Network account. Saved data for PS3™ format software Saved data for PS3™ format software is saved on the system’s hard disk. The data is displayed under “Saved Game Utility” in the Game menu. 2 Player Controls (Cont.) Prophet Returns Twenty years have passed since New York City was saved from the hostile alien race known as the Ceph. With the alien infestation under control, the chaos seemed all but over. The Crynet Enforcement and Local Logistics organization, or CELL, utilized the Ceph’s technology and promised free and unlimited energy to the world. All that goodwill vanished as CELL took advantage of their technological and political might to strong-arm society. A resistance has begun to fight against CELL, but their forces are simply not strong enough. The resistance hopes to turn the tide by freeing the one man who can stop CELL: Prophet. Campaign Controls Player Controls Move/Strafe Look/Rotate Sprint Melee Stealth kill (in stealth only) Aim/Weapon sights Fire weapon Toggle armor Toggle cloak Change weapon Grenades Jump Power jump 3 left stick right stick B button N button N button Q button E button W button R button D button D button (double-tap) S button S button (hold) Reload Interact Toggle crouch Slide Toggle visor Toggle Nanovision Equip Predator Bow Explosives Toggle fire modes Weapon customization Nanosuit customization Pause menu F button F button (hold) A button A button (when sprinting) directional button C directional button C (hold) directional button V directional button X directional button Z SELECT button (hold) SELECT button START button Vehicle Controls Steer Look Switch seats (ICV only) Accelerate Fire primary weapon Reverse Fire secondary weapon Exit/Enter Handbrake Pause menu left stick right stick D button R button Q button W button E button F button S button START button 4 Main Menu in-game Manual Resume Game Extras Select RESUME GAME to continue the single-player campaign from your last saved checkpoint. Campaign Access the Campaign menu from the main menu in order to start a new single-player game or revisit completed missions. The mission to liberate New York from CELL starts here. Campaign Menu New Campaign Begin a new campaign. Choose to play the game on Recruit, Soldier, Veteran, or Super Soldier difficulty. Replay Mission Start a previously completed mission from its beginning. Previously in Crysis ® Recaps the events in Crysis and Crysis ® 2. Saving & Loading While playing Crysis ® 3, your progress is automatically saved via a number of mid-mission checkpoints. If Prophet dies, the Nanosuit reboots and Prophet respawns at the last activated checkpoint. Multiplayer Select MULTIPLAYER to jump online and test your skills against players around the world. To access the Multiplayer features of Crysis 3, you must be logged into a profile with access to Sony Entertainment Network and an Origin Account (EA). 5 Visit the main menu to access the in-game manual. Access the Extras menu to view the credits for Crysis 3 or access things you have unlocked while playing the game. Nanosuit Showroom Visit the Nanosuit Showroom to examine the Nano Modules unlocked for the Nanosuit. Service Record View your current status and overall progress. The Operative Status menu displays your kills, assists, deaths, accuracy percentage, kill/death ratio, headshots, stealth kills, and suicides. You may also view weapon and Nanosuit-related statistics. Story Information Review detailed information on units, weapons, and collected Intel. Settings Select SETTINGS from the main menu to change settings within the game and view the controls. Game Change the crosshair settings, toggle subtitles, and adjust the HUD bob during player movement. Sound Adjust various volume settings. Visuals Change visual settings. Brightness Adjust the picture brightness. Safe Area Adjust the screen size. 3D Options Make changes to 3D visuals (requires 3D-compatible television). Controls Change the player or vehicle controls, controller sensitivity, vibration, aim assistance, and inversion settings. 6 Playing the Game Equipment Briefing Mission Information Prophet’s Nanosuit is the ultimate battle armor, granting him a range of enhanced abilities. The suit features an integral heads-up display (HUD) that utilizes a satellite uplink to place essential tactical information directly in view. Objectives As you progress through a mission, your briefing and objectives are updated and displayed on Prophet’s HUD. Objectives are briefly shown at the top of the screen before being assigned as waypoints to follow. To access the objectives list, open the Pause menu and switch to the list. There are two types of objectives: primary objectives that are required to complete the mission and secondary objectives that are optional. Strategic Map To view a detailed map of the battlefield, press open the Pause menu. The map displays a yellow arrowhead indicating your position and a blue hexagon that represents your objective waypoint. Press the Q button to zoom out when viewing the map. Heads-Up Display HUD Ammo in clip/ Ammo remaining Weapon crosshair Threat gauge Toggle visor/ Fire mode/ Explosive type/ Toggle bow Navigation Panel Secondary weapon Objective Marker Stealth/ Armor mode indicator 7 Nanosuit energy gauge 8 Navigation Panel Threat Gauge The Navigation Panel monitors and analyzes the environment, giving you real-time tactical feedback on your surroundings. The yellow arrowhead marks your position and heading, while blue dots indicate primary objective points to follow. Green arrowheads indicate an enemy unit. Pay attention to the Navigation Panel to view your surroundings and assess your threat level, and use the tactical information to complete objectives. As Prophet proceeds through a mission, secondary objectives may be relayed to his Nanosuit. After receiving a secondary objective, a yellow dot appears on the Navigation Panel and indicates where the objective is located. Unlike primary objectives, secondary objectives are optional and are not integral to the mission. Take these challenging detours to reward Prophet with more intel, weapons, and more. The Threat Gauge meter to the right of the Navigation Panel displays your current threat level. The meter increases and changes color depending on your level of detection. Green Enemy units are unaware of your presence. Orange Enemies are on a high state of alert and will investigate the slightest disturbance. Enemy units have line of sight on you. Take cover and use your Nanosuit Red abilities to lower the alert status. Basic map of the immediate terrain Current heading Hit Detection Instant analysis of incoming projectiles allows the Nanosuit to pinpoint the location of any enemy that scores a hit, allowing you to retaliate accurately. Stay alert for a red arc and arrow in the HUD, indicating the direction of attacking fire. Tactical Visor The Nanosuit’s Tactical Visor is essential for scouting out areas for enemy units before engaging them. Press the the directional button C to use the visor, and toggle zoom depth with the Q button. Once anything is scanned, the Nanosuit feeds any important information on the object from its satellite uplink. Tagging Enemy locations—enemy icons will change from green to orange to red as they become more aware of your location. 9 Threat Level—the meter changes from green to orange to red as your detection level increases. Use the Tactical Visor to tag enemy units and ammo caches so they appear on the HUD and Navigation Panel. To tag a unit, center it on screen with the Visor active and the Nanosuit will automatically tag it. Once a unit has been tagged, the Threat Icon Designator, which appears as a hollow triangle over the unit, fills with a color. Green indicates the unit has not spotted you. Orange units are aware of your presence and are on alert, but are unaware of your location. Red units can see you and are poised to attack. When you lower the Visor, the Threat Icon Designator remains so you can track the unit. Tagged units will remain visible on the HUD within a range of 100 meters, or until they are dispatched. 10 Hacking The Nanosuit’s complex algorithms can decrypt even the most secure systems. To hack an encrypted system, target the device and press the F button to attempt to crack the code’s wavelength. As the icon moves along the wavelength, press the F button to match it until all the sequences are complete. Hacking can be augmented with Nanosuit upgrades. Hacking is not limited to security panels, but also provides a way to disable mines and temporarily gain control over enemy auto-turrets. The Tactical Visor also provides the ability to hack encrypted systems from a distance, provided that line of sight is maintained with the target. Nanosuit Functions The Nanosuit can be quickly augmented to adapt to any combat situation, but all functions require energy. During combat, the suit’s energy can be temporarily channeled to boost a number of the Nanosuit’s abilities. Each function slowly drains the suit’s energy over time, but the Nanosuit will automatically recharge energy when suit functions are inactive. Learn to use these augmentations during battle conditions to survive. Cloak Module description Nanosuit Upgrade Kits Module Packages Suit Statistics The Nanosuit’s energy can be used to power its cloaking function, an advanced augmentation that camouflages Prophet when active. Press the R button to use the cloak to sneak up on enemies and perform Stealth Kills, or simply use the advantage to escape detection. Energy consumption depends on your movement speed. Energy depletes at a slower rate when you are standing still. As Prophet moves through New York, he may come across CELL stockpiles that hold Nano Modules. Once Prophet collects these modules, he can apply them to enhance the Nanosuit’s functions or unlock new abilities. Access the Nanosuit Modules menu by pressing the SELECT button to view the Nanosuit’s available upgrades. You may browse through all the modules and then unlock your chosen upgrade. These upgrades do not need any additional power and are always active after being installed. Armor Module Upgrades Press the W button to channel the Nanosuit’s energy to its armor and increase its defensive capabilities. With Armor mode active, the Nanosuit can absorb damage during hectic firefights, cushion the shock of a potentially fatal fall, or protect you from being knocked down by strong melee attacks. When stealth tactics have failed and Prophet’s at the center of a firefight utilize Armor mode to fight the enemy head on. Nanovision Hold the directional button C to enter Nanovision. When active, Nanovision’s enhanced visual filter colors all units’ energy signatures to help you locate hidden targets, even in the dark. Using Nanovision consumes suit energy. 11 Upgrading the Nanosuit You may read a description of each module, detailing its upgrades or abilities, on the screen. Every module can be auto-upgraded to the maximum level by completing relevant tasks. For instance, completing a task to remain cloaked near enemies for 100 seconds earns you the maximum level for the Super Stealth module, which awards you with improved cloak. Whenever you auto-upgrade a module to the maximum level, a pop-up reminder appears on the HUD. Each Nanosuit Module Upgrade requires one to three kits to unlock. Cheap modules have minor benefits, while expensive modules provide bigger boosts. Highlight Nanosuit Upgrade Kits in range on the Visor. 12 Suit Statistics Weapon Attachments Equipping a Nano Module can also increase the Nanosuit’s five main capabilities: Power, Stealth, Armor, Speed, and System. Check out the Suit Statistics on the bottom left side of the screen to view the Nanosuit’s overall capabilities. Play around with each module to improve the Nanosuit’s statistics. To improve Prophet’s efficiency on the battlefield, he can customize his weapons with available attachments that he has collected. To access the Weapon Attachments menu, hold the SELECT button. Press the corresponding on-screen buttons to cycle through available attachments. Equip weapons with scopes to land a distant kill shot, attach silencers for muffled takedowns, or discover new attachments to unlock even more destructive potential. NOTE: With the bow equipped, use the Weapons Attachments menu to swap out arrow types and adjust the weapon’s draw strength. Module Packages The Nanosuit can only have up to four modules equipped at a time. To help you change out module combinations with ease, you can assign three module packages to a button. Choose a module combination you wish to save and then hold the F button, the D button, or the A button to save it for a quick change, or simply press it to load the package as your current selection. Weapons and Equipment As Prophet progresses through each mission, he procures a number of different weapons. From simple rifles to advanced Ceph technology, discover each weapon’s strengths and weaknesses to get through New York in one piece. Predator Bow When utilized alongside Cloak, the Predator Bow is a versatile weapon that allows Prophet to silently kill enemy units without alerting reinforcements. Arrows make little noise when fired and can be retrieved from the unit that was fired upon. The Predator Bow is also one of the few weapons that can be fired while remaining cloaked and is best utilized when employing stealth tactics. Grenades Double-tap the D button to equip grenades. Grenades can be aimed accurately using the Nanosuit’s telemetry system. Hold the Q button to display the grenade’s trajectory on the HUD and then press the E button to throw it. Special Ammo Some of the advanced weapons require special ammo, which you’ll find at special ammo caches. In addition, certain weapons can fire multiple types of ammo. Use the weapon customization screen to switch ammo types. Alternate Firing Modes Certain weapons have alternate firing options. Press the directional button Z to switch between firing modes. Selecting alternate firing modes can change the weapon’s firing style, speed, recoil, and damage. Adding attachments can add firing modes. Vehicles While fighting through New York, Prophet can commandeer various CELL vehicles to drive. Vehicles not only provide transportation, but also can deliver some heavy firepower from mounted guns or provide cover in dire situations. To use a vehicle hold the F button. Upon entering a vehicle, the Nanosuit HUD is synchronized for seamless control with the vehicle’s built-in heads-up display, and allows Prophet to take full control of the vehicle’s navigation and weapon systems. 13 14 New York Feed Multiplayer The New York Feed is where you and your Friends can view all of your latest progress, accomplishments and feats. The Feed is where all of your completed challenges are displayed for everyone to see. Also check out the Crynet broadcasts to get information on community events. Score, Time, Progress, Objective Map Ammo in clip/ Ammo remaining, Energy Meter, ARMR, STLTH Up to 12 fighters can take to the field and battle it out over a variety of game modes. Your character grows with experience, allowing you greater control over their weapons, attachments, and Nano Modules. Take up arms with the Marines or CELL and battle for supremacy. NOTE: The multiplayer HUD has a few differences that distinguish it from the single-player experience. In a multiplayer match, there are separate energy meters for the Armor and Cloak Nanosuit functions and Nanovision. Sprinting does not drain your energy bar. 15 Challenges Complete challenges to move up the multiplayer ranks faster. During a match, players can complete performance goals, feats of daring, or use a particular weapon or module to gain XP rewards. As you complete challenges, new challenges are generated that feature higher XP rewards and bragging rights for you and your Friends. Each challenge has an easy, medium, and hard difficulty, and the XP rewarded is high or low depending on which one is completed. There are four types of challenges to pursue: Social Individual goals or goals set by Friends based on each player’s personal achievements, progress, and combat abilities. Crynet Game generated challenges over a broad range of gameplay areas. Squad During a match each member of a squad has set goals (selected by your squad leader). All these goals are required to complete the challenge and gain the rewards. Players in the lobby can select the conditions of a gameplay challenge before Lobby a match begins. The conditions are available according to the game mode being played. 16 Multiplayer Controls Below are the controls necessary to compete in a multiplayer match. Move/Strafe Look/Rotate Sprint Melee Stealth kill (in stealth only) Aim/Weapon sights Fire weapon Toggle armor Toggle cloak Change weapon Grenades Jump Power jump Air stomp Reload Interact Toggle crouch/slide (while sprinting) Toggle visor Toggle Nanovision Cycle explosives Support Bonus Toggle fire modes Scoreboard Weapon customization Pause menu 17 left stick right stick B button N button N button Q button E button W button R button D button D button (double-tap) S button S button (hold) A button (midair) F button F button (hold) A button directional button C directional button C (hold) directional button X directional button V directional button Z SELECT button (hold) SELECT button START button Main Multiplayer Menu Quick Match Choose a game type and then jump into a game with automatically chosen teammates and opponents. Private Match Create a private match. You may select the game type, invite Friends, and adjust certain match settings. Player Profile Check out your multiplayer stats, rank, current form, skill assessment progress, and the leaderboard. Select a Dog Tag or set your Clan Tag for your profile, as well. Customize Equipment Adjust your loadout settings for multiplayer matches. Settings Adjust the volume of in-game audio, change controller settings, and alter other options. Download Content Check for new downloadable content. Singleplayer Return to the campaign. NOTE: When on applicable menus, press the SELECT button to access your Friends list. View your Friends list, read any messages, and look at a list of the players you have encountered online. Pause Menu Resume Game Change Equipment Settings Friends List Leave Session Return to the multiplayer match. Access the Equipment menu to change your class or equipment loadout. Adjust the volume of in-game audio, change controller settings, and alter other options. View your Friends who are currently playing online. Leave the match. 18 Game Types Game types decide the objectives and rules for every multiplayer match. Game types may be automatically updated from the Crysis 3 servers. This is the basic team-based deathmatch mode. You must kill enemies to Team Deathmatch score points, and the first team to reach the score limit or finish with the highest score when the timer ends wins. This is a free-for-all deathmatch mode. There are no teams, only Deathmatch enemies, so kill everyone to score the most points within the time limit. Hunter Play as the hunter or the prey across five rounds in this mode. Hunters are Marines with unlimited stealth, armed only with bows. CELL operatives have superior numbers and firepower, but return as Hunters when killed. Rounds end when all CELL operatives are dead or the timer runs out. Crash Site Capture energy from downed alien pods while preventing the enemy team from doing the same thing. Spears Capture three Alien Spears while preventing the enemy from doing the same. A captured spear emits a shield to provide some cover. The first team to earn 100 points wins. Capture the Relay Capture the enemy’s relay and return it to your base to score. The team with the highest number of captures wins. The match is split into two rounds, and teams swap sides at half time. Extraction Extract Power Cells from defended locations to score points. Each match consists of an even number of rounds, and teams take turns attacking and defending. Nanosuit operatives must download data from terminals defended by Assault black ops soldiers. Pick a side and get the job done. 19 Stats and Progression After completing a match, you gain XP. The XP you gain is a combination of your Match Score, Match Bonus, and XP earned during that match by fighting other players and completing various objectives. The XP awarded in a match is based on the game mode, so when playing in special game types, focus on completing game objectives as well as killing the other team for best results. XP serves both to track your progress and to unlock more skill assessments. Your total XP is measured by Rank. You start at Rank 1 and move up the ranks as you earn XP. As you earn higher ranks, you obtain more upgrades. Skill Assessments Skill Assessments are ongoing objectives and milestones achieved during a multiplayer match. Completing these assessments can earn players additional attachments, Nano Modules, and bonus XP. There is a Skill Assessment for just about every action on the battlefield, so use your weapons, play in many different types of matches, and use all of your Nanosuit functions to meet and exceed these milestones. The assessments become more complex as you progress, and each assessment has its own unique requirements. Dog Tags Customize your player profile with Dog Tags. Accomplish various feats, skills, and progress through the game to earn new Dog Tags. Some tags are very hard to obtain and show off your skill as a player, while others are just plain cool to collect. Check out the sub-menu dedicated to Dog Tags to see what you have collected and find out how to unlock more. Try to collect Dog Tags from your fallen enemies to unlock Support Bonuses. Clan Tag Want a name to strike fear into your opponents? Select Clan Tag from the Player Profile menu and enter a name for your Clan. 20 Customize Equipment Nano Modules Your character starts with four base multiplayer classes. Each class has its own strengths and weaknesses. Going into battle on the front lines with a sniper rifle or attempting to hold down a rear guard position with a handgun are sure to lead to your doom. Once you have moved up to Rank 5, you unlock five new class slots. You can customize these with new weapon attachments and Nano Modules. Pick the appropriate weapons, attachments, and module sets before going into battle by selecting a preset class or customizing one of your own. Nano Modules allow you to increase or enhance specific aspects of your Nanosuit while competing online. You may select three modules from among the Armor, Power, and Stealth module categories. Once you have obtained a module, it can be upgraded multiple times to increase its attributes. Select modules to match your class and weapon attachments to complement your play style. Classes Much like the attachments in single player, you can customize your weapons with weapon attachments that have been unlocked in the multiplayer mode. To change weapon attachments, select CHANGE EQUIPMENT from the Pause menu and switch out attachments manually. You can also change your weapon attachments through the in-game Weapon Attachments menu. To change classes, select CHANGE EQUIPMENT from the Pause menu. Class Loadouts Assault Scout Sniper Gunner Primary Weapon SCARAB MOD 2 (Assault Rifle) Marshall (Shotgun) DSG-1 (Sniper Rifle) O.G.R. (Medium Machine Gun) Secondary Weapon Hammer II (Pistol) M 12 Nova (Pistol) AY69 (Machine Pistol) Majestic-Six (Heavy Revolver) Explosives M17 Frag Grenade M34 Flash Bang R.E.X. Charge JAW (Rocket Launcher) Armor Module Auto Armor Auto Armor Auto Armor Auto Armor Support Module Aim Enhance Maneuverability Surveillance Weapon Pro Point Fire Enhance Proximity Alarm Heavy Weapon Pro Weapon Module Armor Transfer 21 Weapon Attachments 22 Need Help? The EA Worldwide Customer Experience team is here to ensure you get the most out of your game—anytime, anywhere. • Online Support & Contact InfoFor FAQs, help articles, and to contact us, please visit help.ea.com. • Twitter & Facebook SupportNeed a quick tip? Reach out on Twitter to @askeasupport or post on facebook.com/askeasupport. “PlayStation”, “DUALSHOCK” and “SIXAXIS” are registered trademarks and “PS3” and the PlayStation Network logo are trademarks of Sony Computer Entertainment Inc. 23