1
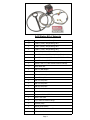
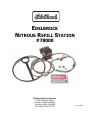
EDELBROCK
NITROUS REFILL STATION
#78000
Edelbrock Nitrous Systems
2700 California Street
Torrance, California 90503
Tech Line (800) 416-8628
Tech Fax (310) 972-2730
Rev. 12/00
Thank You….
…for purchasing an Edelbrock Nitrous Oxide Refill Station.
Nitrous Oxide injection is one of the most exciting performance enhancements, for the dollar invested, on the
market today. With the use of nitrous oxide come some important safety considerations. This manual has been
written to help you during the installation and use of your Edelbrock Refill Station. Please read it completely before
you use your system. Please pay close attention to the safety information at the beginning of each section.
Please take the time to read and understand the following….
By setting up your Edelbrock Refill Station, you indicate you have read this document and you agree with the terms
stated below:
It is the responsibility of the purchaser to follow
procedures supplied with the Edelbrock Refill Station.
all
installation
instruction
guidelines
and
safety
Edelbrock Corporation assumes no responsibility for damages occurring from misuse, abuse, improper installation,
improper operation, lack of responsible care, or all previously-stated reasons resulting from incompatibility with
other manufacturer’s products and/or systems.
Edelbrock Corporation neither recommends nor condones the use of products manufactured or sold by Edelbrock
Corporation for use on vehicles, which may be driven on public roads or highways, and assumes no responsibility for
damages incurred by such use.
Edelbrock Corporation assumes no responsibility for damages incurred by the use of products manufactured or sold
by Edelbrock Corporation on vehicles used for competition or racing.
Edelbrock General Warranty
It is the constant endeavor of Edelbrock Corporation to give our customers the highest quality products obtainable.
Edelbrock warrants each new product, except Performer Series Carburetors, Race Division Parts, Tubular Exhaust
Systems, RPM Series Mufflers, Cat-Back Systems and Performer IAS Shock Absorbers which are warranted
separately, to be free from defects in both workmanship and material for a period of one (1) year from the date of
purchase, provided that the product is properly installed, subjected to normal use and service and that the product
is not modified or changed in any way, negligence by customer or installer or used for racing or competition
purposes.
Our warranty service and repair facility is located at 2700 California Street, Torrance, California 90503. Customers
who believe they have a defective product should either return it to the dealer from which it was purchased or ship
it directly to Edelbrock along with proof of purchase and a complete description of the problem. The product must
be returned freight pre-paid. If a thorough inspection of the product by the factory indicates defects in
workmanship or material, our sole obligation shall be to repair or replace the product. Warranty covers only the
product itself and not the cost of installation or removal.
Edelbrock Corporation shall not be liable for any and all consequential damages occasioned by the
breach of any written or implied warranty pertaining to this sale in excess of the purchase price of the
product sold.
If you have any questions regarding a product or installation, please contact our Technical
Department, toll free at 1-800-416- 8628 from 7:00am to 5:00pm PST, Monday through Friday.
Thank you again for choosing Edelbrock Nitrous Systems.
Page 1
What is Nitrous Oxide?
Nitrous Oxide is a cryogenic gas composed of nitrogen and oxygen molecules. It is stored as a “gas over a liquid”
which means that both liquid and gaseous nitrous oxide is delivered into your engine. It is 36% oxygen by weight,
which is what produces the added horsepower. By injecting more oxygen (and a corresponding fuel signal), we
create the additional power much like a supercharger or a turbocharger does.
Nitrous Oxide is considered an “oxidizer” and not a fuel. Nitrous oxide is non-flammable by itself. Because nitrous
oxide is a cryogenic, the same safety methods in handling dry ice apply to nitrous. Direct contact with the skin will
cause a burn similar to contact with dry ice. The exception in using nitrous oxide comes from increased breathing
hazards associated with the gaseous properties of nitrous oxide.
Nitrous Oxide is offered for sale in two common grades, which are U.S.P., and Nytrous Plus. U.S.P. nitrous oxide is
medical grade nitrous oxide. Its common use is dental and veterinary anesthesia as well as use as a propellant in
food such as canned whip cream. U.S.P. is not available to the public and would provide no advantage in the making
of horsepower over the automotive grade nitrous oxide.
Nytrous Plus was specifically designed for automotive consumption and differs from U.S.P. in that it contains trace
amounts of sulfur dioxide (100 parts per million or “PPM”) added to prevent substance abuse. The Sulfur Dioxide is
an irritant to all of your breathing passageways and will cause sore throats and sore nasal passages. Nytrous Plus
was specifically created for automotive applications and is available for sale to the public at many speed shops
across the USA.
þ Safety Steps For Working With Nitrous Oxide
1. Never inhale Nytrous Plus (Nitrous oxide (N2O) for vehicular use) as continued exposure can cause death.
Nytrous Plus has a maximum of 100 parts per million (ppm) of sulfur dioxide and will cause irritation to nose
and throat passageways.
2. When working around any high-pressure gas including nitrous oxide, take all precautions to ensure that
exposure to nitrous oxide is minimized.
3. Do not vent nitrous oxide to atmosphere in confined spaces. Only vent nitrous oxide in well-ventilated and
open areas.
4. Liquid nitrous oxide can cause burns to human flesh so protect all skin in and around your hands, arms
and face. Wear safety glasses and rubber gloves to protect from liquid nitrous oxide splatter.
5. When venting down the nitrous system, vent the line down closest to the nitrous bottle.
6. Do not use any form of Teflon tape as sealant on fitting connections. Use only Teflon paste.
7. When washing components, ensure the clean components are completely dry, free of oils, and solvents.
Failure to remove all liquids could cause component or system failure.
8. Always turn the bottle off before making any repairs to the nitrous delivery system.
9. To safely release nitrous oxide in a pressurized line:
a. Position vehicle in a well-ventilated, unconfined space.
b. Turn bottle off.
c. Slowly loosen the nitrous feed line at the bottle until you hear a light hissing noise.
d. Allow the entire nitrous pressure to vent from the line.
e. Perform your work on the system.
f. Tighten the nitrous line to the bottle.
g. Slowly open the nitrous bottle valve, listening for leaks.
h. Perform leak checks on all affected fittings and the bottle fitting.
Page 2
þSafety Tips for the Refill Station
1. Always chain your “mother” bottle securely to a wall or solid work station to protect the bottle from falling.
2. Place the station away from high foot traffic area. This will prevent exposure to residual nitrous oxide vapors and tripping dangers associated with the “mother” bottle stand.
3. Positively mount the pump to a solid work surface. Do not attempt to fill nitrous bottles without mounting
the pump. The pumping process is cyclical and therefore the pump will vibrate during the pumping process.
This will cause the pump to move and possibly fall over if not mounted properly.
4. The cyclical nature of the pumping process will cause minor whipping of the nitrous feed lines. Take care to
not bind or restrict the movement of the nitrous feed lines.
5. Place your refill station in a well-ventilated area away from any open flame which would included heated devices such as hot tanks, water heaters and any area in close proximity to such equipment as welders.
6. Always completely remove the bottle that you plan to fill from the vehicle or motorcycle that it is installed.
7. Always verify the cylinder that you are filling has a current hydro test date. The month and date (mm*yy
format) are stamped into the neck of the bottle. Never fill a bottle that is more than five years past its
test date. These bottles should be sent for re-certification. This can be done through most welding or
scuba supply shops for a minimal charge.
8. Never fill a bottle that has been altered, modified, dented, or appears to be heated by a open flame.
9. Always verify that a pressure release device is installed on the bottle valve. It is illegal to fill a bottle in
which the PRD has been removed or modified in any way.
10. Never drive the pump with any gas other than clean dry air or vapor CO2 regulated at no more than 100
psi. Use of 100 psi or more driven air can damage nitrous refill pump.
Refill Station Pump Warnings
1. Always use Teflon pipe sealant on all pipe (NPT) fittings. It is recommended to use a Teflon paste
sealant instead of Teflon tape to ensure no blockages in your system commonly caused by the use of
Teflon tape.
2. Loose connections of both feed air and nitrous oxide can cause serious injury or death.
3. Always pump nitrous oxide through the nitrous filter. Never pump unfiltered nitrous oxide.
4. Do not exceed 100 psi for driving air pressure. Pressures in excess of 100 psi can cause equipment
damage and/or catastrophic failure of equipment. Serious injury or death can result. A high quality
regulator/filter system should be used to assure no damage occur to air-driven pump used in the nitrous refill station.
5. For the maximum pump life, driving air should be filtered to 10 microns.
Introduction
The ability to refill nitrous oxide bottles in the fields and as a service to customers is an important addition to any
service facility or race shop. The Edelbrock Refill Station Kit is designed to provide a safe and effective way in which
to recharge nitrous bottles.
Page 3
Refill Station Bill of Materials
Qty.
Description
2
6 AN x 1/4 NPT, straight fitting, Blue
1
6 AN x 3/8 NPT, straight fitting, Blue
1
6 AN x 1/2 NPT, straight fitting, Blue
1
4 AN x 6 AN, Reducer Union Fitting Blue
1
1/4 NPT male x 1/4 NPT male, Union, (Blue)
1
1/4 NPT female x 1/4 NPT male x 1/4 NPT female Tee
1
1/4 NPT male x 1/8 NPT female Reducer Bushings
1
3/8 NPT male x 1/4 NPT female Reducer Bushings
2
#6AN Bottle Nut
1
326 to #4AN Adapter
2
Washer, Bottle Nut
1
326 to #4AN Adapter Nut
1
4AN 12” Hose, Blue
1
6AN 12” Hose, Blue
1
6AN 24” Hose, Blue
1
6AN 48” Hose, Blue
1
6AN 6 ft. Hose, Blue
1
Bottle Stand
1
Compressed Air on/off Valve
1
Nitrous Tee Valve
1
1-1/2" Nitrous Pressure Gauge
1
Transfer pump
1
Manual, Refill Station
1
#6AN Billet In-line Nitrous Filter
1
Information Packet
Page 4
IMPORTANT NOTE: Unpack all of the components and check them against the bill of materials. If any component is missing, do not substitute parts. Call the Edelbrock Customer Service line at 800-416-8628.
Proper Assembly of the Pump Station
1. Select mounting location for transfer pump. Lowest point of transfer pump should be located above
highest point of tallest bottle you intend to fill. Bolt pump securely in place.
2. Install bottle stand on your nitrous oxide source bottle (if it is non-siphoned).
Note: The bottle stand supplied with this kit is designed
to work with non-siphoned 65-lb. source bottles using a
CGA 660 exit style of valve produced by Purittan-Bennet,
which are the most common used for the Edelbrock refill
station. It is possible to use smaller nitrous oxide source
bottles. To do so, you must first determine if your source
bottle has a siphon tube. If so, the bottle must remain upright to transfer properly. If it does not have a siphon tube,
it must be inverted for proper transfer operation. The
point of identifying which source bottle you have is to ensure that the liquid nitrous oxide and not the gaseous nitrous oxide is drawn out of the source bottle to the bottle
being filled.
3. Install Teflon washer and 6 AN bottle nut on the nitrous oxide source bottle.
4. Invert the nitrous oxide source bottle and place near the transfer pump.
Note: Bottle should be chained to a structural
and must be near enough to the where
pump will be mounted for the 6 AN 6 ft.
reach from the source bottle valve to the
pump.
Note:
support
transfer
hose to
transfer
Always use Teflon pipe sealant on all pipe
(NPT) fittings.
5. Install the blue 3/8 NPT x 6 AN fitting in the transfer pump
N2O outlet port (arrow on bottom of pump indicates flow
direction).
6. Install the blue ½ NPT x 6 AN fitting in the transfer pump
N2O inlet port.
7. Install the blue 3/8 NPT x ¼ NPT female reducer in the
compressed air inlet port. This port can be found in the front center of the pump.
8. Install ¼ NPT male union in the 3/8 NPT x ¼ NPT fitting at the compressed air inlet port.
9. Install compressed air on/off valve on the ¼ NPT x ¼ NPT fitting at the compressed air inlet
port.
10. Ensure valve is in its closed position. Connect your air supply to the ¼ NPT inlet of the on/off
valve using a air supply fitting that correctly mates with your air supply hose. Due to vast styles
of air connections, this fitting is not included in the Nitrous Refill Station. Inspect lines and fittings for leaks. Find and repair leaks, if any.
Note: If you desire to mount the compressed air on/off valve assembly remotely, or in a different orientation, ¼ NPT adaptors can be purchased at most local hardware stores.
11. Connect the N2O filter outlet port (marked by arrow on filter) to one end of the 1 ft. 6 AN hose.
Connect the opposite end of the 1 ft. 6 AN hose to the blue ½ NPT x 6 AN fitting at the transfer
pump inlet port.
12. Connect inlet port of the N2O filter to the nitrous oxide source bottle by using the 6 ft.
6 AN hose. The other end will attach to the 6 AN bottle nut on the source bottle.
Page 5
Proper Assembly of the Pump Station (Continued)
13. Install ¼ NPT x 6 AN fitting on inlet side of nitrous control valve. The control valve is the ball valve
used to control the flow of nitrous from the pump to the bottle being filled. Arrow on control valve
indicates flow direction.
14. Install male leg of brass ¼ NPT tee adaptor in outlet of nitrous control valve.
15. Install ¼ NPT x 6 AN fitting in the female port of tee adaptor that runs straight through.
16. Install ¼ NPT male x 1/8 NPT female reducer in remaining port of brass tee adaptor.
17. Install nitrous gauge in ¼ NPT male x 1/8 NPT female adaptor installed in brass tee adaptor.
18. Connect N2O Tee valve assembly to the 3/8 NPT x 6 AN fitting at the transfer pump outlet port using
4 ft. 6 AN hose.
19. Connect 2 ft. 6 AN hose to N2 O control valve outlet.
Pump is now set up for use and should now be checked for leaks in the nitrous lines as well as in the drive
air lines prior to use.
1. Ensure all valves in system are in their closed positions.
2. Slowly crack open valve on source bottle and inspect nitrous lines and fittings for leaks. Find and repair leaks as necessary.
3. Install 6 AN bottle nut with Teflon washer, that is included in kit, on bottle to be filled.
4. Connect 6 AN hose from nitrous control valve.
5. With the valve closed on the bottle to be filled, slowly open control valve.
6. Inspect nitrous lines and fittings for leaks. Find and repair leaks as necessary.
Please refer to “How To Fill Nitrous Bottles” section for bottle filling procedures.
How to Fill Nitrous Bottles
Safety:
Never fill a bottle that is more than five years past its test date.
Warning: Never fill any cylinder above the “full” weight as stated on the cylinder label as “weight of cylinder
and gas”.
1. Check to be certain that the bottle you are about to fill is within the current hydro test dating. The month
and date (mm*yy format) are stamped into the neck of the bottle. Never fill a bottle that is more than five
years past its test date. Failure to do so can result in serious injury or death. These bottles should
be sent for re-certification. This can be done through most welding or scuba supply shops for a minimal
charge.
2. Place the cylinder you intend to fill on an accurate scale. Determine how much nitrous oxide is left in the
cylinder by weight. Subtracting this amount from the “weight of cylinder and gas” found on the bottle label
to give you the amount needing to be added. If there is only a small percentage left in the cylinder, open
the valve and relieve all the pressure in the cylinder. If a cylinder is more than 1/3 full and is going to be
“topped off”, it may be necessary in hot climates to place it in a refrigerator or freezer for a short period of
time to cool it off to approximately 45 degrees F. Lowering the temperature will also lower the bottle pressure and allow a complete fill. In areas where daytime temperatures exceed 80 degrees F, this method of
cooling cylinders before filling may be necessary for all cylinders whether they are full or empty.
3. Connect nitrous control valve assembly to the cylinder to be refilled, using the 6 AN bottle nut and washer
included in kit.
Note 1:
If the cylinder being refilled is equipped with a 4 AN fitting, use a 4AN x 6 AN adaptor fitting and
1 ft. 4 AN hose.
Note 2: If the cylinder being refilled is equipped with an 326 style of valve, use the #4 AN 326 nipple, 326
nut valve adaptor, a 4AN x 6 AN adaptor fitting and 1 ft. 4 AN hose.
Page 6
How to Fill Nitrous Bottles (CONTINUED)
4. Tighten line.
5. Place the cylinder on the scale and note weight. There will be a slight weight increase due to nitrous control
valve assembly.
6. Fully open the valve on the Nitrous Oxide source bottle.
7. Slowly Open the nitrous control valve assembly.
8. At this point, it is recommended to carefully loosen the line leading to the cylinder to be filled until you hear
a hissing sound followed by a whitish cloud of liquid nitrous. This ensures that there is liquid in the line as
well as ensuring that the source bottle is not empty.
9. When this is seen, re-tighten the line.
10. Fully open the valve on cylinder to be refilled. Wait for pressure in the source bottle and bottle being filled
to equalize. Note the scale reading.
11. Open the air pressure control valve on the compressed air on/off valve assembly. Watch the scale reading.
12. Close the air pressure valve when cylinder being filled reaches its full weight.
Note: If cylinder being refilled reaches 1100 psi before the full weight of the bottle is reached, stop the
pump by turning off the compressed air valve. Invert the bottle and repeat this several times until
you feel the bottle temperature drop. You can then turn the pump back on and continue pumping.
Also, as the pressure creeps up in the bottle being filled, you may be able to hear the nitrous pump
slow down. This is normal as it is now trying to push the liquid nitrous into the now pressurized
(more dense) liquid in the bottle. At this point, is may help to invert the bottle while the pump is on
so that the new liquid now pushing through the gaseous (less dense) nitrous liquid in the bottle.
13.
14.
15.
16.
Close the valve on cylinder being filled.
Close the valve on nitrous control valve assembly.
Slowly loosen the line from cylinder being filled until you hear a light hissing noise.
Allow the all nitrous pressure to vent from the line.
This should only take a few seconds.
If hissing persists, tighten line and return to step 13.
17. Close the valve on the nitrous oxide source bottle.
18. While holding the nitrous control valve assembly line pointed away from yourself, slowly open the valve on
the nitrous control valve assembly just enough to relieve contents left in feed line.
You have now completed the refill of the bottle.
Edelbrock Nitrous Systems
2700 California Street
Torrance, California 90503
Tech Line (800) 416-8628
Tech Fax (310) 972-2730
Page 7
Rev. 12/00