1
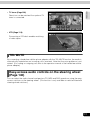
Warnings and caution signs, illustrated below, are posted throughout this manual as well as
on the AVN62D. They show safe and correct ways to handle the product to prevent personal
injury to you and others and avoid damage to property. Before reading through the manual,
take time to read through and learn the important information listed in this section.
Cautions for use
* The illustrations of screens shown in this manual may differ from the actual screens of
this product.
Warning
This WARNING sign indicates a situation in which incorrect
handling through disregard of a sign may result in death or
serious personal injury.
Caution
This CAUTION sign indicates a situation in which incorrect
handling through disregard of a sign may result in personal
injury or may result solely in damage to property.
The symbol shown below indicates that you should know about the information in order to
carefully follow it or you should remember the information for its helpfulness.
This ATTENTION sign indicates helpful information to
remember and know.
• Please read all materials such as manuals and warranties that have come with the product.
• Eclipse will not be responsible for unsatisfactory product performance due to failure to
follow these instructions.
• Changes to product specifications may result in differences between content of the manual
and features of the product.
LAMP(S) INSIDE THIS PRODUCT CONTAIN MERCURY AND MUST
BE RECYCLED OR DISPOSED OF AS HAZARDOUS WASTE
ACCORDING TO LOCAL, STATE, OR FEDERAL LAWS APPLICABLE
TO YOU. DO NOT PLACE IN THE TRASH.
1
Table of Contents
Introduction
How to use this manual . . . . . . . . . . . . . . . . . . . . . . . . . . . . 12
Features . . . . . . . . . . . . . . . . . . . . . . . . . . . . . . . . . . . . . . . . . 14
Before using the main unit. . . . . . . . . . . . . . . . . . . . . . . . . . 18
About discs. . . . . . . . . . . . . . . . . . . . . . . . . . . . . . . . . . . . . . . . . . . . . . 20
About playable discs . . . . . . . . . . . . . . . . . . . . . . . . . . . . . . . . .
About handling discs . . . . . . . . . . . . . . . . . . . . . . . . . . . . . . . . .
About new discs. . . . . . . . . . . . . . . . . . . . . . . . . . . . . . . . . . . . .
About rental discs . . . . . . . . . . . . . . . . . . . . . . . . . . . . . . . . . . .
About specially shaped discs. . . . . . . . . . . . . . . . . . . . . . . . . . .
About disc accessories . . . . . . . . . . . . . . . . . . . . . . . . . . . . . . .
About TV . . . . . . . . . . . . . . . . . . . . . . . . . . . . . . . . . . . . . . . . . . . . . . .
20
21
21
22
22
22
23
About the LCD panel . . . . . . . . . . . . . . . . . . . . . . . . . . . . . . . . . . . . . . 23
Basic operation
Switching mode . . . . . . . . . . . . . . . . . . . . . . . . . . . . . . . . . . 24
Switching the mode . . . . . . . . . . . . . . . . . . . . . . . . . . . . . . . . . . . . . . . 24
Switching the mode using panel switches . . . . . . . . . . . . . . . . . 24
Switching the mode using touch switches . . . . . . . . . . . . . . . . . 25
Displaying operation screen. . . . . . . . . . . . . . . . . . . . . . . . . . . . 25
Operation screen of each mode . . . . . . . . . . . . . . . . . . . . . 26
Adjusting the volume . . . . . . . . . . . . . . . . . . . . . . . . . . . . . . 28
Adjusting main volume . . . . . . . . . . . . . . . . . . . . . . . . . . . . . . . . . . . . . 28
Adjusting sound quality . . . . . . . . . . . . . . . . . . . . . . . . . . . . 29
Setting DSP (acoustics) . . . . . . . . . . . . . . . . . . . . . . . . . . . . . . . . . . . . 30
DSP mode setting . . . . . . . . . . . . . . . . . . . . . . . . . . . . . . . . . . .
Adjusting, saving DSP (acoustics) . . . . . . . . . . . . . . . . . . . . . . .
Resetting DSP (acoustics) levels. . . . . . . . . . . . . . . . . . . . . . . .
Adjusting EQ (equalizer) . . . . . . . . . . . . . . . . . . . . . . . . . . . . . . . . . . .
30
30
31
32
Adjusting/saving EQ. . . . . . . . . . . . . . . . . . . . . . . . . . . . . . . . . . 32
Selecting a EQ pattern from memory. . . . . . . . . . . . . . . . . . . . . 34
Resetting EQ curves . . . . . . . . . . . . . . . . . . . . . . . . . . . . . . . . . 34
2
Setting POS (position selector) . . . . . . . . . . . . . . . . . . . . . . . . . . . . . . 35
Adjusting volume balance . . . . . . . . . . . . . . . . . . . . . . . . . . . . . . . . . . 36
Setting the BEEP tone . . . . . . . . . . . . . . . . . . . . . . . . . . . . . . . . . . . . . 37
Muting sound . . . . . . . . . . . . . . . . . . . . . . . . . . . . . . . . . . . . . . . . . . . . 37
Switching the bass enhancement (Tru Bass). . . . . . . . . . . . . . . . . . . . 38
Setting LOUDNESS . . . . . . . . . . . . . . . . . . . . . . . . . . . . . . . . . . . . . . . 38
Setting the sub-woofer . . . . . . . . . . . . . . . . . . . . . . . . . . . . . . . . . . . . . 39
Setting WOOFER OUTPUT. . . . . . . . . . . . . . . . . . . . . . . . . . . .
Selecting phase control . . . . . . . . . . . . . . . . . . . . . . . . . . . . . . .
Selecting the sub-woofer level . . . . . . . . . . . . . . . . . . . . . . . . . .
Setting X-OVER . . . . . . . . . . . . . . . . . . . . . . . . . . . . . . . . . . . . .
Setting the harmonizer . . . . . . . . . . . . . . . . . . . . . . . . . . . . . . . . . . . . .
39
40
40
41
42
Setting the Circle Surround II . . . . . . . . . . . . . . . . . . . . . . . . . . . . . . . . 43
Setting the background screen . . . . . . . . . . . . . . . . . . . . . . 44
Setting the wallpaper . . . . . . . . . . . . . . . . . . . . . . . . . . . . . . . . . . . . . . 44
Changing the wallpaper . . . . . . . . . . . . . . . . . . . . . . . . . . . . . . . 44
Adjusting the background screen. . . . . . . . . . . . . . . . . . . . 45
Setting the opening screen . . . . . . . . . . . . . . . . . . . . . . . . . . . . . . . . . 45
Changing the image on the opening screen . . . . . . . . . . . . . . . 45
About usable image data . . . . . . . . . . . . . . . . . . . . . . . . . . . . . . 45
Adjusting/setting the screen . . . . . . . . . . . . . . . . . . . . . . . . 46
Displaying the image adjustment screen . . . . . . . . . . . . . . . . . . . . . . . 46
How to switch to daytime display when the lights are ON . . . . . 47
Turning off the screen . . . . . . . . . . . . . . . . . . . . . . . . . . . . . . . . 47
Adjusting image quality . . . . . . . . . . . . . . . . . . . . . . . . . . . . . . . 48
Switching screen mode . . . . . . . . . . . . . . . . . . . . . . . . . . . . . . . . . . . . 48
How to operate the tuner
How to use the AM / FM radio . . . . . . . . . . . . . . . . . . . . . . . 50
Listening to the AM/FM radio . . . . . . . . . . . . . . . . . . . . . . . . . . . . . . . . 50
Selecting radio stations . . . . . . . . . . . . . . . . . . . . . . . . . . . . . . . . . . . . 51
Manual selection . . . . . . . . . . . . . . . . . . . . . . . . . . . . . . . . . . . . 51
Automatic selection . . . . . . . . . . . . . . . . . . . . . . . . . . . . . . . . . . 51
Selection using preset switches. . . . . . . . . . . . . . . . . . . . . . . . . 51
Selecting radio bands. . . . . . . . . . . . . . . . . . . . . . . . . . . . . . . . . . . . . . 52
Saving radio stations . . . . . . . . . . . . . . . . . . . . . . . . . . . . . . . . . . . . . . 53
3
Saving manually. . . . . . . . . . . . . . . . . . . . . . . . . . . . . . . . . . . . .
Saving with AUTO.P . . . . . . . . . . . . . . . . . . . . . . . . . . . . . . . . .
Changing stations saved by AUTO.P . . . . . . . . . . . . . . . . . . . .
Turning off the radio . . . . . . . . . . . . . . . . . . . . . . . . . . . . . . . . . . . . . . .
53
53
53
55
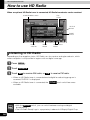
How to use HD Radio . . . . . . . . . . . . . . . . . . . . . . . . . . . . . . 56
Listening to HD Radio . . . . . . . . . . . . . . . . . . . . . . . . . . . . . . . . . . . . . 56
Selecting radio stations . . . . . . . . . . . . . . . . . . . . . . . . . . . . . . . . . . . . 57
Manual selection . . . . . . . . . . . . . . . . . . . . . . . . . . . . . . . . . . . .
Automatic selection . . . . . . . . . . . . . . . . . . . . . . . . . . . . . . . . . .
Selection using preset switches. . . . . . . . . . . . . . . . . . . . . . . . .
Saving radio stations . . . . . . . . . . . . . . . . . . . . . . . . . . . . . . . . . . . . . .
57
57
57
58
Saving manually. . . . . . . . . . . . . . . . . . . . . . . . . . . . . . . . . . . . .
Saving with AUTO.P . . . . . . . . . . . . . . . . . . . . . . . . . . . . . . . . .
Changing stations saved by AUTO.P . . . . . . . . . . . . . . . . . . . .
Displaying information about the current broadcast. . . . . . . . . . . . . . .
58
58
58
58
Turning off the radio . . . . . . . . . . . . . . . . . . . . . . . . . . . . . . . . . . . . . . . 59
How to use the SIRIUS satellite radio . . . . . . . . . . . . . . . . . 60
Listening to SIRIUS satellite radio . . . . . . . . . . . . . . . . . . . . . . . . . . . . 60
Check the SIRIUS ID . . . . . . . . . . . . . . . . . . . . . . . . . . . . . . . . . . . . . . 60
Changing the SIRIUS band . . . . . . . . . . . . . . . . . . . . . . . . . . . . . . . . . 61
Selecting the channel you want to listen to . . . . . . . . . . . . . . . . . . . . . 61
Selecting from the available categories . . . . . . . . . . . . . . . . . . . 61
Selecting a channel by direct input . . . . . . . . . . . . . . . . . . . . . . 61
Displaying information about the current broadcast. . . . . . . . . . . . . . . 62
Turning off the SIRIUS . . . . . . . . . . . . . . . . . . . . . . . . . . . . . . . . . . . . . 62
How to use the XM satellite radio . . . . . . . . . . . . . . . . . . . . 64
Listening to XM satellite radio . . . . . . . . . . . . . . . . . . . . . . . . . . . . . . . 64
Check the XM ID . . . . . . . . . . . . . . . . . . . . . . . . . . . . . . . . . . . . . . . . . 64
Changing the XM band . . . . . . . . . . . . . . . . . . . . . . . . . . . . . . . . . . . . 65
Selecting the channel you want to listen to . . . . . . . . . . . . . . . . . . . . . 65
Selecting from the available categories . . . . . . . . . . . . . . . . . . . 65
Selecting a channel by direct input . . . . . . . . . . . . . . . . . . . . . . 65
Displaying information about the current broadcast. . . . . . . . . . . . . . . 66
Turning off the XM . . . . . . . . . . . . . . . . . . . . . . . . . . . . . . . . . . . . . . . . 66
4
How to operate the CD player
How to use the CD player. . . . . . . . . . . . . . . . . . . . . . . . . . . 68
Listening to a CD . . . . . . . . . . . . . . . . . . . . . . . . . . . . . . . . . . . . . . . . . 68
Selecting a song. . . . . . . . . . . . . . . . . . . . . . . . . . . . . . . . . . . . . . . . . . 68
Fast-forwarding/rewinding . . . . . . . . . . . . . . . . . . . . . . . . . . . . . . . . . . 69
Searching for a song . . . . . . . . . . . . . . . . . . . . . . . . . . . . . . . . . . . . . . 69
Repeating a song . . . . . . . . . . . . . . . . . . . . . . . . . . . . . . . . . . . . . . . . . 69
Playing songs in random order . . . . . . . . . . . . . . . . . . . . . . . . . . . . . . 70
Turning off the CD player . . . . . . . . . . . . . . . . . . . . . . . . . . . . . . . . . . . 70
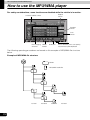
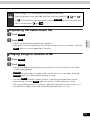
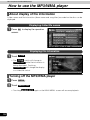
How to operate the MP3/WMA player
How to use the MP3/WMA player . . . . . . . . . . . . . . . . . . . . 72
Playing MP3/WMA . . . . . . . . . . . . . . . . . . . . . . . . . . . . . . . . . . . . . . . . 73
Selecting a music file . . . . . . . . . . . . . . . . . . . . . . . . . . . . . . . . . . . . . . 73
Selecting with file change switches . . . . . . . . . . . . . . . . . . . . . . 73
Selecting with TUNE/TRACK button . . . . . . . . . . . . . . . . . . . . . 73
Fast-forwarding/rewinding . . . . . . . . . . . . . . . . . . . . . . . . . . . . . . . . . . 74
Changing display of the current level . . . . . . . . . . . . . . . . . . . . . . . . . . 74
Displaying the current level . . . . . . . . . . . . . . . . . . . . . . . . . . . . . . . . . 74
Searching for a music file. . . . . . . . . . . . . . . . . . . . . . . . . . . . . . . . . . . 74
Repeating the same music file . . . . . . . . . . . . . . . . . . . . . . . . . . . . . . . 75
Playing songs in random order . . . . . . . . . . . . . . . . . . . . . . . . . . . . . . 75
About display of file information . . . . . . . . . . . . . . . . . . . . . . . . . . . . . . 76
Displaying folder/file names . . . . . . . . . . . . . . . . . . . . . . . . . . . . 76
Displaying file information . . . . . . . . . . . . . . . . . . . . . . . . . . . . . 76
Turning off the MP3/WMA player . . . . . . . . . . . . . . . . . . . . . . . . . . . . . 76
About MP3/WMA . . . . . . . . . . . . . . . . . . . . . . . . . . . . . . . . . . . . . . . . . 77
Playable MP3 file standards . . . . . . . . . . . . . . . . . . . . . . . . . . .
Playable WMA file standards . . . . . . . . . . . . . . . . . . . . . . . . . . .
ID3tag/WMAtag . . . . . . . . . . . . . . . . . . . . . . . . . . . . . . . . . . . . .
Media . . . . . . . . . . . . . . . . . . . . . . . . . . . . . . . . . . . . . . . . . . . . .
Format of discs . . . . . . . . . . . . . . . . . . . . . . . . . . . . . . . . . . . . .
File names . . . . . . . . . . . . . . . . . . . . . . . . . . . . . . . . . . . . . . . . .
Multi-sessions . . . . . . . . . . . . . . . . . . . . . . . . . . . . . . . . . . . . . .
Playing MP3/WMA . . . . . . . . . . . . . . . . . . . . . . . . . . . . . . . . . . .
MP3/WMA playing time display . . . . . . . . . . . . . . . . . . . . . . . . .
Display order of MP3/WMA file/folder names . . . . . . . . . . . . . .
77
78
79
79
80
82
82
82
82
82
5
Making and playing MP3/WMA files. . . . . . . . . . . . . . . . . . . . . . . . . . . 83
Downloading from Internet MP3/WMA music sites . . . . . . . . . .
Converting CD music to MP3/WMA files . . . . . . . . . . . . . . . . . .
Writing to CD-R/CD-RW . . . . . . . . . . . . . . . . . . . . . . . . . . . . . .
When playing back CD-R/RW . . . . . . . . . . . . . . . . . . . . . . . . . .
83
83
83
83
How to operate the CD changer
How to use the CD changer . . . . . . . . . . . . . . . . . . . . . . . . . 84
Listening to a CD . . . . . . . . . . . . . . . . . . . . . . . . . . . . . . . . . . . . . . . . . 84
Selecting a song. . . . . . . . . . . . . . . . . . . . . . . . . . . . . . . . . . . . . . . . . . 84
Fast-forwarding/rewinding . . . . . . . . . . . . . . . . . . . . . . . . . . . . . . . . . . 84
Selecting a CD . . . . . . . . . . . . . . . . . . . . . . . . . . . . . . . . . . . . . . . . . . . 85
Searching for a song or CD from all CDs in changer . . . . . . . . . . . . . . 85
Searching for a song . . . . . . . . . . . . . . . . . . . . . . . . . . . . . . . . . 85
Searching for a CD . . . . . . . . . . . . . . . . . . . . . . . . . . . . . . . . . . 85
Repeating a song or CD. . . . . . . . . . . . . . . . . . . . . . . . . . . . . . . . . . . . 86
Repeating the current song . . . . . . . . . . . . . . . . . . . . . . . . . . . . 86
Repeating the current CD . . . . . . . . . . . . . . . . . . . . . . . . . . . . . 86
Playing songs in random order . . . . . . . . . . . . . . . . . . . . . . . . . . . . . . 86
Playing songs on current CD in random order. . . . . . . . . . . . . . 86
Playing songs on all CDs in random order. . . . . . . . . . . . . . . . . 86
Turning off the CD player . . . . . . . . . . . . . . . . . . . . . . . . . . . . . . . . . . . 86
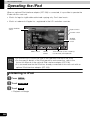
How to operate iPod®
Operating the iPod . . . . . . . . . . . . . . . . . . . . . . . . . . . . . . . . 88
Listening to iPod. . . . . . . . . . . . . . . . . . . . . . . . . . . . . . . . . . . . . . . . . . 88
Searching for a song in various ways . . . . . . . . . . . . . . . . . . . . . . . . . 89
Displaying the search mode screen. . . . . . . . . . . . . . . . . . . . . .
Selecting a song from your favorite GENRE . . . . . . . . . . . . . . .
Selecting a song from your favorite ARTIST . . . . . . . . . . . . . . .
Selecting a song from your favorite ALBUM . . . . . . . . . . . . . . .
Selecting your favorite song from song name list . . . . . . . . . . .
Selecting a song from your favorite PLAYLIST . . . . . . . . . . . . .
Selecting a song. . . . . . . . . . . . . . . . . . . . . . . . . . . . . . . . . . . . . . . . . .
89
90
91
91
92
92
93
Fast-forwarding/rewinding . . . . . . . . . . . . . . . . . . . . . . . . . . . . . . . . . . 93
6
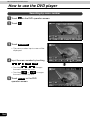
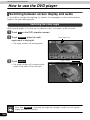
How to operate the DVD player
Before using the DVD player . . . . . . . . . . . . . . . . . . . . . . . . 94
DVD video characteristics . . . . . . . . . . . . . . . . . . . . . . . . . . . . . . . . . . 94
About Multiple Languages . . . . . . . . . . . . . . . . . . . . . . . . . . . . .
About Multiple Angles . . . . . . . . . . . . . . . . . . . . . . . . . . . . . . . .
About Subtitles. . . . . . . . . . . . . . . . . . . . . . . . . . . . . . . . . . . . . .
About discs. . . . . . . . . . . . . . . . . . . . . . . . . . . . . . . . . . . . . . . . . . . . . .
94
94
95
95
About playable discs . . . . . . . . . . . . . . . . . . . . . . . . . . . . . . . . .
About region codes of playable discs . . . . . . . . . . . . . . . . . . . .
About marks displayed on discs . . . . . . . . . . . . . . . . . . . . . . . .
About DVD disc structure. . . . . . . . . . . . . . . . . . . . . . . . . . . . . .
Products equipped with Macrovision . . . . . . . . . . . . . . . . . . . . . . . . . .
95
96
96
97
97
About flow of operations. . . . . . . . . . . . . . . . . . . . . . . . . . . . . . . . . . . . 98
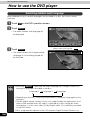
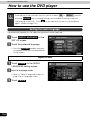
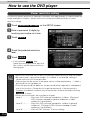
How to use the DVD player . . . . . . . . . . . . . . . . . . . . . . . . . 99
Watching a DVD. . . . . . . . . . . . . . . . . . . . . . . . . . . . . . . . . . . . . . . . . . 99
Operating the video . . . . . . . . . . . . . . . . . . . . . . . . . . . . . . . . . . . . . . 100
Playing the video . . . . . . . . . . . . . . . . . . . . . . . . . . . . . . . . . . .
Fast-forwarding/rewinding . . . . . . . . . . . . . . . . . . . . . . . . . . . .
Pausing the video . . . . . . . . . . . . . . . . . . . . . . . . . . . . . . . . . .
Stopping the video . . . . . . . . . . . . . . . . . . . . . . . . . . . . . . . . . .
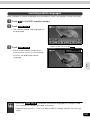
Operating the disc menu . . . . . . . . . . . . . . . . . . . . . . . . . . . . . . . . . .
100
100
101
101
102
Turning off the DVD . . . . . . . . . . . . . . . . . . . . . . . . . . . . . . . . . . . . . . 102
Searching for a desired chapter . . . . . . . . . . . . . . . . . . . . . . . . . . . . . 103
Searching by chapter . . . . . . . . . . . . . . . . . . . . . . . . . . . . . . . .
Searching by title number . . . . . . . . . . . . . . . . . . . . . . . . . . . .
Searching by menu number. . . . . . . . . . . . . . . . . . . . . . . . . . .
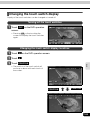
Changing the touch switch display. . . . . . . . . . . . . . . . . . . . . . . . . . .
103
103
104
105
Turning off the touch switches . . . . . . . . . . . . . . . . . . . . . . . . . 105
Changing the touch switch display locations . . . . . . . . . . . . . . 105
Switching between screen display and audio . . . . . . . . . . . . . . . . . . 106
Switching the video angle . . . . . . . . . . . . . . . . . . . . . . . . . . . .
Switching subtitle languages . . . . . . . . . . . . . . . . . . . . . . . . . .
Switching dubbed audio language . . . . . . . . . . . . . . . . . . . . . .
Setting the DVD player. . . . . . . . . . . . . . . . . . . . . . . . . . . . . . . . . . . .
106
107
108
109
Setting the audio language . . . . . . . . . . . . . . . . . . . . . . . . . . .
Subtitle language setting . . . . . . . . . . . . . . . . . . . . . . . . . . . . .
Menu language setting. . . . . . . . . . . . . . . . . . . . . . . . . . . . . . .
Setting display of multi-angle mark (angle selection mark) . . .
Viewer restriction setting . . . . . . . . . . . . . . . . . . . . . . . . . . . . .
110
111
112
113
114
7
Changing video output . . . . . . . . . . . . . . . . . . . . . . . . . . . . . . . 115
Table of language codes . . . . . . . . . . . . . . . . . . . . . . . . . . . . . . . . . . 116
How to operate the VTR
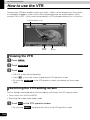
How to use the VTR . . . . . . . . . . . . . . . . . . . . . . . . . . . . . . 118
Viewing the VTR . . . . . . . . . . . . . . . . . . . . . . . . . . . . . . . . . . . . . . . . 118
Switching the VTR setting screen . . . . . . . . . . . . . . . . . . . . . . . . . . . 118
Turning off the VTR mode . . . . . . . . . . . . . . . . . . . . . . . . . . . . . . . . . 119
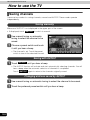
How to operate the TV tuner
How to use the TV. . . . . . . . . . . . . . . . . . . . . . . . . . . . . . . . 120
Watching a TV . . . . . . . . . . . . . . . . . . . . . . . . . . . . . . . . . . . . . . . . . . 120
Selecting channels . . . . . . . . . . . . . . . . . . . . . . . . . . . . . . . . . . . . . . . 120
Manual selection . . . . . . . . . . . . . . . . . . . . . . . . . . . . . . . . . . .
Automatic selection . . . . . . . . . . . . . . . . . . . . . . . . . . . . . . . . .
Selection using preset switches. . . . . . . . . . . . . . . . . . . . . . . .
Saving channels. . . . . . . . . . . . . . . . . . . . . . . . . . . . . . . . . . . . . . . . .
120
121
121
122
Saving manually. . . . . . . . . . . . . . . . . . . . . . . . . . . . . . . . . . . .
Saving with AUTO.P . . . . . . . . . . . . . . . . . . . . . . . . . . . . . . . .
Changing stations saved by AUTO.P . . . . . . . . . . . . . . . . . . .
Switching the TV setting screen. . . . . . . . . . . . . . . . . . . . . . . . . . . . .
122
122
122
124
Turning off the TV mode . . . . . . . . . . . . . . . . . . . . . . . . . . . . . . . . . . 124
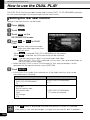
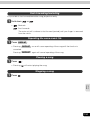
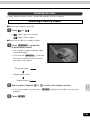
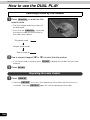
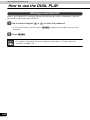
How to operate the DUAL PLAY
How to use the DUAL PLAY. . . . . . . . . . . . . . . . . . . . . . . . 126
Setting the rear seat monitor . . . . . . . . . . . . . . . . . . . . . . . . . . . . . . . 126
Operating the rear seat monitor . . . . . . . . . . . . . . . . . . . . . . . . . . . . . 127
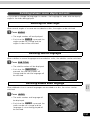
How to play CD . . . . . . . . . . . . . . . . . . . . . . . . . . . . . . . . . . . . . . . . . 128
Listening to CD . . . . . . . . . . . . . . . . . . . . . . . . . . . . . . . . . . . .
Selecting a song . . . . . . . . . . . . . . . . . . . . . . . . . . . . . . . . . . .
Fast-forwarding/rewinding . . . . . . . . . . . . . . . . . . . . . . . . . . . .
Repeating a song. . . . . . . . . . . . . . . . . . . . . . . . . . . . . . . . . . .
Pausing a song . . . . . . . . . . . . . . . . . . . . . . . . . . . . . . . . . . . .
Stopping a song . . . . . . . . . . . . . . . . . . . . . . . . . . . . . . . . . . . .
8
128
128
128
129
129
129
How to play MP3/WMA . . . . . . . . . . . . . . . . . . . . . . . . . . . . . . . . . . . 130
Playing MP3/WMA . . . . . . . . . . . . . . . . . . . . . . . . . . . . . . . . . .
Selecting a folder . . . . . . . . . . . . . . . . . . . . . . . . . . . . . . . . . . .
Selecting a music file . . . . . . . . . . . . . . . . . . . . . . . . . . . . . . . .
Fast-forwarding/rewinding . . . . . . . . . . . . . . . . . . . . . . . . . . . .
Repeating the same music file. . . . . . . . . . . . . . . . . . . . . . . . .
Pausing a song . . . . . . . . . . . . . . . . . . . . . . . . . . . . . . . . . . . .
Stopping a song . . . . . . . . . . . . . . . . . . . . . . . . . . . . . . . . . . . .
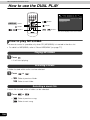
How to play DVD . . . . . . . . . . . . . . . . . . . . . . . . . . . . . . . . . . . . . . . .
130
130
130
131
131
131
131
132
Watching a DVD . . . . . . . . . . . . . . . . . . . . . . . . . . . . . . . . . . .
Fast-forwarding/rewinding . . . . . . . . . . . . . . . . . . . . . . . . . . . .
Playing the video in slow motion . . . . . . . . . . . . . . . . . . . . . . .
Pausing the video . . . . . . . . . . . . . . . . . . . . . . . . . . . . . . . . . .
Stopping the video . . . . . . . . . . . . . . . . . . . . . . . . . . . . . . . . . .
Operating the disc menu . . . . . . . . . . . . . . . . . . . . . . . . . . . . .
Selecting the video. . . . . . . . . . . . . . . . . . . . . . . . . . . . . . . . . .
Repeating the same chapter . . . . . . . . . . . . . . . . . . . . . . . . . .
Switching between screen display and audio . . . . . . . . . . . . .
Watching a restricted DVD. . . . . . . . . . . . . . . . . . . . . . . . . . . .
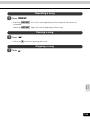
How to watch TV . . . . . . . . . . . . . . . . . . . . . . . . . . . . . . . . . . . . . . . .
132
132
132
133
133
134
135
136
137
138
139
Selecting a channel . . . . . . . . . . . . . . . . . . . . . . . . . . . . . . . . . 139
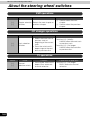
How to use the steering wheel switch
About the steering wheel switches . . . . . . . . . . . . . . . . . . 140
Function names and summaries . . . . . . . . . . . . . . . . . . . . . . . . . . . . 140
Common operations. . . . . . . . . . . . . . . . . . . . . . . . . . . . . . . . .
Radio operations . . . . . . . . . . . . . . . . . . . . . . . . . . . . . . . . . . .
CD player operations . . . . . . . . . . . . . . . . . . . . . . . . . . . . . . . .
SIRIUS/XM satellite radio tuner operations . . . . . . . . . . . . . . .
MP3/WMA Player operations. . . . . . . . . . . . . . . . . . . . . . . . . .
DVD operations . . . . . . . . . . . . . . . . . . . . . . . . . . . . . . . . . . . .
CD changer operations . . . . . . . . . . . . . . . . . . . . . . . . . . . . . .
TV operations. . . . . . . . . . . . . . . . . . . . . . . . . . . . . . . . . . . . . .
140
141
141
141
141
142
142
142
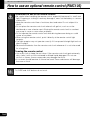
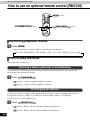
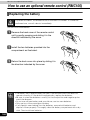
How to use an optional remote control
How to use an optional remote control (RMC105) . . . . . . 144
Turning the power on/off . . . . . . . . . . . . . . . . . . . . . . . . . . . . . . . . . . 145
9
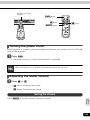
Adjusting the audio volume . . . . . . . . . . . . . . . . . . . . . . . . . . . . . . . . 145
Muting the Volume . . . . . . . . . . . . . . . . . . . . . . . . . . . . . . . . . . 145
Switching playback modes. . . . . . . . . . . . . . . . . . . . . . . . . . . . . . . . . 146
How to play the tuner . . . . . . . . . . . . . . . . . . . . . . . . . . . . . . . . . . . . . 146
Selecting a station (manually or automatically) . . . . . . . . . . . . 146
Selecting preset stations . . . . . . . . . . . . . . . . . . . . . . . . . . . . . 146
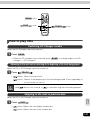
How to play CDs . . . . . . . . . . . . . . . . . . . . . . . . . . . . . . . . . . . . . . . . 147
Switching CD Changer modes. . . . . . . . . . . . . . . . . . . . . . . . . 147
Advancing to the next track or returning to the beginning of the
track being played . . . . . . . . . . . . . . . . . . . . . . . . . . . . . . . . . . 147
Skipping to the next or previous disc . . . . . . . . . . . . . . . . . . . . 147
Replacing the battery . . . . . . . . . . . . . . . . . . . . . . . . . . . . . . . . . . . . . 148
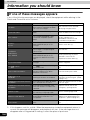
For reference
Information you should know . . . . . . . . . . . . . . . . . . . . . . 150
If one of these messages appears . . . . . . . . . . . . . . . . . . . . . . . . . . . 150
Before asking for repairs . . . . . . . . . . . . . . . . . . . . . . . . . . . . . . . . . . 152
Glossary. . . . . . . . . . . . . . . . . . . . . . . . . . . . . . . . . . . . . . . . 153
Index by topic . . . . . . . . . . . . . . . . . . . . . . . . . . . . . . . . . . . 155
About screen and sound adjustment . . . . . . . . . . . . . . . . . . . . . . . . . 155
About Using AM/FM radio . . . . . . . . . . . . . . . . . . . . . . . . . . . . . . . . . 156
Usage when an HD Radio tuner is connected . . . . . . . . . . . . . . . . . . 156
Usage when a SIRIUS satellite radio tuner is connected. . . . . . . . . . 156
Usage when a XM satellite radio tuner is connected . . . . . . . . . . . . . 156
About using the CD player/CD changer . . . . . . . . . . . . . . . . . . . . . . . 157
About using the MP3/WMA player . . . . . . . . . . . . . . . . . . . . . . . . . . . 157
About using the iPod . . . . . . . . . . . . . . . . . . . . . . . . . . . . . . . . . . . . . 158
About using the DVD player. . . . . . . . . . . . . . . . . . . . . . . . . . . . . . . . 158
About using the VTR . . . . . . . . . . . . . . . . . . . . . . . . . . . . . . . . . . . . . 159
About using the TV tuner . . . . . . . . . . . . . . . . . . . . . . . . . . . . . . . . . . 159
Useful functions . . . . . . . . . . . . . . . . . . . . . . . . . . . . . . . . . . . . . . . . . 159
When something isn't clear . . . . . . . . . . . . . . . . . . . . . . . . . . . . . . . . 159
INDEX . . . . . . . . . . . . . . . . . . . . . . . . . . . . . . . . . . . . . . . . . . 160
10
The Index by Topic simplifies searches for explanations
about individual features. When confused by an
operation, use the Index by Topic to search for information
about the operation.
11
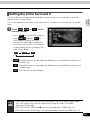
Introduction
How to use this manual
Section title
A title is assigned for each
section.
Item title
A number and title
is assigned for
each item.
Basic operation
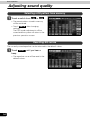
Adjusting sound quality
Setting DSP (acoustics)
The DSP function reproduces the sensation of various factory set performance environments
by adding reverberation to the music being played.
Operation title
A title is assigned
for each operation.
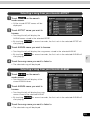
DSP mode setting
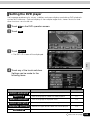
Touching the DSP touch switch
brings up the acoustics mode
screen as shown.
• Touch BACK after changing
settings.
The acoustics mode adjustments will
be saved and the system will return to
the previous operation screen.
Operation screen
A screen showing
the operation will
appear.
Touch switch
Detailed operation title
DSP Environment
Touch switch
DSP Environment
CONCERT
Concert hall
CLUB
Disco, Club
LIVE
Live performance
arena
THEATER
Movie theater
CATHEDRAL
Church with echo
OFF
DSP OFF
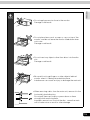
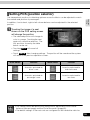
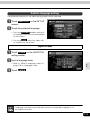
Adjusting, saving DSP (acoustics)
A title is assigned for
each detailed
operation.
The factory set DSP (acoustics) level for each mode can be adjusted to preference and
saved.
Touch
or
at the right of the
screen while in the acoustics mode
to be adjusted.
There are five + and five - adjustment
levels available.
Operation procedure
Describes the
operation.
Proceed with the
operation as per the
numerical order.
12
Touch the switch for the acoustics
mode that has been adjusted until
a beep is heard.
30
Introduction
Resetting DSP (acoustics) levels
Touch OFF until a beep is heard.
• The accoustic level will be returned to default value (the default value is "0").
Basic
operation
Default settings for the currently adjusted and saved DSP (acoustics) level can be reset.
Section heading
Only the section
heading will appear.
When adjusting the level for the currently selected DSP (acoustics) mode, the
level will not be saved for other acoustics modes.
Attention
Additional points
regarding the
operations are given
here.
Go to the next page
31
The operation
procedures are
continued on the
next page.
The description shown above is for explanation, and therefore it may differ from
the actual one on the same page.
13
Introduction
Features
DVD player with sharp video and dynamic sound
(Page 94)
Plays DVD Video recorded with high quality
images and sound.
(DVD media is able to record a movie with
high quality video and digital sound that
exceeds the quality of CD media.)
The MP3/WMA player that can play a disc holding
many music tracks equivalent to several albums
(Page 72)
The MP3 compression technology that can
compress the music data by a factor of 10.
The CD-R/RW discs holding MP3/WMA data
can be played with this unit. Also, WMA data
which provides higher compression rate than
MP3 can be played.
DSP effects for simulating acoustics of various
performance environments (Page 30)
Provides ability to simulate the sensation of
various performance environments for
matching to the genre and source of a song.
14
Introduction
Selection and display of favorite wallpaper
(screen backgrounds) (Page 44)
Wallpaper of your choice can be switched and
displayed for use as the background of the
information screen and audio playback
screens.
The screen from a navigation unit can also be
linked and selected.
● Setting wallpaper for the information screen and
audio operations screen
Radio tuner for receiving various broadcasts
• AM/FM tuner (Page 50)
Enables reception of analog AM/FM radio
broadcasts.
● AM radio operation screen
• HD Radio tuner (Page 56)
Enables reception of HD Radio broadcasts.
● HD Radio AM operation screen
15
Introduction
Features
• SIRIUS tuner (Page 60)
SIRIUS is a satellite broadcasting service
offering music, news, sports and other
programming with CD-quality sound; This is
a paid subscription service.
● SIRIUS operation screen
• XM tuner (Page 64)
XM tuner is a satellite broadcasting service
offering music, news, sports and other
programming with CD-quality sound; This is
a paid subscription service.
● XM operation screen
System additions
• CD changer (Page 84)
A CD changer enables non-stop playing of
multiple discs, for convenience at times
such as taking a long drive.
It is easy to search for and play a song from
among the discs on a changer.
• iPod (Page 88)
When an optional iPod interface adaptor
(iPC-106) is connected to this main unit, it is
possible to operate the iPod® with this main
unit and to display information relevant to it
on the screen of this main unit, so you can
listen to the songs stored in the iPod.
16
Television can be watched if an optional TV
tuner is connected.
Introduction
• TV tuner (Page 120)
• VTR (Page 118)
Connecting a VTR deck enables watching
of video tapes.
TEL MUTE
By connecting a handsfree cellular phone adapter with the TEL-MUTE function, the audio is
automatically muted when an incoming call is received. Note that the voice guidance is not
muted. (For muting on outgoing call, refer to the operation manual of the handsfree cellular
phone adapter.)
Easy-access audio controls on the steering wheel
(Page 140)
You can select the radio channel and perform CD, MP3 and DVD operations using the easyaccess switches on the steering wheel. (This function is only available on vehicles fitted with
steering wheel switches.)
17
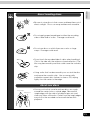
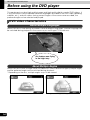
Introduction
Before using the main unit
• Be very careful and pay full attention to safety when
operating the audio controls while driving, otherwise
accidents may occur. Also be sure to set volume so that
you can still adequately hear sounds outside the vehicle.
Improper use can contribute to a traffic accident.
• Never continue to use the system if it is malfunctioning in
any way. If smoke, abnormal noises or abnormal odors
are noticed, turn off the power immediately.
Immediately turn off audio in such situations.
• Exercise caution as to the temperature inside the vehicle.
The temperature inside the vehicle can increase during
hot weather. Wait for the temperature inside the vehicle to
drop before using the unit.
Damage could result.
• Do not disassemble or modify the main unit.
The main unit has a precisely designed structure, so
consult your retailer in the event of any unsatisfactory
performance.
18
Introduction
• Do not apply excessive force to the monitor.
Damage could result.
• Do not place items such as cups or cans on top of the
monitor, and do not leave the monitor tilted down when
not in use.
Damage could result.
• Do not insert any objects other than discs into the disc
slot.
Damage could result.
• Be careful not to get fingers or other objects behind
monitor when it is being retracted into place.
Interference can cause an injury or damage the main unit.
• When removing a disc from the main unit, remove it in the
horizontally level direction.
Do not pull them up forcibly or press down on them
strongly while removing them.
Improper removal can scratch the disc, cause the main
unit to make noise or result in other damage.
19
Introduction
Before using the main unit
About discs
• Water droplets can form on the inside of the main unit during cold or rainy
weather in the same way car windows can fog up (This is condensation). When
this happens, the audio can jump and playback can stop, so ventilate or
dehumidify the vehicle for a short time before operating the equipment.
• To safeguard the components of the player, the unit will automatically stop when
a malfunction occurs. If the player will not operate even when messages
displayed on the screen are followed, consult with your equipment retailer,
because it is possible that the unit has been damaged.
• It is possible that the sound will skip if the vehicle experiences violent motion on
rough roads.
• Please do not use a commercially available lens cleaner because it may cause
damage to the pickup of the player.
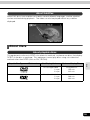
About playable discs
• An audio disc or DVD video disc bearing one of the marks below can be played.
When using DVD-R/RW (DVD-Recordable/ReWritable) and DVD+R/RW
(DVD+Recordable/ReWritable) discs, note that only those whose contents were
recorded in the video mode can be played. Discs whose contents were
recorded in the video recording (VR) mode and audio mode cannot be played.
TEXT
• Discs that are compatible with Dolby Digital and bear the indication below can
be used.
Manufactured under license from Dolby Laboratories, Inc. "Dolby" and the double-D symbol are
trademarks of Dolby Laboratories.
• It is possible that a CD-R (CD-Recordable) or CD-RW (CD-ReWritable) disc will
not play on the main unit due to the circumstances of the recording, special disc
characteristics, scratches, dirt or deterioration caused by long storage in the
vehicle. In addition, a CD-R or CD-RW disc written with CD-R, CD-RW or UDF
format that has not been finalized will not play on the main unit.
• It is possible that a DVD-R/RW (DVD-Recordable/ReWritable) or DVD+R/RW
(DVD+Recordable/ReWritable) disc will not play on the main unit due to the
circumstances of the recording, special disc characteristics, scratches, dirt or
deterioration caused by long storage in the vehicle. DVD-R/RW or DVD+R/RW
discs that have not been finalized will not play on the main unit. It may not be
possible to play a disc that has been recorded on a personal computer,
depending on the application setting and the environment.
• The CD-TEXT function can be used only with the original CD-TEXT-compatible
compact discs. If it is used with CD-R or CD-RW discs, characters may not be
displayed normally.
• Do not use discs with transparent or semi-transparent portions within the
recording area, or see through discs, since they may not be accepted and
ejected properly and may not play properly.
20
Introduction
About handling discs
• Be sure to store discs in their cases and keep them out of
direct sunlight. Discs can warp and become unusable.
• Do not apply paper-based tape to either the recording
side or label side of a disc. Damage could result.
• Do not use discs on which there are cracks or large
warps. Damage could result.
• Do not touch the recorded side of a disc when handling it.
(This is the side with the rainbow-colored reflection.) The
disc may become dirty and that could cause the sound to
skip.
• Using a disc that has become dirty can scratch the disc
and cause the sound to skip. Use a commercially
available compact disc cleaner to clean a CD, wiping
lightly from the center to the edge.
About new discs
Rough Edges
Ballpoint pen
• You may notice that some brand new discs are rough
around the center hole or outside edge. Remove the
rough edges with the side of a ballpoint pen, etc and
clean any flakes off the disc. Flakes from the rough edges
may stick to the recorded surface and interfere with
playback.
21
Introduction
Before using the main unit
About rental discs
Cellophane tape
Recorded surface
• Do not use CD discs with attached cellophane tape,
rental CD discs with glue protruding from labels or discs
with the residue of peeled adhesives. Using discs with
those conditions can prevent the player from properly
opening and closing as well as cause other damage.
About specially shaped discs
• Specially-shaped or octagonal CDs, like heart-shaped
cannot be played. Do not attempt to play them, even with
an adapter, since they may damage the player.
About disc accessories
• Do not use accessories (stabilizers, protective seals,
laser lens cleaners, etc.) sold for "improving sound
performance" or "protecting CDs." The changes in CD
thickness or outside dimensions made by these
accessories may cause problems in the player.
CD ring
22
• Please be sure NOT to attach any ring-shape protector (or
other accessory) to your discs. Those protectors are
commercially available and said to protect discs and to
improve sound quality (and antivibration effect), but they
can do more harm than good in regular uses. The most
common problems are Insert/Eject related problems and
"No playback" problems due to the protector ring that may
have come off in the disc mechanism.
Introduction
About TV
• When connection with the battery is cut due to changing it, changing fuses,
etc.,all preset channels will be erased.
• It may be difficult for the TV to maintain optimal reception due to variation in
signal strength or interference from other objects. The main causes of
interference are listed below.
• Visual or audio static may result when in close proximity to overhead train wires,
high-tension wires, traffic signals, neon signs, etc.
·Depending on the signal, buildings and mountains may adversely affect reception.
·Visual or audio static may result when in close proximity to radio broadcasting
or ham radio antennas.
·Signal reception will become extremely weak when driving through a tunnel.
·Signal reception will become weak when traveling at a great distance from the
broadcasting station.
·In some areas, visual or audio static may result when in close proximity to TV or
radio towers. This is due to the influence of electro-magnetic waves outside of
the reception range.
About the LCD panel
• The LCD panel can appear to be white or black when seen from certain angles.
• The screen will be difficult to read when external light such as sunlight falls on
the display.
23
Basic operation
Switching mode
The main unit can be used when the vehicle's ignition switch is on or in the ACC position.
• The main unit supports use of a remote control. The optional remote control is sold
separately and can be purchased at your local retailer. Refer to page 144 for instructions
on operation of the remote control.
Switching the mode
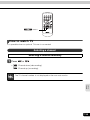
Switching the mode using panel switches
Press MENU .
Touch SOURCE
on the MAIN
MENU screen.
• The AUDIO MENU screen will be
displayed.
Touch
FM .
• The various audio modes can be
selected by touching the
corresponding touch switches.
• When the navigation screen is being
displayed before pressing
MENU , the selected mode will be
displayed on-screen over the
background.
On-screen display
24
Switching the mode using touch switches
Basic
operation
SOURCE MENU switch
Touch the SOURCE MENU switch.
Touch the touch switch of the
source you want to operate.
• The operation screen for the selected
source is displayed.
• Touching
screen.
returns to the previous
Displaying operation screen
Press
AV .
AV
25
Basic operation
Operation screen of each mode
The operation screen for each mode will appear as shown below.
26
● AM radio operation screen
● FM radio operation screen
● XM operation screen (optional)
● SIRIUS operation screen (optional)
● HD Radio operation screen (optional)
● CD player operation screen
● MP3/WMA player operation screen
● DVD player operation screen
● CD changer operation screen (optional)
● VTR operation screen (optional)
● TV operation screen (optional)
Basic
operation
● iPod operation screen (optional)
When the operation screen for DVD or video (VTR/TV) has not been operated for 6 seconds
or more, the operation screen will automatically be canceled.
27
Basic operation
Adjusting the volume
Adjusting main volume
Press the VOLUME switch.
Pressing
will increase volume.
Pressing
will decrease volume.
• Each press of the switch will change
the volume by two steps. When the
volume reaches 50 or higher, the
switch will change the volume by one
step. Holding the switch will continue
to change the volume.
28
VOLUME switch
Basic operation
Adjusting sound quality
DSP
EQ
Basic
operation
To adjust sound quality, touch the DSP, EQ or POS switch while the operation screen for a
mode is displayed. Adjustments made in any mode will be saved and applied to all modes.
POS
In the DVD mode, display the sound quality adjustment switches by touching
from the operation modes, and then SET . In the VTR mode display them
either by touching SET .
29
Basic operation
Adjusting sound quality
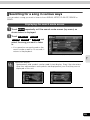
Setting DSP (acoustics)
The DSP function reproduces the sensation of various factory set performance environments
by adding reverberation to the music being played.
DSP mode setting
Touching the DSP touch switch
brings up the acoustics mode
screen as shown.
• Touch BACK after changing
settings.
The acoustics mode adjustments will
be saved and the system will return to
the previous operation screen.
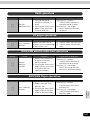
Touch switch
DSP Environment
Touch switch
DSP Environment
CONCERT
Concert hall
CLUB
Disco, Club
LIVE
Live performance
arena
THEATER
Movie theater
CATHEDRAL
Church with echo
OFF
DSP OFF
Adjusting, saving DSP (acoustics)
The factory set DSP (acoustics) level for each mode can be adjusted to preference and
saved.
Touch
or
at the right of the
screen while in the acoustics mode
to be adjusted.
• There are five + and five - adjustment
levels available.
Touch the switch for the acoustics
mode that has been adjusted until
a beep is heard.
30
Resetting DSP (acoustics) levels
Touch OFF until a beep is heard.
• The accoustic level will be returned to default value (the default value is "0").
Basic
operation
Default settings for the currently adjusted and saved DSP (acoustics) level can be reset.
When adjusting the level for the currently selected DSP (acoustics) mode, the
level will not be saved for other acoustics modes.
31
Basic operation
Adjusting sound quality
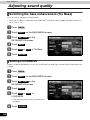
Adjusting EQ (equalizer)
Adjusts sound quality to preferred characteristics according to the music genre and audio
source.
Adjusting/saving EQ
The sound quality can be adjusted according to music genre and then stored.This product
has a 7-band parametric equalizer which can adjust median frequency, frequency level, and
Q curve (bandwidth).
Touch the frequency of each band
to select the frequency (median
frequency) you want to adjust.
• Each time the switch of each band is
touched, the median frequency will be
switched in the order shown below.
1
32
4
Median frequency (Hz)
1
63 → 80 → 100
2
125 → 160 → 200
3
250 → 315 → 400 → 500
4
630 → 800 → 1k → 1.25k
5
1.6k → 2k → 2.5k → 3.15k
6
4k → 5k → 6.3k → 8k
7
10k → 12.5k → 16k
• To make fine adjustments, touch
.
3
Band
Touch the desired frequency level.
or
2
5
6
7
Touch Q1 , Q2 , Q3 to select a Q
curve.
Basic
operation
• The Q curve patterns set the median
frequency bandwidth as follows:
Switch
Q curve pattern
Q1
Wide
Q2
Normal
Q3
Narrow
Repeat steps through to change the setting for each band.
• It is not possible to set more than one band in the same channel to the same median
frequency.
Touch the switch you want to use to
save ( EQ1 to EQ5 ) until you hear
a beep.
• Save the PEQ settings for future use.
• Touch BACK after changing
settings.
The PEQ mode adjustment will be
saved and the system will return to the
previous operation screen.
• If you touch and hold
or
during fine adjustment, the frequency level will
continue to adjust automatically until it reaches the center value (0). Touch
or
again to continue adjustment.
• Touch FLAT
to return to the center value (0).
33
Basic operation
Adjusting sound quality
Selecting a EQ pattern from memory
Touch a switch from EQ1 to EQ5 .
• The preset pattern stored in memory
will be retrieved.
• Touch BACK after changing
settings.
The PEQ mode adjustments will be
saved and the system will return to the
previous operation screen.
Resetting EQ curves
The currently saved equalizer can be returned to the default values.
Touch
FLAT
until you hear a
beep.
• The equalizer curve will be reset to the
default values.
34
The stereophonic position for obtaining optimum acoustic effects can be adjusted to match
the number and position of passengers.
In addition, front-to-back, right-to-left volume balance can be adjusted for the selected
position.
Basic
operation
Setting POS (position selector)
Touching the image of a seat
shown on the POS setting screen
will change the position.
• The selected position will change its
color to orange. Touching the seat
again will cancel the selection. The
four positions shown by the table
below can be set.
• Touching OFF will cancel all
settings.
• Touch BACK after changing settings. The position will be saved and the system
will return to the previous operation screen.
Touch switch
Function
Touch switch
Function
Acoustics optimized for
driver's seat
Acoustics optimized for
both front seats
Acoustics optimized for
passenger's seat
Acoustics optimized for
rear seats
• This setting cannot be done at the same time as adjustment of the volume
balance (see next page) and the Circle Surround II (page 43).
• The default settings of the main unit are configured for left-hand drive vehicles.
35
Basic operation
Adjusting sound quality
Adjusting volume balance
The set position for front-to-back, right-to-left volume balance can be adjusted.
Touch
FADER BALANCE on the
POSITION setting screen to
display the volume balance
adjustment screen.
Touch the screen at the preferred
balance point.
• To make fine adjustments, touch
,
,
,
.
• Touching CENTER will set the
volume balance to the center position.
• Touch BACK after changing
settings.
The set volume balance will be saved
and the system will return to the previous operation screen.
• To set the POS again, touch POS .
• This setting cannot be done at the same time as POS (position selector)
adjustment, described on the previous page.
• Touching and holding
,
,
or
while making fine adjustments will
adjust values in a continuous action. However, adjustment will lock when it
reaches the center value, and
continue adjustment.
36
,
,
or
must be pressed again to
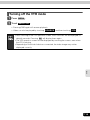
Setting the BEEP tone
Press MENU .
Touch INFO on the MAIN MENU screen.
Touch SETTING on the INFORMATION screen.
Touch 1 , 2 , 3 , 4 or OFF of GUIDE TONE.
Basic
operation
The guide tone that is heard when touching a panel switch or touch switch can be set.
• The pressed touch switch will become brighter.
• Touching OFF will cancel (turn off) the guide tone.
Touch
ENTER .
Muting sound
Sound from the audio system can be temporarily muted.
Press
MUTE .
• Volume will become zero.
• Pressing MUTE switch again will
return to previous volume.
• The VOLUME display will flash during
mute.
MUTE switch
The MUTE function will be canceled on pressing the + VOLUME switch (it is
unaffected by pressing the – switch).
37
Basic operation
Adjusting sound quality
Switching the bass enhancement (Tru Bass)
You can switch the bass enhancement.
• Note that Tru Bass is adjusted only when the Circle Surround II (page 43) effectiveness is
set to Low or Hi.
Press MENU .
Touch INFO on the MAIN MENU screen.
Touch SETTING on the
INFORMATION screen.
Touch
Touch
Touch
NEXT .
ON or OFF of Tru Bass.
ENTER .
Setting LOUDNESS
Audio can be modulated to correct for insufficient low and high sounds when listening at low
volume.
Press MENU .
Touch INFO on the MAIN MENU screen.
Touch SETTING on the
INFORMATION screen.
Touch
Touch
NEXT .
ON or OFF of
LOUDNESS.
• The pressed touch switch will become
brighter.
Touch
38
ENTER .
Setting the sub-woofer
Press MENU .
Touch INFO on the MAIN MENU screen.
Touch SETTING on the
Basic
operation
When a sub-woofer is connected, the preferred output level for the audio can be set.
INFORMATION screen.
Touch
Touch
NEXT .
WOOFER in the setting
screen.
Setting WOOFER OUTPUT
The sub-woofer output can be set to STEREO or MONO. Select the method that matches the
output method for the connected sub-woofer system.
Touch STEREO or MONO for
WOOFER OUTPUT.
• Touch BACK after changing
settings.
The woofer output setting will be saved
and the system will return to the
previous screen.
39
Basic operation
Adjusting sound quality
Selecting phase control
The merging of sound between the front and rear speakers and the sub-woofer can be
improved by selecting the phase.
Switch to a phase which lets the speakers combine without any disharmony.
Touch
NORMAL or REVERSE
for PHASE CONTROL.
• Touch BACK after changing
settings.
The phase control will be saved and
the system will return to the previous
screen.
Selecting the sub-woofer level
The output level of the sub-woofer can be adjusted with this function.
Touch
or
for WOOFER
LEVEL.
: Increase level
: Decrease level
• Touch BACK after changing
settings.
The woofer level will be saved and the
system will return to the previous
screen.
40
The frequencies for the front and rear speaker high-pass filter (HPF) and sub-woofer lowpass filter (LPF) can be set within a range of 63 / 80 / 100 / 125 / 160 / 200 Hz. (This is the
same as setting the HPF and LPF cutoff frequencies.)
Touch
or
off frequency.
Touch
to select the cut
Basic
operation
Setting X-OVER
6dB/oct , 12dB/oct or
PASS to select the slope.
• Touch BACK after changing
settings.
The crossover setting will be saved
and the system will return to the previous screen.
If no sub-woofer has been connected, set the slope adjustment to "PASS". (If
slope is set to a setting other than PASS, the low frequency range will not be
output from the speakers.)
41
Basic operation
Adjusting sound quality
Setting the harmonizer
It is possible to set the sound quality boost level to automatically regenerate harmonics such
as reverberation, depth, and tone lost in compression, producing a much clearer sound.
Press MENU .
Touch INFO on the MAIN MENU screen.
Touch SETTING on the
INFORMATION screen.
Touch NEXT .
Touch LOW , HI
or OFF for
HARMONIZER.
• LOW : Low level of correction
HI : High level of correction
OFF : No correction (default)
Touch
ENTER .
• Selection can be made when MP3/WMA disc is inserted into the unit .
42
The Circle Surround II reproduces deep bass and localization of sound without a center
speaker and/or a sub-woofer.
This is also applied to the audio of FM radio and TV. However, it is not effective for the AM
radio.
Touch OFF , LOW or
Basic
operation
Setting the Circle Surround II
HI on the
operation screen.
• Touch SET (in TV and VTR mode) or
touch NEXT and then SET (in
DVD mode) to display the touch
switches for adjusting sound quality.
• Each time touch switch is touched, the
screen display will be changed in the
order shown below.
OFF
LOW
OFF
HI
• LOW : The effectiveness to reproduce the deep bass sound and the localization of
sound is low.
HI : The effectiveness to reproduce the deep bass sound and the localization of
sound is high.
OFF : Cancels the function (default).
• The Circle Surround II setting cannot be done at the same time as DSP (Page
30), POS (the position selector) adjustment (Page 35) and LOUDNESS
adjustment (Page 38).
• Circle Surround II, SRS and (●) symbol are trademarks of SRS Labs, Inc.
• Circle Surround II technology is incorporated under license from SRS Labs, Inc.
43
Basic operation
Setting the background screen
The background for the audio screen, information screen and navigation screen can be
changed to a preferred wallpaper.
Setting the wallpaper
Changing the wallpaper
Press MENU .
Touch INFO on the MAIN MENU screen.
Touch SETTING on the
INFORMATION screen.
Touch
1 , 2 , 3 , 4 or 5 of
WALL PAPER.
• The pressed touch switch will become
brighter and the wallpaper
(background) will change.
Touch
44
ENTER .
Basic operation
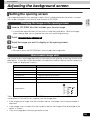
Adjusting the background screen
The image displayed on the opening screen (which is displayed when the power is turned
on) can be changed to your favorite one stored in a CD-R/RW.
Changing the image on the opening screen
Insert a CD-R/RW disc that includes your favorite image.
Basic
operation
Setting the opening screen
• It would take approximately 30 seconds to read the image data. While the image
data is being read, do not operate the main unit and the ignition key.
Touch Opening Image Change .
Touch the image you want to display on the opening screen.
Touch OK .
• Be sure to eject the CD-R/RW disc that includes the image data.
About usable image data
The format of disc and image data that can be used on the opening screen are shown in the
table below. If your disc and/or data does not meet the conditions below, the file names may
not be listed nor displayed correctly.
CD-R/RW
Disc format
ISO9660 (MODE1)
File size
Smaller than 100 KB
File name
ISO9660 LEVEL 2 (Up to 31 bytes)
File extension
.jpg (Non-JPEG2000-compliant)
Writing method
Single-session only
Image size
416 (W) X 240 (H) dots (Max.)
The files in the root directory (top-most directory) only.
Displayed file
*When storing the image data in a CD-R/RW disc, make a text file named "CSM.txt" (any
content/text is OK) and store it together with the image data.
• If the image size is larger than the condition above, the image cannot be previewed or
imported.
• If the image size is smaller than the condition above, the image will be displayed at the
center of screen.
• Only one image data can be imported at a time.
45
Basic operation
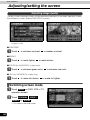
Adjusting/setting the screen
Quality adjustments can be made for the images such as the audio operation screen,
navigation screen and DVD or VTR (optional).
Displaying the image adjustment screen
Contrast, brightness and other picture settings can be adjusted to match preferences for
viewing DVD video or the audio operation screen.
To make viewing easier, the display switches between day screen/night screen according to
whether the vehicle lights (parking lights, taillights, license plate lights) are on/off.
[Audio operation screen]
● Day display [Vehicle lights are off]
● Night display [Vehicle lights are on]
[DVD/VTR Screen]
● Day display [Vehicle lights are off]
● Night display [Vehicle lights are on]
(Default settings)
• When vehicle head lights are on: [Night screen is displayed]
• When vehicle head lights are off: [Day screen is displayed]
46
Press and hold
MENU until a beep is heard on the audio mode screen or
Touch
ENTER after making any adjustments.
• If no adjustments are made after 20 or more seconds, the image quality adjustment
screen will be canceled.
● When adjusting audio operation screen
Basic
operation
DVD/VTR/TV screen.
● When adjusting DVD/VTR/TV screen
How to switch to daytime display when the lights are ON
The day screen and night screen will be switched each time
DAY is
pressed.
● When adjusting audio operation screen
● When adjusting DVD/VTR/TV screen
Turning off the screen
Touch OFF .
• Press AV
or MAP to return to the original screen.
47
Basic operation
Adjusting/setting the screen
Adjusting image quality
The day screen and night screen can be separately adjusted (on the audio operation screen,
the navigation screen, and the DVD/VTR/TV screen).
● When adjusting audio operation screen or
navigation screen
● When adjusting DVD/VTR/TV screen
■ CONTRAST
Touch
to enhance contrast,
to weaken contrast.
■ BRIGHT
Touch
to make lighter,
to make darker.
■ COLOR (for DVD/VTR/TV screen only)
Touch
to enhance green color,
to enhance red color.
■ TINT (for DVD/VTR/TV screen only)
Touch
to make tint darker,
to make tint lighter.
Switching screen mode
Touch
WIDE on DVD, VTR or TV
operation screen.
Touch
NORMAL , WIDE1 ,
WIDE2 or WIDE3 .
• This selects the wide mode.
48
Touch
BACK .
Basic
operation
• Returns to the DVD, VTR or TV operation screen.
■ NORMAL mode
■ WIDE 1 mode
The screen is shown with vertical to
horizontal ratio of 3 to 4 (normal TV
screen size) and side edges are black.
The screen for vertical to horizontal ratio
of 3 to 4 (normal TV screen size) is
uniformly expanded in the left and right
directions.
■ WIDE 2 mode
■ WIDE 3 mode
The screen for vertical to horizontal ratio
of 3 to 4 (normal TV screen size) is
uniformly expanded in the left and right
directions (except for the central section
of the screen).
The screen for vertical to horizontal ratio
of 3 to 4 (normal TV screen size) is
uniformly expanded in the upward,
downward, left and right directions.
Viewing of wide screen modes is permitted when limited to the personal
entertainment of the user, but caution is required when using technologies such
as image compression and expansion for the purpose of commercial benefit or
public presentation may infringe upon the rights of the copyright holder being
protected by applicable copyright law.
49
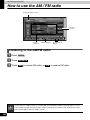
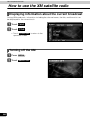
How to operate the tuner
How to use the AM / FM radio
SOURCE MENU switch
AUTO.P
Switch
Preset
Switches
MENU Button
TUNE TRACK
Button
Listening to the AM/FM radio
Press MENU .
Touch SOURCE .
Touch AM to receive AM radio, or
FM to receive FM radio.
When an HD Radio tuner is connected, the standard radio (analog radio) is also
controlled through the HD Radio tuner. Note that this means the antenna should
be connected to the HD Radio tuner.
50
Selecting radio stations
Manual selection
or
.
• Each pressing of the switch moves the frequency one step up or down. (One step on
the AM band is 10kHz. One step on the FM band is 0.2MHz.)
: Raises frequency
RADIO
Press
: Lowers frequency
Automatic selection
Press and hold
or
until a beep is heard.
• The station that is closest in frequency to the frequency that is currently displayed on
the screen will be searched for automatically, and searching will stop when the station
is received. To stop the search before a station is found, press the button again.
Selection using preset switches
Touch the preset switch that already has a station recorded.
• Refer to "Saving radio stations" on page 53 for details on saving stations.
If the reception for a particular station is weak in the area you are in, automatic
selection may not work.
51
How to operate the tuner
How to use the AM / FM radio
Selecting radio bands
Touch FUNC .
Touch BAND .
• Each time the switch is touched, the
radio band will be changed in the
order shown below.
FM1
52
FM2
OFF
FM3
Saving radio stations
There are two modes for saving radio stations, manual and AUTO.P, and these modes
operate independently.
Confirm that "AUTO.P" is not displayed in the upper part of the screen.
• If "AUTO.P" is displayed, touching AUTO.P will switch the screen to manual.
RADIO
Saving manually
Use manual tuning or automatic tuning to select the station to be saved.
Choose a preset switch and touch it until a beep is heard.
• The radio station (frequency) is set. Touching the preset switch will now tune in the
selected station.
Saving with AUTO.P
Touch FUNC .
Touch AUTO.P until a beep is heard.
• The AUTO.P function will be activated and start automatically selecting stations. A
beep will be heard when automatic selection of stations is completed. On touching
AUTO.P again, the display will switch to the previously recorded station.
Changing stations saved by AUTO.P
Use manual tuning or automatic tuning to select the station to be saved.
Choose a preset switch and touch it until a beep is heard.
53
How to operate the tuner
How to use the AM / FM radio
About AUTO.P
Because AUTO.P temporarily saves stations for the preset switches, stations saved
manually will remain in memory even if AUTO.P is used. By manually saving
stations that are used regularly, these manually saved stations can be restored even
after AUTO.P has been used, such as after traveling.
Touching AUTO.P while AUTO.P is being used or after AUTO.P has been used
will return the preset memories back to the condition they had before AUTO.P was
used. (Doing so will delete the stations saved with AUTO.P.) The flow for switching
from AUTO.P to manual is shown below.
If the BAND is switched to another BAND, the saved station with AUTO.P is cleared.
Touch AUTO.P
beep is heard.
Automatically saves
stations to preset switches
until a
Manual
Touch AUTO.P
(Stations saved by AUTO.P are
deleted)
AUTO.P
(starts search)
AUTO.P
(stops search)
• AUTO.P may not automatically receive stations if radio waves in the surrounding
area are weak.
• A station saved by the tuning switch may not match a station saved by AUTO.P
even though the signal is received from the same station.
• Due to conditions for receiving radio waves, saved stations may differ even
when the AUTO.P switch is operated repeatedly in the same location.
• Up to six stations having good reception sensitivity are automatically saved in
order starting from the lowest frequency.
• When less than six stations capable of reception are found, nothing is saved for
the remaining preset switches.
• In the FM mode, when the BAND is switched to another BAND, the AUTO.P is
canceled temporarily.
54
Turning off the radio
• Touching AUDIO OFF again on the
MAIN MENU screen will turn on the
radio and resume reception of the
radio station (frequency) received
before power was turned off.
RADIO
Press MENU .
Touch AUDIO OFF .
55
How to operate the tuner
How to use HD Radio
When an optional HD Radio tuner is connected, HD Radio broadcasts can be received.
Title
Switch
SOURCE MENU switch
AUTO.P
Switch
MODE
Switch
Preset
Switches
MENU
Button
TUNE TRACK
Button
Listening to HD Radio
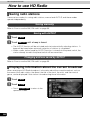
Depending on the reception status, HD Radio can also receive analog broadcasts, which
means reception is still possible in regions with no digital coverage.
Press MENU .
Touch SOURCE .
Touch AM to receive AM radio, or
FM to receive FM radio.
• When an HD Radio tuner is connected and a digital broadcasting program is
received, "DIGITAL" is displayed.
• When an HD Radio tuner is connected, the
available.
TITLE touch switch becomes
• With the MODE switch, you can switch between analog and digital
broadcasting.
• The HD Radio Ready logo is a proprietary trademark of iBiquity Digital Corp.
56
Selecting radio stations
Manual selection
or
.
• Each pressing of the switch moves the frequency one step up or down. (One step on
the AM band is 10kHz. One step on the FM band is 0.2MHz.
: Raises frequency
RADIO
Press
: Lowers frequency
Automatic selection
Press and hold
or
until a beep is heard.
• The station that is closest in frequency to the frequency that is currently displayed on
the screen will be searched for automatically, and searching will stop when the station
is received. To stop the search before a station is found, press the button again.
Selection using preset switches
Touch the preset switch that already has a station recorded.
• Refer to "Saving radio stations" on page 58 for details on saving stations.
If the reception for a particular station is weak in the area you are in, automatic
selection may not work.
57
How to operate the tuner
How to use HD Radio
Saving radio stations
There are two modes for saving radio stations, manual and AUTO.P, and these modes
operate independently.
Saving manually
Refer to "How to use the AM / FM radio" on page 53.
Saving with AUTO.P
Touch
Touch
FUNC .
AUTO.P until a beep is heard.
• The AUTO.P function will be activated and start automatically selecting stations. A
beep will be heard when automatic selection of stations is completed.
• When a radio station found by AUTO.P function is stored into the preset switch, the
station already stored in the preset switch will be overwritten.
Changing stations saved by AUTO.P
Refer to "How to use the AM / FM radio" on page 53.
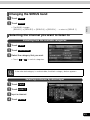
Displaying information about the current broadcast
When receiving an HD Radio broadcast, information about the current broadcast, such as
the name of the radio station, the album, the title of the track, the artist, and the musical
genre, can be displayed if that station is broadcasting those information.
Touch
Touch
FUNC .
TITLE .
• Touch TITLE OFF to return to the
operation screen.
58
Turning off the radio
• Touching AUDIO OFF again on the
MAIN MENU screen will turn on the
radio and resume reception of the
radio station (frequency) received
before power was turned off.
RADIO
Press MENU .
Touch AUDIO OFF .
59
How to operate the tuner
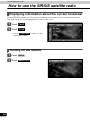
How to use the SIRIUS satellite radio
When an optional SIRIUS satellite radio tuner is connected, SIRIUS satellite radio
broadcasts can be received.
SOURCE MENU switch
DIRECT
Switch
CATEGORY
Switch
TITLE
Switch
BAND
Switch
Preset
Switches
MENU
Button
TUNE TRACK
Button
Listening to SIRIUS satellite radio
With SIRIUS satellite radio, over 100 channels are available including music, news, and
entertainment programs.
You can select the channel you want from various categories such as POP and ROCK, or you
can select a channel by direct input.
Reception of SIRIUS satellite radio is a paid subscription.
Press MENU .
Touch SOURCE .
Touch SIRIUS .
Check the SIRIUS ID
The SIRIUS ID number is a 12-digit numerical code that is assigned each time the SIRIUS
satellite radio tuner is connected.
Touch
SIRIUS ID on the
INFORMATION screen.
• A 12-digit numerical code is displayed.
60
Changing the SIRIUS band
FUNC .
BAND .
• The BAND changes.
[SIRIUS 1] → [SIRIUS 2] → [SIRIUS 3] → [SIRIUS 4] ... → return to [SIRIUS 1]
RADIO
Touch
Touch
Selecting the channel you want to listen to
Selecting from the available categories
Touch FUNC .
Touch CATEGORY .
Select the category that you want.
• Touch
or
to switch categories.
If the selected category is unobtainable, the blank category button appears.
Selecting a channel by direct input
Touch FUNC .
Touch DIRECT .
Input a channel.
Touch ENTER .
61
How to operate the tuner
How to use the SIRIUS satellite radio
Displaying information about the current broadcast
During SIRIUS broadcasts, information including the channel name, the album name, the
title, and the artist can be displayed for the current track.
Touch
Touch
FUNC .
TITLE .
• Touch TITLE OFF to return to the
operation screen.
Turning off the SIRIUS
Press MENU .
Touch AUDIO OFF .
62
63
RADIO
How to operate the tuner
How to use the XM satellite radio
When an optional XM satellite radio tuner is connected, XM satellite radio broadcasts
can be received.
SOURCE MENU switch
DIRECT
Switch
CATEGORY
Switch
TITLE
Switch
BAND
Switch
Preset
Switches
MENU
Button
TUNE TRACK
Button
Listening to XM satellite radio
With XM satellite radio, over 100 channels are available including music, news, and
entertainment programs.
You can select the channel you want from various categories such as DANCE and ROCK, or
you can select a channel by direct input.
Reception of XM satellite radio is a paid subscription.
Press MENU .
Touch SOURCE .
Touch XM .
Check the XM ID
The XM ID number is a 8-digit numerical code that is assigned each time the XM satellite
radio tuner is connected.
Touch
XM ID on the
INFORMATION screen.
• A 8-digit numerical code is displayed.
64
Changing the XM band
FUNC .
BAND .
• The BAND changes.
[XM 1] → [XM 2] → [XM 3] → [XM 4] ... → return to [XM 1]
RADIO
Touch
Touch
Selecting the channel you want to listen to
Selecting from the available categories
Touch FUNC .
Touch CATEGORY .
Select the category that you want.
• Touch
or
to switch categories.
If the selected category is unobtainable, the blank category button appears.
Selecting a channel by direct input
Touch FUNC .
Touch DIRECT .
Input a channel.
Touch ENTER .
65
How to operate the tuner
How to use the XM satellite radio
Displaying information about the current broadcast
During XM broadcasts, information including the channel name, the title, and the artist can
be displayed for the current track.
Touch
Touch
FUNC .
TITLE .
• Touch TITLE OFF to return to the
operation screen.
Turning off the XM
Press MENU .
Touch AUDIO OFF .
66
67
RADIO
How to operate the CD player
How to use the CD player
Repeat
Switch
SOURCE MENU switch
Random
Switch
Scan
Switch
MENU
Button
Track selection (track start point)/
Fast-forward (rewind) Button
Listening to a CD
When a CD is inserted into the disc slot, it automatically starts playing.
Press MENU while a CD is inserted.
Touch SOURCE .
Touch CD .
• Playback will begin.
Selecting a song
You can select a song you want to hear.
Press
•
or
.
: Selects next song
: Selects previous song
Restarts current track. Pressing the down button once more continuously plays
previous tracks.
• Titles and song names can be displayed when they are recorded on a CD. Up
to 32 characters can be shown in the display.
• Only characters recorded by ASCII code can be shown on the CD-TEXT display.
• The CD-TEXT display may not be able to show characters for discs recorded
with many title characters.
68
Fast-forwarding/rewinding
It is possible to fast-forward/rewind the song played currently.
Press and hold
•
or
until a beep is heard.
: Fast-forwards
CD
: Rewinds
The main unit switches to the fast-forward (rewind) mode when the beep is heard and
will continue fast-forwarding (rewinding) until your finger is removed from the switch.
Searching for a song
Touch
Touch
FUNC .
SCAN .
• The main unit will play the first 10 seconds of each song. Touching SCAN again
will continue playing the current song.
Repeating a song
Touch
Touch
FUNC .
RPT .
• Touching RPT once will cause repeating of the song until the function is canceled.
Touching RPT again will cancel repeating of the song.
69
How to operate the CD player
How to use the CD player
Playing songs in random order
Touch
Touch
FUNC .
RAND .
• Touching RAND will play songs in random order until the function is canceled.
Touching RAND again will cancel random playing of songs.
• The song to be played next is randomly selected at the end of the current song, so it
is possible that a single song could end up being played twice in a row.
Turning off the CD player
Press MENU .
Touch AUDIO OFF .
• Touching AUDIO OFF again on the MAIN MENU screen will resume playback.
70
CD
71
How to operate the MP3/WMA player
How to use the MP3/WMA player
For safety considerations, some functions are disabled while the vehicle is in motion.
Repeat
Switch
SOURCE MENU switch
Random
Switch
Scan
Switch
File changing
Switches
MENU
Button
AV Button
Track selection (track start point)/
Fast-forward (rewind) Button
The following operating procedures are based on this example of MP3/WMA file structure
below.
Example of MP3/WMA file structure
Folder
MP3/WMA audio file
1st level
72
2nd level
3rd level
4th level
Playing MP3/WMA
When a CD is inserted into the disc slot, it automatically starts playing.
• Playback will begin.
• The CD player screen will be shown for about 2 seconds as the system checks
whether the inserted CD is a music CD or MP3/WMA disc.
• Normally, tracks are played back in the order
→
→
→
→
→
→
.
• When multiple MP3/WMA files and folders are on the same level, they are played in
ascending order by folder and file names.
MP3/WMA
Press MENU while a disc is inserted.
Touch SOURCE .
Touch MP3 WMA .
Selecting a music file
A music file located within a folder can be selected.
Selecting with file change switches
Touch the music file.
• The currently selected file name and folder name will be shown in the display.
• When more than 8 music files are located in the same folder, touching
or
can
switch between the data. (This function is not available when the vehicle is in motion.)
Selecting with TUNE/TRACK button
When several music files are located in the same folder, the next music file or previous music
file can be selected with the track selection (track start point).
Press
•
or
.
: Selects next music file
: Selects previous music file
Restarts current track. Pressing the down button once more continuously plays
previous tracks.
If music data (CD-DA) and MP3/WMA data are mixed on the same disc, only the
data recorded in the first session can be played.
73
How to operate the MP3/WMA player
How to use the MP3/WMA player
Fast-forwarding/rewinding
It is possible to fast-forward/rewind the song being played.
Press and hold
•
or
until a beep is heard.
: Fast-forwards
: Rewinds
The main unit switches to the fast-forward (rewind) mode when the beep is
heard and will continue fast-forwarding (rewinding) until your finger is removed
from the switch.
Changing display of the current level
The folder level can be switched and displayed.
Touch
•
.
: Displays the next higher folder level.
Displaying the current level
Displays the file currently being played.
Touch
HOME .
• HOME
: Displays the level of the file currently being played.
Searching for a music file
Touch
Touch
FUNC .
SCAN .
• The system will play the first 10 seconds of each song located within the same layer
of the folder currently being played. Touching SCAN again will continue playing
the current song.
74
Refer to page 72 for an example of MP3/WMA file structure.
When the display shows the folder and files of the second level (
as
,
and
)
of the third level is being played, touching HOME will show the folder and
files of the third level (
and
).
Repeating the same music file
FUNC .
RPT .
• The file currently being played will be repeated.
• Setting RPT will cause repeating of the song until the function is canceled. Touching
MP3/WMA
Touch
Touch
RPT again will cancel repeating of the song.
Playing songs in random order
Touch
Touch
FUNC .
RAND .
• Files will be randomly selected from among all files at the same level as the folder
currently being played.
• RAND will play songs in random order until the function is canceled. Pressing
RAND again will cancel random playing of songs.
• Touching RPT while the random function is operating will repeat the currently
playing song. Touching RPT again will return to random playing of songs.
• The song to be played next is randomly selected at the end of current song, so it is
possible that a single song could end up being played twice in a row.
75
How to operate the MP3/WMA player
How to use the MP3/WMA player
About display of file information
Folder names and file information (album name and song titles) recorded on the disc can be
displayed.
Displaying folder/file names
Press AV
to display the operation
screen.
Displaying file information
Touch
TITLE .
• The TITLE switch will change to
TITLE OFF while file information is
being displayed. Touching
TITLE OFF will change the display
to a folder/file switch.
Turning off the MP3/WMA player
Press MENU .
Touch AUDIO OFF .
• Touching AUDIO OFF again on the MAIN MENU screen will resume playback.
76
About MP3/WMA
MP3 (MPEG-1 Audio Layer III) is a standard format for audio compression technology. By
using MP3, a file can be compressed to one-tenth the size of the original.
WMA (Windows MediaTM Audio) is the audio compression format by Microsoft. This can
compress files to a smaller size than MP3 can.
This unit has limitations on MP3/WMA file standards and recorded media and formats that
can be used. Be aware of the following points when recording MP3/WMA files.
Playable MP3 file standards
:
MPEG-1 Audio Layer III
• Supported sampling frequencies :
16, 22.05, 24, 32, 44.1, 48 (kHz)
• Supported bit rate
8 to 320 (kbps)
:
* Supports VBR.
* Does not support free format.
* Bit rates vary for MPEG-1 and MPEG-2.
• Supported channel modes
:
MP3/WMA
• Supported standards
stereo, monaural, dual channel, joint stereo
77
How to operate the MP3/WMA player
How to use the MP3/WMA player
Playable WMA file standards
• Supported standard
:
WMA Ver. 7, 8, 9
• Supported sampling frequencies :
44.1, 48 (kHz)
• Supported bitrates
48 to 192 (kbps)
:
* VBR is supported (48 to 192 kbps)
* No support for reversible compression
(loss-less compression)
Playable sampling frequencies and supported bitrates
Sampling frequencies (Hz)
48 k
44.1k
2 (ch)
2 (ch)
192 k
160 k
128 k
96 k
Bitrates
(bps)
80 k
-
64 k
48 k
VBR
192 k max
: Playable
: Not playable
- : No combination
78
192 k max
ID3tag/WMAtag
MP3 and WMA files have an "ID3tag/WMAtag" that allows input of text information so that
data such as song title and artist can be saved.
This unit supports ID3v.1.0 and ID3v.1.1 tags. Use only ASCII code to record tags, since only
ASCII code is supported by this equipment. Recording of characters not included in ASCII
code will result in display of garbled characters.
This unit supports the WMA tag (v1.20.02). Since the WMA tag supports unicode only,
please input the information with unicode characters.
Media
Compared to CD-ROM media commonly used for music discs, CD-R and CD-RW discs are
fragile in high temperature/high humidity environments and one section of the CD-R/CD-RW
may become incapable of playback. Fingerprints or scratches on the disc may prevent
playback or cause skipping during playback.
MP3/WMA
Media capable of playing MP3/WMA includes CD-ROM, CD-R and CD-RW discs.
Sections of CD-R/CD-RW may deteriorate if left inside a vehicle for long periods of time.
It is also recommended that CD-R/CD-RW discs be kept in a light-blocking case because the
discs are vulnerable to ultra-violet light.
79
How to operate the MP3/WMA player
How to use the MP3/WMA player
Format of discs
The format of discs to be used must be as following:
• Disc format
:
CD-ROM (MODE 1), CD-ROM XA
(MODE2 Form1)
• File format
:
ISO9660 Level 1 or Level 2
ROMEO system, JOLIET system
MP3/WMA files recorded in a format other than the one explained above may result in files
that cannot be played normally and in file names and folder names that do not display
properly.
Limitations in addition to standards are as follows.
• Maximum directory layers
80
:
8 layers
• Maximum characters for folder names/file names :
30 characters for MP3 (including
delimiter "." + file extension 3
characters)
15 characters for WMA (including
delimiter "." + file extension 3
characters)
• Allowable characters for folder names/file names :
A to Z, 0 to 9, _ (underscore)
• Number of files possible on a single disc
:
512
• Number of folders possible on a single disc
:
255
Configuration example for CD supporting MP3/WMA
F1
Folder1
001.MP3
002.MP3
003.MP3
004.WMA
A total of 512 files can be created
within a single disc.
384.MP3
F2
Folder2
F3
Folder3
F255
MP3/WMA
005.MP3
Folder255
• A total of 255 folders can be recorded on a single disc.
81
How to operate the MP3/WMA player
How to use the MP3/WMA player
File names
Only files with the MP3/WMA file extension ".mp3/.wma" can be recognized as MP3/WMA and
played. Be sure to save MP3/WMA files with the ".mp3/.wma" file extension.
Use half-width English capital letters to write "MP3" or "WMA" of the extension.
Multi-sessions
Multisessions are supported and CD-R/RW with recorded MP3/WMA files can be played.
When written with "Track at once", however, finalize the disc with session close or write
protect.
Playing MP3/WMA
When a disc having MP3/WMA files recorded on it is inserted into the main unit, the system
first checks all the files on the disc. If the number of files and folders is large, the check will
take some time.
While the system is checking the disc, the music that had been playing continues to play.
In order to speed up completion of the file check, it is recommended that you avoid recording
files that are not MP3/WMA files and avoid establishing unnecessary folders.
In addition, it is recommended that you record all data in a single session because a
multisession disc takes time for CD control information acquisition.
MP3/WMA playing time display
It is possible that playing time will not be correct, depending on the writing condition of the
MP3/WMA file.
* It is possible that playing time will not be correct when VBR Fast Up/Down is operated.
Display order of MP3/WMA file/folder names
Names of MP3/WMA folders and files within the same level are displayed in the following
order.
1. MP3/WMA files displayed first, by ascending order of numbers, letters.
2. Folders displayed next, by ascending order of numbers, letters.
If the ".mp3/.wma" file extension is attached to a file other than an MP3/WMA file,
that file will be mistakenly recognized by the main unit as an MP3/WMA file and
played, resulting in loud noise output that can damage the speakers. Be sure to
avoid attaching the ".mp3/.wma" file extension to files that are not MP3/WMA files.
82
Making and playing MP3/WMA files
MP3/WMA files created by recording broadcasts, records, audio recordings, video
recordings or live performances cannot be used for purposes other than personal
entertainment without permission of the copyright holder as set forth in copyright law.
Downloading from Internet MP3/WMA music sites
Converting CD music to MP3/WMA files
Prepare a computer with commercially available MP3/WMA encoding software (conversion
software). Some encoding programs available on the Internet do not require payment.
Music data files in MP3/WMA format can be made by inserting the music CD into the CDROM drive of the computer and following the procedures of the MP3/WMA encoding software
to compress the songs of the music CD. A 12cm music CD (having a maximum of 74
minutes of recording/650MB of data) can be compressed to 65MB (about 1/10 of the original
size).
MP3/WMA
There are many kinds of sites that distribute MP3/WMA files on the Internet, such as "pay per
download" online shopping sites, "try before you buy" listening sites and free download sites.
Follow the rules for each site (such as paying fees) and download according to site
instructions.
Writing to CD-R/CD-RW
MP3/WMA files can be recorded on CD-R/RW by using a CD-R/RW drive connected to a
computer. Record by setting the recording format of the recording software to ISO9660 level
1 or level 2 (not including extension format).
Select CD-ROM ( mode1 ) or CD-ROM XA ( mode2 ) for the disc format.
When playing back CD-R/RW
Insert a CD-R/RW disc having recorded MP3/WMA files. The system will automatically
determine whether the disc is a music CD or a CD-R/RW with MP3/WMA files and begin
playing the disc. A music CD recorded onto a CD-R/RW can also be played. However,
depending on the type of disc being used, the disc may not play.
• A fixed bit rate of 128kbps and sampling frequency of 44.1kHz is recommended
for obtaining stable audio quality at playback.
• Depending on the characteristics of a disc, CD-R and CD-RW may not be able
to read the disc.
• Because there are many types of MP3/WMA encoding software available,
including commercial and freeware programs, audio quality may deteriorate,
noise may be generated when playing starts and some recordings may not play,
depending on the condition of the encoder and the file format.
• When files other than MP3/WMA files are recorded on a disc, the system may
take some time to recognize the disc and it may not play the disc.
83
How to operate the CD changer
How to use the CD changer
An optional CD changer can be connected and used.
Disc repeat
switch
SOURCE MENU switch
Disc random
switch
Disc scan
switch
Disc changing
switches
MENU
Button
Track selection (track start point) /
Fast-forward (rewind) Button
Listening to a CD
Press MENU .
Touch SOURCE .
When only one CD changer is connected, touch
CDCHANGER1 . When two
CD changers are connected, touch CDCHANGER1 or CDCHANGER2 .
Selecting a song
Refer to "How to use the CD player" (Page 68).
Fast-forwarding/rewinding
Refer to "How to use the CD player" (Page 69).
84
Selecting a CD
A CD can be selected from among all the discs on a changer.
Touch one of the disc changing switches.
• The number for the selected CD will change color.
Searching for a song or CD from all CDs in changer
Searching for a song
Refer to "How to use the CD player" (Page 69).
Touch
Touch
FUNC .
DISC SCAN .
CD changer
Searching for a CD
• The system will play the first 10 seconds of the first song on each CD in the changer.
Touching DISC SCAN again will continue playing the current song.
• The system will display the amount of disc changing switches that matches the
number of CDs that can be inserted into the CD changer, and it will only allow
selection of disc numbers that have discs currently loaded.
• No operation is possible when there are no discs loaded into the CD changer.
• If two CD changers are connected, switch between the optional CD changers
and the CD changer with CDCHANGER1 / CDCHANGER2 .
85
How to operate the CD changer
How to use the CD changer
Repeating a song or CD
Repeating the current song
Refer to "How to use the CD player" (Page 69).
Repeating the current CD
Touch
Touch
FUNC .
DISC RPT .
• Touching DISC RPT once will cause repeating of the CD until the function is canceled
Touching DISC RPT again will cancel repeating of the CD.
Playing songs in random order
Playing songs on current CD in random order
Refer to "How to use the CD player" (Page 70).
Playing songs on all CDs in random order
Touch
Touch
FUNC .
DISC RAND .
• Touching DISC RAND will play songs in random order until the function is
canceled. Touching DISC RAND again will cancel random playing of songs.
• The song to be played next is randomly selected at the end of current song, so it is
possible that a single song could end up being played twice in a row.
Turning off the CD player
Press MENU .
Touch AUDIO OFF .
• Touching AUDIO OFF again on the MAIN MENU screen will resume playback.
86
87
CD changer
How to operate iPod
®
Operating the iPod
When an optional iPod interface adaptor (iPC-106) is connected, it is possible to operate the
iPod® with this main unit.
• iPod is for legal or rightholder-authorized copying only. Don't steal music.
• iPod is a trademark of Apple Inc., registered in the U.S. and other countries.
SOURCE MENU
switch
Repeat Switch
Random switch
ALBUM
Random
switch
MENU switch
MENU
Button
Track selection (Track startpoint)/
Fast-forward (rewind) Button
• For the functions of the iPod, refer to the operation manual of the iPod.
• For the specific details of the iPod operation and connection, refer to the
Instruction Manual of the optional iPod interface adaptor (iPC-106).
• It is assumed here that the iPod has already connected to this main unit with an
optional iPod interface adaptor (iPC-106).
Listening to iPod
Press MENU .
Touch SOURCE .
Touch iPod .
• Playback will begin
88
Searching for a song in various ways
You can select a song you want to listen to from ALBUM, ARTIST, PLAYLIST, GENRE or
SONG.
Displaying the search mode screen
Touch MENU repeatedly until the search mode screen (top menu) as
shown below is displayed.
Touch PLAYLIST , ARTIST ,
ALBUM , GENRE or SONG and
select the song you want to listen
to.
• If no operation was performed on the
search mode screen for 10 seconds, it
returns to the playback.
iPod
Search mode screen (top menu)
About text display
Alphanumeric and symbols can be used for text display. Even if the characters
other than alphanumeric and symbols are displayed on your iPod, they are not
displayed on this unit.
Playback mode screen
Search mode screen
89
How to operate iPod
®
Operating the iPod
Selecting a song from your favorite GENRE
Touch GENRE on the search
mode screen.
• All the genre names stored in the iPod
that is connected to this unit will be
displayed.
Touch GENRE name you want to
browse.
• The ARTIST names stored in the selected GENRE will be displayed.
Touch ARTIST name you want to browse.
• Touching ARTIST briefly will display the ALBUM names stored in the selected ARTIST.
• By touching ARTIST for several seconds, the first track in the selected ARTIST will
start playing.
Touch ALBUM name you want to browse.
• Touching ALBUM briefly will display the song names stored in the selected ALBUM.
• By touching ALBUM for several seconds, the first track in the selected ALBUM will
start playing.
Touch the song name you want to listen to.
• The selected song will be played.
90
Selecting a song from your favorite ARTIST
Touch ARTIST on the search
mode screen.
• All the stored ARTIST names will be
displayed.
Touch ARTIST name you want to
browse.
• Touching it briefly will display the
ALBUM names stored in the selected ARTIST.
• By touching ARTIST for several seconds, the first track in the selected ARTIST will
start playing.
Touch ALBUM name you want to browse.
• By touching ALBUM for several seconds, the first track in the selected ALBUM will
start playing.
Touch the song name you want to listen to.
iPod
• Touching it briefly will display the song names stored in the selected ALBUM.
• The selected song will be played.
Selecting a song from your favorite ALBUM
Touch ALBUM on the search
mode screen.
• Touching it briefly will display all the
stored ALBUM names.
Touch ALBUM name you want to
browse.
• Touching it briefly will display the song
names stored in the selected ALBUM.
• By touching ALBUM for several seconds, the first track in the selected ALBUM will
start playing.
Touch the song name you want to listen to.
• The selected song will be played.
91
How to operate iPod
®
Operating the iPod
Selecting your favorite song from song name list
Touch
SONG on the search
mode screen.
• Touching it briefly will display all the
stored song names.
Touch the song name you want to
listen to.
• The selected song will be played.
Selecting a song from your favorite PLAYLIST
Touch PLAYLIST on the search
mode screen.
• Touching it briefly will display all the
stored PLAYLIST names.
• Touching it for several seconds will
play all the songs for every PLAYLIST.
Touch the PLAYLIST name you
want to listen to.
• The selected PLAYLIST will be played.
• Touching ALL SONGS will play all the songs for every ALBUM.
About REPEAT/RANDOM function
• REPEAT, RANDOM and ALBUM RANDOM correspond to the "Song REPEAT",
"Shuffle" and "ALBUM shuffle" functions of the iPod, respectively.
• Touching FUNC will display the RPT , RAND and ALBUM RAND button.
92
Selecting a song
You can select a song you want to hear.
Press
•
or
.
: Selects next song
: Selects previous song
Restarts current track. Pressing the down button once more continuously plays
previous tracks.
Fast-forwarding/rewinding
It is possible to fast-forward/rewind the song played currently.
Press and hold
until a beep is heard.
: Fast-forwards
: Rewinds
The main unit switches to the fast-forward (rewind) mode when the beep is heard and
will continue fast-forwarding (rewinding) until your finger is removed from the switch.
iPod
•
or
93
How to operate the DVD player
Before using the DVD player
This equipment can play high quality images and high quality digital sound of DVD videos. It
is also possible to switch between different languages recorded on the DVD video (dubbing,
subtitles, etc.), and with videos having several angles of the same scene recorded, the
preferred angle can be selected and played.
DVD video characteristics
About Multiple Languages
Some DVD discs have dialog recorded in several different languages, and the language can
be switched during playback in the same way as multilingual TV broadcasts.
An airplane was flying
in the night sky...
About Multiple Angles
Some DVD discs have a single scene recorded from several different angles (multiple angle),
and the preferred angle can be switched during playback.
* Depending on the disc, multiple angles may not be viewed.
The angle of the image is changed.
94
About Subtitles
Some DVD discs have subtitles recorded in several different languages, and the subtitles
can be switched during playback. The video can also be played without any subtitles
displayed.
About discs
About playable discs
Playable Disc Types and Their marks
Size/Playing Surface
Maximum Playing Time
12 cm/single-sided
1 layer
2 layer
Using MPEG 2
133 min.
242 min.
12 cm/double-sided
1 layer
2 layer
266 min.
484 min.
DVD
This equipment conforms to NTSC color television methods, so please use discs that display
"NTSC" on the disc or package. This equipment cannot play discs using color television
methods other than NTSC (such as PAL, SECAN).
95
How to operate the DVD player
Before using the DVD player
About region codes of playable discs
Some DVD discs display a 1 ("Region Code"). The mark (a number) shows the
geographical region where the disc can be played. This equipment will not play discs that
do not show "1" or "ALL" in this mark. Even if the disc does play, the message "Cannot play
this disc" will be displayed on the screen. Note also that some discs may be subject to
regional restrictions, meaning that this equipment will not play them, even though they list or
state a region code.
The playing condition is determined by the intention of the DVD/software creator.
Some functions may not perform during operation because this equipment is
playing the disc according to content specifications intended by the software
creator. Be sure to consult the explanatory material provided with the disc to be
played.
About marks displayed on discs
The following mark may be displayed on a DVD disc or its package.
mark
Meaning
3
Shows number of voice tracks.
2
Shows number of subtitle languages.
Shows number of filmed angles.
3
96
16:9 LB
4:3
Shows available aspect ratio (television screen horizontal to
vertical ratio).
• "16:9" is wide screen, "4:3" is standard screen.
ALL
1
Shows playable region code.
• ALL indicates worldwide. A number indicates a specific
region code. "1" is the region number for North America.
About DVD disc structure
Videos and songs recorded on a DVD are divided into many segments.
Large segments are called "titles", and each title has a number ("title number"). Title
segments are further divided into smaller segments called "chapters", and each chapter has
a number ("chapter number").
Chapter 1
Title 1
Chapter 2
Chapter 3
Chapter 1
DVD-Video
Title 2
Chapter 2
Chapter 3
Title 3
Chapter 2
Title number
Chapter 3
Chapter number
DVD
Chapter 1
Products equipped with Macrovision
This product incorporates copyright protection technology that is protected by method
claims of certain U.S. patents and other intellectual property rights owned by Macrovision
Corporation and other rights owners. Use of this copyright protection technology must be
authorized by Macrovision Corporation, and is intended for home and other limited viewing
uses only unless otherwise authorized by Macrovision Corporation. Reverse engineering or
disassembly is prohibited.
97
How to operate the DVD player
Before using the DVD player
About flow of operations
The section below describes the flow for items such as operation and search of images and
default settings for the DVD player.
• Touching a touch switch brings up the operation screen shown below.
● DVD operation screen
● Title screen
SEARCH
BACK
SET
BACK
BACK
● Menu operation screen
NUMBER
● Menu number search screen
98
BACK
SETUP
● Default settings screen
ENTER
How to operate the DVD player
How to use the DVD player
A DVD can be watched only if the vehicle is completely stopped in a safe location with the
parking brake set and the ignition switch turned to ON or ACC. (Only sound can be heard if
a DVD is played while the car is in motion.)
Title number
Chapter number
Playing time
SOURCE MENU
switch
Angle change
switch
Subtitles change
switch
Audio change
switch
Buttons off switch
MENU
Button
AV
Button
Chapter changing/
Fast-forward (rewind) Button
Watching a DVD
Press MENU while a disc is inserted.
Touch SOURCE .
Touch DVD .
DVD
Start playback by inserting a DVD into the DVD insertion slot, which will automatically turn on
power.
• Playback will begin.
• If the operation switches (touch switches) are not being displayed, press AV or
touch the screen.
99
How to operate the DVD player
How to use the DVD player
Operating the video
Playing the video
Touch
.
Fast-forwarding/rewinding
It is possible to fast-forward or rewind through the video being played.
Using panel button
Press and hold
•
or
until a beep is heard.
: Advances the video
: Rewinds the video
• The main unit switches to the fast-forward (rewind) mode when the beep is heard and
will continue fast-forwarding (rewinding) until your finger is removed from the switch.
Fast-forwarding/rewinding using the touch switches
Touch
or
.
• The main unit switches to the fastforward (rewind) mode when the beep
is heard and will continue fastforwarding (rewinding) until your finger
is removed from the switch.
• Information for items such as touch switches will be displayed for about 6
seconds. Pressing AV or touching the screen will display them again.
• Depending on the disc, automatic playback may not function or playback may
not function unless a menu recorded on the disc is selected. (Refer to
"Operating the disc menu" on page 102.)
100
Pausing the video
Touch
.
• While paused (
), briefly touching
will play in slow motion and
touching
frame.
will play frame-by-
Stopping the video
.
DVD
Touch
101
How to operate the DVD player
How to use the DVD player
Operating the disc menu
It is possible to use the menu recorded on the disc.
Touch
Touch
Touch
Touch
on the DVD operation screen.
MENU or TOP MENU .
.
and select
the video to play.
Touch ENTER .
Recorded menu items will differ by disc. Some functions may not perform during
operation because playback is following disc content specifications.
Turning off the DVD
Press MENU .
Touch AUDIO OFF .
• Touching AUDIO OFF again on the MAIN MENU screen will resume playback.
102
Searching for a desired chapter
It is possible to search for a particular video segment by title and chapter or by menu number
(number for divided segments).
Searching by chapter
Press
or
•
Chapter number
.
: Selects next chapter
: Selects previous chapter
Searching by title number
Touch
SEARCH on the DVD
Title number
• The title number input screen will be
displayed.
DVD
operation screen.
Input the title number by touching
,
,
-10 , +10 .
• Touching
or
the title number by ones.
changes
• Touching -10 or +10 changes
the title number by tens.
Touch ENTER .
103
How to operate the DVD player
How to use the DVD player
Searching by menu number
Touch
Touch
Touch
on the DVD operation screen.
.
NUMBER .
• The menu number input screen will be
displayed.
Input the menu number by touching
,
,
-10 , +10 .
• Touching
or
changes
the menu number by ones.
• Touching -10 or +10 changes
the menu number by tens.
Touch ENTER on the DVD
operation screen.
104
Changing the touch switch display
Display of the touch switches can be changed or turned off.
Turning off the touch switches
Touch
OFF on the DVD operation
screen.
• Pressing AV or the touching the
screen will display the touch switches
again.
Changing the touch switch display locations
on the DVD operation screen.
.
POSITION .
DVD
Touch
Touch
Touch
• The position of the touch switch will
move up or down with each touch of
the screen.
POSITION
POSITION
105
How to operate the DVD player
How to use the DVD player
Switching between screen display and audio
It is possible to change the language for subtitles, the language for audio and the display
angle for the video being played.
Switching the video angle
When several angles of a scene are recorded on a disc, the angle can be switched.
Touch
Touch
on the DVD operation screen.
ANGLE when the multi-
Multi-angle mark
angle mark is displayed.
• The angle number will be displayed.
Touch
ANGLE .
Angle number
• The angle number will change and the
angle of the video will be switched.
Each time ANGLE is pressed, the angle will change in order from among the
angles recorded on the disc.
106
Switching subtitle languages
When subtitles in several languages are recorded on a disc, the subtitles can be switched.
Touch
Touch
on the DVD operation screen.
SUB TITLE .
• The subtitle number and language will
be displayed.
Touch
SUB TITLE .
Subtitle number and language
DVD
• Switches the subtitle number each
time the touch switch is touched and
switches the displayed subtitle
language.
• Each time SUB TITLE is pressed, the subtitle language will change in order
from among the subtitles recorded on the disc.
• Depending on the disc, it may only be possible to change subtitles from the top
menu.
107
How to operate the DVD player
How to use the DVD player
Switching dubbed audio language
When dubbed voices in several languages are recorded on a disc, the voices can be
switched.
Touch on the DVD operation screen.
Touch AUDIO .
• The audio number and language will
be displayed.
Touch AUDIO .
Audio number and language
• The audio number will change and the
language of voices being played will
be switched.
• Each time AUDIO is pressed, the audio language will change in order from
among the languages recorded on the disc.
Language 1
Language 2
Language...
• Depending on the disc, it may only be possible to change the language from the
top menu.
• The dts (digital theater system) format is not supported by this equipment, so no
audio will be emitted when "dts audio" is selected by a disc having dts audio
recorded on it. In this case, select "Dolby Digital audio" if it is definitely recorded
on the DVD video.
• dts is a registered trademark of the US company Digital Theater Systems, Inc.
108
Setting the DVD player
The language preference for voices, subtitles and menu display used during DVD playback
can be set in advance. Optional display of the multiple angle mark, viewer restriction and
other functions can also be set.
Touch
Touch
SET .
Touch
SETUP .
on the DVD operation screen.
DVD
• The SET UP screen will be displayed.
Touch any of the touch switches.
Settings can be made for the
following items.
Touch switch
Function
Page
Sets the language of voices for video playback.
110
Sets the language of subtitles for video playback.
111
MENU LANGUAGE
Sets the language of displayed menus.
112
ANGLE INDICATOR
Sets display/non-display of multiple angle mark.
113
Restricts the types of DVD videos that can be played.
114
Sets screen size.
115
AUDIO LANGUAGE
SUB TITLE
PARENTAL SETTING
VIDEO OUT
Go to the next page
109
How to operate the DVD player
How to use the DVD player
Pressing one of the switches that can switch screens ( AV or MENU ) without
touching ENTER after changing settings with the default setting screen will
stop playing of the DVD. Touch
again. (Refer to page 100.)
on the operation screen to start playback
Setting the audio language
The preferred language for the video being played can be selected.
Touch
AUDIO LANGUAGE on the
SET UP screen.
Touch the preferred language.
• Touching OTHER enables setting of
a language other than those displayed
on the screen.
Input a code
Touch OTHER
on the AUDIO
LANGUAGE setting screen.
Input a language code.
• Refer to "Table of language codes" on
page 116 for language codes.
Touch ENTER .
110
Subtitle language setting
The preferred subtitles for the video being played can be selected.
Touch
SUB TITLE on the SET UP
screen.
Touch the preferred language.
• Touching OTHER enables setting of
a language other than those displayed
on the screen.
• Touching OFF plays the video with
no subtitles on the screen.
Input a code
Touch OTHER
on the SUB TITLE
setting screen.
• Refer to "Table of language codes" on
page 116 for language codes.
DVD
Input a language code.
Touch ENTER .
Language switching cannot be performed if the selected language is not
recorded on the disc.
111
How to operate the DVD player
How to use the DVD player
Menu language setting
Allows selection of a preferred menu language from those recorded on the disc.
Touch
MENU LANGUAGE on the
SET UP screen.
Touch the preferred language.
• Touching OTHER enables setting of
a language other than those displayed
on the screen.
Input a code
Touch OTHER
on the MENU
LANGUAGE setting screen.
Input a language code.
• Refer to "Table of language codes" on
page 116 for language codes.
Touch ENTER .
112
Setting display of multi-angle mark (angle selection mark)
The multi-angle mark can be set to display/not display for the video being played.
Multi-angle mark
Touch
ANGLE INDICATOR on the
SET UP screen.
• Each time ANGLE INDICATOR is
pressed, the condition will switch
between "ON" and "OFF".
DVD
Touch ENTER .
• Language switching cannot be performed if the selected language is not
recorded on the disc.
• Setting multi-angle mark display to "ON" will display the multi-angle mark in the
upper right corner of the screen when multiple angles are available on the disc.
113
How to operate the DVD player
How to use the DVD player
Viewer restriction setting
This function allows restriction of viewing so that discs with adult themes or violent scenes will
not be available to children. Viewer restriction can be set at different levels to match
restriction ratings.
Touch PARENTAL SETTING on the SETUP screen.
Enter a password (4 digits) by
touching one number at a time.
Touch ENTER .
Touch the preferred restriction
level.
Touch ENTER .
• If you touched ENTER after
inputting a wrong password, eject the
disc once to set the viewer restriction
setting again.
• Restriction cannot be set for discs not having a viewer restriction level recorded.
• Be sure to enter a password number. If a number is not entered, setting of
viewer restriction will not be possible.
• The password to be shown in the upper section will be displayed as ---- when a
password has not yet been set.
• Once the password has been set, the password will be required for subsequent
use of this function. Please do not forget the password. If the password is
forgotten, the default condition (no password set) can be restored by touching
CLEAR 10 times.
• Viewer restriction levels are classified in 3 types.
Level 1 ................. Plays only DVD software intended for children. (Playing of
DVD software intended for general audiences or adult
audiences is prohibited.)
Level 2 - 7 ............ Plays only DVD software intended for children or general
audiences. (Playing of DVD software intended for adult
audiences is prohibited.)
Level 8 ................. Plays all DVD software. (Factory setting)
114
Changing video output
Touch VIDEO OUT on the SETUP
screen.
• Each time VIDEO OUT is pressed, the
screen size will be changed in the
order shown below.
16:9
4:3
letter box
4:3
pan & scan
• 16:9
The video is displayed in normal wide size. DVD software recorded in 4:3 size will be
displayed with black left and right edges or will be expanded to the left and right.
• 4:3 (letter box)
The video is displayed with black upper and lower edges.
DVD software recorded in 4:3 size will be displayed exactly at screen size (4:3).
• 4:3 (pan & scan)
The video is displayed with right and left edges cut off. DVD software recorded in 4:3
size will be displayed exactly at screen size (4:3).
DVD
Touch ENTER .
When another monitor such as the rear seat monitor is being used, the size of the
video being displayed in the rear seat monitor will differ according to the video
output size that is set by this main unit (front).
Viewing of wide screen modes is permitted when limited to the personal
entertainment of the user, but caution is required when using technologies such
as image compression and expansion for the purpose of commercial benefit or
public presentation may infringe upon the rights of the copyright holder being
protected by applicable copyright law.
115
How to operate the DVD player
How to use the DVD player
Table of language codes
These codes are used to specify the language for audio tracks, subtitles and on-screen
menu displays.
Input
code
1001
116
Language
Input
code
Japanese
0801
0514
English
0618
French
0405
Language
Input
code
Language
Hausa
1721
Quechua
0809
Hindi
1813
Rhaeto-Romance
0818
Croatian
1814
Kirundi
German
0821
Hungarian
1815
Romanian
0920
Italian
0825
Armenian
1823
Kinyarwanda
0519
Spanish
0901
Interlingua
1901
Sanskrit
1412
Dutch
0905
Interlingue
1904
Sindhi
1821
Russian
0911
Inupiak
1907
Sangho
2608
Chinese
0914
Indonesian
1908
Serbo-Croatian
1115
Korean
0919
Icelandic
1909
Sinhalese
0512
Greek
0923
Hebrew
1911
Slovak
0101
Afar
1009
Yiddish
1912
Slovenian
0102
Abkhazian
1023
Javanese
1913
Samoan
0106
Afrikaans
1101
Georgian
1914
Shona
0113
Amharic
1111
Kazakh
1915
Somali
0118
Arabic
1112
Greenlandic
1917
Albanian
0119
Assamese
1113
Cambodian
1918
Serbian
0125
Aymara
1114
Kannada
1919
Siswati
0126
Azerbaijani
1119
Kashmiri
1920
Sesotho
0201
Bashkir
1121
Kurdish
1921
Sundanese
0205
Byelorussian
1125
Kirghiz
1922
Swedish
0207
Bulgarian
1201
Latin
1923
Swahili
0208
Bihari
1214
Lingala
2001
Tamil
0209
Bislama
1215
Laothian
2005
Telugu
0214
Bengali
1220
Lithuanian
2007
Tajik
0215
Tibetan
1222
Latvian
2008
Thai
0218
Breton
1307
Malagasy
2009
Tigrinya
0301
Catalan
1309
Maori
2011
Turkmen
0315
Corsican
1311
Macedonian
2012
Tagalog
0319
Czech
1312
Malayalam
2014
Setswana
0325
Welsh
1314
Mongolian
2015
Tonga
0401
Danish
1315
Moldavian
2018
Turkish
0426
Bhutani
1318
Marathi
2019
Tsonga
0515
Esperanto
1319
Malay
2020
Tatar
0520
Estonian
1320
Maltese
2023
Twi
0521
Basque
1325
Burmese
2111
Ukrainian
0601
Persian
1401
Nauru
2118
Urdu
0609
Finnish
1405
Nepali
2126
Uzbek
0610
Fiji
1415
Norwegian
2209
Vietnamese
0615
Faroese
1503
Occitan
2215
Volapuk
0625
Frisian
1513
Oromo
2315
Wolof
0701
Irish
1518
Oriya
2408
Xhosa
0704
Scots-Gaelic
1601
Panjabi
2515
Yoruba
0712
Galician
1612
Polish
2621
Zulu
0714
Guarani
1619
Pashto
0721
Gujarati
1620
Portuguese
DVD
117
How to operate the VTR
How to use the VTR
Connecting a VTR deck enables watching of video. Videos can be played only if the vehicle
is completely stopped in a safe location with the parking brake set and the ignition switch
turned to ON or ACC. (Only sound can be heard if a VTR is played while the car is in motion.)
SOURCE MENU switch
MENU
Button
AV
Button
Viewing the VTR
Press MENU .
Touch SOURCE .
Touch VTR .
• The VTR screen will be displayed.
• Press AV or touch the screen to display the VTR operation screen.
• By touching ENTER on the VTR operation screen, the display will show video
again.
Switching the VTR setting screen
Various settings mentioned below can be made by switching to the VTR setting screen.
• Tone control such as EQ and POS.
• Switching the screen mode (wide mode)
Touch SET on the VTR operation screen.
• By touching BACK , the display will return to the VTR operation screen.
118
Turning off the VTR mode
Press MENU .
Touch AUDIO OFF .
• Pressing PWR again will resume playback.
• Video can also be played by touching SOURCE and then touching VTR .
• After switching to the VTR operation screen, touch switches will be displayed for
VTR
about 6 seconds. Pressing AV will display them again.
• The VTR operation screen will be displayed by touching the screen, even when
the VTR is playing.
• Depending on the kind of devices connected, the video image may not be
displayed correctly.
119
How to operate the TV tuner
How to use the TV
The unit can be used as a TV if a TV tuner (sold separately) is connected to the unit. For
safety reasons, the TV can be viewed only when the ignition is switched to ON or ACC and
the vehicle is completely stopped with the parking brake set. If TV mode is selected while the
vehicle is in motion, or while the display is closed, only sound will be output.
SOURCE MENU
switch
AUTO.P
Switch
Preset
Switches
MENU
Button
TUNE TRACK
Buttons
Watching a TV
Press MENU .
Touch SOURCE .
Touch TV .
Selecting channels
Manual selection
Press
/
or
/
.
• Pressing the switch once moves the channel one step up or down.
120
/
: Raises the channel
/
: Lowers the channel
Automatic selection
Press and hold
/
or
/
until you hear a beep.
• The channel that is closest to the current channel will be searched for automatically,
and searching will stop when the channel is received. To stop the search before a
channel is found, press the button again.
Selection using preset switches
Touch a preset switch that already
has a channel recorded.
• See "Saving channels" shown below
for more information.
TV
After switching to the TV operation screen, touch switches will be displayed for
about 6 seconds. Touch the screen to display them again.
121
How to operate the TV tuner
How to use the TV
Saving channels
There are two modes for saving channels, manual and AUTO.P. These modes operate
independently.
Saving manually
Make sure "AUTO.P" is not displayed in the upper part of the screen.
• If displayed, touch AUTO.P to switch to manual.
Use manual tuning or automatic
tuning to select the channel to be
saved.
Choose a preset switch and touch
it until you hear a beep.
• The channel is set. Touch the preset
switch to tune in the selected channel.
Saving with AUTO.P
Touch
AUTO.P until you hear a beep.
• The AUTO.P function will activate and start automatically selecting channels. You will
hear a beep when the automatic selection of channels is completed.
Touch AUTO.P again to return to the channels originally saved.
Changing stations saved by AUTO.P
Use manual tuning or automatic tuning to select the channel to be saved.
Touch the preferred preset switch until you hear a beep.
122
About AUTO.P
Because the AUTO.P function can be used to temporarily save channels for the
preset switches, channels saved manually will remain in memory even if AUTO.P is
used. Manually saving channels that are used regularly allows them to be restored
even after AUTO.P has been used, such as after traveling.
Touching AUTO.P while AUTO.P is operating or after it has been used will return
the preset memories to their previous settings. (The channels saved with AUTO.P
will be deleted.) The diagram below shows how to switch between AUTO.P and
manual.
Touch AUTO.P until
you hear a beep.
Automatically saving
channels to preset switches
AUTO.P
(Search started)
Manual
Touch AUTO.P
AUTO.P
(Search
completed)
• AUTO.P may not automatically receive channels if TV waves in the surrounding
area are weak.
• A frequency saved with the tuning switch may not match the channel saved with
AUTO.P even though the signal is received from the same station.
• Due to conditions for receiving TV waves, saved channels may differ even when
the AUTO.P switch is operated repeatedly in the same location.
• Up to eight channels with good signal reception are automatically saved in
channel order (low to high).
• When less than eight channels capable of reception are found, nothing is saved
for the remaining preset switches.
TV
(The channels saved with
AUTO.P will be deleted)
123
How to operate the TV tuner
How to use the TV
Switching the TV setting screen
Various setting mentioned below can be made by switching to the TV setting screen.
• Switching the display mode (wide mode)
• Memorizing channel number manually.
Touch
SET .
• By touching BACK , the display will
return to the TV operation screen.
Turning off the TV mode
Press MENU .
Touch AUDIO OFF .
• Touching AUDIO OFF again on the MAIN MENU screen to turn on the TV and
resume reception of the channel received before power was turned off.
124
TV
125
How to operate the DUAL PLAY
How to use the DUAL PLAY
The DUAL PLAY function provides another audio system (DVD, TV, CD, MP3/WMA) specially
for rear seat passengers by using the optional rear seat monitor.
Setting the rear seat monitor
Setting of rear seat monitor can be made.
Press MENU .
Touch INFO .
Touch RSE on the
INFORMATION screen.
Touch
ON or OFF for DUAL
PLAY.
• ON :The rear seat monitor provides
audio and video separately from
the front seats.
•
When DISC is selected, DVD, CD or MP3/WMA will be played.
When TV is selected, the TV broadcasting will be received.
• OFF : The rear seat monitor does not provide audio and video.
When the DVD, TV or VTR is selected for front seats, the same audio/video as
the front seats will be output.
• When the DUAL PLAY is set to ON, the audio for rear seat passengers can be
operated with the optional remote control [RRC106].
•
Touch
ENTER .
• In the DUAL PLAY mode, the combinations of the Audio functions that can be
selectable are as following:
Selected Audio mode for Front seat
Selected Audio mode for Rear seat
• AM/FM (analog broadcasting)
• DISC (DVD·CD·MP3/WMA)
• TV
• DISC (DVD·CD·MP3/WMA)
• TV
•
•
•
•
•
•
• DISC (DVD·CD·MP3/WMA)
*TV cannot be selected.
HD Radio
SIRIUS satellite radio
XM satellite radio
iPod
CD changer
VTR
• The TV button is displayed only when the optional TV tuner is connected.
• The audio for rear seat passengers is output from rear monitor built-in speakers.
126
Operating the rear seat monitor
The rear seat monitor can be operated using a dedicated remote control.
Remote-Control light
receptor
Optional remote control (RRC106)
for DUAL PLAY operation
• Be careful when handling the remote control, especially because it is small and
light. Dropping or striking it hard may damage it, wear out the battery or cause a
malfunction.
• Keep the remote control free of moisture, dust and water. Do not subject it to
shock.
• Do not place the remote control unit where it will get hot, such as on the
dashboard or near a heater vent. Allowing the remote control unit to overheat
may warp its case or cause other problems.
• Do not operate the remote control unit while driving because doing so could
cause an accident.
• When using the remote control, point it directly at the remote control light
receptor on the main unit.
• The light receptor may not operate correctly if it is exposed to bright light such as
direct sunlight.
• Remove the batteries from the remote control unit whenever it is not to be used
for a long time.
Cleaning the remote control
DUAL
PLAY
Precautions in use of the remote control
• Use a dry cloth to keep the unit clean. If the remote control unit gets extremely
dirty, clean it with a cloth moistened in diluted liquid detergent. Do not use
alcohol or thinner; these compounds may damage the finish.
• In no event should benzine or thinner be used. These substances will damage
the case or finish.
127
How to operate the DUAL PLAY
How to use the DUAL PLAY
REPEAT
button
button
button
button
buttons
The screen display of rear seat monitor
How to play CD
The remote control is operable only when CD is inserted in the disc slot.
Listening to CD
Press
.
• It will start playing.
Selecting a song
You can select a song you want to hear.
Press
•
or
.
:Selects previous song.
:Selects next song.
Fast-forwarding/rewinding
It is possible to fast-forward/rewind the song played currently.
Hold down
•
or
.
:Rewinds.
:Fast-forwards.
The main unit will continue to fast-forward (rewind) until your finger is removed
from the switch.
128
Repeating a song
Press
REPEAT .
• Pressing REPEAT once will cause repeating of the song until the function is
canceled.
Pressing REPEAT again will cancel repeating of the song.
Pausing a song
Press
.
• Pressing
will restart playing the song.
Stopping a song
.
DUAL
PLAY
Press
129
How to operate the DUAL PLAY
How to use the DUAL PLAY
button
REPEAT
button
button
button
buttons
buttons
The screen display of rear seat monitor
How to play MP3/WMA
The remote control is operable only when CD (MP3/WMA) is inserted in the disc slot.
• For details of MP3/WMA, refer to "About MP3/WMA" (on page 77).
Playing MP3/WMA
Press
.
• It will start playing.
Selecting a folder
A folder located within a disc can be selected.
Press
•
or
.
:Selects previous folder.
:Selects next folder.
Selecting a music file
A music file located within a folder can be selected.
Press
•
or
.
:Selects previous song.
:Selects next song.
130
Fast-forwarding/rewinding
It is possible to fast-forward/rewind the song played currently.
Hold down
•
or
.
:Rewinds.
:Fast-forwards.
The main unit will continue to fast-forward (rewind) until your finger is removed
from the switch.
Repeating the same music file
Press
REPEAT .
• Pressing REPEAT once will cause repeating of the song until the function is
canceled.
Pressing REPEAT again will cancel repeating of the song.
Pausing a song
Press
.
• Pressing
will restart playing the song.
Stopping a song
.
DUAL
PLAY
Press
131
How to operate the DUAL PLAY
How to use the DUAL PLAY
button
button
SLOW
button
button
buttons
The screen display of rear seat monitor
How to play DVD
The remote control is operable only when DVD is inserted in the disc slot.
• For details of DVD operation, refer to "Before using the DVD player" (on page 94).
Watching a DVD
Press
.
• It will start playing.
Fast-forwarding/rewinding
It is possible to fast-forward/rewind the video played currently.
Hold down
•
or
.
:Rewinds
:Fast-forwards
The main unit will continue to fast-forward (rewind) until your finger is removed
from the switch.
Playing the video in slow motion
Press
SLOW .
• Pressing
132
will cancel the slow motion.
Pausing the video
Press
.
• Pressing
will restart playing the video.
Stopping the video
.
DUAL
PLAY
Press
133
How to operate the DUAL PLAY
How to use the DUAL PLAY
0 - 9
SEARCH
TOP MENU
button
ANGLE
button
REPEAT
button
buttons
CLEAR
button
MENU
button
AUDIO
button
SUB TITLE
ENTER
Operating the disc menu
It is possible to use the menu recorded on the disc.
Press
MENU or TOP MENU .
• The disc menu or the TOP MENU
screen will be displayed.
Press
,
,
the video to play.
Press ENTER .
134
or
button
buttons
to select
button
button
Selecting the video
A video that you want to watch can be searched by its title or chapter.
Searching a video by chapter
■ Searching a video by manually
Press
•
or
.
:Select previous chapter
:Select next chapter
■ Searching a video by chapter number
Press
SEARCH to enter the
chapter search mode.
• The chapter number entering screen
will be displayed.
• Each time the SEARCH is pressed,
the search mode will be switched in
the order shown below.
Title search mode
Chapter search mode
Use a numeric keypad ( 0
to 9 ) to enter the chapter number.
• If you have made a mistake, press CLEAR to delete the number that you have
entered.
DUAL
PLAY
Search mode off
Press ENTER .
135
How to operate the DUAL PLAY
How to use the DUAL PLAY
Searching a video by title number
Press
SEARCH to enter the title
search mode.
• The title number entering screen will
be displayed.
• Each time the SEARCH is pressed,
the search mode will be switched in
the order shown below.
Title search mode
Chapter search mode
Search mode off
Use a numeric keypad ( 0
to 9 ) to enter the title number.
• If you have made a mistake, press CLEAR to delete the number that you have
entered.
Press ENTER .
Repeating the same chapter
Press
REPEAT .
• Pressing REPEAT once will cause repeating of the video until the function is
canceled. Pressing REPEAT again will cancel repeating of the video.
136
Switching between screen display and audio
It is possible to change the language for subtitles , the language for audio and the display
angle for the video being played.
Switching the video angle
When several angles of a scene are recorded on a disc, the angle can be switched.
Press ANGLE .
• The angle number will be displayed.
• Each time the ANGLE is pressed, the
angle number will change and the
angle of video will be switched.
Switching subtitle languages
When subtitles in several languages are recorded on a disc, the subtitles can be switched.
Press SUB TITLE
.
• The subtitle number will be displayed.
• Each time the SUB TITLE is
pressed, the sub title number will
change and the sub title language will
be switched.
When dubbed voices in several languages are recorded on a disc, the voices can be
switched.
Press
DUAL
PLAY
Switching dubbed audio language
AUDIO .
• The audio number and language will
be displayed.
• Each time the AUDIO is pressed, the
audio number will change and the
language of voices being played will
be switched.
137
How to operate the DUAL PLAY
How to use the DUAL PLAY
Watching a restricted DVD
When a restricted DVD is inserted, the password entering screen is displayed. Enter the
password to watch the restricted DVD.
Use a numeric keypad ( 0
to 9 ) to enter the password.
• If you have made a mistake, press CLEAR to delete the number that you have
entered.
Press ENTER .
• For details of parental restriction and password, refer to "Viewer restriction
setting" (on page 114).
138
buttons
How to watch TV
It is operable when an optional TV tuner is connected.
Selecting a channel
Selecting a channel manually
Press
.
:Channel down (descending).
:Channel up (ascending).
The TV channel number is not displayed on the rear seat monitor.
DUAL
PLAY
•
or
139
How to use the steering wheel switch
About the steering wheel switches
On vehicles equipped with steering wheel switches, these easy-access switches can be
used to perform the main audio and other operations.
• For details of the steering wheel switch, please contact your local dealer.
• This function may not be used depending on the vehicle type.
Function names and summaries
Volume switch
Channel selection (radio) switches
Track selection (CD/CD changer,
MP3/WMA mode) switch
Chapter selection (DVD) switch
Mode selection switch
Common operations
Switch
(+)
(–)
(MODE)
Name
Function
Volume switch
Mode selection
switch
• When the power is OFF,
pressing this switch turns
it ON.
• The mode changes.
FM1 → FM2 → FM3 →
CD → MP3/WMA → (CD Each time (MODE) is pressed
changer) → DVD → (TV) while the power is ON, the mode
→ (VTR) → (iPod) → AM changes.
→ (SIRIUS) → (XM) →
return to FM1
• Press the switch until it
beeps to turn the power
OFF.
(
140
Explanation of operation
Each momentary actuation
of these switches changes
(+): Volume UP
the volume one step.
(–) : Volume DOWN
Hold a switch down for a
continuous volume change.
) : Optional
Radio operations
Switch
(∧)
(∨)
Name
Function
Channel
selection switch
Explanation of operation
Pressing (∧)/(∨) briefly:
• Calls up the preset
Used to select the next or
broadcast channels in
previous preset channel
order.
• Pressing the switch until it Pressing (∧)/(∨) for longer:
Starts automatic channel
beeps starts automatic
selection.
channel selection.
CD player operations
Switch
(∧)
(∨)
Name
Track selection
switches
Function
Explanation of operation
Selects the next track or
previous track or beginning
of the current track.
(∧): Used to select the next track.
(∨): Used to select the previous
track.
SIRIUS/XM satellite radio tuner operations
Switch
(∧)
(∨)
Name
Function
Explanation of operation
• Selects the next preset
Pressing (∧)/(∨) briefly:
channel or previous
Used to select the next or
preset channel.
previous preset channel
• Pressing the switch until it
Pressing (∧)/(∨) for longer:
beeps to start searching
Starts searching channels
channels within the
within the selected category.
selected category.
Channel
selection
switches
MP3/WMA Player operations
(∧)
(∨)
Name
Track selection
switches
Function
Explanation of operation
Pressing (∧)/(∨) briefly:
• Selects the next file or
Used to select the next or
previous file.
previous file
• Pressing the switch until it
Pressing (∧)/(∨) for longer:
beeps to go to the next
Used to select the next or
folder or previous folder.
previous folder
Steering Wheel
Switch
Switch
141
How to use the steering wheel switch
About the steering wheel switches
DVD operations
Switch
(∧)
(∨)
Name
Function
Chapter selection Selects the next chapter or
switches
previous chapter.
Explanation of operation
(∧): Used to select the next
chapter.
(∨): Used to select the previous
chapter.
CD changer operations
Switch
(∧)
(∨)
Name
Track selection
switches
Function
• Selects the next track or
previous track or
beginning of the current
track.
• Press the switch until it
beeps to go to the next
disc or previous disc.
Explanation of operation
Pressing (∧)/(∨) briefly:
Used to select the next track
or previous track.
Pressing (∧)/(∨) for longer:
Used to select the next disc
or previous disc.
TV operations
Switch
(∧)
(∨)
142
Name
Channel
selection switch
Function
Explanation of operation
• Pressing the switch until it Pressing (∧)/(∨) for longer:
Starts automatic channel
beeps starts automatic
selection.
channel selection.
143
Steering Wheel
Switch
How to use an optional remote control
How to use an optional remote control (RMC105)
Precautions in use of the remote control
• Be careful when handling the remote control, especially because it is small and
light. Dropping or striking it hard may damage it, wear out the battery or cause a
malfunction.
• Keep the remote control free of moisture, dust and water. Do not subject it to
shock.
• Do not place the remote control unit where it will get hot, such as on the
dashboard or near a heater vent. Allowing the remote control unit to overheat
may warp its case or cause other problems.
• Do not operate the remote control unit while driving because doing so could
cause an accident.
• When using the remote control, point it directly at the remote control light
receptor.
• The light receptor may not operate correctly if it is exposed to bright light such as
direct sunlight.
• Remove the batteries from the remote control unit whenever it is not to be used
for a long time.
Cleaning the remote control
• Use a dry cloth to keep the unit clean. If the remote control unit gets extremely
dirty, clean it with a cloth moistened in diluted liquid detergent. Do not use
alcohol or thinner; these compounds may damage the finish.
• In no event should benzine or thinner be used. These substances will damage
the case or finish.
TU, DISC and AUX buttons do not work.
144
Remote-Control light
receptor
PWR
button
button
MUTE
button
button
Turning the power on/off
When the power is turned on, the state used when the power was turned off such as CD and
tuner will be restored.
Press PWR .
• The power turns on or off each time the button is pressed.
When the main unit is shut down, the remote control will not work.
Adjusting the audio volume
Press
•
or
.
button: Increases the volume.
button: Decreases the volume.
Press MUTE to cut the volume or restore it instantly.
Remote
control
Muting the Volume
145
How to use an optional remote control
How to use an optional remote control (RMC105)
MODE
PRESET•CH
button
button
TUNE•SEEK
button
Switching playback modes
Press
MODE .
• Press the button to switch modes in the following sequence:
AM→FM→CD(MP3/WMA)→(CD Changer)→DVD→(TV)→(VTR)→(SIRIUS)→(XM)→(iPod)
How to play the tuner
Select the tuner mode first.
Selecting a station (manually or automatically)
A short press of the button will allow manual station tuning. Pressing for more than one
second will start automatic tuning.
Press
•
TUNE•SEEK
.
button: Tunes to higher frequency stations.
button: Tunes to lower frequency stations.
Selecting preset stations
A total of six stations may be selected (preset tuning) out of those already set in memory
through the main unit. (Refer to the Section "Saving radio stations" on page 53)
This function is not available for TV.
Press
•
PRESET•CH
.
button: Select the next higher number preset button.
button: Select the next lower number preset button.
146
BAND
DISC
button
button
TRACK
button
How to play CDs
Switching CD Changer modes
Select the CD Changer (optional) mode first.
Press
BAND .
• When two CD changers are connected, press BAND to change modes from CD
changer 1 → CD changer 2.
Advancing to the next track or returning to the beginning of the track being played
Select the CD or CD Changer (optional) mode first.
Press
•
TRACK
.
button: Skips to the next track.
button: Returns to the beginning of the track being played. (Press repeatedly to
move to previous tracks.)
Hold
down to fast forward, or
to rewind through the track being played.
Skipping to the next or previous disc
Press
•
DISC
.
Remote
control
Select the CD or CD Changer (optional) mode first.
button: Selects the next higher number disc.
button: Selects the next lower number disc.
147
How to use an optional remote control
How to use an optional remote control (RMC105)
Replacing the battery
To prevent accidents, store batteries out of the reach of children. If a child has
swallowed one, consult a doctor immediately.
Use two AAA-size batteries.
Remove the back cover of the remote control
unit by gently pressing and sliding it in the
direction indicated by the arrow.
Install the two batteries provided into the
compartment as illustrated.
Return the back cover into place by sliding it in
the direction indicated by the arrow.
• The battery life is approximately one year. If the remote control unit does not
operate correctly or if the button lamp gets dim, replace the batteries.
• Be sure to orient the batteries correctly so that the positive and negative poles
match the diagram.
• Do not use one new battery and one old one; use two new batteries.
• Only use two of the same type of battery.
• If any liquid is seen leaking from the batteries, remove both batteries and
dispose of them properly. Thoroughly clean the battery compartment with a dry
cloth. Then install new batteries.
148
149
Remote
control
For reference
Information you should know
If one of these messages appears
If any of the following messages are displayed, check the equipment while referring to the
Cause and Corrective action columns.
Messages
Cause
Corrective action
CD SEEK
The CD changer is searching for
discs when a magazine has been
set in the CD changer.
Wait until the unit has finished
identifying the type of disc.
CD DOOR OPEN
The door of the CD changer is
open.
Close the door of the CD changer.
DISC CHECK
The CD/MP3·WMA/DVD is dirty,
scratched, warped or upside
down.
Clean the disc if it is dirty. Insert
the disc correctly if it is
upsidedown. Do not use the
scratched or warped disc.
NO DISC
NO CD
There is no disc in the CD/
MP3·WMA/DVD player or CD
changer.
Load a music disc (1).
The CD/MP3·WMA/DVD player or
CD changer is not operating for
some reason.
Eject the disc.
The temperature of the CD/
MP3·WMA/DVD player or CD
changer has become unusually
high.
Without performing any other
operations, wait until the
temperature comes down (2).
NO CD MAGAZINE
There is no magazine in the CD
changer.
Load a magazine.
CD
The
th CD in the CD changer
cannot be read.
Check for a properly loaded music
CD.
PASS CODE INCORRECT
This message is displayed when
the pass code that has been
entered is not correct.
Enter the correct pass code.
PARENTAL LOCK
ENABLED
Viewing restrictions are enabled.
Change the setting for viewing
restrictions and start again. (Refer
to page 114.)
CURRENTLY THIS FUNCTION IS
DISABLED
A function that has been disabled
was selected with the menu.
Follow the directions on the screen
and start again.
CURRENTLY THIS FUNCTION IS
DISABLED
A function that cannot be used
while the vehicle is in motion was
selected.
Stop the vehicle and set the
emergency / parking brake.
INVALID CODE
A number not supported was input
for selecting a language code.
Input a valid language code.
REGION CODE ERROR
The region code (controlled region
for playback) of the disc isn't
acceptable.
Check that the DVD has a region
code that can be played on this
equipment. (Refer to page 96.)
REQUESTED CHAPTER OR TITLE
NOT FOUND
The selected chapter/title does not
exist.
Select a chapter/title that is on the
disc.
CD ERROR
DVD ERROR
DISC ERROR
CHECK
1: If the unit will not work after the disk is ejected, contact your local retailer.
2: If this happens, wait for a while. When the temperature inside the equipment returns to
normal, the message will disappear and playback will start. If the message does not
disappear after a long period of waiting, contact the place of purchase.
150
Cause
Corrective action
EJECT LOCK
The loaded disc cannot be
ejected.
Contact the Eclipse dealer at
(800)-233-2216.
ANTENNA
The SIRIUS/XM antenna is
disconnected.
Check the connection of the
SIRIUS/XM antenna.
ACQUIRING
Displayed when the SIRIUS
satellite radio signal is lost
(during access)
Try receiving the signal again
in the place where there are
no obstacles.
NO SIGNAL
Displayed when the XM
satellite radio signal is lost
(during access)
Try receiving the signal again
in the place where there are
no obstacles.
CALL888-539-SIRIUS
You are tuned to a valid
SIRIUS channel but you are
not subscribed to that
channel.
Subscribe to SIRIUS.
Or, check/change your
subscription plan.
OFF AIR
Displayed when the XM
channel you are tuned to is not
currently on air.
Tune to channels currently on
air.
LOADING
Obtaining audio and
information data for the XM
channel.
Wait for a moment.
SUB UPDATED
Displayed when your SIRIUS
channel subscription has
been accepted and your
status is being updated to
allow you to receive the
channels.
After this message is
displayed, the channels for
which you do have a
subscription can be received.
INVALID
Displayed when you are tuned
to a SIRIUS channel that you
cannot receive.
Tune to channels that you can
receive.
CH- - -
Displayed when you are tuned
to a XM channel that you
cannot receive.
Tune to channels that you can
receive.
UPDATING
Displayed while the channel
map is being updated.
After this message is
displayed, subscribe to
SIRIUS/XM. The channels for
which you do have a
subscription can be received.
For reference
Messages
151
For reference
Information you should know
Before asking for repairs
Slight differences in operation can sometimes be mistaken for malfunctions, so check the
following table before asking for any repairs.
If the following fail to solve the problem, contact the place of purchase.
Problem
Corrective action
This is a characteristic of LCDs.
This is not a malfunction. Wait for a
brief period.
The display is distorted for a brief
period after the power is turned on.
This is a characteristic of LCD
backlighting.
This is not a malfunction. The display
will stabilize after a brief period.
No sound comes out.
Volume is poorly adjusted or MUTE is
functioning.
Press the volume switch and check
volume. Or cancel MUTE.
A speaker wire is disconnected.
Check the connections of the speaker
wires.
Volume is poorly adjusted.
Check the balance and fader
adjustments.
The adjusted audio quality is not
included in the radio broadcast or
disc.
Check by changing the radio station
or disc.
Power is not turned on.
Turn the vehicle ignition switch to
[ACC] or [ON].
A disc is already inserted and you are
trying to insert a second disc.
Eject the previously inserted CD/DVD
and insert the preferred CD/DVD.
There is water condensation in the
equipment.
Do not use the equipment for a while
and then try using it again. (Refer to
pages 20.)
There is a large scratch or warp in the
CD/DVD.
Insert a different CD/DVD.
The CD/DVD is very dirty.
Clean the CD/DVD.
(Refer to page 21.)
The CD/DVD is upside down.
Insert the CD/DVD with the proper
orientation.
A non-supported type of CD/DVD has
been inserted.
Insert a CD/DVD that is supported by
the deck. (Refer to pages 20.)
A CDCHANGER1 / CDCHANGER2 is
not displayed on the screen.
The CD changer is not completely
connected.
Check the connections to the CD
changer.
Audio is output, but not video.
The screen has been turned off with
the screen OFF button.
Press AV or
page 47.)
Audio is output, but not DVD video.
(With vehicle stopped.)
The emergency / parking brake has
not be set.
Set the emergency / parking brake.
The vehicle ignition switch has not
been turned on.
Turn the vehicle ignition switch to
[ACC] or [ON].
The connection wires and cables are
not completely connected.
Check the connections to each
connection wire and cable.
At least 99.99% of the pixels on the
LCD panel are effective, but it is
possible that 0.01% of the pixels may
not light or may stay lighted.
This is not a defect, so please use the
equipment in this condition.
Sound comes out of only one side
(left or right, front or back).
Sound quality does not change even
after making adjustments.
A CD/DVD will not go into the deck.
A CD/DVD cannot be played.
Neither video nor audio is output.
There is a point of light on the display.
152
Possible reason
The screen is dark for a brief period
when the power is turned on at low
temperatures.
MAP . (Refer to
For reference
Glossary
(Compact Disc Recordable)
CD-DA
(Compact Disc Digital Audio)
CD-RW
(Compact Disc ReWritable)
This is a disc that can only be recorded once.
Recorded data cannot be deleted. There are two
types of CD-R, one having capacity of 650MB
(74 minutes of music), the same as a regular CD,
and the other having capacity of 700MB (80
minutes of music).
This disc is the standard for recording and
playing of music data. One track is recorded with
one song, and a maximum of 74 minutes can be
used with the CD.
This disc uses a phase transformation method
that enables recording and deleting of data as
many times needed. Capacity is 700MB (80
minutes of music).
EQ (Equalizer)
This enables setting of stronger or softer playing
of sounds throughout the high to low range of the
sound. Levels can be adjusted to personal
preference, enhancing enjoyment of the music.
MP3
• "MP3" is the abbreviation for "MPEG Audio Layer
(MPEG-1 Audio Layer-3)
LPCM
(Linear PCM)
MPEG
3," which is the standard format for compression
of audio data. MP3 technology compresses
sound in the range inaudible to the human ear,
producing a file one tenth the size of the original.
This is an abbreviation for Linear Pulse Code
Modulation, a signal recording method used with
music CDs. A music CD is recorded at 44.1kHz/
16 bit, but a DVD is recorded at 48kHz/16 bit ~
96kHz/24 bit, enabling a DVD to be played with
higher sound quality than a music CD.
This is an abbreviation for Moving Picture Experts
Group and is pronounced "empeg". It is the
international standard for moving image
compression. With DVDs, this method is also
used to compress and record digital audio.
Copy Control CD
This is a CD that has controls for preventing
computers from copying and ripping (taking
audio information recorded on a compact disc
and using it as data to create a file).
UDF
This is one format for use with optical discs not
reliant on the OS. It is used with media such as
DVD and CD-RW.
(Universal Disc Format)
Track
The single division for a song on a music CD is
called a track.
For reference
CD-R
153
For reference
Glossary
Viewing Restriction
This is a DVD video function that "Restricts
playing of discs that support viewing restrictions,
in accordance with the regulated levels of each
country." Restrictions differ by DVD video and
may completely prevent playing of the video or
may skip or insert alternate scenes for extreme
scenes.
Title
This is the largest unit for divisions of video or
songs recorded on a DVD video. Usually a single
movie is treated as a title by video software and a
single album (or song) is treated as a single title
by music software. The consecutive numbers
attached to titles are called title numbers.
Chapter
This is a unit for divisions of video or songs
recorded on a DVD video, but it is a smaller unit
than a title. A single title is made up of several
chapters, and the consecutive numbers attached
to chapters are called chapter numbers.
Multi-Angle
154
This is one feature of DVD video, where
viewpoints of the same scene are changed by
recording from several different angles (camera
positions), allowing the viewer to select the
preferred angle.
Multi-Language
This is one feature of DVD video, where the same
scene is recorded with several different
languages and subtitles, allowing the viewer to
select the preferred language.
Region Code
DVD players and DVD discs have a region code
that enables playing by geographic marketing
regions, and a disc cannot be played if the
number recorded on the disc is not included in
the region codes of the player. Refer to page 96
for details on region codes.
For reference
Index by topic
About screen and sound adjustment
[Regarding screen adjustment]
To make the audio operation screen or VTR screen easier to see
"Adjusting/setting the screen" . . . . . . . . . . . . . . . . . . . . . . . . . . . . . . . . P46
To turn off the screen
"Turning off the screen" . . . . . . . . . . . . . . . . . . . . . . . . . . . . . . . . . . . . . . P47
To change the wallpaper
"Changing the wallpaper" . . . . . . . . . . . . . . . . . . . . . . . . . . . . . . . . . . . . P44
To set the screen to wide mode
"Switching screen mode". . . . . . . . . . . . . . . . . . . . . . . . . . . . . . . . . . . . . P48
[Regarding audio adjustment]
To change the volume
"Adjusting main volume" . . . . . . . . . . . . . . . . . . . . . . . . . . . . . . . . . . . . . P28
To turn on/off the guide tone used at switch operation
"Setting the BEEP tone". . . . . . . . . . . . . . . . . . . . . . . . . . . . . . . . . . . . . . P37
For reference
To adjust sound quality
• To change the acoustic environment of a performance
"Setting DSP (acoustics)" . . . . . . . . . . . . . . . . . . . . . . . . . . . . . . . . . . . . P30
• To adjust high and low sounds
"Adjusting EQ (equalizer)" . . . . . . . . . . . . . . . . . . . . . . . . . . . . . . . . . . . P32
• To change the localization of sound according to your seating
"Setting POS (position selector)". . . . . . . . . . . . . . . . . . . . . . . . . . . . . . P35
• To adjust front/rear and left/right volume balance
"Adjusting volume balance" . . . . . . . . . . . . . . . . . . . . . . . . . . . . . . . . . . P36
• To switch the bass enhancement
"Switching the bass enhancement (Tru Bass)" . . . . . . . . . . . . . . . . . . P38
• To boost the high/low frequencies at low volume
"Setting LOUDNESS". . . . . . . . . . . . . . . . . . . . . . . . . . . . . . . . . . . . . . . . P38
• To change the phase and output level of woofer
"Setting the sub-woofer". . . . . . . . . . . . . . . . . . . . . . . . . . . . . . . . . . . . . P39
• To adjust the MP3/WMA sound quality
"Setting the harmonizer". . . . . . . . . . . . . . . . . . . . . . . . . . . . . . . . . . . . . P42
• To reproduce deep bass and localization of sound
"Setting the Circle Surround II" . . . . . . . . . . . . . . . . . . . . . . . . . . . . . . . P43
155
For reference
Index by topic
About Using AM/FM radio
To play the radio
"Listening to the AM/FM radio" . . . . . . . . . . . . . . . . . . . . . . . . . . . . . . . P50
To search for a radio station
"Selecting radio stations" . . . . . . . . . . . . . . . . . . . . . . . . . . . . . . . . . . . . P51
To save radio stations
"Saving radio stations" . . . . . . . . . . . . . . . . . . . . . . . . . . . . . . . . . . . . . . P53
Usage when an HD Radio tuner is connected
To listen to HD Radio
"Listening to HD Radio" . . . . . . . . . . . . . . . . . . . . . . . . . . . . . . . . . . . . . P56
To search for a radio station
"Selecting radio stations" . . . . . . . . . . . . . . . . . . . . . . . . . . . . . . . . . . . . P57
To save radio stations
"Saving radio stations" . . . . . . . . . . . . . . . . . . . . . . . . . . . . . . . . . . . . . . P58
Usage when a SIRIUS satellite radio tuner is
connected
To listen to SIRIUS broadcasts
"Listening to SIRIUS satellite radio" . . . . . . . . . . . . . . . . . . . . . . . . . . . P60
To select a channel
"Selecting from the available categories" . . . . . . . . . . . . . . . . . . . . . . . P61
"Selecting a channel by direct input" . . . . . . . . . . . . . . . . . . . . . . . . . . P61
Usage when a XM satellite radio tuner is connected
To listen to XM broadcasts
"Listening to XM satellite radio". . . . . . . . . . . . . . . . . . . . . . . . . . . . . . . P64
To select a channel
"Selecting from the available categories" . . . . . . . . . . . . . . . . . . . . . . . P65
"Selecting a channel by direct input" . . . . . . . . . . . . . . . . . . . . . . . . . . P65
156
About using the CD player/CD changer
To play a CD
"Listening to a CD" . . . . . . . . . . . . . . . . . . . . . . . . . . . . . . . . . . . . . . P68/84
To select a song or CD
"Selecting a song" . . . . . . . . . . . . . . . . . . . . . . . . . . . . . . . . . . . . . . . . . . P68
"Selecting a CD". . . . . . . . . . . . . . . . . . . . . . . . . . . . . . . . . . . . . . . . . . . . P85
When you don't know a song number or on what CD a song is located
"Searching for a song" . . . . . . . . . . . . . . . . . . . . . . . . . . . . . . . . . . . . . . P69
"Searching for a song or CD from all CDs in changer" . . . . . . . . . . . . P85
To repeat the song or CD currently being played
"Repeating a song" . . . . . . . . . . . . . . . . . . . . . . . . . . . . . . . . . . . . . . . . . P69
"Repeating a song or CD" . . . . . . . . . . . . . . . . . . . . . . . . . . . . . . . . . . . . P86
To play songs in a different order
"Playing songs in random order". . . . . . . . . . . . . . . . . . . . . . . . . . . . . . P70
To fast-forward or rewind
"Fast-forwarding/rewinding". . . . . . . . . . . . . . . . . . . . . . . . . . . . . . . . . . P69
About using the MP3/WMA player
To play MP3/WMA file
"Playing MP3/WMA". . . . . . . . . . . . . . . . . . . . . . . . . . . . . . . . . . . . . . . . . P73
To select a music file
"Selecting a music file" . . . . . . . . . . . . . . . . . . . . . . . . . . . . . . . . . . . . . . P73
When you want to return to a level or don't know the current level
"Changing display of the current level". . . . . . . . . . . . . . . . . . . . . . . . . P74
To search for a music file
"Searching for a music file" . . . . . . . . . . . . . . . . . . . . . . . . . . . . . . . . . . P74
To repeat a music file
"Repeating the same music file" . . . . . . . . . . . . . . . . . . . . . . . . . . . . . . P75
To change the file information
"About display of file information". . . . . . . . . . . . . . . . . . . . . . . . . . . . . P76
For reference
To play files in a different order
"Playing songs in random order". . . . . . . . . . . . . . . . . . . . . . . . . . . . . . P75
157
For reference
Index by topic
To learn about MP3/WMA
"About MP3/WMA" . . . . . . . . . . . . . . . . . . . . . . . . . . . . . . . . . . . . . . . . . . P77
To learn about making MP3/WMA files
"Making and playing MP3/WMA files" . . . . . . . . . . . . . . . . . . . . . . . . . . P83
About using the iPod
To listen to iPod
"Listening to iPod". . . . . . . . . . . . . . . . . . . . . . . . . . . . . . . . . . . . . . . . . . P88
To search for a song
"Searching for a song in various ways" . . . . . . . . . . . . . . . . . . . . . . . . P89
To select a song
"Selecting a song" . . . . . . . . . . . . . . . . . . . . . . . . . . . . . . . . . . . . . . . . . . P93
To fast-forward or rewind
"Fast-forwarding/rewinding". . . . . . . . . . . . . . . . . . . . . . . . . . . . . . . . . . P93
About using the DVD player
To play a DVD video
"Watching a DVD" . . . . . . . . . . . . . . . . . . . . . . . . . . . . . . . . . . . . . . . . . . . P99
To learn about discs
• To learn about the marks displayed on discs and packages
"About marks displayed on discs" . . . . . . . . . . . . . . . . . . . . . . . . . . . . . P96
• To learn about discs that can be played
"About playable discs" . . . . . . . . . . . . . . . . . . . . . . . . . . . . . . . . . . . . . . . P95
• To learn about disc structures
"About DVD disc structure" . . . . . . . . . . . . . . . . . . . . . . . . . . . . . . . . . . . P97
To operate the menu recorded on a disc
"Operating the disc menu" . . . . . . . . . . . . . . . . . . . . . . . . . . . . . . . . . . P102
To operate the video being played
"Operating the video" . . . . . . . . . . . . . . . . . . . . . . . . . . . . . . . . . . . . . . . P100
To select/search for a video
"Searching by chapter" . . . . . . . . . . . . . . . . . . . . . . . . . . . . . . . . . . . . . P103
"Searching by title number". . . . . . . . . . . . . . . . . . . . . . . . . . . . . . . . . . P103
"Searching by menu number" . . . . . . . . . . . . . . . . . . . . . . . . . . . . . . . . P104
To change the display of touch switches
"Changing the touch switch display locations" . . . . . . . . . . . . . . . . . P105
158
To change subtitles, audio or the video angle
"Switching the video angle" . . . . . . . . . . . . . . . . . . . . . . . . . . . . . . . . . P106
"Switching subtitle languages" . . . . . . . . . . . . . . . . . . . . . . . . . . . . . . P107
"Switching dubbed audio language" . . . . . . . . . . . . . . . . . . . . . . . . . . P108
To set the player
"Setting the audio language". . . . . . . . . . . . . . . . . . . . . . . . . . . . . . . . . P110
"Subtitle language setting" . . . . . . . . . . . . . . . . . . . . . . . . . . . . . . . . . . P111
"Menu language setting" . . . . . . . . . . . . . . . . . . . . . . . . . . . . . . . . . . . . P112
"Setting display of multi-angle mark (angle selection mark)" . . . . . . P113
"Viewer restriction setting" . . . . . . . . . . . . . . . . . . . . . . . . . . . . . . . . . . P114
"Changing video output" . . . . . . . . . . . . . . . . . . . . . . . . . . . . . . . . . . . . P115
About using the VTR
To use the VTR
"How to use the VTR" . . . . . . . . . . . . . . . . . . . . . . . . . . . . . . . . . . . . . . . P118
About using the TV tuner
To watch TV
"Watching a TV" . . . . . . . . . . . . . . . . . . . . . . . . . . . . . . . . . . . . . . . . . . . P120
To search for a TV channel
"Selecting channels" . . . . . . . . . . . . . . . . . . . . . . . . . . . . . . . . . . . . . . . P120
To save TV channels
"Saving channels" . . . . . . . . . . . . . . . . . . . . . . . . . . . . . . . . . . . . . . . . . P122
Useful functions
To operate the audio system by fingertip operations while driving
"About the steering wheel switches" . . . . . . . . . . . . . . . . . . . . . . . . . . P140
When something isn't clear
When you don't understand a screen message
"If one of these messages appears" . . . . . . . . . . . . . . . . . . . . . . . . . . . P150
For reference
When you think the equipment may have a problem
"Before asking for repairs" . . . . . . . . . . . . . . . . . . . . . . . . . . . . . . . . . . P152
159
For reference
INDEX
A
Adjusting sound quality ...... 29
Adjusting the volume .......... 28
ANGLE ............................. 106
AUTO.P ........................ 53, 58
AV ....................................... 25
B
BRIGHT .............................. 48
C
CD-R (CD-Recordable) ...... 20
CD-RW (CD-ReWritable) .... 20
COLOR ............................... 48
CONTRST ........................... 48
D
Day screen ......................... 47
DISC RAND ........................ 86
DISC RPT ........................... 86
DISC SCAN ........................ 85
DSP .................................... 30
160
How to use the
CD changer ........................84
How to use the
CD player ...........................68
How to use the
DVD player .........................99
How to use the
MP3/WMA player ................72
How to use the
SIRIUS satellite radio ..........60
How to use the TV ............120
How to use the VTR ..........118
How to use the
XM satellite radio ................64
M
Multi-angle mark ...............106
N
Night screen .......................47
NORMAL mode ..................49
O
E
Operating the iPod .............88
EQ (equalizer) .................... 32
P
H
POS (position selector) .......35
How to use an optional
remote control .................. 144
How to use HD Radio ......... 56
How to use the
AM / FM radio ..................... 50
R
RAND ............................ 70, 75
RPT ............................... 69, 75
S
Saving radio stations .... 53, 58
SCAN ............................ 69, 74
Setting LOUDNESS ............ 38
Setting the BEEP tone ........ 37
Setting the Circle
Surround II .......................... 43
Setting the harmonizer ....... 42
Setting the
opening screen .................. 45
Steering wheel switches ... 140
Switching subtitle
languages ........................ 107
Switching the bass
enhancement (Tru Bass) .... 38
T
TINT .................................... 48
Turning off the screen ........ 47
V
Volume balance ................. 36
VOLUME switch ................. 28
W
For reference
Wallpaper (background) .... 44
WIDE 1 mode ..................... 49
WIDE 2 mode ..................... 49
WIDE 3 mode ..................... 49
Woofer ................................ 39
161