1
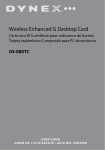
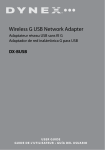
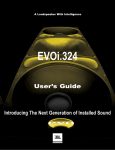
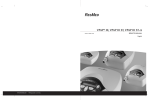
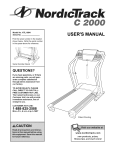
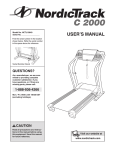
20” Round Tube TV
Product Description [French]
Product Description [Spanish]
DX-RCRT20-09
USE R GUI DE
GUI DE DE L’UTILI SATEUR • GUÍ A D EL USUAR IO
Contents
2
Dynex DX-RCRT20-09
20” Round Tube TV
Contents
Important safety instructions............................................................2
Features.............................................................................................5
Setting up your TV...........................................................................10
Using your TV ..................................................................................17
Troubleshooting ..............................................................................38
Specifications ..................................................................................40
Maintaining.....................................................................................40
Legal notices ...................................................................................40
90-Day Limited Warranty ................................................................43
Français ...................................................44
Español....................................................85
Important safety instructions
CAUTION:
TO REDUCE THE RISK OF ELECTRIC SHOCK,
DO NOT REMOVE COVER (OR BACK).
NO USER SERVICABLE PARTS INSIDE.
REFER SERVICING TO QUALIFIED SERVICE
PERSONNEL.
The lightning flash with arrowhead symbol, within an
equilateral triangle is intended to alert the user to the
presence of uninsulated dangerous voltage within the
product’s enclosure that may be of sufficient magnitude
to constitute a risk of electric shock.
The exclamation point within an equilateral triangle is
intended to alert the user to the presence of important
operating and maintenance (servicing) instructions in the
literature accompanying the appliance.
Important safety instructions
3
WARNING: TO PREVENT FIRE OR SHOCK HAZARD, DO NOT EXPOSE
THIS APPLIANCE TO RAIN OR MOISTURE.
CAUTION: TO PREVENT ELECTRIC SHOCK DO NOT USE THIS
POLARIZED PLUG WITH AN EXTENSION CORD, RECEPTICAL, OR
OTHER OUTLET UNLESS THE BLADES CAN BE FULLY INSERTED TO
PREVENT BLADE EXPOSURE.
CAUTION: These servicing instructions are for use by qualified service personnel only. To
reduce the risk of electric shock, do not perform any servicing other than that contained in
the operating instructions, unless you are qualified to do so.
Important safety instructions
1
2
3
4
5
6
7
8
9
10
11
12
13
14
Read these instructions.
Keep these instructions.
Heed all warnings.
Follow all instructions.
Do not use this apparatus near water.
Clean only with a dry cloth.
Do not block any ventilation openings. Install in accordance with the manufacturer’s
instructions.
Do not install near any heat sources, such as radiators, heat registers, stoves, or other
apparatus (including amplifiers) that product heat.
Do not defeat the safety purpose of the polarized or grounding-type plug. A polarized
plug has two blades with one wider than the other. A gounding-type plug has to
blades and a third grounding prong. The wide blade or the third prong are provided for
your safety. If the provided plug does not fit into your outlet, consult an electrician for
replacement of the obsolete outlet.
Protect the power cord from being walked on or pinched, particularly at plugs,
convenience recepticals, and the point where they exit from the apparatus.
Only use the attchements/accessories specified by the manufacturer.
Use only with the cart, stand, tripod, bracket, or table specified by the
manufacturer, or sold with the apparatus. When a cart is used, use
caution when moving the cart/apparatus combination to avoid injury
from tip-over.
Unplug this apparatus during lightning storms or when unused for long
periods of time.
Refer all servicing to qualified service personnel. Servicing is required when the
apparatus has been damaged in any way, such as power-supply cord or plug is
damaged, liquid has been spilled or objects have fallen into the apparatus, the
apparatus has been exposed to rain or moisture, does not operate normally, or has
been dropped.
Important safety instructions
4
15 The apparatus shall not be exposed to dripping or splashing and that no objects filled
with liquids, such as vases, shall be placed on the apparatus.
16 The mains plug or appliance inlet is used as the disconnect device, remain it readily
operable during the apparatus normal use.
7
6
5
4
3
1
Reference
2
Grounding component
1
Electric service equipment
2
Power service grounding electrode system (NEC Art 250, Part H)
3
Ground clamp
4
Grounding conductors (NEC Section 810-21)
5
Antenna discharge unit (NEC Section 810-20)
6
Ground clamp
7
Antenna lead-in wire
• Use No. 10 AWG (5.3 mm2) copper, No. 8 AWG (8.4 mm2) aluminum, No. 17 AWG
(1.0 mm2) copper-clad steel or bronze wire, or larger, as a ground wire.
• Secure antenna lead-in and ground wires to house with stand-off insulators spaced
from 4-6 feet (1.22 -1.83 m) apart.
• Mount the antenna discharge unit as close as possible to where lead-in enters
house.
• Use jumper wire not smaller than No. 6 AWG (13.3 mm2) copper, or the equivalent,
when a separate antenna-grounding electrode is used. See ANSI/NFPA70.
• An outside antenna system should not be located in the vicinity of overhead power
circuits, or where it can fall into such power lines or circuits. When installing an outside
antenna system, extreme care should be taken to keep from touching such power lines
or circuits as contact with them might be fatal.
• For added protection for the TV during a lightning storm, or when it is left unattended
and unused for long periods of time, unplug it from the power outlet and disconnect it
from the antenna or cable system. This prevents damage to the TV due to lightning
and power line surges.
Features
5
Note to cable TV system installer
This reminder is provided to call the cable TV system installer’s attention to Section 820 40 of
the NEC which provides guidelines for proper grounding and, in particular, specifies that the
cable ground shall be connected to the grounding system of the building, as close to the
point of cable entry as practical.
Features
Parts and functions
Front
INPUT
Item
Name
VOL-
VOL+
Function or control
1
Power button and
power indicator
Press to turn on the TV. Press again to turn off the TV.
Lights green when the power is turned on.
2
Remote sensor
Receives the signal from the remote control
3
INPUT button
Press to select the TV signal source (Analog TV, Digital TV,
AV, [S-VIDEO], COMPONENT).
Features
6
Item
Name
Function or control
4
MENU button
Press to open the on-screen display (OSD)
5
VOL-/VOL+ buttons
Press to decrease or increase the volume. When the OSD is
open, press to adjust the options.
6
CH-/CH+ buttons
Press to select a lower or higher channel. When the OSD is
open, press to make selections.
Rear
Y
Cb
Cr
IN
OUT
ANT IN
VIDEO
S-VIDEO
L-AUDIO-R
IN
Item
Name
Function or control
1
COMPONENT input jacks Connect the Y, CB, and CR cables from an external AV source to these jacks.
2
Video output jack
3
S-VIDEO input jack
Connect the S-Video cable from an external video source to this jack.
4
VIDEO input jack
Connect the video (yellow) cable from an external AV source to this jack.
5
Left AUDIO output jack
Connect the audio left (white) cable from this jack to an external audio amplifier.
Connect a video (yellow) cable from this jack to an external monitor or display.
Features
Item
7
Name
Function or control
6
Left AUDIO input jack
Connect the audio left (white) cable from an external AV source to this jack.
7
Antenna jack
Connect the 75 ohm antenna cable from:
•
•
•
•
•
an indoor antenna
an outdoor antenna
the cable TV cable
the satellite cable
the cable from a descrambler box
8
Right AUDIO output jack Connect the audio right (red) cable from this jack to an external audio amplifier.
9
Right AUDIO input jack
Connect the audio right (red) cable from an external AV source to this jack.
Features
8
Remote control
MUTE
POWER
RECALL
DISPLAY
INPUT
TV/DTV
1
2
3
4
5
6
7
8
DTV Audio
0
ENTER
9
PICTURE
.
CH+
VOL
-
MENU
VOL
+
CH-
CCD
SLEEP
FAVORITE
GUIDE
ZOOM
CH.LIST
EXIT
Item
Button
Description
1
MUTE
Press this button once to turn off the sound. Press this button again,
or the VOL + button, to restore the sound.
2
RECALL
Press to return to the previously selected channel.
Features
9
Item
Button
Description
3
INPUT
Press this button to select the video input source. (TV, AV, [S-VIDEO],
COMPONENT)
4
DTV Audio
Press to choose between different TV program languages when the
signal contains different languages.
5
ENTER
Press to make or confirm selections in the on-screen display (OSD)
menus.
6
MENU
Press to open the OSD.
7
VOL– / VOL+
Press to decrease or increase the volume. In some cases, press this
button to change an OSD setting.
8
SLEEP
Press this button to set the TV to turn off after a preset amount of
time. To confirm the sleep time setting, press this button once and
the remaining time is momentarily displayed. To cancel sleep time,
press this button repeatedly until 0FF is displayed.
9
CCD
Press this button to select CCD mode.
10
GUIDE
Press this button to display the program guide for cable or satellite
TV.
11
EXIT
Press this button to exit the OSD.
12
POWER
Press this button to turn the TV on. Press again to turn the TV off.
13
DISPLAY
Press this button to display channel status and signal information.
14
TV/DTV
Press this button to select analog (TV) or digital (DTV) TV mode.
15
Number buttons
(0-9)
Press these buttons to directly go to any channel.
16
PICTURE
Press this button to select the picture mode.
17
•
Press this button to select a digital TV sub-channel. For example, to
select channel 54, sub-channel 3, press 54, press •, press 3, then
press ENTER.
18
CH– / CH+
Press these buttons to change to a lower or higher numbered
channel set into memory. When the OSD is open, press to adjust
options and make selections.
19
ZOOM
Press this button, in 16:9 digital TV mode, to select the aspect ratio
of the picture.
20
FAVORITE
Press this button to open the DTV favorites list.
21
CH.LIST
Press this button to open the DTV channel list.
Setting up your TV
10
Setting up your TV
Connecting your TV to AC power
AC outlet
Wider hole
and blade
Polarized AC plug (one blade is
wider than the other.)
Warning:
- Never connect the AC plug to other than the specified voltage (120V 60 Hz). Use the
attached power cord only.
- If the polarized AC cord does not fit into a non-polarized AC outlet, do not file or cut the
blade. It is your responsibility to have an electrician replace the obsolete outlet.
Note: If you cause a static discharge when touching the TV and the TV fails to work, unplug
the TV from the AC outlet, then plug it back in. The TV should work normally.
Installing batteries in the remote control
Before using the remote control, you must install batteries. Use two AAA size batteries. The
batteries may last about one year depending on how much the remote control is used. For
best performance, we recommend the batteries should be replaced on a yearly basis, or
when the remote control operation becomes erratic. Do not mix old and new batteries or
different types of batteries.
Setting up your TV
11
To install batteries in the remote control:
1 Open the battery compartment cover.
2 Install two AAA batteries (not supplied). Make sure that the + and – symbols on the
batteries match the + and – symbols in the battery compartment.
3 Close the battery compartment cover.
Battery precautions
Follow these precautions when using batteries in this remote control:
• Use only the size and type of batteries specified.
• Make sure to follow the correct polarity when installing the batteries as indicated in
the battery compartment. Reversed batteries may damage the device.
• Do not mix different types of batteries together (such as alkaline and carbon-zinc) or
old batteries with fresh ones.
• If the remote control is not to be used for a long period of time, remove the batteries to
prevent damage or injury from possible battery leakage.
• Do not try to recharge batteries that are not intended to be recharged. These batteries
can overheat and rupture (follow battery manufacturer's directions).
Setting up your TV
12
Effective range of the remote control
15 ft. (5 m)
MUTE
RECALL
DISPLAY
INPUT
TV/DTV
1
2
4
5
7
8
DTV Audio
0
ENTER
3
6
9
PICTURE
.
CH+
VOL
-
MENU
VOL
+
CH-
CCD
SLEEP
FAVORITE
GUIDE
ZOOM
CH.LIST
EXIT
Notes:
- The remote control may not work correctly if there is an obstacle between the remote
control and the TV.
- Operation of the remote control may be inconsistent when direct sunlight, incandescent
or fluorescent light, or any strong light source that shines on the remote sensor of the TV.
Setting up your TV
13
Connecting to an antenna
VHF
Y
Cb
UHF
Cr
IN
OUT
75 ohm coaxial cable
ANT IN
VIDEO
S-VIDEO
L-AUDIO-R
IN
Power cord
To connect a combination VHF/UHF antenna (single 75 ohm cable or 300 ohm twin-lead
wire) or cable TV:
• Connect the 75 ohm cable from the combination VHF/UHF antenna or cable TV to the
antenna input jack on the TV.
If your combination VHF/UHF antenna has a 300 ohm twin-lead wire, you may need to use a
300-75 ohm matching transformer.
75 ohm coaxial cable
from antenna, cable
wall outlet, or
descrambler box
Antenna input jack
- OR -
300-75 ohm
matching
transformer
Antenna input jack
Notes:
- We recommend that you use 75 ohm coaxial cable to eliminate interference and noise.
- Antenna cables should not be bundled with electrical power cords.
- If the antenna is not installed correctly, see your dealer for assistance.
Setting up your TV
14
To connect a combination VHF/UHF antenna with separate 300 ohm VHF and UHF
twin-lead wires:
1 Connect the 300 ohm UHF twin-lead wire to the combiner (not-included).
300 ohm VHF
Antenna input jack
Combiner
300 ohm UHF
300-75 ohm matching
transformer
2 Connect the 300 ohm VHF twin-lead wire to the 300-75 ohm matching transformer.
3 Connect the transformer to the combiner, then connect the combiner to the antenna
input jack on the back of your TV.
To connect separate VHF and UHF antennas (75 ohm VHF and 300 ohm UHF twin-lead
wires):
1 Connect the 75 ohm VHF and 300 ohm UHF twin-lead wires to the combiner
(not-included).
Antenna input jack
75 ohm VHF cable
Combiner
300 ohm UHF
twin-lead wire
2 Connect the combiner to the antenna input jack on the back of your TV.
Connecting cable TV
To connect basic cable (no converter box):
• Connect the 75 ohm coaxial cable to the antenna input jack on the back of your TV.
75 ohm coaxial cable
from cable wall outlet
Antenna input jack
Setting up your TV
15
To connect a cable converter box:
1 Connect a 75 ohm coaxial cable from the cable TV wall outlet to the antenna input jack
on the back of the converter box.
Incoming cable
Antenna input jack
Converter box
2 Connect a 75 ohm coaxial cable from the antenna out jack on the back of the converter
box to the antenna input jack on the back of your TV.
To connect cable with both scrambled and unscrambled signals:
1 Connect a 75 ohm coaxial cable to a signal splitter (not included).
2 Connect a 75 ohm cable from the signal splitter to the converter box and another
75 ohm cable to the B connector on an A/B switch (not included).
75 ohm coaxial cable
from antenna, cable
wall outlet, or
descrambler box
Signal splitter
Converter box
Antenna input jack
A/B switch
3 Connect a 75 ohm cable from the antenna out jack on the converter box to the A
connector on the A/B switch.
4 Connect a 75 ohm cable from the output jack on the A/B switch to the antenna in jack
on the back of your TV.
5 Use the A/B switch to switch the signal from scrambled to unscrambled.
Setting up your TV
16
Connecting to other equipment
The exact arrangement you use to connect various video and audio components to the TV is
dependent on the model and features of each component. Check the owner's manual
provided with each component for the location of video and audio inputs and outputs.
The following connection diagrams are offered as suggestions. You may need to modify them
to accommodate your particular components. This diagram is intended to show example
video and audio connections only.
UHF
VHF
DVD, VCR, or other
unit with S-Video
Additional TV
DVD, VCR, or
other unit
Video
output
VIDEO
L-AUDIO-R
To audio input
Receiver DVD, VCD
or other unit
To video input
Audio output
ANT IN
Laser DVD with output
terminal
To Audio output
S-VIDEO
Selecting the video input source
Press INPUT on the remote control or the TV to view a signal from another device connected
to your TV, such as a VCR or DVD player. You can select ANT, VIDEO (or S-VIDEO), or
COMPONENT, depending on which input jacks you used to connect your devices.
Note: The S-Video input uses the same circuit as VIDEO. If both S-Video and VIDEO inputs are
connected, the S-Video signal overrides the VIDEO signal and S-VIDEO is shown on the
on-screen display. To watch the VIDEO input, disconnect the S-Video cable.
Using your TV
17
Using your TV
Note: Unless otherwise stated, all buttons referred to in tasks are on the remote control.
Turning on your TV
To turn your TV on or off:
1 Make sure that the antenna or cable TV system is connected, and the TV is plugged
into a power outlet.
2 Press the (power) button on the TV or POWER on the remote control to turn on
the TV.
Warning: The AC plug supplied with this TV is polarized to help minimize the possibility of
electric shock. If the polarized AC cord does not fit into a non-polarized AC outlet, do not
file or cut the blade. It is your responsibility to have an electrician replace the obsolete
outlet. Do not use this plug with an extension cord or other outlet unless the blades can be
fully inserted.
3 Press the
off the TV.
(power) button on the TV or POWER on the remote control again to turn
Note: You can set the TV to turn off automatically by setting the SLEEP timer. In TV mode, the
TV will turn off automatically if there is no input signal for 15 minutes. After you turn off
the TV, you should wait at least 5 seconds before you turn it on again.
Selecting a channel
For information on channel numbering, see “Understanding US channel numbering” on
page 17.
To select a channel:
• Press CH – or CH + on the remote control to go to the next lower or higher channel
(after the channels have been memorized. See “Setting up the channels” on page 18).
Or
Press the number buttons to select a channel (for example, if you want channel 83,
press 8, then press 3).
Or
Press RECALL to go to the last viewed channel.
Understanding US channel numbering
Most digital TV channels have more than one channel. The main channel carries the signal
for the main TV program. The sub-channels carry signals for additional or alternate
programming, such as a radio or news broadcast.
For example, if the main channel number is 8, the sub-channel number might be 8-1, 8-2, or
8-3.
To select a sub-channel:
1 Press the number buttons for the main channel (for example 8).
2 Press the • button, then press the sub-channel button (for example 1).
Using your TV
18
3 Press ENTER.
Viewing the program guide (digital TV only)
To view the program guide:
• Press GUIDE on the remote control to display the program guide.
Adjusting the volume
To adjust the volume:
• Press VOL+ to increase the volume or VOL– to decrease the volume.
• Press MUTE to mute the sound. Press MUTE again to restore the sound (you can also
restore the sound by pressing VOL+).
Setting up the channels
The first time you turn on the TV, you should use AUTO SCAN to automatically set up the
available channels on your TV. This lets you use the CH – or CH + buttons to go to the
previous or next channels.
To set up the channels:
1 Press MENU on the TV or remote control. The on-screen display (OSD) opens.
2 Press VOL+ or VOL– to select CHANNEL, then press CH –. The CHANNEL menu opens.
3 Press CH + or CH – to select RECEPTION, then press VOL+ or VOL– to select the
signal mode you want. You can select:
• AIR–Analog and digital antenna signals,
• CABLE–Analog and digital cable signals.
4 Press CH + or CH – to select AUTO SCAN, then press VOL+ to begin scanning for
channels.
The TV begins to search for, and memorize, all available TV channels. This process takes
several minutes. When the scan is complete, the lowest memorized channel is
displayed. If you press MENU during the scan, the scan is cancelled and the lowest
memorized channel is displayed.
Using your TV
19
Skipping unwanted channels
After saving channels into memory, you can eliminate unwanted channels from memory so
that only the channels you want to watch are selected with the CH+ or CH– buttons.
To delete a memorized analog channel:
1
2
3
4
Tune to the channel you want to delete.
Press MENU on the TV or remote control. The on-screen display (OSD) opens.
Press VOL+ or VOL– to select CHANNEL, then press CH –. The CHANNEL menu opens.
Press CH + or CH – to select SKIP, then press VOL+ or VOL– to select ON.
Tip: You can add a channel to memory by using the number buttons to enter the channel
number, then completing the steps for deleting a channel and setting the SKIP option to
OFF.
5 Press MENU one or more times to close the OSD.
To delete a memorized digital channel:
1 Tune to the channel you want to delete.
2 Press CH.LIST to open the CHANNEL LIST screen.
3 Press CH + or CH – to select SKIP, then press VOL+ to select ON.
Tip: You can add a channel to memory by using the number buttons to enter the channel
number, then completing the steps for deleting a channel and setting the SKIP option to
OFF.
4 Press MENU one or more times to close the OSD.
Selecting a different signal source
This TV has one group of AV input terminals, an S-VIDEO input terminal, and set of
Component input terminals to enable connection to a DVD, VCR, or other video equipment.
For information on connecting your TV to other video equipment, see “Connecting to other
equipment” on page 16.
To select a different signal source:
• Press INPUT repeatedly to cycle through the available input sources. The input sources
will be shown on the screen as they are selected.
Note: The S-VIDEO input uses the same circuit as VIDEO. If both S-VIDEO and VIDEO inputs
are connected, the S-VIDEO signal overrides the VIDEO signal and S-VIDEO is shown on the
screen. To watch the VIDEO input, disconnect the S-Video cable.
To watch TV again, press INPUT until the TV program is shown on the screen.
Using your TV
20
Adjusting the video
To adjust the video:
1 Press MENU on the TV or remote control. The on-screen display (OSD) opens.
2 Press VOL+ or VOL– to select VIDEO, then press CH –. The VIDEO menu opens.
3 Press CH + or CH – to select the option you want to adjust, then press VOL+ or VOL–
to adjust the option. You can select:
Option
VOL–
VOL+
CONTRAST
decrease
increase
BRIGHTNESS
decrease
increase
COLOR
paler color
brilliant color
SHARPNESS
softer picture
clearer picture
TINT
purplish tint
greenish tint
4 Press MENU one or more times to close the OSD.
Selecting a preset Picture mode
To select a preset Picture mode:
• Press PICTURE on the remote control to cycle through the available picture modes,
which include:
• MILD —Select for a finely detailed picture
• STANDARD —Select for a normal picture
• VIVID —Select for a bright and dynamic picture
• CUSTOM —The picture quality you set
Using your TV
21
Setting the language
Setting the on-screen display (OSD) language
You can choose from three different languages (English, French, and Spanish) for the OSD.
To select an OSD menu language:
1 Press MENU on the TV or remote control. The on-screen display (OSD) opens.
2 Press VOL+ or VOL– to select FUNCTION, then press CH –. The FUNCTION menu
opens.
3 Press CH + or CH – to select LANGUAGE, then press VOL+ or VOL– to select
ENGLISH, SPANISH, or FRENCH.
4 Press MENU one or more times to close the OSD.
Selecting the audio source for digital TV (DTV)
In digital TV mode you can also choose from several different audio languages (depending on
the program).
To select the audio source for DTV:
• Press DTV Audio one or more times to cycle through the available language choices.
The first time you press the button, the currently selected language and total number
of available languages is shown. Each time you press the button, the language
changes.
Note: If you press DTV Audio when an external A/V device is selected, nothing happens.
Using your TV
22
Selecting the color system for analog TV (ATV)
To select the color system for ATV:
1 Press MENU on the TV or remote control. The on-screen display (OSD) opens.
2 Press VOL+ or VOL– to select CHANNEL, then press CH –. The CHANNEL menu opens.
3 Press CH + or CH – to select COLOR SYSTEM, then press VOL+ or VOL– to select
AUTO or NTSC.
4 Press MENU one or more times to close the OSD.
Note: The COLOR SYSTEM option only appears if the TV signal is analog.
Displaying channel and program information
To display channel and program information for analog TV:
1 Press DISPLAY. The currently selected channel and audio mode is displayed in the
upper-right corner of the screen.
2 Press DISPLAY again to turn off the display.
To display channel and program information for digital TV:
1 Press DISPLAY. The currently selected channel and signal mode is displayed in the
upper-right corner of the screen.
2 Press DISPLAY again. Information about the currently selected channel and program
appears. The information includes:
• Channel title
• Audio language
• Program content
• Program air time
• Channel number
• Closed caption mode
3 Press DISPLAY again to turn off the display.
Using your TV
23
Setting the time
To set the time:
1 Press MENU on the TV or remote control. The on-screen display (OSD) opens.
2 Press VOL+ or VOL– to select TIME, then press CH –. The TIME menu opens.
3 Press CH + or CH – to select TIME, then press CH + or CH – to select --:-- AM.
4 Press VOL+ or VOL– to change the setting.
5 Press MENU one or more times to close the OSD.
Note: The time will need to be reset after a power failure or if you disconnect the power cord.
Setting the timer
You can use the timer to set when you want your TV to automatically turn on or off. The timer
turns your TV on or off each day at the same (set) time. If you want to set a timer to
automatically turn off your TV just one time, use the sleep timer (see “To set the sleep timer:”
on page 26).
To set the timer to turn your TV on:
1 Press MENU on the TV or remote control. The on-screen display (OSD) opens.
2 Press VOL+ or VOL– to select TIME, then press CH –. The TIME menu opens.
Using your TV
24
3
4
5
6
Press CH + or CH – to select TIME ON, then press CH + or CH – to select --:-- .
Press VOL+ or VOL– to set the value.
Press CH + or CH – to select AM, then press VOL+ or VOL– to select AM or PM.
Press MENU one or more times to close the OSD.
To set the timer to turn your TV off:
1 Press MENU on the TV or remote control. The on-screen display (OSD) opens.
2 Press VOL+ or VOL– to select TIME, then press CH –. The TIME menu opens.
3
4
5
6
Press CH + or CH – to select TIME OFF, then press CH + or CH – to select --:-- .
Press VOL+ or VOL– to set the value.
Press CH + or CH – to select AM, then press VOL+ or VOL– to select AM or PM.
Press MENU one or more times to close the OSD.
Turning off the daylight saving time feature
Daylight saving time is automatically set by specially broadcast signals. If you live in an area
that does not use daylight saving time, you can turn off this feature so the time on your TV is
not automatically adjusted.
To turn off the daylight saving time feature:
1 Press MENU on the TV or remote control. The on-screen display (OSD) opens.
Using your TV
25
2 Press VOL+ or VOL– to select DTV SETUP, then press CH –. The DTV SETUP menu
opens.
3 Press CH + or CH – to select DAYLIGHT SAVING, then press VOL+ or VOL– to select
OFF.
4 Press MENU one or more times to close the OSD.
Setting the time zone
When you set the time zone, your TV adjusts the time signal from an out-of-area broadcast
so the clock displays the correct local time.
To set the time zone:
1 Press MENU on the TV or remote control. The on-screen display (OSD) opens.
2 Press VOL+ or VOL– to select DTV SETUP, then press CH –. The DTV SETUP menu
opens.
3 Press CH + or CH – to select TIME ZONE, then press VOL+ or VOL– to select your
viewing area’s time zone. You can select NEWFOUNDLAND, ATLANTIC, EASTERN,
CENTRAL, MOUNTAIN, PACIFIC, ALASKA, HAWAII, or SAMOA.
4 Press MENU one or more times to close the OSD.
Using your TV
26
Setting the sleep timer
To set the sleep timer:
1 Press SLEEP one or more times to select the amount of time you want your TV to delay
before it turns off automatically. You can select 5 minutes, 10 minutes, 15 minutes, 30
minutes, 45 minutes, 60 minutes, 90 minutes, 120 minutes, 180 minutes, or 240
minutes.
2 To turn off the sleep timer, press SLEEP one or more times until OFF appears on the
screen.
Creating a favorite channel list
To create a favorite channel list:
1 Tune to the channel you want to add to the favorite channel list.
2 Press FAVORITE. The FAVORITE CHANELS screen opens.
3 Press ENTER to add the channel to the list.
To view a favorite channel:
1 Press FAVORITE. The FAVORITE CHANELS screen opens.
2 Press CH + or CH – to select the channel you want to watch. The FAVORITE CHANNELS
screen closes and your TV tunes to the channel you selected.
Using your TV
27
Viewing the DTV program guide
Electronic program guides (EPG) are available for some digital channels or programs. You can
view this information by doing the following:
To view the EPG:
1 Press GUIDE. The EPG opens
2 Press VOL+ or VOL– to select a program. The information about that program is
shown in the EPG.
3 Press GUIDE or EXIT to close the guide and watch the program you selected.
Turning the blue screen on or off
When your TV is tuned to a channel that does not have a signal, you can specify whether you
want the blank screen to be blue.
To turn the blue screen on or off:
1 Press MENU on the TV or remote control. The on-screen display (OSD) opens.
2 Press VOL+ or VOL– to select FUNCTION, then press CH –. The FUNCTION menu
opens.
Using your TV
28
3 Press CH + or CH – to select BLUE SCREEN, then press VOL+ or VOL– to select OFF or
ON.
4 Press MENU one or more times to close the OSD.
Displaying closed captions
This TV has the capability to decode and display closed captioned TV programs. Closed
captioning displays text on the screen for hearing-impaired viewers or translates and
displays text in another language.
Closed captions are usually displayed in Captions mode or Text mode. Captions mode usually
displays captions for the program’s audio language. CC1 usually displays English. CC2 usually
displays a secondary language. Text mode usually displays other types of information, such
as a program schedule.
Notes:
- If the program or video you select is not closed-captioned, no captions display on-screen.
- If text is not available in your viewing area, a black rectangle may appear on-screen. If
this happens, set the closed caption feature to OFF.
- When selecting closed captions, the captioning delays about ten seconds.
- If no caption signal is received, no captions appear, but the TV remains in the caption
mode.
- Misspellings or unusual characters may occasionally appear during closed captioning.
This is normal with closed captioning, especially with live programs. This is because
during live programs, captions are also entered live. These transmissions do not allow
time for editing.
- When captions are being displayed, on-screen displays, such as volume and mute, may
be seen but may interfere with closed captions.
- Some cable TV systems and copy protection systems may interfere with the closed
captioned signal.
- If using an indoor antenna or if TV reception is very poor, the closed caption decoder may
not appear or may appear with strange characters or misspelled words. In this case,
adjust the antenna for better reception or use an outdoor antenna.
Viewing closed captions with analog NTSC channels
If your TV is set up to receive analog TV channels and the color system is set to NTSC, you can
specify how you want closed captions displayed.
Note: You can press CCD on the remote control to adjust closed captions.
To display closed captions:
1 Press MENU on the TV or remote control. The on-screen display (OSD) opens.
Using your TV
29
2 Press VOL+ or VOL– to select FUNCTION, then press CH –. The FUNCTION menu
opens.
3 Press CH + or CH – to select NTSC CAPTION, then press VOL+ or VOL– to select OFF,
C1, C2, C MUTE, TEXT1, or TEXT2.
Note: C1 and C2 display closed captions across the bottom of the TV screen. This type of
closed caption is usually the audio portion of the program. TEXT1 and TEXT2 display
closed captions in a black box that covers a large portion of the TV screen. These types of
closed captions are usually messages provided by the broadcaster.
4 Press MENU one or more times to close the OSD.
Viewing closed captions with digital channels
If your TV is set up to receive digital TV channels, you can specify how you want closed
captions displayed.
Note: You can press CCD on the remote control to turn closed captions on or off.
To turn closed captions on or off:
1 Press MENU on the TV or remote control. The on-screen display (OSD) opens.
2 Press VOL+ or VOL– to select DTV SETUP, then press CH –. The DTV SETUP menu
opens.
Using your TV
30
3 Press CH + or CH – to select DTV CC, then press VOL+. The DTV CC sub-menu opens.
4 Press CH + or CH – to select CAPTION MODE, then press VOL+. The CAPTION MODE
sub-menu opens.
5 Press VOL+ or VOL– to select ON or OFF.
Note: CAPTION MODE must be turned on to select a service level.
6 Press CH + or CH – to select DTV CC, then press VOL+ or VOL– to select the service
level you want. There are as many as six service levels. SERVICE1 provides closed
captions for the audio language of the program. SERVICE2 provides closed captions
for a secondary audio language of the program. The other service levels vary,
depending on the program.
7 Press MENU one or more times to close the OSD.
Using your TV
31
Customizing closed captions for digital channels
You can customize how you want closed captions displayed for digital channels.
Note: You can press CCD on the remote control to turn closed captions on or off.
To customize closed captions:
1 Press MENU on the TV or remote control. The on-screen display (OSD) opens.
2 Press VOL+ or VOL– to select DTV SETUP, then press CH –. The DTV SETUP menu
opens.
3 Press CH + or CH – to select DTV CC, then press VOL+. The DTV CC sub-menu opens.
4 Press CH + or CH – to select USER SETTING, then press VOL+ or VOL– to select
CUSTOM.
32
Using your TV
5 Press CH + or CH – to select DTV CAPTION STYLE, then press VOL+. The DTV
CAPTION STYLE sub-menu opens.
6 Press CH + or CH – to select the style option you want to adjust, then press VOL+ or
VOL– to adjust the option. (The BG COLOR and BG OPACITY options are not visible
until you press CH – to scroll down the list of options.)
• STYLE–Selects the font style. STYLE1 through STYLE8 are available.
• SIZE–Selects the font size of the caption display. You can select SMALL,
STANDARD, or LARGE.
• TEXT COLOR–Selects the color of the text.
• TEXT OPACITY–Selects the opacity of the text.
• EDGE TYPE–Selects the font edge type.
• BG COLOR–Selects the color of the background.
• BG OPACITY–Selects the opacity of the background.
7 Press MENU one or more times to close the OSD.
Using your TV
33
Setting the parental controls
Your TV has a V-Chip that lets you block certain types of programs and movies. When you
block a rating, that rating and all higher ratings are blocked.
To set parental controls or to temporarily override a blocked rating, you must set a password.
Caution: Make sure that you select a password that you can remember, or make sure that
you write down the password you select. If you forget your password, you can enter 9443
to reset the password to 0000.
To set or change a parental controls password:
1 Press MENU on the TV or remote control. The on-screen display (OSD) opens.
2 Press VOL+ or VOL– to select FUNCTION, then press CH –. The FUNCTION menu
opens.
3 Press CH + to select PARENTAL LOCK, then press VOL+. The PLEASE ENTER
PASSWORD screen opens.
4 Press the number buttons on the remote control to enter the old password. The default
password is 0000. After you enter the password, the PARENTAL LOCK menu opens.
Note: If you forget the old password, enter 9443 to reset the password.
Using your TV
34
5 Press CH – to scroll down to CHANGE PASSWORD, then press VOL+. (This option is
not visible until you scroll down the list of options.)
6 Press the number buttons on the remote control to enter the new password, then
reenter the new password to confirm.
7 Press MENU one or more times to close the OSD.
To turn the parental lock on or off:
1 Press MENU on the TV or remote control. The on-screen display (OSD) opens.
2 Press VOL+ or VOL– to select FUNCTION, then press CH –. The FUNCTION menu
opens.
3 Press CH + to select PARENTAL LOCK, then press VOL+. The PLEASE ENTER
PASSWORD screen opens.
4 Press the number buttons on the remote control to enter the password. The PARENTAL
LOCK menu opens.
5 Press CH + or CH – to select PARENTAL LOCK, then press VOL+ or VOL– to select ON
or OFF.
6 Press MENU one or more times to close the OSD.
Using your TV
35
To block or unblock TV ratings:
1 Open the PARENTAL LOCK menu (see “To turn the parental lock on or off:” on page 34).
2 Press CH + or CH – to select PARENTAL GUIDE, then press VOL+. The RATING screen
opens.
3 Press CH + or CH – to select a TV rating, then press VOL+ or VOL– to block or unblock
the rating. Some ratings have sub-ratings that you can block as well. A check mark
indicates that a rating or sub-rating is blocked.
Main TV ratings include:
• TV-Y—All children
• TV-Y7—7 years old and above
• TV-G—General audience
• TV-PG—Parental guidance suggested
• TV-14—Parental guidance strongly suggested for children under 14
• TV-MA—Mature audiences only
Using your TV
36
TV sub-ratings include:
• ALL–Applies to TV-G, TV-PG, TV-14, and TV-MA. Blocks all programs with these
ratings.
• FV (fantasy violence)—Applies to TV-Y and TV-Y7.
• D (sexual dialog)—Applies to TV-PG and TV-14.
• L (adult language)—Applies to TV-PG, TV-14, and TV-MA.
• S (sex scenes)—Applies to TV-PG, TV-14, and TV-MA.
• V (violence)—Applies to TV-PG, TV-14, and TV-MA.
4 Press EXIT to return to the normal screen.
To block or unblock movie ratings:
1 Open the PARENTAL LOCK menu (see “To turn the parental lock on or off:” on page 34).
2 Press CH + or CH – to select MPAA RATING, then press VOL+. The MOVIE RATING
screen opens.
3 Press CH + or CH – to select a movie rating, then press VOL+ or VOL– to block or
unblock the rating. A check mark indicates that a rating is blocked. When you block a
rating, that rating and all higher ratings are blocked.
Using your TV
37
MPAA ratings include:
• NR—Not rated
• G—General audiences
• PG—Parental guidance suggested
• PG-13—Parental guidance strongly suggested for children under 13
• R—Parental guidance recommended for 17 and under
• NC-17—Not recommended for 17 and under
• X—Adults only
4 Press EXIT to return to the normal screen.
Setting the ATSC parental lock
Note: The ATSC PARENTAL LOCK option only appears if the TV signal carries V-CHIP
information.
To set the ATSC parental lock:
1 Press MENU on the TV or remote control. The on-screen display (OSD) opens.
2 Press VOL+ or VOL– to select DTV SETUP, then press CH –. The DTV SETUP menu
opens.
3 Press CH + or CH – to select ATSC PARENTAL LOCK. The ENTER CODE screen opens.
Troubleshooting
38
4 Press the number buttons on the remote control to enter the password. The default
password is 0000. The ATSC PARENTAL LOCK screen opens.
5 Press CH + or CH – to select an option, then press VOL+ or VOL– to adjust the option.
Options include:
• VERSION–Displays the V-CHIP broadcast source version.
• DIMENSION–The information displayed here varies, depending on the V-CHIP
signal.
• CLEAR RRT–Clears the version field.
6 Press MENU one or more times to close the OSD.
Troubleshooting
Use the following checklist for troubleshooting when you have problems with your TV.
Consult your local dealer or service outlet if problems persist. Be sure all connections are
properly made when using with other units.
Warning: Do not try to repair your TV yourself. Refer all servicing to qualified service
personnel. Do not remove the back cover. Your TV has dangerous electrical voltages inside
that may cause a fire or injury.
Note: Your TV may make occasional snapping or popping noises. This is caused by materials
in the cabinet expanding or contracting when the room temperature changes. This is
normal.
Problem
Solution
TV does not operate.
•
•
•
•
Make sure the power cord is plugged in.
Try another AC outlet.
Power is off. Check fuse or circuit breaker.
Unplug TV for an hour, then plug it back in.
Poor sound or no sound.
• Station or cable experiencing problems. Tune to another station.
• Check sound adjustments (volume and mute).
• Check for sources of possible interference.
Troubleshooting
39
Problem
Solution
Poor picture or no picture.
•
•
•
•
•
Station or cable experiencing problems. Tune to another station.
Make sure channels are set into memory.
Check antenna or cable connections. Adjust the antenna.
Check for sources of possible interference.
Check picture control adjustments.
Poor reception on some
channels.
•
•
•
•
Station or cable experiencing problems. Tune to another station.
Make sure channels are set into memory.
Station is weak. Adjust the antenna to receive the desired station.
Check for sources of possible interference.
Poor color or no color.
•
•
•
•
Station or cable experiencing problems. Tune to another station.
Check picture control adjustments.
Check antenna or cable connections. Adjust the antenna.
Check for sources of possible interference.
Picture wobbles or drifts.
•
•
•
•
Station or cable experiencing problems. Tune to another station.
Make sure channels are set into memory.
Cable company is scrambling signal.
Adjust antenna.
No CATV reception.
• Check all cable connections.
• Set AIR/CABLE menu option to the CABLE mode.
• Station or cable system problems. Try another station.
No remote control operation. •
•
•
•
•
Batteries are weak, dead, or inserted incorrectly.
Remote control is out of range. Move closer to TV (within 15 feet [5 m]).
Make sure the remote control is aimed at the sensor.
Confirm there are no obstructions between the remote control and the TV.
Make sure the power cord is plugged in.
TV shuts off.
• No broadcast on tuned station.
• Sleep timer is set.
• Power interrupted.
Closed Caption is not
activated.
• TV station experiencing problems or program is not closed captioned. Try
another channel.
• Check cable connection or VHF/UHF antenna. Adjust the antenna.
• Turn closed captioning on in the OSD or press CCD.
Parental Control is not
working correctly.
• Parental control set to OFF. Change setting to ON.
• News or sporting event being broadcast.
• Ratings not set. Set ratings as desired.
Specifications
40
Specifications
Design and specifications are subject to change without notice.
Color system
ATSC
Sound system
Monaural
Picture tube
20” color
Sound output power
2 × 2 W (10% THD)
Power requirements
AC 120 V ~ 60 Hz
Power consumption
85 Watts
Dimensions (WxDxH)
19.29 × 22.68 × 17.64 inches
(490 × 576 × 448 mm)
Accessories
Remote control (1)
User Guide (1)
Batteries (AAA × 2)
Maintaining
Cleaning your TV
Clean the screen and cabinet with a soft, lint-free cloth. If the screen or cabinet is especially
dirty, moisten a soft, lint-free cloth in a weak detergent solution, squeeze the excess
moisture from the cloth, then wipe the screen or cabinet with the cloth. Use a clean cloth to
dry the screen or cabinet.
Caution: Avoid the following, because it may cause damage to your TV:
- Cleaning your TV with volatile substances, such as insect sprays, solvents, and thinners.
- Leaving items made from rubber or PVC in contact with your TV for long periods.
- Letting liquids drip into the cabinet
Legal notices
FCC Part 15
This device complies with Part 15 of the FCC Rules. Operation of this product is subject to the
following two conditions: (1) this device may not cause harmful interference, and (2) this
device must accept any interference received, including interference that may cause
undesired operation.
This equipment has been tested and found to comply within the limits for a class B digital
device, pursuant to Part 15 of the FCC Rules. These limits are designed to provide reasonable
protection against harmful interference in a residential installation. This equipment
generates, uses, and can radiate radio frequency energy and, if not installed and used in
accordance with the instructions, may cause harmful interference to radio communications.
However, there is no guarantee that interference will not occur in a particular installation. If
Legal notices
41
this equipment does cause harmful interference to radio or TV reception, which can be
determined by turning the equipment off and on, the user is encouraged to try to correct the
interference by one or more of the following measures:
• Reorient or relocate the receiving antenna.
• Increase the separation between the equipment and receiver.
• Connect the equipment into an outlet on a circuit different from that to which the
receiver is connected.
• Consult the dealer or an experienced technician for help.
FCC warning
Changes or modifications not expressly approved by the party responsible for compliance
with the FCC Rules could void the user’s authority to operate this equipment.
Copyright
© 2007 Dynex. DYNEX and the DYNEX logo are trademarks of Best Buy Enterprise Services,
Inc. Other brands and product names are trademarks or registered trademarks of their
respective holders. Specifications and features are subject to change without notice or
obligation.
For service and support call (800) 305-2204.
Legal notices
43
90-Day Limited Warranty
Dynex Products (“Dynex”) warrants to you, the original purchaser of this new DX-RCRT 20-09 (“Product”), that
the Product shall be free of defects in the original manufacture of the material or workmanship for a period of 90
days from the date of your purchase of the Product (“Warranty Period”). This Product must be purchased from an
authorized dealer of Dynex brand products and packaged with this warranty statement. This warranty does not
cover refurbished Product. If you notify Dynex during the Warranty Period of a defect covered by this warranty
that requires service, terms of this warranty apply.
How long does the coverage last?
The Warranty Period lasts for 90 days from the date you purchased the Product. The purchase date is printed on
the receipt you received with the product.
What does this warranty cover?
During the Warranty Period, if the original manufacture of the material or workmanship of the Product is
determined to be defective by an authorized Dynex repair center or store personnel, Dynex will (at its sole option):
(1) repair the Product with new or rebuilt parts; or (2) replace the Product at no charge with new or rebuilt
comparable products or parts. Products and parts replaced under this warranty become the property of Dynex
and are not returned to you. If service of Products and parts are required after the Warranty Period expires, you
must pay all labor and parts charges. This warranty lasts as long as you own your Dynex Product during the
Warranty Period. Warranty coverage terminates if you sell or otherwise transfer the Product.
How to obtain warranty service?
If you purchased the Product at a retail store location, take your original receipt and the Product to the store you
purchased it from. Make sure that you place the Product in its original packaging or packaging that provides the
same amount of protection as the original packaging. If you purchased the Product from an online web site, mail
your original receipt and the Product to the address listed on the web site. Make sure that you put the Product in
its original packaging or packaging that provides the same amount of protection as the original packaging.
To obtain in-home warranty service for a TV with a screen 25 inches or larger, call 1-888-BESTBUY. Call agents will
diagnose and correct the issue over the phone or will have an Dynex-approved repair person dispatched to your
home.
Where is the warranty valid?
This warranty is valid only to the original purchaser of the Product in the United States and Canada.
What does the warranty not cover?
This warranty does not cover:
• Customer instruction
• Installation
• Set up adjustments
• Cosmetic damage
• Damage due to acts of God, such as lightning strikes
• Accident
• Misuse
• Abuse
• Negligence
• Commercial use
• Modification of any part of the Product
• Plasma display panel damaged by static (non-moving) images applied for lengthy periods (burn-in).
This warranty also does not cover:
• Damage due to incorrect operation or maintenance
• Connection to an incorrect voltage supply
44
Legal notices
• Attempted repair by anyone other than a facility authorized by Dynex to service the Product
• Products sold as is or with all faults
• Consumables, such as fuses or batteries
• Products where the factory applied serial number has been altered or removed
REPAIR REPLACEMENT AS PROVIDED UNDER THIS WARRANTY IS YOUR EXCLUSIVE REMEDY. DYNEX SHALL NOT BE
LIABLE FOR ANY INCIDENTAL OR CONSEQUENTIAL DAMAGES FOR THE BREACH OF ANY EXPRESS OR IMPLIED
WARRANTY ON THIS PRODUCT, INCLUDING, BUT NOT LIMITED TO, LOST DATA, LOSS OF USE OF YOUR PRODUCT, LOST
BUSINESS OR LOST PROFITS. DYNEX PRODUCTS MAKES NO OTHER EXPRESS WARRANTIES WITH RESPECT TO THE
PRODUCT, ALL EXPRESS AND IMPLIED WARRANTIES FOR THE PRODUCT, INCLUDING, BUT NOT LIMITED TO, ANY
IMPLIED WARRANTIES OF AND CONDITIONS OF MERCHANTABILITY AND FITNESS FOR A PARTICULAR PURPOSE, ARE
LIMITED IN DURATION TO THE WARRANTY PERIOD SET FORTH ABOVE AND NO WARRANTIES, WHETHER EXPRESS OR
IMPLIED, WILL APPLY AFTER THE WARRANTY PERIOD. SOME STATES, PROVINCES AND JURISDICTIONS DO NOT
ALLOW LIMITATIONS ON HOW LONG AN IMPLIED WARRANTY LASTS, SO THE ABOVE LIMITATION MAY NOT APPLY TO
YOU. THIS WARRANTY GIVES YOU SPECIFIC LEGAL RIGHTS, AND YOU MAY ALSO HAVE OTHER RIGHTS, WHICH VARY
FROM STATE TO STATE OR PROVINCE TO PROVINCE.
Contact Dynex:
For customer service please call 1-800-305-2204
www.dynexproducts.com
DYNEX® is a registered trademark of Best Buy Enterprise Services, Inc.
Distributed by Best Buy Purchasing, LLC.
Dynex, 7601 Penn Avenue South, Richfield, Minnesota, U.S.A.
07-538
www.dynexproducts.com (800) 305-2204
© 2007 Best Buy Enterprise Services, Inc. All rights reserved.
DYNEX is a trademark of Best Buy Enterprise Services, Inc. Registered in some countries. All other
products and brand names are trademarks of their respective owners.
Distributed by Best Buy Purchasing, LLC
7601 Penn Ave. South, Richfield, MN 55423 U.S.A.
© 2007 Best Buy Enterprise Services, Inc. Tous droits réservés.
DYNEX est une marque de Best Buy Enterprise Services, Inc. Déposée dans certains pays. Tous les
autres produits ou noms de marques sont des marques de commerce qui appartiennent à leurs
propriétaires respectifs.
Distribué par Best Buy Purchasing, LLC
7601 Penn Ave. South, Richfield, MN 55423 É.-U.
© 2007 Best Buy Enterprise Services, Inc. Todos los derechos reservados.
DYNEX es una marca de Best Buy Enterprise Services, Inc. Registrada en ciertos países. Todos los
demás productos y marcas son marcas comerciales de sus respectivos dueños.
Distribuido por Best Buy Purchasing, LLC7601 Penn Ave. South, Richfield, MN 55423 U.S.A.