1
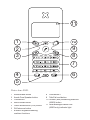
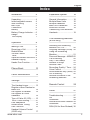
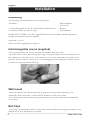
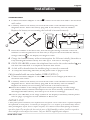
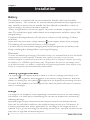
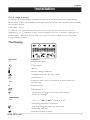
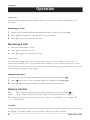
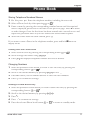
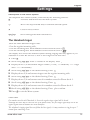
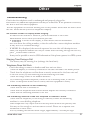
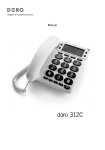
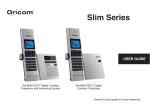
design on speaking terms Manual doro 820/830R 11 10 9 8 1 2 3 7 6 4 5 Picture shows 830R. 1 Redial/Erase button 8 Phonebook 2 2 Hands Free Speaker button 9 Talk/Call end button 3 Phonebook 1 4 Menu/Recall button 10 Volume (820)/Answering Machine (830R) button 5 Caller Identification (CID) button 6 OK/Intercom button 7 Numeric keypad/Answering machine functions 11 New Message/Hands Free (830R only) indicator light Index Installation 4 Unpacking........................... 4 Interchangeable covers ...... 4 Wall mounting ..................... 4 Belt Clips ............................ 4 Connection ......................... 5 Battery ............................... 6 Battery Charge Indicator .... 6 Range ................................. 6 The Display......................... 7 Operation 8 Making a Call...................... 8 Receiving a Call.................. 8 Redial Button ...................... 8 Volume Control ................... 8 Timer................................... 8 Optional Network Services. 9 Handset Paging .................. 9 Hands Free Function .......... 9 Phone Book 10 Caller Identification 12 Settings 13 The Handset ringer............. 13 Register a New Handset or Base Unit ............................ 14 De-register a Handset ........ 14 De-register all Other Handsets ............................ 14 Type of Caller ID (CID) ....... 15 Tone / Pulse Dialling.............15 Line Adaptation................... 15 Recall Button Timing .......... 16 PBX Function...................... 16 Handset Volume Control (830R only) ......................... 17 www.doro.com Expanded System English 18 General Information............ 18 Multiple Base Units............. 18 Multiple Handsets ............... 19 Base Unit Placement .......... 19 Intercom Function............... 19 Transferring Calls Between Handsets ............................ 19 The Answering Machine (830R only) 20 Switching the Answering Machine On / Off….. ........... 20 Outgoing Message (OGM) . 20 Using the Answering Machine .............................. 21 Personal Message - MEMO 22 Call Screening .................... 22 Day / Time Stamp............... 22 Number of Rings................. 23 Remote Code ..................... 23 Recording Quality / Time.... 24 Voice Control ...................... 24 Announcement only (ANN). 24 Out of Memory.................... 25 Remote Activation of the Answering Machine ............ 25 Remote Control 26 Other 27 Troubleshooting .................. 27 UK....................................... 28 Guarantee........................... 28 Australia and New Zealand 29 Guarantee........................... 29 REN (RN for New Zealand) 30 3 English Installation Unpacking The package should include the following items: - Handset - Base unit - 2 interchangeable covers for the handset and base unit. - Guarantee card (AU & NZ only) - Mains adapter - Line cord - Battery - User Manual Models 820+1/830R+1 are also supplied with an extra handset including battery, charger and electrical mains adapter. IMPORTANT! Only use with the supplied power adapter/s. Interchangeable covers (supplied) You can personalise the colour of both the handset and base unit. The base unit cover is removed by pressing a long thin object into the round hole on the underside of the base unit. The handset cover can be removed as showed in the pictures below. Remove carefully to avoid damaging the locating tabs. Please ensure no button is jammed when refitting. Wall mount The base unit can be wall mounted by fitting the enclosed wall bracket to the underside of the base unit. A click will be heard as it locks into place. The wall bracket can be removed by pressing the lock tab located on the underside of the base. Belt Clips A belt clip is permanently fitted on the back of the handset allowing the handset to be attached to a belt, waistband or similar. 4 www.doro.com Installation English Connection 1. Connect the mains adapter to the Y socket of the base unit and to an electrical wall socket. 2. Carefully remove the battery cover from the back of the handset following the diagrams below. Insert the battery plug and fit the battery into the handset. Replace the battery cover ensuring the lock tab is inserted correctly. A) B) C) é NiMH é D é 3. Place the handset in the base unit, with the keypad facing outwards. Once the handset is correctly placed in the base unit, a beep will be heard and the battery charge indicator in the display will begin to flash. 4. Charge the handset battery without interruption for 24 hours initially (thereafter a fully discharged handset battery will take up to 14 hours to recharge). 5. ONCE CHARGED, connect the telephone line cord to the socket marked T on the base unit and then to a telephone network wall socket. 6. A click will be heard when the modular plug is correctly connected. 7. To setup the answering machine (830R) please refer to pages 20-26. Only for models with an extra handset (830R+1/820+1): 8. Connect the mains adapter to the Y socket of the charger pod and to an electrical wall socket. 9. Carefully remove the battery cover from the back of the handset following the diagrams above. Insert the battery plug and fit the battery into the handset. Replace the battery cover ensuring the lock tab is inserted correctly. 10. Place the handset in the charger pod with the keypad facing out and charge the handset battery without interruption for 24 hours initially (thereafter a fully discharged handset battery will take up to 14 hours to recharge). 11. ONCE CHARGED, if the range symbol in the display continually flashes please refer to page 14, Register a New Handset or Base Unit. IMPORTANT! Under power failure conditions, this telephone will not operate. Please ensure that a separate telephone, not dependent on local power, is available for emergency use. The earpiece of the handset may attract small ferromagnetic objects such as staples and pins, care should be taken when placing the handset near these items. Do not place the base unit in areas of high humidity or where it will be exposed to direct sunlight or other major heat sources. Only use with the supplied power adapter. www.doro.com 5 English Installation Battery The telephone is supplied with an environmentally friendly nickel metal hydride (NiMH) battery - 2.4V 400mAh. As with all batteries performance may degrade over time, should you notice that the standby time has reduced considerably or there are signs of leakage, the battery should be replaced. A fully charged battery will last for approx 140 hours in standby or approx 8 hours call time. The stated times apply under normal room temperatures and when using a fully charged battery. Completely discharged battery will take about 14 hours to fully recharge (24 hours from new). Please note that the battery charge indicator in the display flashes while charging. The flashing will stop when the battery is fully charged. The base unit has an automatic charging mechanism that prevents the battery from being overcharged or damaged due to prolonged charging. Please note! To ensure and maintain good charging of the handset battery/s we recommend that the base and handset charge contacts are cleaned regularly, ie monthly, with a pencil eraser and/or a soft dry cloth. When the telephone is installed for the first time, the battery must be charged for 24 hours before using the telephone. Use a DORO original battery only. The guarantee does not cover any damage caused by an incorrect battery. The handset is charged with the keypad facing outwards. Please dispose of any battery in a responsible and environmentally friendly manner. Battery Charge Indicator The symbol in the display indicates when its is time to recharge the battery. The symbol has two segments which disappear as the battery charge decreases. When the battery is running low, the symbol will appear in the display and a warning tone will be heard. If the handset is not recharged at this time, the phone will cease to function until it is recharged. Range The range of the telephone varies depending on different factors in the surrounding enviroment. The radio waves transmitting the call may be hindered by obstructions, reducing the range. Specified ranges require unobstructed transmission between the handset and the base unit. In such ideal conditions, the telephone range can be up to 300 metres. In a densely populated area, house, apartment, etc. the range of the telephone will be reduced. Try to get the best range by relocating the base unit. The ideal location for the base unit is a high and unobstructed place. 6 www.doro.com Installation English Out of range warning If during a call the handset is carried too far from the base unit, the sound quality deteriorates. Unless the handset is moved closer to the base unit within a few seconds, the call will be lost. IMPORTANT! To reduce the risk of possible interference please do not locate the base unit near any electrical equipment e.g. TV’s, computers, fridges, telecom equipment etc or close to radiators, metal pipes or window frames. Also ensure the base unit is not exposed to direct sunlight, excessive heat, damp or high humidity locations. The Display Indicator % Function Handset Ringer p Programme. = Menu. Battery charge indicator. Numbers in Caller ID log (CID). b Q i Phonebook 1. Indicates that a call is connected. Flashes when the phone rings. Intercom call. Phonebook 2. Shown within range of the base unit. Flashes when out of range. 830R only: a Upper row: Answering machine settings. Lower row: The indicator is lit when the answering machine is activated. New incoming messages (ICM) on the answering machine. Handset volume control. www.doro.com 7 English Operation Important! Please note when programming all references to press = to press once and then immediately release the button. Making a Call 1. Enter the required telephone number. Mistakes can be erased using x. 2. Press Q, the telephone number will now be dialled. 3. Press Q again to terminate the call. Receiving a Call 1. Wait for the handset to ring. 2. Press Q to answer the call. 3. Press Q again to terminate the call. Please note! The telephone’s ringing signal does not follow the line signal, ie it may continue to ring for up to 7 seconds after answering a call. If the telephone cannot connect to a line, a warning tone will be heard. The problem may be due to the batteries running low, the handset being too far from the base unit or all of the transmission channels being engaged. Redial Button The five most recently dialled numbers can easily be redialled using r : 1. Press r and scroll to the required telephone number using < < /> >. 2. Press Q, the displayed telephone number will now be dialled. Volume Control 820: The earpiece volume may be adjusted during a call by pressing . 830R: The volume is adjusted by accessing the menu, please refer to page 17. The display will show the selected volume: +=low, ++=medium, +++=high, and ++++=maximum. Timer Within approximately 5 seconds after the connection of a call, a timer will be shown on the display. The timer helps you keep track of how long the call lasts. 8 www.doro.com Operation English Optional Network Services Access to additional network services (e.g. Call Waiting) can be gained by using the recall button R , * and # keys. Contact your network operator for more information. Press the recall button R followed by the extension number to transfer calls when connected to a PBX (TBR only). Handset Paging Pressing j on the base unit will activate the paging signal of the handset. This function is used to help locate the handset or to page the person carrying the handset. The signal will continue until i on the handset is pressed. The page can also be cancelled by pressing j on the base again. Hands Free Function The hands free button s is located on the front of the handset. This allows calls to be made without having to hold the handset. If you wish, you can switch between handset and hands free during a call. 1. Enter the required telephone number. 2. Press Q. When the call has been connected press s. The hands free feature will be activated and the conversation can be heard through the speaker. 3. Place the handset on a hard flat surface, e.g. a table, shelf or similar, with the display facing up. 4. Speak towards the microphone located on the front edge of the handset, ensuring that you are no further than 1 meter (3 feet) away from the handset during the call. 5. If you need to adjust the speaker volume press s repeatedly, the display will cycle through +=low, ++=high and off settings. To reactivate hands free press s again. 6. Press Q to terminate the call. Please note! Please remember that in hands free speaker mode, it is only possible for one person at a time to talk. The switch over between speaker and microphone is automatic and dependant on the sound level of the incoming call and the microphone respectively. It is therefore essential that there are no loud noises in the immediate surroundings of the telephone, as this will disrupt the speaker function. www.doro.com 9 English Phone Book Using the Phone Book There are two Phone Books which will store a total of 20 (10+10) telephone numbers (25 digits maximum) and names (10 characters maximum), this allows a stored phone number to be dialled using fewer button presses than if dialled manually. The Phone Books are arranged alphabetically. If you subscribe to a Caller ID service, the telephone number (and for those numbers stored in the Phone book) the name of a caller will be shown upon receiving an incoming call. Letters Each number key has been allocated certain letters. Button Letters/symbols 1.......................................... [Space character] --1 2.......................................... A B C 2 3.......................................... D E F 3 4.......................................... G H I 4 5.......................................... J K L 5 6.......................................... M N O 6 7.......................................... P Q R S 7 8.......................................... T U V 8 9.......................................... W X Y Z 9 0.......................................... 0 10 www.doro.com English Phone Book Storing Telephone Numbers/Names 1. Do Not press Q. Enter the telephone number, including the area code. 2. Select a Phone book by either pressing b or . 3. Enter a name by pressing the corresponding number button until the required letter is displayed, please refer to the table on the previous page. Press x to delete or make changes. Once the first letter has been entered wait a second or two and repeat this procedure until all you have entered the entire name required. 4. When the entire name has been entered, press 0. If you want to enter a Pause in the telephone number, press and hold # until the display shows --. Dialling from the Phone book 1. Select a Phone book by pressing the corresponding button b or 2. Scroll through the entries using < < /> >. 3. Press Q, the displayed telephone number will now be dialled. . Changing Numbers 1. Select the phonebook into which you wish to save the entry by pressing the corresponding button: b or . 2. Scroll to the desired memory by pressing < < /> >. Press 0. 3. Press x to delete, use the number buttons to enter the new numbers. 4. Press 0 to confi rm the settings. Erasing a Phone Book Entry 1. Select the phonebook from which you wish to delete the entry by pressing the corresponding button: b or . 2. Scroll to the desired memory by pressing < < /> >. 3. Press c. 4. Press 0 to confirm the settings. 5. Press the relevant Phone book button b or to return to standby mode. www.doro.com 11 English Caller Identification Explanation of Caller ID Caller ID allows you to see who is calling before you answer a call, and see who has called in your absence. If a name is attached to the telephone number and stored in the phone book, the name will be shown while the phone is ringing. The call log will store up to 10 telephone numbers, which can easily be retrieved for viewing and dialling. If you are checking incoming calls on the call log, only the telephone number will be shown. New calls are indicated in standby mode by in the display. When a voicemail message (Optional Network Services Required) has been received will flash. While scrolling through the list two short beeps will indicate that you have reached the fi rst or the last call. When the log is full, the oldest number will be deleted automatically, as the new call is logged. Please note! In order for numbers to be shown, the Caller ID service must be provided by your network operator and a current subscription in place. Contact your network operator for more information. Some telephone networks will transmit a call description (e.g. MOBILE) as a name, the number will not be shown while ringing, only when scrolling in the list. Retrieving and Dialling CID Numbers. 1. Press . 2. Scroll to the required telephone number by using < < /> >. Press 0, the time and date the call was logged will now be displayed. 3. Press Q to dial, or press to return to the standby mode. Messages Besides showing telephone numbers, the display may also show a message. No information was received, e.g. when receiving an international call, voicemail (Optional Network Services required), secret or blocked numbers. ****** Removing a Number 1. Press . 2. Scroll to the required telephone number by using < < /> >. 3. Press C. Transferring Numbers to the Phone Book 1. Press . 2. Scroll to the required telephone number by using < < /> >. 3. Select the phonebook into which you wish to save the entry by pressing the corresponding button: b or . 4. Enter a name by pressing the corresponding number button until the required letter is displayed, please refer to the table on page 10. Press x to delete or make changes. 5. When the entire name has been entered, press 0. The telephone will return to the standby mode. 12 www.doro.com Settings English Description of the menu system The telephone has a menu system, controlled by the following buttons: w Activates and deactivates the menu system. 0 Move one step forward and/or confirm selected option. x Used to erase/correct. < < /> > Scroll through the menu alternatives. The Handset ringer There are three different ringer tunes. - One for regular incoming calls, - One for incoming calls from numbers stored in Phone book 1 b , - One for incoming calls from numbers stored in Phone book 2 . The display also shows the attached symbol during ringing and only applies if you subscribe to Caller ID services. There is NO ringer in the base unit. 1. Press w. 2. Scroll using < < /> > until % flashes in the display. Press 0. 3. Display shows 1/4 and current ringer volume (+=low, ++=medium, +++=high and ++++=maximum). 4. Scroll using < < /> > to the desired setting. Press 0. 5. Display shows 2/4 and current ringer tune for regular incoming calls. 6. Scroll using < < /> > to the desired setting. Press 0. 7. Display shows 3/4 and current tune for numbers stored in Phone book 1. 8. Scroll using < < /> > to the desired setting. Press 0. 9. Display shows 4/4 and current tune for numbers stored in Phone book 2. 10.Scroll using < < /> > to the desired setting. Press 0 to confirm. 11. Press w to exit the Menu system. Please note! If a number stored in the Phonebook is Secret the regular ringer signal will be heard. Although the caller may be stored in one of the phone books, the first ringer signal may still be the regular signal until the number has been identified. The telephone’s ringing signal does not follow the line signal, ie it may continue to ring for up to 7 seconds after answering a call. www.doro.com 13 English Settings Register a New Handset or Base Unit To enable the use of more than one handset a registration has to be performed. Every new handset must be registered in order to use a base unit. A maximum number of 2 base units can be registered with each handset, and each base unit can handle up to 4 handsets. Additional base units and handsets can be purchased from your local retailer. Please also refer to page 18 for more information on Expanded Systems. 1. Disconnect the main base unit electrical adapter for a few seconds, and then reconnect. 2. Press w . 3. Scroll using < < /> > until P starts flashing in the display. Press0. 4. Enter the PIN code (1111 for this model). Press 0. 5. The handset will now search for the base unit. 6. If the registration is successful the handset will return to standby mode in a few seconds (max 90 seconds). If registration is unsuccessful repeat this procedure. De-register this Handset Your own handset can easily be de-registered from a base. This means that a selected handset identity number can be erased from the list of registered handsets. 1. Press w. 2. Press the keypad digits 9 4 . 3. Enter the PIN code (1111 for this model). 4. Press 0. De-register All other Handsets All other handsets except the one on which you perform the operation below, can easily be de-registered from a base. 1. Press w. 2. Press the keypad digits 9 5 . 3. Enter the PIN code (1111 for this model). 4. Press 0. 14 www.doro.com Settings English Type of Caller ID (CID) Dependant on your network sytem requirements the Caller ID settings may need to be adjusted. If the telephone has been purchased in Australia this setting will be displayed as 1/4. 1. Press w. 2. Scroll using < < /> > until w flashes in the display. Press 0. 3. Press 0 repeatedly until the display shows 1/5 - UK (1/4 - Australia). 4. Scroll using < < /> > to the desired setting: 1=BT for UK/Normal for Australia 2=CCA for UK/Polarity reversal for Australia. 5. Press 0 to confirm setting and move to the next programming sequence, alternatively. 6. Press w to exit the Menu system. Tone/Pulse Dialling (UK only) Select dialling type (tone or pulse). The default setting is tone dialling, dependant on your network system requirements this may not require changing. This setting only applies to models purchased in the UK. 1. Press w. 2. Scroll using < < /> > until w flashes in the display. Press 0. 3. Press 0 repeatedly until the display shows 2/5. 4. Scroll using < < /> > to the desired setting (TONE/PULSE). Press 0 to confirm setting and move to the next programming sequence, alternatively. 5. Press w to exit the Menu system. Line Adaptation On some telephone networks and PBX systems, it may be necessary to adjust the microphone level. If the telephone has been purchased in Australia this setting will be displayed as 2/4. 1. Press w. 2. Scroll using < < /> > until w flashes in the display. Press 0. 3. Press 0 repeatedly until the display shows 3/5. - UK (2/4 - Australia). 4. Scroll using < < /> > to the desired setting (A/B=normal, C=medium, D=low). Press 0 to confirm setting and move to the next programming sequence, alternatively. 5. Press w to exit the Menu system. www.doro.com 15 English Settings Recall Button Timing In some PBX installations, the timing of the Recall button may need to be adjusted. For normal domestic use, this setting should not require changing. If the telephone has been purchased in Australia this setting will be displayed as 3/4. 1. Press w. 2. Scroll using < < /> > until w flashes in the display. Press 0. 3. Press 0 repeatedly until the display shows 4/5. - UK (3/4 - Australia). 4. Scroll using < < /> > to the desired setting: = 100ms = 270ms (UK) - 600ms (AU/NZ) 5. Press 0 to confirm setting and move to the next programming sequence, alternatively. 6. Press w to exit the Menu system. PBX Function This telephone has a PBX function that will automatically insert a pause between the first and second digits of the telephone number before dialling. For example: When the function is activated (see below), dialling a phone number ie: ”0123456”, the phone will dial: “0” followed by a pause, and then the remaining part of the number: “123456”. If the telephone has been purchased in Australia this setting will be displayed as 4/4. 1. Press w. 2. Scroll using < < /> > until w flashes in the display. Press 0. 3. Press 0 repeatedly until the display shows 5/5. - UK (4/4 - Australia). 4. Scroll using < < /> > to the desired setting (YES=on, NO=off). Press 0 to confi rm. 5. Press w to exit the Menu system. 16 www.doro.com Settings English Handset Volume Control (830R only) 1. Press w. 2. Scroll using < < /> > until flashes in the display. Press 0. 3. Scroll using < < /> > to the desired setting (+=low, ++=medium, +++=high, and ++++=maximum). Press 0 to confirm. 4. Press w to exit the Menu system. www.doro.com 17 English Expanded System General Information DECT (Digital Enhanced Cordless Telephone) technology offers superior performance, clarity and security using its completely digital method of transmission. You can: - Use (register) up to 4 handsets with the same base unit. - Use (register) up to 2 base units with the same handset. - Make internal calls (intercom) and transfer calls between handsets using the same base unit. Additional base units and handsets can be purchased from your local retailer. This model is GAP (Generic Access Profi le) compatible, which means that the handset and the base unit can both be used with most GAP compatible units irrespective of manufacturer. Multiple Base Units By connecting several base units to the system, the useful range for the handset can be expanded.. Registering multiple base units with the handset will cause the handset to automatically connect to another base if and when it loses contact with the current base unit Another practical application could be to have one base station at home and one at work. Then the same handset can be used in both places. The handset remains in contact with its base unit until it goes out of range. When this happens, the handset will begin to search for another base from its list of registered base units. It is essential that the range of the base units overlap, in order to achieve uninterrupted coverage. The transfer from one base unit to another will then be automatic, however, this will not occur while a call is in progress. If not, there may be reduced communication in certain areas where the handsets have no signal from the base units. More about placement of the base units on the next page. IMPORTANT! Automatic switching between base units (handset handover) will not occur while a call is in progress. 18 www.doro.com Expanded System English Multiple Handsets The combination of multiple base units and multiple handsets provides for many useful applications. So long as all handsets are programmed to the same base unit. - Any handset can answer incoming calls, and make outgoing calls. External calls can be transferred between handsets. Internal handset to handset communication (intercom). Base Units Placement If you wish to use several handsets with one base unit, you should make sure that the base unit is placed “in the middle”, to evenly divide the base unit range among the handsets. If you wish to use several base units to achieve an extended coverage within a specific area, eg a large home or office, a storage area, etc, then it is important that the range of the base stations overlap. If not there may be a reduced communication in certain areas where a handset has no signal from the base units. Intercom Function When using several handsets with the same base unit, calls can be made internally between the handsets, this is referred to as an internal call. Internal calls can only be made between handsets operating on the same base unit. 1. On the handset press i. 2. All other handsets will now ring. 3. Answer the call by pressing Q on one of the other handsets. If an external call is received while an intercom call is in progress, a tone will be heard. You will then have to terminate the intercom call to answer. Transferring Calls Between Handsets An external call can be transferred from one handset to another (so long as both handsets are operating on the same base unit). 1. While an external call is connected on line. 2. Make an internal call according to the description above. A tune will be played to the incoming caller. 3. Answer the call by pressing Q on one of the other handsets, when the call has been answered press Q on your handset. If you decide not to transfer the call, press 0 on your handset to return to the external caller. www.doro.com 19 English The Answering Machine (830R) About the Answering Machine The answering machine has to be turned on in order to receive messages. On incoming calls the telephone will be answered after the selected number of rings (please refer to page 23). When the answering machine answers an incoming call, the caller will hear your outgoing message (OGM) followed by a short beep, at which point they can leave an incoming message (ICM) of up to 2 minutes in length. Should the caller exceed this limit, the call will be disconnected. The answering machine can record between 5 and 7 minutes of incoming messages (ICM’s) depending on the selected sound quality (high or standard). Please refer to page 24. Switching the Answering Machine On/Off 1. Press and the number of new ICM’s will be announced. All answering machine features can only be accessed while the indicator light in the top right hand corner of the display is illuminated. 2. To switch the answering machine on, press keypad digit 7 . a will be on in the display. 3. To switch the answering machine off, press keypad digit 9 . a will be off in the display. Outgoing Message (OGM) The OGM is your announcement to the caller and may be up to 2 minute in length. If you choose not to record your own OGM, the caller will hear a prerecorded OGM. Use your OGM to advise the caller to begin talking after a beep is heard. For example: “Hello, we are unable to take your call right now, please leave a message after the beep, and we’ll return your call as soon as possible. Thank you for calling.” Recording your OGM 1. Press . 2. The total number of (new) recorded ICM’s will now be announced. 3. Press 8 to stop playback. 4. Press 4 5 . 5. Record your OGM. 6. Press 8 to stop recording. 7. Your OGM will be repeated after a few seconds. Repeat the same procedure if you wish to change the OGM. Any old OGM will automatically be erased when a new one is recorded. 20 www.doro.com The Answering Machine (830R) English Checking your OGM 1. Press . 2. The total number of (new) recorded ICM’s will now be announced. 3. Press 8 to stop playback. 4. Press 5 . 5. Your current OGM will now be replayed. 6. At any point you can press 8 to stop playback. Using the Answering Machine When new ICM’s are recorded the new message indicator light (page 2, item 11) and in the display will flash. Playback will always be new ICM’s only, the answering machine will then return to standby mode. Press 2 to playback all messages, starting with the oldest ICM. 1. Press . 2. The total number of (new) recorded ICM’s will now be announced. Before each ICM the day and time the message was received will be announced, and a short beep will be heard between each message. 3. Listen to your ICM’s, or press 8 to stop playback. 4. Select an operational command from the table below by pressing the corresponding button. 5. All messages will be saved (unless erased during playback) and new messages will be recorded after any old messages. Command Function 1.......................................... Repeat/skip to previous message 2.......................................... Playback of messages 3.......................................... Skip to next message 42 ........................................ Record a MEMO, (to stop recording press 8 ) 45........................................ Record new outgoing message, (to stop recording press 8 ) 6.......................................... Erase individual messages during playback 6 (press & hold) .................. Erase all messages after playback 7.......................................... Switching On the answering machine (the display will show a ) 8.......................................... Stop 9.......................................... Switching Off the answering machine (the display will no longer show a ) www.doro.com 21 English The Answering Machine (830R) Personal Message - MEMO MEMO – is a personal message recorded directly onto the answering machine without dialling. This means that the machine may be used as an electronic notebook, where messages, reminders or other notes to family members or colleagues can be recorded. Each MEMO can be recorded for up to 2 minutes. 1. Press . 2. The total number of (new) recorded ICM’s will now be announced. 3. Press 8 to stop playback. 4. Press 4 2 and record your MEMO message. 5. Press 8 to stop recording. Call Screening Incoming messages (ICM’s) can be heard (screened) on the handset loudspeaker as they are received. Press s while the ICM is being recorded. You can also press Q to speak directly to the caller. If you are answering the call from another telephone, press # # to terminate recording. Day/Time Stamp The answering machine has a voice function that announces the day and time when each message (ICM) was recorded. 1. Press w. 2. Scroll using < < /> > until a flashes in the display. Press 0. 3. The display will show 1/5. Scroll using < < /> > until the correct day of the week is displayed (1=Monday, 2=Tuesday…..7=Sunday). Press 0. 4. The display will show 2/5. Enter correct time (HR:MIN) using the telephone keypad. (24 hour display) 5. Press 0 to confirm setting and move to the next programming sequence, alternatively. 6. Press w to exit the Menu system. 22 www.doro.com The Answering Machine (830R) English Number of Rings The number of rings before the answering machine answers can be selected between 2, 3, 4, 5 or TOLL SAVER. 1. Press w. 2. Scroll using < < /> > until a flashes in the display. Press 0. 3. Press 0 repeatedly until the display shows 3/5. 4. Scroll using < < /> > to the required setting (2, 3, 4, 5 or TOLL). Press 0 to confi rm setting and move to the next programming sequence, alternatively. 5. Press w to exit the Menu system. Please note: With Toll Saver selected, calls will be answered after five rings until a new ICM message has been recorded, any subsequent calls will be answered after three rings. Once these ICM’s have been erased this cycle will be repeated. This is useful when remote accessing your unit, if there is no answer after four rings no ICM messages have been recorded, you can therefore terminate the call before you are charged. Remote Code A four digit code is required to gain access to the remote functions of the answering machine (1111 when supplied). To increase security and simplify usage this code can be altered to any four digit number of your choice. 1. Press w. 2. Scroll using < < /> > until a flashes in the display. Press 0. 3. Press 0 repeatedly until the display shows 4/5, the current four digit code will now be shown in the display. 4. Enter your new four digit code on the handset keypad. Press 0 to confirm setting and move to the next programming sequence, alternatively. 5. Press w to exit the Menu system. www.doro.com 23 English The Answering Machine (830R) Recording Quality / Time There are two choices of recording quality/time. A - high quality recordings (total time 5 minutes maximum). B - standard quality recordings (total time 7 minutes maximum). 1. Press w. 2. Scroll using < < /> > until a flashes in the display. Press 0. 3. Press 0 repeatedly until the display 5/5. 4. Scroll using < < /> > to the required setting (A/B). Press 0 to confirm. 5. Press w to exit the Menu system. Voice Control The answering machine will record an ICM so long as the caller keeps speaking (max. 2 minutes). If the caller stops speaking for more than 7 seconds the answering machine will disconnect the call. Announcement Only (ANN) ANN is your announcement message to a caller in which contact information can be supplied but no incoming message (ICM) will be recorded. An example ANN message: “Sorry I cannot take your call at this time, if urgent try contacting me on 0746 ……. Please do not leave a message as this will not be recorded. Thanks for calling.” To select ANN 1. Press w. 2. Press 9 8 . 3. The display will show 1/1. Scroll using < < /> > to the required setting. --)+(-- = play OGM and record ICM, --) = ANN only. 4. Press 0. 24 www.doro.com The Answering Machine (830R) English Out of Memory The answering machines maximum recording capacity will be either 5 or 7 minutes (depending on the selected sound quality). This time is shared between the OGM, MEMO and ICM messages. If the memory is full, no new ICM messages will be accepted until the existing messages have been played and erased. When the memory is full the a symbol in the display will flash, the answering machine will respond after approximately 9 rings to allow remote playback and deletion of messages. Remote Activation of the Answering Machine The answering machine can be remotely turned on, so long as the electrical supply is connected and live. 1. Dial the telephone number to which the answering machine is connected. After approximately 9 rings the machine will answer and a tone will be heard. 2. Enter your four digit remote code (1111 when supplied). 3. Press 7. The answering machine is now switched ON. 4. Replace the handset. www.doro.com 25 English The Answering Machine (830R) Remote Control This machine can be remotely accessed using an ordinary tone dialling telephone. Dial the telephone number to which the answering machine is connected, after the OGM has been played enter your Four digit remote code. Once the code is accepted several remote options are available. Remote Control 1. Dial the telephone number to which the answering machine is connected. 2. Press * after the OGM is played. 3. Enter your four digit remote code (1111 when supplied). 4. The number of new ICM’s will be announced, and then playback will begin, (to stop playback press 8 ). 5. Select an option from the list below. 6. Once you have fi nished accessing the machine replace the handset. Command Function 1 ...........................................Repeat/skip to previous message 2 ...........................................Playback of messages 3 ...........................................Skip to next message 42 .........................................Record a MEMO, (to stop recording press 8) 45.........................................Record new outgoing message, (to stop recording press 8) 6 ...........................................Erase individual messages during playback 7 ...........................................Switching On the answering machine (the display will show a) 8 ...........................................Stop 9 ...........................................Switching Off the answering machine (the display will no longer show a) Please note! If the machine doesn’t respond correctly to the remote control commands, try pressing the telephone buttons for a longer or shorter time. In normal cases, the answering machine should react to tones approximately 0.5 – 1 seconds in length, but longer tones may be necessary on certain telephone networks. If you do not enter any remote control command, the answering machine will disconnect after a few seconds. 26 www.doro.com Other English Troubleshooting Check that the telephone cord is undamaged and properly plugged in. Disconnect any additional equipment that may be connected. If the problem is resolved, the fault is with the other equipment. Test the equipment on a known working line. If the product works then the fault is with the line. Please inform your local telephone company. No Number Shown in Display when Ringing - In order for this feature to function, you must subscribe to the Caller Identification service from your network provider. - If is shown in the display, it either means that no information was sent about the calling number, or that the caller has a secret telephone number. It may also be a voicemail message. - If MOBILE is displayed, the network operator has sent this call description as a name, the telephone number will only be visible when scrolling through the call list, press 0 when name is shown. - It may not be possible to receive CID information if the phone operates in a PBX system. ****** Warning Tone During a Call - The battery may be running low (recharge the hand unit). Telephone Does Not Work - Check that charge contacts in handset and base unit are clean. - Check the adapter, is it correctly connected to the base unit and to the mains power? - Check that the telephone cord has been correctly connected to the base unit and to the line socket, by disconnecting and reconnecting both ends. - Check the charge status of the handset batteries. - Try connecting another telephone, known to be in working order, to the line socket. If that phone works then it is likely that this equipment is faulty. The Answering Machine Is Not Answering - Check that the unit is switched on - Check that the telephone cable and the mains adapter are correctly connected. - Check that the answering machine is not full. The Answering Machine Does Not Respond to Remote Control - Check that the telephone you are using to remotely control the answering machine is a tone dialling telephone. - Some telephones only output a short tone beep when buttons are pressed, and this may not be enough to activate remote control. Please use a separate tone transmitter in these cases. - Also try holding the buttons down longer, approximately 1 second per digit. www.doro.com 27 English Other I can’t hear the outgoing message very well - Record a new outgoing message. - Speak closer to the microphone when recording. The line is disconnected when someone leaves a message: - An incoming message may be up to 120 seconds in length. After this time, the call will be disconnected. - If the caller pauses approximately 7 seconds or more, the call may be terminated, since the voice control function believes that the caller has hung up. If the telephone still does not work, contact the place of purchase. Don’t forget the receipt or copy of the invoice. - If the function Announcement only is activated the caller cannot leave a message. UK If you cannot resolve the fault using the faultfinder section, technical support is available on the Premium Rate Number: 0906 302 0114. Calls cost 50 pence per minute (prices correct at the time of going to press), and is operational between 9AM - 5PM Monday-Friday excluding Bank Holidays. Alternatively, E-mail on: [email protected] You can contact us in writing: Consumer Support Group, Doro UK Ltd., 22 Walkers Road, North Moons Moat, Redditch, Worcestershire, B98 9HE, (regarding any Spares or Technical query), or Telephoning (Spares only): 01527 584377 Web site: www.doro-uk.com Specific Absorption Rate (SAR) This telephone complies with applicable international safety requirements for exposure to radio waves. The SAR-value of this product is not greater than 0.042 W/kg (measured over 10g of tissue). The maximum limit according to WHO is 2W/kg (10g of tissue). Guarantee This product is guaranteed for a period of 12 months from the date of purchase. Proof of purchase is required for any service or support required during the guarantee period. This guarantee shall not apply to a fault caused by an accident or any similar incident or damage, liquid ingress, negligence, abnormal usage, not reasonably maintained or any other circumstances on the purchaser’s part. Furthermore, this guarantee shall not apply to a fault caused by a thunderstorm or any other voltage fluctuations. This guarantee does not in any way affect your statutory rights. (As a matter of precaution, we recommend disconnecting the telephone during a thunderstorm.) 28 www.doro.com Other English ��� �� ���� Australia and New Zealand ��� Products permitted for connection to the telephone network are��marked with in ���� �� ���������� and Australia in New Zealand. These marks indicate the products comply with the regulations and can be used without concern in the country of purchase. If you believe this product is malfunctioning, please refer to the relevant section and/ or consult the troubleshooting guide in this manual to ensure that you have followed �� ���������� the instructions carefully. As an alternative you can visit our web site for FAQ’s or send an e-mail for a prompt reply. Guarantee This product is guaranteed for a period of 12 months from the date of purchase. Should you experience difficulties with the product, please contact us for assistance. If the product is then found to be faulty you will be asked to return it directly to us with a copy of the purchase receipt. This guarantee shall not apply to a fault caused by an accident or a similar incident or damage, liquid ingress negligence, abnormal usage, not reasonably maintained or any other circumstances on the purchaser’s part. Furthermore, this guarantee shall not apply to a fault caused by a thunderstorm or lightning, excessive or any other voltage fluctuations or faults on the telephone line. (As a matter of precaution, we recommend disconnecting the telephone during a thunderstorm). This guarantee does not affect your statutory rights. AUSTRALIA DORO Australia Pty Ltd PO Box 6760 Baulkham Hills BC NSW 2153 Australia NEW ZEALAND Atlas Gentech (NZ) Limited Private Bag 14927 Panmure Auckland New Zealand Consumer Support Ph: (02) 8853 8444 Fax: (02) 8853-8489 Email: [email protected] Web site: www.doro.com.au Consumer Support Ph: 0900 500-25 (Toll Call) Fax: (09) 574-2722 Email: [email protected] www.doro.com 29 English Other REN (RN for New Zealand) The REN (Ringer Equivalence Number) or (RN) is of significance only if you wish to connect more than 1 telephone to your telephone line. A standard telephone line has a maximum REN capacity of 3 (RN of 5). It is possible to connect 3 devices with a REN of 1 (RN of 1) with no degradation to the product’s performance. Exceeding this limit may cause the volume of the ringer in any phone to decrease or not ring at all. Electro Magnetic Radiation (EMR) This telephone complies with applicable safety requirements for exposure to radio waves. The mean power of this telephone is not greater than 7.9 mW. This is below the 20mW limit at which testing is required. Answering Machines Please note when set to answer after 2 rings this product may block CID information when used in conjunction with certain distinctive ring signals (FaxAbility). 30 www.doro.com English Version 1.3