1
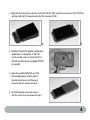
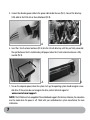
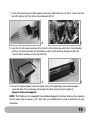
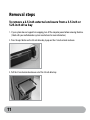
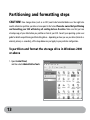
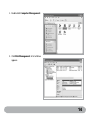
Installation & User Guide
SK01 EXTERNAL 2.5” DRIVE STORAGE KIT
www.crucial.com
For additional information on product, warranty or return
information visit www.crucial.com/support
Pour obtenir de plus amples renseignements sur la garantie ou le
retour de produit, veuillez visiter le site www.crucial.com/support
Zusätzliche Informationen zur Produktgarantie oder zum
Zurücksenden finden Sie unter www.crucial.com/support
Gå til www.crucial.com/support for ytterligere informasjon om
produktgaranti eller -retur
Per ulteriori informazioni sulla garanzia del prodotto o sulla
restituzione, visitare il sito www.crucial.com/support
Para más información sobre la garantía del producto o el
procedimiento de devolución, visite www.crucial.com/support
Table of Contents
Package contents........................................................................ 2
Minimum system requirements.............................................. 2
Installation steps
• To insert the SSD into the 2.5-inch external enclosure.................................................... 3-4
• To use the 2.5-inch external enclosure as a standalone device............................................. 5
• To use the 2.5-inch external enclosure in the 3.5-inch desktop drive bay........................... 5-7
• To use the 2.5-inch external enclosure in the 5.25-inch desktop drive bay...................... 8-10
Removal steps
• To remove a 2.5-inch external enclosure from a 3.5-inch or 5.25-inch drive bay....................11
• To remove the standalone 2.5-inch external enclosure from the USB port in Windows
2000 or above...........................................................................................................12
• To remove the standalone 2.5-inch external enclosure from the USB port in a Mac...............12
Partitioning and formatting steps
• To partition and format the storage drive in Windows 2000 or above......................... 13-18
• To partition and format the SSD in Mac OS............................................................ 19-22
FAQs............................................................................................. 23
1
Package contents
• 2.5-inch USB 2.0 external enclosure
• 3.5-inch hot-swappable SATA drive bay
• 5.25-inch bracket
• USB cable
• Internal SATA cable
• Internal power cable adapter
• Screw packets:
– 7 large screws for mounting 3.5-inch drive bay and 5.25-inch bracket, plus 1 spare
– 4 small screws for attaching the SSD to the PCB, plus 1 spare
• Protective carrying case
• User guide
NOTE: The Crucial SK01 storage kit does NOT contain an SSD; please purchase the SSD separately at
Crucial.com. The SK01 storage kit is also compatible with standard 2.5-inch SATA mechanical hard drives.
Minimum system requirements
• Microsoft® Windows® 2000 or above
• Mac® OS 9.x or above
• Linux kernel 2.4.1.0 or above
• Computer with a USB 2.0 connection (for external/standalone use) and
SATA interface (for internal installation)
2
Installation steps
The SK01 external 2.5-inch storage kit is designed to house
an internal 2.5-inch SSD for use in three different ways:
• Connection as an external USB 2.0 device for desktops or notebooks
• Connection via a SATA 3Gb/s port by way of installation into a 3.5-inch desktop drive bay
• Connection via a SATA 3Gb/s port by way of installation into a 5.25-inch desktop drive bay
NOTES:
• .No USB or SATA driver installation is required for Windows 2000 or above or for Mac OS 9.x or above.
However, drivers may be required for other OSs; check with your software and system manufacturer.
To insert the SSD into the 2.5-inch external enclosure
Regardless of whether you choose internal installation or standalone use, you must first insert your SSD
into the 2.5-inch external enclosure provided in this kit.
1.. Unscrew the back cover of the 2.5-inch external enclosure (Pic A) and pull out the printed circuit board
(PCB) (Pic B).
A
3
B
2. Align the SATA connector on the rear of the SSD with the SATA connector on the rear of the PCB (Pic A),
and then slide the SSD connector onto the PCB connector (Pic B).
A
B
3. Hold the PCB and SSD together and flip them
upside down. On the bottom of the PCB,
use the smaller screws to attach the SSD to
the PCB, and then flip the assembled PCB/SSD
unit upright.
4. Align the assembled PCB/SSD unit with
the rounded grooves on both sides of
the external enclosure, and then push
the unit inside the external enclosure.
5. Re-attach the back cover and secure it
with the screws that you removed in step 1.
4
To use the 2.5-inch external enclosure
as a standalone device
If you are installing the SSD internally into a desktop computer, skip this section and proceed to either “To
use the 2.5-inch SSD external enclosure in the 3.5-inch desktop drive bay” or “To use the 2.5-inch SSD
external enclosure in the 5.25-inch desktop drive bay.”
If you are using the SSD as a standalone external device
for a desktop or notebook computer, use the following
instructions.
1. Start the system.
2. Using the USB cable provided in this kit, connect the USB port of the 2.5-inch external enclosure to
a computer USB port.
NOTE: The cable is two-headed; you may need to use both heads in order to draw enough power to run
the SSD, particularly if you are using a notebook computer.
3. After the system recognizes the device, the SSD is ready to use.
To use the 2.5-inch external enclosure
in the 3.5-inch desktop drive bay
Use the 3.5-inch drive bay provided in this kit to install the 2.5-inch external enclosure into the 3.5-inch
bay (floppy drive bay) of a desktop computer.
1. Turn the computer power off, and then open the computer case.
5
2. On the rear of the 3.5-inch drive bay,
plug in the power cable adapter and
the SATA cable.
3. Insert the 3.5-inch drive bay into
the 3.5-inch bay of a desktop computer.
4. Adjust the drive bay so that it is level
in the case. Use the larger screws
to secure it on both sides.
6
5.. Connect the drive bay power cable to the power cable inside the case (Pic A). Connect the drive bay
SATA cable to the SATA slot on the motherboard (Pic B).
A
B
6. Insert the 2.5-inch external enclosure (Pic A) into the 3.5-inch drive bay until they are firmly connected.
The eject button on the 3.5-inch drive bay will pop out when the 2.5-inch external enclosure is fully
inserted (Pic B).
A
B
7. T. urn on the computer power; when the system starts up, the operating system should recognize a new
disk drive. If the system does not recognize the drive, contact technical support at
www.crucial.com/support.
NOTE: The SATA drive is hot-swappable if the motherboard supports this feature; otherwise, the connection
must be made when the power is off. Check with your motherboard or system manufacturer for more
information.
7
To use the 2.5-inch external enclosure in the 5.25-inch
desktop drive bay
Use the 3.5-inch drive bay and 5.25-inch bracket provided in this kit to install the 2.5-inch external
enclosure into the 5.25-inch bay (CD-ROM/DVD drive bay) of a desktop computer.
1. Turn the computer power off, and then open the computer case.
2. Place the 3.5-inch drive bay into the 5.25-inch bracket (Pic A), aligning the screw holes in the drive bay
with the openings in the bracket (Pic B).
A
B
3. Use the larger screws to anchor the housing
inside the brackets.
8
4. On the rear of the 3.5-inch drive bay,
plug in the power cable adapter and
the SATA cable.
5. Insert the assembled 3.5-inch drive
bay/5.25-inch bracket unit into
the 5.25-inch bay of the desktop tower.
6. Adjust the assembled 3.5-inch drive
bay/5.25-inch bracket unit so that
it is level in the case. Use the larger
screws to secure the unit on both sides.
9
7.. Connect the drive bay power cable adapter to the power cable inside the case (Pic A). Connect the drive
bay SATA cable to the SATA slot on the motherboard (Pic B).
A
B
8.. Insert the 2.5-inch external enclosure (Pic A) into the 3.5-inch drive bay within the 5.25-inch bracket
until they are firmly connected. The eject button on the 3.5-inch drive bay will pop out when the
2.5-inch external enclosure is fully inserted (Pic B).
A
B
9. Turn on the computer power; when the system starts up, the operating system should recognize
a new disk drive. If the system does not recognize the drive, contact technical support at
www.crucial.com/support.
NOTE: The SATA drive is hot-swappable if the motherboard supports this feature; otherwise, the connection
must be made when the power is off. Check with your motherboard or system manufacturer for more
information.
10
Removal steps
To remove a 2.5-inch external enclosure from a 3.5-inch or
5.25-inch drive bay
1. I.f your system does not support hot-swapping, turn off the computer power before removing the drive.
(Check with your motherboard or system manufacturer for more information.)
2. Press the eject button on the 3.5-inch drive bay to pop out the 2.5-inch external enclosure.
3. Pull the 2.5-inch external enclosure out of the 3.5-inch drive bay.
11
To remove the standalone 2.5-inch external enclosure
from the USB port in Windows 2000 or above
1. In the bottom-right section of the Taskbar, right-click the remove hardware icon (
and then select Safely remove USB Mass storage Device.
),
Safely remove USB Mass Storage Device
2. When the Safe to Remove Hardware
message appears, and the remove hardware
icon disappears from the task bar, detach
the USB cables that connect the SSD
external enclosure to the computer.
Safe To Remove Hardware
The “USB Mass Storage Device” device can
now be safely removed from the system.
To remove the standalone 2.5-inch external enclosure from
the USB port in a Mac
1. Before detaching the 2.5-inch external
enclosure from the computer, you must
drag the drive icon to the trash can.
12
Partitioning and formatting steps
CAUTION! New storage drives (such as an SSD) need to be formatted before use. You might also
need to reformat or partition your drive at some point in the future. Please be aware that partitioning
and formatting your SSD will destroy all existing data on the drive. Make sure that you have
a backup copy of your data before you partition or format your SSD. Consult your operating system user
guide for details on partitioning and formatting drives – depending on how you use your drive (internal vs.
external, primary vs. secondary), all the steps below may not apply to your particular configuration.
To partition and format the storage drive in Windows 2000
or above
1. Open Control Panel,
and then select Administrative Tools.
13
2. Double-click Computer Management.
3. Click Disk Management. A list of drives
appears.
14
4. Right-click inside the section with
unallocated disk space, and then select
New Partition.
5. The New Partition Wizard appears.
Click Next.
15
6. Select Primary partition,
and then click Next.
7. Leave the Partition size in MB at
the default setting, and then click Next.
16
8. Select Assign the following
drive letter:, and then click Next.
9. Select Format this partition with
the following settings:. In the
File system field, select FAT32 or
NTFS, and then click Next.
NOTE: Although the Windows 2000/XP Fast
FAT driver can support volumes larger than
32GB using the FAT32 file system (subject to
other system limits), by design you cannot
create a volume in excess of 32GB using
the Format Partition interface. Instead,
Microsoft recommends using the NTFS file
system with SSDs larger than 32GB.
17
10. When the formatting completes,
click Finish to close the New
Partition Wizard.
11. The SSD should appear in the
Computer Management screen as
another storage drive.
18
To partition and format the SSD
in Mac OS
Partitioning and formatting the SSD in Mac OS 9.2
and earlier:
Mac OS 9.2 and earlier does not support making partitions on an external drive; you will need to purchase
additional third-party software and then connect the SSD to the computer internally.
Partitioning and formatting the SSD in Mac OS X:
1. Turn on the computer power.
2. Connect the SSD according to the internal
or standalone instructions in this guide.
3. Open the Go menu, and then select
Utilities.
19
4. Double-click Disk Utility.
5. In the list of drives on the left side,
select the Crucial SSD. (Be sure
to select the SSD, not an individual
partition.)
20
6. On the right side, near the top of the page, click the Partition tab. Under Volume Information,
enter a Name, and then select the correct Format. Select Install Mac OS 9 Disk Drivers. Click the
Partition button in the lower-right corner.
21
7. Click the Erase tab near the top of
the page, and then click the Erase
button in the lower-right corner.
8. When the formatting completes, the SSD
should appear on the desktop as another
storage drive.
22
FAQs
Q:
Do I need to connect the SSD to the computer with both USB plugs? What is the difference between
using one plug versus using two plugs?
A:
Variations in the computer’s hardware working environment may cause the USB power supply to be
inadequate at times. In this case, you need to connect the SSD to the computer with both USB
plugs or use an extra power adapter.
Q:
A:
Is the SSD hot-swappable?
Yes.
SATA:
The SSD is hot-swappable via the SATA connection if the motherboard supports this
feature; otherwise, the connection must be made when the power is off. Check with your motherboard
manufacturer for more information.
USB:
USB connections are always hot-swappable; just be sure to stop the drive first by right-clicking
the remove hardware icon (
) in the bottom-right section of the Taskbar.
©2008 Micron Technology, Inc. All rights reserved. Information subject to change without notice. Micron, Crucial, and
the Crucial logo are trademarks of Micron Technology, Inc. in the U.S. and outside of the U.S. All other trademarks
referenced herein are the property of their respective owners.
23