1
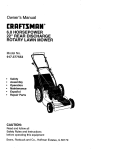
Owner's Manual
®
&75 HORSEPOWER
22" REAR DISCHARGE
POWER PROPELLED
ROTARY LAWN MOWER
Model No.
917+377592
°
o
o
Safety
Assembly
Operation
Maintenance
o
o
EspaSoi
Repair Parts
CAUTRON:
Read and follow all
Safety Rules and Instructions
before operating this equipment
Sears,
Roebuck
and Co., Hoffman
Estates,
IL 60179
Warranty
Safety Rules
Assembly
Operation
Maintenance Schedule
Maintenance
2
2
4
6
10
10
Product Specifications
Service and Adjustments
Storage
Troubleshooting
Repair Parts
Parts Ordering
11
14
15
16
35
Back Cover
LIMITED TWO YEAR WARRANTY ON CRAFTSMAN POWER MOWER
For two years from date of purchase, when this Craftsman Lawn Mower is maintained,
lubricated, and tuned up according to the operating and maintenance instructions in the
owner's manual, Sears will repair free of charge any defect in material or workmanship
If this Craftsman Lawn Mower is used for commercial or rental purposes, this warranty
applies for only 90 days from the date of purchase,
This Warranty does not cover:
* Expendable items which become worn dudng normal use, such as rotary mower
blades, blade adapters, belts, air cleaners and spark plug.
. Repairs necessary because of operator abuse or negligence, including bent crankshafts and the failure to maintain the equipment according to the instructions contained in the owneCs manual.
Warranty service is available by returning the Craftsman power mower to the nearest
Sears Service Center/Department
in the United State& This warranty applies only while
this product is in use in the United States_
This Warranty gives you specific legal rights, and you may also have other rights which
vary from state to state.
SEARS, ROEBUCK AND CO., D/817 WA, HOFFMAN ESTATES, ILLINOIS 60179
Safety standards require operatore
presence controls to minimize the risk of
injury. Your unit is equipped with such
controls. Do not attempt to defeat the
function of the operator presence controls
under any circumstances.
= Do not operate mower if it has been
dropped or damaged in any manner_
Always have damage repaired before
using your mower.
o Do not use accessory attachments that
are not recommended by the manufacturer. Use of such attachments may be
hazardous.
° The blade turns when the engine is
running.
TRAINING:
= Read this operator's manua( carefully.
Become familiar with the controls and
know how to operate your mower
properly_ Learn how to quickly stop
mower_
. Do not allow children to use your mower,
Never allow adults to use mower without
proper instructions.
o Keep the area of operation clear of all
persons, especially small children and
pets.
. Use mower only as the manufacturer
intended and as described in this manual.
PREPARATION:
° Always thoroughly check the area to be
mowed and clear it of all stones, sticks,
wires, bones, and other foreign objects.
These objects will be thrown by the blade
and can cause severe injury
° Always wear safety glasses or eye
shields when starting and while using
your mower.
2
fumesaredangerous
o Dressproperly,Donotoperatemower
whenbarefootor wearingopensandals, ° Nevercutgrassbypullingthe mower
Wearonlysolidshoeswithgoodtraction
towardsyou.Mowacrossthe faceof
whenmowing
slopes,neverupanddownoryoumight
o Checkfueltankbeforestartingengine.
loseyourfooting.DonotmowexcesDonotfill gastankindoors,whenthe
sivelysteepslopesUsecautionwhen
engineis runningor whentheengineis
operatingthemoweronuneventerrain
hot Allowtheenginetocoolforseveral
or whenchangingdirections-- maintain
minutesbeforefillingthegastank,Clean
goodfooting
offanyspilledgasolinebeforestartingthe o Neveroperateyourmowerwithout
engine,
properguards,plates,grasscatcheror
- Alwaysmakewheelheightadjustments
othersafetydevicesin place.
beforestartingyourmower.Never
MAINTENANCEAND STORAGE:
attemptto dothiswhilethe engineis
• Check the blade and the engine mountrunning,
ing bolts often to be sure they are
• Mowonlyin daylightor goodartificial
tightened properly.
light
o Check a!l bolts, nuts and screws at
OPERATION:
frequent intervals for proper tightness to
° Keepyoureyesandmindonyourmower
be sure mower is in safe working
condition.
andtheareabeingcut Donotletother
interestsdistractyou.
o Keep all safety devices in place and
- Donotmowwetor slipperygrass.Never
working_
runwhileoperatingyourmower.Always o To reduce fire hazard, keep the engine
besureofyourfooting-- keepa firm
free of grass, leaves or excessive grease
and oil..
holdonthe handlesandwalk,
• Donotputhandsorfeetnearor under
o Check grass catcher often for deteriorarotatingparts.Keepclearofthedischarge tion and wear and replace worn bag&
openingatalltimes.
Use only replacement bags that are
o Alwaysstopthe enginewheneveryou
recommended by and comply with
leaveor arenotusing yourmower,or
specifications of the manufacturer of your
mower.
beforecrossingdriveways,walks,roads,
andanygravel--covered
areas.
o Always keep a sharp blade on your
mower.
° Neverdirectdischargeof materialtoward
bystandersnorallowanyonenearthe
, Allow engine to cool before storing in any
enclosure
mowerwhileyouareoperatingiL
. Beforecleaning,inspecting,or repairing o Never store mower with fuel in the tank
yourmower,stoptheengineandmake
inside a building where fumes may reach
absolutely
surethebladeandallmoving
an open flame or an ignition source such
partshavestopped.Thendisconnect
the
as a hot water heater, space heater,
sparkplugwireandkeepit awayfromthe
clothes dryer, etc.
sparkplugtopreventaccidentalstarting. CAUTION:
Always disconnect spark plug
• Donotcontinueto runyourmowerifyou wire and place wire where it cannot contact
hita foreignobjectFollowtheprocedure spark plug in order to prevent accidental
outlinedabove,thenrepairanydamage starting when setting up, transporting,
beforerestarting
andoperatingyou
adjusting or making repairs.
mower
WARNING
• Donotchangethe governorsettingsor
engine exhaust from this product
overspeed
theengine.Enginedamageor The
contains chemicals known to the State of
personalinjurymayresult
to cause cancer, birth defects, or
• Donotoperateyourmowerifitvibrates California
other reproductive harm.
abnormally.
Excessive
vibrationis an
indicationofdamage;stoptheengine,
safelycheckforthecauseofvibration
andrepairas required.
• Donotrunthe engineindoorsExhaust
3
Theseaccessories
wereavailable
whenthislawnmowerwasproduced.Theyarealso
available
atmostSearsretailoutletsandservicecentersMostSearsstorescanalsoorder
repairpartsforyou,whenyouprovidethemodalnumberofyour'town
mower:Someofthese
accessones
maynotapplytoyourlawnmower
LAWN MOWER PERFORMANCE.
CLIPPING
_FOR
REAR
DEFLECTOR
DISCHARGE
MULCHER
LAWN MOWERS
GRASS CATCHERS
FOR
REAR DISCHARGE
LAWNMOWERS
KITS
STABILIZER
FOR
SIDE DISCHARGE
GRASS
LAWN CATCHERS
MOWERS
GAS CANS
_wE'R
MAI'NTE_
AIR FILTERS
BELTS
BLADES
BLADE
ADAPTERS
Read these instructions and this manual in its
entirety before you attempt to assemble or
operate your new lawn mower° Your new lawn
mower has been assembled at the factory with
the exception of those parts left unassembled
for shipping purposes_All parts such as nuts,
washers, bolts, etc., necessary to complete the
assembly have been placed in the parts bag.
To ensure safe and proper operation of your
lawn mower, all parts and hardware you
assemble must be tightened securely, Use the
correct tools as necessary to ensure proper
tightness.
TO REMOVE
CARTON
LAWN MOWER
FROM
o Remove loose parts included with mower,
o Cut down two end corners of carton and lay
end panel down flat.
,, Remove all packing materials except
padding between upper and lower handle
and padding holding operator presence
control bar to upper handle.
!
SPARK
WHEELS
PLUGS
ENGINE
OIL
• Roll lawn mower out of carton and check
carton thoroughly for additional loose parts.
HOW TO SET UP YOUR LAWN
MOWER
TO UNFOLD HANDLE
IMPORTANT:
Unfold handles carefully so as
not to pinch or damage control cables.
° Raise handles untU lower handle section
locks into place in mowing position°
o Remove protective padding, raise upper
handle section into place on lower handle
and tighten both handle knobs.
° Remove handle padding holding operator
presence central bar to upper handle.
o Your lawn mower handle can be adjusted
for your mowing comfort. Refer to "Adjust
Handle" in the Service and Adjustment
section of this manual.
Operator presence
TO INSTALL A"rrACHMENTS
control bar
Uppper handle
Lift up
Mowing
position
Lower handle
Your lawn mower was shipped ready to be
used as a mulcher_ To convert to bagging or
discharging:
o Open rear door and remove mulcher plug
Store mulcher plug in a safe place,
o You can now install catcher or optional
clipping deflector,
,, To retum to mulching operation, install
mulcher plug into discharge opening of
mower Be sure all tabs are seated
properly
Mulcher plug
CAUTION:
Do not run your lawn mower
without mulcher plug in place or approved
clipping deflector or grass catcher in place,
Never attempt to operate the lawn mower with
the rear door removed or propped open,
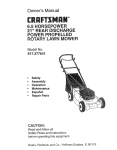
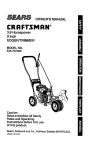
KNOWYOURLAWNMOWER
READTHISOWNER'S
MANUALAND
SAFETYRULESBEFOREOPERATING
YOURLAWN
MOWER.Compare
theillustrationswith your lawn mower to familiarize yourself with the
location of vadous controls and adjustments. Save this manual for future reference,
These symbols may appear on your lawn mower or in literature supplied with the
product. Learn and understand these meaning
CAUTION
OR WARNING
ENGINE
ON
ENGINE
OFF
FAST
SLOW
CHOKE
FUEL
OIL
DANGER, KEEP HANDS
AND FEET AWAY
Engine zone control cable
perator presence control bar
Drive control lever
Srarter handle
Handle knob
Mulcher plug
Engine oil cap w/dipstick
/ Housing
Drive cover
Gasoline cat:
Wheel adjuster
(on each wheel)
Prime
MEETS CPSC SAFETY REQUIREMENTS
Sears rotary walk-behind power lawn mowers conform to the safety standards of the American
National Standards Institute and the U.S Consumer Product Safety Commission_ The blade
turns when the engine is running,
Starter handle - used for starting the engine.
Drive control lever - used to engage power_
propelled forward motion of lawn mowe[:
Mulcher plug - must be removed to convert to
bagging or discharging ope[ation,
Operator presence control bar - must be
held down to the handle to start the engine.
Release to stop the engine.
Primer - pumps additional fuel from the
carbureto[ to the cylinder for use when starting
a cold engine.
6
The operationof anylawnmowercan
resultinforeignobjectsthrownintothe
eyes,whichcanresultin severeeye
damage.Alwayswearsafetyglassesor
eyeshieldswhileoperatingyourlawn
moweror performingany adjustmentsor
repairs.Werecommenda widevision
safetymaskoverspectaclesor standard
safetyglasses
HOW TO USE YOUR LAWN MOWER
ENGINE
SPEED
The engine speed was set at the factory
for optimum performance.
Speed is not
adjustable
ENGINE ZONE CONTROL
CAUTION:
Federal regulations require an
engine control to be installed on this lawn
mower in order to minimize the risk of blade
contact injury Do not under any circumstances
attempt to defeat the function of the operator
control. The blade turns when the engine is
running.
, Your lawn mower is equipped with an
operator presence control bar which
requires the operator to be positioned
behind the lawn mower handle to start and
operate the lawn mower.
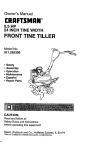
TO ADJUST CUTrlNG HEIGHT
o Raise wheels for low cut and lower wheels
for high cut
• Adjust cutting height to suit your requirements. Medium position is best for most
lawns.
, To change cutting height, squeeze adjuster
lever toward wheel Move wheel up or
down to suit your requirements. Be sure all
wheels are in the same setting.
NOTE: Adjuster is properly positioned
when plate tab inserts into hole in lever.
Also, 9-position adjusters (if so equipped)
allow lever to be positioned between the
plate tabs
TO A'I'TACH GRASS CATCHER
o Close the flip lid. Flip lid must be closed
while operating lawn mower.
o Lift the rear door on the mower housing and
place the grass catcher frame onto the
formed tabs on the rear door hinge bracket
,, The grass catcher is secured to the lawn
mower housing when the rear door is
lowered onto the grass catcher frame.
CAUTION:
Do not run your lawn mower
without clipping deflector or approved
grass catcher in place Never attempt to
operate the lawn mower with the rear door
removed or propped open.
Hinge
bracket
Rear door
Formed
tabs
',%
TO EMPTY GRASS CATCHER
° To remove grass catcher, release operator
presence control bar to stop engine.
o Lift up rear door and remove the grass
catcher by the handle
NOTE: Do not drag the bag when emptying; it will cause unnecessary wear.
Plate Tab
Lower Wheels for High Cutr.._._._ ._
Raise Wheels for Low Cut
7
DRIVE CONTROL
GAS
= Self-propelling
is controlled by holding
the operator presence control bar down
to the handle and pushing the drive
control lever forward until it clicks; then
release the lever.
. Forward motion will stop when the
operator presence control bar is
released° To stop forward motion
without stopping engine, release the
operator presence control bar slightly
until the drive control disengages,,
Hold
operator presence control bar down to
handle to continue mowing without selfpropelling.
• To keep drive control engaged when
turning corners, push down on handle
and lift front wheels off ground while
turning lawn mower_
° Fill fuel tank Use fresh, clean, regular
unleaded gasoline with a minimum of 87
octane. Do not mix oil with gasoline
Purchase fuel in quantities that can be used
within 30 days to assure fuel freshness
WARNING: Experience indicates that alcohol
blended fuels (called gasohol or using ethanol
or methanol) can attract moisture which leads
to separation and formation of acids during
storage. Acidic gas can damage the fuel
system of an engine while in storage. To avoid
engine problems, the fuel system should be
emptied before storage of 30 days or longer
Drain the gas tank, start the engine and let it
run until the fuel lines and carburetor are
empty. Use fresh fuel next season. See
Storage Instructions for additional information
Never use engine or carburetor cleaner
products in the fuel tank or permanent
damage may occur:
Operator presence control bar
Drive
trol
'_
Gasoline filler cap
To engage drive
control
BEFORE
Drive control
desengaged
STARTING
OIL
Your lawn mower
Engine oil cap
ENGINE
TO START ENGINE
is shipped
without
oil in
the engine.,
o Be sure mower is level and area around oil
fill is clean,,
• Remove engine oil cap and fill to the full line
on the dipstick.
• Use 27 ozs. of oil. For type and grade of oil
to use, see "ENGINE" in Maintenance
section of this manual.
o Pour oil slowly° Do not over fill.
o Check oil level before each use. Add oil if
needed. Fill to full line on dipstick
= To read properlevel, tighten engine oil cap
each time.
° Reinstall engine oil cap and tighten,,
• Change the oil after every 25 hours of
operation or each season. You may need
to change the oil more often under dusty,
dirty conditions.
° To start a celd engine, push primer three (3)
times before trying to start. Use a firm push.
This step is not usually necessary when
starting an engine which has already run for
a few minutes.
• Hold operator presence control bar down to
the handle and pull starter handle quickly.
Do not allow starter rope to snap back°
= To stop engine, release operator presence
control bar.
NOTE:
In cooler weather it may be neces-
sary to repeat priming steps. In warmer
weather over priming may cause flooding and
engine will not start. If you do flood engine,
wait a few minutes before attempting to start
and do not repeat priming steps.
8
MOWINGTIPS
o Undercertainconditions,suchas very
tall grass,it maybenecessaryto raise
the heightof cut to reducepushingeffort
andto keepfromoverloadingtheengine
andleavingclumpsof grassclippings It
mayalsobe necessaryto reduce
groundspeed and/orrunthe lawn
mowerovertheareaa secondtime
o Forextremelyheavycutting,reducethe
widthof cutby overlappingpreviously
cutpathandmowslowly
. For better grass bagging and most
cutting conditions, the engine speed
should be set in the fast position.
° When using a rear discharge lawn
mower in moist, heavy grass, clumps of
cut grass may not enter the grass
catcher
Reduce ground speed (pushing speed) and/or run the lawn mower
over the area a second time
,, If a trail of clippings is left on the right
side of a rear discharge mower, mow in
a clockwise direction with a small
overlap to collect the clippings on the
next pass.
• Pores in cloth grass catchers can
become filled with dirt and dust with use
and catchers will collect less grass. To
prevent this, regularly hose catcher off
with water and let dry before using
,, Keep top of engine around starter clear
and clean of grass clippings and chaff_
This will help engine air flow and extend
engine life
MULCHING
MOWING
TIPS
IMPORTANT:
For best perfon'nance, keep
mower housing free of built-up grass and
trash See "Cleaning" in Maintenance section
of this manual
o The special mulching blade will recur the
grass clippings many times and reduce
them in size so that as they fall onto the
lawn they will disperse into the grass and
not be noticed Also, the mulched grass will
biodegrade quickly to provide nutrients for
the lawn Always mulch with your highest
engine (blade) speed as this will provide the
best recurring action of the blades
° Avoid cutting your lawn when it is wet. Wet
grass tends to form clumps and interferes
with the mulching action The best time to
mow your lawn is the early afternoon At
this time the grass has dried and the newly
cut area will not be exposed to the direct
sun_
• For best results, adjust the lawn mower
cutting height so that the lawn mower cuts
oft only the top one4hird of the grass blades
If the lawn is overgrown it will be necessary
to raise the height of cut to reduce pushing
effort and to keep from overloading the
engine and leaving clumps of mulched
grass. For extremely heaw mulching,
reduce your width of cut by overlapping
previously cut path and mow slowly.
o Certain types of grass and grass conditions
may require that an area be mulched a
second time to completely hide the
clippings When doing a second cut, mow
across or perpendicular to the first cut path.
. Change your cutting pattern from week to
week. Mow north to south one week then
change to east to west the next week. This
wilt help prevent matting and graining of the
lawn,
Max 1/3
9
=
MA,°+ .A.OESO.EOOLE
AS YOU COMPLETE
_,_SERVICE
,i
i
Check for Loose Fasteners
Clean/Inspect Grass Catcher
(If Equipped)
M
Clean Lawn Mower
O
(Power-Propelled
Clean
Under Ddve Mowers)
Cover
Check drive bell/pulleys
_r
,6/
v'
_
J
6/
6/
....
(Power-Propelled Mowers)
Check/Sharpen/Replace
Blade
_,/3'
Lubrication Chart
Clean Battery/Recharge
{Electric Start Mowers)
6,/
J
,
S
Cheek Engine Oil Level
N
Change Engine Oil
6/1,2
G
Clean Air Filter
_
I
tnepeot Muffler
N
DATES
rrr--
6/
2
Clean or Replace Spark Plug
Replace Air Filter Paper Cartridge
_,/2
1 • Change more olten when operating under a heavy load or in high ambient temperatures
2 - Service mote otlen when operagng in dirty or dusty condilio_l_
g -Replaca blades mote ellen when mowing in s_n_, soil
4 - Charge 48 bout8 at end of =_eason
GENERAL
RECOMMENDATIONS
LUBRICATION
The warranty on this lawn mower does not
cover items that have been subjected to
operator abuse or negligence+ To receive
full value from the warranty, operator must
maintain mower as instructed in this
manual,
Some adjustments will need to be made
periodically to properly maintain your unit
All adjustments in the Service and
Adjustments section of this manual should
be checked at least once each season.
- Once a year, replace the spark plug,
replace air filter element and check
blade for wear+ A new spark plug and
clean/new air filter element assures
proper
engine
o Follow
manual
BEFORE
air-fuel mixture and helps your
run better and last longer.
the maintenance schedule in this
(_
Wheel
adjuster
+,
,
._ _
Engine el{
I! l+l,L+' l; li )1
1_) Handle bracket
mounting pin
Rear door
hinge
(_) Spraylubricant
EACH USE
(_ Referto Maintenance"ENGINE" section+
° Check engine oil level.
° Check for loose fasteners.
LUBRICATION
Keep unit well lubricated
TION CHART")
CHART
(See "LUBRICA-
IMPORTANT: Do not oil or grease plastic
wheel bearings+ Viscous lubricants will attract
dust and dirt that will shorten the life of the self
lubricating bearings. If you feel they must be
lubricated, use only a dry, powdered graphite
type lubricant sparingly,
10
PRODUCT SPECIFICATIONS
MODEL NUMBER
917.377592
;ERIAL NUMBER
DATE OF PURCHASE
HORSEPOWER:
675
DISPLACEMENT:
12,560
GASOLINE CAPACITY/TYPE:
15 QUARTS
CU
UNLEADED
OIL TYPE (API-SF/SG/SH):
IN
REGULAR
SAE 30 (ABOVE 32°F)
SAE 5W-30 (BELOW 32°F)
OIL CAPACITY:
SPARK
PLUG(GAP:
27 OZS,
030")
CHAMPION
VALVE CLEARANCE:
RJ19LM OR J19LM
INTAKE:
004"
- .008"
EXHAUST:
.004"
- .008"
SOLID STATE IGNITION
AIR GAP:
.0125 IN.
BLADE BOLT TORQUE:
35-40 FT. LBS.
The model and serial numbers will be found on a decal attached to the rear of the
lawn mower housing,Record both serial number and date of purchase in space
provided above,
LAWN MOWER
Always observe safety rules when performing
any maintenance.
"TIRES
• Keep tires free of gasoline, oil, or insect
control chemicals which can harm rubber,
o Avoid stumps, stones, deep ruts, sharp
objects and other hazards that may cause
tire damage
BLADE CARE
For best results, mower blade must be
kept sharp, Replace bent or damaged
blades_
TO REMOVE BLADE
. Disconnect spark plug wire from spark
plug and place wire where it cannot
come in contact with spark plug.
• Turn lawn mower on its side. Make sure
air filter and carburetor are up
o Use a wood block between blade and
mower housing to prevent blade from
turning when removing blade bolt,
• Protect your hands with gloves and/or
wrap blade with heavy cloth.
o Remove blade bolt by turning counterclockwise,
o Remove blade and attaching hardware
(bolt. lock washer and hardened
washer).
NOTE: Remove the blade adapter and
check the key inside hub of blade adapter,
The key must be in good condition to work
properly. Replace adapter if damaged.
TO REPLACE
BLADE
o Position the blade adapter on the engine
crankshafL
Be sure key in adapter and
crankshaft keyway are aligned.
o Position blade on the blade adapter
aligning the two (2) holes in the blade
with the raised lugs on the adapter.
o Be sure the trailing edge of blade
(opposite sharp edge) is up toward the
engine,
° Install the blade bolt with the lock
washer and hardened washer into blade
adapter and crankshaft.
• Use block of wood between blade and
lawn mower housing and tighten the
blade bolt, turning clockwise,
o The recommended tightening torque is
35-40 ft. Ibs_
IMPORTANT:
Blade bolt is grade 8 heat
11treated.
TO SHARPEN
BLADE
NOTE: We do not recommend sharpening
blade - but if you do, be sure the blade is
balanced.
Care should be taken to keep the blade
balanced An unbalanced blade will cause
eventual damage to lawn mower or
engine.
. The blade can be sharpened with a file
or on a grinding wheel. Do not attempt
to sharpen while on the mower
,, To check blade balance, drive a nail into
a beam or wall. Leave about one inch of
the straight nail exposed.. Place center
hole of blade over the head of the nail.
If blade is balanced, it should remain in
a horizontal position_ If either end of the
blade moves downward, sharpen the
heavy end until the blade is balanced
Blade
Crank shaft
adapter
keyway
o Remove any trash or grass cuttings from
inside the dust cover, pinion and/or drive
wheel gear teeth
° Put wheels back in place
,, If after cleaning, the drive wheels do not
turn freely, contact your nearest
authorized service center
GEAR CASE
" To keep your' drive system working
properly, the gear case and area areund
the drive should be kept clean and free
of trash build-up. Clean under the drive
cover twice a season
,, The gear case is filled with lubricant to
the proper level at the factory
The only
time the lubricant needs attention is if
service has been performed on the gear
case.
• If lubricant is required, use only Texaco
Starplex Premiurn 1 Grease, Part No
750355. Do not substitute.
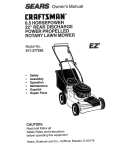
ENGINE
LUBRICATION
Use only high quality detergent oil rated with
API service classification SF, SG, or SH.
Select the oil's SAE viscosity grade according to your expected ope rating temperature.
bolt
shaft
Lock
washer Hardened
washer
edge
Blade
adapter
.20'
=C
_30.
,=0"
*ta,
O,
_o,
TEMPERATURE RANGE ANTICIPATED BEFORE NEXT OIL CHANGE
GRASS
CATCHER
,, The grass catcher may be hosed with
water, but must be dry when used.
o Check your grass catcher often for damage
or deterioration. Through normal use it will
wear. If catcher needs replacing, replace
only with a manufacturer approved
replacement catcher. Give the lawn mower
model number when ordering.
DRIVE WHEELS
Check front drive wheels each time before
you mow to be sure they move freely.
The wheels not turning freely means trash,
grass cuttings, etco are in the drive wheel
area and must be cleaned to free drive
wheels.
If necessary to clean the drive wheels,
check both front wheels.
,, Remove hubcaps, hairpin cotters and
washers.
- Remove wheels from wheel adjusters.
NOTE: Although multi-viscosity oils (5W30,
10W30 etc ) improve starting in cold weather,
these multi-viscosity oils will result in increased
oil consumption when used above 32°R
Check your engine oil level more frequently to
avoid possible engine damage from running
low on oil.
Change after the first 25 hours of operation at
least once a year if the lawn moweris not used
for 25 hours in one year:
Check the crankcase oil level before starting
the engine and after each five (5) hours of
continuous use. "lighten oil plug securely each
time you check the oil level
12
TOCHANGEENGINE
OIL
NOTE: Beforetippinglawnmowertodrain
oil.drainfueltankbyrunning
engineuntilfuel
tankisempty
o Disconnect
sparkplugwirefromsparkplug
andplacewirewhereitcannotcomein
contactwithsparkplug
° Removeengineoilcap;layasideona clean
surface
° Tiplawnmoweronitssideasshownand
drainoil into a suitable container Rock lawn
.
.
•
•
mower back and forth to remove any oil
trapped inside of engine
Wipe off any spilled oi_on lawn mower and
on side of engine
Fill engine with oil Fill only to the "FULL"
line on the dipstick. DO NOT overfill
Replace engine oil cap
Reconnect spark plug wire to spark plug
AIR FILTER
Your engine will not run properly and may be
damaged by using a dirty air filter
Replace the air filter every year. more often if
you mow in very dusty, dirty conditions. Do not
wash air filter:
TO CHANGE AIR FILTER
• Loosen cover knob.
•
•
o
°
•
Swing cover down and remove from hinge
Pull paper filter out of air cleaner body.
Clean air cleaner cover and body.
Install a new paper filter.
Reinstall cover to aircleanerbody.
Be sure
hinge is assembled properly.
• Swing cover up and tighten cover knob,
(Do not overtighten).
MUFFLER
Inspect and replace corroded muffler as it
could create a fire hazard and/or damage,
SPARK PLUG
Change your spark plug each year to make
your engine start easier and run better Set
spark plug gap at 030 inch.
CLEANING
IMPORTANT:
Forbest performance, keep
mower housing free of built-up grass and
trash. Clean the underside of your mower after
each use,
CAUTION:
Disconnect spark plug wire from
spark plug and place wire where it cannot
come in contact with the spark plug
o Turn lawn mower on its side Make sure air
filter and carburetor are up. Clean the
underside of your lawn mower by scraping
to remove build-up of grass and trash
o Clean engine often to keep trash from
accumulating. A clogged engine runs hotter
and shortens engine life.
o Keep finished surfaces and wheels free of
all gasoline, oil,etc.
o We do not recommend using a garden
hose to clean lawn mower unless the
electrical system, muffler, air filter and
carburetor are covered to keep water out
Water in engine can result in shortened
engine life
CLEAN UNDER DRIVE COVER
Clean under drive cover at least twice a
season. Scrape underside of cover with putty
knife or similar tool to remove any build-up of
trash or grass on underside of drive cover
Air filter cover
Cover
knob
Hinge
Paper filter
13
CAUTION: Beforeperformingany
serviceor adjustments.
o Releasecontrolbarandstopengine
o Makesurethe bladeandallmoving
partshavecompletelystopped.
o Disconnectsparkplugwirefromspark
plug and place where it cannot come
in contact with plug
LAWN MOWER
TO ADJUST CUTTING HEIGHT
See "TO ADJUST CUTTING HEIGHT" in the
Operation section of this manual
REAR DEFLECTOR
The rear deflector, attached between the rear
wheels of your lawn mower, is provided to
minimize the possibility that objects will be
thrown out the rear of the lawn mower into the
operator's mowing position. If the rear
deflector becomes damaged, it should be
replaced.
TO REMOVE/REPLACE DRIVE BELT
° Remove the starter rope guide from the
upper handle
° Remove hairpin cotters.
° Disconnect the lower handle from the
handle brackets.
° Turn the handle over and reassemble the
hairpin cotters that have been removed.
. Reassemble the starter rope guide
. Reassemble the controls and the operator
presence control bar to the upper handle
CAUTION:
The operator presence control
bar must pivot freely to permit blade brake
engagement when control bar is released.
Do not over tighten the fasteners holding
the controls to the upper handle.
• To change from medium low to high
position only the upper' handle section will
have to be turned over,.
° To change from medium low to low position,
only the lower handle section will have to be
turned over,.
° Remove drive cover_ Remove belt by
pushing down on gear case pulley and roll
belt off.
- Turn lawn mower on itsside with carburetor
and fuel cap up.
• Remove blade,
- Remove debris shield.
,, Remove belt from engine pulley on
crankshaft,
= Install new belt by reversing above steps.
. Always use factory approved belt to assure
fit and long life.
Shipping position
Medium low
high
Drive
cover
Low
High
Belt
Push
down
TO ADJUST HANDLE
Your' lawn mower handle can be raised or
lowered for your mewing comfort, Four (4)
positions are available: high, medium high,
medium low and tow, Handles are shipped
mounted in the medium low position_
o To change from medium low to medium
high position, the upper and lower handle
sections will have to be turned over.
• Remove cable clips.
o Remove the controls and operator presence
centre{ bar from the upper handle,
\
Lower handle
Squeeze to
remove
Hairpin clil
14
Har_dle
bracket
ENGINE
SPEED
Tubular frame
Your engine speed has been factory set
Do not attempt to increase engine speed
or it may result in personal injury, If you
believe that the engine is running too fast
or too slow, take your lawn mower to an
authorized service center for repair and
adjustment
Sewn
CARBURETOR
Your carburetor has a non-adjustable fixed
main jet for mixture control, If your engine
does not operate properly due to suspected carburetor problems, take your
lawn mower to an authorized service
center for repair and/or adjustment
TO ASSEMBLE
GRASS
Sewn hem
Flip lid
Lower frame
CATCHER
.-"
_
, ..."
o Insert leg of tubular frame through front
opening of grass catcher and thread
frame into sewn hem of bag.
NOTE: Keep bag hem gathered on the
straight leg of the tubular frame,
o When frame comes out the other end of
sewn hem, immediately work the end of
frame down inside the bag as shown in
inset,
o Slide sewn hem evenly around the
tubular frame until both ends of frame
fully
seated)
Tabular frame
Lower frame handle
are exposed out of the front opening.
o Assemble lower frame to tubular frame
as shown. Be sure handle is outside of
bag and frames are fully seated as
shown in inset.
• Slip vinyl bindings over frame.
NOTE: tf vinyl bindings are too stiff, hold
them in warm water for a few minutes. If
bag gets wet, let it dry before using
o Close the flip lid. Flip lid must be closed
while operating lawn mower,
CAUTION:
Do not run your lawn mower
without clipping deflector or approved
grass catcher in place. Never attempt to
operate the lawn mower with the rear door
removed or propped open
\
bindings
Jny,
15
must be
Immediately prepare your lawn mower for
storage at the end of the season or if the unit
will not be used for 30 days or mote,
LAWN
Operator presence control bar
Fold foward
for storage
MOWER
When lawn mower is to be stored for a period
of time, clean it thoroughly, remove all dirt,
grease, leaves, etc Store in a clean, dry area
o Clean entire lawn mower (See "CLEANING"
in the Maintenance section of this manual).
,, Lubricate as shown in the Maintenance
section of this manual
o Be sure that all nuts, bolts, screws, and pins
are securely fastened. Inspect moving
parts for' damage, breakage and wear.
Replace if necessary.
o Touch up all rusted or chipped paint
surfaces; sand lightly before painting.
HANDLE
You can fold your lawn mower handle for
storage.
o Squeeze the bottom ends of the lower
handle toward each other until the lower
handle clears the handle bracket, then
move handle forward
o Loosen upper handle mounting bolts
enough to allow upper handle to be folded
back°
IMPORTANT:
When folding the handle for
storage or transportation, be sure to fold the
handle as shown or you amy damage the
control cables.
. When setting up your handle front the
storage position,the lower handle will
automatically lock into the mowing position.
Lower
handle
Handle
bracket
Squeeze to fold
Upper
Fold
backward
Lower
handle
Mowing
position
ENGINE
FUEL SYSTEM
IMPORTANT:
It is important to prevent gum
deposits from forming in essential fuel system
parts such as carburetor; fuel filter; fuel hose or
tank during storage. Also, experience indicates
that alcohol blended fuels ( called gasohol or
using ethanol or methanoJ) can attract
moisture which leads to separation and
formation of acids during storage Acidic gas
can damage the fuel system of an engine
while in storage,
,, Drain the fuel tank.
" Start the engine and let it run until the fuel
lines and carburetor are empty,
,, Never use engine or carburetor cleaner
products in the fuel tank or permanent
damage may occur,,
- Use fresh fuel next season.
NOTE: Fuel stabilizer is an acceptable
alternative in minimizing the formation of fuel
gum deposits during sterage_ Add stabilizer to
gasoline in fuel tank or storage container,
Always follow the mix ratiofound on stabilizer
container; Run engine at least 10 minutes
after adding stabilizer to allow the stabilizer to
reach the carburetor. Do not drain the gas
tank and carburetor if using fuel stabilizer.
Hairpin
cotter
16
ENGINE
OIL
Drainoil(withenginewarm)andreplace
with
cleanengineoil. (See"ENGINE"inthe
Maintenance
sectionofthismanual)_
CYLINDER
o Removesparkplug.
', Pouroneounce(29ml)ofoilthroughspark
plugholeintocylinder
o Pullstarterhandleslowlya fewtimesto
distnbute
oil,
., Replace
withnewsparkplug,
OTHER
o Donotstoregasoline
fromoneseasonto
another,
o Replace
yourgasoline
canifyourcanstarts
torust Rustand!ordirtinyourgasoline
will
causeproblems
- Ifpossible,
storeyourunitindoorsandcover
ittogiveprotection
fromdustanddirt
• Coveryourunitwitha suitable
protective
coverthatdoesnot retainmoisture.Donot
useplastic.Plasticcannotbreathewhich
allowscondensation
toformandwillcause
yourunittorust
IMPORTANT:Nevercovermowerwhile
engineandexhaustareasarestillwarm
CAUTION: Neverstorethelawnmower
withgasolineinthetankinsidea building
wherefumesmayreachanopenflameor
sparL Allowthe engineto coolbefore
storingin anyenclosure
TROUBLESHOOTING CHART
PROBLEM
Does not start
CAUSE
o
o
o
CORRECTION
Dirty air filter
Out of fuel
Stale fuel
o Clean/replace air filter
• Fill fuel tank,
,, Drain tank and refill with
fresh clean fuel.
• Drain fuel tank and
carburetor and refill tank
Water in fuel
with fresh gasoline.
o Connect wire to plug.
°
Spark plug wire is
disconnected.
o
Bad spark plug.
Loose blade or broken blade
o
o
o
adapter.
Control bar in released
position,
Control bar defective_
17
° Replace spark plug_
° Tighten blade bolt or
replace blade adapter.
o Depress control bar to
handle,
o Replace control bar.
TROUBLESHOOTINGCHART
PROBLEM
CAUSE
CORRECTION
Loss of power
o Rear of lawn mower housing
° Set to "Higher Cut"
position,
or cutting blade dragging
in hea W grass
o Cutting too much grass
o Dirty air filter
• Buildup of grass, leaves,
and trash under mower'
. Too much oil in engine
o WalPJngspeed too fast,
Poor cut- uneven
, Worn. bent or bose blade.
o Wheel heights uneven.
o Buildup of grass, leaves
and trash under mower,
Excessive
vibration
o Worn, bent or loose blade.
° Bent engine crankshaft.
Starter rope hard
to pull
° Engine flywheel brake is on
when control bar is released.
= Bent engine crankshaft
= Blade adapter broken
- Blade dragging in grass
o Set to "Higher Cut''
position
o Clean/replace air filter
. Clean underside of mower
housing
o Check oil level
o Cut at slowerwalking
speed.
o Replace blade Tighten
blade bolt,
o Set all wheels at same
height
• Clean underside of
mower housing,
• Replace blade. Tighten
blade bolt.
° Contact an authorized
service center,
° Depress control bar to
upper handle before
pulling starter rope,
. Contact an authorized
service center:
o Replace blade adapter
° Move lawn mower to cut
grass or to hard surface
to start engine,
Grass catcher
not filling (if so
equipped)
Hard to push
• Cutting height too low,
• Lift on blade worn off.
o Catcher not venting air_
. Raise cutting height,
• Replace blade_
,, Clean grass catcher:
. Grass is too high or wheel
height is too Iow_
. Rear of lawn mower
. Raise cutting height
housing or blade dragging
in grass,
° Grass catcher too full
housing one (1) setting
higher,
• Empty grass catcher
o Adjust handle height to
suit.
• Handle height position not
right for you_
18
° Raise rear of lawn mower
Garantia
Reglas de Seguridad
Montaje
Opera¢i6n
Mantenimiento
Programa de Mantenimiento
18
18
20
22
26
26
Especificaciones del Producto
Servicio y Adjustes
Almacenamiento
Identificaci6n de problemas
Partes de repuesto
Orden de Partes
GARANTIA LIMITADA
DE DOS ANOS PARA LA SEGADORAA
MOTOR
27
30
31
33
Vea el manual
ingl6s del due_o
Contratapa
CRAFTSMAN
Por dos (2) aSos, a partir de la fecha de compra, cuando esta Segadora Craftsman se mantenga, lubdque
y aline segLin las instrtJcciones para la operaci6n y el mantenimiento en el manual dal dueSo, Sears
repararA gratis todo defecto en el material y la mano de obra
Si la Segadora Craftsman se usa para fines comerciales o de arriendo, esta garantia s61o se aplica per
noventa (90) dias a partir de la fecha de compra.
Esta Garantia no cobra:
,, Arti_los que se desgastan durante el uso normal tales como las cuchillas segadoras rotatodas, los
adaptadores de la cuchilla, las correas, los filtros de aire y las bujfas.
. Reparaciones necesadas debido al abuso o a la negligenda del operador, incluy6ndose a los
cigeeSales doblados y a la falta de mantenimiento del equipo segQn las JnstrtJcciones que se Jnclwen
en el manual del dueSo
EL SERVICIO DE GARANTiA ESTA DISPONIBLE al devolver la segadpra a motor Craftsman al Centro/
Departmento de Seryicio Sears mas cercano en los Estados Unidos Esta garantia se aplica solamente
mientras el producto este en uso en los Estados Unidos
Esta Garantfa le otorga derachos legales especfficos, y puede que tambi6n tenga otros derechos que
varfan de estado a estado+
Sears, Roebuck and Co., D/817WA, Hoffman Estates, IL 60179 USA
Los estandrares de segu_dad exigen la presencia
dal operator an los controles para reducir a un
minimo el riesgo de lesionarse Su unidad viene
equipada con dichos controles. Por ningun motivo
trate del efiminar la fund6n de los controles que
exigen la presencia del operador.
ENTRENAMIENTO:
• Use la segadorasolamantepara los fines
propuestospor el fabricantey segQnlas
explicacionesdescritasen este manual.
o No opera la segadorasi se ha ca[do o daBado en
cualquieraforma. Siemprarepare los da_os
antes de usafla.
° No use accesoriosque no hayan sido
recomendadospor el fabricante. El uso de dichos
accesoriospuede set paligroso.
• Cacuchi!lagira cuando el motor est#.
funcionando+
PREPARAClON:
•
Lea este manual de] operador
cuidadosamente, Familiarfcese con los
controles y aprenda a operar su segadora en
forma adecuada Aprenda a parar su segadora
r_pidamente
° No permita que los niSos usen su segadora
Nunca permita que los adultos operen la
segadora sin contar con las instruccJones
adecuadas
- Siempre revisecuidadosamente el _rea que se
va a segar y desp6jela de todas laspiedras,
palos, alambres,huesos y otros objetos
extraSos Estos objetos serAnlanzados con la
cuchilla y puedan producir lesionesgraves
• Siempreuse anteojos de seguridado protectores
de ojos cuando arranque y durante el tiempo
que usela segadora
• Mantenga el &rea de operaci6n despejada
de gente, especialmente de niSos pequeSes
y de animales dom6sticos
19
• V[stase en forma adecuad& No opera la
segadote sin zapatoso con sandalias
mientras que el motor estA funcionando
o Siegue siempre durante el dia o con buena
luz adificiaJ
OPERAClON:
• Mantenga sus ojos y su monte en la
segadera y en eJ#,tea qua se est4 cortando
No permita que otros inte[eses Io distraigan
. No corte c6sped mojado o resbaloso Nunca
corra rnientras est6 operando su segadora
Siempre aeegerese de mantener el equilibria
mantenga el mango agarrado fimlemente y
camine
. No ponga las manes o Ins pies cerca odebajo
de los partes rotaterias Mant_ngase
alejado de la abertura de descarga en todo
momento_
- Siemprepareelmotorcuandose vaya
oouandono est_usandoeusegadera,
o
antes de atravesar las entredas para autos,
Ins senderos, caminos y &reas cubiertas de
ripio.
° Nunca dirfja la descarga del material hacia
Ins espectedores ni permita a nadie cerca de
la segadora mientras laest@operando
. Antes de limpiar, inspeccionar o de repa_er I
a eegadera, pare el motor y est@
completamente segure de que la cuchilla y
que todas las partes que se mueven se
hayan detenido Luego, desconecte el
alambre de la bujia y mant@ngaloalejado de
@stapare evitar el er_anque per accidente
• No continSe haciendo funcionar su segadora
sile pega a un objeto extra5o Siga el
pmcedimiento desqdto anteriorrnente, luego
repare cualquier dado antes de velver a
arrancar y de operar su segadora.
- No cambie Ins ajustes del regulador o
hagaque el motor ande a una vetecidad
excesiva Se pueden producir daSos en el
motor y I esiones personale&
° No opere su segadora si vibra fuera de Io
normal La vibraci6n excesiva es una
indicaci6n de daifio; pare el motor, revise en
forma segura la causa de la vibraci6n y haga
las reparaciones segSn sea necesario
° No haga funeionar el motor en
recintoscerrados Los gases de escape son
peligrosos
° Nunca corte el c_sped tirando la segadora
hacia usted_Siegue a travi_sde la cara de
las pendientes, nunca hacia arriba e hacia
abajo pues puede perder el equilibrio No
siegue pendientes demasiedo empinada&
Tenga cuidado cuando opere la segadora en
_erreno dispareio o cuando cambie de
direcci6n - mantenga un buen equilibrio
• Nunca opere la segadora sin las
proteccienes adecuadas, las pJanchas, el
recogedor de c_sped y olros dispositivos de
seguridad en su lugar
MANTENIMIENTO
Y ALMACENAMIENTO:
•
Revise la cuchilla y Ins pernos de montaje
deJ motor a menudo, para asegurarse qua
estAn apretados en la forma adecuada
° Revise redes Ins pemos, tuercas y tomillos a
intervalos frecuentes, pare verificar si est&n
apretados en forma adeeuada, y
asegurarseque la segadora se encuentra en
cendiciones de funcionamiento seguro
- Mantenga todos los dispositivos de seguridad
en su lugar y listos pare funcionar
•Para
reducir el peligro de incendio,
mantenga el motor sin c_sped, hojas y grasa
o aceite en exceso
• Revise el recogedor de c_sped a menudo
para vedficar si hay deterioro y desgaste y
cambie las bolsas desgastadas
Use
solamente lee bolsas de repuesto
recomendadas pot el tabricante de su
segadora o que cumplen con los
especificaciones de _ste
• Siempre mantenga una cuchilla afi]ada en su
segadora
° Siempre permita que el motor se enfrie
antes de guardarla en cualquier recinto
cenado
• Nunca guarde la segadora con combustible
en el estanque dentro de un edifieio endonde
Ins gases pueden alcanzar una llama
expuesta o una fuente de ignici6n, tel come el
calentador de agua, la estufa de
calefeccidn, la secadora de ropa, etc
PRECAUCl0N"
Siempre desconecte el
alambre de la buj{a y pdngato donde rio pueda
entrar en centacto con la bujfa, para evitar el
arranque per accidente, durente la preparaci6n,
el transpette, el ajuste o cuando se haeen
reparacione&
PRECAUCI(_N: Ee cenecido per el Estado de
California que Ins gases de escape del motor de
este productor contienen quimicos Ins cuales a
ciertos niveles, pueden ocasionar, c,_ncer,
defectos de nacimiento, y otros daSos al sistema
reproductive
2O
Estosaccesofios estabandisponibles cuando se produjo la segadora Tambi6n estAn disponiblesen la
mayorfade las liendas de Sears yen los cantros de servicio La mayor[ade las tiendas Searstambi6n
pueden mandar a pedir partes de repuesto para usted,si les proporcionael nt_merodel modelode su
segadora Alguncade estos accesodca tal vez no se apliquen a su segadora
RENDIMIENTO
DE LA SEGADORA
DESVIADOR DE RECORTES
PARA SEGADORAS CON DESCARGA TRASERA
JUEGOS
PARA LA ACOLCHADORA
RECOREDOR
PARA
SEGADORAS
CON DESCARGA
LATERAL
SEGADORAS
CON
RECOREDORpARA
DESCARGA
TRASERA
MANTENIMIENTO
CUCHILLAS
FILTROS
ADAPTADORES
DE CUCHILLA
Lea estas instrucdones y este manual
completamente antes de tratar de montar u operer
su segadora nueva Su segadora nueva ha sido
mentada en la f&bdca con la excapciSn de aquellas
pastes que se dejaron sin montar por rezones de
env[o Todas las partes como las tuercas, las
arendalas, los pemos, etc,, que son necesadas
pare completar el montaje han sido colocadas en la
balsa de partes Para asegurarse que su segadora
funcione en forma segura y adecuada, todas las
partes y los art[culos de ferreten'a que se monten
tienen que ser apretados seguramente Use las
herramientas correctas, como sea necesario, pare
asegurar que se aprieten adecuadamente_
PAPA REMOVER
ENVASES
DE GASOLINA
DE LA SEGADORA
SILENCIADORES
CORREAS
ESTABILIZADORES
LA SEGADORA
LA CAJA DE CARTON
DE
•
RUJIAS
DE AIRE
RUEDAS
ACEITE
DEL MOTOR
Haga rodar la segadore hacia afuere de la caja
de cart6n y revfsela cuidadosamente pare
verificar si todavfa quedan partes sueltas
adicionales.
COMO
PARA
PREPARAR
DESDOBLAR
SU SEGADORA
EL MANGO
IMPORTANTE:
Despliegue el mango con mucho
cuidado pare no pel[izcar o daSar los cables de
central.
° Levante los mangos hasta que la secciSn del
mango inferior se asegure en su lugar, en la
pos=c=onpare segar
o Levante la secci6n dal mange superior hasta su
lugar en el mango inferior, remueva la cuSa
protectora y apriete ambas manillas del mango.
o Remueva la cuSa del mango que sujeta la barra
de los control que ezJge la presencia del
operador junto con el mango superior.
o El mango de la segadore puede ajustarse segun
le acomede para segar Refi6rase a "AJUSTE
DEL MANGO" en la Secci6n de Servicio y
Ajustes de este manual
• Remuevalas partes sualtas que se incluyen con
la segadora
• Corte las dos esquinas de los extremos de la
cajade cartSny tienda el panel dal extremo
piano
° Remuevatodo el material de empaque, excepto
la cuSaentre el mango superiory 61inferior, y la
cuba que sujeta la barra de los control que exige
la presenciadel eperadorjunto con el mango
superior
21
Ba[ta de control que exige la
presencia del operado
Man
Levantar
Tapon
alcolchadora
Posici6n
para segar
Mango
inferior
PAPA INSTALAR LOS ACCESORIOS
Su segadora rue enviada lista para usarse como
una acolchadora de capa vegetal.Para convertida
de mode que pueda ensacar o descan:Jar.
• Ab[a la puerta trasera y remueva la tapon
acolchador& Gu_rdela en un lugar seguro
o Ahora puede instalar el recogedoro el desviador
de recortesoptional
,, Para volver a la operadSn de acolchamientocon
capa vegetal, instale la taponacolchadoraen la
aberiura de descarga de la segador& Asegt_rese
de que todas las orejas est_n asentadasen
forma adecuada.
PRECAUClON: No haga funcionar su
segadora sin la tapon acoichadora aprobada en su
lugar,o sin el desviador de recortes,o sin el
recogedorde c_sped, aprobados,en su lugar
Nunca trate de operar la segadora cuando se ha
removido la puertatrasera o euando estAun poco
abierta.
22
FAIVIILIARICESE CON SU SEGADORA
LEA ESTE MANUAL DEL DUEllO Y LAS REGLAS DE SEGURIDAD ANTES DE OPERAR SU
SEGADORA_Compare las ilustraciones con su segadora para familiarizarse con la ubicaci6n de los
diversos controles y ajustes. Guarde este manual para referencia en el futuro.
Estos simbolos pueden apareser sobre su segadora o en la literatura proporcionada con el
producto. Aprenda y comprenda sus significados.
ATTENCI6N O
ADVERTENCIA
MOTOR
SNCENDIDO
MOTOR
APAGADO
R,&PIDO
LENTO
ESTRANGU
LAClON
Cable de control de
zona del motor --_
COMSUSTIBLE
ACEITE
PELIGRO. GUARDS LAS
MANOS Y LOS PIES LEJOS
control que exige la
presencia del operador
Control de impulsi6n
Cord6n arrancador
Manilla de!
mango
del motor con varilla
indicadora de nivel
Recogedordelc_sped
Cubierta de la
impulsi6n
Tapon de la
acolchadera
Tapa del deposito
de la gasolina
Ajustador de la rueda
(en cada rueda)
Caja
CUMPLE CON LOS REQUISITOS DE SEGURIDAD DE LA CPSC
Las segadoras a motor, que se conducen desde la parte de atr_s, rotatorias, Sears, cumplen con
los estandares de seguridad del American National Standards Institute y de la U S Consumer
Product Safety Commission. La cuchiila gira cuando el motor est,. funcionando
Barra de control que exige la prencia del
operador - tiene que sujetar-se abajo, junto
con el mango, para hacer arrancar el motor
Su_ltala para parar el motor
Cebador - bombea combustible adicional
desde el carburador al cilindro para uso cuando
se necesita hacer arrancar un motor fr[o
Cord6n arrancador
arrancar el motor,
Palanca de control de la impulsi6n - se usa
para enganchar la segadora para movimiento
hacia adelante impulsada a motor
"rapon de la acolchadera - situada en la
abertura de la descarga y debe ser quitada
cuando se convierte la operacci6n de ensacado
a descarga
- se usa para hacer
23
La operacidn de cualquier segadora puede
hacer que salten objetos extraSos dentro de sus
ojos, Io que puede producir daSos graves en
6stos. Siempre use anteojos de seguddad o
protecci6n para los ojos mientras opere su
segadora o cuando haga ajustes o
reparaciones Recomendamos una mascara de
seguridad de visi6n amplia, para use espejuelos
o anteojos de seguridad estandarte
come
USAR SU SEGADORA
VELOClDAD
DEL MOTOR
La velocidad det motor se estableci6 en la
f_.brica papa un rendimiento @time. La
velocidad no se puede ajustar:.
CONTROL DE ZONA DEL MOTOR
PRECAUClON: Las regulacionesfederales
exigen que se instale un control para el motor en
esta segadorapara reducira un minimo el desgo
de lesionarse debido a! contactocon la cuchilla
Per ning[in motive trate de eliminarla funci6n del
control del operador.La cuchilla gira cuando el
motor est4.fundonando.
. Su segadoraviene equipada con una bana de
control que exigela presencia del operador, le
que requiereque el operadot est6 detr'4sdel
mango de la segadora para haceda arrancary
operad&
PARA AJUSTAR LA ALTURA DE CORTE
= Levantelas ruedas para el corte bajo y baje las
ruedas para el corte alto
• Ajuste la altuta de code paraque se acomode a
sus requisites La posici6ndel medio es la meier
para la mayoria de los c_spedes,,
• Rata cambiar'laaltura de corte,emguje la
palancadel ajustador hacia la rued& Mueva ta
tueda hada ardba o hada abajo de mode que
se acomode a sus requisites.Asegdrese que
todas las ruedasqueden igualmenteajustada&
AVISO: El ajustador esta correetamente
celecado cuando las orejas de la plaea est_n
insertadas en el agujero del mango. Tambi_n,
los ajustes de 9 posiciones (si equipado)
permiten que el mango pueda ser movido
entre las orejas de la plaea,
Rata un code alto, baje las
ruedas
Orejas de [a
placa
Para un code bajo, levante las ruedas
PARA MONTAR Y ADJUNTAR
RECOGEDOR DE ClaSPED
EL
o Cier_e la tapa soltable, La tapa soltable
debe estar cerrada cuando se esta
operando la segadora.
• Levante la puerta trasera de la caja de la
segado_a y ponga el bastidor deJrecogedor
de c_sped en las orejas formadas en e!
puntal de bisagra de la puerta trasera
,, El recogedor de c_sped esta asegurado en
la caja de la segadora cuando se baja la
puerta trasera para descansar en el
bastidor del recogedor de c_sped
PRECAUClON: No haga funcionar su segadora
sin el desviadorde recorles o sin el recogedor de
c_sped, aprobados,en su luga_:Nunca trate de
operar la segadoracuando se ha removido la
puerta traserao coando eat#,un poco abie4a
--_//
Puntal de
bisagra _J,,_
_//j_
Orejas
formadas
Puerta
traaera
.
Sastidor del
reogedor del
_ cesped
PAPA VACIAR EL RECOGEDOR DE
C_SPED
• Para remover el recogedordel c#sped suelte la
barrade controldel operadorparapoderpararel
motor.
o Levantela puertade atras y remova el recogedor
del c_spedper el mango
AVISO: No arrastre la bolsa cuando la vacie;
se produeirAun desgaste innecesario,
24
CONTROLDE LA IMPULSION
° La autolmpulsi6n se controla af sujetar la barra
de cont;ol que exige la presencia del operador
hacia aoajo en el mango y al empujar la palanca
de control de la imputsi6n hacia adelante hasta
qua susne clic," luego se suetta la palanca
• El movimiento hacia adelante parar& cuando ta
barra de contro! que exige ra presencia de]
operador se suella Para parar el movimiento
hacia adelante sin parar el motor, suelte la barra
de control que exige la presencia del operador un
peco haste que se desenganche el control de la
impulsi6n Sujete la barra de control que exige la
presencia del operador abaio en contra del
mango para continuar segando sin
autoimpulsi6n.
- Para mantener el control de la impuleiSn
enganchado cuando se de vuelta en las
esquinas, empuje el mango hacia abajo y levante
las nJedas delanteras fuera del suelo al girar Ia
segadcra
Barra de control qua exige
la presencia del operador
t
Para enganchar
control de !a
impulsi6n
ANTES
MOTOR
el
DE HACER
Control de
Control de la
impulsiSn
desenganchado
ARRANCAR
° Despu_s de !as dos (2) primeras horas de
siega, cambie el aceite y cada 25 horas de
ahi en adelante Puede necesitar cambiar el
aceite mAs a menudo cuando las
condiciones son polvorosas o sucias
GASOLINA
Llene el estanque de combustible
Use
gasolina regular, sin plomo, nueva y limpia
con el mfnimo de 87 octanos
(El uso de
gasolina con plomo aumentar_, los dep6sitos
de 6xido de plomo y carbono y se reducirb, la
duraci6n de la v_Ivula) No mezcle el aceite
con la gasolina
Para asegurar que la
gaso!ina utilizada sea fresca compre
estanques los cuales puedan ser utilizados
durante los primeros 30 dias
ADVERTENClA:
La experiencia ha indicado
que los combustibles mezctados con alcohol
(conocidos como gasohol, o el uso de etanol o
metanol) pueden atraer la humedad, la que
conduce a la separaciSo y formaci6n de _.cidos
durante el almacenamiento
La gasolina acidica
puede daSar el sistema del combustible de un
motor durante e! almacenamiento
Para evitar
!os problemas con el motor, se debe vaciar el
sistema de combustible antes de guardado pot
un periodo de 30 d[as o m_.s Vac[e el estanque
de combustible, haga arrancar el motor y
h_.galo funcionar hasta que las lineas del
combustible y el carburador queden vacios La
pr6xima temporada use combustible nuevo
Vea las Instrucciones para el Almacenamiento
para m&s informaci6n. Nunca use productos de
!impieza para el motor o para el carburador en
el estanque del combustible pues se pueden
producir daSos permanentes
EL
Tapa del \
deposito de _._.__<_
ACEITE
Su segadora fue enviada sin aceite en el motor.
• Aseg_Jrese que la segadora est6 nivelada y
que el _rea alrededor del dep6sito de aceite
est_ limpia.
• Remueva la tapa del dep6sito de aceite del
motor y rellene hasta la linea de Ileno en
_sta.
la gasolina
•
Use 27 oz. de aceite. Para el tipo y la calidad
vea "MOTOR" en la secciSn de las
Mantenimento en este manual.
o Vac[e el aceite lentamente. No Io Ilene
demasiado.
• Revise el nivel del aceite antes de cada uso
Agregue aceite si es necesado, Liens hasta
la linea de tleno en ta varil!a indicadora de
niveL
"
Para leer el nivel adecuado, aprlete la tapa
del dep6sito de aceite det motor cada vez
•' Vuelva a instalar la tapa del depSsito del
aceite y apd_teta
25
_
/
Tapa del
deposito de
aceite del
motor
PARA HACER ARRANCAR
CONSEJOSPARASEGARYACOLCHAR
EL MOTOR
.
Para hacer arrancar un motor frfo, empuje el
cebador tfes (3) veces antes de tratarlo. Empuje
firmemente Este paso normalmente no es
necesario cuando se hace arrancar un motor que
ya ha estado funcionando pot unos cuantos
minutos
o Suiete la barra de cantt_ que exige la presencia
del operador abajo en el mango y tireel mango
del arrancador r_pidamente No permita que el
cord6n arrancador se devuelva abruptamante.
- Para parar el motor, suelte la bar_ade control
que exige la presencia dot operador,
AVISO: En climas mas frios puede que sea
necesafio repetir los pasos del cebado. En
climas mAs calurosos et oebar demasiado
puede producir' el ahogo y el motor no va a
arrancar. Si se ahoga el motor espere unos
cuantos minutos antes de tratar de hacerlo
arrancar y no repita los pasos del cebado_
CONSEJOSPARASEGAR
o Bajo ciertas condiciones, tal como c6sped
muy alto, puede ser necesario el elevar la
attura del eotte para reducir el esfuerzo
necesario para empujar la segadora y para
evitar sobrecargar el motor, dejando
raontones de recortes de c_spe& Puede que
sea necesario reducir la velocidad del
recorrido y/o haga funcionar la segadora
sobre el Area por segunda vez.
. Para un corte muy pesado, reduzca el ancho
det corte pasando parcialmante pot encima
del lugar antertormente cortado y siegue
lentamente.
- Para un mejor ensacado del c_sped y para la
mayor[a de las condiciones de code, la
vetocidad del motor debe ajustarse a la
posici6n de r&pido
o Cuando use una segadora con descarga
trasera en c_sped h_medo y pesado, los
montones del c_sped cortado puede que no
entren en el recogedor de c_sped, Reduzca
la velocidad del recorrido (velocidad de
empuje) y/o haga funcionar la segadora
sobre el _rea pot segunda vez,
• Si queda una huella de cortes en el 1ado
derecho de una segadora con descarga
trasera, siegue en la direcci6n en que giran
las maniilas del reloj, solapando un poco para
recaudar los recortes en la pr6xima pasad&
° Los poros en los recogedores de c6sped de
tela pueden Itenarse con mugre y polvo con
el uso y los recogedores recaudaran menos
e_sped. Para evitar 6sto, rocie el recogedor
con la manguera de agua regularmente y
d_jelo secaree antes de usarlo_
o Mantenga la parte superior del motor,
alrededor del arrancador, deepejada y sin
recortes de c_sped y paj& Esto ayudar_ el
flujo del aire dal motor' y extender& su
duraci_n.
IMPORTANTE: Para obtaner e( mejor rendimeinto
mantenga la caja de la segador a sin acumlacion de
cesped y basura Vea "LIMPIEZA" en seccion de
"Mantenimento "de este manual
• La cuchilla acoichadora especial va a volver a
cortar los recortes de c_sped muchas veces, y
toe reduce en tamafio, de modo que sise caen
en el c_sped se van a dispesar entre _ste y no
se van a notar Tambi_n, e! c_sped acolchado se
va a deshacer r_pidamenteentregando
substancias nutritivas para el c_sped Siempre
acolche con la velocidad del motor (cuchilla) mAs
alta, pues asi se obtandr_,la mejor aeci6n de
recorte de las ouchillas
° Evite cortar el o_sped cuando est_ mojado El
c6sped mojado tiendea format montones e
intediere con la acci6n de acolchado La mejor
hora para segar el c_sped es tempranoan la
tarde A esa hora _ste se ha secado y el _rea
recien cortada no quedar_,expuesta al sol
directo,
', Para obtener los mejores resultados, ajuste la
aliura dal corte de ta segadora de modo que _sta
corte solamente el tercio superior de las hojas de
c_sped En el caso de que el c_sped haya
crecido demasiado, puede set necesario el
alevar la altura del corte para reducir el esfuerzo
necesario para empujar la segadora y para evitar
sobreeargar el motor, dejando montanes de
recortes de c_sped Para un acolchamiento raW
pesado, reduzca el arrcho dal code pasat_dopot
encima del lugar antedormente cortado y siegue
lentaraante
° Ciertos t_posde e#sped y sus condiciones
pueden exlgir que un &rea tonga que ser
acolchada por segunda vez para esconder
comptetarnente los recortes, Cuando se haga el
segundo corte, siegue atravesado o en forma
perpandiculara la pasada dal primer corte.
. Cambie su patr6n de corte de semana a
seman& Siegue de norte a sur una semana y
luego cambie de este a oeste la pr6xima
semana, Esto evitarb,que el c_sped se enrede y
cambie de direcci6n.
Max 1/3
26
PROGRAMA
DE MANTENIMIENTO
LLENE LAS FECIIAS
QUE COMPLETE
Revisar
A MEDIDA
SU SERVrCIO
si hay sujeladores
._
G_
eS_ _o_
REGULAR_,._._O
suel_os
S
Limpiar/inspeccionar
el recogedor
c_sped (_!viene equipado)
E
Limpiar
_,4
de
$f
la segadora
G
Limpiar debajo de _a cubierta
A
rnisi6n (segadoras
g
sadas (segadoras con poder propulsor)
Revisar las correas y las poleas impul-
R
Tabta
de lubricaci6n
Revisaro/afiladcambiarlacuchilla
Limpiar la baleria/recargar
(segado[as
de la trans-
J
con poder ptopulsor)
con arranque
el_ctrico)
O_ Cambiar
Revisar elel nivet
aceitedeldelacelte
motor
i Limpiar
el fittro de aire
J
T
Inspeccionar elsilenciador
a
Limpiaro/cambiar
la bujia
Cambiar el car_ucho de papal del lilt_o
de aire
1 • Cambtar m&s a menudo
cuando se opere bajo carga pesada o en ambientes con alias
2 _ ear setvtcto rn_s a menudo cuando se opere en cGndicJQnes SUCt_S o polvo_osas
3 _C_rnbie Ias cuchillas m_s a menudo cuando
4 ÷C_ltgar po_ 48 betas al fin de la lemporada
RECOMENDAC|ONES
_Iegue
lernperalutas
en terreno atettoso
TABLA
GENERALES
La garantia de esta segadora no cubre los
a[ticulos que ban estado sujetos al abuse o a la
negligencia del operado[ Para recibir lode el
valor de la garantia, el operador tiene que
mantener la segadora seg0n las instrucciones
descritas en este manual
DE LUBRICAC|ON
(D
Ajustador
de la rueda
Hay algunos ajustee que se tienen que hacer en
torma peri6dica, para poder mantener su unidad
adeeuadamente
Todos los ajustes en la secciSn de Servicio y
Ajustes de este manual tienen que set
revisados per Io menos un vez per cada
temperada.
• Una vez al are, cambie ta buj[a, limpie o
cambie el elemento del filtro de aire y revise
si la cuchilla est,. desgastada
Una bujia
nueva y un elemento del filtro de aire limpid
nuevo aseguran la mezela de aire-combustible adeeuada y ayudan a que su motor
funcione mejor y que dure m_s
• Siga et programa de mantenimiento en este
manual
ANTES DE CADA use
/_
de
la
puerta
_
trasera
(_ ROCIE EL LUBRICANTE.
(_) REFIERASE A LA SECCION DE
RESPONSABILIDADES
DEL CLIENTE
"MOTOR"
IMPORTANTE:
EN
NO acefit o engrase los
rodamientos de la rueda de plastico. Los
lubricantes viscosos atraeran polve y mugra, Io
que ace[tara la duracion de los rodamientos
auto lubricantes. Si cree que lubricarse, use
solamente un lubricante tipo grafito, de polve
seeo, en _orma moderada
sueltos
Mantenga la unidad bien lubricada
"TABLA DE LUBRICACION").
aisagra
(D Clavija de montaje
del puntal del
mango
° Revise el nivel del aceite del motor,
• Revise si hay sujetaderes
LUBRICACION
I_=I_[L-_. _1i_4
(vea la
27
ESPECIFiCACIONES
NUMERO
DE MODELO
NUMERO
DE SERIE
DEL PRODUCTO
917.377592
FECHA DE COMPRA
CABALLOS
DE FUERZA:
6.75
DESPLAZAMIENTO:
1256 CU IN,
CAPACIDAD Y TIPO
DE GASOLINA:
1,5 Cuartos
REGULAR SIN PLOMO
TIPO DE ACEITE:
(API-SF/SG)
SAE 30 (sobre 32°F)
SAE 5W-30 (debaio 32°F)
CAPACIDAD
27 oz. de capacidad
DE ACEITE:
BUJ[A (ABERTURA:
TOLERANCIA
SENCENDIDO
CHAMPION
DE VALVULA:
RJ19LM O J19LM
ADMISION:
.004" - 008"
DESCARGA:
.004" - .008"
DE ESTADO
SOLIDO ABERTURA
TORSION
.030")
DE AIRE:
.0125 IN.
DEL PERNO
DE LA CUCHILLA:
35-40 FT. LBS.
o El num6ro del nodelo y el de serie se encuentran en la calcomanla adjunta ala parte
trasera de la caja de la segadora Debe registrar tanto el r_um_ro de eerie come la
fecha de compra y mantengalos en un lugar seguro para refencia en el future.
SEGADORA
Siempre observe las reglas de seguridad
cuando haga e! mantenimiento
LLANTAS
• Mantenga las II_tas sin gasolina, aceite o
substanciasquimicasparecontrol de insectes
que pueden dabar }agoma.
• Evite los tocones, las piedras, las gdetas
profundas,los objetosafilados y otros peligros
que pueden daSaralas Ilantas.
CUIDADO DE LA CUCHILLA
Para obtener los mejores resultados, la cuchilla
de la segadora tienen que mantenerse afilada_
Cambie la cuchilla doblada o daSada,
PARA REMQVER
• Proteja sue manes con guantes y/o envuelva
la cuchiila con una tela gruesa,
• Remueva el perno de la cuchilla gir&ndolo en
el sentido contrario en que giran las manillas
del reloj_
• Remueva la cuchilla y los articulos de
ferreteria adjuntadores (el pemo, la arandela
de seguridad y la arandela endurecida).
AVlSO: Remueva el adaptador de la cuchilia y
revise el cube interior de la ranur'a del
adaplador de la euchilla, La tanura tiene que
estar en buenas condiciones pare que funciene
en forma adecuada. Cambie el adaptador si
est&daSado_
PARA CAMBIAR
LA CUCHILLA
LA CUCHILLA
• Ponga el adaptader de la cuchiila en el
cigue_al del motor: Asegdrese que {a ranura
del adaptador y que el chavetero del cigueSal
est_n alineados
• Ponga la euchillaen el adaptador de _sta
allneando los dos (2) agujeros en la cuchilla
con las salientes elevadas en el adaptador,
• AsegSrese de que el horde de salida de la
cuchilla (opuesto al borde afilado) est6 hacia
arrlba hacia el motor.
• Instale el pemo de la euchillacon la arandela
de seguridad y la erandela endurecida en el
adaptador de la cuchilla y el ciguet_aL
. Desconecte el alambre de la bujia y pSngalo
en deride no pueda entrar en contacto con
_stao
* Haga descansar la segadora en su lade,
AsegLireee que el filtro de aire y que el
carburador queden mirando hacia arriba,
- Use un bloque de madera entre la cuchilla y
la caja de la segadora pare evitar que la
cuchilla gire"cuando sele quite el perno,
28
•
Use un b!oque de madera entre la cuchilla y
la caje de la segadora y apriete el pemo de la
cuchilta gir#,ndolo en e! sentido en que giran
las ms:lilies del reloj
• La tors 6r para apretar recomendada es de
35- 40 FeS libras
IMPORTANTE:
tratado acalor
Ei perno deta cuchilla el clase 8
PARA AFILAR LA CUCHILLA
AVISO: i'lo recomendamos el afilar la cuchilla pero silo hace, asegtJrese de que quede
balanceada
Se tiene que tener cuidado de mantenerla
balanceada Una cuchilla que no est4
balanceada va a producir eventualmente dafio
en [a segadora e en el motor
• La cuchilla puede afilarse con una lima o en
una rueda rectificadora
No trate de afilafla
mientras se encuentra en la segadora
• Para revisar e] balance de la cuchitla, clave
un ctavo en una viga o en la pared Deje
alrededor de una pulgada de un clave recto
expuesto Ponga el agujero central de la
cuchilta sobre la cabeza del clave Si la
cuchilta esta balanceada debe permanecer
en la posici6n horizontal, Si cualquiera de los
extremes de la cuchilla se mueve hacia
abajo, afile el extreme pesado hasta que _sta
quede balanceada
Adaptador
de la cuchilla
Chavertero
_._gue_al
Ranura .@
Cuchilla
Ill "_
Perno de / __
la cuchilla / _
2---
CAJA DE ENGRANAJES
• Para mantener el sistema de impulei6n
funcionando en forma adecuada, la caja de
engranajes y el &rea alrededor de la impulsi6n
tienen que mantenerse limpias y sin acumulaci6n
de basura Limpie debajo de la cubierta de la
impulsi6n dos vecee por temporada
° La caja de engranajes se Ilena con tubficante
hasta el nivel adecuado en la f4bdca La unica
vez que el lubdcante necesita atenci6n es
cuando se le ha prestado servicio a la caja de
engranajes
• Si se necesita lubricante, use solamente Grasa
Texaco Starplex Premium 1, Parte No 750355
No use substitutos
RUEDAS DE IMPULSION
Revise las ruedas de impulsi6n delanteras cada vez
antes de segar, para asegurarse de que se mueven
libremente
Si las medas no giran libremente quiere decir que
hay basura, recedes de c_sped, etc en el Area de
lae ruedas de impulsi,Sn y tienen que limpiarse para
liberaflas
del
/
Cigue al
Es necesario limpiar las ruedas de impulsi6n; revise
ambas ruedas delanteras
• Remueva los tapacubos, las clavijas de horquina
y las arandelas
• Remueva las nJedas de los ajustadores de las
ruedas
• Remueva la basura y los recortes de c_sped de
dentro de ta cubieda contra el polvo, pifi6n y/o de
los dientes de los engranajes de las ruedas de
impulsi6n
o Ponga las ruedas de vuelta en su lugar
" Si despu_s de limpiar las ruedas de impulsi6n no
giran libremente, p6ngaee en contacto con su
centro/departamento de eervicio autorizado mAs
cercano.
MOTOR
LUBRICACION
de
segddad
Arandela
Endurecida
Borde de
salida
Use solamente aceite de detergents de alia calidad
clasificado con la clasificaci6n SF. SG o SH de
servicio API Selecoione la calidad de viscosidad
SAE segen su temperatura de operaci6n esperada.
Adaptador
de la
cuchilIa
RECOGEDOR DE CESPED
', El recogedorde c_sped puede ser rociado con el
agua de la manguerapero tiene que estar seco
cuando se vaya a usar
• Revisesu recogedorde c_sped a menudo para
vefificar si est,. dariado o detefiorado Se va a
desgastarcon et use normal. Si se necesita
cambiar el recogedor,c4mbielo solamente per
uno que sea aprobado per el fabdcante. D_ el
nt)merodel mode]ode la segadora cuando Io
ordene.
29
CALIDADES!_____IFDE
VISCOSIDAD
F
aC
,
*20'
.30,
,
._0'
O'
,
.i0,
30'
.2'
O*
40,
DE SAE
g0,
iO,
80'
20_
i00,
30,
41_,
AVlSO: A pesar de que los aceites de
multiviscosidad (5W30, 10W30, etc) mejoran e!
an'anque en clima fifo, estos aceites de
multiviscosidad van ha aumentar e! consumo de
aceite cuando se usa.r}en temperaturas sobre 32 °
E Revise el nivel del aceite del motor m_.s a
menudo, para evitar un posible da_o en el motor,
debido a que no tiene sufidente aceite.
Cambie el aceile despu6s de 25 hot'as de
operaci6n o per !o menos una vez al a5o si la
segadora se utiliza menos 25 horas el a5o+
Revise el nivel del eceite del c_rter antes de
anancar el motor y despu6s de cada cinco (5) horas
de uso continuade, Apriete el tap6n del aceite en
forma segura cada vez que revise el nivel del
aceite,
Acubierta del
filtro de eire
Manilla
de la
cubieria
Filtro
PAPA CAMBIAR ELACEtTE DELMOTOR
AVISO: Antes de indinar la segadorapare drenar
el aceite,drone el tanque de combustiblehaciendo
cotter el motor hasta que el tanqueest_ vado.
° Desoonecte el alambre de la bujia y p6ngalode
modo que no pueda entraren contacto con _sta+
o Remueva la tape del dep_sito del aceite;d_jela a
un lade en una superlicie limpia.
o Incline la segadora y h_.galadescansar en su
lade y drene el aceite en un envase adecuado,
Mueva la segadora de arraspara adelantepara
remover todo el eceffeque se hayaqueclado
atrapado dentroclefmotor,
° Umpie todo el aceite denamado en la segadora
yen el tado del motor.
o Uene el motor con aceite+LI6nelosolarnente
has_ala t{neade/leno (FULL)en la varilla
indicadorade niveLNO LO LLENE
DEMAStADO+
* Vuelvaa poner la tape en el dep6sitodel aceite_
* Vuelvaa conectar el alambrede le bujia a _sta.
SILENClADOR
Inspeccioney cambie el silenciadorsiesta,corroido
pues producir un pe/igrode incendio y/o dar_o
BUJIA
Carnbie su bujia cade a_o pare hacer que su motor
ananque m_s f_,cilmentey funcionemeier Ajuste la
aberturade la bujia en 0,030 pulgada,
LIMPIEZA
IMPORTANTE,"Pare obtenerel mejor redimientom,
mantenga lacajadelasgadorasinacumulacionde
cesped y gasura. Umpie la parte de su segadora
despues de ca.dauso.
PRECAUClON: Desconecteel alambre de la
bujia y p6ngaJoen donde no pueda enlrar en
contacto con _eta.
• Haga descansar la segadora en su lade+
Asegt3reseque el filtro de aire y que el
carburadorqueden mimndo hacia ardba UmpJe
la parte interior de su segadora rasp_'_dola
pare
remover la acumuladSn de c_sped y basura.
° Umpie el motor a menudo pare evitar que se
acumule
la basura. Un motor tapade tuncienamAs
ca!lentoy se acortasu duraciSn.
• Mantenga las superliciespulidasy las ruedas sin
gasoline, aceite, etc+
° No recomendamos el uso de unamanguera de
jardin pare limpiar la segadoraa menos que el
sistema elg%'trico,el silenciador,el filtro de aire y
el carburador est_n tapados pare evitar que lee
entre el ague+[] agua en el motor puede acortar
la duraci(_nde _ste.
LIMPIE DEBAJO DE LA CUBIERTA DE LA
IMPULSION
/
"-_
Envase
FIL'I'FIO DE AIRE
Su motor no funcionar_ en forma adecuada y
puede sufrir daflos si se usa un filtro de aire
sucio.
Cambie el filtro de aire cada aSo,y mAs a
menudo si siege en condiciones muy
polvorosas o sucias No lave el fittro de aire.
PARA CAMBIAR
EL FILTRO DE AIRE
, Alleje los tomillos de la cubierta
, Empuje la cubierta hacia abajo y remuevala
de la bisagta.
• Remueva el filtro de papel afuera del cuetpo
det filtrode aire.
o Limpie la cubierta y el euerpo del filtro de
aire.
o Instale un rmevo filtro de papel
• Renstale cubierta al oonjunto del filtrode a#e.
Asegerese que el quicio est_ montado
adecuadaamente
• Empuje la cubierta hacia arriba y apdete los
tornillos de la cubierta (No los priete
demaciado)
Umpie debajo de la cubierta de la impulsion por Io
menos dos veces cede temporada. Raspe debajo
de la cubierta con un cuchillo pare masilla o con una
herrarnientaparecida,pare remover teda
acumulaci6n de c_sped o basuraen la parte interior
de la cubierta de la impulsi6n.
3O
PRECAUClON: ANTES DE DAR
CUALQUIER SERVlClO O DE HACER
AJUSTES:
• Suefte la barra de control y pare el motor
° Asegurese que la cuchilla y qua todas las partes
moviblesse hayandelenido complatamente
o Deacanecteel alambrede la bujia y p6ngalo en
donde no pueda entrar en contacto con _sta
SEGADORA
PARA AJUSTAR LA ALTURA DE CARTE
Vea "PARAAJUSTAR LAALTURA DE CARTE"
la secciSn de OperadSn de este manual
DESVIADOR
TRASERO
° Remueva las abrazaderas del cable,
° Remoeva los controles y la barra de control que
exige la presencia del operador del mango
superior
• Remueva la guia dal cord6n arrancador del
mango superior
° Remueva las clavijas de horquilla
• Desconecte el mango inferior de los puntales del
mango
• De vuelta el mango y vuelva a montar las clavijas
de horquilla qua se habian removido.
• Vue[va a montar la gula de] cord6n arrancador
° Vuelva a montar los controles y la barra de
control que exige la presencia del operador en el
mango supedor.
PRECAUClON:
La barra de control que exige la
presencia del operador tiene que pivotear
Iibremente para penmitir el enganche de la cuchilla/
freno cuando se auelta la barra de control No
apriete dem&siado los sujetadores que sujetan a los
controles al mango superior.
. Para cambiar de la posici6n de mediana baja a
alia solamente se tendr_ que dar vuelta la
secci6n del mango superior
• Para cambiar de la posid6n mediana baja a baja,
solamente se tend_ qua dar vuelta la secoi6n
del mango infedor_
en
Se proporciona un desviador trasero, adjunto entre
]as ruedas traseras de su segadora, para reducir a
un minima la poaibilidad que objetos sean lanzados
hacia afuera de la parte trasera de la segadora, en
la posici6n en donde se encuentra el operador Si
se daSa el desviador debe cambiarse
PARA REMOVEPJCAMBIAR
LA CORREA
DE IMPULSION
•
Remueva la cubierta de la impulsi6n Remueva
la correa empujando hacia abajo en la polea de
la caja de engranajes
• Haga descansar la segadora en su lado con el
filtro de aire y el carburador miranda hacia arrib&
° Remueva la cuchilla
Posici6n de envio
° Remueva la defensa en contra del desperdicio
• Remueva la correa de la polea del motor en el
cigueSaL
o Instale la correa nueva siguiendo los pasos
antedores en el arden inverso
° Siempre use la correa aprobada par la fAbrica
para asegurarse qua calce y dure
Mediana
Cubierla
de la
impulsion
baja
Mediana alta
J""'TAIta
%
Baja
Correa
Empujar
hacia
abajo
PARA AJUSTAR EL MANGO
Se puede levantar o bajar el mango de su segadora
segun le quede c6modo Hay cuatro (4) posiciones
disponibles: alta, mediana alia, mediana baja, baja
Los mangos se envian montados en la posici6n
mediana baja
• Para cambiar de la posici6n mediana baja a
mediana alia, la secoi6n superior y la inferior del
mango tendr&n que darse vuelta
rA_mioetvepara_\
31
Abrazadera
horquilla
de
_4
Ma_
inferi°r
MOTOR
VELOCIDAD DEL MOTOR
Costura
Marco tubular
La velocidad del motor ha sido ajustada en la
f&bdca No trate de aumentar la velocidad del
motor pues se pueden producir lesiones
personales Si oree que el motor est&
funcionando demasiado r#,pido o demasiado
lento, Ileve su segadora a un centro/
departamento de servicio autorizado pata
repararla o ajustarla+
Tapa
soltable
CARBURADOR
Su carburador no es ajustable Si su motor no
est_ funcionando en forma adecuada debido a
problemas que se sospecha vienen del
carburador, lleve su segadora a un centro de
servicio autorizado para reparada y/o ajustada+
PARA MONTAR Y ADJUNTAR
EL
RECOGEDOR
DE ClaSPED
Marco inferior
_
(los marcos
deben estar
completamente
.7._/_
s'tuad°s)
/Li @
• Insertala pierna del marco tubular en la
abertura del recogedor de c6sped y deslice Io
entre la costura de _abolsa+
Marco tubular
AVISO: Mantenga la costurade la bolsa
recogida sobre
la piema recta del marco
o Cuando el marco salga del otro lado de la
costura, inserta inmediatamente el exttemo
del marco adentro de la bolsa como
rnostrado en la intercalaci6n.
° Deslice la costura igual al rededor del marco
tubular, al mismo tiempo trabaje et marco
adentro del recogedor de c_sped
. Monte el marco inferior al marco tubular
como demostrado
Des_icelos eugetadores de vinilio sobre el
marco.
AMISO: Si los sujetadoresde vinifio est&n muy
duros, m_talos en agua cafiente
• Cierre la tapa soltable. La tapa soltable debe
estar cerrada cuando se esta operando la
segadora.
PRECAUCION: No haga funeionar su
segadora sin ef desviador de recortes o sin el
recogedor de c_sped, aprobados, en su lugar+
Nunca trate de operar la segadora cuando se
ha removido la puerta trasera o cuando est4Lun
poco abierta+
Marco del bastidor
32
Inmediatamente prepare su segadora para el
almacenamiento al final de cada temporada o si la
unidad no se va a usar per 30 dias o m&s
Barra de control que exige la
presencia dalo F
SEGADORA
Mango superior
Cuando se va a guardar la segadora per cierto
per[ode de tiempo, I[mpiela cuidadosamente,
remueva toda ta mugre, la grasa, las hojas, etc
Gu4rdela an un 4rea limpia y seca
• Limpie toda la sagadora (Vea "LIMPIEZA" en la
secci6n de Mantenimento de este manual)
• Lubriquela segt]n se maestra en la secci6n de
Mantenimento de este manual
• AsegQrese de que todas las tuercas y clavijas y
redes los pemos y tomillos est_n apretados en
foma segura Inspecoione fas partes que se
mueven para verificar si est_n dafiadas,
quebradas o desgastadas C4mbielas si es
necesario
• Retoque tedas las superficies que est_n
oxidadas o con la pinlura picada; use una lija
antes de pintar.
MANGO
Doblar hacia
adelante para
almacenar
Doblar
hacia
arras
Posici6n
para segar
Mango
inferior
MOTOR
SISTEMA
DE COMBUSTIBLE
IMPORTANTE: Es imporlanle evitar que sa formen
depositos de partes fundamentales de! sistema de
cemustible tales come el carburador, el fittro del
combutible, la manguera del combustible o en el
eatanque durante el a[macanmiento La
experiencaa tambien endica que los combustibles
mezclados con alcohol (cenocido come gasehol e
que tienen etanol o metanol) pueden atraer
humedad, Io que conduce a la separati6n y a la
formaci6n de &cidos durante atmacemamiento la
gaselina acideca puede nafiar el sistema de
combustible de un motor durante el perido de
alcamenmiento
Puede doblar el mango de su segadora para
almacenaria
• Apriete los extremes inferioras del mango inferior
entre sl hasta que el mango inferior quede
separado del puntal del mango, luego mu_valo
hacia adelante.
• Suelte los pemos de montaje del mango superior
Io suficiente come para permitir que el mango
superior se pueda doblar hacia arras
IMPORTANTE:
Caando doble el mango para el
alacenamiento o el trasporte, asegurese qua Io
doble segun se muestra o puede danar los cables
de control
° Drene el estanque de combustible
° Haga arrancar el motor y d_jelo funcionar hasta
que las lineas del combustible y el carburador
est_n vacfos.
•
• Cuando prepare sus mangos a partir de la
posici6n de almacenamiento, el mango inferior
autom#,ticamente se asegurar_ en la posici6n
para segar
•
Nunca use los productos para limpieza del
carburader o del motor en e! estanque de
combustible pues se pueden producir daSos
perrnanentes.
Use combustible nuevo la pr6xima temperada.
AVISO; El estabilizador de combustible es una
altemativa aceptable para reducir a un minimo la
formaci6n de dep6sitos de gema en el combustible
durante el pedodo de almacenamiento Agregue
estabilizador a la gasolina en el estanque de
combustible o an el envase para el
almacanamiento. Siempre eiga la proporci6n de
mezcla que se encuentra en el envase del
estabilizador Haga funcionar el motor per Io menos
10 minutes despu_s de agregar et estabilizader,
para permitir que este Ilegue al carburador No
drene la gasolina del estanque de gasolina y el
carburador si se est,, usando estabilizader de
Mango inferior
Puntal del
mango
de
horquilla
combustible.
33
ACEITEDEL
MOTOR
Drene el aceite (con et motor caliente)y c_mbielo
con aceite de motor limpio (Vea "MOTOR"en la
secd6n de Mantenimentode este manual )
ClLINDRO
• Reraueva la bujia.
• Vacie una onza (29 ml) de aceite a trav_s del
agujero de la bujia en el cilindr 0
• Tire la manilla de arranque lentamente unas
cuantas veces para distribuir el aceite,,
• Vuefva a montar la nueva buj(a.
OTROS
o No guarde la gasolinade una ternporadaa la
otra.
. Cambie el envase de la gasolinasi se empiezaa
oxidar. La oxidaci6n y/o la mugre en su gasolina
producir_.nproblemas.
IDENTIFICACI(3N
PROBLEMA
,' Si es posible, guarde su unidad en un recinto
cerrado y cdbrafa para protegeda contra el polvo
y la raugre
° Cubra su unidad con un forra protector adecuado
qua no retenga la humedad No use pl_stico El
pl_,stico no puede respirar, Io que permite la
fom]aci6n de condensaci6n, Io que producir_ la
oxidaci6n de su unidad,
IMPORTANTE; Nunca cub_a la segadora
mentras el rnontor y las areas de escape todavia
eetan clientes
PRECAUCION:
Nunca almacene la segadera
con gasolina en el estanque dentro de un edificio en
donde los gases pueden alcanzar una llama
expuesta o una chispa Perrnita qua se enfrie el
motor antes de alraacenarta en aJg_n recinto
cerrado
DE PROBLEMAS
CAUSA
-C-ORRECCION
° Filtrode aire eucio
oSin combustible_
• Combustible rancio.
• Limpie/cambie el filtro de aire
i. Llene e! estanque de corabuslible_
• Drene el estanque y vuelva a
Ilenado con combustible limpio y
nuevo.
° Drene el estanque de combustible y
el carburador y vuelva a Ilenar el
estanque con gasolina nueva.
= Conecte el alambre a la bujia
,.,...
No arranca
,,,
° Agua en el combustible
° Alambre de la bujia
desconectado,
Falta de fuerza
,,,,.
,
° Bujia mala.
• Cuchilla suelta o adaptador
de la cuchillaquebrado.
• Barra de control en la posicibn
suelta.
° Barra de control defectuosa
° Cambie la bujia_
• Apdete et perno de (a cuchi(ta o
• Parte trasera de la cajacuchiila
de la segadoraarrastr_.ndose
en el c_sped pesado.
° Est_ cortandotouche c6sped
° Ajustea la poslei6nde "Corte mrs
alto,."
• Filtro de aire sucio.
° Acumulacibn de c_sped, hojas
y basura debajo de la segadora.
, Deraasiado aceite en el motor.
34
° cambie el adaptador de la cuchilla.
Pres one a barra de control hacia e
mango.
° Cambie la barra de control
° Ajuste a la pes[ci6n de "Corte m_.s
alto,,"
° Limpie/cambieel filtro de aire,
° Limpie la parte inferior de la caja de
la eegadora_
° Revise el nivel del aceite.
PROBLEMA
I Mal corte -disparejo
Vibraci6n excesiva
Cord6n ar_ncador
dificildetimr
CAUSA
CORRECCION
" Cuchilla desgastada, doblada o
suelta
• Altura de las ruedas dispareja
Cambie la cuchilla Apriete el
perno de la cuchilla
Ajuste todas las ruedas a la
misma altura
• Acumulaci6n de c#sped, hojas o
basura debajo de la segadora
Limpie la parte inferior de la caja
de la segadora
° Cuchilla desgastada, doblada o
suelta
• CigueSal del motor doblado
Cambie la cuchill& Apriete el
perno de la cuchilla
P6ngase en contacto con su
centro de servicio autorizado
m4s oercano
° El freno del volante del motor
estA aplicado cuando se suelta
la barra de contro!
• Cigue#.al del motor doblado
Presione la barra de control
hacia el mango superior antes de
tirar el cord6n arrancador
P6ngase en contacto con su
centre de servicio autodzado
m&s cercano_
Cambie el adaptador de la
cuchilla.
•
Adaptadordela
cuchina
quebrado
° La cuchilla se arrastraen
c_sped
Recogedor de c_sped
no se Ilena (si viene
equipado)
Dificil de empujar
el
Altura de corte demasiado
baja.
Levantamiento de la cuchilla
desgastado
Recogedor sin ventilaci6n de
aire
Io El c6sped est& demasiado alto
o la altura de la rueda demasiado baja
,, Parle trasera de la caja/cuchilla
de la segadora arrastr4ndose
an el c_spad.
• Recogedorde e_sped demasiado Ileno
• Posici6n de la altura del mango
no adecuada para usted
35
Mueva la aegadora a un lugar en
donde el c_spad ha sido cortado
o a una supedicie firme para
hacer arrancar el motor.
Eleve la altura de corte
Cambie la cuchillas.
Limpie el recogedor de c_sped,
Eleve la altura de code,
Eleve la parte trasera de la caja de
la segadora (1) un lugar m&s alto.
Vacie el recogedor de e_sped
Ajuste la altura del mango de
modo que le acomode
36
ROTARY
GEAR
LAWN
CASE
MOWER
- - MODEL
ASSEMBLY
PART
NO. 917.377592
NUMBER
702511
14
f
8
J
J
* -
J
J
KEY
NO.
PART
NOo
1
2
3
4
6
17490416
137055X004
137053
57072
48373
7
8
9
10
77881
137051
137074
57079
KEY
NO.
DESCRIPTION
Tapping Screw 1/4-20 x 1-1/4
Engagement Bracket
Shifter
Seal
Gear Case Halves Kit
(Includes Key Nos4, 5, and 7)
Bearing
Worm Shaft
Drive Shaft
Hardened Washer
11
12
13
14
15
16
17
16
19
PART
NO.
131484
700343
86447
137050
750436X
750369
12000003
850848
81585X004
DESCRIPTION
Clutch Yoke
Bushing
Plug
Helical Gear
Clutch Jaw
Grease
E-Ring
Hi-Pro Key
Spring Bracket
NOTE: All component dimensions
given in U.S. inches, 1 inch = 25_4 mm
37
ROTARY
LAWN MOWER MODEL NUMBER
917.377592
27
26
75
28
O
Co
Co
58
lo
27
34
32
25
3O
28
29
ROTARY
KEY
NO.
O3
LO
1
2
3
6
9
10
11
12
14
15
16
17
20
21
22
23
25
26
27
28
29
30
31
32
34
35
37
38
39
40
41
PART
NO.
165451X479
158152
63601
136376
151023
128415
150050
STD512505
156374X479
700385X479
133190X479
140661X479
140540
150425
85543
87677
83923
57143
151138
142748
61851
750913X004
701037
7B0331X004
146630
750085X007
150078
88348
161814X479
161812X479
150406
LAWN
MOWER
DESCRIPTION
Upper Handle
Engine Zone Control Cable
Nylon LockNut
Handle Knob
Rear Door Kit
Pop Rivet
Self Tapping Screw #10-24
Hex Tapping Screw 1/4-20 x 1/2
Back Plate
Side Baffle
Discharge Baffle
Rear Baffle
Rear Skirt
Mulcher Plug
Engine Pulley
Hi-Pro Key #505
Nut
Washer
Wheel & Tire Assembly
Shoulder Bolt 3/8-16
Belleville Washer
Axle Arm Assembly
Selector Knob
Selector Spnng
Spacer
Wheel Adiusting Bracket
Thread Cutting Screw 5/16-18 x 3/4
Washer
Handle Bracket Assembly (Left)
Handle Bracket Assembly (Right)
Hex Head Thread Rolling Screw 3/8-16 x 1-1/8
MODEL
NUMBER
KEY
NO.
PART
NO.
44
46
47
48
49
50
51
52
53
55
56
57
58
59
61
62
64
161769
851514
157101
851074
850263
851084
165548
85463
74760612
751592
88652
51793
157081X479
131959
132001
134612
......
74
75
---
66426
151440
161068
166735
917.377592
DESCRIPTION
Lawn Mower Housing (incl. Key # 14,15, 17, 5i & 52)
Blade Adapter
Blade 22"
Hardened Washer
Helical Washer 3/8-24 x 1-3/8 Grd. 8
Hex Head Machine Screw 3/8-24 x 1-3/8 Grd. 8
Front Baffle
Danger Decal
Bolt
Locknut 3/8-16
Hinge Screw
Hairpin Cotter
Lower Handle
Handle Bolt
Rope Guide
Debns Shield
Engine - (See Breakdown)Craftsman
Model 143.996700
Wire tie
Hub Cap
Warning Decal (Not Shown)
Owner's Manual (English/Spanish)
Available accassones not included wilh lawn mower;
71 33623
Gas Can (2.5 gaL)
71 33500
Fuel Stabilizer
71 33027
SAE 3OW Oi! (27 oz.)
71 33417
Dust Shield
ZJ_33316
Mower Cover
71 33303
Chute Deflector
ROTARY
o
LAWN MOWER MODEL NUMBER
917.377592
ROTARY
4_
KEY
NO.
PART
NO.
2
4
5
6
8
9
11
12
13
14
!5
16
17
18
27
145755
158755
146527
150495
150182
145212
150340
12000058
137054
88080
88118
67725
145793
701037
143603
LAWN
MOWER
MODEL
KEY
NO.
DESCRIPTION
Drive Control
Hex Washer Head Screw
V-Belt
NUMBER
PART
NO.
28
31
32
154990
132010
137052
SprJng Retainer
Hubcap
Hex Nut
35
36
37
152018
702511
137090
Wheel & Tire Assembly
E-Ring
Pinion
Dust Cover
Felt Washer
Washer 1/2 x 1-1/2 x .134
Control Bar
Selector Knob
Hex Washer Head Screw # 10-24 x 3/4
38
40
41
52
53
54
55
56
63601
75192
152019
144748
144747
154870
86012
75 ! 152
1/4-20 x 2-1/8
917.377592
DESCRIPTION
Drive Cover
Hex Flange Nut
Drive Pulley
Wheel Adiusler Assembly (Lelt)
Gear Case Assembly
Spring
Nut
Spnng
Wheel Adiuster Assembly (Right)
Catcher Tube
Catcher Throat
Grassbag
Drweshaft Cover
Nut
CRAFTSMAN
4-CYCLE
MODEL NUMBER
ENGINE
12
240
4O
42
251
25fA
75
42
143.996700
CRAFTSMAN
KEY
NO.
PART
NO.
1
36177
2
6
9
10
11
12
12C
14
15
16
17
18
19
20
25
27652
36059
590568
36002
36003A
32447
36005A
28277
36006
36008
31335
651018
36103
36010
37149
26
30
40
650802
36185
40004
40005
36070
41
36071
42
43
45
40006
40007
20381
36023A
46
48
50
52
69
70
3261OA
36030
36031A
29914
36032A
37271
75
80
81
82
83
85
86
89
90
91
92
93
100
101
103
36010
30574A
30590A
30591
36057
36034
650924
611154
611155
611156
650815
650816
34443B
610118
651007
110
119
120
125
36054
36061
36187
36471
36472
29314C
29315C
6021A
35395
31672
126
130
135
150
4-CYCLE
ENGINE
DESCRIPTION
Cylinder
(Incl 2,10.12,20 & 125)
Dowel Pin
Breather Etement
Screw, 10-24 x 3/4"
Breather Valve Body
Check Valve
Breather Tube
• Breather Cover & Gasket
Flat Washer
Governor Rod (Machined)
Governor Lever
Governor Lever Clamp
Screw, Torx T-15, 8-32 x 19/64"
Governor Spring
Oil Seal
Blower Housing Baffle
Ass'y (Inc1195)
Screw, 1/4-20 x 5/8"
Crankshaft
Piston,Pin,Ring
Set (Std.)
Piston,Pin,Ring
Set (010 OS)
Piston & Pin Ass'y (Std)
(tncl 43)
Piston & Pin Ass'y
(.O10 OS)(Incl43)
Ring Set (Std.)
Ring Set (010 OS)
Piston Pin Retaining Ring
Connecting Rod Ass'y
(Incl 46)
Connecting Rod Bolt
Valve Lifter
Camshaft (MCR)
Oil Pump Ass'y
• Mounting Flange Gasket
Mounting Flange
(Incl. 72 thru 85)
Oil Seal
Governor Shaft
Washer
Governor Gear Assay (Inc181)
Governor Spool
Idler Gear
Screw, 1/4-20 x 1-9/16"
Flywheel Key
Flywheel
Flywheel Fan
BeHeville Washer
Flywheel Nut
Solid State Ignition
Spark Plug Cover
Screw, Torx T-15,
10-24 x 15/16"
Ground Wire
• Cylinder Head Gasket
Cylinder Head
Exhaust Valve (Std.)(IncL 151 )
Exhaust Valve (1/32" OS)
Intake Valve (Std.) (Incl 151)
Intake Valve (I/32" OS)
Screw, 5/16-18 x !-1/2"
Resistor Spark Plug (RJ19LM)
Valve Spring
MODEL NUMBER
KEY
NO
PART
NO
151
151A
159
172
174
177
184
186
187A
190
191A
192
193
194
195
198
199
239
31673
40016A
27234A
32755
30200
650925A
36183
36009
37148
36013
36012
36016
36015
36014
610973
36017
36018
36048
240
36190
243B
245
250
251
25tA
255
256
260
261
263A
275
276
277
285
287
290
292
300
301
305
307
308
310
346A
347
350
370A
370C
380
390
400
651041
36046
36191
650928
650933
36193
650983
36188
650737
36192
36107
36043
650927
34449A
650926
29774
26460
36189
36246
36063
35499
36040
36064
28763
650898A
36045A
36261
37199
640020A
590739
36062D
416
36085
417
900
650821
900
143,996700
DESCRIPTION
Lower Valve Spring Cap
Intake Valve Seal
• Valve Spring Box Gasket
Valve Spring Box Cover
Screw, 10-24 x 9/16"
Carburetor Mounting Stud
Carburetor Gasket
Governor Link
Air Baffle
Brake Lever Ass'y
Brake Control Lever
Brake Control Lever Link
Brake Spring
Retaining Ring
Terminal Ass'y
Brake Control Lever Spring
Brake Lever Bushing
• Carburetor To Air Cleaner
Gasket
Air Cleaner Body
(include 239 & 350)
Air Cleaner Stud
Air Cleaner Filter
Air Cleaner Cover
Lock Nut 1/4-20
Wing Nut, 1/4-20
Control Plate
Screw, 8-32 x 17/32"
Blower Housing
Screw, 1/4-20 xl/2"
Stader Grill
Muffler
Locking Plate
Screw, 5/16-18x2-11/32"
Starter Cup
Screw, 8-32 x 21/64"
Fuel Line
Fuel Line Clamp
Fuel Tank (Include 301)
Fuel Cap
Oil Fill Tube
"O" Ring
Fill Tube Clip
Dipstick
Screw, 10-32 x35/64"
Screw, 10-32 x27/64"
Primer
Lubrication Decal
Primer Decal
Carburetor (Inc1184&239)
Rewind Starter
Gasket Set
(Incl Items Marked ° )
Spark Arrestor Kit (Incl. 417)
(Optional)
Screw, 10-32 x 1/2' (Optional)
Replacement Engine 750819B,
order from 71-999
Replacement S/B 750797B,
order from 71-999
RPM High 2900 to 3200
NOTE: This engine could have been built with 590702
starter
NOTE: All component
1 inch =25 4 mm
43
dimensions
given in U S inches
CRAFTSMAN
4-CYCLE ENGINE
MOD,EL ,NUMBER
KEY
NOo
PART
NO.
DESCRIP'flON
1
5
6
7
14A
25
27
28
29
3O
32
33
36
37
37A
38
38A
39
40
47
640020A
632539
632593
632541
650500
632773
632675A
632544
632543
632548
632709
632672
632673
640022
6,32547
632547
632545
632545
632549
640021
632554
Carburetor
Tilrottle Shaft & Lever Assembly
Dust Seal
Throttle Shutter
Throttle Shutter Screw
Venturi
Float Bowl
Float Shaft
Ftoat
Float Bowl to Body Gasket
Inlet Needle & Seat
Sow/Drain Screw
Bawt Drain Washer
Main Nozzle Tube
"O" Ring
"(3" Ring, Main Nozzle Tube
Spring, Main Nozzle Tube
Spring
Float Bowl Retainer
Main Fuel Jet
Welch Plug, Idle Mixing Well
44
143.996700
CRAFTSMAN
4-CYCLE
ENGINE
MODEL NUMBER
13
--8
45
143.996700
KEY
NO,,
PART
NO.
1
2
3
4
5
6
7
8
590702
590599A
590600
590696
590601
590697
590698
590699
690700
11
590703
12
590535
13
590701
Recoil Starter
Spring Pin (Incl 4)
Washer
Retainer
Washer
Brake Spring
Starter Dog
Dog Spring
Pu[ley & Rewind Spring
Ass'y
Starter Housing Ass'y
(40 degree
grommet)
Starter Rope
( 98" X 9/64" din )
Starter Handte
KEY
NO.,
PART
NO.
DESCRIPTION
3
6
7
8
590739
590740
590616
590617
590618A
11
590638
12
590535
13
14
590701
590760
DESCRIPTION
Rewind Starter
Retainer
Starter Dog
Dog Spring
Pulley & Rewind Spring
Ass'y
Starter Housing Ass'y
(40 degree grommet)
Starter Rope (Length 98"
x 9/64" dia,)
Stader Handle
Spring Clip
46
47
Forthe repairor replacementpartsyou need
delivereddirectlyto your home
Call 7 arn - 7 pro, 7 days a week
1-800-366-PART
(1-800-366-7278)
Para ordenar piezas con entrega
domicilio
- 1-800-659-7084
a
For in-house major brand repair service
Call 24 hours a day, 7 days a week
1-800-4-REPAIR
(1-800-473_7274)
Para pedJr servicio de reparaci6n
domicilio - 1-800-676-5811
For the location
a
of a Sears Parts and
Repair Center in your area
Call 24 hours a day, 7 days a week
1-800-488-1222
J
For information on purchasing a Sears
Maintenance Agreement or to inquire
about an existing Agreement
Call 9 am - 5 pm, Monday-Saturday
1-800-827-6655
When requesting service or ordering
parts, always provide the following
information:
= Product Type
o Model Number
= Part Number
• Part Description
America s Repair Specialists
166735
REV.1
12.17.98
VB
Printed
in U.S,Ao