1
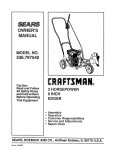
Owner's
Ma_nual
CRnFTSMRHo
6.75 HORSEPOWER
21" REAR DISCHARGE
POWER PROPELLED
ROTARY LAWN MOWER
Model No.
917.377610
e
o
,,
®
e
Safety
Assembly
Operation
Maintenance
EspaSoi
Repair Parts
CAUTION:
Read and follow
all
Safety Rules and Instructions
before operating this equipment
Sears,
Roebuck
and Co,, Hoffman
Estates,
IL 60179
Warranty
Safety Rules
Assembly
Operation
Maintenance
Schedule
Maintenance
LIMITED
TWO
YEAR WARRANT(
2
2
4
6
10
10
Product Specifications
Service and Adjustments
Storage
Troubleshooting
Repair Parts
Parts Ordering
ON CRAFTSMAN
POWER
11
14
14
16
34
Back Cover
MOWER
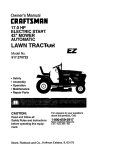
For two years from date of purchase, when this Craftsman Lawn Mower is maintained,
lubricated, and tuned up according to the operating and maintenance
instructions
in the
owner's manual, Sears will repair free of charge any defect in material or workmanship.
If this Craftsman Lawn Mower is used for commercial
or rental purposes, this warranty
applies for only 90 days from the date of purchaser
This Warranty does not cover:
• Expendable
items which become worn during normal use, such as rotary mower
blades, blade adapters, belts, air cleaners and spark plug,
• Repairs necessary because of operator abuse or negligence,
including bent crankshafts and the failure to maintain the equipment according to the instructions contained in the owner's manual.
Warranty service is available by returning the Craftsman power mower to the nearest
Sears Service CentedDepartment
in the United States. This warranty applies only while
this product is in use in the United States.
This Warranty gives you specific legal rights, and you may also have other rights which
vary from state to state.
SEARS, ROEBUCKAND
CO_, D/817 WA, HOFFMAN
ESTATES, ILLINOIS
60179
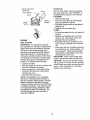
TRAINING:
Read this operator's manual carefully.
Become familiar with the controls and
know how to operate your mower properly. Learn how to quickly stop mower.
• Do not allow children to use your mower.
Never allow adults to use mower without
proper instructions.
o Keep the area of operation clear of all
persons, especially small children and
pets.
, Use mower only as the manufacturer
intended and as described in this manual.
, Do not operate mower if it has been
dropped or damaged in any manner_
Always have damage repaired before
using your mower.
, Do not use accessory attachments that
are not recommended by the manufac-
turer. Use of such attachments
may be
hazardous.
- The blade tums when the engine is running.
PREPARATION;
. Always thoroughly check the area to be
mowed and clear it of all stones, sticks,
wires, bones, and other foreign objects,
These objects will be thrown by the
blade and can cause severe injury.
- Always wear safety glasses or eye
shields when starting and while using
your mower,
° Dress properly. Do not operate mower
when barefoot or wearing open sandals.
Wear only solid shoes with good traction
when mowing.
° Check fuel tank before starting engine.
Do not fill gas tank indoors, when the
engine is running or when the engine is
hot.Allow the engineto coolfor several
minutesbeforeiillingthe gas tank.Clean
off any spilledgasoline beforestarting
the engine.
, Alwaysmakewheelheightadjustments
beforestartingyour mower.Never
attemptto do this whilethe engineis running.
• Mow onlyin daylightor good artificial
light.
OPERATION:
° Keepyour eyesand mindon your mower
and the area beingcut. Do not let other
interestsdistractyou.
° Donot mow wet or slipperygrass. Never
runwhile operatingyour mower.Always
be Sureof your footing-- keepa firm
hold on the handlesand walk.
o Do not put hands or feet nearor under
rotatingparts.Keepclearof the dis..
charge openingat alltimes.
° Alwaysstop the enginewheneveryou
leaveor are not.using your mower,or
beforecrossingdriveways,walks,roads,
and any gravel--coveredareas.
• Neverdirectdischargeof materialtoward
bystandersnor allowanyonenearthe
mowerwhileyou areoperatingit.
, Beforecleaning,inspecting,or repairing
your mower,stop the engineand make
absolutelysurethe bladeand all moving
paris havestopped.Thendisconnectthe
sparkplug wire andkeepit awayfrom
the spark plug to preventaccidental
starting.
- Do not continueto runyour mowerif you
hit a foreignobject.Followthe procedure
outlinedabove,then repairany damage
beforerestartingand operatingyou
mower.
- Do not changethe governorsettingsor
overspeedthe engine.Enginedamage
or personalinjury mayresult.
o Do not operateyour mowerif it vibrates
abnomlally.Excessivevibrationis an indicationof damage; stop the engine ,
• Never cutgrass
by pulling the mower
towards you. Mow across:the face of
slopes, never up and down or you might
lose your footing. Do not mow excessive:
ty steep slopes. Use caution when operating the mower on uneven terrain or
when changing directions ---maintain
good footing.
o Never operate your mower without proper guards, plates, grass catcher or other
safety devices in place,
MAINTENANCE
AND
STORAGE=
° Check the blade and the engine mounting bolts often to be Sure they are tight.ened properly.
- Check all bolts; nuts and screws at frequent intervals for proper tightness to be
sure mower is in safe working condition.
• Keep all safety devices in place and
working.
° 'To reduce fire hazard,keep
the engine
free of grass, leaves or excessive grease
and oil
• Check grass catcher often for deterioration and wear and replace worn bags.
Use only replacement bags that are recommended by and comply with specifications of the manufacturer
of your mower.
° Always keep a sharp blade on your
mower.
° Allow engine to Cool before storing in any
enclosure.
° Never store mower with fuel in the tank
inside a building where fumes may reach
an open flame or an ignition source such
as a hot water heater, space heater,
clothes dryer, etc.
CAUTION:
Always disconnect
spark plug
wire and place wire where it cannot contact spark plug in order to prevent accidental starting when setting up, transporting, adjusting or making repairs.
WARNING
The engine exhaust from this product con..
tains chemicals known to the State of California to cause cancer, birth defects, or
other reproductive harm.
safely check for the cause of vibration
and repair as required.
° Do not run the engine indoors. Exhaust
fumes are dangerous.
3
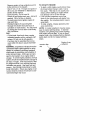
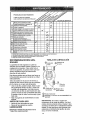
These accessories were available when this lawn mower was pr Fuced They are also
available at most Searsretail
outlets and service centers. Most Sears stores can also
order repair parts for you, when you provide the model number e{ your Iawn mower
Some
of these accessories may not apply to your lawn mower
LAWN MOWER PERFORMANCE
CLIPPING DEFLECTOR
FOR REAR DISCHARGE LAWN MOWERS
MULCRER KITS
STAE
,,,
GAS CANS
,,l_, ,ll_ ,i i_1 i LII, .............
MOWER
R
/,,
GRASS CATCHERS
FOR
SIDE DISCHARGE
LAWN MOWERS
FOR
REAR DISCHARGE
GRASS
LAWN CATCHERS
MOWERS
LAWN
,
MAINTENANCE
MUFFLERS
AIR FILTERS
SPARK PLUGS
ENGINE OIL
Read these instructions and this manual
in
die and padding holding operator presence control bar to upper handle.
, Roll tawn mower out of carton and
its entirety before you attempt to assemble
or operate your new lawn mower. Your
new lawn mower has been assembled at
check carton thoroughly
loose parts.
the factory with the exception of those
parts left unassembled
for shipping purposes. To ensure safe and proper operation of your lawn mower, all parts and
hardware you assemble must be tightened
securely.
Use the correct tools as necessary to ensure proper tightness.
Atl parts
such as nuts, washers, bolts, etc., necessary to complete the assembly
placed in the parts bag.
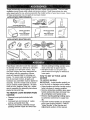
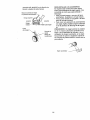
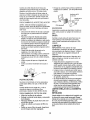
HOW TO SET
MOWER
TO UNFOLD
UP YOUR
for additional
LAWN
HANDLE
IMPORTANT:
Unfold handle carefully so
as not to pinch or damage control cables.
o Raise handles until lower handle section
locks into place in mowing position,
° Remove protective padding, raise upper
handle section into place on lower handle and tighten both handle knobs.
have been
TO REMOVE LAWN MOWER FROM
CARTON
° Remove handle padding holding operator presence control bar to upper ham
die.
= Remove loose parts included with
mower.
° Cut down two end comers of carton
° Your lawn mower handle can be adjusted for your mowing comfort.
Refer to
"Adjust Handle" in the Service and
Adjustments
section of this manual.
and lay end panel down flat.
,, Remove all packing materials except
Padding between upper and lower han4
Operator presence
control bar
"_
Upper handle "'_,_
=.°,
Lower
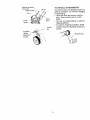
TO INSTALL
Lilt up
'four lawn mower was shipped ready to b_
used as a mulcher. To convert to bagging
F)
_L_. :_._"
".-_',_,,j"
,sition
handle ._
Handle
pin
3-position
Handle
adjustment
bracket
/
A'[-rACHMENTS
or discharging:
• Open rear door and remove mulcher
ptug, Store mulcher plug in a safe
place.
• You can now install catcher or optional
clipping deflector.
• To return to mulching operation, install
mulcher plug into discharge opening of
mower,
Mulcher Plug
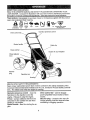
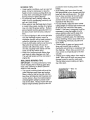
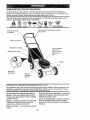
KNOW YOUR LAWN MOWER
READ "]'HIS OWNER'S MANUAL AND SAFETY RULES
BEFORE OPERATING
YOUR
LAWN MOWER. Compare the illustrations with your lawn mower to familiarize yourself with
the location of various controls and adjustments.
Save this manual for future reference.
I1[11111
_
..............
I
MUl
i,, ,i,
These symbols
may appear on your lawn mower or in literature supplied
Learn and understand their meaning.
CAU"NON
OR WARNING
ENGINE
ON
ENGINE
OFF
__._L..L
FAST
LUU J[J"2_ _'J".............
SLOW
I
FUEt
CHOKE
,
i
, ...n
OIL
with the product.
DANGER, KEEP HANDS
AND FEET AWAY
=
..
Operator presence control
DI
Starter handle
Cabte clip
Grass catcher
oil cap wldlpstick
Wheel adjuster
]ever
Primel
Mutcher
plug
_.
Gasoline cap
II ....
IlIII
....
IJ
LLJ_UII/J/
II
I
i_lii
pllI
I I I
I IIIIIIRIIF
MEETS CPSC SAFETY REQUIREMENTS
Sears rotary walk-behind
power lawn mowers conform to the safety standards
American National Standards
Institute and the U.S. Consumer Product Safety
sion. The blade turns when the engine is running.
p
of the
Commis-
Drive control bar - used to engage
power-propelled foward motion of lawn
mower.
Mulcher plug - Located at the rear discharge opening must be removed when
converting to bagging operation.
Operator presence control - must be
held down to the handle to start the
engine. Release to stop the engine.
Primer - pumps additional fuel from the
carburetor to the cylinder for use when
starting a cold engine.
Starter handle - used for starting the engine.
6
i
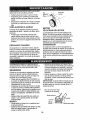
]'he operation of any lawn mower can
result in foreign objects thrown into the
eyes, which can result in severe eye damage_ Always wear safety glasses or eye
shields while operating your lawn mower or
performing any adjustments or repairs. We
recommend a wide vision safety mask over
the spectacles or standard safety glasses.
Operator presence
HOW TO USE YOUR LAWN MOWER
TO ATTACH
ENGINE
° Lift the rear door of the lawn mower
control bar I
SPEED
or propped
desengaged
and
open.
Rear door
Your lawn mower is equipped with an
operator presence control bar which
requires the operator to be positioned
behind the lawn mower handle to start
Grass
"catcher
handle
Catchei" frame hook
and operate the lawn mower.
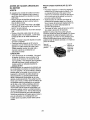
TO ADJUST CUTTING HEIGHT
TO EMPTY GRASS
by a single
CATCHER
° Lift up on grass catcher using the frame
handle.
• Pull adjuster lever toward wheel. To raise
mower, move lever forward to desired
position, ]b lower mower, move the lever
toward the rear.
Wheel Adjuster
Lever
GRASS
Drivecontrol
• The grass catcher is secured to the lawn
mower housing when the rear door is
lowered onto the grass catcher frame.
CAUTION:
Do not run your lawn [newer
without clipping deflector or approved grass
catcher in place. Never attempt to operate
the lawn mower with the rear door removed
contact injury. Do not under any circumstances attempt to defeat the function of the
operator control. The blade turns when the
engine is running
All four wheels are adjusted
lever.
\\
CATCHER
place the grass catcher frame hooks into
the slots of the rear door.
CAUTION:
Federal r#gu ations require an
engine control to be installed on this lawn
mower in order to minimize the nsk of blade
,
trol bar
"_
The engine speed was set at the factory for
optimum performance,
Speed is not adjustable_
ENGINE ZONE CONTROL
-
Drive con-
,
Remove grass catcher with clippings
from under lawn mower handle.
,
Empty clippings from bag using both
frame handle and bag handle.
NOTE: Do not drag the bag when emptying; it will cause unnecessary wear.
Lower Wheels
for high cut
Raise Wheels for
low cut
TO OPERATE DRIVE SYSTEM
o To start forward motion, lift drive control
,
bar up to handle.
To stop forward motion,
control bar°
BEFORE
OIL
release drive
STARTING
ENGINE
Your lawn mower is shipped without oil in
the engine.
° Be sure mower is level and area around
oil fill is clean.
IMPORTANT:
Always keep drive control
bar fully engaged against handle when in
use,
7
Remove engine oil cap w/dipstick and fill
to the full line on the dipstick.
Use 27 ozs. of oil. For type and grade of
oil to use, see "ENGINE" in Maintenance
section of this manual.
Pour oil slowly. Do not over fill.
Check oil level before each use. Add oil if
needed.
Fill to full line on dipstick,
To read proper level, tighten engine oil
cap each time,
Reinstall engine oi! cap and tighten,
Change the oi! after every 25 hours of
operation or each season. You may need
to change the oil more often under dusty,
dirty conditions.
3AS
, Fill fuel tank. Use fresh, clean, regular
unleaded gasoline with a minimum of 87
octane. Do not mix oil with gasoline,
Purchase fuel in quantities that can be
used within 30 days to assure fuel freshBess.
AtARNING:
Experience indicates that alcohol blended fuels (called gasohol or using
_thanot or methanol) can attract moisture
t_hich leads to separation and formation of
_,cids during storage. Acidic gas can dam..
_ge the fuel system of an engine while in
storage. To avoid engine problems, lhe fuel
_ystem should be emptied before storage of
30 days or longer. Drain the fuel tank, start
the engine and let it run until fuel lines and
carburetor are empty. Use fresh fuel next
season. See Storage Instructions for addi,tionat information.
Never use engine or carburetor cleaner products in fuel tank or per-,
manent damage may occur.
TO START
ENGINE
o
To start a cold engine, push primer three
(3) times before trying to start, Use a
firm push, This step is not usually necessary wllen starting an engine which
has already run for a few minutes.
Hold operator presence control bar
down to the handle and pull starter hart..
die quickly.
Do not allow starter rope to
snap back.
• To stop engine, release operator presence control bar.
NOTE:
In cooler weather it may be necessary to repeat priming steps. In warmer
weather over priming may cause flooding
and engine will not start, tf you do flood
engine, wait a few minutes before attempting to start and do not repeat priming
steps.
Engine oil cap
Gasoline filler
cap
8
//w/dipstick
.i/
providethe best recuttingactionof the
MOWING TIPS
blades°
• Undercertainconditions,suchas very tall
o
Avoidcuttingyour lawnwhenit is wet
g_ass,it maybe necessaryto raisethe
Wetgrasstendsto formclumpsandinterheightof cutto reducepushingeffortand
fereswith the mutch!ng action,, 3"he best
_tokeepfrom_verloadingthe engineand
time to mow your lawn is the early after.,
leavingclumpsof grass€lipp!ngs°
noon. At this time the grass has dried
• :Forextremelyheavycutting,reducethe
and
the newly cut area will not be
widthof cut by overlappingpreviouslycut
exposed
to the direct Sun,
path and mowslowly_
• For best results, adjust the lawn i_ower
• Whenusinga reardischargelawnmower
cutting: height so that the lawn mower cuts
in moist,heavYgrass,clumpsof cut grass
off only the top one-third of the grass
may not enterthe grasscatcher. Reduce
blades_ flf the lawn is overgrown it will be
ground speed(pushingspeed)and!orrun
necessary to raise the height Of cut to ,_
,thelawnmoweroverthe areaa second
reduce pushing effort and to keep fro m
time.
overloading the engine and leaving
o If a trailof clippingsis lefton the rightside
clumps of mulched grass. For extremely
of a reardischargemower,mowin a
heavy mulching, reduce your width of cut
clockwisedirectionwith a Smalloverlapto
by overlapping previously cut path and
collectthe clippingson the_next pass.
mow slowly.,
o Poresin clothgrasscatcherscanbecome
o Certain types of grass and grass condifilledwith dirt anddustwith useand
tions may require that an area be
catcherswill collectlessgrass, Topremulched a second time to completely hid_
vent this,regularlyhosecatcheroff with
the clippings. When doing a second cut,
waterandlet dry beforeusing.
mow across or perpendicular
to the first
• Keeptop of enginearoundstarterclear
cut
path,
andcleanof grassclippingsandchaff.
o Change your cutting pattern from week to
This willhelp engineair flow andextend
week. Mow north to south one week then
enginelife.
change to east to west the next week.
MULCHING MOWING TIPS
This will help prevent matting and grainIMPORTANT:Forbest performance,keep
ing of the lawn.
mowerhousingfree of built-upgrassand
trash.See"Cleaning"in MAINTENANCE
sectionofthis manual
113
• The specialmulchingbladewill recutthe
grassclippingsmanytimes and reduce
them in sizeso thatas they fallontothe
lawnthey will disperseinto the grassand
not be noticed,Also,the mulchedgrass
will biodegradequicklyto providenutrientsforthe lawn. Alwaysmulchwith your
highestengine(blade)speed as this will
MAINTENANCE
SCHEDULE
FILL IN DATES
AS YOU COMPLETE
REGULAR SERVICE
SERVICE DATES
Check for Loose Fasteners
Clean/Inspect Grass Catcher
(fl Equipped)
v"
v'
v'
Clean Lawn Mower
O Clean Under Drive Cover
_r i.(Power-.Pr£pelled Mowers}
Check drive bG1UpuiTeys
E ..(.Power-PropelledMowers)
R i Check/Sharper-,/RepiaceB!ade...................
LubricationChart
v'
v'3
L
v'
Clean BatterylRecharge
•
(Electric Start Mowers)
11111
J
I
II
L_
v'
v'
iJ.
i
v'
E Check Engtne Oil Level
Change Engine oi!
G clean Air Filter
.......
I Inspect Muffler
N ;Clean or Replace Spark Plug
N
E Replace Air Filter Paper Cartridge
I
2
3
4
V'
.
,
1t/'2
e
z
t
- Change more allen when op_raling under e heavy load or{n high _mbiont lemp_re_ures,
-Setvtco more oltBn when oporel]ng In didy or dugty com:lltlons
- Replace bJ[td_smore alton when mow;ng tn sa.n6y soil
- Char£e 48 hou_ al end o! season,
LUBRICATION
IENERAL RECOMMENDATIONS
Wheel
adjuster
he warranty on this lawn mower does not
over items that have been subjected to
perator abuse or negligence.
To receive
Jll value from the warranty, operator must
_aintain mower as instructed in this manuI.
;ome adjustments will need to be made
eriodically to properly maintain your unit.
II adjustments in the Service and Adiusttents section of this manual should be
becked at least once each season,
Once a year, replace the spark plug,
replace air filter element and check blade
for wear. A new spark plug and
clean/new air fitter element assures proper ai[4uel mixture and helps your engine
run better and last longer.
Follow the maintenance schedule in this
manual.
EFORE EACH USE
Check engine oil level.
Check for loose fasteners.
UBRICATION
eep unit well lubricated
ION CHART"),
(See "LUBRICA-
CHART
(_) Engine oil
(_
Drive pins
(_
Spray lubricant
(_
Refer to MAINTENANCE
"ENGINE" soctlon,
Rear
door
hinge
IMPORTANT: Do not oil or grease plastic
wheel bearings. Viscous lubricants will attract
dust and dirt that will shorten the life of the
self lubricating bearings. If you feel they must
be lubricated, use only a dry, powdered
graphite type lubricant sparingly°
10
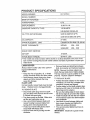
PRODUCT SPECIFICATIONS
MODEL
NUMBER
917.3776t0
;ER1AL NUMBER
DATE OF PURCHASE
HORSEPOWER:
6.75
DISPLACEMENT:
12.56 CUo IN.
GASOLINE
'1.5 QUARTS
CAPACITY/TYPE:
UNLEADED
OIL TYPE
SAE 30 (ABOVE
(API-SF/SG/SH):
SAE 5W-30
OIL CAPACITY:
SPARK
PLUG(GAP:
VALVE
CLEARANCE:
SOLID
REGULAR
32°F)
(BELOW
32°F)
27 OZS+
+030")
CHAMPION
RJ19LM
OR J19LM
INTAKE:
+004- ,008
EXHAUST:.
.004 + .008
STATE IGNITION
AIR GAP:
+0125 IN+
"B-_DE
35-40 FT. LBSo
BOLT TORQUE:
° The model and serial numbers wiil be found on a decal attached to the rear of the
lawn mower housing+Record
both serial number and date of purchase in space provided above+
LAWN
MOWER"
Always observe safety rules when performing any maintenance.
TIRES
• Keep tires free of gasoline, oil, or insect
control chemicals which can harm rubber+
• Avoid stumps, stones, deep ruts, sharp
objects and other hazards that may
cause tire damage.
BLADE CARE
For best results, mower
sharp.
blade must be kept
Replace bent or damaged
TO. REMOVE
blades.
BLADE
• Disconnect spark plug wire from spark
plug and place wire where it cannot come
in contact with spark plug.
• Turn lawn mower on its side+ Make sure
air filter and carburetor are up,
• Use a wood block between blade and
mower housing to prevent blade from
turning when removing blade bolt.
° Protect your hands with gloves and/or
wrap blade with heavy cloth.
• Remove blade bolt by turning counterclockwise+
'_'......
• Remove blade and attaching hardware
(bolt, lock washer and hardened washer).
NOTE: Remove the blade adapter and
check the key inside hub of blade adapter,
The key must be in good condition to work
properly. Replace adapter if damaged.
TO REPLACE
BLADE
• Position the blade adapter on the engine
crankshaft.
Be sure key in adapter and
crankshaft
keyway are aligned+
. Position blade on the blade adapter aligning the two (2) holes in the blade with the
raised lugs on the adapter.
• Be sure the trailing edge of blade (opposite sharp edge) is up toward the engine.
• Install the blade bolt with the lock washer
and hardened washer into blade adapter
and crankshaft+
• Use block of wood between blade and
lawn mower housing and tighten the
blade bolt, tum!ng clockwise,
o The recommended
tightening torque is
35+40 ft, Ibs+
IMPORTANT:
treated.
Blade bolt is grade 8 heat
NOTE: We do not recommend sharpening
blade +-but if you do, be sure the blade is
balanced+
TO SHARPEN
= Remove any trash or grass cuttings
from inside the dust cover, pinion and/or
drive wheel gear teeth.
° The pinion gear must be installed with
the teft gear on the left side and with the
right gear on the right side, from an
operator's view.
, The pinion gear is stamped with an "L"
(left) or"R" (right) on the inside. If
installed incorrectly, the drive system will
not work+
BLADE
Care should be taken to keep the blade bal+
anced. An unbatanced blade will cause
eventual damage to lawn mower or engine.
• The blade can be sharpened with a file or
on a grinding wheel. Do not attempt to
sharpen while on the mower.
o To check blade balance, drive a nail into a
beam or wall. Leave about one inch of
the straight nail exposed.
Place center
hole of blade over the head of the nail.
- Place wheels back on adjuster axles.
° Replace iocknuts and hubcaps_
If
blade is balanced, !t should remain in a
horizontal position. If either end of the
blade moves downward, sharpen the
heavy end until the blade is balanced.
Blade
Crankadaptor
shaft keyKey
way
NOTE:
Pinions and drive pawls should be
cleaned and lubricated with grease
approximately
every 25 hours or once a
year.
Wash _r
Locknut
Blade
Blade
bolt
E-ring
Lock
washer
Hardened
washer
GRASS
Trailing
edge
Crank,+
shaft
adaptor
CATCHER
° The grass catcher may be hosed with
water, but must be dry when used.
° Check your grass catcher often for damage or deterioration.
Through normal
use it will wear. If catcher needs replacing, replace only with a manufacturer
approved replacement
catcher.
Give
the lawn mower model number when or-
Use only high quality detergent oi! rated with
API service classification SF, SG or SH.
Select the oil's SAE viscosity grade according to your expected operating temperature+
SAE V|SCOS|TY
GRADES
NOTE: Although multi-viscosity oils (5W30,
10W30 etc.) improve starting in cold weather, these multi-viscosity oils will result in
increased oil consumption
when used
above 327F. Check your engine oil level
more frequently to avoid possible engine
damage from running low on oil+
Change the oil after every 25 hours of operation or at least once a year if the lawn
mower is not used for 25 hours in one year.
Check the crankcase oil level before starting
the engine and after each five (5) hours of
dering.
DRIVE WHEELS
Check rear drive wheels each time you
mow to be sure they move freely. The
wheels not turning freely means trash,
grass cuttings, etc., may be inside the
drive wheel :and dust cover area and must
be cleaned out to free drive wheels+
If necessary to clean the drive wheels,
check both rear wheels+
• Remove
° Remove
axles.
ENGINE
LUBRICATION
hubcaps and Iocknuts+
wheels from wheel adjuster
continuous use. Tighten oil plug secure!y
each time you check the oil level.
12
TO CHANGE
ENGINE
MUFFLER
Inspect and replace corroded muffler as it
could create afire hazard and/or damage.
SPARK PLUG
Change your spark plug each year to make
your engine start easier and run better. Set
spark plug gap at ,030 inch.
OIL
NOTE: Before tipping lawn mower to drain
oil, drain fuel tank by running engine until
fuel tank is empty
• Disconnect spark plug wire from spark
plug and place wire where it cannot come
in contact with spark plug.
- Remove engine oil cap; lay aside on a
clean surface.
CLEANING
IMPORTANT:
For best performance, keep
mower housing free of built..up grass and
trash. Clean underside of mower housing
after each use.
CAUTION:
Disconnect spark plug wire
from spark plug and place wire where it
cannot come in contact with the spark plug.
• Turn lawn mower on its side. Make sure
• Tip lawn mower on its side as shown and
drain oil into a suitable container_ Rock
lawn mower back and forth to remove
any oil trapped inside of engine.
o Wipe off any spilled oil on lawn mower
and on side of engine.
• Fill engine with oil
Fill only to the
"FULL" line on the dipstick. DO NOT
OVER FILL.
air filter and carburetor are up. Clean the
underside of your lawn mower by scraping to remove buiid..up of grass and trash
- Clean engine often to keep trash from
accumulating° A clogged engine runs hotter and shortens engine life.
o Keep finished surfaces and wheels free
of all gasoline, oil, etc.
• We do not recommend using a garden
hose to clean lawn mower unless the
° Replace engine oil cap.
- Reconnect spark plug wire to spark plug.
Container
electrical system, muffler, air filter and
carburetor are covered to keep water out
Water in engine can result in shortened
engine life.
AIR FILTER
Your engine will not run properly and may
be damaged by using a dirty air filter.
Replace the air filter every year, more often
if you mow in very dusty, dirty conditions.
Do not wash air filter.
TO CHANGE AIR FILTER
° Loosen cover screw.
• Swing cover down and remove from
hinge.
° Pull paper filter out of air cleaner body.
• Clean air cleaner cover and body.
• Install a new paper filter,
o Reinstall cover to air cleaner body, Be
sure tiinge is assembled properly.
• Swing cover up and tighten cover
screw. (Do not overtighten).
Air filter cover
Hinge
13
;AUTION:
BEFORE PERFORMING
IERVICE OR ADJUSTMENTS:
Release
ANY
Handle pin
High
Med,
Low
control bar.
Make sure the blade and all moving parts
have completely stopped.
Disconnect spark plug wire from spark
plug and place where it cannot come in
contact with plugo
.AWN
CUTI'ING
_ee "TO ADJUST
3e Operation
\
HEIGHT
CUTTING
section
HEIGHT"
ENGINE
ENGINE
in
,\
DEFLECTOR
Your carburetor has a non-adjustable
fixed
main jet for mixture control. If your engine
does not operate properly due to suspected
carburetor problems,
take your lawn mower
to an authorized
service centeridepadment
for repair and adjustment.
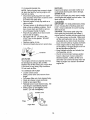
"he handle on your lawn mower has three
3) height positions - adjust to height that
_uits you,
Squeeze the bottom ends of lower handle
towards each other until the pin in handle
can be inserted into one of the three
height adjustment
SPEED
Your engine speed has been factory set.
Do not attempt to increase engine speed or
it may result in personal injury., if you
believe that the engine is running too fast or
too slow, take your lawn mower to an authorized service center/depadment
for repair
and adjustmenL
CARBURETOR
of this manual.
"he rear deflector, attached between the
ear wheels of your lawn mower, is provided
minimize 1he possibility that objects will
Je thrown out the rear of the lawn mower
_to the operator's mowing position. 1fthe
ear deflector becomes damaged, it should
_e replaced°
"O ADJUST HANDLE
holes.
HANDLE
nmediately prepare your lawn mower for
4orage at the end of the season or if the
_nit will not be used for 30 days or more.
.AWN
3-position
Handle adjustment bracket
MOWER
"O ADJUST
{EAR
/
o You can fold your lawn mower handle for
storage.
,, Loosen the two (2) handle knobs on sides
of the upper handle and allow handle to
fold down to the rear.
MOWER
Vhen lawn mower is to be stored for a peri,d of time, clean it thoroughly, remove all
lift, grease, leaves, etc. Store in a clean,
lry area.
Clean entire lawn mower (See "CLEANING" in the Maintenance section of this
,, Squeeze the bottom ends of lower handle
toward each other until pins in handle
clear the brackets and pivot entire handle
assembly forward and allow it to rest on
mower.
• When setting up your handle from the
storage position, the lower handle wilt
require manually locking into the mowing
position.
IMPORTANT:
When folding the handle for
storage or transportation
be sure to fold the
handle as shown or you may damage the
control cables.
manual),
Lubricate as shown in the Maintenance
section of this manual.
Be sure that all nuts, bolts, screws, and
pins are securely fastened.
Inspect
moving parts for damage, breakage and
wear. Replace if necessary.
Touch up all rusted or chipped paint surfaces; sand lightly before painting.
14
Operator presence
control bar
Upper handle
Lift up
Lower
_
ENGINE
::
Drain oil (with engine warm) and repla_ce.
with clean engine oil. (See "ENGINE"
in
the Maintenance section of this manual).
CYLINDER
Lift up
_
OIL _
._
,.zY_
,, Remove sp_,rk plug.
• Pour one ounce (29 ml) of oil through
spark plug hole into cylinder.
° Pull starter handle slowly a few times to
distribute oil.
Mewing
position
handle ------_
° Replace with new spark plug.
OTHER
° Do not store gasoline from one season to
another,
- Replace your gasoline can if your can
starts to rust. ,Rust and/or dirt in your
gasoline will cause problems.
• If possible, store your unit indoors and
cover it to give protection from dust and
dirt.
° Cover your unit with a suitable protective
cover that does not retain moisture.
Do
ENGINE
FUEL SYSTEM
IMPORTANT:
It is important to prevent
gum deposits from forming in essential fuel
system parts such as carburetor, fuel filter,
fuel hose, or tank during storage. Also,
experience indicates that alcohol blended
fuels (called gasohol or using ethanol or
methanol) can attract moisture which leads
to separation and formation of acids during
storage. Acidic gas can damage the fuel
system of an engine while in storage.
• Drain the fuel tank.
not use plastic. Plastic cannot breathe
which allows condensation to form and
will cause your unit to rust.
IMPORTANT:
Never cover mower while
engine and exhaust areas are still warm.
CAUTION:
Never store the lawn mower
with gasoline in the tank inside a building
where fumes may reach an open flame or
spark. Allow the engine to cool before
storing tn any enclosure,
, Start the engine and let it run until the fuel
lines and carburetor are empty_
• Never use engine or carburetor cleaner
products in the fuel tank or permanent
damage may occur..
• Use fresh fuel next season.
NOTE; Fuel stabilizer is an acceptable
alternative in minimizing tile formation of
fuel gum deposits during storage. Add stabilizer to gasoline in fuel tank or storage
container. Always fellow the mix ratio found
on stabilizer container.
Run engine at least
I0 minutes after adding stabilizer to allow
the stabilizer to reach the carburetor° Do
not drain the gas tank and carburetor if
using fuel stabilizer.
15
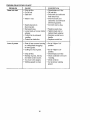
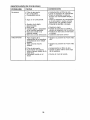
rROUBLESHOOTING
PROBLEM
Does not start
CHART
CAUSE
CORRECTION
• Dirty air filter
= Out of fuelo
° Stale fuel
• Clean/replace
air filter:
o Fill fuel {_ank.
• Drai n tank and refill with
fresh clean fuel.
• Drain fuel tank and
• Water in {ueL
carburetor
and refill tank
with fresh gasoline
° Spark plug wire is
disconnected.
• Connect
- Bad spark plug.
• Loose blade or broken blade
° Replace spark plug.
• Tighten blade bolt or
replace Blade adapter.
adapter.
- Control bar in released
position,
• Control bar defective.
Loss of power
- Rear of lawn mower
- Depress
handle.
wire to plug,
control bar to
- Replace control bar..
housing
or cutting blade dragging
in heavy grass.
,, Set to "Higher Cut"
position_
° Cutting too much grass
• Set to "Higher Cut"
position.
o Dirty air filter.
• Clean/replace
air filter,
- Clean underside of mower
* Buildup of grass, leaves,
and trash under mower.
o Too much oil in engine,
° Walking speed too fast.
16
housing.
o Check oil level.
• Cut at slower walking
speed,
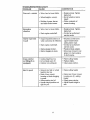
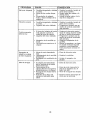
TROUBLESHOOTING
PROBLEM
Poor cut - unevi_n
CHART
._ CAUSE
CORRECTION
, Worn, bent or loose blade.
" Wheel heights
uneven.
• Buildup of grass, leaves
and trash under mower.
' Replace blade. Tighten
blade bolt.
- Set all wheels at same
height
° Clean underside
mower housing.
,, ,,,,,,,,,,,,,,
Excessive
,;
• Replace blade. Tighten
blade b01t.
. Bent engine crankshaft.
• Contact
service
Starter rope hard
,.
* Worn, bent or loose blade.
vibration
to pull
of
an authorized
center.
° Engine flywheel brake is on
when control bar is released.
° Depress control bar to
upper handle before
, Bent engine crankshaft.
pulling starter rope.
* Contact an authorized
service center.
• Blade adapter
• Blade dragging
broken,
in grass.
- Replace blade adapter.
° Move lawn mower to cut
grass or to hard surface
to start engine.
Grass catcher
not filling (if so
° Cutting height too low.
° Lift on blade worn off.
equipped)
o Catcher
Hard to push
, Grass is too high or wheel
height is too low
o Rear of lawn mower
housing
not venting air.
or blade dragging
in grass°
* Grass catcher too fu{L
- Handle height position not
right for you.
, Raise cutting height.
- Replace blade.
° Clean grass catcher.
• Raise cutting height.
° Raise rear of lawn mower
housing
higher.
one (I)
setting
° Empty grass catcher.
, Adjust handle height to
SUrf.
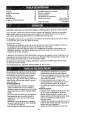
_arantfa
leglas de Seguddacl
_ontaje
)peracl6n
fJantenimiento
'rograma de Mantenimiento
18
18
20
22
26
26
Especificaciones de! Producto
Servicio y Adjustes
Almacenamiento
Identificaci6n de problemas
Pades de repueslo
Orden de Pades
_ARANT[A
LIMITADA
DE DOS AltOS
PARA LA SEGADORA
A MOTOR
27
30
30
32
Vea el manual
tngl_s del dueSo
Contratapa
CRAFTSMAN
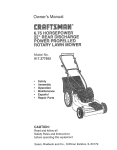
'or dos (2) afios, a partir de la fecha de compra, cuando esta Segadora Craftsman se mantenga,
Jbrlque y aline seg0n las inslrucciones para la operaci6n y e! mantenimiento en el manual del
ue_,o, Sears reparar& gratis todo defecto en el material y la mano de obra.
_ila Segadora Craftsman se usa para fines comerctaEes o de arriendo, esta garantfa s61ose apltca
or noventa (90) d,_asa partir de la fecha de compra.
!sta Garantia no cubre:
Artfculos qua se desgastan durante el uso normal tales como las cuchillas segadoras rotatorlas,
ios adaptadores de la cuchtlla, las correas, los filtros de aire y las bujfas.
Reparaciones necesarias deb{do al abuso o aia negltgencia del operador, incluy#ndose a los
cig_efiaJes doblados y ala falta de mantenlmiento del equipo segt)n las instrucclones que se
incluyen en el manual del duefio.
!L SERVICIO DE GARANT[A ESTA DISPONIBLE at devolver la segadpra a motor Craftsman al cen•o/deparlrnenlo de servicio Sears mas cercano en los Estados Unidos.. Esta garantia se aplica sota _ente mientras el producto este en uso en los Estados Unidos.
ista Garantia le otorga derechos legales especificos, y puede que tambi_n tenga otros derechos
ue varian de estado a estado.
;ears, Roebuck and Co., D/817WA, Hoffman Estates, tL 60179 USA
.os estandares de seguridad exigen la presem
ia del operador del operador en los controles
,era reduclr a un minimo el riesgo de lesion-.
_rseoSu unidad viene equipada con dichos
ontroles. Por nlngun motivo trate de eliminar la
Jncion de los controles que exigen la presenia del operador.
:.NTRENAMIENTO:
Lea este manual del operador cuidadosamente. Familiaricese con los controles y
aprenda a operar su segadora en forma adecuada. Aprenda a parar su segadora r&pida..
manta.
No permita qua los nifios usen su segadora.
Nunca permita qua los adultos operen la
segadora sin contar con las instrucciones
adecuadas.
Mantenga el &rea de operaci6n despejada
de gente, especialmente de niSos pequei_os
y de animates dom_sttcos.
Use la segadora solamente pare los fines
propuestos por el fabricante y seg0n las
explicaciones clescfitas en este manual
* No opera la segadora si so ha cafdo o dafiado en cualqulera form& Siempre repare los
dafios antes de usarla.
No use accesodos que no hayan sido
recomendados pot e! fabricante, El uso de
dlchos accesorios puede set peligroso.
o La cuchilla gira cuando el motor esl_ functonando°
PREPARACt6N:
-
Siempre revise cuidadosamente el &rea que
se va a segar y desp6jela de todas las
piedras, palos, alambres, huesos y otros
objetos extrafios. Estos objetos ser&n lanzados con ta cuchilta y pueden producir
lesiones graves.
° Siempre use anteojos de segurldad o protectotes de ojos cuando arranque y durante el
tiempo qua use la segadora.
, Vistase en forma adecuacla_ No opera la
18
° Nunca corte e| c6sped ttrando la segadora
hacia usted. Slegue a tray, s de ta care de
tas pendientes, nunca hacia arrlba o hacia
abajo pues puede perder et equilibrio, No
siegue pendientes demasiedo empinadas.
Tenge cuidado cuando opere la segedora en
terreno disparejo o cuando cambie de dlrecci6n - mantenga un buen equilibdo.
. Nunca opere ta segadora sin las protecclones adecuadas, las planchas, el recogedor de c_sped y otros d[sposJtivos de seguddad en su lugar.
MANTENtMIENTO
Y ALtVtACENAMIENTO:
segad0ra sin zapatos o con sandaEias ab[ertas. Use'sOlamente zapatos s61idos con
buena trecci6n cuando siegue.
o Revise el estanque de combustible antes de
hacer arrancar el motor. No Ilene el estanque
de gasoline en recintos cerrados, ni cuando
e[ motor est,. funcionando o cuando est&
calienteo Permita que el motor se enfrie per
varios mlnutos antes de Ilenar el estanque
de gasolina. [Jmpie toda la gasolina derramada antes de hacer arrancar el motor.
. Slempre haga los ajustes de attura de las
ruedas antes de hacer arrancar su segadora.
Nunca trate de hacer _sto mientras que el
motor est_ luncfonando.
. Siegue siempre durante et dia o con buena
luz artificial,,
OPERAOION:
.
•
.
-
•
.
•
°
,
•
Mantenga sus ojos y su mente en la segadoray en el _.rea que se estQ cortando, No permira que otros intereses Io distratgan.
No corte c6sped moil, do o resbaloso. Nunce
corra mientras est_ operando su segadora,,
Siempre aseg0rese de mantener el equilibrlo
- mantenga el mango agarrado firmemente y
camlne.
No ponga las manos o los pies cerca o
debajo de las partes rotatoriaso Mant6ngase
a)ejado de la aberture de descarga en todo
momento.
Siempre pare el motor cuando se vaya o
cuando no est6 usando su segadora, o antes
de atravesar las entradas pare autos, los
senderos, caminos y ._reas cublertas de
ripio.
Nunca dirija la descarga del material hacia
los espectadores ni permita a nadie cerca de
la segadora mientras la est_ operando_
Antes de limpiar, tnspeccionar o de reparar la
segadora, pare el motor y est6 completamente seguro de que la cuchilla y que todas
las partes que se mueven se hayan
detenido. Luego, desconecte el alambre de
la bujia y mant6ngafo alejado de _sta pare
evitar el arranque pot accidente,
No contin0e haclendo funcionar su segadora
si le pega a un objeto extrafio, Siga et procedimiento descdto antedormente, luego
repare cualquier daSo antes de volver a
arrancar y de operar su segadora.
No cambie los aj'ustes del regulador o haga
que el motor ande a una velocidad excesiva,
Se pueden producir da_,os en el motor y
lesiones personales,
No opere su segadora si vibra fuera de to
normal, La vibraci6n excesiva es una lndtcaci6n de dafio; pare el motor, revise en
forma segura la causa de la vibraci6n y haga
las reparac|ones segOn sea necesarioo
No haga funclonar el motor en recintos cerrados. Los gases de escape son peligrososo
_Q
o Revise la cuchilla y los pernos de montaJe
del motor a menudo, para asegurarse que
estAn apretados en la forma adecuada.
. Revise todos los pernos, tuercas y torniitos a
intervatos frecuentes, para verifIcar st est&n
apretados en forma adecuada, y asegurarse
que la segadora se encuentra en condF
clones de functonamiento seguro
° Mantenga todos los dispositlvos de segurtdad en su lugar y tistos pare funcionaro
° Pare reducir el peligro de incendio, mantenga el motor sin c_sped, hojas y grasa o
acelte en exceso,
. Revise el recogedor de c_sped a menudo
pare verificar si hay detedoro y desgaste y
cambie las bolsas desgastadas. Use solamente las bolsas de repuesto recomendadas
pot el fabricante de su segedoza o que
cumpten con las especificaciones de _ste.
. Siempre mantenga una cuchilla al]lada en su
segadora,
• Siempre permtta que el motor se enfrfe antes
de guardarla en cualquier recinto cerradoo
• Nunca guarde la segadora con combustible
en el estanque dentro de un edificto en
donde los gases pueden alcanzar una llama
expuesta o una fuente de ignicidn, tel como
el calentador de ague, la estufa de calefacci6n, la secadora de rope, etc..
Busque este sfmbolo que sefiala las precau-,
ciones de seguridad de impor-tancia_ Quiere
decir - i t IATENGI6NHI li _ESTE ALERTOII! SU
SEGURIDAD ESTA COMPROMETIDA
PRECAUClL%N: Siempre desconecte et alambre de la buj[a y p6ngalo donde no pueda
entrar en contacto con la bujla, para evitar el
arranque por eccidente, durante la preparackSn,
el transporte, el ajuste o cuando se hacen
reparacIones.
PRECAUCl6N: Es conocido por el Estado de
California que los gases de escape del motor
de este productor contienen qufmtcos to.s
cuales a ciertos niveles, pueden ocaslonar,.
c_ncer, defectos de nacimiento, y otros daRos
alsistema reproductivo.,
Estosaccesorios
estabandisponlbles
cuandoseprodujolasegadora.
Tambi6n
est&ndisponibles
en
la mayorfa
delastiendasdeSearsyen loscentrosdeservicio.
Lamayori'a
delastiendasSears
lambi_n pueden mender a pedir partes de repuesto para usted, si les proporciona el n0mero del
modelo de su segador& Algunos de eslos accesodos tel vez no se apliquen a su segadora
RENDIMtENTO
DE LA SEGADORA
J
DESVIADOR DE RECORTES
PARA $EGADORAS CON DESCARGA "J'RASEP,A
JUEGOS
RECOREDOR
PAPA
SEGADORAS
CON DESCARGA
TRASEFIA
MANTENIMIENTO
PARA
LA ACOLCHADORA
PARA
SEGADORAS
CON
DESCARGA
RECOREDOR
I_TERAL
=_
ESTABILIZADORES
ENVASES
DE GASOLINA
DE LA SEGADORA
S_LENCIADORES
FILTROS Dt_ AIRE
..........
_L_
ADAPTADORES
DE CUCHILLA
Lea estas instruccionesy este manual completamente antes de tratar de reenter u oper_ su
segadora nueva. Su segadora nueva ha side
montada en la fdbrica con la excepci6n de aquellas partes que se deiaron sin rnonlar per razones
de env[o. Todas las partes come las tuercas, las
arandetas, los pemos, etco, que son necesadas
pare completar el montaje hart side colocadas en
la bolsa de partes. Pare asegurarse que su
segadora funcione en forma segura y adecuada,
todas las partes y los art_culos de ferreteda que
se monten tieneq que ser apretados seguramente. Use las herramtentas correctas, come
sea necesario, para asegumr que se ap=ieten
adecuadamente.
ACER'E
DEL MOTOR
exige la presencia del operador junto con el
mango superior.
Haga rodar la segadora hacia afuem de la
caja de cartSn y revfsela cuidadosamente pare
veriftcar si todavfa quedan parles sueltas adictonales.
COMe
PREPARAR
SU
SEGADORA
PARA DESDOBLAR
EL MANGO
IMPORTANTE: Despllegue el mango con
mucho cu{dado pare no pellizcar o dar3ar los
cables de control.
* Levante los mangos haste que ta secciSn del
mango inferior se asegure en su lugar, en la
posiciSn para segar.
, Remueva la cuSa protectora, levante la secci6n del mango superior hastasu luger en el
mango inferior, y apriete ambas maniltas del
mango.
- Remueva la cuSa del mango que sujeta la
barra de los control que exige la presenci a del
operador junto con el mango superior.
o E! mango de ta segadora puede ajustarse
segOn le acomode pare segar. Ref_6rase a
PARA REMOVER LA SEGADORA
DE LA CAJA DE CARTON
• Remueva las partes sueltas que se incluyen
con la segadora.
• Corte las dos esquinas de los extremes de la
caja de cartSn y t_nda et panel del extreme
plane.
• Remueva rode el material de empaque, excep10 la cuba entre el mango Superior y _I tnfedor,
yla cuSa que su!el ala, b&rra de Io,_ _contrOl
que
20
"AJUSTE
DELMANGO"e_laSecci6nde
ServIcio
y Ajustesde estemartial,
PARA INSTALAR LOS ACCESORIOS
Su segadora rue env|ada lista para usarse
como una acolchado_'a de capa vegetal. Para
convertirla de modo qua pueda ensacar o
descargar:
* Abra la puerta trase_'a y remueva la tapon
acolchadora. Gu&rdela en un lugar seguro.
. Ahora puede instalar el recogedor o el desvi
ador de recortes opcional.
. Para volver a la operaci6n de acolchamtento
con capa vegetal, instale la tapon acolchado
ra en la abertura de descarga de la segado-
Barra de control que exige
la presencia dot oF
Mango
supedor
._y
Levantar
Levantar
Mango
Inferior
Posii6n para segar
ra.
Pinza
del mango_
PRECAUCi6N:
No haga funclonar su segado
ra sin Ia tapon acoIchadora aprobada en su
lugar, o sin el desviador de recortes, o sin el
recogedor de c6sped, aprobados, en su lugar_
Nunca trate de operar la segadora euando se
ha removido ta pueda trasera o cuando est_i ul
poco abierta.
,
.....
t-
_--__
ajusle
Mango de
3 posiciones
Sopo_e de
Tap6n acolchador
2t
"AMILIARICESE
CON SU SEGADORA
EA ESTE MANUAL DEL DtJENO Y LAS REGLAS DE SEGURIDAD ANTES DE OPERAR SU
;EGADORAo Compare las ilustracfonescon su segadora para famitiartzarse con la ubicac_6n de los
iversos controles y ajusles. Guarde este ma,nual para referencia en olfuture,
istos simbolos pueden apareser sobre su segadora o en la literatura proporcionada
_roducto. Aprenda y comprenda sus slgnificados.
ATTENCI_N O
ADVERTENCtA
MOTOR
ENCENDtDO
MO'fOR
ApAGADO
P._PIO 0
lENTO
E_TRANGU
LACf_)N
COMBUS'TtBLE
AcEn'E
con el
PELIGRO. GUARDE LAS
MANOS Y LOS PiES LEJ08
de control que exige ta presencia
operador
Barra de control de
laImpulsl6n
Cord6n
Recogedor de c6sped
Tapa det deposlto
de aceite del
motor con vadlia
,tndicadora de
nivel
Adjutador de la rueda
Cebador
Caja
Tap6n de la
acotchadora
;UMPLE CON''LOS'
Tapa del
depost{o de
gasolina
RE6dlsrros
DE'SE'e@DAD
DE LA OPSO
as segadoras a motor, que se conducen desde fa parte de arras, rotatorias, Sears, cumplen con los
et&ndares de saguridad del American National Standards Insti_Jte y de la U.S, Consumer Product
!.af_e_h!_
C_o_m_rnissi.0_
n. La cuchifla gira cuando el motor est& funcionand.o.
larra de control que exlge la presencia del
,perader- tiene que sujetarse abajo, junto con
,Imango, para hacer armncar el motor. Su61teia
era parar el motor.
;ebador - bombea combustible adiclonat desde
I carburador al cilindro para use cuando se
ecesita hacer arrancar un motor fifo°
Barra de control de la impulsion - se usa para
enganchar la segadora para movimiento hacia
adelante impulsada a motor,
Tapon de la acoichadora - situada en la abertu..
ra de la descarga trasera y debe ser quitada
cuando se convierte la opracci6n de ensacado a
descarga,
;order arrancador - se usa para hacer errancar
,I motor.
22
La operaci6n de cualquier segadora puede
hacer que salten objetos exlra_os dentro de
sus ojos, Io que poede produc{r dafios graves
en _stos. Siempre use anteojos de seguridad o
protecci6n para los ojos mientras opere su
segadora o cuando haga ajustes o reparaciones Recomendamos una mascara de
seguridad de visi6n amplia, pare use espejuelos
o anteojos de seguridad estandarte..
come USAR SU SEGADORA
CONTROL DE LA VELOClDAD DEL MOTOR
La velocidad del motor se estableci6 en la f&brica
para un rendimlento 6p_mo. La velocidad no
se puede ajustar,
CONTROL DE ZONA DEL MOTOR
PRECAUCi6N; Las regulaciones federales exigen que se Instale un control pare el motor en
esta segadora para reduclr a un mfnimo e!
riesgo de tesionarse debldo al contacto con la
cuchilla. Per ningun motive Irate de eliminar la
funct6n del centre{ del operadoc La cuchilla
gira cuando el motor est& funcionando
• Su segadora viene equipada con una barra de
control que exige la presencia del operador, Io
que requiere que el operador est_ detr&s del
mango de la segadora pare hacerla arrancar y
opemrla.
PARA AJUSTAR LA ALTURA DE CORTE
° Las cuatro ruedas son ajustadas con una
palanca L)ntca.
• Tire de la palanca de ajustes hacia la rued&
Levante la segadora, mueva la palanca haste
detante ala postci6n deseada.. Pare bajar la
segadora, mueva Is palanca hacla la retaguardia.
Batra
con Control que e×fge
la presencta
del ep_rador
Comrol
de la |mpulsi6n
Pare engrancharel control
de la impulsi6n
Control de la lmpulsi6n
desenganchado
PARA iVIONTAR Y ADJUNTAR
REOOGEDOR
DE OESPED
EL
,, Levante la pueda trasera de la segadora de
c_sped y ponga el marco del recogedor de
c_sped a dentro de las ranuras de la puerta
trasera.
. El recogedor de c_sped queda asegurado en
la caja de la segadora cuando se baja la
puerta trasera pare descansar en el basUdor
del recogedor de c_spedo
PRECAUCI_)N: No haga fundonar su segadora sin el
des'_4adorde recortes o sin el recogedor de c_sped,
aprobados, en su lugm Nunca Irate de operar la
segadora cuando se ha removido la puerta trasera o
cuando estA un poco abiert&
Puerta trasera
baslidor del
Gancho de} marco del
recogedor de c_sped
Pare un corte allo,
baje las nJedas
PARA VAClAR
CESPED
jl
EL RECOGEDOR
DE
• Levante el recogedor de c_sped usando el
mango del bastidor.
• Remueva el recogedor de c_)sped, con los
recortes, de debajo del mango de la segado-
Ma£
Pare un corte bajo,
levante las ruedas
re.
• Vacfe los recortes de ta botsa usando tanto el
mango del bastldor come _1de la bolsa,.
AVtSO: No arrastre la boise cuando la vacfe;
se productr_, un desgaste Innecesado..
EL IMPULSI6N
•Para arrancar eli movtmlento hacia adelante,
tire ]a barra de control de la Impulsi6n hacia el
mango.
• Pare parer el mo,,4miento hacia adelante, alivie
la barra de control de la impulsi6n.
IMPORTANTE: durante la utilizaci6n, guarde
siernpre la barra de control de la impulsion en
centre del mango..
23
ANTES DE HACER
EL MOTOR
ACEITE
ARRANCAR
PARA
TOR
HACER
ARRANCAR
EL MO-
-
Pare hacer arrancar un motor file, empuje et
cebador tres (3) veces antes de tratado_ Use
un empuje firmemente, Este paso normal_
manta no es necesado cuando se hace arrancar un motor que ya ha estado funcionando
per unos cuantos minutos_
, Sujete la baira de controles que exigen la
presencia del operador abajo en el mang() y
tire el mango del arrancador r,ipidamente, No
permita qua el cordon de! arrancador se
devuelva abruptamente,
- Para parar el motor, suelte la barra de control
que exige ta presencia del operador.
AVISO: En climas m6s frfos puede que sea
necesario repetir los pesos del cebado_ En climas
m6s caluros6s el cebar demasiado puede producir el ahogo y el motor no 'Ja a arrancar. Si se
ahoga el motor espere unos cuantos minutes
antes de tratar de hacerlo arrancar y no repita los
pasos del cebado,
Su segadora rue envtada sin aceite en el motor.
, Aseg_rese que ta segadora est_ nivelade y
qua el _rea alrededor det depSstto de acette
est_ limpla,
• Reueva el tape del dep6sito de] aceite con la
varilla indicadora de nivel y retlene haste la
lfnea de lleno en _stao
" Use 27 ozode aceile, Para el tipo y la cal}dad
vea "MOTOR" en ta secci6n de las "MANTENIMENTO" en este manual.
,, Vacie el aceite lentamenteo No Io Itene demas!ado,
• Revise el nlvet del aceite antes de cada use.
Agregue ace|re si es necesar{o_ LLene hasta
la linea de llano en la varilla indlcadora de
ntveL
• Vuefva a instatar la tapa del dep6sito de aceite
det motor y apri_tela.
, Cambie el aceite despu6s de 25 bores de
operaciSn o per !o menos una vez al aSo st la
segadora se utiliza manes 25 horas al erie.
Puede necesitar cambiar el aceite m&s a
menudo cuando las condlciones son
p61vorosas
o sucias,
Tape del
rellenador de
cjasollna
GASOLINA
. Llene el estanque de combustible, Use gasoline regular, sin plomo, nueva y limpla con el
mlnimo de 87 octanes., No mezcle el aceite
con ta gasolina, Pare asegurar que la gasolina
utilizada sea fresca compre estanques los
cuaJes puedan set utilizados durante los
primeres 30 dfaso
ADVERTENC1A: La expedencia ha indicado que
los combustibles mezclados con alcohol (cx:_noctdos come gasohol, o el use de etanol o materiel)
pueden atraer la humedad, la que conduce a la
separaciSn y formaci6n de _cldos durante el
almacenamlento. La gasotina acidica puede
dafter el sistema del combustible de un motor
duranta el almacenamtento. Pare evitar los problamas con el motor, se debe vaciar el sistema del
combustible antes de guardado per un periodo
de 30 dias o m_.s, Vaci'e el estanqua del combustible, haga arrancar el motor y h_galo funcionar haste qua las l[neas del combustible y el
carburador queden vac_os_La pr(_×lma temporada use combustible nuevo. Vea las Instrucciones
Pare El Almacenamiento pare m_s lnforrnaci6n,
Nunca use productos de limpIeza pare el motor o
pare el carburador en el estanque del combustible pues se pueden producir de,ties parma _
nantes.
24
Tape de!
deposito de
aceite con
variUa Indicadora de
nlvel
CONSEJOS
°
o
,,
-
,,
o
PARA SEGAR
• Evite cortar el c6spe d cuando est6 mojado
El c_sped mojado tiende a format montones
e interfiere con ta acci6n de acolcha,do, La
rnejor hera para segar el c6sped es temprano en la tarde, A esa Ilora t_ste se ha, secado
y el Area reci6n codada no quedarA expuesta
a! sol directo,
,, Para obtener los mejores resuttados, ajuste
la altura del carte de ta segadora de mode
que 6sta code sofamente el tercio superior
de las hojas de c6sped. En el case de que el
c_sped haya crecido demasiado, puede set
necesario el elevar la altura del carte para
reducir et esfuerzo necesado para empuja,r la
segadora y para evilar sobrecargar el motor,
dejando mentones de recedes de cSsped
Para un acolchamiento muy pesado, reduzca
el ancho del code pasando par encima del
lugar anteriormente cortado y siegue lentamente°
• Ciertos tlpos de c6sped y sus condiciones
pueden exigir que un Area` tenga que ser
acoichada par segunda vez para esconder
comptetamente los recortes. Cuando se haga
et segundo code, slegue a,travesado o en
farina perpendicular a [a pasada, del primer
carte,
• Cambie su patr6n de corle de semana a
sema,na. Siegue de node a sur una semana
y luego cambie de este a oeste la pr6xima
semana. Eslo evitar_ que el c6sped se
enrede y cambie de direcci6n
Bajo ciedas condiciones, tal coma c6sped
muy alto, puede set necesario el elevar la
altura del carte para reducir el esfuerzo necesario para empujar la segadora y para evitar
sobrecargar el motor, dejando montones de
recortes de c6sped
Para un carte muy pesado, reduzca el ancho
del carte pasando parcialmente par encima
del lugar anteriormente cortado y siegue
lentarnente
Cuando use una segadora con descarga
trasera en c6sped ht_medo y pesado, los
montones del c_sped cortado puede que no
entren en el recogedor de c6sped. Reduzca,
la velacidad del recorrido (velocidad de
empuje) y/o haga funcionar ta segadora
sabre el Area par segunda, vez.
St queda una huella de cortes en el lade
derecho de una segadora, con descarga
trasera, siegue en la direcci6n an que giran
la,s manillas del reloj, solapando un pace
pa,ra recauda,r los recortee en la prS×fma
pasa,da.
Los paros en los recogedares de c_sped de
tela pueden tlenarse con mugre y polvo con
el usa y los recogedores recaudarAn menos
c6sped. Para evitar _sto, roc[e el recogedor
con la manguera de ague regularmente y
d_jelo secarse antes de usarlo..
Mantenga la parte supedor del motor, alrededor del arrancador, despejada y sin recortes
de c_sped y paja. Esto ayudarA el flujo del
atre del motor y exlenderA su duraci6n
Ma.× lf3
CONSEJOS
ACOLCHAR
PARA SEGAR
Y
IMPORTANTE: Para obtener el meier
rendimiento mantenga la caja de la sega,dota
sin acumulac6n de c6sped y basura, Vea,
"LIMPIEZA" en la secci6n de MANTENIMENTO
de este manual.
• La, cuchilla acolchadora especial va a velvet
a cortar los recortes de c_sped muchas
veces, y los reduce en tamafio, de mode que
st se caen en el c_sped se van a dispesar
entre _ste y no se van a notate Tambi6n, et
c_sped acolehado se va a deshacer rApida-mente entregando substancias nutdtivas para
el c_sped. 8iempre acolche con la, velocidad
del motor (cuchtlla) m_,s alta, pues asf se
obtendr& la meier accl6n de recede de las
cuchlllas.
25
PROGRAMADE MANTENIMIENTO
_o_.__,/_
_J
OUECOMPLETE
SUSERVlCtO
REGULAR../r_'_%._'r'._'d._O._'_"
,...............
S
E
_eladores
suellos
Limptadinspecdonar el recogedor de
c_sped (si viene equipado)
Limplaf_asegado_a
_
Limpiat
mis_6n
(segado_as
debaiode i_cubied_de
con poder p_opuiso_)
lat,ans-
(_)
sadas
{segadoras
poderp_opulsor)
Revisa_
las corteascon
y las
poleas imputRevisaf ofaflladcamblar la cuchiIla
_l_ .Tabla de lupdcaciSn
Llmpiar fa batedahecargar
_,segadorascon artanque el_d_icol
o , Rv.c,o
I
v"
..........
_,"
...........................................
V'
V'4
.....
,eln!vel
aceltedeldet
motor
oU Cambtar
Revisar el
aceile
oT
_nspecdonar
sllenclado[
Limpt,ar e,lfilh' el
0 de
ai[e .....................
R
LimpIaro/cambtar ta bujia
Camblar el caducho de papel del iiltro
de aide
1
2
3
4
V"
_ Cambtar m_s a menuda cu_ndo se epe_e bajo cafga pesada o at_ _,mbienles co_ altas temperaturas,,
* Dar serv_lo mi_s a menudo cu_ndo se opere en condlciof_e$suc_a_ o poivo_osas
.. C_mb_e _s ct,tchi!la_mtJ_ _ menudo cuand0 _legue e_ |erteno arenoso,
-Cargar pot 48 horas al llt_de la _emporada_
RECOMENDACIONES
ERALES
TABLA
GEN-
(_) Aceite del
motor
La garant{a de esta segadora no cubre los
artt'culos que han estado sujetos at abuso o a la
negligencia del operadoro Para rectblr todo el
valor de la garant[a, el operador tiene que mantenor la segadora segL_ntas instrucciones
descdtas en este manual
DE LUBRICACi(DN
(_) Ajustador
Ia rueda de
Hay algunos aJustes que se tlenen que hacer en
forma ped6dica para poder mantener su untdad
adecuadamente.
Todos los ajustes en la secci6n de Servicio y
AJustes de este manual ttenen que ser revlsados
por Io menos un vez pot cada temporada.
- Una vez al ailo, cambie la buj[a, limpie o cambte el elemento del filtro de aire y revise si la
cuchllla estb. desgastada. Una bujia nueva y
un elemento del fiif,ro de aire limpio/nuevo aseguran la mezcla de atre-combustible adecuada
y ayudan a que su motor funcione mejor y que
dure m&s_
= SIga el programa de manlentmlento en este
manual.
ANTES
DE CADA
USO
" Revise el nlvel del aceite del motor.
• Revise sl haysujetadores
sueltos.
LUBRIGACION
Mantenga la untdad bien tubricada (vea la
"rABLA DE LUBRtCACION")..
®
PiSon de
lmpulsi6n
@
Cfavija de la
transmfsiOn
(_) Bisagra de la
puerla trasera
(_) Rocel el lubricante
Rellerase a la secciSn de MANTENIMENTO
"MOTOR"
en
tMPORTANTE: No aceite o engrase los
rodamientos de la rueda de plastico. Los lubricantos viscosos atraeran polve y mugre, Io que
acortara la duraci6n de Io rodamientos autolubricanto& Si cree que tienen que lubrlcarse, use
solamente un Iubdcante tipo grafito, de polve
seco, an forma moderada.
_VIc::L;ii-IUAL;IUNi::_
U_L
NOMERO
DE MODELO
NOMERO
DE SERIE
FECHA
FHUUUU
aU
917.3776t0
DE COMPRA
CABALLOS
DE FUERZA:
6,75
DESPLAZAMIENTO:
CAPACIDAD
12,56 CU. IN,
Y TIPO
1,5 Cuartos
DE GASOLINA:
" HPODE
ACEITE:
_ (API-SF/SG/SH)
CAPACIDAD
DE ACEtTE:
REGULAR
SIN PLOMO
30 (S6bre 32"Ft ........
SAE 5W-30 {deba_jo 32°F)
27 oz. de capacidad
-B-0_A
.030")
CHAMPION
DE VALVULA:
ADMISION:
,004 _ .008
DESCARGA:
.004 - .008
(ABERTURA:
TOLERANCIA
SENCEND1DO
SOLIDO
o J19LM
DE ESTADO
ABERTURA
TORStON
RJ19LM
DE AIRE:
,0125
IN,
35-40
FT. LB&
DEL PERNO
DE LA CUCHILLA:
El num_ro del nodelo y el de serie se encuentran
en la calcomania
adjunta ala parte
trasera de la caja de la segadora,
Debe registrar tanto e! num6ro de serie come la
fecha de compra y mantengalos
en un lugar seguro pare refencia en el futuro.
SEGADORA
Siempre observe las reglas de seguridad cuando haga el mantenfmiento,
LLANTAS
o Mantenga las Itantas sin gasotina, aceite o
substancias quimicas para control de insectos que pueden debar la goma_
. Evite los tocenes, las piedras, las grietas profundas, los objetos afilados y olros peligros
que pueden daSar alas tlantas.
CUIDADO
DE LA CUCHILLA
PARA CAMBIAR
Pare obtener los mejores resultados, la cuchllla
de la segadera tiene que mantenerse afilada.
Cambie {a cuchilia doblada o dafiada.
PARA REMOVER
• Remueva et pemo de la cuchilla gir_ndoto en
el sentido contrado en que giran tas manillas
de[ reloj.
• Remueva ta cuchilla y los art[culos de ferreteda adjuntaderes (e! perno, la arandela de
seguridad y la arandeta endurecida)o
AVlSO: Remueva el adaplador de la cuchilla y
revise e! cubo interior de la ranura del adaptador de la cuchilla. La ranura tiene que ester en
buenas condiciones pare que funcione en forma
adecuada. Cambie el adaptador si est_ daOado.,
LA CUCHILLA
Desconecte el alambre de la bujia y pOngalo
en donde no pueda entrar en contacto con
6sta.
. Haga descansar ta segadora en su lado.
Asegt_rese que el filLrode alre y que el carbufader queden mirando hacia arriba.
= Use un bloque de madera entre la cuchilla y
la caja de la segadora para evitar que la
cuchllla gire cuando se le quite el pemo.
• Proteja sus manos con guantes y/o envuelva
la cuchilla con una tela gruesa.,
27
LA CUOHILLA
• Ponga el adaptador de la cuchltla en el
ciguefial del motor, Asegt3rese que la ranura
del adaptador y que el chavetero del ciguefial
est_n atineados,,
• Ponga la cuchilla en el adaptador de _sta
allneando los dos (2) agujeros en la cuchilla
con las salientes elevadas en el adaptador,
= AsegSrese de que el borde de sallda de la
cuchilla (epuesto ai horde afilado) est_ hacia
ardba hacta el motor.
• lnstale e} pemo de la cuchilla con la arandeta
de seguridad y la arandela endurectda en el
adaptador de la cuchilla y et dguefial.
• Use un bloque de madera entre la cuchiila y
la caja de la segadora y apdete el pemo de la
cuchilla
glr#.ndolo
en elsentldoenquegtran ::
lasmanillas
delreloj.
• La torsi6n para apretar recomendada es de 35
- 40 pies tibras,
IMPORTANTE: EL PERNO DE LA CUCHILLA
ES CLASE 8 TRATADO A CALOR.
AVISO: No recomendamos el afilar la cuchtila pero si Io hace, aseg6rese de que quede balanceada.
PARAAFILAR LA CUCHILLA
Se tiene que tener cuidado de mantenerta ba]anceada, Una cuchilla que no est& baJanceada
va a producir eventuafmente dafio en la segadora
o en el motor°
* La cuchllla puede afilarse don una lima o en
una rueda rect]!icadora. No trate de afilarla
mientras se encuentra en la segador&
- Para rev_sar el balance de ta cuchilla, dave un
davo en una riga o en la pared. Deje alreddor
de una pulgada de un clavo recto expuesto.
Ponga el agujero central de la cuchiHa sobre ta
cabeza del clavo. Sf la cuchllla est_ balanceada debe permanecer en la posid6n horizontal.
Si cualquiera de los extremos de la cuchilla se
mueve hacia abajo, afile el extremo pesado
hasta que 6sta quede batanceada.
Adaptadorde la ...
cuchilla
_
"-..... _..-_._
Pemo de la
cuohilla
Hanura
Chaveterodel
ctguenal
_,.._ _
1_'-,/
Es necesado l]mPlar as medas de !rnpulsi6n;.
re_'ise'a'mbas ruedas traseras.
- Remaeva los tapacubos y las tuercas de
segudda&
• Remueva las ruedas de los eies de bs ajustadores de ]as ruedas,
° Remueva la basura y los rec;ortes de c_sped
de dentro de la cubterta contra el polvq,.pi56n
yio de [os dientes de los engranajes de las
ruedas de impulsi6n.
:
• El plgdn diferencial tiene que insta]arse con el
engranaje lzquierdo en el lado izquierdo y con
el engranaje derecho en el lado derecho
desde el punto de vista del operador.
° El pi_i6n diferencial viene estampado con una
"U' (left (izquierda)) o con una "R" (dght
(derecha)) en la parte intedor._Si se instala
incorrectamente el sistema de impulsiSn no va
a [uncionaro
• Ponga las niedas de vueita en los ejes dei
ajustador.
• Vue[va a poner las tuercas de seguddad y los
tapacubos.
AVISO: Los piSones y los trlnquetes de impulsi6n
deben limplarse y lubricarse con grasa, aproximadamente cada 25 horas, o una vez al afio.
Arandeia
erca de seguddad
RECOGEDOR
...
_
,_
P_Ron
Borde
Arandela
de satendurectda ida
/17.__.
%
Adaptador
de la
cuchilla
Cubtertacontra
el polvo
MOTOR
LUBRICAClON
DE CESPED
* El recogedor de c_sped puede ser roctado con
el agua de la manguera pero tiene que estar
seco cuando se vaya a usar_
o Revise su recogedor de c_sped a menudo
para verificar s| est& daSado o deter_orado. Se
va a desgastar con el uso normal. Si se necesita camblar et recogedor, c&mbielo solamente
por uno que sea aprobado por el fabricante_
D_ el n[3mero del modelo de la segadora
cuando io ordene.
Use solamente aceite de detergente de alta calldad clasificado con la clasificad_n SF, SG o SH
de se_vtcio APL Seleceione la calldad de viscosldad SAE seg_n su temperatura de operaci6n
esperada.
RUEDAS DE IMPULSI6N
Revise las ruedas de tmpulst6n traseras cada vez
antes de segar, para asegurarse de que se
mueven libremente. Si tas ruedas no glran Ubremente qulere dedr que hay basura, recortes de
c_sped, etc. dentro del &rea de las ruedas de
impulsiSn y de la cubterta contra el polvo y tJenen
que timpiarse para Iiberarlas.
28
AVISO: A pesar de que los aceites de multfvis,.
cosidad (5W30, 10W30, etc,) mejoran el
arranque en clim& fri'o, estos aceites de multiviscosldad van ha aumentar el consumo de aceite
cuando se usan en temperaturas s0bre 32 ° F.
Revise el nivel del aeeite del motor m_,sa
menudo, para evitar un postb]e de.rio en el motor,
deb[do a que no tJenesufldente acelte.
Cambie el aceite despu_ s d_ 25 horas de
oPeraci0n o per Io menos una vez al ado Si la
segadora se utitiza :menos" :25 horas el a._o..
Revise el nivel del aceite del c_rter antes de
arrancar el motel y despu6s de cada cinco (5)
horas de use continuado. Apriete el tap6n del
aceite en form& segura cada vez que revise e!
nivel del aceiteo
PARA CAMBIAR
ELAOEtTE
:
Manilla de la
cubleda
DEL MOTOR
AVlSO; Antes de incliner la segadora pare
drenar el aceite, drene el tanque de combustible
haciendo correr el motor haste que el tanque
est_ vacio.
* Desconecte el alambre de la bujia y pdngalo
de mod.o que no pueda entrar en contacto
con 6sta. '
, Remueva la tape deI depdstto del aceite;
d_jela a un lade en una superficie limpia..
o Incline ta cortado_'a de c_sped poi" este costado tel coma se muesb'a y purgue el aceite en
un recipiente Iddneo.. Mueva la segadora de
air&s pare adelanie pare remover todd el
aceite que se haya quedado atrapado dentro
det motor,
, Limpie todo el acette derramado en Is
segadora y en el lade del motor.
. Llene el motor con aceite. U_nelo solamente
hasta la tinea de Ueno (FULL) en la varilla
indicadora de niveL NO LO LLENE DEMASlADO.
° Vuelva a poner la iapa en el depdsito del
aceite.
o Vuelva a conectar el alambre de la buj[a a
_.sta.
Envase
FILTRO
DE AIRE
Su motor no funcionarA en forma adecuada y
puede sufrir dados si se usa un filtro de sire
sucio.
Cambie el fittro de aire cada a_o, y m&s a
men{_do si siega en condiciones muy
polvorosas o sucias. No tare el filtro de aire°
PARA CAMBIAR
Empuje la cubierta hacia arriba y apriete los
tornillos de ta cublerta. (No tos pdete demaciado)
Bisagra
FIIIro
de
(d
SILENCiADOR
Inspeccione y cambie el silenciador si est& cor..
re[do pi_es producir un peligro de incendio y/o
dare.
BUJfA
Cambie su bujfa cada are pare hacer que su
motor arranque m&s f_cilmente y funcione
meier. Ajuste la abertura de la bujfa en 0.030
pulgad&
LIMPIEZA
IMPORTANTE: Pare obtener el meier
remdimiento, mantenga, lal caja de la segadora
sin acumulacion de cesped y basura. Limpie fa
parte de abajo de su segadora despues de
cede use.
PRECAUCION: Descenecte el alambre de la
bujia y pdngalo en donde no pueda entrar en
contacto con _sta.
,, Naga descansar la segadora en su lado_
Asegdtrese que et Iiftro de sire y queet carbufader queden mlrando hacta arriba. Limpie la
parte inferior de su segadora rasp&ndola pare
remover fa acumulaci6n de c_sped y basura,
- Llmple el motor a menudo pare evitar que se
acumule la basura. Un motor tapado funciona
m_s caliente y se acorta su duracidn.
° Mantenga las superlicies pulidas y las ruedas
sin gasoline, aceite, etc.
• No recomendamos el use de una manguera
de jardin pare limpiar la segadora a menos
que el sistema el_ctdco, el sllenciado[, el fittro
de aire y el carburador est_n tapados pare
evitar que lee entre el ague, EI agua en el
motor puede acodar la duracidn de _ste.
LIMPIE DEBAJO
DE LA CUBIERTA
DE LA
IMPULSION
EL FILTRO DE AIRE
, Afloje 10stomlllos de ta cubierta,.
• Empuje la cubierta hacia abajo y remuevala
de la bisagrs.
o Remueva el filtro de papel afuera del cuerpo del filtro de aire.
, Llmpie la cubleda' y el cuerpo del filtro de
atre.
• Instale un nuevo filtro de papel. AsegLirese
que la bisagra este blen agregada.
Limpie debajo de la cublerla de ta impulsidn per
to menos dos veces cada temporada. Raspe
debajo de la cubterta con un cuchillo para masfllao con una herrarnienta pareclda, pare
remover toda acumulacidn de c_sped e basura
en la parte inferior de la cublerta de la impulsi6n,
29
bN; ANTES DE DAR CUALQUIER
SERVICIO O DE HACER AJUSTES:
, Suelte la barra de control y pare el motor.
• Aseg_rese que la cuchilla y que todas las
partee movlbles se hayan detenido completamente.,
• Desconecte el alambre de {a buj[a y pSngalo
en donde no pueda entrar en contacto con
_sta.
PARA AJUSTAR
EL MANGO
El mango de su segadora cuenta con Ires (3)
poslciones de altura - aj_stelo ala altura que le
acomode.
* Preslone lee extremidades infedores del
mando infedor una en centre una de la otra
haste que la pinza de! mango pueda ser Insertada en uno de los Ires agujeros del control de
la altura.
DESVtADOR
TRASERO
Se proporciona un desv_ador trasero, adjunto
entre las ruedas traseras de su segadora, pare
reducir a un mi'nimo la posibilldad que obJetos
seen lanzados hacia afuera de la parte trasera
de la segadora, en la posfci6n en deride se
encuentra el operadoro Sl se da_fiael desviador
debe cambiarseo
prepare
almacenamlento al final de cada temperada o si
la unidad no se va a usar per 30 dfas o mds.
SEGADORA
Cuando se va a guarder la segadora per cierto
perfodo de tiempo, I_mpiela cuidadosamente,
remueva toda la mugre, ta grasa, las hojas, etc.
Gu_rdela en un &rea limpia y seca.
• Umpte toda la segadora (Vea "L.IMPIEZA" en
ta seccl6n de Manlenimiento de este manual).
, LubrfqtJela segQn se muestra en la secciSn de
Mantenimlento de este manual.
, Aseg_rese de que todas las tuercas y clavijas
y redes los pemos y tomlIlos estL=napretadoe
en foma segura. Inspeccione las parfes que se
mueven pare vedlicar si est_ decades, qu ebradas o desgastadas. C&mb!elas` si es necesario.
° Retoque todas las superficies qua estOn oxtdadas o con fa pintu_ picada; use una lija
antes de plntar.
A|ta
M_
Baja
Pinza del
mango
MOTOR
VELOCIDAD DEL MOTOR
La velocidad det motor ha side ajustada en la
f&bdca_ No trate de aumentar la veloctdad del
motor puss se pueden producir lesi_?nespersonales, Si cree que el motor est_ funcionando
demastado r_pido o demasiado lento, Ileve su
segadora a.un centro/departamento de servicio
autorizado pare reparada o ajustada.
CARBURADOR
Su carburador ttene un chorro principal fijo no
ajustable pare controlar la mezciao St su motor no
est,, funcionando en forma adecuada debtdo a
problemas que se sospecha vienen del carbu*
rador, Iteve su segadora a un centro/departamento de servlcio autorizado pare repararla y/o ajustada.
mango
una en contra de ta otra basra que la pinza en
el mando desparche los soportes y pivote el
conjunto complete del mango hacia adelante
para que se pueda reposar encima de ]a
segadora..
° Cuando prepare su mango a partir de le posici6n de almacenemiento, et mango inferior
necesitar_ cerrado manualmente pare la postciSn de sega.
IMPORTANTE: Cuand0 doble el mango pare el
almacenamiento o el transporte, asegurese que
Io doble segun se muestra o puede darter los
cables de control.
Barra de control q_e exige
ia presencla del operador
uenr
MANGO
Mango .._
infedori
_
• Puede doblar el mango de su segadora pare
el almacenamtento_
• Suelte las dos (2) manlltas del mango en cada
lade dal mango superior y permlta que el
mango se doble hacia detr_s.
3O
""" "_ '
"Y_
'_ _
PostiSnpare segar
ACE1TE
DEL MOTOR
Drene el aceite (con el motor caliente) y c_mblelo con aceite de motor limpio. (Vea "MOTOR"
en la seccidn de Mantenimiento de esle manual°)
CILINDRO
• Remueva la bujia..
• Vacfe una onza (29 ml) de aceite a tray, s del
agujero de la buj{a en el cilindro,
• Tire la mantita de arranque lentamente unas
cuanlas veces para distribuir el aceiteo
. Vuelva a montar la nueva buj{a.
MOTOR
SlSTEMA
DE COMBUSTIBLE
IMPORTANTE: Es importante evitar qua se formen depositos de goma en parles fundamentales del sistema de combustible tales come el
carburador, el !ittro del combustible, la manguera
del combustible o en el estanque durante el
a]macenamiento. La experiencia tambien tndica
qua los combustibles mezclados con alcohol
(conocido come gasohol o que tiene etanot o
metanol) pueden atraer humedad, Io qua conduce a la separaei6n y a Is tormact6n de ac{dos
durante el almacenamiento_ La gasolina acidica
puede daSar el sistema de conbustible de un
motor' durante el periodo de almacenamiento.
• Drene el estanque de combustible.
. Haga arrancar el motor y d_ielo funcionar
hasta qua las lineas de! combustible y et carburador asian vacios,
• Nunca use los productos para limpieza del
carburador o del motor en el estanque de
combustible pu_s se pueden producir dales
permanentes..
o Use combustible nuevo la prdxima temporada.
AVISO: Et estabilizador de combustible es una
allemaliva aceptable para reducir a un mfnimo la
forrnaciSn de dep6sitos de goma en el combustible durante et periodo de almacenamiento.
Agregue estabilizador a la gasolina en el
estanque de combustible o en el envase para el
almacenamiento. Siempre slga la proporci6n de
mezcla qua se encuentra en e] envase del estabtlizador. Haga funciorlar el motor per 1o menos
I0 minutes despu_s de agregar el eslabilizador,
para permitir qua este Ilegue a! carburadoro No
drene la gasolina del estanque de gasolina y el
carburador si se est& usando estabilizador de
combustible.
OTROS
• No guarde la gasolina de una temporada a la
otrao
• Cambia el envase de la gasolina si se
empieza a oxidar.. La oxidacidn y/o la mugre
en su gasolina producir_n problemas.
• Si es posible, guarde su unidad en un recinto
cerrado y cubrala para protegefla contra el
polvo y la mugre.
. Cubra su unidad con un forro protector adecuado qua no retenga la humedad. No use
pI_stico, El plSstico no puede resplrar, 1o qua
permite la formaci6n de condensaci6n, lo qua
producir& la oxidaciOn de su unidad.
IMPORTANTE: Nunca ctlbra la segador a mientras el motor y tas areas de escape todavia estan
calientes.
PRECAUCION: Nunca almacene la segadora
con gasolina en el estanque dentro de un edificio
en donde los gases pueden alcanzar una llama
expuesta o una chispa° Permita que se enfr[e el
motor antes de almacenafla en alg0n recinto carfade.
31
IDENTIFICACION
PROBLEMA
DE PROBLEMAS
CORRECCION
CAUSA
n, 1111 niiii,_
_1oarranca
Filtro de aire sucio.
Sin combustible,
Combustible ranctoo
Limple/cambie el filtro de airm
:Llene
el estanque de combustible.
• Drene el estanque y vuelva a
Ilenarlo con combustible
tlmpio y
Agua en el combustible.
• Drene el estanque de combustible
y el carburador y vuelva a tienar
elestanque con gasolina nueva,
• Conecte el alambre a la bujia.
nuevo.
Alambre de la buj[a
desconectado,
Buji'a mala_
Cuchilta suelta o adaptador
de la cuchilla quebrado.
Barra de control en la
_3ostciOn suelta.
arra de control defectuosa,
....
Faita de fuerza
Parte trasera de la .......
cajacuchllla de la segadora
arrastr&ndose en el c_spe
pesado,
Est& cortando mucho
c_sped_
• Filtro de aire sucio.
• Acumulaci6n de c_sped,
hojas y basura debajo de la
saga-dora,
* Demasiado aceite en el
motor.
32
° Camble ta buji'a_
, Apriete el perno de la cuchilia o
cambIe el adaptador de la cuchllla,
• Presione fa barra de control hacia
el mango,
• Cambie la barra de control
• Ajuste a la posici6n
altoJ'
de "Corte m&s
• Ajuste a la posici6n
alto."
de "Corte m_.s
• Limpie/camble
el flltro de atre.
• Limpie la parte inferior de la caja
de la segadora.
- Revise el nive! del aceite.
PROBLEMA
CAUSA
CORRECClON
....
m
Mal corte -disparejo
• Cuchitla desgastada, doblada
o sueIta,
• Altura de las ruedas dispar
ja.
o Acumulaci6n de c_sped,
hojas o basura debajo de ta
segadora_
• Cambie la cuchilte.. Apriete ei
perno de la cuchilta.
• Ajuste todas las ruedas a 18
misma altura.
* Limpie la parte inferior de la
caja de la segadora.
VibraciSn excesiva
• Cuchilla desgastada, doblada
o suelta.
• CigueSal det motor doblado.
" Cambie la cuchilta. Apriete el
perno de la cuchilla,
" P6ngase en contacto con su
centro de servicio autorizado
m&s cercano,,
Cord6n arrancador
difi'eit de tirar
° Et freno del volante del motori"
est& 8plicado cuando se
suelta 18 barra de control,
• Ciguer_al del motor doblado.
"
• Adaptador de la cuchilla qu
brado.
• La cuchilla se arrastra en el
c_spedo
Recogedor de
cCsped no se Itena
(si viene equipado)
Dificit de empular
,
Eleve la altura de corte.
• Altur8 de corte demasiado
baja.
• Levantamiento
de 18 cuchitfa
desgastado.
• Recogedor sin ventilaci6n de
8ire,
,, El c_sped est& demasiado
aito o la attura de la rueda
dema-siado baja.
- Paile trasera de la
caja/cuchilta de la segadora
arrastr_ndose
en el c_sped.
• Recogedor de c6sped dema
siado lleno,
• Posici6n de la altura del
mango no adecuada pare
usted°
33
Presione ta barra de control
hacia el mango superior antes
de tirar el cord6n arrancador.
PSngase en contacto con su
centro de servicio autorizado
m_s ceroano.
Cambie el adaptador de 1a
cuchilla.
Muev8 la segadora a un lugar
en donde el c_sped ha sido
cortado o a una superficie
firms para hacer 8rrancar e!
motor.
Cambie ]a cuchiltas.
Limpie el recogedor
c_sped,
i
i,
i
,
i
de
Eleve la altura de corte.
Eleve la parte trasera de la
caja de la segadora (1) un
lugar m&s alto.
• Vacie el recogedor de c_sped.
Ajusle la altura del mango de
modo que le acomode.
\
C_
Tm
\
id
Z
m_J
LU
Q
0
!
!
LU
0
Z
0
_A
tO
co
o_
00
_0o3
o
Z
E
o
0
"_
o
o
O9
W
b.-
mmNO_
_O_e3
y,,-
o)
o
d
Z
.J
o e"_ 03 e) e'_
t,,_ _ e3 0_ 03
0
0
_d
!
I
e¢
I&l
0
Z
,,J
>ec
Z
0
0
(3
W
13
rr'
.
o
0
0
_
_
o
X
X_
m_
->,d
_z
35
_o
d
Z
J
W
0
0
!
a
W
N
0
z
.-1
rr
o
n-
88
o
t,.O
I'-,
Cf_
d
;Z
-1
r-,
0
_z
I,
t
00
0
X
_
o._ '_
>0
-
_>_
o
_: E-_
_
_o
mmm
_._
_
<_-o_
0
_:
"8.
_oC_._O
t_
o
&-
rr
xo°
__
e_mooe_mem_ee_mo_
NNNm_oo_o_o_o_omo
_d
vZ
37
x_
°
_
_
CRAFTSMAN
4-O'_CLE
ENGINE
..:.
MODEL NUMBER 1.43.986706
MODEL
KEY PART
NO. NO.
1
36177
2
6
7
9
10
11
12
14
15
16
17
18
27652
36059
36005A
590568
36002
36003A
32447
28277
36006
36008
31335
651018
19
20
25
36082
36010
37149
26
30
40
650802
36185
40004
4O0O5
41
36070
KEY
NO,
DESCRIPTION
15t,A 40016
152 37075
169 27234A
172 32755
174 30200
177 650925A
184 36183
186 36009
187A 37148
190 36013
191A 360!2
192 36016
193 36015
194 36014
195 610973
198 36017
199 36018
239 36048
Cylinder (Incl 2,10,
12,20 & 125)
Dowel Pin
+:_
Breather Element
Breather Cover & Gasket
Screw, t0-24 x 3/4"
Breather Valve Body
Check Valve
Breather Tube
Flat Washer
Governor Rod (Machined)
Governor Lever
Governor Lever Clamp
Screw, Torx T:15,
8-32 × 19/64"
Governor Spring
Oil Seal
Blower Housing Baffle Ass'y
(Inc1195)
Screw, 114-20x 5/8"
Crankshaft
Piston,Pin,Ring Set (Std,)
Piston,Pin,Ring Set
240
(.olo OS)
36071
42
43
45
40006
40007
20081
36023A
46
48
50
52
69
70
3261OA
36030
36031A
29914
36032A
36194A
75
80
8I
82
36010
30574A
30590A
30591
83
85
86
89
90
91
92
93
!00
101
103
36057
36034
650924
611154
611155
611156
650815
650816
34443B
610118
651007
110
119
!20
126
36054
36061
36187
36471
36472
126 29314B
29315C
130 6021A
135 35395
150
151
31672
31673
PART
NO.
Piston & Pin Ass'y (Std,)
(Incl. 43)
Piston & Pin Ass'y,
(.O10 OS)(incL43)
Ring Set (St.d.)
Ring Set (,010 OS)
Piston Pin Retaining Ring
Connecting Rod Ass'y
(lncl 46)
Connecting Rod Bott
Valve Litter
Camshaft (MCR)
OIl Pump Ass'y,
Mounting Flange Gasket
Mountlng Flahge
(Incl. 72 thru 85)
Oil Seal
Governor Shaft
Washer
Governor Gear Ass'y
G(Inc181)
cromer Spool
Idler Gear
Screw, 1/4-20 x 1..9116"
Flywheel Key
Flywheel
Flywheel Fan
Betleville Washer
Flywheel Nut`
Sotld State Ignlton
Spa_k P}ug Cover
Screw, Torx T+15,
10+24x 15/16=
Ground WEre
Cylinder Head Gasket
Cylinder Head
Exhaust Valve (St,d.)
ElnCL151)
xhaust Valve (I132" OS)
Intake Valve (Std.) (lncl 151)
Intake Valve (1/32" OS}
Screw, 5/16.,18 x 1+1/2
Resistor Spark Plug
,_aRJ19LM)
Ive Spring
Lower Valve Spring Cap
36190
243B 651041
245 36046
250 36191
251 650928
251A 650933
256 38193
266 650983
260 36188
261 650737
262 650737
263A 36192
275 36107
276 36043
277 650927
285 34449A
287 650926
290 29774
292 26460
300 36189
301 36246
305 36063
307 35499
308 36040
310 36064
346A 28763
347 650898A
350 36045
370A 36261
370(336861
380 640020
390 590702
400 36062D
4t6
36085
417 650760
900 .....
900 -- -...............
39
NUMBER
143,986706
DESCRIPTION
Intake Valve Seal
"O"-Ring
_ ..
" Valve Spdng BoxL_asKe[
Valve Spdng Box Cover
Screw, 10+24x 9/16"
Carburetor Mounting Stud
Carburetor Gasket
Governor Link
Air Baffle
Brake Lever Ass'y
Brake Control Lever
Brake Control Lever l.fnk
Brake Spring
Retaining Ring
Terminal Ass'y,
Brake Contro/Lever Spring
Brake Lever Bushing
" Carburetor To Air Cleaner
Gasket
Air Cteaner Body
(lncL 239 & 350)
Air Cleaner Stud
Air Cleaner Ftlter
Air Cteaner Cover
Lock Nut, 1/4+20
Wing Nut, t/4-,20
Control Plate
Screw, 8-32 x 21/64"
Btower Housing
,
Screw, 1/4-20 x 1/2
Screw, 114+20x 1t2"
Starter Gdtl
Multler
Lockfng Plate
Screw, 5/6,+18x 2.11/32"
Starter Cup
Screw, 8-32 x 21/64"
Fuel Line
Fuel Line Clamp
FuefTank (IncL 301)
Fuel Cap
Oil Fill Tube
"O" Ring
FqllTube Clip
Dipstick
Screw, t0-32 x 35/64"
Screw, t0.32 x 27/32"
Primer
LubricationDecaI
Primer Decal
Carburetor (Inc! 184 & 239)
Rewind Statler
Gasket Set
(IncL Items Marked')
Spark Arrestor }(it
(IncL 417)(Optional)
Screw, 8-32 x 3/8" (Optional)
Replacement Engine
750819,order fro m 71-999
Replacement S/B 750797A,
order from 71-999
RPM High 3000 to 3300
NOTE; This engine could have been built with 590'739
starter,
NOTE: All component dimensions given In U.S inches
1 inch = 25.4 mm
CRAFTSMAN
d,t_,=,
,
,
ii .......
.....
4-CYCLE
ENGINE
,,,,
I
III P
I
I
I
MODEL
I
I
NUMBER
!
I
I
I I
! 43.986706
..,0 t 47
KEY
NO,
PART
NO,
DESCRIPTION
1
5
6
7
25
27
28
29
30
31
32
33
36
37
37A
38
3BA
39
40
47
640020
632539
632593
632541
650506
632675A
632544
632543
632548
632709
632637
632672
632673
64O022
632547
632547
632545
632545
632549
640021
632554
Carburetor (Incl. t87B & 239 of Engine Parts Ust)
Throttle Shaft & LeverAssembly
Dust Seal
Throttle Shutte
Throttle Shutter Screw
Float Bowl
Roar Shaft
Roar
Float Bowl to Body Gasket
Inlet Needle, Seat & Seat Retainer (Incl. 31)
Seat Retainer
Bowl Drain Screw
Bowl Drain Washer
Main Nozzle Tube
"O" Ring
"O" Ring, Main Nozzle Tube
Spring, Main Nozzle Tube
Spring
.
Float Bowl Retainer
Main Fuel Jet
Welch Plug, Idle Mixing Welt
40
-
CRAFTSMAN
4-CYCLE
ENGINE
MODEL
KEY
NO°
PART
NO.
....
590702
590599A
590600
590696
590601
590697
590698
590699
590700
....
4'i
DESCRIPTION
tt
590703
12
590535
13
590701
KEY
NO.
PART
NO.
DESCRIPTION
--- _
3
6
7
8
590739
590740
590616
590617
590618A
12
11
13
14
_1 la--'
143.986706
Recoil Slarter
Spring Pin (Inc!. 4)
Washer
Retainer
Washer
Brake Spdng
Starler Dog
Dog Spring
Pulley & Rewind Spring
Ass'y_
Starter Housing Ass'y
(40 degree grommet
Starter Rope
( 98" X 9/64" _a )
Starter Handle
1
2
3
4
5
6
7
8
l=
NUMBER
590535
590638
590701
590741
Rewind Starter
Retainer
Starter Dog
Dog Spring
Pulrey & Rewind Spdng
Ass'y
Slarler Housing Ass'y
(40 degree grommet)
Slarter Rope
(Length 98" × 9t64"dia.)
Starlet Handle
Locking Tab
42
43
For the repair or replacement
parts you need
delivered directly to your home
Call 7 am - 7 pm, 7 days a week
1-800-366-PART
(1-800-366-7278)
Para ordenar piezas con entrega
domicillo --. 1-800-,659-7084
a
For in-house
major brand repair service
Call 24 hours
a day, 7 days a week
1-800-4-REPAIR
(I -800-473-7274)
Para pedir servloio
de reparaol6n
domieillo
- 1-800-676_5811
For the location
a
of a Sears Parts and
Repair Center in your area
Call 24 hours a day, 7 days a week
1-800-488-1222
For information
on purchasing
a Sears
Maintenance
Agreement
or to inquire
about an existing Agreement
Call 9 am - 5 pm, Monday--Saturday
1 °800-827-6855
When requesting service or ordering
parts, always provide the following
information:
* ProductType
, Model Number
* Part Number
• Part Description
$EAR
Amencas
162100
12.21o98
REV.9
VB/RDNB
Repatr Specialtsrs
Piinted
in U.S.A,