1
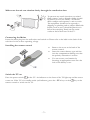
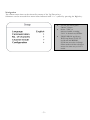
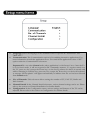
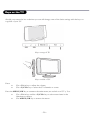
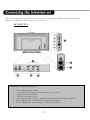
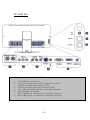
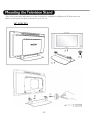
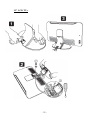
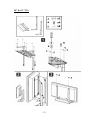
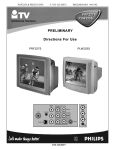
20HF
23HF
30HF
42HF
Instruction for Use
Care of the screen
Do not touch, push, rub or strike the screen with anything hard as this may scratch or damage the screen
permanently. Do not rub with chemically treated cloth. Do not touch the surface with bare hands or greasy
cloth. Unplug the TV before cleaning the screen. When the surface becomes dusty, please wipe gently with
absorbent cotton or other soft materials like chamois. Do not use acetone, toluene and alcohol because
they cause chemical damage.
Do not use liquid cleaners or aerosol cleaners. Wipe off saliva or water drops from the screen as soon as
possible as their long time contact with the screen may cause deformations and colour fading over time.
Warning concerning stationary images on the TV screen (For Plasma TV only)
A characteristic of Plasma Display Panels is that displaying the same image for a long time can cause a
permanent after-image to remain on the screen. This is called phosphor burn in. Normal use of the Plasma
TV should involve the showing of pictures that contain constantly moving and changing images that fill the
screen.
Warning concerning VGA/DVI display mode
As this product processes in VGA/DVI mode, some diagonal lines may be seen due to environmental
interference. This will not affect the computer signal performance that displays in VGA/DVI mode.
Environmental
• Your television contains material that can be recycled and reused by specialized companies. Please
find out about local regulations on the disposal of your old television set. Pay particular attention
to the disposal of exhausted batteries.
• Your television consumes energy in the stand-by mode. Energy consumption contributes to air
and water pollution. We advise you to switch off your television overnight instead of leaving it in
stand-by mode.
Wall mounting instructions/Table stand
According to the type of TV you’ve purchased a wall mount bracket and/or stand may be supplied.
To mount the supplied stand and/or wall mount bracket, please refer to attached separate
instructions. Make sure that the wall mount is fixed securely so that it meets safety standards.
-2-
Make sure that air can circulate freely through the ventilation slots
To prevent any unsafe situations, no naked
flame sources, such as lighted candles, should
be placed on or in the vicinity. Avoid heat,
direct sunlight and exposure to rain or water.
The equipment should not be exposed to
dripping or splashing and no objects filled with
liquids, such as vases, should be placed on it.
Insert the aerial plug firmly into the aerial
socket at the bottom rear of the TV.
Connecting the Mains
Insert the mains plug into the wall socket and switch on. Please refer to the label on the back of the
television for the correct operating voltage.
Installing the remote control
•
•
•
Remove the cover at the back of the
remote control.
Insert the correct battery type and size
into the compartment making sure that
the polarity orientation is correct.
You can secure your batteries by
fastening an appropriate screw into the
hole of the battery cover.
Switch the TV on:
Press the power switch
on the TV. An indicator on the front of the TV lights up and the screen
comes on. If the TV is in standby mode (red indicator), press the - TV+ keys or the
remote control to switch on the TV.
-3-
key on the
Accessing the Set-up Menu
When the set is in the High Security Mode, the Setup menu can be accessed only by the Institutional
Set-up Remote Control (RG4172BK or RC2573) by pressing the M key. The Institutional Set-Up
Remote Control is available as an option.
When the set is in the Standard Security Mode the Set-up Menu may be accessed with the standard
guest remote control (RC2886) by a sequence of commands (3 1 9 7 5 3 MUTE).
RC2886
RG4172BK
(Optional)
-4-
RC 2573
(Optional)
Navigation
The current menu item can be selected by means of the Up/Down keys.
Submenus can be accessed from menu items indicated with a “>” symbol by pressing the Right key.
•
•
•
-5-
To exit any menu press
“Menu” button
Select “YES” to
activate/enable a setting,
“NO” to deactivate/disable.
TELEVISION up/down,
INFO up/down, PAY-TV
up/down and RADIO
up/down are active in Setup
menu mode and the television
reacts the same way as in TV
mode.
•
•
Language: Select the language of the installation menu. Options are "ENGLISH" and
"MELAYU".
Communication: The Communication option is for enabling interactive applications. For
more information consult the application notes. For stand-alone applications select “OFF”
option under the Communication sub menu.
Important! Do not select Iconn1 mode unless application is with Iconn 1 box. Once the TV
is set in Iconn1 mode, it will not respond to RC commands anymore. To regain control over
the TV, press any key (except the Power key) on the Set-Up remote for about 4 seconds and
while continuing to hold the key, press any key (except the Power key) on the local keyboard.
A message “IR Loopback” will appear momentarily to indicate that the set has been released
from Iconn1 mode.
•
•
•
No. of Channels: This sub menu allows setting the number of TV, PAY-TV, Radio and
Info channels.
Channel Install: In the Channel Install sub-menu, various channel settings can be set. Please
refer to the section on Channel Installation for further details.
Configuration: In the Configuration menu, various settings and features of the TV can be
adjusted. Please refer to the section on Configuration for further details.
-6-
In the Channel Installation sub-menu, channel settings can be set. When this menu is open, all the
protections are inactive.
• Channel: The Channel type
can be selected with the cursor
Left/Right key. The available
options are: "TV", "INFO",
"PAYTV" and "RADIO".
Note:
Use the numeric keys to enter the
program number. For program
number below 10, enter the first digit
as “0” followed by the program
number. Eg “01” for TV 1.
Alternatively, enter the program
number followed by Up/Down key.
Program number “0” or “00” are
not allowed.
• Input: The "Input" menu item selects the desired input source that will be assigned to the
program. Possible values are Tuner, AV1, AV2, S-Video, CVI, RADIO, VGA, DVI, HD-A and
HD-D. Note that some input sources may not be available on certain models.
• System: NTSC 3.58 BG/I/DK/M, NTSC 4.43 BG/I/DK, PAL 4.43 BG/I/DK, SECAM 4.43
BG/I/DK, and AUTO.
• Frequency: Digits can be entered for a frequency in MHz. Press the Right key to start the auto
search; during frequency entry the digits not yet entered are displayed as dashes "-". Enter first
digit as “0” for frequencies below 100 MHz.
• Label: This menu item will be used to add a label/name for each program.
o Press the Left/Right key to select the label digit; press the Up/Down key to insert
alphanumeric characters.
o Press the Menu button to exit the Label menu item.
• Store: The Channel information is stored after pressing the Left/Right key. Press the Menu key
to exit without storing.
• Fine Tune: Press the Left/Right key for fine-tuning.
• Mute: This item enables/disables picture and sound for the particular channel.
o NONE: normal picture and sound enabled
o VIDEO: picture is blanked for this channel (e.g. radio channel)
o AUDIO: sound is muted for this channel (e.g. information channel)
• Auto Install TV: This sub menu allows the TV channels to be scanned and set automatically.
• Protection: This function is to protect a selected program for Pay TV purpose. Press the
Left/Right key to toggle the protection between "YES" and "NO".
-7-
In the Configuration menu, various settings and features of the TV can be adjusted.
• Switch On/OSD: In this submenu the Switch On characteristics
and On Screen Display settings of
the TV upon switched On can be
configured.
• Picture/Sound: In this sub-menu,
the Picture and Sound settings of
the TV can be set.
• Security: In this sub-menu, the
Security settings of the TV can be
configured.
• Control: In this sub-menu, the
Control settings of the TV can be
configured.
In this sub menu the behavior of the TV after switching on and the behavior of the On Screen
Display can be selected.
• Welcome Message: Press Cursor
Left/Right to display Welcome
message entry menu:
o Welcome Message
o Display Yes/No
o Line 1
o Line 2
o Clear
With the Up/Down key you can
set the message characters.
• Switch On Channel: This item
sets the television’s channel at
switch on.
• Switch On Volume: This item
sets the television’s volume at
switch on. Use the Right/Left key
to adjust.
-8-
•
•
•
•
•
Switch On Pic Fmt: This item sets the television’s Picture Format at switch on. Use the
Right/Left key to select the desired format.
Power On: The Power On menu function defines the behavior of the television whenever
AC Power is applied. The available options are "FORCED ON", "LAST STATUS" and
“STANDBY”.
o FORCED ON: TV will be automatically switched to ON mode whenever the
mains power is turned ON or resumed after a power interruption. Note that the
remote control STANDBY key will no longer function when TV is set in this
mode. TV can only be switched OFF by means of the main switch or a set-up
remote control or by ESP function (Energy Saving Programmability controls the
maximum continuous viewing time allowed).
o LAST STATUS: TV will be automatically switched to the last status (either
STANDBY or ON) whenever the mains power is turned ON or resumed after a
power interruption.
o STANDBY: TV will be automatically switched to STANDBY mode (even if the
last status was ON) whenever the mains power is turned ON or resumed after a
power interruption.
Volume Indicator: To display volume indicator when adjusting volume, select "YES".
Select “NO” to hide the volume indicator.
Channel Display: Channel Display values can be: Number, Label, All, None.
Digit Timeout: This is the time-out to enter the second digit of program number, eg for
program number 10 and above.
In this sub menu, the Picture and Sound settings of the TV can be selected.
• Brightness: This changes picture
brilliance.
• Colour: This changes the intensity
of the colour.
• Contrast: This changes the
difference between the light and
dark tones.
• Sharpness: This changes the
picture definition.
• Tint: This allows adjustment of
colour hue to obtain natural skin
tones.
• Active Control (* menu option
only available in certain models):
Active Control function optimises
the quality of the picture according
to the quality of reception
-9-
• Treble/Bass: This adjusts the level of treble and bass effects on the TV’s sound output.
• Balance: This balances the sound on the left and right speakers.
• AVL (Automatic Volume Leveller): This option is used to limit the increase in sound level
especially during programme change or advertising slots.
In this sub menu, the Security settings of the TV can be configured.
• Security Level: The “SECURITY” function allows the user to select one of two states “HIGH” or “STANDARD”. The default is “STANDARD”.
o When the set is in the Security High Mode the setup menu can only be accessed by a
Institutional Set-up Remote Control.
o When the set is in the Security Standard Mode, the Set-up Menu can be accessed with a
guest remote control by a sequence of commands (3 1 9 7 5 3 MUTE).
• Keyboard Lock: The Keyboard Lockout function disables the television’s local keyboard for
volume and program control.
• Video Out Mute (* menu option only available for 30” and 42” models) : This option
allows the user to mute the AV output, to prevent unauthorized copying of AV content.
- 10 -
In this sub menu, the Control settings of the TV can be configured.
• ESP: Energy Saving Programmability Mode (ESP) function controls the maximum
continuous viewing time allowed and its valid values are 00 - 99 (in hours). 00 value means
that the ESP function is OFF. Note that if the TV is switched off, the ESP timer
countdown will be reset.
• Audio/Video Mute: The Audio/Video Mute menu function determines whether the video
should be blanked and the audio should be muted if the currently tuned channel has no
signal.
• Step Tuning: If YES is selected, TV programs (1 to 9) are tuned immediately when a digit
is pressed. If NO is selected, tuning is performed only after the dash (second digit)
disappears.
• Min Volume: This item sets the minimum volume level allowed for the television set. Use
Right/Left key to adjust.
• Max Volume: This item sets the limit for the maximum volume allowed for the television
set. Use Right/Left key to adjust.
• Audio Out Volume (* menu option only for models with external bathroom speaker
feature): Set the volume of the external audio output (e.g. bathroom speaker). This volume
is independent of the main speaker volume level.
- 11 -
Alarm On (for sets with Clock display)
Activates the wake-up alarm. After a valid time
(0:00 to 23:59) is entered, the “Wake up Alarm”
icon on the clock display will be visible.
Standby
Press to switch the
TV to standby mode.
+ Info To move up or down
an Info channel.
+ Pay TV To move up or down a
Pay TV channel.
+ Radio To move up or down
a Radio channel.
Alarm Off (for sets with
Clock display)
Deactivates the wake-up alarm.
The “Wake-up Alarm” icon on
the clock display will disappear.
Smart Keys
To select predefined
picture and sound
settings.
Menu
To call up or exit the TV menus.
Sleep
Activates the sleep timer.
Press repeatedly to increment
the countdown time with 15
minutes.
+ Vol To adjust the volume.
Mute
Press once to suppress
the TV sound. Press
once more to restore
the TV sound.
+ TV – Channel Selection
To move up or down a TV
channel.
0/9 Digit keys
To select a TV channel. For a
two digit programme number,
enter the second digit before
the dash appears.
16:9 Formats
(See p.14 for details)
Teletext
(See p.12 for details)
- 12 -
Teletext is an information system broadcast available in certain channels. In some countries, it also
offers access to subtitles for viewers with hearing problems or who are not familiar with the
transmission language (cable networks, satellite channels, etc.).
Press:
To switch Teletext On/Off
In Teletext mode, press:
To enter a (3-digit) page number
For previous / next page
For previous / next page
Direct access to coloured page numbers
as indicated at the bottom of screen
- 13 -
The pictures you receive may be transmitted in 16:9 format (wide screen) or 4:3 format (conventional
screen). 16:9 pictures sometimes have a black band at the top and bottom of the screen (letterbox
format). This function allows you to optimize the picture display on screen.
Using the different formats
Use the 16:9 Formats key on the Remote Control to select the different modes: 4:3, Zoom 14:9,
Zoom 16:9, Subtitle zoom, Super wide, Wide screen or Fullscreen.
4:3
The picture is reproduced in 4:3 format and a black band is
displayed on either side of the picture.
Zoom 14:9
The picture is enlarged to 14:9 format, a thin black band remains
on both sides of the picture.
Zoom 16:9
The picture is enlarged to 16:9 format. This mode is
recommended when displaying pictures that have black bands at
the top and bottom (letterbox format).
Subtitle Zoom
This mode is used to display 4:3 pictures using the full surface of
the screen leaving the subtitles visible.
Super Wide
This mode is used to display 4:3 pictures using the full surface of
the screen by enlarging the sides of the picture
Widescreen
This mode restores the correct proportions of pictures
transmitted in 16:9 using the full screen display.
- 14 -
Fullscreen
This mode displays images in full screen.
Press the
key for approximately 5 seconds. The following text then appears:
If the word “LOW” appears instead of “OK”, the remote control batteries are low and must be
replaced.
- 15 -
Should your remote be lost or broken you can still change some of the basic settings with the keys on
top/side of your TV.
Keys on top of TV
Keys on side of TV
Press:
•
•
The – Vol + key to adjust the volume;
The – P/CH+ key to select the TV channels or source
Press the MENU/OK key to summon the main menu (not available on all TVs). Use:
•
The – Vol + key and the – P/CH+ key to select menu items in the
directions as shown;
•
The MENU/OK key to remove the menu
- 16 -
This section provides information on the connectivity available for different LCD Television sets.
Refer to the screen size that is relevant to your TV set.
20” LCD TVs
Connectors on the 20” LCD TVs
1.
2.
3.
4.
5.
6.
7.
TV and Radio aerial sockets
Component Video Inputs (CVI) connectors – Pr, Pb, Y
Audio-In connectors (AV1)
Video-In connector (AV1)
Side IO Connectors (AV2) – Audio-In, Video-In, S-Video, and PC-Audio In
Data 2 (RJ45) jack – for interactive connectivity purposes
Data 1 (RJ12) jack – for interactive connectivity purposes
- 17 -
23” LCD TVs
Connectors on the 23” and 26” LCD TVs
1.
2.
3.
4.
5.
6.
7.
8.
TV and Radio aerial sockets
Component Video Inputs (CVI) connectors – Pr, Pb, Y
Audio-In and Video-In connectors (AV1)
S-Video and Audio/Video-In connectors (AV2)
VGA, DVI and Audio input for connecting a computer
External Bathroom Speaker
Data 2 (RJ45) jack – for interactive connectivity purposes
Data 1 (RJ12) jack - for interactive connectivity purposes
- 18 -
30” LCD TVs
Connectors on the 30” LCD TVs
1.
2.
3.
4.
5.
6.
7.
8.
9.
10.
11.
Side IO Connectors – Audio-In, Video-In, and S-Video
Data 1 (RJ12) jack - for interactive connectivity purposes
Data 2 (RJ45) jack – for interactive connectivity purposes
12V-In power DC jack
HDMI Input connector (AV3)
VGA and Audio input for connecting a computer (AV3)
S-Video and Audio/Video-In connector (AV2)
Monitor-Out (Video/Audio) connector
Component Video Inputs (CVI) connectors – Pr, Pb, Y
Audio-In and Video-In connectors (AV1)
TV aerial socket
- 19 -
42” TVs
Connectors on the 42” TVs
1.
2.
3.
4.
5.
6.
7.
8.
9.
10.
12V-In power DC jack
Data 1 (RJ12) jack - for interactive connectivity purposes
Data 2 (RJ45) jack – for interactive connectivity purposes
HDMI Input connector (AV3)
VGA and Audio input for connecting a computer (AV3)
S-Video and Audio/Video-In connector (AV2)
Monitor-Out (Video/Audio) connector
Component Video Inputs (CVI) connectors – Pr, Pb, Y
Audio-In and Video-In connectors (AV1)
TV aerial socket
- 20 -
This section provides information on the connectivity available for different LCD Television sets.
Refer to the screen size that is relevant to your TV set.
20” LCD TVs
- 21 -
23” LCD TVs
- 22 -
30” & 42” TVs
- 23 -
3139 125 33534
- 24 -