1
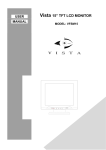
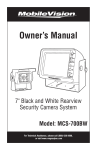
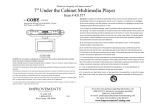
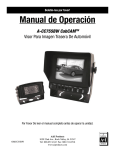
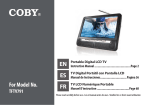
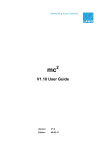
•
Important Safety Instruction
R
WARNING: TO REDUCE THE RISK OF FIRE OR ELECTRIC SHOCK, DO
NOT EXPOSE THIS APPLIANCE TO RAIN OF
OR MOISTURE.
The lightning flash with arrowhead symbol, within an equilateral triangle, is intended
to alert the user to the presence of uninsulated “dangerous voltage” within the
product’s enclosure that may be of sufficient magnitude to constitute a risk of
electric to persons.
The exclamation point within an equilateral triangle is intended to alert the user to
the presence of important operating and maintenance (servicing) instructions in the
literature accompanying the appliance.
CAUTION:
These servicing instructions are for use by qualified service personnel only. To reduce the risk
of electric shock, do not perform any servicing other than that contained in the operating
instructions unless you are qualified to do so. Refer to manual for servicing instructions.
TF-TV1913
POWER SUPPLY:
Connect one end of the supplied power cord to the power jack on the unit and the other end to
the AC100-240V wall outlet.
POWER MANAGEMENT
Before plugging the power cord into the AC outlet, make sure that all the connections have
been properly made.
If the unit will not be used for a long period of time, disconnect the power and remove the
batteries form the remote.
Please read this manual before connection and use.
Important Safety Instruction
1. Read these instructions.
2. Keep these instructions.
3. Heed all warnings.
4. Follow all instructions.
Table of Contents
Table Of Contents
Important Safety Instruction
Unpacking --------------------------------------------------------------------------------------------------------------------1
5. Do not use near water.
Unit View-----------------------------------------------------------------------------------------------------------------------2
6. Clean only with dry cloth.
Remote Control --------------------------------------------------------------------------------------------------------------3-4
7. Do not block any ventilation openings. Maintain well ventilated conditions around the product. Do
Cable Connections----------------------------------------------------------------------------------------------------------5
not put product on bed, sofa or anything that blocks ventilation. Install according to instructions.
TV Function-------------------------------------------------------------------------------------------------------------------6-9
8. Do not install near any heat sources such as radiators, heat registers, stoves, or other apparatus
AV Function-------------------------------------------------------------------------------------------------------------------10
(including amplifiers) that produce heat.
9. Do not defeat the safety purpose of the polarized or grounding-type plug. A polarized plug has two
blades with one wider than the other. If the provided plug does not fit into your outlet, consult an
electrician for replacement of the obsolete outlet.
10. Protect the power cord from being walked on or pinched particularly at plugs, convenience receptacles,
and the point where they exit from the apparatus.
11.Only use attachments/accessories specified by the manufacturer.
12.Use only with the cart, stand, tripod, bracket, or table specified by the manufacturer, or sold with the
apparatus. When a cart is used, use caution when moving the cart/apparatus combination to avoid
injury from tip-over.
13.Unplug this apparatus during lightning storms or when unused for long periods of time.
14.Refer all servicing to qualified service personnel. Servicing is required when the apparatus has
been damaged in any way, such as power-supply cord or plug is damaged, liquid has been spilled
or objects have fallen into the apparatus, the apparatus has been exposed to rain or moisture,
does not operate normally, or has been dropped.
15.Apparatus shall not be exposed to dripping or splashing and no objects filled with liquids, such as
vases, shall be placed on the apparatus.
Copyright Protection
Unauthorized copying, broadcasting, public performance, and lending of disks are prohibited. This
product incorporates copyright protection technology that is protected by method claims of certain U.S.
patents and other intellectual property rights owned by Macrovision Corporation and other rights
owners. Use of this copyright protection technology must be authorized by Macrovision Corporation,
and is intended for home and other limited viewing uses only unless otherwise authorized by
Macrovision Corporation. Reverse engineering or disassembly is prohibited.
PC Function-------------------------------------------------------------------------------------------------------------------11
Troubleshooting--------------------------------------------------------------------------------------------------------------12
Specifications ----------------------------------------------------------------------------------------------------------------13
Unit View
4
1
5
6
7
2 8
P-MODE
3
1. TFT SCREEN
2. REMOTE SENSOR
3. POWER INDICATOR
4. VOLUME-/+
5. CH-/+
6. MENU
7. MODE
8. POWER
9
10
11
12
13
14
15
16
9. TV ANTENNA
10. COMPONENT IN
11. AUDIO IN((R/L))
12. VIDEO IN
13. S-VIDEO IN
14. PC AUDIO IN
15. VGA IN
16. POWER JACK
2
Remote Control
Remote Control
Remote Control Drawing
1. POWER button
1
Press to turn the power on/off.
2. CC button
Set the CC mode. (CC on Mute/Off/On).
3. VOLUME +/- button
Press to adjust the volume.
4. MENU button
2
Press to show the setup menu.
3
5. SLEEP button
Press to set the sleep timer.
4
6. MODE button
Press to select the working mode. (TV, AV, S-VIDEO,
COMPONENT, PC).
5
7. RETURN
13
Press to view the previous channel.
14
8. MTS
15
Press to select the TV audio mode.
16
9. CHANNEL +/- button
Press to skip channels.
10. Direction & OK button
Press the direction buttons to move the cursor.
Press OK to confirm settings.
11. EXIT button
Press to exit the menu setup.
12. Numeric key pad
Press to input data.
13. P.MODE button
Setup the picture mode (Personal, Standard,
Soft, Dynamic).
14. FAV button
Press to show the Favorite Channel List. If no channel is set on the list,
the button does not function.
15. EPG button
Press to show the Electronic Program Guide.
16. FORMAT button
Press to change the display format as Full, Zoom, Cinema, Letterbox.
17. INFO button
Press to show the current working status.
18. CH-LIST button
Press to show the channel list.
19. MUTE button
Press to muffle/release sound.
20. SOUND button
Press to change the sound mode.
P-MODE
6
12
7
8
Remote Control
Preparation
1. Take off the back cover and insert two AAA batteries and then put on the cover.
Insert the batteries while observing the correct (+) and (-) polarities.
2. Under normal use, the battery will last for six months.
Using Remote control
Point the remote to the remote sensor from no more than 7 meters and within about 60 degrees of the
front unit.
9
10
11
17
18
19
20
s
7
MODE
RETURN
The operating distance may vary depending on the brightness around.
Notes:
Do not point bright lights directly at the remote control sensor.
Do not place objects between the remote control unit and the remote control sensor.
Do not use this remote control unit while simultaneously operating the remote control unit of any other
equipment.
3
4
Cable Connections
Figure. Cable connections
Set the unit to the relative input mode
to enable the signal pass.
TV Function
TV Function
Preparations
1. Connect the antenna to the antenna jack on the unit side panel.
2. Connect the power supply cord. Press POWER to turn on the the player.
3. Press MODE on the remote to select TV.
4. Press CH+/- buttons to skip channels or press numeric buttons to input channel directly.
Setup Menu
Various features can be preset through the TV setup menu.
TV setup menu consists of six menus. They are Picture Menu, Audio Menu, Time Menu, Option Menu,
Lock Menu as well as Channel Menu.
AC100-240V
Outlet
External AV Source
1. Press MENU to show the menu window.
2. Press the left/right button to select the menu, press OK to enter the menu.
NOTE: 1. Be sure to have all necessary connections properly
done before connect the power supply.
2. When input the AV signal, refer to the manual of the
external sources as well.
Antenna Connection
Connect TV RF sources to the antenna port. TV RF signals include: receiving antenna/CATV net. You
can use 75 coaxial cable to connect outdoor antenna.
AV Signal Input
You can adopt any of the three methrods below to input the AV signal.
Defined by the image definition, component input mode ranks first among the three and the S-Video
input mode works much better than the RCA mode does.
Component - Connect the YCbCr port by the component cable (not supplied) to input the video signal.
Connect the “L” “R” port to input the audio signal by the white&red plug of the RCA cable.
S-Video - Connect the “S-Video” port by the S-Video cable(not supplied) to input the video signal.
Connect the “L” “R” port to input the audio signal by the white&red plug of the RCA cable.
RCA - - Connect the “Video” port to input the video signal by the yellow plug of the RCA cable.
Connect the “L” “R” port to input the audio signal by the white&red plug of the RCA cable.
Working with menu
While working with the menu,
1. Press the up/down direction button to select the item.
2. Press the left/right direction button to adjust
3. Press MENU to exit.
VGA Connection (PC Connection)
When used as the computer screen, connect the VGA port by the 15-pin D-SUB signal cable and the
PC Audio In port by the audio cable.
Power Connection
Insert one end of the power cord to the power jack on the unit and the other end to the wall outlet with
AC100-240V. If the unit will not be used for long period of time, please disconnect the power.
5
6
TV Function
TV Function
Picture Setup
Option Setup
Closed Caption Setup
Select “Closed Caption” from the Option menu, press OK to enter
ITEM
DESCRIPTION
Picture Mode
Contrast
Brightness
Sharpness
Tint
Color
Setup the picture mode (Personal, Standard, Soft, Dynamic)
Adjust the color contrast
Adjust the display brightness .
Adjust the display definition.
Adjust the image color.
Adjust the display color.
CC Mode
CC on Mute
Basic Selection
CC1
Advanced Selection
Service1
Option
Audio Setup
ITEM
DESCRIPTION
Sound Mode
Bass
Treble
Balance
Audio Language
Setup the sound mode as Music, Movie, Personal, Standard.
Setup the bass effect.
Setup the treble effect.
Adjust the sound balance.
Setup the audio language.( English, French, Spanish)
Time Setup
ITEM
DESCRIPTION
Sleep Timer
Setup the sleep timer. (15/30/60/90/120/180/240 Min/Off).
Time Zone
Select the time zone.
(Central, Mountain, Pacific, Alaska, Hawaii, Eastern).
Set the time saving function on/off.
Daylight Saving
Time
ITEM
Setup the CC mode. (CC On Mute/Off/On)
Select the basic CC type. (CC1, CC2, CC3, CC4, TEXT1,
TEXT2, TEXT3, TEXT4)
Advanced Selection Select the advanced CC type. (service 1~service 6).
Option
Setup the closed caption type to your own preference.
Option - Mode - Default/Custom
You can not setup the CC type under the default mode.
Select “Custom” to show the CC edit menu.
Lock Setup (Parental Control)
You are required to enter the four digit password to access the lock function.
The initial password is 0000.
After the password is confirmed correct, the screen will display the parental control menu.
ITEM
Change password
Option Setup
System Lock
ITEM
DESCRIPTION
OSD LanguagH
Transparency
Color Mode
Zoom Mode
Closed Caption
Restore Default
Setup the OSD language.
Adjust the OSD transparency.
Setup the color mode.
Adjust the display mode. (Normal, Zoom, Cinema, 4:3).
Setup the closed caption type. Refer to “Closed Caption” for details.
Restore settings to the factory default.
Unrated Lock
US
Canada
RRT Setting
Reset RRT
7
DESCRIPTION
CC Mode
Basic Selection
DESCRIPTION
Select to change the password. Please remember the password since
the system’s reset function would not restore the password to the default.
Set the system lock function on/off.
Set the lock function on to access the parental control setup.
Set the unrated lock on/off.
Setup the US parental control.
TV(TV Rating) - Y, Y7, G, PG, 14, MA.
MPAA(Movie Rating) - PG-13, R, NC-17, X, N/A, G, PG)
Press the direction buttons to move between options, press OK to set
block. To release, press OK again.
Setup the canada parental control
Canada Eng - G, PG, 14+, 18+, E, C, C8+.
Canada Fre - E, G, 8ans+, 13ans+, 16ans+, 18ans+.
Set the rating region table.
Restore RRT to the default.
8
TV Function
AV Function
Channel Setup
AV Function
ITEM
Antenna
Auto Scan
Favorite
Channel Skip
Channel No
Channel Label
DTV Signal
DESCRIPTION
Setup the antenna type as Air or Cable.
Search channels automatically.
Press the right direction button to start searching, press MENU to stop.
Make the favorite channels collection.
Press the up/down direction button to select the channel, press OK to set.
Press OK again to release.
Skip the unwanted channels.
Press the up/down direciton button to select the channel, press OK to set.
Press OK again to release.
Edit the channel label.
1. Select “Channel No”, press the left/right direction button to select
the channel.
2. Select “Channel Label”, press the right direction button to show the edit menu.
In the menu, press the left/right direction button to move left/right,
Press the up/down direction button to make changes.
The player has AV input functions. You can enjoy programs from external input sources.
Connect the external AV signal source to VIDEO or S-VIDEO jack, and then turn on the player and
press the MODE button to select the AV inuput mode. (AV, S-VIDEO, COMPONENT).
Setup Menu
Various features can be preset through the AV setup menu.
AV setup menu consists of five menus. They are Picture Menu, Audio Menu, Time Menu, Option Menu
as well as Lock Menu.
1. Press MENU to show the menu window.
2. Press the left/right direction button to select the menu, press OK to enter the menu.
Display the DTV signal information.
Working with menu
While working with the menu,
1. Press the up/down direction button to select the item.
2. Press the left/right direction button to adjust
3. Press MENU to exit.
Note: Refer to the TV section for details on Picture Setup , Audio Setup,
Time Setup, Option Setup as well as Lock Setup.
9
10
PC Function
PC Function
You can use the unit's TFT LCD as your computer's monitor.
1. Shut down the unit and the computer. Connect the unit to the computer VGA jack by the VGA cable.
2. Turn on the player and the computer. If the unit is in the standby mode, press POWER button
to switch on. Press the MODE button to select the "PC" mode.
Setup Menu
Various features can be preset through the PC setup menu.
PC setup menu consists of four menus. They are Picture Menu, Audio Menu, Time Menu as well as
Option Menu
Trouble Shooting
Symptom
Make sure the unit has been powered on manually.
Check if the power cord has been properly connected to the power outlet.
Check if the main power has been switched on.
No picture
Try another TV channel
Check if the system connection is proper and secure.
Check if the connection cables are damaged.
No sound
1. Press MENU to show the menu window.
2. Press the left/right direciton button to select the menu, press OK to enter the menu.
Color distorted
Increase the volume.
Check if the MUTE function of the unit has been activated.
Check if the sound system has been properly set.
Check if the AV audio signal input cable has been connected properly.
Reset the color system of the unit.
Check if the system has been properly connected.
Check if the AV video signal input cable is connected properly.
Picture and
sound are interfered
Check if the system has been properly connected.
If using antenna, adjust the antenna.
Remote control does
not work
Make sure the POWER button on the unit has been turned on manually.
Remove the obstacles between the remote control and the player.
Point the remote control towards the remote sensor on the player.
Check if the batteries of the remote control have been loaded with correct polarities.
Replace the batteries of the remote control.
Working with menu
While working with the menu,
1. Press the up/down direction button to select the item.
2. Press the left/right direction button to adjust
3. Press MENU to exit.
Check and Action
No power
Malfunction
Should the player develop a malfunction, unplug the player for 30 minutes. After that,
power on the player and the restore function should reset the player.
Note: Refer to the TV section for details on Picture Setup , Audio Setup,
Time Setup as well as Option Setup.
Adjust the PC Screen
Upon switching to the PC mode, the moniter will be automatically regulated for a
proper functioning. If the result is not up to your expectation, please perform the
following steps to adjust the screen manually .
1. Select “Auto” under the “PC Setup Menu” and press the right direction button
to start modulation. ( Option Menu - - > PC Setup Menu - - > Auto )
2. Or if you still have problem with the monitor after, adjust “H-Position”,
V-Position”, ”Clock “ as well as “Phase” accordingly under the PC Setup
menu.
11
12
Specification
TFT Panel characteristic
Size
Resolution
Pixel pitch
TV system
19"
1440X900
0.297(H)x0.294(V)mm
NTSC 3.58/4.43 (VIDEO IN)
Channel received
TV characteristic
Intermediate frequencies
Scanning
Antenna impedance
VHF-L
54.25-160.25MHz
VHF-H
166.25-463.25MHz
UHF
469.25-863.25MHZ
Picture IF
45.75MHz
Color
42.17MHz
Sound
41.75MHz
Horizontal
15750Hz
Vertical
60Hz
75 unbalance
Tuning system
FS with PLL
AC input
Power consumption
On working
Standard
40W (Max)
Standing
<2W
Speaker
2x ( 4
Operating temperature range
10 c-40 c
Dimension
460x59x423 mm
Weight
5302g
DTV system
ATSC/QAM
Channel received
100-240V 50/60Hz
, 5W)
VHF-L ch.2 to B (57 to 129MHz
DTV characteristic
VHF-H ch. C to KK(135 to 363 MHz)
UHF ch. LL to 69 (369 to803 MHz)
Intermediate frequencies
Center IF : 44 MHz
f1 : 46.69 MHz
f2: 41.31MHz
Design, specifications and manual are subject to change without prior notice.
13