1
Clickfree DVD Backup User Guide
for Microsoft Windows users
Feature / function
M
P
O
EULA
N
N
N
Password protection
N
N
N
backup complete folders
N
N
Y
choosing categories for BU / RSTR (like HD/Xformer)
N
N
Y
choosing locations / types & sizes / embedded
Y
Y
N
all filetypes selected by default
N
N
Y
multiple computers per DVD
N
N
N
multiple backups per DVD – adding / updating
N
N
N
undo restore
N
N
N
browsing / searching backed-up files
N
N
Y
Search entire computer - exclusions for Windows folders &
removable media (true for Music, not true for Photos, ???
Office) CHECK SCREENCAPS
Y
?
Y
Restore files to their original location
N
N
N
restore defaults to x:\Restored Files\{Music|Photos}
Y
Y
Y
Tools
N
N
N
Reminders
N
N
N
Remembers your customized settings
N
N
N
Add/Remove/Edit filetypes
N
N
Y
Copyright © 2009 Storage Appliance Corporation.
2
Clickfree DVD Backup User Guide
Introducing Clickfree DVD Backup
Contents
CONTENTS
3
INTRODUCING CLICKFREE DVD BACKUP
6
Main Features
6
Package contents
6
Definitions
7
BASICS
8
HOW DOES CLICKFREE WORK?
8
WHAT GETS BACKED UP?
8
Clickfree backs up content
8
What content categories does Clickfree back up?
8
WHAT DO I NEED BEFORE I START?
BACKING UP MY CONTENT
9
10
HOW DO I START USING MY CLICKFREE DVD BACKUP?
10
ZERO EFFORT BACKUP – REALLY!
11
WHAT IF CLICKFREE DOESN’T START UP AUTOMATICALLY?
12
What if the Vista Autoplay Window appears?
HOW DO I CHANGE HOW CLICKFREE DOES BACKUPS? (OFFICE ONLY)
13
13
Choosing categories of content to be backed up – required
15
Choosing locations to search for content – required
15
Choosing complete folders to be backed up – optional
16
HOW DO I CHANGE HOW CLICKFREE DOES BACKUPS? (MUSIC, PHOTO)
19
Choosing locations to search for content – optional
20
Choosing file types and sizes to be backed up – optional
22
Choosing whether embedded files are backed up – optional
22
Copyright © 2009 Storage Appliance Corporation.
3
Clickfree DVD Backup User Guide
Introducing Clickfree DVD Backup
RESTORING MY CONTENT
26
WHAT IF MY COMPUTER’S INTERNAL HARD DRIVE STOPS WORKING, OR I WOULD LIKE TO TRANSFER MY
CONTENT TO A NEW COMPUTER?
26
WHAT DO I NEED BEFORE I CAN USE CLICKFREE TO RESTORE MY CONTENT?
26
HOW DO I GET MY CONTENT BACK?
26
What gets restored, and to where – Default restore?
26
HOW DO I LET CLICKFREE RESTORE DECIDE WHAT TO RESTORE AND WHERE?
27
HOW DO I CHANGE HOW CLICKFREE RESTORES CONTENT?
30
Restoring content
30
Choosing content to be restored
30
Choosing where to restore content to
31
HOW CAN I USE CLICKFREE TO COPY FILES FROM ONE COMPUTER TO ANOTHER?
33
HOW DO I FIND FILES THAT WERE RESTORED
33
BROWSING, SEARCHING & VIEWING YOUR FILES
HOW DO I BROWSE, SEARCH & VIEW? (OFFICE ONLY)
From the Backup Summary screen
35
35
35
HOW DO I PLAY OR EMAIL MUSIC? (MUSIC ONLY)
36
HOW DO I VIEW AND USE PHOTOS? (PHOTO ONLY)
36
HOW DO I BROWSE MY BACKED-UP FILES? (OFFICE ONLY)
38
HOW DO I SEARCH FOR MY BACKED-UP FILES? (OFFICE ONLY)
39
WHAT CAN I DO WITH FILES FROM BROWSE AND SEARCH
41
ADVANCED TOPICS
42
WHAT IF THERE IS MORE THAN ONE USER ON MY COMPUTER?
42
WHAT IF I HAVE MORE THAN ONE COMPUTER?
42
Copyright © 2009 Storage Appliance Corporation.
4
Clickfree DVD Backup User Guide
Introducing Clickfree DVD Backup
HOW DO I CHOOSE INDIVIDUAL FILE EXTENSIONS FOR BACKUP? (OFFICE)
42
HOW DO I CHOOSE INDIVIDUAL FILE EXTENSIONS FOR BACKUP? (MUSIC, PHOTO)
43
WHAT IF I DON’T ENOUGH CLICKFREE BACKUP DVDS?
44
WHAT ARE ‘FACTORY SETTINGS’ AND HOW DO I USE THEM?
45
HOW DO I ADD/REMOVE/EDIT FILETYPES? (OFFICE ONLY)
45
HOW DO I CHOOSE ANOTHER DRIVE AND/OR FOLDER TO RESTORE TO?
47
LEGAL STUFF
Copyright © 2009 Storage Appliance Corporation.
49
5
Clickfree DVD Backup User Guide
Introducing Clickfree DVD Backup
Introducing Clickfree DVD Backup
Thank you for buying the Clickfree DVD Backup – the easiest way to keep the valuable
information on your computer safe.
Clickfree is an easy-to-use computer backup system that automatically searches for and
backs up content stored on your computer. No hardware configuration or software
installation is required. The backup procedure begins once the Clickfree DVD has been
inserted into your DVD drive.
Caution:
Please remember that a backup is meant to be a second copy of your computer
data, not the only copy of your data. Having two copies (redundancy) is what
keeps your important data safe. Please use your Clickfree DVD Backup to keep a
safe copy of your data.
MAIN FEATURES
Clickfree backup technology
• Automatically starts when connected to your computer
• Does not require any software installation or setup
• Automatically searches for and backs up the important data from your computer –
music, photos, or office files, depending on which Clickfree DVD Backup package
you are using
• For most users the automatic search finds and backs up everything that matters
Customizable backup options
• Includes options for custom file types and full folder backup (Office Files Backup
only)
Easy restore to same or other computer
• Backed-up content can quickly and easily be restored
• You can just as easily ‘restore’ content to a different computer as to the original one
• This makes Clickfree a great way to move your content from your old computer to
your new one
How it backs up
• The first time you put a Clickfree Backup DVD into your DVD writer it searches for,
finds, backs up and organizes all of your important content, depending on which
Clickfree DVD Backup package you are using
Photo Viewer/Music Player
• Conveniently view backed-up photos from the DVD in thumbnail and expanded
view(Photo Backup Only)
• Conveniently listen to backed-up music from the DVD (Music Backup only)
PACKAGE CONTENTS
Your Clickfree backup package contains three, five, or ten Clickfree DVD Backup disks.
Copyright © 2009 Storage Appliance Corporation.
6
Clickfree DVD Backup User Guide
Introducing Clickfree DVD Backup
DEFINITIONS
Just to make sure that the user guide is clear, we’re going to define a couple of terms that
are used throughout the guide.
Administrator
“Administrator” is a special login name for the user who can make system-wide changes to
the computer, has full control, and can access all of the files on the computer. Most home
users are automatically the Administrator of their computer. If you don’t know if you are
the Administrator, or how to log in as Administrator, you might need to talk to the person
who set up the computer for you. If no one set up your computer for you, then by default,
you are the Administrator.
Back up and Restore
Backing up is making copies of data so that a copy can be used to restore the original after
the data is lost or destroyed. Backups are used to restore data after loss of or damage to
your computer’s hard drive, and to restore files that have been accidentally deleted or
corrupted.
Making a backup of your content only copies it from your computer to your DVD Backup,
and does not delete it from the computer’s hard drive.
Restoring your content from a backup only copies it from your DVD Backup to your
computer, and does not delete it from the DVD Backup.
Important: Clickfree never erases or replaces content on your computer’s hard drive, unless
you ask it to replace a file during restore.
Clickfree never erases or replaces content on your DVD Backup.
Your Clickfree backups are also handy for moving or copying data from one computer to
another.
Content
Normally you don’t use Clickfree to back up your programs or operating system
(Windows), only the data that you have created or copied to your computer – music,
photos, letters, emails, tax information etc, depending on which Clickfree DVD Backup
package you are using. In this guide we refer to this data as content.
File
Information used by your computer and stored in a specific place on your hard drive. A file
may be content, a program or part of a program, or information a program uses in some
way.
Sometimes the relationship between content and file is clear: a photo or a letter is usually a
single file. On the other hand, a single email message may be just a part of a large file that
contains many messages, and related information such as email addresses, calendar events
etc. However, you don’t need to be concerned about this because Clickfree takes care of all
the details for you.
Copyright © 2009 Storage Appliance Corporation.
7
Clickfree DVD Backup User Guide
Basics
Basics
HOW DOES CLICKFREE WORK?
All you need to do to keep your projects, photos, videos, music etc. safe is to put the
Clickfree DVD Backup into the DVD drive in your computer and let it work! No need to
install software or to configure anything. Your computer knows when the Clickfree DVD
has been inserted, and it runs the program automatically each time. You can back up as
many computers as you like with the Clickfree DVD Backup. However, each DVD can hold
backed-up files from only one computer.
When Clickfree has finished backing up your computer, just eject the DVD and store it in a
safe place. We recommend that you do not leave the Clickfree DVD in your DVD drive:
your content is safer if your DVD Backup is kept separately from the computers it has
backed up.
If your data is lost for any reason (hard disk crash, laptop lost or stolen, content
accidentally deleted), you’ll be really happy that you bought and used Clickfree. Your
backed-up content is safe on your Clickfree backup, waiting to be restored when you have
a working computer again.
A Clickfree backup is also ideal for transferring your content from an old computer to a
new one.Sometimes, for a variety of reasons, the program may not run by itself – it may
need a little help. If this happens to you, don’t worry – it’s easy to get things going. We’ll
show you how a little later. For details, see “What if Clickfree doesn’t start up
automatically?” on page 12.
WHAT GETS BACKED UP?
CLICKFREE BACKS UP CONTENT
At Clickfree we want to protect our customers from losing things that are irreplaceable.
That’s why Clickfree finds and backs up all of the content from wherever it is on your
computer – according to which DVD Backup you use – Office, Music, Photo.
When it runs automatically, Clickfree searches your computer for all of the content that
you have either created or placed in your computer. To see a list of the categories of content
that Clickfree backs up automatically, see “What content categories does Clickfree back
up?” on page 8. Most likely, this means that it will back up everything that matters to you
right out of the box without you having to do anything but insert the DVD.
Unless you explicitly ask it to do so (and only for Office backup), Clickfree does not back
up the programs or the operating system. This means that your backup won’t need nearly
as much space as the size of your computer’s hard drive since your content may only take
up a small portion of your hard drive’s capacity, and we only look for the content.
WHAT CONTENT CATEGORIES DOES CLICKFREE BACK UP?
Depending on which DVD Backup you are using, Clickfree backs up content in these
categories:
Copyright © 2009 Storage Appliance Corporation.
8
Clickfree DVD Backup User Guide
•
•
•
•
•
•
•
•
•
•
•
Basics
{P} Photos – including common graphic formats such as JPEG and RAW
{P} Video – for example, AVI, MPEG, Shockwave Flash
{M} Music – including CD audio, MP3, MIDI
{O} Emails – including Thunderbird, Eudora, and those from Microsoft Office
{O} Text Documents – usually from word-processing programs such as Microsoft
Word, Open Office, and WordPerfect
{O} Spreadsheets – for example, Microsoft Excel, Open Office, and Lotus 123
{O} Presentations – for example, Microsoft Powerpoint and Corel Show
{O} Artwork and Drawings – such as Corel Draw, Visio and Paintshop images
{O} Favorite Websites – internet shortcuts and address books
{O} Other – including zip and RAR files, XML, and comma-separated values files
{O} Financial – such as those from QuickBooks and tax programs
Want to know more? You can look at the details by following the steps in “How do I
Change how Clickfree does backups? (Office only)” on page 13, or “How do I Change how
Clickfree does backups? (Music, Photo)” on page 19, without making any changes.
WHAT DO I NEED BEFORE I START?
Before you start your first restore you should read the entire “Restoring my content”
chapter of this manual.
For Clickfree to work, your computer needs to be running one of these operating systems:
•
•
•
•
Microsoft Vista® (any editions)
Microsoft Windows® XP (any editions)
Microsoft Windows® 2000 (with SP4)
Mac OSX 10.5 Leopard running on an Intel processor (products manufactured after
Jan 1, 2009)
In addition you need:
•
•
At least 100 MB of free space on your computer
A DVD writer with DVD+R capability
Copyright © 2009 Storage Appliance Corporation.
9
Clickfree DVD Backup User Guide
Backing up my content
Backing up my content
HOW DO I START USING MY CLICKFREE DVD BACKUP?
Note:
♦
Screenshots in this section show mostly Office Backup screens – the screens for
Music and Photo backup are almost identical.
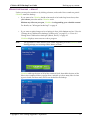
To start using your Clickfree DVD Backup:
1. Make sure that your computer is switched on and has finished starting up.
2. Log in, if that is what you normally do.
3. Insert a Clickfree DVD into your DVD drive.
4. Wait for the Clickfree window to appear. You may have to wait up to a full minute for
your computer to recognize the Clickfree DVD Backup – please be patient!
What happens next depends on whether the Clickfree DVD contains any backed-up
content.
•
If the Clickfree DVD contains backed-up content, see “Restoring my content” on
page 26.
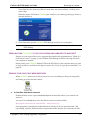
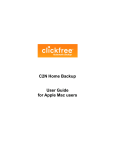
A second Welcome window appears and shows the number of seconds left before the
backup starts automatically:
Copyright © 2009 Storage Appliance Corporation.
10
Clickfree DVD Backup User Guide
Backing up my content
ZERO EFFORT BACKUP – REALLY!
Unless you stop the countdown by clicking a button, at the end of the countdown period
Clickfree starts the backup.
•
If you want to let Clickfree decide what needs to be backed up from where, then
you’re done: just relax and let Clickfree work.
Without any effort on your part, Clickfree is safeguarding your valuable content!
For details, see “What gets backed up?” on page 8.
•
If you want to make changes to how backup is done, click Options and see “How do
I Change how Clickfree does backups? (Office only)” on page 13, or “How do I
Change how Clickfree does backups? (Music, Photo)” on page 19.
Clickfree displays some screens to show progress:
Note:
The appearance of these screens varies a little, depending on which Clickfree DVD
Backup package you are using: Office, Music, or Photo.
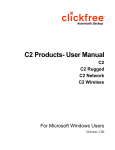
Clickfree adds up the sizes of all of the content it finds, then adds the sizes of the
files in the complete folders you also chose, and tells you how many files of what
types it found, and how many DVDs are needed for the backup:
Copyright © 2009 Storage Appliance Corporation.
11
Clickfree DVD Backup User Guide
Backing up my content
5. If you have enough Clickfree Backup DVDs, click I’m Ready – Start Backup.
Important: Before you backup your files, you must ensure that you have as many Clickfree
Backup DVDs as are needed: if the backup requires more than one DVD, you need
to use a Clickfree Backup DVD every time that the program tell you to change
DVDs. If you don’t have enough Clickfree Backup DVDs for a backup, see “What
if I don’t enough Clickfree Backup DVDs?” on page 44.
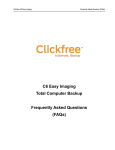
The Backup Summary screen shows you how many files of each type were backed
up.
When you see the Backup Summary screen, simply click Close, then OK, then eject
the Clickfree DVD and store it in a safe place.
Note:
Before backing up any content, Clickfree tells you how many DVDs will be
needed. Each time it fills up a DVD, Clickfree prompts you to label the full DVD
with a sequence number, and to insert another empty Clickfree DVD.
You should write the date & time on the DVD, and, if you use Clickfree DVD
Backup with more than one computer, write the name of the computer too.
WHAT IF CLICKFREE DOESN’T START UP AUTOMATICALLY?
There could be a couple of reasons why Clickfree does not run when you plug in the
Clickfree DVD Backup:
•
You may see a message telling you that “Clickfree™ Backup cannot start because
you do not have the required permissions. Please re-login to this computer as the
Copyright © 2009 Storage Appliance Corporation.
12
Clickfree DVD Backup User Guide
Backing up my content
Administrator.”
1. Log out.
2. Eject the Clickfree DVD.
3. Log in again as Administrator.
4. Insert the Clickfree DVD again.
The backup then starts automatically.
•
Your computer settings may prevent Clickfree from running automatically because
“Autorun” is turned off.
To fix this problem, follow these steps. You only need to do this once, not every time
you use Clickfree.
♦
To turn on Autorun:
[[are we going to give any instructions about enabling autorun? or just say to call tech
support?]]
WHAT IF THE VISTA AUTOPLAY WINDOW APPEARS?
In Windows Vista, if the AutoPlay window appears:
1. Check Always do this for software and games.
2. Click Start ClickFree Backup.
You only need to do this once, not every time you use Clickfree.
HOW DO I CHANGE HOW CLICKFREE DOES BACKUPS? (OFFICE ONLY)
You can change:
•
•
The types of content Clickfree backs up
Where Clickfree looks for the content to back up content.
You can also tell Clickfree to back up all of the files in a folder, regardless of what category
or file type they are.
Copyright © 2009 Storage Appliance Corporation.
13
Clickfree DVD Backup User Guide
Backing up my content
What do the Cancel, Next, and Back buttons do?
As you go from one step to the next to back up content, the screens you see usually have
buttons for Cancel, Next >, and Back>.
Cancel abandons the changes you have made and returns you to the Manage
Settings and PCs screen.
Next > accepts the decisions you have made so far, then moves on to the next step and the
next decision.
Back > sends you back to the previous step so that you can change a decision you already
made. Until you click Start or Cancel there is no limit to how often you can go back and
make changes.
♦
To review or change what gets backed up:
1. Follow steps 1 to 4 of the procedure “How do I start using my Clickfree DVD Backup?”
on page 10.
2. Before the countdown reaches zero, click Options.
The Choose File Types screen is displayed:
Copyright © 2009 Storage Appliance Corporation.
14
Clickfree DVD Backup User Guide
Backing up my content
CHOOSING CATEGORIES OF CONTENT TO BE BACKED UP – REQUIRED
3. All of the categories are selected by default. Choose the categories of content to be
backed up, for example, Text Documents, Presentations, and Financial.
•
•
Note:
To include a category, for example, Presentations, in the backup, make sure that the
box to the left of the category name is checked
. If it isn’t, click
the box to check it. You can add and remove the checkmark by clicking in the box.
To exclude a category, for example, Financial, from the backup, make sure that the
box to the left of the category name is unchecked
. If it is checked,
click the box to uncheck it.
You can make a finer selection by choosing file types within each category. For
details, see “How do I choose individual file extensions for backup? (Office)” on
page 42 in the “Advanced topics” chapter.
4. When you are finished choosing content categories, click Next >.
Note:
You must choose at least one file type or category – you cannot leave all file types
and categories unchecked.
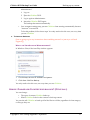
CHOOSING LOCATIONS TO SEARCH FOR CONTENT – REQUIRED
1. Choose where you want Clickfree to search for content for the categories and types you
chose earlier – Clickfree can either:
• look through your entire computer (the default setting)
or
• look only in certain folders
♦
To look through the entire computer
•
♦
Choose Search the entire computer
To look only in certain folders:
•
Choose Search selected folders only
then select folders
from My Documents. and My Computer in the folder selection box that appears.
• To search the entire My Documents folder, make sure that the checkbox is
checked
.
• To see details of a folder under My Documents, click the + to the left of the
checkbox. This expands My Documents to show the folders that it contains,
and changes the + to a -. Click the – when you want to collapse the folder
Copyright © 2009 Storage Appliance Corporation.
15
Clickfree DVD Backup User Guide
Backing up my content
again.
Each folder with a + beside it can also be expanded.
Note:
•
You can now choose the individual folders you want to be searched by
adding and removing checkmarks in the checkboxes. For example, to search
only the folder with the Help and Manual projects, uncheck the My
Documents checkbox, then check only My HelpAndManual Projects:
•
Do the same for My Computer.
You must choose a location – you cannot leave all locations unchecked.
2. When you have made your choices, click Next >.
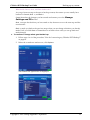
CHOOSING COMPLETE FOLDERS TO BE BACKED UP – OPTIONAL
3. Choose complete folders to be backed up in addition to categories and locations.
The complete folders you choose here, and all of their files, are backed up regardless of
file type. Complete folders are backed up in addition to the file types in the locations
Copyright © 2009 Storage Appliance Corporation.
16
Clickfree DVD Backup User Guide
Backing up my content
you already chose.
•
•
To add the entire My Documents folder to the backup, make sure that the checkbox
is checked
.
To see details of a folder under My Documents, click the + to the left of the
checkbox. This expands My Documents to show the folders that it contains, and
changes the + to a -. Click the – when you want to collapse the folder again.
Each folder with a + beside it can also be expanded.
•
You can now choose the individual folders you want to include in the backup by
adding and removing checkmarks in the checkboxes. For example, within My
Documents if you want to include only the folder with the photos of your hike,
uncheck the My Documents checkbox, then check only HikePhotos:
•
Do the same for My Computer.
4. When you have made your choices, click Done > to continue with the countdown. You
can click Start at this time to go to the backup right away without waiting for the rest of
the countdown.
Clickfree searches for content to back up
Before actually backing up any content, Clickfree searches the locations you chose for
your chosen categories of content:
Copyright © 2009 Storage Appliance Corporation.
17
Clickfree DVD Backup User Guide
Backing up my content
It adds up the sizes of all of the content it finds, then adds the sizes of the files in the
complete folders you also chose, and tells you how many files of what types it found,
and how many DVDs are needed for the backup:
^TPHx_BU_CFSearches01
5. If you have enough Clickfree Backup DVDs, click I’m Ready – Start Backup.
Important: Before you backup your files, you must ensure that you have as many Clickfree
Backup DVDs as are needed: if the backup requires more than one DVD, you need
to use a Clickfree Backup DVD every time that the program tell you to change
DVDs. If you don’t have enough Clickfree Backup DVDs for a backup, see “What
if I don’t enough Clickfree Backup DVDs?” on page 44.
Clickfree backs up your content
Clickfree then backs up the content and complete folders you chose:
Copyright © 2009 Storage Appliance Corporation.
18
Clickfree DVD Backup User Guide
Backing up my content
At the end of the backup, a Backup Summary screen is displayed:
The Backup Summary screen shows you how many files in each category were backed up
and the amount of space they take up on the DVD.
When you see the Backup Summary screen, simply click Close, then OK, then eject
the Clickfree DVD and store it in a safe place.
Note:
Before backing up any content, Clickfree tells you how many DVDs will be
needed. Each time it fills up a DVD, Clickfree prompts you to label the full DVD
with a sequence number, and to insert another empty Clickfree DVD.
You should write the date & time on the DVD, and, if you use Clickfree DVD
Backup with more than one computer, write the name of the computer too.
HOW DO I CHANGE HOW CLICKFREE DOES BACKUPS? (MUSIC, PHOTO)
Note:
Screenshots in this section show either Music or Photo Backup screens – the
screens for Music and Photo backup are almost identical to each other.
You can change:
•
•
The types and sizes of files Clickfree backs up
Where Clickfree looks for the content to back up content.
Copyright © 2009 Storage Appliance Corporation.
19
Clickfree DVD Backup User Guide
♦
Backing up my content
To review or change what gets backed up:
1. Follow steps 1 to 4 of the procedure “How do I start using my Clickfree DVD Backup?”
on page 10
2. Before the countdown reaches zero, click Options.
You can now choose the locations to search for content, what types and sizes of files get
backed up, and whether files embedded in compressed files and email messages should
be included.
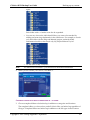
CHOOSING LOCATIONS TO SEARCH FOR CONTENT – OPTIONAL
1. Click Search Locations.
2. Choose where you want Clickfree to search for content for the file types you chose
earlier – Clickfree can either:
• look through your entire computer (the default setting)
or
• look only in certain folders
♦
To look through the entire computer
•
•
Choose Search the entire computer
, and click OK >.
Continue with “Choosing file types and sizes to be backed up” on page 22.
Copyright © 2009 Storage Appliance Corporation.
20
Clickfree DVD Backup User Guide
♦
Backing up my content
To look only in certain folders:
•
Choose Search selected folders only
then select folders
from My Documents and My Computer in the folder selection box that appears.
• To search the entire My Documents folder, make sure that the checkbox is
checked
.
• To see details of a folder under My Documents, click the + to the left of the
checkbox. This expands My Documents to show the folders that it contains,
and changes the + to a -. Click the – when you want to collapse the folder
again.
Each folder with a + beside it can also be expanded.
Note:
•
You can now choose the individual folders you want to be searched by
adding and removing checkmarks in the checkboxes. For example, to search
only the folder with the Help and Manual projects, uncheck the My
Documents checkbox, then check only My HelpAndManual Projects:
•
Do the same for My Computer.
You cannot leave all locations unchecked.
•
When you have made your choices, click OK > and continue with
“Choosing file types and sizes to be backed up” on page 22.
Copyright © 2009 Storage Appliance Corporation.
21
Clickfree DVD Backup User Guide
Backing up my content
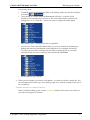
CHOOSING FILE TYPES AND SIZES TO BE BACKED UP – OPTIONAL
3. Click Types and Sizes:
Note:
For Music, only one type is shown: Music.
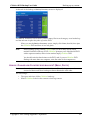
1. All of the files types are selected by default. Choose the types of files to be backed up:
Photos, Raw Files, Videos.
•
•
Note:
To include a type, for example, Photos, in the backup, make sure that the box to the
left of the type name is checked
. If it isn’t, click the box to check it. You
can add and remove the checkmark by clicking in the box.
To exclude a type, for example, Raw Files, from the backup, make sure that the box
to the left of the type name is unchecked
. If it is checked, click the
box to uncheck it.
You can make a finer selection by choosing file extensions within each type. For
details, see “How do I choose individual file extensions for backup? (Music,
Photo)” on page 43 in the “Advanced topics” chapter.
2. When you are finished choosing content types, enter minimum and maximum sizes for
the files to be backed up. NOTE KB / MB
Note:
You cannot leave all file types unchecked.
3. Click OK > and continue with “Choosing whether embedded files are backed up –
optional” on page 22.
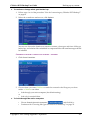
CHOOSING WHETHER EMBEDDED FILES ARE BACKED UP – OPTIONAL
4. Click Embedded Music or Embedded Photos:
Copyright © 2009 Storage Appliance Corporation.
22
Clickfree DVD Backup User Guide
Backing up my content
5. Choose whether Clickfree should search for content
•
•
inside compressed files (for example, zip files)
inside email messages
6. Click OK.
7. If you have enough Clickfree Backup DVDs, click I’m Ready – Start Backup.
Important: Before you backup your files, you must ensure that you have as many Clickfree
Backup DVDs as are needed: if the backup requires more than one DVD, you need
to use a Clickfree Backup DVD every time that the program tell you to change
DVDs. If you don’t have enough Clickfree Backup DVDs for a backup, see “What
if I don’t enough Clickfree Backup DVDs?” on page 44.
Clickfree searches for content to back up
Before actually backing up any content, Clickfree searches the locations you chose for
your chosen categories of content:
It adds up the sizes of all of the content it finds, then adds the sizes of the files in the
complete folders you also chose, and tells you how many files of what types it found,
and how many DVDs are needed for the backup:
Copyright © 2009 Storage Appliance Corporation.
23
Clickfree DVD Backup User Guide
Backing up my content
8. (Music) Continue with step 13.
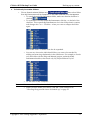
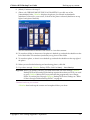
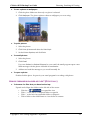
9. (Photo only PERHAPS MOVE THIS TO ADVANCED) If you click one of the
(view/change) links, Clickfree displays the photos you selected as thumbnails
(miniature versions) for your review, with all of the photos selected (checkboxes at top
right of each photo checked):
You can select folders at the left of the screen to view their contents.
10. To unselect a folder, so that none of its photos is backed up, uncheck the checkbox at the
left of the folder. This unselects (unchecks) every photo in the folder.
11. To unselect a photo, so that it is not backed up, uncheck the checkbox at the top right of
the photo.
12. When you are finished selecting and unselecting photos, click OK.
13. If you have enough Clickfree Backup DVDs, click I’m Ready – Start Backup.
Important: Before you backup your files, you must ensure that you have as many Clickfree
Backup DVDs as are needed: if the backup requires more than one DVD, you need
to use a Clickfree Backup DVD every time that the program tell you to change
DVDs. If you don’t have enough Clickfree Backup DVDs for a backup, see “What
if I don’t enough Clickfree Backup DVDs?” on page 44.
Clickfree backs up your content
Clickfree then backs up the content and complete folders you chose:
Copyright © 2009 Storage Appliance Corporation.
24
Clickfree DVD Backup User Guide
Backing up my content
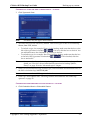
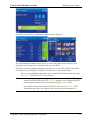
At the end of the backup, a Backup Summary screen is displayed:
The Office Backup Summary screen shows you how many files in each category were
backed up and the amount of space they take up on the DVD.
The Music and Photo Backup Summary screen shows you how many files in each folder
were backed up, and displays thumbnails of each photo in the selected folder.
When you see the Backup Summary screen, simply click Close, then OK, then eject
the Clickfree DVD and store it in a safe place.
Note:
Before backing up any content, Clickfree tells you how many DVDs will be
needed. Each time it fills up a DVD, Clickfree prompts you to label the full DVD
with a sequence number, and to insert another empty Clickfree DVD.
You should write the date & time on the DVD, and, if you use Clickfree DVD
Backup with more than one computer, write the name of the computer too.
Copyright © 2009 Storage Appliance Corporation.
25
Clickfree DVD Backup User Guide
Restoring my content
Restoring my content
WHAT IF MY COMPUTER’S INTERNAL HARD DRIVE STOPS WORKING, OR I WOULD LIKE
TO TRANSFER MY CONTENT TO A NEW COMPUTER?
All computer hard drives fail eventually, sometimes without warning. Occasionally,
computers suffer damage that affects the hard drive. Sometimes, laptop computers get lost
or stolen. Sometimes, also, you may delete content by mistake. When these things happen,
other computer users may lose valuable, sometimes irreplaceable, data.
But if you lose content you’ll be really happy that you bought and used Clickfree. Your
backed-up content is safe on your Clickfree backup, and can be restored when you have a
working computer again.
A Clickfree backup is also ideal for transferring your content from an old computer to a
new one.How can I use Clickfree to copy files from one computer to another?
WHAT DO I NEED BEFORE I CAN USE CLICKFREE TO RESTORE MY CONTENT?
Before you can restore your content, your computer needs to be working – at the very least
it needs to be able to start up and display the desktop.
In addition you need the DVD you used to back up your content.
Of course, you can ‘restore’ your content to any computer that meets the system
requirements (see “What do I need before I start?” on page 9), not just to the computer
whose content you backed up.
The easiest way to copy content between computers is to insert the Clickfree DVD into
your new computer. When the Clickfree application launches, just click Restore Files.
HOW DO I GET MY CONTENT BACK?
To get your content back you don’t need to do much more than you did to back the content
up – it just takes a couple of clicks.
As with Clickfree backup, you can either make some choices – whether to restore all, or
just selected content, and where the content is restored to – or you can allow Clickfree to
make the choices for you.
WHAT GETS RESTORED, AND TO WHERE – DEFAULT RESTORE?
When Clickfree restore runs without you changing any options, it restores all of the content
that was backed up.
Clickfree
•
•
•
c:\Restored Files (Office)
c:\Restored Files\Music (Music)
c:\Restored Files\Photos (Photo)
If you prefer, you can easily tell Clickfree restore to restore your files to another place on
Copyright © 2009 Storage Appliance Corporation.
26
Clickfree DVD Backup User Guide
Restoring my content
your computer’s hard drive.
For details, see:
•
•
“How do I let Clickfree restore decide what to restore and where?” on page 27
“How do I change how Clickfree restores content?” on page 30
HOW DO I LET CLICKFREE RESTORE DECIDE WHAT TO RESTORE AND WHERE?
Note:
Screenshots in this section show mostly Office Backup screens – the screens for
Music and Photo backup are almost identical.
You can allow Clickfree to make the decisions about what to restore and to where, but you
need to confirm what Clickfree plans to do.
♦
To let Clickfree decide what to restore and to where:
1. Make sure that your computer is switched on and has finished starting up.
2. Log in, if that is what you normally do.
3. Insert the Clickfree DVD with your backed-up files into your DVD drive.
Clickfree starts up just as it did when you used it to back up your content.
4. Wait for the Clickfree window to appear – this may take up to 60 seconds.
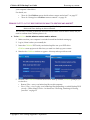
5. Because your Clickfree DVD has been used to back up content, Clickfree prompts you
to choose to:
•
•
Restore Files – store your backed-up files to this computer
View / Play – view or play your backed-up files (depending on which Backup DVD
you use – Office, Music, Photo – for details see “Browsing, Searching & Viewing
your files” on page 35.
Copyright © 2009 Storage Appliance Corporation.
27
Clickfree DVD Backup User Guide
Restoring my content
6. Since you are going to restore your files, click Restore Files:
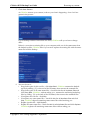
7. To restore all of your content, simply click Restore All.
8. Since you are letting Clickfree decide where to restore files to, simply click Start
Restore.
As Clickfree restores your content, it shows you what is happening – how far it has
gotten in the process.
If your backup consists of more than one
DVD, Clickfree tells you when to change disks.
Before it overwrites an existing file on your computer with one of the same name from
the backed-up files, Clickfree asks if you want to replace the existing file with the samename file from the backup:
Copyright © 2009 Storage Appliance Corporation.
28
Clickfree DVD Backup User Guide
Restoring my content
9. You can choose to:
•
•
•
•
•
•
Keep both copies of this one file – click Keep Both. Clickfree renames the backedup file by adding ‘ (2)’ to the end of the file name, then restores the renamed file.
Keep both copies of all same-name files – check Do this for all duplicate files and
click Keep Both. Clickfree, without asking you , renames the remaining backed-up
files by adding ‘ (2)’ to the ends of the file names, then restores the renamed files.
Not replace this one file – click Skip
Not replace any same-name files – check Do this for all duplicate files and click
Skip. Clickfree skips all remaining same-name files without asking you.
Replace just this file – click Replace
Replace all same-name files – check Do this for all duplicate files and click Replace.
Clickfree replaces all remaining same-name files without asking you.
If two files have the same size (KB) and same date modified, it is likely to be safe to
skip.
10. When all of your content has been restored, Clickfree tells you that it is done:
Note:
Your content has not been deleted from your Clickfree backup: it is still safe on the
DVD.
When you see the Restore Complete screen, simply click Close, then eject the
Clickfree DVD and store it in a safe place.
Copyright © 2009 Storage Appliance Corporation.
29
Clickfree DVD Backup User Guide
Restoring my content
HOW DO I CHANGE HOW CLICKFREE RESTORES CONTENT?
By making choices at several steps in the restore process you can affect which content is
restored and where it is restored to.
RESTORING CONTENT
♦
To change how Clickfree restores content:
1. Follow steps 1 to 6 of the previous section “How do I let Clickfree restore decide what
to restore and where?” on page 27:
2. What you do next depends on whether you want to restore all or only some of your
files.
•
•
If you want to restore all of your files, click Restore All and go to step 5.
If you want to restore only some of your files, click Restore Selected and continue
with step 3.
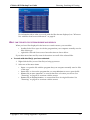
CHOOSING CONTENT TO BE RESTORED
3. The screen where you select files to restore shows the folders and files that were backed
up.
On the left you can see the folders from which files were backed up. All of the folders
are selected – their checkboxes are checked.
The first folder is highlighted, and you can see its files on the right. All of the files are
Copyright © 2009 Storage Appliance Corporation.
30
Clickfree DVD Backup User Guide
Restoring my content
selected – their checkboxes are checked.
4. For each folder whose content you do not want to restore, click the checkbox to unselect
the folder. This unselects all of the files in that folder. Or you can click the checkbox
beside a file to unselect each file that you do not want to restore.
5. When you are finished selecting and unselecting files and folders, click OK >.
You can now choose where the restored content will be restored to.
CHOOSING WHERE TO RESTORE CONTENT TO
6. What you do next depends on whether you want to restore your content to the default
location (see “What gets restored, and to where – Default restore?” on page 26), or to
somewhere else.
•
•
If you want to restore your content to the default location, click Start Restore and
continue with step 7.
If you want to restore your files to somewhere else, see “How do I choose another
drive and/or folder to restore to” on page 47 in the “Advanced topics” chapter.
Copyright © 2009 Storage Appliance Corporation.
31
Clickfree DVD Backup User Guide
Restoring my content
7. Click Start Restore.
As Clickfree restores your content, it shows you what is happening – how far it has
gotten in the process.
If your backup consists of more than one DVD, Clickfree tells you when to change
disks.
Before it overwrites an existing file on your computer with one of the same name from
the backed-up files, Clickfree asks if you want to replace the existing file with the samename file from the backup:
8. You can choose to:
•
•
•
•
•
•
Keep both copies of this one file – click Keep Both. Clickfree renames the backedup file by adding ‘ (2)’ to the end of the file name, then restores the renamed file.
Keep both copies of all same-name files – check Do this for all duplicate files and
click Keep Both. Clickfree, without asking you , renames the remaining backed-up
files by adding ‘ (2)’ to the ends of the file names, then restores the renamed files.
Not replace this one file – click Skip
Not replace any same-name files – check Do this for all duplicate files and click
Skip. Clickfree skips all remaining same-name files without asking you.
Replace just this file – click Replace
Replace all same-name files – check Do this for all duplicate files and click Replace.
Clickfree replaces all remaining same-name files without asking you.
Copyright © 2009 Storage Appliance Corporation.
32
Clickfree DVD Backup User Guide
Restoring my content
If two files have the same size (KB) and same date and time modified, it is likely to be
safe to skip.
When the restore is finished, Clickfree puts a link on your desktop pointing to where it
restored the files to.
9. Click Close then eject the Clickfree DVD Backup and store it in a safe place.
Note:
Your content has not been deleted from your Clickfree backup: it is still safe on the
DVD Backup.
HOW CAN I USE CLICKFREE TO COPY FILES FROM ONE COMPUTER TO ANOTHER?
Because you can restore files to any computer that satisfies the requirements in “What do I
need before I start?” on page 9, your Clickfree DVD Backup is ideal for moving files from
one computer to another.
Simply insert your Clickfree Backup DVD in the DVD drive of the computer that you want
to copy the files to, and follow the steps to restore. See “How do I get my content back?” on
page 26.
HOW DO I FIND FILES THAT WERE RESTORED
When Clickfree restored your files it put an icon on your desktop so that you can quickly
and easily get to the restored content:
♦
To find files that were restored:
Double-click the icon to open a Windows Explorer at the folder where your content was
restored.
You can now use Explorer to move the files to a more convenient folder.
My program cannot find the restored files – what should I do?
Some programs, especially those like Outlook in which you do not open files from a file
open dialog, expect to find their files in a particular folder. Because you restored your files
Copyright © 2009 Storage Appliance Corporation.
33
Clickfree DVD Backup User Guide
Restoring my content
to a folder other than the original location, your program may not be able to find them.
If your program displays an error message telling you that it cannot find its files, or if the
program starts up but your data is missing, you will need to move the files to the proper
folder. Unfortunately, this is different for every application and you may need to consult
the program’s Help or user guide to find out where the files need to be moved to.
Copyright © 2009 Storage Appliance Corporation.
34
Clickfree DVD Backup User Guide
Browsing, Searching & Viewing
Browsing, Searching & Viewing your files
HOW DO I BROWSE, SEARCH & VIEW? (OFFICE ONLY)
From the Backup Summary screen you can:
•
•
•
Browse your backup(s) for files
Search your backup(s) for files
View backed-up files
If you insert a DVD that contains backed-up Office files, after the program starts up you see
this screen:
♦
To browse and search for files:
Click View. The Backup Summary screen is displayed.
FROM THE BACKUP SUMMARY SCREEN
♦
To browse and search for files:
Do one of the following:
•
•
Click the name of a Type on the left of the screen, and follow ”How do I search for
my backed-up files” on page 39
Click the Browse Files tab, and follow “How do I browse my backed-up files” on
Copyright © 2009 Storage Appliance Corporation.
35
Clickfree DVD Backup User Guide
•
Browsing, Searching & Viewing
page 38
Click the Search Files tab, and follow ”How do I search for my backed-up files” on
page 39
HOW DO I PLAY OR EMAIL MUSIC? (MUSIC ONLY)
If you insert a DVD that contains backed-up Music files, after the program starts up you see
this screen:
♦
To browse and play music files:
1. Click View/Play:
2. Click the name of a folder on the left of the screen. The music files in the folder appear
on the right.
3. Select one or more files and use the controls at the bottom of the screen to play your
selection.
HOW DO I VIEW AND USE PHOTOS? (PHOTO ONLY)
If you insert a DVD that contains backed-up Photos, after the program starts up you see
this screen:
Copyright © 2009 Storage Appliance Corporation.
36
Clickfree DVD Backup User Guide
♦
Browsing, Searching & Viewing
To browse and view photos:
1. Click View:
The photo viewer shows “thumbnails”, or miniature views of your photos.
2. Click the name of a folder on the left of the screen. The music files in the folder appear
on the right.
Select one or more files and use the buttons at the bottom of the screen to:
•
•
Print them on your own printer
Email them (if you use Outlook or Outlook Express for your email)
You can also select one photo and:
•
♦
Use it as wallpaper for your computer
To select photos:
Click the photo so that the checkbox at the top right is checked. As you continue to click
photos, they are added to the selection.
Copyright © 2009 Storage Appliance Corporation.
37
Clickfree DVD Backup User Guide
♦
Browsing, Searching & Viewing
To use a photo as wallpaper:
3. Click the photo. Make sure that only one photo is selected.
4. Click Wallpaper. The photo replaces whatever wallpaper you were using:
♦
To print photos:
1. Select the photos.
2. Click Print @ Home and select the Print Style:
3. Set the Printer Options, and click Print.
♦
To email photos:
1. Select the photos.
2. Click Email:
If you use Outlook or Outlook Express for your email, the email program opens a new
blank message with the photos included as attachments.
3. Address and send the message as you would normally do.
♦
To open a photo:
Double-click the photo. It opens in your usual program for working with photos:
HOW DO I BROWSE MY BACKED-UP FILES? (OFFICE ONLY)
♦
To browse for files that you have backed up:
Expand and collapse the folders on the left side of the screen:
•
•
•
•
Click the +
to expand the view
Click ‘+’ to the left of a collapsed folder to expand it
Click ‘-’ to the left of an expanded folder to collapse it
Click a folder or the folder name to view the list of contents
Copyright © 2009 Storage Appliance Corporation.
38
Clickfree DVD Backup User Guide
Browsing, Searching & Viewing
To find out more about what you can do with the files that are displayed, see “What can
I do with files from browse and search ” on page 41.
HOW DO I SEARCH FOR MY BACKED-UP FILES? (OFFICE ONLY)
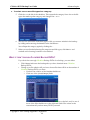
If you clicked the Search Files tab, the Search screen looks like this:
You can enter search factors to find the files you want.
If you clicked a category name, the File Type is already filled in, and all files of that
category, regardless of File Date or File Name, are displayed.
♦
To search for files:
1. If the backup used more than one DVD, decide if you want to search for files that may
be on any of the DVDs, or for files that are on this DVD currently in your DVD drive:
•
•
To search all DVDs that were used in the backup, select All Disk Files:
To search this DVD only, select Current Disk Files:
Copyright © 2009 Storage Appliance Corporation.
39
Clickfree DVD Backup User Guide
Browsing, Searching & Viewing
2. Use the combination of File Type, File Date, and File Name that you think should match
the file(s) you want to find:
These selections are combined so that only files that match all of them are found – in
this case only files in the category Artwork and Drawings, and created/last changed
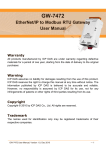
within the last year, and with names starting with ‘inuk’.
•
•
File Type – select a category, or ‘Any’ if you want all categories to be searched
File Date – select the time period within which the files were created or changed, or
•
‘All’ if you want the date to be ignored
File Name – type a “mask” to select files. A blank file name matches all files.
Type whatever you can remember of the file names you want to find, and substitute:
•
•
? for one character, meaning that character can be anything at all
* for any number of characters, meaning these characters can be anything at
all
For example (assuming that the File Type and File Date selections you made would
include them):
•
•
•
•
To find all files whose names begin with ‘08Dec’, type ‘08Dec*’ – this will
find 08Dec_LetterToMary.doc, but not 2008DecemberExpenses.xls
To find all files with ‘Dec’ anywhere in the name, type ‘*Dec*’ – this will find
08Dec_LetterToMary.doc, 2008DecemberExpenses.xls, etc
To find all files with ‘n’ as the second character of the name, type ‘?n*’ – this
will find IndiaSlides.ppt, inukshuk5.jpg, but not 5inukshuk.jpg
To find all files of type ‘doc’ or ‘docx’, type ‘*.doc*’ – of course, this will also
find any files that have type ‘doczzz’ as well
3. Click Search.
Files that match all of your search factors are displayed.
Copyright © 2009 Storage Appliance Corporation.
40
Clickfree DVD Backup User Guide
Browsing, Searching & Viewing
For information about what you can do with the files that are displayed, see “What can
I do with files from browse and search ” on page 41.
WHAT CAN I DO WITH FILES FROM BROWSE AND SEARCH
When you have files displayed in the browse or search screens, you can either:
•
•
double-click a file to open it with the program that your computer normally uses for
files of this type
right-click a file and choose one of several actions as shown below
If you select more than one file, some of the actions act on all of the selected files.
♦
To work with the file(s) you have selected:
1. Right-click the file (or one of the files) to bring up a menu.
2. Select one of the menu items:
•
•
•
•
Open – to open the file with the program that your computer normally uses for files
of this type
Open with – to choose the program that you want Windows to use to open the file
Restore file to your computer – to restore that file to a location you choose. See
“Restoring” on page 30 to continue with the restore.
Restore file to original location – to restore that file to its original location. See
“Restoring” on page 30 to continue with the restore.
Copyright © 2009 Storage Appliance Corporation.
41
Clickfree DVD Backup User Guide
Advanced topics
Advanced topics
WHAT IF THERE IS MORE THAN ONE USER ON MY COMPUTER?
This matters only if each user has a separate user login name for the computer. If every
user logs in with the same user name, all of their content is backed up and restored at
the same time whoever is logged in.
When Clickfree runs, it can only back up the content that you can access from your
login, and restore content to locations you have access to. Because Windows 2000,
Windows XP and Windows Vista maintain a separate Documents or My Documents
folder for each user name, Clickfree can back up only the corresponding content that
belong to the person who is logged in, unless that person logs in as Administrator.
“Administrator” is a special login name for the user who can make system-wide changes
to the computer, has full control, and can access all of the files on the computer. Most
home users are automatically the Administrator of their computer. If you don’t know if
you are the Administrator, or how to log in as Administrator, you might need to talk to
the person who set up the computer for you. If no one set up your computer for you,
then by default, you are the Administrator.
WHAT IF I HAVE MORE THAN ONE COMPUTER?
Each Clickfree Backup DVD can back up only one computer. If you have more than one
computer, use a separate Clickfree Backup DVD for each.
HOW DO I CHOOSE INDIVIDUAL FILE EXTENSIONS FOR BACKUP? (OFFICE)
You already saw how to choose file types for backup in “Choosing categories of content
to be backed up” on page 15.
You can also expand each category and select or unselect individual file types that make
up that category.
Note: When a category is selected or unselected by checking or unchecking its checkbox, all
of the file types that make up that category are also selected or unselected.
Copyright © 2009 Storage Appliance Corporation.
42
Clickfree DVD Backup User Guide
♦
Advanced topics
To select one or more file types in a category:
1. Click the + to the left of the checkbox. This expands the category list to show the file
types that make up that category, and changes the + to a -:
2. You can now choose the individual types of file you want to include in the backup
by adding and removing checkmarks in the checkboxes.
You collapse the category again by clicking the - .
3. If you need to back up file types that are not in any category, see “How do I
Add/Remove/Edit filetypes? (Office only)” on page 45 for details of how to add a
new file type.
4. When you are finished selecting file categories and file types, click Next > and
continue with choosing locations to be searched.
HOW DO I CHOOSE INDIVIDUAL FILE EXTENSIONS FOR BACKUP? (MUSIC, PHOTO)
Note:
Screenshots in this section show either Music or Photo Backup screens – the
screens for Music and Photo backup are almost identical to each other.
You already saw how to choose file types for backup in “Choosing categories of content
to be backed up” on page 15.
You can also expand each category and select or unselect individual file types that make
up that category.
Note: When a category is selected or unselected by checking or unchecking its checkbox, all
of the file types that make up that category are also selected or unselected.
Copyright © 2009 Storage Appliance Corporation.
43
Clickfree DVD Backup User Guide
♦
Advanced topics
To select one or more file types in a category:
5. Click the + to the left of the checkbox. This expands the category list to show the file
types that make up that category, and changes the + to a -:
6. You can now choose the individual types of file you want to include in the backup
by adding and removing checkmarks in the checkboxes.
You collapse the category again by clicking the - .
7. When you are finished selecting file categories and file types, click Next > and
continue with choosing locations to be searched.
WHAT IF I DON’T ENOUGH CLICKFREE BACKUP DVDS?
If you don’t have enough Clickfree Backup DVDs for a backup, you can either:
•
•
Click Cancel and rerun the backup after you have obtained more Clickfree
Backup DVDs
Change your file selection till you have chosen files that will fit on the number of
Clickfree Backup DVDs you have:
• Uncheck one of more of the Include checkboxes
• Click one of the (view/change) links
Uncheck one of more of the Folders checkboxes on the left, and/or one of
more of the files checkboxes on the right and click OK to return to the
screen that tell you how many DVDs you need.
Copyright © 2009 Storage Appliance Corporation.
44
Clickfree DVD Backup User Guide
•
Advanced topics
Repeat these steps until you can fit your backup on the number of
Clickfree Backup DVDs you have, and click I’m Ready – Start Backup
WHAT ARE ‘FACTORY SETTINGS’ AND HOW DO I USE THEM?
Factory settings can be used in Clickfree in two places:
•
When choosing categories and file types to be backed up – see “Choosing
categories of content to be backed up” on page 15
Use Factory Settings for categories and files types means that all categories and
the corresponding file types are included.
•
When choosing locations to search – see “Choosing locations to search for
content – required ” on page 15
Use Factory Settings for locations means that the entire computer is searched,
except for temporary folders and folders that Windows uses for its own files.
♦
To reset categories and file types to factory settings:
1. On the Choose File Types screen click Use Factory Settings.
2. Click Next > and continue with choosing locations to be searched.
♦
To reset locations to search to factory settings:
1. On the Choose File Locations screen click Use Factory Settings.
2. Click Next > and continue with choosing complete folders.
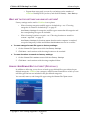
HOW DO I ADD/REMOVE/EDIT FILETYPES? (OFFICE ONLY)
In addition to allowing you to choose to back up pre-defined file types within the predefined categories, Clickfree has a category called Custom Extensions to which you can
add file types that are not included in the pre-defined categories.
You can add, remove, and change file types using the Choose File Types screen:
Copyright © 2009 Storage Appliance Corporation.
45
Clickfree DVD Backup User Guide
♦
To add a file type:
1. Click Add File Type:
2. Type the extension for the new file type, and click Save.
The new file type is added to Custom Extensions:
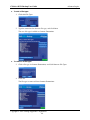
♦
To remove a file type:
3. Click a file type in Custom Extensions, and click Remove File Type:
4. Click Yes.
The file type is removed from Custom Extensions:
Copyright © 2009 Storage Appliance Corporation.
46
Advanced topics
Clickfree DVD Backup User Guide
♦
Advanced topics
To change a file type:
1. Click a file type in Custom Extensions, and click Edit File Type:
2. Type the new extension for the file type, and click Save.
The file type in Custom Extensions is modified.
3. When you are finished working with custom extensions, click Next > and continue
with choosing locations to be searched.
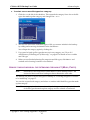
HOW DO I CHOOSE ANOTHER DRIVE AND/OR FOLDER TO RESTORE TO?
On the Select Location to Restore Files screen you can choose:
•
•
the disk drive to restore content to (if you have more than one)
the folder on that drive to use
If any drive does not have enough space for the content to be restored, the drive letter
and free space are ‘greyed’:
♦
To select another drive and/or folder to restore to:
1. Select the drive to restore to.
The folder that will be used is shown below the drives.
Copyright © 2009 Storage Appliance Corporation.
47
Clickfree DVD Backup User Guide
Advanced topics
2. To change the folder, click Change Folder and select the folder you want.
As usual, click + to expand a folder, - to collapse the folder again.
3. To create a new subfolder, click New Folder, type the folder name, and click OK.
4. Click Next >.
Copyright © 2009 Storage Appliance Corporation.
48
Clickfree DVD Backup User Guide
Legal stuff
Legal stuff
Clickfree and the Clickfree logo are trademarks or registered trademarks of Storage
Appliance Corporation.
Other product names used in this guide are recognized as trademarks or registered
trademarks of their owners.
The information contained in this guide is provided by Storage Appliance Corporation and while we
try to keep the information up-to-date and correct, we make no representations or warranties of any
kind, express or implied, about the completeness, accuracy, reliability, or suitability of the
information or related products. Any reliance you place on such information is therefore strictly at
your own risk.
In no event will we be liable for any loss or damage including without limitation, indirect or
consequential loss or damage, or any loss or damage whatsoever arising from loss of data or profits
arising out of, or in connection with, the use of this information or related products.
The specifications and performance of the products manufactured by Storage Appliance
Corporation and featured in this publication may be changed without notice.
Copyright © 2009 Storage Appliance Corporation. All rights reserved.
Copyright © 2009 Storage Appliance Corporation.
49