1
Introduction
Introduction
Thank you for purchasing this Canon Microfilm Scanner 800II.
These instructions describe how to use the Scanning Utility 800 utility software to import an
image projected on the scanner screen into your PC. To ensure that you fully understand the
functions of this scanning utility and can make the best possible use of your scanner, read
these instructions in conjunction with the Microfilm Scanner 800II Instructions. This scanning utility uses its own dedicated scanner driver and does not require an ISIS or TWAIN
driver.
1
Chapter0
Page 1
07.2.23, 13:24
Adobe PageMaker 6.5J/PPC
Conventions
Conventions
This manual uses the following symbols and icons.
IMPORTANT
NOTE
Indicates important information on items that must be observed or that are
prohibited as part of scanner operation. Read this information to prevent scanner faults or damage.
Indicates additional information that is useful in operating the scanner. It is a
good idea to read these notes.
(➝ P.XX)
Indicates a reference page. The number in the parentheses indicates a page
that contains more information about the previous sentence or paragraph.
Scanner
In these instructions, the Microfilm Scanner 800II is referred to simply as the
“scanner”.
2
Chapter0
Page 2
07.2.23, 13:24
Adobe PageMaker 6.5J/PPC
Contents
Contents
Introduction ...........................................................................................................1
Conventions ..........................................................................................................2
Chapter 1 Installation and Basic Operation of Scanning Utility 800 ..............5
Installing Scanning Utility 800 ...............................................................................6
Before Installation ................................................................................................................................. 6
Installing Scanning Utility 800 ............................................................................................................... 6
Uninstalling Scanning Utility 800 ........................................................................................................... 9
Basic Scanning Utility 800 Operations ................................................................10
Startup and Exit .................................................................................................................................. 10
Screen Descriptions ............................................................................................................................ 11
Chapter 2 Specifying the Scanner Settings....................................................17
Specifying the Scanner Settings .........................................................................18
Starting up Scanning Utility 800 .......................................................................................................... 18
Scanner Settings ................................................................................................................................. 20
Detail Settings ..................................................................................................................................... 23
Add on Settings ................................................................................................................................... 26
Gamma Curve Settings ....................................................................................................................... 31
Assigning Function Keys ..................................................................................................................... 33
Chapter 3 Using the Scanner ...........................................................................35
Scanning and Saving Images .............................................................................36
Scan Page .......................................................................................................................................... 36
Scan Batch to File ............................................................................................................................... 38
Opening a Saved File ..........................................................................................41
Printing Images ...................................................................................................43
Scan Batch to Printer .......................................................................................................................... 43
Printing the Displayed Image .............................................................................................................. 46
Other Operations.................................................................................................48
3
Chapter0
Page 3
07.2.23, 13:24
Adobe PageMaker 6.5J/PPC
Converter Mode .................................................................................................................................. 48
ReaderPrinter Emulation Mode ........................................................................................................... 50
Chapter 4 Troubleshooting ...............................................................................53
When an Error Message is Displayed .................................................................54
When the Scanned Image is Not Normal ............................................................56
Index ...................................................................................................................57
4
Chapter0
Page 4
07.2.23, 13:24
Adobe PageMaker 6.5J/PPC
Chapter 1
Installation and Basic
Operation of Scanning
Utility 800
This chapter describes how to install the
Scanning Utility 800 software and explains its
basic operations.
Installing Scanning Utility 800 .................................... 6
Before Installation ................................................. 6
Installing Scanning Utility 800 ............................... 6
Uninstalling Scanning Utility 800 .......................... 9
Basic Scanning Utility 800 Operations .................... 10
Startup and Exit .................................................. 10
Screen Descriptions ........................................... 11
Chapter1
Page 5
07.2.28, 19:35
Adobe PageMaker 6.5J/PPC
Chapter 1 Installation and Basic Operation of Scanning Utility 800
Installing Scanning Utility 800
This section describes the preparations for installing Scanning Utility 800 on your PC and
the installation procedure itself.
Before Installation
Check the following before you install Scanning Utility 800 on your PC.
● Scanning Utility 800 uses its own dedicated scanner driver and does not require a scanner driver such as an ISIS or TWAIN driver.
● When you install Scanning Utility 800, a folder called “\ceiscan” is created inside the
Windows folder. This is in addition to the installation destination folder.
The “cel*.dll” file is also copied to \windows\system.
Note that the Scanning Utility 800 software will no longer operate normally if these files are
modified.
● The Scanning Utility 800 uses “wnaspi32.dll” to control the scanner. It should be noted
that the scanner will not operate if the “wnaspi32.dll” is not correctly installed. If
“WINASPI32.DLL” is not installed, run “ASPIEX.EXE” located in the “ASPI” folder on the
setup disk. For details, refer to README.TXT.
IMPORTANT
Before using Scanning Utility 800, set the scanner to “Scanner Mode.” Using
Scanning Utility 800 when the scanner is in the “Reader-Printer Mode” results
in some of the functions described in this manual being disabled. For more
information on scanner operation modes, refer to “Operation Modes” on P.10
of the Microfilm Scanner 800II Instructions.
Installing Scanning Utility 800
This section describes the procedure for installing Scanning Utility 800 on your PC.
1
Login to Windows.
IMPORTANT
2
If you are using Windows 2000 Professional, or Windows XP, be sure to log
on as a user with administrator privileges.
Load the Setup disk into your CD-ROM drive.
6
Chapter1
Page 6
07.2.28, 19:35
Adobe PageMaker 6.5J/PPC
Chapter 1 Installation and Basic Operation of Scanning Utility 800
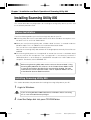
3
1
Click [Start] and select Run.
Installation and Basic Operation of Scanning Utility 800
The screen that appears differs depending on your version of Windows.
[Windows 2000]
4
In the Open field, type “D:\su800\setup.exe” and click [OK].
In these instructions, the CD-ROM drive is designated as drive D.
The Choose Setup Language dialog box appears.
5
Select English (United States) and click [OK].
The Welcome dialog box appears.
7
Chapter1
Page 7
07.2.28, 19:35
Adobe PageMaker 6.5J/PPC
Chapter 1 Installation and Basic Operation of Scanning Utility 800
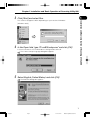
6
Click [Next].
The Choose Destination Location dialog box appears.
7
Check the displayed installation folder and then click [Next].
To change the installation destination folder, click [Browse] and then select a new destination folder.
Installation begins.
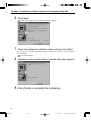
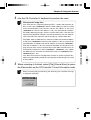
8
Installation ends and the Setup Complete dialog box appears.
9
Click [Finish] to complete the installation.
8
Chapter1
Page 8
07.2.28, 19:35
Adobe PageMaker 6.5J/PPC
Chapter 1 Installation and Basic Operation of Scanning Utility 800
Uninstalling Scanning Utility 800
1
Installation and Basic Operation of Scanning Utility 800
To uninstall Scanning Utility 800, click on Add/Remove Programs in the Control Panel, select
“Scanning Utility 800” and click [Change/Remove].
9
Chapter1
Page 9
07.2.28, 19:35
Adobe PageMaker 6.5J/PPC
Chapter 1 Installation and Basic Operation of Scanning Utility 800
Basic Scanning Utility 800 Operations
This section explains how to start up and exit Scanning Utility 800 and also describes the
Scanning Utility 800 screens.
Startup and Exit
◆Startup
1
Click the Windows [Start] button and choose [Programs]-[Scanning Utility 800].
Scanning Utility 800 starts up.
◆Exit
2
In the Scanning Utility 800 screen, select [File]-[Exit].
Scanning Utility 800 shuts down.
10
Chapter1
Page 10
07.2.28, 19:35
Adobe PageMaker 6.5J/PPC
Chapter 1 Installation and Basic Operation of Scanning Utility 800
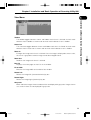
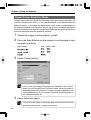
Screen Descriptions
1
Installation and Basic Operation of Scanning Utility 800
This section describes the functions of the menu bar and toolbar in the Scanning Utility 800
screens.
Menu bar
Toolbar
The scanned image is displayed here.
Status bar
◆Menu Bar
File Menu
Open
Opens an image saved by Scanning Utility 800. The four image formats that can be
opened by Scanning Utility 800 are TIFF (*.tif), BMP (*.bmp), JPEG (*.jpg) and JBIG
(*.jbg). (➝ P.41 “Opening a Saved File”.)
Save Page As
Saves the displayed page under a new name. When the open file includes multiple pages,
undisplayed pages are not saved.
(➝ P.36 “Scan Page” and P.41 “ Opening a Saved File”)
11
Chapter1
Page 11
07.2.28, 19:35
Adobe PageMaker 6.5J/PPC
Chapter 1 Installation and Basic Operation of Scanning Utility 800
Print
Prints the image. (➝ P.46 “Printing the Displayed Image”)
Print Format
Actual size:
Prints the image at the size shown on the screen, regardless of the paper
used for printing or the resolution at which the image was scanned.
If the image size is larger than the paper size, this setting shrinks the
image to match the paper size. If the image is smaller than the paper
size, the image is printed at actual size.
Prints each dot in the scanned image as one dot on the printer. Accordingly, the printed image is smaller when it is printed on a high-resolution
printer that prints smaller dots.
Fit to paper:
Actual pixel:
Printer setting...
Sets the printer.
Scanner setting...
Sets the scanner. (➝ P.18 “Specifying the Scanner Settings”)
Scan page
Scans the image currently shown on the screen. (➝ P.36 “Scan Page”)
Scan batch to file
Scans an image and saves the image to the specified file. (➝ P.38 “Scan Batch to File”)
Scan batch to printer
Scans an image and then prints the image on the printer currently set as the “Normally
used printer”. (➝ P.43 “Scan Batch to Printer”)
Cancel Scan
Cancels the current scan.
Select scanner...
Selects the scanner to be used.
Converter mode
Scans an image and then saves the image to the specified folder with the film address as
the file name or folder name. (➝ P.48 “Converter Mode”)
ReaderPrinter Emulation Mode
This is a mode in which the Scanning Utility 800 software emulates the scanner’s
ReaderPrinter mode and prints the image shown on the screen directly to the printer
connected to the computer. (➝ P.50 “ReaderPrinter Emulation Mode”)
Exit
Exits Scanning Utility 800.
12
Chapter1
Page 12
07.2.28, 19:35
Adobe PageMaker 6.5J/PPC
Chapter 1 Installation and Basic Operation of Scanning Utility 800
1
View Menu
Installation and Basic Operation of Scanning Utility 800
Toolbar
The toolbar toggles between shown and hidden each time it is clicked. A check mark
denotes that the toolbar is shown and no check mark indicates that it is hidden.
Status bar
The status bar toggles between shown and hidden each time it is clicked. A check mark
denotes that the status bar is shown and no check mark indicates that it is hidden.
Zoom In
Enlarges the image each time it is clicked. Once the image is displayed at 100% scale,
this menu is grayed out and the image cannot be enlarged further.
Zoom Out
Reduces the image each time it is clicked.
Best Fit
Displays the entire page so that it fits in the window.
Fit to width
Matches the image width to the width of the window.
Rotate Left
Rotates the image left (counterclockwise) by 90°.
Rotate Right
Rotates the image right (clockwise) by 90°.
Grayscale
Black and white images shown at reduced size are displayed in grayscale. Images shown
at a scale of 100% are not displayed in grayscale.
13
Chapter1
Page 13
07.2.28, 19:35
Adobe PageMaker 6.5J/PPC
Chapter 1 Installation and Basic Operation of Scanning Utility 800
Page Menu
Next page
Displays the image on the next page.
Prev Page
Displays the image on the previous page.
Help Menu
About
Displays the Scanning Utility 800 version and copyright information.
◆Toolbar
Open: Opens an image saved using Scanning Utility 800.
Save Page As: Saves the currently displayed page under a different name.
When the open file includes multiple pages, undisplayed pages are not
saved.
Print: Prints an image.
Fit to width: Matches the image width to the width of the windows.
Best Fit: Displays the entire page so that it fits in the window.
Zoom In: Enlarges the image each time it is clicked. Once the image is
displayed at 100% scale, this menu is grayed out and the image cannot be
enlarged further.
Zoom Out: Reduces the image each time it is clicked.
14
Chapter1
Page 14
07.2.28, 19:35
Adobe PageMaker 6.5J/PPC
Chapter 1 Installation and Basic Operation of Scanning Utility 800
1
Rotate Left: Rotates the image left (counterclockwise) by 90°.
Installation and Basic Operation of Scanning Utility 800
Rotate Right: Rotates the image right (clockwise) by 90°.
Previous Page: Displays the image on the previous page.
(if TIFF is selected as the file format and multiple pages are scanned)
Next page: Displays the image on the next page.
(if TIFF is selected as the file format and multiple pages are scanned)
Set Scanner: Sets the scanner.
Scan batch to file: Scans an image and saves the image to the specified
file.
Converter mode: Scans an image and then saves the image to the specified folder with the film address as the file name or folder name.
ReaderPrinter Emulation mode: A mode in which the Scanning Utility 800
software emulates the scanner’s ReaderPrinter mode and prints the image
shown on the screen directly to the printer connected to the computer.
About: Displays the Scanning Utility 800 version and copyright information.
15
Chapter1
Page 15
07.2.28, 19:35
Adobe PageMaker 6.5J/PPC
Chapter 1 Installation and Basic Operation of Scanning Utility 800
16
Chapter1
Page 16
07.2.28, 19:35
Adobe PageMaker 6.5J/PPC
Chapter 2
Specifying the Scanner
Settings
This chapter describes how to specify the
settings for Scanning Utility 800.
Specifying the Scanner Settings ...................... 18
Starting up Scanning Utility 800 .................. 18
Scanner Settings ......................................... 20
Detail Settings ............................................. 23
Add on Settings ........................................... 26
Gamma Curve Settings ............................... 31
Assigning Function Keys ............................. 33
Chapter 2 Specifying the Scanner Settings
Specifying the Scanner Settings
This section describes how to specify the settings used to scan images.
Starting up Scanning Utility 800
Begin by switching the scanner and PC on and then start up Scanning Utility 800.
1
Switch the scanner on.
2
Switch your PC on and start up Windows.
Windows starts up.
3
Click the [Start] button and select [Programs]-[Scanning Utility
800].
Scanning Utility 800 starts up.
18
Chapter 2 Specifying the Scanner Settings
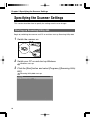
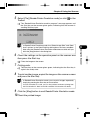
4
Select [File]–[Scanner setting...], or click
on the Toolbar.
2
Specifying the Scanner Settings
The Scanner setting... dialog box appears.
5
Select the desired settings screen and specify the required settings.
Scanner setting... dialog box
(➝P.20)
Add on dialog box (➝ P.26)
Gamma dialog box (➝ P.31)
Function key dialog box(➝ P.33)
Detail Settings dialog box (➝ P.23)
19
Chapter 2 Specifying the Scanner Settings
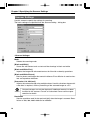
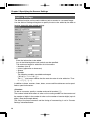
Scanner Settings
Use this screen to specify the settings for scanning.
The basic settings are specified from the Scanner setting... dialog box.
<Scanner Settings>
Mode
Selects the scanning mode.
[Black and White]
Scans film with content such as text and line drawings in black and white.
[Black and White-Fine]
Imports the image with enhanced contrast for film with no density gradations.
[Black and White-Picture]
Best for photos and images that contain halftones. Error diffusion is used to simulate and reproduce halftones.
[Grayscale-4, 16, 256 level]
Imports the scanned image using multiple values. Used for situations where multivalue data is required, such as processing of the scanned image on a PC.
IMPORTANT
Grayscale images can only be displayed if additional memory has been
installed in the scanner. Consult an authorized Canon service representative for details.
Resolution
Sets the resolution used (in dots per inch (dpi)) when the image is scanned. Resolutions of 200, 300, 400 or 600 can be selected.
20
Chapter 2 Specifying the Scanner Settings
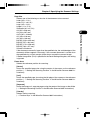
Page Size
Selects one of the following as the size of the document to be scanned.
Letter (8.5 x 11 in.)
Letter-R (11 x 8.5 in.)
Legal (8.5 x 14 in.)
Ledger (11 x 17 in.)
Statement (8.5 x 5.5 in.)
A3 (297 x 420 mm)
A4 (210 x 297 mm)
A4-R (297 x 210mm)
A5 (148 x 210 mm)
A6 (105 x 148 mm)
B4(ISO) (250 x 353 mm)
B4(JIS) (257 x 364 mm)
B5(ISO) (176 x 250 mm)
B5(JIS) (182 x 257 mm)
Scanner’s Maximum
If the document scanned is larger than the specified size, the outside edges of the
document will be cropped. Conversely, if the scanned document is smaller than
the specified size, a black margin will be shown around the scanned image.
If Detect Image Size (P.24) is specified in the Detail Setting dialog box, this setting
is ignored.
2
Specifying the Scanner Settings
Frame Area
Selects the reference position for scanning.
[Center]
Scans the specified page size using the center of the screen as the reference
position. (➝ “Setting the Scanning Position” in the Microfilm Scanner 800II Instructions)
[Left]
Scans the specified page size using the left edge of the screen as the reference
position. (➝ “Setting the Scanning Position” in the Microfilm Scanner 800II Instructions)
[Separate]
Scans the image as 2 separate pages using the center of the image as the divide.
(➝ “Setting the Scanning Position” in the Microfilm Scanner 800II Instructions)
[Overlay]
Selects overlay scanning.
(➝ “Function Keys” in the Microfilm Scanner 800II Instructions)
21
Chapter 2 Specifying the Scanner Settings
Brightness
Automatically or manually sets the brightness of the image. If the automatic setting is selected, the brightness is set automatically. When the manual setting is
selected, values from 1 to 255 can be specified, with larger settings increasing the
exposure level on the scanner and giving a brighter image. Smaller values decrease the exposure level and produce darker images.
Contrast
When the “Brightness” adjustment is set to Manual, the contrast in the image can
also be adjusted to any value between 1 and 255. If “Brightness” adjustment is set
to Automatic, the contrast cannot be adjusted.
<Buttons>
OK
Applies the selected settings and closes the dialog box.
Cancel
Closes the dialog box without applying the selected settings.
Detail
Opens the Detail Settings dialog box.
22
Chapter 2 Specifying the Scanner Settings
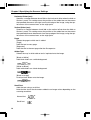
Detail Settings
The scanning settings can be specified in more detail.
Use this dialog box to specify the detailed scanning settings.
2
Specifying the Scanner Settings
Polarity
Selects the film polarity.
[Nega Film]
Reverses black and white in a negative film image and prints a positive image.
[Posi Film]
Prints positive film as a positive image.
[Auto]
Automatically detects whether the film is negative or positive and prints a positive
image.
Batch type
This mode can be used to select consecutive scanning when the FS Controller III
is used. Refer to the FS Controller III Instructions for details.
[Page]
Specifies consecutive scanning one page at a time.
[File]
Specifies consecutive scanning one file at a time.
[Batch]
Specifies consecutive scanning one batch at a time.
23
Chapter 2 Specifying the Scanner Settings
IMPORTANT
When you select Batch mode, always ensure that OFF is selected in
the SemiAuto setting. Selecting ON as the SemiAuto setting disables
the Batch mode setting. If you want to use Batch mode when the
SemiAuto setting is ON or if you want to use Batch mode from FS Controller I, select Batch mode from the keyboard supplied with the FS
Controller. Refer to your FS Controller user’s manual for details.
Image Rotation
Rotates the scanned image 90° to the right (clockwise) for printing.
If the Add on function (➝P.26) is selected, the image is rotated 90° and printed
after the text etc. has been imprinted on the image.
Detect Image Size
When this option is enabled, the Scan Size and Trimming/Border settings are also
enabled and Page Size in the scanner settings is disabled.
(➝ “Selecting the Scan Size” and “Trimming/Border settings” in the Microfilm Scanner 800II Instructions)
Add on
Check this option to imprint the information specified in the Add-on setting (➝P.26)
on the scanned image.
Semi Auto
If scanning is started with this option enabled, the Semi Auto key on the scanner’s
operation panel glows green and the Start key switches to the ready state. Check
the scanned image and then press the Start key to perform the scan. After you
have checked the scanned image, press the Start key to begin scanning. If you
switch Semi-Auto mode on, the [Detect image size] option is also set to ON.
Margin Scanning
Adjusts the margins (top, bottom, left and right) for the specified scan size.
To adjust the margins, click the Enable checkbox and specify a setting between –10
(reduces the scanned area by 10 mm) and +10 (enlarges the scanned area by 10).
For example, to slightly enlarge the scanning area so that the edges of the document are not cropped, specify a positive setting. To slightly reduce the scanning
area and avoid creating a black frame around the image, specify a negative setting.
These margin settings are also applied in image size detection.
AE Adjustment
This is a fine adjustment for the automatic brightness and contrast adjustments
and is enabled when automatic adjustment is selected in the Brightness setting.
AE adjustment can be set to any value between 1 and 17.
Sharpness
This setting is valid when the image mode setting is Black and White, Black and
White-Fine or Black and White-Picture. It sets the level of text outline enhancement and the softening of image gradations in photographs, etc. Values between
1 and 5 can be selected as the sharpness setting.
24
Chapter 2 Specifying the Scanner Settings
<Filter Settings>
These settings specify the image processing filters used.
Erase Background
This option is valid when the selected image mode is [Black and White] or [Black
and White-Fine], and automatically erases the background for text, line drawings,
etc.
2
Specifying the Scanner Settings
Erase Notch
Automatically erases portions of the image (notches) that overlap the outline.
Compliment Thin Line
Automatically joins faint or broken lines that occur when thin lines or faint documents are scanned.
Use User Gamma
Check this option to use the gamma data set in the Gamma Settings dialog box
(➝P.31). If gamma data is used, the polarity settings are ignored.
<Buttons>
Addon
Opens the Add on Settings dialog box (➝P.26). Use this dialog box to specify the
settings for the Add on function that imprints text on scanned images.
Gamma
Opens the Gamma Settings dialog box (➝P.31). The Gamma function reads in
and stores the gamma curve data used to modify the settings for representing
colors and halftones. The stored gamma data is valid when the Use User Gamma
option is checked.
Function Key
Opens the Function Key Settings dialog box (➝P.33). Use this dialog box to set
the function assignments specified for the function keys on the scanner or on the
optional operation keyboard.
OK
Applies the selected settings and closes the dialog box.
Cancel
Closes the dialog box without applying the selected settings.
Default
Restores the settings specified at shipment.
25
Chapter 2 Specifying the Scanner Settings
Add on Settings
The Add on function can be used to add any text or counter to a scanned image.
Use the Add on Settings dialog box to specify the text to be added by the Add on
function along with other related settings.
Text
Enter the information to be added.
Any of the following letters and symbols can be specified.
The maximum length for added text is 64 characters.
•
•
•
•
Numbers (0 to 9)
Letters (uppercase or lowercase)
Spaces
Symbols
The following symbols are added unchanged:
!”#$%&’()*+-./:;<=>?@^_|{}~‘
The \, [ , ] characters indicate that the next character is to be added on. Thus:
\\ ➝ \, \[ ➝ [, \] ➝ ].
In addition to these, counters, times, dates, arrows and film addresses can be specified as special characters.
<Counter>
To add on a counter, specify a number enclosed in brackets ([ ]).
The number inside the brackets is taken as the starting number for the counter and
the number of digits in the number is taken as the number of counter digits (up to 9
digits). (See the example below.)
The size of the timer increment and the timing of incrementing is set in “Counter
Settings” described below.
26
Chapter 2 Specifying the Scanner Settings
(Input)
CANON[00001]
(Add on result)
CANON 00001
<Time>
To add the time that the document was scanned, type “\TIME”.
The time is added as an 8-digit number (including colons) in the 24-hour clock format, as shown in the examples below.
2
(Add on result)
16:28:30
Specifying the Scanner Settings
(For 4.28.30 pm)
(Input)
\TIME
<Date>
To add the date that the document was scanned, type a combination of Y (year), M
(month) and D (day) to give “\MDY”, “\DMY” or “\YMD”.
The date is added as a 10-digit number, as shown in the example below. Slashes are
used as separators between the year, month and day.
(For January 20, 2000)
(Input)
(Add on result)
\YMD
2000/01/20
<Arrows>
To add an arrow, type one of the following:
(Input)
\u
\d
\l
\r
(Add on result)
↑
↓
←
→
<Film Address>
When the FS Controller III is used as the carrier, this option adds the film address of
roll film detected by the FS Controller III.
To add the film address (batch, file and page), type “\A”.
The added address is enclosed in brackets ([ ]), with the batch, file and page addresses added sequentially and separated by periods (.).Because batch, file and
pages addresses can each contain up to 9 digits, the added address consists of up
to 31 characters including the enclosing brackets and the separating periods.
(Input)
\A
(Add on result)
[123456.789012.345]
batch file
page
27
Chapter 2 Specifying the Scanner Settings
Horizontal Offset (mm)
Specifies a number between 0 and 500 as the horizontal offset when the Add on
feature is used. This setting moves the position of the added text on the screen
the specified distance to the right from the left edge of the image, using the topleft corner of the scanned area as the origin point.
Vertical Offset (mm)
Specifies a number between 0 and 300 as the vertical offset when the Add on
feature is used. This setting moves the position of the added text on the screen
the specified distance downwards from the top edge of the image, using the topleft corner of the scanned area as the origin point.
Pages
Selects the page to which text is added.
[Page]
Adds the text to every page.
[Separator]
Adds the text to the next page after the file separator.
Addon Type
Selects the way in which add-on text is imprinted onto the image.
[Black on White]
Adds black letters on a white background.
[White on Black]
Adds white letters on a black background.
[Black on Image]
Overlays black letters onto the image.
Small Font
Adds the text using a small font.
Note that the size of the characters added to an image varies depending on the
scanning resolution.
Normal font
Small font
28
Chapter 2 Specifying the Scanner Settings
<Counter Settings>
When a counter is set in a text string, use these settings to specify the size of the
counter increment and the increment trigger.
Increment Trigger
Select one of the following as the trigger for incrementing the number on the
counter.
2
Specifying the Scanner Settings
[New File]
Increments the counter when a new file command is used to change to a new file.
[File Mark]
Increments the counter at each file mark on the film.
[Batch Mark]
Increments the counter at each batch mark on the film.
[File/Batch Mark]
Increments the counter at each file or batch mark on the film.
[Each image]
Increments the counter at each scanned image.
[None]
The counter is not incremented.
NOTE
The [File Mark], [Batch Mark] and [File/Batch Mark] settings are valid
when the FS Controller III is used. Refer to the FS Controller III Instructions for details.
Increment
Sets the amount (0 to 255) by which the counter is incremented.
Reset Trigger
Select one of the following as the trigger for resetting the counter.
[New File]
Resets the counter when a new file command is used to change to a new file.
[File Mark]
Resets the counter at each file mark on the film.
[Batch Mark]
Resets the counter at each batch mark on the film.
[File/Batch Mark]
Resets the counter at each file or batch mark on the film.
[Each image]
Resets the counter at each scanned image.
[None]
The counter is not reset.
29
Chapter 2 Specifying the Scanner Settings
NOTE
The [File Mark], [Batch Mark] and [File/Batch Mark] settings are valid
when the FS Controller III is used. Refer to the FS Controller III Instructions for details.
Reset Value
Sets the starting value of the counter (0 to 255) after a reset.
<Buttons>
OK
Applies the selected settings and closes the dialog box.
Cancel
Closes the dialog box without applying the selected settings.
30
Chapter 2 Specifying the Scanner Settings
Gamma Curve Settings
Sets the gamma curve.
NOTE
2
Prepare gamma curve data matched to the gamma curve. (P.32
“Preparing Gamma Curve Data”)
Open the Gamma Curve Settings dialog box.
NOTE
3
2
Specifying the Scanner Settings
1
The gamma curve setting uses gamma curve data prepared by the
user to adjust the output values (to the computer) relative to the input
values for 256 levels of brightness in the scanned image.
The gamma curve settings specified here are only valid if the Use
User Gamma option is checked in the Detail Settings dialog box (P.25).
Only “Gray” can be selected from the Gamma Curve pull-down menu.
Always use the prepared gamma curve data to modify the gamma
curve.
Click [Download] and select the prepared gamma curve data.
The file extension for gamma curve data is “*.gmm”.
NOTE
4
Click [Open] to download the gamma curve data and return to
the Gamma Settings dialog box.
NOTE
The downloaded gamma curve data is stored in the scanner even when
it is switched off and remains valid until another set of gamma curve
data is downloaded.
31
Chapter 2 Specifying the Scanner Settings
◆ Preparing Gamma Curve Data
Gamma curve data consists of a 258-line text file (*.gmm) containing the output
values for the 256 levels of input values.
Always enter a connect as the first line of the gamma curve data and “256” in the
second line to indicate the number of data items.
Lines 3 onwards set the output values for each input value, starting with the output
values for “0” in line 3, “1” in line 4 and so on through to the output value for input
value “255” in line 258.
Smaller values in the gamma curve data give a darker image while larger values
produce a lighter image.
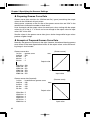
◆ Example of Prepared Gamma Curve Data
Normally, the gamma curve leans to the right. However, the leftward-leaning gamma
curve shown in the lower figure below inverts all the output values so that the resulting image is also inverted.
Gamma curve data
1st line : gamma curve
2nd line : 256
3rd line : 0
4th line : 1
5th line : 2
253rd line : 250
254th line : 251
255th line : 252
256th line : 253
257th line : 254
258th line : 255
(Gamma curve)
255
Output value
0
Input value
Gamma curve data (inverted)
1st line : inverted linear gamma curve
255
2nd line : 256
3rd line : 255
4th line : 254
5th line : 253
Output value
253rd line : 5
254th line : 4
255th line : 3
256th line : 2
257th line : 1
258th line : 0
32
255
(Gamma curve)
0
255
Input value
Chapter 2 Specifying the Scanner Settings
Assigning Function Keys
Specific functions can be stored in the function keys on the scanner.
Use the Function Key Settings dialog box to set the function keys.
2
Specifying the Scanner Settings
1
Select a function key.
When you select the function key to which a function is to be assigned from the
pull-down menu, the function stored in the selected key by the assignment function is displayed.
NOTE
2
F1 to F6 in the Key field correspond to the F1 to F6 keys on the operation panel. The P1 to P4 keys correspond to the P1 to P4 keys on the
operation keyboard (sold separately).
Assign the function.
Any of the following 15 functions can be assigned to a function key. Refer to
“Function Keys” on P.38 of the Microfilm Scanner 800II Instructions for more
information on the respective functions.
[New File]
When you press this key, the data from the scanned image is saved to a separate file (folder).
[Rotate Right]
Rotates the image on the screen 90° to the right (clockwise).
[Rotate Left]
Rotates the image on the screen 90° to the left (counterclockwise).
[Lighten Screen]
Brightens the image on the screen
[Darken Screen]
Darkens the image on the screen
[Standby Mode]
Puts the scanner into Standby mode. Screen projection is switched off and the
standby display appears.
When you press this key again or press any other key, Standby mode is cancelled.
[Addon]
Specifies whether text, counters, or information such as the date or time are imprinted on the scanned image.
33
Chapter 2 Specifying the Scanner Settings
[Margin Scanning]
Scans the margins when an image is scanned.
[Adjust Margin]
Adjusts the size of the margin during scanning. When you press this key, the
display shows the margin size and you can adjust the margins through a range
from –10 mm to 10 mm either side of 0
[Adjust Sharpness]
Selects the level of sharpness (edge enhancement) during scanning. When you
press this key, the display shows the level of sharpness. Select any of 5 levels
from 1 to 5.
[Skew Correction]
Corrects skewed images during scanning so that images are scanned straight.
[Overlay Scanning]
When you press this key, the 2 images in the A and B positions on duplex film are
scanned for output as a single image with one image positioned above the other.
[Picture Mode]
Pressing this key switches the scan mode to [Monochrome Photo].
[600 DPI]
Toggles the scan resolution between 300 and 600 dpi. When this key is set to ON,
the image is scanned at 600 dpi. When you change the setting to OFF, the scanning resolution changes to 300 dpi.
[Background Erase]
When the image mode is set to Black and White or Black and White-ED, pressing
this key automatically clears any speckling in the background of text, line drawings, etc.
[Scanner]
Pressing this key switches the scanner to Scanner mode.
[Printer]
Pressing this key switches the scanner to Reader Printer mode.
[Auto Centering]
In Reader Printer mode, this option prints the scanned image in the center of the
page.
[Setting Assignment]
Stores the operation panel status and the scan settings.
3
Press the Set button to store the functions assigned to the function keys.
NOTE
34
To assign the “Setting Assignment” option to a function key, specify
the desired scanner settings, click [OK] and close the [Detail Settings]
and [Scanner setting...] dialog boxes. Then open the Function Key
dialog box and select the key to which the settings will be assigned
and select “Setting Assignment”. Then click [Set] to store the setting.
Chapter 3
Using the Scanner
This chapter describes the procedures for
using Scanning Utility 800.
Scanning and Saving Images .................................. 36
Scan Page ......................................................... 36
Scan Batch to File .............................................. 38
Opening a Saved File .............................................. 41
Printing Images ........................................................ 43
Scan Batch to Printer ......................................... 43
Printing the Displayed Image ............................ 46
Other Operations ..................................................... 48
Converter Mode ................................................. 48
ReaderPrinter Emulation Mode .......................... 50
Chapter 3 Using the Scanner
Scanning and Saving Images
There are two ways to scan the image projected on the screen and save the scanned image
as a file on your PC: “Scan page” and “Scan batch to file”. The scanning procedures for the
two differ.
The procedure also differs depending on the carrier used. Refer to the instructions for the
carrier for details.
Scan Page
The Scan Page function allows you to scan just one page so you can check the scanned
image before saving or printing the image projected on the screen. Because the image is
not saved or printed in this mode, you must save and print the image if required.
1
2
Project the image on the scanner screen.
Select [File]-[Scan page].
The image is scanned.
NOTE
3
In Semi-auto mode, the Start key on the scanner’s operation panel glows
green and the Start key switches to the ready state. Check the scanned image and then press the Start key to perform the scan.
Check the scanned image.
The [View] menu and Toolbar buttons can be used to check the image.
Fit to width: Matches the image width to the width of the window.
Best Fit: Displays the entire page so that it fits in the window.
Zoom In: Enlarges the image each time it is clicked. Once the image is displayed at 100%
scale, this menu is grayed out and the image cannot be enlarged further.
Zoom Out: Reduces the image each time it is clicked.
Rotate Left: Rotates the image left (counterclockwise) by 90°.
Rotate Right: Rotates the image right (clockwise) by 90°.
36
Chapter 3 Using the Scanner
4
Select [File]-[Save Page As...] or click
in the Toolbar.
The “ Save Page As...” dialog box appears.
5
Specify the file name, type (format) and save destination, and
then click [Save].
3
Using the Scanner
The scanned image is saved.
File Types
NOTE
Scanned images can be saved in the TIFF (*.tif), BMP (*.bmp), JPEG (*.jpg)
and JBIG (*.jbg) file formats. However, the displayed file types differ depending on the “Mode” scanner setting (P.20).
Scan Mode
Available File Formats
JBIG
BMP
JPEG TIFF(MMR)
Black and White
Black and White-Fine
Black and White-Picture
Grayscale
File Names
Specify file names no longer than 59 characters, not including the file extension.
If the file name is longer than 59 characters, an error message is displayed.
6
Print the scanned image. (P.46 “Printing the Displayed Image”)
37
Chapter 3 Using the Scanner
Scan Batch to File
This mode allows you to specify the file name for the saved image before scanning the
image and saving the scanned image to the specified file.
1
2
Project the image on the scanner screen.
Select [File]-[Scan batch to file...] or click
on the Toolbar.
The “ Save Page As...” dialog box appears.
3
Specify the file name, type (format) and save destination, and
then click [Save].
The “Start Scan” dialog box appears.
NOTE
Number of file name characters
The maximum number of file name characters to be saved is 59 except for the extension. If the number of file name characters has exceeded 59, an error message will appear.
File types
You can save the scanned file in the format of TIFF(*.tif).
BMP(*.bmp).JPEG(*.jpg).JBIG(*.jbg). However, the type of the file to
be displayed differs according to the “Image Selection” of scanner setting. (See Page 37).
38
Chapter 3 Using the Scanner
Saving images when film is scanned repeatedly (consecutively)
When film is scanned repeatedly (consecutively) and the images are saved
in TIFF format, multiple pages of images are saved as a single TIFF file (multipage TIFF).
If the images are saved in the BMP, JBIG or JPEG format, each page in the
document is saved to the specified destination folder as a separate file. The
files are named using sequential numbers (“0001”, “0002”, etc.) automatically
appended to the specified file name. (Eg. When the pages are saved as BMP
files with the “scan.bmp” file name, files called “scan0001.bmp”,
“scan0002.bmp”, etc. are created.)
If you use the New File function or File Separator function to separate files,
folders with sequential numbers (“0001”, “0002”, etc.) are automatically created for each separator and the images are saved into those folders.
NOTE
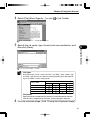
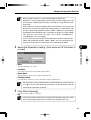
4
3
Using the Scanner
Select the [Separator] setting. (Only when an FS Controller III
is used)
• None
No file separators are used.
• File Mark
File marks on the film are used to separate files.
• Batch Mark
Batch marks on the film are used to separate files.
• File/Batch Mark
File and batch marks on the film are both used to separate files.
NOTE
5
File separators can be selected when the FS Controller III is used. They act
as triggers for file separation during continuous scanning. Refer to the FS
Controller III Instructions for details.
Click [Start Scanning].
The screen image is scanned.
NOTE
In Semi-auto mode, the Start key turns green indicating the ready state. Check
the scanned image and then press the Start key to perform the scan.
39
Chapter 3 Using the Scanner
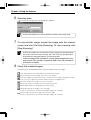
6
Scanning ends.
The Start Scanning (Continue) dialog box appears.
In Semi-Auto mode, the scanner’s Start key switches to the ready state.
NOTE
7
To scan another image, project the image onto the scanner
screen and click [Continue Scanning]. To stop scanning, click
[Stop Scanning].
NOTE
In Semi-auto mode, you can continue scanning simply by pressing the Start
key on the scanner. To stop scanning, press the Clear key. The Start Scanning (Continue) dialog box appears and scanning stops.
If you are using the FS Controller III, you can perform continuous scanning from the FS Controller III keyboard. Refer to the FS Controller III
Instructions for details.
8
Check the scanned images.
The [View] menu and Toolbar buttons can be used to check the image.
Fit to width: Matches the image width to the width of the window.
Best Fit: Displays the entire page so that it fits in the window.
Zoom In: Enlarges the image each time it is clicked. Once the image is displayed at 100%
scale, this menu is grayed out and the image cannot be enlarged further.
Zoom Out: Reduces the image each time it is clicked.
Rotate Left: Rotates the image left (counterclockwise) by 90°.
Rotate Right: Rotates the image right (clockwise) by 90°.
Next page: Displays the image on the next page.
(if TIFF is selected as the file format and multiple pages are scanned)
Previous Page: Displays the image on the previous page.
(if TIFF is selected as the file format and multiple pages are scanned)
40
Chapter 3 Using the Scanner
Opening a Saved File
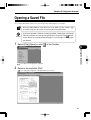
This section describes how to use Scanning Utility 800 to open a saved file.
Scanning Utility 800 can only open TIFF (*.tif), BMP (*.bmp), JPEG (*.jpg)
and JBG (*.jbg) files that were saved using Scanning Utility 800.
NOTE
IMPORTANT
1
If you have opened a TIFF file containing multiple saved pages (multi-page
button,
TIFF file) and then save the file using [File]–[Save Page As] or the
note that only the currently displayed page is saved. Images on other pages
are deleted.
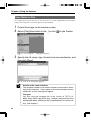
Select [File]-[Open] or click
in the Toolbar.
3
Using the Scanner
The Open File dialog box appears.
2
Select a file and click [OK].
The selected image file is displayed on the screen.
41
Chapter 3 Using the Scanner
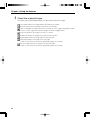
3
Check the scanned image.
The [View] menu and Toolbar buttons can be used to check the image.
Fit to width: Matches the image width to the width of the window.
Best Fit: Displays the entire page so that it fits in the window.
Zoom In: Enlarges the image each time it is clicked. Once the image is displayed at 100%
scale, this menu is grayed out and the image cannot be enlarged further.
Zoom Out: Reduces the image each time it is clicked.
Rotate Left: Rotates the image left (counterclockwise) by 90°.
Rotate Right: Rotates the image right (clockwise) by 90°.
Next page: Displays the image on the next page.
(if TIFF is selected as the file format and multiple pages are scanned)
Previous Page: Displays the image on the previous page.
(if TIFF is selected as the file format and multiple pages are scanned)
42
Chapter 3 Using the Scanner
Printing Images
To print an image projected onto the screen, you can either send the scanned image
data to the printer (Scan batch to printer) or print an image downloaded to the PC.
The print procedures differ for the two methods.
In the case of Scan batch to printer, the procedure also differs depending on the carrier
used. Refer to the instructions for your carrier for details.
Scan Batch to Printer
In the “Scan batch to printer” method, the image projected on the screen is scanned
スキャン結果の画像がここに表示されます。
and sent directly to the printer. In this mode, because the scanned image is not automatically saved, the image should be saved if necessary.
3
Project the image onto the scanner screen.
Using the Scanner
1
2
3
Check [Printer setting...].
Select [File]-[Print Format].
• Actual size
Prints at the size shown on the screen, regardless of the paper used for printing and the
resolution at which the image was scanned.
• Fit to paper
If the image size is larger than the paper size, this setting shrinks the image to match
the paper size. If the image is smaller than the paper size, the image is printed at actual
size.
• Actual Pixel
Prints each dot in the scanned image as one dot on the printer. Accordingly, the printed
image is smaller when it is printed on a high-resolution printer that prints smaller dots.
43
Chapter 3 Using the Scanner
4
Select [File]-[Scan batch to printer...].
The Start Scanning dialog box appears.
5
Click [Start Scanning].
The screen image is scanned.
NOTE
6
In Semi-auto mode, the Start key turns green indicating the ready state. Check
the scanned image and then press the Start key to perform the scan.
Scanning ends.
The Start Scanning (Continue) dialog box appears.
In Semi-Auto mode, the scanner’s Start key switches to the ready state.
NOTE
44
Chapter 3 Using the Scanner
7
To scan another image, project the image onto the scanner
screen and click [Continue Scanning]. To stop the Scan batch
to printer operation, click [Stop Scanning].
NOTE
In Semi-auto mode, you can continue scanning simply by pressing the Start
key on the scanner. To stop the Scan batch to printer operation, press the
Clear key. The Start Scanning (Continue) dialog box appears and the Scan
batch to printer operation ends.
If you are using the FS Controller III, you can perform continuous scanning from the FS Controller III keyboard. Refer to the FS Controller III
Instructions for details.
8
Check the scanned images.
3
Using the Scanner
45
Chapter 3 Using the Scanner
Printing the Displayed Image
The Print command in the File menu prints the image displayed on the PC screen.
1
2
3
Check the image displayed on the PC screen.
Check the [Printer Setting...].
Select [File]-[Print Format]
• Actual size
Prints at the size shown on the screen, regardless of the paper used for printing and
the resolution at which the image was scanned.
• Fit to paper
If the image size is larger than the paper size, this setting shrinks the image to match
the paper size. If the image is smaller than the paper size, the image is printed at
actual size.
• Actual Pixel
Prints each dot in the scanned image as one dot on the printer. Accordingly, the printed
image is smaller when it is printed on a high-resolution printer that prints smaller dots.
4
Select [File]-[Print] or click
The Print dialog box appears.
46
on the Toolbar.
Chapter 3 Using the Scanner
5
Check the print settings and click [OK].
The displayed image is printed.
3
Using the Scanner
NOTE
• The Printer Properties screen differs depending on the printer driver used.
Refer to the printer driver instructions or the help file for details.
• When an image spans multiple pages, you can select [All] to print all
the pages in the “Pages” range or select only specific pages to be
printed.
47
Chapter 3 Using the Scanner
Other Operations
Scanning Utility 800 also provides 2 additional scanning modes: Converter mode and
ReaderPrinter mode.
Converter Mode
Converter mode can be used when an FS Controller III is used as the carrier. In this mode,
file names are automatically created from the film address detected by the FS Controller III
and scanned images are saved to a specified folder.
1
2
Project an image onto the scanner screen.
Click
in the Toolbar.
The Folder Select dialog box appears.
3
Specify the destination folder for the saved files and the file
type, then click [OK].
The mode switches to Converter mode.
NOTE
Creating New Folders
When you want to create a new folder, enter a new folder name into
[Current Folder] under an absolute path name, and click on [Create
New] button. The number of absolute path name characters in this
case must not exceed 200.
File Types
Scanned images can be saved in the TIFF (*.tif), BMP (*.bmp), JPEG (*.jpg)
and JBIG (*.jbg) file formats. However, the displayed file types differ depending on the “Mode” scanner setting (P.20).
Scan Mode
Black and White
Black and White-Fine
Black and White-Picture
Grayscale
48
Available File Formats
JBIG
BMP
JPEG TIFF(MMR)
Chapter 3 Using the Scanner
4
Use the FS Controller III keyboard to perform the scan.
File names for image files
NOTE
If the TIFF format is selected (multi-page TIFF), a folder with the batch address as the name (“00000003B” when the batch address is “3B”) is created
in the specified folder, and TIFF files with the file address as the name
(“00000009F.tif” when the file address is “9F”) are automatically created in
that folder. Multi-page images are then saved to those files. If the New File
function or File Separator function is used to separate files, files are automatically created for each separator and the images are saved to those files.
If the BMP, JBIG or JPEG format is selected, a folder with the batch address
as the name (“00000003B” when the batch address is “3B”) is created in the
specified folder, and folders with the file address as the name (“00000009F”
when the file address is “9F”) are created in that folder. The images on each
page are each then saved as separate files in that folder. The file names are
automatically assigned in a series (“00000001P”, “00000002P”, etc.). (When
the BMP format is selected, the created file names are “00000001P.bmp”,
“00000002P.bmp”, etc.)
If the New File function or File Separator function is used to separate files,
folders are automatically created for each separator and the images are saved
in those folders.
Using the Scanner
5
3
When scanning is finished, select [File]-[Cancel Scan] or press
the Clear button on the FS Controller III to exit Converter mode.
NOTE
When you select [File]-[Cancel Scan], the “Scanning was canceled” message
is displayed. Click [OK].
49
Chapter 3 Using the Scanner
ReaderPrinter Emulation Mode
ReaderPrinter Emulation mode, the Scanning Utility 800 software emulates the
scanner’s ReaderPrinter mode (➝ P.10 “Operation Modes” in the Microfilm Scanner
800II Instructions). In this mode, the image shown on the screen is printed directly to
the printer connected to the computer. As with the scanner’s ReaderPrinter mode,
printing in ReaderPrinter Emulation mode is performed from the operation panel and
cannot be performed from the application software.
1
2
Project the image onto the scanner screen.
Press the Scan Size key on the scanner to set the paper size to
be used for printing.
(120V model)
3
Check “Printer setting...”
NOTE
4
Use a printer that supports the paper size specified on the scanner.
When you use ReaderPrinter Emulation mode, the printer paper is
selected automatically. However, if margin scanning is specified or the
Trimming/Border key on the scanner is pressed, the printer paper is
not selected automatically.
Check the printer paper.
NOTE
50
(220 – 240V model)
If the size of the paper in the printer does not match the scan size
specified on the scanner, a printer error occurs.
Chapter 3 Using the Scanner
5
Select [File]-[ReaderPrinter Emulation mode] or click
Toolbar.
in the
The “ReaderPrinter Emulation mode in progress” message appears and
the Start key on the scanner glows green, indicating that the scanner is
awaiting Start key input.
NOTE
3
Using the Scanner
6
In ReaderPrinter Emulation mode, the “Detect Image Size” and “Semi
Auto” options in the Detail Settings dialog box are always enabled.
Note also that ReaderPrinter Emulation mode does not end until you
click the [Stop] button in the dialog box.
Check the settings on the operation panel on the scanner and
then press the Start key.
Prints the image on the screen.
7
Printing ends.
The Start key on the scanner glows green, indicating that the Start key is
again in the ready state.
8
To print another image, project the image on the scanner screen
and press the Start key.
NOTE
In ReaderPrinter Emulation mode, you can print images repeatedly
simply by pressing the Start key on the scanner.
If an FS Controller III is used, you can also perform continuous printing from
the FS Controller III. Refer to the FS Controller III Instructions for details.
9 Click the [Stop] button to end ReaderPrinter Emulation mode.
10 Check the printed image.
51
Chapter 3 Using the Scanner
52
Chapter 4
Troubleshooting
This chapter lists the possible causes of errors
and describes how to deal with those errors.
When an Error Message is Displayed ...................... 54
When the Scanned Image is Not Normal ................ 56
Index ........................................................................ 57
Chapter 4 Troubleshooting
When an Error Message is Displayed
If a document cannot be scanned correctly, an error message may be displayed. Check the
type of error and deal with the error as described below.
54
Message
Scanner is not found. Check the cable.
Solution 1
The computer does not recognize the scanner. Check that the PC and scanner
are correctly connected.
Solution 2
This message is sometimes displayed even when the PC does recognize the
scanner. In this event, the cause is probably that the SCSI is not suitable for the
PC. This error message can sometimes be cancelled by setting synchronous
transmission in the scanner to OFF. Contact an authorized Canon service center for information on the scanner’s synchronous transmission settings.
Message
Parameter is not valid. Change the parameters.
Solution
An illegal value was specified as one of the scanner settings in the Scanner
Settings dialog box or Add on Settings dialog box. Change the setting to a
valid value.
Message
Scanner reset detected. Try again.
Solution
Follow the on-screen directions and switch the scanner ON and then OFF again.
Message
No page was found. Set the paper and try again.
Solution
There is no film loaded in the scanner. Load a film and try scanning again.
Message
Scanner is busy.
Solution
The scanner cannot perform a new scan because it is processing other data or
because the search parameter is incorrect. Check the status of the scanner
and search unit.
Message
Scanning is not possible with the current settings. Change the settings.
Solution
One or more of the scanner settings is invalid. Change the settings and try
scanning again.
Chapter 4 Troubleshooting
File access error. Check whether the media is write protected or has insufficient available space.
Solution 1
The image file you tried to open cannot be opened as it is in use by another
application program. Close the file in the other application.
Solution 2
The file you tried to save cannot be replaced as it is write protected. Save the
file under a different name.
Solution 3
There is insufficient available space on the destination media. Increase the
available space or save the file to a different destination.
Message
File already exists. Do you wish to overwrite it?
Solution
A file already exists with the name you are using to save the image file. To
overwrite the existing file, click [OK] or [Replace all]. To retain the existing file,
click [Cancel] and save the file under a different name.
Message
File name too long. Use no more than 59 characters (excluding file extension).
Solution
The file name under which you tried to save the file is too long. Save the file
again using a file name no longer than 59 characters (excluding the file extension).
4
Troubleshooting
Message
55
Chapter 4 Troubleshooting
When the Scanned Image is Not Normal
If there is a problem with the scanned image (the image is not clear or there are smudges or
stripes in the image), the problem is probably caused by one of the following. Check the
circumstances and apply the appropriate solution.
● The scanner’s scanning plate or lense are soiled.
If the carrier’s glass plate or the lens is soiled, the soiling also appears on the scanned
image.
➝ Clean the carrier’s glass plate and the lens. Refer to “Maintenance and Troubleshooting” in the Microfilm Scanner 800II Instructions for information on how to clean the lens.
For information on cleaning the carrier glass plate, refer to the instructions provided
with the carrier.
● The scanner settings are incorrect.
When the scanner settings are not correct, the scanned image is unclear or dull and dark.
➝ Check the Brightness settings.
● Scanning Utility 800 does not run correctly.
If documents are not scanned correctly even when the scanner settings are adjusted,
Scanning Utility 800 may not be running correctly.
➝ Re-install Scanning Utility 800. (See “Installing Scanning Utility 800” on P.6.)
● Other causes
If the solutions given above to not solve the problem, contact an authorized Canon service center.
56
Chapter 4 Troubleshooting
Index
A
B
C
Converter Mode ........................................... 48
Counter Settings .......................................... 29
Increment ............................................... 29
Increment Trigger ................................... 29
[Batch Mark] ..................................... 29
[Each Image] .................................... 29
[File Mark] ......................................... 29
[File/Batch Mark] .............................. 29
[New File] .......................................... 29
[None] ............................................... 29
Reset Trigger .......................................... 29
[Batch Mark] ..................................... 29
[Each Image] .................................... 29
[File Mark] ......................................... 29
[File/Batch Mark] .............................. 29
[New File] .......................................... 29
[None] ............................................... 29
Reset Value ............................................ 30
Creating New Folders .................................. 48
4
Troubleshooting
Add on ......................................................... 24
Add on Settings ........................................... 26
Addon Type .................................................. 28
[Black on Image] .................................... 28
[Black on White] ..................................... 28
[White on Black] ..................................... 28
Horizontal Offset (mm) ............................ 28
Pages ..................................................... 28
[Page] ............................................... 28
[Separator] ........................................ 28
Small Font ............................................... 28
Text ......................................................... 26
Arrows ................................................. 27
Counter .............................................. 26
Date .................................................. 27
Film Address ..................................... 27
Time .................................................. 27
Vertical Offset (mm) ................................ 28
AE Adjustment ............................................. 24
Assign the function ...................................... 33
[600 DPI] .................................................. 34
[Add on] ................................................... 33
[Adjust Margin] ......................................... 34
[Adjust Sharpness] ................................... 34
[Auto Centering] ....................................... 34
[Background Erase] ................................. 34
[Darken Screen] ....................................... 33
[Lighten Screen] ....................................... 33
[Margin Scanning] .................................... 34
[New File] ................................................. 33
[Overlay Scanning] .................................. 34
[Picture Mode] .......................................... 34
[Printer] ..................................................... 34
[Rotate Left] .............................................. 33
[Rotate Right] ........................................... 33
[Scanner] .................................................. 34
[Setting Assignment] ................................ 34
[Skew Correction] ..................................... 34
[Standby Mode] ....................................... 33
Assigning Function Keys ............................. 33
[File] ....................................................... 23
[Page] ..................................................... 23
Before Installation .......................................... 6
Buttons ............................................ 22, 25, 30
Add on .................................................... 25
Cancel ....................................... 22, 25, 30
Default .................................................... 25
Detail ...................................................... 22
Function Key .......................................... 25
Gamma ................................................... 25
OK ............................................. 22, 25, 30
D
Detail Settings .............................................. 23
Detail Settings dialog box ............................ 19
Add on .................................................... 19
Function key ........................................... 19
Gamma ................................................... 19
Detect Image Size ........................................ 24
E
Example of Prepared Gamma Curve Data .. 32
Batch type .................................................... 23
[Batch] .................................................... 23
57
Chapter 4 Troubleshooting
F
File Menu ...................................................... 11
Cancel Scan ........................................... 12
Converter mode ..................................... 12
Exit .......................................................... 12
Open ...................................................... 11
Print ........................................................ 12
Print Format ............................................ 12
Actual pixel ....................................... 12
Actual size ........................................ 12
Fit to paper ....................................... 12
Printer setting... ...................................... 12
ReaderPrinter Emulation Mode .............. 12
Save Page As ......................................... 11
Scan batch to file ................................... 12
Scan batch to printer .............................. 12
Scan page .............................................. 12
Scanner setting... ................................... 12
Select scanner... ..................................... 12
File Names ................................................... 37
File Types ......................................... 37, 38, 48
BMP ............................................. 37, 38, 48
JBIG ............................................ 37, 38, 48
JPEG ........................................... 37, 38, 48
TIFF(MMR) ................................... 37, 38, 48
Filter Settings ............................................... 25
Complement Thin Line ........................... 25
Erase Background .................................. 25
Erase Notch ............................................ 25
Use User Gamma ................................... 25
G
Gamma Curve Settings ................................ 31
H
Help Menu .................................................... 14
About ...................................................... 14
I
Image Rotation ............................................. 24
Installing Scanning Utility 800 ........................ 6
M
Margin Scanning .......................................... 24
P
Page Menu ................................................... 14
Next page ............................................... 14
58
Prev Page ............................................... 14
Polarity ......................................................... 23
[Auto] ...................................................... 23
[Nega Film] ............................................. 23
[Posi Film] ............................................... 23
Preparing Gamma Curve Data .................... 32
Printing the Displayed Image ....................... 46
R
ReaderPrinter Emulation Mode .................... 50
S
Scan Batch to File ........................................ 38
Scan Batch to Printer ................................... 43
Scanner setting... dialog box ....................... 19
Scanner Settings .......................................... 20
[Black and White] ................................... 20
[Black and White-Fine] ........................... 20
[Black and White-Picture] ......................... 20
[Grayscale-4, 16, 256 level] ................... 20
Brightness .............................................. 22
Contrast ................................................... 22
Frame Area ............................................. 21
[Center] ............................................... 21
[Left] ................................................. 21
[Overlay] ........................................... 21
[Separate] ........................................... 21
Mode ...................................................... 20
Page Size ............................................... 21
Resolution ............................................... 20
Scan Page .................................................... 36
Screen Descriptions ..................................... 11
Select [File]-[Print Format] .................... 43, 46
Actual pixel ...................................... 43, 46
Actual size ....................................... 43, 46
Fit to paper ...................................... 43, 46
Select the [Separator] setting ...................... 39
Batch Mark ............................................. 39
File Mark ................................................. 39
File/Batch Mark ...................................... 39
None ....................................................... 39
Semi Auto ..................................................... 24
Sharpness .................................................... 24
Starting up Scanning Utility 800 .................. 18
Startup and Exit ........................................... 10
Exit .......................................................... 10
Startup .................................................... 10
T
Toolbar ......................................................... 14
Chapter 4 Troubleshooting
About ...................................................... 15
Best Fit ................................................... 14
Converter mode ..................................... 15
Fit to width .............................................. 14
Next page ............................................... 15
Open ...................................................... 14
Previous Page ........................................ 15
Print ........................................................ 14
ReaderPrinter Emulation mode .............. 15
Rotate Left .............................................. 15
Rotate Right ............................................ 15
Save Page As ......................................... 14
Scan batch to file ................................... 15
Set Scanner ............................................ 15
Zoom In .................................................. 14
Zoom Out ............................................... 14
U
Uninstalling Scanning Utility 800 ................... 9
V
View Menu .................................................... 13
Best Fit ................................................... 13
Fit to width .............................................. 13
Grayscale ................................................. 13
Rotate Left .............................................. 13
Rotate Right ............................................ 13
Status bar ............................................... 13
Toolbar .................................................... 13
Zoom In .................................................. 13
Zoom Out ............................................... 13
4
Troubleshooting
W
When an Error Message is Displayed .......... 54
When the Scanned Image is Not Normal .... 56
59
Chapter 4 Troubleshooting
60