1
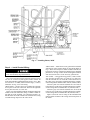
30GX080-176
30HX076-271
Minimum Load Control Accessory
50/60 Hz
Installation Instructions
Part Nos. 30HX-900---008, 30GX-900---004
(60 Hz — 115-v Control)
Part Nos. 30HX-900---009, 30GX-900---005
(50 or 60 Hz — 230-v Control)
CONTENTS
Page
SAFETY CONSIDERATIONS . . . . . . . . . . . . . . . . . . . 1
INTRODUCTION . . . . . . . . . . . . . . . . . . . . . . . . . . . . . . 1
INSTALLATION . . . . . . . . . . . . . . . . . . . . . . . . . . . . . 1-6
Step 1 — Examine Package Contents . . . . . . . . . 1
Step 2 — Install Piping . . . . . . . . . . . . . . . . . . . . . . . 2
• REMOVE MINIMUM LOAD PORT PLUGS AND
INSTALL FITTINGS
• INSTALL PIPING
• INSTALL BALL AND SOLENOID VALVES
• CONNECT PIPING
Step 3 — Dehydrate and Recharge Circuit . . . . . 3
Step 4 — Install Control Wiring . . . . . . . . . . . . . . . 4
• 30HX UNITS
• 30GX UNITS
• ALL UNITS
Step 5 — Configure Unit for Minimum
Load Control . . . . . . . . . . . . . . . . . . . . . . . . . . . . . . 6
Step 6 — Test Minimum Load Relay
Outputs . . . . . . . . . . . . . . . . . . . . . . . . . . . . . . . . . . . 6
Step 7 — Adjust Setting of Minimum Load
Ball Valve . . . . . . . . . . . . . . . . . . . . . . . . . . . . . . . . . . 6
Follow all safety codes. Wear safety glasses and work gloves.
Use care in handling equipment.
Be sure power to equipment is shut off before performing maintenance or service.
IMPORTANT: When removing refrigerant, use an
approved refrigerant recovery device. Do not vent refrigerant into the atmosphere.
INTRODUCTION
The minimum load control accessory allows 30HX and
30GX chillers to have their capacities decreased below the
standard fully unloaded condition. The accessory provides
more precise control of leaving fluid temperature during light
load conditions.
The 30GX and 30HX chillers have a dual-circuit design.
Each minimum load control accessory package contains the
items required for both circuits. Because of an automatic lead/
lag feature on the chillers, the accessory should be installed
on both circuits.
SAFETY CONSIDERATIONS
Installing, starting up, and servicing air-conditioning equipment can be hazardous due to system pressures, electrical
components, and equipment location.
Only trained, qualified installers and service technicians
should install, start up, and service this equipment.
When working on air-conditioning equipment, observe precautions in the literature and on tags, stickers, and labels attached to the equipment.
INSTALLATION
Step 1 — Examine Package Contents — Package includes solenoid valves, ball valves, Swagelokt connectors, and instructions. The kit for 30GX units also contains a junction box, junction box cover, and conduit. Examine
each item. If any part is damaged or missing, file a claim
immediately with the shipper. See Table 1 for accessory package contents and field-supplied material.
Table 1 — Accessory Package Contents and Field-Supplied Material
ACCESSORY PACKAGE
COMPONENTS
30HX-900---008
Solenoid Valve
(2) EF23JX212
Ball Valve
(2) EP71BA201
Swagelok Connector
(4) DC09CA307
Junction Box
—
Junction Box Cover
—
Watertight Conduit
—
FIELD SUPPLIED MATERIAL —
5⁄8-in. OD Copper Tubing, Wiring, Conduit,
Thread Sealant, Electrical Supplies
ACCESSORY PART NUMBER
30HX-900---009
30GX-900---004
(2) EF23JX231
(2) EF23JX212
(2) EP71BA201
(2) EP71BA201
(4) DC09CA307
(2) DC09CA307
—
HX30FZ001
—
HX38ZZ001
—
99CD2121AC028
REQUIRED PARTS (Ordered Separately)
30GX-900---005
(2) EF23JX231
(2) EP71BA201
(2) DC09CA307
HX30FZ001
HX38ZZ001
99CD2121AC028
Field Supplied
Manufacturer reserves the right to discontinue, or change at any time, specifications or designs without notice and without incurring obligations.
Book 2
PC 903
Catalog No. 563-056
Printed in U.S.A.
Form 30GX,HX-2SI
Pg 1
1-97
Replaces: New
Tab 5c
30GX — Cut plug end off of minimum load port braze nipple
on discharge line, located between oil separator and condenser. Remove plug from minimum load port on cooler shell.
See Fig. 1. Using thread sealant, install Swagelok fitting in
minimum load port on cooler. Port on nipple in discharge
line is reserved for a brazed connection.
30HX — Remove plugs from minimum load ports on the
cooler shell and the condenser shell (30HXC) or oil separator (30HXA). See Fig. 2. Using thread sealant, install
Swagelok fittings in minimum load ports.
INSTALL PIPING — On 30GX units, install field-supplied
5⁄8-in. OD copper tubing between the Swagelok fitting on
the cooler shell and the brazed nipple on the discharge line.
On 30HX units, install field-supplied 5⁄8-in. OD copper tubing between the fittings on the cooler shell and condenser
(30HXC) or oil separator (30HXA). Do not tighten fittings
or braze tubing yet.
Step 2 — Install Piping
Shut off all power to the unit, then lock out and safetytag all disconnects before proceeding with installation.
Remove refrigerant charge from circuits using an approved refrigerant recovery device before proceeding with
installation.
NOTE: The units have 2 circuits. Perform all of the following piping installation procedures on both A and B circuits.
REMOVE MINIMUM LOAD PORT PLUGS AND INSTALL FITTINGS — Plugs must be removed from these
ports and replaced with Swagelokt fittings. Note that plugs
were factory-installed with Loctitet refrigerant-compatible
sealant. Fittings should be installed with similar sealant on
threads.
TOP VIEW
Fig. 1 — Installing Fittings, 30GX (Typical)
2
INSTALL BALL AND SOLENOID VALVES — Using good
piping practice, braze ball valve and solenoid valve into
5⁄8-in. minimum load piping. Fig. 2 shows a typical 30HX
installation and Fig. 3 shows a typical 30GX installation, including valve locations and orientation. Ensure that ball valve
is fully open, and that both the ball and solenoid valve are
protected from excess heat during brazing process. Wrap wet
cloths around valve bodies during brazing to prevent damage to the valves from heat.
IMPORTANT: Do NOT overtighten the fittings. Overtightening the fittings can deform the tube ends and
cause leaks.
30GX UNITS ONLY — Using good brazing practice, braze
the 5⁄8-in. minimum load tubing to the copper nipple on the
discharge line (minimum load port) between the condenser
coil and oil separator. See Fig. 1 and 3.
IMPORTANT: When installing solenoid valve, make
sure that flow direction arrow on valve body points
towards the cooler. The minimum load control will not
function correctly if this valve is installed backwards.
Step 3 — Dehydrate and Recharge Circuit
— When piping has been completed, leak test the assembly. If one of the Swagelok fittings leaks, slowly tighten the
compression nut until the leak stops. If this does not fix the
leak, the connection must be reinstalled using a new ferrule
and backup ring in the fitting. Contact your Carrier representative for assistance in locating these parts.
After leak testing, evacuate, dehydrate, and recharge the
circuit using an approved refrigerant recovery device. Correct type and amount of refrigerant are listed on unit nameplate and in base unit documentation.
CONNECT PIPING — Check the ends of the tubes where
they will be inserted into the Swagelokt fittings. To avoid
leaks, tube ends must be round and free of burrs, nicks, and
grooves.
Insert tube ends into fittings as far as they will go. When
tube bottoms out, tighten the compression nut finger-tight
while holding the fitting body. Use backup wrench to hold
fitting body and tighten compression nut another 11⁄4 turns.
Fig. 2 — Installing Fittings and Valves, 30HX (Typical)
3
Fig. 3 — Installing Valves, 30GX
30GX UNITS — Install the accessory junction box included
with this kit in the position shown on the 30GX chiller in
Fig. 3. Route the waterproof conduit included with this kit
between the accessory junction box and the factory-installed
junction box. See Fig. 3 and 4. Route field-supplied conduits
from the solenoid valves to the accessory junction box.
ALL UNITS — Using good wiring practice, connect a white
wire from the solenoid valve on circuit A to a white wire
from the solenoid valve on circuit B. Connect both wires to
the white wire in the factory-installed junction box (30GX),
or unit wiring harness labelled ‘‘MLC-A & B’’(30HXA, HXC).
Connect a pink wire from the solenoid valve on circuit A
to the pink wire in the factory-installed junction box (30GX),
or unit wiring harness labelled MLC-A (30HXA, HXC).
Connect a gray wire from the solenoid valve on circuit B
to the gray wire in the factory-installed junction box (30GX),
or unit wiring harness labelled MLC-B (30HXA, HXC).
Figure 4 shows the correct wiring for the minimum load
control and the location of the wiring connection points on
the chiller.
Step 4 — Install Control Wiring
Be sure all power to the unit is off before proceeding.
Lock out and safety-tag all disconnects.
Wires between field-installed components and unit control
box must be enclosed in field-supplied conduit. Follow all
local codes and NEC (National Electrical Code, U.S.A.). Wire
size must be no. 16 AWG (American Wire Gage) (1.5 mm2)
minimum. See Fig. 4 for field wiring.
30HX UNITS — Remove the screws holding the right-side
access panel to the unit control box. Remove the right-side
access panel and store in a safe area.
Route wires through field-supplied conduit and attach the
conduit to the unit control box, using a suitable conduit fitting and one of the available 7⁄8-in. knockout openings. Attach the other end of the conduit to the solenoid valve, using
a suitable fitting. Repeat for the other circuit.
4
30GX080-176
30HX076-271
LEGEND
MLC — Minimum Load Control
TB
— Terminal Block
NOTE: See Fig. 3 for locations of junction
boxes on unit.
Fig. 4 — Minimum Load Control Wiring
5
Step 5 — Configure Unit for Minimum Load Control — Once the piping installation and wiring installation
8. Press
to turn off the minimum load valve relay
for Circuit A.
are complete, the chiller must be configured for minimum
load control operation. This may be done using the unit keypad (HSIO-2). Set the LOCAL/OFF switch in the OFF
position.
1. Press
To check the operation of the solenoid valve on Circuit B,
follow the same procedure as the preceding, but enter
enter
in Step 1, instead of
screens will be for Circuit B instead of A.
on the keypad.
After testing is complete, recheck all electrical connections for proper location and tightness. For 30HX units, replace and secure the access panels for the unit control box.
For 30GX units, secure the junction box covers to the junction boxes.
2. Press the down arrow
until the display reads:
MIN. LOAD VALVE SELECT
DISABLE
3. To enable the minimum load valve feature, press
.
4. The display may read as follows. (If not, skip to Step 7.)
PASSWORD PROTECTED FUNCTION
ENTER PASSWORD
Step 7 — Adjust Setting of Minimum Load Ball
Valve — Before the installation is complete, the minimum load ball valve must be adjusted to suit the application.
Calibrate one circuit at a time as follows:
1. Adjust the ball valve so that it is approximately half open.
2. Operate the chiller in Manual Control mode, with one circuit operating, and all compressor loaders deenergized.
NOTE: Operation of the chiller in Manual Control mode is
described in the Controls, Start-Up, Operation, and Troubleshooting Guide that is included with the 30GX,HX
Ecologic™ chillers.
3. Record the cooler DT (the difference between cooler entering fluid temperature and cooler leaving fluid temperature) at this fully unloaded condition.
4. Use the Manual Control feature to enable the minimum
load valve for the circuit that is operating.
5. Observe and record the cooler DT with the minimum load
valve energized.
6. Adjust the minimum load ball valve until the cooler temperature difference reading from Step 5 is equal to half of
the temperature difference reading from Step 3.
7. Open the ball valve to decrease the temperature difference or close the ball valve to increase the temperature
difference (DT). When the valve is adjusted correctly,
the difference between cooler entering and leaving fluid
temperatures when the minimum load control is energized must be at least half of the temperature difference
when the minimum load control is deenergized. For example, if the difference between the cooler entering and
leaving water temperature is 3° F with the valve deenergized, then the difference between cooler entering and
leaving water temperature must be at least 1.5° F with the
valve energized.
Once the outputs have been tested and the ball valve adjusted, the installation is complete.
5. Press
.
6. The HSIO-2 again displays the following:
MIN. LOAD VALVE SELECT
DISABLE
7. Press
. The display changes to:
MIN. LOAD VALVE SELECT
ENABLE
The chiller is now configured for minimum load valve
control.
Step 6 — Test Minimum Load Relay Outputs
— After the accessory components are installed and the unit
is recharged and reconfigured, test the operation of the relay
and solenoid valve using the Quick Test software function.
Test Circuit A as follows (the LOCAL/OFF switch must be
in the OFF position):
1. Press
on the HSIO-2 keypad.
2. Press the down arrow
MIN. LOAD VALVE A
RELAY IS OFF
. The display
until the display reads:
3. Press
.
4. The display may read as follows. (If not, skip to Step 7.)
PASSWORD PROTECTED FUNCTION
ENTER PASSWORD
5. Press
.
6. The HSIO-2 again displays the following:
MIN. LOAD VALVE A
RELAY IS OFF
7. Press
to energize the relay. The display reads:
MIN. LOAD VALVE A
RELAY IS ON
An audible click will be heard. Verify that the solenoid
valve for Circuit A is energized.
6
Copyright 1997 Carrier Corporation
Manufacturer reserves the right to discontinue, or change at any time, specifications or designs without notice and without incurring obligations.
Book 2
PC 903
Catalog No. 563-056
Printed in U.S.A.
Form 30GX,HX-2SI
Pg 8
1-97
Replaces: New
Tab 5c