1
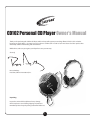
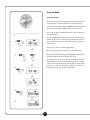
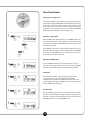
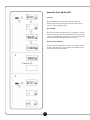
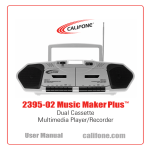
CD102
Personal CD Player
Owner’s Manual
CD102 Personal CD Player Owner’s Manual
Thank you for purchasing this Califone CD Player, which we hope will support your teaching efforts in ELD, ELL, ESL and other
language arts applications. I encourage you to go online to califone.com in order to learn more about our other product lines
which help student understanding and achievements.
While online, make sure you register your Player for its one year warranty.
Sincerely,
Roscoe Anthony
President, Califone® International, Inc.
Unpacking
Inspect the unit and the headphones for any damage
which may have occurred during shipping and contact us
immediately. Please keep the packing material for further use.
1
Location of Controls
1. MODE Button
2. Pause Button
3. Skip/Search button (PREV)
4. Stop Button
5. Play/Pause Button
6. ESP Button (Anti-Shock Protection)
7. Program Button
8. Skip/Search Button (NEXT)
9. LCD Display
10. DC 4.5V
11. Open CD Compartment Switch
12. Volume Control
13. HOLD Button
14. Line Out Socket
15. Headphone Socket
16. Bass Boost Switch
2
Power Supply
1. Battery
Open the battery cover, insert the batteries as indicated in
diagram 1 and then close the battery cover.
Caution:
If you are not going to use the CD Player for an
extended period of time, it’s recommended the batteries be
removed to prevent any possible corrosion within the unit.
2. Connecting AC Voltage
Transformer
Insert the DC Jack into point (a) as indicated in diagram 2
and then connect AC pack into an AC outlet.
Notes:
when not in operation, please unplug the AC transformer.
3. Battery Power/ Volume Indication
When the batteries become weak, the LCD display will
indicate the “low battery” symbol. Replace the batteries to
restore correct operation.
4. The CD Player Output Connection
The CD Player output can be connected to headphones (14),
external amplifier, and jackbox for multiple listeners (15).
15
14
3
Operation
Play Mode
Press the [OPEN] button to open the cover and then
insert the CD.
Ensure the label side is facing up. Place the center of the CD
onto the spindle and gently press down to secure it in place.
Close the cover.
Plug the stereo headphone into the phone jack.
Press the PLAY button once.
The Player will start playing with the LCD display showing the
track number. When all of the tracks have been played, the player
will automatically stop playing, unless programmed otherwise.
Pause Mode
To temporarily pause while the unit is playing, press the PLAY
button once. The playing time in the LCD display will blink,
indicating “Pause” mode. Pressing the PLAY button a second
time will resume playing.
Stop Mode and Power Off
Press the STOP button once to stop playing the CD. After
the STOP button is pressed, the LCD display will indicate the
total tracks and total playing time.
To switch your player off from the STOP mode, press the
STOP button. The LCD display will become blank and
the player will turn off.
Adjusting Volume
Adjust the volume knob to the desired level.
4
Program Mode
Programmable Play
The disc can be played in a programmed order (maximum 20 tracks
can be played) to suit personal preferences and learning styles.
(1) While a CD is playing, pressing the PROGRAM button will prompt
the LCD display to indicate “PROG” and the track number ”01”.
(2) Press the FF/NEXT or REV/PREV button to select the first track
to be programmed.
(3) Press the PROGRAM button to store the selected track. The track
number will display “00” and the program number will change to
“02”, indicating that one track is stored and you may program your
next selection.
Repeat steps 2 and 3 to continue programming.
When your programming is complete, press the PLAY button.
The LCD display will stop showing a blinking “PROG” and the player
will start playing from the first “programmed” track.
Programming can also be conducted while in PAUSE mode. When
all programmed tracks have been played, the player will automatically stop. The programmed tracks will be stored in memory until
the CD door is opened or the power is shut off. To play the same
programmed tracks again, press the PLAY button.
5
Other Play Methods
Skipping or Scanning Tracks
Pressing the FF/NEXT button while a CD is playing will skip to the
next track. Pressing the REW/PREV button will skip the player backwards to the start of the current track or to the previous track if
pressed twice. Press and hold the FF/NEXT button to fast forward
through the current playing song. Press and hold the REW/PREV
button to Rewind through the current playing song.
Repeating a Single Track
While in STOP, PLAY or PAUSE modes, press the MODE button. The
LCD display will indicate 1 and the player will repeat the current
track. Press the FF/NEXT or REW/PREV button to change the track
that you wish to repeat.
If the “REPEAT” function was selected while in STOP mode, press
the PLAY button to begin. Press the STOP button to exit REPEAT
mode or press the MODE button consecutively until no “alternative” method is indicated on the LCD.
Repeating the Whole Disc
Press the MODE button twice. The LCD will indicate 1 ALL and
the player will repeat playing the entire disc. Pressing the MODE
button three times will return to the normal playing condition.
Intro Mode
The Intro Mode describes when the player will play the first
10 seconds of each track on the entire disk and will then
automatically turn off. Press the MODE button three times and
the LCD display will indicate “INTRO.” Then press the PLAY button
and the “INTRO” mode will begin.
Random Mode
Press the MODE button four times. The LCD will indicate “SHUFF.”
Then press the PLAY button to begin. The player will play all tracks
on the disc in random order until all tracks have been played. Press
the MODE button once to exit RANDOM mode.
6
Automatic Start-Up/Shut Off
Power On
While in STOP mode, press the PLAY button. The Player will
automatically start up and the display will indicate the start up
sequence as shown in figure 1 (left).
Auto Shut Off
The Player will shut off automatically if no operation is selected
within a one minute period after turning the CD Player on or after
a disc has completed playing. If there is no disc in the unit, it will
automatically shut off after approximately 30 seconds.
“DISC” (no disc) Indication
If there is no disc in the player or if a disc is not inserted correctly,
the player will show “disc” on the LCD for approximately 30 seconds after pressing the PLAY button.
7
Shock Protection (ESP/Anti-Shock)
Vibration Resistant
By reading audio date and storing it in the “ANTI-SHOCK” memory,
vibration resistance is achieved. When the player is bumped or
knocked, the CD player will compensate with the data in its memory. The CD player also contains a vibration resistant mechanism to
prevent the skipping noise caused by the change of playing speed
when the player is “rocked”.
Auto ESP
When pressing the PLAY button, the Anti-Shock System will
automatically be enabled. The in the display will turn into
after a few seconds of play. When vibration continues, the in
the display will turn into depending on the length of
the vibration.
To Cancel “ANTI-SHOCK”
Press the ESP button, the in
the display will turn off
HOLD Function
Moving the HOLD switch to the “On” position locks the unit,
protecting it from an accidental pressing of another button
while in use.
8
Charge Function (Optional)
Charge Function
1. The CD Player will charge correctly sized rechargeable batteries
(which are not supplied with the unit.) Open the battery cover
and insert the rechargeable batteries into the battery compartment, making sure the correct polarity as shown in diagram 1
(left) is observed.
2. Connecting AC voltage transformer (2). Refer to Page 2 for
correct connection.
3. Continuously press FAST FORWARD, REWIND, NEXT & PREVIOUS
FUNCTIONS.
Press the FF/NEXT button once quickly to skip the next track.
Press the REW/PREV button once quickly to skip backwards to the
previous track or to the start of the current track. Press and hold
the FF/NEXT button to fast forward through the current playing
song. Press and hold the REW/PREV button to rewind through the
current playing song.
9
1
Concerning Compact Discs
1. Only Compact Discs bearing this mark can be used
with this unit.
2. How to hold a disc
3. If the surface is dirty b) Play surface (shiny surfaces)
Wipe it with a damp cloth and then wipe dry. Wipe from the
center toward the edge.
2
Handling precautions
If you are taking the CD from a cold environment to a warm environment, moisture may form on the CD. Wipe any moisture off
with a soft, dry, lint-free cloth before using the CD.
Do not write on the label side with a ball-point pen or other writing
instrument. Do not use record cleaning sprays, such as: Benzine,
Thinner, Static Electricity Prevention Liquids or any other solvent.
Do not attach labels or stickers to CDs. (Do Not use CDs with exposed adhesive from tape or left over peeled off stickers.)
3
Do not use scratch-proof protectors or covers other than those
specified for use with this unit.
Storage Precautions
Be sure to store CDs in their cases to protect them from dust,
scratches and warping.
Do not place or store CDs where they can be: exposed to direct
sunlight, humid or dusty locations, directly exposed to a heat vent
or heating appliance, in the glove compartment or on the rear
deck of an automobile.
10
Precautions
Specifications
To prevent battery damage, electrolyte leakage, and
short-circuiting, follow these recommendations.
Audio
(A) Do not peel off the covering on batteries and do not use
if the covering has been peeled off.
(B) Align the polarities + and – correctly when inserting
the batteries.
(C) Do not mix different types or makes of batteries of
old and new batteries.
(D) Remove the batteries if you do not intend to use
the unit for a long time.
(E) Do not throw into fire, shirt-circuit, disassemble,
or subject to excessive heat.
(F) Do not attempt to recharge dry cell batteries.
(G) Do not allow metal objects to touch the battery terminals
as this may cause short-circuiting which is dangerous.
Channels: Frequency Response:
Channel Isolation: Wow-Flutter
Reading Time:
L, R level balance:
Sampling Frequency:
Power: Operating Temperature Range:
Dimension (Width*Height*Depth): 2 (left and right, stereo)
20-20000Hz
>40dB
Lower than
measurement limit
<10ESC
<2dB
44.1 KHz
+ - DC4.5V 600mA
0-40 C
153*138*24.5mm
Accessories
Unit
1. Operating Instructions
2. 3060AVS Stereo Headphone
No altering or remodeling
Specifications/Features are subject to change without notice.
Values of dimension are approximated.
This can cause malfunctioning.
Caution
Do not drop
This product utilizes a laser.
This may damage the unit.
Use of controls or adjustments or performance of procedures
other than those specified herein may result in hazardous radiation exposure.
Locations to be avoided
Avoid using the unit in the following locations.
Do not open covers and do not repair yourself. Refer servicing to
qualified Califone personnel or our authorized service facilities.
1. Bathrooms and other moisture-prone places
2. Warehouses and other dusty places
3. Very hot places such as near heating appliances, etc.
Warning
Do not leave the unit exposed to direct sunlight
for long periods of time.
To reduce the risk of fire, electric shock or product damage, do not
expose this appliance to moisture of any kind.
Marking sign is located on bottom of the unit.
This may deform or discolor the cabinet and may
also cause malfunctioning.
Califone® International Inc. • 1145 Arroyo Avenue, # A • San Fernando, CA 91340 USA
Toll Free 800.722.0500 | Toll Free Fax 877.402.2248
International Customers call 818.407.2400 or Fax 818.407.2405 califone.com