1
9600/3600
USER’S GUIDE
• Read this User’s Guide before you start using your P-touch.
• Keep this User’s Guide in a handy place for future reference.
PREFACE
Thank you for purchasing this P-touch!
With your new P-touch, you can create labels for any purpose. Select from a variety of frames, fonts
and character styles to design beautiful custom labels. In addition, the many pre-formatted templates
available make label-making quick and easy.
You can print professional-looking labels in no time. The quality and performance of this P-touch
make it an extremely practical machine to meet all your labelling needs.
Although this P-touch is easy to use, we suggest that you read this User’s Guide carefully before
starting. Keep this manual nearby for future reference.
NOTE
The P-touch will make a noise when it is turned on or while it is printing; however, this does not indicate a
malfunction.
Declaration of Conformity
We
BROTHER INDUSTRIES, LTD.
1-1-1, Kawagishi, Mizuho-ku,
Nagoya 467-8562, Japan
declare that the Labelling System PT-9600/3600 conforms with the following normative documents:
EMC:
EN 55022:1998 Class B
EN 55024:1998
EN 61000-3-2:1995
EN 61000-3-3:1995
and follows the provisions of the Electromagnetic Compatibility Directive 89/336/EEC (as amended by 91/
263/EEC and 92/31/EEC). The AC adapter also conforms with EN 60950 and follows the provisions of the
Low Voltage Directive 73/23/EEC.
Issued by: BROTHER INDUSTRIES, LTD.
P & H company
Development DIV.
QUICK REFERENCE
Entering text
Adding a space
Space bar
Entering/Exiting Insert
mode
i
Adding an uppercase
letter
h or t + desired character
Adding a series of
uppercase letters (entering Caps mode)
c → Type character
Adding a lowercase letter in Caps mode
h or t + desired character
Adding an accented
character
a → Type character
OR
d + s → Type letter (OR n) → m or g to select letter →
Rotate r (OR j or k) to select → Press r (OR n)
OR
: or l + Type letter
Adding a symbol
Rotate r to select SYMBOL, then press r (OR just press s) →
Rotate r (OR m or g) to select category → Rotate r (OR j or k)
to select symbol → n
Adding a new line
n
Adding a new block
d+n
Adding a barcode
Rotate r to select BARCODE, then press r (OR just press d + i)
→ Type barcode data → Press r (OR n)
Adding a special character to the barcode
Rotate r to select BARCODE, then press r (OR just press d + i)
Changing a barcode
parameter
Rotate r to select BARCODE, then press r (OR just press d + i)
→ s → m or g to select special character → n
→ m → j or k to select parameter → Rotate r (OR m or g) to
select setting → Press r (OR n)
Setting up the Euro conversion function
Rotate r to select CONVERSION SETUP, then press r (OR just press
d + h) → Rotate r (OR m or g) to select currency → Press
r (OR n) → Type in exchange rate → Press r (OR n) → Rotate
r (OR m or g) to select separator → Press r (OR n) → Rotate r
(OR m or g) to select printing order → Press r (OR n)
Converting euros to/
from other currencies
d + 7 → Rotate r (OR j or k) to select conversion direction
→ Type in value to be converted → Press r (OR n)
Editing text
Deleting text
b OR q
Deleting one line of text d + q
Clearing all of the text
and formats
d + b → m or g to select TEXT & FORMAT → n
Clearing only the text
d + b → m or g to select TEXT ONLY → n
Formatting text
Changing formats for
entire text
Rotate r to select GLOBAL FORMAT, then press r (OR just press d +
1) → Rotate r, then press r (OR j or k) to select function → Rotate
r, then press r (OR m or g) to select setting → Press r (OR n)
Changing formats for a
block of text
j, k, m or g to select text block → Rotate r to select BLOCK
FORMAT, then press r (OR just press d + 2) → Rotate r, then
press r (OR j or k) to select function → Rotate r, then press r
(OR m or g) to select setting → Press r (OR n)
Changing formats for a
line of text
j, k, m or g to select text line → Rotate r to select LINE FORMAT, then press r (OR just press d + 3) → Rotate r, then press
r (OR j or k) to select function → Rotate r, then press r (OR m
or g) to select setting → Press r (OR n)
Changing the font
Select GLOBAL FORMAT, BLOCK FORMAT or LINE FORMAT, then
press r (OR just press d + 1, 2 or 3) → Rotate r, then press
r (OR j or k) to select FONT → Rotate r (OR m or g) to select
setting → Press r (OR n)
Changing the character
size
Select GLOBAL FORMAT, BLOCK FORMAT or LINE FORMAT, then
press r (OR just press d + 1, 2 or 3) → Rotate r, then press
r (OR j or k) to select SIZE → Rotate r (OR m or g) to select
setting → Press r (OR n)
Changing the character
width
Select GLOBAL FORMAT, BLOCK FORMAT or LINE FORMAT, then
press r (OR just press d + 1, 2 or 3) → Rotate r, then press
r (OR j or k) to select WIDTH → Rotate r (OR m or g) to
select setting → Press r (OR n)
Changing the character
style
Select GLOBAL FORMAT, BLOCK FORMAT or LINE FORMAT, then
press r (OR just press d + 1, 2 or 3) → Rotate r, then press
r (OR j or k) to select STYLE1 or STYLE2 → Rotate r (OR m or
g) to select setting → Press r (OR n)
Changing the line effects Select GLOBAL FORMAT, BLOCK FORMAT or LINE FORMAT, then
press r (OR just press d + 1, 2 or 3) → Rotate r, then press
r (OR j or k) to select LINE EFFECTS → Rotate r (OR m or g)
to select setting → Press r (OR n)
Changing the frame
Select GLOBAL FORMAT, BLOCK FORMAT or LINE FORMAT, then
press r (OR just press d + 1, 2 or 3) → Rotate r, then press
r (OR j or k) to select FRAME → Rotate r (OR m or g) to
select setting → Press r (OR n)
Changing the text alignment
Select GLOBAL FORMAT, BLOCK FORMAT or LINE FORMAT, then
press r (OR just press d + 1, 2 or 3) → Rotate r, then press
r (OR j or k) to select ALIGNMENT → Rotate r (OR m or g) to
select setting → Press r (OR n)
Changing the label mar- Select GLOBAL FORMAT, then press r (OR just press d + 1) →
gins
Rotate r, then press r (OR j or k) to select T. MARGIN → Rotate r
(OR m or g) to select setting → Press r (OR n)
Changing the label
length
Select GLOBAL FORMAT, then press r (OR just press d + 1) →
Rotate r, then press r (OR j or k) to select T. LENGTH → Rotate r
(OR m or g) to select setting → Press r (OR n)
Changing the block
margins
Select GLOBAL FORMAT, then press r (OR just press d + 1) →
Rotate r, then press r (OR j or k) to select B. MARGIN → Rotate
r (OR m or g) to select setting → Press r (OR n)
Changing the block
length
Select GLOBAL FORMAT or BLOCK FORMAT, then press r (OR just
press d + 1 or 2) → Rotate r, then press r (OR j or k) to
select B. LENGTH → Rotate r (OR m or g) to select setting → Press
r (OR n)
Printing in reverse (mirror printing)
Rotate r to select MIRROR, then press r (OR just press d + p) →
Formatting text for a
stamp
d + S → Rotate r (OR m or g) to select setting → Press r (OR
Rotate r (OR m or g) to select setting → Press r (OR n)
n)
Rotating the text
Select GLOBAL FORMAT or BLOCK FORMAT, then press r (OR just
press d + 1 or 2) → Rotate r, then press r (OR j or k) to
select ROTATE → Rotate r (OR m or g) to select setting → Press r
(OR n)
Using an Auto format template
Creating a label or
stamp from an Auto format template
Rotate r to select AUTO FORMAT, then press r (OR just press d
+ 6) → Rotate r (OR m or g) to select template → Press r (OR
n) → Type in each line of text, then press r (OR n) → Continue
with 1, 2, 3 or 4
1 Printing an Auto format template
Rotate r (OR m or g) to select PRINT → Press r (OR n)
2 Editing the Auto format template text
Rotate r (OR m or g) to select CONTINUE → Press r (OR n) →
Type in each line of text, then press r (OR n)
3 Changing the style of Rotate r (OR m or g) to select CHANGE STYLE → Press r (OR
the Auto format temn) → Rotate r (OR m or g) to select format style → Press r (OR
plate
n)
4 Quitting the Auto
format function
Rotate r (OR m or g) to select FINISH → Press r (OR n) → Press
r (OR n)
Printing text
Previewing the label
Rotate r to select LAYOUT PREVIEW, then press r (OR just press
d + 9) (j or k to scroll)
Changing how the
labels are cut
Rotate r to select AUTO CUT, then press r (OR just press d + f)
→ Rotate r (OR m or g) to select setting → Press r (OR n)
Printing using the current print options
p
Feeding and cutting
24 mm of tape
f
Printing many copies
Rotate r to select REPEAT, then press r (OR just press d + 4) →
Rotate r (OR m or g) to select number (OR type number) → Press
r (OR n)
Printing many copies
while increasing
selected text
Rotate r to select NUMBER, then press r (OR just press d + 5)
→ j, k, m or g to select start of numbering field → Press r (OR
n) → j or k to select end of numbering field → Press r (OR n)
→ Rotate r (OR m or g) to select (or type) number → Press r (OR
n)
Storing, recalling, deleting & printing text files
Saving a file
Rotate r to select MEMORY, then press r (OR just press d + 8)
→ Rotate r (OR m or g) to select STORE → Press r (OR n) →
Rotate r (OR m or g) to select file number → Type file name →
Press r (OR n)
Recalling a previously
saved file
Rotate r to select MEMORY, then press r (OR just press d + 8)
→ Rotate r (OR m or g) to select RECALL → Press r (OR n) →
Rotate r (OR m or g) to select file number → Press r (OR n)
Deleting a previously
saved file
Rotate r to select MEMORY, then press r (OR just press d + 8)
→ Rotate r (OR m or g) to select CLEAR → Press r (OR n) →
Rotate r (OR m or g) to select file number → Space bar so !
appears → Press r (OR n) → Press r (OR n)
Printing a previously
saved text file
Rotate r to select MEMORY, then press r (OR just press d + 8)
→ Rotate r (OR m or g) to select PRINT → Press r (OR n) →
Rotate r (OR m or g) to select file number → Space bar so !
appears → Press r (OR n)
CONTENTS
Chapter 1
Before You Start ...................................................... 1
GENERAL DESCRIPTION .............................................................2
Top view .............................................................................................................. 2
Bottom view ........................................................................................................ 3
LCD display ........................................................................................................ 3
Keyboard ............................................................................................................. 4
Carrying case ...................................................................................................... 5
Chapter 2
Getting Started ........................................................ 7
PRECAUTIONS ............................................................................8
Connecting the AC adapter ................................................................................ 9
Turning on/off the P-touch .................................................................................. 9
Installing/replacing a tape cassette .................................................................... 9
Connecting the P-touch to a computer ............................................................. 10
Installing the Software & Printer Driver .......................................................... 11
Reading the User’s Guide ................................................................................. 27
Using P-touch Editor 3.2 .................................................................................. 28
Using P-touch Quick Editor ............................................................................. 30
Uninstalling the Software & Printer Driver ..................................................... 33
Attaching labels ................................................................................................ 36
Assembling stamps ............................................................................................ 37
Chapter 3
Functions .............................................................. 41
Performing basic operations ............................................................................ 42
Entering text ...................................................................................................... 44
Editing text ........................................................................................................ 51
Formatting ........................................................................................................ 52
Printing ............................................................................................................. 68
Storing and recalling files ................................................................................ 71
i
Chapter 4
Machine Adjustments ........................................... 79
Machine adjustments .........................................................................................80
ERROR MESSAGE LIST .............................................................. 83
TROUBLESHOOTING ............................................................... 89
MACHINE SPECIFICATIONS ..................................................... 93
Appendix .............................................................. 95
Symbols ..............................................................................................................96
Special barcode characters ...............................................................................99
Fonts ..................................................................................................................99
Sizes and widths ...............................................................................................100
Type styles .......................................................................................................102
Framing and shading patterns ........................................................................104
Pre-set templates .............................................................................................105
Template text styles .........................................................................................108
INDEX ..................................................................................... 109
ACCESSORIES .......................................................................... 113
ii
Ch.1 Before You Start
1
Before You Start
Chapter
Before You Start
1
Ch. 1 Before You Start
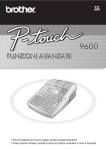
GENERAL DESCRIPTION
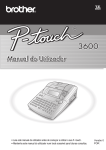
Top view
Before You Start
P-touch 9600:
Tape compartment cover
Recharging indicator
LCD display
Cover release button
AC adapter connector
RS-232C port
USB port
Navigation dial
Keyboard
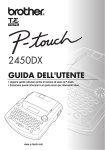
P-touch 3600:
Tape compartment cover
LCD display
Cover release button
AC adapter connector
USB port
Navigation dial
Keyboard
2
Ch.1 Before You Start
Bottom view
Before You Start
Battery compartment cover
(PT-9600 only)
Handle
Tape exit slot
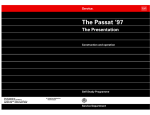
LCD display
Q
R1 2 3 4 5 6 7 8 9 A B C D E F K Q
Q
Q
Q
G
Q
<<<P-touch>>>
Q
Q
O
N
Q
H
Q
L
Q
M
Q
I 1:_
J
AUTO
0.4
HELSINKI
Length
Margin
Font
A
Width
AUTO
Size
1 Tape width indicator ➩ p. 10
0 Mirror printing setting indicator ➩ p. 64
2 Caps indicator ➩ p. 44
A Rotate setting indicator ➩ p. 60
3 Alt indicator ➩ p. 45
B Auto cut setting indicator ➩ p. 68
4 Insert mode indicator ➩ p. 44
C Tape length setting ➩ p. 62
5 Line effects setting indicator ➩ p. 58
D Tape margin setting ➩ p. 61
6 Frame setting ➩ p. 58
E Font setting ➩ p. 54
7 Style1 setting indicators ➩ p. 56
F Character width setting ➩ p. 55
8 Style2 setting indicators ➩ p. 57
G Character size setting ➩ p. 54
9 Text alignment setting indicators ➩ p. 59
H Character size setting indicator ➩ p. 54
3
Ch. 1 Before You Start
Keyboard
P-touch 9600:
4
32
1
0
Before You Start
9
8
7
5
6
P-touch 3600:
1 Power key ➩ p. 9
6 Arrow keys ➩ p. 42
2 Screen backlight key (PT-9600 only)
7 Return key ➩ p. 43
➩ Refer to the Advanced Functions booklet.
3 Macro key (PT-9600 only)
8 Backspace key ➩ p. 51
➩ Refer to the Advanced Functions booklet.
4 PF keys (PT-9600 only)
9 Interface key (PT-9600 only)
➩ Refer to the Advanced Functions booklet.
➩ Refer to the Advanced Functions booklet.
5 Space bar ➩ p. 44
4
0 Function dial/Set key ➩ p. 43
Ch.1 Before You Start
The carrying case, which is included with the PT-9600 and available as an option for the PT-3600,
is useful for storing and transporting the P-touch and its accessories. The cover attached inside the
case at the right helps protect your tape cassettes from dust. In addition, if the cover is removed and
attached to the left side of the carrying case, it can be used as a tray for collecting labels that are fed
out.
Tape cassette cover/label tray
5
Before You Start
Carrying case
Ch. 1 Before You Start
Before You Start
6
Ch. 2
Chapter
2
Getting Started
Getting Started
7
Ch. 2 Getting Started
PRECAUTIONS
Getting Started
●
Use only Brother TZ tapes with this machine. Do not use tapes that do not have the
mark.
●
Do not pull on the tape being fed from the P-touch, otherwise the tape cassette may be damaged.
●
Avoid using the machine in extremely dusty places. Keep it out of both direct sunlight and rain.
●
Do not expose the machine to extremely high temperatures or high humidity. Never leave it on
the dashboard or in the back of your car.
●
Do not store tape cassettes where they would be exposed to direct sunlight, high humidity or
dust.
●
Do not leave any rubber or vinyl on the machine for an extended period of time, otherwise the
machine may be stained.
●
Do not clean the machine with alcohol or other organic solvents. Only use a soft, dry cloth.
●
Do not put any foreign objects into or heavy objects on the machine.
●
To avoid injuries, do not touch the cutter’s edge.
●
Use only the AC adapter designed exclusively for this machine. Use of any other adapter will
void the warranty.
●
Do not try to disassemble the AC adapter.
●
When the machine is not to be used for a long period of time, disconnect the AC adapter, and
(for the PT-9600 only) remove the rechargeable battery to prevent it from leaking and damaging
the machine.
●
Use only the Ni-MH rechargeable battery designed exclusively for this machine. (PT-9600 only)
●
Never try to disassemble the P-touch.
●
Use only the enclosed USB interface cable. Use of any other USB cable will void the warranty.
8
Ch. 2 Getting Started
●
●
●
●
●
●
●
●
●
●
●
●
●
●
●
●
●
●
●
●
●
●
This P-touch can be used anywhere a standard
electrical outlet is available.
1 Insert the plug on the adapter cord into the
AC adapter connector on the right side of
the P-touch.
2 Insert the pronged plug on the other end of
the adapter cord into the nearest standard
electrical outlet.
NOTE
Installing/replacing
cassette
●
●
●
●
●
●
●
●
●
●
●
●
●
●
a
●
●
●
tape
●
●
●
●
●
●
Tape cassettes are available for this machine in
a wide variety of types, colours and sizes, enabling you to make distinctive colour-coded and
stylised labels. In addition, this machine has
been designed to allow you to change the tape
cassette quickly and easily.
1 Press the cover release button, and then lift
open the tape compartment cover.
Getting Started
Connecting the AC adapter
☞ Only use the AC adapter designed exclusively
for this machine.
P-touch 9600:
☞ If you do not intend to use this machine for an
extended period of time, disconnect the AC
adapter.
Turning on/off the P-touch
●
●
●
●
●
●
●
●
●
●
●
●
●
●
●
●
●
●
●
●
●
●
The power key (o) is located in the upperright corner of the machine’s keyboard. If the
P-touch has remained plugged in, the previous
session’s text is displayed when you turn it on
again. This feature allows you to stop work on a
label, turn off the machine, and return to it later
without having to re-enter the text.
If the PT-9600 is being operated from its
rechargeable battery, the machine will automatically turn off if no key is pressed or no operation is performed for 5 minutes.
P-touch 3600:
NOTE
☞ Do not unplug the AC adapter if the P-touch is
plugged in and turned on, otherwise the data
being edited will be erased. Be sure to turn off
the P-touch before unplugging the AC adapter.
☞ If the P-touch is connected to a computer
through a USB interface cable, the P-touch will
automatically turn off if no key is pressed or no
operation is performed for 30 minutes.
☞ If the PT-9600 is connected to a computer
through a serial (RS-232C) interface cable or is
printing data from the computer, it will not
automatically turn off.
☞ If the P-touch is connected to a computer
through a USB interface cable and is printing
data from the computer, the P-touch will not
automatically turn off.
●
2 If a tape cassette is already installed and
you wish to replace it, remove it by pulling
it straight up.
3 If the ink ribbon is loose in the tape cassette
to be installed, use your finger to wind the
toothed wheel in the direction of the arrow
on the cassette until there is no slack in the
ribbon. Also, make sure that the end of the
tape feeds under the tape guides.
NOTE
If you are using a new tape cassette provided with a
stopper, be sure to remove the stopper.
Press o to turn on or turn off the P-touch.
9
Ch. 2 Getting Started
4 Insert the tape cassette firmly into the tape
compartment, making sure that the entire
back of the cassette touches the bottom of
the compartment.
NOTE
When inserting the tape cassette, make sure that the
inner ribbon does not catch on the corner of the
metal guide.
.
P-touch 9600:
Connecting the P-touch to a
computer
●
●
●
●
●
●
●
●
●
●
●
●
●
●
●
●
●
●
●
●
●
●
This machine is equipped with a USB port,
allowing you to use a USB cable to connect the
P-touch to a computer running Windows® or
Mac OS, and print labels created using the
P-touch Editor software.
NOTE
Getting Started
Do not connect the P-touch to the computer before
installing the P-touch Editor software, otherwise it
may not be installed correctly. Follow the installation procedure on pages 11 through 27 to install
the P-touch Editor software and the printer driver,
and connect the P-touch to the computer when you
are instructed to do so.
To connect a computer to the P-touch
through the USB port:
1 Insert the flat (A) connector on the USB
cable into the USB port on the computer.
P-touch 3600:
2 Insert the square (B) connector on the USB
cable into the USB port on the right side of
the P-touch.
3 Turn on the P-touch.
P-touch 9600:
5 Close the compartment cover, and then
press o to turn on the machine, if it is off.
The width of the currently installed tape is
shown by the tape width indicator on the
left edge of the display.
Q
R1 2 3 4 5 6 7 8 9 A B C D E F K Q
Q
Q
RG
Q
Q
<<< P-touch >>>
Q
RH
Q
Q
NO
R
Q
Q
L
RI 1:_
Q
M
RJ AUTO
0.4
HELSINKI
A
AUTO
Length
Margin
Font
Width
Size
6 Press f once to remove any slack in the
tape and cut off the excess.
10
P-touch 3600:
Ch. 2 Getting Started
After the P-touch is connected to a computer
using a USB cable, the P-touch enters Interface
mode when data is sent to it from the computer.
Installing the Software &
Printer Driver
●
●
●
●
●
●
●
●
●
●
●
●
●
●
●
●
●
●
●
●
●
●
●
NOTE
and return to the text, press any key.
☞ The P-touch cannot enter Interface mode for a
USB connection while it is printing, feeding
tape or in Interface mode for an RS-232C connection (PT-9600 only) or while a macro is
being assigned to a PF key (PT-9600 only).
Q
R1 2 3 4 5 6 7 8 9 A B C D E F K Q
Q
Q
RG
Q
Q
INTERFACE
Q
RH
Q
Q
R
Q
Q
Q
RI
RJ AUTO
0.4
HELSINKI
A
AUTO
Length
Margin
Font
Width
Size
In order to provide even more illustration and
layout features to the label-making possibilities
available with your P-touch, two applications
are available on the enclosed CD-ROM: Ptouch Editor 3.2 and P-touch Quick Editor. With
either application, the printer driver must also
be installed in order to print labels from the Ptouch.
Getting Started
☞ To exit Interface mode for a USB connection
On a Computer Running
Windows®
Before installation
Check that your system configuration meets the
following requirements.
Computer: IBM PC or compatible.
Operating system: Pre-installed with Microsoft®
Windows® 98, 98 SE, Me, 2000 Professional or
XP
NOTE
☞ For installation on Windows® 2000, administrator privileges are required. In addition, printing
requires power user or administrator privileges.
This software cannot be operated in Users
groups. In addition, this software is not compatible with the Windows® 2000 Server operating
system.
☞ With Windows® XP, printing and installation is
only possible from an account with administrator privileges. These operations cannot be performed from an account with limited privileges.
Hard disk free space: At least 20 MB (100 MB
for a full installation)
NOTE
Up to 100 MB of hard disk free space may be
needed when printing long labels or large amounts
of data.
Memory: At least 64 MB
Monitor: VGA or higher graphics card
USB port
CD-ROM drive
11
Ch. 2 Getting Started
Installing the P-touch Editor 3.2
software
The P-touch Editor 3.2 software includes a variety of more complex functions for printing barcodes and images, enabling you to design just
about any label that you can image. Install the
P-touch Editor 3.2 software onto a PC as
described below.
3 Click the upper button (P-touch Editor). The
InstallShield® Wizard for installing the
P-touch Editor software starts up, and then
the Welcome dialog box appears.
NOTE
Getting Started
Do not connect the P-touch to the computer before
installing the software, otherwise it may not be
installed correctly. Be sure to connect the P-touch
only when you are instructed to do so.
To install the P-touch Editor 3.2 software
1 Insert the enclosed CD-ROM into the computer’s CD-ROM drive. A dialog box automatically appears, allowing you to the
select the language of the Installer.
NOTE
☞ To install just the printer driver, click the lower
button (Driver). The first Driver Setup dialog box
appears, allowing you to select whether the Ptouch will be connected through the USB port or
the RS-232C port. Continue with the procedure
in Installing the USB printer driver on page 16.
(To install the serial printer driver, refer to the
Advanced Functions booklet.)
☞ To install the P-touch Quick Editor software,
NOTE
If the dialog box does not automatically appear,
double-click “My Computer” on the desktop, and
then double-click the CD-ROM drive containing
the CD-ROM. (For Windows® XP, click “My Computer” in the Start menu, and then double-click the
CD-ROM drive containing the CD-ROM.) Next,
double-click “Setup.exe” to display the dialog box.
click the middle button (P-touch Quick Editor).
Continue with the procedure in Installing the
P-touch Quick Editor software on page 14.
2 Select the desired language, and then click
the OK button.
4 Carefully read the contents of the Welcome
dialog box, and then click the Next button
to continue. The User Information dialog
box appears.
12
Ch. 2 Getting Started
Typical: All of the basic options (P-touch
Editor 3.2, Clip art, Auto Format templates, Help and fonts) are installed.
5 Type the necessary information into the
appropriate boxes (If the information has
already been registered in Windows®, it will
automatically appear.), and then click the
Next button. A dialog box appears, asking
for confirmation of the entered information.
6 Click the Yes button to register the entered
information.
● For a Custom installation
Selecting “Custom”, then clicking the
Next button displays a dialog box that
allows you to select which options to
install. Only the options with a check
mark beside them will be installed. In
addition to the basic options listed for a
Typical installation, the User’s Guide can
also be installed.
NOTE
To change the registration information, click the No
button, and then return to step 4.
The Setup Type dialog box appears.
1) Select which options to install.
Editor: P-touch Editor 3.2 software
7 Select the installation method, and then
click the Next button.
● For a Typical or Compact installation
Selecting “Typical” or “Compact”, then
clicking the Next button immediately
starts installation.
Clip Art: Illustrations for the P-touch
Editor 3.2 Clip Art function
Fonts
Auto Format Templates: Templates for
the Auto Format function
Help: Help files for P-touch Editor 3.2
User’s Guide: HTML User’s Guide for
P-touch Editor 3.2 (The User’s Guide
can also be viewed from the CDROM.)
13
Getting Started
Compact: Only P-touch Editor 3.2 is
installed.
Ch. 2 Getting Started
Getting Started
Transfer Manager: (PT-9600 only-not
compatible with the software for the
PT-3600) Two applications: Transfer
Manager (which allows you to transfer
templates, a database linked to a template or image data to the P-touch from
a computer) and Backup Manager
(which allows you to back up P-touch
data on a PC and transfer it back to the
P-touch)
If the Change button can be clicked
while an option is selected, sub-components can be selected. Click the
Change button to display the Select
Sub-components dialog box, and then
select the sub-components that you
wish to install by putting a check mark
beside them. If certain options or subcomponents are not installed, some Ptouch Editor functions may not be
available. After selecting the desired
sub-components, click the Continue
button.
2) Click the Next button to begin installation.
8 After P-touch Editor is installed, a dialog
box appears, allowing you to select whether
or not to install the printer driver.
To install the printer driver, click the Yes
button. The first Driver Setup dialog box
appears, allowing you to select whether the
P-touch will be connected through the USB
port or the RS-232C port.
Continue with the procedure in Installing
the USB printer driver on page 16. (To
install the serial printer driver, refer to the
Advanced Functions booklet.)
NOTE
If the printer driver is already installed, click the No
button.
9 When installation of P-touch Editor is finished, a dialog box appears, allowing you
to upgrade P-touch Editor 3.2 so that it will
be compatible with Access 2000.
14
To upgrade P-touch Editor 3.2 for Access 2000,
click the Yes button, and then follow the
instructions that appear.
If you do not wish to upgrade P-touch Editor 3.2
for Access 2000, click the No button.
NOTE
If a dialog box appears, indicating that the installation is finished and explaining that the computer
should be restarted, select the option for restarting
the computer, click the Finish button to restart the
computer, and then remove the CD-ROM from the
CD-ROM drive.
Installing the P-touch Quick Editor software
The P-touch Quick Editor software provides
quick access to the more simple label-designing
features for easy text input and instant printing
of labels. Install the P-touch Quick Editor software onto a PC as described below.
NOTE
Do not connect the P-touch to the computer before
installing the software, otherwise it may not be
installed correctly. Be sure to connect the P-touch
only when you are instructed to do so.
To install the P-touch Quick Editor software
1 Insert the enclosed CD-ROM into the computer’s CD-ROM drive. A dialog box automatically appears, allowing you to the
select the language of the Installer.
Ch. 2 Getting Started
NOTE
NOTE
If the dialog box does not automatically appear,
double-click “My Computer” on the desktop, and
then double-click the CD-ROM drive containing
the CD-ROM. (For Windows® XP, click “My Computer” in the Start menu, and then double-click the
CD-ROM drive containing the CD-ROM.) Next,
double-click “Setup.exe” to display the dialog box.
☞ To install just the printer driver, click the lower
Getting Started
2 Select the desired language, and then click
the OK button.
button (Driver). The first Driver Setup dialog
box appears, allowing you to select whether the
P-touch will be connected through the USB port
or the RS-232C port. Continue with the procedure in Installing the USB printer driver on
page 16. (To install the serial printer driver,
refer to the Advanced Functions booklet.)
☞ To install the P-touch Editor 3.2 software, click
3 Click the middle button (P-touch Quick Editor). The InstallShield® Wizard for installing
the P-touch Quick Editor software starts up,
and then the Welcome dialog box appears.
the upper button (P-touch Editor). Continue
with the procedure in Installing the P-touch Editor 3.2 software on page 12.
4 Carefully read the contents of the Welcome
dialog box, and then click the Next button
to continue. The User Information dialog
box appears.
15
Ch. 2 Getting Started
5 Type the necessary information into the
appropriate boxes (If the information has
already been registered in Windows®, it
will automatically appear.), and then click
the Next button. A dialog box appears, asking for confirmation of the entered information.
Getting Started
6 Click the Yes button to register the entered
information.
NOTE
To change the registration information, click the No
button, and then return to step 4.
The Choose Destination Location dialog
box appears.
7 Click the Next button to begin installation.
NOTE
To change the location where P-touch Quick Editor
will be installed, click the Browse button, and then
select the installation folder in the Choose Folder
dialog box that appears. Then, click the OK button.
After P-touch Quick Editor is installed, a
dialog box appears, allowing you to select
where shortcuts to P-touch Quick Editor
will be added.
8 Select the desired locations for the shortcuts, and then click the Next button. A dialog box appears, allowing you to select
whether or not to install the printer driver.
To install the printer driver, click the Yes
button. The first Driver Setup dialog box
appears, allowing you to select whether the
P-touch will be connected through the USB
port or the RS-232C port.
Continue with the procedure in Installing
the USB printer driver on page 16. (To
install the serial printer driver, refer to the
Advanced Functions booklet.)
NOTE
If the printer driver is already installed, click the No
button. A dialog box appears explaining that installation is finished. Select “Yes, I want to restart my
computer now.”, click the Finish button to restart
the computer, and then remove the CD-ROM from
the CD-ROM drive.
Installing the USB printer driver
With Plug-and-Play, new devices connected to
the system are detected, and their drivers are
automatically installed. If the P-touch 9600/
3600 is to be connected through the USB port,
its driver will be installed with Plug-and-Play.
Be sure to read the installation instructions
described below before installing the printer
driver supplied on the CD-ROM.
NOTE
☞ Do not connect the P-touch to the computer
until you are instructed to do so, otherwise the
printer driver may not be installed correctly.
☞ The dialog boxes shown in the procedures
below are for the installation of the software for
the PT-9600. When installing the software for
the PT-3600, the dialog boxes may be slightly
different from those shown.
16
Ch. 2 Getting Started
To install the USB printer driver
With Windows® 98, 98 SE, Me or 2000:
4 Click the Finish button.
NOTE
If a dialog box appears, indicating that the installation is finished and explaining that the computer
should be restarted, select the option for restarting
the computer, click the Finish button to restart the
computer, and then remove the CD-ROM from the
computer.
2 Click the Next button. A dialog box
appears, instructing you to connect the Ptouch to the computer.
With Windows® XP:
1 In the dialog box that appears, allowing you
to select whether the P-touch will be connected with a USB cable or an RS-232C
cable, select “USB cable”, and then click
the OK button. A dialog box appears,
informing you that the PT-9600/3600
printer driver will be installed.
3 Connect the P-touch to the computer using
the enclosed USB interface cable as
described on page 10, and then turn on the
P-touch. A dialog box appears, indicating
that the printer driver has been installed.
2 Click the Next button. A dialog box
appears, instructing you to connect the
P-touch to the computer.
17
Getting Started
1 In the dialog box that appears, allowing you
to select whether the P-touch will be connected with a USB cable or an RS-232C
cable, select “USB cable”, and then click
the OK button. A dialog box appears,
informing you that the PT-9600/3600
printer driver will be installed.
Ch. 2 Getting Started
3 Connect the P-touch to the computer using
the enclosed USB interface cable as
described on page 10, and then turn on the
P-touch. The first Found New Hardware
Wizard dialog box appears.
6 Click the Finish button.
NOTE
If a Driver Setup dialog box appears, indicating that the
printer driver has been installed, click the Finish button.
Getting Started
4 Select “Install the software automatically
(Recommended)”, and then click the Next
button. A dialog box appears, warning that
the software has not passed Windows®
Logo testing.
5 Click the Continue Anyway button to continue with the installation. A Found New
Hardware Wizard dialog box appears, indicating that the Found New Hardware Wizard has finished installing the software for
the PT-9600/3600.
A dialog box appears, indicating that the
installation is finished.
7 Select “Yes, I want to restart my computer
now.” (or “Yes, restart immediately” if the
printer driver was installed separately), click
the Finish button to restart the computer,
and then remove the CD-ROM from the
computer.
Replacing or adding a USB
printer driver
To replace or add a USB printer driver
1 Turn off the P-touch, and then disconnect it
from the computer.
2 Insert the enclosed CD-ROM into the computer’s CD-ROM drive. A dialog box automatically appears, allowing you to the
select the language of the Installer.
18
Ch. 2 Getting Started
NOTE
NOTE
If the dialog box does not automatically appear,
double-click “My Computer” on the desktop, and
then double-click the CD-ROM drive containing
the CD-ROM. (For Windows® XP, click “My Computer” in the Start menu, and then double-click the
CD-ROM drive containing the CD-ROM.) Next,
double-click “Setup.exe” to display the dialog box.
☞ If “Replace with new Brother PT-9600/3600.” is
3 Select the desired language, and then click
the OK button.
☞ If “Add Brother PT-9600/3600.” is selected, a
new printer driver is added. With a USB connection on Windows® 98 or Me, only a port is
added without adding it as a new printer. Select
this option when connecting and using multiple
P-touch 9600/3600s with the same computer.
☞ To delete the printer driver, follow the procedure in Uninstalling the printer driver on
page 33.
With Windows® 98, 98 SE, Me or 2000:
4 Click the lower button (Driver). A Driver
Setup dialog box appears, allowing you to
select whether to replace, add or delete the
PT-9600/3600 printer driver.
6 A dialog box appears, instructing you to
connect the P-touch to the computer.
5 Select either “Replace with new Brother PT9600/3600.” or “Add Brother PT-9600/
3600.”, and then click the Next button.
7 Connect the P-touch to the computer using
the enclosed USB interface cable as
described on page 10, and then turn on the
P-touch. A dialog box appears, indicating
that the printer driver has been installed.
19
Getting Started
selected, the previously installed printer driver
is deleted, and replaced with a new one. Select
this option when upgrading the printer driver,
or when running Windows® 2000 or XP and
changing to a P-touch 9600/3600 with a different serial number.
Ch. 2 Getting Started
8 Click the Finish button.
NOTE
If a dialog box appears, explaining that the computer should be restarted, select the option for
restarting the computer, and then click the Finish
button.
9 Click the Continue Anyway button to continue with the installation. A Found New
Hardware Wizard dialog box appears, indicating that the Found New Hardware Wizard has finished installing the software for
the PT-9600/3600.
With Windows® XP:
6 A dialog box appears, instructing you to
connect the P-touch to the computer.
Getting Started
0 Click the Finish button. A Driver Setup dialog box appears, indicating that the printer
driver has been installed.
7 Connect the P-touch to the computer using
the enclosed USB interface cable as
described on page 10, and then turn on the
P-touch. A dialog box appears, indicating
that the printer driver has been installed.
The first Found New Hardware Wizard dialog box appears.
A Select “Yes, restart immediately”, click the
Finish button to restart the computer, and
then remove the CD-ROM from the computer.
On a Macintosh Computer
8 Select “Install the software automatically
(Recommended)”, and then click the Next
button. A dialog box appears, warning that
the software has not passed Windows®
Logo testing.
The Mac version of the software is for a Macintosh with an English operating system. If the
software is installed on a Macintosh with an
operating system in a different language, the
software may not run properly.
Before installation
Check that your system configuration meets the
following requirements.
Computer: Macintosh with Power PC processor
Operating system: Mac OS 8.6 or later, or Mac
OS X v10.1 or v10.2
Hard disk free space: At least 20 MB (100 MB
for a full installation)
NOTE
Up to 100 MB of hard disk free space may be
needed when printing long labels or large amounts
of data.
20
Ch. 2 Getting Started
Memory: At least 32 MB
USB port (installed as standard equipment)
CD-ROM drive
6 Double-click the P-touch Editor 3.2 Installer
icon in the folder that appears. The installer
starts up.
The P-touch Editor 3.2 software includes a variety of more complex functions for printing barcodes and images, enabling you to design just
about any label that you can image. Install the
P-touch Editor 3.2 software onto a Macintosh as
described below.
To install the P-touch Editor 3.2 software
7 Select the installation method.
● For a basic installation
Clicking the Install button immediately
starts installing all options.
With a Mac OS before OS X:
1 With the P-touch and the Macintosh turned
off, connect the P-touch to the computer
using the enclosed USB interface cable as
described on page 10. Be sure to leave the
P-touch turned off.
2 Turn on the Macintosh.
3 Insert the enclosed CD-ROM into the computer’s CD-ROM drive.
NOTE
About 20 MB of available hard-disk space is
needed to begin installation. In order to install all
options, about 100 MB of available hard-disk space
is needed. If enough hard-disk space is available,
click the Install button.
● For a custom installation
Clicking the Custom Install button displays a dialog box that allows you to
select which options to install.
4 Double-click the Mac OS 9 folder to open
it.
Only the options with a check mark
beside them are installed. Select the
options that you wish to install, and then
click the Install button.
NOTE
5 Double-click the P-touch Editor 3.2 folder
to open it.
☞ In order to print from the P-touch 9600/3600,
“PT-9600/3600 Driver” must be selected for
installation.
☞ If certain options are not installed, some Ptouch Editor functions may not be available.
21
Getting Started
Installing the P-touch Editor 3.2 software
Ch. 2 Getting Started
8 When the dialog box appears, indicating
that the installation is finished, click the
Quit button.
6 Double-click the P-touch Editor 3.2 Installer icon
in the folder that appears. The installer starts up,
and then the Introduction dialog box appears.
9 When the dialog box appears, asking if you
wish to restart the computer, click the
Restart button to restart the computer.
Getting Started
NOTE
With Mac OS X v10.1 or v10.2:
1 With the P-touch and the Macintosh turned
off, connect the P-touch to the computer
using the enclosed USB interface cable as
described on page 10. Be sure to leave the
P-touch turned off.
2 Turn on the Macintosh.
When the Next button is pressed, a message may
appear, warning that an older version of the software is installed. Be sure to uninstall the older version of the software before trying to install the new
software. For details on uninstalling the software,
refer to To uninstall the P-touch Editor 3.2 software:
on page 35.
7 Click the Next button. The Choose Product
Components dialog box appears.
3 Insert the enclosed CD-ROM into the computer’s CD-ROM drive.
8 Select the installation method.
● For a typical installation
Click the Next button to immediately start
installing all options.
4 Double-click the Mac OS X folder to open it.
NOTE
About 20 MB of available hard-disk space is needed to
begin installation. In order to install all options, about
100 MB of available hard-disk space is needed.
5 Double-click the P-touch Editor 3.2 folder
to open it.
22
● For a minimal installation
Select “Minimal” from the Feature Set list,
and then click the Next button to start installing just the P-touch Editor 3.2 application.
Ch. 2 Getting Started
NOTE
If certain options (such as the Auto Format Templates and the Clip Art) are not installed, some Ptouch Editor functions may not be available.
● For a custom installation
0 Check that the installation will be performed as desired, and then click the Install
button. After P-touch Editor is installed, a
dialog box appears, indicating that the
installation is finished.
Select “Custom” from the Feature Set list
to display the list of options that can be
selected for installation.
A Click the Done button, and then restart the
computer.
Only the options with a check mark
beside them are installed. Select the
options that you wish to install, and then
click the Next button.
The Choose Alias Folder dialog box
appears, allowing you to select where an
alias to P-touch Editor 3.2 will be added.
Installing the P-touch Quick Editor software
The P-touch Quick Editor software provides
quick access to the more simple label-designing
features for easy text input and instant printing
of labels. Install the P-touch Quick Editor software onto a Macintosh as described below.
With a Mac OS before OS X:
1 With the P-touch and the Macintosh turned
off, connect the P-touch to the computer
using the enclosed USB interface cable as
described on page 10. Be sure to leave the
P-touch turned off.
2 Turn on the Macintosh.
3 Insert the enclosed CD-ROM into the computer’s CD-ROM drive.
23
Getting Started
9 Select the desired location for the alias, and
then click the Next button. A dialog box
appears, allowing you to check the installation.
Ch. 2 Getting Started
Only the options with a check mark
beside them are installed. Select the
options that you wish to install, and then
click the Install button.
NOTE
4 Double-click the Mac OS 9 folder to open it.
In order to print from the P-touch 9600/3600, “PT9600/3600 Driver” must be selected for installation.
7 When the dialog box appears, indicating
that the installation is finished, click the
Quit button.
Getting Started
5 Double-click the P-touch Quick Editor
Installer icon in the folder that appears. The
installer starts up.
8 When the dialog box appears, asking if you
wish to restart the computer, click the
Restart button to restart the computer.
With Mac OS X v10.1 or v10.2:
6 Select the installation method.
● For a basic installation
Clicking the Install button immediately
starts installing the most basic options.
NOTE
About 20 MB of available hard-disk space is
needed to begin installation. If enough hard-disk
space is available, click the Install button.
1 With the P-touch and the Macintosh turned
off, connect the P-touch to the computer
using the enclosed USB interface cable as
described on page 10. Be sure to leave the
P-touch turned off.
2 Turn on the Macintosh.
3 Insert the enclosed CD-ROM into the computer’s CD-ROM drive.
● For a custom installation
Clicking the Custom Install button displays a dialog box that allows you to
select which options to install.
4 Double-click the Mac OS X folder to open
it.
24
Ch. 2 Getting Started
8 Select the desired location for the alias, and
then click the Next button. A dialog box
appears, allowing you to check the installation.
6 Double-click the P-touch Quick Editor
Installer icon in the folder that appears. The
installer starts up, and then the Introduction
dialog box appears.
NOTE
When the Next button is pressed, a message may
appear, warning that an older version of the software is installed. Be sure to uninstall the older version of the software before trying to install the new
software. For details on uninstalling the software,
refer to To uninstall the P-touch Quick Editor software: on page 35.
7 Click the Next button. The Choose Alias
Folder dialog box appears, allowing you to
select where an alias to P-touch Quick Editor will be added.
9 Check that the installation will be performed as desired, and then click the Install
button. After P-touch Quick Editor is
installed, a dialog box appears, indicating
that the installation is finished.
0 Click the Done button, and then restart the
computer.
Installing the printer driver
(Mac OS X v10.1 or v10.2)
To install the printer driver:
1 With the P-touch and the Macintosh turned
off, connect the P-touch to the computer
using the enclosed USB interface cable as
described on page 10. Be sure to leave the
P-touch turned off.
2 Turn on the Macintosh.
3 Insert the enclosed CD-ROM into the computer’s CD-ROM drive.
25
Getting Started
5 Double-click the P-touch Quick Editor
folder to open it.
Ch. 2 Getting Started
Getting Started
4 Double-click the Mac OS X folder to open
it.
7 Check that the installation will be performed as desired, and then click the Install
button. After the printer driver is installed, a
dialog box appears, indicating that the
installation is finished.
5 Double-click the Driver Installer icon in the
folder that appears. The installer starts up,
and then the Introduction dialog box
appears.
8 Click the Done button, and then restart the
computer.
Selecting the PT-9600/3600 as the
printer
To select the printer:
NOTE
When the Next button is pressed, a message may
appear, warning that an older version of the printer
driver is installed. Be sure to uninstall the older version of the printer driver before trying to install the
new driver. For details on uninstalling the printer
driver, refer to To uninstall the printer driver: on
page 35.
6 Click the Next button. A dialog box
appears, allowing you to check the installation.
26
With a Mac OS before OS X:
1 Turn on the P-touch 9600/3600.
2 Pull down the Apple menu and select
“Chooser” to display the Chooser window.
Ch. 2 Getting Started
3 In the list on the left, click the PT-9600/
3600 icon. Then, select the appropriate
printer from the list on the right.
Reading the User’s Guide
4 Close the Chooser window to confirm your
settings.
The P-touch Editor User’s Guide can be viewed
either by inserting the CD-ROM into the drive
each time you wish to refer to it or by installing
it onto your computer so that it is quickly available at any time. Since the User’s Guide is an
HTML document, a browser is needed to read it.
1 Turn on the P-touch 9600/3600.
2 Double-click the Applications folder on the
Macintosh HD to open it.
●
●
●
●
●
●
●
●
●
●
●
●
●
●
●
●
●
●
●
●
●
●
On a Computer Running
Windows®
3 Double-click the Utilities folder to open it.
4 Double-click “Print Center” to start it up.
NOTE
If no printers have been added, a message appears,
allowing you to add to your list of printers. Click
the Add button.
To view the User’s Guide from the CD-ROM:
1 Start up Windows® Explorer.
2 Select the CD-ROM drive.
3 Double-click the Ptouch folder
4 Double-click the Manual folder
5 Double-click “Main.htm”.
To view the User’s Guide installed on the
hard disk:
1 Click the Start button in the taskbar to display the Start menu.
2 Point to “Programs”.
5 Click the Add Printer button. A list of
detected USB printers appears.
6 Select “PT-9600/3600” from the USB list,
and then click the Add button. The PT9600/3600 appears in the Printer List.
7 Quit Print Center.
3 Point to “P-touch Editor 3.2”.
4 Click “The User’s Guide P-touch Editor
3.2”.
On a Macintosh Computer
To view the User’s Guide from the CD-ROM:
●
Double-click “Main.htm” in the User’s
Guide folder within the P-touch Editor 3.2
folder on the CD-ROM.
To view the User’s Guide installed on the
hard disk:
●
Double-click “Main.htm” in the User’s
Guide folder within the P-touch Editor 3.2
folder installed on the computer.
27
Getting Started
With Mac OS X v10.1 or v10.2:
●
Ch. 2 Getting Started
Using P-touch Editor 3.2
●
●
●
●
●
●
●
●
●
●
●
●
●
●
●
●
●
●
●
●
●
●
●
P-touch Editor 3.2 makes it easy for anyone to
design and print more complex labels for almost
any need imaginable.
Starting up P-touch Editor 3.2
To view the help for the Mac version of P-touch
Editor 3.2, double-click “Main.htm” in the Help
folder within the P-touch Editor 3.2 folder installed
on the computer.
Displaying the Properties
NOTE
To start up P-touch Editor 3.2:
On a computer running Windows
NOTE
®
Getting Started
1 Click the Start button in the taskbar to display the Start menu.
2 Point to “Programs”.
Although the screens shown in the following explanations are for Windows® 98, 98 SE and Me, the
operations for Windows® 2000 and XP and Macintosh are the same unless specifically mentioned.
The desired Properties can be displayed by
clicking the icon in the property dock.
3 Point to “P-touch Editor 3.2”.
4 Click “P-touch Editor 3.2”.
When P-touch Editor is started, the following
window is displayed.
Property dock
Layout area
Print area
Rulers
Cursor
Object dock
Status bar
Font Properties icon
Database Properties
icon (replaced with the
database toolbar on the
Mac version of the software)
To display the Properties:
●
Draw toolbar
Text Properties icon
Layout Properties icon
Title bar
Menu bar
Standard toolbar
Page Properties icon
Click the icon.
Page Properties (
Click this button to
hide the Properties.
On a Macintosh computer
●
Double-click the P-touch Editor 3.2 icon in
the P-touch Editor 3.2 folder installed on
the computer.
When P-touch Editor is started, the following
window is displayed.
Rulers Layout area Print area Title bar
Menu bar
)
When the P-touch 9600/3600
is selected as the printer:
Entering text
NOTE
Although the screens shown in the following explanations are for Windows® 98, 98 SE and Me, the
operations for Windows® 2000 and XP and Macintosh are the same unless specifically mentioned.
Draw toolbar
Print toolbar
Database toolbar
Property dock
Object dock
Status bar
28
1 Click
(Text button) on the draw toolbar.
Text can be typed in, and the pointer
changes from
(selection pointer) to
(I-beam pointer).
2 Move the I-beam pointer to the position in
the layout area where you wish to type in
text, and then click the left mouse button.
The cursor flashes in the layout area to indicate that you can now type in text.
Ch. 2 Getting Started
●
The QR Code protocol can only be used
with English. If data in any other language is
entered, the barcode may not be read correctly.
Databases
Keep the following points in mind when using
the database functions of P-touch Editor 3.2.
NOTE
4 To create a new line of text, press the keyboard’s Enter key.
For general details, refer to the User’s Guide supplied on the P-touch Editor 3.2 CDROM.
●
The database function of P-touch Editor 3.2
(Windows® version) uses database files that
are compatible with Microsoft Access 97.
By upgrading P-touch Editor 3.2 using a
program available on the CD-ROM, Ptouch Editor will become compatible with
Access 2000. If P-touch Editor 3.2 has not
been updated to Access 2000 during installation, refer to the Readme file located at
Ptouch\Editor\Ac2k on the CD-ROM, and
start up the program.
●
P-touch Editor 3.2 can import files other
than mdb files, such as csv files. Files saved
as csv files with an application such as
Microsoft Excel can be used with P-touch
Editor. Refer to the User’s Guide supplied
on the P-touch Editor 3.2 CD-ROM for
more details.
●
Using a function available with Microsoft
Access 97, Excel files can be linked to mdb
files. With this function, data changed in
Excel is automatically updated with the Ptouch Editor.
NOTE
☞ With P-touch Editor 3.2, text is always typed in
using the insert mode. The overwrite mode cannot be used to type in text.
☞ To change the font and text size, click the
appropriate icon in the property dock, and then
select the desired settings from the Properties
that appear.
☞ For details, refer to Reading the User’s Guide on
page 27.
Notes on usage
Barcodes
Keep the following points in mind when using
P-touch Editor 3.2 to print barcodes.
● Barcodes should be printed on white tape.
If other colors of tape are used, the barcode
reader may not be able to read the barcode
correctly.
●
Be sure to test the barcode reader to make
sure that it can read printed barcodes in the
environment where you plan to use them.
29
Getting Started
3 Use the computer keyboard to type in the
text.
Ch. 2 Getting Started
Using P-touch Quick Editor
●
●
●
●
●
●
●
●
●
●
●
●
●
●
●
●
●
●
●
●
●
●
●
P-touch Quick Editor enables you to design a
simple label layout quickly and easily. In addition to the various functions available through
the buttons in the toolbar, right-clicking (Windows®) or holding down the Control key and
clicking (Macintosh) in the label view displays a
pop-up menu containing more commands.
On a Macintosh computer
●
Double-click the P-touch Quick Editor icon
in the P-touch Quick Editor folder installed
on the computer.
When P-touch Quick Editor is started, the following window is displayed.
Toolbar
Label view
Starting up P-touch Quick Editor
Getting Started
NOTE
To start up P-touch Quick Editor:
On a computer running
-
Windows®
If a shortcut was added to the StartUp
menu:
●
-
P-touch Quick Editor automatically
starts when the computer is started up.
If a shortcut was added to the desktop:
●
-
Double-click the P-touch Quick Editor
icon on the desktop.
If a shortcut was added to the Quick Launch
toolbar:
●
-
Double-click the P-touch Quick Editor
icon in the Quick Launch toolbar.
If no shortcuts were added:
1 Click the Start button in the taskbar to
display the Start menu.
2 Point to “Programs”.
3 Click “P-touch Quick Editor”.
When P-touch Quick Editor is started, the following window is displayed.
Toolbar
Label view
NOTE
P-touch Quick Editor can be hidden or displayed
by clicking its icon in the system tray, at the right of
the taskbar.
30
To view the help for the Mac version of P-touch
Quick Editor, double-click “Help.html” in the Ptouch Quick Editor folder installed on the computer.
Specifying a label size
Before entering text, the label size must be set. A
selection of preset layout sizes is available for a
variety of needs.
NOTE
Although the screens shown in the following explanations are for Windows® 98, 98 SE and Me, the
operations for Windows® 2000 and XP and Macintosh are the same unless specifically mentioned.
To specify the label size:
1 Click the arrow beside the Properties button
(
) to display a drop-down menu.
2 Click [Tape Settings] to display various
label format settings.
NOTE
The Tape Settings can also be displayed by selecting [View Properties], then clicking [Tape Settings]
in the pop-up menu, displayed by right-clicking
(Windows®) or holding down the Control key and
clicking (Macintosh) in the label view.
Ch. 2 Getting Started
3 In the Format list, click the desired label format.
NOTE
Importing text
Text that has already been typed in another application can easily be imported into the label.
☞ The size of the label layout can also be set by
Entering text
The entire text can quickly be formatted by
specifying the font, size, style and alignment. In
addition, a frame can be drawn around the text.
To import text:
1 Select the desired text in the other application.
2 Import the text into the label layout either
by pressing the designated shortcut keys
(Windows® only) or by dragging it from the
other application.
NOTE
To enter text:
1 Click the arrow beside the Properties button
(
) to display a drop-down menu.
2 Click [Text Settings] to display various text
format settings.
NOTE
The Text Settings can also be displayed by selecting
[View Properties], then clicking [Text Settings] in
the pop-up menu, displayed by right-clicking (Windows®) or holding down the Control key and clicking (Macintosh) in the label view.
(Windows® only) To specify the shortcut keys used
to import text, right-click in the label view (or text
box), and then click [Options] in the menu that
appears. In the Options dialog box that appears,
select the desired shortcut keys for importing text.
Using the Text History list
The 10 most recently printed texts are automatically stored for future use.
To use text from the Text History list:
1 Click the Text History button (
play the Text History list.
) to dis-
2 Click the desired text.
NOTE
3 In the Text Settings Properties, select the
desired text formats.
4 Click in the label view, and then type or
import the text.
NOTE
Typing in the label view shows the text as it will
appear when it is printed. However, by clicking the
Change View button (
), the text is displayed
in the text box, giving you a clearer view of the
entered text.
Text selected from the Text History list replaces all
text already entered in the layout.
Adding a symbol
A symbol from the various installed symbol fonts
can be added at the left side of the label text.
To add a symbol to the text:
1 Windows®: Right-click in the label view (or
text box), select [Symbols] in the menu that
appears, and then click [Insert/Change].
The Input Symbol dialog box appears.
Macintosh: Hold down the Control key and
click in the label view (or text box), select
[Symbol font] in the menu that appears, and
then click [Import/Change]. A dialog box
displaying symbols appears.
31
Getting Started
specifying the Length and Width settings or by
dragging the edges of the label view until the
layout is the desired size.
Ch. 2 Getting Started
NOTE
If the label view (or text box) has been moved away
from the tool bar, it will be docked before scrolling.
Printing
2 In the Symbol Font list, select the desired
symbol font.
Getting Started
3 In the Symbol List view, select the desired
symbol.
4 Click the OK button. The selected symbol is
added at the left of the text.
NOTE
Before printing labels, certain print options can
be selected.
To print a label:
1 Click the arrow beside the Print button (
) to display a drop-down menu.
2 Click [Print Options]. The Print dialog box
appears.
If a symbol has already been added to the text, it
will be replaced by the newly selected symbol.
Changing the background color
The background color of the layout can be
changed to suit your preference.
To change the background color:
●
Windows®: Right-click in the label view (or
text box), select [Background Color] in the
menu that appears, and then click the
desired color from the list.
Macintosh: Hold down the Control key and
click in the label view (or text box), select
[Background Color] in the menu that
appears, and then click the desired color
from the list.
3 Select the desired print settings.
Auto Cut: This option allows you to select
whether or not to automatically cut off the
label after it is printed.
Mirror Printing: This option allows you to
print the text in reverse so that it is perfect
for attaching to the inside of windows®.
Copies: This option allows you to enter the
number of copies to be printed.
4 Windows®: Click the OK button to start
printing.
Macintosh: Click the Print button. The layout is printed.
NOTE
To select a color other than those listed, select
[User Settings] (Windows®) or [User Settings] (Macintosh) from the Background Color sub-menu, create the desired color in the dialog box that appears,
and then click the OK button.
Viewing the text
Layouts that are too long to fit in the screen can
be scrolled by clicking the Arrange button ( )
to view the left, the center, then the right side of
the layout with each click of the button.
32
NOTE
If you want to start printing without changing the
print options simply click the Print button (
)
or click the arrow beside the Print button and click
[Print].
Hiding/displaying P-touch Quick
Editor (Windows® only)
P-touch Quick Editor can be hidden by clicking
the Hide button ( ). Re-display P-touch Quick
Editor by clicking its icon in the system tray, at
the right of the taskbar.
Ch. 2 Getting Started
To quit P-touch Quick Editor:
On a computer running Windows®
Do either of the following:
● Right-click the P-touch Quick Editor icon in
the system tray, and then click [Exit] in the
menu that appears.
●
Right-click in the label view (or text box),
and then click [Exit] in the menu that
appears.
On a Macintosh computer
Do either of the following:
● Click [Quit] in the [File] menu
●
Hold down the Control key and click in the
label view (or text box), and then click
[Quit] in the menu that appears.
Uninstalling the Software &
Printer Driver
●
●
●
●
●
●
●
●
●
●
●
●
●
●
●
●
●
●
●
●
●
●
●
On a Computer Running Windows®
Uninstalling the software
Uninstall the P-touch Editor 3.2 or the P-touch
Quick Editor software from a PC as described
below.
To uninstall the software:
1 Start up Windows® 98, 98 SE, Me, 2000 or XP.
2 Click the Start button in the taskbar, select
“Settings”, and then click “Control Panel”.
With Windows® XP, click the Start button
in the taskbar, and then click “Control
Panel”.
3 In the Control Panel window, double-click
“Add/Remove Programs” (“Add or Remove
Programs” in Windows® XP).
NOTE
The dialog box that appears may differ depending
on the operating system being used.
4 In the Add/Remove Programs Properties
dialog box, select “P-touch Editor 3.2” (to
delete the P-touch Editor 3.2 software) or
“P-touch Quick Editor” (to delete the Ptouch Quick Editor software), and then click
the Add/Remove button (Change/Remove
button in Windows® XP).
5 A message appears, asking if you wish to
delete the selected application. Click the
Yes button to delete the application.
NOTE
If you do not wish to delete the application, click
the No button.
6 In the dialog box that appears, indicating
that the application is deleted, click the OK
button.
Uninstalling the printer driver
Uninstall the PT-9600/3600 printer driver from
a PC as described below.
33
Getting Started
Quitting P-touch Quick Editor
Ch. 2 Getting Started
To uninstall the printer driver:
1 Turn off the P-touch 9600/3600, and then
disconnect it from the computer.
2 Insert the enclosed CD-ROM into the computer’s CD-ROM drive. A dialog box automatically appears, allowing you to the
select the language of the Installer.
5 Select “Delete Brother PT-9600/3600.”, and
then click the Next button. A dialog box
appears, asking for confirmation to delete
all PT-9600/3600 printer drivers.
6 Click the Yes button. A dialog box appears,
indicating that the printer drivers have been
deleted.
Getting Started
NOTE
If the dialog box does not automatically appear,
double-click “My Computer” on the desktop, and
then double-click the CD-ROM drive containing
the CD-ROM. (For Windows® XP, click “My Computer” in the Start menu, and then double-click the
CD-ROM drive containing the CD-ROM.) Next,
double-click “Setup.exe” to display the dialog box.
3 Select the desired language, and then click
the OK button.
7 Click the Finish button.
NOTE
If a dialog box appears, explaining that the computer should be restarted, select the option for
restarting the computer, and then click the Finish
button.
On a Macintosh Computer
Uninstall the P-touch Editor 3.2 software, the P-touch
Quick Editor software or the PT-9600/3600 printer
driver from a Macintosh as described below.
NOTE
Before deleting the printer driver, be sure that the
P-touch is turned off and disconnected from the
computer.
4 Click the lower button (Driver). A Driver
Setup dialog box appears, allowing you to
select whether to replace, add or delete the
PT-9600/3600 printer driver.
With a Mac OS before OS X:
To uninstall the software and printer driver:
1 Drag the following to the Trash icon:
• P-touch Editor 3.2 folder (to delete the Ptouch Editor 3.2 software)
• P-touch Quick Editor folder (to delete the
P-touch Quick Editor software)
2 In the System Folder, open the Extensions
folder.
34
Ch. 2 Getting Started
To uninstall the printer driver:
• PT-9600/3600 icon (to delete the printer
driver)
1 Disconnect the USB cable from the USB
port on the P-touch.
• USB PT-9600/3600 Extension icon (to
delete the printer driver)
2 Double-click the Applications folder on the
Macintosh HD to open it.
4 In the System Folder, open the Preferences
folder.
5 Drag the following to the Trash icon.
• P-touch Editor 3.2 Prefs icon (for the Ptouch Editor 3.2 software)
3 Double-click the Utilities folder to open it.
4 Double-click the Print Center icon to start
up Print Center.
5 Check that “PT-9600/3600” does not appear
in the Printer List. If it is listed, select it, and
then click the Delete button to delete it.
• P-touch Quick Editor Prefs icon (for the
P-touch Quick Editor software)
6 Quit Print Center.
• PT-9600/3600 Prefs icon (for the printer
driver)
7 In the Library folder, open the Printers
folder, and then open the Brother folder.
8 Drag the following to the Trash icon.
With Mac OS X v10.1 or v10.2:
• PT9600/3600PDE.plugin
• PT9600/3600PM.plugin
To uninstall the P-touch Editor 3.2 software:
1 Double-click the Applications folder on the
Macintosh HD to open it.
2 Double-click the P-touch Editor 3.2 folder
to open it.
3 Double-click the Uninstall P-touch folder.
4 Double-click the Uninstall P-touch icon in
the folder that appears. The uninstaller starts
up.
5 Click the Uninstall button. After P-touch
Editor 3.2 is removed, a dialog box appears,
indicating that the uninstallation is finished.
6 Click the Quit button.
To uninstall the P-touch Quick Editor software:
1 Double-click the Applications folder on the
Macintosh HD to open it.
2 Double-click the P-touch Quick Editor
folder to open it.
3 Double-click the Uninstall P-touch folder.
4 Double-click the Uninstall P-touch icon in
the folder that appears. The uninstaller starts
up.
5 Click the Uninstall button. After P-touch
Quick Editor is removed, a dialog box
appears, indicating that the uninstallation is
finished.
6 Click the Quit button.
35
Getting Started
3 Drag the following to the Trash icon:
Ch. 2 Getting Started
Attaching labels
●
●
●
●
●
●
●
●
●
●
●
●
NOTE
●
●
●
●
●
●
●
●
●
●
●
Laminated tape
The backing from labels printed on laminated
tapes can easily be removed if an Auto Cut setting with a half cut (1, 3, 5 or 7) was used (refer
to page 68).
Non-laminated tape
Getting Started
Labels printed on non-laminated tapes can be
folded in half so that the inside edges of the two
backing pieces come off the label, enabling the
backing to easily be peeled off.
☞ White garments made from 100% cotton with a
plain (smooth) surface are best for iron-on transfers.
You can also make transfers to garments made
from 100% linen or cotton/polyester blends as
long as they have a plain (smooth) surface.
☞ The label will not adhere properly to any cloth
with a rough surface, such as pile or denim, or
with a waterproof surface. Heat-sensitive materials, such as nylon, acetate or other similar
fibres, are also unsuitable as they may be damaged when pressing with an iron at a high temperature.
☞ Do not move the iron while pressing, otherwise
the label may move out of the desired position.
Press the iron straight down onto the cloth.
☞ After the backing tape has been removed, the
transferred label may appear glossy. In addition,
some white spots may have appeared on the
label if it was touched while the backing tape
was peeled off. These can be removed by ironing over the label with a piece of cloth placed
between the label and the iron.
☞ Since the transferred label cannot be removed
Iron-on transfer tape
Iron-on transfer tape is used to transfer your text
onto garments using an iron.
1 Insert an iron-on transfer tape cassette, press
p to print the text and cut off the label.
2 Iron the garment to flatten it before transferring the text.
3 Place the label on the garment at the location where you wish the text to be transferred.
4 Set the iron to cotton (150 to 180 °C), and
then press down on the label with the iron
for about 15 seconds.
5 Allow the iron-on transfer to cool (for about
60 seconds), and then carefully remove the
backing paper.
36
once it is applied, make all transfers with care.
Washing
Garments with transfer labels can be washed
over 20 times if the label has been transferred
correctly. Normal biological and non-biological
household detergents may be used.
The label may become discolour if the garment
is placed in bleach for an extended length of
time.
Be careful that hard objects such as buckles or
buttons do not come into contact with the label
during the wash.
Do not dry clean garments that have had transfer labels applied.
Drying
Garments with transfer labels may be dried
either inside or outside out.
Do not tumble dry. The transfers will come off
and may stick to other items of clothing.
Ch. 2 Getting Started
Ironing
Assembling stamps
Iron garments with transfers using normal temperature settings.
Be sure to place a piece of cloth between the
iron and the label when you iron over it to prevent the label from sticking to the iron.
●
The labels are non-toxic, however, please maintain the usual precautions, such as not placing
them in your mouth, etc.
●
●
●
●
●
●
●
●
●
●
●
●
●
●
●
●
●
●
●
●
●
In addition to labels, your P-touch can be used
to make custom, pre-inked stamps for various
uses (optional stamp kit required). Simply design
your own customised stamps using one of the
pre-formatted stamp templates, and then affix
the printed stamp stencil to a self-inking stamp
film holder.
1 Install a stamp film cassette, and then format the stamp text in either of the following
ways:
a) Select a pre-formatted stamp template
from those available with the Auto format function (refer to page 65).
b) Type in text, and then set the Stamp function to ON (refer to page 64).
Fabric tape
NOTE
Fabric tape is used to attach a piece of fabric
printed with your text onto garments using an
iron. After printing the text onto fabric tape and
cutting off the label using scissors, place the
label on an ironed garment at the location
where you wish to attach it in such a way that
the printed text can be read correctly. Cover the
label with another piece of cloth and use an
iron set to a medium-high temperature (160 to
180 °C) to press down firmly for 15 to 30 seconds. For more details, refer to the instructions
included with the fabric tape cassette.
If an Auto format stamp template is used, it is not
necessary to set the Stamp function to ON.
2 Print out the stamp stencil and remove its
backing paper.
3 Remove the frame from around the stamp
holder ink pad, one end at a time, and then
remove the protective seal covering the ink
pad.
NOTE
☞ If the stamp holder already contains a stamp
film, hold the stamp over a piece of scrap paper
and remove the stamp frame by pulling it off,
one end at a time. Then, slowly peel off the
stamp film. Be careful that the ink does not
splatter.
☞ Keep the stamp film holder out of the reach of
children.
☞ Avoid getting ink in your eyes or mouth. If ink
gets in your eyes or mouth, immediately wash it
with fresh water for several minutes and consult
a doctor.
☞ Keep ink off skin, clothes and important papers.
Immediately use soap to wash skin that has
come in contact with ink. Even washing may
not remove all ink.
4 With the glossy side of the stamp film facing
up, align one end of the stamp film with the
slit in the side of the stamp holder.
37
Getting Started
CH
P-TOU
●
Ch. 2 Getting Started
Glossy side
Tape end
Slit
Getting Started
5 Hold the end of the stamp film in place with
your thumb, and then pass the stamp film
through the guides while pulling it tight.
8 Insert the stamp holder straight into the cap.
Fold over
NOTE
☞ Be sure that the cap correctly covers the stamp
in order to prevent ink spills.
☞ When the stamp is not being used, firmly cover
it with the cap and always store it standing up
with the stamp facing downward. Do not leave
the stamp laying on its side or leaning.
☞ Store stamp film holders and stamp film cassettes in a location where they are not exposed
to high temperatures, high humidity or direct
sunlight.
6 Fold the other end of the stamp film over
the other side of the stamp holder and hold
it in place with your finger.
Guides
Attaching the identification label
1 Insert a TZ tape cassette into the tape compartment.
NOTE
Use 12-mm-wide tape to make an identification
label for an M-size stamp and use 18-mm-wide
tape to make a label for an L-size stamp.
2 Press p to print out the identification label.
7 Fit the frame over the stamp film, and then
push the frame down into place.
38
3 After the label is cut off, affix it to the end of
the holder so that its bottom edge is on the
same side of the stamp holder as the raised
“brother” logo.
Getting Started
Ch. 2 Getting Started
Stamping
Since the length of time and amount of pressure
that the stamp holder should be held down
depends on the amount of ink in the holder, first
practise stamping on a piece of scrap paper.
You can expect to use a stamp film holder
approximately 300 to 500 times, although some
ink is lost when the stamp film is changed. The
actual life of the stamp film holder will vary
depending on the size and thickness of the characters, whether a shading pattern is used, etc.
NOTE
☞ After stamping, wait until the ink has completely dried before touching it in order to prevent smearing.
☞ If the stamp holder is not pressed straight down,
the stamp may be blurred.
☞ Do not press the stamp holder down too forcefully.
☞ Do not stamp on wet, sticky, rough or uneven
surfaces. Only stamp on paper. The ink will not
dry on plastic overhead projector transparencies and other ink-impermeable objects.
☞ If a stamp made with a new stamp film is faint
or incomplete, even after forcefully pressing
down the stamp holder for up to 30 seconds,
replace the stamp holder with a new one. Do
not try to refill the stamp holder.
39
Ch. 2 Getting Started
Getting Started
40
Ch. 3
Chapter
3
Functions
Functions
41
Ch. 3 Functions
Performing basic operations
●
●
●
●
●
●
●
●
●
●
●
●
●
●
●
●
●
●
●
●
●
k (right arrow key)
●
The following keys are necessary for using the
many functions.
Arrow keys
The machine’s LCD display can show three
rows of 19 characters; however, the text that
you create can be up to 1000 characters long.
You can review and edit your text by using the
four arrow keys (j, k, m and g) to move
the cursor so that different parts of the text are
shown in the display.
The arrow keys can also be used to select the
various functions and settings.
j (left arrow key)
To move the cursor one character to the
left:
Functions
●
Press j once.
NOTE
If this key is pressed when the cursor is at the beginning of a line following another line, the cursor
moves to the end of the previous line.
To move the cursor several characters to
the left:
●
Hold down j until the cursor moves to the
desired position.
To move the cursor to the beginning of the
current line of text:
●
Hold down d and press j.
To move the cursor to the beginning of the
current text block:
●
Hold down h and press j.
NOTE
If the cursor is already at the beginning of a text
block when these keys are pressed, the cursor
moves to the beginning of the previous block.
To move the cursor one character to the
right:
●
NOTE
If this key is pressed when the cursor is at the end of
a line followed by another line, the cursor moves to
the beginning of the next line.
To move the cursor several characters to
the right:
●
Hold down k until the cursor moves to the
desired position.
To move the cursor to the end of the current line of text:
●
Hold down d and press k.
To move the cursor to the beginning of the
next text block:
●
Hold down h and press k.
NOTE
If the cursor is already at the beginning of the last
text block when these keys are pressed, the cursor
moves to the end of the text.
m (up arrow key)
To move the cursor up to the previous line:
●
Press m once.
NOTE
If this key is pressed when the cursor is in the first
line of text, the cursor moves to the beginning of
the line.
To move the cursor up several lines:
●
Hold down m until the cursor moves to the
desired position.
To move the cursor to the beginning of the
entire text:
●
42
Press k once.
Hold down d and press m.
Ch. 3 Functions
To move the cursor down to the following line:
●
Press g once.
NOTE
If this key is pressed when the cursor is in the last
line of text, the cursor moves to the end of the line.
To move the cursor down several lines:
●
Hold down g until the cursor moves to the
desired position.
To move the cursor to the end of the entire text:
●
Hold down d and press g.
Function dial/Set key (r)
The navigation dial in the upper-right corner of
the keyboard provides a quick way to access
many of the P-touch functions and to select
from the various settings. Refer to the description of each function for a detailed explanation
on how to use the navigation dial.
To select a function or setting:
●
Rotate r either clockwise or counterclockwise until the desired function or setting is
displayed.
Return key (n)
The return key can be used to select an item
from a list, (for example, when adding a symbol
or accented character to the text) or to apply a
selected setting.
Some questions asking you to confirm a command may appear on the LCD display, especially when the function that you have chosen
will delete or affect files. In these cases, press
n is like answering “yes”.
NOTE
To answer “no”, press e. Refer to Cancel key
below.
To select an item from a list or to apply the
selected setting:
●
Press n.
Cancel key (e)
The Cancel key can be used to quit most functions and return to the previous display without
changing the text.
Some questions asking you to confirm a command may appear on the LCD display, especially when the function that you have chosen
will delete or affect files. In these cases, pressing
e is like answering “no”.
NOTE
NOTE
To return to the text without making a selection,
press e.
To answer “yes”, press n. Refer to Return key
above.
To apply the selection:
●
Press r.
To quit a function without applying any
changes that you may have made:
●
Press e.
Code key (d)
To use a function printed in color above or
on a key:
●
Hold down d and press the key for the
desired function.
43
Functions
g (down arrow key)
Ch. 3 Functions
Entering text
●
●
●
●
●
●
●
●
●
●
●
●
●
●
●
●
●
●
●
●
●
●
Typing in the text for your labels is almost the
same as typing on a typewriter or a computer.
Insert key (i)
Normally, text is entered with the Insert mode, in
other words, the text that you type is inserted into
any existing text at the cursor’s position. However, by exiting Insert mode, the text that you type
replaces any existing text at the cursor’s position.
When the P-touch is in Insert mode, the Ins indicator on the left side of the display comes on.
To enter Insert mode:
●
Press i. The Ins indicator comes on.
Functions
Q
R1 2 3 4 5 6 7 8 9 A B C D E F K Q
Q
Q
RG
Q
Q
<<< P-touch >>>
Q
RH
Q
Q
NO
R
Q
Q
L
RI 1:_
Q
M
RJ
AUTO
0.4
HELSINKI
A
AUTO
Length
Margin
Font
Width
Size
To exit Insert mode:
●
Press i. The Ins indicator goes off.
Space bar
The space bar lets you add blank spaces
between characters in your text. It is different
from the right arrow key (k), which just moves
the cursor without adding blank spaces.
NOTE
If the P-touch is in Caps mode, holding down h
or t while pressing a letter key will enter a lowercase letter.
To type a capital letter or a symbol printed
on the top half of certain keys:
●
Hold down h or t and press the key of
the desired letter or symbol.
Caps key (c)
Caps mode allows you to type uppercase letters
continuously without holding down h or
t. Enter or exit Caps mode by pressing c.
When the P-touch is in Caps mode, the Caps
indicator on the left side of the display comes
on.
NOTE
☞ When a number key is pressed while the Ptouch is in Caps mode, the number—not the
symbol above it—is typed in, unless h or t
is held down.
☞ To type lowercase letters while the P-touch is in
Caps mode, hold down h or t while pressing the key of the desired character.
To type in many uppercase letters:
1 Press c. The Caps indicator comes on.
Q
R1 2 3 4 5 6 7 8 9 A B C D E F K Q
Q
Q
RG
Q
Q
<<< P-touch >>>
Q
RH
Q
Q
NO
Q
R
Q
L
I
Q
R
M
1:_
RJ
To add a blank space to the text:
●
Press the space bar.
Shift key (h or t)
Lowercase letters can entered simply pressing
their keys. However, like on a typewriter or a
computer, to enter uppercase letters or the symbols in the top half of certain keys, the Shift key
should be pressed.
44
AUTO
0.4
HELSINKI
A
AUTO
Length
Margin
Font
Width
Size
2 Press the keys for the desired letters or symbols.
NOTE
To exit Caps mode at any time, press c. The Caps
indicator goes off.
Ch. 3 Functions
Alt mode (a)
Accented characters or special punctuation
marks on the right-hand side of the keys can be
added to the text using the Alt mode. Enter or
exit Alt mode by pressing a. When the Ptouch is in Alt mode, the Alt indicator on the left
side of the display comes on.
Tape width
6 mm
To add an accented character or a special
punctuation mark written in colour to the
text:
Q
R1 2 3 4 5 6 7 8 9 A B C D E F K Q
Q
Q
RG
Q
Q
<<< P-touch >>>
Q
R
Q
Q
Q
RH NO
Q
L
I
Q
R
M
1:_
RJ
AUTO
0.4
HELSINKI
A
AUTO
Length
Margin
Font
Width
Size
2 To type in a character written in the lowerright corner of the key, press the key of the
desired character.
To type in a character in the upper-right
corner of the key, hold down h or t
(OR press c to enter Caps mode) and press
the key of the desired character.
NOTE
3
9 mm
4
12 mm
6
18 mm
10
24 mm
13
36 mm
16
Stamp 18 mm
6
Stamp 24 mm
10
To create a new line:
●
Press n. The return mark (
the end of the line.
) appears at
New Block function (d + n)
In order for one section of the text to have a different number of lines than other sections of the
text or in order to apply a different format to a
section of the text (Refer to Block format functions on page 53.), a new text block must be
created using the New Block function.
NOTE
☞ A single label can only contain a maximum of
☞ If the P-touch is in Caps mode, holding down
fifty text blocks. If the max number of lines/per
h or t while pressing a letter key will enter
a lowercase letter.
label have already been entered (50) and you
press n (OR hold down d and press n),
☞ To exit Alt mode at any time, press a. The
the error message “50 LINE LIMIT REACHED!”
Alt indicator goes off.
Return key (n)
will appear.
☞ To split a text block into two, position the cursor under the character that you want to start
Like on a typewriter or word processor, this
machine’s return key (n) is used to end a line
of text and start another one. When you have
finished entering one line, press the return key
to make a new line and move the cursor to it.
NOTE
A single block of text can only contain a maximum
of 16 text lines. If the maximum number of text
lines has already been entered when n is pressed,
the next block, and then hold down d and
press n.
To create a new block:
●
Hold down d and press n. The new
block mark ( ) appears at the end of the
block.
the error message “16 LINE LIMIT” will appear.
The number of text lines that can be printed
depends on the width of the tape.
45
Functions
1 Press a. The Alt indicator comes on.
Maximum number of
lines that can be printed
Ch. 3 Functions
Symbol key (s)
Accent function (d + s)
In addition to the letters, symbols and numerals
on the key tops, there are over 440 additional
symbols and pictures available with the Symbol
function. After these symbols or pictures are
added to the text, they can be deleted like any
other character, and some can be formatted
using certain text formatting functions (see
pages 54 through 60).
The Accent function can be used to add
accented characters to your text. Many of these
characters can also be found on the keys and
typed in using a (refer to page 45), or they
can be entered using the composite character
keys (refer to page 47).
A table of the available symbols can be found
on pages 96 through 99.
To add a symbol or picture to the text:
1 Rotate r until SYMBOL is displayed, and
then press r (OR press s). A row of
symbols appears in the display.
Q
R1 2 3 4 5 6 7 8 9 A B C D E F K Q
Q
Q
RG L
Q
M PUNCTUATION
A01 Q
Q
R
Q
Q
Q
RH NO
Q
Q
RI
+ × ÷
RJ
·
Functions
AUTO
0.4
HELSINKI
A
AUTO
Length
Margin
Font
Width
Size
The accented characters are grouped according
to the uppercase or lowercase letter that they
are combined with. The following table shows
the available characters.
Accented
characters
Letter
Accented
characters
Letter
a
äáàâãåæ
A
ÄÁÀÂÃÅÆ
c
ç
C
Ç
e
ëéèê
E
ËÉÈÊ
i
ïíìî
I
ÏÍÌÎ
n
ñ
N
Ñ
o
öóòôõøœ
O
ÖÓÒÔÕØŒ
u
üúùû
U
ÜÚÙÛ
y
ÿ
NOTE
To add an accented character to the text:
To return to the text at any time, press e (OR
press s).
1 Rotate r until ACCENT is displayed, and
then press r (OR hold down d and
press s). The message “ACCENT a-y/AU? PRESS THE REQUIRED CHARACTER”
appears on the display.
2 Rotate r (OR press m or g to select the
desired category of symbols, and then press
j or k) until the desired symbol is displayed enlarged within the frame in the
middle of the display.
Q
R1 2 3 4 5 6 7 8 9 A B C D E F K Q
Q
Q
RG ACCENT
Q
Q
a-y/A-U?
Q
R
Q
Q
RH NO
Q
PRESS
THE
REQUIRED
Q
RI L
Q
M
CHARACTER
RJ AUTO
0.4
HELSINKI
A
AUTO
3 Press r (OR press n). The symbol is
added to the text.
Length
Margin
Font
Width
Size
NOTE
☞ To type in a series of symbols, hold down d
before pressing r (OR n). Then, continue
adding symbols by selecting them as explained
in step 2, and holding down d while pressing r (OR n). Press just r (OR n) after
selecting the last symbol in the series.
☞ A symbol can also be selected by typing in the
corresponding code indicated in the table of
available symbols. For example, pressing T
displays the GARDENING category, and then
pressing 3 displays the third symbol of the
GARDENING category.
46
NOTE
To return to the text at any time, press e (OR
hold down d and press s).
2 Rotate r (OR press the key of the letter in
the desired accented character). OR press
n.
NOTE
To type an uppercase accented character, hold
down h (OR press c to enter Caps mode)
before pressing the letter key.
Ch. 3 Functions
To type in a composite character:
a
AUTO
Length
0.4
HELSINKI
Margin
Font
A
Width
AUTO
Size
3 Press m or g to select the desired letter in
the accented character, and then press j
or k until the desired accented character
is displayed enlarged within the frame in
the middle of the display.
4 Press r (OR press n). The accented character is added to the text.
NOTE
To type in a series of accented characters, hold
down d before pressing r (OR n). Then,
continue adding accented characters by selecting
them as explained in step 2, and holding down
d while pressing r (OR n). Press just r (OR
n) after selecting the last accented character in
1 To type in a diacritical mark written in colour on the key, press a once. The Alt
indicator comes on.
To type in a diacritical mark written in the
top half of the key, hold down h.
2 Press the key (: or ,) of the desired diacritical mark. The diacritical mark is added
to the text.
3 Press the key of the letter that you wish to
combine with the diacritical mark. The letter is combined with the diacritical mark
and added to the text.
NOTE
If the letter of the key that you pressed cannot be
combined with the diacritical mark (see the above
table), only the letter is added to the text.
Barcode key (d + i)
The Barcode function, which enables barcodes
to be printed as part of labels, is one of this
machine’s most advanced features.
the series.
Composite character keys
(: & l)
This machine can display and print composite
characters, which consist of a letter and a diacritical mark. The diacritical marks available are
ˆ, ¨, ´, ` and ~.
Several composite characters can be found on
the key tops. Characters such as ü, ç, and ñ can
be entered using a. Before inputting a composite character as described below, check
whether it is already available as a keytop character.
The following diacritical mark and letter combinations are available:
Diacritical mark
Letters that can be combined
ˆ
aeiouAEI OU
¨
aeiouyAE IOU
´
aeiouAEI OU
`
aeiouAEI OU
~
anoANO
NOTE
☞ This section will explain how to enter a barcode
into your text. It is not intended as a comprehensive introduction to the concept of barcoding. For more detailed information, please
consult one of the many reference books available.
☞ Since this machine is not specifically designed
for special barcode label-making, some barcode readers may not be able to read the labels.
☞ Barcodes should be printed on white labels
with black ink.
The various barcode parameters enable you to
create more customised barcodes.
Parameter
Settings
TYPE
CODE 39, I-2/5, EAN13, EAN8,
UPC-A, UPC-E, CODABAR,
EAN128, CODE128
WIDTH
(bar width)
LARGE, MEDIUM, SMALL,
EXTRA SMALL
47
Functions
Q
R1 2 3 4 5 6 7 8 9 A B C D E F K Q
Q
Q
RG L
Q
a1 Q
Q
RH M a
Q
..
Q
NO
R
Q
Q
Q
á à â
RI
RJ
Ch. 3 Functions
Parameter
Settings
UNDER#
(numbers printed
below barcode)
ON, OFF
CHECK DIGIT
OFF, ON
To change the barcode parameter settings:
3 Press m.
Q
R1 2 3 4 5 6 7 8 9 A B C D E F K Q
Q
Q
RG 01/04
Q
Q
Q
R
Q
Q
H
NO
Q
R
TYPE
Q
Q
RI L
M CODE 39
R
The default settings are CODE 39 TYPE,
MEDIUM WIDTH, UNDER# set to ON, and
CHECK DIGIT set to OFF.
NOTE
☞ It is recommended that barcodes be printed
with the barcode WIDTH parameter set to at
least SMALL, otherwise barcodes may be difficult to read.
☞ The CHECK DIGIT parameter is only available
with the CODE 39, I-2/5 and CODABAR types.
To enter the barcode data:
Functions
1 Rotate r until BARCODE is displayed, and
then press r (OR hold down d and
press i).
NOTE
☞ To change the data or parameters of a barcode
that has already been added to the text, position
the cursor below the right half of the barcode
mark ( ) before rotating r to select BARCODE and pressing r (OR holding down d
and pressing i).
☞ To quit the Barcode function without adding a
barcode, press e at any time (OR hold down
J
AUTO
0.4
HELSINKI
A
AUTO
Length
Margin
Font
Width
Size
4 Press j or k until the parameter that you
want to change is displayed.
NOTE
☞ To select the default setting, press the space bar.
☞ To return to the barcode data without changing
any parameters, press e (OR hold down
d and press i).
5 Rotate r (OR press m or g) until the
desired setting is displayed.
6 Repeat steps 4 and 5 until all parameters
are set as you wish.
7 Press r (OR press n).
To add special characters to barcodes
(only with types CODE39, CODABAR,
EAN128 or CODE128):
8 Press j or k until the cursor is below the
character immediately to the right of where
you want to add the special character.
9 Press s.
Q
R1 2 3 4 5 6 7 8 9 A B C D E F K Q
Q
Q
RG 01/02
Q
Q
Q
RH L
Q
Q
M SYMBOL 1
R
Q
+
Q
Q
RI O
∗∗ N
RJ AUTO
0.4
HELSINKI
A
AUTO
d and press i ).
Q
R1 2 3 4 5 6 7 8 9 A B C D E F K Q
Q
Q
RG
Q
Q
PARAMETER
Q
RH
Q
Q
R
Q
CODE 39
Q
Q
RI O ∗ ∗ N
RJ
AUTO
0.4
HELSINKI
A
AUTO
Length
Margin
Font
Width
Size
2 Type in the new barcode data or edit the
old data.
Length
Margin
Font
Width
Size
0 Rotate r (OR press m or g) until the
special character that you want to add is
displayed.
NOTE
Refer to page 99 for tables of the special characters
that are available.
A Press r (OR press n). The selected special character is added to the barcode data.
48
Ch. 3 Functions
NOTE
Q
R1 2 3 4 5 6 7 8 9 A B C D E F K Q
Q
Q
RG
Q
Q
Q
RH L
Q
Q
M
R
Q
CURRENCY
Q
L
Q
RI M CHF
R
To quit the Barcode function without adding a
barcode, press e at any time (OR hold
down d and press i ).
J
AUTO
0.4
HELSINKI
A
AUTO
Length
Margin
Font
Width
Size
To add the barcode to the text:
2 Rotate r (OR press m or g) until the setting for the desired currency is displayed.
B Press r (OR press n).
NOTE
diately after the barcode mark (
) or below the
right half of the mark and press b (OR move the
cursor below either half of the barcode mark (
)
and press q). When the message “OK TO CLEAR?
” appears, press n. To return to the text without deleting the barcode, press e.
NOTE
The following currency settings are available:
CHF (Swiss franc), DKK (Danish krone), GBP (British pound), NOK (Norwegian krone), SEK (Swedish
krona), AUD (Australian dollar), CAD (Canadian
dollar), HKD (Hong Kong dollar), USD (US dollar),
JPY (Japanese yen), ANY1 (in the format X.XXX,XX),
ANY2 (in the format X,XXX.XX)
3 Press r (OR press n). The RATE screen
appears.
Euro conversion function
(d + h)
With the easy-to-use Euro conversion function,
euros are automatically converted to or from
any currency that you select, and the two prices
are added to your text. Simply set up the function by selecting which currency you wish to
convert and how you want the prices to
appears, and then you can quickly create labels
containing prices in both euros and one other
currency.
Functions
To delete a barcode, move the cursor either imme-
Q
R1 2 3 4 5 6 7 8 9 A B C D E F K Q
Q
Q
RG RATE
Q
Q
Q
RH
Q
Q
R
Q
Q
Q
RI
=
0.
R
J
AUTO
0.4
HELSINKI
A
AUTO
Length
Margin
Font
Width
Size
4 Type in the exchange rate for converting a
euro into the desired currency.
NOTE
☞ A number with a maximum of 9 digits (excluding the decimal point) can be entered.
☞ Pressing either , or : inserts the decimal
point into the number.
To set up the Euro conversion function:
1 Rotate r until CONVERSION SETUP is
displayed, and then press r (OR hold
down d and press h once). The
CURRENCY screen appears with the currently selected setting.
NOTE
To return to the text without changing any settings
for the Euro conversion function, press e (OR
hold down d and press h.
☞ If you make a mistake while typing in the
exchange rate, press b (OR press q).
5 Press r (OR press n). The SEPARATOR
screen appears with the currently selected
setting.
Q
R1 2 3 4 5 6 7 8 9 A B C D E F K Q
Q
Q
RG
Q
Q
Q
RH
Q
Q
R
Q
SEPARATOR
Q
L
Q
RI M /
RJ
AUTO
0.4
HELSINKI
A
AUTO
Length
Margin
Font
Width
Size
49
Ch. 3 Functions
6 Rotate r (OR press m or g) until the setting for the desired separator is displayed.
NOTE
4 Press r (OR n). The value is converted
and values in both currencies are added to
the text at the cursor’s current position.
The following separator settings are available:
NOTE
/ (slash), SPACE,
The currency values are added to the text in the formats shown below.
(return).
7 Press r (OR press n). The EURO screen
appears with the currently selected setting.
Q
R1 2 3 4 5 6 7 8 9 A B C D E F K Q
Q
Q
RG
Q
Q
Q
RH
Q
Q
R
Q
EURO
Q
Q
RI L
M 1ST
RJ
AUTO
0.4
HELSINKI
A
AUTO
Length
Margin
Font
Width
Size
8 Rotate r (OR press m or g) until the
desired setting for the printing order of the
euro price is displayed.
NOTE
Functions
The following settings for printing the euro price are
available:
1ST (The euro price is printed before the price in
the other currency.), 2ND (The euro price is printed
after the price in the other currency.)
9 Press r (OR press n).
To convert a currency to or from euros and
add the two values to the text:
1 Hold down d and press 7 once. The
current currency conversion setup appears.
Q
R1 2 3 4 5 6 7 8 9 A B C D E F K Q
Q
Q
RG NO
Q
Q
Q
RH
Q
Q
Q
R
EURO→
→CHF
Q
L
Q
RI M
0.
RJ
AUTO
0.4
HELSINKI
A
AUTO
Length
Margin
Font
Width
Size
2 Rotate r (OR press j or k) until the
arrow points in the desired conversion
direction.
3 Type in the value that you wish to convert.
NOTE
A number with a maximum of 9 digits (excluding
the decimal point and limited to 2 decimal digits)
can be entered. Pressing either , or : inserts the
decimal point into the number.
50
Currency
Format
Euro format
CHF
X’XXX.XX SwF
X’XXX.XX
DKK
DKK X.XXX,XX
X.XXX,XX
GBP
£X,XXX.XX
X,XXX.XX
NOK
Nkr X.XXX,XX
X.XXX,XX
SEK
SEK X.XXX,XX
X.XXX,XX
AUD
A$ X,XXX.XX
X,XXX.XX
CAD
CA$ X,XXX.XX
X,XXX.XX
HKD
HK$ X,XXX.XX
X,XXX.XX
USD
US$ X,XXX.XX
X,XXX.XX
JPY
JP¥ X,XXX.XX
X,XXX.XX
ANY1
X.XXX,XX
X.XXX,XX
ANY2
X,XXX.XX
X,XXX.XX
Ch. 3 Functions
Editing text
●
●
●
●
●
●
●
●
●
●
●
●
●
●
●
●
●
●
●
●
●
Backspace key (b)
The backspace key (b) allows you to remove
characters to the left of the cursor’s current position. It differs from the left cursor key (j),
which only moves the cursor without deleting
any characters.
NOTE
If the cursor is at the beginning of a line or a block
when b is pressed, the current text line or block
is joined with the previous one.
To remove one character:
1 Press j, k, m or g to position the cursor below the character immediately to the
right of the character that you wish to
delete.
2 Press b once.
NOTE
1 Press j, k, m or g to position the cursor below the character that you wish to
delete.
2 Hold down q until all of the characters
that you wish to delete are removed.
Line out function (d + q)
With the Line out function, you can easily
remove an entire line of text.
To delete a line of text:
1 Press j, k, m or g to position the cursor within the line of text that you wish to
delete.
2 Hold down d and press q once.
NOTE
Each time q is pressed while d is held down,
one line of text is deleted.
Each time b is pressed, one character is deleted.
Clear function (d + b)
To delete a sequence of characters:
1 Press j, k, m or g to position the cursor below the character immediately to the
right of the character that you wish to
delete.
2 Hold down b until all of the characters
that you wish to delete are removed.
Delete key (q)
The Delete key (q) allows you to remove the
character above the cursor. After the character is
deleted, the remaining text to the right moves
one place to the left. Each time q is pressed,
one character is deleted.
When clearing the display before entering new
text, the Clear function can be used to choose
whether all of the text is erased and all formatting functions (Font, Size, Width, Style1, Style2,
Line effects, Frame, Alignment, Text rotation,
Tape margin, Tape length, Block margin, Block
length and Mirror printing) are returned to their
default settings, or whether just the text is
erased.
To erase all of the text and formats:
1 Hold down d and press b.
NOTE
To return to the text without erasing anything, press
e (OR hold down d and press b ).
To remove one character:
1 Press j, k, m or g to position the cursor below the character that you wish to
delete.
2 Press q once.
Q
R1 2 3 4 5 6 7 8 9 A B C D E F K Q
Q
Q
RG OK TO CLEAR?
Q
Q
Q
R
Q
Q
PTEXT&FORMAT
RH NO
Q
Q
M
Q
RI
TEXT
ONLY
RJ AUTO
0.4
HELSINKI
A
AUTO
Length
Margin
Font
Width
Size
51
Functions
●
To delete a sequence of characters:
Ch. 3 Functions
2 Since ! is already beside TEXT&FORMAT,
press n. All of the text is erased and all of
the formatting functions are reset to their
default settings.
Formatting
To erase only the text:
The appearance of characters can be changed
using the text formatting functions Font, Size,
Width, Style1, Style2, Line effects, Frame, Alignment and Text rotation. Most text formats can be
applied to a single text line, a single text block
or all of the text. However, the Text rotation
function can only be applied to single text
blocks or the entire text. When the text format
for a line is changed and text is added to the
line, the format remains applied until it is
changed again.
1 Hold down d and press b.
NOTE
To return to the text without erasing anything, press
e (OR hold down d and press b ).
2 Press m or g to move ! beside TEXT
ONLY.
Q
R1 2 3 4 5 6 7 8 9 A B C D E F K Q
Q
Q
RG OK TO CLEAR?
Q
Q
Q
R
Q
Q
H
NO
PTEXT&FORMAT
Q
R
Q
Q
RI L
PTEXT ONLY
M
R
J
AUTO
0.4
HELSINKI
A
AUTO
Length
Margin
Font
Width
Size
Functions
3 Press n. The text is erased, but the formatting functions remain unchanged.
●
●
●
●
●
●
●
●
●
●
●
●
●
●
●
●
●
●
●
●
●
●
A variety of formatting functions are available
for making more decorative and customised
labels.
The label formatting functions (Tape margin,
Tape length, Block margin, Block length and
Mirror printing) specify the general appearance
of the label. The label formatting functions will
be applied to the entire text. In addition, the
Block length function can be applied to single
blocks.
Global format functions
(d + 1)
With the Global format functions, you change
the appearance of the entire text by printing it
with various settings applied: Font, Size, Width,
Style1, Style2, Line effects (underline/strikeout),
Frame, Text alignment or Text rotation. In addition, the appearance of the whole label can be
adjusted by changing the Tape margin, Tape
length, Block margin and Block length settings.
To change the Global format functions:
1 Rotate r until GLOBAL FORMAT is displayed, and then press r (OR hold down
d and press 1).
2 Select FONT, SIZE, WIDTH, STYLE1,
STYLE2, LINE EFFECTS, FRAME, ALIGNMENT, T. MARGIN, T. LENGTH, B. MARGIN, B. LENGTH or ROTATE and the
desired setting as described on pages 54
to 63. The selected setting will be applied
to the entire text.
52
Ch. 3 Functions
NOTE
NOTE
To return to the text without changing the format-
To return to the text without changing the format-
ting, press e (OR hold down d and press
ting, press e (OR hold down d and press
1).
2).
Block format functions
(d + 2)
Formatting with the Block format functions enables you to change the appearance of each of
the label’s text blocks, created using the New
Block function. The following label shows how
these functions can be used together.
Line format functions
(d + 3)
The Line format functions allow you to emphasise a single line of the text by printing it with a
Font, Size, Width, Style1, Style2, Line effects
(underline/strikeout), Frame or Text alignment
setting that is different from the rest of the text.
NOTE
The multiple blocks in this label were created
using the New Block function with the first block
of this text containing a single line, the second
containing two lines, and the third, one line.
Then, different settings were applied to each
block separately, using the Block format functions
(Font, Size, Width, Style1, Style2, Line effects
(underline/strikeout), Frame, Text alignment, Text
rotation and Block length).
NOTE
Only the square frame (1) and rounded frame (2)
settings can be selected for the Frame function in
block formatting. (For samples of the frames, refer
to page 104.)
To change the Block format functions:
1 Press j, k, m or g to position the cursor in
the block that will be given a different format.
2 Rotate r until BLOCK FORMAT is displayed, and then press r (OR hold down
d and press 2).
3 Select FONT, SIZE, WIDTH, STYLE1,
STYLE2, LINE EFFECTS, FRAME, ALIGNMENT, B. LENGTH or ROTATE and the
desired setting as described on pages 54
to 61. The selected setting will only be
applied to the text block that the cursor is
positioned in.
Functions
Only the square frame setting (1) can be selected
for the Frame function in line formatting. (For a
sample of the frame, refer to page 104.)
To change the Line format functions:
1 Press j, k, m or g to position the cursor in the line that will be given a different
format.
2 Rotate r until LINE FORMAT is displayed,
and then press r (OR hold down d and
press 3).
3 Select FONT, SIZE, WIDTH, STYLE1,
STYLE2, LINE EFFECTS, FRAME or ALIGNMENT and the desired setting as described
on pages 54 to 60. The selected setting will
only be applied to the text line that the cursor is positioned in.
NOTE
To return to the text without changing the formatting, press e (OR hold down d and press
3).
53
Ch. 3 Functions
Font function (FONT)
With the Font function, you can change the font of
the text to one of the many that are available. For
samples of the available Font settings, refer to
page 99. The font of the text at the cursor’s current
position is shown at the bottom of the display.
Q
R1 2 3 4 5 6 7 8 9 A B C D E F K Q
Q
Q
RG
Q
Q
Q
RH NO <<< P-touch >>>
Q
Q
R
Q
Q
L
Q
RI 1:_
M
RJ
AUTO
0.4
HELSINKI
A
AUTO
Length
Margin
Font
Width
Size
3 Rotate r (OR press m or g) until the
desired setting is displayed.
NOTE
☞ If “*****” appears as a setting, the Font function
has already been applied to part of the current
text (either a line in the current block if the
Block format or the Global format function is
being set or a block in the text if the Global format function is being set). Changing the setting
will cancel the setting that was previously
applied.
☞ To return the function to its default setting (HELSINKI), press the space bar.
NOTE
Letter Gothic (L. GOTHIC) is a fixed pitch font (all
characters use a fixed amount of space), as opposed
to all of the other fonts, which are proportional
(characters use different amounts of space).
To change the setting for the Font function:
Functions
1 Select GLOBAL FORMAT, BLOCK FORMAT or LINE FORMAT (OR hold down
d and press 1, 2 or 3) as described
on pages 52 to 53.
☞ To return to the text without changing the formatting, press e (OR hold down d and
press 1, 2 or 3).
4 Press r (OR press n) to apply the setting.
NOTE
If r is used to select the settings, only one function
can be set at a time. To apply several format settings at the same time, press j or k to select the
function, and then press m or g to select the
NOTE
This step may be skipped if settings for several format functions are being applied at the same time.
2 Rotate r until FONT is displayed, and then
press r (OR press j or k until FONT is
displayed). The setting for the text at the
cursor’s current position is shown on the
left side of the display and a sample can be
seen on the right side.
Q
R1 2 3 4 5 6 7 8 9 A B C D E F K Q
Q
Q
RG 01/13
Q
Q
Q
R
Q
Q
Q
RH NO FONT
Q
L
Q
RI M HELSINKI
R
J
AUTO
0.4
HELSINKI
A
AUTO
Length
Margin
Font
Width
Size
desired setting. Press n only after the necessary
functions have been set.
Size function (SIZE)
The character size can be adjusted using the
Size function. With the AUTO setting, the
machine compares your text with the width of
the installed tape and automatically adjusts the
characters to the largest possible size. For samples of the available Size settings, refer to
page 100. The size of the text at the cursor’s current position is shown in the lower-right corner
of the display and with the indicator on the right
side of the display.
Q
R1 2 3 4 5 6 7 8 9 A B C D E F K Q
Q
Q
RG
Q
Q
Q
RH ON <<< P-touch >>>
Q
Q
R
Q
Q
RI L
Q
M
1:_
R
J
54
AUTO
0.4
HELSINKI
A
AUTO
Length
Margin
Font
Width
Size
Ch. 3 Functions
3 Rotate r (OR press m or g) until the
desired setting is displayed.
NOTE
☞ Since the text sizes that can be printed depends
on the width of the tape, the following table
shows the maximum text size that can be used
with each tape width.
The following text sizes do not apply to text
with a Text rotation setting applied.
Maximum text size
(in points)
☞ If “*****” appears as a setting, the Size function
has already been applied to either a line in the
current text block (if the Block format or the
Global format function is being set) or a block
in the current text (if the Global format function
is being set). Changing the setting will cancel
the setting that was previously applied.
☞ To return the function to its default setting
6 mm
12
9 mm
20
12 mm
28
☞ To return to the text without changing the for-
18 mm
40
matting, press e (OR hold down d and
24 mm
64
press 1, 2 or 3).
36 mm
76
(AUTO), press the space bar.
4 Press r (OR press n) to apply the setting.
☞ With the AUTO setting selected and the text in
a block consisting of just one line of only uppercase letters (and no accented letters) and written
horizontally/vertically without the BERMUDA
font, the text is printed slightly larger than the
maximum possible.
☞ If the 4 point or 5 point text size setting is
selected, the text will be printed with the BRUSSELS font setting, regardless of the font setting
that is selected.
To change the setting for the Size function:
1 Select GLOBAL FORMAT, BLOCK FORMAT or LINE FORMAT (OR hold down
d and press 1, 2 or 3) as described
on pages 52 to 53.
NOTE
This step may be skipped if settings for several format functions are being applied at the same time.
2 Rotate r until SIZE is displayed, and then
press r (OR press j or k until SIZE is
displayed). The setting for the text at the
cursor’s current position is shown on the
left side of the display and a sample can be
seen on the right side.
Q
R1 2 3 4 5 6 7 8 9 A B C D E F K Q
Q
Q
RG 02/13
Q
Q
Q
R
Q
Q
H
NO
Q
R
SIZE
Q
Q
RI L
M AUTO
R
J
AUTO
0.4
HELSINKI
A
AUTO
Length
Margin
Font
Width
Size
NOTE
If r is used to select the settings, only one function
can be set at a time. To apply several format settings at the same time, press j or k to select the
function, and then press m or g to select the
desired setting. Press n only after the necessary
functions have been set.
Width function (WIDTH)
The Width function can be used with any of the
text sizes to make the size of the characters
wider or more narrow. For samples of the available Width settings, refer to page 100. The
width of the text at the cursor’s current position
is shown at the bottom of the display.
Q
R1 2 3 4 5 6 7 8 9 A B C D E F K Q
Q
Q
RG
Q
Q
Q
RH NO <<< P-touch >>>
Q
Q
R
Q
Q
L
Q
RI M
1:_
RJ
AUTO
0.4
HELSINKI
A
AUTO
Length
Margin
Font
Width
Size
To change the setting for the Width function:
1 Select GLOBAL FORMAT, BLOCK FORMAT or LINE FORMAT (OR hold down
d and press 1, 2 or 3) as described
on pages 52 to 53.
55
Functions
Tape width
NOTE
Ch. 3 Functions
Style1 function (STYLE1)
NOTE
This step may be skipped if settings for several format functions are being applied at the same time.
2 Rotate r until WIDTH is displayed, and
then press r (OR press j or k until
WIDTH is displayed). The setting for the
text at the cursor’s current position is shown
on the left side of the display and a sample
can be seen on the right side.
With the Style1 function, 5 other text styles are
available, allowing you to create more personalised labels. For samples of the available style
settings, refer to page 102. The style indicators
at the top of the display show the style of the
text at the cursor’s current position when any
setting other than NORMAL is selected.
Q
R1 2 3 4 5 6 7 8 9 A B C D E F K Q
Q
Q
RG
Q
Q
<<< P-touch >>>
Q
R
Q
O
N
Q
H
R
Q
Q
RI L
Q
M
1:_
R
Q
R1 2 3 4 5 6 7 8 9 A B C D E F K Q
Q
Q
RG 03/13
Q
Q
Q
R
Q
Q
Q
RH NO WIDTH
Q
L
Q
I
R
M NORMAL
R
J
AUTO
0.4
HELSINKI
A
AUTO
Length
Margin
Font
Width
Size
3 Rotate r (OR press m or g) until the
desired setting is displayed.
Functions
NOTE
☞ If “*****” appears as a setting, the Width function has already been applied to either a line in
the current text block (if the Block format or the
Global format function is being set) or a block
in the current text (if the Global format function
is being set). Changing the setting will cancel
the setting that was previously applied.
☞ To return the function to its default setting
(NORMAL), press the space bar.
☞ To return to the text without changing the formatting, press e (OR hold down d and
press 1, 2 or 3).
4 Press r (OR press n) to apply the setting.
NOTE
If r is used to select the settings, only one function
can be set at a time. To apply several format settings at the same time, press j or k to select the
function, and then press m or g to select the
J
AUTO
0.4
HELSINKI
A
AUTO
Length
Margin
Font
Width
Size
Each of the text styles available with the Style1
function can be combined with each of the text
styles available with the Style2 function. (See
Style2 function (STYLE2) on pages 57.)
To change the setting for the Style1 function:
1 Select GLOBAL FORMAT, BLOCK FORMAT or LINE FORMAT (OR hold down
d and press 1, 2 or 3) as described
on pages 52 to 53.
NOTE
This step may be skipped if settings for several format functions are being applied at the same time.
2 Rotate r until STYLE1 is displayed, and
then press r (OR press j or k until
STYLE1 is displayed). The setting for the text
at the cursor’s current position is shown on
the left side of the display and a sample can
be seen on the right side.
Q
R1 2 3 4 5 6 7 8 9 A B C D E F K Q
Q
Q
RG 04/13
Q
Q
Q
RH
Q
Q
NO STYLE1
R
Q
Q
Q
RI L
M NORMAL
R
J
AUTO
0.4
HELSINKI
A
AUTO
Length
Margin
Font
Width
Size
desired setting. Press n only after the necessary
functions have been set.
56
3 Rotate r (OR press m or g) until the
desired setting is displayed.
Ch. 3 Functions
NOTE
☞ If “*****” appears as a setting, the Style1 function has already been applied to either a line in
the current text block (if the Block format or the
Global format function is being set) or a block
in the current text (if the Global format function
is being set). Changing the setting will cancel
the setting that was previously applied.
☞ To return the function to its default setting
(NORMAL), press the space bar.
☞ To return to the text without changing the formatting, press e (OR hold down d and
press 1, 2 or 3).
The VERTICAL style setting, which rotates each
character 90° counterclockwise and prints the
text vertically along the length of the label, is
different from the Text rotation function
(page 60), which rotates each text block 90°
counterclockwise and prints the text horizontally along the length of the label.
To change the setting for the Style2 function:
1 Select GLOBAL FORMAT, BLOCK FORMAT or LINE FORMAT (OR hold down
d and press 1, 2 or 3) as described
on pages 52 to 53.
NOTE
If r is used to select the settings, only one function
can be set at a time. To apply several format settings at the same time, press j or k to select the
function, and then press m or g to select the
desired setting. Press n only after the necessary
functions have been set.
NOTE
This step may be skipped if settings for several format functions are being applied at the same time.
2 Rotate r until STYLE2 is displayed, and
then press r (OR press j or k until
STYLE2 is displayed). The setting for the text
at the cursor’s current position is shown on
the left side of the display and a sample can
be seen on the right side.
Q
R1 2 3 4 5 6 7 8 9 A B C D E F K Q
Q
Q
RG 05/13
Q
Q
Q
R
Q
Q
H
NO
R
Q
STYLE2
Q
Q
RI L
M NORMAL
R
Style2 function (STYLE2)
Two more text styles are available with the
Style2 function: ITALIC and VERTICAL. Either of
these styles can be combined with each of the
text styles available with the Style1 function.
(See Style1 function (STYLE1) on pages 56.) For
samples of the available style settings, refer to
page 102. The style indicators at the top of the
display show the style of the text at the cursor’s
current position when any setting other than
NORMAL is selected.
Q
R1 2 3 4 5 6 7 8 8 A B C D E F K Q
Q
Q
RG
Q
Q
Q
RH NO <<< P-touch >>>
Q
Q
R
Q
L
Q
Q
RI 1:_
M
R
J
AUTO
0.4
HELSINKI
A
AUTO
Length
Margin
Font
Width
Size
J
AUTO
0.4
HELSINKI
A
AUTO
Length
Margin
Font
Width
Size
3 Rotate r (OR press m or g) until the
desired setting is displayed.
NOTE
☞ If “*****” appears as a setting, the Style2 function has already been applied to either a line in
the current text block (if the Block format or the
Global format function is being set) or a block
in the current text (if the Global format function
is being set). Changing the setting will cancel
the setting that was previously applied.
☞ To return the function to its default setting
(NORMAL), press the space bar.
☞ To return to the text without changing the formatting, press e (OR hold down d and
press 1, 2 or 3).
57
Functions
4 Press r (OR press n) to apply the setting.
Ch. 3 Functions
4 Press r (OR press n) to apply the setting.
NOTE
Q
R1 2 3 4 5 6 7 8 9 A B C D E F K Q
Q
Q
RG 06/13
Q
Q
Q
R
Q
Q
Q
RH NO LINE EFFECTS
Q
L
Q
I
R
M OFF
R
If r is used to select the settings, only one function
can be set at a time. To apply several format set-
J
tings at the same time, press j or k to select the
AUTO
0.4
HELSINKI
A
AUTO
Length
Margin
Font
Width
Size
function, and then press m or g to select the
desired setting. Press n only after the necessary
functions have been set.
Line effects function
(LINE EFFECTS)
NOTE
☞ If “*****” appears as a setting, the Line effects
The Line effects function enables you to underline or strike out certain parts of your text.
OFF
UNDERLINE
STRIKEOUT
Functions
When any setting other than OFF is selected for
the text at the cursor’s current position, the Line
effects indicator at the top of the display comes
on.
Q
R1 2 3 4 5 6 7 8 9 A B C D E F K Q
Q
Q
RG
Q
Q
Q
RH NO <<< P-touch >>>
Q
Q
R
Q
L
Q
Q
RI 1:_
M
R
J
3 Rotate r (OR press m or g) until the
desired setting is displayed.
AUTO
0.4
HELSINKI
A
AUTO
Length
Margin
Font
Width
Size
function has already been applied to either a
line in the current text block (if the Block format
or the Global format function is being set) or a
block in the current text (if the Global format
function is being set). Changing the setting will
cancel the setting that was previously applied.
☞ To return the function to its default setting
(OFF), press the space bar.
☞ To return to the text without changing the formatting, press e (OR hold down d and
press 1, 2 or 3).
4 Press r (OR press n) to apply the setting.
NOTE
If r is used to select the settings, only one function
can be set at a time. To apply several format settings at the same time, press j or k to select the
To change the setting for the Line effects
function:
1 Select GLOBAL FORMAT, BLOCK FORMAT or LINE FORMAT (OR hold down
d and press 1, 2 or 3) as described
on pages 52 to 53.
NOTE
This step may be skipped if settings for several format functions are being applied at the same time.
2 Rotate r until LINE EFFECTS is displayed,
and then press r (OR press j or k until
LINE EFFECTS is displayed). The setting for
the text at the cursor’s current position is
shown on the left side of the display and a
sample can be seen on the right side.
58
function, and then press m or g to select the
desired setting. Press n only after the necessary
functions have been set.
Frame function (FRAME)
With the Frame function, you can choose from a
variety of frames and highlights for emphasising
certain parts or all of the text in your label. For
samples of the available frame settings, refer to
page 104. When any setting other than OFF is
selected for the text at the cursor’s current position, the Frame indicator at the top of the display comes on. The lines on the right side of the
indicator, starting from the top, show if the
Frame setting is applied to the entire text, the
block or the line.
Ch. 3 Functions
4 Press r (OR press n) to apply the setting.
Q
R1 2 3 4 5 6 7 8 9 A B C D E F K Q
Q
Q
RG
Q
Q
Q
RH NO <<< P-touch >>>
Q
Q
R
Q
L
Q
Q
RI 1:_
M
R
J
AUTO
0.4
HELSINKI
A
AUTO
Length
Margin
Font
Width
Size
NOTE
If r is used to select the settings, only one function
can be set at a time. To apply several format settings at the same time, press j or k to select the
function, and then press m or g to select the
desired setting. Press n only after the necessary
To change the setting for the Frame function:
1 Select GLOBAL FORMAT, BLOCK FORMAT or LINE FORMAT (OR hold down
d and press 1, 2 or 3) as described
functions have been set.
Text alignment function
(ALIGNMENT)
You can choose to align the text in one of four
ways:
on pages 52 to 53.
NOTE
This step may be skipped if settings for several format functions are being applied at the same time.
2 Rotate r until FRAME is displayed, and
then press r (OR press j or k until
FRAME is displayed). The setting for the text
at the cursor’s current position is shown on
the left side of the display and a sample can
be seen on the right side.
CENTRE
RIGHT
Q
R1 2 3 4 5 6 7 8 9 A B C D E F K Q
Q
Q
RG 07/13
Q
Q
Q
RH
Q
Q
NO FRAME
Q
R
Q
Q
RI L
M OFF
R
J
AUTO
0.4
HELSINKI
A
AUTO
Length
Margin
Font
Width
Size
Functions
LEFT
JUSTIFY
3 Rotate r (OR press m or g) until the
desired setting is displayed.
NOTE
☞ Even if a frame setting has already been applied
to either a line in the current text block (if the
Block format or the Global format Frame function is being set) or a block in the current text (if
the Global format Frame function is being set),
all frames will be applied and printed.
☞ To return the function to its default setting
(OFF), press the space bar.
☞ To return to the text without changing the formatting, press e (OR hold down d and
In addition, if the Text rotation function is set to
OFF, the text will align within the length set
with the Block length function. If the Text rotation function is set to any setting other than
OFF, the text will align within the width of the
tape. The alignment of the text at the cursor’s
current position is shown at the top of the display.
Q
R1 2 3 4 5 6 7 8 9 A B C D E F K Q
Q
Q
RG
Q
Q
Q
RH NO <<< P-touch >>>
Q
Q
R
Q
Q
Q
RI L
M
1:_
R
J
AUTO
0.4
HELSINKI
A
AUTO
Length
Margin
Font
Width
Size
press 1, 2 or 3).
59
Ch. 3 Functions
To change the setting for the Text alignment function:
4 Press r (OR press n) to apply the setting.
1 Select GLOBAL FORMAT, BLOCK FORMAT or LINE FORMAT (OR hold down
d and press 1, 2 or 3) as described
If r is used to select the settings, only one function
on pages 52 to 53.
NOTE
can be set at a time. To apply several format settings at the same time, press j or k to select the
function, and then press m or g to select the
desired setting. Press n only after the necessary
NOTE
This step may be skipped if settings for several format functions are being applied at the same time.
2 Rotate r until ALIGNMENT is displayed,
and then press r (OR press j or k until
ALIGNMENT is displayed). The setting for
the text at the cursor’s current position is
shown on the left side of the display and a
sample can be seen on the right side.
functions have been set.
Text rotation function (ROTATE)
Any text block with the Text rotation function
applied is rotated 90° counterclockwise. By
selecting the &REPEAT setting, the text is repeatedly printed for the length of the text block.
Q
R1 2 3 4 5 6 7 8 9 A B C D E F K Q
Q
Q
RG 08/13
Q
Q
Q
R
Q
Q
Q
RH NO ALIGNMENT
Q
L
Q
RI M LEFT
R
Functions
J
AUTO
0.4
HELSINKI
A
AUTO
Length
Margin
Font
Width
Size
OFF
ON
3 Rotate r (OR press m or g) until the
desired setting is displayed.
&REPEAT
NOTE
☞ If “*****” appears as a setting, the Text alignment function has already been applied to
either a line in the current text block (if the
Block format or the Global format function is
being set) or a block in the current text (if the
Global format function is being set). Changing
the setting will cancel the setting that was previously applied.
☞ To return the function to its default setting
(LEFT), press the space bar.
☞ To return to the text without changing the for-
When any setting other than OFF is selected for
the text at the cursor’s current position, the Text
rotation indicator at the top of the display comes
on.
Q
R1 2 3 4 5 6 7 8 9 A B C D E F K Q
Q
Q
RG
Q
Q
Q
RH ON <<< P-touch >>>
Q
Q
R
Q
Q
Q
RI L
M
1:_
R
J
AUTO
0.4
HELSINKI
A
AUTO
Length
Margin
Font
Width
Size
matting, press e (OR hold down d and
press 1, 2 or 3).
To change the setting for the Text rotation
function:
1 Select GLOBAL FORMAT or BLOCK FORMAT (OR hold down d and press 1 or
2) as described on pages 52 to 53.
60
Ch. 3 Functions
Tape margin function
(T. MARGIN)
This step may be skipped if settings for several format functions are being applied at the same time.
2 Rotate r until ROTATE is displayed, and
then press r (OR press j or k until
ROTATE is displayed). The setting for the
text at the cursor’s current position is shown
on the left side of the display and a sample
can be seen on the right side.
The Tape margin function allows you to adjust
the size of the margins on the left and right sides
of your text. The label margins can be set to a
width between 0.2 cm and 9.9 cm.
The current Tape margin setting is shown at the
bottom of the display.
Q
R1 2 3 4 5 6 7 8 9 A B C D E F K Q
Q
Q
RG
Q
Q
Q
RH NO <<< P-touch >>>
Q
Q
R
Q
Q
Q
RI L
M
1:_
R
Q
R1 2 3 4 5 6 7 8 9 A B C D E F K Q
Q
Q
RG 13/13
Q
Q
Q
R
Q
Q
Q
RH NO ROTATE
Q
L
Q
I
R
M OFF
R
J
AUTO
0.4
HELSINKI
A
AUTO
Length
Margin
Font
Width
Size
3 Rotate r (OR press m or g) until the
desired setting is displayed.
NOTE
☞ If “*****” appears as a setting, the Text rotation
function has already been applied to a block in
the current text (when the Global format function is being set). Changing the setting will cancel the setting that was previously applied.
☞ To return the function to its default setting
(OFF), press the space bar.
☞ To return to the text without changing the formatting, press e (OR hold down d and
press 1 or 2).
4 Press r (OR press n) to apply the setting.
NOTE
If r is used to select the settings, only one function
J
AUTO
0.4
HELSINKI
A
AUTO
Length
Margin
Font
Width
Size
To change the setting for the Tape margin
function:
1 Select GLOBAL FORMAT (OR hold down
d and press 1) as described on
page 52.
NOTE
This step may be skipped if settings for several Global Format functions are being applied at the same
time.
2 Rotate r until T. MARGIN is displayed,
and then press r (OR press j or k until
T. MARGIN is displayed). The current setting is shown on the left side of the display.
Q
R1 2 3 4 5 6 7 8 9 A B C D E F K Q
Q
Q
RG 09/13
Q
Q
Q
RH
Q
Q
NO T. MARGIN
Q
R
Q
L
Q
RI M
0.4cm
R
J
AUTO
0.4
HELSINKI
A
AUTO
Length
Margin
Font
Width
Size
can be set at a time. To apply several format settings at the same time, press j or k to select the
function, and then press m or g to select the
desired setting. Press n only after the necessary
functions have been set.
3 Rotate r (OR press m or g) until the
desired setting is displayed, or use the
number keys to type in the desired margin
width.
61
Functions
NOTE
Ch. 3 Functions
NOTE
NOTE
☞ To return the function to its default setting (0.4
This step may be skipped if settings for several Global Format functions are being applied at the same
time.
cm), press the space bar.
☞ To change the setting in 1.0 cm steps, hold
down either m or g, and then release the key
when the desired setting is displayed.
☞ To return to the text without changing the formatting, press e (OR hold down d and
2 Rotate r until T. LENGTH is displayed,
and then press r (OR press j or k until
T. LENGTH is displayed). The current setting is shown on the left side of the display.
press 1).
Q
R1 2 3 4 5 6 7 8 9 A B C D E F K Q
Q
Q
RG 10/13
Q
Q
Q
R
Q
Q
H
NO T. LENGTH
R
Q
Q
Q
RI L
M AUTO
R
4 Press r (OR press n) to apply the setting.
J
NOTE
AUTO
0.4
HELSINKI
A
AUTO
Length
Margin
Font
Width
Size
If r is used to select the settings, only one function
can be set at a time. To apply several format settings at the same time, press j or k to select the
function, and then press m or g to select the
desired setting. Press n only after the necessary
Functions
functions have been set.
3 Rotate r (OR press m or g) until the
desired setting is displayed, or use the
number keys to type in the desired tape
length.
NOTE
☞ To return the function to its default setting
(AUTO), press the space bar.
Tape length function
(T. LENGTH)
☞ To change the setting in 1.0 cm steps, hold
Although the length of the printed label automatically adjusts to fit the length of the entered
text, there may be times when you will want to
make a label with a specific length. The Tape
length function allows you to set the label
length between 0.6 cm and 99.5 cm.
☞ To return to the text without changing the for-
The current Tape length setting is shown in the
lower-left corner of the display.
Q
R1 2 3 4 5 6 7 8 9 A B C D E F K Q
Q
Q
RG
Q
Q
Q
RH NO <<< P-touch >>>
Q
Q
R
Q
L
Q
Q
RI 1:_
M
R
J
AUTO
0.4
HELSINKI
A
AUTO
Length
Margin
Font
Width
Size
down either m or g, and then release the key
when the desired setting is displayed.
matting, press e (OR hold down d and
press 1).
4 Press r (OR press n) to apply the setting.
NOTE
If r is used to select the settings, only one function
can be set at a time. To apply several format settings at the same time, press j or k to select the
function, and then press m or g to select the
desired setting. Press n only after the necessary
functions have been set.
To change the setting for the Tape length
function:
1 Select GLOBAL FORMAT (OR hold down
d and press 1) as described on
page 52.
62
Ch. 3 Functions
4 Press r (OR press n) to apply the setting.
The width of the margins between text blocks
can be set between 0.0 cm and 30.0 cm. The
left and right margins for each text block will
have a width that is the specified setting. If the
AUTO setting is selected, the block margins will
be 0.0 cm if only one text block has been created and 0.3 cm if multiple text blocks have
been created.
To change the setting for the Block margin
function:
1 Select GLOBAL FORMAT (OR hold down
d and press 1) as described on
pages 52.
NOTE
This step may be skipped if settings for several format functions are being applied at the same time.
2 Rotate r until B. MARGIN is displayed,
and then press r (OR press j or k until
B. MARGIN is displayed). The current setting is shown on the left side of the display.
Q
R1 2 3 4 5 6 7 8 9 A B C D E F K Q
Q
Q
RG 11/13
Q
Q
Q
RH
Q
Q
NO B. MARGIN
Q
R
Q
L
Q
I
R
M AUTO
R
J
AUTO
0.4
HELSINKI
A
AUTO
Length
Margin
Font
Width
Size
3 Rotate r (OR press m or g) until the
desired setting is displayed, or use the
number keys to type in the desired block
margin width.
NOTE
☞ To return the function to its default setting
(AUTO), press the space bar.
☞ To change the setting in 1.0 cm steps, hold
down either m or g, and then release the key
when the desired setting is displayed.
☞ To return to the text without changing the formatting, press e (OR hold down d and
NOTE
If r is used to select the settings, only one function
can be set at a time. To apply several format settings at the same time, press j or k to select the
function, and then press m or g to select the
desired setting. Press n only after the necessary
functions have been set.
Block length function
(B. LENGTH)
Normally, the length of each text block automatically adjusts to fit the length of the entered
text. However, with the Block length function,
you can set each text block to a length between
0.6 cm and 99.5 cm.
To change the setting for the Block length
function:
1 Select GLOBAL FORMAT or BLOCK FORMAT (OR hold down d and press 1
or 2) as described on page 52 to 53.
NOTE
This step may be skipped if settings for several Format functions are being applied at the same time.
2 Rotate r until B. LENGTH is displayed,
and then press r (OR press j or k until
B. LENGTH is displayed). The current setting is shown on the left side of the display.
Q
R1 2 3 4 5 6 7 8 9 A B C D E F K Q
Q
Q
RG 12/13
Q
Q
Q
RH
Q
Q
NO B. LENGTH
R
Q
Q
Q
RI L
M AUTO
R
J
AUTO
0.4
HELSINKI
A
AUTO
Length
Margin
Font
Width
Size
3 Rotate r (OR press m or g) until the
desired setting is displayed, or use the
number keys to type in the desired block
length.
press 1).
63
Functions
Block margin function
(B. MARGIN)
Ch. 3 Functions
NOTE
Q
R1 2 3 4 5 6 7 8 9 A B C D E F K Q
Q
Q
RG
Q
Q
<<< P-touch >>>
Q
R
Q
Q
RH ONL
Q
Q
I
Q
R
M
1:_
R
☞ To return the function to its default setting
(AUTO), press the space bar.
☞ To change the setting in 1.0 cm steps, hold
J
down either m or g, and then release the key
when the desired setting is displayed.
AUTO
0.4
HELSINKI
A
AUTO
Length
Margin
Font
Width
Size
☞ To return to the text without changing the formatting, press e (OR hold down d and
To print a mirror image of the text:
press 1 or 2).
1 Rotate r until MIRROR is displayed, and
4 Press r (OR press n) to apply the setting.
NOTE
then press r (OR hold down d and
press p).
If r is used to select the settings, only one function
Q
R1 2 3 4 5 6 7 8 9 A B C D E F K Q
Q
Q
RG
Q
Q
Q
RH
Q
Q
NO
R
Q
MIRROR
Q
Q
RI L
M OFF
R
can be set at a time. To apply several format settings at the same time, press j or k to select the
J
function, and then press m or g to select the
AUTO
0.4
HELSINKI
A
AUTO
Length
Margin
Font
Width
Size
desired setting. Press n only after the necessary
functions have been set.
Functions
Mirror printing function
(d + p)
2 Rotate r (OR press m or g) until the
desired setting is displayed.
NOTE
☞ To return the function to its default setting
(OFF), press the space bar.
This function prints your label so that the text
can be read from the adhesive side of the tape. If
mirror-printed labels are attached to glass or
some other transparent material, they can be
read correctly from the opposite side.
☞ To return to the text without changing the formatting, press e (OR hold down d and
press p).
3 Press r (OR press n) to apply the setting.
NOTE
When using the Mirror printing function, the text
should be printed on clear tape.
OFF
ON
When ON is selected, the Mirror printing indicator at the top of the display comes on.
Stamp stencil function
(d + S)
The Stamp stencil function allows you to
quickly and easily create your own stamp stencil films for chemical etching. After inserting a
stamp film cassette, select this function to adjust
the text to a perfect thickness for the pre-inked
stamp film holders. Since the stamp holder is
reusable, just make a new stamp stencil film and
replace the one in the holder.
To make a stamp:
1 Type in the text, and then insert a medium
(18-mm-wide) or large (24 mm-wide) stamp
film cassette.
64
Ch. 3 Functions
Q
R1 2 3 4 5 6 7 8 9 A B C D E F K Q
Q
Q
RG
Q
Q
Q
R
Q
Q
Q
RH NO
STAMP MODE
Q
L
Q
I
R
M OFF
R
J
AUTO
0.4
HELSINKI
A
AUTO
Length
Margin
Font
Width
Size
NOTE
☞ If a stamp is created using this function, be sure
to use the Tape length function to select left and
right label margins of 25 mm.
3 Rotate r (OR press m or g) until the
desired setting is displayed.
The many templates available allow you to create labels and stamps for a variety of needs—
from addressing envelopes to identifying floppy
disks or audio and video cassettes. The width
and length of each label or stamp printed from a
template is preset. For samples of the available
templates, refer to pages 105 through 107.
After the text is entered, a different style for the
text can easily be selected. For samples of the
available style formats, refer to page 108.
To select a pre-formatted template:
1 Rotate r until AUTO FORMAT is displayed, and then press r (OR hold down
d and press 6).
NOTE
NOTE
☞ To return the function to its default setting
☞ The template that was last used appears first.
(OFF), press the space bar.
☞ To return to the text without changing the setting for the Stamp function, press e (OR
hold down d and press S).
4 Press r (OR press n). If ON was
selected, print resolution is automatically
adjusted for stamps.
Selecting this template displays the text that was
entered in it at that time.
☞ An Auto format template that has been stored in
the memory can be recalled and used again.
For details on recalling stored Auto format templates, refer to page 73.
Q
R1 2 3 4 5 6 7 8 9 A B C D E F K Q
Q
Q
RG L
Q
Q
M 1:
Q
R
Q
Q
RH ADDRESS-1
Q
Q
Q
RI 24× 80mm
R
5 Press p to cut the text out of the stamp
stencil film.
6 After the stamp stencil film is cut off,
remove the backing paper from the stamp
stencil film and affix it to the ink pad of a
stamp film holder. Refer to Assembling
stamps on page 37.
Auto format function (d + 6)
The Auto format function makes creating labels
and stamps quick and easy. After simply selecting one of the various pre-formatted templates
and typing text into each of its fields, the overall
style of the label can easily be changed by
selecting one of the six available style formats,
and then the label is ready to be printed.
J
8.0
0.4
HELSINKI
A
AUTO
Length
Margin
Font
Width
Size
2 Rotate r (OR press m or g) until the
name of the desired template is displayed.
NOTE
To select the default setting (ADDRESS-1), press the
space bar.
3 Press r (OR press n). The first field for
the selected template is displayed.
NOTE
☞ To select a different field, rotate r (OR press
m or g) until the desired field is displayed.
☞ To select a different template, press e, rotate
r (OR press m or g) until ! moves beside
CANCEL EDITING?, and then press r (OR
press n).
65
Functions
2 Hold down d and press S.
Ch. 3 Functions
Q
R1 2 3 4 5 6 7 8 9 A B C D E F K Q
Q
Q
RG L
Q
M
Q
AUTO FORMAT
Q
RH
Q
Q
R
Q
1NAME?
Q
Q
RI _
RJ
8.0
0.4
HELSINKI
A
18P
Length
Margin
Font
Width
Size
Q
R1 2 3 4 5 6 7 8 9 A B C D E F K Q
Q
Q
RG 04/04
Q
Q
CONTINUE
Q
RH
Q
Q
P CHANGE STYLE
R
Q
MENU
Q
L
Q
RI M
P
RJ
AUTO
0.4
HELSINKI
A
AUTO
Length
Margin
Font
Width
Size
6 Press r (OR press n).
To enter text in the template:
Q
R1 2 3 4 5 6 7 8 9 A B C D E F K Q
Q
Q
RG
Q
Q
Q
RH ON
Q
Q
R
Q
CHAR.
STYLE
Q
Q
RI L
M ITALIC
R
4 For each field, type in the text, and then
press r (OR press n). When r (OR n)
is pressed after typing in the text for the last
field, the MENU screen appears in the display.
NOTE
☞ If g is pressed while the last field is displayed,
J
AUTO
0.4
HELSINKI
A
AUTO
Length
Margin
Font
Width
Size
7 Rotate r (OR press m or g) until the
name of the desired format style is displayed. A sample can be seen on the right
side of the display.
the first field appears. If n is pressed while the
Functions
last field is displayed, the MENU screen
NOTE
appears.
The default setting (ORIGINAL) can be selected by
pressing the space bar.
☞ To return to the first field while the MENU
screen is displayed, press e.
☞ Accented characters (pages 46 to 47), symbols
(page 46), barcodes (page 47), time stamps
(Refer to the Advanced Functions booklet.) and
user-defined character images (Refer to the
Advanced Functions booklet.) can be entered in
the fields.
☞ An Auto format template can be stored in the
memory to be recalled and used at a later time.
For details on storing Auto format templates,
refer to page 72.
☞ To immediately print the label for the selected
template, press p.
NOTE
To store the template with text and a specific character style, type in the text for each field, and then
select the style of the text before storing the template.
To print a label using the selected template:
9 Rotate r (OR press m or g) until !
moves beside PRINT.
NOTE
Q
R1 2 3 4 5 6 7 8 9 A B C D E F K Q
Q
Q
RG 01/04
Q
Q
Q
R
Q
Q
P PRINT
Q
RH L
MENU
Q
Q
RI M
P FINISH
RJ
AUTO
0.4
HELSINKI
A
AUTO
Length
Margin
Font
Width
Size
To change the style of the text:
5 Rotate r (OR press m or g) until !
moves beside CHANGE STYLE.
66
8 Press r (OR press n). The MENU screen
appears in the display again.
Before printing an Auto format template, a TZ tape
cassette with the specified tape width must be
installed.
Q
R1 2 3 4 5 6 7 8 9 A B C D E F K Q
Q
Q
RG 01/04
Q
Q
Q
RH
Q
Q
PPRINT
R
Q
MENU
Q
L
Q
RI M
PFINISH
RJ
AUTO
0.4
HELSINKI
A
AUTO
Length
Margin
Font
Width
Size
Ch. 3 Functions
0 Press r (OR press n) to print the label.
The message “COPIES 1/ 1” appears in the
display while the label is being printed. The
MENU screen appears in the display again.
To change the text entered in the template:
A Rotate r (OR press m or g) until !
moves beside CONTINUE.
Q
R1 2 3 4 5 6 7 8 9 A B C D E F K Q
Q
Q
RG 03/04
Q
Q
FINISH
Q
R
Q
Q
P CONTINUE
RH MENU
Q
Q
RI L
Q
M
P CHANGE STYLE
RJ AUTO
0.4
HELSINKI
A
AUTO
Length
Margin
Font
Width
Size
B Press r (OR press n). The first field for
the selected template appears in the display.
NOTE
☞ The template that was last used appears first.
Selecting this template displays the text that was
entered in it at that time.
☞ An Auto format template that has been stored in
the memory can be recalled and used again.
For details on recalling stored Auto format templates, refer to page 73.
☞ To quit the Auto Format function without using
a template, hold down d and press 6 at
any time.
☞ The half cut can only be used to cut laminated
tape.
Functions
C Repeat step 4 until the text is edited as you
wish. The MENU screen appears again
when r (OR n) is pressed after editing
the last field in the template.
To finish using the Auto format function:
D Rotate r (OR press m or g) until !
moves beside FINISH.
Q
R1 2 3 4 5 6 7 8 9 A B C D E F K Q
Q
Q
RG 02/04
Q
Q
PRINT
Q
RH
Q
Q
PFINISH
Q
R
MENU
Q
Q
RI L
M
PCONTINUE
RJ
AUTO
0.4
HELSINKI
A
AUTO
Length
Margin
Font
Width
Size
E Press r (OR press n). The message “OK
TO FINISH AUTO FORMAT?” appears in
the display.
F Press r (OR press n). Any text displayed
before the Auto format function was used
reappears in the display.
67
Ch. 3 Functions
Printing
●
●
●
●
●
●
●
●
●
●
●
●
●
●
●
●
●
●
●
●
●
●
Layout preview function
(d + 9)
The Layout preview function allows you to get a
general overview of the text within the width of
the currently installed tape. The length of the
current label is indicated in the lower-left corner
of the display.
However, if an Auto cut setting using chain printing is selected, the last label in the previous session remains in the machine (is not fed out), so
that the next label can be printed without wasting
tape. When the last label is printed, press f to
feed the chain of labels and cut it.
When setting 1, 2, 3 or 4 is selected, the Auto
cut indicator in the upper-right corner of the display comes on, indicating that the labels will be
cut off after the last label in the chain is printed.
Q
R1 2 3 4 5 6 7 8 9 A B C D E F K Q
Q
Q
RG
Q
Q
<<< P-touch >>>
Q
R
Q
O
N
Q
H
R
Q
L
Q
RI 1:_
Q
M
R
To preview the label:
●
Rotate r until LAYOUT PREVIEW is displayed, and then press r (OR hold down
J
AUTO
0.4
HELSINKI
A
AUTO
Length
Margin
Font
Width
Size
d and press 9).
Functions
NOTE
NOTE
☞ To scroll the label preview back and forth,
When setting 5, 6, 7 or 8 is selected, the Auto Cut
indicator does not come on.
rotate r (OR press j or k).
☞ To return to the text at any time, press e (OR
hold down d and press 9).
Q
R1 2 3 4 5 6 7 8 9 A B C D E F K Q
Q
Q
RG
Q
Q
Q
RH NO
Q
Q
R
Q
Q
Q
RI L
M
RJ
1.3
0.4
HELSINKI
A
AUTO
Length
Margin
Font
Width
Size
Auto cut function (d + f)
Each setting of the Auto cut function consists of
settings for three different cut methods: full cut
(which is used to completely cut off the label),
half cut (which is used to cut laminated tape
without cutting the label backing, making it easier to remove the backing paper from labels),
and chain printing (where the last copy is not
cut off, reducing the amount of tape that is
wasted).
Chain printing is an economical function
designed to help eliminate “wasted tape” at the
beginning of labels. Without chain printing, the
usual leftover tape from the previous printing
session is wasted before the first label in the current session is printed.
68
1
(both full and half cuts—
no chain printing)
2
(full cuts only—no half
cuts and no chain printing)
3
(half cuts only—no full
cuts and no chain printing)
4
(no full cuts, half cuts or
chain printing)
5
(full cuts, half cuts and
chain printing)
6
(full cuts and chain printing—no half cuts)
7
(half cuts and chain printing—no full cuts)
8
(chain printing—neither
full nor half cuts)
Ch. 3 Functions
NOTE
☞ After printing with settings 5, 6, 7 or 8, press f
Q
R1 2 3 4 5 6 7 8 9 A B C D E F K Q
Q
Q
RG COPIES
Q
Q
Q
RH NO
Q
Q
R
Q
Q
L
Q
RI M 1/1
R
to feed the tape, then cut it.
☞ This function can also be specified with the
J
P-touch Editor 3.2 software.
To change the setting for the Auto cut
function:
1 Rotate r until AUTO CUT is displayed,
and then press r (OR hold down d and
press f).
1.3
0.4
HELSINKI
A
AUTO
Length
Margin
Font
Width
Size
Feed & Cut key (f)
Press this key to feed out any leftover printed
tape after pressing e to quit printing.
NOTE
After printing with the Auto cut function set to 5, 6,
J
1.3
0.4
HELSINKI
A
AUTO
Length
Margin
Font
Width
Size
2 Rotate r (OR press m or g) until the
desired setting is displayed. The current setting is shown on the left side of the display
and a sample can be seen on the right side.
NOTE
☞ To return the function to its default setting (1),
press the space bar.
☞ To return to the text without changing the setting for the Auto cut function, press e (OR
hold down d and press f).
3 Press r (or press n) to apply the setting.
7 or 8, press f to feed the tape, then cut it.
To feed out 26 mm of tape and automatically cut it:
●
Press f. The message “FEED” appears.
Functions
Q
R1 2 3 4 5 6 7 8 9 A B C D E F K Q
Q
Q
RG
Q
Q
Q
R
Q
Q
RH NOA. CUT
Q
Q
L
Q
RI M 1
R
Repeat printing function
(d + 4)
This function allows you to print up to 999 copies of the same text.
To print multiple copies of a label:
1 Rotate r until REPEAT is displayed, and
then press r (OR hold down d and
press 4).
Print key (p)
After you have typed in your text and chosen all
of the desired format settings, you are ready to
print it.
To print a label:
●
Press p. The message “COPIES” followed
by the number of the label being printed
appears.
Q
R1 2 3 4 5 6 7 8 9 A B C D E F K Q
Q
Q
RG COPIES
Q
Q
Q
RH L
Q
Q
R
Q
1
M
Q
Q
RI L
M
RJ
1.3
0.4
HELSINKI
A
AUTO
Length
Margin
Font
Width
Size
2 Rotate r (or press m or g) until the
desired setting is displayed, or use the
number keys to type in the desired number
of copies.
NOTE
To quit printing at any time, press e.
69
Ch. 3 Functions
NOTE
NOTE
☞ To select the default setting (1), press the space
☞ Only one numbering field can be selected from
bar.
any text.
☞ To change the setting in steps of 5, hold down
☞ If you include a non-alphanumeric character
either m or g, and then release the key when
the desired setting is displayed.
such as a symbol in the numbering field, only
the letters and numbers in the numbering field
will be increased when the labels are printed,
or just one label will be printed if the field only
contains a non-alphanumeric character.
☞ To quit the Repeat printing function, press e
(OR hold down d and press 4).
3 Press r (or press n) to begin printing the
set number of copies. The number of each
☞ When a barcode is selected as the numbering
field, only the numbers in the barcode data are
increased.
copy is displayed while it is being printed.
NOTE
After printing with the Auto cut function set to 5, 6,
7 or 8, press f to feed the tape, then cut it.
Numbering function (d + 5)
Functions
The Numbering function can be used to print
many copies of the same text while increasing
certain characters (letters, numbers or barcode
data) after each label is printed. This type of
automatic incrementation is very useful when
printing serial number labels, production control labels or other labels requiring ascending
codes.
Letters and numbers increase as shown below:
0
"
1
"
...9
"
0
"
...
A
"
B
"
...Z
"
A
"
...
a
"
b
"
...z
"
a
"
...
B0 "
...
A0 "
A1 "
...A9 "
Spaces (shown as underlines “_” in the examples below) can be used to adjust the space
between characters or to control the number of
digits that are printed:
To print labels using the Numbering function:
1 Rotate r until NUMBER is displayed, and
then press r (OR hold down d and
press 5). The message “SET START
POINT” appears.
Q
R1 2 3 4 5 6 7 8 9 A B C D E F K Q
Q
Q
RG SET START POINT
Q
Q
Q
RH ON
Q
Q
R
Q
Q
Q
M
RI L
1:STUDIO
101
R
J
AUTO
0.4
HELSINKI
A
AUTO
Length
Margin
Font
Width
Size
2 Rotate r (OR press m, g, j or k)
until the first character that you wish to
include in the numbering field is flashing.
NOTE
To quit the Numbering function, press e (OR
hold down d and press 5).
3 Press r (OR press n). The message “SET
END POINT” appears.
NOTE
☞ If a barcode was selected in step 2, this step is
skipped.
_Z "
AA
" ...ZZ
"
_A
"
...
_9 "
10
"
"
_0
"
...
1_9 " 2_0 " ...9_9 " __0 "
...
70
...99
☞ A numbering field must be located entirely
within one line of text of a single block.
☞ A maximum of five characters can be selected
for the numbering field.
Ch. 3 Functions
Storing and recalling files
●
J
AUTO
0.4
HELSINKI
A
AUTO
Length
Margin
Font
Width
Size
4 Press r (OR press n). The NUMBER
screen appears.
Q
R1 2 3 4 5 6 7 8 9 A B C D E F K Q
Q
Q
RG NUMBER
Q
Q
Q
R
Q
Q
RH L
Q
1
M
Q
Q
RI
RJ 1.3
0.4
HELSINKI
A
AUTO
Length
Margin
Font
Width
Size
5 Rotate r (OR press m or g) until the
desired setting is displayed, or use the
number keys to type in the desired number
of copies.
NOTE
☞ To select the default setting (1), press the space
bar.
☞ To change the setting in steps of 5, hold down
either m or g, and then release the key when
the desired setting is displayed.
6 Press r (OR press n) to begin printing
the set number of labels. The number of
each copy is displayed while it is being
printed.
NOTE
After printing with the Auto cut function set to 5, 6,
7 or 8, press f to feed the tape, then cut it.
●
●
●
●
●
●
●
●
●
●
●
●
●
●
●
●
●
●
●
●
●
Memory functions (d + 8)
You can store frequently used text and Auto format template text in the memory. These text files
and template files remain in the memory, even
after all characters are erased from the display
using the Clear function (holding down d
and pressing b).
When each file is stored, it is given a number
and can also be given a file name to make
recalling it easier. Up to 100 files or approximately 10,000 characters can be stored in the
memory. All Global format, Block format and
Line format functions (Font, Size, Width, Style,
Line effects, Frame, Alignment and Text rotation, Tape margin, Tape length, Block margin,
Block length) specified are also saved with the
text.
Since a copy of the stored text file is recalled
when the Recall function is used, the text can be
edited or printed without changing the originally stored file. However, the Store function
can be used to replace the previously saved file
with the new edited one. When a file is no
longer needed or more space is necessary, the
Memory clear function can be used to delete it.
With the Memory print function, either a single
file or multiple files stored in the memory can be
quickly selected for printing.
NOTE
Templates from the Auto format function can also
be stored while the template is being selected,
while text is being entered or while the MENU
screen is displayed. To store the template with text
and a specific character style, type in the text for
each field, and then select the style of the text
before storing the template.
71
Functions
Q
R1 2 3 4 5 6 7 8 9 A B C D E F K Q
Q
Q
RG SET END POINT
Q
Q
Q
RH NO
Q
Q
R
Q
L
Q
Q
RI M
1:STUDIO 101
R
Ch. 3 Functions
Storing text and Auto format templates
To save a text file:
1 Rotate r until MEMORY is displayed, and
then press r (OR hold down d and
press 8). The MEMORY screen appears.
Q
R1 2 3 4 5 6 7 8 9 A B C D E F K Q
Q
Q
RG 01/04
Q
Q
Q
RH
Q
Q
PSTORE
R
Q
MEMORY
Q
Q
RI L
M
PRECALL
RJ
AUTO
0.4
HELSINKI
A
AUTO
Length
Margin
Font
Width
Size
2 Rotate r (OR press m or g) until !
moves beside STORE.
4 Rotate r (OR press m or g) until the file
number where you wish to store the text is
displayed.
NOTE
File numbers that are not flashing already contain a
text file.
5 Type in the desired file name.
For a text file:
Q
R1 2 3 4 5 6 7 8 9 A B C D E F K Q
Q
Q
RG STORE
Q
Q
Q
R
Q
L
Q
RH M FILE[01:NAMETAG_]
Q
Q
Q
RI
RJ AUTO
0.4
HELSINKI
A
AUTO
Length
Margin
Font
Width
Size
For an Auto format template file:
3 Press r (OR press n). The STORE screen
appears in the display with the currently
selected file number. The type of file is also
indicated: FILE (for normal text files) or TZ
Q
R1 2 3 4 5 6 7 8 9 A B C D E F K Q
Q
Q
RG STORE
Q
Q
Q
RH L
Q
Q
M
R
Q
TZ[01:ADDRESS_
]
Q
Q
RI
RJ
Functions
(for Auto format templates).
AUTO
0.4
HELSINKI
A
AUTO
Length
Margin
Font
Width
Size
NOTE
☞ If the maximum number of characters has
already been stored, the error message “MEMORY FULL!” appears in the display. If this
occurs, an existing text file must be deleted
before the new one can be stored.
☞ To quit the Store function without storing the
text, press e (OR hold down d and press
8).
NOTE
The file name can be up to 8 characters long and
can contain letters, numbers, symbols, spaces and
accented characters.
6 Press r (OR press n). The text is stored
under the selected file number and the text
previously shown in the display reappears.
NOTE
For a text file:
Q
R1 2 3 4 5 6 7 8 9 A B C D E F K Q
Q
Q
RG STORE
Q
Q
Q
RH L
Q
Q
M
R
Q
FILE[00:_
]
Q
Q
RI
RJ
AUTO
0.4
HELSINKI
A
AUTO
Length
Margin
Font
Width
Size
If a file is already stored under the selected file
number, the message “OVERWRITE?” appears in
the display and you must decide whether or not to
overwrite it (delete it from the memory and store
the new one).
To overwrite the stored file with the new one:
For an Auto format template file:
●
Q
R1 2 3 4 5 6 7 8 9 A B C D E F K Q
Q
Q
RG STORE
Q
Q
Q
R
Q
L
Q
H
M TZ[00:_
Q
R
]
Q
Q
RI
RJ
72
AUTO
0.4
HELSINKI
A
AUTO
Length
Margin
Font
Width
Size
Press n to delete the previously stored file
and store the new one under the selected
number.
NOTE
To go back and choose another file number without
overwriting the text file, press e, and then select
a different file number.
Ch. 3 Functions
Recalling text and Auto format templates
NOTE
☞ To see other parts of the selected text file, press
To recall a file that has been saved:
1 Rotate r until MEMORY is displayed, and
then press r (OR hold down d and
press 8). The MEMORY screen appears.
NOTE
An Auto format template that has been stored in the
memory can be recalled when you are asked to
select a template in the Auto format function.
2 Rotate r (OR press m or g) until !
moves beside RECALL.
Q
R1 2 3 4 5 6 7 8 9 A B C D E F K Q
Q
Q
RG 02/04
Q
Q
STORE
Q
R
Q
Q
H
PRECALL
R
Q
MEMORY
Q
L
RI M
Q
PCLEAR
RJ AUTO
0.4
HELSINKI
A
AUTO
Length
Margin
Font
Width
j or k.
☞ Auto format template files of the same tape
width are displayed grouped together.
5 Press r (OR press n). Any text previously
entered in the display is erased and the text
stored under the selected file number is
recalled into the display.
Deleting a file
To delete a file that has been saved:
1 Rotate r until MEMORY is displayed, and
then press r (OR hold down d and
press 8). The MEMORY screen appears.
Size
3 Press r (OR press n). The RECALL screen
appears in the display with the currently
An Auto format template that has been stored in the
memory can be deleted by holding down d and
pressing 8 from the Auto format function.
selected file number.
NOTE
To quit the Recall function without recalling any
2 Rotate r (OR press m or g) until !
moves beside CLEAR.
text, press e (OR hold down d and press 8).
Q
R1 2 3 4 5 6 7 8 9 A B C D E F K Q
Q
Q
RG 03/04
Q
Q
RECALL
Q
R
Q
Q
RH L
MEMORY PCLEAR
Q
Q
Q
RI M
PPRINT
RJ AUTO
0.4
HELSINKI
A
AUTO
For a text file:
Q
R1 2 3 4 5 6 7 8 9 A B C D E F K Q
Q
Q
RG RECALL
Q
Q
Q
RH L
Q
Q
M
R
Q
FILE[00:NAMETAG ]
Q
RI O R. Becker ABC Tran Q
R
J
AUTO
0.4
HELSINKI
A
AUTO
Length
Margin
Font
Width
Size
For an Auto format template file:
Margin
Font
Width
Size
3 Press r (OR press n). The CLEAR screen
appears in the display with the currently
selected file number.
NOTE
Q
R1 2 3 4 5 6 7 8 9 A B C D E F K Q
Q
Q
RG RECALL
Q
Q
18mm
Q
R
Q
L
Q
RH M 00TZ[00:VIDEO
Q
]
Q
Q
RI
S
FAVORITE
SONGS
R
J
Length
AUTO
0.4
HELSINKI
A
AUTO
Length
Margin
Font
Width
Size
4 Rotate r (OR press m or g) until the file
number containing the text that you wish to
recall is displayed. The file name is shown
beside the file number and the text stored in
the selected file number is shown at the bottom of the display.
To quit the Memory clear function without erasing
any text, press e (OR hold down d and press
8).
For a text file:
Q
R1 2 3 4 5 6 7 8 9 A B C D E F K Q
Q
Q
RG CLEAR
Q
Q
Q
R
Q
L
Q
RH M FILE[00:NAMETAG ]
Q
Q
Q
RI O R. Becker ABC Tran
R
J
AUTO
0.4
HELSINKI
A
AUTO
Length
Margin
Font
Width
Size
73
Functions
NOTE
Ch. 3 Functions
For an Auto format template file:
Q
R1 2 3 4 5 6 7 8 9 A B C D E F K Q
Q
Q
RG CLEAR
Q
Q
18mm
Q
R
Q
L
Q
Q
RH M 00TZ[00:VIDEO
]
Q
Q
I
R
S
FAVORITE
SONGS
R
J
AUTO
0.4
HELSINKI
A
AUTO
Length
Margin
Font
Width
Size
4 Rotate r (OR press m or g) until the file
number containing the text that you wish to
delete is displayed. The file name is shown
beside the file number and the text stored
under the selected file number is shown in
the bottom line.
6 Repeat steps 4 and 5 until ! appears to
the right of all files to be deleted. Files
marked with ! will be deleted.
NOTE
☞ If multiple files are to be deleted, follow steps
5 and 6 to mark them with !. If only one file
is to be deleted, steps 5 and 6 can be
skipped.
☞ To select all files in the memory, hold down
d and press the space bar.
☞ To remove a file from those that are to be
deleted, select the file, and then press the space
bar to remove the ! from the right side of the
file name.
NOTE
☞ To see other parts of the selected text file, press
j or k.
☞ Auto format template files of the same tape
width are displayed grouped together.
Functions
5 Press the space bar so that ! appears to the
right of the file name.
7 Press r (OR press n). The message “OK
TO CLEAR?” appears.
NOTE
If all of the stored files were selected, the message
“CLEAR ALL?” appears.
For a text file:
Q
R1 2 3 4 5 6 7 8 9 A B C D E F K Q
Q
Q
RG OK TO CLEAR?
Q
Q
Q
R
Q
Q
RH
Q
Q
Q
RI
RJ AUTO
0.4
HELSINKI
A
AUTO
Q
R1 2 3 4 5 6 7 8 9 A B C D E F K Q
Q
Q
RG CLEAR
Q
Q
Q
RH L
Q
Q
M FILE[00:NAMETAG ] P
R
Q
Q
Q
RI O R. Becker ABC Tran
R
J
AUTO
0.4
HELSINKI
A
AUTO
Length
Margin
Font
Width
Size
Length
Margin
Font
Width
Size
8 Press r (OR press n). The text stored in
the selected file numbers is deleted.
For an Auto format template file:
NOTE
Q
R1 2 3 4 5 6 7 8 9 A B C D E F K Q
Q
Q
RG CLEAR
Q
Q
18mm
Q
R
Q
L
RH M 00TZ[00:VIDEO
Q
]P Q
Q
Q
I
R
S
FAVORITE
SONGS
R
J
AUTO
0.4
HELSINKI
A
AUTO
Length
Margin
Font
Width
Size
To go back and select different files to be deleted,
press e.
Printing stored text and Auto format
templates
Multiple stored text or Auto format templates
can be printed immediately without first being
recalled.
To print stored text files:
1 Rotate r until MEMORY is displayed, and
then press r (OR hold down d and
press 8). The MEMORY screen appears.
2 Rotate r (OR press m or g) until !
moves beside PRINT.
74
Ch. 3 Functions
NOTE
Q
R1 2 3 4 5 6 7 8 9 A B C D E F K Q
Q
Q
RG 04/04
Q
Q
CLEAR
Q
RH
Q
Q
P
R
Q
MEMORY PRINT
Q
L
Q
RI M
P
RJ
AUTO
0.4
HELSINKI
A
AUTO
Length
Margin
Font
Width
Size
3 Press r (OR press n). The PRINT screen
appears in the display with the currently
selected file number.
NOTE
To quit the Memory print function without printing
any text, press e (OR hold down d and press
8).
☞ If multiple files are to be printed, follow steps
5 and 6 to mark them with !. If only one file
is to be printed, steps 5 and 6 can be
skipped.
☞ To remove a file from those that are to be
printed, select the file, and then press the space
bar to remove the ! from the right side of the
file name.
7 Press r (OR press n). The text stored
under the selected file numbers is printed.
To print stored Auto format template files:
J
AUTO
0.4
HELSINKI
A
AUTO
Length
Margin
Font
Width
Size
4 Rotate r (OR press m or g) until the file
number containing the text that you wish to
print is displayed. The file name is shown
beside the file number, and the text stored
under the selected file number is shown in
the bottom line.
NOTE
To see other parts of the selected text file, press j
or k.
5 Press the space bar so that ! appears to the
right of the file name.
Q
R1 2 3 4 5 6 7 8 9 A B C D E F K Q
Q
Q
RG PRINT
Q
Q
Q
RH L
Q
M FILE[00:NAMETAG ] P Q
R
Q
Q
RI O R. Becker ABC Tran Q
R
J
AUTO
0.4
HELSINKI
A
AUTO
Length
Margin
Font
Width
Size
6 Repeat steps 4 and 5 until ! appears to
the right of all files to be printed. Files
marked with ! will be printed.
2 Hold down d and press 8. The MEMORY screen appears.
3 Rotate r (OR press m or g) until !
moves beside PRINT.
Q
R1 2 3 4 5 6 7 8 9 A B C D E F K Q
Q
Q
RG 04/04
Q
Q
CLEAR
Q
RH
Q
Q
P
Q
R
MEMORY PRINT
Q
L
Q
RI M
P
RJ
AUTO
0.4
HELSINKI
A
AUTO
Length
Margin
Font
Width
Size
4 Press r (OR press n). The PRINT screen
appears in the display with the currently
selected file number.
NOTE
To quit the Memory print function without printing
any text, press e (OR hold down d and press
8).
Q
R1 2 3 4 5 6 7 8 9 A B C D E F K Q
Q
Q
RG PRINT
Q
Q
18mm
Q
RH L
Q
Q
M 00TZ[00:VIDEO
Q
R
]
Q
Q
RI
S FAVORITE SONGS
R
J
AUTO
0.4
HELSINKI
A
AUTO
Length
Margin
Font
Width
Size
75
Functions
Q
R1 2 3 4 5 6 7 8 9 A B C D E F K Q
Q
Q
RG PRINT
Q
Q
Q
RH L
Q
Q
M FILE[00:NAMETAG ]
R
Q
Q
RI O R. Becker ABC Tran Q
R
1 Rotate r until AUTO FORMAT is displayed, and then press r (OR hold down
d and press 6).
Ch. 3 Functions
5 Rotate r (OR press m or g) until the file
number containing the text that you wish to
print is displayed. The file name is shown
beside the file number, and the text stored
under the selected file number is shown in
the bottom line.
To change the style of the stored Auto format template:
0 Rotate r (OR press m or g) until !
moves beside CHANGE STYLE.
Q
R1 2 3 4 5 6 7 8 9 A B C D E F K Q
Q
Q
RG 04/04
Q
Q
CONTINUE
Q
R
Q
Q
RH L
P.MENU P CHANGE STYLE
Q
Q
Q
RI M
P
RJ
NOTE
☞ To see other parts of the selected text file, press
j or k.
☞ Auto format template files of the same tape
width are displayed grouped together.
J
AUTO
0.4
HELSINKI
A
AUTO
Length
Margin
Font
Width
Size
Functions
7 Repeat steps 5 and 6 until ! appears to
the right of all files to be printed. Files
marked with ! will be printed.
NOTE
☞ If multiple files are to be printed, follow steps
5 and 6 to mark them with !. If only one file
is to be printed, steps 5 and 6 can be
skipped.
☞ To remove a file from those that are to be
printed, select the file, and then press the space
bar to remove the ! from the right side of the
file name.
0.4
HELSINKI
A
AUTO
Margin
Font
Width
Size
A Press r (OR press n).
6 Press the space bar so that ! appears to the
right of the file name.
Q
R1 2 3 4 5 6 7 8 9 A B C D E F K Q
Q
Q
RG PRINT
Q
Q
18mm
Q
R
Q
L
RH M 00TZ[00:VIDEO
Q
]P Q
Q
Q
RI
S
FAVORITE
SONGS
R
AUTO
Length
Q
R1 2 3 4 5 6 7 8 9 A B C D E F K Q
Q
Q
RG
Q
Q
Q
R
Q
O
N
Q
H
Q
R
CHAR.
STYLE
Q
Q
RI L
M ITALIC
R
J
AUTO
0.4
HELSINKI
A
AUTO
Length
Margin
Font
Width
Size
B Rotate r (OR press m or g) until the
name of the desired format style is displayed. A sample can be seen on the right
side of the display.
NOTE
The default setting (NO CHANGE) can be selected
by pressing the space bar.
C Press r (OR press n). The MENU screen
appears in the display again.
To print more stored Auto format template
files:
D Rotate r (OR press m or g) until !
moves beside CONTINUE.
8 Press r (OR press n). The MENU screen
appears in the display.
9 Make sure that ! is beside PRINT, and then
press r (OR press n). The text stored
under the selected file numbers is printed.
Q
R1 2 3 4 5 6 7 8 9 A B C D E F K Q
Q
Q
RG 03/04
Q
Q
FINISH
Q
R
Q
Q
RH P.MENU P CONTINUE
Q
Q
L
I
Q
R
M
P CHANGE STYLE
RJ AUTO
0.4
HELSINKI
A
AUTO
Length
Margin
Font
Width
Size
E Press r (OR press n). The PRINT screen
appears in the display with the currently
selected file number.
Q
R1 2 3 4 5 6 7 8 9 A B C D E F K Q
Q
Q
RG PRINT
Q
Q
18mm
Q
RH L
Q
M 00TZ[00:VIDEO
Q
R
]P Q
Q
Q
I
R
S
FAVORITE
SONGS
R
J
76
AUTO
0.4
HELSINKI
A
AUTO
Length
Margin
Font
Width
Size
Ch. 3 Functions
F Rotate r (OR press m or g) until the file
number containing the text that you wish to
print is displayed. The file name is shown
beside the file number, and the text stored
under the selected file number is shown in
the bottom line.
NOTE
☞ To see other parts of the selected text file, press
j or k.
☞ Auto format template files of the same tape
width are displayed grouped together.
G Press the space bar so that ! appears to the
right of the file name.
Q
R1 2 3 4 5 6 7 8 9 A B C D E F K Q
Q
Q
RG PRINT
Q
Q
18mm
Q
R
Q
L
RH M 00TZ[00:VIDEO
Q
]P Q
Q
Q
RI
S
FAVORITE
SONGS
R
J
AUTO
0.4
HELSINKI
A
AUTO
Length
Margin
Font
Width
Size
Functions
H Repeat steps F and G until ! appears to
the right of all files to be printed. Files
marked with ! will be printed.
NOTE
If multiple files are to be printed, follow steps G
and H to mark them with !. If only one file is to
be printed, steps G and H can be skipped.
I Press r (OR press n). The MENU screen
appears in the display.
J Make sure that ! is beside PRINT, and then
press r (OR press n). The text stored
under the selected file numbers is printed.
To finish using the Auto format function:
K Rotate r (OR press m or g) until !
moves beside FINISH.
Q
R1 2 3 4 5 6 7 8 9 A B C D E F K Q
Q
Q
RG 02/04
Q
Q
PRINT
Q
R
Q
Q
RH P.MENU PFINISH
Q
Q
L
Q
RI M
PCONTINUE
RJ AUTO
0.4
HELSINKI
A
AUTO
Length
Margin
Font
Width
Size
L Press r (OR press n). The screen from
the Auto format function displayed before
the Memory print function was used reappears in the display.
77
Ch. 3 Functions
Functions
78
Ch. 4
Chapter
4
Machine Adjustments
Machine Adjustments
79
Ch. 4 Machine Adjustments
Machine adjustments
●
●
●
●
●
●
●
●
●
●
●
●
●
●
●
●
●
●
●
●
●
●
Setup functions (d + A)
Various functions are available for changing the
general appearance of how text is shown on the
display and for adjusting the operation of the
P-touch.
To change the CONTRAST setting:
The CONTRAST function enables you to make
the LCD display lighter or darker.
1 Hold down d and press A.
To change the TAPE LENGTH ADJUST
setting:
When printing a label with a specified length
(Tape length function), the length of the printed
label may be slightly different. This function
allows you to adjust the length of the printed
label.
NOTE
If the tape length cannot be adjusted satisfactorily
using this function, small adjustments can be made
to the tape length using the Tape length function.
1 Hold down d and press A.
NOTE
NOTE
This step may be skipped if settings for several
Setup functions are being applied at the same time.
This step may be skipped if settings for several
Setup functions are being applied at the same time.
2 Rotate r until CONTRAST is displayed,
and then press r (OR press j or k until
CONTRAST is displayed).
2 Rotate r until TAPE LENGTH ADJUST is
displayed, and then press r (OR press j
or k until TAPE LENGTH ADJUST is displayed).
Q
R1 2 3 4 5 6 7 8 9 A B C D E F K Q
Q
Q
RG 01/05
Q
Q
Q
RH
Q
Q
NO CONTRAST
R
Q
Q
L
Q
RI M 00
R
Q
R1 2 3 4 5 6 7 8 9 A B C D E F K Q
Q
Q
RG 02/05
Q
Q
Q
RH
Q
Q
NO
R
Q
TAPE
LENGTH
ADJUST
Q
Q
RI L
M 00
R
J
AUTO
0.4
HELSINKI
A
AUTO
Length
Margin
Font
Width
Size
Machine Adjustments
3 Rotate r (or press m or g) until the
desired setting is displayed.
NOTE
J
AUTO
0.4
HELSINKI
A
AUTO
Length
Margin
Font
Width
Size
3 Rotate r (or press m or g) until the
desired setting is displayed.
NOTE
To return the function to its default setting (0), press
the space bar.
☞ To return the function to its default setting (0),
4 Press r (or press n) to apply the setting.
☞ To decrease the label length, select a lower
NOTE
If r is used to select the settings, only one function
can be set at a time. To apply several Setup settings
press the space bar.
value. To increase the label length, select a
higher value.
4 Press r (or press n) to apply the setting.
at the same time, press j or k to select the func-
NOTE
tion, and then press m or g to select the desired
If r is used to select the settings, only one function
setting. Press n only after the necessary functions
can be set at a time. To apply several Setup settings
have been set.
at the same time, press j or k to select the function, and then press m or g to select the desired
setting. Press n only after the necessary functions
have been set.
80
Ch. 4 Machine Adjustments
To change the HEAD ADJUSTMENT setting:
This function allows you to shift the printing up
or down within the tape.
NOTE
This function does not adjust printing on 36-mmwide tape.
1 Hold down d and press A.
If the tape is still not cut correctly even after this setting has been continuously adjusted, the cutter may
be dull. Contact your service representative.
1 Hold down d and press A.
NOTE
This step may be skipped if settings for several
Setup functions are being applied at the same time.
2 Rotate r until HEAD ADJUSTMENT is displayed, and then press r (OR press j or
k until HEAD ADJUSTMENT is displayed).
Q
R1 2 3 4 5 6 7 8 9 A B C D E F K Q
Q
Q
RG 03/05
Q
Q
Q
RH
Q
Q
NO
R
Q
HEAD
ADJUSTMENT
Q
Q
RI L
M 00
R
AUTO
0.4
HELSINKI
A
AUTO
Length
Margin
Font
Width
Size
3 Rotate r (or press m or g) until the
desired setting is displayed.
NOTE
☞ To return the function to its default setting (0),
press the space bar.
☞ To shift the printing down, select a lower value.
To shift the printing up, select a higher value.
4 Press r (or press n) to apply the setting.
This step may be skipped if settings for several
Setup functions are being applied at the same time.
2 Rotate r until HALF CUTTER is displayed,
and then press r (OR press j or k until
HALF CUTTER is displayed).
Q
R1 2 3 4 5 6 7 8 9 A B C D E F K Q
Q
Q
RG 04/05
Q
Q
Q
RH
Q
Q
NO HALF CUTTER
Q
R
Q
Q
RI L
M 00±3
R
J
AUTO
0.4
HELSINKI
A
AUTO
Length
Margin
Font
Width
Size
3 Rotate r (or press m or g) until the
desired setting is displayed.
NOTE
☞ To cut less deep, select a lower value. To cut
deeper, select a higher value.
☞ Adjust the setting in small steps.
☞ To return the function to its default setting (0),
press the space bar.
4 Press r (or press n) to apply the setting.
NOTE
NOTE
If r is used to select the settings, only one function
If r is used to select the settings, only one function
can be set at a time. To apply several Setup settings
can be set at a time. To apply several Setup settings
at the same time, press j or k to select the func-
at the same time, press j or k to select the func-
tion, and then press m or g to select the desired
tion, and then press m or g to select the desired
setting. Press n only after the necessary functions
setting. Press n only after the necessary functions
have been set.
have been set.
To change the HALF CUTTER setting:
This function allows you to adjust how deep a
half cut is cut with laminated tape, for example, if
the tape is cut too much or not enough. Normally, it is only necessary to change the setting
by one. If the half cut is still either too deep or not
deep enough, change the setting by one again.
81
Machine Adjustments
NOTE
J
NOTE
Ch. 4 Machine Adjustments
To change the USB ID SELECTION setting:
This function allows you to specify a unique
identification number for each P-touch connected to a computer in order to print through
the USB connection. Normally, for easy setup of
multiple P-touch machines connected to a computer, all PT-9600/3600s will be set to
000000001, indicating that the data will be
printed on all connected P-touch machines at
the same time.
1 Hold down d and press A.
NOTE
This step may be skipped if settings for several
Setup functions are being applied at the same time.
2 Rotate r until USB ID SELECTION is displayed, and then press r (OR press j or
k until USB ID SELECTION is displayed).
Q
R1 2 3 4 5 6 7 8 9 A B C D E F K Q
Q
Q
RG 05/05
Q
Q
Q
RH
Q
Q
NO USB ID SELECTION
R
Q
Q
Q
RI L
M 000000001
R
J
AUTO
0.4
HELSINKI
A
AUTO
Length
Margin
Font
Width
Size
3 Rotate r (or press m or g) until the
desired setting is displayed.
Machine Adjustments
NOTE
To return the function to its default setting
(000000001), press the space bar.
4 Press r (or press n) to apply the setting.
NOTE
If r is used to select the settings, only one function
can be set at a time. To apply several Setup settings
at the same time, press j or k to select the function, and then press m or g to select the desired
setting. Press n only after the necessary functions
have been set.
82
ERROR MESSAGE LIST
ERROR MESSAGE LIST
ERROR MESSAGE
4 DIGITS MINIMUM!
16 LINE LIMIT!
CAUSE
●
●
SOLUTION
This message appears if less
than the minimum four digits
are entered as the barcode data.
●
This message appears if 16 lines
●
Limit the number of lines
in a text block to 16.
Enter a minimum of four
digits before pressing n.
have already been entered in a
text block of text when you
press n.
50 LINE LIMIT
REACHED!
●
This message appears if you
delete text, causing the number
of lines in a block to exceed the
16-line limit.
●
Adjust the number of lines
so that the block will not
have more than 16 lines.
●
This message appears if 50 text
●
Limit the number of text
blocks to 50.
blocks have already been
entered when you hold down
d and press n.
●
This message appears when the
installed Ni-MH battery has
become weak.
●
Recharge the battery or
use the AC adapter.
BUFFER EMPTY!
●
This message appears if no text
has been typed in when you try
to print or use the Numbering
function, Repeat printing function or Layout preview function.
●
Type in some text before
trying to perform any of
these operations.
BUFFER FULL!
●
This message appears if you try
to add a character, a space, a
new line, a new block, a symbol, an accented character or a
barcode after the maximum
number of characters has
already been entered.
●
Delete some existing text
before trying to add any
more.
CHARGE BATTERIES!
●
This message appears when the
rechargeable Ni-MH battery has
reached a low voltage.
●
Recharge the battery or
use the AC adapter.
●
This message appears if the tape
compartment cover is open.
●
Close the compartment
cover.
BATTERIES WEAK!
(PT-9600 only)
(PT-9600 only)
CLOSE CASSETTE
COVER!
83
ERROR MESSAGE LIST
ERROR MESSAGE
CUTTER ERROR!
CAUSE
●
This message appears if the cutter did not operate correctly.
SOLUTION
●
Turn off the P-touch, and
then turn the P-touch on
again.
●
If the problem cannot be
corrected, contact your
service representative.
DIVIDE BY ZERO
ERROR!
●
This message appears if the
conversion rate entered when
setting up the Euro conversion
function was 0.
●
Type in a conversion rate
other than 0.
EEPROM ERROR!
●
This message appears if a
checksum error occurred when
the P-touch was turned on or if
the keyword was damaged and
failed to initialize.
●
Contact your service representative.
INPUT WHOLE CODE!
●
This message appears if the set
number of digits is not entered
in the barcode data.
●
Input the correct number
of digits or change the
number of digits set in the
barcode parameters.
84
ERROR MESSAGE LIST
ERROR MESSAGE
INTERFACE ERROR!
CAUSE
●
SOLUTION
This message appears if the Windows
wrong port is selected for a USB Under “Print to the following
connection.
port” in the printer Properties
dialog box, select “PTUSB:”
for the USB connection.
For Windows 98 and Me:
☞
If two or more of the same
P-touch model are connected through their USB
ports, instead of “PTUSB:”,
select “PTUSB (PT-3600/
9600-XXXXXXXXX):”
(where XXXXXXXXX is the
serial number). The serial
number is written above
the barcode on the silver
label attached to the bottom of the P-touch.
For Windows 2000 and XP:
☞
The P-touch can be added
as a second printer.
Macintosh
In the Chooser, select the PT3600/9600 as the printer.
●
LENGTH LIMIT!
●
This message appears if the
wrong port is selected for a
serial (RS-232C) connection.
This message appears if you try
to print or use the Layout preview function when the length
of the text is greater than the 1
m limit.
●
Specify correct settings for
the
BAUDRATE,
BIT
LENGTH, PARITY and
BUSY interface parameters.
●
Check that the interface
cable is correctly connected.
●
Delete some of the text.
85
ERROR MESSAGE LIST
ERROR MESSAGE
LINE LIMIT!
XX LINES MAXIMUM
CAUSE
●
This message appears if you try
to print or use the Layout preview function when the number
of lines in the text is greater
than the maximum possible for
the installed tape. (Since the
number of lines possible
depends on the width of the
tape, the message that appears
depends on the tape width.)
SOLUTION
●
Reduce the number of
lines or install a wider
tape.
16 LINES MAXIMUM (on 36 mm tape)
13 LINES MAXIMUM (on 24 mm tape)
10 LINES MAXIMUM (on 18 mm tape)
6 LINES MAXIMUM (on 12 mm tape)
4 LINES MAXIMUM (on 9 mm tape)
3 LINES MAXIMUM (on 6 mm tape)
MEMORY FULL!
●
This message appears if you try
to store a text file after the maximum number of characters has
already been stored in the
memory.
●
Delete an unwanted file to
make space for the new
one.
NO FILES!
●
This message appears if no files
are stored in the memory when
you try to recall, delete or print
one.
●
Store a text file before trying to recall, delete or
print one.
OVERFLOW!
●
This message appears if the
result of the conversion with the
Euro
conversion
function
exceeds 10 digits.
●
Change the euro conversion setup so that the
result will not exceed 10
digits.
REPLACE BATTERIES!
●
This message appears when the
installed Ni-MH battery is about
to run out, or when the battery
has reached a high voltage.
●
Replace the battery or use
the AC adapter.
●
This message appears if a 6mm-wide tape cassette is not
installed when printing an Auto
format template created for 6mm-wide tape.
●
Install a 6-mm-wide tape
cassette.
(PT-9600 only)
SET 6mm!
86
ERROR MESSAGE LIST
ERROR MESSAGE
CAUSE
SOLUTION
SET 9mm!
●
This message appears if a 9mm-wide tape cassette is not
installed when printing an Auto
format template created for 9mm-wide tape.
●
Install a 9-mm-wide tape
cassette.
SET 12mm!
●
This message appears if a 12mm-wide tape cassette is not
installed when printing an Auto
format template created for 12mm-wide tape.
●
Install a 12-mm-wide tape
cassette.
SET 18mm!
●
This message appears if a 18mm-wide tape cassette is not
installed when printing an Auto
format template created for 18mm-wide tape.
●
Install a 18-mm-wide tape
cassette.
SET 24mm!
●
This message appears if a 24mm-wide tape cassette is not
installed when printing an Auto
format template created for 24mm-wide tape.
●
Install a 24-mm-wide tape
cassette.
SET 36mm!
●
This message appears if a 36mm-wide tape cassette is not
installed when printing an Auto
format template created for 36mm-wide tape.
●
Install a 36-mm-wide tape
cassette.
SET STAMP-L!
●
This message appears if an 24mm-wide stamp tape cassette is
not installed when printing an
Auto format template created
for a STAMP L stamp.
●
Install an 24-mm-wide
stamp tape cassette.
SET STAMP-M!
●
This message appears if an 18mm-wide stamp tape cassette is
not installed when printing an
Auto format template created
for a STAMP M stamp.
●
Install an 18-mm-wide
stamp tape cassette.
TAPE EMPTY!
●
This message appears if no tape
cassette is installed when you
try to feed the tape, print or use
the Layout preview function.
●
Install a tape cassette and
try again.
TAPE END!
●
This message appears if the end
of the tape in the cassette has
been reached.
●
Replace the tape cassette.
87
ERROR MESSAGE LIST
ERROR MESSAGE
TEXT TOO HIGH!
CAUSE
●
This message appears if the size
of the text is larger than the
width of the installed tape.
●
(PT-9600 only) This message
appears if the Lines of Text setting for the ESC/P interface
mode exceeds the maximum
possible for the installed tape.
SOLUTION
●
Reduce the size of the
characters, install a tape
with a greater width or
select the AUTO text size
setting.
●
Specify the correct setting
for the installed tape.
●
Delete some of the text,
reduce the character
width, or increase the set
label length.
●
Delete some of the text or
reduce the character size.
●
Type in a value that is
within the allowable
range.
●
This message appears if the
length of the text is longer than
the label length that has been
set with the Tape length function.
●
This message appears if you try
to print a label that is longer
than the maximum label length.
●
This message appears if you try
to print a label that is longer
than the maximum label length
or is longer than the specified
block length.
●
This message appears if the
length of the text is longer than
the width of the tape when the
Text rotation function is used.
●
This message appears if the
value entered while setting the
Tape margin, Tape length,
Block margin and Block length
function is not within the allowable range.
●
This message appears if the
specified characters cannot be
found in the database.
●
This message appears if the values for the records to be printed
is not within the allowable
range.
WRONG ADAPTER!
●
This message appears if an
extremely
high-voltage
or
extremely low-voltage adapter
is being used.
●
Disconnect the adapter,
and connect the adapter
designed exclusively for
this machine.
WRONG CHARACTER!
●
This message appears if a time
stamp or user-defined character
image is selected when you try
to use the Numbering function.
●
Select text or a barcode
before trying to use the
Numbering function.
TEXT TOO LONG!
VALUE OUT OF RANGE!
CHECK VALUE AND
RE-ENTER.
88
TROUBLESHOOTING
TROUBLESHOOTING
Problem
(1) The display stays blank after you have
turned on the machine, or abnormal characters are displayed.
Solution
●
Check that the AC adapter is connected.
●
Check that the rechargeable Ni-MH battery is properly charged. (PT-9600 only)
●
Reset the machine by:
- (PT-3600) unplugging the AC adaptor,
and leaving it unplugged for about one
minute, then and plugging it in again
- (PT-9600 only) pressing the reset button
in the battery compartment at the bottom
of the machine
☞
The text and formats in the display will be
erased and under certain circumstances
the entire contents of the memory will be
cleared.
Reset button
●
Check that the tape cassette has been
inserted properly.
●
If the tape cassette is empty, replace it
with a new one.
●
Make sure that the tape compartment
cover has been closed.
(3) The text is printed on striped tape.
●
You have reached the end of the tape in
the cassette. Replace it with a new one.
(4) The P-touch is not working correctly.
●
Reset the P-touch by turning it off, then
while holding down d and R, turning
the machine back on.
(2) The machine does not print or the printed
characters are blurred.
☞
All settings will be reset to their defaults
and the entire contents of the memory will
be cleared. If it necessary to keep the current settings and stored files, back them up
to the computer using the P-touch Backup
Manager.
89
TROUBLESHOOTING
Problem
(5) The machine has “locked up” (i.e., nothing happens when a key is pressed).
Solution
●
Reset the machine by:
- (PT-3600) unplugging the AC adaptor,
and leaving it unplugged for about one
minute, then and plugging it in again
- (PT-9600 only) pressing the reset button
in the battery compartment at the bottom
of the machine
☞
(6) The half cut is either too deep or not deep
enough.
90
●
All text and formats in the display and all
text files stored in the memory will be
erased.
Follow the procedure on page 81 to adjust
how deep laminated tape is cut.
TROUBLESHOOTING
Problem
Solution
(7) A blank horizontal line appears through
the text in the printed label.
1 Turn off the machine, and then disconnect
the AC adapter and (for the PT-9600 only)
remove the rechargeable battery.
2 Open the tape compartment cover, then
remove the tape cassette if one is installed.
The print head and rollers are located in the
tape compartment.
3 Print head: Use a dry cotton swab to gently
wipe up and down along the print head.
Print head
Rollers: Use a dry cotton swab to wipe up
and down along each roller while rotating
them with your finger.
Print head
Rollers
Cotton swab
4 Install a tape cassette, close the tape compartment cover, and then try printing again.
5 If a blank streak still appears in the printed
label, repeat steps 2 through 4 using a
cotton swab dipped in isopropyl (rubbing)
alcohol.
If none of the above works, contact your service
representative.
☞
The print head can be cleaned more easily
if the optional print head cleaning cassette
(TZ-CL6) is used.
91
TROUBLESHOOTING
Problem
Solution
(8) The tape is not ejected correctly after
being automatically cut.
●
Turn off the machine, open the tape compartment cover, and remove the tape cassette if one is installed.
●
Using a cotton swab, clean off the metal
piece in the exit slot to the left of cutter.
Cotton swab
Metal piece
(Area to be cleaned)
(9) The cutter does not cut correctly.
92
●
Change the HALF CUTTER setting. (Refer
to page 81.)
●
The cutter may be dull. Contact your service representative.
MACHINE SPECIFICATIONS
MACHINE SPECIFICATIONS
HARDWARE
Power supply:
AC adapter 24 V, 2.5 A
(PT-9600 only: Rechargeable Ni-MH battery)
Input device:
Keyboard (PT-9600: 69 keys; PT-3600: 59 keys)
LCD:
24 × 119 dots
+ Caps, Alt and other indicators
(with screen backlight—PT-9600 only)
Print tape:
6 widths available:
6 mm
9 mm
12 mm
18 mm
24 mm
36 mm
Print head:
384 dots (height)/360 dpi (resolution)
Tape cutter:
Automatic full cut
Automatic half cut
Dimensions:
237 (W) × 302 (D) × 101 (H) mm
Weight:
2 kg
SOFTWARE
Character fonts:
10 built-in fonts (Helsinki, Brussels, US, San Diego, Florida, Brunei
Bold, Los Angeles, Bermuda Script, Istanbul and Letter Gothic)
Character sizes:
AUTO plus 24 point sizes (4, 5, 6, 7, 8, 9, 10, 11, 12, 14, 16, 18,
20, 22, 24, 28, 32, 36, 40, 48, 56, 64, 72 and 76 points)
Character styles:
Normal, Bold, Outline, Solid, Shadow, Invert, Italic, and Vertical
Buffer size:
Maximum 1.0-meter line of text
Maximum 16 lines
Maximum 50 blocks
Memory size:
Approximately 10,000 characters
93
MACHINE SPECIFICATIONS
94
Appendix
Appendix
95
Appendix
Symbols ➩ p. 46
The following symbols are available.
Symbols
Category
PUNCTUATION
(A01-A18)
BRACKET
(B01-B08)
ARROW
(C01-C14)
UNIT
(D01-D26)
•
+
×
÷
±
=
\
§
¶
¿
¡
1
2
3
4
5
6
7
8
9
10
11
12
13
14
@
#
&
15
16
17
18
[
]
{
}
<
>
1
2
3
4
5
6
7
8
→
←
↑
↓
1
2
3
4
5
6
7
8
9
10
11
12
13
14
13
14
14
°
$
¥
« »
£
1
2
3
4
5
6
7
8
9
10
11
12
15
16
17
18
19
20
21
22
23
24
25
26
1
2
3
4
5
6
7
8
9
10
11
12
13
2
3
4
5
6
7
8
9
0
LETTER
(E01-E14)
NUMBER
(F01-F40)
1/2 1/3 1/4 1
1
2
3
4
5
6
7
8
9
10
11
12
13
±
-
+
0
1
2
3
4
5
6
7
8
9
14
±
15
Appendix
PICTOGRAPH
(G01-G14)
16
17
18
19
20
21
22
23
24
25
26
27
28
-
+
0
1
2
3
4
5
6
7
8
9
29
30
31
32
33
34
35
36
37
38
39
40
★
O
●
♠
♥
♦
♣
1
2
3
4
5
6
7
8
9
10
11
12
13
14
1
2
3
4
5
6
7
8
9
10
11
12
13
14
15
16
17
18
ELECTRICAL
(H01-H18)
96
Appendix
Symbols
Category
PROHIBITION
(I01-I29)
1
2
3
4
5
6
7
8
9
10
11
12
13
14
15
16
17
18
19
20
21
22
23
24
25
26
27
28
1
2
3
4
5
6
7
8
9
10
11
12
13
14
15
16
17
18
19
20
21
22
23
24
25
26
27
28
29
30
31
32
33
34
35
36
37
38
39
40
41
42
1
2
3
4
5
6
7
8
9
10
11
12
13
14
15
16
17
18
19
1
2
3
4
5
6
7
8
1
2
3
4
5
6
7
8
9
10
11
12
13
1
2
3
4
5
6
1
2
3
4
5
6
7
8
9
10
11
12
13
14
15
16
17
18
19
20
21
22
23
24
25
26
27
28
29
30
31
32
33
34
35
36
37
38
39
40
41
42
29
WARNING
(J01-J42)
MANDATORY
(K01-K19)
FIRE
(L01-L08)
TRANSPORT
(M01-M13)
Appendix
EMERGENCY
(N01-N06)
INFORMATION
(O01-O43)
43
97
Appendix
Symbols
Category
OTHER SIGNS
(P01-P12)
1
2
3
4
5
6
7
8
9
10
11
12
1
2
3
4
5
6
7
8
9
1
2
3
4
5
6
7
8
9
10
11
12
13
14
15
16
17
18
19
20
21
22
23
24
25
26
27
28
29
30
31
32
33
34
35
36
37
38
39
40
41
42
43
44
1
2
3
4
5
6
7
8
9
10
11
12
13
14
15
16
17
18
19
20
21
22
23
24
25
26
27
1
2
3
4
5
6
7
8
9
10
11
12
13
1
2
3
4
5
6
7
8
9
10
11
12
13
1
2
3
4
5
6
7
8
9
10
11
12
13
15
16
17
18
VIDEO
(Q01-Q09)
OFFICE
(R01-R44)
GENERAL
(S01-S27)
GARDENING
(T01-T14)
14
VEHICLES
(U01-U13)
OCCASIONS
(V01-V18)
Appendix
☞
98
14
The use of the CE mark is strictly governed by one or more European Council directives. Ensure
that any labels you produce which use this mark conform with the relevant directives.
Appendix
Special barcode characters ➩ p. 47
The following special characters can only be added to barcodes created using types CODE39 or
CODABAR.
Value
Character
1
+
2
$
The following special characters can only be added to barcodes created using types EAN128 and
CODE128.
Value
Character
Value
Character
3
#
69
ENQ
87
ETB
4
$
70
ACK
88
CAN
11
+
71
BEL
89
EM
28
<
72
BS
90
SUB
29
=
73
HT
91
ESC
30
>
74
LF
91
{
32
@
75
VT
92
FS
59
[
76
FF
92
|
60
\
77
CR
93
GS
61
]
78
SO
93
}
62
^
79
SI
94
RS
63
_
80
DLE
94
64
NUL
81
DC1
95
82
DC2
95
DEL
65
SOH
83
DC3
96
FNC3
66
STX
84
DC4
97
FNC2
67
ETX
85
NAK
100
FNC4
68
EOT
86
SYN
102
FNC1
64
Value
Character
US
Fonts ➩ p. 54
Appendix
The following fonts are available.
☞
Letter Gothic (L. GOTHIC) is a fixed pitch font (all characters use a fixed amount of space), as
opposed to all of the other fonts, which are proportional (characters use different amounts of space).
99
Appendix
Sizes and widths ➩ pp. 54 & 55
Samples of some available text sizes and widths are shown below.
Width
Size
76 points
72 points
64 points
56 points
48 points
40 points
36 points
32 points
28 points
24 points
22 points
20 points
Appendix
18 points
16 points
14 points
12 points
11 points
10 points
9 points
8 points
100
WIDE
NORMAL
NARROW
NARROWEST
Appendix
Width
Size
WIDE
NORMAL
NARROW
NARROWEST
7 points
6 points
5 points
4 points
If the 4 point or 5 point text size setting is selected, the text will be printed with the BRUSSELS
font setting, regardless of the font setting that is selected.
☞
Characters printed using the smaller sizes may be difficult to read if certain style settings are
selected.
Small characters may appear faint when they are printed.
Appendix
☞
101
Appendix
Type styles ➩ pp. 56 & 57
Style1 setting
NORMAL
BOLD
OUTLINE
SOLID
SHADOW
INVERT
Style2 setting
NORMAL
NORMAL
NORMAL
NORMAL
NORMAL
NORMAL
Helsinki
Brussels
US
San Diego
Florida
Brunei Bold
Los
Angeles
Bermuda Script
Istanbul
Letter
Gothic
Style1 setting
NORMAL
BOLD
OUTLINE
SOLID
SHADOW
INVERT
Style2 setting
ITALIC
ITALIC
ITALIC
ITALIC
ITALIC
ITALIC
Helsinki
Brussels
Appendix
US
San Diego
Florida
Brunei Bold
Los
Angeles
102
Appendix
Style1 setting
NORMAL
BOLD
OUTLINE
SOLID
SHADOW
INVERT
Style2 setting
ITALIC
ITALIC
ITALIC
ITALIC
ITALIC
ITALIC
Bermuda Script
Istanbul
Letter
Gothic
The VERTICAL style setting can be combined with all Style1 text styles (NORMAL, BOLD,
OUTLINE, SOLID, SHADOW and INVERT).
☞
The VERTICAL style setting cannot be combined with the ITALIC style setting.
Appendix
☞
103
Appendix
Framing and shading patterns ➩ p. 58
The following frame and shading patterns are available.
Setting
Sample
Setting
Sample
Setting
1
11
21
2
12
22
3
13
23
4
14
24
5
15
25
6
16
26
7
17
27
8
18
28
9
19
29
10
20
30
Appendix
104
Sample
Appendix
Pre-set templates ➩ p. 65
Samples of the available templates are shown below.
Template
name
Tape
width
Label
length
1
ADDRESS-1
24 mm
80 mm
2
ADDRESS-2
24 mm
78 mm
3
ADDRESS-3
24 mm
104 mm
4
ADDRESS-4
36 mm
86 mm
5
ASSET
24 mm
84 mm
6
WALLPLATE
36 mm
186 mm
7
NAMEBADGE-1
24 mm
102 mm
8
NAMEBADGE-2
36 mm
98 mm
9
NAMEBADGE-3
18 mm
102 mm
10
SALE
36 mm
AUTO
Sample
Appendix
No.
105
Appendix
Appendix
No.
Template
name
11
PRICE-1
24 mm
57 mm
12
PRICE-2
24 mm
110 mm
13
SIGN
36 mm
114 mm
14
FLOPPY-1
24 mm
70 mm
15
FLOPPY-2
24 mm
70 mm
16
FLOPPY-3
36 mm
70 mm
17
VCR VHS-1
18 mm
140 mm
18
VCR VHS-2
18 mm
140 mm
19
VCR 8mm-1
9 mm
73 mm
20
VCR 8mm-2
12 mm
92 mm
21
VCR VHSC
18 mm
81 mm
106
Tape
width
Label
length
Sample
Appendix
Template
name
Tape
width
Label
length
22
AUDIO-1
9 mm
89 mm
23
AUDIO-2
9 mm
89 mm
24
AUDIO-3
9 mm
89 mm
25
SLIDE
12 mm
42 mm
26
FILE-1
36 mm
200 mm
27
FILE-2
24 mm
190 mm
28
STAMP NORMAL-L
STAMP L
(24mm)
115 mm
29
STAMP NORMAL-M
STAMP M
(18mm)
105 mm
30
STAMP 2LINE-L
STAMP L
(24mm)
115 mm
31
STAMP VERTICAL-M
STAMP M
(18mm)
105 mm
Sample
Appendix
No.
107
Appendix
Template text styles ➩ p. 65
Samples of the available template text styles are shown below.
CHAR. style
Sample
Font
Style
ORIGINAL
Template default
ITALIC
Template
default
ITALIC
ISTANBUL
SOLID
FLORIDA
OUTLINE
BRUSSELS
ITALIC
US
NORMAL
SAN DIEGO
NORMAL
DYNAMIC
ARTISTIC
FORMAL
ELEGANT
NATURAL
Appendix
108
INDEX
A
AC adapter 9
AC adapter connector 2
Accent function 46
Accented characters 46, 47
Accessories 113
Adapter 9
Aligning text 59
Alt indicator 45
Alt key 45
Alt mode 45
Appendix 95
Arrow keys 42
Attaching labels 36
Auto cut function 68
Auto format function 65
B
Backing removal 36
Backspace key 51
Barcode function 47
Barcode key 47
Barcode parameters 47
Barcode special characters 48, 99
Basic functions 41
Battery compartment (PT-9600) 2
Blank space 44
Block format functions 53
Block length function 63
Block margin function 63
Blocks 45
C
Cancel key 43
Caps indicator 44
Caps key 44
Caps mode 44
Centre alignment 59
Changing
Block format 53
Block length 63
Block margins 63
Character size 54, 55
Character style 56, 57
Character width 55
Font 54
Framing 59
Global format 52
Label length 62
Line effect 58
Line format 53
Margins 61
Text alignment 60
Text in template 67
Text rotation 60
Character size 54
Character styles 56, 57
CHECK DIGIT parameter 48
Cleaning
Print head 91
Rollers 91
Clear function 51
Clear key 51
Clearing display 51
CODABAR special characters 99
Code key 43
CODE128 special characters 99
CODE39 special characters 99
Composite character keys 47
Computer, connecting to 10
Connecting
AC adapter 9
To computer 10
Converting currencies 49
Copies 69
Cover release button 2
Creating
New block 45
New line 45
Stamps 64
Currency conversion 49
Currency rates 50
Cursor 42
Custom stamps 37
Customised stamps 64
Cutting tape 68, 69
D
Default settings
Auto cut 69
Auto format 65
Block length 64
Block margin 63
Font 54
Frame 59
Line effects 58
109
Mirror printing 64
Numbering 71
Repeat printing 70
Size 55
Stamp 65
Style 2 57
Style1 57
Tape length 62
Tape margin 62
Text alignment 60
Text rotation 61
Width 56
Delete key 51
Deleting
Barcode 49
File from memory 73
Text 51
Text and formats 51
Text lines 51
Description of machine 2
Diacritical marks 47
Dial 2, 43
Display clearing 51
Displaying text 42
Drying garments with labels 36
E
EAN128 special characters 99
Editing
Text 51
Emphasising 58
Ending line of text 45
Entering
Accented characters 45, 46
Barcodes 47
Blank space 44
Composite characters 47
Special characters 45
Symbols or pictures 46
Text 44
Uppercase letters 44
Erasing
File from memory 73
Text 51
Text and formats 51
Text lines 51
Error messages 83
Euro conversion function 49
Exchange rates 49, 50
110
F
Fabric tape 37
Feed&Cut key 69
Font function 54
Format functions
Block 53
Global 52
Format templates 65
Formatting
Entire text 52
Text 52
Text automatically 65
Text blocks 53
Frame function 58
Framing 58
Function dial 43
Functions
Accent 46
Auto cut 68
Auto format 65
Barcode 47
Block format 53
Block length 63
Block margin 63
Clear 51
Euro conversion 49
Font 54
Frame 58
Global format 52
Layout preview 68
Line effect 58
Line out 51
Mirror printing 64
New Block 45
Numbering 70
Repeat printing 69
Size 54
Stamp 64
Style 1 56
Style 2 57
Symbol 46
Tape length 62
Tape margin 61
Text alignment 59
Text rotation 60
Width 55
G
Global format functions 52
Grip 2
H
Handle 2
Hardware specifications 93
Highlighting 58
I
Incremental printing 70
Indicators
Alt 45
Auto cut 68
Caps 44
Font 54
Frame 58
Ins 44
Line effects 58
Size 54
Style 56, 57
Tape length 62
Tape margin 61
Text Alignment 59
Text alignment 59
Text rotation 60
Width 55
Ink stamps 37
Ins indicator 44
Insert key 44
Insert mode 44
Inserting text 44
Installing
P-touch Editor 11, 12
Tape cassette 9
Ironing garments with labels 37
Iron-on transfer tape 36
Italic text style 57
J
Justify text 59
K
Keyboard 2, 4
L
Label, attaching 36
Laminated tape 36
Layout preview function 68
LCD display 2, 3
Left alignment 59
Line effects function 58
Line out function 51
Lines of text 45
Lowercase letters 44
M
Macintosh operating systems 20
Maximum
Memory 71
Number of blocks 45
Number of characters in memory 71
Number of lines 45
Text size 55
Memory functions 71
Mirror printing function 64
Modes
Alt 45
Caps 44
Insert 44
Multiple copies 69
N
Navigation dial 2
New Block function 45
New line 45
Non-laminated tape 36
Numbering function 70
O
Operating systems 11
Overwriting stored files 72
P
PARAMETER menu 48
PC operating systems 11
PC, connecting to 10
Picture, add to text 46
Pictures 96
Power key 9
Precautions 8
Previewing 68
Print head cleaning 91
Print key 69
Printing 69
Auto format template file from memory 75
Multiple copies 69
Text file from memory 74
Problems & solutions 89
P-touch Editor 12
Installing 11
Starting 28
P-touch Quick Editor 14
111
Starting 30
Punctuation marks 45, 96
Q
Quitting functions 43
R
Recalling text file 73
Release button 2
Removing
Text 51
Text and formats 51
Text lines 51
Repeat printing function 69
Replacing tape cassette 9
Return key 43, 45
Right alignment 59
Roller cleaning 91
Rotating text 60
RS-232C port (PT-9600) 2
S
Saving text file 72
Selecting function or setting 43
Set key 43
Shift key 44
Signs 46, 96
Size function 54
Software
Installing 11
Starting 28, 30
Space bar 44
Special characters
Barcode 99
Entering 45
Specifications 93
Stamp function 64
Stamp kits 113
Stamp, assembling 37
Striking out 58
Style1 function 56
Style2 function 57
Supplies 113
Symbol function 46
Symbol key 46
Symbols 46, 96
System configuration 11, 20
T
Tape
112
Fabric 37
Iron-on transfer 36
Laminated 36
Non-laminated 36
Tape cassette
Installing 9
Replacing 9
Tape compartment cover 2
Tape exit slot 2
Tape length function 62
Tape margin function 61
Tapes 113
Template text
Editing 67
Entering 66
Printing 66, 76
Style 66, 76
Text alignment function 59
Text formats 52
Text rotation function 60
Transferring
Text to fabric 36
Troubleshooting 89
Turning power on/off 9
TYPE parameter 47
Typing text 44
U
UNDER# parameter 48
Underlining 58
Uppercase letters 44
USB port 10
V
Vertical text style 57
W
Washing garments with labels 36
Width function 55
WIDTH parameter 47
ACCESSORIES
Obtain tape cassettes from your nearest authorised dealer.
Use only Brother TZ tapes with this machine. Brother cannot be held responsible for trouble caused
by the use of unauthorised supplies. Do not use tapes that do not have the
Stock No.
mark.
Description
36 mm laminated tapes
TZ-161
Black characters on clear adhesive
TZ-261
Black characters on white adhesive
TZ-461
Black characters on red adhesive
TZ-561
Black characters on blue adhesive
TZ-661
TZ-M961
Black characters on yellow adhesive
Black characters on silver (mat) adhesive
TZ-262
Red characters on white adhesive
TZ-263
Blue characters on white adhesive
TZ-364
Gold characters on black adhesive
TZ-164
Gold characters on clear adhesive
TZ-365
White characters on black adhesive
TZ-165
White characters on clear adhesive
24 mm laminated tapes
TZ-151
Black characters on clear adhesive
TZ-M51
Black characters on clear (mat) adhesive
TZ-M951
Black characters on silver (mat) adhesive
TZ-251
Black characters on white adhesive
TZ-451
Black characters on red adhesive
TZ-551
Black characters on blue adhesive
TZ-651
Black characters on yellow adhesive
TZ-751
Black characters on green adhesive
TZ-951
Black characters on silver adhesive
TZ-A51
Black characters on grey adhesive
TZ-E51
Black characters on pink adhesive
TZ-C51
Black characters on fluorescent yellow adhesive
TZ-B51
Black characters on fluorescent orange adhesive
TZ-D51
Black characters on fluorescent green adhesive
TZ-152
Red characters on clear adhesive
TZ-252
Red characters on white adhesive
TZ-153
Blue characters on clear adhesive
TZ-253
Blue characters on white adhesive
TZ-354
Gold characters on black adhesive
TZ-155
White characters on clear adhesive
TZ-355
White characters on black adhesive
TZ-455
White characters on red adhesive
TZ-555
White characters on blue adhesive
113
Stock No.
Description
TZ-655
White characters on orange fluorescent adhesive
TZ-755
White characters on green adhesive
18 mm laminated tapes
TZ-141
Black characters on clear adhesive
TZ-241
Black characters on white adhesive
TZ-242
Red characters on white adhesive
TZ-243
Blue characters on white adhesive
TZ-344
Gold characters on black adhesive
TZ-145
White characters on clear adhesive
TZ-345
White characters on black adhesive
TZ-441
Black characters on red adhesive
TZ-541
Black characters on blue adhesive
TZ-641
Black characters on yellow adhesive
TZ-741
Black characters on green adhesive
TZ-E41
Black characters on pink adhesive
12 mm laminated tapes
TZ-131
Black characters on clear adhesive
TZ-132
Red characters on clear adhesive
TZ-133
Blue characters on clear adhesive
TZ-135
White characters on clear adhesive
TZ-231
Black characters on white adhesive
TZ-232
Red characters on white adhesive
TZ-233
Blue characters on white adhesive
TZ-334
Gold characters on black adhesive
TZ-335
White characters on black adhesive
TZ-431
Black characters on red adhesive
TZ-435
White characters on red adhesive
TZ-531
Black characters on blue adhesive
TZ-535
White characters on blue adhesive
TZ-631
Black characters on yellow adhesive
TZ-635
White characters on orange adhesive
TZ-731
Black characters on green adhesive
TZ-735
White characters on green adhesive
TZ-931
Black characters on silver adhesive
TZ-A31
Black characters on grey adhesive
TZ-B31
Black characters on fluorescent orange adhesive
TZ-C31
Black characters on fluorescent yellow adhesive
TZ-D31
Black characters on fluorescent green adhesive
TZ-E31
Black characters on pink adhesive
TZ-M31
Black characters on clear (mat) adhesive
TZ-M931
Black characters on silver (mat) adhesive
9 mm laminated tapes
TZ-121
114
Black characters on clear adhesive
Stock No.
Description
TZ-122
Red characters on clear adhesive
TZ-123
Blue characters on clear adhesive
TZ-221
Black characters on white adhesive
TZ-222
Red characters on white adhesive
TZ-223
Blue characters on white adhesive
TZ-324
Gold characters on black adhesive
TZ-325
White characters on black adhesive
TZ-421
Black characters on red adhesive
TZ-521
Black characters on blue adhesive
TZ-621
Black characters on yellow adhesive
TZ-721
Black characters on green adhesive
TZ-A25
White characters on grey adhesive
TZ-E21
Black characters on pink adhesive
TZ-M21
Black characters on clear (mat) adhesive
6 mm laminated tapes
TZ-111
Black characters on clear adhesive
TZ-211
Black characters on white adhesive
TZ-315
White characters on black adhesive
TZ-611
Black characters on yellow adhesive
24 mm non-laminated tapes
TZ-N251
Black characters on white adhesive
115
Stock No.
Description
18 mm non-laminated tapes
TZ-N241
Black characters on white adhesive
TZ-N242
Red characters on white adhesive
TZ-N243
Blue characters on white adhesive
TZ-N541
Black characters on blue adhesive
TZ-N641
Black characters on yellow adhesive
TZ-N741
Black characters on green adhesive
TZ-NF41
Black characters on purpul adhesive
TZ-PH41
Black characters on adhesive with a heart design
TZ-PF41
Black characters on adhesive with a fruit design
TZ-PM41
Black characters on adhesive with a marine design
12 mm non-laminated tapes
TZ-N231
Black characters on white adhesive
TZ-N232
Red characters on white adhesive
TZ-N233
Blue characters on white adhesive
TZ-N531
Black characters on blue adhesive
TZ-N631
Black characters on yellow adhesive
TZ-N731
Black characters on green adhesive
TZ-NF31
Black characters on purple adhesive
9 mm non-laminated tapes
TZ-N221
Black characters on white adhesive
6 mm laminated tapes
TZ-N211
Black characters on white adhesive
Strong adhesive tapes
Stock No.
TZ-S161
116
Description
36 mm strong adhesive tape (black characters on clear adhesive)
TZ-S261
36 mm strong adhesive tape (black characters on white adhesive)
TZ-S661
36 mm strong adhesive tape (black characters on yellow adhesive)
TZ-S151
24 mm strong adhesive tape (black characters on clear adhesive)
TZ-S251
24 mm strong adhesive tape (black characters on white adhesive)
TZ-S651
24 mm strong adhesive tape (black characters on yellow adhesive)
TZ-S141
18 mm strong adhesive tape (black characters on clear adhesive)
TZ-S241
18 mm strong adhesive tape (black characters on white adhesive)
TZ-S641
18 mm strong adhesive tape (black characters on yellow adhesive)
TZ-S131
12 mm strong adhesive tape (black characters on clear adhesive)
TZ-S231
12 mm strong adhesive tape (black characters on white adhesive)
TZ-S631
12 mm strong adhesive tape (black characters on yellow adhesive)
TZ-S121
9 mm strong adhesive tape (black characters on clear adhesive)
TZ-S221
9 mm strong adhesive tape (black characters on white adhesive)
TZ-S621
9 mm strong adhesive tape (black characters on yellow adhesive)
TZ-S111
6 mm strong adhesive tape (black characters on clear adhesive)
TZ-S211
6 mm strong adhesive tape (black characters on white adhesive)
Stock No.
TZ-S611
Description
6 mm strong adhesive tape (black characters on yellow adhesive)
Special tapes
Stock No.
SK-151
Description
Medium stamp stencil tape
SK-141
Large stamp stencil tape
TZ-IY41
18 mm iron-on transfer tape (black characters)
TZ-SE4
18 mm security tape (black characters on white adhesive)
TZ-FA4
18 mm fabric tape (blue characters on white fabric)
TZ-FA3
12 mm fabric tape (blue characters on white fabric)
Options
Stock No.
Description
TZ-CL6
Print head cleaning cassette
CC9000
Carrying case for PT-3600, PT-9600
BA9000
Rechargeable battery for PT-9600
117
Printed in China
LA8772001