1
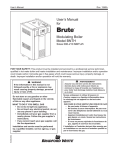
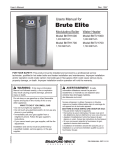
Atmospheric Gas Water Heaters
SERVICE
MANUAL
Troubleshooting Guide
and Instructions for Service
(To be performed ONLY by qualified service providers)
Models Covered
by This Manual :
GX225S*BN
GX155S*BN
25X78B*N
55X80B*N
M1XR65T*(BN,CX)
MI75S*(BN,CX)
M2XR75S*(BN,CX)
MI100T*(BN,CX)
65T65*(BN,CX)
75T80*(BN,CX)
(*) Denotes Warranty Year
Manual 238-46647-00A
Save this manual for future reference
Table of Contents
Page
Service Procedure
Trouble shooting Chart
3
---
Thermocouple Testing and Replacement
4
AG-I
Pilot Assembly Inspection Cleaning and Replacement
5
AG-II
Combination Thermostat/Gas Valve Testing and Replacement
6
AG-III
Burner Operation Inspection, Adjustment, Cleaning and Replacement
10
AG-IV
Dip Tube and Anode Inspection and Replacement
13
AG-V
Page 2
2
Troubleshooting Chart
SYMPTOM
Pilot will not light
Pilot will not
stay lit
when button is
released
Pilot will light, but
the main burner
will not come on
Pilot goes out
periodically (after
heating cycles,
once a day, once
a week etc.)
Not enough hot
water
PROBABLE CAUSE
CORRECTIVE ACTION
1. No incoming gas or too low gas
pressure.
2. Gas control knob set to wrong position.
3. Pilot light button not being fully
depressed when attempting to light pilot.
4. Pilot orifice or pilot tube is obstructed or
kinked.
1. Turn on gas supply and/or check line
pressure.
2. Review lighting instruction. Set
combination/thermostat
gas valve to correct position.
3. Review lighting instruction. Fully depress
pilot lighting button.
4. Clean, repair or replace.
1. Poor thermocouple connection at
combination thermostat/gas valve.
2. Thermocouple not fully engaged in pilot
assembly bracket.
3. Pilot flame is not fully enveloping the
thermocouple “hot” junction.
4. Weak or defective thermocouple.
5. Open ECO on combination thermostat/
gas valve.
6. Defective magnet in combination
thermostat/gas valve.
1. Check connection at combination
thermostat/gas valve. Proper tightness
should be finger tight plus ¼ turn.
2. Inspect thermocouple to ensure that it is
fully engaged into pilot bracket.
3. Adjust tip of thermocouple to be fully
engulfed by pilot flame.
4. Check thermocouple and replace if
necessary.
5. Check ECO continuity and replace
combination thermostat/gas valve if
necessary.
6. Check magnet operation and replace
combination thermostat/gas valve if
necessary.
1. Combination thermostat/gas valve set too
low for desired water temperature.
2. Combination thermostat/gas valve
temperature is satisfied.
3. Insufficient gas supply or low gas
pressure.
4. Combination thermostat/gas valve has
wide differential or is out of calibration.
1. Adjust temperature dial on combination
thermostat/gas valve.
2. Check temperature dial setting on
combination thermostat/gas valve.
3. Check gas supply and line pressure.
4. Check combination thermostat/gas valve
for proper operation, replace if
necessary.
1. Insufficient combustion air supply.
2. Incorrect, clogged vent system/ vent
terminal or location.
3. Inconsistent gas supply or gas pressure.
1. Combination thermostat/gas valve set too
low for desired water temperature.
2. Cold inlet water temperature is very cold.
3. High demand periods.
4. Incorrectly sized water heater for
application.
5. Combination thermostat/gas valve is out
of calibration/not functioning.
6. Out of spec dip tube is diluting hot water
with cold water.
7. Integrated mixing device is set too low for
desired water temperature.
1. Verify adequate combustion air is available
to the unit. Check and clear Jacket slot
openings of any dirt, dust, restrictions or
other obstructions.
2. Check venting for proper sizing and proper
operation
3. Check gas supply and line pressure.
1. Check dial on combination thermostat/gas
valve.
2.Extremely cold water going into the heater
will decrease the amount of hot water
produced. It may be necessary to temper
incoming water supply.
3. Adjust high demand usage.
4. Contact Plumbing professional.
5. Check combination thermostat/gas valve
for proper operation, replace if
necessary.
6. Inspect dip tube and replace if necessary.
7. Reset device using the procedure
in the instructions included with the device.
Page 3
3
SERVICE
PROCEDURE
1. See Service Procedure
AG-III, Page 6.
4. See Service Procedure
AG-II, Page 5.
4. See Service Procedure
AG-I, Page 4
5. See Service Procedure
AG-III, Page 6
6. See Service Procedure
AG-III, Page 6
2. See Installation &
operation manual.
3. See Service Procedure
AG-III, Page 6
4. See Service Procedure
AG-III, Page 6
3. See Service Procedure
AG-III, Page 6
5. See Service Procedure
AG-III, Page 6
6. See Service Procedure
AG-V, Page 13
SERVICE PROCEDURE AG-I
Thermocouple Testing and Replacement
OPEN CIRCUIT THERMOCOUPLE TESTING
Step 1.
Disconnect thermocouple from combination thermostat/gas valve.
Step 2.
Using a multimeter capable of measuring millivolts, connect
one alligator clip to the end ball or contact portion of the
thermocouple, and the other alligator clip to copper portion of
the thermocouple.
Step 3.
Following the lighting instruction label on the heater, proceed to light the pilot and allow to operate for
three minutes. It will be necessary to hold the pilot button down continuously throughout this test.
A reading of 20 to 30 millivolts indicates good thermocouple output.
THERMOCOUPLE REPLACEMENT
Step 1.
Turn off gas supply to water heater. Rotate knob of combination
thermostat/gas valve to “OFF” position.
For Robertshaw Control, rotate
knob clockwise to the “OFF”
position.
For White Rodgers Control,
depress knob slightly and rotate
clockwise to the “OFF” position.
Step 2.
Remove outer jacket door.
Step 3.
Slide open inner combustion chamber door.
Step 4
Disconnect thermocouple from combination thermostat/gas valve (3/8" wrench). Locate other end of
thermocouple inside of combustion chamber and remove from pilot bracket. Pull firmly pulling away
from the pilot assembly.
Step 5.
Install new thermocouple into pilot bracket making certain the thermocouple is fully engaged into the pilot
bracket. Connect other end of thermocouple to combination thermostat/gas valve (finger tight + ¼ turn).
Step 6.
Route carefully through the relief opening in the combustion chamber skirt.
Step 7.
To resume operation follow the instructions located on the lighting instruction label or the lighting
instructions located in the installation and operation manual.
Step 8.
Slide inner door closed when finished.
Thermocouple position
Page 4
4
SERVICE PROCEDURE AG-II
Pilot Assembly Inspection, Cleaning
and Replacement
R
PILOT ASSEMBLY INSPECTION,
CLEANING AND REPLACEMENT
For White Rodgers Control,
depress knob slightly and rotate
clockwise to the “OFF” position.
Step 1.
Turn off gas supply to water heater. Rotate knob
of combination thermostat/gas valve
to “OFF” position.
Step 2.
Remove outer jacket door.
Step 3.
Slide open inner combustion chamber door.
Step 4
Disconnect thermocouple (3/8" wrench), pilot tube (7/16" wrench),
and feedline (¾" wench) from combination thermostat/gas valve.
For Robertshaw Control, rotate
knob clockwise to the “OFF”
position.
NOTE: Feedline nut for natural gas control
uses right hand threads, LP control uses left hand thread.
Step 5
Remove burner assembly from combustion chamber.
Step 6.
Remove pilot assembly from feedline (¼" drive tool)
Step 7.
Inspect pilot for the following:
Feedline
Nut
a) Primary air openings for blockage. Must be free from any
debris (dirt, lint, etc).
b) Kinks or cracks in the pilot tube. If found,
the pilot must be replaced.
Step 8.
Inspect pilot orifice:
Primary Air
Opening
a) Remove ½" nut from bottom of pilot assembly.
b) Remove pilot tube and pilot orifice.
c) inspect pilot orifice for blockage, must be cleaned or replaced.
Pilot Orifice
Step 9.
Install pilot assembly to feedline, secure with screw from step 7.
Step 10.
Re-Install burner assembly into combustion chamber, connect feedline, pilot tube and thermocouple
to combination thermostat/gas valve.
Step 11.
Slide inner combustion chamber door closed and re-attach outer jacket door.
Step 12.
To resume operation follow the instructions located on the lighting instruction label or the lighting
instructions located in the installation and operation manual.
Page 5
5
SERVICE PROCEDURE AG-III
Combination Thermostat/Gas Valve
Testing and Replacement
Combination Thermostat/Gas Valve Testing and Replacement
The combination thermostat/gas valve is a non repairable device. If trouble shooting has determined a problem with the
combination thermostat/gas valve, it must be replaced.
If the burner and/or pilot do not function, service checks for gas pressure, thermocouple output, magnet assembly and
ECO are to be performed. If these check OK, the combination thermostat/gas valve may be faulty.
LINE PRESSURE
The combination thermostat/gas valve is designed for a maximum line pressure of 14.0" w.c. and a minimum line
pressure of 1.0"w.c. over the water heater rated manifold pressure. Line pressure must be checked with burner on and
burner off to assure proper readings.
MANIFOLD PRESSURE TESTING (this procedure assumes a maximum line pressure of 14.0" w.c.)
Step 1.
Set combination thermostat/gas valve to “OFF” position.
Step 2.
Remove pressure tap plug (3/16" Allen wrench) and install
pressure tap (7/16" wrench)
Step 3.
Connect manometer to pressure tap.
Step 4
Follow lighting instructions and proceed to light
main burner and observe manometer reading.
Step 5
Proper operating range for natural gas is 4.0 ±0.3" W.C.
Proper operating range for L.P. gas is 10.0 ±0.5" W.C.
Step 6
If pressure is OK, set combination thermostat/gas valve to “OFF”
remove manometer and pressure tap and replace pressure tap plug. Check for gas leaks before placing water
heater back in operation. If pressure is out of the specification noted in step 5, proceed to step 7 or 8 for proper
service procedure.
Step 7
For White Rodgers control, the manifold pressure is not adjustable. If manifold pressure is outside the range
in step 5, the control must be replaced.
Step 8
For Robertshaw control, the manifold pressure is adjustable, proceed to step 9 for adjustment procedure
Step 9
While burner is in operation, remove regulator access cap to expose the regulator adjusting screw. With small
screw driver, rotate adjusting screw clockwise to increase pressure and counter clockwise to decrease pressure.
Step 10
Replace regulator access cap, set combination thermostat/gas valve to “OFF”. Remove manometer and
pressure tap and replace pressure tap plug. Check for gas leaks before placing water heater back in operation.
Page 6
6
Pressure Tap
Shown Installed
SERVICE PROCEDURE AG-III
Combination Thermostat/Gas Valve
Testing and Replacement
THERMOCOUPLE TESTING
See SERVICE PROCEDURE AG-I
MAGNET ASSEMBLY TESTING (White Rodgers Control)
Step 1.
Following the lighting instruction label on the heater, proceed to light the pilot and allow to operate for
three minutes. If the pilot will not stay lit, hold the pilot button (located on the combination
thermostat/gas valve) down during this test
Step 2.
Using a multimeter capable of measuring millivolts, connect one lead
using an alligator clip to the copper sheath of the thermocouple, use the second lead of the multi meter to
probe the top terminal located at the back of the combination thermostat/gas valve.
Probe top terminal on
back of combination
thermostat/gas valve
Alligator clip to copper
sheath of thermocouple
Step 6.
With a meter reading of 13 millivolts or greater, rotate knob of combination thermostat/gas valve to the
“OFF” position.
Step 7.
The magnet should remain closed for a drop of at least 6 millivolts. You will here a “snap” or “click” sound
when the magnet opens, if you hear this sound prior to a drop of 6 millivolts, the magnet is out of
specification and the combination thermostat/gas valve should be replaced.
MAGNET ASSEMBLY TESTING (Robertshaw Control)
Step 1.
Disconnect thermocouple from combination thermostat/gas valve.
Step 2.
Connect a thermocouple adaptor
(Robertshaw P/N 75036) at the thermocouple location
in the combination thermostat/gas valve.
Step 3.
Reconnect thermocouple to adaptor. Make certain all connections
are tight (finger tight plus ¼” turn).
Step 4
Using a multimeter capable of measuring millivolts, connect one
alligator clip to the set screw of the adaptor and the other alligator
clip to copper portion of the thermocouple.
Step 5.
Following the lighting instruction label on the heater, proceed to light the pilot and allow to operate for
three minuets.
Step 6.
With a meter reading of 13 millivolts or greater, rotate knob of combination thermostat/gas valve to the
“OFF” position.
Step 7.
The magnet should remain closed for a drop of at least 6 millivolts. You will here a “snap” or “click” sound
when the magnet opens, if you hear this sound prior to a drop of 6 millivolts, the magnet is out of
specification and the combination thermostat/gas valve should be replaced.
Page 7
7
SERVICE PROCEDURE AG-III
Combination Thermostat/Gas Valve
Testing and Replacement
ECO (Energy Cut Off) TESTING
Step 1.
Disconnect thermocouple from combination thermostat/gas valve.
Step 2.
Using a multimeter capable of measuring Ohms (or continuity),
attach one lead (alligator clip) to the pilot tube. Insert the other lead
(probe) fully into the magnet opening, Be sure the probe makes
contact only at the top center of the magnet opening. Do not allow
the probe to make contact with the threaded sides of the opening.
Step 3.
If continuity is indicated, the ECO is OK. If continuity is not indicated, the ECO has opened and the
combination thermostat/gas valve must be replaced.
COMBINATION THERMOSTAT/GAS VALVE REPLACEMENT
Step 1. Rotate knob of the combination thermostat/gas valve
to the “OFF” position.
Step 2. Turn off gas supply to water heater.
Step 3. Disconnect gas supply line from
combination thermostat/gas valve.
Step 4. Turn off water supply and drain water heater completely.
Step 5. Remove outer jacket burner access door.
Step 6. Slide open inner combustion chamber door.
Page 8
8
For White Rodgers Control,
depress knob slightly and rotate
clockwise to the “OFF” position.
For Robertshaw Control, rotate
knob clockwise to the “OFF”
position.
SERVICE PROCEDURE AG-III
Combination Thermostat/Gas Valve
Testing and Replacement
Step 7. Removal of combination thermostat/gas valve.
a) Disconnect main burner feedline (¾” wrench), pilot tube (7/16" wrench) and thermocouple (3/8" wrench)
from combination thermostat/gas valve & remove burner from combustion chamber.
NOTE: Feed line nut for natural gas control uses right hand threads,
LP control uses left hand thread.
b) Remove Combination Thermostat/Gas Valve from heater,
rotating counter clockwise using a control body wrench or a
length of ½" NPT pipe threaded into inlet of control.
Wrench Boss
To remove or install control, insert
only ½" NPT threaded pipe into inlet
and use to loosen or tighten control.
Step 8. Installation of Combination Thermostat/Gas Valve.
a) Install new combination thermostat/gas valve using a control body wrench or a length of ½" NPT
pipe threaded into inlet of control. DO NOT OVER TIGHTEN. Use caution not to damage cast
aluminum body of combination thermostat/gas valve. Be certain not to damage the bundled wire
leads.
NOTE: Combination thermostat/gas Valve must be installed in proper upright position to
assure the feedline will align properly at the inner door flange.
DO NOT OVER TIGHTEN. If control is turned past proper alignment, do not
reverse direction to align.
b) Reattach main burner feedline, pilot tube and thermocouple to combination thermostat/gas valve.
NOTE: Feedline nut for natural gas control uses right hand threads,
LP control uses left hand thread.
c) Connect gas supply piping to inlet of control. Use back up wrench on wrench boss of control, never
use back up wrench on body of control.
Step 9.
Reconnect gas supply to Combination Thermostat/Gas Valve.
Step 10.
Resume water supply to water heater. Be sure tank is full of water.
Step 11.
Slide inner combustion chamber door closed
Step 12.
Re-attach outer jacket door.
Step 13.
To resume operation follow the instructions located on the lighting instruction label or the lighting instructions
located in the installation and operation manual.
Page 9
9
SERVICE PROCEDURE AG-IV
Burner Operation Inspection, Adjustment
Cleaning and Replacement
R
MAIN BURNER: Inspection, Adjustment,
Cleaning and Replacement
At periodic intervals (not more then 6 months) a visual inspection should be made of the main burner for proper operation
and to insure no debris accumulating.
Main burner should light smoothly from pilot and burn with a blue flame with a minimum of yellow tips.
Steel burner models have a self adjusting air mixture and do not have an adjustable air shutter. Cast iron burner can have
the gas and air mixture properly proportioned by adjusting the air shutter on the mixer face of the main burner (see step 2
below).
Main burner must be free from any debris accumulation that may effect burner operation (see burner cleaning procedure
in this manual).
CAST IRON BURNER ADJUSTMENT
WARNING
Inner door and burner components may be HOT when performing this operation. Take
necessary precaution to prevent personal injury.
Step 1.
With main burner in operation slide the inner combustion chamber door open.
Step 2.
To adjust for proper burning, loosen the air shutter nut, rotate the shutter to close the opening in the burner,
then slowly rotate the shutter until the yellow tips are minimized. Tighten the air shutter nut. Too much air
will cause the flame to lift off the burner ports and create noisy burner operation. Too little air may result
in soot formation.
Air Shutter Nut
Page 10
10
SERVICE PROCEDURE AG-IV
Burner Operation Inspection, Adjustment
Cleaning and Replacement
MAIN BURNER: Inspection, Adjustment,
Cleaning and Replacement (cont.)
Step 3.
Fully inspect combustion chamber for debris or carbon build up.
Step 4.
Burner should operate as adjusted in step 2, if not, repeat procedure compensating air shutter position for
proper burner operation with inner door closed.
Step 5.
It may be necessary to clean main burner or main burner orifice to achieve proper burner operation. If
cleaning is required proceed to burner cleaning section in this procedure.
BURNER CLEANING (Steel & Cast Iron)
Step 1.
Slide open inner combustion chamber door.
Step 2.
Disconnect main burner feed line (¾” wrench), pilot tube (7/16" wrench) and thermocouple (3/8") wrench
from combination thermostat gas valve and remove burner assembly from combustion chamber.
NOTE: Feedline nut for natural gas control uses right hand threads,
LP control uses left hand thread.
Step 3.
Thoroughly inspect burner surface area and burner ports and remove any loose debris accumulation.
Burner Surface Area
Burner Port Area
Step 4.
Burner Venturi
Opening
On cast iron burners, inspect
for any debris build up inside
burner venturi. If found,
disconnect feedline from burner
and remove debris build up.
Feedline
Page 11
11
SERVICE PROCEDURE AG-IV
Burner Operation Inspection, Adjustment
Cleaning and Replacement
BURNER CLEANING (Cont.)
Step 5.
Disconnect (unscrew) Main burner (stamped steel burner) from main
burner orifice or on cast iron burners, loosen air shutter &
disconnect (unscrew) feedline from burner.
Step 6.
Remove main burner orifice from feed line (½” wrench on steel
burner, 3/8" wrench on cast iron). Inspect and clean if necessary.
Step 7.
Inspect pilot assembly per service procedure AG-II.
Step 8.
Reassemble burner.
Step 9.
Inspect combustion chamber area of heater and clean if needed prior to reinstallation of burner assembly.
Step 10.
Reinstall burner assembly into combustion chamber, reconnect feedline, thermocouple and pilot tube to
the combination thermostat/gas valve.
Step 11.
Slide inner combustion chamber door closed and reattach outer jacket door.
Step 12.
To resume operation, follow the instructions located on the lighting instruction label or the lighting
instructions located in the installation and operation manual.
Page 12
12
SERVICE PROCEDURE AG-V
Dip Tube and Anode
Inspection and Replacement
R
DIP TUBE INSPECTION AND REPLACEMENT
WARNING
Heater components and stored water may be HOT when performing the following steps in
this procedure. Take necessary precaution to prevent personal injury.
Step 1.
Rotate knob of combination thermostat/gas valve to “OFF” position.
For White Rodgers Control,
depress knob slightly and rotate
clockwise to the “OFF” position.
For Robertshaw Control, rotate
knob clockwise to the “OFF”
position.
Step 2.
Turn off cold water supply to heater. Connect hose to drain spigot of water heater and route to an open drain.
Open a nearby hot water faucet to vent heater for draining. Open drain spigot on water heater and allow
heater to drain to a point below the inlet connection nipple.
Step 3.
Disconnect inlet nipple from plumbing system.
Step 4
With an appropriate wrench, remove inlet nipple/dip tube from the water heater. Use caution not to damage
nipple threads.
Step 5.
Visually Inspect inlet nipple/dip tube. Inlet nipple/dip tube should be free of cracks and any blockage.
Hydro-jets (small curved openings) should be open and free of any blockage.
Anti-siphon hole located approximately 6" from the bottom of nipple, should be free of any blockage.
Any damage such as cracks, restriction due to deformation or unintentional holes are not field repairable
and the inlet nipple/dip tube must be replaced.
Step 6.
Upon completion of inspection or subsequent replacement, reinstall inlet nipple/dip tube into heater. Connect
nipple to plumbing system, resume water supply and refill heater with water.
Step 7.
To resume operation follow the instructions located on the lighting instruction label or the lighting instructions
located in the installation and operation manual.
Page 13
13
SERVICE PROCEDURE AG-V
Dip Tube and Anode
Inspection and Replacement
ANODE INSPECTION AND REPLACEMENT
WARNING
Heater components and stored water may be HOT when performing the following steps in
this procedure. Take necessary precaution to prevent personal injury.
Step 1.
Turn off water supply to water heater. Rotate knob of combination thermostat/gas valve to “OFF” position.
For White Rodgers Control,
depress knob slightly and rotate
clockwise to the “OFF” position.
For Robertshaw Control, rotate
knob clockwise to the “OFF”
position.
Step 2.
Turn off cold water supply to heater. Connect hose to drain spigot of water heater and route to an open drain.
Open a nearby hot water faucet to vent heater for draining. Open drain spigot on water heater and allow
heater to drain to a point below the outlet connection nipple.
Step 3.
Disconnect outlet nipple from plumbing system.
Step 4
With an appropriate wrench, remove outlet nipple/anode from the water heater. Use caution not to damage
nipple threads.
Step 5.
Visually Inspect outlet nipple/anode. Outlet nipple/anode should show signs of depletion, this is normal.
If depletion is ½ of the original anode diameter (approximately ¾” diameter), replacement is recommended.
If any of the steel core of the anode is exposed, replacement is recommended.
Step 6.
Upon completion of inspection or subsequent replacement, reinstall outlet nipple/anode into heater. Connect
nipple to plumbing system, resume water supply and refill heater with water.
Step 7.
To resume operation, follow the instructions located on the lighting instruction label or the lighting
instructions located in the installation and operation manual.
Page 14
14
NOTES
15
Application & Sizing/800-523-2931
Fax/215-641-1612
Email
[email protected]
[email protected]
www.bradfordwhite.com
www.bradfordwhitecanada.com