1
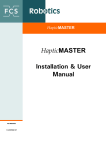
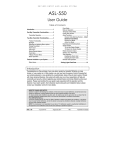
Keyless Entry And Alarm System
User Guide
Table of Contents
Introduction ....................................1
One-Way Transmitter
Functionalities ................................2
Transmitter Operation ....................2
Two-Way Transmitter Functions at
a Glance.........................................3
LCD Transmitter Operation ............3
Basic Vehicle Operation.................3
Transmitter Mode Selection ...........3
Parking Countdown........................4
Time or Alarm Clock Adjustments..4
Features Available on your System5
Relock doors ..................................5
Panic Mode ....................................5
Multi-car Operation.........................5
Temporary Chirp Delete................. 5
Priority Door Access ...................... 6
Alarm Functions............................. 6
Passive Arm Mode......................... 6
Active Arm Mode ........................... 6
Disarming and Unlocking Doors..... 6
Starter Disable ............................... 6
To Arm the Starter Disable ............ 6
To Disarm the Starter Disable........ 6
Retain Accessory Output ............... 7
System L.E.D. Flash Rate.............. 7
Valet Operation.............................. 7
Remote Valet Operation ................ 7
Parking Lights Flash Rate.............. 8
Introduction
Congratulations on the purchase of your new alarm system by Autostart! Whether you have chosen a 1-way
system or a 2-Way system, you can now have the peace of mind of knowing that your prized possession is now
protected by a sophisticated, state of the art alarm system. Packed with many advanced features, this system
will satisfy any one of your expectations of high-end commodity and security, without neglecting any standard
feature commonly offered by entry-level systems. Please read carefully this user guide to get acquainted with
the operation and the features of your alarm system. Some features require extra parts and installation labour,
please contact your installation centre for more details.
INDUSTRY CANADA USER NOTICE:
Operation is subject to the following two conditions: (1) this device may not cause
interference, and (2) this device must accept any interference, including interference that may
cause undesired operation of the device.
To reduce potential radio interference to other users, the antenna type and its gain should be
so chosen that the equivalent isotropically radiated power (EIRP) is not more than that
required for successful communication.
FCC USER NOTICE (U.S.A.):
This device complies with Part 15 of the FCC Rules. Operation is subject to the following two
conditions: (1) this device may not cause harmful interference, and (2) this device must
accept any interference received, including interference that may cause undesired operation.
NOTE: The manufacturer is not responsible for any radio or TV interference caused by
unauthorized modifications to this equipment. Such modifications could void the user's
authority to operate the equipment.
DOC: 1.04
TL
April 12, 2006
Manufactured in Canada
One-Way Transmitter Functionalities
Picture serves as example only.
1.
button:
Locks the doors and arms the module (starter kill and alarm), or activates panic
mode if the button is held down for 4 seconds.
2.
button:
Unlocks the doors and disarms the module (starter kill and alarm), or activates
panic mode if the button is held down for 4 seconds.
3.
button:
4.
button:
a.
b.
To open the trunk: Press and hold for 3 sec.
Silent arming or disarming: press the TRUNK button once, then press the LOCK
or UNLOCK buttons within 3 seconds to lock or unlock the doors without chirp.
a.
b.
To activate the AUX 2 output: Press and hold.
Car Finder (If programmed): this will cause the parking lights to flash once and
the Horn or siren to chirp once
Transmitter Operation
BUTTON(S) to press
or
(while siren sounding)
(2 times)
(for 4 seconds)
(for 4 seconds)
(for 3 seconds)
+
(for 3 seconds)
P. 2
FUNCTION
Locks doors
Arms starter kill (Not in Alarm Valet)
Dome light OFF (If programmed)
Unlocks driver’s door
Disarms starter kill (Not in valet) – rearm timer at 60 sec.
Dome light ON for 60 sec. or until ignition goes ON or LOCK pressed (If
programmed)
• Mutes siren; system not disarmed. A second UNLOCK press is required to
disarm, unless the passive arming mode with no TWO-STAGE disarm is
selected.
•
•
•
•
•
•
• Unlocks all doors (If Priority door programmed)
AUX 2 or 1 flash and 1 chirp (If car finder was enabled)
Mutes siren — system not disarmed.
Locks doors
Enter panic mode – siren ON for 60 sec, valet ends
Unlocks doors
Enter panic mode – siren ON for 60 sec, valet ends
AUX 3 output, system disarmed with 1-sec pulse (trunk mode) or toggle ON
/ OFF (in latch mode)
• Mutes siren — system disarmed
•
•
•
•
•
•
•
• Valet ON or valet OFF
User Guide
Two-Way Transmitter Functionalities
Function Button:
. Turns On the backlight
. For accessing Multi-level functions
. Activates Panic mode if pressed
for more than 3 seconds
AUXILIARY Button:
. Use to select option 5 while
in programming mode
. Or to save settings while in
Siren/Horn adjustment mode
LOCK Button:
. Locks all Doors and arms the
Security system
. Activates Panic mode if
pressed for more than 4
seconds
TRUNK Button:
Activates the Trunk output
(AUX3)
UNLOCK Button:
. Unlocks all Doors and disarms
the Security system
. Activates Panic mode if press
for more than 4 seconds
Aux 2 Button:
Activates the Aux 2 output or
car finder (If enabled)
LCD Transmitter Operation
Basic Vehicle Operation
FUNCTION
BUTTON PRESSED
ICON
BUZZER
1 beep
Lock, arm and starter kill on
(if ignition is on, alarm will not
arm)
Unlock, disarm and starter kill
off
Trunk or Aux 3 output
No
1 beep
Aux 2 output
ICON
BUZZER
Lock
1 beep
Unlock
2 beeps
Trunk or Aux 3
Aux 2
INSTRUCTIONS /DESCRIPTION
Transmitter Mode Selection
FUNCTION
BUTTON PRESSED
POWER-SAVING
MODE
(
VIBRATION
MODE
ALARM CLOCK
MODE ON/OFF
User Guide
+ )
Melody
+
Vibrates 4X
+
Melody
INSTRUCTIONS
/DESCRIPTION
Press the UNLOCK button
then press FUNCTION and
LOCK simultaneously.
Press once to switch the
Alarm Clock ON
Press twice to switch the
Alarm Clock OFF
P. 3
Parking Countdown
FUNCTION
FOR
PARKING
COUNTDOWN
BY PRESSING
ICON
BUZZER
INSTRUCTIONS /
DESCRIPTION
+
1 time
Melody
10 MIN COUNT DOWN
+
2 times
Melody
20 MIN COUNT DOWN
+
3 times
Melody
30 MIN COUNT DOWN
+
4 times
Melody
60 MIN COUNT DOWN
+
5 times
Melody
90 MIN COUNT DOWN
+
6 times
Melody
120 MIN COUNT DOWN
+
7 times
Melody
PARKING COUNT DOWN
OFF
Current time
Time or Alarm Clock Adjustments
User
1. Press and hold the FUNCTION button until a
beep is heard.
2. Upon hearing the beep, release the FUNCTION
button.
3. Press and hold the FUNCTION button once
more.
4. Release the FUNCTION button when a beep is
heard.
5. Press and hold the FUNCTION button once
more until a beep is heard.
6. Release the FUNCTION button.
Transmitter
The backlight will turn on the moment the
FUNCTION button is pressed.
..................................
is displayed
..................................
is displayed
..................................
is displayed
7. At that point, press and hold the FUNCTION
.............The hour setting will starts to flash.
button until 2 beeps are heard.
Pressing the FUNCTION button
1X..................................................Adjust hour (current time)
2X..................................................Adjust minutes (current time)
3X..................................................Adjust hour (Alarm)
4X..................................................Adjust minutes (Alarm)
5X..................................................Melody selection for the ringing of the alarm
6X..................................................Activate (ON) / Deactivate (OFF) Alarm
7X..................................................Adjust hour (countdown)
8X..................................................Adjust minutes (countdown)
9X..................................................Melody selection for the countdown
10X................................................Activate (ON) / Deactivate (OFF) countdown
a.
Press the
button to increase the value or to activate or deactivate a function or to toggle
through the melodies.
b.
c.
P. 4
Press the button to decrease the value or to activate or deactivate a function or to toggle
through the melodies.
To save modifications, do not touch any buttons for approx. 10 to 15 seconds. There will be a
beep and the display will return to the time.
User Guide
Features Available on your System
Relock doors
If you unlock the doors with the remote transmitter, but do not open any door or open trunk within 60 seconds,
the doors will automatically relock and the system will be armed.
Note: When the system is in active arming mode and the relock mode is enabled, the doors will relock but the
system will not rearm.
Panic Mode
In a panic situation, you can activate the panic mode that disables the valet mode, locks the doors and sounds
the siren for 1 minute. You can activate the panic mode by pressing the LOCK or the UNLOCK button for
approximately 4 seconds until the siren goes ON and the parking lights flash.
To activate panic mode:
•
Press and hold the UNLOCK button for approximately 3 sec. until the sound signal starts and the
parking lights flash: this will unlock the doors before the sound signal starts.
•
Press and hold the LOCK button for approximately 3 seconds until the sound signal starts and the
parking lights flash: this will lock the doors before the sound signal starts.
Or
•
Press and hold the FUNCTION button for approximately 3 sec. until the sound signal starts and the
parking lights flash: this will only activate the siren.
(For two-way LCD remote only)
Multi-car Operation
The system features multi-car operation. This allows the user to control two systems with one transmitter. (Both vehicles must
be equipped with identical systems). The transmitter of the primary vehicle can control the starter kill system, the door lock and
unlock operations of the second vehicle as well as the AUX 2 and AUX 3 outputs. The transmitter of the second vehicle can
also operate the primary vehicle
For 1-WAY remote:
•
+
.....................................................Lock
•
+
................................................Unlock
•
+
•
+
. ...............................................Aux 2
+
. ......................................Aux 3
For 2-WAY LCD remote:
•
Press and hold the FUNCTION button until you hear a “beep”. Within 3 seconds, release the
FUNCTION button and
will appear on the LCD display. Press and hold the FUNCTION
will be displayed. This display
button once more until you hear another “beep”.
means that you are now in Multi-car Operation Mode. Simply press the corresponding
button to access the desired feature:
•
..............................................................Lock
•
...............................................................Unlock
•
. ..............................................................Aux 2
•
. ..............................................................Aux 3
Temporary Chirp Delete
If you want to avoid the siren chirps in a quiet neighbourhood when arming or disarming the system, press the
TRUNK button until you see the parking lights flash. Then within 3 seconds, press the LOCK or UNLOCK to arm
or disarm the vehicle without generating the siren chirps.
Note:
Your installer could program the chirp disable feature, so that the chirps are disabled permanently.
User Guide
P. 5
Priority Door Access
(Enabled by default.) If the Remote Door Locks option is installed on your vehicle, this safety feature allows you
to unlock solely the driver’s door with a single press of the UNLOCK button on the transmitter; upon a second
press of the UNLOCK button, all the doors will unlock, except for the driver’s door and finally with a third press of
the UNLOCK button, all the doors will unlock.
Alarm Functions
(The siren and the shock detectors are optional)
Your installer can program your alarm in passive arming mode, so that the system automatically arms itself
when you leave your vehicle, or in active arming mode, so that you can arm or disarm your car at will.
In either mode, you can arm or disarm your alarm system using your remote control as well as lock or unlock
your doors.
Passive Arm Mode
In passive arming mode, the system will arm itself automatically after the completion of a 1 min arming delay
(LED flashes quickly) initiated after the last door of the vehicle is closed. Therefore, you do not need to arm the
system. The LED indicator flashes slowly when the system is armed. However, you must lock your doors
manually when leaving the vehicle.
When leaving your vehicle, perform the following:
1.
Turn the key switch off. The LED remains off.
2.
Unlock if required and open the doors.
3.
Once all doors are closed after exiting the vehicle, the LED will begin to flash quickly, indicating that
passive arming delay has begun.
Also, as long as a door, trunk or hood is open before the completion of the arming delay, the system will not
rearm. If you want to stay in the vehicle for a certain period of time, it is recommended to have your key switch
in the ON position to avoid a situation where the system arms before somebody leaves the vehicle. While your
key is in the ON position, the system will not arm and the LED stays off.
Active Arm Mode
To arm the system, and lock your doors (if you have this option), the ignition must go from ON to OFF and a
door has to be opened and then closed. Press the LOCK button on your remote until the siren chirps once in
confirmation. Notice that the parking lights confirm the system arming by flashing once and that the LED
indicator flashes slowly to confirm the armed state. (See “Chirp delete” on p.5 to bypass the chirping effect).
Disarming and Unlocking Doors
If the system was programmed in passive mode, to disarm the system and unlock the doors, press and hold the
UNLOCK button until the siren chirps twice in confirmation. Notice also that the parking lights confirm the system
disarming by flashing twice. Once the system is disarmed, you have to open a door within a 35-second delay or
else the system will rearm (LED flashing slowly). If the entry delay expires, you must disarm the vehicle by
pressing the UNLOCK button to enter the vehicle. Once inside the vehicle, you have up to 35 seconds to turn
the key switch to the ON position or start the car to prevent the system from rearming again. If this is not done,
your system will rearm (LED flashing slowly) and if your system has a starter kill, you will not be able to start the
car. If this situation occurs, you need to disarm the car by pressing the UNLOCK button.
Starter Disable
Among the many features, the starter disable circuit will immobilize the vehicle when the system is armed (If
installed). The system, when armed, will control a relay that will physically interrupt the vehicle starter wire and
prevent the hot-wiring of your vehicle. The system is selectable, passive or active arming; this means that you
can have the unit arm itself (passive) after a pre-programmed period of time 1 minute or you can have control
over the system (active) such that it will never arm itself.
Note: When the system is armed, the vehicle will not start with the key unless the system has been
disarmed.
To Arm the Starter Disable
• Lock the doors by remote or wait the timeout period in passive arm mode. The system is armed
automatically when the doors are locked by remote.
To Disarm the Starter Disable
• Unlock the doors by remote or place the unit into valet mode.
P. 6
User Guide
Retain Accessory Output
Retain Accessory output is activated as soon as key is turned to the ON position. When the key goes from ON
to OFF position, the accessory output stays ON and a countdown period of 10 minutes is set. The output is
turned OFF after 10 minutes or if a door is opened anytime during the countdown period.
Note: The Accessory Output is also turned off while starting the car.
System L.E.D. Flash Rate
The L.E.D will display the status of the system, to indicate if the starter kill is armed or disarmed. The L.E.D will
also indicate if the system is in valet mode or not (See “Valet operation” on p. 5)
The following are L.E.D conditions:
L.E.D State
OFF
ON Solid
Flashing slowly
Flashing quickly
System Status
Starter kill Disarmed
Starter kill Disarmed
Starter Kill armed
System is in rearming sequence
Mode
Regular operation
Valet Mode
Regular operation
Passive arming Mode
Valet Operation
The unit can be placed into alarm valet mode to stop alarm conditions or to disable the alarm functions and the
anti-theft starter kill feature. While a vehicle stands in alarm valet mode, Panic mode and door locking /
unlocking functions are still operational.
This system can remotely be placed in or out of valet mode: it is not necessary to access the vehicle.
Enabling the Alarm Valet
1.
2.
3.
4.
5.
Turn the key to the RUN position.
Within 5 sec. press and hold the valet button for about 3 seconds.
The parking lights will flash 3 times to indicate that the system has entered valet mode.
Release the valet button and turn the key to OFF position
The LED will come on and stays lit to indicate that the alarm valet mode is enabled.
Disabling the Alarm Valet
1.
2.
3.
4.
5.
Turn the ignition to the RUN position.
Within 5 sec. press and hold the valet button for about 3 seconds.
The parking lights will flash twice to indicate that the system is out of valet mode.
Release the valet button and turn the key to OFF position
The LED will go out to indicate that the alarm valet is disabled.
Remote Valet Operation
The system can be placed in or out of valet mode through the remote control. This means that the user does
not have to enter the vehicle or switch the key to the RUN position to get in or out of valet mode.
To remotely place the system in or out of valet mode:
•
User Guide
+ buttons simultaneously for 3 seconds on the transmitter; the system will
Press and hold
toggle in and out of valet mode:
o
Getting into valet mode, the parking lights will flash 3 times, the LED will come on and
remain lit.
o
Getting out of valet mode, the parking lights will flash twice, the LED will go out.
P. 7
Parking Lights Flash Rate
FLASHES &
CHIRPS
1
1
P. 8
RATE
DESCRIPTION
Quick
Quick
Locked by transmitter, system armed, starter kill armed
Car finder
• Unlocked by transmitter, system disarmed, starter kill disarmed
• System has exited valet mode
• Locked by transmitter while a door opened
• System has entered valet mode
Doors unlocked by transmitter with an intrusion occurred before unlocking
the doors.
New transmitter programmed
Unit reset: Occurs when the unit is reset to factory defaults
2
Quick
3
Quick
4
Quick
5
8
Quick
Quick
User Guide