1
~afe~
instructions
....................2-5
Anti-Tip Device .................................3,30,40
Problem Solver ...............................46
More questions?...call
GEAnswer
Centerm
80~626.2000
.
operating
Instructions,
mps
Aluminum Foil............................5, 16, 19,23
Features........................................................6,7
Oven..................................................... 12-20
Baking ..................................................15, 16
Broiling,BroilingGuide .................... 19,20
Clock and Timer ................................. 11,12
Control Settings ................... 12, 15, 17, 19
Light; Bulb Replacement .................14,24
Preheating........................................... 15, 18
Roasting, RoastingGuide ................17. 18
Shelves.........................................13-15,23
Surface Cooking......................................8-10
Control Settings ..........................................8
Electric Ignition............................................8
Standing Pilot Models................................8
Care and Cleaning
....................2l-28
Air AdjustmentShutter.....................................28
ContinuousClean...............................................26
BroilerDrawer ......................................................27
BroilerPanand Rack..................................19,23
BurnerAssembly..........................................21,22
Door Removal...............................................25
Lift-upCooktop .............................................28
Oven Bottom .................................................23
Oven Vents ....................................4,5, 13,28
Storage Drawer ............................................27
Preparation .................................29-45
Flame Size................................ 10,34,35,46
Flooring Under the Range..........................31
Installation Instructions.......................29-45
Leveling..........................................................40
Thermostat Adjustment ............................. 14
~o~~~m~~
~~~w~c~s ...................47
Appliance Registration..................................2
Model and Serial Number Location...........2
Warranty ........................................Back Cover
Standard-Clean
Models:
JGBS02EN JGBS06PR
JGBS02PN JGBS12GER
JGBS04ER JGBS15GER
JGBS04PR JGBS16GEP
JGBS04GER JGBS17GER
JGBS04GPR JGBS19GEP
JGBS06ER JGSS05GER
Continuous-Clean
Models:
JGBC75GER JGBC16GEP
JGBC17GER
—
m~pusmLP
s
You
Wtitedown the model
It is intendedto help you operate
and maintainyour new range
properly.
Keep it handyfor answersto your
questions.
If you don’tunderstandsomething
or need morehelp,write (include
your phonenumber):
ConsumerAffairs
GE Appliances
ApplianceP&k
Louisville,KY 40225
If
1
Ou
received
and Setid nmbers.
a amaged
Dependingon yourrange,you’ll
find the modeland serialnumbers
on a labelon the frontof the range,
behindthe kick panel,storage
draweror broilerdrawer.
Thesenumbersare alsoon the
ConsumerProductOwnership
RegistrationCard thatcame
with your range.Beforesending
in this card, pleasewritethese
numbershere:
Immediatelycontactthe dealer(or
builder)that soldyou the range.
range.*
Save the and
Before you
service..
s
e
money.
request
Checkthe ProblemSolverin the
backof this book.It lists causesof
minoroperatingproblemsthat you
can correctyourself.
ModelNumber
SefialNumber
Use thesenumbersin any
correspondenceor servicecalls
concerningyourrange.
@
oAPPROVEO
mYou rdEEDSERWCE*..
Toobtainservice,seethe Consumer
Servicespagein the back of this
book.
Toobtainreplacementparts,contact
G~otpoint ServiceCenters.
We’reproudof our serviceand
want you to be pleased.If for some
reasonyou are not happywith the
serviceyou receive,here are three
stepsto followfor furtherhelp.
~ST, contactthe peoplewho
servicedyour appliance.Explain
why you are not pleased.Inmost
cases,this will solvethe problem.
NEXT,if you are stillnot pleased,
write all the details-including
your phonenumber-to:
Manager,ConsumerRelations
GE Appliances
AppliancePark
Louisville,KY 40225
—Do notstem or w gmtine or other
flmable vapm md Iiqti* inthevicitity
of$Mormy otherapptimce,
—mT To m m You smLLGAS
~ALLY, if yourproblemis still
notresolved,write:
MajorApplianceConsumer
ActionPanel
20 North WackerDrive
Chicago,~ 60606
e
~bdately
d yourgw supplierfmma
nei@bor9s
phone.FoUowtie gassuppMer9s
htmctiom.
eHyoumnnotreachyow gasSupptier,w
—
—
—
WORTANT
SAFETY NOTICE
TheCtifornia SafeDrinkingWaterandToxic
Enfo~cementActrequirestheGovernorof
Californiato publisha listof substancesknown
tothe stateto causecancer,birthdefectsor other
reproductiveharm,andrequiresbusinessesto warn
customersofpotentialexposureto suchsubstances.
Gasappliancescankauseminorexposureto
fourof thesesubstances,namelybenzene,carbon
monoxide,formaldehydearidsoot,causedprimarily
bytheincompletecombustionof naturalgasor
LPfuels:Roperlyadjustedburners,indicatedby
a bluishratherthana yellowflame,willminifize
combustion.Exp,osureto these
incomplete
substancescanbe minimizedby ventingwithan
openwindowor usinga ventilationfanor hood.
~Be sureyourrangeis correctly
adjusti by a‘
qualified
servicetecMcianorinstilerforthe
typeof gas (na@rdorLP).thatistobe@d.
Yourrangecanbe convertedforusewitheither
typeof gas,Seehstallationk5tructi0ris0
use-ofa range9
ti@,,flwi
oAfterprolonged
temperatures
mayresdt’ah~ti*yf100k - .coverings
til notwithstid this~”~-oftiea..
Neverinstalltherangeovervinyltileoi”.~noleum
thatcannotwithstandsuch~@--tifkse:Never
installit directlyoverinteriorkitchen,-c~ting,
,:--...,.. -,;.,
,.
. . -..
. .l.
-“..,..-,-.,.
.,:,
~~~g ~~~ ~~~g~, ‘ ‘-’.
:.,‘ ‘“::::,
““
~ -,..,,.
,.,.,.-,., ,,-..f,>,>-.
~Do”n9t,
leavec~dre~done6r*Wh~~wh.6fi ~.
~ a rangeishotorinoperati6~iTheyeQ
uId ~ “
seriouslybtied. ., -, ~~;,
:-.:. ~,::.::.,.;
~..:-.,
I
,:.-.
~.‘.,).
‘>,....::
~.
.7“,
~ H*v6the
—
—
e–
instiler showyouthelocationofthe
rmgegascut-offvalveandhowtoshutit off
Mnee=ary.
~
yourrange‘inStaMed
andproperly
&omdd bya qualifiedinsti~er,in accordance
Wve”
withthe‘hstallationkstructions.Anyadjustment
andserviceshouldbe performedonlyby qualified
gasrangeinstallersor servicetechnicians.
*P#ugyo~r rmge kto a 120=voIt
grounded
outletady, Donot removetheroundgrounding
prongtim theplug.fiin doubtaboutthegrounding
of the hime electrical’system,it is yourpersonal
msp~ibility md obligationtohavean~grounded
outletreplacedwitha properlygrounded,threeprongoutletin accordancewiththeNational
ElectricalCode.h Canada,the appliancemust
be electrica~ygroundedin accordancewiththe
CanadianElectricalCode.Do notusean
extensioncordwiththis appliance.
s* m
* pachg materials
areremoved
frO~
ther-e beforeoperatingit to preventfireor
smokedamageshouldthepackingmaterialignite.
whenyoupushthe“rangebae~agtist’ke
~di.
.2, .
.,-.
~
eNeverwearloosefitig
otih~n@ng
gamenk
whtieusingtheapptiance.
Be caretil ‘when
reachingforitemsstoredincabinetsoverthe
cooktop.Nammablematerialcouldbe ignitedif
broughtin contactwithflameor hotovensurfaces
andmaycauseseverebums.
(cotiitiuedhextpage)
3
~afe~,~~~~~US~yoar appiiance
for
wartingorheatingthemom*
. .
sDOnotusewater on greasefi~o ~~verpickUP ‘
~For ~ow
s~~~ays~rn surfaceburnerto0~ before
removing
Cookwaree
~ ~~efi~]y
w~~c~ food$ beh~ ftid
at ~ M@
.,
,
a flamingpan.Turnoff burner,thensrno~er
“ , flme setting.
..
flamingpanby coveringpan
e ~e~er ~~~~kt~~f~nts (airopetings)Ofthe -~,
completelywithwell-fittingEd,cookie
range,Theyprovidetheairinletandoutletth~i .sh~t or flattray.H-tig,grease outside
menecessaryfortherangeto operate.propbrl~-:”~
a pancanbeputoutby c@v&ring
with ~‘
withcorrectcombustion.Airopenings,ti~l*aM”
bakingsodaor,if available,a multi-purposedry
~
at therearof the cooktop>at ~e toP Wd:bOttO@OfZ
chemical
orfoam-typefireexting~sh?ro’”
~
:
theovendoor,,wd’
a
t
thebottomof
thei~gb?
~~
...-.
.:
,.;
@Do not store flammabiemtit6iE*-k”an oven9; ~; , . underthetick panel,storagedraweror,br?~ler}~
~~~~s
., r”.,:...
kneara:coq~$op~-_ -”, ,‘ drawer(depetidingonthemode]).
a range storagedrawero,,-,_....” .:>-.
,,----,“ - -,. ,
~~-~not~
~~o~‘On
~
tiels
tith
~~
~~s~:‘
~Do notstoreorusecotibtitiblematGrids9. ~.:,.:.
gasohe orotherflmtitibl~Yapors.
~nd~~tiqs~~ ~-, ~~if theWokhas.~ round~g~ .$pg:~~t~~’P~~@-:
OVerthe bkrnir@atetosuP@o~’~e’Jwo%o.@$
‘,’;
~
h theticbity ofttiisorak~ti!hirapp~ancee‘.”-.
,- ~ - ringactsas a heattrap,w~ch may’d~tige~q;:.’~,.
,
~Do~~t~~tCooMg gretie oroier flti~ab~~
burnergratetid’burnerhead,Alibi:itmaydauie
materialsaccmulateinorneartherange.
i ~
ti&burnerto-workimproperly.This,@ay.cause.[a
,, :,,
!-. ,
abovethat-~owd-by(;;~..:
-,,..:.” , ~carbon monoxid~.level
~Whentooting pork9followtie directions
‘currentstandardsresulting-in a healt~~~~d.~<~~t.‘
exactlyandalwayscookthe:fieatto q i.nte.m~ ‘ L, “~~
-~,,.
temperatureof at least170°F.’
tis @surGsthat,’ih’. ,
e~~od~‘fir frfi~gs~~~d.be:~-dfy- ~:!po#;~~~~-~,;:
theremotepossibilitythatxc~na:wajbe ~reseS$“ ~~‘ Fiost-on,froienfoods‘ormoisture,
o~’’tie$h’food~;~..
, .. ~.’,
.. ,
.,
in the meat, it wiHbe Wledaridtie m~atwill be,,..6. . ‘ ‘,cti causehot.fatto ,bubbleup’tid 6ver$id~~{:~~,
-.
-,. ..... ,,: “.:.:
.4,’ ..
~
,., ,. ”’.
safeto eat,
- ‘“.
‘;::’}:-:,.’::.;:,;:::
.~fpm. ~~‘,-: . ,
,,
)’.
~:.Use..leaitpos&bli
mount ‘of “fitfOr:+ffiC@Ve~’.;:;;::
,.
. .
Stiace Cooting
ShaNOW
or deep-fatfryifig.~i~g thep“ti:tod”::,:f’
~
,’
ti,bffat
cancatiies~i!over~
when.
fo@-is
@d~O
_
~
.
.,.
e AIwaysusetheLITEposition(o~;~ode~s
tith,
electricignition)orthe~ posi~on(onmodels”- -~ ::ii coibiniiiQnif Qils6k:’fap’”wiu
b@’bd::#::;-:::
;
_
~‘~
withs~ntig ~flOt$) when i@ti~g ~~p ~~~e~~ - ,.‘...,. ,:-:. sn-f~itig; stirto~etherb~foreheating.tir-asfats;~;
,.\-~~,, -”-, .’”- “‘ -‘:, -; -, ;,;; i::,~: ...’
~
surethe.burnershave ig@ted.
and make
. . !’ ‘ -- ~,, ~, .~elt SIOWlyj: --- ,
*Neverleave~~~’~e b~~~ersuna~tefidedit’ ~‘- - ~‘Altiays.”iiat
iii ~lowly~-am~”~at$h
Wjthm~,...,...
j::,:.
-,
.-.i..
>,-”,
- ..
~~g~flameset~ings.Boilovercausessmok.ing
*‘~~ea~~.
deepfa~,~~er&o@e~~r
y,b~neve~‘:,i‘~I ‘::“,’.,,“
0~fire.
~andgreasyspilloverkthatm?ycatch
,,
~;-:’..,
‘possibleto preventoverheating’fat-beyond.~e
e~~j~s~top b~~er fl~e ske so it ~OeS not
.}.
extendbeyondtheedgeofthecookw~ri.
.,.,
,. .-
~‘~~eProP~r‘P~”,$ize-Avoid p-ms th~t.ti&:.“j:~,--.,
Excessiveflameis htiardous.
u~stableor eas.fiy-tipptid.
Selectcookwyehav~qg
~~$e ~n~Ydv pot holders-moist or d~p
‘
flatbottomslargeenoughto properlycontti.fdod”.
potholdersonhot surfacesmayresultin burns
md avoidbdiloversWdspi~ld~ers’‘wd
l~g? - ~‘,-.
fromsteam.DQnotletpotholders
enough,to’cover
burnergrqte;~s will-boths?ve; 1,
comenearopenflameswhen
~ ~ ‘ cletig timewd preventh~tidous accmtil?ions.”
liftingcookware.Donot usea
- of food,sinceheavyspatteri~g’orSPi~OVerS
lefi -.
towelor otherbulkyclothin place
onrangecanignite.Usepanswithharidlesthat
of a potholder.
canbe easilygraspedandremaincool.
8Tominimizethe p~~sib~ii~y
of burns9ignition
~When ~s~~gg~~sc~okwam9
make sure it is .,
of flammablematerials,andspillage,turn
designedfortop-of-rangecooking.
cookwarehandlestowardthe sideorbackof the
e~e~p a~~p~~sticsaway fromtO~bU~~a~S.
rangewithoutextendingoveradjacentburners.
.
3
—
Don$theatunopened
food containers
inthe
codd buildup andthe
contatierco~d burst,causinganinjury.
eDon9twe alwhum foflanywhere
intheoven
* Do notleavepkastic
~
items
onthe
cooktop theymay
meltif lefttoocloseto
thevent.
oven. Pressure
Ventappearance
andlocationvary
itemsonthecoiktop.me hotairfromthevent
mayigniteflammableitems andwill increase
pressurein closedcontainers,whichmaycause
themto burste
eTI avoid thepossibility
ofa burn,alwaysbe
exceptas describedin thisbook. Msuse could
resultm afire hazardor damageto therange.
$ Whenusingcookingorroastingbagsinoven9
followthemanufacturer’sdirections.
@Useody @asscookware
thatisrecommended
forusein gasovens..
.
0Alwaysremove-brotie~
pan~romovenassoon
certainthat-thecontrohforWburnersareat.”
Gr~aseleftin thepancan
asyoufiih broilifi~.
the0~ poiitionpndallgratesarecoolbefore.“
,.
catchfne if ovenis usedwitioutremovingthe
atiemptig to removethem.
,.. ,, grease.fromti~ broilerpan. ~ ~,
,7.,
,.,
~men flfig foodsareunderthehood,tu~-n- ‘
broilkg,if&&t,iqtooclosetotheflame,
thefanoH.Thefan,ifoperating,
mayspread , ~ .-O,When
i ‘thefatmtiyigriiti.Ttirnexeessfatto prevent
theflames. ~
,, excessivefl~e-up$l~ ‘‘ ‘~
..~@Ifr~~geis locatedneara window,
do nothang ~~ ‘ j:. ,
.. ~
.; ~
surebroiler
pan-winplaceco~rwfi~to
longcurtainsthatcouldblowoverthetopburners ~~~ @--Make
,.
‘‘’-r~qucetheposs~bility
of g~ease.fwes.
andcreatea f~e hazard;
!$ ,agreasefirein thebrofler
~-men ~ pilotgoesout(on a modelwithstanding‘,.. A~~U youshotid-~ave
pilots),youwilldetecta faintodorof gasas your’ . ~~”~~an~ti ofi.oven9-fidkeepovendoorclosedto
signal.torelightthepilot.Whenrelightingthe ~. ‘“ ‘ ‘--,.,
containfire,
untilit.bu~s
.,,. ,
out.-., ,
,
... ,
pilot,m~e sureburnercontrolsarein theOW ~~
-‘ - - ~~”
position,andfollowinstructionsin the Surface~, ~ - ~~
~ ““
‘~‘c~ “’‘‘: ‘“
,CleaningYOurRange
,,
..~.~
-~
CooKngsectiontorelight.
\$-”.
.’
0.~~~”~
~~~.pfi tis~@iuthisUseand
‘
eHyousmellgas,andyouhavealreadymades~e
G$$&----...
.
pilotsarelit (onsomemodels),turnoffthe gas to ; ~
.:,. ,,-, -’ ~~ : .r;-~
therangeandcalla qualifiedservicetechnician,, ~.‘ “~tiee~ r~;ge::i~~~-~
~tid~fre;
.bf~ccumdations
of
Neverusean openfi~e to locatea leak.
flte.
,. .-.’. ~-..%maskqrsptilbvefs~:wtich:hayi
,-. .
,-- ;.,
,. ,- ~:~~,~~ti: whenyo’~-dlea~.th~
~o;ktop
,.’ , ~~ ~b.w~tise
tfiehre%
over.thgpilot(onsome
~‘~pdeb)filb~
,, ‘hot,-..:,
,,, -~ .’
@Donotuseovenfora storagearea.Items
.. .-. .,.
storedk theovencan~gnite.
w Y6uNeei,..Se;tice.”
~~~“”
,r
@~md awayfromtherangewhenopefingthi
doorof~hotoven.Thehotairandsteamthat
‘
‘~~ead!6The
P~objem
thebackof
,. $~lvef’!;in.
=capecancauseburnstohands,faceandeyes.
ttis@de. -..,
“.-.’..
‘ .
@Keep
ovenfreefromgreasebddup.
@tion’t attem~tto;eptiirorreplaceanypartof
yourrtige:udti itis s-my
recommended
@Place
ovenshelvesindesiredpositionwhileo,
A
ll
otherse~iiiug
shouldbe
htM
guide?
ovenisCOOI.
J refereedtoa.qu~led-techniciani
~~~ng out shelf totheshelf-stopisa
convenience
in Iiftingheavyfoods.Itisalso
a premutionagainstburnsfromtouchinghot
SAVE T.HisE
L‘
suflaeesofthedoororovenwalls.Thelowest
pwition6gR99
is notdesignedtostide.
INSTRUCTIONS
“
.,
B*i~g9 BrOfingand Roasting
5
——
FEP.TURES
OF YOURMNGE
r
II
II
1
Ill
Ill -
$, [-~.
II I
//
u
@
\fi
\
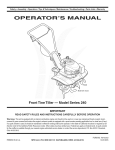
BurnerCap
\J
.—
\ .,
(onsome
models)
“\!
.
BurnerBase
Your range is equipped with one ofthe two types of sutiace burners shorn above
—
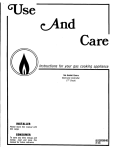
Feature Index (Notall modelshaveall features.Appearanceof featuresvaries.) I
See page
1 Backguard(on somemodels)
2 SurfaceBurners,Drip Pans (on somemodels)and Grates
I
21,22
14
3 OvenLamp On/OffSwitch(on somemodels)
11,12
4 Clockand Timer(on somemodels)
5 OvenVent(locatedon cooktopon somemodels)
I 4,5,13,28
6 Bake/BroilSwitch(on somemodels)
I
12
7 OvenControl
12
8 SurfaceBurnerControls
8
23,28
9 Cooktop
19,23
10 BroilerPan and Rack
11 Oven Shelves(numberof shelvesvaries)
I
13-15,23
12 Oven ShelfSupports
13,14
13 Air Ventin OvenDoor (locatedat top of OvenDoor)
4,28
14 BroilerDraweror StorageDrawer(dependingon model)
27
15 Air Intake
4,28
16 Modeland SerialNumbers(locatedon frontframeof range,
behindeitherBroilerDraweror StorageDrawer)
2,31
17 RemovableOvenDoor
18 Anti-TipDevice(Lowerrightrear-comeron rangeback.
See InstallationInstructions.)
19 Oven Bottom
20 OvenInteriorLight(on somemodels)
25
3,30,40
23
14,24
JGBC16GEP,
and
NOTE: Allmodels have standard oven interiors, exceptfor JGBC15GER,
SeeCareandCleaning
for
JG~Cl~GE~ w~ic~have continuous-cleaningoven interiors.
instructions.
7
.
.-
Yoursurfaceburnersare lightedby electricignition,
eliminatingthe needfor standingpilot lightswith
constantlyburningflames.
In case of a power failure, you can lightthe surface
burnerson yourrange with a match.Hold a lighted
matchto the burner,then turn the knob to the LITE
position.Useextreme cautionwhen E@tingburners
this way.
Surfaceburnersin use whenan electricalpower
failureoccurswill continueto operatenormally.
Theelectrodeof thesparkigniteris exposed.
Whenoneburneris turnedto LITE,alltheburners
spark.Do notattemptto disassembleor clean
aroundanyburnerwhileanotherburneris on.
Anelectricshockmayresult,whichcouldcause
youto knockoverhotcookware.
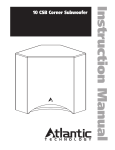
Stinding Blot Models
The surfaceburnerson tiese rangeshave standing
pilotsthatmustbe lit initially.To light them:
1. Be suresurfaceburnercontrolknobs are in
the OFFposition.
2. Removethe grates andlift the cooktopup
(see the Lift-UpCooktopsection).
3. Locatethe two pilot
ports and lighteach
of them with a match.
NOTE:If the pilotis too high or low,you can
adjustit. See the Adjustthe SurfaceBurnerPilots
If Necessarysectionof the InstallationInstructions.
4. Lowerthe cooktop.Yoursurfaceburnersare now
readyfor use.
5. Observelightedburners.Comparethe fhirnes
to picturesin the ProblemSolver.If any flame
is unsatisfactory,call for service.
Suflaee Burner controls
Webs that turn the surfaceburnerson and off are
markedas to whichburnersthey control.The two
knobson the left controlthe left front and left rear
burners.The two knobson the right controlthe right
front and rightrear burners.
8
On ranges with sealed burners:
ID
The smallerburner(rightrear position)will give
the best simmerresults.
~The right frontburneris higherpoweredthan the,
othersand willbringliquidsto a boil quicker
(naturalgas installationsonly).
...
I
Before Lighting
a Burner
e If drip pansare suppliedwith yow range,they shouldbe used at dl times.
*Make sure both grateson one side of the range are in placebeforeusing
eitherburner.
To Light
a
Sutiace Burner
Standing
PilotMtiel:
Electric I@tion Mdels:
mh tie Controlbob inad
mm it to LITE.Youwill hear
a little “clicking” noise—the
soundof the electricspark
ignitingthe burner.
Mter the burnerignites,turn the
knobto adjustthe flame size.
-
After Lighting
a
Wsh controlknob in and turn it to HI position.
The burnershouldlightwithina few seconds.
After the burnerignites,turn the knobto adjustthe
flamesize.
Flame will h *ost horizontal and willlift
sM@tlyaway from the burner when the burner
is first turned on. A blowing or hissingsound
may be heard for 30 to 60 s~conds.~~s normal
soundis due to improvedinjectionof gas and air
into the burner.Put a pan on the burnerbeforelighting
it, or adjustthe flame to matchpan size as soonas
it lights,and the blowingor hissingsoundwill be
muchless noticeable.
Burner
~Checkto be sure the burneryou turnedon is the one
you want to use.
~Do not operatea burnerfor an extendedperiod
of time withoutcookwareon tie grate. The finish
on the grate may chip withoutcookwareto absorb
the heat.
@Be sure the burners and gratesare cool beforeyou
place your hand, a pot holder,cleaningclothsor
other materialson them.
(continuednextpage)
—
--
ACE coom~
(continued)
How
a
toselect Flqme size
Watchthe flame,not theknob,as youreduceheat.
The flamesize on a gas burnershouldmatchthe
cookwareyou are using.
FOR SAFEHANDLINGOF
COOKWARENEVERLET
THE FLAMEEXTEND
UP THE SIDESOF THE
COOKWARE.Any flamelargerthanthe bottom
of the cookwareis wastedand only servesto heat
the handle.
Top”of”Range
Whenboiling, adjustthe flame so the circleit makes
is about 1/2inch smallerthan the bottomof the
cookware-no matterwhat the cookwareis madeof.
Foodscookjust as quicklyat a gentleboil as they do
at a furious,rollingboil. A high boilcreatessteam
and cooksaway moisture,flavorand nutrition.Avoid
it exceptfor the few cookingprocessesthatneed a
vigorousboil.
When frying or warming foo~ in stiidess steel,
east iron or enamelware, keep the flame down
lower—to about 1/2 the diameter of the pan.
When frying in glass or ceramic cookware, lower
the flame even more.
cookware
Aluminum: Medium-weightcookwareis
recommendedbecauseit heatsquicklyand evenly.
Mostfoodsbrownevenlyin an aluminumskillet.Use
saucepanswith tight-fittinglids whencookingwith
minimumamountsof water.
Cast-Iron: If heatedslowly,most skilletswillgive
satisfactoryresults.
Enamelware: Undersomeconditions,the enamelof
somecookwaremay melt.Followcookware
manufacturer’srecommendations
for cookingmethods.
Glass: Thereare two typesof glasscookware-those
for ovenuse only and thosefor top-of-rangecooking
(saucepans,coffeeand teapots).Glassconductsheat
very slowly.
Heatproof Glass Ceramic: Can be used for either
surfaceor oven cooking.It conductsheat very
slowlyand coolsvery slowly.Checkcookware
manufacturer’sdirectionsto be sureit can be used
on gas ranges.
Stainless Steel: This metal alonehas poor heating
propertiesand is ~~sually
combinedwith copper,
aluminumor other metalsfor improvedheat
distribution.Combinationmetalskilletsusu~ly work
satisfactorilyif they are used with mediumheat as the
manufacturerrecommends.
wok cooking
useofstove
Top
Gflls
(onmodelswithsealedburners)
(onmodelswithsealedburners)
oWerecommendthat you
use only a flat-bottomed
wok. They are availableat
your localretail store.
~Do not use woks thathave
supportrings. Use of these
typesof woks, with or
withoutthe ring in place,
can be dangero~s.placingthe
ring over the burnergratemay
cause the burnerto workimproperlyresultingin
carbonmonoxidelevelsaboveallowablecurrent
standards.This couldbe dangerousto yourhealth.
Do not try to use suchwokswithoutthe ring. You
could be seriouslyburnedif the wok tippedover.
Do not use stovetop grills
on your sealedgas burners.
If you use the stovetop
grill on the sealedgas
burnerit will cause
incompletecombustion
and can result in exposure
to carbonmonoxidelevels
aboveallowablecurrentstandards.
This can be hazardousto your health.
‘t~!’i.r”
,tl!g
.
..
F{)llowthe directions belowif your range has the
clock and timer shown at the right.
~Ie rangeclock and timerallowyou 10set the timer
up 1024 hours. Yotihavetie choiceof having the
tin]crshotv the time countingdownor the time of day.
111
cilhcr C:ISC.
tic timer\villsignalat the cnc.iof lhe
[il))cr~lcri(l(l [t>:~icr( yoti [h:t[ Ihc time is ~Ip.
=
To Set the Timer
NTO”i-E:
Whenyou first plug in [herange or tiler a
lIt)i~”c*r
Rlil[lre.IhcentireClwkflimer (Iispl;iyl~~iil
“SET CLOCK””
ligi]tLip.Af[crs~~~rillSCCOIILIS
apl~~.:trs
in (1ICdisplfiy.
1. Press (hcCLOCK pad.
2. Press i}ndhold {heUP or DOWNpad and {hethe
of tiay willchange 10 minutesat a time. To change
(hc [imc by single minutes,give the pads short taps.
3. Prc:;sIhcCLOCKpad to start the clock.
1. Press theTWR pad.
2. Use the UP and DOWN pads 10set (he [imcr.
Short taps on the UP or DOWN pad change ;hc
timer’ssettingone minute at a time. Pressing and
continuingto hold the WPpad increasesthe selling
ten minutesat a time.The timer can be set for a
maximumof 24 hours.
3, Press theMR
pad to start the timer.
As the timercountsdown, two beeps will indicate
when oneminuteis left. After these beeps, the
displaywillcomt down ti seconds.men time nms
out, a signalwill sound.Ress the Tpad to stop
the signal.
setting
When [hc timer is coun[ingdown, use the UP and
DOWN pflci(o CllilIlge
theremainingtime, or press
tic TIMER Pild 10 stop (hetimer.The timer cannot
k Cane-cllcdLinti1•*SETTIhlE” disappearsfrom
lhc (iispln)”.
To Displayw tl~e Clock While
—-
(Appearancemay vary)
T{) settile clock
To Cilange or cancel the Timer
....
:m~
tl~eTimer
Is
Operating
Pressing Ihc CLOCKpad while the timer is operating
wi]1II()[intcrfcrcwith lhc timer’soperation:Ihe
display will cl~ange[o show :hc clock, bl]tthe timer
\villCOIII
inllc10ct)llntdown and will still signal when
li~ncis up. Press [hcTI~R pad again to change the
displ;iyback [o show !hetimer.
CLOCKAm
TMR
---—-—
=
a
Followthe directions belowif your range has the
clockand timer shown at the right.
me electronicrangeclockand timerallowyou to set
the timerup to 9 hoursand 45 minutes.Youhavethe
choiceof havingthe timer showthe timecounting
downor the timeof day.In eithercase, the timerwill
signalat the end of the timerperiodto alertyou that
the timeis up.
To setthe clock
_
NOTE: Whenyou first plug in the rangeor after
a powerfailure,the entireClock/Timerdisplaywill
fightup. After severalseconds“12:00”will then flash
on the display.
1. Press the CLOCKpad. “12:00”stopsflashing
and “SETME’ flasheson the display.
. .
2. Press andhold the UP or DOWNpad and the time
of day willchange10minutesat a time.Tochange
the timeby singleminutes,givethe pads shorttaps.
For exmple, to set the clockfor 3:15,press and
holdthe UP pad until “3:10”appears,and thentap
the UP pad until“3:15”is displayed.
3. Press the CLOCKpad and the clock willbe set. If
you do notpress the CLOCKpad, the clockwill
automaticallybe set withinone minute.
To Change
or
c1
[;]
m
\L
To
setthe Ther
1. Pressthe TIMERpad. “:00”appearson the display
and “SETTIMER’flashes.
2. Use the UP and DOWNpads to set the timer.
Shorttapson theUP or DOWNpad changethe
timer’ssettingoneminuteat a time.Pressingand
continuingto holdthe UP pad increasesthe setting
five minu~esat a timeunti~onehour (“1:00”)is displayed.Afteronehouris displayed,pressing
and holdingthe UP pad increasesthe setting
15minutesat a time.(Shorttaps on the UP and
DOWNpads will alwayschangethe settingby
l-minuteincrements.)The timercan be set for a
maximumof 9 hoursand 45 minutes.
3. To startthe timer,pressthe TIMERpad.
If the TIMERpad is not pressed,the timerwill
automaticallystartaftera few seconds.
As the timercountsdown,a singlebeep will
indicatewhen oneminute”is lefi~After-thisbeep,
the displaywill countdownin seconds.When the
timerreaches“:00~’you will hear three sets of three
shortbeeps,and then a singlebeep every 10 seconds
for 10minutesor untilyou press any of the
Clock/Timerpads.
Cancel the Timer Setting
Whenthe timeris countingdown,use the UP and DOWNpad to change
theremainingtime,or press theTIMER pad to cancelthe timerfunction.
Thetimerfinction cannotbe cancelleduntil “SETTIMER”stopsflashing
and “TIMER”appearson the display.
To Display
the Time of Day While the Timer Is Operating
Pressingthe CLOCKpad whilethe timeris operatingwill not interfere
withthe timer’soperation;the displaywill changeto showthe timeof day,
butthe timerwill continueto countdown and will still signalwhentime
is up. Simplypress the TMER pad againto changethe displaybackto
showthe timerfunction.
(continuednextpage)
CLOCK Am TMR
(continued)
a.
-“
12 ,
\,t~OFF
II,
~ s+’o 4 /,, ,
clock
3H.
Follow these directiom if your range has the clock and timer shown at
:~lo
set the clock,push in the knoband turn it to the right.Let the g ~ O ~~ a
-, 20
knob out whenthe clockhandsreachthe correcttime.Continueturningthe
/<
301 ,%”knob to OFF.
@ 4“1//,,
1 !6’,\\’
e
the right. TO
The Timerhas been combinedwith the rangeclock.
Use it to time all yourprecisecookingoperations.
You’llrecognizethe Timeras the pointerthat is
differentin colorthan the clockhands.
Minutesare markedup to 30, and hoursare marked
up to 4 on the centerof the clock.
Toset the Timer, turn the knobto the left—without
pushingin—untilthe pointerreachesthe numberof
minutesor hoursyou wantto time.
At the end of the set time, a buzzer sounds to tell
you time is up. Turnthe knob-without pushing
in—untilthe pointerreachesOFF and the buzzerstops.
usmG YOUR OVEN
Before
using
Your
oven
Be sure you understandhow to set the controlsproperly.Practiceremoving
md replacingthe shelveswhilethe ovenis cool.Read the informationand
tips on the followingpages.Keep thisbook handywhereyou can refer to it,
especiallyduringthe first weeksof using yournew range.
oven
.-.
control
Youroven is controlledeitherby a singleOVEN
CONTROLknob or by a BAKE/BROILswitchand
an OVEN CONTROLknob.
It will normallytake 30-90secondsbeforethe flame
comes on. After the ovenreachesthe selected
temperature,the oven burnercycles-off completely,
then on with a full flame-to maintainthe selected
temperature.
Turn switchto BAKEfor all normaloven
operations—forexample,for cookingroastsor
casseroles.Only the bottomovenburneroperates
whenthe BAKE settingis selected.
Use the BROILsettingfor broiling.Only the top oven
burneroperateswhen the BROILsettingis selected.
Electric Ignition Models
Power Outige
The oven burner =d bmti burner are lighted by
electric ignition.
To light either burner, turn the OVENCONTROL
hob to the desiredtemperature.The burner should
ignite within 30-90 seconds.
After the ovenreaches the selectedtemperature,the
oven burnercycles-off completely,then on with a
full flam~to keep the oven temperaturecontrolled.
CAUTION:DO NOTMAKEANYA~EMPT TO
OPERATETHE ELECTRICIGNITIONOVEN
DURINGAN ELECTRICALPOWERFAILURE.
The ovenor broilercannotbe lit duringa power
failure.Gas will not flow unlessthe glowbar is hot.
If the oven is in use when a powerfailureoccurs,the
oven burnershutsoff and cannotbe re-lit untilpower =
is restored.
If your range is equipped with a separate
BA~BROIL switch:
standing Pilot Models
Theserangeshave standingpilotsthat mustbe
lit initially.
To light the oven pilot:
1. Be sure the OVENCONTROLknobis in the OFF
position.
2. Open the broilerdoor andremovethe broilerpan
and rack. Thiswill makeit easier for you to reach
insidethe broilercompartment.
oven
—
Venb
The oven is ventedthroughductopeningsat the rear
of the cooktop.See Featuressection.Do not block
theseopeningswhen cookingin the oven—itis
importantthat the flow of hot air from the oven and
freshair to the oven burnersbe uninterrupted.
~ The vent openingsand
nearby surfaces may ~“.>~
become hot. Do not
~
touch them.
~Do not leave plastic
item on the cooktop-- Ventappearanceandlocationvary
they may melt if left too
closeto the vent.
oven
3. Find the ovenpilotport at the
back of the broiler
compartment.The long tube,
runningfrom front to back,is
the oven burner.The pilotport
is at the back aboutone inch
belowthe burner.
4. Using a long matchor match
hold~r,reach in and lightthe oven pilot.
oHandles of pots and pans on the cooktop may
becomehot if left too closeto the vent.
oMetal items will become very hot if they are left
on the cooktop and could cause burns.
oDo not leave any items on the cooktop.The hot air
from the ventmay igniteflammableitemsand will
increasepressurein closedcontainers,whichmay
causethemto burst.
shelves
me shelvesare
~n
II
designedwith
stop-locksSO
whenplaced
correctlyon the
shelfsupports,
they will stop
beforecoming
completelyout of
the oven and will
not tilt when
...-. you
are removingtood irom them or placingfood on
them.
Whenplacingcookwareon a shelf,pull the shelf out
to the “stop” position.Place the cookware on the
shelf,then
slidethe shelf back into the oven.This will
—
eliminatereachinginto the hot oven.
To remove a
shelf from the
oven,pull it
toward YOU, tilt
frontendupward
and pull shelfout.
To replace, place
shelfon shelf
supportwith stopIocks(curved
extensionof
shelf)facingup and towardrear of oven.Tiltup front
and push shelf towardback of ovenuntilit goes ~ast
“stop” on oven wall.Then lower front of s~elf&d
push it all the way back.
I
(continuednextpage)
~-.
—
13
usm~YOUR owN
(continued)
shelf
oven Moistire
Positions
The ovenhas five shelf
supportsfor normal
bakingand roasting
identifiedin this
illustrationas A
(bottom),B, C, D and E
~
(top).It alsohas a
1
speciallow shelf
position(R) for roasting extralargeitems,such
as a largeturkey-the
.Alc
shelfis not designedto slideout at thisposition.Shell
positionsfor cookingare suggestedon Bakingand
Roastingpages.
Oven Temperature
a
-
As your ovenheatsup, the temperaturechangeof the
air in the ovenmay causewaterdropletsto form on
the door glass.Thesedropletsare harmlessand will
evaporateas the ovencontinuesto heat up.
~v~~ ~i~~~ (onsomemodels)
The ovenlightcomeson automaticallywhenthe door
is opened.Somemodelshave a switchon the lower
controlpanelthat allowsyou to turn the lighton or off
whenthe dooris closed.
Adjustment
Thetemperatureselectedon thethemostat dial
determinesthe averageof the maximumandminimum
temperaturesreachedduringthecyclingof the oven
burner.Thethermostatcontrolin yournewovenhas
beencarefu~ydesignedandmanufacturedto provide
accuratetemperatures.H your new oven is replacing
one you have used for severalyears,you may notice
a differencein thedegreeof browningor the lengthof
timerequiredwhen usingyour favoriterecipes.This
is becauseoventemperaturecontrolshave a tendency
to “drift” over a periodof years.
Beforeattemptingto havethe temperatureof your
new ovenchanged,be sure you have carefully
followedthe bakingtimeand temperature
recommendedby the recipe.Then,afteryouhaveused
the ovena fewtimesandyou feelthe ovenis too hotor
too cool,thereis a simpleadjustmentyoucanmake
yourselfon the OVENCO~OL knob.
Pull the knoboff the rangeand look at the back side. Tomake adjustment,loosen(approximatelyone turn),
but do not completelyremove,the two screwson the
back of the knob.Withthe back of the knob facing
you,hold tie outeredgeof the knob with one hand
and turn the front of the knobwith the otherhand.
Toraise the oventemperature,movetie top screw
towardthe right.You’llhear a clickfor each notch
you movethe knob.Tolower the temperature,move
the top screwtowardthe left. Each click will change
the oven temperatureapproximately10”F.(Rangeis
plus or minus60°F.from the arrow.)
We suggestthat you makethe adjustmentone click
from the originalsettingand checkoven performance
beforemakingany additionaladjustments.
After the adjustmentis made,retightenscrewsso they
are snug,but be carefulnot to overtighten.Reinstall
knob on rangeand checkperformance.
.—.
= How To setYour
BAm~
Range
For Bating
1. Toavoid possibleburro, placethe shelvesin the
correctpositionbeforeyouturn the ovenon.
2. Closeovendoor.If yourmodelhas a separate
BAKE/BROILswitch,turnit to BAKE.Turn
OVENCONTROLknobto desiredtemperature.
3. Checkfoodfor donenessat minimumtime on
recipe.Cooklongerif necessary.TurnOVEN
CONTROLknobto OFF and r~movefood.
For best bakingresults,followthese suggestions:
oven
shelves
Arrangethe oven
shelfor shelves
in the desired
locationswhile
theovenis cool.
Thecorrectshelf
positiondepends
on thekind of
foodand the
browningdesired.
As a generalrule,
placemost foodsin themiddleof the oven,on either
the secondor thirdshelffromthe bottom.See the
chartfor suggestedshelfpositions.
~peof Food
I Shelf Position
Angelfood cake
1A
Biscuitsor muffins
I BorC
Cooties or cupcakes
I BorC
Brownies
I Bor C
Layercakes
I BorC
I Bundtor poundcakes
I
I
I AorB
Pies or pie shells
I BorC
Frozenpies
I A (on cookiesheet) I
Casseroles
Roasting
Bor C
I AorB
I
Preheating
Preheatthe ovenif the recipecalls for it. Preheat
meansbringingthe ovenup to the specified
temperaturebeforeputtingin the food.Topreheat,set
theovenat the correcttemperature-selecting a
highertemperaturedoesnot shortenpreheattime.
Preheatingis necessaryfor goodresultswhenbaking
cakes,cookies,pastry and breads.For mostcasseroles
androasts,preheatingis not necessary.For ovens
withouta preheatindicatorlightor tone,preheat 10
minutes.After the oven is preheatedplacethe food
in the oven as quicklyas possibleto preventheat
fromescaping.
For even cookingand properbrowning,theremust be
enoughroom for air circulationin the oven.Baking
resultswill be betterif bting pans are centeredas
muchas possiblerather than beingplacedto the front
or to the back of the oven.
Pans shouldnot toucheach otheror the walls of the
oven.Allow 1 to 1%inch spacebetweenpans as well
as from the back of the oven,the door and the sides.
If youuse two shelves,staggerthe pans so one is not
directlyabovethe other.
(continuednextpage)
h.
—-
——..
15
BAm G
Bating Guides
Whenusingpreparedbakingmixes,followpackagerecipeor instructions
for best bakingresults.
Cooties
When baking
cookies,flat cookie
sheets(without
sides)produce
@
better-looking
cookies.Cookies
bakedin a jelly roll
pan (shortsidesdl
around)may have
darkeredgesand pale or lightbrowningmay occur.
Do not use a cookiesheetso largethat it touchesthe
walls or the door of the oven.
For best results,use onlyone cookiesheetin the oven
at a time.
Nevercovera shelf
entirelywith a large
cookiesheetor
aluminumfoil. ~s
willdisturbthe heat
circulationand results
in poorbaking.A
smallersheetof foil
may be used to catcha
spilloverby placingit
on a lowershelfseveralinchesbelow
the food.
Res
cakes
For best results,b~e pies in dark,roughor dull
pans to producea browner,crispercrust.Frozen
pies in foil pans shouldbe placedon an aluminum
cookiesheetfor bakingsincethe shinyfoilpanreflects
heat away from the pie crust;the cookiesheethelps
retain it.
Whenbakingcakes,warpedor bentpans will cause
unevenbakingresultsand poorlyshapedproducts.
A cakebakedin a pan largerthan therecipe
recommendswill usuallybe crisper,thinnermd drier
thanit shouldbe. If bakedin a pan smallerthan
recommended,it maybe undercookedand battermay
ovefflow.Checkthe recipeto makesurethe pan size
used is the one recommended.
Bating Pans
Dom9t Peek
Use the properbakingpan. The typeof finishon the
pan determinesthe amountof browningthatwilloccur.
~Dark, roughor dullpans absorbheat resultingin a
browner,crispercrust.Use this typefor pies.
~Shiny,brightand smoothpans reflectheat, resulting
in a lighter,more delicatebrowning.Cakesand
cookiesrequirethis typeof pan.
~Glass bakingdishesdso absorbheat.When baking
in glassbakingdishes,lower the temperatureby
25°F.and use the recommendedcookingtime in
the recipe.This is not necessarywhenbakingpies
or casseroles.
Setthetimerfortheestimatedcookingtimeanddo
notopenthedoorto lookat yourfood.Mostrecipes
provideminimumandmaximumbakingtimessuch
as “bake 30-40mintites.”
DONOTopenthedoorto checkuntiltheminimum
time.Openingtheovendoorfrequentlyduring
cookingallowsheattoescapeandm~es baking
timeslonger.Yourbakingresultsmayalsobe
affected.
o:
.
16
Roastingis cookingby dry heat.Tendermeat or
poultrycan be roasteduncoveredin youroven.
Roastingtemperatures,wl~ichshou~dbe low and
m steady,keep spatteringto a minimum.
The ovenhas a special
low shelf (R) position
just abovethe oven
bottom.Use it when
extracookingspaceis
needed,for example,
whenroastinga large
turkey.The shelfis not
designedto slideout at
thisposition.
Roastingis redly a bakingprocedureused for meats.
Roastingis easy;just followthese steps:
1.Positionoven shelf
at (B) positionfor
1smallsize roast
(3 to 5 lbs.) and
~
at (R) positionfor ~~
largerroasts.
@
$
2. Checkthe weight
3
of the meat. Place
the meat fat-side-up
or the poultrybrea~t-side-upon the roastingrack in
a shallowpan. The meltingfat will bastethe meat.
Selecta pan as closeto the size of meat as possible.
(Broilerpan with rack is a goodpan for this.)
Frozen
Linebroilerpan withaluminumfoil whenusingpan
for marinating,cookingwith fruits,cookingheavily
curedmeats,or bastingfood duringcooking,Avoid
spillingthesematerialsinsidethe ovenor insidethe
ovendoor.
3. If your modelhas a separateBAKE/BROILswitch,
turn it to BA~. Turnthe OVENCO~OL knob
to desiredtemperature.Checkthe RoastingGuide
for temperaturesand approximatecookingtimes.
4. Mostmeatscontinueto cookslightlywhile
standingafterbeingremovedhorn the oven.
Recommendedstandingtimefor roastsis 10to 20
minutes.This allowsroaststo fii up and makes
themeasierto carve.Internaltemperaturewill rise
about5° to 10°F.If you wish to compensatefor
temperaturerise, removethe roast fromthe oven
whenits internaltemperatureis 5° to 10°F.less
than temperatureshownin the RoastingGuide.
NOTE: Rememberthat food willcontinueto cook in
the hot oven and thereforeshouldbe removedwhen
the desiredinternaltemperaturehas beenreached.
Roask
QFrozenroasts of beef, pork, lamb,etc., can be started
withoutthawing,but allow 15 to 25 minutesper
poundadditionaltime (15 minutesper poundfor
roastsunder5 pounds,more time for largerroasts).
s Thaw most frozenpoultrybeforeroastingto ensure
even doneness.Somecommercialfrozenpoultrycan
be cookedsuccessfullywithoutthawing.Follow
directionsgivenon packagelabel.
Thisallowsmorethan one food to be cookedat the
sametime.For example:Whileroastinga 20-lb.
turkeyon shelfpositionR, a secondshelf(if so
equipped)may be addedon positionD so that
scallopedpotatoescan be cookedat the sametime.
Calculatethe totalcookingtimeto enableboth dishes
to completecookingat the sametime.Allow 15-20
minutesof additionalcookingtime for the potatoes.
(continuednextpage)
—
17
Q. h it !necessa~ to check for doneness with a
meat thermometer?
A. Checkingthe finishedinternaltemperatureat the
completionof cookingtime is recommended.
Temperaturesare shownin RoastingGuide.For
roastsover 8 lbs., checkwith thermometerat halfhourintervalsafter half the timehas passed.
Q. Why is my roast crumbling when I try to
carve it?
A. Roastsare easier to sliceif allowedto cool 10to
20 minutestier removingfrom oven.Be sureto
cut acrossthe grain of the meat.
Q, Do I need to preheat my oven each time I cook
a roast or poultry?
A. It is unnecessaryto preheatyouroven.
Q. When buying a roast, are there any special tips
that would help me cook it more evedy?
A. Yes.Buy a roast as evenin thicknessas possible,
or buy rolledroasts.
Q. Can I seal the sides of my foil ‘tent” when
roasting a turkey?
A. Sealingthe foil will steamthe meat.Leaving
it unsealedallowsthe air to circulateand brown
the meat.
, ROAST~G GWE
I
Oven
Temperature Doneness
Type
Meat
Rare:
325°
Tendercuts;rib,highqualitysirloin
Medium:
tip,rumportopround~
WellDone:
Rare:
325°
Lamblegorbone-inshoulder?
Medium:
WellDone:
WellDone:
325°
Vealshoulder,legorloin~
WellDone:
325°
Porkloin,ribor shoulder?
ToWarm:
325°
Ham,precooked
Podtry
WellDone:
325°
ChickenorDuck
WellDone:
350°
Chickenpieces
Turkey
325°
RoastingTime
hternal
in Minutesper Pound
“W.
I Approximate
ITemperatum
3 to 5 lbs.
24-35
35-39
39-45
21-25
25-30
30-35
35-45
35-45
6 to 8 ~bS.
18-25
25-31
31-33
20-23
24-28
28-33
30-40
30-40
18-23minutesperpound(anyweight)
3 to 5 lbs.
35-40
35-40
10to15lbs.
WellDone: 16-22
Over5lbs.
30-35
Over15Ibs,
12-19
140°-1500*
15(?0-1600
170°-1850
140°-1500*
150°-1600
170°-1850
1700-180°
170°-180°
115°-1250
185°-1900
185°-1900
In thigh:
185°-1900
TForbonelessrolledroastsover6 inchesthick,add5 to 10minutesperpoundtotimesgivenabove.
*TheU.S.DepartmentofAgriculturesays“Rarebeefis popular,butyoushouldknowthatcookingit to only140°F.means
somefoodpoisoningorganismsmaysurvive.”(Source:SafeFoodBook.YourKitchenGuide.USDARev.June1985.)
w
*
Broilingis cookingfoodby directheat from abovethe
food.Yourrangehaseithera broilerin theovenor a
compartmentbelowtheovenfor broiling.A specially
designedbroilerpan andrackallowsdrippingfat to
drainawayfromthefoodsandbe keptawayfromthe
highheatof thegasflame.
Both the oven and broiler compartment doors (on
some models)should be closedduring broiling.
Dependingon whetheryourrangeis equippedwith a
separatebroilerdraweror is equippedfor in-oven broiling,you can changethe distanceof the food from
theheat sourceby positioningthe broilerpan and rack
on one of the ovenshelvesor one of the three shelf
positionsin the broilercompartment-A (bottomof
broilercompartment),B (middle)and C (top).
1. Reheating the broileror ovenis not necessaryand
can producepoorresults.
2. If meathas fat or gristlenearthe edge,cut vertical
slashesthroughit about2 inchesapart,but don’t
cut into meat.Werecommendthat you trim fat to
preventexcessivesmoking,leavinga layer about
1/8inch thick.
3. Arrangefood on rack and positionthe broilerpan
on the appropriateshelfin the ovenor broiling
compartment.Placingfoodcloserto flame
increasesexteriorbrowningof food,but also
increasesspatteringand the possibilityof fats and
meatjuices igniting.
4. Closethe ovenor broilerdoor.
5. Turn OVENCONTROLknoband BAKE/BROIL
switch(on modelsso equipped)to BROIL.
6. Turnmostfoodsonceduringcooking(the
exceptionis thin filletsof fish; oil one side,place
that sidedownon broilerrack and cook without
turninguntildone).Timefoodsfor aboutone-half
the totalcookingtime,turn food,then continueto
cookto preferreddoneness.
7. TurnOVENCONTROLknobto OFF.Remove
broilerpan horn oven and servefood immediately.
Leavepan outsidethe oven to cool.
—
—
use
ofAldnum
Fofl
Youcanusealuminumfoilto
/J
1,,
he yourbroilerpan and
broilerrack.However,you
mustmold the foil tightlyto
the rack md cut slitsin itjust
likethe rack.
W’ithoutthe slits,the foil willpreventfat and meat
juicesfrom drainingto the broilerpan. Thejuices
couldbecomehot enoughto catchon fire. If you do
not cut the slits,you are frying,not broiling.
Questions
-
Broiling
Tips
1. Alwaysuse broilerpan and rack thatcomeswith
youroven.It is designedto minimizesmokingand
spatteringby trappingjuices in the shieldedlower
part of the pan.
2. For steaksand chops,slashfat evenlyaround
outsideedgesof meat.To slash,cut crosswise
throughouterfat surfacejust to the edge of the
meat.Use tongsto turn meatover to prevent
piercingmeat and losingjuices.
& Answers
Q. When broiling, is it necessary to aiways use a
rack in the pan?
A. Yes.Usingthe rack suspendsthe meat over the
pan. As the meatcooks,thejuices fall into the pan,
thuskeepingmeat drier.Juicesare protectedby the
rack and stay cooler,thusp~eventingexcessive
spatterand smoking.
Q. Why are my meats not turning out as brown as
.- A. Checkto see if you are usingthe recommended
shelfposition.Broilfor longestperiodof time
.
indicatedin the BroilingGuide.Turnfood only
onceduringbroiling.
Q. Should I salt the meat before broiting?
A. No. Salt drawsout thejuices and allowsthem to
evaporate.Alwayssalt after tooting. firn meat
with tongs;piercingmeat with a fork also allows
juices to escape.Whenbroilingpoultryor fish,
brush each sideoften with butter.
(continuednextpage)
19
BROm~G GmE
Modelswithout
BroilerCompartment
Yood
Quantityand/or OvenSheti Ist Side
ThicknessI
Position Minutti
Modelswith
Broiler Compartment
2nd Side Broiler Shelf Ist Side 2nd Side
Minutes
Position
Minutes Minutes Comments
Bacon
1/2lb. (about8
c
3%
3
B
3!4
3
Arrangeinsinglelayer.
GroundBeef
thinslices)
1lb,(4patties)
1/2to 3/4in. thic
c
10-11
4-5
A
10-11
4-5
Spaceevenly.Upto9
pattiestakeaboutsame
time.
1in.thick
(1 tO 1Xlbs.)
B
B
B
9
12
13
7
5-6
8-9
B
B
A
9
12
13
7
5-6
8-9
Rare
Medium
WellDone
1in.thick
(2to2%lbs.)
10
12-15
25
6-7
9-12
16-18
1whole
(2to2XIbs.),
splitlengthwise
30-35
25-30
B,C
B
A
A
10
12-15
25
Chicken
B
B
B
B
30-35
6-7
10-12
16-18
25-30
Steakslessthan1inch
thickcookthroughbefore
browning.
Panfryingis
recommended.
Slashfat.
1/2-1
c
2-3
1/2-1
c
3-5
A
13-16
BeefSteaks
Rare
Medium
WellDone
Bakery Product
Bread(Toast)or
ToasterPastries
2 to4 slices
1pkg.(2)
c
2-3
EnglishMuffins
2,split
2t04
c
3-5
c
13-16
Donot
turnover.
Hsh
l-lb.fillets
1/4to 1/2in.thick
B
5
5
B,C
5
Wm Slices
1in.thick
c
8
8
B
8
PorkChops
2(1/2in. thick)
2(1 in. thick),
ibout 1 lb.
B
B
10
13
B
B
10
:72
1(1in.),
10to 12oz.
1(1X in.),
~bout1 lb.
l-lb.pkg.(10)
B
B
B
B
8
4-7
10
10
8
17
4-6
12-14
10
10
17
4-7
10
4-6
12-14
c
6
1-2
B
B
B
B
B,C
6
1-2
LobsterTails
(6to 8 oz. each)
Precooked
WellDone
LambChops
Medium
WellDone
Medium
WellDone
Wieners
similarprecooked
sausages,
bratwurs
20
10
13
Reducetimesabout5 to
10minutespersidefor
cut-upchicken.Brush
eachsidewithmelted
butter.Broilskin-sidedownfirst.
Spaceevenly.Place
Englishmuffinscut-side-a
upandbrushwithbutter _
ifdesired.
Donot Cutthroughbackofshell *
turnover. andspreadopen.Brush
withmeltedbutterbefore
broilingandafterhalfof
time.
Handleandturnvery
5
carefully.
Brushwith
lemonbutterbefore
broilingandduring
broilingif desired.
Preheatbroilerto
increasebrowning.
Increase5 to 10
8
minutespersidefor
‘inchthickorhomecured.
Slashfat.
4-5
9-12
Slashfat.
If desired,splitsausages
in halflengthwise;
cut into5-to6-inchpieces. ‘-‘v
CAm Am CLEAmG
Proper care and cleaningareimportantso yourrangewillgiveyoueffleient
andsatisfactoryservice.Followthesedirectionscarefullyin caringfor it to
elpassuresafeandpropermaintenance.
BE SUW ELECTKCAL POWER IS DISCONNECTEDBEFO~
CLEANING ANY PART OF YOUR WNGE.
~ea~ed Burner
~ssemb~ies (on somemodels)
~ua~ ~urners
(on somemodels)
CAUTION: DO NOT OPEWTE T~
BU~ER WITHOUT ALL BU-R
PARTS AND DW
~ PLACE.
Grate
PANS (~ SO EQU~PED)
Grate
fi.
-
\i
BurnerCap
u
BurnerHead
—
w
On modelswith dualburners,the cooktoplifis up for
easyaccess.
Theholesin the surfaceburnersof yourrangemust be
keptcleanat all timesfor properignitionand an even,
unhamperedflame.
Youshouldcleanthe surfaceburnersroutinely,
especiallyafterbad spillovers,whichcouldclog these
holes.Wipeoff sutiaceburners.If heavyspillover
occurs,removethe surfaceburnersfromrange.
Burnerslift out for cleaning.Lifi up the cooktopand
thenlift out the surfaceburners.
Toremoveburned-onfood, soak the surfaceburnerin
a solutionof mild liquiddetergentand hot water.Soak
the surfaceburnerfor 20 to 30 minutes.For more
stubbornstains,use a cleanserlike Soft Scrub”brand
or BonAmi”brand.Rinsewellto removeany traces
of tie cleanserthat mightclog the surfaceburner
openings.Do not use steel woolbecauseit will clog
the surfaceburneropeningsand scratchthe surface
burners.If the holesbecomeclogged,cleanthem with
a toothpick.
Beforeputtingthe surfaceburnerback, shakeout
excesswaterand then dry it thoroughlyby settingit in
a warmovenfor 30 minutes.Thenplaceit back in the
range,makingsure it is properlyseatedand level.
.
\\
.z // =~’urner’ase
DripPan
(onsomemodels)
The burner assemblies should be cleaned thoroughly
after spillovers.
Turn all controlsOFF beforeremovingburnerparts
anddrippans (if so equipped).
The burner grates, caps, burner heads and drip pans
(if so equipped) can be lifted off, making them easy
to clean.
Electrode
The electrode of the
sparkigniter is
exposed. When
one burner is turned
to LIT~, all the bume
spark. Do not attempt to
disassembleor clean around any burner while
anotherburner is on. An electric shock may result,
whichcould cause you to knock over hot cookware.
(continue~nextpage)
—
—-
Lift off whencool.Washburnercapsin
hot, soapywater and rinsewith clean
water.If desired,soak up to 30 minutes
and scourwith a plasticscouringpad to remove
burned-onfood particles.Dry themin a warm ovenor
with a cloth-don’t reassemblethemwet.
The burnerbase (thepart of’the burner
fastenedto the cooktop)may be
cleanedwith a softbrushand a mild
cleanser.Cleanall foodresiduesfrom
aroundsparkelectrode.Do not use steelwool;small
bits of steelwoolwill shortout theelectrode.Rinse
well.
The holesin the burnersof your range, ~--- >
.
and the sparkelectrodes,must be kept
“/.\.\,, . “
a
clean at all times for properignition
and ~ even,unhamperedflame.
Youshouldcleantheburnerheadsroutinely,especially
after bad spi~overs,whichcouldclog theseholes.
Wipeoff burnerheads.If heavy spilloveroccurs,
removeburnerheadsfromrange.
Removethe burnergrateand burnercap. Then lift the
burnerhead sfiaightup.
Toremoveburned-onfood,soak the burnerhead
upside-downin a solutionof mild liquiddetergentand
hot water.Soak the burnerhead for 20 to 30 minutes.
If the food doesn’trinseoff completely,scrub it with
soapand waterand a softbrushor plasticscoutingpad.
For morestubbornstains,use a cleanserlike Soft
ScrubQbrandor Bon AmiQbrand.Wnsewellto
removeany tracesof the cleanserthatmightclogthe
burneropenings.Do not use steelwoolbecauseit will
clog the burneropeningsand scratchthe burners.If
theholesbecomeclogged,cleanthemwitha toothpick.
Beforeputtingthe burnerheadback,shakeout excess
waterand dry it thoroughlyby settingit in a warm
ovenfor 30 minutes.Thenplaceit backin the range,
makingsurethe pin in the burnerbasegoesin the
hole in the burnerhead,and thatthe burnerheadsare
properlyseatedand level.
.~~~~ ~~~$ (on somemodels)
Removethegrates
and lift outthe drip
pans.Drippanscan
be cleanedin
[~-~
dishwasheror by
hand.Placethemin a
%
coveredcontainer(or
~plasticbag)with 1/4cupammoniato loosenthe soil.
Thenscrubwitha soap-filledscouringpadif necess~.
22
Burner
Grates
Lift out when cool.
Gratesshouldbe
washedregularly
and, of course,
after spillovers.
Washthemin hot, soapywaterandrinse with clean
water.After cleaning,dry them thoroughlyby putting
them in a warm ovenfor a few minutes.Don’tput the
gratesbackon the rangewhilethey are wet. When
replacingthe grates,be surethey’repositioned
securelyoverthe burners.
To get rid of burned-onfood,placethe gratesin a
coveredcontainer(or plasticbag)with 1/4cup
ammoniato loosenthe soil.Then scrubwith a
soap-filledscouringpad if necessary.
Althoughthey’redurable,the grateswill gradually
lose their shine,regardlessof the bestcare you can
givethem.This is due to their continualexposureto _high temperatures.
Do not operatea burnerfor an extendedperiodof
time withoutcookwmeon the grate.The finishon the
grate may chip withoutcookwareto absorbthe heat.
—
Cooktop Suflace
Toavoiddamagingthe porcelainenamelsurfaceof
the cooktopand to preventit from becomingdull,
cleanup spillsright away.Foodswith a lot of acid
(tomatoes,sauerkraut,fruitjuices, etc,) or foodswith
high sugarcontentcouldcausea dull spotif allowed
to set.
Whenthe surfacehas cooled,washandrinse.For
otherspillssuch as fat smatterings,etc., washwith
soapand wateroncethe surfacehas cooled.Then
rinse and polishwith a dry cloth.
Donot store flammablema@fids in an ovenor
near the cwhp. Donotstoreorusecombustible
materials,gasolineor otherflammablevaporsand
liquidsin the vicinityof thisor anyotherappliance.
oven
Bottom
The oven bottom has a porcelain enamel fitish.
Tomake cleaningeasier,protectthe ovenbottom
fromexcessivespilloversby placinga cookiesheet
on the shelfbelowthe shelfyou are cookingon. You
can use aluminumfoil if you do not coverthe whole
shelf.This is particularlyimportantwhenbakinga
fruitpie or otherfoodswith a high acidcontent.Hot
fruitfillingsor otherfoodsthat are highlyacidic
(suchas milk, tomatoesor sauerkraut,and sauces
withvinegaror lemonjuice) may causepittingand
damageto the porcelainenmel surfaceand should
be wipedup immediately.Takecare not to touchhot
portionof oven.
If a spilloverdoesoccuron the ovenbottom,allow
the oven to coolfirst. Youcan then cleanthe oven
bottomwith soap and water,an abrasivecleanseror
scouringpads.
oven
shelves
Broiler Pan and Rack
Afterbroiling,removethebroiler
pan and rack from the oven.
Removethe rack from the pan.
Carefullypour out the greasein
the pan into a propercontainer.
If foodhas burnedon, sprinkle
therack with detergentwhilehot
— andcover with we~Dat)ertowelsor a dishcloth.That
~-w-av.
burned-onfoods‘willsoakloose whilethe meal
——
-“~is ij~ingserved.Wash;scourif necessary.Rinse and
–+ dr>~.
The broiierpan and rack may also be cleanedin a
:j?<l!w~~ll~lo
‘“-L----”-’= Do not store a soiledbroilerpan and rack
‘-” anywherein the range.
D
Shelvescanbe cleanedby
handusingsoapandwateror
withan abrasivecleanser.
After cleaning,rinse the
shelveswith cleanwater and
dry.Toremoveheavy,
burned-onsoil,you may use
scouringpads. After
scrubbing,wash with soapy
water,rinse and dry.
(continuednextpage)
23
c~mAm
CLEAMG
(continued)
~ve~ ~~~~ ~e~~a~e~e~~ (onsomemodels) =
CAUTION:
Before replacing your oven bulb,
disconnectelectrical power to the range at the
@
main fuse or circuit breaker panel. Be sure to let
the lamp cover and bulb coolcompletely.
The ovenlamp (bulb)is coveredwith a removable
glasscoverthatis held in placewith a bail-shaped
wire.Removeovendoor,if desired,to reach cover
easily.
To remove:
1. Holdhandundercoverso it doesn’tfall when
released.Withfingersof samehand,firmlypush
back wirebail untilit clearscover.Lifi off cover.
DO NOTREMOVEANY SCREWSTO
REMOVECOVER.
2. Do not touchhot bulb with a wet cloth.Replace
bulb with a 40-watthouseholdappliancebulb.
To replace cover:
1. Placeit intogrooveof lampreceptacle.Pull wire
bail forwardto centerof coveruntilit snapsinto
place.Whenin place,wire holdscoverfirmly.Be
certainwirebail is in depressionin centerof cover.
2. Connectelectricalpowerto the range.
~ontrol
Panel
andKnobs
It’s a goodidea to wipethe controlpanelafter each
use of the oven.Cleanwith mild soap and wateror
vinegarand water,rinse with cleanwater andpolish
dry with a soft cloth.
Do not use abrasivecleansers,strongliquidcleaners,
‘plasticscouringpads or oven cleanerson the control
panel-they will damagethe finish.A 50/50solution
of vinegarand hot water workswell.
The controlknobsmay be removedfor easier
cleaning.Toremoveknob,pull it straightoff the
stem.If knobis difficultto remove,place a towel
or dishclothbetweenthe knob and controlpanel
and pull gently.Washthe knobsin soap and water
or a vinegarand hot water solutionbut do not soak.
To cleanoutsideglassfinish,use a glass cleaner.Do
not allowthe wateror cleanerto run down inside
openingsin the glass whilecleaning.
Metalparts can be cleanedwith soap and water.Do
not use steelwool, abrasives,ammonia,acidsor
commercialovencleaners.Dry with a soft cloth.
----
The oven door is removable but it is heavy. You may
need help removing and replacing the door.
TO REMOVE THE \ \
~00~, open it a few
inches to the special
stop position that will
hold the door open.
Grasp firmly on each
side and lift the door
straight up and off
the hinges.
NOTE: Be carefil not
to place hands between
the hinge and the oven
door frame as the hinge
could snap back and
pinch fingers.
TO REPLACE THE DOOR, make
sure the hinges are in the special stop position.
Position the-slots in the bo~tomof tie door squarely
overthe hinges.Then lowerthe door slowly~d evenlyoverboth hingesat the same time.If hinges
snap back against th{ oven frame, pull them bat-k out.
Porcelain
TO CLEAN THE DOOR:
(Donot immersedoor in water.)
Inside of door:
oAllowto coolbeforecleaning.For light soil,wipe
frequentlywith mild soapand water(especiallyafter
cookingmeat).Thjs willprolongthe time between
majorcleaning.Rinsethoroughly.NOTE: Soap left
on the oven door causes additional stains when
the oven is reheated.
● For heavysoil,choosean ovencleaner(for
ContinuousCleaningoven,beforeapplying
commercialoven cleaner,removethe oven door)
andfollowlabelinstructions.Rinsewell.
Outside of door:
s Use soap and waterto thoroughlycleanthe top,
sidesand frontof the ovendoor.Rinsewell. You
may also use a glasscleanerto cleanthe glasson
the outsideof the door.
e Spillageof marinades,fruitjuices, tomatosauces
and bastingmaterialscontainingacidsmay cause
discolorationand shouldbe wipedup immediately.
When surfaceis cool,cleanand rinse.
eDo not use ovencleaners,cleansingpowdersor
harsh abrasiveson the outsideof the door.
oven
Interior
(on all models except Continuous-Cleaning Models)
With proper care, the porcelain enamel interior will
retain its attractive finish for many years.
Soap and water will normally do the job. Heavy
spattering or spillovers may require cleaning with a
mild abrasive cleanser. Soapy, wet pads may also be
used. Do not allow food spills with a high sugar or
acid content (such as milk, tomatoes, sauertiaut, fruit
juices or pie filling) to remain on the surface. They
may cause dull spots even after cleaning.
Household ammonia may make the cleaning job
easier. Place 1/2 cup ammonia in a shallow glass pan
and leave in a cold oven overnight. The ammonia
fumes will help loosen the burned-on grease and food.
Whennecessary,you may use a commercialoven
cleaner.FO11OW
the packagedirections.
Cautions about using spray-on oven cleaners:
● Be carefulwherethe oven cleaneris sprayed,
SIDo not sprayoven cleaneron the electricalcontrols
and switches(on somemodels)becauseit could
causea shortcircuitand result in sparkingor f~e.
e Do not allowa film from the cleanerto remainon
the temperaturesensingbulb—itcouldcausethe
ovento heat improperly.(The bulb is locatedat the
rear of the oven.)Carefullywipe the bulb clean after
each oven cleaning,beingcarefulnot to move the
bulb as a changein its positioncouldafiect how the
ovenbakes.
~Do not spray any ovencleaneron the outsideoven
door,handlesor any exteriorsurfaceof the oven,
woodor paintedsurfaces.The cleanercan damage
these surfaces.
(continuednextpage)
—
25
I
The Continuous-CleaningOven cleans itself while
tooting. The oven wallsare finishedwitha special
coatingthatcannotbe cleanedin the usualmannerwith
soap,detergents,steelwoolpads, commercialoven
cleaners,coarseabrasivepadsor coarsebrushes.Use of
suchcleansersand/ortheuse of ovensprayswill cause
permanentdarnage.
The special coating is a porous ceramic material,
whichis dark in colorandfeels slightlyroughto the
touch.If magnified,the surfacewouldappearas peaks,
valleysand sub-stiace “tunnels.”Thisroughfinish
tendsto preventgreasespattersfrom forminglittle
beadsor dropletsthatrun downthe sidewallsof a
‘hard-surfaceovenliner,leavingunsightlystreaksthat
requirehand cleaning.Instead,when spatterhits the
porousfinish,it is dispersedand partiallyabsorbed.
This spreadingactionincreasesthe exposureof oven
soilto heatedair andmakesit somewhatlessnoticeable.
Sotimay not disappearcompletelyand at sometime
afterextendedusage,stainsmay appearthat cannot
be removed.
The special coating works best on small arnounk of
spatter. It doesnot workwell with largerspills,
especiallysugars,egg or dairymixtures.
This special coating is not used OXI
oven shelves,
oven bottom or door liner. Removetheseto clean
with a commercialovencleanerto preventdamaging
the Continuous-CleaningOven coating.
To C1eanthe Continuous-CleaningOven:
1. Let rangeparts coolbeforehandling.Werecommend
rubberglovesbe wornwhencleaning.
2. Removeshelvesand cookware.
3. Soilvisibilitymaybe reducedby operatingthe oven
at 400”F.Closethe doorand turn OVENCONTROL
knobto 400”F.Timefor at leastfourhours.Repeated
cyclesmay be necessarybeforeimprovementin
appearanceis apparent.
Remember: During the operation of the oven, the
door and other range surfaces willget hot enough to
cause burns. Do not touch. Let the range coolbefore
replacing oven shelves.
~. If a spilloveror heavysoilingoccurson the porous
surface,as soonas the ovenhas cooled,removeas
much of the soil as possibleusing a smallamountof
water and a stiff-bristlenylonbrush.Use water
sparinglyand changeit frequently,keepingit as
cleanas possible,and be sureto blotit up withpaper
towels,clothsor sponges.Do not rub or scrubwith
papertowels,clothsor sponges,sincethey will leave
unsightlylint on the ovenfinish.If waterleaves a
whitering on the finishas it dries,applywateragain
and blot it with a cleansponge,startingat the edge
of the ring and workingtowardthe center.
The oven bottom and the inside of the oven door
have a porcelain enamel finish. The oven doorlifts
off and the ovenbottomcomesout for cleaningaway
fromthe Continuous-CleaningOven.
Do not use soap, detergent, steel woolpads,
commercial oven cleaner, siliconeoven sprays,
coarse pads or coarse brushes on the porous
surface. Theseproductswill spot, clogand darnage
the porous surfaceand reduceits abilityto work.
Donot scrape the porous surfacewitha Imifeor
spatia— they couldpermanentlydamagethe finish.
a---
26
The storagedraweris a goodplaceto storecookware
and bakeware.Do not storeplasticsandflammable
materialin the drawer.
Do not overloadthe storagedrawer.If the draweris
too heavy,it may slip off the track whenopened.
The storagedrawermay be removedfor cleaning
underthe range.Cleanthe storagedrawerwith a
dampcloth or sponge.Neveruse harsh abrasivesor
scouringpads
To remove
If”
storage drawer:
1. fill drawer
straightout
until it stops.
2. Lift drawer
until stopson
drawerclear
stopson range.
3. Againpull drawerout untilit hits secondset of
stops.
4. Tiltfront of drawerup and free of range.
To renlove:
1. When broileris cool,
removerack and pan.
2. fill the broilerdrawer
out until it stops,then
push it back in about
one inch.
3. Grasphandle,lift and
pull broilerdrawerout.
Clean the broilerdrawer
with hot soapywater.
~~~ov~~~~ ~c~
jc
/
~.’
,
‘.\ \~
--
—
To rep~ace:
1.Hold the broilerdrawerin the raisedpositionas
you slideit partwayinto the range.Then lowerthe
drawerandpush it completelyclosed.
~~~~~ (on somemodels)
Thekick panelmay be removedfor cleaningunder
therange.
.
-
Toreplace storage drawer:
1. Set the stopson the backof the draweroverthe
stopsin therange.
2. Slidedrawerevenlyand straightback,so thatthe
rails in therangeare engaged.
3. ~sh drawerback untilsecondstopson drawerhit
stopsin therange.Tiltdrawerup andover these.
4. Slidedrawerthe rest of the way in.
To remove, lift up bottom
of panel slightly to
disengage the panel from
the tabs at the base of the
: range. pull bottom of
panel forward until spring
clips are released at top of
To replace, insertthe
two slotsat bottomof
panelontothe two tabs
at base of rangeand
pushtop of panel
forwardto engage
springclips.
27
oven
Air
Venb
‘mm
Never block the venti (air opetigs) of the range. Theyprovidethe air
~~
inlet and outletthat are necessaryfor the rangeto operateproperlywith
=>
conect combustion.Air openingsare locatedat the rear of the cooktop,at ->
the top and bottomof the oven door,and at the bottomof therange,under
the kick panel,storagedraweror broilerdrawer(dependingon the model).
-+-7
,,. >.0 , .... ,
It -.
“.,,
*
‘.-<
.-
.7*.R
Ventappearance
andlocationvary
~~~~-~~ ~00~~0~ (onmodelswithdualburners)
Cleanthe areaunderthe cooktopoften.Built-upsoil,
especiallygrease,may catchon fire.
Tomakecleaningeasier,thecooktopmaybe liftedup.
To raise the cooktop:
1. Be sureburnersare turnedoff.
2. Removethe grates.
3. Graspthe two front burnerwells and lift up.
Somemodelshavedual supportrods thatwillhold the
cooktopup whileyou cleanunderneathit.
After cleaning under the cooktop with hot, soapy
waterand a cleancloth,lowerthe cooktop.Be careful
not to pinchyour fingers.
I.owercooktopgentlyto avoidblowingout pilot
flames(on modelswith standingpilots).
Metil Park
Glass $utiaces
Do not use steel wool,abrasives,
ammoniaor commercialoven
cleaners.Tosafelycleansurfaces;
wash,rinse and then dry with a
soft cloth.
To cleanthe outsideglass
finish,use a glasscleaner.
Rinseand polishwith a dry
cloth.Do not allowthe
wateror cleanerto run
downinsideopeningsin
the glasswhilecleaning.
Air Adjustment
Shutter(s)
forOven
Burner(s)
The air adjustmentshutter(s)for the oven burner(s)regulatesthe flow of air
to the flames.
The locationof the air adjustmentshutter(s)dependson whetheryouroven
has a singlebottomburneror two separateburners-a top burnerfor
broilingand a bottomburnerfor normalbaking.See InstallationSectionof
thisbook for instmctionsfor locationand properadjustmentof shutters.
28
--—..-—
- .——
FORYOUR SAFETY
-
Myou smell gas:
1• open tidows.
2. Don’ttouch electicd stitches.
30 Em@ish any open flame.
4. Immediatelycd yom gas suppfiere
FORYOUR SAFETY
~
~
Removeau pactig materialmd
Ukratire horn oven before comectig
gas and electrid supp&to range.
Provide adequate clearaces between the range
and adjacent combustible surfaces.
Do not store or USecombustible
materids9gasotie or otier flammable
vapors ad Mquidsin me victity of tis
or my otier apptiance.
DepthwithDoorClosed
(IncludesDoorHandle):
,
t
BEFORE
You BEGUN
-
i
Read tiese tistructions complete&md
Carefiuy.
IMPORTm Save tiese instructions
for tie local electricalinspecto~s use.
lNmUR
kave tiese instructions
dti tie apptiance tier initiation iS
completed.
CONS~ER KeepMS Use md Care
Guide and tie kstiation Instructions
forfitie use.
Ws apptiancemust be proper~gromded.
4
1
Improperins~ation, adjustment,
alteration service or mtitenmce cause hjmy or propertydamage.Referto
his muudo For assistice or adtitiond
itiormation9consult a quafied kstier9
service agency,mmtiactier (deder) or
tie gas suppUere
See Chart
Belowfor
Height
I
IIF
Depthwith DoorOpen:~.
\\
\
RangeHeight:
36”
JGSS05GER
40”
JGBS02ENJGBS02PN
45~~ JGBS04PR
JGBS04ER
JGBS04GER JGBs~GpR
JGBS06ER JGBS06PR
46Y
JGBSIPGER JGBS15GERJGBSIGGERJGBS17GER
JGBS19GEP JGBC15GERJGBC16GEPJGBC17GER
18”
auTioN
Do notatiempt to operate tie oven of
j tiis rmge d~fing a power ftil~re.
-- —
—–
a
--”
.
.
.
(conttnuednextpage)
29
—
mSTAL~~mo~
msTRucTIoNs
,. , (continued)
,.
,.
!-BMmRTAHT
saFETY!HSWRUCTIOMS
tisMatiOn of tis range must cotiormtiti
Iod codes, or in tie absenceof Iod codes,
tith the NationalFuelGasCode,~SI
=23.1, ktest e&tion.h Canada,instition
must conform with the cwrent Natial Gas
Initiation Code,C~/CGA-B149.l ortie
mrent Propmeks-tion Code,C~/CGAB149.2,md tith Iod codeswhereapplicable.
Thisrange has been design-certied by the
AmericanGasAssociationaccordingto ANSI221.1,
latest edition and Canadian Gas Association
according to CANICGA-1.Ilatest edition. As with
any applianceusing gas and generating heat,
there are certain safety precautions you should
follow.Youwillfind these precautions in the
Important Safety Instructions in the front of this
book. Read them carefully.
~ Have your range installed by a qua~ed
installer or service technician.
~ Your range must be electricallygrounded in
accordance with local CO*<Sor, in the absence of
local codes, in accordance with the National
Electrical Code (ANS1/NFPA70, latest edition).
In Canada, electrical grounding must be in
accordancewith tie current CSAC22.1Canadian
Electrical Code Part 1 and/or local codes. See
Electrical Connections in this section.
~ Before installing your range on linoleum or
any other synthetic floor covering, make sure
the floor covering can withstand 180°R without
shrinking, warpiiig or discoloring. Do not install
the range over carpeting unless a sheet of 1/4”
thick plywood or similar insulator is placed
between the range and carpeting.
s Make sure the wall coverings around the
range can withstid heat generated by the
range up to 200°R
~ Avoidplacing cabinets above the range. To
reduce the hazard caused by reaching over the
open flames of operating burners, install a
ventilation hood over the range that projects
forward at least Wbeyondthe tiont ofthe cabinets.
~ The ventilating hood must be constructed of
sheet metal not less than 0.0122”thick. Install
above the cooktop with a clearance of not less
than 114”between the hood and the underside
of the combustiblematerial or metal cabinet. The
hood must beat least as wide as the appfianceand
centered over the appliance. Clearance between
the coohg surface and the ventilationhood stice
mm mR
BE m
m
24 mcm.
30
‘ ~
~ If cabinets are placed above the range, allowa
minimum clearance of 30”between the cooking
surface and the bottom of unprotected cabinets.
~ Ifa 30”clearancebetweencookingstice and
overheadcombustiblematerialor metalcabinets
cannotbe maintained,protectthe undersideof
the cabinetsabovethe cooktopwithnotless
than 1/4”insulatingmillboardcoveredwith
sheet metalnot less than 0.0122”thick.
~ Clearancebetweenthe cookingsurfaceand
protectedca~inetsWm mR
BE =
_
24 INC=. Theverticaldistancefrom
the planeofthe cookingsurfaceto the bottom
ofadjacentoverheadcabinetsextendingcloser
than 1“to the planeofthe rangesidesmust not
be less than 18”.(SeeDimensionsand
Clearancesi~ustrationin this section.)
QCaution:Itemsofinterestto childrenshould
notbe storedin cabinetsabovea range or onthe
backsplashofa range--childrenclimbingon the
rangeto reach itemscouldbe seriouslyinjured.
Allranges cantip andinjury
couldresult.Toprevent
accidentitippingoftherange,
attachan approvedAnti-Tip
deviceto the wan.(See
Instalhg the Anti-TipDevice
in this section.)To checkif
the deviceis installedand
engagedproperly,carefully
tipthe rangeforward.The
Anti-Tipdeviceshouldengage
andpreventthe rangefrom
tippingover.
Ifyoupullthe range outfrom
the wallfor anyreason,make sure the Anti-Tip
deviceis engagedwhenyoupush the rangeback
againstthe wall.
~ For your safety,never use your range for warming
or heating the room. Your oven and range top are
not designed to heat your kitchen. Top burners
should not be operated tithout cookware on the
grate. Such abuse could result in fire and damage
to your range and willvoid your warranty.
~ Do not store or use combustiblematerials,
gasolineor other flammablevaporsand liquids
in the vicini~ofthis or anyother appliance.
Explosionsor fires couldresult.
~ Do not use ovenfor a storagearea.Items
storedin the ovencan ignite.
@Do not let cookinggrease or otherflammable
materialsaccumulatein or near the range.
o
?OOLS
You WILL
NEEB
~ See Dimensions and Clearances in this section
for all rough-in and spacing dimensions. These
dimensionsmust be met for safeuse ofyourrange.
The locationofthe electricaloutletand pipeopening
(see Gas Pipe and Electric Outlet Locations) may
be adjusted to meet spectic requirements.
~ The range maybe placed with 0“ clearance
(flush)at the back walland sidewalls of the range.
~ PhilMpsand flat-bladescrewdrivers
~ Pencil and ruler
~ Two pipe wrenches (one for backup)
~ lW open-end or adjustable wrench
~ Nut drivers or wrenches: 3/16” and 114”
mlERmLs
YOMMY MEEB
MolTaow
Gas he shut-offvalve
~
Do not locate the range where it may be subject
to strong drafts. Any openings in the floor or wall
behind the range should be sealed. Make sure
the openings around the base of the range that
supply tiesh air for combustion and ventilation
are not obstructed by carpeting or woodwork.
PRoTEcrYOURFLOOR
Yourrange, like many other household items, is
heavy and can setde into soft floorcoveringssuch
as cushioned vinyl or carpeting. Use care when
moving the range on this me of flooririg.It is
recommended that the followingsimple and
inexpensive instructions be followedto protect
your floor.The range shouldbe instied on a sheet
ofplywood(or similar material). men thefloor
coveringenh at thefio~~tof the ra~ge,the area
that the range will rest on should be built up with
plywood to the same level or higher than the
floor covering. This willallowthe range to be
moved for cleaning or servicing.
Depending on your range, you’llfind the model
and serial numbers on a label on the front frame
of the range, behind the storage drawer, kick
panel or broiler drawer.
@Pipejointsealantor Unapprovedpipethread
tapewithTeflon*that resists actionofnatural
andLPgases
@Flexiblemetalapplianceconnector(1/2”I.D.)
A5-footlengthis recommendedforease of
installationbut otherlengthsare acceptable.
Neveruse an oldconnectorwheninstallinga
newrange.
@Flareunionadapterforconnectionto gas
supplyline (3/& or 1/7 NPTx 1/2”I.D.)
@Fltie l~nionadapterforconnectionto pressure
regulatoronrange (1/2”NPTx 1/2”I.D.)
Teflon: RegisteredtrademarkofDuPont
PREHMTIOW
oRemovealltape andpackaging.Liftup the
cooktop(onmodelswithdud burners)andremove
anypackingmaterialunderit. Makesure the
dualburners are properlyseatedandlevel.
@Removeplasticfilmthat coverssomechrome
parts (aroundovendoor,sidetrim).
@Takethe accessorypackout ofthe oven.
@Checkto be sure that no rangeparts have
comelooseduringshipping.
(continuednextpage)
❑ PR@vHoE
WEQUAFE
GM SUPPLY
Your range is designed to operate at a pressure
of 4“ ofwater column on natural gas or, if designed
for LP gas (propane or butane), 10”of water
column. Make sure you are supplyingyour range
with the type ofgas for which it is designed.This
range is convertiblefor use on natural or propane
gas, if you decide to use MISrange on a different
typeofgas,conversionadjustmentsmustbe made
by a servicetechnicianor other qua~ed person
beforeattemptingto operatetie rangeonthatgas.
For properoperation,the pressureofnaturalgas
suppliedto the regulatormustbe between4“and
lY’ofwatercolumn.ForLPgas,the pressure
supptiedmustbe between10”and 13”ofwater
column.Whencheckingforproperoperationof
the regulator,tie inletpressuremustbeat least
v greaterthanthe operatig (manMold)
pressure
as givenabove.The pressureregulatorlocated
at the inletofthe rangemanifoldmustremti in
the supplylineregardlessofwhethernaturalor
LPgas is beingused.Aflexiblemetalappliance
connectorusedto connectthe rangeto the gas
supplylineshouldhavean I.D.of1/2” andbe
5feet in length (shorterandlongerlengthsare
acceptable)for ease ofinstallation.In Canada,
flexibleconnectorsmustbe singlewallmetal
connectorsno longerthan 6feetin length,
❑ coNHEcTTHEMMGETo GM
Shutoffthe maingas supplyvalvebefore
disconnectingthe oldrange andleaveit offuntil
newhook-uphas been completed.Don’tforget
to retightthe piloton othergas applianceswhen
youturn the gas backon.
Becausehard pipingrestrictsmovementofthe
range,the use ofanA.G.A-certied flexible
metalapplianceconnectoris recommended
unlesslocalcodesrequirea hard-piped
connection.Neveruse an oldconnectorwhen
installinga newrange.Hthe hard pipingmethod
is used,youmust carefullyalignthe pipe;the
range cannotbe movedafterthe connection
is made.
To preventgas leaks,put pipejointcompound
on, or wrappipethreadtapewithTeflon*
around,allmale (external)pipethreads.
Teflon:Registered
trademark
ofDuPont
Thisareaallows
for flushrange
installationwith
/
/
through-the-wall
connectionof pipe
stub/shut-offvalve
andrearwall
120Voutlet.
1
J
from hardpipe
stub locationto
rangehookup.
/
Thisareaallowsfor
flush rangeinstallation
with through-the-floor
connectionof pipe
r/
stub/shut-offvalve.
Thisareaallows
for flushrange
installationwith
through-the-wall
connectionof pipe
stub/shut-offvalve
andrearwall
120Voutlet.
\\
2’
‘t
Thisareaallows
for flush range
installationwith
through-the-floor
connectionof pipe
stub/shut-offvalve.
c-~
... . .. .
..’
“
\,-
4
Pressure
Regulator
w-
90° Elbow~
(provided)
“
t
Adapte
Flex
Connector
(6 ft. max.)
~
(continuednextpage)
I
I
Nipple Union
~
Black
IronPipe
~~
B
~
M
.
I
I
.
~
Union
Nipple
w
33
msTALLATIoN
mSTRucTIoNs
(continued)
•~o~~~m TMEM6E TOGM (continued)
1. Installa manualgas lineshut-offvalvein the
gas linein an easilyaccessedlocationoutsideof
the range.Makesure everyoneoperatingthe
rangeknowswhereandhowto shutoff the gas
supplyto the range.
2. Installmale 1/2”flareunionadapterto the
1/2”N~ internalthread elbowat inletof
regulator.On models eqtippedAh dud
~wners, installthe malepipethread end of
the 1/2”flareunionadapterto the 1/2”N~
internalthread at klqt ofpressure regulator.
Usea backupwrenchonthe regulatorfitting
to avo~ddamage.
Wheninstallingthe rangeborn the front,
removethe 90°elbowforeasierinstallation.
3. Installmale 1/2” or 3/4”flareunionadapter
to the N~ internalthread ofthe manualshutoffvalve,takingcare to back-upthe shut-off
valveto keep it fromturning.
~. Connectflexiblemetalapplianceconnector
to the adapteron the range.Positionrange
to permitconnectionat the shut-offvalve.
~. men allconnectionshavebeen made,make
sure allrange controlsare in the offpositionand
turn on tie maingas supplyvalve.Usea liquid
leakdetectorat alljointsand connectionsto
checkfor leaksin the system.
CAmON: DO N~ USEA ME
CHECKFORGAS~.
TO
Whenusingtest pressures greater than 1/2 psig
to pressure test the gas supply system of the
residence, disconnect the range and individud
shut-off valvefrom the gas supply piping. When
using test pressures of 1/2 psig or less to test the
gas SUpply system, simply isolate the range from
the gas supplysystemby closingthe individual
shut-offvalve.
*
34
Electid
Reqdremenk
60 Hertz,properlygroundedbranch
120-volt,
D
circuitprotectedby a I$amp or 20-ampcircuit
breakeror timedelayfuse.
ExtensionCord Cautions
Because of potential safety hazards associated
with certain conditions, we strongly recommend
against the use of an extension cord. However,
ifyou sti~ elect to use an extension cord, it is
absolutely necessary that it be a UL-listed,
3-wiregrounding-type appliance extension cord
and that the current carrying rating of the cord
in amperes be equivalent to, or greater than,
the branch circuit rating.
Gmuntin$
MORTM—(Please
read wetifly)
FOR PERSONALSAPETY,THIS APPLIANCE
MUSI’BE PROPEWY GROUNDED.
The powercord ofthis applianceis equipped
witha three-prong(grounding)plugwhich
mateswitha standardthree-pronggrounding
wallreceptacle
.
PREFERRED
f
the
to mintize
METHOD
possibility
of
-\
electricshock
QQ 9
0
hazardhorn
%
this appliance.
~,
VB
The customer
ENSUREPROPER
shouldhavethe
GROUNDEXISTS
wallreceptacle
BEFOREUSE
andcircuit
..-.
II
checked by a
qua~ed electrician to make sure the receptacle
is properly grounded.
Wherea standardtwo-prongwallreceptacleis
encountered,it is the personalresponsibilityand
obligationoftie customerto haveit replacedwith
a properlygroundedthree-prongwallreceptacle.
B
❑
Usage Sitiati.ns where Appliance
PowerCord~ be DiscomectedMquen*.
Anadapter maybe used only on a 15-arnp
circuit. Do not use an adapter on a 20-amp
circuit. Where local codes permit, a
CONNE~ON may be
~wOwY
madeto a properlygroundedtwo-prongwall
receptaclebythe use ofa ULlistedadapter,
availableat mosthardwarestores.me larger
slotin the adaptermustbe alignedwiththe
largerslotin the wallreceptacleto provide
properpolarityin the connectionofthe
powercord.
TEMPORARY METHOD
(ADAPTERPLUGSNOT
PERMllTED INCANADA)~~11
ALIGNLARGE\
))~ ~-”
PRONGS/SLOTS
w.,,.
II2T)
ENSUREPROPER
GROUNDAND
FIRMCONNECTION
BEFOREUSE
CA~ON: Attachingthe adapterground
terminalto the wallr~ceptacle-cov~r
screw
doesnotgroundthe applianceunlesstie cover
screwis metal,andnotinsulated,andthe wall
receptacleis groundedthroughthe house
wiring.Thecustomershouldhavethe circuit
checkedbya qualifiedelectricianto makesure
the receptacleis properlygrounded.
~ ~SW~ Satiationswhere Applia.e Power
Cordti be Discomected Frquently.
Do not use an adapter plug in these situations
because disconnecting of the power cord
places undue stiain on the adapter and leads to
eventual failure of the adapter ground terminal.
The customer should have the two-prong
wall receptacle replaced with a three-prong
(grounding) receptacle by a qualifiedelectrician
before using the appfiance.
The installation of appliances designed for
mobile home installation must conform with
the Manufactured Home Construction and
Safety Standard, Title 24 CF~ P~t 3280
(formerly the Federal Standard for Mobile
Home Construction and Safety,Title 24, HUD,
Part 280) or, when such standard is not
applicable,the Standard for Manufactured
Home Installations, latest edition (Manufactured
Home Sites, Communities and Set-Ups),ANSI
A225.1,latest edition, or with local codes. In
Canada, mobile home installation must be in
accordance with the current C~/CSA
Z240/MH Mobile Home Installation Code.
Elec?ricOisconttecg
1. Locate disconnect plug on the range back.
2. P~nchsides of connector and pull out of
range back.
with
ModelsEquEpped
DuaiBurnefi
ModelsEquippedwith
SealedBurnew
men disconnectingthe powercordfromthe
adapter,alwaysholdthe adapterwithone hand.
Ethis is notdone,the adaptergroundterminal
is very likelyto breakwithrepeateduse. Should
this happen,DO NOT USEthe appfiance until a
proper ground has again been established.
(continuednextpage)
35
msTmLAmoN”
,- (Cintiiud)
,.,. ,-”.
‘,,. ,.
Sed anyopeningsin the wallbehindthe range
andin the floorunderthe rangewhenhookups
are completed.
cmo~s
-.,,
1. Raisethe cooktop.
M llGHT 3HEPlkom
(formodelsequippedwithstandingpilots)
The rangeshouldbe insta~edin its permanent
positionbeforeanypilotsare lit or adjusted.
Light~heSuhae BMm$rMloh
CAUTION:Makesure tie surfaceburner
controlknobsare in the “OFF”positionsbefore
attemptingto lightthe pilots.
1. Mse the cooktop.
2. Lightbothpilotswitha match.
3. Toavoidpilotoutage,use cautionwhen
closingcooktopafterlightingpilots.
Note:Donot leavestandingpilotfitin a newly
constructedor remodeledhome or apartment
thatwillbe unoccupiedformore than a monti.
Eachpilotflamewasadjustedat the factory
to be approximately5/16”tall.Atingeofyellow
appearingat the uppertipis normal.Myoufind
pilotadjustmentis necessary,see the following
instructions.
smallholenear th~center
ofthe manifoldpanel.
3. To adjust,use a bladetypescrewdriverwitha
shaftdiameterofless than 3/1611,
Turn pilot
adjustmentscrewuntilpilotis 5/16f1high.Do
not reducethe flameto lessthan 5/161’or pilot
outagemayoccur.Apilotflameburninghigher
than recommendedmaygeneratesoot (carbon
black)on the bottomofyourcooktop.
E LUGHFWMEOVENPILOT
CA~ON: Makesure the OVENCONTROL
knobis in the “OFF positionbeforeattempting
to lightthe pilot.
1. Removethe storagedrawer,broilerdraweror
kickpanel,(dependingonyourmodel),by sfiding
the drawerallthe wayout and
then liftingslightlyto rem
it fromits tracks.
2. Locatethe pilotat the
backwall.The pilotis
attachedto the left
sideofthe ovenburner.
3. Lightthe pilotwitha
match.No adjustments
are requiredfor natural
gas.For LPgas, see How
to Convertthe Rangefor
UsewithLPGasor
NaturalGas.
r
.(
Stand-By
PilotFlame
HeaterPilotFlame
4. Turn the OVEN CONTROLknob to a setting
above 2000E The pilotflame wi~increase in size
and impingeon the temperature-responseelement
The oven burner willlight in 30-90seconds.
The ovenburner willoperateunti the set
temperatureis reached.The ovenburner will
continueto cycleon andoffas necessaryto
maintainthe ovenat the temperatureindicated
bythe OVENCONTROLknob.
Qwaii~ ofFlames
The combustionquatityofburnerflamesneeds
to be determinedvisually.
E burner flameslooklike (A),callfor service.
Normalburnerflamesshouldlooklike @) or
(C),dependingonthe typeofgas youuse.
WithLPgas,someyellowtippingon outer
conesis normal.
(A)YeMowflmesCallforservice
(B) YeMowtips on
outercones—
Normalfor LPgas
(C) Sofiblue flmesNormalfornaturalgas
Operation of all cooktop and oven burners
should be checked after the pilots have been
lighted (on some models) and range and gas
supplylines have been careftdlychecked for leaks.
Stifig
Pilot Models
Selectatop burner knob and simultaneouslypush
in and turn to HI position.The burner should
light within a few seconds. Try each burner in
succession until all burners have been checked.
Electic I@ition Mode#s
Select atop burner knob and simultaneously
push in and turn to LITEposition. Youwillhear a
snapping sound indicating proper operation of
the spark module. Once the air has been purged
born the supplylines, burners should light within
4 seconds. Afterburner lights, rotate knob out of
the L~E position. Try each burner in succession
until all burners have been checked.
OvenBwrnerIgnition
Yourovenis designedto operatequietlyand
automaticallyTooperatethe oven,turnthe OVEN
CONTROLknobto a settingabove200°E After
30-90seconds,the ovenburner willigniteand
burn untilthe set temperatureis reached.The
ovenburner willcontinueto cycleon and offas
necessarytomainti the ovenat thetemperature
indicatedbythe OVENCONTROLknob.
Electic i~tion models requireelectrical
powerto operate.The ovencannotbe lit duringa
poweroutage.Gaswillnotflowunlessthe glow
“
bar is hot.
E the ovenis in use whena poweroutageoccurs,
the burner willshut offand cannotbe re-lituntil
poweris restored.
(continuednextpage)
37
msTALLATIoN
msTRucTIoNs
~(contitiued)
,’
To determine if the bottom burner flames are
The air adjustmentshutterforthe top (broil)
burnerisinthe centerofthe rearwallofthe oven.
burning properly, remove the oven bottom and
the burner baffle (see below). Flames should
have approximately 1“blue cones and, if range
is supplied with natural gas, should burn with no
yellowtipping. (With most LP gas, small yeflow
tips at the end of outer cones are normal.)
Flames should not lift off burner ports. If mg
is observed, gradually reduce air shutter
opening until flames are stabitied. With the
baffle in place, the flames should burn steady
and should not extend past the edges of the
burner baffle.
Oven
The shutterfor the bottom (oven)burner is near
the backwallbehindthe storagedraweror the
kickpanel (dependingon the model).Remove
the draweror panel. (SeeCareand Cleaning
sectionin this book.)
To adjust the flow of air to either burner, loosen
the Philtips head screw and rotate the shutter
toward open or closed position as needed.
To removethe ovenbottom:
1. Removethe knurledscrewsholdingdownrear
ofthe ovenbottom.
2. Graspthe ovenbottomat fingerslotson
each side.
3. Lift the rear ofthe ovenbottomenoughto
clearthe lipofthe rangeframe,then pullout.
BurnerBaffle
RemoveScrew
-r–F/—’
Toremovethe burner baffle(onsomemodels):
1. Use a nut driver to remove the 1/4” h~-hea~
screw ShOWI h tie fiustiation above. Do
me flamesfor the top (broil)burner shouldbe
steadywithapproximately
1“blueconesandshould
not extendoutoverthe edgesofthe burnerbaffle.
not removemy otier screws.
2. Pullbafflestraight out until it is free from the
slot that holds it at rear of oven,
Oven
To removetie
ovenbottom:
1. Removeknurledscrewsholdingdownrear of
ovenbottom.
2. Graspovenbottomatfingerslotsoneachside.
3. Liftrear ofovenbottomenoughto clearthe
lipofrangetiame,then pullout.
‘“r”erB’ff’eC*’
Withthe baffleremoved,properlyadjusted
flamesshouldhaveapproximatelyl“ bluecones
and,ifrange is suppliedwithnaturalgas,should
burn withnoyellowtipping.~~th mostLPgas,
sma~yellowtips at the end ofouterconesare
normal.)FlamesshouldnotM offburner ports.
Ifliftingis observed,graduallyreduceair
shutter openinguntilflamesare stabilized.Wlti
the bafflein place,or withthe ovenbottomin
place (onmodelsnot equippedwitha burner
baffle),the flmes shouldburn steady.They
shouldnot extendpastthe edgesofthe burner
baffle(orthe ovenbottomifthere is no baffle).
The shutterforthe ovenburner is near the back
wallofthe ovenandbehindthe broilerdrawer.
Toremovethe broilerdrawer:
1. Pullthe draweroutuntilit stops,then push it
back in aboutoneinch.
2. Grasphandle,liftand pullbroilerdrawerout.
Removethe metalshieldat the rear ofthe cavity.
To removetie burner bdfle
- Loosen \
(on some models):
1. Use a nut driver to remove the 1/411hex-head
screw shorn in tie iUustiationabove. Do
- Adjustment
Shutter
\
~
.
I
)
not remove my otier screws.
2. Pull baffle straight out until it is tiee from the
slot that holds it at rear of oven.
The air adjustmentshutter is behindthis shield.
To adjustthe flowofair to the burner,loosenthe
Phillips-headscrewand rotatethe shutter to
allowmoreor less air intothe burner tube.
(continuednextpage)
m
LEVELBMG
1. Removethe storage
Anti-Tip
Device
THEmGE
drawer,broilerdraweror
kickpanel.
2. Usea 3/l& open-endor
socketwrenchto backout
bothrearlevelinglegs
approximatelytwoturns.
3. Usea 1%”open-endor
adjustablewrenchto back
outthe frontlevelinglegs
twoturns.
4. Installthe ovenshelvesin
the ovenandpositionthe range
whereit willbe installed.
5. Checkforlevelnessbyplacinga spiritlevelor
a cup,partiallyfilledwithwater,on one ofthe
ovenracks.Husinga spiritlevel,taketwo
readings-with the levelplaceddiagondlytist
in one directionandthen the other.
6. Adjustthe levelinglegsuntilthe rangeis level.
7. Afterthe rangeis level,slidethe range away
fromthe wallso that the Anti-Tipdevicecan be
installed.
m BHSTALLIHG
THEMTU=TIP
DEWHCE
W~ING:
~ Rangemustbe securedwithan approved
Anti-Tipdevice.
@Unlessproperlyinstiled, the range could
be tippedbyyou or a childstanding,sitting
or leaningon an opendoor.
@Mer instiling the Anti-Tipdevice,verify
that it is in placeby carefullyattemptingto
tiltthe rangeforward.
~Thisrange has been designedto meet all
recognizedindustrytip standardsfor all
normalconditions.
~The use ofthis devicedoes not preclude
tippingofthe rangewhennot properly
installed.
~ Ifthe Anti-Tipdevicesuppfiedwiththe
rangedoesnot fitthis application,use the
universalAnti-Tipdevice~02X7909.
,
*
1. Markthe wallwherethe MGHTEDGEofthe
rangeis to be located.Besureto allowforthe
countertopoverhangtiyouintendto installthe
rangenextto cabinets.
40
I
-----i-Wallplatf3 I
I
I
Slotted
Head
Screw
Approx,~~”’
9-’
2%
i
i
II
,/
~’ tvlarked
Edge
/
of Range
./
,#~
2. Locatetheoutsideedgeofthe device2Y
toward
thecenteroftherangefromthemarked
edgeoftherange.
3. U@ngthe deviceas a template,markthe
positionofthe holeforthe screw.
4. Forwoodconstruction,drilla pilotholeat an
angleof20degreesfromthe horizontal.A nail
or awlmaybe used ifa drillis notavailable.
Mountthe Anti-Tipdevicewiththe screw
provided.
For cementor concreteconstruction,you
willneed a I/&x 1%”lagboltanda 1/2”O.D.
sleeveanchor,whichare not provided.Drill
the recommendedsizeholeforthe hardware.
Instil the sleeveanchorintothe drilledhole
and then installthe lagboltthroughtie device.
The boltsmustbe properlytightenedas
recommended-forthe hardware.
m
m
Backof
Range
e
5. Stidethe rangeagainstthe wall,andcheck
forproperinstallationby graspingthe tiont
edges ofthe rear surfaceunit openingsand
carefullyattemptingto tiltthe rangeforward.
1sthe
eina
ation.
TOOLS
~~~u!~~m
T-10T’orxdriver(for sealed burners)
1/2” and 3/4” open-end wrench
Flat blade screwdriver (small)
Nut drivers or wrenches: 7rnm or 5/16”
(depending on the size of the spuds)
❑ PREPMEMHGE FORCOHWERSROH
(1) Twn offgas supp~ at tie wall.
(2) Tmn off tie electicd powe; to tie mgee
Ifrange has not yet been connected to gas supply,
or if flexible connection was made, range maybe
pulled out from the wall to make conversion easier.
—
Ifit is this regulator:
1. Use a cointo removethe capfromthe
pressureregulator.
2. Turn the capoverand hookit intothe slots.
The typeofgas to be used shouldnowbe visible
onthe top ofthe cap.
❑
Note:On somemodelsthe shut-offvalve
maybe in a differentlocation.
W~G:
Do not removethe pressure
regulatorfrom the range.
1. For models equipped with sealed burners,
remove the storage drawer, broiler drawer or
kick panel and locate the pressure regulator at
rear of the range.
this protectivecap exceptfor conversion
Cap Assembly
RemoveScrews
AccessCover
On some models,youmayhaveto removean
accesscoveralso.
For models equipped with dual burners, remove
the cooktop and locate the pressure regulator at
right rear of range.
2. FOUOW
the directions in ~ or 0~ that match
your regulator type.
❑
Ifit is this regulato~
1. Unscrewthe plastic-protectedhex-nutcap
fromthe regulator.
2. Carefullypry the protectiveplasticcapoff
the threadedmetalcap.Gentlypullthe plastic
washeroffthe threads on the other side ofthe
metalcap.
3. Push the plasticcapontothe end ofthe metal
capdisplayingthe typeofgas you are converting
to.Press the attachedplasticwasherontothe
threads on the other side ofthe metalcap.
4. Screw the hex-nutcapback intothe regulator.
Donot overtighten.
(continuednextpage)
msTkLLAmoN
msTRucTIoNs
(continued)
a
~o~~~~~l~~ suRFacEBURNERSON
MOBELSEQU!PPEBWITHsmLEn BURHEB (see
sP@p4 if ramgois @quipp@dwith dualburneK.)
,
LP orifice spuds are in a small plastic bag packed
with this Use and Care book. LP orifice spuds
have a 2-digitnumber and the Letter “L”on
one side, Each ofice spud will also have 1 or 2
grooves on one side, denoting the location on
the range where it is to be installed.
D
BurnerCap
w
w
II
OrificeSpud
GasInletTube
(( —, 1 .
Removegrates, burner caps and burner heads.
2. Removeburner bases by unscrewing the 3
small screws in each base. ~ bmner
1.
strai&t out.
DO N~ disconnect the wires from the burner
bases unless the cooktop needs to be raised.
3. Remove the brass orifice spud under each
burner base by unscrewing sp~d fi-omfitting with
a 7mm or 5/16” wrench (depending on the size of
your spuds). Apply a 3/4” wrench to the hex on
the gas inlet tube as a back-up when removing
spud to prevent the aluminum tube from twisting.
4. Install orifice spuds accordin to one of the
fol~owingdiagrams (see ❑ or dB), for LP
gas or natural gas, depending on which you are
converting to.
42
‘Frontof.angw
Natural gas ofice spuds have a 3-digitnumber
on one side. Each orifice spud willalso have 1,2
or 3 grooves on one side, denoting the location
on the range where it is to be installed.
o‘D
Front of Range
5, To preventleakage,makesure the ofice
spudsare securelyscrewedintothe gas inlet
tubes.Use a smallwrenchto holdthe inlettube
hex to preventitfromtwisting.
6. Put oldofice spudsbackinthe bag to save
forpossiblefutureconversion.
Note:Han orificespudis accidentally
dropped$the cooktop
canbe raisedby
disengaging
the 2 frontclips
witha largeflat
bladescrewdriver.
DO Nm attemptto raisethe cooktopwithout
removingall4 burner bases.
Ewireswere disconnectedto removethe
cooktop,feedwiresthroughthe burner holesin
the cooktop.Attachto eachburner electrode
terminalcarefufly,makingsure notto bendthe
tertial. Then lowercooktopuntilit snaps
overthe clips.
Electrode
TallScrew
7. Carefullvinsert burner bases straightdown
tith the tube overthe orificespud.R~placethe
screws,mtig swe tie W screw is
opposib tie bmner electrode b each
bmner
❑ coHvEmlHGSURFACE
BuRM~mOH
WITHDUALBURHEB
MOOELS
EQUIPPEB
(See step 3 if range is equippedwith sealed burners.)
cooktop.
2. Liftburner assembliesstraightup and set
asideto gainaccessto surfaceburner spuds.
3. Witha 7mm
or 5/16”wrench
(dependingonthe
sizeofyour
spuds),remove
eachofthe four
spudsonthe
surfaceburner gas
inlettubesand
‘
replacethemwith
the correctgas
spudsmountedin
a holderat the
rightrear ofthe range,abovethe regulator.
Naturalgas spudsare brass and LPgas spuds
are red or silver.(Mountthe spudsthatyou
removedfromthe inlettubesbackin the holder.)
To preventleakage,makesure spudsare
securelyscrewedintogas inlettubes.
4. Replacethe burner assemblies.
5. Keepdl spudswithyourrangesoyouhave
them ifyoumoveor get a dtiferentgas hook-up.
1.
Lii
base.
~ AD$USF
OVEM
TMEWOSFAT
(forModelsEquippedwithStandingPilots)
1. Removethe oven
controlknob.
2. Locatethe thermostat
adjustmentscrewat lefiof
thermostatshaft.Turn
screwclockwiseuntilthe
smallpointeris at LPor N,
dependingon the typeof
gas youare convertingto.
3. Replaceovencontrolknob.
(continuednextpage)
43
—
ms~fi~i~~o~
msTRucTIo~s
(continued)
,.’
❑ coHvEti4uRMJusTmEHT
SHUT?E*(S)
ForU gas,loosenthe
1. Removeovendoor,storagedraweror broiler
drawer,ovenbottomandburner baffle.The
lowerburner orificespudis locatedbehindthe
storagedrawer,broilerdraweror kickpanel.(On
somemodels,a metalshieldmustbe removedto
accessthe orifice.)
2. TOconvert to U gas,
use a 1/2”wrenchto turn
the lowerburner orifice
spudcloctilse. Tightenthe
spudonlyuntilit is snug.
To preventdamage,do
not overtightenthe spud.
To convert b na~d
Phillipshead screwand
rotatethe shutterto the
Screw
fufl openposition.With
baffleinplace,flames
Air Shutter
shouldhaveapproximately
l-inchblueconesand
shouldnotextendbeyond
the edgesofthe burner btifle.Mer 30seconds
ofburner operation,checkforflamesliftingoff
burner ports.Ifliftingis observed,gradually
reduceair shutter openinguntilflamesare
stabilized.
For natial gas, theshutter should be open
1/2” or about 3/4 of the way open.
gas, =
loosen the spudabout2 turns.
Whenallconnectionshavebeenmade,makesure
allrangecontrolsare in the offpositionandturn
on the maingas supplyvalve.Usea liquidleak
detectorat alljointsand connectionsto checkfor
leaksin the system.
I
CA~ON: DON~ USEA FCHECK
FORGM ~.
~
When using test pressures greater than 1/2 psig
to pressure test the gas supplysystem of the
residence, disconnectthe range and individual
shut-offvalvefrom the gas supplypiping.When
using test pressures of 1/2 psig or less to test the
TOconvert to U gas, use a 1/2”wrenchto
turn the upperburner orificespudclockwise.
Tightenspudonlyuntilit is snugwiththe base.
TOpreventdamage,donot overtightenspud.
To convertto na~d gas, loosenthe spud
about2 turns.
1
44 ..
B
~
gas supplysystem,simplyisolatethe rangefrom
the gas supplysystembyclosingthe individual
shut-offvalve.
IiB
m
❑ CHECKQUALITYOFFmEs
The combustionqutity ofburner flamesneeds
to be determinedvisually.
Ifburner flameslooklike (A),callfor service.
Normalburner flamesshouldlooklike@)or
(C),dependingon the typeofgasyouuse.
WithLPgas,someyellowtippingon outercones
is normal.
(A) YeUowflmes-
Callforservice
1. Turn au top burners to LOW.
2. Remove all four knobs.
3, With a small flat blade screwdriver, turn the
valve set screws clockwise to decrease flame
ske, counterclockwise to increase flame size.
Adjust until the flaxneis about the same height
as the top of the burner.
4. Replace knobs.
~. Check for flame outage by opening and
closing the oven door several times. If the flame
goes out, increase the flame size.
~) YeUowtips on
outercones-
NormalforLPgas
(C) %ft blueflmes-
Normal for natural gas
MADJV$TFHESURFACEBURMERPuLom
(formodels equipped with standing pilots)
1. Raisethe cooktop.
2. hcate the pilot
adjustmentscrew.It can
be accessedthrough the w
sma~hole near th~center
ofthe manifoldpanel.
3. To adjust,use a blade-typescrewdriverwith
a shaftdiameterofless than 3/16”.Turn pilot
adjustmentscrewuntilpilotis 5/16”high. Do
notreduce the flme to less than 5/16”or pilot
outagemayoccur.Apilotflameburninghigher
tian recommendedmaygenerate soot (carbon
black)on the bottomofyour cooktop.
45
—
~ms~~o~s?
USE THIS PROBLEM SOLVER
POSSIBLK CAUSE
OVEN
wmLNOT WORK
~Plug on rmge is not completelyinsetiedin the electricaloqt.let,‘
~The circuitbre~er
in ~ourhousehas been tripped,or a fusehas beenblown.
,.
., .
,.”
~Ovencon~olsnot ~roperlyset.
‘
BUWRS HAVEYELLOW
OR YELLOW-TIPPED
KMES
-
BUNER WMS
VERY
LARGEOR YELLOW
.—
OWN DOES NOT
COOKPROPE~Y
CLOCKDOESNOT’WORK
OVEN LIGHT DOES NOT
COME ON
smoNG
ODOR
..
~An odor from the insulationaroundthe ovetiIker is n’bmd ‘forthe first few
timesoven is used.~s is tempor~. ,
‘ ‘
~,, <‘
—
———
...
W$llBeThere
Ti7iththe purchase of your new GE appliance, receive the
assurance fiat if you ever need information or assistance
from GE, we’llbe there. All you have to do is cdl—toll-free!
Whateveryour questionabout anyGE
major appliance,GEAnswerCente#
informationserviceis availableto
help.Yourcall-and your question—
willbe answeredpromptlyand
courteouslyAnd you can callany
time.GEAnswerCente# serviceis
open 24 hours a day 7 daysa week.
AGE CansumerServiceprofessional
willprovide mpert repairservice,
scheduledat a timethat’sconvenient
for you. Many GE ConsumerService
company+peratedlocationsoffer you
servicetodayor tomorrow,or at your
convenience(700 a.m.to 700 p.m.
weekda~ 9:00 a.m.to 2:00p.m.Saturdays).Our factory-trained
technicians
knowyour applianceinsideand out—
so mostrepairscan be handledinjust
one visit.
You can havetie securefeelingthat
GE ConsumerServicewillstillbe
thereafteryour warrantyexpires.Purchasea GE contractwhileyour warrantyis stillin effectand you’Ureceive
a substantial
discount.Witha multipleyearcontrac~you’re assuredof future
serviceat today’sprices.
~lecommunication
DevicefortheDeaf
kdividu~ qualified to service their
own appliances can haveneeded
partsor accessoriessentdirectlyto
theirhome. The GE parts systempro-
videsaccessto over 4’7,000parts..and
all GE Genuine RenewalParts are
fullywarranted. ‘VISA,MasterCard
and Discovercards are accepted.
User maintenance titructions
contained in tis booldet cover procedmes ktended to be performed by
any user. Otier servictig generdy
shodd be referred to qutified service personnel. Caution mwt be
exercised, sbce improper servicing
may came msafe operation.
Upon request,GEwillprovideBradle
controlsfor a varietyof GEappliances,
and a brochureto assistin planninga
barrier-fi-ee
kitchenfor personswith
ltiited rnobili~.Toobtaintheseitems
freeof charge,call 800.626.2000.
Consumelxwithimpairedhearing
or speechwho haveaccessto a TDD
or a conventionalteletypewritermay
800-TDD-GEAC
(800-833.4322)
to requestinformationor service.
Cd]
———
YOUR GE GAS RANGE
WARRANTY
Saveproofof originalpurchasedatesuchas yoursalesslipor cancelledcheckto establishwarrantyperiod.
WHATIs COVERED
FULLONE-YEARWARRANTY
For one year from date of original
purchase, we will provide, free of
charge, parts and service labor in
your home to repair or replace
~~y paft of therangethat fails
because of a manufacturingdefect.
WHAT IS NOTCOVERED
e Service trips to your home to
teach you how to use the product.
ReadyourUseandCarematerial.
If you then have any questions
about operating the product,
please contact your dealer or our
Consumer Affairs office at the
address below, or call, toll free:
GE Answer Cente@
800.626.2000
consumer information service
. Improper installation.
If you have an installation problem,
contact your dealer or installer,
You are responsible for providing
This warranty is extended to the
originalpurchaserand any succeeding
owner for products purchased for
ordinaty home use in the 48 mainland
states, Hawaii and Washington, D.C.
in Alaska the warranty is the same
except that it is LIMITED because you
must pay to ship the product to the
serviee shop or forth-e service
technician’stravel costs to your home.
All warranty service will be provided
by our Factory Service Centers or by
our authorized Customer Care@
setvicersduringnormalworkinghours.
Should your appliance need service,
during the warranty period or beyond,
call 800-GE-CARES (800-432-2737).
adequate electrical,gas, exhausting
and other connecting facilities as
describedin the InstallationInstructions
provided with the product.
e Replacement of house fuses or
resetting of circuit breakers.
4
e Failure of the product if it is used
for other than its intended purpose
4
or used commercially.
e Damage to product caused by
accident, fire, floods or acts of God.
WARRANTORIS /VOTRESPONSIBLE
FOR CONSEQUENTIAL DAMAGES.
Some states do not allow the exclusion or limitation of incidental or consequential damages, so the above limitation or exclusion
maynotapplyto you. This warranty gives you specificlegalrights,andyou mayalsohaveotherrightswhichvaryfromstateto state.
Toknowwhatyourlegalrightsare in yourstate,consultyourlocalor stateconsumeraffairsofficeor yourstate’sAttorneyGeneral.
Warrantor:GeneralElectricCompany
[ffurther help is neededconcerningthis warranty,write:
Manager—ConsumerAffairs,GE Appliances,Louisville,KY40225
This book is printed on recycled paper
PartNo. 164D2764P013
Pub tiO. 49-8338
6-92CG
JGBS02EN
JGBS02PN
JGBS04ER
JGBS04PR
JGBS04GER
JGBS04GPR
JGBS06ER
JGBS06PR
JGBS12GER
JGBS15GER
JGBS16GEP
JGBS17GER
JGBSI 9GEP
JGSS05GER
JGBC15GER
JGBC16~JGBC17Gkt-