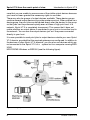
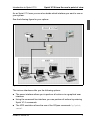
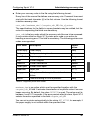
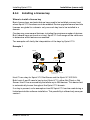
1
Outputware
Xprint V7.0
User’s and Administrator’s Guide
Redakteur
Fujitsu Siemens Computers GmbH Paderborn
33094 Paderborn
e-mail: email: [email protected]
Tel.: (089) 61001-1??
Fax: (++49) 700 / 372 00001
U23841-J-Z915-6-76
Sprachen: En
Edition June 2002
Comments… Suggestions… Corrections…
The User Documentation Department would like to
know your opinion of this manual. Your feedback helps
us optimize our documentation to suit your individual
needs.
Fax forms for sending us your comments are included in
the back of the manual.
There you will also find the addresses of the relevant
User Documentation Department.
Certified documentation
according DIN EN ISO 9001:2000
To ensure a consistently high quality standard and
user-friendliness, this documentation was created to
meet the regulations of a quality management system
which complies with the requirements of the standard
DIN EN ISO 9001:2000.
cognitas. Gesellschaft für Technik-Dokumentation mbH
www.cognitas.de
Copyright and Trademarks
Copyright © 2002 Fujitsu Siemens Computers GmbH.
All rights reserved.
Delivery subject to availability; right of technical modifications reserved.
All hardware and software names used are trademarks of their respective manufacturers.
This manual is printed on
paper treated with
chlorine-free bleach.
Preface
Introduction to Xprint V7.0
Printing with Xprint V7.0
Managing print jobs
Introduction to administering Xprint V7.0
Configuring Xprint V7.0
Interoperability
Installing Xprint V7.0
Xprint V7.0 for Windows NT
Appendix
Continued
Glossary
Related publications
Index
Contents
1
1.1
1.2
1.3
1.4
Preface . . . . . . . . . .
Target groups . . . . . . .
Structure of the manual . .
Notational conventions . . .
Other publications in this set
.
.
.
.
.
.
.
.
.
.
.
.
.
.
.
.
.
.
.
.
.
.
.
.
.
.
.
.
.
.
.
.
.
.
.
.
.
.
.
.
.
.
.
.
.
.
.
.
.
.
.
.
.
.
.
.
.
.
.
.
.
.
.
.
.
.
.
.
.
.
1
1
2
3
4
2
2.1
2.2
2.3
2.4
2.4.1
2.4.2
Introduction to Xprint V7.0 . . . . . . .
Xprint V7.0 from the user’s point of view
Mercator . . . . . . . . . . . . . . . . .
Xprint V7.0 R/3 kit . . . . . . . . . . . .
Xprint V7.0 elements . . . . . . . . . .
Xprint V7.0 objects . . . . . . . . . . . .
Options for printing documents . . . . .
.
.
.
.
.
.
.
.
.
.
.
.
.
.
.
.
.
.
.
.
.
.
.
.
.
.
.
.
.
.
.
.
.
.
.
.
.
.
.
.
.
.
.
.
.
.
.
.
.
.
.
.
.
.
.
.
.
.
.
.
.
.
.
.
.
.
.
.
.
.
.
.
.
.
.
.
.
.
.
.
.
.
.
.
.
.
.
.
.
.
5
5
8
8
8
9
13
3
3.1
3.2
3.3
3.4
3.4.1
3.4.2
3.4.3
3.4.4
3.4.4.1
3.4.4.2
3.4.5
15
15
17
19
21
21
23
24
30
31
32
.
3.4.6
3.4.7
3.4.8
3.4.9
3.5
3.6
3.6.1
3.6.2
Producing Output with Xprint V7.0 . . . . . . . . . . . . . .
Basic information . . . . . . . . . . . . . . . . . . . . . . . .
Printing files . . . . . . . . . . . . . . . . . . . . . . . . . . .
Selecting a printer . . . . . . . . . . . . . . . . . . . . . . . .
Using Xprint V7.0 options . . . . . . . . . . . . . . . . . . . .
Printing parts of a document . . . . . . . . . . . . . . . . . . .
Printing files with special content types . . . . . . . . . . . . .
Creating printouts with special formats . . . . . . . . . . . . .
Using Loadable Resources . . . . . . . . . . . . . . . . . . .
Using Public Loadable Resources . . . . . . . . . . . . . . . .
Using Private Loadable Resources . . . . . . . . . . . . . . .
Copying print files before printing and deleting them after printing
33
Defining separator pages . . . . . . . . . . . . . . . . . . . .
Printing several copies of a document . . . . . . . . . . . . . .
Requesting notification of the result . . . . . . . . . . . . . . .
Using further options . . . . . . . . . . . . . . . . . . . . . .
Using other Xprint V7.0 objects . . . . . . . . . . . . . . . . .
Job templates . . . . . . . . . . . . . . . . . . . . . . . . . .
Printing a document via a globally defined job template . . . . .
Defining customized job templates . . . . . . . . . . . . . . .
4
4.1
4.2
4.3
4.4
Managing print jobs . . . . .
Selecting a print job . . . . . .
Displaying print jobs . . . . . .
Modifying a submitted print job
Redirecting print jobs . . . . .
49
49
55
61
63
U23841-J-Z915-6-76
.
.
.
.
.
.
.
.
.
.
.
.
.
.
.
.
.
.
.
.
.
.
.
.
.
.
.
.
.
.
.
.
.
.
.
.
.
.
.
.
.
.
.
.
.
.
.
.
.
.
.
.
.
.
.
.
.
.
.
.
.
.
.
.
.
.
.
.
.
.
.
.
.
.
.
.
.
.
.
.
.
.
.
.
.
.
.
.
.
.
.
.
.
.
.
.
.
.
.
.
.
.
.
.
.
.
.
.
.
.
.
.
.
.
.
34
35
36
37
40
44
44
46
Contents
4.5
Deleting print jobs . . . . . . . . . . . . . . . . . . . . . . . . . 65
5
5.1
5.2
5.2.1
5.3
5.3.1
5.3.2
5.3.3
5.3.4
5.3.5
5.3.6
5.4
5.4.1
5.4.2
5.4.3
5.4.4
Introduction to administering Xprint V7.0 .
Responsibilities . . . . . . . . . . . . . . . .
Xprint V7.0 architecture . . . . . . . . . . . .
The Xprint V7.0 objects . . . . . . . . . . . .
Administrative tasks under Xprint . . . . . . .
Configuring Xprint V7.0 objects . . . . . . . .
Deleting Xprint V7.0 objects . . . . . . . . .
Modifying Xprint V7.0 objects . . . . . . . . .
Changing the status of Xprint V7.0 objects . .
Displaying information on Xprint V7.0 objects
Administering Xprint V7.0 . . . . . . . . . . .
Rules for configuring the system . . . . . . .
Defining an Xprint V7.0 domain . . . . . . . .
Configuring hosts . . . . . . . . . . . . . . .
Configuring printers . . . . . . . . . . . . . .
Configuring gateways . . . . . . . . . . . . .
.
.
.
.
.
.
.
.
.
.
.
.
.
.
.
.
.
.
.
.
.
.
.
.
.
.
.
.
.
.
.
.
.
.
.
.
.
.
.
.
.
.
.
.
.
.
.
.
.
.
.
.
.
.
.
.
.
.
.
.
.
.
.
.
.
.
.
.
.
.
.
.
.
.
.
.
.
.
.
.
6
6.1
6.1.1
6.1.2
6.2
6.2.1
6.2.2
6.2.3
6.3
6.3.1
6.3.2
6.4
6.4.1
6.4.2
6.4.3
6.4.4
6.4.5
6.4.6
6.4.7
6.4.8
6.5
6.5.1
6.5.2
6.5.3
6.5.4
Configuring Xprint V7.0 . . . . . . . . . . . . . . . . .
Administering hosts . . . . . . . . . . . . . . . . . . . .
Configuring the first host . . . . . . . . . . . . . . . . .
Configuring a new host . . . . . . . . . . . . . . . . . .
Administering hosts (users only) . . . . . . . . . . . . .
Configuring Xprint V7.0 on a stand-alone system . . . .
Introducing Xprint V7.0 into a network . . . . . . . . . .
Configuring a new host in an existing Xprint V7.0 network
Predefined printers . . . . . . . . . . . . . . . . . . . .
Configuring predefined printers . . . . . . . . . . . . . .
Extending the list of predefined printers . . . . . . . . .
Administering devices . . . . . . . . . . . . . . . . . . .
Adding a printer . . . . . . . . . . . . . . . . . . . . . .
Deactivating a printer . . . . . . . . . . . . . . . . . . .
Reactivating a printer . . . . . . . . . . . . . . . . . . .
Removing a printer . . . . . . . . . . . . . . . . . . . .
Reconnecting a printer to another system . . . . . . . .
Reconnecting a printer to a different port . . . . . . . . .
Replacing an existing printer with a new one . . . . . . .
Assigning a security level to a printer . . . . . . . . . . .
Administering printer groups . . . . . . . . . . . . . . .
Setting up a new printer group . . . . . . . . . . . . . .
Adding a printer to a printer group . . . . . . . . . . . .
Removing a printer from a printer group . . . . . . . . .
Deactivating a printer group . . . . . . . . . . . . . . .
.
.
.
.
.
.
.
.
.
.
.
.
.
.
.
.
.
.
.
.
.
.
.
.
.
.
.
.
.
.
.
.
.
.
.
.
.
.
.
.
.
.
.
.
.
.
.
.
.
.
.
.
.
.
.
.
.
.
.
.
.
.
.
.
.
.
.
.
.
.
.
.
.
.
.
. 95
. 96
. 96
. 98
101
101
103
105
108
109
112
114
116
118
120
121
122
122
123
124
126
127
129
129
130
.
.
.
.
.
.
.
.
.
.
.
.
.
.
.
.
.
.
.
.
.
.
.
.
.
.
.
.
.
.
.
.
.
.
.
.
.
.
.
.
.
.
.
.
.
.
.
.
.
.
.
.
.
.
.
.
.
.
.
.
.
.
.
.
.
.
.
.
.
.
.
.
.
.
.
.
.
.
.
.
67
67
70
71
79
79
80
81
82
82
85
88
88
89
89
92
U23841-J-Z915-6-76
Contents
6.5.5
6.5.6
6.6
6.6.1
6.6.2
6.6.3
6.6.4
6.6.5
6.6.6
6.6.7
6.6.8
6.7
6.7.1
6.7.2
6.7.3
6.7.4
6.7.5
6.7.6
6.7.7
6.7.8
6.8
6.8.1
6.8.2
6.8.3
6.9
6.9.1
6.9.2
6.9.3
6.9.4
6.10
6.10.1
6.10.2
6.10.3
6.10.4
6.10.5
6.11
6.11.1
6.11.2
6.11.3
6.12
6.12.1
6.12.2
6.12.3
6.13
Reactivating a printer group . . . . . . . . . . . . . . . . .
Deleting a printer group . . . . . . . . . . . . . . . . . . .
Administering users . . . . . . . . . . . . . . . . . . . . .
Defining a user . . . . . . . . . . . . . . . . . . . . . . . .
Entering a defined user for other hosts . . . . . . . . . . .
Deleting a host from a user’s host list . . . . . . . . . . . .
Modifying user privileges . . . . . . . . . . . . . . . . . .
Deleting a user . . . . . . . . . . . . . . . . . . . . . . . .
Resetting user print quotas . . . . . . . . . . . . . . . . .
Displaying information on users . . . . . . . . . . . . . . .
Assigning a security level to a user . . . . . . . . . . . . .
Administering permission lists . . . . . . . . . . . . . . . .
Creating a permission list . . . . . . . . . . . . . . . . . .
Modifying a permission list . . . . . . . . . . . . . . . . . .
Deleting a permission list . . . . . . . . . . . . . . . . . .
Granting or denying specific users access to a printer . . .
Granting or denying specific users access to a printer group
Granting or denying specific users access to a form . . . .
Granting or denying specific printers access to a form . . .
Allowing or prohibiting administration of supervisors . . . .
Administering fonts . . . . . . . . . . . . . . . . . . . . .
Adding a font . . . . . . . . . . . . . . . . . . . . . . . .
Deleting a font . . . . . . . . . . . . . . . . . . . . . . . .
Modifying the attributes of a font . . . . . . . . . . . . . .
Administering forms . . . . . . . . . . . . . . . . . . . . .
Adding a form . . . . . . . . . . . . . . . . . . . . . . . .
Deleting a form . . . . . . . . . . . . . . . . . . . . . . .
Modifying the attributes of a form . . . . . . . . . . . . . .
Default forms for printers . . . . . . . . . . . . . . . . . .
Administering filters . . . . . . . . . . . . . . . . . . . . .
Adding filters . . . . . . . . . . . . . . . . . . . . . . . .
Deleting filters . . . . . . . . . . . . . . . . . . . . . . . .
Modifying the attributes of a filter . . . . . . . . . . . . . .
Assigning a filter to a printer . . . . . . . . . . . . . . . .
Removing a filter from a printer . . . . . . . . . . . . . . .
Administering public loadable resources . . . . . . . . . .
Defining a loadable resource . . . . . . . . . . . . . . . .
Deleting a loadable resource . . . . . . . . . . . . . . . .
Displaying the definition of a loadable resource . . . . . . .
Administering global job templates . . . . . . . . . . . . .
Defining a job template . . . . . . . . . . . . . . . . . . .
Deleting a job template . . . . . . . . . . . . . . . . . . .
Customizing job templates . . . . . . . . . . . . . . . . . .
Administering PCLs . . . . . . . . . . . . . . . . . . . . .
U23841-J-Z915-6-76
.
.
.
.
.
.
.
.
.
.
.
.
.
.
.
.
.
.
.
.
.
.
.
.
.
.
.
.
.
.
.
.
.
.
.
.
.
.
.
.
.
.
.
.
.
.
.
.
.
.
.
.
.
.
.
.
.
.
.
.
.
.
.
.
.
.
.
.
.
.
.
.
.
.
.
.
.
.
.
.
.
.
.
.
.
.
.
.
131
132
133
133
134
135
135
137
138
140
141
143
144
146
147
148
149
149
150
151
152
152
154
155
156
157
158
160
160
162
162
167
168
169
170
171
171
173
173
174
174
177
177
179
Contents
6.13.1
6.13.2
6.13.3
6.13.4
6.13.5
6.14
6.14.1
6.14.2
6.14.3
6.14.4
6.14.5
6.15
6.15.1
6.15.2
6.15.3
6.15.4
6.16
6.16.1
6.16.2
6.16.3
6.16.4
Adding a PCL . . . . . . . . . . . . . . . . . . . . . .
Deleting a PCL . . . . . . . . . . . . . . . . . . . . .
Assigning a comment to a PCL . . . . . . . . . . . .
Assigning a PCL to a printer . . . . . . . . . . . . . .
Defining a PCL yourself . . . . . . . . . . . . . . . . .
Administering recovery rules . . . . . . . . . . . . . .
Defining a recovery rule . . . . . . . . . . . . . . . . .
Assigning a recovery rule to a printer . . . . . . . . . .
Canceling the assignment of a recovery rule to a printer
Modifying recovery rules . . . . . . . . . . . . . . . .
Deleting a recovery rule . . . . . . . . . . . . . . . . .
Administering servers . . . . . . . . . . . . . . . . .
Adding a server . . . . . . . . . . . . . . . . . . . .
Deleting a server . . . . . . . . . . . . . . . . . . . .
Changing the status of a server . . . . . . . . . . . . .
Modifying the attributes of a server . . . . . . . . . . .
Administering supervisors . . . . . . . . . . . . . . .
Adding a supervisor . . . . . . . . . . . . . . . . . . .
Activating or deactivating supervisors . . . . . . . . .
Modifying the attributes of a supervisor . . . . . . . . .
Deleting a supervisor . . . . . . . . . . . . . . . . . .
.
.
.
.
.
.
.
.
.
.
.
.
.
.
.
.
.
.
.
.
.
180
181
182
183
185
186
186
190
190
191
192
193
193
196
197
198
200
200
203
204
205
7
7.1
7.2
7.2.1
7.2.2
7.3
7.3.1
7.3.2
7.3.3
7.3.4
7.3.5
7.4
7.4.1
7.4.2
7.4.3
7.4.4
7.4.5
Interoperability . . . . . . . . . . . . . . . . . . . . . . . . .
Introduction . . . . . . . . . . . . . . . . . . . . . . . . . . .
Accessing BSD printers . . . . . . . . . . . . . . . . . . . . .
Basic information . . . . . . . . . . . . . . . . . . . . . . . .
Configuring printers for BSD Xprint V7.0 . . . . . . . . . . . .
Gateways . . . . . . . . . . . . . . . . . . . . . . . . . . . .
Gateway characteristics . . . . . . . . . . . . . . . . . . . . .
Setting up a gateway connection . . . . . . . . . . . . . . . .
Gateways to BSD spoolers . . . . . . . . . . . . . . . . . . .
Gateways to other Xprint V7.0 domains . . . . . . . . . . . .
Gateways to DPRINT spoolers . . . . . . . . . . . . . . . . .
Administering gateways . . . . . . . . . . . . . . . . . . . . .
Configuring an additional connection from an existing gateway
Deleting a gateway connection . . . . . . . . . . . . . . . . .
Deactivating a gateway . . . . . . . . . . . . . . . . . . . . .
Activating a gateway . . . . . . . . . . . . . . . . . . . . . .
Obtaining information on a gateway . . . . . . . . . . . . . .
207
207
209
209
210
213
213
213
214
219
223
227
227
229
230
232
233
8
8.1
8.2
8.3
Installing Xprint V7.0 . . . . . . . . . . . . .
Considerations . . . . . . . . . . . . . . . . .
Configuring the local area network (LAN) . . . .
Setting the language for the Xprint V7.0 system
235
235
235
236
.
.
.
.
.
.
.
.
.
.
.
.
.
.
.
.
.
.
.
.
.
.
.
.
.
.
.
.
.
.
.
.
.
.
.
.
.
.
.
.
.
.
.
.
.
.
.
.
.
.
.
.
.
.
.
.
.
.
.
.
.
.
.
.
.
.
.
.
.
.
.
.
.
.
.
.
.
.
.
.
.
.
.
.
.
.
.
.
.
.
.
.
.
.
.
U23841-J-Z915-6-76
Contents
8.4
8.4.1
8.4.2
8.4.3
8.5
8.5.1
8.5.2
8.5.3
8.5.4
Installation (new) . . . . .
Installing with cpio . . . .
Installing with pkgadd . .
Installing with sd method
Installation (users only) .
Installation with pkgadd .
Product licensing . . . .
Types of licenses . . . .
Installing a license key . .
.
.
.
.
.
.
.
.
.
.
.
.
.
.
.
.
.
.
.
.
.
.
.
.
.
.
.
.
.
.
.
.
.
.
.
.
.
.
.
.
.
.
.
.
.
.
.
.
.
.
.
.
.
.
.
.
.
.
.
.
.
.
.
.
.
.
.
.
.
.
.
.
.
.
.
.
.
.
.
.
.
237
238
238
239
241
242
243
243
245
9
9.1
9.2
9.3
9.3.1
9.3.2
9.3.3
9.3.4
9.3.5
9.3.6
9.3.7
9.3.8
9.4
Xprint V7.0 for Windows . . . . . . . . . . . .
Approach . . . . . . . . . . . . . . . . . . . .
Requirements . . . . . . . . . . . . . . . . . .
Differences from Xprint V7.0/UNIX . . . . . . .
Installation and license key . . . . . . . . . . .
Integration with Wprint . . . . . . . . . . . . . .
Start-up and shutdown . . . . . . . . . . . . . .
Responsibilities . . . . . . . . . . . . . . . . .
Printer support . . . . . . . . . . . . . . . . . .
Logging . . . . . . . . . . . . . . . . . . . . .
Interoperability with the BS2000 DPRINT system
WINDOWS 2000 special files . . . . . . . . . .
Limitations and restrictions . . . . . . . . . . .
.
.
.
.
.
.
.
.
.
.
.
.
.
.
.
.
.
.
.
.
.
.
.
.
.
.
.
.
.
.
.
.
.
.
.
.
.
.
.
.
.
.
.
.
.
.
.
.
.
.
.
.
.
.
.
.
.
.
.
.
.
.
.
.
.
.
.
.
.
.
.
.
.
.
.
.
.
.
.
.
.
.
.
.
.
.
.
.
.
.
.
.
.
.
.
.
.
.
.
.
.
.
.
.
249
249
250
250
250
251
252
252
253
254
254
255
257
10
Appendix . . . . . . .
Worksheet . . . . . . .
Filling out the worksheet
Selection criteria list . .
General requirements .
Special cases . . . . .
SNMP Agent . . . . . .
Axis box support . . . .
TV-CC integration . . .
Fax and mail support .
.
.
.
.
.
.
.
.
.
.
.
.
.
.
.
.
.
.
.
.
.
.
.
.
.
.
.
.
.
.
.
.
.
.
.
.
.
.
.
.
.
.
.
.
.
.
.
.
.
.
.
.
.
.
.
.
.
.
.
.
.
.
.
.
.
.
.
.
.
.
.
.
.
.
.
.
.
.
.
.
259
260
261
266
266
267
268
270
270
271
.
.
.
.
.
.
.
.
.
.
.
.
.
.
.
.
.
.
.
.
.
.
.
.
.
.
.
.
.
.
.
.
.
.
.
.
.
.
.
.
.
.
.
.
.
.
.
.
.
.
.
.
.
.
.
.
.
.
.
.
.
.
.
.
.
.
.
.
.
.
.
.
.
.
.
.
.
.
.
.
.
.
.
.
.
.
.
.
.
.
.
.
.
.
.
.
.
.
.
.
.
.
.
.
.
.
.
.
.
.
.
.
.
.
.
.
.
.
.
.
.
.
.
.
.
.
.
.
.
.
.
.
.
.
.
.
.
.
.
.
.
.
.
.
.
.
.
.
.
.
.
.
.
.
.
.
.
.
.
.
.
.
.
.
.
.
.
.
.
.
.
.
.
.
.
.
.
.
.
.
.
.
.
.
.
.
.
.
.
.
.
.
.
.
.
.
.
.
.
.
.
.
.
.
.
.
.
.
.
.
.
.
.
.
.
.
.
.
.
.
.
.
.
.
.
.
.
.
.
Glossary . . . . . . . . . . . . . . . . . . . . . . . . . . . . . . . . . . 273
Related publications . . . . . . . . . . . . . . . . . . . . . . . . . . . 279
Index . . . . . . . . . . . . . . . . . . . . . . . . . . . . . . . . . . . . 281
U23841-J-Z915-6-76
1
Preface
Xprint V7.0 is the output management system developed by Océ Software
Laboratories Namur S.A. for use in heterogeneous networks. It is available for
many open system platforms, for Microsoft Windows NT® and Windows 2000®.
It can also interact with systems such as MS-DOS®/MS Windows, BS2000 and
BSD UNIX.
Some limitations exists according to the platform, please refer to chapter 9
“Xprint V7.0 for Windows”.
This manual describes how to install, configure and use Xprint V7.0, the
different chapters being designed to meet the specific requirements of different
groups of users.
1.1
Target groups
This manual is written for the following target groups:
●
Users
If you want to print files via Xprint V7.0 as a general user, this manual tells
you what options are available for doing this and how to manage existing
print jobs.
●
System administrators
This manual contains information for the system administrator on how to
install and configure Xprint V7.0 locally on his/her system.
●
Xprint V7.0 administrators
If you are responsible for administering Xprint V7.0 in a network, this manual
informs you of the options you have for doing this and how to make the best
use of these to achieve your goals.
U23841-J-Z915-6-76
1
Structure of the manual
1.2
Preface
Structure of the manual
The individual chapters of this manual deal with various aspects of using and
configuring Xprint V7.0 on UNIX systems. All the special features of Xprint V7.0
on the Windows platforms are presented in a separate chapter. You should read
the following chapters, depending on which tasks you have to perform:
●
Chapter 2 - “Introduction to Xprint V7.0” starting on page 5
This chapter describes Xprint V7.0 from the points of view of the user and
the administrator. You should in any case read the sections relevant to you.
These will tell you about the possibilities you have for printing under Xprint
V7.0 and what steps you might have to take when configuring Xprint V7.0.
●
Chapter 3 - “Producing Output with Xprint V7.0” starting on page 15
This chapter describes how to print documents using the Xprint V7.0
commands.
●
Chapter 4 - “Managing print jobs” starting on page 49
This chapter describes how to manage existing print jobs using the Xprint
V7.0 commands.
●
Chapter 5 -“Introduction to administering Xprint V7.0” starting on page 67.
This chapter provides an introduction to managing Xprint V7.0 and
describes the basic aspects of this task.
●
Chapter 6 - “Configuring Xprint V7.0” starting on page 95
This chapter describes how to configure Xprint V7.0 on a stand-alone
system or in a network using the Xprint V7.0 commands. Furthermore, it tells
you how to manipulate the various Xprint V7.0 objects in order to achieve
specific goals.
●
Chapter 7 -“Interoperability” starting on page 207
This chapter describes the possible ways of having Xprint V7.0 interact with
other spooler systems.
●
Chapter 8 - “Installing Xprint V7.0” on page 235
This chapter tells you how to install Xprint V7.0 on your system and what to
consider when doing this.
2
U23841-J-Z915-6-76
Preface
●
Notational conventions
Chapter 9 - “Xprint V7.0 for Windows” on page 249
While the other chapters of this manual describe Xprint V7.0 on UNIX
systems, this one presents the differences on the Windows platforms.
●
The “Appendix” starting on page 259 contains important tables, summaries
and a worksheet for configuring Xprint V7.0.
●
The glossary explains the most important terms in connection with Xprint
V7.0.
●
The index helps you to quickly find the information you need.
1.3
Notational conventions
The following notational conventions are used throughout this manual:
Convention
Use
“double quotes”
For references within the manual and to other
manuals.
italics
For variable parts of commands.
fixed pitch
In continuous text for commands, options, file names,
constants, and screen output and menu texts as well
as invariable parts of examples.
bold
For emphasis in continuous text.
fixed pitch and
bold
For your input in sample dialogs.
●
Actions you must perform.
i
Refers to important information which you should
note.
!
Refers to important information which warns of
potential damage.
U23841-J-Z915-6-76
3
Other publications in this set
1.4
Preface
Other publications in this set
Xprint V7.0
- Application Programming Interface (API)
This manual is written for application programmers with a sound knowledge of
the C programming language who also have a basic knowledge of the administration and general operation of Xprint V7.0 . API (Application Programming
Interface) allows the programmer access to the functions of the Xprint V7.0
system via a programming interface. This manual contains information on the C
functions and C data structures comprising the API.
Xprint V7.0
- Reference Manual
This manual serves primarily as a reference book. It contains detailed information on commands and the corresponding options.
Xprint V7.0
- Graphical User Interface
Mercator is the graphical user interface for Xprint V7.0. This manual gives an
introduction to the product and an overview of the functions available.
4
U23841-J-Z915-6-76
2
Introduction to Xprint V7.0
This chapter describes the concepts of Xprint V7.0, which you must be familiar
with in order to use this product. It describes the objects comprising Xprint V7.0
and how these objects interact.
2.1
Xprint V7.0 from the user’s point of view
From the point of view of the user, Xprint V7.0 represents a number of
commands and a graphical interface used for printing files. For the user, the
entire Xprint V7.0 system consists of a number of output devices on which
documents can be produced (see figure below). Output devices can be printers,
fax devices and e-mail addresses. For historical reasons, the word printer is
often used instead of output device in the rest of this manual. Similarly, you
should understand the term printing as producing an output.
Figure 1: The Xprint V7.0 system
As a user, the first things you deal with are the local workstation on which you
are working, and the output devices of the Xprint V7.0 system. You can use any
of the visible output devices for printing your documents. It may however be the
U23841-J-Z915-6-76
5
Xprint V7.0 from the user’s point of view
Introduction to Xprint V7.0
case that you are unable to access some of the visible output devices because
you have not been granted the necessary rights to use them.
There may also be groups of output devices available. These device groups
combine several output devices to provide quicker spoolout. When printed via a
device group, the print jobs are distributed evenly over the devices in the group
so that jobs can be processed quickly even at times of high print load. In a
network, Xprint V7.0 is completely transparent. This means that it does not
matter whether an output device is connected to your host or to another host in
the network. You can use the output devices just as if they were connected
directly to your host.
It is even possible to send print jobs to output devices outside your own Xprint
V7.0 domain, provided that the required gateways are configured. In addition to
the devices of other Xprint V7.0 domains, you can also use devices which are
not connected to the Xprint V7.0 of a system but to a computer running BSDUNIX,
MS-DOS/MS-Windows or BS2000 (see the following figure).
Figure 2: Using Xprint V7.0
6
U23841-J-Z915-6-76
Introduction to Xprint V7.0
Xprint V7.0 from the user’s point of view
As an Xprint V7.0 user you can also decide which interface you want to use on
your system.
See the following figure for your options:
Figure 3: User‘s options
The various interfaces offer you the following options:
●
The menu interface allows you to perform all actions via a graphical user
interface.
●
Using the command line interface, you can perform all actions by entering
Xprint V7.0 commands.
●
The XPG emulation allows the use of the X/Open commands lp, lpstat,
cancel.
U23841-J-Z915-6-76
7
Mercator
●
Introduction to Xprint V7.0
The application programming interface API enables applications to access
the Xprint V7.0 system via C function calls.
2.2
Mercator
Mercator is the graphical user interface for Xprint V7.0. It allows the administrator to have easy access to Host, Devices, Device groups and Job properties.
It also provides a quick overview of what is happening in the whole print domain
or a subset of it.
One can interface Mercator with several third party viewers, in order to preview
the pcl or PostScript files to print (Windows platforms only).
The User Guide gives you an introduction to the product. For more detailed
information, see the online help which is available for each window.
2.3
Xprint V7.0 R/3 kit
Xprint V7.0 can be optimally interfaced with SAP R/3 V4.x, and has been
certified by SAP as an Output Management System (certification BC-XOM).
The Xprint V7.0 R/3 kit offers the following advantages:
–
–
–
–
–
accurate and timely information on the print documents
real-time asynchronous status feed-back
tracking of documents
improved performance
better support of output devices
You can find more information on the Xprint V7.0 R/3 kit in the Xprint V7.0
Reference Manual.
2.4
Xprint V7.0 elements
This section describes the elements comprising Xprint V7.0 and the possibilities
Xprint V7.0 offers its users.
8
U23841-J-Z915-6-76
Introduction to Xprint V7.0
2.4.1
Xprint V7.0 elements
Xprint V7.0 objects
Xprint V7.0 is an object-oriented system. This is also reflected in the way Xprint
V7.0 is used. Almost all the Xprint V7.0 commands can be used with the
different object types, which is why the number of Xprint V7.0 commands is
relatively low. The following section provides an overview of the available
objects and their use.
The following objects are defined in Xprint V7.0. The parentheses contain the
short name of the Xprint V7.0 objects for use in Xprint V7.0 commands:
●
The Xprint V7.0 system (-sys)
The Xprint V7.0 system refers to all the Xprint V7.0 objects which are
combined in a common administrative unit, what is called an Xprint V7.0
domain. Within the Xprint V7.0 system the Xprint V7.0 administrator is
allowed to perform all the administrative tasks.
●
Gateways (-gtw)
Gateways allow you to make a connection from one Xprint V7.0 domain to
another Xprint V7.0 domain or to other spooler systems. Via these gateways
you can use the output devices and device groups of the other system
involved.
Gateways to DPRINT (spooler system for BS2000 systems) or BSD spooler
systems (spooler systems supporting the BSD lpr protocol) allow users of
the local Xprint V7.0 domain to access the output devices and device groups
in these spooler systems. Conversely, it is also possible to access the
printers and printer groups of the local Xprint V7.0 domain from DPRINT and
BSD spooler systems.
i
●
Exchanging data with DPRINT requires that the local gateway be
defined on a platform which has openFT installed.
Hosts (-hos)
Under Xprint V7.0 the term host refers to every computer defined in an
Xprint V7.0 domain. Hosts are divided into different classes: master, slave
and parasite hosts. The difference lies in the way they handle the Xprint V7.0
database.
U23841-J-Z915-6-76
9
Xprint V7.0 elements
Introduction to Xprint V7.0
The Xprint V7.0 database contains all the data Xprint V7.0 needs to access
Xprint V7.0 resources. This includes information on the defined hosts, users,
devices and device groups as well as on forms and all the other Xprint V7.0
objects. Only the print jobs are stored on the server responsible for their
execution.
●
Servers (-srv)
Servers are the Xprint V7.0 objects which administer incoming print jobs and
are responsible for scheduling them. Each server administers its own print
queue which contains all the print jobs for the devices whose supervisors
are controlled by the server.
●
Supervisors (-spv)
A supervisor is directly responsible for controlling one or more devices. It
obtains the job data from the superordinate server and forwards it to the
backend program (see the glossary entry “Backend” on page 273). One
supervisor may control several local devices.
●
Device groups (-dgr)
Devices can be combined to form what are called device groups to achieve
better loading of all the devices in the group. If a print job is sent to a device
group, it is printed on the first device to become available in this group.
●
Devices (-dev)
Xprint V7.0 can use devices of many different types. The devices are
controlled by a supervisor and assigned tools, called backends. Also, a
PCL is assigned to the device.
●
Print jobs (-job)
Print jobs are submitted by users and, as described in the previous section,
can be modified. They are administered by the servers responsible for the
respective print queues.
In addition to the normal manipulation options, you can redirect all print jobs
for a given device to another device.
●
Forms (-frm)
Forms are a convenient way of influencing the appearance of print jobs.
Forms can be used to define paper and page formats, the layup (portrait or
landscape), font, appearance of the information pages and user privileges.
Xprint V7.0 differentiates between automatic and manual forms. Jobs using
automatic forms can be printed at any time: these forms are mounted on
10
U23841-J-Z915-6-76
Introduction to Xprint V7.0
Xprint V7.0 elements
the printer by default and usually only define the hopper or the page format
(margins) or the font. If a specific form requires that special paper be
mounted in the printer manually or that a font cassette be changed, a
manual form makes sure that the job is only printed when the printer has
been prepared.
●
PCLs (-pcl)
PCLs (printer capability lists) are used to define what printing options a
device provides. Furthermore, the PCL contains information on how the
options specified when the job is submitted can be converted to device
commands. Xprint V7.0 is supplied with a number of PCLs for the most
common printers, and with one generic PCL which in most cases also allows
printing on unknown devices. A list of all the PCLs supported by Xprint V7.0
is provided in the Reference Manual.
●
Users (-usr)
Xprint V7.0 differentiates between two types of user: there are users, who
are not defined in the Xprint V7.0 system, and Xprint V7.0 users, who are
defined in the Xprint V7.0 system. users are all users of the system on
which Xprint V7.0 is running; the default settings for Xprint V7.0 apply to
them. If these settings are not sufficient, the users can be defined in the
Xprint V7.0 system.
The administrator can make more settings for Xprint V7.0 users than for
users:
– Xprint V7.0 users can access their print jobs from all the hosts for which
they are registered.
– They can be assigned a security level and thus be granted access to
devices with a corresponding security level.
– Print quotas can be defined for the number of jobs or print pages
allowed, thus preventing users from making unlimited numbers of
printouts.
●
Filters (-flt)
Filters have the function of converting the data sent to the device by the user
into the format required by the device. This makes it possible, for example,
to print normal ASCII files on PostScript printers, as Xprint V7.0 is supplied
with the filter vppost. Two types of filter are distinguished under Xprint V7.0:
slow filters which are executed before the Xprint V7.0 process, and fast
filters which are used to provide a link to objects other than standard components.
U23841-J-Z915-6-76
11
Xprint V7.0 elements
●
Introduction to Xprint V7.0
Fonts (-fnt)
Font types supported by the printers in use can be easily accessed through
the definition of fonts.
●
Job templates (-jtp)
Job templates serve to simplify the use of frequent print commands by
allowing the options of the xpadd command, which must normally be
specified individually, to be combined in groups. These can then be specified
via the job template.
●
Loadable resources(-lrs)
Loadable resources allow faster printing of jobs that use the same
background, logo, soft font etc. They also improve job recovery. A loadable
resource must be downloaded to the printer before it can be called by a print
job.
Public loadable resources can be created, modified or deleted for the whole
system by the Xprint V7.0 administrator. Individual users can create, modify
or delete private loadable resources, that is loadable resources that are for
their use only.
●
Permission lists (-prm)
Permission lists make it possible to define who may use which Xprint V7.0
resources by granting the relevant privileges. The administrator can define
the following privileges for users under Xprint V7.0:
– Which users may/may not use a device or a device group in Xprint V7.0
or other environments.
– Which users may/may not use a specific form.
– Which forms may/may not be used on a specific printer.
●
Recovery rules (-rec)
Recovery rules are used to describe how specific device conditions are
handled. The default recovery procedure in the case of a device error can be
overridden by a recovery rule. In the case of the device error “paper_end”,
for example, the default is for the Xprint V7.0 system to continue trying to
print the job until the paper cassette is refilled. You could use a recovery rule
to specify a different procedure (for example, to suspend the print job and
set the device to NOT_ACTIVE until the administrator intervenes).
12
U23841-J-Z915-6-76
Introduction to Xprint V7.0
2.4.2
Xprint V7.0 elements
Options for printing documents
In a network as well as on a stand-alone system, Xprint V7.0 provides extensive
functionality for printing documents (see also the Reference Manual):
●
Selecting the output device of your choice
You can print your documents on any device in the Xprint V7.0 system which
you are allowed to use. You can choose either an individual device or a
device group as the destination. You can also define your personal default
device to which every print job is sent for which you do not explicitly specify
a destination, and you can access devices which are not available in your
own Xprint V7.0 domain via what are called gateways.
●
Automatic adjustment of the document type
Xprint V7.0 allows you to send any document to any device. If the relevant
filters are defined, the document type is automatically adjusted to the device
type. This makes it possible, for example, to print normal ASCII files on
PostScript printers (the filter for this conversion is supplied with Xprint V7.0).
●
Printing several copies of a document
For every print job you can specify how many copies of the entire job are to
be printed. Provided the printer supports this option, you can also print
several copies of each individual page. In this case, each page is printed
several times before the next page is printed.
●
Printing parts of a document
You can also print parts of a document. Here it is possible to define the part
to be printed by specifying a range of pages or strings (“print from abc to
xyz”).
●
Printing at specific times
For every print job, you can specify a time when it is to be printed. This allows
you, for example, to schedule longer print jobs for nighttime printing. In
addition, you can define that print jobs which have not been printed by a
specific time are deleted automatically.
●
Printing at a low priority
Xprint V7.0 allows priorities to be assigned to print jobs. These priorities are
user-specific, which enables print jobs of specific users to be given
preference over those of others. Less important jobs can be assigned a
lower priority.
U23841-J-Z915-6-76
13
Xprint V7.0 elements
●
Introduction to Xprint V7.0
Printing confidential documents
Every user and every device under Xprint V7.0 has what is called a “security
level”. This allows you to ensure that confidential jobs are only printed on
those devices which feature a corresponding security level.
●
Selecting forms
If there are several forms defined for a device, you can specify which of these
forms you want to use for printing. Forms define the page format and the font
attributes of a printout. However, you can always change the specifications
for an existing form to make it meet your specific needs, for example by
specifying a different typeface for a specific job. This also applies if only the
default form is defined.
●
Using resources that are external to the document
Documents can be printed using external resources like logos, soft fonts etc.
Calls to these resources may belong to the document, or they can be
inserted automatically by Xprint V7.0 at the top of the page.
●
Notification of the result
Xprint V7.0 allows you to define how you want to be notified of the status of
your print jobs. You can define, for example, that in the event of an error you
want user Brown to be notified by mail.
●
Direct printer control
You can also control a specific printer directly and define specific printer
settings, such as the line spacing.
●
Defaults for print jobs
Xprint V7.0 allows you to combine all the options mentioned above in what
are called job templates. In this way, you can define frequently recurring
settings once and then simply retrieve them whenever required. These job
templates can be defined by each user.
●
Individual, national-language user interface
By default, Xprint V7.0 uses the national language set for you for displaying
messages or menus. You can easily change this language by altering the
setting of the environment variable LANG.
14
U23841-J-Z915-6-76
3
Producing Output with Xprint
V7.0
This chapter describes how to print documents using the command line
interface. To begin with, it introduces the basic structure of the Xprint V7.0
commands available to the normal Xprint V7.0 user and describes how and
where you can obtain additional information on the commands. This is followed
by several sections explaining the most important options for printing
documents.
3.1
Basic information
This section provides an introduction to using the Xprint V7.0 commands, their
basic structure, and how you can access the online help for these commands at
any time.
Available Xprint V7.0 commands
Xprint V7.0 provides a number of commands with which you can manipulate the
Xprint V7.0 objects. The following table shows the Xprint V7.0 commands you
can call as a user:
Command
Use
xpadd
adding print jobs
xpchange
changing the job status
xpdel
deleting print jobs
xpmod
modifying existing print jobs
xpshow
displaying information on Xprint V7.0 objects
xpstat
displaying the status of Xprint V7.0 objects
Table 1: Xprint V7.0 commands
As an ordinary user, you can only use all these commands for the job object.
For all other objects you can only use the xpstat and xpshow commands. Only
the administrator can also use all the other commands for other objects.
U23841-J-Z915-6-76
15
Basic information
Producing Output with Xprint V7.0
Structure of Xprint V7.0 commands
This section describes the general structure of the Xprint V7.0 commands.
Command Object type [Selection] Options
---------------------------------------------------xpadd
-job
-dr file1 -ct SIMPLE
xpshow
-job
13
-di LONG
xpdel
-job
13
Every Xprint V7.0 command is called using this format. The name of the
command, e.g. xpadd, is followed by the short identifier for the object type
consisting of three characters, e.g. -job. Furthermore, you can select from the
objects available of the selected object type, e.g. in the case of the object type
-job, you can select one or more specific print jobs. Finally, there are a number
of options available for most commands which have an effect on the behavior of
the individual commands. For detailed information on the various Xprint V7.0
commands see the “Xprint V7.0 - Reference Manual”.
Online help
For every command, you can call online help with the -? option. This online help
works on two levels: command and option level.
If you call an Xprint V7.0 command followed by the -? option (e.g. xpadd -?),
command level help will be displayed, providing the general form of this
command. This type of help displays the objects supported by the command. It
also shows the options that are independent of the object type. Not all the
options are displayed, however, because these depend on the use of a
command and an object together.
Option level help displays all the possible options of a specific object type used
with an Xprint V7.0 command. To call the online help at option level, you must
specify the command name as well as the relevant object type before the -?
option (e.g. xpshow -dgr -?).
16
U23841-J-Z915-6-76
Producing Output with Xprint V7.0
3.2
Printing files
Printing files
This section describes the simplest way of printing files with Xprint V7.0. This
might be sufficient for some users while other users will require further options.
Use the following basic command to print a complete document on your default
printer:
xpadd [-job] -dr selection
If you want to print a file, you do not have to specify the object type -job for the
xpadd command as this is the default for xpadd. The -dr option (document
reference) is used to select one or more files for printing. After this option, for
selection, specify the names of the files to be printed. The command could have
the following format:
xpadd -dr file
xpadd -dr file1 file2.txt file3.xyz
If you have specified only one file, only this file is sent to the printer; if you have
specified several files, these are sent to the printer as one block. This block of
combined files or the solitary file is called a print job.
Instead of the xpadd command you can also use the X/Open command lp to
submit a print job. As with the other X/Open commands lpstat and cancel, the
lp command is described in the “SINIX - Commands” manual and in the
appendix of the “Xprint V7.0 - Reference Manual”.
In addition to the -dr option, there are numerous possible options for controlling
the printing process. In the following sections many of these options are listed
according to topics. A complete alphabetical overview of all the available options
can be found in the “Xprint V7.0 - Reference Manual” under the command
xpadd -job. The table below serves as a guide through this section.
If you want to ...
Read ...
print a document on a specific device section “Selecting a printer” on
page 19
print parts of a document
section “Printing parts of a document”
on page 21
print a document with special data not section “Printing files with special
suitable for the printer
content types” on page 23
Table 2: Options for controlling the printing process
U23841-J-Z915-6-76
17
Printing files
Producing Output with Xprint V7.0
If you want to ...
Read ...
print a document with a specific
appearance
section “Creating printouts with
special formats” on page 24
print the current state of the document section “Copying print files before
printing and deleting them after
printing” on page 33
add separator pages between
documents or files
section “Defining separator pages” on
page 34
print several copies of a document
section “Printing several copies of a
document” on page 35
be notified of the completion of your
print job or of other events
section “Requesting notification of the
result” on page 36
print a document using further Xprint
V7.0 options
section “Using further options” on
page 37
print a document using predefined
fonts or forms
section “Using other Xprint V7.0
objects” on page 41
print a document using loadable
resources
section “Using Resources” in the
“Reference Manual”
print a document using a predefined
job template
section “Printing a document via a
globally defined job template” on
page 44
print a document with a private job
template
section “Defining customized job
templates” on page 46
Table 2: Options for controlling the printing process
18
U23841-J-Z915-6-76
Producing Output with Xprint V7.0
3.3
Selecting a printer
Selecting a printer
Xprint V7.0 allows you to print documents on any printer within your Xprint V7.0
domain. You can select any printer for your printout for which you have the
required privileges.
There are two possible ways of selecting printers or printer groups for printing
in Xprint V7.0. Firstly, you can specify one specific printer (group) for a print job,
and secondly, you can define one or more printers as your personal default
printers:
If you do not specify a specific printer (group) for your print job, Xprint V7.0 will
select a suitable printer according to the options specified for the print job (e.g.
double-sided printing, landscape format).
Specifying a printer or printer group for a print job
You can select the printer on which you want to print your document according
to various criteria. There are the following options:
-de destination
This option allows you to select a printer or printer group. If you select a
printer group, Xprint V7.0 sends your job to a device which belongs to this
group. Xprint V7.0 has a load balancing procedure which ensures the
jobs will be distributed effectively between the printers in the group. You
can display a list of the available printers via the xpshow -dev command.
The available printer groups can be displayed with the xpshow -dgr
command.
-pc pcl
Instead of selecting a specific printer by its name, you can also use the
printer capability list pcl as a criterion, e.g. POSTSCRIPT, HP-LASERJET or
HP-DESKJET. In this case, Xprint V7.0 sends your job to any available
printer which uses the selected PCL.
Addressing a printer via a gateway
You can also select a printer (group) which is not defined in your Xprint V7.0
domain, provided it can be reached via a gateway. This applies to
printers/printer groups which are available in other Xprint V7.0 domains or
which are connected to computers running the DPRINT printer spooler (for
BS2000 systems) or the BSD printer spooler (for BSD-UNIX systems and other
systems with an lpd print server).
U23841-J-Z915-6-76
19
Selecting a printer
Producing Output with Xprint V7.0
To address a printer (group) via a gateway, you must specify both the name of
the gateway and the name of the desired destination, separating the names with
the ! character. Only the administrator can find out the name of all the gateways
available using the xpshow -gtw command.
To address a printer via a gateway, specify the combination gateway!printer as
the printer name with the -de option.
Defining a default destination
With the shell variable XP_DESTIN you can define one or more printers of your
Xprint V7.0 domain as the default destination for your print jobs. In this case,
each print job for which you do not explicitly specify a target printer will be
printed on this default destination. If you have defined more than one printer as
the default destination, Xprint V7.0 will select a suitable printer.
To define a default destination, you must set the shell variable XP_DESTIN to the
names of the desired printers and export it before submitting a print job. The
individual printers must be separated by spaces. If you want to define the default
destination for every session with your computer, it is recommended that you set
XP_DESTIN in a file which is processed for every login (e.g., depending on the
shell, the file .profile or .xsession in your HOME directory).
Examples
– To print a document on device printer1:
xpadd -dr file1 -de printer1
– To print a document on printer printer1 via the gateway linuxgtw:
xpadd -dr file1 -de linuxgtw!printer1
– To print a document on any device belonging to the device group SP211:
xpadd -dr file1 -de SP211
– To print a PostScript file on any PostScript printer in the network:
xpadd -dr file2.ps -pc POSTSCRIPT
– To print a document on a device with the PCL HP-LASERJET belonging to the
device group SP211:
xpadd -dr file2 -de SP211 -pc HP-LASERJET
– To configure printer printer2 as the default destination:
XP_DESTIN=printer2; export XP_DESTIN
20
U23841-J-Z915-6-76
Producing Output with Xprint V7.0
Using Xprint V7.0 options
To print file1 on printer printer2:
xpadd -dr file1
– To configure printers printer1 and printer2 as the default destination:
XP_DESTIN=“printer1 printer2"
export XP_DESTIN
To print the file file1 on one of the printers printer1 or printer2:
xpadd -dr file1
3.4
Using Xprint V7.0 options
This section describes further options for printing files with Xprint V7.0. The
individual subsections describe the various possibilities offered by Xprint V7.0
for printing documents.
3.4.1
Printing parts of a document
In raw mode, printing parts of documents is not supported.
i
By default, all pages of a document are printed when xpadd is used. If you want
to print only specific parts of the file, use one of the following options to select
the sections to be printed:
-ps page_select
You can select individual pages or ranges of pages for printing by using one
of the following methods:
You can specify individual page numbers separated by commas, e.g.
1,6,7,16
pages 1, 6, 7, and 16 are printed.
You can specify a range of pages a-b where b must always be larger than a:
18-34
pages 18 through 34 are printed.
3all pages from page 3 onward are printed
U23841-J-Z915-6-76
21
Using Xprint V7.0 options
Producing Output with Xprint V7.0
--23
pages up to page 23 are printed.
You can specify combinations of page ranges:
--15,17all pages are printed except for page 16.
--15,27-30,35all pages up to page 15, from page 27 through page 30, and from
page 35 onward are printed.
--15,30,35
all pages up to page 15, page 30, and all pages from page 35 onward
are printed.
Finally, you can combine individual pages and page ranges.
i
The two hyphens are indispensable and must always be specified if
you want to print up to a certain page without specifying a start
page.They prevent the minus sign from being interpreted as the
beginning of a new option.
If you do not specify any page numbers after the -ps option, all pages of the
document are printed (exactly as if the -ps option had not been specified).
-fr string
A string in your document where printing is to start. If Xprint V7.0 does
not find the specified string, nothing is printed.
-to string
A string in your document where printing is to stop. If Xprint V7.0 does
not find the specified string in your document, the document is printed up
to the end.
If the -ps option is combined with the -fr and/or -to option, Xprint V7.0
searches the specified strings in the page ranges defined with -ps.
i
22
If the print job is sent to a device that does not use a PCL, i.e. prints in
raw mode (see section “Using further options” on page 37), the options
-ps, -fr, and -to are ignored.
U23841-J-Z915-6-76
Producing Output with Xprint V7.0
Using Xprint V7.0 options
Examples
– To print a document from page 5 through page 10:
xpadd -dr file1 -ps 5-10
– To print a document from page 7 to the end:
xpadd -dr file1 -ps 7-
– To print a document from page 1 through 5:
xpadd -dr file1 -ps --5
– To print a document from the string Example 1 up to the string
}/* main */:
xpadd -dr file1 -fr"Example 1" -to"}/* main */"
– To select the page range from page 5 to page 19 and print the section
starting with the string abc up to the string xyz in this range:
xpadd -dr file1 -ps 5-19 -fr abc -to xyz
3.4.2
Printing files with special content types
The basic print command requires that the contents of the specified files can be
processed by the printer. However, sometimes this is not the case. For example,
a PostScript printer cannot print ASCII files directly. The simple ASCII data in
the file must be converted to PostScript format before printing.
Xprint V7.0 can make such conversions automatically if it knows the content
type of the file and what the printer expects. The administrator specifies the
supported content type when configuring the printer, while the content type of
the print data must be specified by the user when defining the print job.
If the two types match, Xprint V7.0 can send the print job directly to the printer;
if they do not match, Xprint V7.0 will try to convert the print job data into a format
suitable for the printer.
If you do not specify a content type, the following will occur automatically:
●
Xprint V7.0 will read the start of the data. If %! are the very first characters,
or the string %!PS occurs in the first 15 characters, then the content type will
be set to POSTSCRIPT.
●
If this is not the case and only SIMPLE characters are detected in the first 15
characters, then the content type is set to SIMPLE.
U23841-J-Z915-6-76
23
Using Xprint V7.0 options
Producing Output with Xprint V7.0
Otherwise, the content type is set to COMPATIBLE.
●
If you are printing more than one document, then the content type than is determined for the first document will be used for all the other documents in the job.
3.4.3
Creating printouts with special formats
Usually, a printer is not only capable of printing data on paper but can also do
this in different formats. Therefore Xprint V7.0 also allows you to influence the
formatting by specifying font settings, the page format, and the character set to
be used.
Printing a document with different font settings
The following options allow you to change the default font for a printout. What
you can modify depends on the printer you use. If you use the xpshow -pcl
command and specify the PCL set for the selected printer, you can display a list
of the fonts, styles, character pitches etc. that are supported by the printer, e.g.:
xpshow -pcl HP-LASERJET -di LONG.
i
A font always consists of several components such as typeface, style or
font size. You can override these at any time, for example by modifying
the font size.
If you often want to print with such customized settings, you can also
define a special job template for this purpose. For more detailed information see section “Defining customized job templates” on page 46.
-tp typeface
This option selects the specified typeface for the print job. Printers are
supplied with a number of predefined typefaces. A list of the typefaces
available for your printer under Xprint V7.0 can be displayed using the
command
xpshow -pcl -di LONG.
-cs character_style
You can choose between two character styles: STRAIGHT and ITALICS.
The default is STRAIGHT.
-hm horizontal_motion
The value horizontal_motion specifies the number of characters printed
horizontally per inch.
24
U23841-J-Z915-6-76
Producing Output with Xprint V7.0
Using Xprint V7.0 options
-vm vertical_motion
This option is used to specify the number of lines to be printed per inch.
Selecting the layup
Many printers can print in PORTRAIT and in LANDSCAPE format. In most cases the
default is PORTRAIT. The following figure illustrates the possible settings:
Figure 4: Layup settings
The page layup can be changed with the following option:
-ls layup_specification
This option specifies whether a print job is to be printed in PORTRAIT or in
LANDSCAPE format.
U23841-J-Z915-6-76
25
Using Xprint V7.0 options
Producing Output with Xprint V7.0
Defining the margin settings
When printing under Xprint V7.0, you can also define which part of a page is to
be printed on. The following figure provides an overview of the possible settings
and is followed by a description of the individual options.
-pw
T, B, L and R mark the
printer-dependent nonprintable area.
T
-tm
-lm
The values for the nonprintable margin are
retrieved from the values
nppl and npll of the
corresponding PCL
object:
-ll
T = B = nppl/2
L = R = npll/2
-ph
L
-pl
R
B
Figure 5: Margin settings
26
U23841-J-Z915-6-76
Producing Output with Xprint V7.0
Using Xprint V7.0 options
Xprint V7.0 always defines its printable area by means of the logical page
specified with the options -pl (page length) and -ll (line length). The margin
options -tm (top margin) and -lm (left margin) can also be used for defining the
printable area within the physical page. If only the margin settings -tm and -lm
are specified, the bottom and right margin of the logical page are defined via the
non-printable area. If a logical page is not given, the size of the printable area is
calculated from the size of the physical page (-ph for the page height, -pw for the
page width) minus the non-printable margins.
-lm left_margin
This option specifies the width of the left margin in inches (i), centimeters
(c) or millimeters (m) or, if no unit is specified, in characters.
-ll line_length
This option defines the maximum length of a print line, which indirectly
also determines the right margin. This can also be specified in inches (i),
centimeters (c) or millimeters (m). If no measurement is specified and no
left margin is defined, the value is interpreted as the number of
characters per line. If no value is specified, the page width specified with
the -pw option minus the printer-specific non-printable margin widths is
used.
This option is controlled by the option -wm (wrap mode), i.e. the line length
is modified if the printable line length is exceeded. For more information
refer to the “Xprint V7.0 - Reference Manual”.
-tm top_margin
This option is used to specify the width of the top margin in inches (i),
centimeters (c) or millimeters (m) or, if no unit is specified, in characters.
-pl page_length
This option defines the maximum length of a printed page, and thus
indirectly also the bottom margin. This can also be specified in inches (i),
centimeters (c) or millimeters (m). If no measurement is specified, the
value is interpreted as the number of lines per page. If no value is
specified and no top margin is defined, the page height specified with the
-ph option minus the printer-specific non-printable top and bottom
margins is used.
i
Depending on the printer, the margins on the printout may differ from the
set values. Therefore it is advisable to print a sample copy first in order
to adjust the values for the printer. Also bear in mind that the printable
area is controlled by the -wm option (wrap mode) of the xpadd -job
command.
U23841-J-Z915-6-76
27
Using Xprint V7.0 options
Producing Output with Xprint V7.0
Switching double-sided printing on/off
When printing jobs which comprise several pages, it often makes sense to
change the page settings for even- and odd-numbered pages in such a way that
they face each other as in a book. The margin settings should be set alternately
to result in a symmetrical overall image. The following figure shows the various
options for double-sided printing under Xprint V7.0:
DOUBLE_WIDE & PORTRAIT
SINGLE & PORTRAIT
DOUBLE_NARROW & PORTRAIT
SINGLE & LANDSCAPE
DOUBLE_WIDE & LANDSCAPE
DOUBLE_NARROW & LANDSCAPE
Figure 6: Options for double-sided printing
-sd side _specification
This option is used to specify whether a form is to be printed only on one
side (SINGLE) or on both sides. In the case of double-sided printing you
specify the gutter for the portrait side (DOUBLE_WIDE) or for the landscape
side (DOUBLE_NARROW). By default, single-sided printing (SINGLE) is set.
28
U23841-J-Z915-6-76
Producing Output with Xprint V7.0
Using Xprint V7.0 options
Selecting specific character sets
Depending on the PCL, a printer supports a number of special character sets,
e.g. ENGLISH, FRENCH, INTERNATIONAL etc. If you want a job to be printed using a
specific character set table, e.g. the character set INTERNATIONAL, you must
specify this with the option -la character_set.
The supported character sets can be seen in the Language field of the output of
the xpshow -pcl pcl_name -di LONG command.
Examples
– To print the document file1 with a left margin of 5 cm and a top margin of
34 mm:
xpadd -dr file1 -lm 5c -tm 34m
– To print the file file1 double-sided (with a vertical gutter):
xpadd -dr file1 -sd DOUBLE_WIDE
– To print file english (created using the English character set) using the
character set INTERNATIONAL:
xpadd -dr english -la INTERNATIONAL
U23841-J-Z915-6-76
29
Using Xprint V7.0 options
3.4.4
Producing Output with Xprint V7.0
Using Loadable Resources
The figure below gives a simplified view of how loadable resources work. This
is explained more fully in the following paragraphs.
Data (document)
This is sample text. This is
another line. This is sample text.
This is another line of sample
text. This is a further line of sample text. This is one more line of
sample text. This is a further line
of sample text. This is one more
line of... This is sample text. This
is another line of sample text.
This is a further line of sample
Loadable Resources
Font
mylogo
mylogo
This is sample text. This is
another line. This is sample text.
This is another line of sample
text. This is a further line of sample text. This is one more line
of... of sample text. This is a further line of sample text. This is
one more line of...This is sample
text. This is another line of sample text. This is a further line of
Logo
Font used by text
Text (foreground)
Background
Figure 7: Function of loadable resources
30
U23841-J-Z915-6-76
Producing Output with Xprint V7.0
Using Xprint V7.0 options
Loadable resources (such as fonts, logos etc.) can be sent to the printer
separately from the document. The printer will merge the data and the loadable
resource to give the required printed output.
The resources external to the document can be defined as Xprint V7.0 objects
called “loadable resources”. They can either be predefined by the administrator
for the entire system and made available to all users, or they can be defined by
each individual user as “private loadable resources”. For further information on
creating and using loadable resources, see Chapter 4 in the “Reference
Manual”.
3.4.4.1
Using Public Loadable Resources
The administrator may have configured loadable resources in the system. To
print a document that uses resources, use the following option:
-lr loadable resources
With this option, you can reference a list of loadable resources.
Examples
– To display the loadable resources available in the system, use the command
xpshow -lrs
The system displays a list of all loadable resources that can be used. For
example, you could use any of the loadable resources listed below.
Name
---logo
font
i
Type
---Overlay
Softfont
Administrator
------------root
root
PCL
--------PJL-PCL5e
PJL-PCL5e
Please note that only those loadable resources are displayed which
have been defined by the Xprint V7.0 administrator. Your own job
loadable resources in the $HOME/.Xprint file are not displayed but can
also be used.
– To print a document with a logo on every page:
xpadd -dr mydocument -lr logo -cr ALL
Xprint V7.0 is only able to insert calls to resources at the top of a page in a
document. Other cases must be dealt with by the user. The user must call
the resource with the appropriate escape sequence (see the printer manual)
and with the identifier known by the printer. This identifier is shown in the
Internal Id field in the xpshow -lrs -di LONG display.
U23841-J-Z915-6-76
31
Using Xprint V7.0 options
3.4.4.2
Producing Output with Xprint V7.0
Using Private Loadable Resources
Only administrators can create public loadable resources, but users can create
private loadable resources. To do this, create a file named .Xprint in your
home directory. You can insert as many comment lines as you like, which must
start with the “#” character. The definition of a loadable resource starts with its
name followed by any options allowed by xpadd -lrs. If a definition continues
on the next line, the current line must end with a backslash character.
Resources first have to be created with dedicated tools such as FGL or
SIEFONT from Siemens. These tools will generate the data to be downloaded
to the printer. The name of the generated file can be saved in a loadable
resource object. Each resource needs its own identifier in the printer. This
identifier has to be reflected in the resource object as the “printer internal
identifier”. The description of a resource can be registered in a loadable
resource object.
Resources may be called from documents if they include printer commands that
call the resource.
Examples
– The following example shows the definition of several loadable resource
objects.
# Private .Xprint file
#
# Loadable resources
# everypage logo
mylogo -pi 101 -pc HP-LASERJET -tp Overlay -ec
-fi $HOME/lrs/mylogo.hp -cr ALL
mybckgrd -pi 102 -pc HP-LASERJET -tp Overlay -ec
-fi $HOME/lrs/mybckgrd.hp
– Jobs can use the loadable resources as follows:
xpadd -dr mydocument -lr mylogo
xpadd -dr mydocument -lr mylogo mybckgrd
i
If a private loadable resource has the same name as a predefined
(public) loadable resource, the private one is given preference when the
name is selected. This means that first your .Xprint file is searched for
private loadable resoures. If none can be found, or the .Xprint file does
not exist, or the .Xprint file is not readable, then the resource is
assumed to be a public loadable resource.
32
U23841-J-Z915-6-76
Producing Output with Xprint V7.0
Using Xprint V7.0 options
For inter-domain printing, resources are assumed to be available in the
remote domain. This restricts resources to public ones.
3.4.5
Copying print files before printing and deleting
them after printing
The basic command xpadd -dr file prints the specified file by adding to the
job queue a reference to the original file. If there is some time between job
submission and the actual printing, any changes made to the document during
this time also affect the printout. This is not always desirable. For this reason,
Xprint V7.0 allows you to make a copy of the data to be printed. This can be
done using the following option:
-cp (cp stands for copy file)
This option causes a copy to be made of the document to be printed. This
way the original file can immediately be edited further or can be deleted
without these modifications affecting the printout.
Another option causes a file to be deleted immediately after printing:
-rm (rm stands for remove file after printing)
This option causes all the specified files to be deleted after the printout.
If the printout is not finished, for example due to an error or because the
job was canceled, the files are not removed from the system. If a
retention period was specified with the -rp retention_period option, this
file is only deleted when this period of time has elapsed. If Xprint V7.0 is
not active on the relevant host system at the scheduled delete time, the
files cannot be removed.
i
If the options -cp and -rm are used simultaneously, the -rm option is
ignored without notice and only -cp is interpreted.
U23841-J-Z915-6-76
33
Using Xprint V7.0 options
3.4.6
Producing Output with Xprint V7.0
Defining separator pages
With printers which are used by many users at the same time or when listing
paper is used, it can make sense to add separator pages between the different
print jobs. This makes it easier to distinguish the print jobs of the individual users
or two different print jobs. For this purpose, Xprint V7.0 offers the option of
defining print jobs with a start or end sheet. Additionally, individual files of one
job can be separated by adding separator sheets.
-js job_start_sheet
-je job_end_sheet
-sp separator_sheet
With a print job you can specify whether start and end sheets are to be
printed, or in the case of several documents also separator sheets between
the documents. The variables of these options can be set to the following
values: BRIEF, FULL and NONE. The default is NONE.
Example
To insert a start sheet of type BRIEF and separator sheets of type FULL for print
job job1:
xpadd -dr file1 file2 file3 -jt job1 -js BRIEF -sp FULL
34
U23841-J-Z915-6-76
Producing Output with Xprint V7.0
3.4.7
Using Xprint V7.0 options
Printing several copies of a document
There are two possible ways of printing several copies of a document. Firstly,
you can print the entire document, and secondly you can print each page of the
document several times. The difference is that in the first case the copies of the
document are sorted while in the second case they are not. The second option,
however, might be faster if the printer itself can print several copies of individual
pages (e.g. HP-LASERJET printers).
You can define the number of copies for the entire document using the following
option:
-fc number
number defines the number of copies of the specified documents to be
printed. If this option is not specified, exactly one copy of each document
is printed.
If you have access to a printer supporting multiple printouts (e.g. an HPLASERJET printer), you can use the following option to print several copies of
each individual page:
-fp number
In this case, number defines how often each page of the job is to be
printed.
i
This option is not supported by PostScript printers.
Examples
– To print three copies of a document:
xpadd -dr file1 -fc 3
– To print five copies of pages 1 through 5 of a document one after the other:
xpadd -dr file1 -ps 1-5 -fp 5
U23841-J-Z915-6-76
35
Using Xprint V7.0 options
3.4.8
Producing Output with Xprint V7.0
Requesting notification of the result
Xprint V7.0 allows you to have a message about the result of a print job sent to
you. This is particularly useful if the period of time between the job’s submission
and its execution is fairly long (e.g. in the case of scheduled print jobs and jobs
with a low priority). For this purpose, Xprint V7.0 provides several options for the
xpadd command:
-ev events
With this option you can specify the events of which you want to be
notified. Possible events are: ALL, DEVICE_ERROR, MOUNTING and NONE. The
default is NONE for local jobs, or REJECTED_FROM_REMOTE_DOMAIN if the job
was sent via a gateway (or ALL if either of the options -nm or -na is
specified). Further settings are STARTED, COMPLETED, ABORTED, SUSPEND,
RESUMED, DEVICE_ERROR, USER_ERROR, MODIDFIED and
SENT_TO_REMOTE_DOMAIN (a detailed description of these keywords is
given in the “Xprint V7.0 - Reference Manual”).
-nm notification_method
With this option you can specify how you want to be notified. The default
is MAIL, other possible settings are WRITE, COMMAND and FILE (see the
“Xprint V7.0 - Reference Manual” for details).
-na notification_address
With this option you specify where the message is to be delivered.
-nd comment (nd stands for notification descriptor)
Allows you to define a comment that is to be added to the message.
Examples
– To request a message to be sent to yourself via the write command when
the job is completed or aborted:
xpadd -dr file1 -ev COMPLETED ABORTED -nm WRITE
– To log all the events of the print job in the file /home/baxter/print.log:
xpadd -dr file1 -nm FILE -na /home/baxter/print.log
– To notify user smith of every modification of the print job via mail:
xpadd -dr file1 -ev MODIFIED -na smith
– To send a job to a gateway and request information in the event of an error:
xpadd -dr file1 -de gateway1!printer1 \
-ev REJECTED_FROM_REMOTE_DOMAIN
36
U23841-J-Z915-6-76
Producing Output with Xprint V7.0
3.4.9
Using Xprint V7.0 options
Using further options
This section describes further useful options of the xpadd command.
Printing in raw mode
Besides printing on predefined forms, Xprint V7.0 allows you to specify
formatting and printer control sequences for the printer yourself. This can be
done with the -rw option (raw mode). Xprint V7.0 sends the document to the
selected printer without making changes to your formatting. This option is
particularly useful if you use the xpadd command as a print command for an
application program which formats the print data itself.
Retention period of print jobs
When the print process is finished, the information which can be displayed with
xpshow and xpstat is also deleted from the spooler system. If you want this
information to still be available, you can specify a period of time in minutes with
the option -rp retention_period. This defines how long the print job is to be
retained in the system after its completion. The default is 0 (remove immediately).
i
If you specify the keyword INFINITE, the print job remains in the system
permanently.
Printing a document directly
To send a document directly to the printer by bypassing the print queue, you can
use the option -dp (stands for direct printing). This option allows quick printing
of a document; you cannot, however, modify the print job (xpmod or xpchange) or
request information on the job (xpshow). You can only select one printer, which
must be disabled for normal Xprint V7.0 spoolout by the Xprint V7.0 administrator. You are only assigned a local rather than a global ID for the print job you
submit. This local ID can be used to delete the job (xpdel) or display its status
(xpstat).
Initial state of a print job
When a print job is transferred to the spooler, it is automatically assigned the
status WAIT (waiting for printout). You can, however, also assign it the status
SUSPEND (to defer it) or TOP (to move it to the top of the print queue) with the -st
option if your Xprint V7.0 administrator has given you the required permission.
U23841-J-Z915-6-76
37
Using Xprint V7.0 options
Producing Output with Xprint V7.0
The -wa option (wait activation) allows you to assign the status SCHEDULED to the
print job. This means that the print job is added to the print queue and moves in
it according to its priority. When it comes to the top position, the printer to which
the job is assigned is no longer available for other jobs. Only when the print job
is explicitly assigned the status ACTIVE (xpchange -job, option -st ACTIVE), is
printing started. When the print job is completed, the printer is released for use
by other print jobs again.
Figure 8: States of print jobs
Extended options
The –ex flag has been introduced to extend the set of pre-defined object
attributes in a flexible way.
The purpose of this option is twofold:
●
adapt product behavior via predefined variables.
●
collect and store any interesting information for the user or the administrator
in a structured way.
Example:
– the room number where the printer is located
– the page cost of a printer
38
U23841-J-Z915-6-76
Producing Output with Xprint V7.0
Using Xprint V7.0 options
– the e-mail adress of a user
– the operating system of a host...
It consists in a list of strings that can be stored in all Xprint V7.0 objects. Each
string must respect the following format: “<variable>=<value>”.
Example:
<command_name> <object_type> name [...] [operand] [options] ex "variable1=value1" "variable2=value2" [...]
Besides the options mentioned above, there are numerous additional options
for printing files with Xprint V7.0. For a complete overview of all the possible
options see the description of the xpadd -job command in the “Xprint V7.0 Reference Manual”.
U23841-J-Z915-6-76
39
Using other Xprint V7.0 objects
3.5
Producing Output with Xprint V7.0
Using other Xprint V7.0 objects
The previous section has already mentioned a number of options which are in
some cases closely related to each other. For example, the options for defining
font settings and the options for defining page settings are logically connected.
Xprint V7.0 responds to this fact by providing two objects which combine
logically connected settings. These are the objects font (-fnt) and form (-frm).
With the help of objects of these types, the corresponding settings can be
defined globally and called up for printing.
Instead of specifying several options, e.g. for defining the font settings, you only
need to specify a single option which will activate a predefined font. Here the
following applies:
A font comprises all the options for font settings, a form comprises a font as well
as all the options for page and margin settings for a printout. Fonts are assigned
to forms and these in turn are assigned to printers. By default, every printer is
assigned the GENERIC form which defines the default settings for the printer. An
administrator can define new fonts or forms and assign these to printers. A user
can only assign these objects to his/her print jobs, thus overriding the default
settings.
Selecting a font or form does not mean, however, that all the options defined by
this object must be accepted exactly as they are. Every user can assign to a job
a predefined form and additionally specify single options which will override the
settings defined by the form.
Fonts and forms are selected with the following options:
-ft font_name
If you want to use a predefined font for printing your document, select the
font font_name with the -ft option. You must, however, make sure that the
printer to which your print job is sent supports the selected font. You can
display a list of the defined fonts with the xpshow -fnt command.
-fm form_name
form_name is the name of a predefined form on which you want to print
your document. You can display a list of all the available forms with the
xpshow -frm command.
There are two types of form: AUTOMATIC and MANUAL. This differentiation is due to
the fact that there are forms which require manual intervention at the printer
(e.g. changing paper or font cassettes) and others which do not.
40
U23841-J-Z915-6-76
Producing Output with Xprint V7.0
i
Using other Xprint V7.0 objects
Jobs using forms of the type MANUAL, which require manual intervention
at the printer, are only printed when Xprint V7.0 is informed that the
required steps for printing these jobs have been performed. For this
purpose Xprint V7.0 provides the xpmount command which sends this
information to Xprint V7.0.
Printing a document with a MANUAL form
To print a document with a MANUAL form, proceed as follows:
●
Submit the print job and select the required form:
xpadd -job -dr file -fm form
●
Prepare the target printer accordingly.
●
Now tell the system that the form is mounted and printing can thus be
started. Use the following command:
xpmount
By means of menus the system then asks you to specify the mounted form
and target printer (see example). When the required specifications are
made, the system starts printing the document.
The xpmount command also provides the options -f form, -d printer and -s
(silent mode, i.e. the user is not asked for mount confirmation); this allows
you to avoid the menu selection by explicitly specifying the relevant values.
●
If you need to print with normal settings again, make the required changes
on the printer.
●
Notify the system of this:
xpmount -f- -d printer
where the option -d printer, i.e. the printer from which the form was removed,
must be specified.
U23841-J-Z915-6-76
41
Using other Xprint V7.0 objects
Producing Output with Xprint V7.0
Examples
– To display all defined forms :
xpshow -frm
A list of all the available forms is displayed, which might read as follows:
Name
---GENERIC
LETTER
A5LAND
MANUAL
i
Default font
-----------GENERIC
COURIER
GENERIC
GENERIC
Layup
----PORTRAIT
PORTRAIT
LANDSCAPE
LANDSCAPE
User perm.
---------perm1
Mount method
-----------AUTOMATIC
AUTOMATIC
MANUAL
MANUAL
Forms with the value MANUAL in the Mount method column require
specific manual settings to be made (e.g. mounting the correct paper,
see section “Printing a document with a MANUAL form” on page 41).
– To print a document using the form LETTER:
xpadd -dr file1 -fm LETTER
– To print a document via the form A5LAND, but using the font COURIER:
xpadd -dr file1 -fm A5LAND -ft COURIER
– To print the document file1 on the printer printer1 with the (manual) form
A5LAND:
xpadd -job -dr file1 -de printer1 -fm A5LAND
The user mounts the required form.
xpmount
The following menu query is displayed:
Please select the manual form to mount on the device.
Selection:
0. Unmount the form
1. manual
2. A5LAND
Type number or”?” for help:
Input: 2
Form”A5LAND” has been selected.
Please select the device where the form”A5LAND” will be
mounted.
42
U23841-J-Z915-6-76
Producing Output with Xprint V7.0
Using other Xprint V7.0 objects
Selection:
1. printer1
2. printer2
3. printer3
Type number or”?” for help:
Input: 1
Device”printer1" has been selected.
Please mount”A5LAND" on device”printer1".
Type "y" when finished or"?" for help:
Input: y
Form"A5LAND" is now mounted on device"printer1".
The printer now starts printing the document file1. When printing is
finished, the user removes the form from the printer and notifies the system
of this:
xpmount -f- -d printer1
Again the confirmation is displayed on the screen:
Form unmounted for"printer1"
– To print the document file2 on printer printer2 using the form manual:
xpadd -job -dr file2 -de printer2 -fm manual
The user mounts the required form.
Then he/she enters the command xpmount, this time avoiding the query by
specifying the required values explicitly:
xpmount -f manual -d printer2 -s
Xprint V7.0 confirms with the following message:
Form"manual" is now mounted on device"printer2".
The printer starts printing the document file2.
When printing is finished, the user unmounts the form on the printer and
notifies the system of this:
xpmount -f- -d printer2
Again the confirmation is displayed on the screen:
Form unmounted for"printer2"
U23841-J-Z915-6-76
43
Job templates
3.6
Producing Output with Xprint V7.0
Job templates
Just as different font settings can be combined in the font objects, print job
settings can be combined in an Xprint V7.0 object. This is called a job template
(-jtp). Job templates can either be predefined by the administrator for the entire
system and made available to all users, or they can be defined by each
individual user as private job templates.
In Xprint V7.0, jobs are sent to a device, a device group, or to an unspecified
target. This is different to a number of other print spoolers, where jobs are sent
to a qualified print queue. Sending jobs to a qualified print queue allows administrators to associate print characteristics with each queue (e.g. a form, a print
density etc.). For the users, this means that selecting a queue automatically
selects the characteristics associated with that queue. Using this approach,
each physical printer can be associated with several logical queues, each
logical queue having its own characteristics.
The Xprint V7.0 job templates work in a similar way. Administrators can define
job templates, to which they assign a job destination (device or device group),
with print characteristics. If users submit their jobs by using templates instead
of specifying a destination, this has the same effect as using the qualified
queues of the other spoolers.
3.6.1
Printing a document via a globally defined job
template
The Xprint V7.0 administrator might have configured job templates in the
system. These contain all the options required for frequently submitted print
jobs of a specific type. Users no longer have to enter the individual options but
simply select the appropriate template.
To print a document with a job template use the following option:
-te job_template
With this option you can use exactly one predefined job template or a job
template you have defined yourself for your print job.
44
U23841-J-Z915-6-76
Producing Output with Xprint V7.0
Job templates
Examples
– To display the job templates available in the system:
xpshow -jtp
The system displays a list of all the job templates the Xprint V7.0 administrator has defined. This list can look, for example, as follows:
Name
rm
---letter1
letter2
template1
Destination
----------printer1
printer1
Form
Font
----
----
A5LAND
TIMES
fc
-001
001
001
-020
001
001
pr
-RESET
RESET
RESET
You can use any of the listed templates for your print jobs.
i
Please note that only those job templates are displayed which have
been defined by the Xprint V7.0 administrator. Your own job templates
in the $HOME/.Xprint V7.0 file are not displayed but can also be used
(see next page).
– To use the predefined job template template1 and overwrite the template’s
priority, making it 5:
xpadd -dr file1 -te template1 -pr 5
For the printout, the options defined for this template are used instead of the
-te option.
i
Do not confuse option -te job_template with -jt job_title.
You can modify the options defined in the selected job template by
explicitly specifying the relevant options with the modified values in
the command line:
xpadd -jtp my_job -pr 10
xpadd -dr file_1 -te my_job -pr 15
The job is spooled in with the priority 15.
U23841-J-Z915-6-76
45
Job templates
3.6.2
Producing Output with Xprint V7.0
Defining customized job templates
Not only the system administrator but also the users themselves can define job
templates. To do this, create a file named .Xprint V7.0 in your home directory.
You can insert as many comment lines as you like. Comment lines must start
with the ’#’ character. The definition of the job template starts with the template
name. This is followed by the options for this template. All xpadd options are
allowed. Strings must be enclosed in inverted commas or quotes, e.g. -jc ’a
comment’. If a definition is to be continued in the next line, the current line must
end with a backslash.
i
Job templates are a convenient way of combining recurring option
sequences to form a template (e.g. if you want to assign a specific font to
a specific paper format). In this way you do not have to specify all your
selected settings for every print job. When defining a customized job
template, you do not necessarily have to define all settings but you can
also modify the settings of an existing template such that it meets your
requirements.
Examples
– The following example shows several simple job templates:
# Private .Xprint file
#
# JOB TEMPLATE
# for letters:
letter
-de printer1 -fm form3 -la USA -jt letters -cp
#
# for ASCII files on PostScript printer printer2:
a2ps
-de printer2 -ct SIMPLE -cp
#
# with notification of success or failure:
notification -ev COMPLETED ABORTED -nm WRITE\
-nd ’Send message on termination’
– This example shows the templates letter and notification. The
templates are then used as follows:
xpadd -dr file1 -te letter
xpadd -dr file1 -te notification -pr 5
For the printout, the options defined for this template are used instead of the
specified -te option.
46
U23841-J-Z915-6-76
Producing Output with Xprint V7.0
i
Job templates
If a customized job template has the same name as a predefined job
template, the customized one is given preference over the predefined
template when this name is selected. This means that your .Xprint V7.0
file is searched first for the customized job template. If it cannot be found,
the .Xprint V7.0 file does not exist or is not readable, the job template
is assumed to be a globally defined template.
U23841-J-Z915-6-76
47
4
Managing print jobs
This section shows the possible ways of displaying, modifying or deleting a
submitted print job. The following table serves as a guide through this section:
If you want to ...
Read ...
display a print job
section “Displaying print jobs” on page 55
modify a submitted print job
section “Modifying a submitted print job” on
page 61
delete a print job
section “Deleting print jobs” on page 65
Table 3: Managing print jobs
As you have to select submitted print jobs to be able to delete or modify them,
the following section “Selecting a print job” first describes the possible ways of
selecting print jobs.
4.1
Selecting a print job
To manage a submitted print job, you must first select the job. You can only
select print jobs which are still in a print queue.
There are several different ways of doing this. This section describes how to
select individual print jobs via the job’s default identifier or how to select one or
more print jobs via a selection criteria list.
The job identifier
When you submit a print job, it is placed in a print queue. If your print job is
accepted for printing, Xprint V7.0 automatically returns unique IDs by which you
can identify your print job in the print queue. These IDs have the following
formats:
<local ID><global ID>
or
<global ID><permanent ID>
The local ID is a number specifying the serial number of the job for your host. It
can only be used on the host on which the print job was started.
U23841-J-Z915-6-76
49
Selecting a print job
Managing print jobs
The global ID consists of the name of the server which processes the print job
and a serial job number for this server. This ID can be used from any host on
which you are registered as a user.
The permanent ID is an extension of the local ID, intended to be unique in time,
i.e. never reused for another job. The permanent job ID is made of the client host
name, a counter that garantees the permanence of this identifier and the local
ID.Please refer to page 51 for a complete description of the permanent ID.
A job ID might, for example, read as follows:
<18><se1:97>
In this example, 18 is the local job ID, se1 is the server name and 97 is the serial
job ID on this server.
You should note these IDs in case you need to access the print job before its
execution is completed. If you do not know the ID of the print job you want to
access, you can request a list of all your print jobs (see section “Displaying print
jobs” on page 55).
In addition, the print job is always assigned a job title, which is either the same
as that of the print file (in the case of a job with several files it is the name of the
first file), or which has been specified explicitly with the -jt job_title option.
If you select a print job via its identifier, you can use the number as well as the
job title.
This is illustrated by the following example:
xpadd -dr file1
XP000002: Job <18><se1:97> added
You can select this print job using the following methods:
xpstat
xpstat
xpstat
xpstat
i
18
file1
se1:97
se1:file1
Note that, unlike the job ID, the job title is not always unique. If there are
several jobs with the same title, specifying this title selects all of them.
You can also use the wildcards * and ? when specifying the job title. These have
the same meanings as with UNIX commands. * represents any number of
characters, ? represents exactly one character. The following example selects
all the print jobs at the server se1 whose job title starts with da:
xpstat -job se1:da*
50
U23841-J-Z915-6-76
Managing print jobs
Selecting a print job
The permanent job identifier
The permanent job identifier is usable in the same way as the local job id in the
PRISMAnet domain.
A new key has been integrated in the job structure to garantee the permanence
of the job identifier, which means it will never be assigned to another job.
The permanent job identifier format is: H@C@L
Where
H:is the client host name to make the permanent id single in a domain.
@:is the first separator character.
C:is a counter of 10 digits (it will never be reset).
@:is the second separator character.
L:is the local job id.
It will be possible to select a job with a permanent job id in the following
commands:
- xpchange
- xpdel
- xpmod
- xpshow
- xpstat
When a job is submitted, Xprint V7.0 displays the permanent-id or the local job
id if the value of the extended option of xpadd or whether the environment
variable "XP_SHOW_PERMANENT_ID" is set to "1".
Example:
# xpadd -de device -dr filename -ex "XP_SHOW_PERMANENT_ID=1"
XP000002: Job <d241s081@0000000245@1> (<d241s081:8>) added
Or
# XP_SHOW_PERMANENT_ID=1
# export XP_SHOW_PERMANENT_ID
# xpadd -de device -dr filename
U23841-J-Z915-6-76
51
Selecting a print job
Managing print jobs
XP000002: Job <d241s081@0000000245@1> (<d241s081:8>) added
The permanent job id is only usable locally on the submission host as it is
the case with the local job id.
Example:
A job with the permanent job id "host1@0000003049@5" has been added
on host1 and the following command is submitted from host2:
# xpshow host1@0000003049@5
L. jid Global jid Originator Destination Form fc
pr
------ ---------- ---------- ----------- ---- --
--
XP000093: <host1@0000003049@5> not accessible
Selection criteria lists
You can also access submitted print jobs via what are called selection criteria
lists. In this case you can select print jobs via specific criteria, such as the
printer to which the job was sent, its priority, the scheduled print time, etc.
Selection criteria may be specified for all commands with which you can display,
modify or delete print jobs. Use the following option:
-scl “selection_criteria_list”
This option allows you to select print jobs according to criteria which must
be enclosed in double quotes. The selection criteria are all the options
which were specified when the print job was defined, except for -jt
job_title, -te job_template and -sx (silent execution).
In the case of options without arguments (Boolean options) you can
select the relevant option by means of a following + (set) or - (not set)
sign.
In the case of options which allow for the use of several combined values,
normally those jobs are selected for which at least the specified values
are set. For an exclusive search for print jobs with exactly the specified
values, the option must be followed by the = sign.
The wildcards * and ? are allowed for non-numerical arguments.
Examples
– To delete all print jobs for printer printer1:
xpdel [-job] -scl "-de printer1"
52
U23841-J-Z915-6-76
Managing print jobs
Selecting a print job
– To display all print jobs with the priority 5 and the content type SIMPLE:
xpshow [-job] -scl "-pr 5 -ct SIMPLE"
– To display all print jobs for which the option -cp was specified:
xpshow [-job] -scl "-cp+"
or
xpshow [-job] -scl "-cp"
– To display all the print jobs for which the option -cp was not specified:
xpshow [-job] -scl "-cp-"
U23841-J-Z915-6-76
53
Selecting a print job
Managing print jobs
Examples of the output formats SHORT and LONG
– To obtain a SHORT display, enter the following command:
xpshow [-job] -scl "-de printer1" [-di SHORT]
You will obtain the following display:
L.jid
----1
Global jid
---------si511:7
Originator
---------xprintadm
Destination
----------printer1
Form
----
fc
-001
pr
-001
– To obtain a LONG display, enter the following command:
xpshow [-job] -scl "-de printer1" -di LONG
You will obtain the following display:
LOCAL JOB ID: 2
Global job id: si511:8 si511:/etc/passwd
Permanent job id.: d241psap@0000000036@2
Document references: etc/passwd
Destination: printer1
pcl:
Original job size:2788
Candidate printers: printer1
Form:
Font: No validation: RESET
Job priority: 020 File copies: 001
Page copies: 001
Page select:
From string:
To string:
Originator: xprintadm
Security level: UNCLASSIFIED
Submission time: Wed Aug 30 16:44:04 MET 1995
Submission host: nile
Print after: Wed Aug 30 16:44:04 MET 1995
Retention time:
Retention period: 0
Remove: RESET
File(s) copied: RESET
FF mode:
Wait activation: RESET
Wrap mode: NONE
Tab space: 08
Raw printing: RESET
Hopper number: 00 Output bin: 00 First page behaviour: RESET
Loaded files:
Map table:
Content type: COMPATIBLE
No filter: RESET
Special print modes:
Notification events: NONE
Delivery method: MAIL
Delivery descriptor:
Delivery address:
Slow filters:
Submitted command: xpadd -de printer1 -dr/etc/passwd
Extended options:
Comment:
54
U23841-J-Z915-6-76
Managing print jobs
4.2
Displaying print jobs
Displaying print jobs
You can display individual or all print jobs in the print queue. Information on your
print jobs can be obtained with the commands xpshow and xpstat which also
allow you to view the status of your print jobs :
i
The xpshow and xpstat commands can be used to display the attributes
of all objects in Xprint V7.0. Therefore the following applies not only to
print jobs but to all Xprint V7.0 objects.
xpshow provides all the static attributes of objects (i.e. those which are not
modified by the Xprint V7.0 system itself), while xpstat provides information on
the dynamic criteria. The two corresponding commands xpmod and xpchange
can be used to modify or change the settings of Xprint V7.0 objects. xpmod
modifies the static settings while xpchange changes the dynamic state.
List of print jobs
You can display a list of print jobs to find out, for example, the names of the
existing print jobs.
●
To display a list of all the existing print jobs, use the following command:
xpshow [-job]
This command returns a table with all the print jobs you can access. This
table contains only the most important information.
Detailed information on print jobs
You can output more detailed information on one or more print jobs to find out,
for example, which options are set for the print jobs.
●
To display detailed information on a print job, use the following command:
xpshow [-job] [job] -di LONG
For job you can specify either a job identifier or a selection criteria list. Information on the selected print jobs is then displayed job by job. If you omit job,
you receive information on all the existing print jobs.
The output of xpshow -job is self-explanatory and therefore not described
here.
U23841-J-Z915-6-76
55
Displaying print jobs
Managing print jobs
Selected information on print jobs
You can also display only specific attributes of print jobs. This is again achieved
by means of parameter lists or templates.
Displaying attributes via parameter list
If you only want to display specific attributes for print jobs, use the following
command:
●
xpshow -di "parameter_list"
The selected attributes must be specified for parameter_list, listing the
individual parameters in one string.
In addition to the options of the xpadd -job command, the following options
can be used:
-lj
to display the local job ID
-id
to display both the local and global job IDs
-gj
to display the global job ID
-pj
to display the permanent job ID
By default, both the local and the global job identifier are output first in two
separate columns. To override this, you can use the -id- option. If you want
these identifiers to be output at a different position, insert -id at the position you
want in the parameter list.
Furthermore, specifying -lj or -gj also overrides the default output of both
identifiers.
i
The options -te and -sx of the xpadd -job command cannot be used as
they do not correspond to an attribute of the job definition.
Displaying attributes using display templates
If you frequently use specific attributes for the display of print jobs, you can
define a template containing all these attributes. Then, to obtain a display, you
only call the name of this template; i.e. you do not have to specify a list of
attributes each time. The template is stored in the special file .Xprint V7.0 in
your login directory.
●
Use the following command to call a display template:
xpshow -di display_template
56
U23841-J-Z915-6-76
Managing print jobs
Displaying print jobs
where display_template represents the name of the template you want to use.
Defining a display template
To define a display template, proceed as follows:
●
Open the .Xprint V7.0 file in your login directory.
●
Enter the new display template as follows:
display_template parameter_list
display_template is the name of the template under which the display
template will be called with the xpshow ... -di display_template command.
parameter_list represents a list of options of the xpshow -job command. Here
you use exactly the same options as described under “Displaying attributes
via parameter list” on the previous page.
i
Your system administrator can also define display templates. These are
saved in the .Xprint V7.0 file in the /var/spool/Xprint/config
directory. This file is searched if the template is not found in your private
.Xprint V7.0 file.
Further display settings
By means of environment variables which you set before calling the display
template, you can define various characteristics of the display:
XP_FS:
With this variable you define the character which is to be used to
separate the horizontal fields. If you do not specify a value, a tab space
is set by default.
XP_FW:
This variable defines the field size in characters. If you explicitly specify
a value, e.g. 10 characters, the entries exceeding this length will be
truncated. If you specify 0, the values will not be truncated but displayed
in full. The default is 7 (characters).
XP_LS:
With this variable you define the separator to be used to separate values
within one field. If this variable is not set, the space character is used by
default.
U23841-J-Z915-6-76
57
Displaying print jobs
Managing print jobs
Basically, there are two ways of setting these variables:
You can define them globally, i.e. the selected settings are used for all invocations of the xpshow command until the variables are modified again:
Variable=value
[Variable2=value]
[Variable3=value]
export Variable [Variable2 Variable3]
If you only want to use the display settings once, enter the variables, separated
by spaces, in one line together with the command:
Variable=value [Variable2=value Variable3=value] xpshow -job ...
Status of print jobs
The xpstat command allows you to display the status of a submitted print
job:
●
xpstat [-job] [job] [-di LONG]
For job you can specify either a job identifier or a selection list. Information
on the selected print jobs is then displayed job by job. If you omit job, you
receive information on all the existing print jobs.
If you do not specify the option -di LONG, the SHORT format will be displayed
by default.
The State field contains information, for example, on the status of the
printout, on error messages, etc.; for a complete list of the messages see the
“Xprint V7.0 - Reference Manual”.
The Rank field contains the print job’s position in the print queue: the lower
the value, the sooner it will be printed.
i
58
If a print job is waiting for execution on a printer in a printer group, the
Rank field contains its position in the job queue of the printer with the
lowest load in this printer group.
U23841-J-Z915-6-76
Managing print jobs
Displaying print jobs
Display examples
– Job status display (SHORT):
L jid
----1
Global jid
---------se1:511
Destination
----------P1
Rank
---0001
Percentage
---------000
State
----WAIT
– Job status display (LONG):
LOCAL JOB ID.: 3
Global job id.: d241s052_006:14
State: SUSPEND
State information:
Destination: hplj4m
Rank: 1
Requested copies: 1
Copies printed: 0
% already printed: 0
Last printed page: 0
Related document:
– To display print job information containing only the attributes Destination
and Release time, use the following command:
xpshow -di "-de -at"
You will obtain a display similar to the following:
1
2
se1:14
se1:16
P1
P1
Thu Aug
Thu Aug
– To define and then apply the display template my_template which is to
include the job ID, local ID, files to be printed, destination printer, form used
and the pages to be printed:
Open the file .Xprint V7.0 and enter the following line:
my_template -id -lj -dr -de -fm -ps
Display information on all print jobs using the display template my_template:
xpshow -job -di my_template
Display:
9
10
se1:14
se1:16
9
10
/tmp/file1
/tmp/file2
P1
P1
– To globally change the display of the xpshow command such that the
individual fields are not truncated and are separated by “...”:
XP_FW=0
U23841-J-Z915-6-76
59
Displaying print jobs
Managing print jobs
XP_FS=...
export XP_FW XP_FS
– To use the display settings of the previous example only once for a display
with my_template:
XP_FW=0 XP_FS=... xpshow -job -di my_template
60
U23841-J-Z915-6-76
Managing print jobs
4.3
Modifying a submitted print job
Modifying a submitted print job
When a print job is submitted, you can still modify its attributes as long as the
job has not yet been printed. You can, for example, redirect a print job to another
printer or select a different form. You can also redirect a print job to a remote
domain.
To change the attributes of a submitted job, you can use the xpmod
command:
●
xpmod [-job] job [modifications]
For job you can specify either a job identifier or a selection criteria list. If you
omit job, all the existing print jobs are modified.
For modifications you can use all the xpadd options except for -dr, -jt, -cp,
-ct, -rm+, -te, -dp, -st, -nv, -sc, -sm and -nf.
Options can be set or reset to the default by appending the suffixes + or - .
There are two possible ways of redirecting print jobs to another printer. You can
either use the xpmod -job command and the -de printer option or you can use
the xprdir command. Using this command you can specify the required values
(old printer, new printer, jobs etc.) either explicitly or via an Xprint V7.0-driven
menu query. For more information on the xprdir command, refer to the Xprint
V7.0 Reference Manual.
i
When redirecting a print job to another printer, the new printer must
support the data format of the original target printer as no filters can be
specified.
Examples
– A print job with the ID se2:4 is to be redirected to printer1, given priority 15
and printed from string fgh through string str:
xpmod -job se2:4 -de printer1 -pr 15 -fr fgh -to str
– All print jobs you have submitted for printer3 are set to the default priority:
xpmod -job -scl "-de printer3" -pr-
U23841-J-Z915-6-76
61
Modifying a submitted print job
Managing print jobs
– To redirect a print job:
Spoolin print job job1 on printer printer1, which only supports the data
format POSTSCRIPT; there is a filter available, however, for converting the
format SIMPLE to POSTSCRIPT:
xpadd -job -dr job1 -de printer1 -ct SIMPLE
If the print job is then redirected to the printer printer2, this must be able to
handle the data format POSTSCRIPT, as job1 was automatically converted at
spoolin:
xpmod -job job1 -de printer2
– To redirect a print job to a remote domain, specify the remote printer by
partner_gateway_name!destination name:
xpmod -job job1 -de gtw1!printer31
62
U23841-J-Z915-6-76
Managing print jobs
4.4
Redirecting print jobs
Redirecting print jobs
The xprdir command can be used to redirect print jobs assigned to a specific
printer to another printer, but you can only redirect the entire print queue of a
printer, not individual print jobs. This redirection is permanent, i.e. it also applies
to all subsequent jobs for the original printer, and must be canceled explicitly.
Please note that xprdir is provided for compatibility purpose only. You should
use xpchange -dev -rd instead.
xprdir assigns to the original printer the status NOT_ACTIVE and activates the
printer which is to be the new destination. The active job on the original printer
is handled as specified with the -j option by the user. Then the entire print
queue is redirected from the old printer to the new destination, all the print jobs
keeping their original status.
The xprdir command can be used by every user, no specific privileges
are required. If the Xprint V7.0 administrator wants to restrict its use,
he/she can protect the command by means of access rights and user
definitions.
i
●
To redirect the print jobs of one printer to another, enter the following
command:
xprdir -d old_destination -r new_destination [options]
-d old_destination
specifies the printer whose job queue is to be redirected to another
printer.
-r new_destination
specifies the printer to which the job queue of the original printer is to
be redirected.
i
The device names specified with -d and -r must not be identical.
For options the following options are possible:
-j job_handling
requests Xprint V7.0 to perform an action on the active job on the
original device. The following values can be specified for job_handling:
DELETE
The active job is to be deleted.
U23841-J-Z915-6-76
63
Redirecting print jobs
Managing print jobs
RESTART-BEGINNING
When the job has been redirected to the new destination it is
put at the top of the job queue and printed from the beginning.
RESTART-FROM
When the job has been redirected to the new destination it is
put at the top of the job queue and printed starting with the
page specified with option -p.
SUSPEND
When the job has been redirected to the new destination it is
assigned the status SUSPEND.
TERMINATE
The active print job is printed to the end and not redirected to
the new destination.
i
In this case, the original printer is set to the status SPOOLIN_OFF
until the active job has finished printing. If there is a printer
error, the user must correct it, for example by setting the printer
to the correct physical status. When the job is finished, the
printer is set to the status NOT_ACTIVE.
-p page:
If the value RESTART-FROM is used with the -j option, the number page
specifies the page number from which the active job is to be reprinted.
i
The -j RESTART-FROM -p page option does not work with print
jobs that are to be printed in PostScript format or raw mode.
-?:
The use of the command and its options is displayed.
If xprdir is used without options and arguments, the command starts a dialog
with the user in which it asks for all the required information using selection
menus.
i
64
The xprdir command does not work if Xprint V7.0 is not active on the
host on which the new printer is configured. It returns the same error
messages as the commands xpchange and xpmod.
U23841-J-Z915-6-76
Managing print jobs
4.5
Deleting print jobs
Deleting print jobs
You can delete a print job that is in the print queue or is being printed.
●
To delete a print job, use the xpdel command:
xpdel selection
For selection you can either specify a list of job identifiers or, with the
option -scl “selection_criteria_list”, define a list of criteria according
to which the jobs to be deleted are to be selected. Every entry in this
list consists of an option of the xpadd -job command with a value
assigned to it. For more information, see the section “Selection
criteria list” on page 266 of the Appendix.
Examples
– To delete the print jobs 1, 3, 7, and 9 (local ID):
xpdel [-job] 1 3 7 9
– To delete the print jobs si_mfs1:2 and si_mfs1:4 (global ID):
xpdel [-job] si_mfs:2 si_mfs:4
– To delete all print jobs with the attributes destination printer3 and form
A5LAND:
xpdel [-job] -scl "-de printer3 -fm A5LAND"
U23841-J-Z915-6-76
65
5
Introduction to administering
Xprint V7.0
This chapter describes the concepts of Xprint V7.0, which you must be familiar
with in order to use this product. It describes the objects comprising Xprint V7.0
and provides the basic knowledge you require for administering Xprint V7.0.
5.1
Responsibilities
To allow the privileges and tasks within Xprint V7.0 to be clearly delimited,
several types of Xprint V7.0 user are distinguished:
●
users / Xprint V7.0 users
Users, whether registered in the Xprint V7.0 database or not, cannot administer any Xprint V7.0 objects besides their own print jobs.
●
System administrator
Every system administrator (root) of a system may also perform specific
administrative tasks concerning Xprint V7.0 on his/her system. These
tasks include:
– starting and terminating Xprint V7.0 on the local system (commands
xpstart and xpstop). Only the system administrator can start Xprint
V7.0.
– activating and deactivating local printers, supervisors and servers
(xpchange command).
– setting up local Xprint V7.0 objects other than users and the Xprint V7.0
system (xpadd command).
– administering all local Xprint V7.0 objects (commands xpmod and xpdel).
– defining local Xprint V7.0 administrators, who can perform some of the
tasks of the system administrator for the local host (xpmod -hos
command).
●
Local Xprint V7.0 administrator (sub-root)
Every system administrator can define one or more local Xprint V7.0 administrators who are responsible for administering the Xprint V7.0 system
locally.
U23841-J-Z915-6-76
67
Responsibilities
Introduction to administering Xprint V7.0
A local Xprint V7.0 administrator has the same privileges as the system
administrator (see below), except for starting Xprint V7.0 and defining local
Xprint V7.0 administrators.
●
Xprint V7.0 administrator
The Xprint V7.0 administrator has absolute control over the Xprint V7.0
system throughout an entire Xprint V7.0 domain, i.e. over all the systems
defined in the Xprint V7.0 database. He/she can administer Xprint V7.0 from
any of these hosts, provided he/she is registered as a user of this host. The
only exception is starting Xprint V7.0 on a remote system that is exclusively
controlled by the local system administrator of that system.
The following figure illustrates the privileges of the different types of user with
respect to administering Xprint V7.0:
Figure 9: User privileges
This figure shows an example of a configuration of four hosts A to D and the two
printers 1 and 2. The Xprint V7.0 administrator is registered as a user on all
hosts and can therefore control the various objects of the Xprint V7.0 system
from every host. In the figure, the Xprint V7.0 administrator can administer all
the Xprint V7.0 objects in the Xprint V7.0 domain from host A, i.e. say the
printers 1 and 2, the Xprint V7.0 users and also the four hosts themselves.
68
U23841-J-Z915-6-76
Introduction to administering Xprint V7.0
Responsibilities
The system administrator of host B can administer all those Xprint V7.0 objects
for which host B is defined as the administration host. Similarly, the local Xprint
V7.0 administrator of host C can only administer those Xprint V7.0 objects for
which host C is defined as the administration host.
However, this also means that, for example on a host which is not interconnected with other hosts via a network, Xprint V7.0 can be administered entirely
by the Xprint V7.0 administrator, the system administrator or a specially
configured local Xprint V7.0 administrator (with the exception of starting Xprint
V7.0 which is restricted to the system administrator).
In this manual, the generic terms user and administrator are used as shown
in the following table, unless a specific type of user is being referred to. In this
case the type is expressly specified.
Term
Type of user
user
UNIX user
Xprint V7.0 user
administrator
local Xprint V7.0 administrator
system administrator
Xprint V7.0 administrator
Table 4: Types of users
i
Please note that only the Xprint V7.0 administrator is allowed to administer objects on remote hosts. If in the course of this manual an object is
to be manipulated by an administrator, either this must be the Xprint
V7.0 administrator or the object must be local.
U23841-J-Z915-6-76
69
Xprint V7.0 architecture
5.2
Introduction to administering Xprint V7.0
Xprint V7.0 architecture
Xprint V7.0 is an object-oriented system consisting of various objects. As an
administrator you can define, modify, delete and, if appropriate, activate and
deactivate Xprint V7.0 objects.
The following figure shows the most important Xprint V7.0 components and how
these interact.
Figure 10: Xprint V7.0 architecture
The client (xpadd command or API function) requests the printing of a job. This
job is directly processed by the server (except in the case of what is called
direct printing). The server passes the printout on to a suitable supervisor
which itself communicates with the printer via the backend assigned to the
printer.
The following section provides a more detailed description of the available
objects. Almost all the Xprint V7.0 commands can be used with the different
object types.
70
U23841-J-Z915-6-76
Introduction to administering Xprint V7.0
5.2.1
Xprint V7.0 architecture
The Xprint V7.0 objects
The following objects are defined in Xprint V7.0 (the parentheses contain the
short name of the Xprint V7.0 objects for use in Xprint V7.0 commands):
●
Filters (-flt)
Filters have the function of converting the data sent to the printer by the user
into the format required by the printer. This makes it possible, for example,
to print normal ASCII files on PostScript printers as Xprint V7.0 is supplied
with the filter vppost.
Figure 11: Filters
Two types of filter are distinguished under Xprint V7.0:
Slow filters are executed before the actual spool process, i.e. after the job
is submitted but before it is printed. They convert data or allow special print
modes such as printing in columns or landscape mode.
Fast filters are used to enhance the print functionality provided by Xprint
V7.0. If used, they are the last link in the chain of Xprint V7.0 objects; they
edit the print job and are in direct contact with the printer. Their main function
is to provide a connection with objects other than the standard components.
They receive the feedback from the printer and forward it to the supervisor
in a form it can understand.
As an administrator you can define and compile, modify or delete your own
filters (fast and slow). For a description of how to define new filters see the
“Xprint V7.0 - Reference Manual”.
U23841-J-Z915-6-76
71
Xprint V7.0 architecture
●
Introduction to administering Xprint V7.0
Fonts (-fnt)
Usually, various fonts are available for printing your documents under Xprint
V7.0. These are composed of the following attributes:
– typeface (e.g. Courier, Helvetica, Times Roman etc.)
– style (straight or italic)
– horizontal character pitch (number of characters per inch/centimeter)
– line spacing (number of lines per inch/centimeter)
– print quality (draft or correspondence quality)
– character set (German, English, International, USA etc.)
So that you do not have to specify the desired attributes for each individual
print job, Xprint V7.0 allows you to predefine various fonts. You select the
desired attributes and store them under a font name. If you want to print a
document using these specific font attributes, you only need to request them
via this font name and Xprint V7.0 will apply them automatically to the print
job.
Xprint V7.0 provides a default font (GENERIC) that has the following attributes:
no specific character type, straight, a character pitch of 10 characters per
inch, line spacing of 6 lines per inch and the character set INTERNATIONAL.
This font must not be modified nor deleted, not even by the Xprint V7.0
administrator.
●
Forms (-frm)
Forms are a convenient way of influencing the appearance of print jobs.
Forms can be used to define paper and page formats, the layup (portrait or
landscape), font, appearance of the information pages and user privileges.
Xprint V7.0 differentiates between automatic and manual forms. Jobs using
automatic forms can be printed at any time; these forms are mounted on
the printer by default and usually only define the hopper, page format
(margins) or the font. If a specific form requires that special paper be
mounted in the printer manually or that a font cassette be changed, a
manual form makes sure that the job is only printed when the printer has
been prepared.
You can define, modify or delete forms. Furthermore, you can use
permission lists to restrict the use of a specific form to specific users.
●
72
Gateways (-gtw)
U23841-J-Z915-6-76
Introduction to administering Xprint V7.0
Xprint V7.0 architecture
Gateways allow you to make a connection from one Xprint V7.0 domain to
another Xprint V7.0 domain or to other spooler systems. Via these gateways
you can use the printers and printer groups of the other system involved.
Gateways to other Xprint V7.0 domains simplify the administration of Xprint
V7.0 in very large networks. In this way, the hosts of the entire network can
be distributed over different Xprint V7.0 domains (e.g. by department) so that
there is one Xprint V7.0 administrator for each domain who only has to
administer a reduced number of Xprint V7.0 objects.
Gateways to DPRINT (spooler system for BS2000 systems) or BSD spooler
systems (spooler system of Berkeley BSD UNIX systems) allow users of the
local Xprint V7.0 domain to access the printers and printer groups in these
spooler systems. Vice versa, it is also possible to access the printers and
printer groups of the local Xprint V7.0 domain from DPRINT and BSD
spooler systems. This allows a network spooler system to be configured in
a heterogeneous network.
You can also assign a permission list to a gateway. This makes it possible to
restrict use of remote resources for local users.
i
Connections to BS2000 systems via gateways require the local
gateway to be defined on a UNIX platform on which openFT is
installed.
As an administrator, you can set up, delete, modify and enable or disable
gateways in both directions.
●
Hosts (-hos)
Under Xprint V7.0 the term host refers to every computer defined in an
Xprint V7.0 domain. Hosts are divided into different classes: master, slave
and parasite hosts. The difference lies in the way they handle the Xprint V7.0
database.
The Xprint V7.0 database contains all the data Xprint V7.0 needs to access
Xprint V7.0 resources. This includes information on the defined hosts, users,
printers and printer groups as well on forms, and all other Xprint V7.0
objects. Only the print jobs are stored on the server which is responsible for
their execution.
A master host holds a complete copy of this database. At any one time, one
of the potential master hosts is the active master. When Xprint V7.0 is set
up in a network, the first computer on which it has been installed and started
assumes the function of the active master. If Xprint V7.0 is terminated on the
active master, the next potential master in what is called the host hierarchy
U23841-J-Z915-6-76
73
Xprint V7.0 architecture
Introduction to administering Xprint V7.0
assumes its function as the active master. The ranks of the potential masters
can be defined by the order of their installation and can later be modified via
specific commands.
Slave hosts are hosts that hold a complete copy of the Xprint V7.0 database
but cannot become the active master host. This is useful, for example, for
computers which are shut down frequently, are not very reliable, or which are
still using an old Xprint V7.0 version.
A parasite host does not have a copy of the Xprint V7.0 database. It
requires Xprint V7.0 to be running on a specific computer which is assigned
to it as the database server, also referred to as the supporting host, if the
parasite host is to access Xprint V7.0. This only makes sense if there is a
permanently running database server available for such computers which
exports its database via a network file system (NFS). The database must
then be mounted into the local file system by the parasite host.
●
Job templates (-jtp)
Job templates simplify the use of frequent print commands by allowing the
options of the xpadd -job command, which must normally be specified
individually, to be combined in groups. These can then be specified via the
job template.
Job templates can be defined, modified or deleted for the whole system by
the Xprint V7.0 administrator or user-specifically by each individual user.
●
Loadable resources (-lrs)
Loadable resources allow faster printing of jobs that use the same
background, logo, soft font etc. They also improve job recovery. A Loadable
resource must be downloaded to the printer before it can be called by a print
job.
Public loadable resources can be created, modified or deleted for the whole
system by the Xprint V7.0 administrator. Individual users can create, modify
or delete private loadable resources, that is loadable resources that are for
their use only.
●
PCLs (-pcl)
PCLs (printer capability lists) are used to define what printing options a
printer provides. Furthermore, the PCL contains information on how the
options specified when the job is submitted can be converted to printer
commands. Xprint V7.0 is supplied with a number of PCLs for the most
74
U23841-J-Z915-6-76
Introduction to administering Xprint V7.0
Xprint V7.0 architecture
common printers, and with one generic PCL which in most cases also allows
printing on unknown printers. A list of the PCLs supported by Xprint V7.0 is
provided in the Reference Manual.
As an administrator you can define, modify and delete PCLs.
●
Permission lists (-prm)
With permission lists, you can define the following privileges under Xprint
V7.0:
– Which users may/may not use a printer, a printer group or a gateway.
– Which administrators may assign a new supervisor to a specific server.
– Which users may/may not use a specific form.
– Which forms may/may not be used on a specific printer.
There are two types of permission list: "allowed lists" and "denied lists".
An allowed list is used to specify which users or forms are allowed to use the
relevant object, while the denied list defines which users or forms are not
allowed to use a specific object. The allowed list of a printer, for example,
restricts use of the printer to the users contained in the list. The denied list
of a printer defines that the printer can be accessed by all users except for
those contained in the list.
i
The administrator of a specific object (printer, server, form) can
always access the object, irrespective of the contents of the
associated permission list.
Basically, permission lists for objects are handled as follows: if there is an
entry in the allowed list, the denied list is ignored; if the allowed list is empty,
the denied list applies. If both lists are empty, access to the object is
unrestricted.
●
Print jobs (-job)
Print jobs are submitted by users and, as described in the previous section,
can be modified. They are administered by the servers responsible for the
respective print queues. Print jobs are not part of the Xprint V7.0 database
like printers, servers etc., but they are stored in the server spoolin directory.
In addition to the normal modification options, as an administrator you can
redirect all print jobs for a printer to another printer.
●
Printers (-dev)
Xprint V7.0 can use printers of many different types.
U23841-J-Z915-6-76
75
Xprint V7.0 architecture
Introduction to administering Xprint V7.0
The printers are controlled by a supervisor and assigned tools, called
backends. A PCL is assigned to the printer.
The process of printing is controlled by a backend using the appropriate
printer’s PCL to provide printer details. Xprint V7.0 provides a generalpurpose backend but additional specific backends can be defined by the
administrator and incorporated into the Xprint V7.0 system. For a description
of how to define new backends refer to the “Xprint V7.0 - Reference
Manual”.
As the backend actually controls the printer, it must interface with both the
supervisor and the printer. The backend initializes the printer port and the
printer. It sets the printer with any specified job options, such as the typeface
and style. Furthermore, it ensures that start, end, and separator sheets are
printed if required. It also makes sure that the requested number of copies
of the document are printed. For this printer-specific information the backend
refers to the PCL assigned to the printer.
Backend programs interpret status messages. Information is taken from the
data passing through the backend. Some printers can respond to special
information requests from backend programs. To enable the user to interact
with the active print job (e.g. to delete or suspend the job) a special
mechanism allows signals to be exchanged between the supervisor and the
backend.
Permission lists enable printer access to be restricted to explicitly defined
users, and you can define which forms can be assigned to this printer. By
means of a security level, printers can be restricted to users with an appropriate security level for printing confidential data.
●
Printer groups (-dgr)
Printers can be combined to form what are called printer groups to achieve
better loading of all the printers in the group. If a print job is sent to a printer
group it is printed on the first printer to become available in the printer group.
●
Recovery rules (-rec)
Recovery rules are used to describe how specific printer conditions are
handled. Recovery rules are defined in a source file and saved in the Xprint
V7.0 database after compilation. Then they can be assigned to the printers.
The default recovery procedure in the case of a printer error can be
overridden by a recovery rule. In the case of the printer error “paper_end”,
for example, the Xprint V7.0 system tries by default to print the job until the
76
U23841-J-Z915-6-76
Introduction to administering Xprint V7.0
Xprint V7.0 architecture
paper supply is refilled. By means of a recovery rule you could define a
different procedure (to suspend the print job and set the printer to
NOT_ACTIVE until the administrator intervenes, for example).
You can define, modify and delete recovery rules.
●
Servers (-srv)
Servers are the Xprint V7.0 objects which administer incoming print jobs and
are responsible for scheduling them. Each server administers its own print
queue, which contains all the print jobs for the printers whose supervisors
are controlled by the server.
You can define and delete servers and change their status.
●
Supervisors (-spv)
A supervisor is directly responsible for controlling one or more printers. It
obtains the job data from the responsible server and forwards it to the
backend program (see entry “Backend” on page 273 in the glossary). One
supervisor may control several local printers.
As the system or Xprint V7.0 administrator, you can set up and delete supervisors, and change their status.
●
Users (-usr)
Xprint V7.0 differentiates between two types of user: UNIX users, who are
not defined in the Xprint V7.0 system, and Xprint V7.0 users, who are
defined in the Xprint V7.0 system. UNIX users are all users of the UNIX
system on which Xprint V7.0 is running; the default settings for Xprint V7.0
apply to them. If these settings are not sufficient, the UNIX users can be
defined in the Xprint V7.0 system.
More settings can be made for Xprint V7.0 users than for UNIX users:
– Xprint V7.0 users can access their print jobs from all the hosts for which
they are registered.
– They can be assigned a security level and thus be granted access to
printers with a corresponding security level.
– Print quotas can be defined for the number of jobs or print pages
allowed, thus preventing users from making unlimited numbers of
printouts.
U23841-J-Z915-6-76
77
Xprint V7.0 architecture
●
Introduction to administering Xprint V7.0
The Xprint V7.0 system (-sys)
The Xprint V7.0 system refers to all the Xprint V7.0 objects which are
combined in a local administrative unit, what is called an Xprint V7.0
domain. Within the Xprint V7.0 system the Xprint V7.0 administrator is
allowed to perform all the administrative tasks.
The only operations that can be executed for the Xprint V7.0 system are
displaying or changing the Xprint V7.0 administrator as well as the Xprint
V7.0 system comments.
78
U23841-J-Z915-6-76
Introduction to administering Xprint V7.0 Administrative tasks under Xprint
5.3
Administrative tasks under Xprint
Administering Xprint V7.0 involves a number of tasks which must be performed
by the administrator. This section gives a general description of the different
tasks and describes the basic procedures. For detailed information on administering the individual objects, see the next chapter.
5.3.1
Configuring Xprint V7.0 objects
With the xpadd command you can add Xprint V7.0 objects to the database, thus
making them known in the Xprint V7.0 system. Only print jobs (-job) are not
entered in the database but are added to the print queue administered by the
corresponding server. The xpadd command may be called for all Xprint V7.0
objects with the exception of the Xprint V7.0 system itself (-sys). For a detailed
description of using this command for each object type see the “Xprint V7.0 Reference Manual”.
When you add an object to the database with the xpadd command, the following
rules apply:
– As an Xprint V7.0 administrator you can add any objects you choose and
can define any administration hosts for them by specifying a host other than
the local host with the -ah host option (or, for printers and gateways, with the
-ho host option). The object you add can then be administered by yourself as
well as by the system administrator and the local Xprint V7.0 administrators
of this host. As a system or local Xprint V7.0 administrator you can define
objects only for your local host.
– Every Xprint V7.0 object needs a unique name in the Xprint V7.0 system.
This name should enable users of this object to identify it. For Xprint V7.0internal objects like servers and supervisors it makes sense to use the name
of the host on which these objects are defined. For printers a unique name
indicating their location is a good choice, and for job templates, forms and
fonts it is advisable to use names indicating their purpose.
– To become available to users and administrators, some objects need to be
activated after being added. This applies to the following object types:
printers (-dev), servers (-srv), supervisors (-spv) and gateways (-gtw). For
printers and gateways you can include in their definition that they are
automatically activated on the corresponding host whenever Xprint V7.0 is
started on this host in future (option -aa). Servers are automatically activated
U23841-J-Z915-6-76
79
Administrative tasks under Xprint Introduction to administering Xprint V7.0
whenever the host is started. Supervisors are activated automatically when
Xprint V7.0 is started if a printer they administer was configured with the -aa
option.
Objects are always activated using the xpchange command (see section
“Changing the status of Xprint V7.0 objects” on page 82).
5.3.2
Deleting Xprint V7.0 objects
With the xpdel command you can delete Xprint V7.0 objects from the Xprint
V7.0 database. The Xprint V7.0 administrator can delete all objects from the
system with the exception of the Xprint V7.0 system object (-sys), which cannot
be deleted. System and local Xprint V7.0 administrators can only delete those
objects which are administered on the local host. For a detailed description of
using this command for each object type see the “Xprint V7.0 - Reference
Manual”.
The following rules apply for deleting Xprint V7.0 objects:
– Only Xprint V7.0 objects which are no longer used by any other Xprint V7.0
object can be deleted. Before deleting an object you should therefore make
sure that there are no references to the specified object. Any references can
be displayed using the xpshow command with the option -di REFERENCED_BY
(see section “Displaying the attributes of an Xprint V7.0 object” on page 83).
Any objects with references to the object to be deleted must be modified
such that theses references are canceled.
– Printers (-dev), gateways (-gtw), servers (-srv) and supervisors (-spv) must
be deactivated before they can be deleted. If necessary, this can be checked
with the xpstat command (see section “Displaying the status of an Xprint
V7.0 object” on page 82).
If an object to be deleted is still active, it must be deactivated with the
xpchange command used with the option -st NOT_ACTIVE (see section
“Changing the status of Xprint V7.0 objects” on page 82).
– When deleting an object of the type server, you must always make sure that
the print queue assigned to the server does not contain any print jobs as
these will be lost when the server is deleted. For servers you are therefore
advised to deactivate spoolin some time before deleting the server. In this
case, any print jobs in the print queue can still be printed without any more
jobs being added. Another possibility is to redirect the print queues of a
printer assigned to the server to another printer.
80
U23841-J-Z915-6-76
Introduction to administering Xprint V7.0 Administrative tasks under Xprint
5.3.3
Modifying Xprint V7.0 objects
With the xpmod command, you can modify the static attributes of all Xprint V7.0
objects. Dynamic attributes such as the printer status or the status of the current
print quotas of a user can be changed with the xpchange command (see the
following section “Changing the status of Xprint V7.0 objects” on page 82). The
Xprint V7.0 administrator can modify all objects in the system, while the system
and local Xprint V7.0 administrators can only modify those objects which are
administered on their local host. For a detailed description of using this
command for each object type see the “Xprint V7.0 - Reference Manual”.
The following rules apply for modifying objects:
– Printers (-dev), gateways (-gtw), servers (-srv) and supervisors (-spv) must
be deactivated before they can be modified. If necessary, this can be
checked with the xpstat command (see section “Displaying the status of an
Xprint V7.0 object” on page 82).
If an object to be deleted is still active, it must be deactivated with the
xpchange command used with the option -st NOT_ACTIVE (see section
“Changing the status of Xprint V7.0 objects” on page 82).
Remember to reactivate the object after modifying it!
– Basically you can use any option which can also be used when adding the
object. However, there are a few special cases, which are described below:
Options representing Boolean values (e.g. the option -aa for printers which
switches on automatic activation) can be removed by specifying a minus
sign - after the option (example: xpmod -dev printer1 -aa-).
Options defining lists (e.g. the -dl option for printer groups which defines the
printers belonging to this group) can be modified in three different ways:
– If a minus sign is specified after the option, the objects specified behind
it are removed from the list (example: xpmod -dgr pgroup1 -dl- printer4
printer5).
– If a plus sign + is specified after the option, the objects specified behind
it are added to the list (example: xpmod -dgr pgroup1 -dl+ printer6).
– If the objects are specified directly after the option, the existing list is
replaced by the specified objects (example: xpmod -dgr pgroup2
-dl printer1 printer2 printer6).
U23841-J-Z915-6-76
81
Administrative tasks under Xprint Introduction to administering Xprint V7.0
5.3.4
Changing the status of Xprint V7.0 objects
With the xpchange command, you can change the dynamic data of Xprint V7.0
objects, such as printer states or the states of the current user print quotas. For
a detailed description of using this command for each object type see the “Xprint
V7.0 - Reference Manual”.
With some objects the status can assume several levels, i.e they have a global
status and subordinate substates. A printer, for example, has a global status
which is defined via the -st option. In addition to this, spoolin and spoolout can
be switched on and off individually with the options -si and -so.
If the xpchange command is invoked for an object without options, it always
switches on all states (ACTIVE or ON). Similarly all the states of the object are
switched off when the object is deactivated with the -st NOT_ACTIVE option.
When a substate which has been switched off is switched back on, Xprint V7.0
automatically makes sure that the main status is set to ACTIVE.
5.3.5
Displaying information on Xprint V7.0 objects
With the xpstat and xpshow commands you can display information on each
Xprint V7.0 object you are allowed to use or administer. For a detailed
description of using these commands for each object type see the “Xprint V7.0
- Reference Manual”.
Displaying the status of an Xprint V7.0 object
●
To display the status of an Xprint V7.0 object, use the following command:
xpstat object_type [selection] [-di display]
For object_type you specify the object whose status you want to display (e.g.
-dev for printer). If the object type is not specified, the command refers by
default to print jobs (-job).
If selection is not specified, the command refers to all objects of the specified
type in the Xprint V7.0 system. Otherwise you can either specify the name(s)
of the objects whose status you want to display, or you can use the
-scl “selection_criteria_list” option (see section “Selection criteria list” on
page 266 in the Appendix) to define a list of criteria according to which the
relevant objects are selected.
82
U23841-J-Z915-6-76
Introduction to administering Xprint V7.0 Administrative tasks under Xprint
With the option -di display you can determine the scope of the display as
described for print jobs in the section “Displaying print jobs” on page 55.
Displaying the attributes of an Xprint V7.0 object
●
To obtain more detailed information on the definition of an Xprint V7.0 object,
use the following command:
xpshow object_type [selection] [-di display]
For object_type you specify the object whose attributes you want to display
(e.g. -dev for printer). If the object type is not specified, the command refers
by default to print jobs (-job).
If selection is not specified, the command refers to all the objects of the
specified type in the Xprint V7.0 system. Otherwise you can either specify
the name(s) of the objects whose attributes you want to display, or you can
use the -scl “selection_criteria_list” option (see section “Selection criteria
list” on page 266 in the Appendix) to define a list of criteria according to
which the relevant objects are selected.
To display information on printers or printer groups which can only be
reached via gateways, you must specify the name of the printer or printer
group in the format gateway!printer_name. Which details of the printer or
printer group are displayed in such a case depends on the gateway type.
With the option -di display you can determine the scope of the display as
described for print jobs in the section “Displaying print jobs” on page 55.
Besides the standard values SHORT, LONG and specifying a list of output
parameters as for print jobs, you can also use the keyword REFERENCED_BY
here, which returns a list of the Xprint V7.0 objects referring to the specified
object. If you specify the option -di REFERENCED_BY (short -diR), you must
specify exactly one object of the desired type!
This list is useful if you want to remove an Xprint V7.0 object from the Xprint
V7.0 system as you can only remove an object if it is no longer referenced
by any other object.
U23841-J-Z915-6-76
83
Administrative tasks under Xprint Introduction to administering Xprint V7.0
Examples (in this case for printer groups)
– To display the status of the printer group group1:
xpstat -dgr group1
NAME
Spoolin
---group1
------ON
Date of last modification: Tue Dec 20 11:37:17 1994
Justification:
– To display the definition of the printer group group1 in a complete list:
xpshow -dgr group1 -di LONG
This returns, for example, the following output:
NAME: group1
Host: colorado
Administrator: xprintadm
Device list: printer1 printer2
User permission:
User comment: The printer group for all users
Administrator comment:
– To display a short list of all the printer groups available:
xpshow -dgr
This could return the following output:
Name
---group1
group2
User perm.
----------
Host
---missouri
delaware
Administrator
------------xprintadm
xprintadm
– To display all the references to the printer group group1:
xpshow -dgr group1 -di REFERENCED_BY
The output might appear as follows:
Level Name
----- ---1
host1
Type
---hos
This output shows that an object of type host, namely the host host1, still
refers to the group group1. The printer group can only be removed when the
object host1 has been modified such that the reference to group1 is
canceled.
84
U23841-J-Z915-6-76
Introduction to administering Xprint V7.0 Administrative tasks under Xprint
5.3.6
Administering Xprint V7.0
This section describes a few basic administration tasks concerning Xprint V7.0.
If you want to...
Read...
start Xprint V7.0
section “Administering Xprint V7.0” on
page 85
terminate Xprint V7.0
section “Administering Xprint V7.0” on
page 86
reinitialize the Xprint V7.0
database
section “Administering Xprint V7.0” on
page 86
select a language
section “Administering Xprint V7.0” on
page 87
enable auditing ( users only)
section “Auditing” in the appendix of the
“Reference Manual”
enable logging ( users only)
section “Logging” in the appendix of the
“Reference Manual”
Table 5: Basic administration tasks
Starting Xprint V7.0
Only the system administrator (root) can start Xprint V7.0 with the xpstart
command on his/her local host. Every host must be started individually with this
command.
When you start your local host, the following objects are activated automatically:
– all the local servers belonging to this host.
– all the local printers and the associated supervisors belonging to this host. It
must be possible to activate the printers automatically (see the xpadd -dev
-aa command) and they must be controlled by active servers on the local
host.
– all the remote printers and supervisors belonging to this host, provided the
printers can be started automatically and are controlled by active servers on
the local host.
U23841-J-Z915-6-76
85
Administrative tasks under Xprint Introduction to administering Xprint V7.0
When starting Xprint V7.0, you can also specify whether jobs which were not
finished in a previous session are to be retained (setting WARM; default) or deleted
(setting COLD). Such a setting is useful, for example, if you shut down your
system while there were still print jobs on it with the status ACTIVE or jobs still in
the print queue. After a WARM start, these print jobs are processed again.
Start Xprint V7.0 with the following command:
●
xpstart [-sa system_activation]
For system_activation specify either WARM or COLD. If you do not specify a
value, WARM will be used.
Stopping Xprint V7.0
With the xpstop command the system administrator (root) and the Xprint V7.0
administrator can terminate Xprint V7.0 on his/her local host. Furthermore, the
Xprint V7.0 administrator can shut down Xprint V7.0 on any host in the system.
If Xprint V7.0 is terminated on a local host, the following objects are also deactivated:
– all its servers,
– all its local supervisors, even if controlled by the remote system,
– all its local printers,
– all remote printers and supervisors which are controlled by the local server.
i
●
Active print jobs controlled by a server whose host is shut down are interrupted. (For more information see the command xpchange -dev -wn NOW.)
Deactivate the system with the following command:
xpstop [-ho host]
The host option can only be used by the Xprint V7.0 administrator, as only
he/she is allowed to terminate Xprint V7.0 on remote systems.
Reinitializing the Xprint V7.0 database
You might need to reinitialize the Xprint V7.0 database, for example if it could
not be initialized when Xprint V7.0 was installed, or if the system breaks down.
●
Call DBinstall:
/var/spool/Xprint/config/bin/DBinstall
●
86
Enter NO when asked if this is a new installation.
U23841-J-Z915-6-76
Introduction to administering Xprint V7.0 Administrative tasks under Xprint
●
Now specify the name of a host on which Xprint V7.0 is running.
Selecting the language
For the language interface Xprint V7.0 uses the value of the NLS environment
variable LANG. The following language environments are available:
Environment definition
Language
En
English
De
German
Table 6: Language environment variables
If the environment variable LANG is incorrectly or not at all defined, Xprint V7.0
uses English as the default.
●
Select the language on your local host as follows:
LANG=language_ID; export LANG
For language_ID you enter the abbreviation (see above) of the relevant
language.
U23841-J-Z915-6-76
87
Rules for configuring the system
5.4
Introduction to administering Xprint V7.0
Rules for configuring the system
This section describes the basic rules which must be observed when configuring the Xprint V7.0 system; it does not cover the actual steps that are
required. You should use these guidelines to check the configuration of your
Xprint V7.0 system at regular intervals in order to maintain its performance.
5.4.1
Defining an Xprint V7.0 domain
The print manager must define the Xprint V7.0 domain with respect to
– the resources to be shared,
– the number of hosts,
– and some administration criteria.
Creating an Xprint V7.0 domain is always a compromise between
– the maximum number of hosts administered to provide a maximum of
print resources,
– the assignment of administrative tasks concerning print resources to a
person or association (e.g. resource locations, company strategy)
– and a high number of hosts which might slow Xprint V7.0 down, so that
there might be, say, a relatively long period of time between the
submission and execution of a print job.
88
U23841-J-Z915-6-76
Introduction to administering Xprint V7.0
5.4.2
Rules for configuring the system
Configuring hosts
– All UNIX hosts belonging to an Xprint V7.0 domain and on which Xprint V7.0
has been installed must be defined in the Xprint V7.0 configuration.
– Every host which is to provide its print services must be defined as
POT_MASTER, even if it is the only host in operation.
– The hierarchy of potential master hosts should be defined such that the host
with the best equipment ranks first.
– A host without hard disk or with a limited or full hard disk should be defined
as a PARASITE host. In this case, the Xprint V7.0 database must be imported
from what is called a supporting host by means of an explicit command. The
advantage of such hosts is the fact that less hard disk space is used, as the
database is only stored on the supporting host and some processes do not
have to be running (e.g. the services of the database manager).
– The other computers are defined as SLAVE hosts.
5.4.3
Configuring printers
To be able to add printers to the Xprint V7.0 system, you require at least one
server (responsible for administering printers and their job queue) and a supervisor (responsible for the actual printing process). There are two different ways
of defining servers or supervisors: you can either define the required settings
yourself or you can add a first device to this host without any special specifications. In this case, the Xprint V7.0 system automatically creates a default server
and supervisor.
U23841-J-Z915-6-76
89
Rules for configuring the system
Introduction to administering Xprint V7.0
Servers
– A server can control any number of supervisors. In practice, however, three
supervisors is a good number.
– Where possible the server should be defined on the host of the supervisors.
!
Note that in this case the availability of the printers depends exclusively on this particular host. If you distribute servers and supervisors
over several hosts, you must remember that both hosts must be
available in order to use the printers.
Supervisors
– Each supervisor must be controlled by a server.
– A supervisor can control any number of printers; in practice, however, fifteen
printers per supervisor are recommended.
– The supervisor must be defined on the same host on which the printers are
defined.
Automatic server and supervisor object creation
If no specific setting is used when creating a new device, Xprint V7.0 automatically generates default supervisors and server objects, following the rules
hereafter:
– A new supervisor is created for each 15 devices.
– A new server is created for each 3 supervisors.
These defaults settings can be changed by means of 2 envivariables:
XP_SPV_BY_DFTSRV
Description: maximum number of supervisors by default server
Initialisation time: before xpadd -dev
Possible values: from 1 to 15
Behaviour if unspecified: 3 is used
Behaviour if a value larger than 15 is specified: 15 is used
XP_DEV_BY_DFTSPV
Description: maximum number of devices by default supervisor
90
U23841-J-Z915-6-76
Introduction to administering Xprint V7.0
Rules for configuring the system
Initialisation time: before xpadd -dev
Possible values: from 1 to 15
Behaviour if unspecified: 15 is used
Behaviour if a value larger than 15 is specified: 15 is used
Printers
– Each printer connected to the Xprint V7.0 system must be defined in the
database in order to be accessible. Furthermore the host to which the printer
is attached must be defined in the Xprint V7.0 database.
– Access to systems via the BSD LPD protocol is effected from one or more
pseudo-printers in Xprint V7.0 by means of the fast filter bsd. Another
possible way of accessing the printers directly is via the BSD gateway. The
main difference between these two methods is the fact that in the case of the
fast filter bsd the document is formatted (e.g. font, paper layup), while print
jobs sent via the gateway are not converted.
– Access to printers via the network address is effected from one or more
Xprint V7.0 devices which have LAN defined as the connection type in their
device definition. As any host can be specified, you are advised to use the
host with the best availability. If a network printer is of importance, you can
define several logical printers on different hosts in the Xprint V7.0 system
which all have the same address. The advantage of this is that the printer is
already available when just one of the hosts is in operation.
U23841-J-Z915-6-76
91
Rules for configuring the system
5.4.4
Introduction to administering Xprint V7.0
Configuring gateways
Gateways provide interoperability between different Xprint V7.0 domains and
between Xprint V7.0 and other spooler systems. There are two types of
gateway:
The BSD gateways
These allow Xprint V7.0 users to access BSD LPD printer servers (e.g. Novell
Netware with the BSD LPD emulation Flex/IP) and to share Xprint V7.0
resources with BSD LPD users (e.g. a WPRINT PC user). The functionality
includes:
– the basic job administration functions: xpadd -job, xpdel -job, xpstat -job,
xpshow -job
– restricted functions concerning the print resources: xpshow -dev,
xpstat -dev
As only the BSD LPD functions are accessible with this type of gateway, the
additional Xprint V7.0 options are not available.
The GIP2 gateway
This offers two possibilities:
1. Connecting two Xprint V7.0 domains. This provides the following functionality:
– the complete functionality concerning job administration: xpadd -job,
xpmod -job, xpchange -job, xpdel -job, xpshow -job, xpstat -job
– access to some options concerning Xprint V7.0 resources: xpshow
-dev/-dgr/-flt/-fnt/-frm/-jtp/-lrs/-pcl, xpstat -dev/-dgr
2. Connecting Xprint V7.0 and DPRINT. This provides the following functionality:
– job administration functions: xpadd -job, xpdel -job, xpstat -job,
xpshow -job
– several functions concerning the printer resources: xpshow -dev/-dgr,
xpstat -dev
In addition to the supported print protocols (e.g. BSD or GIP2) the gateways can
be of the type LOCAL or PARTNER. Gateways of the type LOCAL represent active
Xprint V7.0 objects which are responsible for exporting jobs to partner print
92
U23841-J-Z915-6-76
Introduction to administering Xprint V7.0
Rules for configuring the system
servers and for receiving jobs sent from partner systems. Gateways of the type
PARTNER represent remote spooler clients as possible job originators for Xprint
V7.0 resources or print service providers.
Notes on the configuration
– Every gateway of the type PARTNER which supports a print protocol must have
at least a gateway of the type LOCAL with the same print protocol assigned in
the backward-link list (-bl option). This list is required for finding a local
gateway which is capable of sending jobs to this partner.
– Every BSD print server must be represented by a BSD gateway of the type
PARTNER. The BSD server can also be accessed via the fast filter bsd. The
advantage of the fast filter is that Xprint V7.0 converts the data. Gateways,
on the other hand, provide additional functions:
– you can find out the status of jobs you have sent to a BSD server.
– you can remove jobs you have sent to the BSD spooler system from that
system.
– you can display the status of the BSD print queue.
It therefore makes sense to use fast filters for sending print jobs to a BSD
system; however, if you want to have access to the full BSD functionality, you
must use gateways. This only works if the local BSD gateway is defined on
the host of the printer that uses the fast filter bsd.
– Every BSD user should be represented by a BSD gateway of the type
PARTNER. Furthermore, the gateway of the type LOCAL which receives the BSD
jobs must allow the spoolin of jobs from this partner. This means the -ag
option must be set to ALL for the local gateway or the name of the gateway
of the type PARTNER must be specified directly.
– Every Xprint V7.0 or DPRINT domain from which jobs can be submitted for
the local domain must be represented by a gateway of the type GIP2
PARTNER. Furthermore, the local gateway which receives a GIP2 job must
allow the spoolin of jobs from this partner. This means the -ag option must
be set to ALL for the local gateway or the name of the gateway of the type
GIP2 PARTNER must be entered specifically.
– No two gateways of the type LOCAL with the same port number (-ga) can run
on one host at any one time. This is prevented by the network.
U23841-J-Z915-6-76
93
6
Configuring Xprint V7.0
This chapter describes how to configure Xprint V7.0 on your system. It
comprises various sections, each dealing with different activities. The following
table will help you to quickly find the section you need:
If you want to...
Read...
manage hosts
section “Administering hosts” on page 96
add a predefined printer to Xprint section “Configuring predefined printers”
V7.0
on page 109
manage any devices you choose
section “Administering devices” on
page 114
manage device groups
section “Administering printer groups” on
page 126
manage users
section “Administering users” on page 133
make use of Xprint V7.0’s security section “Administering permission lists” on
facilities
page 143
manage fonts
section “Administering fonts” on page 152
manage forms
section “Administering forms”
manage filters
section “Administering filters” on page 162
manage loadable resources
section “Administering public loadable
resources” on page 171
manage job templates
section “Administering global job
templates” on page 174
manage PCLs
section “Administering PCLs” on page 179
manage recovery rules
section “Administering recovery rules” on
page 186
manage servers
section “Administering servers” on
page 193
manage supervisors
section “Administering supervisors” on
page 200
Table 7: Configuring Xprint V7.0
U23841-J-Z915-6-76
95
Administering hosts
i
Configuring Xprint V7.0
Not all the possible options for each command can be described in this
chapter but only the most important ones. For more detailed information
see the description of the relevant command in the “Xprint V7.0 Reference Manual”.
For every command, you can call online help with the -? option. This
online help works on two levels: command and option level.
If you call help on command level, the general form of this command will
be displayed. This type of help displays the objects supported by the
command. It also shows the options which are independent of the object
type. Not all the options are displayed, however, as these depend on the
use of a command and object together. To call online help on command
level, enter xpadd -?, for example.
Option level help displays all the possible options of a specific object
type. To call the online help on option level, you must specify the
xpadd -dgr -? command, for example.
6.1
Administering hosts
This section deals with the Xprint V7.0 objects of type host which must first be
edited for new computers in an Xprint V7.0 configuration. The following table
serves as a guide through this section:
If you want to...
Read...
configure Xprint V7.0 on the first host section “Configuring the first host” on
in a network or on a stand-alone
page 96
system
configure Xprint V7.0 on a new host
section “Configuring a new host” on
page 98
Table 8: Administering hosts
6.1.1
Configuring the first host
Configuring Xprint V7.0 on a stand-alone system and configuring the first host
in a network only requires a few steps. This is in most cases done by one
person, who is referred to below as the Xprint V7.0 administrator. This section
is only intended for the Xprint V7.0 administrator. The Xprint V7.0 administrator
may be someone who is only responsible for managing Xprint V7.0 or he/she
96
U23841-J-Z915-6-76
Configuring Xprint V7.0
Administering hosts
may be one of the system administrators of the computers involved. If you, as
the Xprint V7.0 administrator, want to introduce Xprint V7.0 into an existing
network, you must perform the following tasks in the order given below:
– first study the network structure
– define a (primary) master host which first manages the Xprint V7.0 database
(later you can specify additional computers which are to serve as reserve
masters in case the defined master fails). For more information on the host
hierarchy see the section “Xprint V7.0 objects” on page 9.
– configure Xprint V7.0 on the (primary) master host and define a user ID for
the Xprint V7.0 administrator
– configure the other systems in the network
Then you or the respective system administrators must configure the individual
printers by adding them to the Xprint V7.0 configuration.
The first two and the last step are not of interest if you configure Xprint V7.0 on
a stand-alone host. The fourth step is discussed in the section “Configuring a
new host” on page 98.
Determining the network structure
So that Xprint V7.0 can be introduced into an existing network without problems,
you must study the network structure before configuring Xprint V7.0. For this
purpose you must gain an overview of all the computers and printers in this
network. You should gather data on every computer and printer. This data will
be required for configuring Xprint V7.0. The Appendix contains a worksheet in
which you can enter the relevant data. It is recommended that you make a copy
of this worksheet for every computer in your network and fill it out carefully. If
there is not enough space for the relevant printers and/or supervisors, use the
back of the copy or an additional sheet which you should clip to the worksheet.
Configuring the primary master host
When you have installed Xprint V7.0 on the host which is to be the primary
master host, you can start configuring Xprint V7.0 by preparing the selected
system as follows:
●
Log in to the selected system as root.
●
Configure the network services for the communication with Xprint V7.0
(/etc/services file, see section “Configuring the local area network
(LAN)” on page 235).
U23841-J-Z915-6-76
97
Administering hosts
●
Configuring Xprint V7.0
If the database was not installed in the course of product installation or has
failed for any reason, you must initialize it now as follows:
/var/spool/Xprint/config/bin/DBinstall -f
●
Start the Xprint V7.0 system:
xpstart
Now define the new Xprint V7.0 administrator if you do not want to perform this
task any longer as root on the host now defined as the primary master. In this
manual the user ID xprintadm is used as an example ID for the Xprint V7.0
administrator. To configure the Xprint V7.0 administrator proceed as follows:
●
Define the Xprint V7.0 administrator xprintadm as a user of this host (e.g.
using the administrator interface sysadm).
●
Add the user xprintadm to the Xprint V7.0 configuration:
xpadd -usr xprintadm
●
Modify the Xprint V7.0 configuration such that xprintadm becomes the new
Xprint V7.0 administrator:
xpmod -sys -ad xprintadm
Once you have performed these steps, you, as the Xprint V7.0 administrator,
can configure printers and other Xprint V7.0 objects on the host.
6.1.2
Configuring a new host
Configuration hints
Xprint V7.0 allows interoperability between different administrative domains,
which need to be connected by gateways. All the hosts in an administrative
domain share the same database contents. Each definition of an Xprint V7.0
object or change of state involves a database update, which must be reflected
on each host in the domain. This database propagation mechanism requires a
reasonably fast network, which will allow connections to be opened quickly and
rapid data transfer.
The required data transfer rate between hosts is in the order of megabits per
second. A typical example of such a network is Ethernet. Different domains can
be connected by slower networks (possibly wide area networks) as there is
generally less traffic between domains than within a domain.
98
U23841-J-Z915-6-76
Configuring Xprint V7.0
Administering hosts
As a guideline, experience has shown that there is a practical limit of 50
potential masters/slave hosts in a single domain. If there are too many potential
master/slave hosts, it is difficult to keep all the databases updated. If more than
50 hosts are needed then parasite hosts can be defined, or the domain can be
divided into a number of smaller domains.
Parasite hosts import the database from their supporting host (potential master
or slave) by means of a file sharing utility (e.g. NFS) which needs to be set up
by the administrator. Parasite hosts depend on the supporting hosts, as Xprint
V7.0 cannot run on the parasite if it hasn’t been started on the supporting host.
If you divide the original domain into several smaller domains, printers that are
now in a different domain can be accessed by prefixing their names with a
gateway name. If the devices must be accessed with the same name from every
host, independently of which host they belong to, then this can be achieved by
replicating the definition of the network devices in each domain. A physical
printer can then be defined with the same logical name in each network. A user
can then access the printer by using this name from any host in the system
Procedure
Once at least the primary master host is defined, you can add all the other
systems to Xprint V7.0. The order in which you configure them also determines
the order of the host hierarchy. If one computer is entered after another
computer it also ranks below this one in the hierarchy (see section “Xprint V7.0
objects” on page 9).
To add a new host to the Xprint V7.0 configuration, you must perform steps on
both the active host and the host to be added. First the new host must be registered in the existing Xprint V7.0 configuration, then it can import the Xprint V7.0
database and become part of the Xprint V7.0 network.
To configure a new host, proceed as follows:
●
Log in to an active host. If the Xprint V7.0 administrator is defined as a user
there, log in as the Xprint V7.0 administrator, otherwise as root.
●
Enter the following command to add the new host to the database:
xpadd -hos host_name -re host_type [-sh supporting_host]
where host_name is the name of the relevant host and host_type the value you
have entered in the worksheet. The option -re host_type (re stands for
responsibility) may be omitted for potential masters. If the value PARASITE is
specified for host_type, the value supporting_host for -sh specifies on which
system the database for this parasite host can be found.
U23841-J-Z915-6-76
99
Administering hosts
i
Configuring Xprint V7.0
If a computer has been set up as a PARASITE host, its supporting host
must be running and Xprint V7.0 must be active on it for the PARASITE
host to be able to access Xprint V7.0. Both systems must have the
same hardware. The administrator must make sure that the
supporting host exports the /var/spool/Xprint/config/DB directory
to the PARASITE host and enters it in the parasite host’s directory
under the same name. The export and entry in the directory must be
done manually by the administrator.
You can also specify additional options which above all affect the host
hierarchy and which might depend on the network structure (see the
description of the command xpadd -hos in the “Xprint V7.0 - Reference
Manual”).
●
If the Xprint V7.0 administrator is also to manage Xprint V7.0 from other
hosts, use the following command:
xpmod -usr xprintadm -ho+ host_names
For host_names you specify all hosts on which the administrator is to be
known.
●
Log in to the new system as root.
●
Define the Xprint V7.0 administrator as a system user there, if required (e.g.
via the administrator interface sysadm).
●
Configure the network services for the communication with Xprint V7.0
(/etc/services file, see section “Configuring the local area network
(LAN)” on page 235).
●
Initialize the database on the new host with the following command:
/var/spool/Xprint/config/bin/DBinstall -h host_name
where host_name represents the name of an already active host.
●
Start the Xprint V7.0 system:
xpstart
Once all these operations have been carried out successfully, you can configure
printers and other Xprint V7.0 objects on this host. The new host is now part of
the Xprint V7.0 configuration.
100
U23841-J-Z915-6-76
Configuring Xprint V7.0
6.2
Administering hosts (users only)
Administering hosts (users only)
This section deals with the Xprint V7.0 objects of type host which must first be
edited for new computers in an Xprint V7.0 configuration. The following table
serves as a guide through this section:
If you want to...
Read....
configure a local host which is not
connected to other systems in a
network
section “Configuring Xprint V7.0 on a
stand-alone system” on page 101
introduce Xprint V7.0 to an existing
network or configure a new network
for Xprint V7.0
section “Introducing Xprint V7.0 into a
network” on page 103
configure Xprint V7.0 on a new
system in the network
section “Configuring a new host” on
page 98
Table 9: Administering hosts (Reliant UNIX users)
6.2.1
Configuring Xprint V7.0 on a stand-alone system
Configuring an individual stand-alone system in Xprint V7.0 requires only a few
steps. The only measures concerning the host are the configuration of an Xprint
V7.0 administrator, and (in high-availability configurations) possibly changing
the host name in the Xprint V7.0 configuration in the event that a reserve host
is to assume the functions of the (failed) main host.
Configuring an Xprint V7.0 administrator
You should define an Xprint V7.0 administrator for managing Xprint V7.0 on your
system. Except for starting the spooler system with the xpstart command,
which requires root privileges, the Xprint V7.0 administrator can perform all the
administrative tasks concerning Xprint V7.0 on your system.
The rest of this chapter assumes the existence of an Xprint V7.0 administrator.
If you have not defined an Xprint V7.0 administrator, the specified actions must
be performed by root instead.
You can assign this task to any existing user on your system or you can first set
up a separate user ID.
U23841-J-Z915-6-76
101
Administering hosts (users only)
Configuring Xprint V7.0
●
Log in to your system as root.
●
If required, set up a separate user ID for the Xprint V7.0 administrator.
●
Define the Xprint V7.0 administrator him-/herself with the following
commands:
xpadd -usr xprintadm
xpmod -sys -ad xprintadm
where xprintadm (-ad stands for administrator) represents the user ID of the
user who is to be the Xprint V7.0 administrator.
Renaming the host computer
In high-availability configurations several hosts usually work with shared disk
resources so that, should one of the two hosts fail, the other host can continue
doing the work of the failed one. If the Xprint V7.0 database is stored on the
shared disks of such a system, the second host becomes active in the event of
the normal host failing. If this host has a different name, the Xprint V7.0
database does not correspond to the real configuration.
In such a case the configuration can be adjusted quickly. To do this, you can
rename the local host for the Xprint V7.0 system with the xppatch command.
Observe the following to execute the xppatch command successfully:
1. xppatch only uses an Xprint V7.0 system which is defined locally. Before
the command executes, it finds out whether Xprint V7.0 is installed locally or
in the network.
2. The xppatch command can only be used by the system administrator
(root).
3. The Xprint V7.0 system must be stopped for xppatch to be executed.
xppatch checks if Xprint V7.0 is stopped.
4. Before xppatch modifies a configuration or file, it backs up all data that may
be modified. This backup requires approximately as much space on the hard
disk in the file system in which Xprint V7.0 is installed as the sum of the DB
and SV directories (without log and debugging files). If there is not enough
space available on the hard disk, the xppatch command aborts without
modifying the original files.
102
U23841-J-Z915-6-76
Configuring Xprint V7.0
Administering hosts (users only)
To rename a host computer, proceed as follows:
●
Log in to the system as the system administrator (root).
●
Stop the Xprint V7.0 system:
xpstop
●
Rename the host:
xppatch -hostname oldname newname [-dg n]
oldname is the host name to be changed, newname is the name that is to
replace oldname.
The -dg n option allows you to control the error message output of the
xppatch command. For n use the values 0, 1 or 2, where 0 causes only error
messages to be written to stderr, while 1 and 2 cause any additional
messages to be output during command execution to log the process.
6.2.2
Introducing Xprint V7.0 into a network
Introducing Xprint V7.0 into an existing network or configuring a new network
for Xprint V7.0 is in most cases done by one person, who is referred to below
as the Xprint V7.0 administrator. This section is only intended for the Xprint V7.0
administrator. The Xprint V7.0 administrator may be someone who is only
responsible for managing Xprint V7.0 or he/she may be one of the system
administrators of the computers involved. If you, as the Xprint V7.0 administrator, want to introduce Xprint V7.0 into an existing network, you must perform
the following tasks in the order given below:
– first study the network structure
– define a (primary) master host which first manages the Xprint V7.0 database
(later you can specify additional computers which are to serve as reserve
masters in case the defined master fails). For more information on the host
hierarchy see the section “Xprint V7.0 objects” on page 9.
– configure Xprint V7.0 on the (primary) master host and define a user ID for
the Xprint V7.0 administrator
– configure the other systems in the network by adding them to the existing
network
Then you or the respective system administrators must configure the individual
printers by adding them to the Xprint V7.0 configuration.
U23841-J-Z915-6-76
103
Administering hosts (users only)
Configuring Xprint V7.0
This section of the chapter deals with the first three items in this list. How to
configure the other computers and printers in the network is described in
separate sections later in this chapter.
Determining the network structure
So that Xprint V7.0 can be introduced into an existing network without problems,
you must study the network structure before configuring Xprint V7.0. For this
purpose you must gain an overview of all the computers and printers in this
network. You should gather data on every computer and printer. This data will
be required for configuring Xprint V7.0. The Appendix contains a worksheet in
which you can enter the relevant data. It is recommended that you make a copy
of this worksheet for every computer in your network and fill it out carefully. If
there is not enough space for the relevant printers and/or supervisors, use the
back of the copy or an additional sheet which you should clip to the worksheet.
Configuring the primary master host
When you have installed Xprint V7.0 on the host which is to be the primary
master host, you can start configuring Xprint V7.0 by preparing the selected
system as follows:
●
Log in to the selected system as root.
●
Configure the network services for the communication with Xprint V7.0
(/etc/services file, see section “Configuring the local area network
(LAN)” on page 235).
●
If the database was not installed in the course of product installation or has
failed for any reason, you must initialize it now as follows:
/var/spool/Xprint/config/bin/DBinstall -f
●
Start the Xprint V7.0 system:
xpstart
Now define the new Xprint V7.0 administrator if you do not want to perform this
task any longer as root on the host now defined as the primary master. In this
manual the user ID xprintadm is used as an example ID for the Xprint V7.0
administrator. To configure the Xprint V7.0 administrator proceed as follows:
●
Define the Xprint V7.0 administrator xprintadm as a user of this host (e.g.
using the administrator interface sysadm).
104
U23841-J-Z915-6-76
Configuring Xprint V7.0
●
Administering hosts (users only)
Add the user xprintadm to the Xprint V7.0 configuration:
xpadd -usr xprintadm
●
Modify the Xprint V7.0 configuration such that xprintadm becomes the new
Xprint V7.0 administrator:
xpmod -sys -ad xprintadm
Once you have performed these steps, you, as the Xprint V7.0 administrator,
can configure printers and other Xprint V7.0 objects on the host.
Configuring the other hosts
Configure all the other hosts as described in the following section.
6.2.3
Configuring a new host in an existing Xprint V7.0
network
Configuration hints
Xprint V7.0 allows interoperability between different administrative domains,
which need to be connected by gateways. All the hosts in an administrative
domain share the same database contents. Each definition of an Xprint V7.0
object or change of state involves a database update, which must be reflected
on each host in the domain. This database propagation mechanism requires a
reasonably fast network, which will allow connections to be opened quickly and
rapid data transfer.
The required data transfer rate between hosts is in the order of megabits per
second. A typical example of such a network is Ethernet. Different domains can
be connected by slower networks (possibly wide area networks) as there is
generally less traffic between domains than within a domain.
As a guideline, experience has shown that there is a practical limit of 50
potential masters/slave hosts in a single domain. If there are too many potential
master/slave hosts, it is difficult to keep all the databases updated. If more than
50 hosts are needed then parasite hosts can be defined, or the domain can be
divided into a number of smaller domains.
Parasite hosts import the database from their supporting host (potential master
or slave) by means of a file sharing utility (e.g. NFS) which needs to be set up
by the administrator. Parasite hosts depend on the supporting hosts, as Xprint
V7.0 cannot run on the parasite if it hasn’t been started on the supporting host.
U23841-J-Z915-6-76
105
Administering hosts (users only)
Configuring Xprint V7.0
If you divide the original domain into several smaller domains, printers that are
now in a different domain can be accessed by prefixing their names with a
gateway name. If the devices must be accessed with the same name from every
host, independently of which host they belong to, then this can be achieved by
replicating the definition of the network devices in each domain. A physical
printer can then be defined with the same logical name in each network. A user
can then access the printer by using this name from any host in the system
Procedure
Once at least the primary master host is defined, you can add all the other
systems to Xprint V7.0. The order in which you configure them also determines
the order of the host hierarchy. If one computer is entered after another
computer it also ranks below this one in the hierarchy (see section “Xprint V7.0
objects” on page 9).
To add a new host to the Xprint V7.0 configuration, you must perform steps on
both the active host and the host to be added. First the new host must be registered in the existing Xprint V7.0 configuration, then it can import the Xprint V7.0
database and become part of the Xprint V7.0 network.
To configure a new host, proceed as follows:
●
Log in to an active host. If the Xprint V7.0 administrator is defined as a user
there, log in as the Xprint V7.0 administrator, otherwise as root.
●
Enter the following command to add the new host to the database:
xpadd -hos host_name -re host_type [-sh supporting_host]
where host_name is the name of the relevant host and host_type the value you
have entered in the worksheet. The option -re host_type (re stands for
responsibility) may be omitted for potential masters. If the value PARASITE is
specified for host_type, the value supporting_host for -sh specifies on which
system the database for this parasite host can be found.
i
106
If a computer has been set up as a PARASITE host, its supporting host
must be running and Xprint V7.0 must be active on it for the PARASITE
host to be able to access Xprint V7.0. Both systems must have the
same hardware. The administrator must make sure that the
supporting host exports the /var/spool/Xprint/config/DB directory
to the PARASITE host and enters it in the parasite host’s directory
under the same name. The export and entry in the directory must be
done manually by the administrator.
U23841-J-Z915-6-76
Configuring Xprint V7.0
Administering hosts (users only)
You can also specify additional options which above all affect the host
hierarchy and which might depend on the network structure (see the
description of the command xpadd -hos in the “Xprint V7.0 - Reference
Manual”).
●
If the Xprint V7.0 administrator is also to manage Xprint V7.0 from other
hosts, use the following command:
xpmod -usr xprintadm -ho+ host_names
For host_names you specify all hosts on which the administrator is to be
known.
●
Log in to the new system as root.
●
Define the Xprint V7.0 administrator as a system user there, if required (e.g.
via the administrator interface sysadm).
●
Configure the network services for the communication with Xprint V7.0
(/etc/services file, see section “Configuring the local area network
(LAN)” on page 235).
●
Initialize the database on the new host with the following command:
/var/spool/Xprint/config/bin/DBinstall -h host_name
where host_name represents the name of an already active host.
●
Start the Xprint V7.0 system:
xpstart
Once all these operations have been carried out successfully, you can configure
printers and other Xprint V7.0 objects on this host. The new host is now part of
the Xprint V7.0 configuration.
U23841-J-Z915-6-76
107
Predefined printers
6.3
Configuring Xprint V7.0
Predefined printers
Xprint V7.0 allows you to configure a set of predefined printers quickly and
easily. This section describes how to add such printers to the system.
Xprint V7.0 provides a special command for this purpose: xpconf_dev. With
this command you can configure a printer defined in the
/var/spool/Xprint/config/data/conf_dev file with the default parameters. This file contains a list of printers which can also be extended individually.
By default, this list comprises all the printers of Siemens AG.
The xpconf_dev command is the quickest method of configuring an Siemens
printer. Also, if you want to configure several similar printers not contained in the
list, it is often better to first extend the list and then call the xpconf_dev
command instead of configuring these printers individually with the xpadd -dev
command.
The following table serves as a guide to the subsections dealing with configuring
predefined printers:
If you want to ...
Read ...
configure an Siemens printer
section “Configuring predefined
printers” on page 109
extend the list of predefined printers
section “Extending the list of
predefined printers” on page 112
Table 10: Configuring predefined printers
108
U23841-J-Z915-6-76
Configuring Xprint V7.0
6.3.1
Predefined printers
Configuring predefined printers
The xpconf_dev command provides a quick and easy method of adding a
predefined printer: Xprint V7.0 automatically selects the suitable emulation for
the specified printer model and it suggests a default configuration which you
only need to adjust, if necessary. Proceed as follows to add a new printer with
xpconf_dev:
●
Call xpconf_dev:
xpconf_dev
The displayed screen should read similar to the following:
List of device models and emulations supported by Xprint V7.0 :
----------------
1
2
3
4
5
6
7
8
9
10
11
12
13
14
15
SNI-2050
SNI-4007
SNI-4009
SNI-4009
SNI-4010
SNI-4011
SNI-4011
SNI-4011
SNI-4014
SNI-4014
SNI-4806
SNI-4806
SNI-4806
SNI-4810
SNI-4810
HP-LASERJET
EPSON-LQ
EPSON-FX
PROPRINTER
EPSON-LQ
ECMA-9097
(
EPSON-LQ
EPSON-FX
EPSON-LQ
PROPRINTER
HP-LASERJET
PROPRINTER
HP-GL
(
HP-LASERJET
POSTSCRIPT
users only)
users only)
Please type a number to select a device model, press return
to start customized processing, ’q’ to quit or ’?’ for help.
You can drive inside devices list using +/- (next/previous
screen):
All the printers contained in the
/var/spool/Xprint/config/data/conf_dev file can be selected in this
way.
●
From this list, select your printer model or a similar model with a suitable
emulation by entering the corresponding number and pressing "Enter".
The selected entry is then marked, e.g.
>> 1
SNI-2050 HP-LASERJET
U23841-J-Z915-6-76
109
Predefined printers
●
Confirm again with "Enter".
●
Next you must specify a printer address:
Configuring Xprint V7.0
Please give a device address.
Type device address, ’q’ to quit or ’?’ for help :
Here you must specify to which port the printer is attached. If the printer is
connected to a serial, parallel or SCSI port of one of the hosts, you must
specify the device file belonging to this port (the format is, for example,
/dev/term/tty001 or /dev/term/tty002 for serial,/dev/lp0 or /dev/lp1 for
parallel, and /dev/io0/sprin022 for SCSI ports).
If the printer to be configured is a LAN printer with its own network adapter
card which is connected via a terminal server or via a PC to the software
Wprint (or SPPCS), the address consists of an Internet address (or the
corresponding host name from the file /etc/hosts) and a port number. In
this case, the format of the printer address is, for example, 139.23.124.37
7001.
For details on the Internet address and the port number refer to the
documentation and current configuration data of the LAN printer, the
terminal server or the software Wprint (SPPCS), depending on how the LAN
printer is connected to the network.
Enter the address and confirm with "Enter".
●
Now you are asked to assign a name to the new printer:
Please give a device name.
Type device name, ’q’ to quit or ’?’ for help :
Enter a name which is not yet used in the system and press "Enter".
110
U23841-J-Z915-6-76
Configuring Xprint V7.0
Predefined printers
When you have performed these steps, Xprint V7.0 suggests a default configuration and at the same time offers you the option of modifying this configuration:
●
A display similar to the following appears on the screen:
Proposal of device definition (type "HP Laserjet 4P", emulation
"HP-LASERJET"):
-----------
1
2
3
4
5
6
7
8
9
10
NAME: HPLJ-4P
Host: colorado
pcl: HP-LASERJET
Address: /dev/lp0
Connection type: SERIAL
Protocol: XON
Speed: 9600
Parity: NONE
Significant bits: 8
Enable polling: RESET
Please type a number to update an attribute, press return to start
modification processing, ’q’ to quit or ’?’ for help : 5
To modify the displayed configuration, you must select the corresponding
number and confirm with "Enter". Then the corresponding entry is marked,
e.g.
>> 5
●
Connection type: SERIAL
Confirm again with "Enter".
Then the possible parameters for the relevant option are displayed, from
which you can select one by marking the number and confirming with
"Enter" , e.g.:
Updating attribute: "Connection type" .
Current value: "SERIAL"
Possible values are:
1. SERIAL
4. SCSI
2. PARALLEL
3. LAN
Type entry number (any other entry means no change) : 2
●
Once you have made all the settings according to your requirements,
confirm with "Enter". Xprint V7.0 then confirms the entry of the new printer
with the following message:
Updating device model : "HPLJ-4P" .
U23841-J-Z915-6-76
111
Predefined printers
6.3.2
Configuring Xprint V7.0
Extending the list of predefined printers
If you need to configure a non-predefined printer type frequently in Xprint V7.0,
you can enter this printer type in the
/var/spool/Xprint/config/data/conf_dev file with the corresponding
default values. This allows you to configure printers of this type with the
xpconf_dev command.
By default you require system administrator privileges to be able to edit this file.
The file consists of a number of lines, each of which corresponds to one entry.
The entries could read as follows:
SNI-4007
SERIAL !
SNI-4009
SERIAL !
SNI-4009
SERIAL !
SNI-4010
SERIAL !
SNI-4011
SERIAL !
! EPSON-LQ
! EPSON-LQ
! NONE ! 9600 ! 8 ! XON ! N !
! EPSON-FX
! EPSON-FX
! NONE ! 9600 ! 8 ! ETX ! N !
! PROPRINTER ! PROPRINTER ! NONE ! 9600 ! 8 ! XON ! N !
! EPSON-LQ
! EPSON-LQ
! ECMA-9097 ! E-9097
(
users only).
! NONE ! 9600 ! 8 ! XON ! N !
! NONE ! 9600 ! 8 ! XON ! Y !
Each entry consists of nine fields which are separated by the exclamation
mark !. The individual fields have the following meanings:
Field
Meaning
1
Printer type - the name under which the printer can be selected. For
new entries any name can be used.
2
Emulation - if a printer supports more than one emulation, a separate
entry with the same printer type and a different emulation should be
specified for each different emulation.
3
PCL - here, the name of the PCL suitable for the printer type and
emulation is specified. If this PCL is not yet defined in the Xprint V7.0
configuration, xpconf_dev will add it.
4
Parity - for a connection via a serial interface, the type of parity bit
must be specified here. Possible values are ODD, EVEN and NONE.
5
Baud rate - for a connection via a serial interface, the baud rate of the
connection is specified here.
Table 11: conf_dev file
112
U23841-J-Z915-6-76
Configuring Xprint V7.0
Predefined printers
Field
Meaning
6
Significant bits - for a connection via a serial interface, the number of
bits for transferring a character is specified here. Possible values are
7 and 8.
7
Protocol - for a connection via a serial interface, the handshake
protocol for the connection is specified here. Possible values are XON,
ETX and RXON
8
Polling - this field specifies whether polling is enabled or not.
Possible values are Y (yes) and N (no).
9
Connection type - this field specifies how the printer is usually
connected. Possible values are SERIAL, PARALLEL, SCSI and LAN.
Table 11: conf_dev file
U23841-J-Z915-6-76
113
Administering devices
6.4
Configuring Xprint V7.0
Administering devices
This section describes all the steps required for configuring and modifying
printers. It presents simple procedures which allow you to quickly configure
standard situations without referring to the Reference Manual. This section
does not explain how to configure faxes and e-mail outputs. Please consult the
Reference Manual for the particular features of such output devices.
Bear in mind that a number of predefined printers can also be configured with
the xpconf_dev command which is described in the previous section. The
following table serves as a guide through this section and refers you to other
sections containing additional information on printers.
If you want to...
Read...
configure a new printer
section “Adding a printer” on page 116
deactivate a printer
section “Deactivating a printer” on
page 118
activate a printer
section “Reactivating a printer” on
page 120
remove a printer
section “Removing a printer” on
page 121
connect a printer to another system
section “Reconnecting a printer to
another system” on page 122
reconnect a printer to a different port
on the same system
section “Reconnecting a printer to a
different port” on page 122
replace an existing printer with a new section “Replacing an existing printer
printer
with a new one” on page 123
grant or deny a printer access to a
form
section “Granting or denying specific
printers access to a form” on
page 150
grant or deny specific users access to section “Granting or denying specific
a printer
users access to a form” on page 149
change the security level of a printer
section “Assigning a security level to a
printer” on page 124
assign a filter to a printer
section “Assigning a filter to a printer”
on page 169
Table 12: Administering printers
114
U23841-J-Z915-6-76
Configuring Xprint V7.0
Administering devices
If you want to...
Read...
cancel the assignment of a filter to a
printer
section “Removing a filter from a
printer” on page 170
assign a form to a printer
section “Default forms for printers” on
page 160
assign a PCL to a printer
section “Assigning a PCL to a printer”
on page 183
define a new recovery rule
section “Defining a recovery rule” on
page 186
assign a recovery rule to a printer
section “Assigning a recovery rule to a
printer” on page 190
Table 12: Administering printers
The following sections assume that Xprint V7.0 is installed correctly on all the
relevant systems (see chapter “Installing Xprint V7.0”).
U23841-J-Z915-6-76
115
Administering devices
6.4.1
Configuring Xprint V7.0
Adding a printer
If your system has a printer attached, this printer must be managed by a local
supervisor, which itself must be controlled by a server in the network. You can
use a default supervisor, an existing defined supervisor or you can define a new
one. If you define a new supervisor, you can assign it to any existing server in
the network or define a separate new server for it or use a predefined default
server.
You can also add a printer without first having defined a server and
supervisor. In this case, the following applies: if you add a printer with the
xpadd -dev command and no server or supervisor are defined on the
local host, Xprint V7.0 automatically configures a server and supervisor
with the name of the host on which they are defined. The new printer is
automatically assigned to these objects.
i
Selecting a server
●
To display a list of all the available servers in order to select one for your
supervisor or to define a unique name, use the following command:
xpshow -srv
A list of all the defined servers is displayed, which has the following structure:
Name
User perm.
------------srv_colorado
missouri_server
delaware_srv
●
Host
---colorado
missouri
delaware
Administrator
------------root
xprintadm
root
If you want to define a new server on your system, enter the following
command:
xpadd -srv server_name
Defining a supervisor
●
If the new printer on your system requires its own supervisor, you can now
define this supervisor with the following command:
xpadd -spv supervisor_name [-se server_name]
Assign a unique name to the supervisor and specify with server_name which
server is to manage your supervisor.
116
U23841-J-Z915-6-76
Configuring Xprint V7.0
Administering devices
Configuring printers
●
First use the checklist in the Appendix on page 263 to check if all the
required preparatory steps for adding printers have been taken or if you want
to use any of the further configuration options mentioned there (forms, filters,
permission lists, etc.).
●
If you want to display a list of all the printers available in order to define a
unique device name for your printer, use the following command:
xpshow -dev
A list of all the defined printers is displayed, which has the following
structure:
Name
---printer1
printer2
●
PCL
--POSTSCRIPT
HP-LASERJET
Default form
-----------GENERIC
GENERIC
Host
---hudson
colorado
Administrator
------------root
root
Now choose a printer name which does not yet exist in the list and configure
your printer at the selected or specially defined supervisor:
xpadd -dev device_name -da device_file -co type /
[-su supervisor_name] -pc pcl_name [-aa]
device_file specifies to which port the printer is attached (e.g.
/dev/term/tty001 or /dev/term/tty002 for serial, or /dev/lp0 or
/dev/lp1 for parallel ports, or 192.210.192.127 9100 for a LAN
connection.).
With type you specify which type of port is used for your printer. Possible
values for type are SERIAL for a serial port, PARALLEL for a parallel port, SCSI
for a SCSI high-performance printer, and LAN for a LAN printer. The default
is SERIAL.
If required, you can specify the responsible supervisor with supervisor_name.
If you omit this specification, Xprint V7.0 uses the supervisor with the name
of the host to which the printer is attached. If you do not specify a supervisor,
Xprint V7.0 will automatically define a default supervisor.
With pcl_name you define which printer capability list is to be used for
addressing your printer. Possible values include HP-LASERJET, POSTSCRIPT,
PROPRINTER and HP-DESKJET. The default is GENERIC. See the Reference
Manual to find out which PCL to specify for the printer you use.
The -aa option can be used to have the printer activated automatically
whenever Xprint V7.0 is started.
U23841-J-Z915-6-76
117
Administering devices
Configuring Xprint V7.0
Once you have connected and configured a new printer, you must activate it.
●
Activate the printer by entering the following command:
xpchange -dev printer_name
You can also use the -aa option (for automatic activation) of the xpadd -dev
command, in which case the printer is available immediately after xpstart is
executed.
6.4.2
Deactivating a printer
To deactivate a printer, use the xpchange -dev command. There are three
options available for deactivation (you can only deactivate the printers you
administer):
●
You can deactivate a printer completely.
●
You can deactivate spoolin.
●
You can deactivate the printing itself (spoolout).
Deactivating a printer completely
Deactivating a printer completely means that it is not available for any actions in
the system. A complete deactivation makes sense, for example, if the printer is
not available for a long period of time due to repairs.
●
Use the following command to deactivate a printer:
xpchange -dev [selection] -st NOT_ACTIVE [-ju justification]
If you do not specify a selection, all printers you manage in the Xprint V7.0
system are deactivated; otherwise you can either specify a list of the printers
to be deactivated, or you can use the -scl “selection_criteria_list” option
(see section “Selection criteria list” on page 266 in the Appendix) to define a
list of criteria according to which the printers to be deactivated are selected.
If you de-/activate a printer with the -st option, spoolin and spoolout
(printing) are also de-/activated.
With the option -ju justification you specify a comment justifying the new
spoolin status. You can display this comment with the xpstat -dev
command. The comment is deleted automatically when the -st option is
changed again with the xpchange -dev command.
118
U23841-J-Z915-6-76
Configuring Xprint V7.0
Administering devices
Deactivating spoolin
You can deactivate a printer, but still have it print the print jobs waiting in the print
queue. To do this set its spoolin status to OFF. In this case all print jobs which
have the status ACTIVE or WAIT are still printed; however, at the same time you
lock the spoolin of new print jobs with this command.
●
Use the following command:
xpchange -dev [selection] -si OFF [-ju justification]
The -si option stands for spoolin.
Deactivating printing
If a printer is not available for a short period of time only (e.g. because the toner
needs to be refilled), you can still submit print jobs which will be printed when
the printer becomes available again.
●
Use the following command:
xpchange -dev [selection] -so OFF [-ju justification]
The -so option stands for spoolout.
Examples
– To deactivate the printer printer1 with the justification that the printer is
being repaired:
xpchange -dev printer1 -st NOT_ACTIVE -ju "printer is being
repaired"
– To deactivate all printers controlled by the host colorado:
xpchange -dev -scl "-ho colorado" -st NOT_ACTIVE
– To deactivate all printers you manage:
xpchange -dev -st NOT_ACTIVE
– To deactivate printer printer1, but have all waiting jobs printed before the
printer is removed from the network:
xpchange -dev printer1 -si OFF
– To deactivate printer printer1 because the paper is being refilled:
xpchange -dev -so OFF -ju "refilling paper"
U23841-J-Z915-6-76
119
Administering devices
6.4.3
Configuring Xprint V7.0
Reactivating a printer
To be able to submit print jobs for a printer or start printing, you must first
activate the printer.
●
Activate the printer with the following command:
xpchange -dev [selection] [-si ON | -so ON] [-ju justification]
If you do not specify a selection, the command refers to all printers in the
system; otherwise you can either specify a list of the printers to be activated,
or you can use the -scl “selection_criteria_list” option (see section
“Selection criteria list” on page 266 in the Appendix) to define a list of criteria
according to which the printers to be activated are selected.
With the -si ON option, you can reactivate spoolin only, with -so ON spoolout
only. If neither of these options is specified, the printer is reactivated
completely.
With the option -ju justification you specify a comment justifying the new
spoolin status. You can display this comment with the xpstat -dev
command.
Examples
– To activate printer printer1 with the justification that it is now ready again:
xpchange -dev printer1 -ju "ready again"
– To activate spoolin for all printers connected to host colorado:
xpchange -dev -scl "-ho colorado" -si ON
– To activate all printers:
xpchange -dev
120
U23841-J-Z915-6-76
Configuring Xprint V7.0
6.4.4
Administering devices
Removing a printer
To remove a defined printer because it is no longer available on your system,
use the following procedure:
●
Log in as root or, if defined, as the Xprint V7.0 administrator.
●
Check first whether the printer you wish to delete is referenced by other
Xprint V7.0 objects. If so, these references must be removed. Use the
following command to check for references:
xpshow -dev [selection]printer_name -diR
With printer_name, you specify exactly one printer to be deleted. If you want
to delete several printers, you must repeat this command for each of these
printers.
If you do not specify a selection, the command refers to all printers in the
system; otherwise you can either specify a list of the printers to be removed,
or you can define a list of selection criteria with the -scl
“selection_criteria_list” option (see section “Selection criteria list” on
page 266 in the Appendix) according to which the printers to be removed are
selected.
●
If references to the printer are displayed, you must remove these before you
can delete the printer, by modifying the relevant objects such that the references are canceled.
●
Check if the printer to be deleted is still active with the following command:
xpstat -dev [selection]
●
If the printer is still active (output: State: ACTIVE), you must deactivate it
before deleting it:
xpchange -dev [selection] -st NOT_ACTIVE
●
Delete the printer definition with the following command:
xpdel -dev [selection]
U23841-J-Z915-6-76
121
Administering devices
6.4.5
Configuring Xprint V7.0
Reconnecting a printer to another system
To move a printer from one system to another, use the following procedure:
●
Deactivate the relevant printer:
xpchange -dev printer_name -st NOT_ACTIVE
where printer_name represents the name of the printer to be reconnected.
●
Specify the host to which the printer is to be connected:
xpmod -dev printer_name -ho new_host [-da device_file]
For new_host specify the name of the host at which the printer is to be
available from now on.
If the printer is no longer connected to the same port (e.g. /dev/lp0 instead
of /dev/lp), specify a new file for device_file.
●
Reactivate the printer:
xpchange -dev device_name
6.4.6
Reconnecting a printer to a different port
If you want to connect a defined printer to a different port on the same system,
you only need to modify the device definition - you do not have to delete and
redefine the printer.
●
Check whether the relevant printer is still active. Use the following command:
xpstat -dev [selection]
●
If the printer is still active (output: State: ACTIVE), you must deactivate it
before modifying it:
xpchange -dev [selection] -st NOT_ACTIVE
●
Then modify the printer definition using the following command:
xpmod -dev device_name -da device_file [-co type]
where device_name is the name of the printer whose definition is to be
modified.
Depending on the type, device_file specifies to which port the printer is
attached (e.g. /dev/term/tty001 or /dev/term/tty002 for serial, or
/dev/lp0 or /dev/lp1 for parallel ports), or which LAN address and port
122
U23841-J-Z915-6-76
Configuring Xprint V7.0
Administering devices
number apply for a LAN printer (e.g.: "132.82.127.34 9100", as the Internet
address for your LAN printer). Instead of the Internet address and port
number you can also specify the host name provided it is defined in the
/etc/hosts file.
If the connection type changes (e.g. up to now the first serial port; now the
second parallel port), you must also specify with type the new connection
type your printer will use. Possible values for type are SERIAL for a serial port,
PARALLEL for a parallel port, SCSI for a SCSI high-performance printer, and
LAN for a LAN printer.
6.4.7
Replacing an existing printer with a new one
If you want to replace an existing printer with a new one, you only have to
change the relevant information in the definition of the old printer. What information this is depends on the printer involved.
●
First check the settings of the existing printer:
xpshow -dev printer -di LONG
This displays a list of all the settings for the specified printer printer.
●
Use the checklist on page 263 in the Appendix to check if all the required
preparatory steps for modifying the printer have been taken or if you want to
use any of the further configuration options mentioned there (forms, filters,
permission lists, etc.).
●
Check whether the relevant printer is still active with the following command:
xpstat -dev [selection]
●
If the printer is still active (output: Status: ACTIVE), you must deactivate it:
xpchange -dev [selection] -st NOT_ACTIVE
●
Then modify all the settings which have changed for the new printer with the
following command:
xpmod -dev printer [options_to_be_modified]
For options_to_be_modified you can specify any of the options which can also
be specified when defining a new printer (see also section “Adding a printer”
on page 116 and the description of the xpmod -dev command in the “Xprint
V7.0 - Reference Manual”).
U23841-J-Z915-6-76
123
Administering devices
Configuring Xprint V7.0
Example
– The old printer printer1 used the PCL HP_LASERJET but the new printer is
a PostScript printer:
xpmod -dev printer1 -pc POSTSCRIPT -ct-
The -ct- option makes sure that the data format of the printer is adjusted
to the default, which depends on the PCL.
i
You can only modify a PCL assigned to a printer if all the other printer
options are compatible.
Example: A printer is defined via -pc HP_LASERJET and the default
form LANDSCAPE (-ls LANDSCAPE). In this case, you can only modify the
printer to EPSON-FX with the -pc option if you first modify the default
form to PORTRAIT.
6.4.8
Assigning a security level to a printer
Under Xprint V7.0 one of five security levels can be assigned to printers as well
as to print jobs and users.
Xprint V7.0 assigns print jobs to a printer according to the security level of the
job and the printer. This means that a print job can only be printed on a printer
with at least the same security level. A print job with the security level
CONFIDENTIAL, for example, can only be printed on printers with the security level
CONFIDENTIAL or higher (SECRET, TOP_SECRET).
●
Log in as the Xprint V7.0 administrator.
●
If required, deactivate the printer:
xpchange -dev printer_name -st NOT_ACTIVE [-ju justification]
For printer_name specify the name of the printer whose security level you
want to modify.
With the -ju justification option, you can define a comment justifying the new
security level. This comment can be displayed with the xpstat -dev
command. The comment is automatically deleted when the -st option is
changed again with the xpchange -dev command.
●
To assign a specific security level to a printer, use the following command:
xpmod -dev [selection] -sl security_level
124
U23841-J-Z915-6-76
Configuring Xprint V7.0
Administering devices
If selection is not specified, the command refers to all the printers in the Xprint
V7.0 system. Otherwise you can either specify the name(s) of the printers to
which you want to assign a security level, or you can use the -scl
“selection_criteria_list” option (see section “Selection criteria list” on
page 266 in the Appendix) to define a list of criteria according to which the
relevant printers are selected.
For -sl security_level specify the desired security level. Xprint V7.0 allows
you to choose from UNCLASSIFIED (= default), SENSITIVE, CONFIDENTIAL,
SECRET, TOP_SECRET.
●
Reactivate the printer:
xpchange -dev printer_name
For printer_name specify the name of the printer whose security level has
been modified.
Examples
– To assign the security level CONFIDENTIAL to printer printer5:
xpchange -dev printer5 -st NOT_ACTIVE
xpmod -dev printer5 -sl CONFIDENTIAL
xpchange -dev printer5
– To display the security level of the printer printer4:
xpshow -dev printer4 -di LONG
– To modify the security level of the printer printer5 to SECRET later:
xpchange -dev printer5 -st NOT_ACTIVE
xpmod -dev printer5 -sl SECRET
xpchange -dev printer5
U23841-J-Z915-6-76
125
Administering printer groups
6.5
Configuring Xprint V7.0
Administering printer groups
Under Xprint V7.0 you can set up printer groups to speed up the output of print
jobs. If a print job is submitted for a printer group, the job is printed on the first
printer to become available in the printer group.
This section describes the possible steps required for configuring printer
groups. The following table serves as a guide through this section:
If you want to...
Read...
set up a new printer group or create it section “Setting up a new printer
from an existing one
group” on page 127
add a printer to an existing printer
group
section “Adding a printer to a printer
group” on page 129
remove a printer from a printer group
section “Removing a printer from a
printer group” on page 129
deactivate a printer group
section “Deactivating a printer group”
on page 130
reactivate a printer group
section “Reactivating a printer group”
on page 131
delete a printer group
section “Deleting a printer group” on
page 132
grant or deny specific users access to section “Granting or denying specific
a printer group
users access to a printer group” on
page 149
Table 13: Administering printer groups
126
U23841-J-Z915-6-76
Configuring Xprint V7.0
6.5.1
Administering printer groups
Setting up a new printer group
There are two possible ways of setting up new printer groups: you can either
define a completely new printer group or you can copy an existing one and
modify it.
Setting up a completely new printer group
●
Set up a new printer group with the following command:
xpadd -dgr group_name -dl device_list
With group_name you assign the new group a name. This name must be
unique among all printer groups and printers already defined in the system.
With device_list you specify the names of the printers which are to belong to
the new group. The printer names must be separated by blanks. Printer
groups must not be specified in the list. The following requirements must be
met for the specified printers:
– All printers must already be configured.
– You must have the permission required to address the printers in the
printer group.
– All printers must be controlled by the same server. A print job in the print
queue is always handled by a single server. If any printer in a printer
group were not controlled by the same server as the others in the group,
this printer would never be used for printing jobs (even if it were the first
printer available). If this is the case, use the xpmod -dev command to
assign the printer to the correct server.
– The spoolin status of the added printer group is automatically set to "ON".
Also, the date of the last modification is updated.
In addition, the following options are available for defining the attributes of
the printer group: -up user_permission, -ah administration_host,
-cu comment_for_user, -ca comment_for_administrator.
For more detailed information refer to the description of the xpadd -dgr
command in the “Xprint V7.0 - Reference Manual”.
U23841-J-Z915-6-76
127
Administering printer groups
Configuring Xprint V7.0
Copying a printer group
If you want to set up a printer group which is very similar to an existing one, you
can also copy the existing printer group and modify the copied group according
to your requirements.
The new printer group is set up on the host on which the xpcopy -dgr
command is executed; this is not true if you have specified a different host with
the -ah (administration host) option.
●
Copy a printer group with the following command:
xpcopy -dgr source_group target_group [modifications]
With source_group you specify the name of the printer group you want to
copy. With target_group you must specify the name of the new printer group.
If this name already exists (for a printer or a printer group), the xpcopy -dgr
command is rejected.
For modifications you specify a list containing the new or changed values for
the new printer group. The options in this list correspond to the options with
which the printer group was added to the Xprint V7.0 system (see the
previous section).
Examples
– To set up the printer group group1, which contains the printers printer1,
printer2 and printer3 and is only to be used by the users in the permission
list permission1:
xpadd -dgr group1 -dl printer1 printer2 printer3 \
-up permission1
– To set up a new group group2 based on the existing group group1 without
making any changes:
xpcopy -dgr group1 group2
– To set up a new group group2 based on the existing group group1 keeping
all printers except for printer3:
xpcopy -dgr group1 group2 -dl- printer3
128
U23841-J-Z915-6-76
Configuring Xprint V7.0
6.5.2
Administering printer groups
Adding a printer to a printer group
If you want to add a printer to a printer group, this printer must already be
configured in the spooler system. If this is not the case, you must add the printer
with the xpadd -dev command; for more detailed information on this, see the
section “Adding a printer” on page 116. Proceed as follows:
●
Add additional printers to the printer group:
xpmod -dgr [selection] -dl+ new_printer
If selection is not specified, the command refers to all the printer groups in the
Xprint V7.0 system. Otherwise you can either specify a list of the printer
groups to be added, or you can use the -scl “selection_criteria_list” option
(see section “Selection criteria list” on page 266 in the Appendix) to define a
list of criteria according to which the relevant printer groups are selected.
Example
To add the printers printer4 and printer5 to the printer group group1.
xpadd -dgr group1 -dl+ printer4 printer5
6.5.3
Removing a printer from a printer group
The xpmod -dgr command allows you to delete any printer you manage from
a printer group that you have access to.
Proceed as follows:
●
Remove the printer:
xpmod -dgr [selection] -dl- printer_name
If selection is not specified, the command refers to all the printer groups in the
Xprint V7.0 system. Otherwise you can either specify a list of the printer
groups to be removed, or you can use the -scl “selection_criteria_list”
option (see section “Selection criteria list” on page 266 in the Appendix) to
define a list of criteria according to which the relevant printer groups are
selected.
Example
To delete the printer printer3 from the printer group group1, retaining all the
other printers:
xpmod -dgr group1 -dl- printer3
U23841-J-Z915-6-76
129
Administering printer groups
6.5.4
Configuring Xprint V7.0
Deactivating a printer group
To deactivate a printer group, use the xpchange -dgr command. You can only
change the current spoolin status of the printer groups you manage.
●
Use the following command to deactivate a printer group:
xpchange -dgr [selection] -si OFF [-ju justification]
If selection is not specified, the command refers to all the printer groups in the
Xprint V7.0 system. Otherwise you can either specify a list of the printer
groups to be deactivated, or you can use the -scl “selection_criteria_list”
option (see section “Selection criteria list” on page 266 in the Appendix) to
define a list of criteria according to which the printer groups to be deactivated
are selected.
The option -si OFF specifies the new spoolin status (in this case OFF) for the
selected printer group. When -si OFF is set, the print requests for the
selected printer groups are rejected.
With the option -ju justification you specify a comment justifying the new
spoolin status. You can display this comment with the xpstat -dgr
command. This comment is deleted automatically when the -si option is
changed again with the xpchange -dgr command.
Examples
– To change the spoolin status of printer group group1 to OFF with the justification that the group is being modified:
xpchange -dgr group1 -si OFF -ju "group is being modified"
– To deactivate all printer groups which contain printer printer8 (remember
that all criteria used for selecting the printer groups must be enclosed in
quotes):
xpchange -dgr -scl "-dl printer8” -si OFF
– To deactivate all printer groups:
xpchange -dgr -si OFF -ju "complete reorganization"
130
U23841-J-Z915-6-76
Configuring Xprint V7.0
6.5.5
Administering printer groups
Reactivating a printer group
To be able to assign print jobs to a printer group, the spoolin status of this printer
group must be set to ON.
●
To activate a printer group, use the following command:
xpchange -dgr [selection] [-si ON] [-ju justification]
If selection is not specified, the command refers to all the printer groups in the
Xprint V7.0 system. Otherwise you can either specify the names of the
printer groups you want to activate, or you can use the -scl
“selection_criteria_list” option (see section “Selection criteria list” on
page 266 in the Appendix) to define a list of criteria according to which the
printer groups to be activated are selected.
The option -si ON specifies the new spoolin status (in this case ON) for the
selected printer group. When -si ON is set, all the print requests for the
selected printer groups are accepted.
With the option -ju justification you specify a comment justifying the new
spoolin status. You can display this comment with the xpstat -dgr
command. This comment is deleted automatically when the -si option is
changed again with the xpchange -dgr command.
Examples
– To set the spoolin status of the printer group group1 to ON with the justification
that the group is now ready again:
xpchange -dgr group1 -si ON -ju "ready again"
– To set the spoolin status to ON for all printer groups which contain printer
printer8 (remember that all criteria used for selecting the printer groups
must be enclosed in quotes):
xpchange -dgr -scl "-dl printer8” -si ON
– To activate all printer groups:
xpchange -dgr -si ON
U23841-J-Z915-6-76
131
Administering printer groups
6.5.6
Configuring Xprint V7.0
Deleting a printer group
The xpdel -dgr command allows you to delete any printer group you can
access. In this case, the individual printers of the printer group are not deleted.
●
Check first whether the printer group you wish to delete is referenced by
other Xprint V7.0 objects:
xpshow -dgr [selection]printer_group -diR
With printer_group, you specify exactly one printer group to be deleted. If you
want to delete several groups, you must repeat this command for each of
these printer groups.
If you do not specify a selection, the command refers to all printer groups in
the system; otherwise you can either specify a list of the printer groups to be
removed, or you can define a list of selection criteria with the -scl
“selection_criteria_list” option (see section “Selection criteria list” on
page 266 in the Appendix) according to which the printer groups to be
removed are selected.
●
If references to the printer group are displayed, you must remove these by
modifying the displayed objects such that they no longer refer to this group.
●
Delete the printer group with the following command:
xpdel -dgr [selection]
If selection is not specified, the command refers to all the printer groups in the
Xprint V7.0 system. Otherwise you can either specify a list of the printer
groups you want to delete, or you can use the -scl “selection_criteria_list”
option (see section “Selection criteria list” on page 266 in the Appendix) to
define a list of criteria according to which the printer groups to be deleted are
selected.
Examples
– To delete the printer group named group1:
xpdel -dgr group1
– To delete all printer groups containing printer printer8:
xpdel -dgr -scl "-dl printer8"
132
U23841-J-Z915-6-76
Configuring Xprint V7.0
6.6
Administering users
Administering users
This section describes the possible ways of administering various users in the
Xprint V7.0 system. The following table serves as a guide to this section:
If you want to...
Read...
define a user locally or globally for the section “Defining a user” on page 133
entire Xprint V7.0 system, or grant
him/her further or new privileges
delete a user
section “Deleting a user” on page 137
modify the privileges of a user
section “Modifying user privileges” on
page 135
modify a user’s print quotas
section “Resetting user print quotas”
on page 138
display information on users
section “Displaying information on
users” on page 140
modify a user’s security level
section “Assigning a security level to a
user” on page 141
Table 14: Administering users
6.6.1
Defining a user
Xprint V7.0 allows the Xprint V7.0 administrator to grant privileges to users. For
privileges to be granted, the users must be defined under Xprint V7.0. There are
several different ways of doing this.
The user privileges can be defined while the user is being added. For a detailed
description of the possible privileges, see the description of the xpadd -usr
command in the “Xprint V7.0 - Reference Manual” as well as in the section
“Modifying user privileges” on page 135.
●
To add a new user to the Xprint V7.0 system, use the following command:
xpadd -usr user_IDs [-ho hosts]
For user_IDs you can specify either a single user or a list of users. Now Xprint
V7.0 knows the specified users and you can grant them specific privileges.
By additionally specifying a list of hosts with the -ho hosts option you can
allow users to access jobs they have submitted on one of these hosts from
any other of the specified hosts.
U23841-J-Z915-6-76
133
Administering users
Configuring Xprint V7.0
These users do not have to be registered as SINIX users on the specified
hosts. If the -ho option is not specified, only the local host is added to the list.
Examples
– To add user smith locally to the Xprint V7.0 system:
xpadd -usr smith
– The Xprint V7.0 administrator enters the following command on a spooler
system with the hosts colorado, nashua and hudson:
xpadd -usr smith -ho colorado nashua
smith is now an Xprint V7.0 user of host colorado and host nashua. If he
sends a job from host colorado to the system, he can log in to host nashua
and access this job, for example to modify the job priority. He cannot do this
from host hudson as there the Xprint V7.0 system considers him to be a
different user with the ID smith.
6.6.2
Entering a defined user for other hosts
If an already defined user is to be able to access his/her jobs from other hosts
as well, for example because he/she has a user ID on a newly added host, the
host list can be extended.
●
Enter the new host in the user’s host list with the following command:
xpmod -usr [selection] -ho+ host
If selection is not specified, the command refers to all the users in the Xprint
V7.0 system. Otherwise can either you can specify the name(s) of the users
whose host list you want to modify, or you can use the -scl
“selection_criteria_list” option (see section “Selection criteria list” on
page 266 in the Appendix) to define a list of criteria according to which the
users are selected. For host specify the name of the host from which the user
is to have common access to his/her print jobs.
Example
– To add the new host delaware to the host list of user smith:
xpmod -usr smith -ho+ delaware
– To add the new host missouri additionally for all users:
xpmod -usr -ho+ missouri
134
U23841-J-Z915-6-76
Configuring Xprint V7.0
6.6.3
Administering users
Deleting a host from a user’s host list
If a defined user is no longer to be able to access his/her print jobs from a
specific host, e.g. because there is now another user with the same user ID on
this host, you can delete this host from the list.
●
Delete the host from the user’s host list with the following command:
xpmod -usr [selection] -ho- host
If selection is not specified, the command refers to all the users in the Xprint
V7.0 system. Otherwise you can either specify the name(s) of the users
whose host list you want to modify, or you can use the -scl
“selection_criteria_list” option (see section “Selection criteria list” on
page 266 in the Appendix) to define a list of criteria according to which the
users are selected.
For host specify the name of the hosts from which the user is no longer to
have access to the print jobs of the other hosts.
Examples
– To delete host delaware from the host list of user smith:
xpmod -usr smith -ho- delaware
– To delete host missouri from the host list of all users:
xpmod -usr -ho- missouri
6.6.4
Modifying user privileges
The Xprint V7.0 administrator can also define the privileges of users when or
after defining them. There are a number of options available which can be used
with the xpmod -usr command described below or when defining the user with
xpadd -usr.
●
Use the following command to modify the privileges of one or more users:
xpmod -usr [selection] modifications
If selection is not specified, the command refers to all users in the Xprint V7.0
system. Otherwise you can either specify the name(s) of the user(s) whose
privileges you want to modify, or you can use the -scl
U23841-J-Z915-6-76
135
Administering users
Configuring Xprint V7.0
“selection_criteria_list” option (see section “Selection criteria list” on
page 266 in the Appendix) to define a list of criteria according to which the
relevant users are selected.
For modifications you can specify any combination of the following options:
– With the option -pv privileges you assign specific privileges to a user.
Possible categories are:
ALL
the user is given all privileges.
NONE (default)
the user is granted no privileges.
ANY_DEVICE
the user can access any printer even if defined otherwise in the
permission list.
TOP
the user is allowed to place his/her print job at the top of the print
queue.
– With the option -pr priority you can assign the maximum priority with
which the user may spool in his/her print jobs. Xprint V7.0 then places
the user’s jobs in the print queue according to the priority assigned. The
priority range is 1-100, and the default value is UNDEFINED.
– With the option -aj allowed_jobs the Xprint V7.0 administrator can define
how many jobs each individual user is allowed to print. The default is
NO_LIMIT.
– With the option -nc number_of_copies you define the maximum number of
copies per user job. The default is NO_LIMIT.
– With the option -ap allowed_pages you can define the maximum number
of pages a user is allowed to print. Once a user has reached this number
of pages, he/she is no longer allowed to submit further print jobs. The
default is NO_LIMIT.
– When the -ua (user accounting) option is specified, Xprint V7.0 will
update and save the counter of the number of pages and jobs printed per
user after the job is finished. When a user has reached the limit of one of
his/her print quotas, he/she cannot print any more print jobs until his/her
counter is reset.
136
U23841-J-Z915-6-76
Configuring Xprint V7.0
Administering users
– With the option -sl security_level you can define the maximum security
level with which a user can submit print jobs. The following values are
allowed: UNCLASSIFIED (default), SENSITIVE, CONFIDENTIAL, SECRET,
TOP_SECRET.
Examples
– To modify the current privileges of smith such that he is now allowed to place
his jobs at the top of the print queue (TOP):
xpmod -usr smith -pv TOP
– To assign user smith all the possible privileges:
xpmod -usr smith -pv ALL
– To modify the privileges of all users with the current rights ANY_DEVICE, such
that these are now given all possible privileges:
xpmod -usr -scl "-pv ANY_DEVICE” -pv ALL
– To define a maximum priority of 80 for user smith (now this user can spool
in his/her print jobs with any priority between 1 and 80):
xpmod -usr smith -pr 80
– To define a maximum number of 10 jobs for user smith:
xpmod -usr smith -aj 10
– To restrict the maximum number of copies per print job to 15 for user smith:
xpmod -usr smith -nc 15
– To restrict the maximum number of pages user smith may print to 500:
xpmod -usr smith -ap 500
– To update and save the counter for the number of pages and jobs printed by
smith after the job is finished, use the following command:
xpmod -usr smith -ua
6.6.5
Deleting a user
Before trying to delete a user, make sure that this user is not contained in any
permission list. A user that is still listed in an allowed list cannot be deleted.
●
Check first whether the user you wish to delete is referenced by other Xprint
V7.0 objects. Enter
U23841-J-Z915-6-76
137
Administering users
Configuring Xprint V7.0
xpshow -usr [selection]user -diR
With user, you specify exactly one user to be deleted. If you want to delete
several users, you must repeat this command for each of these users.
If you do not specify a selection, the command refers to all users in the
system; otherwise you can either specify a list of the users to be removed,
or you can define a list of selection criteria with the -scl
“selection_criteria_list” option (see section “Selection criteria list” on
page 266 in the Appendix) according to which the users to be removed are
selected.
●
If references to the user are displayed, you must remove these by modifying
the displayed objects accordingly.
●
To delete user entries in the Xprint V7.0 system, you as the Xprint V7.0
administrator must enter the following command:
xpdel -usr [selection]
If you do not specify a selection, the command refers to all users in the Xprint
V7.0 system. Otherwise you can either specify a list of the users to be
deleted, or you can use the -scl “selection_criteria_list” option (see section
“Selection criteria list” on page 266 in the Appendix) to define a list of criteria
according to which the relevant users are selected.
Examples
– To delete a user named smith:
xpdel -usr smith
– To delete all users who are not assigned any privileges (xpadd -usr
user_name -pv NONE):
xpdel -usr -scl "-pv NONE”
6.6.6
Resetting user print quotas
When defining a user, you can determine specific quotas to restrict the number
of pages or print jobs a user can print. When the number of allowed pages or
jobs is reached, the user can only print again when you reset the print quotas.
There are two possible ways of resetting a user’s print quotas:
138
U23841-J-Z915-6-76
Configuring Xprint V7.0
Administering users
Changing the number of consumed pages
●
You can change the number of pages a user has consumed (i.e. printed) with
the -cp option:
xpchange -usr [selection] -cp new_consumed_pages
If selection is not specified, the command refers to all the users in the Xprint
V7.0 system. Otherwise you can either specify the name(s) of the user(s) for
whom the changed print quotas are to apply, or you can use the -scl
“selection_criteria_list” option (see section “Selection criteria list” on
page 266 in the Appendix) to define a list of criteria according to which the
relevant users are selected.
The variable new_consumed_pages represents the new counter value for the
consumed pages of the user. Now the user can print again until the
maximum number of allowed pages is reached. Once the user has
consumed this number of pages, any further jobs will be rejected.
Changing the number of consumed print jobs
●
You can change the number of print jobs a user has consumed (i.e. printed)
with the -cj option:
xpchange -usr [selection] -cj new_consumed_jobs
If selection is not specified, the command refers to all the users in the Xprint
V7.0 system. Otherwise you can either specify the name(s) of the user(s) for
whom the changed print quotas are to apply, or you can use the -scl
“selection_criteria_list” option (see section “Selection criteria list” on
page 266 in the Appendix) to define a list of criteria according to which the
relevant users are selected.
The variable new_consumed_jobs represents the new counter value for the
consumed jobs of the relevant user. Now the user can print again until the
maximum number of allowed print jobs is reached. Once the user has
consumed this number of print jobs, any further jobs will be rejected.
Examples
– To reset the number of consumed pages for users jones and brown to 0:
xpchange -usr jones brown -cp 0
U23841-J-Z915-6-76
139
Administering users
6.6.7
Configuring Xprint V7.0
Displaying information on users
Xprint V7.0 offers the option of displaying information on the defined users. You
can display the user privileges as well as the current state of the assigned print
quotas.
Displaying privileges and print quotas
●
To display privileges and print quotas of users in the spooler system, enter:
xpshow -usr [selection] [-di display]
If selection is not specified, the command refers to all the users in the Xprint
V7.0 system. Otherwise you can either specify the name(s) of the users
whose privileges or print quota you want to view, or you can use the -scl
“selection_criteria_list” option (see section “Selection criteria list” on
page 266 in the Appendix) to define a list of criteria according to which the
relevant users are selected.
The type of information displayed can be selected with the -di display
option. Possible values for display include LONG and SHORT (default):
SHORT display
Name
---smith
jones
brown
Jobs
---75
75
100
Pages
----500
500
2000
Copies
-----25
25
50
Prio.
----80
90
100
Accounting
---------SET
SET
SET
LONG display:
NAME: jones
Hosts: sni11.24
Allowed jobs:
100
Allowed pages: 2000
Security level: CONFIDENTIAL
Privileges: NONE
Comment:
Maximum priority: 100
Allowed copies: 50
Update accounting: yes
Status display of the current print quotas
●
You can display the current state of the print quota for each user in the
system. To do this use the following command:
xpstat -usr [selection] [-di display]
140
U23841-J-Z915-6-76
Configuring Xprint V7.0
Administering users
If selection is not specified, the command refers to all the users in the Xprint
V7.0 system. Otherwise you can either specify the name(s) of the users
whose print quota state you want to view, or you can use the -scl
“selection_criteria_list” option (see section “Selection criteria list” on
page 266 in the Appendix) to define a list of criteria according to which the
relevant users are selected.
The type of information displayed can be selected with the -di display
option. Possible values for display include LONG and SHORT (default).
Example
To display the current print quotas for smith:
xpstat -usr smith -di LONG
NAME: smith
Allowed pages: 1500
Allowed jobs:
70
6.6.8
Consumed pages: 112
Consumed jobs:
8
Assigning a security level to a user
By assigning a specific security level to a user (can only be done by the Xprint
V7.0 administrator), you allow the user to use all the printers with this security
level or lower.
To change a user’s security level, proceed as follows:
●
Log in as the Xprint V7.0 administrator.
●
Modify the security level:
xpmod -usr [selection] -sl security_level
If selection is not specified, the command refers to all the users in the Xprint
V7.0 system. Otherwise you can either specify the name(s) of the user(s)
whose security level you want to modify or you can use the -scl
“selection_criteria_list” option (see section “Selection criteria list” on
page 266 in the Appendix) to define a list of criteria according to which the
relevant users are selected.
For security_level specify one of the following (in ascending order):
UNCLASSIFIED (= default), SENSITIVE, CONFIDENTIAL, SECRET, TOP_SECRET
U23841-J-Z915-6-76
141
Administering users
Configuring Xprint V7.0
Examples
– To add a new user called brown and assign him the security level TOP_SECRET
at the same time:
xpadd -usr brown -sl TOP_SECRET
– To check the security level of smith:
xpshow -usr smith -di LONG
A message similar to the following is displayed:
NAME: smith
Host:
Allowed jobs: NO_LIMIT
Allowed pages: NO_LIMIT
Security level: TOP_SECRET
Privileges: NONE
Comment:
142
Maximum priority: UNDEFINED
Allowed copies: NO_LIMIT
Update accounting: RESET
U23841-J-Z915-6-76
Configuring Xprint V7.0
6.7
Administering permission lists
Administering permission lists
Xprint V7.0 offers various means of ensuring the security of the data to be
printed. These include creating permission lists for printers, printer groups and
forms, which restrict or deny use of the relevant object to the specified names.
Permission lists also allow other users restricted administration of supervisors
for a specific server.
This section describes the possible measures involved in configuring
permission lists. The following table serves as a guide to this section:
If you want to...
Read...
create a permission list
section “Creating a permission list” on
page 144
modify a permission list
section “Modifying a permission list”
on page 146
delete a permission list
section “Deleting a permission list” on
page 147
grant or deny specific users access to section “Granting or denying specific
a printer
users access to a printer” on page 148
grant or deny specific users access to section “Granting or denying specific
a printer group
users access to a printer group” on
page 149
grant or deny specific users access to section “Granting or denying specific
a form
users access to a form” on page 149
grant or deny specific printers access section “Granting or denying specific
to a form
printers access to a form” on
page 150
allow or reject specific administrators
as supervisor administrators
section “Allowing or prohibiting administration of supervisors” on page 151
Table 15: Administering permission lists
U23841-J-Z915-6-76
143
Administering permission lists
6.7.1
Configuring Xprint V7.0
Creating a permission list
If you want to create a new permission list you have two options: you can either
create a new permission list from scratch or you can copy an existing one and
modify it.
Creating a new permission list
To create a new permission list, proceed as follows:
●
Log in as the Xprint V7.0 administrator.
●
Create a new permission list with the following command:
xpadd -prm list_name list [-pt FORM] [-ca "comment"]
where list_name is the unique name of the permission list and list is the list
of users or forms to be included in the permission list.
list can have the following format:
-al user_list if it is to be an allowed list,
-dn user_list if it is to be a denied list.
user_list is a list of Xprint V7.0 users or forms which are to be included in the
permission list. For forms, this list need only contain the names of the forms,
while for Xprint V7.0 users it may contain the following elements:
user
The user user on the host containing the object to which this
permission list is to be assigned.
*
All users on the host containing the object to which the permission list
is to be assigned.
user@host_name
The user user on host host_name.
user@*
The user user on each host.
*@host_name
All users on host host_name.
*@*
All users on all hosts.
You can also specify several elements. These must then be separated by a
blank or tab.
144
U23841-J-Z915-6-76
Configuring Xprint V7.0
Administering permission lists
If you want to create a list of forms, you must additionally specify the option
-pt FORM (pt = permission type).
comment is an optional comment describing the permission list. Comments
can make using these permission lists later much easier. If a comment
contains blanks it must be enclosed in double quotes.
Copying a permission list
To use an existing permission list as the basis for a similar new list, copy the
existing list and modify the entries at the same time or immediately afterwards.
Use the following procedure:
●
Log in as the Xprint V7.0 administrator.
●
If necessary, check the existing permission lists:
xpshow -prm [-di LONG]
A list of all the available permission lists is displayed, and, if the -di LONG
option is used, also a list of the users contained in the list and whether it is
an allowed or a denied list.
●
Copy your chosen permission list with a new name:
xpcopy -prm old_list new_list [modifications]
With this command you copy an existing list old_list to a new list new_list. If
you wish, you can also modify the copy at the same time by specifying
modifications. Which modifications are possible is described in the following
section.
Examples
– To set up an allowed list right1 with the names of all users on host
delaware, enter the following command:
xpadd -prm right1 -al *@delaware -ca “+: all users on delaware“
– To set up a denied list right3 with the names of the users smith, jones and
brown on the host of the relevant object and the user grant on host nashua,
enter the following command:
xpadd -prm right3 -dn smith jones brown grant@nashua
– To set up an allowed list right2 with all users on host delaware and the user
jones on host colorado, copy the list right1 and add jones:
xpcopy -prm right1 right2 -al+ jones@colorado
U23841-J-Z915-6-76
145
Administering permission lists
6.7.2
Configuring Xprint V7.0
Modifying a permission list
You can modify a permission list by adding new entries to it or removing entries
from it.
Adding entries to the list
To add new entries to a permission list, proceed as follows:
●
Log in as the Xprint V7.0 administrator.
●
Add an entry to the list with the following command:
xpmod -prm list_name additions
where list_name is the name of the permission list to be modified. For
additions specify:
-al+ user_list if it is an allowed list,
-dn+ user_list if it is a denied list
where user_list represents the list of the Xprint V7.0 users or forms to be
added to the permission list. This list can be structured as described in the
previous section.
Removing entries from the list
To remove entries from a permission list, proceed as follows:
●
Log in as the Xprint V7.0 administrator.
●
Modify the desired list with the following command:
xpmod -prm list_name deletions
where list_name is the name of the permission list to be modified. For
deletions specify:
-al- user_list if it is an allowed list,
-dn- user_list if it is a denied list
where user_list represents the list of the Xprint V7.0 users or forms to be
removed from the permission list. This list can be structured as described in
the previous section. The elements in this list must be contained in the
selected permission list.
146
U23841-J-Z915-6-76
Configuring Xprint V7.0
Administering permission lists
Example
– To add the user grant on host nashua to the list right1:
xpmod -prm right1 -al+ grant@nashua
– To add the form A5LAND to the permission list list1:
xpmod -rm list1 -al+ A5LAND
6.7.3
Deleting a permission list
If a permission list is no longer required, you can delete it from the Xprint V7.0
system.
To do this, proceed as follows:
●
Log in as the Xprint V7.0 administrator.
●
Check first whether the permission list you wish to delete is referenced by
other Xprint V7.0 objects.
xpshow -usr [selection]permission_list -diR
With permission_list, you specify exactly one permission list to be deleted. If
you want to delete several permission lists, you must repeat this command
for each of these lists.
If you do not specify a selection, the command refers to all permission lists in
the system; otherwise you can either specify a list of the permission lists to
be removed, or you can define a list of selection criteria with the -scl
“selection_criteria_list” option (see section “Selection criteria list” on
page 266 in the Appendix) according to which the permission lists to be
removed are selected.
●
If references to the permission list are displayed, you must remove these by
modifying the displayed objects accordingly.
●
Remove the list from the Xprint V7.0 system with the following command:
xpdel -prm [selection]
If selection is not specified, the command refers to all the permission lists in
the local Xprint V7.0 system. Otherwise you can either specify a list of the
permission lists you want to delete, or you can use the -scl
“selection_criteria_list” option (see section “Selection criteria list” on
page 266 in the Appendix) to define a list of criteria according to which the
relevant permission lists are selected.
U23841-J-Z915-6-76
147
Administering permission lists
6.7.4
Configuring Xprint V7.0
Granting or denying specific users access to a
printer
If you want to grant only specific users access to a printer, you can assign a
permission list to the printer. To do this, proceed as follows:
●
Select a suitable allowed list containing exactly those users who are to be
granted access to the printer, or select a denied list containing all those
users who are to be denied access to the printer, respectively. A list of all
permission lists can be displayed with the following command:
xpshow -prm
If there is no suitable list defined in the Xprint V7.0 system, you can create
one yourself (see section “Creating a permission list” on page 144).
●
Deactivate the desired printer(s):
xpchange -dev [selection] -st NOT_ACTIVE
If selection is not specified, the command refers to all the printers in the local
Xprint V7.0 system. Otherwise you can either specify a list of the printers you
want to assign a permission list to, or you can use the -scl
“selection_criteria_list” option (see section “Selection criteria list” on
page 266 in the Appendix) to define a list of criteria according to which the
relevant printers are selected.
●
Assign the selected permission list to the desired printer(s):
xpmod -dev [selection] -up list_name
list_name is the name of the selected permission list.
●
Reactivate the printer(s):
xpchange -dev [selection]
148
U23841-J-Z915-6-76
Configuring Xprint V7.0
6.7.5
Administering permission lists
Granting or denying specific users access to a
printer group
If you want to grant only specific users access to a printer group, you can assign
a permission list to the printer group. To do this, proceed as follows:
●
Select a suitable allowed list containing exactly those users who are to be
granted access to the printer group, or select a denied list containing all
those users who are to be denied access to the printer group. A list of all
permission lists can be displayed with the following command:
xpshow -prm
If there is no suitable list defined in the Xprint V7.0 system, you can create
one yourself (see section “Creating a permission list” on page 144).
●
Assign the selected permission list to the desired printer group:
xpmod -dgr [selection] -up list_name
If selection is not specified, the command refers to all the printer groups in the
local Xprint V7.0 system. Otherwise you can either specify a list of the printer
groups to which you want to assign a permission list, or you can use the
-scl “selection_criteria_list” option (see section “Selection criteria list” on
page 266 in the Appendix) to define a list of criteria according to which the
relevant printer groups are selected.
list_name is the name of the selected permission list.
6.7.6
Granting or denying specific users access to a
form
If you want to grant only specific users access to a form, you can assign a
permission list to the form. To do this, proceed as follows:
●
Select a suitable allowed list containing exactly those users who are to be
granted access to the form, or select a denied list containing all those users
who are to be denied access to the form. A list of all permission lists can be
displayed with the following command:
xpshow -prm
If there is no suitable list defined in the Xprint V7.0 system, you can create
one yourself (see section “Creating a permission list” on page 144).
U23841-J-Z915-6-76
149
Administering permission lists
●
Configuring Xprint V7.0
Assign the selected permission list to the desired form:
xpmod -frm [selection] -up list_name
where selection is the name of one or more forms. If it is not specified, all
forms are modified. Otherwise you can either specify a list of the forms to
which you want to assign a permission list, or you can define a selection
criteria list according to which the relevant forms are selected.
list_name is the name of the selected permission list.
6.7.7
Granting or denying specific printers access to a
form
If you want to grant only specific printers access to a form, you can assign a
permission list to the form. To do this, proceed as follows:
●
Select a suitable allowed list containing exactly those printers which are to
be granted access to the form, or select a denied list containing all those
printers which are to be denied access to the form. A list of all permission
lists can be displayed with the following command:
xpshow -prm
If there is no suitable list defined in the Xprint V7.0 system, you can create
one yourself (see section “Creating a permission list” on page 144).
●
Assign the selected permission list to the desired form:
xpmod -frm [selection] -up list_name
where selection is the name of one or more forms. If it is not specified, all
forms are modified. Otherwise you can either specify a list of the forms to
which you want to assign a permission list, or you can define a selection
criteria list according to which the relevant forms are selected.
list_name is the name of the selected permission list.
150
U23841-J-Z915-6-76
Configuring Xprint V7.0
6.7.8
Administering permission lists
Allowing or prohibiting administration of
supervisors
In your capacity as the Xprint V7.0 administrator, Xprint V7.0 permits you to
specify which local administrators (root or subroot) are allowed to attach supervisors to a server that is running on a different host. For example, you can allow
root of host B to attach a supervisor of B to a server running on host A. This can
be achieved by assigning a permission list to the relevant server. Here is how to
do this:
●
Log in as the Xprint V7.0 administrator.
●
Deactivate the server for which you want to change the associated supervisors:
xpchange -srv [selection] -st NOT_ACTIVE
where selection is the name of the server for which you want to grant or deny
permissions. This can be omitted if you want to deactivate all defined
servers, or you can define a selection criteria list according to which the
relevant servers are selected.
Assign to the server a permission list defining which other administrators are
to be allowed to add, modify or delete supervisors for this server:
●
xpmod -srv [selection] -up permission_list
permission_list is the allowed or denied list to be assigned. This permission
list must already exist when you issue this command; if necessary create a
new one first (see section “Creating a permission list” on page 144).
Reactivate the modified server:
●
xpchange -srv [selection]
i
The local privileges of root and subroot always take precedence over the
permission list attached to the server. This means that you can only
protect a server from administrators from other hosts, not from the
administrators on the same host.
Example
To allow jim, subroot of host B, to define supervisors and attach them to any
server in the domain:
xpadd -prm supervisor_administrator -al jim
xpchange -srv -st NOT_ACTIVE
xpmod -srv -up supervisor_administrator
U23841-J-Z915-6-76
151
Administering fonts
Configuring Xprint V7.0
xpchange -srv
6.8
Administering fonts
This section describes how to administer fonts in the Xprint V7.0 system. The
following table serves as a guide to this section:
If you want to...
Read...
add a font
section “Adding a font” on page 152
delete a font
section “Deleting a font” on page 154
modify the attributes of a font
section “Modifying the attributes of a
font” on page 155
Table 16: Administering fonts
6.8.1
Adding a font
The possible attributes of a new font depend on the PCL of the target
printer. The supported attributes can be displayed with the command
xpshow -pcl pcl_name -di LONG (see section “Displaying information on
Xprint V7.0 objects” on page 82).
i
There are two possible ways of defining a new font and adding it to the system:
you can either define a new font from scratch or you can copy an existing font
and modify the relevant attributes in this copy.
Defining a completely new font
●
Check whether the PCL of the printer on which the jobs are to be printed with
the new font supports the desired attributes:
xpshow -pcl pcl_name -di LONG
●
Add a new font to the system with the following command:
xpadd -fnt font_name attributes
where font_name is the name of the object in which you save the desired font
attributes.
152
U23841-J-Z915-6-76
Configuring Xprint V7.0
Administering fonts
The variable attributes represents a list of various options via which you can
define the attributes of the new font:
-tp typeface, -cs style, -hm horizontal_motion, -vm vertical_motion,
-pq print_quality, -la language, -ca comment_for_administrator,
-ah administration_host, -tm typeface_mandatory, -cu comment_for_user.
The possible values for options -tp, -cs, -hm, -vm, -pq, -la depend on the
PCL of the target printer. The supported values can be displayed with the
xpshow -pcl pcl_name -di LONG command (see section “Displaying information on Xprint V7.0 objects” on page 82).
i
For more detailed information, refer to the description of the xpadd fnt command in the “Xprint V7.0 - Reference Manual”.
Defining a font by copying an existing font
An easy way of defining a new font is to copy an existing font with the same or
similar attributes. If you wish, you can modify the font attributes at the same
time.
To create a new font from an existing font by modifying the attributes, proceed
as follows:
●
First check whether the PCL of the target printer supports the desired
attributes:
xpshow -pcl pcl_name -di LONG
●
Then copy the existing font to the new font and make the desired modifications:
xpcopy -fnt old_font_name new_font_name modifications
For modifications specify what modifications you wish to make to the font.
Each entry in this attribute list consists of an option of the xpadd -fnt
command and a corresponding value.
Examples
– To define the font generic2 which is to have the typeface SansSerif, the
character pitch 12 cpi and the character set INTERNATIONAL:
xpadd -fnt generic2 -tp SansSerif -hm 12 -la INTERNATIONAL
– To define the typeface my_font on the basis of the GENERIC font, setting the
character pitch to 10 cpi and the print quality to HIGH:
xpcopy -fnt GENERIC my_font -hm 10 -pq HIGH
U23841-J-Z915-6-76
153
Administering fonts
6.8.2
Configuring Xprint V7.0
Deleting a font
To delete a font from the system, proceed as follows:
●
You can only delete a font if it is not connected to other objects, e.g. assigned
to a form as the default font. To display any references, use the following
command:
xpshow -fnt font -diR
For font you specify exactly one font name you want to delete. If you want to
delete several fonts, you must repeat this command for each of these fonts.
●
If references to the font are displayed, you must remove these by modifying
the displayed objects accordingly.
●
Delete the font(s) with the following command:
xpdel -fnt [selection]
For selection you can either specify a list of font names, or you can use the scl “selection_criteria_list“ option (see section “Selection criteria list” on
page 266 in the Appendix) to define a list of criteria according to which the
fonts to be deleted are selected. If selection is not specified, all fonts (except
GENERIC) are deleted.
Note: The default font GENERIC supplied with the Xprint V7.0 package cannot be
deleted, even by the Xprint V7.0 administrator. Neither can those fonts
be deleted that are still referenced by other objects, e.g. if the font
my_font is used in the form my_form.
Examples
– To delete the fonts font1, font2 and font3 from the system:
xpdel -fnt font1 font2 font3
– To delete all fonts with the attributes character style ITALICS and print quality
DRAFT:
xpdel -fnt -scl "-cs ITALICS -pq DRAFT"
154
U23841-J-Z915-6-76
Configuring Xprint V7.0
6.8.3
Administering fonts
Modifying the attributes of a font
You can modify the attributes of any defined font you administer.
i
The default font GENERIC supplied with Xprint V7.0 cannot be modified,
even by the Xprint V7.0 administrator.
●
To be on the safe side, first display the attributes of the font you want to
modify. To do this, use the xpshow -fnt command (see section “Displaying
information on Xprint V7.0 objects” on page 82).
●
To modify the attributes of specific fonts, enter the following command:
xpmod -fnt [selection] modifications
For selection you can either specify a list of fonts whose attributes you want
to modify, or you can use the -scl “selection_criteria_list” option (see
section “Selection criteria list” on page 266 in the Appendix) to define a list
of criteria according to which the relevant fonts are selected. If you do not
specify selection, all fonts are modified.
modifications represents a list of modifications to be made to the font(s). Each
entry in this list consists of one of the options of the xpadd -fnt command
listed in the section “Adding a font” on page 152, plus a corresponding value.
Examples
– To modify the attributes of the font invoice from SansSerif to Courier and
the line spacing from 4 to 5:
xpmod -fnt invoice -tp Courier -vm 5
– To modify the character pitch of all fonts with the setting “10 cpi” to 12 cpi:
xpmod -fnt -scl "-hm 10" -hm 12
U23841-J-Z915-6-76
155
Administering forms
6.9
Configuring Xprint V7.0
Administering forms
To make it easier for users to work with forms or constantly recurring document
formats, forms can be defined under Xprint V7.0. Such a form is an object with
a name which is stored in the Xprint V7.0 database. In this object, different
parameters (paper size, margins, default font, etc.) are stored and these can
then be assigned to a print job via the object name whenever required. Xprint
V7.0 then applies the formatting parameters automatically to the print job.
Furthermore, it is possible to define a default form for every printer which is
automatically used for all the print jobs sent to this printer.
Xprint V7.0 is supplied with a default form called GENERIC. This is assigned the
default font GENERIC that is also supplied with Xprint V7.0 (see section “Administering fonts” on page 152) as well as the default settings for all the options of
the
xpadd -frm command.
If you want to...
Read...
define a new form
section “Adding a form” on page 157
delete a form
section “Deleting a form” on page 158
modify the attributes of a form
section “Modifying the attributes of a
form” on page 160
assign a form to a printer
section “Default forms for printers” on
page 160
grant or deny specific users access to section “Granting or denying specific
a form
users access to a form” on page 149
grant or deny specific printers access section “Granting or denying specific
to a form
printers access to a form” on
page 150
Table 17: Administering forms
156
U23841-J-Z915-6-76
Configuring Xprint V7.0
6.9.1
Administering forms
Adding a form
Under Xprint V7.0 you can define any number of forms. There are two possible
ways of defining forms: you can either define a new form from scratch or you
can copy an existing form and modify it.
Defining a new form from scratch
●
If you want to define a default font for the form, check first whether this font
is available in the system. To do this, display all the defined fonts using the
following command:
xpshow -fnt
Or search for the desired font font_name with the command
xpshow -fnt font_name
●
Check whether the PCL of your target printer supports the desired attributes
of the new form:
xpshow -pcl pcl_name -di LONG
●
Now define the new form using the following command:
xpadd -frm form_name attributes
For form_name specify the name of the form.
attributes represents a list of attributes the form is to have. Every entry in this
list consists of an option as well as a corresponding value. The following
options are available:
-ah administration_host, -ca comment_for_administrator,
-cu comment_for_user, -ft default_font, -je job_end_sheet,
-js job_start_sheet, -ll line_length, -lm left_margin, -ls layup,
-mf (mounted font), -mm mount_method, -nt notification_delivery_threshold,
-ph page_height, -pl page_length, -pw page_width, -sd side_specification,
-sp job_separator_sheet, -tm top_margin, -up user_permission,
For more information on these options, refer to the description of the
xpadd -frm command in the “Xprint V7.0 - Reference Manual”.
Defining a form on the basis of an existing form
A simple way of defining a new form is to copy an existing one to a form name.
If necessary, you can also modify the new form at the same time.
U23841-J-Z915-6-76
157
Administering forms
Configuring Xprint V7.0
To copy a form, use the following command:
●
xpcopy -frm old_form_name new_form_name [modifications]
old_form_name is the name of the existing form that is to be copied,
new_form_name is the name of the new form file.
modifications represents a list of modified attributes which are to be different
for the new form. Each entry in this list consists of an option of the xpadd
-frm command plus a corresponding value.
Examples
– To define a formletter1 with the values: form layup portrait, page height 297
mm, page width 210 mm, top margin 2 cm, page length 24 cm, left margin
2.5 cm, and default font font4:
xpadd -frm letter1 -ls PORTRAIT -ph 297m -pw 210m -tm 2c \
-pl 24c -lm 2.5c -ft font4
– To copy the form invoice3 to the new form form1 without modifications:
xpcopy -frm invoice3 form1
– To copy the form invoice3 to the form form1, changing the default font to
Times, the left margin to 20 mm and the line length to 17 cm.
xpcopy -frm invoice3 form1 -ft Times -lm 20m -ll 17c
6.9.2
Deleting a form
You can delete from the Xprint V7.0 system any form you administer.
A form which is referenced by another object (e.g. the default form of an
existing printer) cannot be deleted. Neither is it possible to delete the
default form GENERIC supplied with Xprint V7.0.
i
To delete a form, proceed as follows:
●
Log in as the Xprint V7.0 administrator.
●
You can only delete a form if there are no references to other objects (e.g.
default form of a printer). Check this with the xpshow command:
xpshow -frm [selection]form -diR
For form you specify the name of exactly one form you want to delete. If you
want to delete several forms, you must repeat this command for each one.
158
U23841-J-Z915-6-76
Configuring Xprint V7.0
Administering forms
For selection you can either specify a list of form names, or you can define a
list of selection criteria with the -scl “selection_criteria_list” option (see
section “Selection criteria list” on page 266 in the Appendix) according to
which the forms to be deleted are selected.
●
If references to the form are displayed, you must remove these by modifying
the displayed objects accordingly.
●
Delete the form with the following command:
xpdel -frm selection
For selection you can either specify a list of form names, or you can use the
-scl “selection_criteria_list” option (see section “Selection criteria list” on
page 266 in the Appendix) to define a list of criteria according to which the
forms to be deleted are selected.
Examples
– To delete the forms invoice1 and manual:
xpdel -frm invoice1 manual
– To delete all forms with the font font1 and the paper format A4 (page width
210 mm, page height 297 mm):
xpdel -frm -scl "-ft font1 -pw 210m -ph 297m"
U23841-J-Z915-6-76
159
Administering forms
6.9.3
Configuring Xprint V7.0
Modifying the attributes of a form
You can modify the attributes of any form which you administer or which you are
allowed to use:
The attributes of the default form GENERIC of Xprint V7.0 cannot be
modified, even by the system administrator.
i
●
To modify the attributes of a form, use the following command:
xpmod -frm [selection] modifications
For selection you can either specify a list of forms whose attributes you want
to modify, or you can use the -scl “selection_criteria_list” option (see
section “Selection criteria list” on page 266 in the Appendix) to define a list
of criteria according to which the relevant forms are selected. If selection is
not specified, all forms are modified accordingly.
modifications represents a list of changes to be made to the selected form(s).
Each entry in this modifications list consists of one of the options of the
xpadd -frm command listed in section “Adding a form” on page 157 and a
corresponding value.
Examples
– To modify the attributes of the form form1 such that the form layup is set to
landscape format and the default font to font1.
xpmod -frm form1 -ls LANDSCAPE -ft font1
– To modify the paper format of all forms with the setting A4
(297 mm x 210 mm) to Legal (14 inch x 8.5 inch):
xpmod -frm -scl "-ph 297m -pw 210" -ph 14i -pw 8.5i
6.9.4
Default forms for printers
Xprint V7.0 allows you to assign a default form to every printer. This default form
is then used automatically unless a different form is specified at spoolin. If you
do not specify a default form when setting up a printer, Xprint V7.0 automatically
uses the default form GENERIC on this device.
To assign a default form to a printer or to change a default form that has already
been assigned, proceed as follows:
160
U23841-J-Z915-6-76
Configuring Xprint V7.0
Administering forms
●
If you do not know the printer identifier of the relevant printer, display a list of
all the printers with the xpshow -dev command.
●
First check the settings of the relevant printer:
xpshow -dev printer -di LONG
A list of all the settings for the specified printer printer is displayed.
●
Before you can make the changes, the printer must be deactivated:
xpchange -dev printer -st NOT_ACTIVE
●
Now assign a form to the printer:
xpmod -dev printer -fm form_name
printer represents the ID of the printer to which the default form is to be
assigned. form_name is the name of the assigned form.
Note: Xprint V7.0 automatically checks whether the printer’s PCL supports the
attributes of the assigned form and the assigned font. If this is not the
case, the xpmod command is not executed.
A MANUAL form cannot be defined as the default form for a printer.
●
Reactivate the printer:
xpchange -dev printer
Examples
– To add printer printer2 (address /dev/lp1) and at the same time assign to
it the default form invoice1:
xpadd -dev printer2 -da dev/lp1 -fm invoice1
– To assign to the printer printer1 the form form1 as its default form:
xpchange -dev printer1 -st NOT-ACTIVE
xpmod -dev printer1 -fm form1
xpchange -dev printer1
– To cancel the assignment of the form sni_invoice1 to the printer printer2
and assign to it the Xprint V7.0 default form GENERIC:
xpchange -dev printer2 -st NOT-ACTIVE
xpmod -dev printer2 -fm GENERIC or xpmod -dev printer2 -fmxpchange -dev printer2
U23841-J-Z915-6-76
161
Administering filters
6.10
Configuring Xprint V7.0
Administering filters
This section describes how to add filters to the Xprint V7.0 system, or how to
modify or delete exiting filters. The following table serves as a guide to this
section:
If you want to...
Read...
add a new filter
section “Adding filters” on page 162
delete a filter
section “Deleting filters” on page 167
modify filter attributes
section “Modifying the attributes of a
filter” on page 168
assign a filter to a printer
section “Assigning a filter to a printer”
on page 169
remove a filter from a printer
section “Removing a filter from a
printer” on page 170
Table 18: Administering filters
6.10.1 Adding filters
With the xpadd -flt command you can add a new filter to your system. A filter
can be added with specific attributes, e.g. input and output data formats and
special modes. The filters suitable for a job are selected according to these
attributes.
There are two possible ways of adding a new slow or fast filter: you can either
create a filter from scratch by setting all the required options yourself or you can
copy a similar filter and modify the relevant options.
As already mentioned, you can choose between slow and fast filters. By
default the system uses slow filters (-tp SLOW). To use fast filters, you
must always specify the -tp FAST option.
i
Creating a new slow filter
●
To add a new slow filter for use in the Xprint V7.0 system, enter the following
command:
xpadd -flt filter_name -cm command -it input_content_type \
-ot output_content_type -op [options]
162
U23841-J-Z915-6-76
Configuring Xprint V7.0
Administering filters
For filter_name specify the name of the new filter. You must use a name
which does not yet exist in the system, otherwise the command will be
rejected.
For command you must specify the path name of the executable file of the
filter program. The path name must be the same on all host computers on
which the filter is stored. If the absolute path name is not specified, the
executable filter file is searched for in the
directory/var/spool/Xprint/config/filters). If -cm (for command) is not
specified, the filter program name must be identical to the filter name.
For input_content_type specify the formats the slow filter accepts as input.
The names must not exceed 63 characters in length. This might be, for
example, an existing PCL, or a completely new input data format. If this
option is not specified, the system assumes that the filter accepts any input
data format.
With the option output_content_type you define the output data format
generated by the slow filter. Here too the name must not exceed 63
characters in length. If you do not specify this option, the system assumes
that the output type is the same as the input type, i.e. the filter does not
convert data but only implements special modes.
With options you can specify that defined names, attributes or variables are
passed on to the filter program for processing. The Xprint V7.0 options are
mapped by strings in the following format:
keyword pattern =replacement
There is only one blank between the context-sensitive keyword and the
pattern. The equals sign (=) is not enclosed in blanks. An equals sign within
the pattern must be escaped (by a preceding backslash \).
keyword
specifies what must be considered when the option is generated.
The permitted keywords are listed in the table in the “Xprint V7.0
- Reference Manual”. Each keyword represents context-sensitive
attributes which must match the pattern when the option is
generated.
pattern
defines when the option is to be generated. It may be a value, an
asterisk (*) or a regular expression. If pattern matches the actual
values extracted with the keyword, the option is generated.
Otherwise no option is passed on to the filter.
U23841-J-Z915-6-76
163
Administering filters
Configuring Xprint V7.0
replacement
describes how the option is to be passed on to the filter. It can be
extracted from the actual values which may be hidden behind
keyword with the help of regular expressions (& and the combinations \(, \) and \n). replacement may also contain an asterisk (*)
which is replaced by the entire pattern (i.e. it is the same as &).
Examples
– A user submits a job with the special mode -sm express. The slow filter
supporting this mode is activated with the -x option. The description for this
option reads as follows:
MODES express=-x
– A filter is activated by the option -f form_name. This option is described as
follows:
FORM *=-f *
– A filter is activated, the line spacing (vertical motion) being specified in
inches as with the -lpii option:
V_MOTION \(.*\)i=-lpii \1
– or in centimeters as with the -lpic option:
V_MOTION \(.*\)c=-lpic \1
– Another possibility is as follows:
V_MOTION \(.*\)\([ci]\)=-lpi\2 \1
– A filter is required which supports the enlargement of the printed text by a
variable factor. In this case, the filter should be called with the option -mX
where X specifies an enlargement factor between 1 and 9. The filter can be
defined with the following option:
MODES bigger\=\([1-9]\)=-m\l
The same can be achieved by using the corresponding option of the xpadd
-job command; you can set the enlargement factor 3, for example, with
-sm "bigger=3" .
164
U23841-J-Z915-6-76
Configuring Xprint V7.0
Administering filters
Creating a new fast filter
●
Enter the following command to add a new fast filter for use in Xprint V7.0:
xpadd -flt filter_name -tp FAST -cm command [options]
For filter_name specify the name of the new filter. You must use a name
which does not yet exist in the system, otherwise the command will be
rejected.
With -tp specify FAST.
For command you must specify the path name of the executable file of the
filter program. The path name must be the same on all host computers on
which the filter is stored. If the absolute path name is not specified, the
executable filter file is searched for in the
directory/var/spool/Xprint/config/filters). If -cm (for command) is not
specified, the filter program name must be identical to the filter name.
With options you can specify that defined names, attributes or variables are
passed on to the filter program for processing. The Xprint V7.0 options are
mapped by strings in the following format:
keyword pattern =replacement
There is only one blank between the context-sensitive keyword and the
pattern. The equals sign (=) is not enclosed in blanks. An equals sign within
the pattern must be escaped (by a preceding backslash \).
keyword
specifies what must be considered when the option is generated.
The permitted keywords are listed in the corresponding table in
the “Xprint V7.0 - Reference Manual”. Each keyword represents
context-sensitive attributes which must match the pattern when the
option is generated.
pattern
defines when the option is to be generated. It may be a value, an
asterisk (*) or a regular expression. If pattern matches the actual
values extracted with the keyword, the option is generated.
Otherwise no option is passed on to the filter.
U23841-J-Z915-6-76
165
Administering filters
Configuring Xprint V7.0
replacement
describes how the option is to be passed on to the filter. It can be
extracted from the actual values which may be hidden behind
keyword with the help of regular expressions (& and the combinations \(, \) and \n). replacement may also contain an asterisk (*)
which is replaced by the entire pattern (i.e. it is the same as &).
Copying and modifying an existing filter
With the xpcopy -flt command you can add a filter which has similar
attributes to those of a filter already defined in the Xprint V7.0 system. For this
purpose simply copy the attributes of an existing filter to a new filter and modify
the attributes you want to change.
The new filter is set up on the computer on which the xpcopy -flt command
is used. This can be avoided by specifying a different host with the -ah option.
●
Display the defined filters to check whether the filter to be copied actually
exists in the system:
xpshow -flt filter_name
For filter_name specify the name of the filter to be copied.
●
Copy the filter:
xpcopy -flt name_old_filter name_new_filter [modifications]
For name_old_filter specify the name of the filter you want to copy.
For name_new_filter specify the name of the new filter. Here you must use a
name that does not yet exist in the system; otherwise the command is
rejected.
For modifications specify the values you want to modify or add. The options
correspond to the options that can be used when adding a filter to the Xprint
V7.0 system. There is, however, the following restriction: The option
-tp filter_type cannot be modified with the xpcopy -flt command.
Example
To create a new filter called fastmail by copying the filter slowmail. You also
want the new filter fastmail not to be available on your local host colorado but
on the remote host nile:
xpcopy -flt slowmail fastmail -ho nile
166
U23841-J-Z915-6-76
Configuring Xprint V7.0
Administering filters
6.10.2 Deleting filters
With the xpdel -flt command you can delete from the Xprint V7.0 system any
filter that you administer.
i
●
A filter referenced by another object (e.g. a fast filter assigned to an
existing printer) cannot be deleted.
Check whether the filter to be deleted is still referenced by other objects:
xpshow -flt [selection]filter_name -diR
For filter_name you specify the name of exactly one filter you want to delete.
If you want to want to delete several filters, you must repeat this command
for each one.
For selection you can either specify a list of form names, or you can define a
list of selection criteria with the -scl “selection_criteria_list” option (see
section “Selection criteria list” on page 266 in the Appendix) according to
which the forms to be deleted are selected.
●
If references to the filter are displayed, you must remove these by modifying
the displayed objects accordingly.
●
Enter the following command:
xpdel -flt selection
For selection you can either specify a list of the filters to be deleted, or you
can use the -scl “selection_criteria_list” option (see section “Selection
criteria list” on page 266 in the Appendix) to define a list of criteria according
to which the filters to be deleted are selected.
Examples
– To delete the filter LandA2 from the system:
xpdel -flt LandA2
– To delete all filters with the input data format POSTSCRIPT.
xpdel -flt -scl "-it POSTSCRIPT"
U23841-J-Z915-6-76
167
Administering filters
Configuring Xprint V7.0
6.10.3 Modifying the attributes of a filter
With the xpmod -flt command you can modify the attributes of any filter you
administer. This may be useful if the filter is to be administered from another
host or if you want the filter to be accessible on more hosts than were defined
before.
●
Enter the following command:
xpmod -flt [selection] modifications
For selection you can either specify a list of filters you want to modify, or you
can use the -scl “selection_criteria_list” option (see section “Selection
criteria list” on page 266 in the Appendix) to define a list of criteria according
to which the relevant filters are selected. If you do not specify selection, all
filters are modified.
For modifications specify the values you want to modify or add. The options
correspond to the options that can be used when adding a filter to the Xprint
V7.0 system. There is, however, the following restriction: The option -tp
filter_type cannot be modified with the xpmod -flt command.
Examples
– To make the filter LandA2 available also on the hosts colorado and nile:
xpmod -flt LandA2 -ho+ colorado nile
– You want to modify all filters supporting POSTSCRIPT so that they are administered by the new host colorado:
xpmod -flt -scl "-pc POSTSCRIPT" -ah nile
168
U23841-J-Z915-6-76
Configuring Xprint V7.0
Administering filters
6.10.4 Assigning a filter to a printer
If you frequently use with a printer a specific form which uses a particular format,
it might be useful to assign the printer a special filter for this.
i
Only fast filters can be assigned to printers.
Proceed as follows:
●
Check the printer status:
xpstat -dev [selection]
For selection either specify a list of the printers whose status you want to
display, or use the -scl “selection_criteria_list” option (see section
“Selection criteria list” on page 266 in the Appendix) to define a list of criteria
according to which the relevant printers are selected. If you do not specify
selection, information on all printers will be displayed.
●
If necessary, deactivate the printer:
xpchange -dev [selection] -st NOT_ACTIVE
●
Assign the relevant filter to the printer:
xpmod -dev [selection] -fl filter_name
For filter_name specify the name of the relevant filter.
●
Reactivate the printer:
xpchange -dev [selection]
U23841-J-Z915-6-76
169
Administering filters
Configuring Xprint V7.0
6.10.5 Removing a filter from a printer
To remove a filter from a printer, proceed as follows:
●
Check whether the relevant printer is activated:
xpstat -dev [selection]
For selection you can either specify a list of the printers you want to display,
or you can use the -scl “selection_criteria_list” option (see the section
“Selection criteria list” on page 266 in the Appendix) to define a list of criteria
according to which the relevant printers are selected. If you do not specify
selection, information on all printers will be displayed.
●
Deactivate the printer:
xpchange -dev [selection] -st NOT_ACTIVE
●
Cancel the assignment of the filter to the printer:
xpmod -dev [selection] -fl-
●
Reactivate the printer:
xpchange -dev [selection]
170
U23841-J-Z915-6-76
Configuring Xprint V7.0
6.11
Administering public loadable resources
Administering public loadable resources
Loadable resources are objects containing information about fonts,
backgrounds, overlays etc. They can be downloaded to a printer separately
from the document(s) that use them. This can speed up the printing process and
improve job recovery. For full details, see Chapter 4 in the "Reference Manual".
Public loadable resources, which are available throughout the entire system,
can only be defined by the Xprint V7.0 administrator or a local Xprint V7.0
administrator. It is possible, however, for all users to define private loadable
resources on their local hosts.
If you want to...
Read...
create resources
the section "Creating a Loadable
Resource" in Chapter 4 of the
"Reference Manual".
define a loadable resource
the section “Defining a loadable
resource” on page 171
delete a loadable resource
the section “Deleting a loadable
resource” on page 173
Table 19: Administering loadable resources
6.11.1 Defining a loadable resource
There are two possible ways of defining a loadable resource: you can define a
new one ’from scratch’ or copy an existing loadable resource and modify it.
Defining a loadable resource ’from scratch’
●
To define a new loadable resource, use the following command:
xpadd -lrs resource_name options
where the variable resource_name represents the name of the loadable
resource and options stands for a list of options that can be used with the
xpadd -lrs command.
U23841-J-Z915-6-76
171
Administering public loadable resources
Configuring Xprint V7.0
Extending the definition of a loadable resource
A quick method of defining a loadable resource is to copy an existing resource
and modify it as required. Proceed as follows:
●
To find out which loadable resources are already defined in the system and
the attributes they have, enter the following command:
xpshow -lrs
A list of existing loadable resources is displayed, together with their
attributes.
●
Now copy a suitable loadable resource and make the required modifications:
xpcopy -lrs old_lrs new_lrs modifications
old_lrs represents the name of the existing loadable resource and new_lrs
stands for the new, possibly modified loadable resource. The variable modifications represents a list of modification which distinguish the new loadable
resource from the old one. Each entry in this list consists of an option of the
xpadd -lrs command and a corresponding value.
●
It is possible to refer to a class name, rather than referring to the actual name
of a resource. Let’s consider a logo defined for HP Laserjet but also for Reno
emulation. The file logo.hp contains the data to be downloaded to an HP
Laserjet printer before the logo can be called. In a similar way, the file
logo.reno has to be downloaded to a Reno printer.
Two resources can be defined for this purpose:
xpadd -lrs logohp -fi logo.hp -pc HP-LASERJET -tp Overlay
-cn mylogo
xpadd -lrs logoreno -fi logo.reno -pc RENO -tp Overlay
-cn mylogo
Both resources will belong to the same class as mylogo. Jobs can afterwards be submitted as:
xpadd -dr mydocument -lr mylogo
Once a printer (either HP Laserjet or Reno) is free for handling the job, the
printing system will select the appropriate resource. If the job comes out on
a Reno printer, then the logo-reno resource will be used.
172
U23841-J-Z915-6-76
Configuring Xprint V7.0
Administering public loadable resources
6.11.2 Deleting a loadable resource
With the xpdel -lrs command you can delete any loadable resource that you
administer.
To delete a loadable resource, proceed as follow:
●
Delete the loadable resource with the following command:
xpdel -lrs [identifier_list] [-scl selection_criteria_list]
The identifier_list is a list of the loadable resources to be deleted. You can
also use the option -scl and then give a selection_criteria_list that specifies
certain loadable resources. If you do not specify an identifier_list or a
selection _criteria _list, then all loadable resources will be deleted.
Example
To delete the loadable resources mylogo1, mylogo2 and mylogo3:
xpdel -lrs mylogo1 mylogo2 mylogo3
6.11.3 Displaying the definition of a loadable resource
To display the definition of an existing loadable resource, proceed as follows:
●
Display the definition using the following command:
xpshow -lrs [identifier_list] [-scl "selection_criteria_list"] -di LONG
For identifier_list you can give a list of the loadable resource to be displayed,
or you can use the -scl option to define a list of criteria according to which
the relevant loadable resources are displayed. If you do not specify which
resources you want to see, then they will all be displayed.
Example
The following command will show you which printers mylogo can be used on:
xpshow -lrs -scl "-cn mylogo"
U23841-J-Z915-6-76
173
Administering global job templates
6.12
Configuring Xprint V7.0
Administering global job templates
A global job template is an object in which frequently used options of the
xpadd -job command are stored. This saves the user the effort of constantly
specifying the same options explicitly for frequently recurring print jobs. Instead,
the user simply assigns the print job a job template featuring the relevant
options. Xprint V7.0 reads these from the database and executes them.
Global job templates, which are available throughout the entire system, can only
be defined by the Xprint V7.0 administrator or a local Xprint V7.0 administrator.
It is possible, however, for all users to define their own job templates on his local
hosts.
Every user can define customized job templates and also replace global job
templates by private ones.
If you want to...
Read...
define a job template
section “Defining a job template” on
page 174
delete a job template
section “Deleting a job template” on
page 177
customize a job template
section “Customizing job templates”
on page 177
define and use private templates
section “Job templates” on page 44
Table 20: Administering global job templates
6.12.1 Defining a job template
There are two possible ways of defining a job template: you can either define a
new one from scratch or you can copy an existing template and modify the
relevant options.
Defining a completely new job template
●
To define a new job template use the following command:
xpadd -jtp template_name options
where the variable template_name represents the name of the job template.
options stands for a list of options that may be used with the xpadd -jtp
command. These are all the options available with the xpadd -job
174
U23841-J-Z915-6-76
Configuring Xprint V7.0
Administering global job templates
command with the exception of -te job_template and -sx (silent execution)
(see also the description of xpadd -job in the “Xprint V7.0 - Reference
Manual” and the section “Printing files” on page 17).
Defining a job template on the basis of an existing template
A quick method of defining a job template is to copy an existing template and
modify it as required. Proceed as follows:
●
To find out which job templates are already defined in the system and which
attributes these have, enter the following command:
xpshow -jtp
A list of all the existing job templates is displayed with their attributes.
●
Now copy a suitable job template and make the required modifications:
xpcopy -jtp old_template new_template modifications
old_template represents the name of the existing template, while
new_template stands for the new, possibly modified template. The variable
modifications represents a list of modifications which distinguish the new
template from the old one. Each entry in this list consists of an option of the
xpadd -jtp command and a corresponding value (see also chapter
“Producing Output with Xprint V7.0”).
Adding a job template on a remote host
The Xprint V7.0 administrator (only) can also add a job template on a host other
than the local host with the -ah host_name option. To do this, proceed as follows:
●
Log in as the Xprint V7.0 administrator.
●
Add a job template on the remote host:
xpadd -jtp template_name options -ah host_name
template_name
represents the name of the job template.
options
stands for a list of options that may be used with the xpadd -jtp
command and which are applied whenever the template is used.
These are all the options available with the xpadd -job command
with the exception of -te job_template (see also chapter “Producing
Output with Xprint V7.0”).
U23841-J-Z915-6-76
175
Administering global job templates
Configuring Xprint V7.0
host_name
is the name of the remote host on which the template is added.
or:
●
Log in as the Xprint V7.0 administrator.
●
Add a job template on the remote host by copying an existing template to this
host (with or without modifications):
xpcopy -jtp old_template new_template modifications -ah host_name
old_template
represents the name of the existing template
new_template
stands for the new, maybe modified template.
modifications
represents a list of modifications which distinguish the new template
from the old one. Each entry in this list consists of an option of the
xpadd -jtp command and a corresponding value (see also section
“Printing files” on page 17).
Examples
– To define the new job template invoice4 with the values: destination
printer3, form invoice1, priority 75:
xpadd -jtp invoice4 -de printer3 -fm invoice1 -pr 75
– To define a job template letter1 based on the template template1, setting
the destination to printer1 and the form to letter2:
xpcopy -jtp template1 letter1 -de printer1 -fm letter2
– To add the job template generic with the settings destination printer1 and
data content type SIMPLE on the remote host nile:
xpadd -jtp generic -de printer1 -ct SIMPLE
176
-ah nile
U23841-J-Z915-6-76
Configuring Xprint V7.0
Administering global job templates
6.12.2 Deleting a job template
With the xpdel -jtp command you can delete any job template you administer.
To delete a template, proceed as follows:
●
Delete the job template with the following command:
xpdel -jtp [selection]
For selection you can either specify a list of the job templates you want to
delete, or you can use the -scl “selection_criteria_list” option (see section
“Selection criteria list” on page 266 in the Appendix) to define a list of criteria
according to which the relevant job templates are selected. If you do not
specify selection, all templates are deleted.
Example
– To delete the job templates letter1, letter2, and invoice:
xpdel -jtp letter1 letter2 invoice
– To delete all job templates assigned to printer printer4 and having the
priority 50:
xpdel -jtp -scl "-de printer4 -pr 50"
6.12.3 Customizing job templates
With the xpmod -jtp command you can modify the attributes of any job
template you administer.
To modify a job template, proceed as follows:
●
Display the existing job templates to select one which best meets your
requirements.
xpshow -jtp [selection] -di LONG
For selection you can either specify a list of the job templates whose
attributes you want to display, or you can use the -scl
“selection_criteria_list” option (see section “Selection criteria list” on
page 266 in the Appendix) to define a list of criteria according to which the
relevant job templates are selected. If you do not specify selection, a list of all
job templates is displayed.
U23841-J-Z915-6-76
177
Administering global job templates
Configuring Xprint V7.0
You must use the -di LONG option to display all the attributes of a job
template.
●
Select a suitable job template:
xpmod -jtp [selection] modifications
For modifications you can use all the options that may be used when defining
a new job template with the xpadd -jtp command. For more detailed information refer to the “Xprint V7.0 - Reference Manual”.
Examples:
– To modify the job template letter1 such that in future the printout will be in
Helvetica instead of in Times:
xpmod -jtp letter1 -tp Helvetica
178
U23841-J-Z915-6-76
Configuring Xprint V7.0
6.13
Administering PCLs
Administering PCLs
A printer capability list (PCL) contains all the information Xprint V7.0 requires to
print a document on a printer. By means of the PCL, Xprint V7.0 converts the
options of the xpadd -job command into control characters that the printer can
handle. Furthermore, a PCL also contains technical characteristics of the
printer, such as its connection protocol.
Xprint V7.0 is supplied with a substantial number of PCLs, such as those for
different types of HP LaserJet printer, for PostScript printers, IBM ProPrinters,
and all Siemens Nixdorf printers. The Appendix of this manual contains a list of
all the available PCLs and the printers they support. These PCLs are located in
the file /var/spool/Xprint/config/pcl/xpterm. It is possible that only some of
them are installed as Xprint V7.0 objects in your system.
You can display a list of the available PCLs with the xpshow -pcl command.
To define further PCLs, use the xpadd -pcl command. There is also a
standard printer capability list, the PCL GENERIC. This enables you to a certain
extent to also use printers for which there is no special PCL available. The PCL
GENERIC can be neither deleted nor modified.
If you want to...
Read...
add a PCL
section “Adding a PCL” on page 180
delete a PCL
section “Deleting a PCL” on page 181
add comments to PCLs to provide a
better overview
section “Assigning a comment to a
PCL” on page 182
assign a PCL to a printer
section “Assigning a PCL to a printer”
on page 183
define a PCL yourself
section “Defining a PCL yourself” on
page 185
Table 21: Administering PCLs
U23841-J-Z915-6-76
179
Administering PCLs
Configuring Xprint V7.0
6.13.1 Adding a PCL
Adding a PCL via its unique name
●
To add a PCL to the Xprint V7.0 system via its unique name, use the
following command:
xpadd -pcl pcl_name -fi file_name
pcl_name represents the unique name in the entry of file_name and represents a list of attributes which must be processed in order to control the
attached printers, e.g. PROPRINTER or EPSON-FX.
file_name represents the absolute path name of the PCL file. If you do not
specify the absolute path name, Xprint V7.0 searches the Xprint V7.0
directory /var/spool/Xprint/config/PCL) of the specified host (see
option -ho). All the PCLs supplied with Xprint V7.0 by default are located
there in the xpterm file. If no file name is specified, Xprint V7.0 reads the
PCL definition from standard input stdin.
Adding a PCL from another host
If a PCL source file that you want to add to the Xprint V7.0 system is located on
a computer other than the local host, proceed as follows:
●
Log in as the Xprint V7.0 administrator. Only he/she has the right to add a
PCL from another host.
●
Now add the PCL using the following command:
xpadd -pcl pcl_name [-fi file_name] -ho host_name
where host_name represents the name of the host on which the PCL is
administered, and pcl_name is the unique name of the PCL. With -fi
file_name you can specify the file which contains the PCL definition.
Examples
– To add the standard PCL POSTSCRIPT to your system:
xpadd -pcl POSTSCRIPT -fi /var/spool/Xprint/config/pcl/xpterm
– To add your own PCL SELFDEFINED (which is located in the file
/xprint50/pcl_alternative/selfdef_hplj) to the system:
xpadd -pcl SELFDEFINED \
-fi /xprint50/pcl_alternative/selfdef_hplj
180
U23841-J-Z915-6-76
Configuring Xprint V7.0
Administering PCLs
– To add the PCL HP-LASERJET from the file hplj (in the directory
/var/spool/Xprint/config/PCL) to the remote host nashua:
xpadd -pcl HP-LASERJET -ho nashua -fi hplj
6.13.2 Deleting a PCL
Under Xprint V7.0
administer.
you can delete from the Xprint V7.0 system any PCL you
Note: A PCL referenced by another object cannot be deleted from the system.
This applies, for example, to a PCL which is assigned to a printer in the
system.
●
Check if the PCL to be deleted has any references to other objects:
xpshow -pcl [selection]pcl_name -diR
For pcl_name you specify the name of exactly one PCL you want to delete. If
you want to want to delete several PCLs, you must repeat this command for
each one.
For selection you can either specify a list of PCL names, or you can define a
list of selection criteria with the -scl “selection_criteria_list” option (see
section “Selection criteria list” on page 266 in the Appendix) according to
which the PCLs to be deleted are selected.
●
If references to the PCL are displayed, you must remove these by modifying
the displayed objects accordingly.
●
To delete a PCL from the system, use the following command:
xpdel -pcl selection
For selection you can either specify a list of unique PCL names, or you can
use the -scl “selection_criteria_list” option (see section “Selection criteria
list” on page 266 in the Appendix) to define a list of criteria according to
which the relevant PCLs are selected and deleted.
Examples
– To delete the PCL HP-DESKJET from the system:
xpdel -pcl HP-DESKJET
– To delete all the PCLs which start with the identifier EPSON:
xpdel -pcl EPSON\*
U23841-J-Z915-6-76
181
Administering PCLs
Configuring Xprint V7.0
6.13.3 Assigning a comment to a PCL
For better orientation within the system, it may be useful to provide PCLs with
comments, which may be addressed either to users or to the Xprint V7.0 administrator.
Providing a PCL with a comment for users
You can provide a PCL with a comment that every user can display. You can do
this either when adding the PCL to the system, or later when the PCL is already
defined.
●
If you want to assign a comment to an existing PCL, use the following
command:
xpmod -pcl pcl_name -cu for_users
where pcl_name represents the unique name of a PCL, and for_users (cu stands
for comment for user) represents a comment which every user is to be able to
display (using xpshow -pcl pcl_name -di LONG).
Examples
– To display all the PCLs available in the system:
xpshow -pcl
SHORT display
Name
---E-9001-31
EPSON-SQ
GENERIC
File
---/var/spool/Spo
/var/spool/Spo
/var/spool/Spo
HC
-NO
NO
NO
HS
-NO
YES
NO
Host
---d241s045
d241s045
Administrator
------------root
root
Providing a PCL with a comment for the administrator
●
If you want to assign to an existing PCL a comment for the Xprint V7.0
administrator, use the following command:
xpmod -pcl pcl_name -ca for_ administrator
where pcl_name represents the unique name of a PCL, and for_administrator
stands for a comment which only the Xprint V7.0 administrator is to be able
to display (xpshow -pcl pcl_name -di LONG).
182
U23841-J-Z915-6-76
Configuring Xprint V7.0
Administering PCLs
Examples
– To assign the user comment suitable_for_all_printers_XYZ to the PCL
SELFDEFINED when adding the PCL to the system:
xpadd -pcl SELFDEFINED -cu "suitable_for_all_printers_XYZ"
– To assign the user comment
suitable_for_all_printers_XYZ_except_for_model_T to the PCL
SELFDEFINED, which already exists in the system:
xpmod -pcl SELFDEFINED -cu \
"suitable_for_all_printers_XYZ_except_for_model_T"
6.13.4 Assigning a PCL to a printer
Every printer must be assigned a PCL so that it can process incoming jobs. The
following section describes how PCLs are assigned to printers and how this
assignment can be changed or canceled. If you do not specify a PCL when you
set up a printer, Xprint V7.0 automatically assigns to it the standard PCL
GENERIC.
To assign a different PCL to an existing printer, proceed as follows:
●
If you do not know the ID of the printer concerned, you can display a list of
all the printers defined in the system with the xpshow -dev command.
●
First check the current settings of the relevant printer(s):
xpshow -dev [selection] -di LONG
The variable selection represents either a list of the printers or the option
-scl “selection_criteria_list” used to define a list of selection criteria
according to which Xprint V7.0 selects the printers. For more information on
selection criteria lists refer to the section “Selection criteria list” on page 266
in the Appendix. If selection is not specified, a list of all printers is displayed.
●
If you are not sure whether the PCL you want matches the attributes of the
printer or its default form or assigned font, you should display the attributes
of the PCL (and the assigned form) to compare them:
xpshow -pcl pcl_name -di LONG
xpshow -frm form_name -di LONG
where pcl_name is the name of the assigned PCL, and form_name is the
name of the default form assigned to the printer.
U23841-J-Z915-6-76
183
Administering PCLs
●
Configuring Xprint V7.0
To be able to make changes you must first deactivate the printer:
xpchange -dev [selection] -st NOT_ACTIVE
●
Now assign the new PCL to the printer:
xpmod -dev printer -pc pcl_name
where printer is the ID of the printer to which the PCL is to be assigned, and
pcl_name is the name of the assigned PCL.
Note: If the default PCL is replaced by another one, you must make sure
that the new PCL supports the attributes of the default form and the
assigned default font used on the printer. If this is not the case, the
xpmod command is rejected.
●
Now reactivate the printer:
xpchange -dev [selection]
Examples
– To add the printer group4 (address /dev/lp3, supervisor marcus), assigning
to it the PCL HP-LASERJET:
xpadd -dev group4 -da dev/lp3 -su marcus -pc HP-LASERJET
– To assign to the printer printer4 a different PCL, e.g. POSTSCRIPT:
xpchange -dev printer4 -st NOT-ACTIVE
xpmod -dev printer4 -pc POSTSCRIPT -ctxpchange -dev printer4
– To cancel the assignment of the PCL POSTSCRIPT to the printer printer1 and
assign to it the PCL GENERIC instead:
xpchange -dev printer1 -st NOT-ACTIVE
xpmod -dev printer1 -pc GENERIC -ct SIMPLE
xpchange -dev printer1
184
U23841-J-Z915-6-76
Configuring Xprint V7.0
Administering PCLs
6.13.5 Defining a PCL yourself
Except for the default PCL GENERIC, the PCLs supplied with Xprint V7.0 can be
modified. Furthermore, you can also define your own PCLs in order to provide
optimum communication between the Xprint V7.0 system and the printer.
To do this, you must simply give Xprint V7.0 information on the attributes of the
printer and how these are selected. The attributes are defined and saved in a
PCL file so that the Xprint V7.0 system can access the information at any time.
To define a PCL yourself, you must create a file with the PCL definition. This file
must have a special structure. The section “Format of a PCL definition” in the
“Xprint V7.0 - Reference Manual” contains a description of the required format.
!
Only users with a sound knowledge of printers should define PCLs
themselves. It is seriously recommended that you copy an existing PCL
entry in the file xpterm and then adjust it to the functions and requirements of the new printer.
U23841-J-Z915-6-76
185
Administering recovery rules
6.14
Configuring Xprint V7.0
Administering recovery rules
This section describes how to define and administer recovery rules. The
following table serves as a guide to this section:
If you want to...
Read...
define a new recovery rule
section “Defining a recovery rule” on
page 186
assign a recovery rule to a printer
section “Assigning a recovery rule to a
printer” on page 190
cancel the assignment of a recovery
rule to a printer
section “Canceling the assignment of
a recovery rule to a printer” on
page 190
modify a recovery rule
section “Modifying recovery rules” on
page 191
delete a recovery rule
section “Deleting a recovery rule” on
page 192
Table 22: Administering recovery rules
6.14.1 Defining a recovery rule
Recovery rules are defined in a file using a text editor. This file is compiled when
it is added to the Xprint V7.0 system. This section describes how to add
recovery rules to the Xprint V7.0 system.
To define a new recovery rule, proceed as follows:
●
Change to the recovery rule directory RR in the Xprint V7.0 directory on your
computer (by default you require system administrator privileges to be able
to edit files in this directory):
cd /var/spool/Xprint/config/RR
●
Create a new file for the new recovery rule with a text editor:
vi my_RR.rec
To do this, use any editor that can edit pure ASCII files (e.g. vi(1)). You can
choose any name for this file.
186
U23841-J-Z915-6-76
Configuring Xprint V7.0
●
Administering recovery rules
Enter your recovery rules in the file using the following format:
Every line of the source file defines one recovery rule. Comment lines must
start with the hash character (#) in the first column. Use the following format
to define recovery rules:
error_code:[maximum_time]:[exception_rule_ID]:list_of_actions:
The specifications for the fields in square brackets may be omitted, but the
colons for separating the fields are mandatory.
error_code is the key under which the recovery rule files are to be accessed.
It can contain either an Xprint V7.0 printer error code or an action for
handling a recurring error. This field is mandatory. The following printer error
codes are supported:
Error code
Description
Default
action
TonerEmpty
Toner empty
Retry
Parity
Parity error during transfer
Ignore
PaperEnd
Paper empty
Retry
Stop
Printer stopped
Retry
PowerOff
Printer switched off
Restart
CoverOpen
Printer cover open
Retry
PaperJam
Paper jam
Retry
Hangup
I/O system call interrupted due to hardware
failure
Retry
NoAck
Time-out during ETX/ACK protocol
Retry
Table 23: Supported printer error codes
maximum_time is an option which must be specified together with the
exception_rule_ID field. It activates the selection of a specific action if an error
keeps recurring. By default, the value INFINITE is used. The value must lie
between 0 and 65535 seconds. If the error persists after this time, Xprint V7.0
selects the action specified in the field exception_rule_ID.
You can set a printer automatically to the status NOT_ACTIVE, for example, if
the paper supply is not refilled within the specified time.
U23841-J-Z915-6-76
187
Administering recovery rules
Configuring Xprint V7.0
exception_rule_ID is also optional and, if used, must be specified with the field
maximum_time. It may consist of any combination of letters and digits; blanks
are not allowed. The field must contain a reference to a suitable entry in the
error_code field, which itself specifies an action.
list_of_actions specifies the actions to be taken if a specific error occurs. If
two or more actions are specified, the individual actions must be separated
by blanks. The following actions can be specified:
Action
Description
Ignore
Ignore error
Retry
Repeat polling of printer status until READY is returned
Restart
Restart with last printed page
Stop
Set device to NOT_ACTIVE and the job to INTERRUPTED
Suspend
Stop active job
Respool
Print last document again
Table 24: Actions for specific errors
The following examples illustrate the structure of a typical recovery rule:
#Key
:
Time
:
Code
Stop
:
600
:
stopped :
:
:
stopped :
:
Action
:
Retry
:
Stop
:
In the above example, the rule for stopped is applied if the printer is stopped
(by pressing the STOP/PAUSE key) for longer than 600 seconds. Otherwise
availability of the printer is checked again or the default action for the current
error is used (Retry).
#Key
:
Time
:
Exception
:
Action
:
Stop
:
600
:
stopped
:
Retry
:
stopped
:
:
:
Stop
:
*
:
:
:
Stop
:
Stop
In this example, the rule for stopped is applied if the printer is stopped (by
pressing the STOP/PAUSE key) for longer than 600 seconds. Then availability
of the printer is checked again (Retry) or (due to the * character) the status
of the printer is set to NOT_ACTIVE (Stop) irrespective of the error code.
188
U23841-J-Z915-6-76
Configuring Xprint V7.0
Administering recovery rules
The asterisk (*) stands for any error other than those specified earlier in the
recovery rules file. The asterisk must be specified as the last rule.
#Key
:
PowerOFF :
stopped
:
Time
:
Exception
:
Action
:
900
:
stopped
:
Respool
:
:
Stop
:
:
A printer which does not allow polling or handshaking is connected directly
to a LAN. In the event of a PowerOFF error message on the printer, Xprint V7.0
by default restarts the job with the last sent page.
However, as the last page sent is not necessarily the last printed page, the
rule above is more useful: In the case of a PowerOFF error message, the
document is spooled in again; if the connection cannot be re-established
within 15 minutes, the printer is set to the status NOT_ACTIVE so that no more
print jobs can be sent to it. Now the printer can be switched back on and/or
the problem can be eliminated.
●
When you have fully defined your recovery rules, save your file.
●
Add the new recovery rule to the Xprint V7.0 system:
xpadd -rec rule_name -fi rule_file [-ca comment]
where rule_name is a name you want to assign to a set of new recovery rules
in the Xprint V7.0 system and rule_file specifies the file name of the source
file you have created. If this file is not located in the Xprint V7.0 directory
opt/Xprint/RR, you must specify the absolute path name. With comment
you can specify a comment, for example on the purpose of this rule, which
can be useful for later administration of recovery rules.
Example
– To add the recovery rule RR1 from the recovery rules file
opt/Xprint/RR/my_RR_1:
xpadd -rec RR1 -fi my_RR_1
U23841-J-Z915-6-76
189
Administering recovery rules
Configuring Xprint V7.0
6.14.2 Assigning a recovery rule to a printer
To make a newly defined recovery rule effective for a printer, you must assign it
to the printer. Proceed as follows:
●
If the printer is still active, deactivate it:
xpchange -dev [selection] -st NOT_ACTIVE
where selection is either the name of one or more printers or a selection
criteria list according to which the printers are selected.
●
Now you can assign the new recovery rules to an existing printer with the
following command:
xpmod -dev [selection] -rr rule_name
This command assigns the recovery rules rule_name to the selected
printer(s). The option -rr rule_name can also be specified immediately when
a new printer is defined.
●
Now you can reactivate the printers:
xpchange -dev [selection]
Example
Assigning a recovery rule Standard to all printers in the system:
xpchange -dev -st NOT_ACTIVE
xpmod -dev -rr Standard
xpchange -dev
6.14.3 Canceling the assignment of a recovery rule to a
printer
To cancel the assignment of a recovery rule set to a printer because you want
to reactivate the system’s default error recovery, proceed as follows:
●
If the printer is still active, deactivate it:
xpchange -dev [selection] -st NOT_ACTIVE
where selection is either a list of printers to be deactivated or a selection
criteria list via which the printers are selected. If selection is not specified, all
printers are deactivated.
190
U23841-J-Z915-6-76
Configuring Xprint V7.0
Administering recovery rules
You can cancel the assignment of the recovery rule with the following
command:
●
xpmod -dev [selection] -rr-
This command revokes the current assignment of a recovery rule to the
specified printer(s).
Now you can reactivate the printer:
●
xpchange -dev [selection]
6.14.4 Modifying recovery rules
If you want to modify recovery rules, you must modify their source file (usually
located in the Xprint V7.0 directory .../RR) and then recompile it. Proceed as
follows:
●
Modify the source file of the relevant recovery rule using an ASCII editor. To
do this, use the procedure described in the section “Defining a recovery rule”
on page 186.
●
Recompile the recovery rules using the following command:
xpmod -rec rule_name -fi rule_file [-ca comment]
where rule_name is the name of the modified recovery rules in the Xprint
V7.0 system and rule_file specifies the file name of the modified source file.
If this file is not located in the Xprint V7.0 directory .../RR, you must specify
the absolute path name. With comment you can specify or modify a comment.
i
If the xpmod command is called on a host other than the one on which
the rule file was added with xpadd, Xprint V7.0 uses the original host and
path to access the file. You can make Xprint V7.0 modify the local copy
of the selected file by using the -ho- option.
U23841-J-Z915-6-76
191
Administering recovery rules
Configuring Xprint V7.0
6.14.5 Deleting a recovery rule
To delete a recovery rule, proceed as follows:
●
Make sure that the recovery rule is no longer used by any printers in the
system:
xpshow -rec rule_name -diR
where rule_name is the name of exactly one recovery rule. A list is displayed
containing all the objects which have direct or indirect references to the
specified recovery rule.
●
If there are any, delete all the references of level 1 to the recovery rule in the
system, for example by canceling the assignment of the rule to the specified
printer.
●
Delete the recovery rule with the following command:
xpdel -rec selection
where selection is a list of recovery rules or a selection criteria list according
to which the rules are selected.
192
U23841-J-Z915-6-76
Configuring Xprint V7.0
6.15
Administering servers
Administering servers
A server is responsible for scheduling print jobs and administering the job
database. Furthermore, it controls the supervisors and printers which are
assigned to it. A server can have several supervisors assigned.
If you want to...
Read...
add a server
section “Adding a server” on page 193
delete a server
section “Deleting a server” on
page 196
change the status of a server, activate section “Changing the status of a
or deactivate a server
server” on page 197
modify the attributes of a server
section “Modifying the attributes of a
server” on page 198
Table 25: Administering servers
6.15.1 Adding a server
Configuration hints
When defining servers, supervisors and devices in a domain, a good practice is
to attach the device and supervisor to a server that is local to the host controlling
the device. This guarantees that jobs can be submitted to the printer as soon as
the host controlling the printer is up and running. Unless specified otherwise,
this is the default situation that Xprint V7.0 will create for new devices that are
added to the system.
A good ’rule of thumb’ is that a server should not control more than three supervisors and a supervisor should not control more than fifteen devices. It is
important to remember this if you are using the Xprint V7.0 default, as you may
need to manually adjust the balance of supervisors and devices.
If a supervisor is moved from one server to another, remember that jobs
submitted to the supervisor’s device(s) will not be automatically redirected to the
new server. So you should only move a supervisor when all the jobs submitted
to its printers have finished printing.
U23841-J-Z915-6-76
193
Administering servers
Configuring Xprint V7.0
Procedure
There are two possible ways of adding a server to the system: you can either
add a completely new server to the system with the xpadd -srv command, or
you can copy an existing server with the xpcopy -srv command and then
modify the relevant attributes.
If you want to allow administrators of other hosts to assign supervisors to a new
server, you must define a corresponding permission list. This is described in the
section “Creating a permission list” on page 144.
Adding a completely new server
●
To add a new server to the system, use the following command:
xpadd -srv server_name [-ho host_name]
For server_name specify a unique name for the new server. If the name
already exists, the command is rejected.
host_name represents the name of the remote host on which the server is to
be added. Only the Xprint V7.0 administrator can add a server on a remote
host, but root and subroot can administer this server.
●
Activate the server:
xpchange -srv server_name
You must run this command, as every new server is first set to OFF for all its
states (-st, -si, -so) and is therefore not available in the system. The
servers are activated automatically when Xprint V7.0 is started (xpstart
command).
When a server is activated for the first time, Xprint V7.0 creates in the
opt/Xprint/SV directory a subdirectory for this server which contains its
name, unless there is already a directory with the same name.
When adding a new server, you can also use the options -sp scheduling and -up
user_privileges to define which scheduling policy is to be used and which users
can assign supervisors to the server (see section “Administering permission
lists” on page 143). For more detailed information refer to the “Xprint V7.0 Reference Manual”.
194
U23841-J-Z915-6-76
Configuring Xprint V7.0
Administering servers
Note that Xprint V7.0 creates a default server when you define a new supervisor
without specifying an associated server (xpadd -spv -se). Similarly, a default
server is created when you add a new printer without specifying a supervisor
(xpadd -dev -su). This default server is then assigned the name of the supervisor or printer. It is only created if it does not yet exist in the system.
Copying and modifying a server
Using the xpcopy -srv command you can copy existing servers in the system
quite easily. This is useful if the new server is to have similar attributes to an
existing server. With the xpcopy -srv command, you define a new server on
the host on which you issue the command unless you specify another host with
the -ho option.
●
Copy the relevant server
xpcopy -srv name_old_server name_new_server [modifications]
[-ho host_name]
For name_old_server specify the name of the server you want to copy.
For name_new_server specify the name of the new server. If the name already
exists, the command is rejected.
host_name represents the name of the remote host on which the server is to
be added. Only the Xprint V7.0 administrator can add a server on a remote
host.
For modifications specify the modifications you want to make. For more
detailed information on possible modifications refer to the “Xprint V7.0 Reference Manual”. With the options -sp scheduling and -up user_privileges
you can define which scheduling policy applies and which users can assign
supervisors to the server (see section “Administering permission lists” on
page 143). See the “Xprint V7.0 - Reference Manual” for more detailed
information.
Examples
– You want to copy the server hudson and name the new server nashua, nashua
being controlled by host nile. Furthermore, you want the new server nashua
to process the smallest job first instead of the biggest job as is defined for
server hudson.
xpcopy -srv hudson nashua -ho nile -sp SMALL
xpchange -srv nashua -st ACTIVE
U23841-J-Z915-6-76
195
Administering servers
Configuring Xprint V7.0
– To add a new server nashua on the remote host colorado:
xpadd -srv nashua -ho colorado
xpchange -srv nashua -st ACTIVE
– To add the new server delaware based on server nashua on the remote host
nile, and to specify that the new server delaware is to process the biggest
print jobs first:
xpcopy -srv nashua delaware -ho nile -sp BIG
xpchange -srv delaware -st ACTIVE
6.15.2 Deleting a server
With the command xpdel -srv you can delete any server you administer.
When you delete a server, its directory
/var/spool/Xprint/config/SV/server_name is also deleted.
If the server has the status ACTIVE or is connected to an existing supervisor, it
cannot be deleted.
Note: If you delete a server, any jobs on it which might still be pending are also
deleted.
To delete a server, proceed as follows:
●
Make sure that the server is no longer connected to a supervisor and that it
is not processing any print jobs.
xpshow -srv server_name -diR
For server_name you specify the name of exactly one server you want to
delete. If you want to delete several servers, you must repeat this command
for each one.
For selection you can either specify a list of form names, or you can define a
list of selection criteria with the -scl “selection_criteria_list” option (see
section “Selection criteria list” on page 266 in the Appendix) according to
which the forms to be deleted are selected.
●
If references to the server are displayed, you must remove these by
modifying the displayed objects accordingly.
196
U23841-J-Z915-6-76
Configuring Xprint V7.0
●
Administering servers
Deactivate the server:
xpchange -srv [selection] -st NOT_ACTIVE
For selection you can either specify a list of servers you want to deactivate,
or you can use the -scl “selection_criteria_list” option (see section
“Selection criteria list” on page 266 in the Appendix) to define a list of criteria
according to which the relevant servers are selected. If you do not specify
selection, all servers are deactivated.
●
Delete the server:
xpdel -srv selection
i
You can also delete several servers at once via the selection criteria
lists mentioned above. In this case, however, you must make sure that
each of the servers is
– inactive
– not connected to a supervisor
– not processing any jobs.
6.15.3 Changing the status of a server
The status of a server can assume the values ACTIVE or NOT_ACTIVE or
SHUTDOWN; the spoolin status and the spoolout status can be either ON or OFF.
Proceed as follows:
●
Find out the status of the server(s):
xpstat -srv [selection]
For selection you can either specify a list of the servers whose status you
want to display, or you can use the -scl “selection_criteria_list” option (see
section “Selection criteria list” on page 266 in the Appendix) to define a list
of criteria according to which the relevant servers are selected. If you do not
specify selection, the status of all servers is displayed.
U23841-J-Z915-6-76
197
Administering servers
●
Configuring Xprint V7.0
Change the status:
xpchange -srv [selection] modifications
For modifications specify the required changes. These may be: -st ACTIVE
(optional as this is the default) or -st NOT_ACTIVE, -si OFF or -si ON for the
spoolin status and -so OFF or -so ON for the spoolout status, and -sa WARM or
-sa COLD (sa standing for system activation) for retaining or deleting the print
jobs from previous sessions. For more detailed information refer to the
“Xprint V7.0 - Reference Manual”.
i
If you deactivate a server with xpchange -srv [selection] -st
NOT_ACTIVE, all the printers assigned to it are also deactivated. All
print jobs active on these printers are stopped immediately and set to
the status INTERRUPTED. If you activate a server with xpchange -srv
[selection], the printers assigned to it are not activated automatically.
Examples
– To reactivate server nashua and retain the jobs from the previous session:
xpchange -srv nashua -sa WARM
– To deactivate all servers controlled by host colorado:
xpchange -srv -scl "-ho colorado" -st NOT_ACTIVE
6.15.4 Modifying the attributes of a server
You can modify the attributes of a server if, for example, you want to assign
permissions to it which were not assigned when the server was set up.
Note: The attributes of a server with the status ACTIVE cannot be modified.
Proceed as follows:
●
Find out the status of the relevant server(s):
xpstat -srv [selection]
For selection you can either specify a list of the servers whose status you
want to display, or you can use the -scl “selection_criteria_list” option (see
section “Selection criteria list” on page 266 in the Appendix) to define a list
of criteria according to which the relevant servers are selected. If you do not
specify selection, the status of all servers is displayed.
198
U23841-J-Z915-6-76
Configuring Xprint V7.0
●
Administering servers
If necessary, deactivate the relevant server(s):
xpchange -srv [selection] -st NOT_ACTIVE
●
Modify the relevant attributes:
xpmod -srv [selection] modifications
For modifications you can specify all the values which can also be used when
adding a server. With the options -sp scheduling and -up user_privileges you
can define respectively what scheduling policy applies and which users can
assign supervisors to the server (see section “Administering permission
lists” on page 143). See the “Xprint V7.0 - Reference Manual” for more
detailed information.
●
Reactivate the server(s):
xpchange -srv [selection]
Examples
– To modify the server nashua such that it no longer processes the jobs with
the highest priority first but the jobs with the highest security level:
xpstat -srv nashua
xpchange -srv nashua -st NOT_ACTIVE
xpmod -srv nashua -sp SECURITY
xpchange -srv nashua
– To modify all the servers of host colorado such that each server only
processes a maximum of 20 print jobs:
xpstat -srv -scl "-ho colorado"
xpchange -srv -scl "-ho colorado" -st NOT_ACTIVE
xpmod -srv -scl "-ho colorado" -mj 20
xpchange -srv -scl "-ho colorado"
(The -mj option stands for maximum jobs.)
U23841-J-Z915-6-76
199
Administering supervisors
6.16
Configuring Xprint V7.0
Administering supervisors
A supervisor controls one or more printers and provides them with user data. A
supervisor is controlled by one server and must be located on the same host as
the printers it controls.
If you want to...
Read...
add a supervisor
section “Adding a supervisor” on
page 200
delete a supervisor
section “Deleting a supervisor” on
page 205
change the status of a supervisor
section “Activating or deactivating
supervisors” on page 203
modify the attributes of a supervisor
section “Modifying the attributes of a
supervisor” on page 204
Table 26: Administering supervisors
6.16.1 Adding a supervisor
There are two possible ways of adding a supervisor: you can either define a new
supervisor from scratch or you can copy an existing one and, if required, modify
its attributes.
Note: If you add a new supervisor to the Xprint V7.0 system, the supervisor
status is automatically set to NOT_ACTIVE. When the supervisor is
activated for the first time (see section “Activating or deactivating supervisors” on page 203), a subdirectory with the name of the supervisor is
created in the /var/spool/Xprint/config/SP directory (unless this has
already been done).
Defining a new supervisor
●
Add a new supervisor to the system:
xpadd -spv supervisor_name [-se server_name] [-ho host_name]
supervisor_name is the unique name of the new supervisor. If there is already
a supervisor with this name, the command is rejected. For server_name
specify the name of the server on which the supervisor is to be added. A
server name must be specified, otherwise the default name is used.
host_name represents the name of the remote host on which the supervisor
200
U23841-J-Z915-6-76
Configuring Xprint V7.0
Administering supervisors
is to be added. Only the Xprint V7.0 administrator, root and subroot can add
a supervisor on a remote host. Using the additional option -ca comment_for_
administrator you can also assign a comment to the supervisor when adding
it to the system.
●
Activate the supervisor:
xpchange -spv supervisor_name
Adding a supervisor by copying an existing supervisor
Using the xpcopy -spv command you can copy existing supervisors in the
system quite easily. This is useful if the new supervisor is to have similar
attributes to an existing supervisor. Proceed as follows:
●
Copy the relevant supervisor:
xpcopy -spv name_old_supervisor name_new_supervisor [modifications] \
[-ho host_name]
For name_old_supervisor specify the name of the supervisor you want to copy.
For name_new_supervisor specify the name of the new supervisor. If the name
already exists, the command is rejected.
host_name represents the name of the remote host on which the supervisor
is to be added. Only the Xprint V7.0 administrator can add a supervisor on
a remote host.
For modifications specify the modifications you want to make. Each entry in
this list consists of an option of the xpadd -spv command as well as a corresponding value. For more detailed information, see the description of this
command in the “Xprint V7.0 - Reference Manual”.
Using the additional option -ca comment_for_ administrator you can also
assign a comment to the supervisor when adding it to the system.
●
Here also you must activate the supervisor:
xpchange -spv supervisor_name
i
A supervisor that is copied from the server of a local host to a remote
host remains assigned to the server of the source host. If you want
the supervisor and server to be defined on the same host, you should
use the option -se server_name when copying, to immediately assign
the new supervisor to a server of the remote host before activating the
supervisor (see example below).
U23841-J-Z915-6-76
201
Administering supervisors
Configuring Xprint V7.0
Examples
– To define the new supervisor delaware on server nashua and activate it:
xpadd -spv delaware -se nashua
xpchange -spv delaware
– To define the new supervisor colorado by copying the existing supervisor
nashua, adding the comment new_supervisor for the Xprint V7.0 administrator. Then the new supervisor colorado is activated:
xpcopy -spv nashua colorado -ca new_supervisor
xpchange -spv colorado
– To define and activate supervisor hudson on the server nashua of the remote
host nile, adding the comment from_host_colorado for the Xprint V7.0
administrator.
xpadd -spv hudson -se nashua -ho nile -ca from_host_colorado
xpchange -spv hudson
– To add supervisor colorado on the server nashua of the remote host nile
by copying supervisor delaware from the local host. Then the new supervisor colorado is activated.
xpcopy -spv delaware colorado -se nashua -ho nile
xpchange -spv colorado
In this example, the option -se nashua is used to replace the assignment of
the original supervisor delaware to the server of the local host by the
assignment of the new supervisor colorado to the server nashua of the
remote host nile.
202
U23841-J-Z915-6-76
Configuring Xprint V7.0
Administering supervisors
6.16.2 Activating or deactivating supervisors
You can change the status of any supervisor you administer. A supervisor can
assume three status values: ACTIVE, SHUTDOWN and NOT_ACTIVE. SHUTDOWN means
that the status NOT_ACTIVE has been requested for the supervisor but has not
yet been reached.
The status needs to be changed above all in two cases:
1. If a new supervisor is added to the Xprint V7.0 system, its status is automatically set to NOT_ACTIVE. For the supervisor to be able to perform its functions
it must be set to the status ACTIVE.
2. If you want to delete a supervisor or modify its attributes, you must first
deactivate it (status NOT_ACTIVE). A supervisor with the status ACTIVE cannot
be deleted nor modified.
i
●
If you deactivate a supervisor with xpchange -spv [selection] -st
NOT_ACTIVE, all the printers assigned to it are also deactivated. If you
activate a supervisor with xpchange -spv [selection], the printers
assigned to it are not activated automatically.
To change the status of a supervisor, enter the following command:
xpchange -spv [selection] -st status
For selection you can either specify a list of the supervisors you want to
activate or deactivate, or you can use the -scl “selection_criteria_list” option
(see section “Selection criteria list” on page 266 in the Appendix) to define a
list of criteria according to which the relevant supervisors are selected. If
selection is not specified, the status of all supervisors is changed.
status is the status the supervisor is to have. This variable can assume the
values ACTIVE or NOT_ACTIVE.
Examples
– To activate the supervisor marcus:
xpchange -spv marcus
– To deactivate all supervisors with the comment “please_delete”:
xpchange -spv -scl “-ca please_delete“ -st NOT_ACTIVE
U23841-J-Z915-6-76
203
Administering supervisors
Configuring Xprint V7.0
6.16.3 Modifying the attributes of a supervisor
You can modify the attributes of any supervisor you administer.
You cannot modify the attributes of an active supervisor. You must first
set it to the status NOT_ACTIVE.
i
To modify the attributes of a supervisor, proceed as follows:
●
Deactivate the relevant supervisor(s):
xpchange -spv [selection] -st NOT_ACTIVE
For selection you can either specify a list of the supervisors you want to
deactivate, or you can use the -scl “selection_criteria_list” option (see
section “Selection criteria list” on page 266 in the Appendix) to define a list
of criteria according to which the relevant supervisors are selected. If
selection is not specified, the status of all supervisors is changed.
●
Modify the relevant attributes:
xpmod -spv [selection] modifications
For modifications specify the attributes to be modified. You can use all the
options which are allowed when adding a new supervisor with the
xpadd -spv command. With the options -ca comment_for_administrator,
-se server_name and -ho host_name you can add a comment about the
supervisor for administrators, or you can assign the supervisor to another
server or host respectively. For more detailed information refer to the “Xprint
V7.0 - Reference Manual”.
●
Reactivate the supervisor(s):
xpchange -spv [selection]
Examples:
– To modify the attributes of supervisor marcus and add a comment for the
administrator saying that this supervisor is a copy of supervisor nile:
xpchange -spv marcus -st NOT_ACTIVE
xpmod -spv marcus -ca copy_of_nile
xpchange -spv marcus
– To add a comment to all supervisors of host colorado saying that these can
be deleted:
xpchange -spv -scl "-ho colorado" -st NOT_ACTIVE
xpmod -spv -scl "-ho colorado" -ca please_delete
xpchange -spv -scl "-ho colorado"
204
U23841-J-Z915-6-76
Configuring Xprint V7.0
Administering supervisors
6.16.4 Deleting a supervisor
With the command xpdel -spv you can delete any supervisor you administer.
i
A supervisor with the status ACTIVE cannot be deleted. Therefore you
must first deactivate the supervisor. You can also not delete a supervisor
which is referenced by other objects, e.g. a printer.
To delete a supervisor from the Xprint V7.0 system, proceed as follows:
●
Deactivate the supervisor:
xpchange -spv [selection] -st NOT_ACTIVE
For selection you can either specify a list of the supervisors to be deactivated,
or you can use the -scl “selection_criteria_list” option (see section
“Selection criteria list” on page 266 in the Appendix) to define a list of criteria
according to which the relevant supervisors are selected. If selection is not
specified, all supervisors are deactivated.
●
Check whether the supervisor is referenced by any other objects:
xpshow -spv supervisor_name -diR
Cancel any existing references. How to do this is described in the sections
dealing with assigning a supervisor to the relevant object (e.g. to a printer).
●
Delete the supervisor:
xpdel -spv selection
Examples
– To deactivate and delete the supervisor delaware:
xpchange -spv delaware -st NOT_ACTIVE
xpdel -spv delaware
– To deactivate and delete all supervisors with the comment “please_delete”:
xpchange -spv -scl "-ca please_delete" -st NOT_ACTIVE
xpdel -spv -scl "-ca please_delete"
U23841-J-Z915-6-76
205
7
Interoperability
This chapter describes how you can interact with other spooler systems.
7.1
Introduction
Xprint V7.0 allows you to interact with other spooler systems. The following
figure illustrates the various possibilities:
Figure 12: Interoperation with other spooler systems
This means that you can make the printers in remote Xprint V7.0 systems also
available to users of the local Xprint V7.0 domain and, vice versa, the printers
of the local Xprint V7.0 domain can be made available to users of remote
spooler systems.
U23841-J-Z915-6-76
207
Introduction
Interoperability
Xprint V7.0 can assume the role of a client that uses the print services of the
other spooler system involved, or the role of a server that makes its printers
available to other systems. In the previous figure this is illustrated by two arrows
from and to the other spooler system. If the arrows are of different colors, there
are two possible ways of interoperation which depend on the software used.
These methods are as follows:
Type of interoperation
Description
Accessing a BSD printer spooler from Xprint V7.0, i.e.
sending print jobs to printers connected via a BSD printer
spooler.
page 209
Connecting Xprint V7.0 and another printer spooler via a
gateway, i.e. allowing access from Xprint V7.0 to another
printer spooler and vice versa.
page 213
Table 27: Interoperation methods
These methods are based on two different ways of interconnecting different
spooler systems. In the case of interoperation with BSD printer spoolers, you
can allow local Xprint V7.0 users access by defining for every printer of the BSD
system a local printer which forwards the print jobs to the BSD system like an
lpr client. This functionality is available in any Xprint V7.0 system, including
those not installed as network systems. In such a case, access to the BSD
system is effected via a fast filter which is assigned to the local (pseudo) printer.
Xprint V7.0 also allows you to define what are called gateways to other Xprint
V7.0 systems. Gateways allow bidirectional connections between Xprint V7.0
and other spooler systems. Such gateways can only be defined if the gateway
package of Xprint V7.0 was purchased.
208
U23841-J-Z915-6-76
Interoperability
7.2
Accessing BSD printers
Accessing BSD printers
This section describes how you can allow access to the printers of a BSD
spooler from within Xprint V7.0 via the fast filter bsd.
7.2.1
Basic information
You can allow users of the local Xprint V7.0 domain access to BSD printers
which meet the following requirements:
– the printers are defined on a computer with a BSD printer spooler (e.g. a
BSD system, Novell Netware®, Windows NT® Servers, Windows 2000®
Servers, LINUX etc.)
– an lpd process is running on the remote system which allows other
computers to use the printers defined there
– your Xprint V7.0 domain is connected to the remote system via a network
and the TCP/IP protocol (can be checked with the ping command)
– at least one of the systems in your Xprint V7.0 domain is allowed to use the
printers connected to the remote system (e.g. by the file /etc/hosts.lpd
on the remote system or the remote BSD system).
If these requirements are met, you can establish a connection to these printers
which allows print jobs to be sent to them from within the local Xprint V7.0
domain. The following figure illustrates the basic structure of such a connection:
U23841-J-Z915-6-76
209
Accessing BSD printers
Interoperability
Figure 13: Accessing BSD printers
To establish the connection to a BSD printer, you must configure a pseudo
printer on one system in your Xprint V7.0 domain which the Xprint V7.0 users
can specify as the target for their print jobs and which forwards the print jobs it
receives to the BSD printer by using the fast filter bsd for printing.
As this pseudo printer is addressed just like a local printer, it is fully transparent
to the users that the document is printed on a BSD printer and not on a local
printer. The only difference to a local printer is the fact that print jobs cannot be
administered after submission. Also, displaying the job queue is only possible
to a certain extent as print jobs are considered to be not yet printed only as long
as they are not yet transferred to the remote BSD printer spooler.
If this functionality is required, access via the fast filter bsd is not sufficient. In
this case, a gateway connection must be established (see section “Gateways”
on page 213).
7.2.2
Configuring printers for BSD Xprint V7.0
If you want to provide access to a BSD printer, you must first define the fast filter
bsd in the system and then assign it to a local printer configured specially for
this purpose. This local pseudo printer then acts as a substitute for the real BSD
printer. As soon as it receives a job, it passes it on to the specified BSD printer
spooler where the job will later be printed.
Proceed as follows:
210
U23841-J-Z915-6-76
Interoperability
●
Accessing BSD printers
Make sure the fast filter bsd is already configured:
xpshow -flt
If the filter bsd is not displayed, you must first add it to the system (the filter
is supplied with Xprint V7.0). Enter the following command:
xpadd -flt bsd -tp FAST -cm bsd -op "LOGIN *=*" \
"PRINTER *=*" "DOC-REF *=*" "COMMENT *=*" "TITLE *=*"
●
Define the printer as you would a local printer, at the same time assigning to
it the filter bsd:
xpadd -dev bsd_printer -da pseudo_file -fl bsd \
-ca "queue=remote_printer host=host_name" [-pc pcl] -aa
For bsd_printer specify a unique name under which the BSD printer is to be
known in the Xprint V7.0 domain.
For pseudo_file specify any file name of an empty file instead of a real printer
address. This file is required to control access to the print queue; it does not
have anything to do with the actual print job. If necessary, configure the path.
With the -ca option (administrator’s comment) you must specify the name of
the BSD printer in the form queue=remote_printer and the name of the host to
which the BSD printer is connected (host=host_name).
i
If the name of the remote printer (remote_printer) is the same as that
of the local pseudo printer (bsd_printer), “queue=remote_printer” need
not be specified.
You must separate these specifications with a blank. If the LPD service at
the BSD system is defined at a different port than usual, this port number
can also be defined here by additionally specifying an entry
port=port_number.
If required, specify for pcl a PCL defined in the system which corresponds to
the BSD printer. If the required PCL does not yet exist, you can define it as
described in the section “Adding a PCL” on page 180.
Example
You want to configure a new BSD PostScript printer BSD_PS at host host3. The
fast filter bsd, however, is not yet configured in the system, and the printer is to
be activated automatically each time Xprint V7.0 is started:
xpadd -flt bsd -tp FAST -cm bsd -op "LOGIN *=*" \
"PRINTER *=*" "DOC-REF *=*" "COMMENT *=*" "TITLE *=*"
U23841-J-Z915-6-76
211
Accessing BSD printers
Interoperability
xpadd -dev BSD_PS -da /var/tmp/PS1 -fl bsd \
-ca "queue=PS1 host=host3" -pc POSTSCRIPT -aa
Troubleshooting
If your print jobs are rejected by the remote system, add "--compatible" in
the comment field. This is necessary if the remote system is an ATT lp spooler.
For example, to modify the remote printer BSD_PS accordingly, use the following
command:
xpmod -dev BSD_PS -ca "queue=PS1 host=host3 --compatible"
212
U23841-J-Z915-6-76
Interoperability
7.3
Gateways
Gateways
Gateways allow access to various other spooler systems: to other Xprint V7.0
domains, to systems with BSD spoolers and to BS2000 systems on which the
DPRINT spooler is installed. This section describes the characteristics of
gateways and how they are configured.
7.3.1
Gateway characteristics
Gateways allow the bidirectional connection of an Xprint V7.0 domain with:
– other Xprint V7.0 domains
– lpd spoolers in BSD-UNIX systems (e.g. SunOS®, Linux, Ultrix32®)
– lpd daemons in Novell NetWare® servers, UNIX® SVR4 systems,
Microsoft® Windows NT® servers, Microsoft® Windows 2000® servers etc.
– DPRINT spoolers in BS2000 systems
This allows you to make the printers in remote Xprint V7.0 systems also
available to users of the local Xprint V7.0 domain and, vice versa, the printers
of the local Xprint V7.0 domain can be made available to users of remote
spooler systems.
7.3.2
Setting up a gateway connection
This section first describes the general rules for and the basic procedure of
configuring a gateway connection to another printer spooler. A detailed
description of how to establish a gateway connection to another printer spooler
can be found in the following sections:
Type of gateway
Description
connecting Xprint V7.0 and a BSD printer spooler
page 214
connecting two Xprint V7.0 domains
page 219
connecting Xprint V7.0 and a DPRINT printer spooler
(BS2000)
page 223
Table 28: Establishing a gateway connection
i
Only the Xprint V7.0 administrator can configure gateways.
U23841-J-Z915-6-76
213
Gateways
Interoperability
To configure a gateway, you must first define the host of the local Xprint V7.0
domain that is to be used as the gateway to the other printer spooler. For this
purpose, you can use any host in the local Xprint V7.0 domain which has access
to the physical connection to the target system. This host must be reliable,
robust and fail-safe as the connection to the other printer spooler should always
be available. First, a local gateway object is defined for this host.
The local gateway is responsible for the physical connection to the remote
printer spooler. For every logical connection to a host in another spooler system
it is also necessary to define what is called a partner gateway. The partner
gateway is assigned to a local gateway and thus to a physical connection.
Several partner gateways may be defined for access to several remote printer
spoolers which all use the same local gateway. This however requires that all
the remote printer spoolers be of the same type (e.g. BSD).
As soon as the connection between these two gateways has been defined and
the local gateway has been activated, the connection can be used for printing.
However, in this case, printing is subject to specific restrictions which depend
on the configuration of the partner gateway.
i
To be able to successfully establish a gateway connection to a partner
system, it is essential that you make some configurations on the partner
system too:
– So that users can print on the remote system via the gateway, the
remote system must grant the required permission.
– If users of the remote system are to print on the local Xprint V7.0
system, the local system must be declared there.
In any case these measures must be taken in accordance with the
descriptions in the relevant system documentation.
If the other printer spoolers also are to access the local printers via the gateway,
the partner gateway must additionally be registered as an allowed gateway at
the local gateway. All allowed gateways allow the corresponding remote hosts
access to the resources of the local Xprint V7.0 domain.
7.3.3
Gateways to BSD spoolers
As with the fast filter bsd, configuring a gateway to a BSD spooler also allows
users of the local Xprint V7.0 domain to access printers defined in the remote
BSD spooler. Unlike jobs printed with bsd, print jobs printed via gateways can
still be administered after submission.
214
U23841-J-Z915-6-76
Interoperability
Gateways
The following figure shows the basic structure of such a gateway connection
and the possibilities it offers:
Figure 14: Structure of a gateway connection
Requirements
Configuring a gateway to a BSD spooler in a remote system requires that an
LPD spooler be active on the remote host to which the gateway connection is
established.
U23841-J-Z915-6-76
215
Gateways
Interoperability
Defining the local gateway
The local gateway is defined as follows on a host which, if possible, should have
a constant connection to the BSD spooler to which the connection is to be
established:
xpadd -gtw local_gw -tp LOCAL -ho local_host -ga 515 \
-np TCP -pp BSD [-aa] [-op option_list]
This command configures a local gateway named local_gw which administers
the physical connection to the BSD system. For local_gw any name can be
used; it does make sense, however, to use a name which indicates on which
host the gateway is configured. With the option -ho local_host you specify the
name of the host which is to act as the gateway to the BSD system from the local
Xprint V7.0 domain.
The option -ga 515 specifies that the port 515 is to be used for accessing the
BSD print services. If the BSD system uses a different port number for the print
services (see /etc/services file on the BSD host), you must specify the
relevant port number here.
i
The port number is very important as no two gateways with the same port
number can run at the same time on a system.
The option -np TCP defines that the TCP/IP protocol is used. No other protocol
can be specified. For the connection to BSD printer spoolers the print protocol
must be selected with the option -pp BSD. With the -aa option you can define
that the gateway is activated automatically each time Xprint V7.0 is started.
The option -op option_list can be used to adjust the behavior of the local
gateway. The following options/values are possible:
"MODE:COMPATIBLE"
This option is used to send requests to a BSD server. It requires the local
gateway to act as a SUN BSD lp client. This option must be specified if
jobs are rejected by remote BSD lpd daemons for no obvious reason.
For example: for all local gateways defined in "-bl", the option
"MODE=COMPATIBLE" must be set if the partner gateway represents an
ATT lp spooler system.
"PI=<first_port_number_client>"
"PA=<last_port_number_client>"
These two options are important for receiving requests from remote BSD
clients. The two values define the port range the remote BSD client must
use for sending jobs to the local gateway or receiving jobs from it. Default
values are "PI=721" and "PA=731".
216
U23841-J-Z915-6-76
Interoperability
Gateways
“GTW_START_PAGE=YES/NO"
provides a way to enforce ("YES") or suppress ("NO") the header page.
“GTW_SEPARATOR_PAGE=YES/NO"
provides a way to enforce ("YES") or suppress ("NO") the separator
sheet.
“GTW_END_PAGE=YES/NO"
provides a way to enforce ("YES") or suppress ("NO") the trailer page.
Other interesting options are described in the Reference Manual.
Troubleshooting
If requests from a remote BSD client are rejected by the local gateway, the
following values must be used:
-op "PI=0" "PA=0123"
i
Therefore the safest way to define a local BSD gateway is to use the
following command:
xpadd -gtw ... -op "PI=0" "PA=1023" "MODE=COMPATIBLE"
Defining the partner gateway
A separate partner gateway must now be specified for each connection to a
BSD printer spooler. The partner gateway is defined using the following
command:
xpadd -gtw bsd_partner -tp PARTNER -ho bsd_host -ga 515 \
-bl local_gw -np TCP -pp BSD [-op option_list]
This command configures a partner gateway named bsd_partner which administers the logical connection to a special BSD printer spooler. For bsd_partner
any name can be used; it does make sense, however, to use a name which
indicates to which host the gateway is configured. With the option -ho bsd_host
you specify the name of the remote host on which the LPD daemon process of
the BSD spooler runs.
The option -ga 515 specifies that the port 515 is to be used for accessing the
BSD print services. If the BSD system uses a different port number for the print
services (see /etc/services file on the BSD host), you must specify the
relevant port number here.
U23841-J-Z915-6-76
217
Gateways
Interoperability
The partner gateway must be assigned with the -bl local_gw option to the local
gateway administering the physical connection. local_gw can be an individual
gateway or a list of local gateways. In the latter case, the first active gateway in
the list is used to send a request to the partner gateway. The option -np TCP
defines that the TCP/IP protocol is used. No other protocol can be specified. In
addition, the print protocol must be selected with the -pp BSD option.
The option -op option_list can be used to define the behavior of the local
gateway toward the corresponding contact gateway. Here the options
"PI=..." and "PA=..." are available. Default values are "PI=721" and
"PA=731". This port range is used by the local gateway to establish the
connection to the BSD partner.
The safest way to define a partner gateway is not to use the -op option
but to accept the default values.
i
Xprint V7.0 also offers the option of addressing a number of clients via a partner
gateway. In this case, use the following command:
xpadd -gtw bsd_group -pp BSD -tp PARTNER -ga 515 \
-ho bsd_host -bl local_gw -oh pattern
For pattern specify a string with replacement characters. These can be either the
asterisk (*, representing any string) or the question mark (?, representing any
character). This string is used for the host list in the /etc/hosts file, i.e.:
if the option "-op d241p*" is specified, the partner gateway represents all the
hosts in the /etc/hosts list which begin with d241p.
Allowing print jobs to be submitted by the BSD spooler
If you want to allow users of the BSD spooler to submit print jobs for local
printers via the gateway, the partner gateway must be defined as an allowed
gateway at the local gateway. To do this, use the following command:
xpmod -gtw local_gw -ag+ bsd_partner
With this command, the partner gateway bsd_partner is assigned to the local
gateway local_gw as an allowed gateway. Only the BSD systems which are
connected to the local Xprint V7.0 domain via allowed partner gateways are
allowed to use its print services.
You can also define all partner gateways as allowed gateways by using the
keyword ALL:
xpmod -gtw local_gw -ag ALL
218
U23841-J-Z915-6-76
Interoperability
Gateways
In this case only the value ALL needs to be specified with the -ag option.
Therefore, the + character is not specified after the -ag option in the example
above.
i
Please note that when the option -ag ALL is used, any partner gateway
added is automatically given the permission to contact the local gateway.
Activating the gateway connection
To be able to print via the gateways, the corresponding local gateway must be
activated. Activation with the xpchange command can be effected on several
levels: you can allow only the export of print jobs via the assigned partner
gateways, only the import from these gateways, or both. The following
command allows both the import and export of print jobs:
xpchange -gtw local_gw
If only the import of print jobs is to be allowed, you can use the -gi ON option;
to only allow the export, use the -go ON option.
Example
To configure a gateway connection from the local host nashua to the lpd spooler
of the BSD-UNIX system picasso:
xpadd -gtw GTW_nashua -tp LOCAL -ga 515 -ho hudson -np TCP \
-pp BSD -aa
xpadd -gtw GTW_picasso -tp PARTNER -ho picasso -ga 515 \
-bl GTW_nashua -np TCP -pp BSD
xpmod -gtw GTW_nashua -ag+ GTW_picasso
xpchange -gtw GTW_nashua
7.3.4
Gateways to other Xprint V7.0 domains
Xprint V7.0 also allows you to establish gateway connections between
independent Xprint V7.0 domains. This makes it possible to distribute the
administration tasks in fairly large networks, for example at department level by
assigning each department its own Xprint V7.0 domain with an Xprint V7.0
administrator of its own.
A connection between the individual domains can then be established via
gateways.
The following figure shows the basic structure of such a gateway connection
and the possibilities it offers:
U23841-J-Z915-6-76
219
Gateways
Interoperability
Figure 15: Gateway connection to another printer domain
Defining the local gateway
The local gateway is defined as follows on a host which, if possible, should have
a constant connection to the other Xprint V7.0 domain to which the connection
is to be established:
xpadd -gtw local_gw -tp LOCAL -ho local_host \
-ga gtw_port -np TCP -pp GIP2 [-aa]
This command configures a local gateway named local_gw which administers
the physical connection to the other Xprint V7.0 domain. For local_gw any
name(s) can be used; it does make sense, however, to use names which
indicate on which host the gateways are configured. With the option -ho
local_host you specify the name of the host which is to act as the gateway from
the local Xprint V7.0 domain to the other Xprint V7.0 domain.
220
U23841-J-Z915-6-76
Interoperability
Gateways
The option -ga gtw_port specifies which TCP/IP port number is to be used. The
default is 9999.
i
The port number is very important as no two gateways with the same port
number can run on a system at any one time.
The option -np TCP defines that the TCP/IP protocol is used. No other protocol
can be specified. For the connection to other Xprint V7.0 domains the print
protocol must be selected with the option -pp GIP2. With the -aa option you can
define that the gateway is activated automatically each time Xprint V7.0 is
started.
Defining the partner gateway
A separate partner gateway must now be specified for each connection to
another Xprint V7.0 domain. This partner gateway defines a logical connection
to another host on another Xprint V7.0 domain. On this host, a gateway for the
connection to the local gateway must also be configured (mirrored configuration). The partner gateway is configured using the following command:
xpadd -gtw spool_partner -tp PARTNER -ho spool_host -ga gtw_port \
-bl local_gw -np TCP
This command configures a partner gateway named spool_partner which administers the logical connection to a special Xprint V7.0 domain. For spool_partner
any name can be used; it does make sense, however, to use a name which
indicates to which Xprint V7.0 domain the gateway is configured. With the option
-ho spool_host you specify the name of the remote host on which the gateway
to the other Xprint V7.0 domain is configured.
The option -ga gtw_port specifies which TCP/IP port number is to be used. This
number must correspond to that of the local gateway of the other Xprint V7.0
domain.
The partner gateway must be assigned with the -bl local_gw option to the local
gateway administering the physical connection. local_gw can represent a single
gateway or a list of local gateways. The option -np TCP defines that the TCP/IP
protocol is used. No other protocol can be specified.
U23841-J-Z915-6-76
221
Gateways
Interoperability
Allowing print jobs to be submitted by users of the other Xprint V7.0
domain
If you want to allow users of the other Xprint V7.0 domain to submit print jobs
for local printers via the gateway, the partner gateway must be defined as an
allowed gateway at the local gateway. To do this, use the following command:
xpmod -gtw local_gw -ag+ spool_partner
With this command, the partner gateway spool_partner is assigned to the local
gateway local_gw as an allowed gateway. Only the Xprint V7.0 domains which
are connected to the local Xprint V7.0 domain via allowed partner gateways are
allowed to use its print services.
You can also define all partner gateways as allowed gateways by using the
keyword ALL:
xpmod -gtw local_gw -ag ALL
In this case only the value ALL needs to be specified with the -ag option.
Therefore, the + character is not specified after the -ag option in the example
above.
i
Please note that when the option -ag ALL is used, any partner gateway
added is automatically granted permission to access the local gateway.
Activating the gateway connection
To be able to print via the gateways, the corresponding local gateway must be
activated. Activation with the xpchange command can be effected on several
levels: you can allow only the export of print jobs via the assigned partner
gateways, only the import from these gateways, or both. The following
command allows both the import and export of print jobs:
xpchange -gtw local_gw
If only the import of print jobs is to be allowed, you can use the -gi ON option;
to only allow the export, use the -go ON option.
Restrictions of gateways to other Xprint V7.0 domains
Working with gateways to other Xprint V7.0 domains is subject to certain restrictions which the users of these gateways must be familiar with:
– The -rm option of the xpadd -job command cannot be used.
222
U23841-J-Z915-6-76
Interoperability
Gateways
Example
To configure a gateway connection from the local host hudson to host purple of
another Xprint V7.0 domain:
xpadd -gtw GTW_hudson -tp LOCAL -ho hudson -np TCP \
-pp GIP2 - ga 5300 -aa
xpadd -gtw GTW_purple -tp PARTNER -ho purple -ga 5300 \
-bl GTW_hudson -np TCP -pp GIP2
xpmod -gtw GTW_hudson -ag GTW_purple
xpchange -gtw GTW_hudson
7.3.5
Gateways to DPRINT spoolers
Gateways to DPRINT spoolers allow the users of the local Xprint V7.0 domain
to access printers connected to BS2000 mainframes on which the spooler
system DPRINT is installed. Vice versa, they can also be used to allow users of
such BS2000 mainframes to access the printers of the local Xprint V7.0 domain.
The following figure shows the basic structure of such a gateway connection
and the possibilities it offers:
Figure 16: Gateway connection to DPRINT spoolers
U23841-J-Z915-6-76
223
Gateways
Interoperability
Requirements
If a gateway to a DPRINT spooler in a BS2000 system is to be configured, the
software openFT must be installed on the host for which the local gateway is to
be configured. For the openFT root user, OBS, IBR and IBP must be set to the
value 100 (see openFT command ftmoda).
Defining the local gateway
If a local gateway to another Xprint V7.0 domain already exists on a host which
meets the requirements mentioned above, this gateway can also be used for
connections to DPRINT spoolers.
The local gateway is configured in exactly the same way as a gateway to
another Xprint V7.0 domain:
xpadd -gtw local_gw -tp LOCAL -ho local_host \
-ga gtw_port -np protocol -pp GIP2 [-aa]
This command configures a local gateway named local_gw which administers
the physical connection to the DPRINT spooler. For local_gw any name can be
used; it does make sense, however, to use a name which indicates on which
host the gateway is configured. With the option -ho local_host you specify the
name of the host which is to act as the gateway from the local Xprint V7.0
domain to the DPRINT spooler.
In the case of a TCP/IP connection, the option -ga gtw_port specifies which
TCP/IP port number is to be used. The default is 9999.
i
The port number is very important as no two gateways with the same port
number can run at the same time on a system.
The option -np protocol defines whether the TCP/IP protocol (TCP) or the ISO
(ISO) protocol is used. The ISO protocol is only available for users. For the
connection to DPRINT spoolers the print protocol must be selected with the
option -pp GIP2. With the -aa option you can define that the gateway is activated
automatically each time Xprint V7.0 is started.
Defining the partner gateway
The partner gateway is defined as follows:
xpadd -gtw dprint_partner -tp PARTNER -ga port -bl local_gw \
-on original_name -oh original_host -op "FT=tns_entry"
224
U23841-J-Z915-6-76
Interoperability
Gateways
This command configures a partner gateway named dprint_partner which
administers the logical connection to a special DPRINT spooler. For
dprint_partner any name can be used; it does make sense, however, to use a
name which indicates to which DPRINT spooler the gateway is configured. With
the option -oh dprint_host you specify the name of the remote host on which the
gateway to the DPRINT spooler is configured. Additionally, you must specify
with -on original_name the name of the DPRINT gateway on the corresponding
BS2000 system if it is not identical with the gateway name dprint_partner. In
practice, original_name and dprint_host are identical; this is the BCAM host name
of the BS2000 system in capital letters.
In this case, the definition of the partner gateway also requires the specification
of the additional option -op "FT=tns_entry", which specifies the TNS entry of the
FT service on the host for the partner gateway:
The option -ga port specifies which TCP/IP port number is to be used. This
number must correspond to that of the DPRINT gateway of the DPRINT
spooler.
The partner gateway (or a list of partner gateways) must be assigned with the
-bl local_gw option to the local gateway administering the physical connection.
Adjusting the local Xprint V7.0 domain
If the gateway is configured in such a way that the users of the DPRINT system
can also use the printers of the local Xprint V7.0 domain, some adjustments are
required at the local Xprint V7.0 domain, as DPRINT users might print
documents with the EBCDIC character set.
For this reason, a slow filter must be added to the Xprint V7.0 configuration for
every possible content type the DPRINT users might use for EBCDIC
documents.
In any case, at least the following filter is required:
xpadd -flt filter_name -it EBCDIC_ EBCDIC_COMPATIBLE \
-ot ’xpshow -pcl -di ´-id´’ -cm ebcdic2ascii \
-op "pcl *=*" "COMMENT *=1"
This command defines a filter with any unique name filter_name for the DPRINT
format EBCDIC_COMPATIBLE. As the output format for this filter all defined PCLs
are specified. For any other document types you might have to define other
filters using this procedure (e.g. EDCDIC_POSTSCRIPT to POSTSCRIPT):
xpadd -flt ... -it EBCDIC_POSTSCRIPT -ot POSTSCRIPT\
-cm ebcdic2ascii -op "pcl *=*" "COMMENT *=1"
U23841-J-Z915-6-76
225
Gateways
Interoperability
Restrictions of gateways to DPRINT spoolers
Wildcards (* or ?) are not allowed but you can specify
xpshow -dev dprint_gateway! without a printer name and
xpshow -dgr dprint_gateway! without a printer group name. In this case all
corresponding resources are displayed.
If information on a printer of a DPRINT spooler is displayed, you should be
aware that some of the requested items of information are not supported by the
DPRINT spooler. The displayed values for this information are invalid (amongst
others this applies to the information on Keep connection, Open retry time,
Automatic activation, Polling enabled and Priority).
When defining a print job for a DPRINT printer with xpadd -job, the following
must be observed:
i
For every job a document type must be specified with the -ct option. The
document type PLAIN_TEXT represents an ASCII text which contains
only the control characters CR, LF and FF. This data type replaces the
value SIMPLE which is not supported under DPRINT.
Examples
To configure a gateway connection between the local host hudson and the
DPRINT spooler of the BS2000 system D255S017:
xpadd -gtw GTW_hudson -tp LOCAL -ga 5200 -ho hudson -np TCP \
-pp GIP2 -aa
xpadd -gtw GTW_S017 -tp PARTNER -ho d255s017 -ga 5200 \
-on D255S017 -oh D255S017 -bl GTW_hudson -np TCP \
-pp GIP2 -op "FT=FT25517"
xpmod -gtw GTW_hudson -ag GTW_S017
xpchange -gtw GTW_hudson
i
226
Please note that the host hudson running the gateway GTW_hudson must
be a Outputware host which has openFT installed. Furthermore, the
option
-op "FT=xxxxx" must be specified when defining the partner gateway
GTW_SO17 (DPRINT), where xxxxx is the name of the FT partner, in this
case FT25517. The value xxxxx depends on the configuration of openFT.
U23841-J-Z915-6-76
Interoperability
7.4
Administering gateways
Administering gateways
This section contains a brief description of the most important aspects of administering existing gateways.
The following table serves as a guide to the possible tasks involved in administering gateways:
If you want to...
Read...
add another connection to an existing section “Configuring an additional
local gateway (only for Xprint V7.0
connection from an existing gateway”
administrators)
on page 227
delete a gateway (only for Xprint V7.0 section “Deleting a gateway
administrators)
connection” on page 229
deactivate a gateway (only for Xprint
V7.0 administrators, subroot and
root)
section “Deactivating a gateway” on
page 230
reactivate a gateway
section “Activating a gateway” on
page 232
obtain information on a gateway
section “Obtaining information on a
gateway” on page 233
Table 29: Administering gateways
7.4.1
Configuring an additional connection from an
existing gateway
Once you have configured a connection from a local gateway to a remote
partner gateway, you can configure additional connections to other partner
gateways from the local gateway, provided those partner gateways use the
same network protocol (TCP or ISO). ISO is only available for users.
Furthermore, optimum functionality is only ensured if the print protocol is the
same (GIP2 or BSD). It is possible, for example, to configure another connection
to another BSD-UNIX system from a local gateway for which a connection to a
remote BSD-UNIX system already exists.
i
Also for configuring additional connections of a local gateway to other
partner gateways you must be logged in as the Xprint V7.0 administrator.
Only this administrator has the required privileges.
U23841-J-Z915-6-76
227
Administering gateways
Interoperability
To configure additional connections to other gateways, proceed as follows:
●
First check whether there is a local gateway to which you can add the new
connection:
xpshow -gtw -scl "-tp LOCAL -np protocol -pp gateway_type"
This command returns a list of all the local gateways of the type gateway_type
using the network protocol protocol.
●
Then define the new partner gateway with the xpadd -gtw command, as
described earlier in this section for the individual gateway types (see section
“Gateways” on page 213).
●
If you want to allow the partner gateway to print on printers of the local Xprint
V7.0 domain via the local gateway, deactivate the local gateway:
xpchange -gtw gateway -st NOT_ACTIVE
You only need to deactivate the local gateway if you want to modify the list
of allowed gateways. This is not necessary if you have defined the local
gateway with -ag ALL or if the you do not want to make the new gateway an
allowed gateway (define it only for sending requests), e.g.:
xpmod -gtw gateway -ag+ partner_gateway
●
Then reactivate the local gateway with the following command:
xpchange -gtw gateway
Example
To set up an additional connection from the local gateway nashua to the lpd
spooler of the BSD-UNIX system picasso:
xpshow -gtw -scl "-tp LOCAL -np TCP -pp BSD"
only returns the gateway GTW_nashua
xpadd -gtw GTW_picasso -tp PARTNER -ho picasso -ga 515 \
-bl GTW_nashua -np TCP -pp BSD
xpchange -gtw GTW_nashua -st NOT_ACTIVE
xpmod -gtw GTW_nashua -ag+ GTW_picasso
xpchange -gtw GTW_nashua
228
U23841-J-Z915-6-76
Interoperability
7.4.2
Administering gateways
Deleting a gateway connection
A gateway connection that is no longer needed, for example because the
remote partner computer no longer exists, can be deleted. If you only want to
stop the use of a gateway connection temporarily, you can deactivate it
completely or only in one direction (see section “Deactivating a gateway” on
page 230).
i
A gateway can only be deleted by the Xprint V7.0 administrator. You must
first log in accordingly.
If you want to delete a partner gateway, you must first check whether the
gateway to be deleted is registered as an allowed gateway at the responsible
local gateway:
●
xpshow -gtw local_gw -diL
If this is the case, deactivate the local gateway, remove the partner gateway
from the list of allowed gateways and reactivate the local gateway:
xpchange -gtw local_gw -stN
xpmod -gtw local_gw -ag- gateway
xpchange -gtw local_gw
To finally delete the gateway, use the following command:
●
xpdel -gtw gateway
where gateway is the name of the gateway to be deleted. If gateway is a local
gateway, it must be deactivated before deletion.
i
Bear in mind that a complete gateway connection consists of two
gateways - the local gateway and the partner gateway. If you want to
delete the connection completely, you must delete both gateways. To find
out which gateways are defined, use the xpshow -gtw command (see
section “Obtaining information on a gateway” on page 233).
U23841-J-Z915-6-76
229
Administering gateways
Interoperability
Examples
– To delete the only connection originating from the gateway GTW_hudson to the
partner gateway GTW_purple:
xpchange -gtw GTW_hudson -st NOT_ACTIVE
xpmod -gtw GTW_hudson -ag- GTW_purple
xpdel -gtw GTW_purple
xpdel -gtw GTW_hudson
– To delete a gateway connection from the gateway GTW_nashua to the partner
gateway GTW_picasso, but maintaining the connections to other partner
gateways:
xpchange -gtw GTW_nashua -stN
xpmod -gtw GTW_nashua -ag- GTW_picasso
xpdel -gtw GTW_picasso
xpchange -gtw GTW_nashua
7.4.3
Deactivating a gateway
If a local gateway is to be modified or temporarily not used, you can lock it
against further use by deactivating it. There are three possible ways of doing
this:
– You can deactivate a local gateway completely so that no gateway
connection (in either direction) can be used.
– You can deactivate the passing on of print jobs to the other printer spooler
or only the use of the gateway by the other printer spooler (one direction).
This affects all partner systems.
– You can deactivate only the access from one partner gateway to a local
gateway. This can prevent a specific remote system from sending requests
to the local Xprint V7.0 system.
i
230
To deactivate a local gateway, you must be logged in as the administrator.
U23841-J-Z915-6-76
Interoperability
Administering gateways
Deactivating a local gateway completely
●
Use the following command to completely deactivate a gateway:
xpchange -gtw gateway -st NOT_ACTIVE
where gateway is the local gateway to be deactivated. This deactivates the
connections to all remote partner gateways connected to the local gateway.
The option -st NOT_ACTIVE may be abbreviated to -stN.
Once the gateway is deactivated, you can modify or delete it.
Deactivating the export of jobs from the local Xprint V7.0 domain
You only want to deactivate the export of jobs from the local system to a partner
system via a local gateway.
●
To deactivate the export of jobs, enter the following command:
xpchange -gtw gateway -go OFF
Deactivating the import of jobs via a local gateway
If you want to temporarily deny access to the resources of the local Xprint V7.0
domain for all partner gateways, you can deactivate the import of jobs for the
local gateway.
●
To deactivate the import of jobs via the local gateway, enter the following
command:
xpchange -gtw gateway -gi OFF
Deactivating the import of jobs via one gateway connection only
If you want to temporarily deny access to the resources of the local Xprint V7.0
domain to only one of several partner gateways, you can remove it from the list
of allowed gateways of the responsible local gateway. Proceed as follows:
●
Deactivate the local gateway to which the partner gateway is assigned:
xpchange -gtw local_gw -stN
●
Remove the partner gateway from the list of allowed gateways:
xpmod -gtw local_gw -ag- partner_gw
●
Reactivate the local gateway:
xpchange -gtw local_gw
U23841-J-Z915-6-76
231
Administering gateways
7.4.4
Interoperability
Activating a gateway
Three points are important for activating a gateway:
– Activation of the local gateway itself. Only an active gateway can be used by
local and remote users.
– Setting up a backward link from a partner gateway to the local gateway.
A connection between two gateways requires such a backward link.
– Allowing a partner gateway access. Only if a partner gateway is granted
access explicitly can users of the partner system access the local resources.
Only the Xprint V7.0 administrator, subroot or root can activate a
gateway. You must first log in accordingly.
i
Activating the local gateway
●
To completely activate a gateway, use the following command:
xpchange -gtw gateway
where gateway is the gateway to be activated. This also activates all the
connections between remote partner gateways and the local gateway.
Activating job export mode for a local gateway
You can activate a local gateway such that it can process the requests of the
allowed partner gateways, proceed as follows.
●
Activate the connection using the following command:
xpchange -gtw gateway -go ON
Activating job import mode for a local gateway
If you want to grant a partner gateway access to the resources of the local Xprint
V7.0 domain, you must enter the partner gateway as an allowed gateway on the
local gateway.
●
Reactivate the local gateway using the following command:
xpchange -gtw gateway -gi ON
232
U23841-J-Z915-6-76
Interoperability
7.4.5
Administering gateways
Obtaining information on a gateway
As an administrator, you can display the status and the definition of local or
partner gateways.
Displaying the definition of gateways
●
Information on the definition of gateways can be obtained with the following
command:
xpshow -gtw [selection] [-di display]
If selection is not specified, the command refers to all the gateways in the
local Xprint V7.0 system. Otherwise you can either specify a list of the
gateways on which you want information to be displayed, or you can use the
-scl “selection_criteria_list” option (see section “Selection criteria list” on
page 266 in the Appendix) to define a list of criteria according to which the
gateways are selected.
With the option -di display you can determine the scope of the display as for
all the other Xprint V7.0 objects.
Displaying the status of local gateways
●
You can display the status (active or not active) of a local gateway with the
following command:
xpstat -gtw [selection] [-di display]
For selection you have the same options as described under the xpshow
command (see above).
Displaying the status of partner gateways
●
You can display the status of a partner gateway if the corresponding local
gateway is in the ACTIVE state with gateway_out enabled. For partner
gateways, all the fields are left empty except the State field. Use the
following command:
xpstat -gtw [selection] [-di display]
For selection you have the same options as described under the xpshow
command (see above). When the identifier list is empty or contains only *
then only LOCAL gateways will be looked for. In other cases, both LOCAL and
PARTNER gateways will be looked for.
U23841-J-Z915-6-76
233
8
Installing Xprint V7.0
This chapter describes how to install and configure Xprint V7.0 on a system.
8.1
Considerations
Before installing Xprint V7.0 you should define the individual parameters of the
spooler configuration.
If you are not familiar with Xprint V7.0, you should first read the chapter “Introduction to Xprint V7.0” starting on page 5 to get acquainted with the concepts
of Xprint V7.0 and to understand the basic terms used in this section. In
particular you should first define the following configuration parameters:
– Number and names of the hosts planned for your Xprint V7.0 system.
– Hierarchy of the hosts in your system (i.e. which host you want to set up as
the master host and which hosts as potential masters, slaves or parasite
hosts).
– Number of servers and supervisors required for controlling all the printers,
and the hosts on which these are to be set up.
Be aware that Xprint V7.0 is a licensed product. Its usage is protected by a
software key. If you do not have this key at installation time, you can still start
the product and use it with the full functionality during an evaluation period. At
the end of this period, if no license has been installed, you will no longer be able
to use the product at all. See the section “Product licensing” on page 243 for
more details.
i
For more information on installing the product and any last-minute modifications, refer to the Release Notes delivered with Xprint V7.0.
8.2
Configuring the local area network (LAN)
You should configure your LAN before installing Xprint V7.0, otherwise you may
encounter problems when using Xprint V7.0.
i
The following instructions assume that you have experience in administering local area networks; you should also know how to update the
entries in the relevant files of your LAN software. If you have questions
on any of these points, refer to the documentation for your LAN software.
U23841-J-Z915-6-76
235
Setting the language for the Xprint V7.0 system
Installing Xprint V7.0
To configure a network of type TCP/IP you only need to add an entry to the file
/etc/services on each host in the network. This entry must have the identifier
Xprint V7.0_db; the connection number must be the same on all hosts:
Xprint V7.0_db 5999/tcp # Xprint V7.0
service
, the distributed print
The files /etc/hosts and /etc/services should at least have the access
rights -r--r--r--; otherwise Xprint V7.0 might not run smoothly.
8.3
Setting the language for the Xprint V7.0
system
The Xprint V7.0 NLS message files are located in the directory
/var/spool/Xprint/config/MSG. The subdirectories En and De contain the
messages in English and German. To select the desired language for the Xprint
V7.0 system, the shell variable LANG should be set to the correct value (En or De).
In addition, the complete path of the directory holding the Xprint V7.0 message
files (/var/spool/Xprint/config/MSG/%l/%N.cat) should be entered in the shell
variable NLSPATH.
236
U23841-J-Z915-6-76
Installing Xprint V7.0
8.4
Installation (new)
Installation (new)
Xprint V7.0 is delivered on a data medium (CD-ROM or magnetic tape
cartridge) which contains several packages. Depending on the platform, two
installation procedures are possible: pkgadd and cpio. The following figure
provides an overview of the installation process:
Figure 17: Installation procedures
U23841-J-Z915-6-76
237
Installation (new)
8.4.1
Installing Xprint V7.0
Installing with cpio
To install Xprint V7.0, you require a minimum of 15 megabytes free storage
space. Also, the Xprint V7.0 database requires additional storage space the size
of which directly depends on the contents of the database (the number of
servers, printers, PCLs etc.).
To install the Xprint V7.0 software, proceed as follows:
log in as root, change to the /tmp directory and enter the following command:
●
cpio -icvBd Install < <device>
Where device represents the path of the device from which you install the
software, i.e. the pathname of the special file of the magnetic tape drive or
of the CD-ROM drive.
Enter the following command:
●
/tmp/Install
`pwd`
Then the Xprint V7.0 directory is created in which the entire software is going
to be installed.
i
Xprint V7.0 can also be installed in another directory. In this case you
should create a link between the actual Xprint V7.0 directory and the
/var/spool/Xprint directory.
In the case of installations with cpio, DBinstall must be called manually and
there is no automatic configuration of printers.
8.4.2
Installing with pkgadd
The pkgadd command provides another way of installing Xprint V7.0. In the
case of this command, the installation procedure is menu-driven, you only need
to follow the instructions or select one of the options offered by the program.
Start the installation with the following command:
pkgadd -d <device_name>/Xprint V7.0.pkg
device_name represents the identifier of the device from which you install the
software, i.e. the identifier of the magnetic tape drive or of the CD-ROM drive.
238
U23841-J-Z915-6-76
Installing Xprint V7.0
8.4.3
Installation (new)
Installing with sd method
After inserting the media in the correct device, enter the following command and
just follow the guided dialogue:
swinstall
In case of migration from earlier version, it is suggested to take a backup of the
current DB before starting the installation.
U23841-J-Z915-6-76
239
Installation (new)
Installing Xprint V7.0
Initializing the Xprint V7.0 database
To be able to work correctly, Xprint V7.0 requires a database.
This database can be initialized automatically as part of the Xprint V7.0 installation process. The user is asked whether he/she wants a database to be
installed or not. If the user responds with yes, he/she will be asked whether the
database is to be installed in any case or only if an already existing database
has been found to be defective.
If an initialization is started even though there is an old database, this is backed
up in the directory DB.backup in any case, no matter if defective or not.
To restore such a backup database, you must first deactivate the Xprint V7.0
system. Then you must delete the directory config/DB and rename the directory
config/DB.backup to config/DB.
Automatic configuration of printers
Xprint V7.0 offers the option of having printers configured automatically during
installation of the packages. If you select this option, you will be asked to select
one or more printers from a menu in the course of the installation process. To
find out which devices are supported, see the section “Supported printers and
PCLs” in the Reference Manual.
In the case of installations with cpio, DBinstall must be called manually and
there is no automatic configuration of printers.
240
U23841-J-Z915-6-76
Installing Xprint V7.0
8.5
Installation (users only)
Installation (users only)
Xprint V7.0 is delivered on a data medium (CD-ROM, magnetic tape cartridge)
which contains several packages. These packages are installed with the pkgadd
command. The following figure provides an overview of the installation process:
Figure 18: Installation process (Reliant UNIX users)
U23841-J-Z915-6-76
241
Installation (users only)
8.5.1
Installing Xprint V7.0
Installation with pkgadd
The pkgadd command provides a menu-driven installation procedure; you only
need to follow the instructions or select one of the options offered by the
program.
Start the installation with the following command:
pkgadd -d <device_name>
device_name represents the identifier of the device from which you install the
software, i.e. the identifier of the magnetic tape drive. To install Xprint V7.0 from
CD-ROM, use the system administration interface sysadm.
Initializing the Xprint V7.0 database
To be able to work correctly, Xprint V7.0 requires a database.
This database can be initialized automatically as part of the Xprint V7.0 installation process. The user is asked whether he/she wants a database to be
installed or not. If the response is yes, he/she will be asked whether the
database is to be installed in any case or only if an already existing database
has been found to be defective.
If an initialization is started even though there is an old database, this old
database is backed up in the directory DB.backup whether it is defective or not.
To restore such a backup database, you must first deactivate the Xprint V7.0
system. Then you must delete the directory config/DB and rename the directory
config/DB.backup to config/DB.
Automatic configuration of printers
Xprint V7.0 allows you to have printers configured automatically during installation of the packages. If you select this option, you will be asked to select one
or more printers from a menu in the course of the installation process. To find
out which devices are supported, see the section “Predefined printers and
PCLs” in the Reference Manual.
242
U23841-J-Z915-6-76
Installing Xprint V7.0
8.5.2
Installation (users only)
Product licensing
The execution and some features of Xprint V7.0 are protected by a license key.
When you have installed Xprint V7.0 you can use its full functionality without a
key for an evaluation period. At the end of this period, Xprint V7.0 will become
unusable unless a valid key has been installed.
8.5.3
Types of licenses
Different types of licenses can be supplied, depending on the Xprint V7.0
entities you need to configure on your host, the number of devices to be
controlled, or the extra features you wish to use.
Basic licenses
The basic licenses are the following:
●
Xprint V7.0 Local
Xprint V7.0 runs on a single host and not in a domain. This license level
includes all the interfaces (including Mercator and the API), the printing
services (possibility of configuring servers and supervisors) and the
attachment of BSD Printers (BSD fast filter) on one isolated host. Gateways
only support incoming requests from Wprint. Any other interdomain
operation requires the Net Server license (see below). Xprint V7.0 Local is
basically limited to a maximum of 2 devices, but device upgrade licenses can
be added to increase this limit.
●
Xprint V7.0 Net Client
This level offers all the Xprint V7.0 interfaces (including Mercator and the
API). It does not include the possibility of configuring devices on the host.
Xprint V7.0 Net Client hosts can only be configured with SLAVE or PARASITE
responsibility. This does not prevent the administration of the Xprint V7.0
domain from a Net Client, it merely prevents the host from becoming master
of the database. Net Clients can submit jobs to other domains. Gateways
configured on an Xprint V7.0 Net Client can only accept requests from
Wprint, and cannot be used for output.
●
Xprint V7.0 Net Server
This level includes the features of Xprint V7.0 Net Client, and adds the possibility of setting up devices on the host, configuring the host as POTENTIAL
MASTER, and executing fully operational gateways. At least one Xprint V7.0
Net Server license is required in an Xprint V7.0 domain. The number of
U23841-J-Z915-6-76
243
Installation (users only)
Installing Xprint V7.0
devices in a domain is basically limited to 32, independently of the number
of Net Clients and Net Servers. This limit can be increased with device
upgrade licenses.
Device upgrade licenses
These licenses can be installed to increase the number of devices that can be
configured in Xprint V7.0. Without printer upgrade license, a host with Xprint
V7.0 Local is limited to two devices, while a domain is limited to 32 devices.
●
Device Upgrade to 32
can be added to Xprint V7.0 Local and extends the number of devices that
can be defined on the host to 32.
●
Device Upgrade to 128
can be added to Xprint V7.0 Local, or in an Xprint V7.0 domain, and extends
the number of devices to 128.
●
Device Upgrade to 256
can be added to Xprint V7.0 Local, or in an Xprint V7.0 domain, and extends
the number of devices to 256.
●
Unlimited Device Upgrade
can be added to Xprint V7.0 Local, or in an Xprint V7.0 domain, and removes
all limits on the number of devices.
Extra feature licenses
These licenses protect very specific parts of the product.
●
Xprint V7.0 R/3 Kit
This license is required for execution of the client component of the Xprint
V7.0 R/3 kit.
Other special feature licenses exist, but are restricted to specific platforms or
environments.
Site license
This license can be combined with any of the functional features. It allows you
to use the same license key on different hosts. The main advantage of a site
license is that you only have to install one key per domain rather than one key
on each host in the domain.
244
U23841-J-Z915-6-76
Installing Xprint V7.0
8.5.4
Installation (users only)
Installing a license key
Where to install a license key
Basic license keys and extra feature keys need to be installed on every host
where Xprint V7.0 functions are to be enabled. Device upgrade licenses and site
licenses are global to a domain: only one such key has to be installed in a
domain.
One key may cover several features, including the maximum number of devices.
But if several keys are found on a host, Xprint V7.0 will merge all the valid ones
to determine which features are enabled.
Two examples will clarify the interpretation of the keys by Xprint V7.0.
Example 1
Host B
Host C
Net Server
+
SAP
Net Client
Host A
Net Server
+ 256 devices
Host D
Host C has a key for Xprint V7.0 Net Server and the Xprint V7.0 R/3 Kit.
Both hosts A and D need a key to start Xprint V7.0, either Net Client or Net
Server. Host D has a second key that allows up to 256 devices. This device limit
is automatically known throughout the Xprint V7.0 domain.
If no key is present, as for example on host B, Xprint V7.0 can be used during a
limited period after software installation. This possibility is offered only once per
version...
U23841-J-Z915-6-76
245
Installation (users only)
Installing Xprint V7.0
Example 2
A site license needs to be installed only once in an Xprint V7.0 domain. It is
propagated throughout the domain by Xprint V7.0’s internal mechanisms.
Host B
Host C
Site NeT Server
Net Server
+
SAP
Host A
256 devices Host D
A site license is available on B, which offers Net Server. This privilege is given
to all the hosts in the domain. No keys are thus needed on A, C and D.
If keys are found locally while a site key is active, Xprint V7.0 increments the site
key locally with any additional privilege: Host C has Net server from the site
license plus the local key Net Server it already had (no advantage), plus R/3 kit.
Host D has Net Server from the site license. Its second key allows up to 256
devices in the domain.
How to install a license key
The keys to be installed consist of one or more strings made up of printable
characters and spaces. Each string ends with a colon (:) in order to clearly
delimit the final character.
The keys are saved in files whose names are prefixed with DPM (standing for
Distributed Printing Manager). The rest of the filename is free. These files are
located in the directory /etc/.OSL_LICENCE on UNIX platforms and in
Xprint/config/data on Windows.
Two methods can be considered in order to install a license key : manually or
using the xpkey command.
Manual installation
Make sure the directory /etc/.OSL_LICENCE exists and give it the access mode
0555. Create A DPM<suffix> file with the license string exactly as provided,
where suffix is any free string allowed in a file name.
246
U23841-J-Z915-6-76
Installing Xprint V7.0
Installation (users only)
The license string must be on first column of first line of the file. The string in
some cases may be on two lines each ended with the ’:’ character.
Example:
mkdir
chmod
cat >
JG he
^D
chmod
/etc/.OSL_LICENCE
0555 /etc/.OSL_LICENCE
/etc/.OSL_LICENCE/ DPM.0998
iM X3 Ln Fs PM g1 Th FH Gj Dq 0L gf:
0555 /etc/.OSL_LICENCE/DPM.0998
Installation with xpkey:
The same key can be installed with xpkey as follow :
xpkey -i "JG he iM X3 Ln Fs PM g1 Th FH Gj Dq 0L gf:"
Please refer to the “Xprint V7.0 - Reference Manual” for a complete description of
xpkey command.
U23841-J-Z915-6-76
247
9
Xprint V7.0 for Windows
9.1
Approach
Xprint V7.0 for Windows is the port of Xprint V7.0 (UNIX) to the Windows Server
platform. It brings the rich functionality of Xprint V7.0 as a print server to the PC
world and co-exists amiably with the native Windows spooler.
Xprint V7.0 on Windows is not a complete rewrite of Xprint V7.0. It is delivered
with a run-time environment that allows UNIX applications to run on Windows
NT or Windows 2000. Only the graphical Xprint V7.0 management interface
Mercator has been rewritten to look like a standard Windows application.
The architecture is identical to the architecture of Xprint V7.0 on UNIX: server
and supervisors can be defined independently, gateways can be configured for
interdomain printing, and an Xprint V7.0 daemon and database manager run
during the Xprint V7.0 session.
This approach simplifies the integration of the Windows computers into an
existing Xprint V7.0/UNIX configuration: a Windows print server can be added
in an Xprint V7.0 domain exactly like a plain UNIX host. Windows computers
can be defined as potential masters or slaves, and the whole domain can still
be administered from a single point (UNIX or Windows). For the daily Xprint
V7.0 management tasks, the print system administrator does not even need to
know which hosts are UNIX and which Windows. The type of platform hosting
the print server is also totally transparent to the end users and the applications
submitting print requests.
For Windows users printing from graphical applications (word processors,
spreadsheets,...) Wprint can be used to route the print jobs to Xprint V7.0, with
the optional possibility of specifying Xprint V7.0 job parameters or setting
default ones. The full set of Xprint V7.0 commands is also available on Windows
and can be called from a DOS shell window. The xpadd command, for example,
can still be used to print a pre-formatted file received by mail.
U23841-J-Z915-6-76
249
Requirements
9.2
Xprint V7.0 for Windows
Requirements
Xprint V7.0 is designed to run on Windows NT Server 4.0, Windows 2000
Server or on Windows 2000 Advanced Server for Intel processors, and
compatible platforms.
We do not recommend you to run Xprint V7.0 on Windows NT Workstation or
Windows 2000 Professional. The intrinsic restrictions on the number of connections that can be simultaneously open on these operating systems cause Xprint
V7.0 to be relatively unstable.
9.3
Differences from Xprint V7.0/UNIX
The Xprint V7.0 manuals describe Xprint V7.0 on UNIX. In general, their
contents also apply to Xprint V7.0 on Windows. However, there are a number of
differences due to the nature of the operating systems, and these differences
are described in this section.
9.3.1
Installation and license key
The installation of Xprint V7.0 for Windows conforms to the standards for this
platform: a setup wizard guides you in the successive steps of the installation.
The wizard is automatically started when you introduce the CD-ROM medium.
If the wizard does not appear, start it manually by executing D:\setup (if D is
your CD-ROM drive). Wprint, the client program to print from Windows applications, can optionally be installed along with Xprint V7.0.
During the installation you will be prompted for the Xprint V7.0_db entry. This
entry identifies the TCP port number for the Xprint V7.0 database. It is automatically added to the file %SystemRoot%\system32\drivers\etc\services.
Xprint V7.0 must be installed on a local hard drive. The network shared drives
are not supported.
Be careful that temporary files will be stored in the selected installation path.
Indeed, the files to be printed are temporary stored in some installation subdirectories.
At the end of the first installation, two GIP2 gateways are created (a LOCAL and
a PARTNER one) to allow the access from a Wprint client.
250
U23841-J-Z915-6-76
Xprint V7.0 for Windows
Differences from Xprint V7.0/UNIX
You need a license key to use Xprint V7.0. If this key is available to you at installation time you can introduce it during the setup. Otherwise, Xprint V7.0 will run
with the full functionality during a limited period, giving you sufficient time to get
an official license key. If the product has already been installed you can
introduce the definitive key or an upgrade key using the command xpkey -i,
which is described in the Reference Manual.
9.3.2
Integration with Wprint
The Wprint product is the Windows integrated client for Xprint V7.0. This
product provides a very easy way to print from the Windows applications to your
favourite Xprint V7.0 printers and also a powerful management of your print jobs
submitted to Xprint V7.0. This is the major reason why Wprint is delivered on
the same media as Xprint V7.0 for Windows.
For better performance, it is advised to install Wprint and Xprint V7.0 on the
same drive.
The installation procedure proposes three types of installations: "Xprint V7.0
and Wprint" (the suggested one), "Xprint V7.0 only" and "Wprint only".
- The "Xprint V7.0 and Wprint" mode provides a complete solution for your
printing on a Windows server. The applications running on this machine can
print on Xprint V7.0 printers and the jobs can be managed in Xprint V7.0.
- The "Xprint V7.0 only" mode is interesting when the Windows is a print serverwithout any application submitting print jobs.
- The "Wprint only" mode installs only Wprint and is suggested for Windows
workstations.
Concerning the integration for the Wprint configuration, the reader is referred to
the section "2.3.1Graphical interface for administration (Mercator)" and the
description of this specific Windows functionality. If Wprint is installed on a
Xprint V7.0 Windows system, it is recommended to use the local gateway as
entry point in Xprint V7.0.
U23841-J-Z915-6-76
251
Differences from Xprint V7.0/UNIX
9.3.3
Xprint V7.0 for Windows
Start-up and shutdown
Xprint V7.0 appears as a Windows service, which can be controlled from the
Control Panel. The default start-up mode is automatic, meaning that Xprint V7.0
is started and stopped at system boot-up and shutdown respectively.
To start and stop Xprint V7.0, the administrator can either use the xpstart
/xpstop commands or operate the service from the Windows Control Panel.
9.3.4
Responsibilities
The responsibility levels in Xprint V7.0 are described in the section “Responsibilities” on page 67. These levels are based exclusively on user identifiers in
UNIX (for example the root user id) but some of them are mapped to system
privileges on Windows.
The different levels are recognized as follows on Windows:
●
System users, Xprint V7.0 users
All Windows users can submit print jobs and manage their own jobs.
Windows users can also be registered in the Xprint V7.0 database, with their
login id as user name and the node name of the Windows system in the user
host list. They can then be granted the same rights as registered Xprint
V7.0/UNIX users (place print jobs at the top of the queue, print on any
device, security level,...).
●
System administrator
Any user belonging to the Administrators group on Windows is granted
the same Xprint V7.0 privileges on his system as the root user on UNIX.
●
Local Xprint V7.0 administrator (sub-root)
Any system user can be promoted to sub-root by a system administrator or
the Xprint V7.0 administrator, as with Xprint V7.0/UNIX.
●
Xprint V7.0 administrator
Any user registered in the Xprint V7.0 database can be nominated Xprint
V7.0 administrator by modifying the Xprint V7.0 System object.
252
U23841-J-Z915-6-76
Xprint V7.0 for Windows
Differences from Xprint V7.0/UNIX
One special situation that must be described in more detail is the case where
root is configured as Xprint V7.0 administrator (which is the default after
installation). The mapping of the Windows members of the Administrators group to the UNIX root user when root is configured as Xprint V7.0
administrator means that any member of this group is recognized as Xprint
V7.0 administrator. On Windows, it is possible to exclude a member of the
Administrators group from the Xprint V7.0 administration privilege
merely by creating a user with his login name in the Xprint V7.0 database.
So, if root is set as Xprint V7.0 administrator of the domain, only those
members of the Administrators group who are not registered in the
database will be recognized as Xprint V7.0 administrator. However, the
members of the Administrators group who are registered in the database
retain their system administrator rights in Xprint V7.0.
9.3.5
Printer support
Xprint V7.0 for Windows supports the following printers:
– network printers which can be accessed at a given IP address and TCP port
number
– Windows workgroup shared printers
– directly attached printers, connected locally to a serial or parallel port.
The detection of printer errors (for example end of paper) and the related
recovery procedure are only provided on network printers. The directly attached
Windows printers and workgroup shared printers can be used for printing, but
without any polling of the device status.
LAN printers
The configuration is the same as with Xprint V7.0 on UNIX, for example:
xpadd -dev LANpr -da “193.220.12.12 9100” -coLAN -pcHP-LASERJET
Workgroup Shared printers
Xprint V7.0 for Windows can print to printers shared by a Windows station. The
Xprint V7.0 device must be defined with a PARALLEL connection type and the
Windows UNC for device address, i.e. the device address is in the form
\\<hostname>\<printer>, as in the following example:
xpadd -dev NTPr -da “\\D241PCNT\HP” -coPARALLEL -pc HP-LASERJET
where D241PCNT is the name of the Windows computer sharing the printer HP.
U23841-J-Z915-6-76
253
Differences from Xprint V7.0/UNIX
Xprint V7.0 for Windows
Under Windows, the printer must be shared in a way that allows the operation
Print for the account System of the Windows station where Xprint V7.0 runs.
Directly attached printers (serial or parallel connection)
Xprint V7.0 for Windows is able to print to devices connected to the local ports
of the computer. The device address must be the path to the corresponding
Windows reserved file. The reserved files for serial printing are COM1, COM2, …
and for parallel printing LPT1, LPT2,... The following examples show how to
define a parallel and a serial printer in Xprint V7.0:
xpadd -dev PCparallel -da LPT1 -coPARALLEL -pc HP-LASERJET
xpadd -dev PCserial -da COM1 -coSERIAL -pc HP-LASERJET
i
If a printer is defined in the native Windows Spooler on a port which is
also used by an Xprint V7.0 printer, all the jobs printed with Xprint V7.0
are automatically redirected to the Windows Spooler. The Spooler
manages the concurrence with its own jobs, so the jobs from Xprint V7.0
and the native Windows Spooler are properly serialized.
As already mentioned, it is not possible to retrieve the device status from directly
attached printers, and the serial port driver on Windows also expects some
initialization from the Spooler. It is therefore advised to always define the serially
connected devices in both Xprint V7.0 and the native Spooler.
9.3.6
Logging
On Windows, Xprint V7.0 records its logging information in the system event
log. The logging messages can be retrieved with the Event Viewer (Start /
Programs / Administrative Tools (Common) / Event Viewer). The
messages can be found in the Application category (menu item Log /
Application.)
The logged messages are the same as on UNIX.
9.3.7
Interoperability with the BS2000 DPRINT system
It is possible to exchange print requests between Xprint V7.0 on Windows and
the BS2000 DPRINT print system. The only requirement is to install the file
transfer product "openFT" on the Windows machine where the LOCAL Xprint
V7.0 gateway GIP2 is running.
254
U23841-J-Z915-6-76
Xprint V7.0 for Windows
Differences from Xprint V7.0/UNIX
Be careful, the minimal version of openFT supported is the 6.0C00 and this
product must be installed in "multi-user" mode.
To configure the openFT product and GIP2 gateways please refer to the
manuals of this product.
The specific Windows operations to be performed are the following ones:
Concerning openFT:
- a password must be provided to openFT in order to enable the asynchroneous
file transfers. This is to be performed via:
’Start/Programs/openFT/Security Administration’
- the admission set of this account must allow every action.
Concerning Xprint V7.0:
- the same account and password must be provided via the tool:
'set_FTuser -i -' (for the local logged user account)’
or
'set_FTuser -i <DOMAIN> <USER>' (for any user account)’
ex: 'set_FTuser -i domain1 usertest' or user 'usertest' in domain 'domain1'
9.3.8
WINDOWS 2000 special files
Windows 2000 supports additional file types such as encrypted and migrated
files. With this new version of Xprint V7.0, these files are handled as described
hereafter.
Printing encrypted files
Xprint V7.0 runs under the system account. This account does not permit Xprint
V7.0 to access encrypted files. To print encrypted files with Xprint V7.0, two
ways are possible.
1. Encrypted files can be printed using the -cp option that makes a copy of the
file to be printed into an Xprint V7.0 temporary directory. The copy is made using
the current user account, immediately after he/she issues the xpadd command.
That copy is not encrypted and is stored in a temporary directory where it can
be accessed by everybody.
U23841-J-Z915-6-76
255
Differences from Xprint V7.0/UNIX
Xprint V7.0 for Windows
2. To deal with encrypted files without using the -cp option, Xprint V7.0 has to
impersonate a privileged user before accessing encrypted files. The
xpsetuser command can be used to store in a file privileged users accounts
and passwords that Xprint V7.0 will use later to gain access to the encrypted
data.
Two different kinds of accounts can be stored:
– Personal user accounts can be stored by all users in a Xprint V7.0 data file.
These accounts and passwords are coded and writen in the file users.dat
in the subdirectory Xprint V7.0\data\ENC on the local host.
– A default account can be created by an administrator. Only one default
account is supported; each new default account replaces the preceding one.
This information is coded and writen in the file default.dat in the subdirectory Xprint V7.0\data\ENC on the local host.
When a job is sent, Xprint V7.0 firstly checks the job owner’s access rights to
the file to print. If the job owner has not enough rights to view the encrypted file,
the job is rejected (with an access error message).
If the file to print is encryted, then Xprint V7.0 checks if an account exists for the
job owner in the users.dat file. If not, Xprint V7.0 tries to use the account
from the default.dat file.
If no privileged user account can be used for the current job, the job is refused,
and the user is suggested to use the -cp option.
xpsetuser command can be used at any time. This command is also invoked
automatically, in graphical mode, at the end of installation.
Example:
The file d:\bills\june.prt is encrypted by user “editor”.
The file d:\bills\april.prt is encrypted by user “supervisor”.
The file d:\bills\july.prt is encrypted by user “revisor”.
On Xprint V7.0, the accounts & passwords for user “editor” have been registered
in the default.dat file.
The users “revisor” and “supervisor” are registered in the users.dat file.
Assuming that “manager”, “supervisor” and “revisor” have read/write access to
the files in the d:\bills subdirectory, and that the -cp option will not be used:
– The user “manager” can print the file d:\bills\june.prt.
256
U23841-J-Z915-6-76
Xprint V7.0 for Windows
Limitations and restrictions
– The user “supervisor” can print the files d:\bills\april.prt and d:\bills\june.prt.
– The user “revisor” can print the files d:\bills\july.prt and d:\bills\june.prt.
See reference guide for a complete description of xpsetuser command.
Migrated files
Migrated files are located on removable storage media. To access such files, the
user intervention is sometimes required to confirm the recall of the files and/or
to mount the required removable storage medium. Consequently, migrated files
can only be printed using the -cp option that permits making a copy of
submitted files using the user account. In that case, the user would be invited to
confirm the recall of the files immediately after issuing the xpadd command. If
the required storage medium is not yet mounted, the user is also invited to
mount it.
If the -cp option is not used for migrated file, the request is rejected with access
error on the file. The user is suggested to use the -cp option.
9.4
Limitations and restrictions
The following limitations are specific to Xprint V7.0 for Windows:
– xprdir, xpmount and xpconf_dev are not available on Windows.
– Windows hosts cannot be configured as PARASITE.
– the notification method MAIL is emulated by the Windows Messenger
Service.
– no fax or mail support.
– DBinstall comand does not support the -l option.
– Mercator reduced map is not supported on Windows.
– access to shared drives by means of the xpsetuser command.
– the wildcards in document names are not supported on Windows due to
system restrictions.
– the BSD gateway option 'SRVTYPE=WINNT' is not supported.
U23841-J-Z915-6-76
257
10
Appendix
This Appendix contains various informative sections, tables and worksheets for
configuring and using Xprint V7.0.
In detail:
Section
Page
Worksheet for configuring a new host
260
Checklist for adding a new printer
263
Selection criteria lists
266
SNMP Agent
268
Axis box support
270
TV-CC Integration
270
Fax and mail support
271
Table 30: Overview of Appendix sections
U23841-J-Z915-6-76
259
Worksheet
Appendix
Worksheet
Host name
Location
Disk capacity (MB)
Free capacity (%)
Copy of database/host type
Yes
No
Connected printers
Type
Name
Port type
Device address
Supervisor name
Supervisors used
Name
Server name
Host name
Figure 19: Worksheet
260
U23841-J-Z915-6-76
Appendix
Worksheet
Filling out the worksheet
You should fill out a separate worksheet for every host in the network that is to
use the distributed spooler system. First enter the name of the relevant host in
the network in the top left field “Host name”. The computer will later be entered
as an Xprint V7.0 host under this name. In the field to the right of it you can
enter the location of the computer for your reference.
Then find out the overall disk capacity in Mbytes for the relevant host and the
free capacity in percent. You need this information to decide whether this host
is to receive a copy of the Xprint V7.0 database or not. Together with the
responsible system administrator you can then define whether a copy is to be
made or not. The database must be stored on at least one of the computers in
the network. To guarantee availability, however, it is advisable to have several
copies in the network. In addition, hosts which do not hold a copy of the
database (what are called parasite hosts) can only use Xprint V7.0 if the
supporting host assigned to them is running with the database. In addition, the
processor architecture (Intel, RISC) of the parasite and the supporting host
must be identical. The database is then shared via a network file system such
as NFS.
i
You should only forego copying the database if the relevant host has little
or no free disk capacity.
When you have defined whether a copy of the database is to be stored on the
host, decide on the host type of this computer. If the host is to run without a
database, enter PARASITE in the “Host type” field.
If the host is to hold its own copy of the database, you must still decide whether
it can be the master host, i.e. whether this host can take over the administration
of the database and its distribution on the other hosts with a database, or
whether it can only play a passive role. The default for defining a new host is
potential master, i.e. the host can administer the database. In this case enter
POT_MASTER in the “Host type” field.
If the host is to hold a passive copy of the database only, enter SLAVE in the
“Host type” field of the worksheet. A slave can still use the printers of all the
other slaves and the connected parasite hosts in the event of all potential
masters failing.
Next, you should note down all the printers connected to the host. First enter the
specifications for the “Type”, “Port type” and “Device address” in the corresponding columns of the table. Under “Type”, for example, note the type
identifier of the printer, such as HP-Laserjet or PostScript.
U23841-J-Z915-6-76
261
Worksheet
Appendix
For “Port type” you have four options:
SERIAL
if the printer is connected to a serial port of the computer
PARALLEL
if the printer is connected to a parallel port of the computer
LAN
if the printer is a LAN printer that is directly integrated in the network. In
this case, the printer is not directly connected to a computer, but Xprint
V7.0 requires that it be monitored from one of the computers involved.
LAN printers also have an Internet address and a port number. The
Internet address can be specified directly or in form of a host name from
the file /etc/hosts.
SCSI
if supported by your system.
Depending on the port type, you must then specify a device address for each
printer. The structure of the device address depends on the port type. It
specifies the special device file for the port to which the printer is connected, or,
in the case of LAN printers, via which network address and which network type
the printer is addressed. The following table contains a number of concrete
examples of device addresses of printers:
Port type Device address
SERIAL
/dev/term/tty001
first serial port of the host
/dev/term/tty002
second serial port of the host
PARALLEL /dev/lp0 or
/dev/lp
LAN
first parallel port of the host
/dev/lp1
second parallel port of the host
129.12.73.68 9100
Internet address and port number of a LAN
printer (TCP/IP). Ask the responsible network
administrator for the Internet address of the
desired printer
or
SCSI
Remark
lan_printer 9100
where lan_printer is the corresponding name
for 129.12.73.68 registered in /etc/hosts
e.g.:
/dev/io0/sprin022
Device address of the SCSI printer
Table 31: Device addresses (examples)
262
U23841-J-Z915-6-76
Appendix
Checklist for adding a printer
When you have entered all the given data in the worksheet, you can fill out the
other fields concerning printers (“Name” and “Supervisor name”). It makes
sense to have the Xprint V7.0 administrator assign these globally to make sure
that the names are unique within the Xprint V7.0 network. You can choose any
name you wish, but every printer must be given a unique name. The printers can
be named, for example, according to their type, their location, or the computer
to which they are connected. It is only important that the names are unique
throughout the network.
On every computer to which printers are connected, there must be at least one
supervisor defined which controls these printers. Whether several printers are
to be controlled by one supervisor or whether each printer is to have its own
supervisor, depends on the resource requirements (processes) and on availability considerations. Each supervisor entered in the “Connected printers” table
in the worksheet must also be entered in the “Name” field in the “Supervisors
used” table.
Each supervisor is controlled by a server, for which purpose any server in the
network can be used. For each local supervisor on the computer, enter the
name of the server responsible for this supervisor (“Server name” field) and on
which computer the server runs (“Host name” field).
As already described, a default supervisor/server can be used for each host. By
default, these are named after the corresponding host.
When you have completed the worksheet, the computer can be added to the
Xprint V7.0 system.
Checklist for adding a printer
There are a large number of options available for the xpadd -dev command,
which allow you to optimally adjust every printer in the Xprint V7.0 system to
meet the requirements of your environment. To be able to make the best
possible use of these options, you may have to set up permission lists, forms,
fonts, filters etc. before adding a new printer to the system. Furthermore, you
should know which printer attributes are supported by the PCL of the new
printer. Use the following questions to check whether all the requirements for
using the
xpadd -dev command are fulfilled.
U23841-J-Z915-6-76
263
Checklist for adding a printer
Appendix
Questions
1
Has the address of the new printer been defined in the system?
2
If you do not want to use the default supervisor: does the supervisor of
the new printer already exist on the host on which the printer is to be
added?
If this is not the case, first set up the supervisor and then add the printer.
3
Are the attributes you have selected for the new printer compatible with
its PCL?
Compare the attributes with the LONG display of the xpshow -pcl
command for the PCL you have selected. In the event of inconsistencies,
the xpadd -dev command is rejected.
4
If use of the new printer is to be restricted to a specific group of users: is
there a suitable permission list already available in the Xprint V7.0
system?
The section “Creating a permission list” on page 144 contains a
description of how to set up a permission list.
5
If you want to define a default form for the printer: is this form already
defined in the Xprint V7.0 system?
For information on how to add a form, see the section “Administering
forms” on page 156.
6
Can the form you have selected as the default form for the printer be
mounted automatically?
If this is not the case, select another form or change the option -mm to
AUTOMATIC for the selected form.
7
Is the layup of the default form of the printer compatible with the PCL of
the printer?
See the LONG displays of the commands xpshow -frm and xpshow
-pcl to check this. If the layup is not compatible, modify the -ls option
of the form accordingly.
8
264
Is the font of the default form compatible with the printer’s PCL? See the
LONG displays of the commands xpshow -fnt and xpshow -pcl to
check this. If it is not compatible, modify the form accordingly. If there is
no suitable font available, you might have to add a font to the Xprint V7.0
U23841-J-Z915-6-76
Appendix
Checklist for adding a printer
system.
For information on adding a font, see the section “Administering fonts” on
page 152.
9
Is the printer to use a specific set of recovery rules for error recovery?
In this case make sure that a suitable object is available in the Xprint V7.0
system. The section “Administering recovery rules” on page 186
contains detailed information on creating and setting up recovery rules.
10
Is the printer backend to activate a fast filter before printing the jobs?
If this is the case, check if the relevant filter is already available in the
Xprint V7.0 system.
The section “Administering filters” on page 162 contains information on
how to set up a fast filter. Is the printer backend to activate a fast filter
before printing the jobs? If this is the case, check if the relevant filter is
already available in the Xprint V7.0 system.
The section “Administering filters” on page 162 contains information on
how to set up a fast filter. Is the printer backend to activate a fast filter
before printing the jobs? If this is the case, check if the relevant filter is
already available in the Xprint V7.0 system.
The section “Administering filters” on page 162 contains information on
how to set up a fast filter. Is the printer backend to activate a fast filter
before printing the jobs? If this is the case, check if the relevant filter is
already available in the Xprint V7.0 system.
The section “Administering filters” on page 162 contains information on
how to set up a fast filter. Is the printer backend to activate a fast filter
before printing the jobs? If this is the case, check if the relevant filter is
already available in the Xprint V7.0 system.
The section “Administering filters” on page 162 contains information on
how to set up a fast filter.
If you have checked all the points listed above and if all the options to be used
are compatible with the printer’s PCL, you should not have any problems in
adding the printer.
You can find a list of the predefined PCLs in the appendix of the Reference
Manual.
U23841-J-Z915-6-76
265
Selection criteria lists
Appendix
Selection criteria list
General requirements
In many cases you will directly enter specific names for your operations.
However, there may be times when you will want to apply changes, for example,
to several users with the same privileges, or you might not know the exact name.
In such cases you can use specific criteria to select all the objects corresponding to these criteria. These criteria are specified in what is called the
selection criteria list; in general these are the same options as you use with the
xpadd command when you add an object to the Xprint V7.0 system for the first
time. This option has the following format:
-scl “selection_criteria_list”.
When specifying a selection criteria list, you must observe the following:
– The entire list of criteria must be enclosed in quotes.
– By means of the selection_criteria_list, you can select, for example, all the
jobs that are to be printed on a specific date; you can display all the users
who have already printed more than 1000 pages; you can assign a new
security level to all the users with a specific security level.
– In the selection_criteria_list you can specify several criteria simultaneously.
These must be separated by blanks.
– In the selection_criteria_list you can specify almost all the options you can
use with the xpadd command (see also Xprint V7.0 V5.2A - Reference
Manual). There are, however, certain restrictions and also additional
features. These are described further below in the section “Special cases”.
– Specifying the wildcards * (any number of characters) and ? (exactly one
character) is allowed for arguments of non-numeric options.
– For options without arguments (Boolean options) you can find out whether
the relevant option was specified or not by following it with a + or - character.
– In the case of options that allow you to specify several combined values, the
selected objects are those which have at least the specified values set. To
search exclusively for the objects for which exactly the specified values are
set, follow the option with the = character.
266
U23841-J-Z915-6-76
Appendix
Selection criteria lists
Example
The following command deletes all the devices with the XON protocol:
xpdel -dev -scl "-po XON"
Special cases
This section describes all the xpadd options which are not available as criteria
or which are available additionally.
All objects
Except with -job, -hos and -usr, you can additionally use the option -ad. This
option is used to select the objects which are assigned to an existing administrator.
Printers
– With the -st option you can select all the devices with a specific status; this
can be ACTIVE or NOT_ACTIVE.
– With the -si option you can select devices with a specific spoolin state;
possible values are ON or OFF.
– With the -so option you can select devices with a specific spoolout state;
possible values are ON or OFF.
– With the -rd option (for redirection) you can select devices with automatic
redirection to a specific printer.
Printer groups
With the -si option you can select device groups with a specific spoolin state;
possible values are ON or OFF.
Print jobs
– With the -jo option you can display the jobs assigned to a specific job originator.
– With the -st option you can select jobs with a specific job status. The
following values are possible: ACTIVE, WAIT, TOP, SUSPEND,
DATA_FILTERING, SCHEDULED, INTERRUPTED and TERMINATED.
U23841-J-Z915-6-76
267
SNMP Agent
Appendix
– You can use the -ik option to select jobs with a specific status by means of
a keyword (e.g. NOT_ACTIVE) (see xpstat -job)
– The options -jt, -te and -sx cannot be used for job selection.
Supervisors
With the -st option you can select supervisors with a specific status; possible
values are ACTIVE or NOT_ACTIVE.
Servers
– With the -st option you can select servers with a specific status; possible
values are ACTIVE, NOT_ACTIVE or SHUTDOWN.
– With the -si option you can select servers with a specific spoolin state;
possible values are ON or OFF.
– With the -so option you can select servers with a specific spoolout state;
possible values are ON or OFF.
Gateways
– You can use the -st option to select gateways with a specific status;
possible values are ACTIVE and NOT_ACTIVE.
– You can use the -gi option to select those gateways which have a specified
gateway input status; possible values are ON and OFF.
– You can use the -go option to select those gateways which have a specified
gateway output status; possible values are ON and OFF.
Hosts
The options -po and -pd cannot be used for selecting hosts.
SNMP Agent
The Xprint V7.0 SNMP sub-agent is based on the UCD-SNMP (NET-SNMP)
software on Linux and Unix platforms and on the SNMP Microsoft service on
Windows NT and Windows 2000.
268
U23841-J-Z915-6-76
Appendix
SNMP Agent
The Xprint V7.0 objects supported by the SNMP agent are hosts, devices,
device groups, servers, supervisors, gateways and jobs. For each of these
objects, there is a table in the Xprint V7.0 MIB. These tables contain all the
attributes displayed by the xpshow and xpstat commands for the corresponding
objects. The description of each attribute can be found in the comments of the
MIB file. The MIB file (Xprint V7.0-MIB.txt) is installed in the SNMP subdirectory
of the Xprint V7.0 installation directory.
For all supported object types except jobs, the complete domain configuration
is accessible. In the specific case of jobs, only jobs managed by local servers to
the agent host are visible.
The purpose of this agent is the monitoring of Xprint V7.0 activity but not the
administration. Therefore, only read access is allowed via SNMP agent.
Moreover, no SNMP trap functionality is supported.
Be aware that objects from another domain (for instance the partner gateway...)
are always shown as not active. The purpose of the SNMP agent is to monitor
objects from the domain, not the objects from another one.
For efficiency, the Xprint V7.0 information is first completely stored in a "Cache
area" responsible for collecting the complete definition and state of each
supported object. This "cache" is notified about configuration updates except for
hosts becoming "unreachable" due to system or network crash or devices in
error but located on another host than the agent system. The latter situations
are anyway detected via a polling mechanism.
The SNMP agent has also a copy of this information in order to boost access.
This copy is automatically resynchronised with the "Cache" contents after a
given delay.
The information accuracy is determined according to two extended options of
the host object (where the SNMP agent is running):
– XP_CM_POLL_TIME: period for devices and hosts state refreshing in the
"Cache" area. This time determines the maximum time before detection of a
host no longer reachable or of a DEVICE_ERROR state occurring on
another host than the SNMP system. The value must be a number
expressing the time in seconds. The default value is "300" (5 min). A value
"0" disables this refresh operation and could lead to incorrect states of
devices and hosts.
– XP_CM_DISABLE_JOBS: When the monitoring of jobs via the SNMP agent is
not requested, performances will highly improve. A non null value disable the
monitoring of jobs and a value of "0" resets to the default behaviour. This
option is only taken into account at startup.
U23841-J-Z915-6-76
269
Axis box support
Appendix
– XP_SNMP_SYNC_TIME: Validity period for the SNMP agent copy of the Xprint
V7.0 information. Any access to Xprint V7.0 agent after this time will enforce
a resynchronization of the SNMP agent copy with the "Cache Area". The
value must be number expressing the time in seconds. The default value is
"10" (10 seconds). The value "0" means that the resynchronization with the
"Cache" information occurs at each SNMP access.
The installation aspects are detailed in the release notice.
Axis box support
Introduction
Two axis fast filters have been written to allow Xprint V7.0 to submit job to printer
attached to an axis box and to have a follow-up of the printer status ( i.e. : Printer
Off, Paper End , ...... ).
These filters are implemented via programs respectively called "prosbsd" for the
axis firmware <= 5.20 and "prosbsd6" for axis firmware >= 6.0. The axis box
having a firmware version comprised between 5.20 and 6.0 are not currently
supported by Xprint V7.0. It is suggested to upgrade the axis box firmware to a
version 6.0.
Configuration
The configuration is detailed in the reference guide appendix.
TV-CC integration
When installing the package SIsplgu on a platform where Transview Control
Center product is installed (package TV-CCA at least version 3.1A), Xprint V7.0
is automatically integrated in TV-CCA.
Such integration allows the monitoring of Xprint V7.0 printers: any printer error
will be intercepted by TV-CC that may initiate a reaction via the Xprint V7.0
graphical interface.
270
U23841-J-Z915-6-76
Appendix
Fax and mail support
Fax and mail support
Xprint V7.0 fax and mail support is available on the Unix platforms. The fax/mail
software supported by Xprint V7.0 as well as the versions and the platforms on
which the fax/mail solution is certified are given in the following. Even if not
listed, other versions or platforms may be compatible with Xprint V7.0 .
VSI-FAX version 3.5.2 on SCO UNIX
Optio FaxFX version 2.54 on SCO UNIX
TOPCALL version 3.0 runs on Windows NT. The TOPCALL support in Xprint
V7.0 is certified on every supported UNIX system.
SMTP: any SMTP server that is compatible with RFC 1521 can be used. The
SMTP support in Xprint V7.0 is certified on every supported UNIX system.
Please inquire about the document formats your fax software supports. Using
an unsupported format does not generate any error in Xprint V7.0 (it is only a
document carrier to the fax software) but will lead to unexpected fax output.
Optio FaxFX does not support the PJL printer language (embedded in
Postscript files for instance).
The fax and mail support is not available on the Windows platforms.
U23841-J-Z915-6-76
271
Glossary
Backend
This is a driver program responsible for controlling printers. In addition, it is
responsible for error recovery and printer status information.
Character set
The letters, digits, punctuation marks and symbols available for a font.
Direct printing
Under Xprint V7.0 you do not necessarily have to place a print job in the print
queue. You can also send a print job directly to a printer; in this case,
however, the job cannot be modified after submission.
Encrypted files
The Encrypted File System (EFS) introduced in Windows 2000 is used to
prevent unhautorized access to sensitive stored data.
Fast filter
This is a program which enhances the functionality of Xprint V7.0. Above all,
fast filters are used to enhance the backend program, i.e. their main function
is to detect feedback messages from the printer and to pass them on to the
responsible supervisor in a form it can understand. They are executed
between the supervisor and the printer when the job is being printed.
Filter
A filter is a program which enhances the functionality of Xprint V7.0. The
system differentiates between fast filters and slow filters.
Font
Fonts are Xprint V7.0 objects which combine the different pieces of font
information (typeface, style, character pitch, line spacing, print quality and
character set) under one name.
Form
This is an Xprint V7.0 object with which you can have documents output in
a predefined layout.
U23841-J-Z915-6-76
273
Glossary
Gateway
Gateways are Xprint V7.0 objects which allow the connection of an Xprint
V7.0 domain with different systems (other Xprint V7.0 domains, BSD-UNIX
systems, etc. Jobs can be exported as well as imported via gateways. There
may be several gateways running simultaneously on one host.
HOME directory
This is the directory in which a user is located after logging in to the
Outputware system.
Host
This is the central computer to which the terminals and printers of the users
are connected. Under Xprint V7.0 every computer defined in an Xprint V7.0
domain is referred to as a host. Hosts are divided into three categories:
master, slave and parasite hosts. The difference lies in the way each one
handles the Xprint V7.0 database.
Job
See print job.
Job identifier
Every print job is automatically assigned a character combination called the
job identifier when it is added to the print queue. This job ID is required to
make changes to a submitted job.
Job template
A job template is an object which can store a sequence of specific options
of the xpadd command which are used frequently for spooling in print jobs.
If a user specifies this job template when submitting a print job, Xprint V7.0
automatically uses the predefined options of the template; this saves the
user the effort of specifying frequently recurring option sequences again and
again.
Loadable Resource
This is an Xprint V7.0 object that may be used for printing documents.
Resources are data that are document independent and loaded to the
printer separately from the user’s data. Documents can then call
downloaded resources.
274
U23841-J-Z915-6-76
Glossary
Master host
A master host holds the master copy of the Xprint V7.0 database. When Xprint
V7.0 is introduced in a network, the first computer on which Xprint V7.0 is
installed and started assumes the role of the active master host. If Xprint
V7.0 is terminated on the active master, the next potential master host in what
is called the host hierarchy assumes its function as active master host.
Migrated files
These are files stored on a remote media in order to extend disk space using
the remote storage facility from Windows 2000.
Object
This is a generic term for the individual components with which you work
under Xprint V7.0 (e.g. printers, printer groups, print jobs, forms).
Option
These are special instructions used to govern command execution. All
options are preceded by a minus sign (-). With most of the Xprint V7.0
commands you can specify several options (also simultaneously). The
command line xpadd -dr text -de printer -fm form1, for example, contains
the options -dr, -de and -fm which are used to alter the function of the
xpadd command.
Parasite host
A parasite host is a host which does not have a copy of the Xprint V7.0
database. It requires Xprint V7.0 to be running on a specific computer which
is assigned to it as the database server if Xprint V7.0 is to be accessed from
the parasite host.
PCL (printer capability list)
This is an object containing all the information Xprint V7.0 needs for
controlling a printer. It describes how print options are to be converted into
the corresponding control characters the printer needs. Furthermore, it
contains information on the technical features of the printer (e.g. its
connection protocol) and the conversion of common control characters (form
feed, line feed, etc.) performed by the printer. It also describes how the
dialog is to be conducted with the printer.
U23841-J-Z915-6-76
275
Glossary
Permission list
Permission lists are Xprint V7.0 objects, in which access rights for other
objects are defined. There are permission lists for users (USER) and forms
(FORM) and Xprint V7.0 distinguishes two types of permission list: allowed
lists and denied lists. The former comprise lists of users (or forms) that are
allowed to access specific objects, e.g. printers (or which may be used on
the printers to which the list is assigned, respectively). The latter list objects
which are not allowed to access specific objects, for example printers (or
which may not be used on the printers to which the list is assigned, respectively).
Print job
When one or more files are sent off for printing via the xpadd command or
the menu interface, these are combined to form an object named “print job”
and subsequently treated as such by Xprint V7.0. At spoolin, every print job
is assigned a job identifier under which it can later be addressed, e.g. to
change the formatting.
Printer capability list
See PCL.
Printer group
You can combine several printers to form a printer group. Users can then
send a job to this group, whereupon the job will be printed on the first printer
in the group to become available. This avoids long wait times, which might
occur if only one destination printer is selected. Nevertheless, users can still
address any printer in a group individually.
Prompt
When the system is started in command mode or in a shell window, a
character sequence appears on the screen indicating that the command
interpreter is ready for Outputware commands to be entered. Under
Outputware such a prompt might look like this:
(xprintadm@nashua)/home/peter:
This example shows a prompt which gives the name of the user (xprintadm)
and the name of the host on which the user is logged in (nashua) in parentheses. This is followed by the current directory.
276
U23841-J-Z915-6-76
Glossary
Raw mode
When a print job is spooled in in raw mode, Xprint V7.0 sends this file to the
specified printer without any formatting or processing by a filter.
Recovery rule
Recovery rules are used to define the error recovery procedure in the case
of specific printer conditions.
SCSI driver
The SCSI peripheral driver communicates with the SCSI host adapter server
instead of directly with the hardware. It contains entry-point routines to pass
user-level request to open and close the device or to read and write data.
The SCSI peripheral driver populates a request structure with this information, then passes the information to the SCSI host adapter driver. The
host adapter driver handles the direct communication with the hardware.
Server
Servers are the Xprint V7.0 objects which administer incoming print jobs and
are responsible for scheduling them. Every server manages its own print
queue, which contains all the print jobs for the printers whose supervisors the
server controls.
Slave host
A slave host is a host which holds a complete copy of the Xprint V7.0 database
but cannot become active master host itself.
Slow filter
This is a program enhancing the functionality of Xprint V7.0. Slow filters are
executed in parallel to the spooling process, i.e. after job submission and
before printing. They convert data or allow special print modes such as
printing in columns or in landscape mode.
U23841-J-Z915-6-76
277
Glossary
SNMP agent
The Simple Network Management Protocol, abbreviated SNMP, is the
Internet standard protocol for exchanging management information between
management console applications and managed entities. SNMP uses a
distributed architecture consisting of managers and agents. An agent is an
SNMP application that responds to queries from SNMP manager applications.
The SNMP protocol provides a set of rules to monitor and manage network
resources including both hardware components and software applications.
In the context of Xprint V7.0, the SNMP agent exports Xprint V7.0 information (resources definition and status). The list of exported attributes is
described in a MIB file delivered in the Xprint V7.0 package.
Supervisor
A supervisor is directly in charge of controlling one or more printers. It
receives the job data from the superordinate server and passes it on to the
backend program.
Xprint V7.0 database
The Xprint V7.0 database contains all the data Xprint V7.0 needs to be able
to access the Xprint V7.0 resources. This includes information on the
defined hosts, Xprint V7.0 users, printers and printer groups as well as on forms,
filters, gateways and
servers. Only the print jobs are stored on the server, which is responsible for
their administration.
Xprint V7.0 domain
All the Xprint V7.0 objects, in particular the hosts, for which an entry exists in
a shared Xprint V7.0 database and which are administered by a single Xprint
V7.0 administrator.
Xprint V7.0 user
An Xprint V7.0 user is a user who is registered in the Xprint V7.0 database.
Xprint V7.0 allows extensive manipulation of the privileges of the Xprint V7.0
users within the Xprint V7.0 system.
278
U23841-J-Z915-6-76
Related publications
[1]
Xprint V7.0
Application Programming Interface (API)
User Guide
Target group
This manual is for programmers who want to make use of the Xprint V7.0
functionality in their programs.
Contents
The manual describes how you can use the functions of Xprint V7.0 API
in your own programs. Furthermore, it contains a reference of all Xprint
V7.0 API functions and the corresponding macros and functions.
[2]
Xprint V7.0
Reference Manual
Target group
Users and Administrators of Xprint V7.0.
Contents
This manual describes all the Xprint V7.0 commands and files and
serves as a reference book which contains all the information required to
use and administer Xprint V7.0.
[3]
Xprint V7.0
Graphical User Interface
User Guide
Target group
Users, system administrators, printer managers and programmers of
Xprint V7.0
Contents
Description of Xprint V7.0 Mercator User Interface for operation, administration and maintenance.
U23841-J-Z915-6-76
279
Related publications
[4]
Wprint V3.1
User Guide
Target group
Windows administrators and Wprint NT users
Contents
Description of the installation, configuration and operation of Wprint
V3.1, the Xprint V7.0 client for Windows NT.
Please apply to your local office for ordering the manuals.
280
U23841-J-Z915-6-76
Index
A
access rights
permission lists for forms 12, 75
permission lists for users 12, 75
specify allowed list 75
specify denied list 75
activate
gateway 232
printer 118, 120
printer group 131
server 194, 197
supervisor 201, 203
add
filter 162
font 152
form 157
PCL 180
printer 103, 116
printer to printer group 129
server 193
supervisor 200
administration 85
administrator
set up 98, 100, 104, 107, 213
application program
specifying the print command 37
auditing 85
Axis 270
B
BC-XOM 8
C
change
printer port 122
server status 197
supervisor status 203
character pitch 72
character set 72
command
xpadd 79
U23841-J-Z915-6-76
xpchange 82
xpdel 80
xpmod 81
configure
gateway 213
host 105
LAN 235
new host 98, 105
on stand-alone system 101
printer 117
copies
of individual pages 35
D
data format 61
database 97, 99, 103, 106
DBinstall 86
deactivate
gateway 230
printer 118
printer group 130
server 197
supervisor 203
default destination
set up 20
default identifier (print job) 49
define
filter 165
job template 46, 174
job template (simplified) 175
loadable resource 171
new font 152
new font (simplified) 153
new form 157
new form (simplified) 157
new supervisor 200
new supervisor (simplified) 201
PCL 185
server 116
server (simplified) 195
user 133
281
Index
delete
filter 167
font 154
form 158
gateway 229
job template 177
loadable resource 173
PCL 181
print job 65
printer group 132
server 196
supervisor 205
user 137
determine network structure 97, 104
display
form 42
job templates 45
loadable resource 31, 173
objects 55
printer 117
server 116
documents
modify font 24
print 17
print directly 37
print parts 21
print several copies 35
use job template for printing 44
double-sided printing 28
delete 167
input data format 163
modify attributes 168
output data format 163
remove from printer 170
font 152
add 152
character pitch 72
character set 72
define 152
delete 154
GENERIC 154, 155
line spacing (vertical motion) 72
modify attributes 155
modify for document 24
print quality 72
simplified definition 153
style 72
typeface 72
form 156
add 157
define new 157
delete 158
display 42
GENERIC 156, 158, 160
grant access 149, 150
manual 41
modify attributes 160
simplified definition 157
E
e-mail 5
Encrypted files 255
evaluation period 243
Extended options 38
G
gateway
activate 232
configure 213
deactivate 230
delete 229
obtain information 233
type LOCAL 214
type PARTNER 214
use 19
GENERIC (default font) 154, 155
GENERIC (default form) 156, 158,
160
GENERIC (default PCL) 179
F
fax 5
files
select for printing 17
filters 162
add 162
assign to a printer 169
define 165
282
U23841-J-Z915-6-76
Index
H
high availability configurations
special features 102
host
configure 105
configure new 98, 105
delete user 135
enter user 134
parasite 99, 106
host hierarchy 99, 106
I
identifier
global identifier 49
format 50
local identifier 49
format 49
information
on gateway 233
on objects 82
installation
Windows NT 250
J
job identifier 50
job template 174
add on remote host 175
customize 177
define 46, 174
delete 177
display 45
simplified definition 175
use 44
K
key (license) 243
L
LAN
configure 235
LANG= 87
license 243, 251
basic 243
device upgrade 244
U23841-J-Z915-6-76
extra feature 244
installing 245
site 244
line spacing 72
loadable resources
administering 74, 171
defining 171
deleting 173
display definition of 173
private 32
public 31
using 30
local gateway 214
logging 85
lp (X/Open command) 17
M
Migrated files 257
modify
filter attributes 168
font attributes 155
form attributes 160
print job 61
server attributes 198
supervisor attributes 204
user privileges 135
N
native language selection 236
network
determine structure 97, 104
O
objects
display 55
permission lists 12, 75
output devices 5
output management system 1, 8
P
pages
print several copies 35
select for printing 21
parasite host 99, 106
283
Index
partner gateway 214
PCL 152, 179
add 180
add from remote host 180
assign comment 182
define 185
delete 181
GENERIC 179
name 180
PCL (printer capability list) 163
permanent ID 50
permission lists 12, 75
port 117
print
directly 37
documents 17
double-sided 28
job identifier 50
notification of result 36
parts of a document 21
select files 17
several copies 35
use job template 44
using forms 41
via gateway 19
print job
default identifier 49
delete 65
global identifier 49
identifier 50
local identifier 49
maximum number 136
modify after submission 61
priority 136
redirect 61
redirect to another printer 61
select 49
status 37, 38
print quality 72
print queue
delete print job 65
printer
activate 118, 120
add 103, 116
284
add to printer group 129
assign default form 160
assign filter to 169
assign security level 124
change port 122
configure 117
deactivate 118
display 117
display status 121
grant access 148
move 122
port 117
remove 121
remove filter 170
remove from printer group 129
replace 123
printer capability list (PCL) 152, 163
printer group 126
activate 131
copy 128
deactivate 130
delete 132
grant access 149
name 127
remove printer 129
set up 127
printer port 117
change 122
private loadable resources 32
privileges 252
public loadable resources 31
R
R/3 kit 8
redirect
print job 61
REFERENCED_BY 83
remove
printer 121
S
SAP 8
security level 137
assign to a printer 124
U23841-J-Z915-6-76
Index
assign to a user 141
select
language 87
print job 49
selection criteria lists 52, 266
server 193
activate 194, 197
add 193
change status 197
deactivate 197
define 116
delete 196
display 116
modify attributes 198
simplified definition 195
service 252
set up
administrator 98, 100, 104, 107,
213
default destination 20
printer group 127
spooler administrator 101
slave 235
SNMP 268
spooler administrator
set up 101
spooler system
stop 102
start 85
stop 86
supervisor 116, 200
activate 201, 203
add 200
change status 203
deactivate 203
define 200
delete 205
modify attributes 204
simplified definition 201
T
typeface 72
U23841-J-Z915-6-76
U
user
administer 133
assign security level 141
current print quota 140
define 133
define job priority 136
delete 137
delete from host 135
display privileges 140
display quotas 140
enter for other hosts 134
ID 133
information on 140
maximum number of copies 136
maximum number of jobs 136
maximum number of pages 136
maximum security level 137
number of consumed jobs 139
number of consumed pages 139
privileges 135
reset print quota 138
user administration 133
user ID 133
user privileges
grant access to form 149, 150
grant access to printer 148
grant access to printer group 149
modify 135
user quotas
status display 140
W
Windows NT 249
Administrators group 253
printer support 253
worksheet 97, 104, 260
X
X/Open command
lp 17
xpadd
option -ah 175
option -ca 182
285
Index
option -cm 162
option -cn 172
option -co 117
option -cs 24
option -da 117
option -de 19
option -dl 127
option -dp 37
option -ev 36
option -fc 35
option -fm 40
option -fp 35
option -fr 22
option -ft 40
option -hm 24
option -ho 133, 200, 201
option -it 162
option -je 34
option -js 34
option -ll 27
option -lm 27
option -lr 31, 32
option -ls 25
option -na 36
option -nd 36
option -nm 36
option -ot 162
option -pc 19, 117
option -pl 27
option -ps 21
option -re 99, 106
option -rm 33
option -rp 37
option -rw 37
option -sd 28
option -se 116, 200
option -sh 99, 106
option -sl 124
option -sp 34, 116
option -st 37
option -su 117
option -te 44
option -tm 27
option -to 22
286
option -tp 24, 162
option -vm 25
option -wa 38
xpadd command 79
xpadd -dev 117, 124
xpadd -dgr 127
xpadd -flt 162
xpadd -fnt 152
xpadd -frm 157
xpadd -hos 99, 106
xpadd -jtp 174, 175
xpadd -lrs 32, 171, 172
xpadd -pcl 180
xpadd -spv 116, 200
xpadd -srv 116, 194
xpadd -usr 98, 102, 105, 133
xpchange
option -cj 139
option -cp 139
option -st 203
xpchange command 82
xpchange -dev 118, 120, 161, 169
xpchange -dgr 118, 119, 130, 131
xpchange -spv 201, 203
xpchange -srv 194, 198
xpchange -usr 139
xpcopy
option -ah 128, 176
xpcopy -dgr 128
xpcopy -flt 166
xpcopy -fnt 153
xpcopy -frm 158
xpcopy -jtp 175, 176
xpcopy -lrs 172
xpcopy -srv 201
xpdel command 80
xpdel -dev 121
xpdel -dgr 132
xpdel -flt 167
xpdel -fnt 154
xpdel -frm 159
xpdel -job 65
xpdel -jtp 177
xpdel -lrs 173
U23841-J-Z915-6-76
Index
xpdel -pcl 181
xpdel -spv 205
xpdel -srv 197
xpmod
option -ad 98, 102, 105
option -aj 136
option -ap 136
option -cu 182
option -da 122
option -dl- 129
option -dl+ 129
option -fl 169
option -fl- 170
option -fm 161
option -ho- 135
option -ho+ 134
option -nc 136
option -pc 184
option -pr 136
option -pv 136
option -sl 137
option -ua 136
xpmod command 81
xpmod -dev 122, 123, 161, 169, 170,
184
xpmod -dgr 129
xpmod -flt 168
xpmod -fnt 155
xpmod -frm 160
xpmod -job 61
xpmod -jtp 178
xpmod -srv 199
xpmod -sys 98, 102, 105
xpmod -usr 134, 135
xpmount 41
option -d 41
option -f 41
option -s 41
xppatch
error messages 103
option -dg 103
xprdir 61
xpsetuser 256
xpshow 82
U23841-J-Z915-6-76
option -di LONG 152
option -di REFERENCED_BY 83
option -frm 42
option -jtp 45
xpshow -dev 123
xpshow -flt 166
xpshow -fnt 157
xpshow -lrs 31, 172, 173
xpshow -pcl 152, 157, 183
xpshow -srv 116
xpshow -usr 140
xpstart 101
xpstat 82
xpstat -dev 121, 169
xpstat -srv 196
xpstat -usr 140
287
Fujitsu Siemens Computers GmbH
User Documentation
33094 Paderborn
Germany
Fax: (++49) 700 / 372 00001
email: [email protected]
http://manuals.fujitsu-siemens.com
Submitted by
✁
Comments on Xprint V7.0
User’s and Administrator’s Guide
U23841-J-Z915-6-76
Comments
Suggestions
Corrections
Fujitsu Siemens Computers GmbH
User Documentation
33094 Paderborn
Germany
Fax: (++49) 700 / 372 00001
email: [email protected]
http://manuals.fujitsu-siemens.com
Submitted by
✁
Comments on Xprint V7.0
User’s and Administrator’s Guide
U23841-J-Z915-6-76
Comments
Suggestions
Corrections