1
OWNER’S MANUAL
,,,
,,,
,,,
,,,
,,,
,,,
,,,
,,,
,,,
,,,
,,,
,,,
,,,
,,, MFC-730
,,,
,,, MFC-740
,,,
,,,
,,,
,,,
,,,
®
Legal and safety requirements
Telecommunication Authorities (P.T.T.s) require that this product is manufactured
specifically for the country into which it is originally imported for sale by Brother.
Brother advises that this product may not function correctly and does not offer any
warranty should this product be used on any other public exchange equipment other
than that of the original country of sale.
Brother also advises that any use of this equipment in other countries may render
the user to prosecution according to local regulations.
APPROVED FOR CONNECTION TO TELECOMMUNICATIONS SYSTEMS
SPECIFIED IN THE INSTRUCTIONS FOR USE SUBJECT TO THE CONDITIONS
SET OUT THEREIN.
APPROVAL CERTIFICATE NUMBER : 610154 (MFC-730)
608761 (MFC-740)
IMPORTANT SAFETY WARNING
MAIN APPARATUS PORT (modular socket on “T” - shaped line cord connector
for EXTENSION TELEPHONE or ANSWERING MACHINE)
Please ensure that any external device connected into the equipment’s external device socket
meets the isolation and other safety requirements of BS6301, EN41003 or EN60950 (including
Amendment 2). BABT approval of such external devices indicates compliance with one of
these safety standards.
STATUTORY STATEMENTS
Your Brother fax machine (the “series apparatus”) may be used in conjunction with additional
apparatus (the “main apparatus”) supplied separately, such as telephones and/or an answering
machine. The total REN must not in any case exceed 4; for an explanation of REN see
chap. 2.
No additional series apparatus may be connected between the incoming line and the equipment.
The voltage drop at 40mA introduced by the equipment and the PSTN is 0.5V.
In case additional devices are connected downstream of your equipment, difficulties may
occasionally be experienced when making calls from such downstream devices. These
difficulties may include:
(a) Difficulty in making calls.
(b) Problems in conversation being experienced by both parties to a call.
THIS EQUIPMENT IS NOT DESIGNED FOR MAKING
TELEPHONE CALLS WHEN THE POWER FAILS.
ALTERNATIVE ARRANGEMENTS SHOULD BE MADE
FOR ACCESS TO EMERGENCY SERVICES.
© 1996–1998 Brother Industries, Ltd.
REQUEST TO INSTALL SOCKETS
This equipment needs to be connected to a new-style modular telephone socket. If your
telephone line does not have such a socket, your local Telephone Area Sales Office can fit one
for you. If you have extensions that need re-wiring, your Telephone Area Sales Office can also
do this for you, or you can do it yourself using one of the many approved extension kits
available on the market. Complete the form below and send it to your local Telephone Area
Sales Office, whose address you can find in your telephone directory.
Note that a charge is made for this service.
REQUEST TO INSTALL SOCKET(S)
I/we request the installation of new style telephone socket(s).
Customer’s name ........................................................................................................................
Address .......................................................................................................................................
....................................................................................................................................................
....................................................................................................................................................
....................................................................................................................................................
....................................................................................................................................................
Postcode .....................................................................................................................................
Telephone number ......................................................................................................................
Equipment : BROTHER MFC-730, MFC-740
APPROVAL CERTIFICATE NUMBER : 610154 (MFC-730), 608761 (MFC-740)
Special installation instructions ..................................................................................................
....................................................................................................................................................
....................................................................................................................................................
Customer’s signature ........................................................................... Date ..............................
Ordering Accessories and Supplies
For the best quality results use only genuine Brother
accessories. These are available from most Brother dealers or
alternatively you can contact our mail order department on
telephone number 0161 931 2258 or fax number 0161 931 2218.
Description
Ink Cartridge <black>
Item
LC02BK
Ink Cartridge <cyan>(blue)
LC02C
Ink Cartridge <magenta>(red)
LC02M
Ink Cartridge <yellow>
LC02Y
360 dpi High Quality Coated Paper (200 sheets)
BP36CA
720 dpi High Quality Coated Paper (200 sheets)
BP72CA
Glossy Paper (20 sheets)
BPGLA
Transparancies (ink jet compatible)
Print Head
HD002
2MB Upgrade Memory Board (Only for MFC-740)
ME2000
Brother Coated Paper is Ink Jet Paper.
i
Table of Contents
1
Introduction
2
MFC Setup and
Connections
3
4
Paper
On-Screen
Programming
Using This Manual ................................................................................. 1
Finding Information .............................................................................. 1
Symbols Used In This Manual .............................................................. 2
About Fax Machines ............................................................................. 2
Fax Tones and Handshake .................................................................... 2
ECM (Error Correction Mode) ............................................................. 3
MFC-730 Control Panel Overview ..................................................... 4
MFC-740 Control Panel Overview ..................................................... 6
Packing List ............................................................................................ 9
Choosing a Location ............................................................................ 10
Caution .................................................................................................. 11
Assembly ............................................................................................... 11
IMPORTANT: ................................................................................ 11
Installing the Ink Cartridges ............................................................... 17
Important ........................................................................................ 18
Multi-Line Connections (PABXs) ...................................................... 21
If you are installing the MFC to work with a PABX: ................ 21
Ringer Equivalence Number (REN) ............................................... 21
Using Extension Telephones .......................................................... 22
Connecting an External Telephone Answering Device (TAD) ........... 23
Sequence ......................................................................................... 23
Connections .................................................................................... 23
Outgoing Message (OGM) of External TAD ................................. 24
Connecting an External Telephone ..................................................... 24
About Brother Paper ........................................................................... 25
Paper Specifications for Cassette and Manual Slot ............................ 26
Print Area ............................................................................................ 27
User-Friendly Programming .............................................................. 29
Function Mode .................................................................................... 29
Alternating Displays ........................................................................... 30
Function Selection Table ..................................................................... 30
ii
TABLE OF CONTENTS
5
Initial
Setup
6
Setup
Receive
Getting Started ..................................................................................... 35
Setting the Dialling Mode (Tone/Pulse) ............................................. 35
Setting the Date and Time ................................................................... 35
Setting the Station ID .......................................................................... 36
Entering Text .................................................................................. 38
Inserting spaces .............................................................................. 38
Making corrections ......................................................................... 38
Repeating letters ............................................................................. 38
Special characters and symbols ...................................................... 38
Setting the Beeper Volume .................................................................. 39
PABX and TRANSFER ...................................................................... 39
Setting PABX ...................................................................................... 39
Setting the Clock Change ................................................................... 40
Setting the Speaker Volume ................................................................ 40
Setting the Ring Volume ..................................................................... 41
Memory Storage ................................................................................. 41
Basic Receiving Operations ................................................................ 43
Select Answer Mode ........................................................................... 43
Manual Reception (Manual Mode) ..................................................... 44
Automatic Fax Only Reception (Fax Mode) ...................................... 44
Setting the Ring Delay ........................................................................ 45
Setting the F/T (Fax/Tel) Ring Time (For Fax/Tel Mode Only) ......... 45
Recording the Fax/Tel Outgoing Announcement (F/T MESSAGE)
(Only for MFC-740) ......................................................................... 46
Fax Detect ........................................................................................... 46
Printing a Reduced Incoming Document ............................................ 47
Reception into Memory ...................................................................... 48
Advanced Receiving Operations ....................................................... 49
Operation from an External or Extension Telephone ......................... 49
For Fax/Tel Mode Only .................................................................. 49
Changing Remote Codes ................................................................ 50
To change Remote Codes ........................................................... 50
Printing a Fax from Memory (Only for MFC-730) ............................ 50
Caller ID (Caller IDentification) (Only for the UK) ........................... 51
Advantages of Caller ID ................................................................. 51
Set the Caller ID to ON ....................................................................... 51
How Does the Caller ID Work? .......................................................... 52
The Caller ID Appears on the Display When Your Telephone
Rings ............................................................................................. 52
Helpful Hints .............................................................................. 52
The Caller ID is Stored in Your Machine’s Memory ...................... 52
Selecting a Caller ID from the Memory for Call Reply ..................... 53
To Activate Certain Network Services When Using Call Reply .... 54
Call Reply to DDI numbers via Caller ID ...................................... 54
Clearing the Caller ID Stored in Memory ...................................... 55
Printing Caller ID List .................................................................... 55
TABLE OF CONTENTS
7
Setup
Send
8
Setup
Quick-Dial
Numbers
Polling ................................................................................................. 55
Secure Polling ................................................................................. 55
Setup for Polling Receive ............................................................... 55
Setup for Polling Receive with Secure Code ................................. 56
Setup Delayed Polling Receive ...................................................... 57
Sequential Polling ........................................................................... 57
Setting PC Interface Mode .................................................................. 58
Before You Begin .................................................................................. 59
Resolution ........................................................................................... 60
Contrast ............................................................................................... 60
Automatic Transmission ..................................................................... 61
Manual Transmission .......................................................................... 61
Fax Redial ........................................................................................... 61
Dual Access ......................................................................................... 61
Real Time Transmission ..................................................................... 62
Basic Sending Operations ................................................................... 63
Composing an Electronic Cover Page ................................................ 63
Cover Page for Next Fax Only ....................................................... 63
Always Send Cover Page ............................................................... 64
Using a Printed Cover Page ............................................................ 65
Cover Page Message ........................................................................... 65
Composing Your Own Comments .................................................. 65
Advanced Sending Operations .......................................................... 66
Overseas Mode ................................................................................... 66
Call Reservation .................................................................................. 66
Print Sample Call Back Message ........................................................ 67
Delayed Transmission (Timer) ........................................................... 67
Broadcasting ....................................................................................... 68
Multiple Resolution Transmission ...................................................... 69
Setup for Polling Transmit .................................................................. 70
Setup for Polling Transmit with Secure Code ................................ 70
Cancelling a Job While Scanning the Document ................................ 71
Checking Job Status ............................................................................ 71
Cancelling a Scheduled Job in Memory ............................................. 71
Interrupting Delayed Fax and Polling Transmit Jobs ......................... 72
Storing Numbers for Easy Dialling ................................................... 73
Storing One Touch Dial Numbers ....................................................... 73
Storing Speed Dial Numbers .............................................................. 74
Changing One Touch and Speed Dial Numbers ................................. 75
Setting Groups for Broadcasting ......................................................... 75
iii
iv
TABLE OF CONTENTS
9
Telephone
(Voice)
Operation
10
Remote Fax
Options
(Only for MFC-730)
11
Copy
Operations
Making Voice Calls .............................................................................. 77
Manual Dialling .................................................................................. 77
Full-Duplex Digital Speakerphone (Only for MFC-740) ................... 77
One Touch Dialling ............................................................................. 78
Speed Dialling ..................................................................................... 78
Mute .................................................................................................... 78
Pause ................................................................................................... 78
On Hook Dialling ................................................................................ 79
Searching Telephone Index ................................................................. 79
Chain Dialling ..................................................................................... 79
Tone/Pulse ........................................................................................... 80
Fax/Tel Mode ...................................................................................... 80
Answering Calls with the Speaker Phone (Only for MFC-740) ......... 80
Tel Key (Only for MFC-730) .............................................................. 80
Fax Forwarding ................................................................................... 81
Programming a Fax Forwarding Number ........................................... 81
Setting Fax Storage .............................................................................. 82
Changing the Remote Access Code ................................................... 82
Remote Retrieval .................................................................................. 83
Using Your Remote Access Code ................................................... 83
Remote Commands ........................................................................ 83
Change Fax Forwarding Setting ................................................. 84
Retrieve a Fax ............................................................................ 84
Check the Receiving Status ........................................................ 84
Change Answer Mode ................................................................ 84
Exit Remote Operation ............................................................... 84
Retrieving the Memory Status List ................................................. 85
Retrieving Fax Messages ................................................................ 85
Changing the Fax Forwarding Number .......................................... 86
Basic Copy Operations ........................................................................ 87
Copying One Page .............................................................................. 87
Making Multiple Copies ..................................................................... 88
Making Enlarged or Reduced Copies (Temporary Setting) ................ 89
Copy Quality – Temporary Settings ................................................. 89
Using the Copy Quality Key ............................................................... 90
Using the Paper Type Key .................................................................. 91
Using the Brightness Key ................................................................... 91
Copy Quality – Default Settings ........................................................ 92
Changing Default Settings .................................................................. 92
Select Paper Type ................................................................................ 94
Select Copy Quality ............................................................................ 95
Select Type of Original ....................................................................... 95
Colour Adjustment .............................................................................. 96
TABLE OF CONTENTS
12
Message
Manager
(Only for MFC-740)
Copy Brightness .................................................................................. 96
Copy Contrast ..................................................................................... 96
Selecting a Single Colour (One Colour) ............................................. 97
Memory Full Message ......................................................................... 97
Legal Limitations ................................................................................. 98
Introduction .......................................................................................... 99
Message Manager Mode ..................................................................... 99
Flexible Memory Settings (Message Store) ...................................... 100
Setting Up Message Manager ........................................................... 100
Setting the Message Store ................................................................. 101
Recording the Message Manager’s Outgoing Message
(TAD MESSAGE) .......................................................................... 101
Listening to the Outgoing Message (OGM) ................................. 102
Erasing the Outgoing Message (OGM) ........................................ 102
Activating Message Manager Mode ................................................. 102
Message Indicator ............................................................................. 103
What Happens When the Memory Is Full... ................................. 103
Playing Voice Messages and Memos ................................................ 104
Printing a Fax Message ..................................................................... 104
Backup Printing Option .................................................................... 105
Erasing Messages .............................................................................. 105
To erase voice messages individually ...................................... 105
To erase messages all at once ................................................... 106
Setting the Maximum Time for Incoming Messages ........................ 106
Setting the Toll Saver ........................................................................ 106
ICM Recording Monitor (Call Screening) ........................................ 107
Recording a Memo............................................................................ 107
Recording a Conversation ................................................................. 107
Fax Forwarding/Paging ..................................................................... 108
Programming a Fax Forwarding Number ..................................... 108
Recording the Paging Outgoing Message (OGM) ....................... 108
Programming the Paging Number ................................................ 109
Remote Retrieval ............................................................................... 109
Using the Remote Access Code ........................................................ 110
Changing the Remote Access Code .................................................. 110
Remote Control Commands ............................................................... 111
Remote control commands ........................................................ 111
Detail Operation ........................................................................ 111
Retrieving the Memory Status List ................................................... 112
Retrieving Fax Messages .................................................................. 112
Changing the Fax Forwarding Number ............................................ 112
v
vi
TABLE OF CONTENTS
13
Using MFC
as Printer
14
Walk-Up
Video Printing
15
16
Printing
Reports
Setting Up the
MFC and
Computer to
Work Together
Features ............................................................................................... 115
Printer Driver ..................................................................................... 116
Choosing the Right Kind of Paper .................................................. 116
Multi-purpose Sheet Feeder ............................................................. 116
Loading Paper ................................................................................... 117
Manual Feed Slot .............................................................................. 118
Setup for Envelopes .......................................................................... 118
Simultaneous Printing/Fax ............................................................... 119
Printer Operation Keys .................................................................... 119
On/Off Line Key ............................................................................... 119
Reset Key .......................................................................................... 120
Priority Key ....................................................................................... 120
Ink Management Key ........................................................................ 120
Turning Off Bi-directional Printing .................................................. 120
Getting Started ................................................................................... 121
Auto Switch ...................................................................................... 122
Colour Video Printing ....................................................................... 122
Black & White Video Printing ......................................................... 123
Video Print Quality – Temporary Settings .................................... 123
Using the Copy Quality Key ............................................................. 123
Using the Paper Type Key ................................................................ 124
Using the Brightness Key ................................................................. 125
Changing Default Settings ................................................................ 125
Setting Paper Type ............................................................................ 126
Setting Video Printing Quality .......................................................... 127
Setting Video Type ............................................................................ 127
Setting Print Size .............................................................................. 128
Video Printing Colour Adjustment ................................................... 128
Video Printing Brightness ................................................................. 129
MFC Settings and Journal ............................................................... 131
To Print a Report ............................................................................... 132
Transmission Verification (Xmit) Report ......................................... 132
Journal Period ................................................................................... 132
Before You Begin ................................................................................ 135
Connecting the MFC to Your Computer ........................................... 135
Notice to PC User ............................................................................. 136
How to Attach the Filter Core to the Double Shielded Parallel
I/F Cable: .................................................................................... 136
Computer Requirements ................................................................... 137
Installing Drivers for your MFC -730 in Windows® .................... 137
Software / Drivers ............................................................................. 137
Installing MFC-730 Printer Driver ................................................. 138
TABLE OF CONTENTS
17
18
Optional
Accessories
(Only for MFC-740)
PC Printing
If you are using Windows NT® Workstation Version 4.0: ................ 138
If you are using Windows® 3.1 or 3.11: ........................................... 140
If you are using Windows® 95 or 98: ................................................ 140
Installing Brother Drivers for your MFC-740 in Windows® ...... 141
Brother Drivers ................................................................................. 141
Installing Brother Drivers for your MFC-740 under Windows® ....... 142
Installing the Maintenance Utility on MS-DOS® .......................... 143
Installing the MFC-740 Maintenance Utility for DOS ..................... 144
Using the MFC-740 Maintenance Utility for DOS .......................... 144
Memory Board ................................................................................... 147
Optional Memory for the Fax Operations ......................................... 147
Installing the Optional Memory Board ............................................. 148
Printer Emulation .............................................................................. 151
Using the Maintenance Utility Program for Printing from DOS
(Only for MFC-740) ........................................................................ 151
Maintenance ...................................................................................... 151
Data 1 ................................................................................................ 152
Data 2 ................................................................................................ 152
Using the Brother MFC-730/740 Printer Driver .......................... 152
The Paper Tab .................................................................................... 153
Paper Size ......................................................................................... 154
User Defined Paper Size ................................................................... 154
Paper Source ..................................................................................... 155
Feeder ........................................................................................... 155
Manual Feed ................................................................................. 155
Orientation ........................................................................................ 155
Scaling .............................................................................................. 155
2 in 1 ............................................................................................. 155
1 in N ............................................................................................ 155
Copies ............................................................................................... 156
Collate........................................................................................... 156
Reverse Order ............................................................................... 156
The Quality/Colour Tab .................................................................... 157
Quality .............................................................................................. 158
Media ................................................................................................ 158
Colour/Mono ..................................................................................... 159
Colour ........................................................................................... 159
Mono ............................................................................................. 159
Controlling the Colour ...................................................................... 159
Document .......................................................................................... 160
Custom Setting .................................................................................. 160
Colour Matching ........................................................................... 160
Halftone Pattern ............................................................................ 161
Effect ............................................................................................ 161
vii
viii
TABLE OF CONTENTS
19
20
Important
Information
The Control/Maintenance Tab....................................................... 162
Monitor Calibration ...................................................................... 163
Bi-Directional Printing ..................................................................... 163
Maintenance ...................................................................................... 163
The Cleaning Tab .............................................................................. 163
Test Print ....................................................................................... 163
Cleaning ........................................................................................ 164
The Printer Adjustment Tab .............................................................. 164
Vertical Alignment ........................................................................ 164
Important Safety Instructions ................................................... 165
BABT Approval ............................................................................ 166
Radio Interference (220-240 V Model Only) ............................... 167
IMPORTANT-For Your Safety ..................................................... 168
Disconnect device .................................................................... 168
Troubleshooting
and Maintenance Troubleshooting .................................................................................. 169
21
Specifications
Error Messages ................................................................................. 169
Document Jam .................................................................................. 170
Printer Jam or Paper Jam .................................................................. 171
If You Are Having Difficulty with Your MFC .................................. 174
How to Improve Print Quality ......................................................... 176
Test Print ........................................................................................... 176
Cleaning the Print Head .................................................................... 177
Aligning Ink Cartridges .................................................................... 177
Turning Off Bi-directional Printing .................................................. 179
Packing and Shipping the MFC ...................................................... 180
Regular Maintenance ........................................................................ 183
Cleaning the Scanner ........................................................................ 183
Cleaning the MFC Printer Platen ...................................................... 183
Cleaning the Pick-up Roller .............................................................. 184
Replacing the Ink Cartridges ............................................................ 184
Product Description ........................................................................... 189
Fax Specifications .............................................................................. 189
Printer Specifications ........................................................................ 190
Printing ............................................................................................. 190
Controller .......................................................................................... 191
Print Media ....................................................................................... 191
Compilation and Publication Notice ................................................. 192
Trademarks ....................................................................................... 192
Glossary ............................................................................................... 193
Index .................................................................................................... 199
1
C H A P T E R
O N E
Introduction
Using This Manual
Thank you for purchasing a Brother multifunction center (MFC).
This MFC has been designed to be simple to use, with LCD screen
prompts to guide you through functions. However, you can use your
MFC to its fullest potential by taking a few minutes to read this manual.
Additionally, your MFC has a Help Key for assistance. Press Help/
Broadcast to print a list of basic operational steps and functions.
Finding Information
All chapter headings and subheadings are listed in the Table of Contents.
You will also be able to find information about a specific feature or
function by checking the Index at the back of this manual. Also,
throughout this manual, you will see special symbols alerting you to
important information, cross-references, and warnings. Illustrations of
some screen displays also help you choose the correct key-presses.
1
2
CHAPTER ONE
Symbols Used In This Manual
Note or additional information.
The MFC may be damaged or may not work
correctly if this is not observed.
Warning. Damage can result if this is not observed.
About Fax Machines
If you are a first-time fax machine user, fax operation might seem a little
mysterious. You will soon get used to the unusual fax tones on your
phone line, and be able to send and receive faxes easily.
Fax Tones and Handshake
When someone is sending a fax, the MFC sends fax calling tones, (CNG
tones)—soft, intermittent beeps at 4-second intervals. You will hear them
when you dial and press Start, and they continue for about 40 seconds
after dialling. During that time, the sending machine must begin the
“handshake” with the receiving machine. Each time you use automatic
procedures to send a fax, you are sending CNG tones over the phone
line. You will soon learn to listen for these soft beeps each time you
answer a phone on your MFC line, so you can know if you are about to
receive a fax message.
The receiving fax responds with fax receiving tones—loud, chirping
sounds. A receiving fax chirps for about 40 seconds over the phone line,
and the screen displays RECEIVING. If your MFC is set to the Fax
mode, it will answer every call automatically with fax receiving tones.
Even if the other party hangs up, your MFC continues to send the
“chirps” for about 40 seconds, and the screen continues to display
RECEIVING. To cancel the receiving mode, press Stop.
INTRODUCTION
When your MFC is in Fax/Tel mode, it answers with a short beep. After
this beep, the fax machine listens for CNG tones, and then responds with
receiving tones if the CNG tones are present. If it is a voice incoming
call, the MFC makes an attention sound.
The fax “handshake” is the time in which the sending machine’s CNG
tones and the receiving machines “chirps” overlap. This must be for at
least 2 to 4 seconds, so the fax machines can understand how each is
sending and receiving the fax. The handshake cannot begin until the call
is answered, and the CNG tones only last for about 40 seconds after the
number is dialled. Therefore, it is important for the receiving machine to
answer the call in as few rings as possible. We suggest 2 rings as the
standard setting.
When you have an external telephone answering device (TAD) on your
MFC line, your TAD will determine the number of rings before the call is
answered. Pay special attention to the directions in the Installation chapter
for connecting a TAD (or answering machine) to your MFC.
ECM (Error Correction Mode)
The Error Correction Mode (ECM) is a way for the MFC to check the
integrity of a fax transmission while it is in progress. ECM transmissions
are possible only between machines that both have the ECM feature. If
they do, you may send and receive fax messages that are continuously
checked for their integrity. Because of this you should send and receive
error free documents, thus avoiding the need to resend.
Sufficient memory must be available in your MFC for this feature to
work.
3
4
CHAPTER ONE
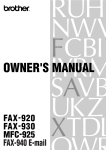
MFC-730 Control Panel Overview
28 30
29
27 26 31 25 24 23
22 21
20
19
18
17
status
status
1
1
2
3
16
15
2
4
5
6
3
7
8
9
4
14
0
5
1
Tel
6
5
Use to shuttle the line
between handset and monitor
speaker.
2
R (Recall)
Use this key to gain access
to an outside line and/or to
recall the operator or transfer
a call to another extension
when it is connected to a
PABX.
3
Speed Dial
Lets you dial stored phone
numbers by pressing a twodigit number.
8
Dial Pad
7
11 13 9 12
8
9
Volume High / Low
10 Start
Shift
Use to access memory
locations 13 through 24 in
the One Touch keys and the
Verify and Mute key.
10
One Touch Keys
Dials phone and fax
numbers, and can be used as
a keyboard for entering
information into the MFC.
# key lets you switch the
dialling type during a
telephone call from
“PULSE” to “TONE”.
Adjusts speaker and ring
volume.
Redial / Pause
Redials the last number
called. Also inserts a pause
in autodial numbers.
4
6
7
These 12 keys give you
instant access to previously
stored phone numbers.
Stop
Stops a fax, cancels an
operation, or exits from
function mode.
Starts an operation, such as
sending a fax.
11 Enlarge/Reduce
Lets you reduce or enlarge
copies depending on the
ratio you select.
INTRODUCTION
12 Brightness
Lets you adjust the
brightness of the whole
image to be lighter or darker.
13 Paper Type
Use this key to temporarily
change the paper type setting
for Copy and Video Printing
modes.
14 Copy Quality
Use this key to temporarily
change the quality and type
of original for Copy and
Video Printing modes.
15 Colour Copy
Makes a full-colour copy.
16 Mono Copy
Makes a black-and-white or
one-colour copy.
17 On/OffLine
Use this key to turn the
printer online (ready to
receive PC data) and offline
(not ready to receive PC
data) alternately. When the
printer is online, the LCD
displays ONLINE.
18 Reset
Clears data from the printer
memory, and then resets and
restores to the factory default
settings.
19 Ink Management
Cleans the ink print heads
and/or resets the ink dot
counter after replacing an
ink cartridge.
25 Ink Empty Indicator
Flashes when ink cartridge is
low and stays lit when ink is
empty.
26 Liquid Crystal
20 Priority
When you press this key the
MFC enters printer mode,
and will not print faxes on
paper. Instead, faxes are
stored in the memory until
you press Priority again.
LCD displays messages to
help you set and operate
your MFC.
27
Moves the LCD cursor to the
right. When the machine is
idle, you can also use this
key to print the Transmission
Verification Report for your
last transmission.
21 Help/Broadcast
Press this key whenever you
want a quick reference Help
List printed. The Help List
shows how to perform
functions, how to register
information, and how to get
basic information. Also use
this key whenever you want
to broadcast faxes to many
different locations,
maximum of 130.
22 Mode
Use to select how the MFC
will handle incoming calls.
23 Resolution
Sets the resolution when you
send a fax.
24 Tel-Index
Lets you look up numbers
stored in the dialling
memory.
(Right Arrow)
Verify
28
(Left Arrow)
Mute
Moves the LCD cursor to the
left. You can also use this
key to put calls on hold.
29 Menu
Lets you access the function
and programming mode.
30 Set
27
Stores a function setting in
the MFC.
31 Clear
Deletes entered data or backs
up one step in function
procedure.
5
6
CHAPTER ONE
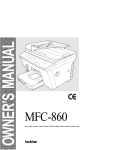
MFC-740 Control Panel Overview
33
34
32 31
30
29 28
27 26
25 24
23
22
74O
35
status
Fine
FAX
status
Photo
TAD
S.Fine
F/ T
Resolution
Mode
36
Menu
1
2
Set
Mute
Clear
Tel - Index
A BC
DE F
2
3
Redial / Pause
GH I
JKL
MNO
4
5
6
05
Speed Dial
PQRS
TU V
W X YZ
17
7
8
9
09
21
3
4
High
Low
On / Off Line
Reset
Brightness
Play
Priority Ink Management
01
02
03
04
13
14
15
16
Enlarge /
Reduce
06
07
08
Paper Type Copy Quality
18
19
20
10
11
12
22
23
24
Mono Copy
Colour Copy
Stop
0
1
R (Recall)
Use this key to gain access
to an outside line and/or to
recall the operator or transfer
a call to another extension
when it is connected to a
PABX.
2
7
5
Microphone
Redial / Pause
7
Speed Dial
Lets you dial stored phone
numbers by pressing a twodigit number.
Speaker Phone
(Handsfree mode)
Dial Pad
Dials phone and fax
numbers, and can be used as
a keyboard for entering
information into the MFC.
# key lets you switch the
dialling type during a
telephone call from
“PULSE” to “TONE”.
Redials the last number
called. Also inserts a pause
in autodial numbers.
4
9
12 14 10 13
8
Start
Volume High / Low
Adjusts speaker and ring
volume. The speaker volume
is for message playback and
speaker phone conversation.
11
Shift
Use to access memory
locations 13 through 24 in
the One Touch keys and the
Verify and Mute key.
9
Picks up your voice when
you speak to another party
using speaker phone.
3
8
Lets you speak to the person
at the other end and dial
telephone and fax numbers
without lifting the handset.
6
17
16
Tone
6
21
20
19
18
Volume
Shift
Speaker Phone
5
Help /
Broadcast
Doc
Erase
Verify
1
R
MIC
Voice
Record
One Touch Keys
These 12 keys give you
instant access to previously
stored phone numbers.
10 Stop
Stops a fax, cancels an
operation, or exits from
function mode.
11 Start
Starts an operation, such as
sending a fax.
12 Enlarge/Reduce
Lets you reduce or enlarge
copies depending on the
ratio you select.
15
INTRODUCTION
13 Brightness
Lets you adjust the
brightness of the whole
image to be lighter or darker.
14 Paper Type
Use this key to temporarily
change the paper type setting
for Copy and Video Printing
modes.
15 Copy Quality
Use this key to temporarily
change the quality and type
of original for Copy and
Video Printing modes.
16 Colour Copy
21 Priority
When you press this key the
MFC enters printer mode,
and will not print faxes on
paper. Instead, faxes are
stored in the memory until
you press Priority again.
22 Play
Lets you listen to voice
messages and outgoing
messages.
23 Message Indicator
Lights
Makes a black-and-white or
one-colour copy.
18 On/OffLine
Use this key to turn the
printer online (ready to
receive PC data) and offline
(not ready to receive PC
data) alternately. When the
printer is online, the LCD
displays ONLINE.
19 Reset
Clears data from the printer
memory, and then resets and
restores to the factory default
settings.
20 Ink Management
Cleans the ink print heads
and/or resets the ink dot
counter after replacing an
ink cartridge.
Sets the resolution when you
send a fax.
29 Tel-Index
Lets you look up numbers
stored in the dialling
memory.
30 Ink Empty Indicator
27
Flashes when ink cartridge is
low and stays lit when ink is
empty.
31 Liquid Crystal
LCD displays messages to
help you set and operate
your MFC.
Notify you that you have
voice or fax messages in the
memory.
Makes a full-colour copy.
17 Mono Copy
28 Resolution
24 Erase
32
Lets you delete voice
messages, and/or fax
messages from the memory.
Moves the LCD cursor to the
right. When the machine is
idle, you can also use this
key to print the Transmission
Verification Report for your
last transmission.
25 Record
Lets you record Outgoing
Messages (OGM), memos
and telephone calls.
26 Help/Broadcast
Press this key whenever you
want a quick reference Help
List printed. The Help List
shows how to perform
functions, how to register
information, and how to get
basic information. Also use
this key whenever you want
to broadcast faxes to many
different locations,
maximum of 174.
27 Mode
Use to select how the MFC
will handle incoming calls.
(Right Arrow)
Verify
33
(Left Arrow)
Mute
Moves the LCD cursor to the
left. You can also use this
key to put calls on hold.
34 Menu
Lets you access the function
and programming mode.
35 Set
Stores a function setting in
the MFC.
36 Clear
Deletes entered data or backs
up one step in function
procedure.
7
8
CHAPTER ONE
9
2
C H A P T E R
T W O
MFC Setup and
Connections
Packing List
Make sure you have the following items:
Ink Cartridges
Telephone
Line Cord
Handset
Curled Cord
Paper Wire
Extension
Document
Wire Extension
Telephone Handset
Printer Drive
Floppy Disks**
Brother Colour Suite
1 CD-ROM*
Dust cover
Document Tray
Paper Tray
Owner’s Manual
Starter Coated Paper
(Ink Jet Paper)
* ... Only for MFC-740
** ... Only for MFC-730
Whenever you transport the MFC, use the packing materials that came
with your MFC and pack the MFC correctly.
10
CHAPTER TWO
Choosing a Location
Place your MFC on a flat, stable surface, such as a desk. Select a place
that is free of vibration and shocks. Locate the MFC near a telephone
socket and a standard, earthed electrical socket. Choose a location where
the temperature remains between 10°C and 32°C (50°–90°F).
Avoid placing your MFC where it may be knocked. Do not place near
heaters, air conditioners, water, chemicals, or refrigerators. Do not
expose the MFC to direct sunlight, excessive heat, moisture, or dust. Do
not connect your MFC to electrical outlets controlled by wall switches or
automatic timers as disruption of power can wipe out information in the
unit’s memory. Do not connect your MFC to electrical outlets on the
same circuit as large appliances or other equipment that might disrupt the
power supply. Avoid interference sources, such as speakers or the base
units of cordless phones. Ensure the airflow from the fan on the right
hand side of the MFC is not impeded.
Caution
Keep the MFC out of strong light such as direct sunlight.
NO !
NO !
NO !
Caution
1 Never touch telephone wires or terminals that are not insulated
unless the telephone line has been disconnected at the network
interface.
2 Use caution when installing or modifying telephone lines.
MFC SETUP AND CONNECTIONS
Assembly
1 Connect the handset.
Connect the longer end of the curled handset cord to the MFC and
the shorter end to the handset.
2 Connect the power cord.
When you connect the power, the screen alternately displays
SET CARTRIDGES
OFFLINE
PLS OPEN COVER
OFFLINE
3 Connect the telephone line cord.
Connect one end of the telephone line cord to the socket on the MFC
and the other end to a modular wall socket.
Caution
Operating the MFC before you install the ink cartridges will permanently
damage the print head.
Power
Cord
Telephone
Line Cord
Handset
Curled Cord
11
12
CHAPTER TWO
NOTICE:
■ The MFC must be fitted with an earthed plug.
■ Since the MFC is earthed via the mains plug, you can protect
yourself from potentially hazardous electrical conditions on the
telephone network by keeping the power to your MFC on when you
connect it to a telephone line. Similarly, you can protect yourself
when you want to move your MFC, by disconnecting the telephone
line first, and then the power cord.
IMPORTANT:
If you need to remove the moulded mains plug in order to fit an appropriate
type, you must discard the moulded plug immediately having cut it off, in
order that it is not inadvertently inserted into a live socket, thus presenting a
shock hazard. The wires in the mains lead of this appliance are coloured in
accordance with the following code.
Green-and-yellow : Earth
Blue
: Neutral
Brown
: Live
As the wires in the mains lead of this apparatus may not correspond with the
coloured markings identifying the terminals in your plug, proceed as follows:
The wire which is coloured green-and-yellow must be connected to the
terminal in the plug which is marked by the letter “E” or by the safety earth
symbol
or coloured green or green-and-yellow.
The wire which is coloured blue must be connected to the terminal which is
marked with the letter “N” or coloured black.
The wire which is coloured brown must be connected to the terminal which
is marked with the letter “L” or coloured red.
MFC SETUP AND CONNECTIONS
4 Attach the paper wire extension to the multi-purpose sheet feeder.
Multi-purpose
Sheet Feeder
Paper Wire
Extension
5 Attach the document wire extension.
Document
Wire
Extension
13
14
CHAPTER TWO
6 Attach the paper tray to the paper output slot to prevent paper
jams and maintain print quality.
Paper
Output
Slot
Paper Tray
7 Attach the document tray.
Document Tray
8 Pull out the plastic extension of the document tray.
Plastic
Extension
MFC SETUP AND CONNECTIONS
9 Loading paper in the multi-purpose sheet feeder (paper cassette).
A Open the multi-purpose sheet feeder cover.
Multi-purpose
Sheet Feeder
Cover
B Fan the paper well. Load the paper. Make sure the printing
surface is towards you and the paper level is stacked below the
paper guide line.
Paper
Guide
Line
C Adjust the guides to fit the paper width.
Guide
15
16
CHAPTER TWO
10 Attaching Dust Cover
A Attach the dust cover to the multi-purpose sheet feeder cover,
pressing the dust cover sides around the feeder until they snap into
place.
B Close the multi-purpose sheet feeder cover.
WARNING
It is essential to keep the dust cover on your MFC to prevent dust from
entering the print mechanism. Using the dust cover on your MFC should
prolong the life of the print head.
MFC SETUP AND CONNECTIONS
Installing the Ink Cartridges
1 Be sure that the power is on. The screen alternately displays
SET CARTRIDGES
OFFLINE
PLS OPEN COVER
OFFLINE
2 Open the top cover by pulling it toward you. The print head will
move left to its replacement position after a few seconds.
3 Open the ink cartridge cover by pinching the clip as shown in the
illustration.
Clip
Cartridge
Cover
17
18
CHAPTER TWO
4 Remove the yellow shipping cover by lifting it up and out.
Yellow
Shipping
Cover
We recommend that you install the ink cartridges from left to right in
this order: Black, Yellow, Cyan, Magenta.
Keep the yellow shipping cover in a safe place. You will need it in the
future when you replace the print head.
5 Open the Black ink cartridge bag and remove the ink cartridge.
6 Carefully remove the sealing tape from the side of the ink cartridge.
Be sure to peel the tape from the side of the cartridge in the direction
away from you.
Important
To prevent spilling ink and staining your hands and clothing, remove the
sealing tape gently and slowly. Do not touch the ink opening on the
cartridge or the removed tape.
opening
MFC SETUP AND CONNECTIONS
7 Each colour has its own correct position. Insert the Black ink
cartridge, matching the markings of the colour indicators on the print
head as a guide.
Please be careful not to push down the switch bar shown in the right
side of the illustration, when inserting a cartridge.
Switch
Bar
8 Repeat Steps 5–7 to install each colour ink cartridge.
9 Close the cartridge covers until they click into place.
10 After installing all ink cartridges, close the top cover until it clicks
into place. Your MFC now prepares for a “head cleaning” and goes
online. The MFC will ask you if you changed each colour ink
cartridge.
DID YOU CHANGE
BLCK?1.YES 2.NO
19
20
CHAPTER TWO
11 Press 1 on the dial pad for each colour, as prompted (for initial setup
only) within 1 minute. The MFC will enter a cleaning cycle for
approximately 6 minutes. The screen alternately displays
CLEANING BLACK and PLEASE WAIT. The ink dot counter
will be set automatically for each colour, so the MFC can warn you
with an error message when ink is running low.
Make sure paper is loaded in the cassette, then press Start within 1
minute.
When the MFC completes the cleaning cycle, the MFC starts
printing the test sheet.
12 Only during initial ink cartridge installation, the screen shows.
PRINT OK?
1.YES 2.NO
Check the print quality of the test sheet. If it is not good, clean the
print head again, by pressing 2. The screen will ask you if the print
quality is OK for each colour. Press 2 for any colour with a problem.
You can choose several colours. After cleaning is finished, press
Start.
The MFC starts printing Test Sheet No. 2.
13 Adjust the Vertical Alignment by following the instructions printed
on the Test Print page.
WARNING
If ink gets in your eyes, flush them with water immediately and seek
medical attention if required.
Caution
■ DO NOT remove ink cartridges if you do not need to replace them.
If you do so, it may reduce the ink quantity and the MFC will not
know the quantity of ink left in the cartridge.
■ DO NOT shake the ink cartridges. If you do so, the ink may spill
when you take off the sealing tape. If ink stains your body or
clothing, wash with soap or detergent immediately.
■ If you install an ink cartridge in the wrong colour position, you must
clean the print head several times after correcting the cartridge
installation and before you start printing because the colours were
mixed.
MFC SETUP AND CONNECTIONS
■ Once you open an ink cartridge, install it in the MFC and use it up
within six months of installation. Use unopened ink cartridge by the
expiry date printed on the cartridge box.
■ DO NOT refill the ink cartridges. Attempting to use refilled
cartridges may cause damage to the print head and will void your
product warranty.
If the INK EMPTY XXXX error message is on the screen display after
you have installed the ink cartridges, check and make sure that the ink
cartridges are installed correctly.
Multi-Line Connections (PABXs)
Most offices use a central telephone system, or PABX. The MFC will
work with most PABX or key systems that allow a two-wire analogue
connection. However, we recommend that you have a separate telephone
line for your MFC. You can then leave the MFC in Fax Mode to receive
faxes any time of day or night.
If you are installing the MFC to work with a PABX:
1 It is not guaranteed that the unit will operate correctly under all
circumstances with a PABX. Any cases of difficulty should be
reported first to the company that handles your PABX.
2 If all incoming calls will be answered by a switchboard operator, it is
recommended that the Answer Mode be set to Manual. All incoming
calls should initially be regarded as telephone calls.
3 The unit may be used with either pulse or tone dialling telephone
service.
Ringer Equivalence Number (REN)
This equipment has a REN value of 1. A BT line has a “bell ringing”
capacity, or REN, of 4. This means that adding downstream-connected
extension telephones and/or extension bells to a total REN of greater
than 4 may cause a reduction in the bell volume. In extreme cases, it
may cause the auto-answer facility of the machine to fail.
Therefore, up to three additional extension telephones (each assuming a
REN of 1), may be connected downstream of your machine. For an
explanation of “downstream connection, read “Using extension
telephones” which follows.
Unless otherwise marked, a telephone provided by BT may be assumed
to have a REN value of 1.
21
22
CHAPTER TWO
Using Extension Telephones
It may be that your premises are already wired with parallel extension
telephones, or you intend to add extension telephones to your line, in
addition to your machine. While the simplest arrangement is
straightforward parallel connection, there are some reasons as to why
this arrangement will cause unsatisfactory service, the most obvious of
which is inadvertent interruption of a facsimile transmission by someone
picking up an extension telephone in order to make an outgoing call.
Additionally, remote activation may not operate reliably in such a simple
configuration.
This machine may also be set to make a delayed transmission (i.e. a
transmission at a pre-set time). This pre-set job may coincide with
someone picking up an extension handset.
Such problems can easily be eliminated however, if you arrange
modification of your extension wiring circuit, such that extension
devices are connected “downstream” of your machine, in a master/slave
configuration. In such a configuration, this machine can always detect
whether a telephone is in use, thus it will not attempt to seize the line
during that time. This is known as “telephone off-hook detection.”
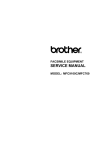
The inadvisable configuration is shown in figure 1 below, and the
recommended master/slave configuration is shown in figure 2.
This new connection configuration can be arranged by your contacting
BT, Kingston upon Hull Telecommunications, your PABX maintainer or
a qualified telephone installation company as appropriate. Simply
explained, the extension telephone circuit should be terminated on a
normal modular plug (BT 431A style), which in turn should be inserted
into the modular socket of the white “T”-shaped connector provided as
part of the line cord assembly.
EXTENSION
SOCKET
EXTENSION
SOCKET
MASTER
SOCKET
INCOMING
LINE
FAX
INADVISABLE CONNECTION OF EXTENSION SOCKETS
Fig. 1.
DISCONNECT
EXTENSION
SOCKET
EXTENSION
SOCKET
MASTER
SOCKET
INCOMING
LINE
FAX
FAX MACHINE MUST BE PLUGGED
INTO MASTER SOCKET
RECOMMENDED CONNECTION OF EXTENSION SOCKETS
Fig. 2.
MFC SETUP AND CONNECTIONS
Connecting an External Telephone
Answering Device (TAD)
Sequence
You might choose to connect an additional answering machine. When
you have an external TAD on the same telephone line as the machine,
the TAD answers all calls. The MFC “listens” for fax calling (CNG)
tones. If it hears them, the MFC takes over the call and receives the fax.
If it does not hear the CNG tones, the machine will not answer the call,
and messages can be left on the TAD by callers in the normal way.
The TAD must answer within a maximum of four rings. However, we
recommend two rings as the TAD setting. The MFC cannot hear CNG
tones until the TAD has answered the call, and with four rings there are
only 8–10 seconds of CNG tones left for the fax “handshake.” Make
sure you carefully follow instructions in this manual for recording your
outgoing message. Do not use a “toll-saver” ring setting on the TAD.
Do not connect a TAD elsewhere on the same phone line—your machine
and TAD will both try to control the line.
Connections
1 You may connect an external TAD to your MFC, as shown below.
2 Set your external TAD to two rings or less. (The MFC’s Ring Delay
setting does not apply).
3 Record the outgoing message (see below).
4 Set the TAD to answer calls.
5 Set Message Storage (Menu, 1, 8, 1) to VOICE:EXT. (Only for
MFC-740)
6 Set the Answer Mode to TAD.
23
24
CHAPTER TWO
Outgoing Message (OGM) of External TAD
Timing is important in recording this message. The message sets up the
ways to handle both manual and automatic fax reception.
1 Limit your speaking to 20 seconds.
2 Record 5 seconds of silence at the beginning of your message.
(This allows your MFC time to listen for the fax CNG tones of
automatic transmissions before they stop.)
3 End your 20-second message by giving your Remote Activation
Code for people sending manual faxes. For example:
“After the beep, leave a message or send a fax manually by pressing
51 and Start.”
Please note that some faxes that are sent manually cannot be received
automatically because some fax machines do not send a fax tone in
manual mode. In these cases you must inform callers that they must enter
the remote activation code to send a fax.
Connecting an External Telephone
Your MFC is equipped with a handset that you can use as a regular
phone. However, you can also connect a separate telephone to your
MFC, as shown below.
Whenever this external phone (or TAD) is in use, the screen displays
EXT. TEL IN USE, and, if the MFC’s handset is lifted, an alarm sounds.
To disconnect the call on the external phone and switch to the MFC, lift
the handset and press Tel (for MFC 730 only) or Speaker Phone (for
MFC-740 only).
3
C H A P T E R
T H R E E
Paper
The quality of your document can be affected by the kind of paper you
use in the MFC. You can use plain paper, coated paper, transparencies,
glossy paper, organizer paper, and envelopes. We recommend testing
various papers before purchasing large quantities. For best results, use
Brother special coated paper, glossy paper, and transparencies. (See the
page next to front page for information about ordering Brother
accessories).
When you print on coated paper, transparencies, and glossy paper, be
sure to select the correct media in the “Quality/Colour” tab in the printer
driver. When using coated paper or transparencies, avoid stacking by
removing each page after copying or printing.
About Brother Paper
Brother paper is manufactured specifically for this MFC, to provide you
with optimum print quality.
Quality Coated Paper for 360 dpi Colour Ink Jet printing—
normal mode (BP36CA for A4)
High Quality Coated Paper for 720 dpi Colour Ink Jet printing—
super fine mode (BP72CA for A4)
Colour Ink Jet Transparencies— fine mode (BPTRA for A4)
Colour Ink Jet Glossy Paper— superfine mode (BPGLA for A4)
25
26
CHAPTER THREE
■ Brother coated (ink jet) paper is coated only on one side. Make sure
this whiter (coated) side is facing up toward you. Therefore, when
loading paper in the paper cassette, make sure that the whiter side
(the coated side) is facing up.
■ The coated side of glossy paper is shiny. Do not touch the shiny side.
Load glossy paper in the feeder with the shiny side facing up toward
you.
■ DO NOT touch the coated side of the paper or either side of
transparencies, because the media absorbs water and perspiration
easily, and this might cause decreased output quality.
■ For optimum output quality, be sure to use paper appropriate for your
resolution setting.
■ Store paper in the original bag, and keep it sealed. Keep the paper
flat and away from moisture and direct sunlight and heat.
■ Transparencies designed for laser printers/copiers may stain your
next document. Use only recommended transparencies for ink jet
printer.
Paper Specifications for Cassette and Manual
Slot
When used as a printer, the MFC can handle paper that has the following
specifications:
But please note that you can receive fax messages only on A4 cut sheet
Paper Type
Paper Size
Cut Sheet
A4, Letter, Executive 200 Sheets of 75 g/m2
Coated Paper
Cassette Capacity
Legal
100 Sheets of 75 g/m2
A4, Letter
100 Sheets
Transparencies A4, Letter
20
Glossy Paper
A4, Letter
20
Envelopes
DL, COM-10, C5,
B5, Monarch
10
Organizer
J(Manual Feed Slot
only), K, L
10
Paper Capacity for Feeder
Cut Sheet Paper Weight 60 to 120 g/m2
Sheet Feeder: Up to 22 mm/Approximately 200 Sheets of 75 g/m2
Output Stacker: Approximately 75 Sheets of 75 g/m2
Transparencies and glossy paper must be picked up from the paper
tray page by page.
PA P E R
■ Curled or damaged paper may cause paper jams and misfeeds. If the
paper is curled, straighten it as much as possible by rolling it in the
opposite direction to the curl.
■ For optimum output quality, we recommend you use only genuine
Brother paper.
■ If paper will not load from the feeder, try the manual feed slot.
Print Area
The Print Area depends on the settings in the application you are using.
The figures below show the unprintable areas on cut sheets and
envelopes.
Cut Sheet
C
Envelopes
C
D
D
A
A
B
B
unprintable area
Paper Type Paper Size
Cut Sheet
Organizer
Envelopes
Fax
Mono Copy
Letter, Legal
Colour Copy
Printer
Fax
Mono Copy
A4
Colour Copy
Printer
Executive
Printer
J, K, L
Printer
Printer
Printer depends on the Printer driver.
A
B
C
D
3.95mm
3mm
11mm 3.95mm
3mm
6.25mm
11mm 3.95mm 8.75mm
3mm
11mm
3mm
3mm
3mm
10mm
4.8mm
11mm 2mm 4.8mm
11mm 3.4mm 3.4mm
11mm 3.4mm 3.4mm
20mm 3.4mm 3.4mm
2mm
2mm
27
28
CHAPTER THREE
Do not use the following types of paper and envelopes:
■ Damaged, curled, wrinkled, or irregularly shaped paper and
envelopes
■ Extremely shiny or highly textured paper and envelopes
■ Envelopes with clasps
■ Envelopes of baggy construction
■ Envelopes not sharply creased
■ Embossed envelopes
■ Paper and envelopes already printed with a laser printer
■ Envelopes preprinted on the inside
■ Paper and envelopes that cannot be arranged uniformly when stacked
4
C H A P T E R
F O U R
On-Screen
Programming
User-Friendly Programming
See
“Using This
Manual”
chap. 1
We have designed your Multi-Function Center with on-screen
programming and a Help key. User-friendly programming helps you take
full advantage of all the functions your MFC has to offer.
Since your programming is done on the LCD, we have created step-bystep on-screen prompts to help you program your MFC. All you need to
do is follow the prompts as they guide you through the function menu
selections and programming options and settings.
Function Mode
The screen displays
1.FAX 2.PRINTER
3.COPY 4.VIDEO
Then press 1 for Fax Functions—OR—press 2 for Printer Functions
—OR—press 3 for Copy Functions—OR—press 4 for Video Functions.
When you enter the Function Mode, your MFC displays a list of Level
One Functions from which you can choose. These function options appear
one after the other on the display. Select an option by pressing Set when
the option appears on the LCD.
You can “scroll” more quickly through options by pressing . When the
screen displays your selection, press Set. Use
to scroll backward if
you passed your choice or to save key strokes. Both arrow keys show all
options, in the opposite order.
When you finish a function, the screen displays ACCEPTED.
If you want to exit the Function Mode, press Stop.
29
30
CHAPTER FOUR
Alternating Displays
The LCD sometimes alternates between the currently selected option,
and a help message giving brief instructions about how to proceed. The
display you’ll probably see most often is shown below, showing you that
when you place a document in the feeder, you can either dial a number to
send it as a fax or press the Mono Copy or Colour Copy key to make
a copy of the document.
FAX: NO. & START
SCAN READY
COPY: PRESS COPY
SCAN READY
Function Selection Table
If you have a basic understanding of how to program your MFC, you can
perform most of the programming settings without the Owner’s Manual.
To help you understand the function selections, options, and settings that
are available, use the Function Selection Table below.
1. Fax Functions
1. INITIAL SETUP
Function
Description
Factory Set Chapter
1. TONE/PULSE
Selects the dialling mode.
TONE
2. DATE/TIME
Enter date and time for LCD
display and to print on
transmissions.
01/01 2000 00:00 5
3. STATION ID
Program the name, fax number
to appear on each transmitted
page.
--
5
4. BEEPER
Adjust the volume level of the
beeps when you press a key, an
error occurs or a document is
sent or received.
LOW
5
5. PBX
Turn on if PABX (Private
OFF
Automatic Branch Exchange) is
connected to your MFC.
5
6. CLOCK CHANGE
Adjust the MFC’s clock by
one hour for summer/winter
time.
5
--
5
ON-SCREEN PROGRAMMING
1. Fax Functions (continued)
2. SETUP RECEIVE
Function
Description
Factory Set Chapter
1. RING DELAY
Number of rings before the
MFC answers in Fax/Tel,
Fax or TAD (Message
Manager for MFC-740) mode.
RING DELAY:02 6
TOLL SAVER:OFF
(MFC-740)
2. F/T RING TIME
Sets the time for “F/T pseudo ring” 30
in Fax/Tel mode.
6
3. FAX DETECT
Receive fax messages without
pressing the Start key.
ON
6
4. REMOTE CODE
Enter code to activate or
deactivate your MFC from a
remote location.
OFF
( 51, #51)
6
5. REDUCTION
Reduces size of image.
AUTO
6
6. MEM. RECEIVE
Automatically stores any
incoming faxes in its memory
if it runs out of paper.
ON
6
7. POLLING RX
You call another fax machine to STANDARD
receive a fax from it.
8. PC INTERFACE
Turn on if PC is connected to
MFC for PC receiving of fax
message.
ON
Function
Description
Factory Set Chapter
1. COVERPG SETUP
Automatically sends a
programmable cover page or
prints a sample coverpage.
OFF
7
2. COVERPAGE NOTE Program customized message
for fax cover page.
--
7
3. CONTRAST
Change the lightness or
darkness of a fax you are
sending.
AUTO
7
4. RESOLUTION
Allows you to change
resolutions page by page.
STANDARD
7
5. OVERSEAS MODE Special setting for international
transmissions.
OFF
7
6. CALL RESERVE
You can send a fax, then speak
to the person operating the
other fax machine or print a
sample call back message.
OFF
7
7. TIMER
Set the MFC to send documents -later.
7
8. POLLED TX
Set Polled Transmission for
someone to poll your MFC
to receive a fax from you.
STANDARD
7
9. REAL TIME TX
When memory is full, you can
OFF
6
3. SETUP SEND
send faxes in real time.
31
32
CHAPTER FOUR
1. Fax Functions (continued)
4. REMAINING JOBS
Function
Description
Factory Set Chapter
Check which jobs are in
memory or cancel a delayed fax
(timer) or polling job.
7
5. INTERRUPT
Function
Description
Factory Set Chapter
Send a fax now, even if you
have the MFC set to send a fax
later, or if you have it set for
Polling.
7
6. SET QUICK-DIAL
Function
Description
Factory Set Chapter
1. ONE-TOUCH DIAL Dial numbers stored in memory
by pressing only one key.
--
8
2. SPEED-DIAL
Dial numbers stored in memory
by pressing only three keys.
--
8
3. SETUP GROUPS
Set up a Group number for
broadcasting.
--
8
7. PRINT REPORTS
Function
Description
Factory Set Chapter
1. XMIT REPORT
Print confirmation of
transmission after each
document is sent.
OFF
2. JOURNAL
Lists information about the last
50 incoming and outgoing
faxes.
JOURNAL:OFF 15
3. QUICK-DIAL
Lists names and numbers stored -in One Touch and Speed Dial
memory (in numerical order).
4. TEL. INDEX
Alphabetical lists of stored
numbers.
5. SYSTEM SETUP
Lists various system settings.
6. MEMORY STATUS Lists information about
memory use.
15
15
--
15
--
15
ON-SCREEN PROGRAMMING
1. Fax Functions (continued)
8. REMOTE FAX OPT (MFC-730 Only)
Function
Description
Factory Set Chapter
1. FAX FWD
Set your fax machine to
forward faxes.
OFF
10
2. FAX STORAGE
Store incoming faxes into
memory for remote retrieval.
OFF
10
3. REMOTE ACCESS Set code for retrieving faxes.
159
10
4. PRINT DOCUMENT
--
6
Print incoming faxes stored in
the memory.
8. SETUP TAD (MFC-740 Only)
Function
Description
Factory Set Chapter
1. MESSAGE STORE Select if memory will store fax,
voice or both.
DOC:OFF
VOICE:ON
12
2. BACKUP PRINT
Automatically prints a copy of
faxes received into memory.
ON
12
3. OGM
Select/Record outgoing
messages.
TAD MESSAGE 6, 12
4. ICM MAX. TIME
Select maximum length of
incoming messages.
35 seconds
12
ON
5. ICM REC. MONITR Select ON or OFF to screen
voice messages as they come in.
12
6. FAX FWD/PAGING Set MFC to forward
fax/message ––OR–– to call
your pager.
OFF
12
7. REMOTE ACCESS Set code for retrieving
messages.
159
12
0. MISCELLANEOUS
Function
Description
Factory Set Chapter
1. NOT USED
IN THIS MODEL
—
—
—
2. CALLER ID
View and dial back, or print a
list of the last 30 Caller IDs
stored in memory.
ON
6
33
34
CHAPTER FOUR
2. Printer Functions
Factory Set
Chapter
Use these functions when you
—
13
2. VERTICAL ALIGN
need to adjust the print
—
13
3. BI-DIR PRINT
quality.
ON
13
Function
1. TEST PRINT
Description
}
3. Copy Functions
Factory Set
Chapter
Function
Description
1. PAPER TYPE
Identify the type of paper in
the cassette.
PLAIN
11
2. QUALITY
Select Draft, Normal or High
copy quality.
HIGH
11
3. ORIGINAL TYPE
Select Standard for any original STD
that is not a photograph.
11
4. COLOUR ADJUST Adjust the amount of Red,
Green, or Blue in copies.
—
11
5. BRIGHTNESS
Adjust the brightness.
—
11
6. CONTRAST
Adjust the contrast.
—
11
7. ONE COLOUR
Select a single colour to use,
instead of Black, when you
use Mono Copy key.
OFF=Black
11
4. Video Functions
Description
1. PAPER TYPE
Identify the type of paper in
the cassette.
PLAIN
14
2. QUALITY
Select NORMAL or H IGH
print
HIGH
14
3. VIDEO TYPE
Select MOVINGor STILL
video signal.
MOVING
14
4. PRINT SIZE
Select the size you want the
captured frame to print.
(14.6x10.8)
14
5. COLOUR ADJUST Adjust the amount of Red,
Green, or Blue in Copies.
—
14
6. BRIGHTNESS
—
14
Adjust the brightness
Factory Set
Chapter
Function
5
C H A P T E R
F I V E
Initial
Setup
Getting Started
Setting the Dialling Mode (Tone/Pulse)
Your MFC is initially set to TONE. If you are using a PULSE dial line,
you can change the setting to PULSE by following the steps below.
1 Press Menu, 1, 1, 1. The screen prompts you to select TONE or
PULSE.
DIALLING:TONE
DIALLING:PULSE
2 Use or to select the dialling mode.
3 Press Set when the screen displays the dialling mode you want.
4 Press Stop to exit.
Although this equipment can use either Pulse or Tone signalling, only the
performance of the Tone signalling is subject to regulatory requirements
for correct operation. It is therefore strongly recommended that the
equipment is set to use the Tone signalling for access to public or private
emergency services. The Tone signalling also provides faster call set up.
Setting the Date and Time
Your MFC displays the date and time, and prints it on every fax you
send.
In the event of a power failure, the MFC maintains date and time
information for several hours. All other settings remain unaffected.
35
36
CHAPTER FIVE
1 Press Menu, 1, 1, 2. The screen prompts you to enter the year.
ENTER YEAR:XX
2 Enter the last two digits of the year. (for example, enter 00 for the
year 2000)
3 Press Set. The screen prompts you to enter the month.
ENTER MONTH:XX
4 Enter two digits for the month (for example, enter 09 for September,
or 10 for October). The screen displays your entry.
5 Press Set. The screen prompts you to enter the day.
ENTER DAY:XX
6 Enter two digits for the day (for example, 06). The screen displays
your entry.
7 Press Set. The screen prompts you to set the time.
ENTER TIME:XX:XX
8 Enter the time in 24-hour format (for example, enter 15:25 for 3:25
PM).
9 Press Set.
10 Press Stop. The screen now displays the date and time you set, and
displays it whenever the MFC is in stand by mode.
Setting the Station ID
See
“Composing
Electronic
Cover page”
chap. 7
You can store your name, fax number, and telephone number to be
printed on the fax Cover Page, on all fax pages that you send.
It is important that you enter the fax and telephone numbers in the
internationally standardized format, i.e. in accordance with the following
strict sequence:
-
The “+” (plus) character (press * key)
-
Your Country Code (e.g. “44” for the United Kingdom, “41” for
Switzerland)
-
Your local area code minus any leading “0” (“9” in Spain)
-
A space
-
Your number on the local exchange, using spaces to aid readability as
appropriate.
INITIAL SETUP
As an example, your MFC is installed in the United Kingdom, is to be
used for both fax and voice calls, and your national telephone number is
0161-444 5555, then you must set the fax and telephone number parts of
your station ID as: +44 161-444 5555
1 Press Menu, 1, 1, 3. The screen prompts you to enter your fax
number.
FAX:
2 Enter your fax number (up to 20 digits). The screen displays your
entry.
3 Press Set. The screen prompts you to enter your telephone number.
TEL:
4 Enter your telephone number (up to 20 digits). If your telephone
number and fax number are the same, enter the same number again.
The screen displays your entry.
See
“Entering
Text”
in this
chapter
5 Press Set. The screen prompts you to enter your name or your
company name.
NAME:
6 Use the dial pad to enter your name (up to 20 characters). (You can
use the following chart to help you enter letters.)
7 Press Set to confirm.
8 Press Stop. The screen returns to the date and time.
■ The telephone number you entered is used only for the Call Back
Message and Cover Page features.
■ If you do not enter a fax number, no additional information can be
entered.
■ To enter a space, press
characters.
once between numbers and twice between
■ If your Station ID has already been programmed, the screen prompts
“1” to make a change, or “2” to exit without changing.
37
38
CHAPTER FIVE
Entering Text
When you are setting certain functions, such as the Station ID, you may
need to enter text into the MFC. Most keys on the dial pad have three or
four letters printed above them. The keys for 0, #, and don’t have
printed letters because they are used for special characters.
By pressing the appropriate number on the dial pad the correct number of
times, you can access the character you want.
Press Key
one time
two times three times four times
five times
2
A
B
C
2
A
3
D
E
F
3
D
4
G
H
I
4
G
5
J
K
L
5
J
6
M
N
O
6
M
7
P
Q
R
S
7
8
T
U
V
8
T
9
W
X
Y
Z
9
Inserting spaces
If you want to enter a blank space, press
twice.
Making corrections
If you entered a letter incorrectly and want to change it, press
to
move the cursor after the last correct letter. Then press Clear; all letters
above and to the right of the cursor are deleted. Re-enter the correct text
and/or digits. You can also back up and type over incorrect letters.
Repeating letters
If you need to enter a character assigned to the same key as the previous
to move the cursor to the right.
character, press
Special characters and symbols
0 key ------------ ÄËÖÜÀÇÈÉ0
key ------------ (space) !”#$%&’() +,-./
# key ------------ :;<=>?@[]^_
INITIAL SETUP
Setting the Beeper Volume
You can set the beeper to LOW, HIGH or OFF. The MFC comes set to
LOW. When the beeper is set to LOW or HIGH, the MFC beeps every
time you press a key or make an error, and at the end of sending or
receiving a fax.
1
2
3
4
Press Menu, 1, 1, 4.
Press
or
to select your setting.
When the screen displays the setting you want, press Set.
Press Stop to exit.
PABX and TRANSFER
Your MFC is initially set to be connected with PSTN (Public Switched
Telephone Network) lines. However, many offices use a central
telephone system or Private Automatic Branch Exchange (PABX). Your
fax can be connected to most types of PABX. You can easily gain access
to the outside line from your MFC connected to PABX by just pressing
R.
Also, you can transfer a call to another external by pressing R.
Setting PABX
If your MFC is connected to a PABX system, set PBX:ON. If not, set
OFF.
1 Press Menu, 1, 1, 5. The screen displays
PBX:OFF
SELECT { } & SET
2 Press or to select ON (or OFF).
3 Press Set when the screen displays your selection.
4 Press Stop to exit.
You can programme an R keypress as part of a number stored in a One
Touch or Speed Dial location. When programming the One Touch or
Speed Dial number (Function menu 1-6-1 or 1-6-2) press R first (the
screen displays “!”), then enter the telephone number. If you do this, you
do not need to press R each time before you dial using a One Touch or
Speed Dial location. (See chap. 8.)
However, if PBX is set to OFF, you can not use the One Touch or Speed
Dial numbers that have R keypress programmed in to them.
39
40
CHAPTER FIVE
Setting the Clock Change
You can easily let the MFC’s clock gain or lose one hour by using this
feature.
1 Press Menu, 1, 1, 6. The screen displays
TO SUMMER TIME ?
SELECT { } & SET
2 Press
or
to select Summer Time to gain an hour or Winter time
to lose an hour.
3 Press Set.
4 Press 1 to change to Winter Time or Summer Time ––OR–– Press 2
to exit without changing.
Setting the Speaker Volume
You can adjust the speaker volume when your MFC has dialled (on hook
dialing), the line is connected and telephone is on the display. You can
turn the volume OFF or you can select a volume level.
or
to adjust the volume level. The display shows the setting
Press
you are choosing. Each key press changes the volume to the next setting.
The new setting will remain until you change it again.
If you have a MFC-740, you can adjust the speaker volume while you
are listening to your OGM (Outgoing Message) and ICMs (incoming
messages).
If you turn the Incoming Recording Monitor to OFF (Menu, 1, 8, 5), on
the MFC-740, the Speaker for screening calls will be disabled and you
will not be able to hear callers leaving messages. The volume for other
and .
operations can still be controlled using
INITIAL SETUP
Setting the Ring Volume
You can adjust the ring volume when your MFC is idle. You can turn the
ring OFF.
Press
or
to adjust the volume level. With each key press, the MFC
rings so you can hear the current setting and the display shows the setting
you are choosing. Each key press changes the volume to the next setting.
The new setting will remain until you change it again.
Memory Storage
In the event of a power failure, all settings in the INITIAL SETUP,
SETUP RECEIVE, SET QUICK-DIAL, REMOTE FAX OPT (MFC730), and SETUP TAD (MFC-740), plus the COVERPG SETUP and
COVERPAGE NOTE (from SETUP SEND) functions are stored
permanently. You may have to reset the date and time.
On the MFC-740, it will retain the data for Out-of-Paper Reception and
Message Manager for up to 6 hours after a power interruption.
41
42
CHAPTER FIVE
43
6
C H A P T E R
S I X
Setup
Receive
Basic Receiving Operations
Select Answer Mode
Answer Mode
( means light off.
For
means light on.)
1. Manual
FAX
TAD
You must answer all calls yourself. If you
hear fax tones, press Start to begin
receiving the fax, then hang up.
F/T
2. Fax
FAX
TAD
F/T
See
“Fax/Tel
Mode Only”
in this
chapter
3. Fax/Tel
FAX
TAD
F/T
The MFC automatically answers every call
as a fax call. You cannot receive a voice
call, but you can dial out and make a voice
call.
The MFC automatically answers every
call. If the call is a fax, it prints the fax. If
the call is not a fax, it signals you with a
F/T pseudo-ring, different from the phone
company ringing, to alert you to pick up
the call. If you select this setting, you’ll
need to set the Ring Delay and F/T Ring
Time features (on the following pages).
You cannot have an answering machine on
the same line, even if it is on a separate
jack on the same line.
44
CHAPTER SIX
4. TAD
(
For MFC730
FAX
)
TAD
F/T
This is the only setting in which you can
use an external answering machine. Your
telephone answering device is connected to
your machine, and answers every call.
Once the external telephone answering
device (TAD) answers, the machine listens
for fax tones. If it detects fax tones, Fax
messages are printed.
The TAD setting works only with an external telephone answering
device (TAD). Ring Delay and F/T Ring Time do not work in this
setting.
4. TAD
(
For MFC740
FAX
)
TAD
F/T
The MFC provides you with a built-in
digital Message Manager for fax and
voice. When you set the MFC to answer
calls, it will record up to 99 minutes of
messages. For more information about
Message Manager operation, please see
chap. 12.
Manual Reception (Manual Mode)
When you set the Answer Mode to manual, you must answer each
incoming call yourself. Here is what you should do when using Manual
Mode:
If You Get a...
Then You Should...
1. Regular phone call
Talk as you normally would.
2. Phone call and
request to send a fax
Press Start when you have finished talking
NOTE:Sender must also press Start.
3. Fax tone...
Press Start, and replace the handset.
Automatic Fax Only Reception (Fax Mode)
You can automatically receive all your faxes in Automatic Fax Reception
mode (Fax light is on). Select this mode by pressing Mode.
SETUP RECEIVE
See
“Operation
from an
External or
Extension
Telephone”
and
“For Fax/Tel
Mode Only”
in this
chapter
Setting the Ring Delay
The Ring Delay setting determines the number of times the MFC rings
before it answers.
1 Press Menu, 1, 2, 1.
2 Press Set.
3 Press or to select how many times the line rings before the
MFC answers (01-04).
4 Press Set when the screen displays your selection.
5 Press Stop to exit.
Setting the F/T (Fax/Tel) Ring Time
(For Fax/Tel Mode Only)
See
“Operation
from
Extension
Telephone” in
this chapter
You need to determine how long the MFC will give its special F/T
pseudo-ring when you have a voice call. This ringing happens after the
initial ringing from the phone company. Only the MFC rings, for 20, 30,
40, or 70 seconds; no other phones on the same line ring the special F/T
pseudo ring. However, you can answer the call on any extension phone
on a separate wall socket on the same line as the MFC.
1 Press Menu, 1, 2, 2.
2 Press or to select how long the MFC will ring to alert you that
you have a voice call.
3 Press Set when the screen displays your selection.
RING TIME:30 SEC
4 Press Stop to exit.
Now, when a call comes in and the MFC is set to Fax/Tel Mode, all
phones on this line will ring the number of times you selected in Ring
Delay.
You can let the MFC pick up and detect if it’s a fax or voice call. If it’s a
fax call, the MFC prints the fax. If it’s a voice call, the MFC signals you
with an F/T pseudo-ring for the length of time you selected in F/T Ring
Time.
Even if the caller hangs up during the F/T pseudo-ringing, the MFC
continues the F/T pseudo-ringing for the set time.
Please note that some faxes cannot be received automatically in Fax/Tel
mode, because some fax machines do not send the standard Group 3
calling tone (“CNG”).
45
46
CHAPTER SIX
IMPORTANT! This MFC does not re-generate ringing conditions to any
extension telephones. Any such extension telephones will only ring
during the period set on ring delay.
Recording the Fax/Tel Outgoing Announcement
(F/T MESSAGE) (Only for MFC-740)
This is the announcement played by your MFC (not an external TAD)
when someone calls and your MFC is set to Fax/Tel mode. Although
callers hear your announcement, they cannot leave a message. To erase
the announcement, follow the directions in chapter 12, “Erasing the
Outgoing Message”.
1 Press Menu, 1, 8, 3. The screen prompts you to choose F/T
MESSAGE, TAD MESSAGE or PAGING MSG.
2 Press or
3 Press Set.
to select F/T MESSAGE.
4 Press Record, then pick up the handset to record a message.
5 Replace the handset. Your announcement is played.
6 Press Stop to exit.
It is not necessary to have an outgoing message. The Fax/Tel mode will
work fine without one. It is only to help the caller understand the status
of your MFC.
For example, you can leave a message that says:
“Hello, please wait, we are trying to connect you. If you wish to send a
fax, please wait until you hear a fax tone and press the Start key, or, press
51 (your three-digit remote activation code) and press the Start key.”
Fax Detect
See
“Operation
from
Extension
Telephone”
and
“For Fax/Tel
Mode Only”
in this
chapter
When you use this feature, you don’t have to press Start when you
answer a fax call and hear calling beeps. Just hold the handset and wait
for several seconds. When you see RECEIVING on the MFC screen or
when you hear “chirps” through the handset of an extension phone
connected to another wall jack, just replace the handset, and your MFC
does the rest. Selecting ON allows the MFC to receive fax calls
automatically, even if you lift the handset of an extension or external
phone. Selecting SEMI lets the MFC receive the call only if you’ve
answered it at the MFC. Selecting OFF means you’ll have to activate the
MFC yourself, by pressing Start or by pressing 5 1 if you are not at
your MFC.
SETUP RECEIVE
In case Fax Detect does not work, because of a poor phone line
connection, just press Start or press the Activation Code 5 1.
1
2
3
4
Press Menu, 1, 2, 3.
Use
or
to select ON, SEMI or OFF.
Press Set when the screen displays your selection.
Press Stop to exit.
If you’ve set the feature to ON, but your MFC doesn’t automatically
connect a fax call when you lift an external or extension phone handset,
press 5 1.
At the MFC, lift the handset and press Start.
Printing a Reduced Incoming Document
You can always reduce the size of an incoming fax to a fixed percentage
with your MFC. If you choose AUTO, the MFC chooses the level of
reduction for you regardless of the original size of the incoming
document.
1 Press Menu, 1, 2, 5. The screen displays
5.REDUCTION
2 Use
or
to select the reduction ratio you want—AUTO, 100%,
88%, 83% or 70%. Choose 100% if you don’t want a reduction.
3 Press Set when the screen displays your selection.
4 Press Stop to exit.
If you receive faxes that are split on two pages, change the reduction to
AUTO ––OR–– choose a lower reduction percentage.
NOTE: ■ When you use Auto Reduction to reduce incoming
documents to fit on one page of recording paper, you can do
so only as long as the original document is not longer than
35 cm. If the original is longer than 35 cm, the data will not
be reduced and will carry over to print on a second page.
■ When you use Auto Reduction and you receive an incoming
document that is smaller than your recording paper, no
reduction will take place, and you will get the same size
recorded as the original.
47
48
CHAPTER SIX
Reception into Memory
As soon as the paper cassette becomes empty during fax reception, the
screen will display “CHECK PAPER”; please put some paper in the
paper cassette (see chap. 2).
If the MEMORY RECEPTION function is ON at this time…
The current fax reception will continue, with the remaining page(s) being
stored in memory, subject to available memory. Subsequent incoming
faxes will also be stored into memory until the memory is full, following
which no further incoming fax calls will be automatically answered; all
data will be printed as soon as fresh paper is put in the paper cassette.
If the MEMORY RECEPTION function is OFF at this time…
The current fax reception will continue, with the remaining page(s) being
stored in memory, subject to available memory. Subsequent incoming fax
calls will not be automatically answered until fresh paper is put in the
paper cassette. The last fax received will be printed as soon as fresh
paper is put in the cassette.
1 Press Menu, 1, 2, 6. The screen displays
6.MEM.RECEIVE
2 Use or to select ON or OFF.
3 Press Set when the screen displays your selection.
4 Press Stop to exit.
SETUP RECEIVE
Advanced Receiving Operations
Operation from an External or Extension
Telephone
An external phone is a telephone that is plugged into your MFC (either
into the MFC’s EXT socket or into the back of the connector that plugs
into the telephone wall socket).
See
“F/T Ring
Time”
in this
chapter
An extension phone is another phone on the same phone number as your
MFC, but plugged into a different telephone wall socket. For example,
your MFC may be connected to a phone line in your study, and you may
have another phone on the same line (and same phone number) in your
kitchen. This feature enables you to answer the phone in the kitchen if it
rings while you are making a coffee, knowing that you can transfer the
call to your MFC if the incoming call is a fax.
If you answer a fax call on an external or extension phone, you can make
your MFC take over by using the Activation Code. When you press the
Activation Code 5 1, the MFC starts to receive a fax.
If the MFC answers a voice call and F/T pseudo-rings for you to take
over, use the Deactivation Code # 5 1 to take the call at an extension
phone. The Deactivation Code is used only in Fax/Tel mode.
See
“Outgoing
Message
(OGM) of
External
TAD”
chap. 2
If you answer a call, and no one is on the line, assume you’re receiving a
fax. At the MFC phone, press Start, then hang up. At an extension
phone, press 5 1, wait for fax receiving tones (chirps), then hang up. At
an external phone, press 5 1 and wait for the phone to be disconnected
(the screen displays RECEIVING) before you hang up. (Your caller will
have to press Start to send the fax.)
If you accidentally pick up an extension phone when a fax message is
being received, you may disrupt the transmission or render some portions
unreadable.
The Remote Activation Code also can be used by your callers. When you
are using a external TAD, your outgoing message (OGM) should end
with the statement “to send a fax, press 5 1”.
For Fax/Tel Mode Only
When the MFC is in Fax/Tel mode, it will use the F/T Ring Time (F/T
pseudo-ringing) to alert you to a voice call. If you’re at the MFC, you
can lift the handset to answer.
49
50
CHAPTER SIX
If you’re at an extension phone, you’ll need to lift the handset during the
F/T Ring Time and press # 5 1 between the F/T pseudo-rings. If no one
is on the line, or if someone wants to send you a fax, send the call back
to the MFC by pressing 5 1.
Changing Remote Codes
Remote Codes might not work with some telephone systems. The preset
Activation Code is 5 1. The preset Deactivation Code is # 5 1.
If you are always disconnected when accessing your external TAD
remotely, try changing the Activation Code from 5 1 to # # # and the
Deactivation Code from # 5 1 to 1 1 1. You cannot use the same number
for the Activation Code and the Deactivation Code.
To change Remote Codes
1 Press Menu, 1, 2, 4.
2 Press
or
to select ON (or OFF).
REMOTE ACT.:ON
3 Press Set when the screen displays the setting you want.
4 If you want to, enter a new Remote Activation Code, then press Set.
ACT.CODE:*51
5 If you want to, enter a new Remote Deactivation Code, then press
Set.
DEACT.CODE:#51
6 Press Stop to exit.
Printing a Fax from Memory (Only for MFC-730)
If you have fax storage ON for remote retrieval, you can still print a fax
from the machine’s memory when you are at your machine:
1 Press Menu, 1, 8, 4.
2 Press Start .
3 After all the data saved in the memory is printed out. Press Stop.
SETUP RECEIVE
Caller ID (Caller IDentification) (Only for the UK)
Caller ID is a telephone service that allows the subscriber to see a
display of the caller’s phone number as the telephone rings. It is a fast
way to screen your calls. You can respond quickly to calls you missed,
because Caller IDs are received and stored in your machine’s memory. In
addition to the standard Caller ID features, you can select a Caller ID and
have your machine dial the number for you.
NOTE: ■ To get the Caller ID Service: apply for the Caller ID service
at your local telephone company, if available.
■ To PABX Users :
Calling line identification signals are not generally delivered
to your Brother fax machine if it is connected behind a
private branch exchange (PBX) system or other call routing
device.
Advantages of Caller ID
For Business
All businesses profit from a quicker response to customer calls.
Businesses that provide mail order services, money-lending services or
provide confidential information, can protect themselves from false
orders or acceptance of false identification.
At Home
Residential customers can protect themselves from unwanted calls.
Set the Caller ID to ON
If you have BT Caller ID on your line, then this function should be set to
ON to display the caller’s phone number on the fax LCD as the
telephone rings.
1 Press Menu 1, 0, 2. The screen displays
CALLER ID:ON
SELECT { } & SET
to choose ON.
2 Press or
3 Press Set.
4 Press Stop to exit.
51
52
CHAPTER SIX
How Does the Caller ID Work?
The Caller ID Appears on the Display When Your
Telephone Rings
As your telephone rings, the display shows you the caller’s phone
number. Once you pick up the handset, the caller’s ID disappears. You
will see up to the first 16 characters of the number on the display.
Helpful Hints
■ If “# UNAVAILABLE” appears on the display, it means that the call
came from outside your caller ID service area. *
■ If “# WITHHELD” appears on the display, it means the caller
intentionally blocked the transmission of his/her ID. *
■ If no caller ID was transmitted to your fax machine, “PICK UP
PHONE” will remain on the display.
* Depends on network Function.
The Caller ID is Stored in Your Machine’s Memory
The machine can store a maximum of the last 30 incoming caller IDs in
the memory, along with the time and date of reception. The 31st call will
cause the oldest ID to be erased.
The Caller ID information stored in the memory can be used for the
following.
■ Selecting a Caller ID from the Memory for Call Reply.
You can scroll through the Caller IDs on the display and select one
for your machine to dial.
■ Printing the Caller ID List.
You can review calls you received by checking the Caller IDs in
memory. This report will list the Date, Time, Phone Number (Caller
ID), and type of call (Comment).
NOTE: Please set up the number of rings to more than 02 in the Ring
Delay (see chap.6) before you use the Caller ID. If you set up
the number of rings to 01, you cannot receive the Caller ID.
SETUP RECEIVE
Selecting a Caller ID from the Memory for Call
Reply
You can display the caller IDs that are stored in the memory and select
the caller you want your machine to dial. Call Reply is a convenient
feature whereby your Brother fax can dial back a voice/fax call “onhook” to the opposite party associated with a Caller ID number which
has been captured into memory. This saves you from having to copy and
dial back to that number manually. (You can skip to Step 4 below by
Pressing the Shift and Tel-Index simultaneously.)
1 Press Menu 1, 0, 2. The screen displays
CALLER ID:ON
SELECT { } & SET
to select DISPLAY ID.
2 Press or
3 Press Set. The caller ID of the last call will appear on the display.
If no ID is stored, the beeper will sound and “NO CALLER ID”
will appear on the display.
4 Press
or
to scroll through the Caller IDs in the memory.
25)5555151
5 Press Set to automatically dial the Caller ID number. Wait until the
screen prompts you to press the Start key.
25)09/11 15:25
PRESS START KEY
6 Press Start.
DIALLING
TELEPHONE
If you wish to send a fax, insert a document into the feeder.
Then press Start.
To cancel the Call Reply (for example, when you selected the Wrong
Caller ID), simply press Stop and begin again ; the Caller ID will not be
lost.
53
54
CHAPTER SIX
In certain circumstances, you may not be able to use this feature due to
the type of CALLER ID service or the type of telephone system you or
the other party is using.
To Activate Certain Network Services When Using Call
Reply
It may be desired (in order to activate certain network services), to insert
a special prefix to be dialled in front of the Caller ID number when
using the Call Reply feature. Some examples of such network services
are :
* Your outgoing Caller ID withheld
The required prefix, typically three to six digits (including # and
symbols) in length, may be inserted after displaying the desired Caller ID
in step 4 on the previous page. (You can enter the prefix up to 20 digits
on the machine. ) The complete number string including the prefix will
then be dialled by pressing Start.
Previous
( page
) Select the desired Caller ID, wait 2 seconds until you see the date and
Step 4. time the caller ID was received.
25)09/11 15:25
PRESS START KEY
Enter the prefix by using number keys up to 20 digits.
-
The display will be cleared when you press any of the number keys.
-
To cancel the prefix (such as when you entered the wrong number),
simply press Stop.
The display will return to the desired Caller ID you selected.
-
If you press Stop again, the machine will return to the current date
and time display. You are no longer in the call reply mode.
-
Any problems or queries in using network services should be raised
in the first instance with your network operator(s).
-
With Call Reply, automatic redial does not function in cases where
the called party is busy or doesn’t answer.
Call Reply to DDI numbers via Caller ID
Calls derived from a caller ID number to destinations connected to a
“Direct Dial Inward (DDI)” private exchange system may fail to connect,
or may be answered in the first instance by the called premises’ main
switchboard rather than by the intended extension. Brother is not liable
for any call charges thus incurred.
SETUP RECEIVE
Clearing the Caller ID Stored in Memory
For the effective use of the memory, it is recommended that you should
clear the Caller ID stored into memory by pressing Clear when the
display shows the number.
Printing Caller ID List
1 Press Menu 1, 0, 2.
2 Press or
3 Press Set.
4 Press Start.
to select PRINT REPORT.
Polling
Polling is the process of retrieving faxes from another machine. You can
use your MFC to “poll” other machines, or you can have someone poll
your MFC.
All parties involved in polling need to set up their machines to
accommodate polling. When someone polls your MFC to receive a fax,
they pay for the call; if you poll someone’s fax machine to receive a fax,
you pay for the call. (See “Setup for Polling Transmit” in chap. 6.)
Some machines do not respond to the polling function.
Secure Polling
Secure Polling is a way to keep your documents and others’ from falling
into the wrong hands while the MFC are set up for polling. You can use
Secure Polling only with another Brother fax machine. Your four-digit
ID number must be entered on the fax machine that polls for your
documents.
Setup for Polling Receive
Polling Receive is when you call another fax machine to receive a fax
from it.
1 Press Menu, 1, 2, 7. The screen displays
POLLING:STANDARD
SELECT { } & SET
55
56
CHAPTER SIX
2 Press or
3 Press Set.
to choose STANDARD.
The screen prompts you to enter the fax number you want to poll,
and then to press Start.
ENTER FAX NO.
ONLINE
THEN PRESS START
ONLINE
4 Enter the fax number you are polling.
5 Press Start. The screen displays DIALLING.
Setup for Polling Receive with Secure Code
You need to make sure you are using the same ID number as the other
party.
1 Press Menu, 1, 2, 7. The screen displays
POLLING:STANDARD
SELECT { } & SET
2 Press or to choose SECURE.
3 Press Set.
4 Enter a four-digit number.
This is the same as the security code of the fax machine you are
polling.
5 Press Set.
The screen prompts you to enter the fax number you want to poll,
and then to press Start.
ENTER FAX NO.
THEN PRESS START
6 Press Start.
SETUP RECEIVE
Setup Delayed Polling Receive
You can set your MFC to begin Polling Receive at a later time.
1 Press Menu, 1, 2, 7. The screen displays
POLLING:STANDARD
SELECT { } & SET
2 Press or to choose TIMER.
3 Press Set.
4 The screen prompts you to enter the time you want to begin polling.
SET TIME=15:25
5 Enter the time (in 24-hour format) you want to begin polling. For
example, enter 21:45 for 9:45 PM.
6 Press Set. The screen prompts you to enter the fax number you are
polling.
ENTER FAX NO.
ONLINE
THEN PRESS START
ONLINE
7 Enter the fax number (you can use One Touch or Speed Dial, or dial
manually).
8 Press Start. The MFC makes the polling call at the time you entered.
You can set up only one Delayed Polling.
Sequential Polling
Your MFC can request documents from several fax units in a single
operation. You just specify several destinations in Step 5. Afterwards, a
Sequential Polling Report will be printed.
1 Press Menu, 1, 2, 7. The screen displays
POLLING:STANDARD
2 Press or to choose STANDARD, SECURE or TIMER.
3 Press Set when the screen displays the setting you want.
57
58
CHAPTER SIX
4 If you selected STANDARD, the screen prompts you to enter the fax
number you want to poll, and then to press Start.
ENTER FAX NO.
ONLINE
THEN PRESS START
ONLINE
•
If you selected SECURE, enter a four-digit number and press
Set.
•
If you selected TIMER, enter the time (in 24-hour format) you
want to begin polling and press Set.
5 Specify the destination fax machines, which you wish to poll by
using One Touch, Speed Dial, a Group, Tel-Index or the dial pad.
You must press Help/Broadcast between each location.
6 Press Start.
Your MFC polls each number or group number in turn for a
document.
DIALLING
Setting PC Interface Mode
If you connect your MFC to your PC, you can receive faxes into your
PC. After completing all setup for Multi-Function Link Pro for Fax, you
can select PC Interface Mode (ON/OFF) for routing incoming faxes.
1 Press Menu, 1, 2, 8.
8.PC INTERFACE
2 Press or to select ON or OFF.
3 Press Set when the screen displays your selection.
4 Press Stop to exit.
7
C H A P T E R
S E V E N
Setup
Send
Before You Begin
■ Documents must be between 7.0 and 21.6 cm wide, and 12.7 and
35.6 cm long. Your MFC can only scan an image 20.8 cm wide,
regardless of how wide the paper is.
■ Make sure you insert documents face down, top edge first.
■ Adjust the paper guides to fit the width of your document.
Paper Guides
■ The automatic document feeder (ADF) can hold up to 20 pages,
See
“Resolution”
in this
chapter
feeding each one individually through the MFC. Use standard (75 g/
m2) paper when using the ADF; if you’re using heavier paper, feed
each sheet individually to prevent paper jams.
■ Press Resolution (before you send the fax) to select the resolution
for the document you’re sending.
■ DO NOT use curled, wrinkled, folded, or ripped paper, or paper with
staples, paper clips, paste or tape attached. DO NOT use cardboard,
newspaper, or fabric.
59
60
CHAPTER SEVEN
■ Make sure documents written with ink are completely dry.
■ To set different resolutions for each page of a multi page document,
refer to “Multiple Resolution Transmission”.
See
“Multiple
Resolution
Transmission”
in this
chapter
Resolution
When you have a document in the feeder, you can use the Resolution
key. Press Resolution continuously until you see the LEDs change.
Fine
Photo
S.Fine
Resolution
Standard
Suitable for most typed documents. (Fine and S.Fine
lights are off)
Fine
Good for small print; transmits a little slower than
Standard resolution. (Only the Fine light is ON)
Super Fine
Good for very small print or artwork; transmits slower
than Fine resolution. (Only the S.Fine light is ON)
Photo
Use when document has varying shades of grey; slow
transmission time. (Both Fine and S.Fine lights are ON)
Contrast
If your document is very light or very dark, you might want to set the
contrast accordingly. Use LIGHT to send a light document. Use DARK
to send a dark document.
1
2
3
4
5
Insert the document, face down, in the feeder.
Press Menu, 1, 3, 3.
Use
or
to select AUTO, LIGHT, or DARK.
When the screen displays your selection, press Set.
Press 2 if you are finished choosing settings, and go to Step 6 ––
OR–– Press 1 if you want to select additional settings. The display
returns to the SETUP SEND menu.
6 Enter a fax number and press Start to send a fax.
SETUP SEND
Automatic Transmission
This is the easiest way to send a fax.
IMPORTANT: Do not pick up the handset ––OR–– press Speaker
Phone (for MFC-740).
1 Insert the document face down in the feeder.
2 Enter the fax number using One Touch, Speed Dial, Tel-index or the
dial pad.
3 Press Start. The MFC starts scanning the document and the display
indicates the job number and how much memony is available. Then
the MFC will start dialling if it is not sending, receiving or printing
the other documents.
Manual Transmission
Manual transmission lets you hear the dial tone, ringing and fax
receiving tones before sending the fax.
See
“One Touch
Dialling”
chap. 9
1 Insert the document face down in the feeder.
2 Pick up the handset and listen for a dial tone ––OR–– press
Speaker Phone (for MFC-740).
3 Enter the fax number you want to call. (You can enter the digits
using the dial pad or you can enter a One Touch or Speed Dial
number or you can call from the Tel-index.)
See
“Speed
Dialling”
chap. 9
4 When you hear the fax tone, press Start.
5 To hang up, replace the handset ––OR–– press Speaker Phone
(for MFC-740).
Note: Manual transmission does not use memory.
Fax Redial
If you’re sending a fax manually and the line is busy, you can retry the
number by pressing Redial/Pause.
If you’re sending a fax automatically and the line is busy, the MFC will
automatically redial up to 4 times at 2 minute intervals.
Dual Access
If the document feeder is empty, you can place a document in the feeder,
set temporary settings, dial a number, and begin scanning the fax into
memory, even when the MFC is receiving a fax, sending a fax, or
printing a fax from memory. The screen displays the new job number and
how much memory is available.
61
62
CHAPTER SEVEN
If you try to scan in and store a 51st fax, the MFC will send it
immediately, without storing it in memory.
See
“One Touch
and Speed
Dial”
chap. 9
If you get a MEMORY FULL message while scanning the first page of
a fax, press Stop to cancel a scan. If you get a MEMORY FULL
message while scanning in a subsequent page, you'll have the option to
press Start to transmit the pages scanned so far, or to press Stop to
cancel the operation.
Real Time Transmission
See
“Setting
Station ID”
chap. 5
When memory is full, the MFC cannot continue to scan documents into
memory before sending. However, you can turn on REAL TIME TX.
Then place the documents in the feeder and enter the fax number. As
soon as the phone line is free, the MFC starts dialling and sending the
fax.
1 Place the document in the feeder.
2 Press Menu, 1, 3, 9. The screen displays
9.REAL TIME TX
3 To change the default setting, press
or
to select ON (or OFF)
and press Set. Go to Step 5 ––OR–– For the next fax transmission
or
to select NEXT FAX ONLY and press Set.
only, press
4 For the next fax only, press
or
to select ON (or OFF) and
press Set.
5 Press 1 if you want to select additional settings. The display returns
to the SETUP SEND menu ––OR–– Press 2 if you are finished
choosing settings and go to Step 6.
6 Enter fax number and press Start.
SETUP SEND
Basic Sending Operations
Composing an Electronic Cover Page
See
“Setup
Quick-Dial
Numbers”
chap. 8
See
“Setting
Station ID”
chap. 5
The cover page is sent to the receiving party’s machine. Your cover page
includes the name stored in the One Touch or Speed Dial memory, if you
have used this feature to start the call.
The cover page indicates the fax is from your Station ID, and the number
of pages you’re sending. If you have COVERPG SETUP set to ON
(Function menu 1-3-1), the number of pages remains blank.
You can select a comment to include on your cover page, or you can
select 1. NOTE OFF if you do not wish to include a comment.
1.NOTE OFF
2.PLEASE CALL
3.URGENT
4.CONFIDENTIAL
As well as using one of the comments above, you can also enter up to
two customized messages, each 27 characters long. Use the chart of
“Entering Text” in chap. 5 to help enter characters.
Most of the SETUP SEND functions are temporary settings that allow
you to make adjustments for each document you send. However, so you
can set up your cover page and cover page comments in advance, the
Cover Page Setup and Cover Page Message functions will change their
default settings.
Cover Page for Next Fax Only
Make sure Station ID is set up (chap. 5). This feature does not work
without the Station ID.
You can set the MFC to send a cover page with a particular document.
This cover page will include the number of pages in your document.
1
2
3
4
Insert the document in the feeder.
Press Menu, 1, 3, 1.
Press Set when the screen displays NEXT FAX ONLY.
Press
or
to select ON (or OFF).
63
64
CHAPTER SEVEN
5
6
7
8
Press Set.
Press
or
to view the comment selections.
Press Set when the screen displays your selection.
Enter two digits to indicate the number of pages you are sending.
(Enter 00 to leave the number of pages blank.) If you make a
to back up and re-enter the number of pages.
mistake, press
9 Press Set. The screen displays
10 Press 1 if you want to select additional settings. The display returns
to the SETUP SEND menu ––OR–– Press 2 if you are finished
choosing settings, and go to Step 11.
11 Enter the fax number .
12 Press Start.
Always Send Cover Page
Make sure Station ID is set up (chap. 5). This feature does not work
without the Station ID.
You can set the MFC to send a cover page whenever you send a fax. The
number of pages in your fax is not included when you use this setting.
1 Press Menu, 1, 3, 1.
2 Press or to select.
COVERPAGE:OFF
COVERPAGE:ON
3 Press Set when the screen displays COVERPAGE:ON. (If you
select ON, a coverpage is always sent when you send a fax.)
4 If you selected ON, the screen displays the cover page comment
options. Press
or
to view comment selections.
5 Press Set when the screen displays your selection. The screen
displays.
6 Press 1 if you want to select additional settings. The display returns
to the SETUP SEND menu ––OR–– Press 2 to exit if you are
finished choosing settings.
SETUP SEND
Using a Printed Cover Page
If you prefer using a printed cover page that you can write on, you can
print the sample page and attach it to your fax.
1
2
3
4
Press Menu, 1, 3, 1.
Press
or
to select PRINT SAMPLE.
Press Set when the screen displays your selection.
Press Start. Your MFC prints a copy of your cover page.
=== COVER PAGE ===
TO:
FROM:
FAX:
TEL:
PAGE[S] TO FOLLOW
COMMENT:
Cover Page Message
You can set up two custom comments.
Composing Your Own Comments
1 Press Menu, 1, 3, 2. The screen displays
2.COVERPAGE NOTE
2 Use
or
comment.
See
“Entering
Text”
chap. 5
3
4
5
6
to choose position 5 or 6 for your customized
Press Set.
Use the dial pad to enter your customized comment.
Press Set.
Press 1 if you want to select additional settings. The display returns
to the SETUP SEND menu ––OR–– Press 2 to exit.
65
66
CHAPTER SEVEN
Advanced Sending Operations
Overseas Mode
Sometimes, when sending a fax to overseas numbers, problems can be
experienced. This mode makes the MFC work better for such calls.
After you send a fax using this feature, the feature turns itself off.
1 Insert the document.
2 Press Menu, 1, 3, 5.
5.OVERSEAS MODE
3 Press or to select ON (or OFF).
4 Press Set when the screen displays your selection.
5 Press 1 if you want to select additional settings. The display returns
to the SETUP SEND menu ––OR–– Press 2 if you are finished
choosing settings and go to Step 6.
6 Enter the fax number you’re calling.
7 Press Start.
Call Reservation
You can send a fax and let the other party know that you want to speak to
him after the fax transmission is complete. The other fax machine will
ring as if it were receiving a telephone call; if the other party picks up the
handset, your MFC will ring. Lift the handset to have a conversation.
If you set Call Reservation and Call Back message to ON, your MFC
leaves a message if the other party does not answer.
1 Insert the document in the feeder.
2 Press Menu, 1, 3, 6. The screen displays the current setting for Call
Reservation.
CALL RESERVE:OFF
SELECT { } & SET
3 Press
or
to select ON (or OFF).
SETUP SEND
4 If you set Call Reservation to ON, press Set when the screen
displays your selection. The screen displays the current setting for
Call Back Message.
CALL MESSAGE:OFF
CALL MESSAGE:ON
5 Press or to select ON (or OFF).
6 Press Set when the screen displays your selection.
7 Press 1 if you want to select additional settings. The display returns
to the SETUP SEND menu ––OR–– Press 2 if you are finished
choosing settings, and go to Step 8. The screen prompts you to enter
the fax number you want to call.
8 Enter the fax number, and press Start.
9 If you’ve set Call Reservation to ON, pick up your handset if the
MFC rings.
You cannot use auto redial with Call Reservation. You cannot use Call
Reservation with Delayed Transmission or with Polling. You must
register your Station ID to set Call Back Message to ON.
Print Sample Call Back Message
1
2
3
4
Press Menu, 1, 3, 6.
Press
or
to select PRINT SAMPLE.
Press Set.
Press Start.
Delayed Transmission (Timer)
You can use this function to send a fax up to 24 hours later.
1 Insert the document in the feeder.
2 Press Menu, 1, 3, 7.
3 Enter the time you want the fax to be sent, in 24-hour format (for
example, enter 19:45 for 7:45 PM).
4 Press Set. The screen displays
1.DOC 2.MEMORY
67
68
CHAPTER SEVEN
5 Press 1 to select DOC ––OR–– Press 2 to select MEMORY. If you
select 1.DOC, the MFC will not start scanning the document until
the time it is due to be sent, so the document must be left in the
feeder.
6 Press 1 if you want to select additional settings. The display returns
to the SETUP SEND menu ––OR–– Press 2 if you are finished
choosing settings and go to Step 7. The screen prompts you to enter
the fax number.
ENTER FAX NO.
ONLINE
THEN PRESS START
ONLINE
7 Enter the fax number, and press Start. The MFC will wait until the
time you have entered to send the fax.
Broadcasting
Broadcasting is automatically sending the same fax message to multiple
fax numbers. Using the Help/Broadcast key, you can include up to 24
One Touch locations, up to 56 Speed Dial locations (MFC-730) and 100
Speed Dial locations (MFC-740), and up to 50 manually dialled numbers
(maximum of 130 locations (MFC-730) and 174 locations (MFC-740) if
you did not use up any locations for Groups, access codes or credit card
numbers). Real Time Transmission needs to be set to OFF.
However, available memory will vary with the types of jobs in memory
and numbers of locations used for broadcasting. If you broadcast to
more than the maximum locations available, you will not be able to setup
transmissions using dual access and the timer.
The easiest way to broadcast is to first combine frequently used One
Touch and Speed Dial numbers as a Group, which uses up a One Touch
Key. (Remember, you can have up to six Groups and Quick-Dial
numbers can be included in more than one Group). Then by pressing
Help/Broadcast between each location, you can include One Touch,
Speed Dial, Groups, and manual dialling (using the dial pad) in the same
broadcast. Use the Tel-index to help you choose the numbers easily.
After the broadcast is completed, a Broadcast Report will be printed
automatically to let you know the results.
1 Insert the document into the feeder.
2 Enter a number using One Touch, Speed Dial, Group number, Telindex or the dial pad.
Example: Group number
SETUP SEND
See “Setting
Up Groups
for
Broadcasting”
chap. 8
3 Press Help/Broadcast. You will be prompted to press the next
number.
4 Enter the next number.
Example: Speed Dial
5 Press Help/Broadcast.
6 Enter the next fax number.
Example: Manual dialling, using the dial pad.
7 Press Start.
Your MFC will read the documents into memory and then start sending
faxes to all the numbers you entered.
■ To stop the broadcasting in progress, press Stop. The display asks if
you want to cancel all locations or just the location that is being sent
to.
■ Enter the long dialling sequence numbers as you normally would, but
keep in mind that each key counts as one location, so the number of
locations you can call becomes limited.
■ If the line is busy or a connection could not be made for some other
reasons while broadcasting, the MFC will redial the number
automatically.
■ If the memory is full, press Stop to abort the job or press Start to
send the portion that is in the memory (if more than one page has
been scanned).
Multiple Resolution Transmission
Use this feature to select separate resolution settings for each page of the
fax you’re sending. This could be useful if you’re sending a fax with
photos and letters, or some pages with small print and others with normal
print. Resolution settings return to STANDARD after the fax is sent.
1 Insert documents in feeder, then press Menu, 1, 3, 4.
2 Use or to select resolution for page 1, then press Set.
3 Repeat Step 2 for subsequent pages. Press Stop when you’re
finished.
4 Press 1 if you want to select additional settings. The display returns
to the SETUP SEND menu ––OR–– Press 2 if you are finished
choosing settings, and go to step 5.
5 Enter the fax number you’re calling, and press Start.
If you want to copy a document using multiple resolutions, press Mono
Copy and Colour Copy in Step 5.
69
70
CHAPTER SEVEN
Setup for Polling Transmit
Polling Transmit is when you set up your MFC to wait with a document
so another fax machine can retrieve it.
1 Place document to be retrieved in feeder.
2 Press Menu, 1, 3, 8.
3 The screen displays
POLLING:STANDARD
SELECT { } & SET
4 Press or to choose STANDARD.
5 Press Set. The screen displays
1.DOC 2.MEMORY
6 Press 1 to select DOC if you want your MFC to scan the printed
document at the time it is polled ––OR–– Press 2 to select
MEMORY.
See
“Interrupting
Timer and
Polling
Transmit
Jobs”
in this
chapter
7 Press 1 if you want to select additional settings. The display returns
to the SETUP SEND menu ––OR–– Press 2 if you choosing setting
and go to Step 8.
8 Press Start.
If you pressed 1 in Step 5, the printed document remains in the document
feeder until your MFC is polled. However, you can “interrupt” it to send
another fax.
Setup for Polling Transmit with Secure Code
When you set POLLING:SECURE to on, anyone who polls your MFC
must enter the polling ID number.
1 Place document in feeder.
2 Press Menu, 1, 3, 8.
3 The screen displays
POLLING:STANDARD
SELECT { } & SET
4 Press
or
to choose SECURE.
SETUP SEND
5 Enter a four-digit number, and press Set.
1.DOC 2.MEMORY
6 Press 1 to select DOC if you want your MFC to scan the printed
document as it is polled ––OR–– Press 2 to select MEMORY.
7 Press 1 if you want to select additional settings. The display returns
to the SETUP SEND menu ––OR–– Press 2 if you are finished
choosing settings and go to Step 8.
8 Press Start and wait for the fax to be polled.
You can use Secure Polling only with another Brother fax machine.
Cancelling a Job While Scanning the
Document
You can cancel a job while you are scanning it into memory by pressing
Stop. Eject the document by pressing Stop again.
Checking Job Status
You can check which jobs are in memory waiting to be sent. Press
Menu, 1, 4 to check it. While the MFC is sending or receiving a fax,
or
to see them.
press Stop. The screen display job numbers. Press
Cancelling a Scheduled Job in Memory
You can cancel tasks you’ve scheduled, such as Delayed Fax, Delayed
Polling Receive or Polling Transmit.
If the MFC is idle,
1 Press Menu, 1, 4.
Any waiting jobs appear on the display. If nothing is waiting, the
screen displays NO JOB WAITING.
4.REMAINING JOBS
71
72
CHAPTER SEVEN
2
If you have more than two jobs waiting, use
or
to select the
job you want to cancel. Press Set when the screen displays your
selection.
—OR—
If you have only one job waiting, go to step 3.
#02 SALES REPORT
1.CLEAR 2.QUIT
3
Press 1 to cancel —OR— Press 2 to exit without cancelling.
To cancel another job, return to step 2.
4 Press Stop to exit.
If the MFC is busy, press Stop, then follow Steps 2 through 4 to cancel a
job.
You can check which jobs are remaining in memory by following Steps 1
and 2 above.
Interrupting Delayed Fax and Polling Transmit
Jobs
You can send a fax or make a copy without cancelling the Timer or Poll
Waiting with documents in the feeder by “interrupting” it. When you
interrupt the Timer to send a “new” set of documents, the MFC will not
automatically redial the number if it was busy. Also, you cannot use the
function mode if you have interrupted the Timer or Poll Waiting.
1 Press Menu, 1, 5.
2 Wait 2 seconds, then remove the documents that are waiting in the
feeder.
INSERT DOCUMENT
3
4
5
6
Place the “new” document you want to send now in the feeder.
Enter the new fax number for the documents you want to send now.
Press Start.
After the transmission is finished, place the “old” documents back
into the feeder.
7 Press Menu, 1, 5, to restore the Delayed Fax and/or Polling timer.
8
C H A P T E R
E I G H T
Setup
Quick-Dial
Numbers
Storing Numbers for Easy Dialling
You can set up your MFC to do three types of easy dialling: One Touch,
Speed Dial and Groups for Broadcasting of faxes.
Storing One Touch Dial Numbers
See
“One Touch
Dialling”
chap. 9
You can store 24 fax/phone numbers that you can dial by pressing one
key. You can also store names with these numbers. Even if you lose
electrical power, numbers stored in memory will not be lost. When you
press a One Touch key, the screen displays the name or number as the
call is dialled.
One Touch Dial keys are not the dial pad keys. They are the 12 keys
(numbers 1-24) located to the right of the dial pad. One Touch Dial
Numbers 13-24 are accessed by holding down Shift while you press the
appropriate One Touch key.
1 Press Menu, 1, 6, 1.
2 Press the One Touch Dial key where you want to store a number. The
screen displays the location you selected.
3 Enter a number (up to 20 digits).
4 Press Set. The screen prompts you to enter a name for this number.
NAME:
5 Use the dial pad to enter the name (up to 15 characters). You can use
the chart of Entering Text in chap. 5 to help you enter letters —
OR— go to Step 6 to store the number without a name.
73
74
CHAPTER EIGHT
6 Press Set. The screen prompts you to select the type of number this
is. Use
FAX
TEL
F/T
or
to select the type you want.
a fax number
a telephone (voice) number
both a fax and telephone (voice) number
7 Press Set.
8 Return to Step 2 to store another One Touch Dial number —OR—
Press Stop to exit.
When you dial a One Touch Dial number, the screen displays the name
you have stored, or, if you have not stored a name, the number you have
stored.
Storing Speed Dial Numbers
See
“Speed
Dialling”
chap. 9
You can store Speed Dial numbers, which you dial by pressing only three
keys. There are 56 (MFC-730) and 100 (MFC-740) Speed Dial locations.
Even if you lose electrical power, numbers stored in memory will not be
lost.
1 Press Menu, 1, 6, 2. The screen prompts you to enter a location.
SPEED-DIAL? #
2 Use the dial pad to enter a two-digit location (01–56 for MFC-730)
(00–99 for MFC-740).
3 Press Set. The screen displays your entry, then prompts you to enter
the number you’re storing.
#05:
ENTER & SET
4 Enter the number (up to 20 digits).
5 Press Set. The screen now prompts you to store a name with this
number.
NAME:
6 Use the dial pad to enter the name (up to 15 characters). You can use
the chart of “Entering Text” in chap. 5 to help you enter letters ––
OR–– go to Step 7 to store the number without a name.
7 Press Set.
SETUP QUICK-DIAL NUMBERS
8 The screen prompts you to select the type of number this is. Use
or
to select the type you want.
FAX
TEL
F/T
a fax number
a telephone (voice) number
both a fax and telephone number
9 Press Set.
10 Return to Step 2 to store another Speed Dial number ––OR–– Press
Stop to exit.
Changing One Touch and
Speed Dial Numbers
If you try to store a One Touch or Speed Dial number in a location where
a number is already stored, the screen displays the current name stored
there, then prompts you to either change it or exit.
1.CHANGE 2.QUIT
1 Press 1 to change the number stored, or press 2 to exit without
making a change.
2 Enter a new number.
■ If you want to erase the number, press Clear when the cursor is
to the far left of the digits.
■ If you want to change a digit, use
or
to position the cursor
under the digit you want to change, then enter it.
3 Follow the directions in Storing One Touch Dial or Speed Dial
Numbers.
See
“Storing
One Touch
Dial
Numbers”
and
“Storing
Speed Dial
Numbers”
in this
chapter
Setting Groups for Broadcasting
Groups allow you to send the same fax message to many fax numbers by
pressing only one One Touch Dial key (This is called Broadcasting.).
First, you’ll need to store each fax number as a One Touch or Speed Dial
number. Then, you can combine them into a Group. Each Group uses up
a One Touch Dial key. Finally, you can have up to 6 small Groups, or
you can assign up to 79 numbers (MFC-730) and 123 numbers (MFC740) to one large Group.
75
76
CHAPTER EIGHT
1 Press Menu, 1, 6, 3. The screen displays
SELECT ONE-TOUCH
2 Select a One Touch Dial key where you wish to store the number.
(For example, press One Touch Dial key 02 to use as a Group.)
SETUP GROUP:GO
ENTER & SET
3 Use the dial pad to enter the Group Number (for example, press 1 for
Group 1).
4 Press Set. To include One Touch or Speed Dial numbers in the
Group, enter them as if you were dialling. For example, for One
Touch Dial key 05, press One Touch Dial key 05. For Speed Dial
location 09, press Speed Dial, then press 0, 9 on the dial pad. The
LCD shows 05, #09.
G01:*05#09_
5 Press Set. The screen prompts you to enter a name.
NAME:
ENTER & SET
6 Use the dial pad and the chart of “Entering Text” in chap. 5 to enter a
name for the group (for example, NEW CLIENTS).
7 Press Set.
8 Press Stop to exit.
You can print a list of all One Touch and Speed Dial numbers. Group
numbers will be marked in the column of “GROUP”. See chap. 15,
“Printing Reports”.
9
C H A P T E R
N I N E
Telephone
(Voice)
Operation
Making Voice Calls
You can use your MFC to make voice telephone calls, by dialling
manually or by using One Touch or Speed Dial memory. You can use the
handset, or if you have the MFC-740 you can use the Speaker Phone to
make and receive calls.
The “Full-duplex” digital Speaker Phone allows you to operate the phone
hands free, or allows more than one person in the room to participate in a
two-way phone conversation. When using the Speaker phone, make sure
to speak clearly and close to the microphone.
Manual Dialling
Manual dialling is simply pressing all of the digits of the phone number.
1 Pick up the handset ––OR–– press Speaker Phone.
2 When you hear a dial tone, dial the number, using the dial pad.
On the MFC-740, you can switch from handset to Speaker Phone by
pressing Speaker Phone, then replacing the handset. You can
switch from Speaker Phone to handset by lifting the handset.
3 To hang up, replace the handset if you are lifting the handset,
––OR–– press Speaker Phone.
Full-Duplex Digital Speakerphone (Only for
MFC-740)
When the MFC rings, instead of lifting the handset, press
Speaker Phone. Speak clearly, toward the microphone. To end the
call, press Speaker Phone.
77
78
CHAPTER NINE
One Touch Dialling
See
“Storing One
Touch Dial
Numbers”
chap. 8
1 Pick up the handset ––OR–– press Speaker Phone.
2 When you hear a dial tone, press the One Touch Dial key of the
location you want to call.
3 To hang up, replace the handset ––OR–– press Speaker Phone.
If you try to use a One Touch location with no number stored in it, you
hear a warning sound, and screen displays NOT ASSIGNED. The
display returns to normal after 2 seconds.
If you are sending a fax, press Start after pressing the One Touch Dial
key. If you picked up the handset, press Start when the receiving fax
machine answers with fax tones.
See
“Storing
Speed Dial
Numbers”
chap. 8
Speed Dialling
1 Pick up the handset ––OR–– press Speaker Phone.
2 When you hear a dial tone, press Speed Dial, then press the twodigit Speed Dial number.
3 To hang up, replace the handset ––OR–– press Speaker Phone.
Mute
1 Press Mute to put a call on hold.
2 You can put down the handset without disconnecting the call.
3 Pick up the MFC’s handset or press Speaker Phone to release the
call from hold. Picking up an extension handset will not release the
call from hold.
Pause
Press Redial/Pause to insert a pause between digits to be dialled.
If your MFC is connected to a PABX, you may need to insert an
additional number prefix (e.g. “9”) and a “pause” before each fax or
telephone number to gain access to the outside line. When you press
Redial/Pause, a dash “-” will appear on the display. By storing a pause,
you can create a delay of 3.5 seconds.
T E L E P H O N E ( V O I C E ) O P E R AT I O N
On Hook Dialling
1 Dial the number by using the dial pad or One Touch Dial key, or
Speed Dial and then two-digit Speed Dial number.
2 The number you are dialling, or the name you have stored for One
Touch or Speed Dial is displayed on the LCD.
3 Press Start.
4 Pick up the handset when you hear the other end from the monitor
speaker. If you press Tel before lifting the handset, the call will be
disconnected. (Only for MFC-730).
On MFC-740, you can now speak to the party at the other end of the
phone, without lifting the handset when you hear the speaker at the
other end. Press Speaker Phone when you finish the conversation.
Searching Telephone Index
You can search for names you have stored in One Touch and Speed Dial
memories. Names are stored alphabetically.
1 Press Tel-Index, then enter the first letter of the name you’re
looking for.
See
“Storing One
Touch Dial
Numbers”
and
“Storing
Speed Dial
Numbers”
chap. 8
2 Press or to search the memory.
3 When the screen displays the name you want to call,
press Start to begin dialling.
4 Pick up the handset when the other party answers.
5 When the call is over, hang up.
Chain Dialling
You can store very long dialling sequences by dividing them and setting
them up as One Touch and Speed Dial numbers. Then while dialling, you
can combine two or more One Touch and/or Speed Dial numbers and
even include manual dialling using the dial pad. You can use these
numbers in any combination. The combined number will be dialled, in
the order you entered it, as soon as you press Start.
For example:
You store “555” on One Touch Dial key 01 and “7000” on One Touch
Dial key 02. If you press One Touch 01, 02 and Start, you can dial
“555-7000”. To temporarily change a number, you can substitute part of
the number with manual dialling using the dial pad. So, if you press One
Touch 01 and press 7001 using the dial pad, you can dial “555-7001”.
79
80
CHAPTER NINE
Using access codes is easy. Sometimes you may want to choose from the
among several long distance carriers when you make a call; rates may
vary depending upon the time and destination. To take advantage of low
rates, you can store the access codes or long-distance carriers as One
Touch and Speed Dial numbers.
Tone/Pulse
If you have pulse dialling service, but need to send tone signals (for
telephone banking, for example), follow the directions below. If you
have touch tone service, you do not need this feature to send tone
signals.
1 Lift the handset.
2 Press #. Any digits dialled after this sends tone signals.
3 When you hang up, the machine returns to pulse dialling service.
See
“Select
Answer
Mode”
chap. 6
Fax/Tel Mode
When you share one line for your telephone and fax machine, in the
Fax/Tel mode, the fax machine can determine whether an incoming call
is a fax or a telephone call.
Answering Calls with the Speaker Phone
(Only for MFC-740)
When the MFC rings, instead of lifting the handset, press
Speaker Phone. Speak clearly, toward the microphone. To end the
call, press Speaker Phone.
If you have a bad telephone line connection, the other party might hear
your voice echoed during the call. Hang up and try the call again —
OR— pick up the handset.
Tel Key (Only for MFC-730)
If you press Tel when you are talking lifting the handset with the other
end, you can hear the other end from machine’s monitor speaker, but the
other end cannot hear you.
10
C H A P T E R
T E N
Remote Fax
Options
(Only for MFC-730)
This chapter is for Model MFC-730. If you have model MFC-740 your
remote fax options are handled by the Message Manager. Please see
chapter 12, “Message Manager”.
Fax Forwarding
You cannot use Fax Forwarding when “Fax Storage” is set to OFF.
Programming a Fax Forwarding Number
See
“Changing
the Fax
Forwarding
number”
in this
chapter.
When Fax Forwarding is set to ON, your fax machine stores the received
fax in memory, then dials the fax number you’ve programmed, and
forwards the fax message.
1 Press Menu, 1, 8, 1.
2 Press or to select ON (or OFF).
FAX FWD:ON
3 Press Set. The screen prompts you to enter the number of the fax
machine where faxes will be forwarded.
FWD#:
ENTER & SET
4 Enter the forwarding number (up to 20 digits).
5 Press Set.
6 Press Stop to exit.
81
82
CHAPTER TEN
You can also dial into your machine from a remote location to switch this
feature on, or to change the number you want your faxes forwarding to.
Setting Fax Storage
If you set Fax Storage to ON, you will be able to retrieve fax messages
from another location, using Fax Forwarding or Remote Retrieval
functions. The screen will indicate when you have a fax stored in
memory.
1 Press Menu, 1, 8, 2.
The screen prompts you to choose a fax setting.
FAX STORAGE:OFF
SELECT { } & SET
2 Press or to select ON (or OFF).
3 Press Set when the screen displays your selection.
4 Press Stop to exit.
If there are faxes in memory when you turn the Fax Storage OFF, the
screen prompts you to erase any faxes in memory.
ERASE ALL DOC?
1.YES 2.NO
If you press 1, all fax data is erased and Fax Storage is turned OFF. If the
fax data in the memory has not been printed, it will be printed first and
then erased. If you press 2, data is not erased, and Fax Storage remains
ON.
Changing the Remote Access Code
Enter your Remote Access Code when the fax machine picks up your
call, so you can access features remotely. The access code is preset to
1 5 9 , but you can change this.
1 Press Menu, 1, 8, 3.
R E M O T E FA X O P T I O N S ( O N LY F O R M F C - 7 3 0 )
2 Enter a three-digit number from 000 to 998. The cannot be
changed. Do not use the same digits that appear in your Remote
Activation or Deactivation Code.
3 Press Set.
4 Press Stop to exit.
Remote Retrieval
Using Your Remote Access Code
To listen to your voice messages, you can call from any touch tone
phone. To receive faxes at your location, you must call from a fax
machine using touch tone. For convenience, you can retrieve faxes from
a touch tone phone by having them sent to a fax machine. For example,
if your hotel room does not have a fax machine, you can enter the
number of the fax machine at the hotel’s Front Desk.
1 Dial your fax number from a touch tone phone.
2 When your fax machine answers and beeps, immediately enter your
Remote Access Code (The factory setting is 159 ).
3 The fax machine signals the kinds of messages received:
1 long beep––Fax message(s)
No long beep––No messages
4 The fax machine prompts you with two short beeps to enter a
command. If you wait longer than 30 seconds to enter a command,
the machine hangs up. If you enter an invalid command, the machine
beeps three times.
5 Press 9 0 to reset the machine when you finish.
6 Hang up.
If your fax machine is set to Manual Mode, you can access your machine
remotely by phoning it and letting it ring for about 100 seconds. Your fax
machine will answer the phone after about 100 seconds of ringing, and
you then have 30 seconds to enter your Remote Access Code.
Remote Commands
Follow the commands below to access features remotely. When you call
the fax machine and enter your Remote Access Code (The factory setting
is 159 ), the system will signal you with two short beeps to enter a
remote control command.
83
84
CHAPTER TEN
Change Fax Forwarding Setting
Press 9 5
then to
Turn Fax Forwarding OFF––Press 1.
Turn Fax Forwarding ON––Press 2.
Program Fax Forward Number––Press 4. The MFC 730 will
automatically turn on Fax Forwarding ON.
Turn Fax Storage ON––Press 6.
Turn Fax Storage OFF––Press 7. (This is only possible if there are no
faxes stored in the memory, or if all faxes have been erased using
Remote Control 9 6 3).
Retrieve a Fax
Press 9 6
then to
Print a Memory Status List––Press 1, then enter the number of remote
fax machine and then press # #, After the beep, hang up and wait.
Retrieve all faxes––Press 2, then enter the number of remote fax
machine and then press # #, After the beep, hang up and wait.
Erase all fax messages––Press 3. If the data stored in the memory has
not been printed before, it will be printed first and then erased.
Check the Receiving Status
Press 9 7
then for
Fax messages––Press 1.
1 long beep––Received messages.
3 short beeps––No messages.
Change Answer Mode
Press 9 8
then for
TAD––Press 1.
Fax/Tel (F/T)––Press 2.
Fax––Press 3.
Exit Remote Operation
Press 9 0
R E M O T E FA X O P T I O N S ( O N LY F O R M F C - 7 3 0 )
Retrieving the Memory Status List
You can retrieve the Memory Status List from a remote fax machine to
see if you have any fax messages.
1 Dial your fax machine’s number.
2 When you hear the beep, immediately enter your Remote Access
Code (The factory setting is 1 5 9 ).
3 When you hear two short beeps, use the dial pad to press 9 6 1.
4 Using the dial pad, enter the number (up to 20 digits) of the remote
fax machine where you want the Memory Status List forwarded, and
then press # #.
You cannot use and # as dial numbers. However, if you want to
store a pause, press #.
5 After you hear your fax machine beep, hang up and wait.
Your fax machine calls the remote fax machine. Your fax machine
then sends the Memory Status List to the fax machine that you are
calling from.
Retrieving Fax Messages
1 Dial your fax machine’s number.
2 When you hear the beep, immediately enter your Remote Access
Code (The factory setting is 1 5 9 ).
3 As soon as you hear two short beeps, use the dial pad to press 9 6 2.
4 Using the dial pad, enter the number (up to 20 digits) of the remote
fax machine where you want your fax messages forwarded, and then
press # #.
You cannot use and # as dial numbers. However, if you want to
store a pause, press #.
5 After you hear your fax machine beep, hang up and wait.
Your fax machine then calls the number of the remote machine that
you have just entered, and that machine prints your fax messages.
85
86
CHAPTER TEN
Changing the Fax Forwarding Number
You can change the default setting of your fax forwarding number from a
remote fax machine.
1 Dial your fax machine’s number.
2 When you hear the beep, immediately enter your Remote Access
Code (The factory setting is 1 5 9 ).
3 When you hear two short beeps, use the dial pad to press 9 5 4.
4 Enter the new number of the remote fax machine (up to 20 digits)
where you want your fax messages forwarded, and then press # #.
You cannot use and # as dial numbers. However, if you want to
store a pause, press #. Also, if your fax machine is connected to a
PABX, you can press # first before the fax machine’s number. The #
works as well as R key.
5 To retrieve the Memory Status List, when you hear two short beeps,
use the dial pad to press 9 6 1.
6 Use the dial pad to enter the number of the remote fax machine (up
to 20 digits), and then press # #.
7 After you hear your fax machine beep, hang up and wait.
Your fax machine calls the remote fax machine. Your fax machine
then sends the Memory Status List showing the new forwarding
number to the fax machine that you are calling from.
8 Check the forwarding number.
If the forwarding number is incorrect, return to Step 1 to reset it.
11
C H A P T E R
E L E V E N
Copy
Operations
Your Multi-Function Center allows you to make high-quality
photocopies and transparencies. Copies can be in black and white, one
color, or full color. Always make sure you have paper in the cassette
before making copies. Do not pull on the paper while copying is in
progress.
Enlarge/
Reduce
Brightness
Mono Copy Colour Copy
Paper Type Copy Quality
Basic Copy Operations
Copying One Page
1 Insert the document face down in the feeder.
2 Press Mono Copy or Colour Copy to copy.
3 Press Mono Copy or Colour Copy again. (Make sure it’s the same
key you pressed in Step 2.) The screen displays
COPYING
ONLINE
P.01
4 To stop, press Stop. Press Stop again to release the original
document.
87
88
CHAPTER ELEVEN
Making Multiple Copies
See
“Memory
Full
Message” in
this chapter
You can make multiple copies in black and white or (one colour for
MFC-740) using your MFC. When you use Mono Copy, you can
choose whether the copies will be STACKED (all copies of page 1, then
all copies of page 2, etc.) or SORTED (collated). The SORT option
(MFC-740) and the multiple copies (MFC-730) are not available when
you use Colour Copy.
1 Place the document face down in the feeder.
2 Press Mono Copy or Colour Copy (MFC-740 only).
3 Using the dial pad, enter the number of copies you want (up to 99).
For example, press 3, 8 for 38 copies.
4 Press Mono Copy or Colour Copy (MFC-740 only).
NOTE: You must press the same button you pressed in Step 2.
5 If you pressed Mono Copy, the screen displays
MULTI COPY:STACK
ONLINE
Press
to select SORT (or STACK),
MULTI COPY:SORT
ONLINE
then press Mono Copy again.
You cannot make multiple colour copies when you are using MFC
memory for Memory Transmission or have incoming messages in the
Message Center (Only for MFC-740).
If you get a MEMORY FULL error message, you may be able to make
multiple copies if you first print incoming faxes in memory and restore
the memory to 100%.
C O P Y O P E R AT I O N S
Making Enlarged or Reduced Copies
(Temporary Setting)
1 Insert the document face down in the feeder.
2 Press Enlarge/Reduce. The screen displays
ELG/RDC:100%
ONLINE
SELECT { } & SET
ONLINE
3 Press
or
to choose an enlargement or reduction ratio.
You can reduce to 93%, 87%, 75%, or 50% of the original size
—OR—
You can enlarge to 120%, 125%, 150%, or 200%
—OR—
You can select MANUAL and press Set, then use the dial pad to
enter an enlargement or reduction ratio between 50% and 200%. For
example, press 5, 3 to enter 53%.
4 Press Set.
5 Press Mono Copy or Colour Copy.
6 Using the dial pad, enter the number of copies
—OR—
Keep the default (01).
7 Press Set.
8 If you pressed Mono Copy in Step 5, you can select SORT by
pressing .
(Only for multiple copies)
9 Press Set.
Copy Quality – Temporary Settings
You can quickly improve the copy quality by using the Copy Quality,
Paper Type and Brightness keys. These settings are temporary, and
the MFC returns to its default settings when you finish copying. You
might want to try different combinations of settings to see which best
suits your needs.
89
90
CHAPTER ELEVEN
Using the Copy Quality Key (This is a temporary setting)
The Copy Quality key changes the settings for quality (NORMAL, HIGH
or DRAFT) and type of original document (STANDARD or PHOTO).
Select DRAFT when you want a colour copy at the fastest speed.
NORMAL is a higher quality than DRAFT and prints faster than HIGH.
HIGH quality is the highest resolution and slowest to print. For type of
original, choose PHOTO only for photographs. If line art, graphs, or text
are included, choose STANDARD. You can make multiple copies, and if
you use Mono Copy you can sort them.
1 Place the document to be copied in the feeder.
2 Press Copy Quality. The screen displays the default setting, for
example:
QUALITY:HIGH
ONLINE
SELECT { } & SET
ONLINE
3 Press
or
to select copy quality resolution.
QUALITY:NORMAL
QUALITY:HIGH
QUALITY:DRAFT
4 When the screen displays your selection, press Set. The screen
displays a setting for the original, for example:
ORIGINAL:STD
ONLINE
SELECT { } & SET
ONLINE
5 Press
or
to select the kind of image you’re copying.
ORIGINAL:STD
(text, line art, graphs, or any
combination including photographs)
ORIGINAL:PHOTO(photographs only)
6 When the screen displays your selection, press Set.
C O P Y O P E R AT I O N S
Using the Paper Type Key
(This is a temporary setting)
If you use premium paper, the copy quality is improved. You can choose
PLAIN, INK JET, GLOSSY, and TRNSPRNCY. For best results, we
recommend using Brother Special paper.
1 Insert the document face down in the feeder.
2 Press Paper Type. The screen displays the default setting, for
example:
PAPER:PLAIN
ONLINE
SELECT { } & SET
ONLINE
3 Press
or
to select a paper type.
PAPER:PLAIN
PAPER:INK JET
PAPER:GLOSSY
PAPER:TRNSPRNCY
If you are using Brother coated paper for 360 dpi (BP36CA) or 720 dpi
(BP72CA) or if you are using non-Brother ink jet paper, select INK JET.
4 Press Set. If you did not select INK JET, skip to Step 6.
5 If you selected INK JET, press or to select 360DPI
(Brother 360 x 360), 720DPI (Brother 720 x 720) or OTHER
(non-Brother ink jet) paper type.
6 Press Set.
Using the Brightness Key
(This is a temporary setting)
You can choose brightness setting before making a copy.
1 Insert the document face down in the feeder.
2 Press Brightness.
3 Press to make a darker copy.
—OR—
Press
to make a lighter copy.
4 Press Set when the screen displays your setting.
91
92
CHAPTER ELEVEN
Copy Quality – Default Settings
Changing Default Settings
Press Menu, 3 to change default settings for Copy mode. These settings
will remain until you change them again by pressing Menu. Adjust the
colours using the Colour Adjustment, Brightness, and Contrast settings.
By pressing a number, you can adjust copy settings as shown in the
or
to move through the selections for each
following chart. Press
setting. Press Set to save your selection. Press Stop to exit —OR—
to select the next setting you want to change.
Press
FACTORY DEFAULT SETTINGS
1. PAPER TYPE
2. QUALITY
3. ORIGINAL TYPE
4. COLOUR ADJUST
5. BRIGHTNESS
6. CONTRAST
7. ONE COLOUR
: PLAIN
: HIGH
: STD
: R:–
: G:–
: B:–
:–
:–
: OFF = Black
+
+
+
+
+
C O P Y O P E R AT I O N S
Press Menu and 3.
1.PAPER TYPE
2.QUALITY
PAPER:PLAIN
PAPER:INK JET
INK JET:360DPI
PAPER:GLOSSY
INK JET:720DPI
PAPER:TRNSPRNCY
INK JET:OTHER
QUALITY:HIGH
QUALITY:NORMAL
QUALITY:DRAFT
3.ORIGINAL TYPE
ORIGINAL:STD
ORIGINAL:PHOTO
4.COLOUR ADJUST
COLOUR:RED
R: ±
+
COLOUR:GREEN
G: ±
+
COLOUR:BLUE
B: ±
+
5.BRIGHTNESS
±
+
6.CONTRAST
±
+
7.ONE COLOUR
COLOUR:OFF
COLOUR:RED
COLOUR:GREEN
COLOUR:BLUE
COLOUR:CYAN
COLOUR:MAGENTA
COLOUR:YELLOW
: is default
93
94
CHAPTER ELEVEN
Select Paper Type (This is a permanent setting)
1 Press Menu, 3, 1. The screen displays
1.PAPER TYPE
2 Press Set.
3 Press or
to select your paper setting.
PAPER:PLAIN
PAPER:INK JET
PAPER:GLOSSY
PAPER:TRNSPRNCY
4 Press Set when the screen displays your selection.
If you use Brother coated paper for 360 dpi (BP36CA) or 720 dpi
(BP72CA), select INK JET, then select 360DPI or 720DPI. If you use
non-Brother ink jet paper, select INK JET, then select OTHER. If you
did not select INK JET, skip to step 7. (For information on ordering
Brother paper, see the page before the Table of Contents.)
5 Press or to select 360DPI, 720DPI, or OTHER.
6 Press Set.
7 Press Stop to exit.
The MFC ejects paper with printed surfaces face up into the paper tray at
the front of the MFC. When you use transparencies, remove each sheet
immediately, to prevent a paper jam or curled sheets.
C O P Y O P E R AT I O N S
Select Copy Quality (This is a permanent setting)
1 Press Menu, 3, 2.
2 Press or to select copy quality.
QUALITY:NORMAL
QUALITY:HIGH
QUALITY:DRAFT
3 Press Set when the screen displays your selection.
4 Press Stop to exit.
This feature is available only for colour copying.
Select Type of Original (This is a permanent setting)
1 Press Menu, 3, 3. The screen displays
3.ORIGINAL TYPE
2 Press
or
to select your original type.
ORIGINAL:STD
ORIGINAL:PHOTO
3 Press Set when the screen displays your selection.
4 Press Stop to exit.
This feature is available only for colour copying.
95
96
CHAPTER ELEVEN
Colour Adjustment
1 Press Menu, 3, 4.
2 Press or to select RED, GREEN, or BLUE.
3 Press Set.
Light
Dark
R: –
+
G: –
+
B: –
+
4 Press or
5 Press Set.
to adjust the degree of colour.
6 Return to Step 2 to select the next colour —OR—
Press Stop to exit.
Copy Brightness
You can choose the brightness setting before making a copy.
1 Press Menu, 3, 5.
2 Press to make a darker copy.
—OR—
Press
to make a lighter copy.
3 Press Set when the screen displays your setting.
Press Stop to exit.
Copy Contrast
You can choose the contrast setting for a copy. Greater contrast can help
an image look sharper and more vivid. This feature is available only for
color copying.
1 Press Menu, 3, 6.
2 Press to decrease contrast
—OR—
Press
to increase contrast.
3 When the screen displays your setting, press Set.
4 Press Stop to exit.
C O P Y O P E R AT I O N S
Selecting a Single Colour (One Colour)
For black and white originals, you can select a single colour, instead of
black, as the default to be used when you press Mono Copy. OFF is the
setting for Black.
1 Press Menu, 3, 7.
2 Press or to select a copy colour: The options are OFF, RED,
GREEN, BLUE, CYAN, MAGENTA, and YELLOW.
3 When the screen displays your selection, press Set.
4 Press Stop to exit.
Memory Full Message
If the memory becomes full while you’re making copies, the screen
displays
MEMORY FULL P.02
ONLINE
followed by
COPY TO COPY
ONLINE
STOP TO ABORT
ONLINE
If you were scanning the first page of your document, press Stop to
cancel the job and restart to make a single copy. If you were scanning a
subsequent page, press Mono Copy or Colour Copy to print the pages
already scanned—OR—Press Stop to cancel.
You’ll need to clear some fax or voice messages to make some additional
memory available before you can continue.
To gain extra memory, you can erase any of the following types of
messages:
•
To erase incoming messages (ICMs) and memos. See Erasing
Messages in chap. 12. (Only for MFC-740)
•
To print fax message stored in memory. See Printing a Fax
Message in chap. 12. (Only for MFC-740)
97
98
CHAPTER ELEVEN
Legal Limitations
Colour reproductions of certain documents are illegal and may result in
either criminal or civil liability. This Notice is intended to be a guide
rather than a complete listing of every possible prohibition. In case of
doubt we suggest that you consult with the legal authorities in your
individual country as to the legality of any particular questionable
documents.
The following are examples of documents which should not be copied:
Paper money.
Bonds or other certificates of indebtedness.
Certificates of Deposit.
Armed Forces Service or Draft papers.
Passports.
Postage stamps (cancelled or uncancelled).
Immigration papers.
Welfare documents.
Cheques or Drafts drawn by Governmental Agencies.
Identification Documents, badges or insignias.
Licences and Certificates of Title to motor vehicles.
Copyrighted works cannot be copied: however, sections of a copyrighted
work can be copied for “personal use”. Multiple copies would indicate
improper use.
Works of art should be considered the equivalent of copyrighted works.
12
C H A P T E R
T W E L V E
Message
Manager
(Only for MFC-740)
Introduction
This section provides you with information about how to operate the
Message Manager features of your MFC-740.
Your MFC has been designed to be user friendly. You will find a
function chart in chap. 4 that shows you the easy button presses you can
perform to access all programmed features.
Voice
Record
Doc
Erase
Play
Message Manager Mode
See
“Recording
Message
Manager
Outgoing
Message”
in this
chapter
Message Manager Mode allows you to store incoming fax and voice
messages in a flexible memory. The memory stores 99 minutes of voice
messages, or up to 300 pages of fax messages. The actual number of
pages stored in memory varies depending on the content and the
resolution used. Memory is shared between fax and voice messages,
which are stored on a “first-come, first-served” basis. Any voice or fax
message can be retrieved remotely.
You must record a TAD Outgoing Message in order to use the Message
Manager Mode.
99
100
C H A P T E R T W E LV E
Flexible Memory Settings (Message Store)
Message Manager Mode offers you six flexible memory settings, so that
you can decide which kinds of messages you want to receive.
1. DOC:ON, VOICE:ON
Both voice and fax messages are stored.
You can use the Fax Forwarding or Paging
features and retrieve voice and fax
messages remotely.
2. DOC:ON, VOICE:EXT
You need an external answering machine
connected to the MFC for this setting. Fax
messages are stored in the Message
Manager memory, but voice messages are
stored in your external answering machine.
Retrieve voice messages from the external
answering machine. You cannot use the
Paging feature for voice message with this
setting.
3. DOC:ON, VOICE:OFF All memory is used to store fax
messages—no voice messages will be
stored.
4. DOC:OFF, VOICE:ON
All memory is used to store voice
messages—no fax messages will be stored.
Incoming faxes will be printed on paper.
You can use the Paging feature, and
retrieve voice messages remotely.
5. DOC:OFF, VOICE:EXT You need an external answering machine
connected to the MFC for this setting.
Incoming faxes are not stored in memory,
but will be printed on paper. Voice
messages are stored in the external
answering machine.
6. DOC:OFF, VOICE:OFF Incoming faxes are not stored in memory,
but will be printed on paper. Voice calls are
not stored in memory.
Setting Up Message Manager
You must set up Message Manager in the following order:
1 Set the Message Store.
2 Record the Message Manager’s Outgoing Message (TAD
MESSAGE).
3 Activate Message Manager (TAD) Mode by pressing the Mode key
untill both FAX and F/T LEDs are lit.
M E S S A G E M A N A G E R ( O N LY F O R M F C - 7 4 0 )
Setting the Message Store
Select the setting from the descriptions of “Flexible Memory Settings”.
1 Press Menu, 1, 8, 1. The screen prompts you to choose a DOC:
(Document) setting.
DOC:OFF
SELECT { } & SET
2 Press or to select ON (or OFF).
3 Press Set. The screen prompts you to choose a VOICE: setting.
VOICE:ON
SELECT { } & SET
4 Press
or
to select your setting from the list (ON, OFF or
EXT).
5 Press Set when the screen displays your selection.
6 Press Stop to exit.
Recording the Message Manager’s Outgoing
Message (TAD MESSAGE)
Recording the Message Manager’s Outgoing Message (TAD
MESSAGE) is the second step you need to follow before you can turn
on the Message Manager. Make sure your OGM (Outgoing Message) is
less than 20 seconds long.
1 Press Menu, 1, 8, 3. The screen prompts you to choose an OGM.
TAD MESSAGE
SELECT { } & SET
2 Press
or
to reach
TAD MESSAGE
This is the only setting you can select if you want to turn the Message
Manager ON.
101
102
C H A P T E R T W E LV E
See
“Record
Fax/Tel
Outgoing
Announcement”
chap. 6
3 Press Set.
4 Press Record, then pick up the handset to record a message.
For example: Hello. We are unable to take your call at this time.
Please leave a message after the signal. If you wish to send a fax,
please press 51, wait for the fax tones, then press the start button
on your machine.
5 Replace the handset. The Message Manager plays your OGM.
6 Press Stop to exit.
Listening to the Outgoing Message (OGM)
1 Press Menu, 1, 8, 3.
2 Press or to select TAD MESSAGE (or F/T MESSAGE or
PAGING MSG.).
3 Press Set when the screen displays your selection.
4 Press Play to hear the OGM. Adjust volume by pressing Volume
or
.
5 Press Stop to exit.
Erasing the Outgoing Message (OGM)
1 Press Menu, 1, 8, 3.
2 Press or to select TAD MESSAGE (or F/T MESSAGE or
PAGING MSG.).
3
4
5
6
Press Set when the screen displays your selection.
Press Erase.
Press 1 to erase the OGM —OR— Press 2 to exit without erasing.
Press Stop to exit.
Activating Message Manager Mode
To activate Message Manager.....
FAX
TAD
Press Mode until both FAX and F/T lights are on.
F/T
...You can easily identify the Message Manager mode that is activated by
viewing the Message Manager indicator lights.
M E S S A G E M A N A G E R ( O N LY F O R M F C - 7 4 0 )
Message Indicator
Once you return home or to the office you can easily and quickly see if
any voice or fax messages have been stored in the Message Manager.
There are two ways to determine if messages are stored.
If the Voice and / or Fax Indicator lights are flashing, there is a new
message stored. Once a new voice message is played, the Voice indicator
light stops flashing and stays on. And once a new fax message is printed,
the Fax indicator will go off.
Voice
Record
Doc
Erase
Play
The display will indicate the total number of incoming Voice and/or FAX
messages stored in Message Manager memory. The number of Voice
includes the Memo messages.
VOICE:03 DOC:02
ONLINE
What Happens When the Memory Is Full...
If the memory becomes full when you have set your MFC to Message
Manager mode, the MFC will change to F/T mode automatically. In this
mode, the MFC can accept incoming faxes automatically and will print
them. Then, if your MFC should run out of paper, the answer mode will
shift automatically to manual mode. In manual mode the call is not
answered, so your caller will know to try again later.
Out of Recording Paper and Memory Full
[Answer Mode]
Message Manager Mode
F/T Mode
Memory Full
See
“Printing
Reports and
Lists”
chap. 15
Manual Mode
Out of Recording Paper
and Memory Full
Print the Memory Status List and select the item to be cleared. This will
clear space for new messages and faxes to be stored in memory.
103
104
C H A P T E R T W E LV E
Playing Voice Messages and Memos
Follow the steps below to listen to voice messages and memos.
1 Press Play. Adjust volume by pressing
or
.
All new messages and memos are played in the order they were
recorded. The display shows the number of the current message, and
the total number of messages.
If Caller ID information was received, the MFC beeps during the
message and displays the Caller ID information for one second.
During playback, the screen displays the time and date the message
was recorded.
2 Press
at the end of the message to repeat a message. Use
to
and
repeatedly until
skip to the next message. You can press
you reach the message you want to play.
3 Press Stop to exit.
Printing a Fax Message
Once you print a new fax message stored in memory, it is erased from
the memory automatically.
1 Press Play. After two seconds, the MFC begins to play voice
messages.
2 After playing voice messages, the display asks if you want to print
fax messages that are in the memory. There is no display if there are
no faxes.
PRINT DOC?
1.YES 2.NO
3 To print the fax messages, press 1.
––OR––
Press 2 to exit without printing.
M E S S A G E M A N A G E R ( O N LY F O R M F C - 7 4 0 )
Backup Printing Option
When you choose DOC:ON in the Message Manager mode, all
incoming fax messages are stored in the available memory for retrieval.
To print a backup copy automatically, turn this option ON.
1 Press Menu, 1, 8, 2. The screen prompts you to select a setting.
BACKUP PRINT:ON
SELECT { } & SET
2 Press or to display ON (or OFF).
3 Press Set when the screen displays your selected setting.
4 Press Stop to exit.
Erasing Messages
If you choose to erase all fax messages, the MFC will print any
previously unprinted fax messages before erasing them from memory.
Fax messages cannot be erased individually.
You can erase voice messages and memos individually, or all at once.
To erase voice messages individually
1 Press Play. The MFC beeps and begins message playback. Each
message is preceded by one long beep, and followed by two short
beeps.
2 To erase a specific message, press Erase immediately after the two
short beeps, or while the message is playing. The screen prompts
ERASE THIS MSG.?
1.YES 2.NO
3 Press 1 to erase the message.
—OR—
Press 2 to cancel.
4 Press Stop to exit.
105
106
C H A P T E R T W E LV E
To erase messages all at once
1 Press Erase. The screen prompts you to choose what kind of
messages you want to erase.
ERASE ALL VOICE?
SELECT { } & SET
2 Press
or
to select erasing all voice messages (ERASE ALL
VOICE?), all document messages (ERASE ALL DOC?), or all
messages—both voice and fax—(ERASE ALL MSG.?).
3 Press Set.
4 Press 1 to erase.
—OR—
Press 2 to cancel.
Setting the Maximum Time for Incoming
Messages
Your MFC comes set to receive voice messages up to 35 seconds long.
You can change this setting to any length from 35 seconds to 60 seconds,
in 5-second increments. This setting also applies to Memo.
1 Press Menu, 1, 8, 4. The screen prompts you to select a maximum
time.
MESSAGE 35 SEC
SELECT { } & SET
2 Press
or
messages.
to select the maximum time setting for incoming
3 Press Set when the screen displays your setting.
4 Press Stop to exit.
Setting the Toll Saver
See
“Ring Delay”
chap. 6
When you set the Toll Saver feature, the MFC answers after 4 rings if
you don’t have messages, and after 2 rings if you do have messages. This
way, when you call the MFC, if it rings 3 times, you know you have no
messages, and can hang up, avoiding any toll charge.
M E S S A G E M A N A G E R ( O N LY F O R M F C - 7 4 0 )
When Toll Saver is ON, it overrides your Ring Delay setting. Toll Saver
must be OFF for the MFC to operate using your Ring Delay setting.
1
2
3
4
5
6
Press Menu, 1, 2, 1.
Press
or
to select TOLL SAVER (or RING DELAY).
Press Set when the screen displays your selection.
Press
or
to select ON (or OFF).
Press Set.
Press Stop to exit.
ICM Recording Monitor (Call Screening)
This feature lets you turn OFF (or ON) the speaker volume for voice
messages. When you turn the monitor OFF, you will not hear messages
as they come in.
1
2
3
4
Press Menu, 1, 8, 5.
Use
or
to select OFF (or ON).
Press Set when the screen displays your selection.
Press Stop to exit.
Recording a Memo
A memo is stored and played as a voice message.
1 Press Record.
2 When the display prompts you to pick up the handset, speak into the
handset to record your memo. Your recording can be as long as the
Incoming Message Maximum Time (Menu, 1, 8, 4).
3 Press Stop or replace the handset when you’re finished.
Recording a Conversation
You can record a telephone conversation by pressing Record during the
conversation. Your recording can be as long as the Incoming Message
Maximum Time. You and the other party will hear a beep every 15
seconds while recording. You cannot record a conversation using the
Speaker Phone.
107
108
C H A P T E R T W E LV E
Fax Forwarding/Paging
When Paging is set to ON, your MFC dials the phone number you have
programmed and, when connected, plays the Paging OGM message you
have recorded. This lets you know you have a fax or voice message in
the Message Manager memory.
When Fax Forwarding is set to ON, your MFC dials the fax machine
phone number you’ve programmed, and forwards any faxes you’ve
received.
You cannot use Paging and Fax Forwarding at the same time.
Programming a Fax Forwarding Number
1 Press Menu, 1, 8, 6.
2 Press or until the screen displays
FAX FORWARD
3 Press Set. The screen prompts you to enter the number of the fax
machine where faxes will be forwarded.
FWD#:
ENTER & SET
4 Enter the forwarding number (up to 20 digits).
5 Press Set.
6 Press Stop to exit.
You can change a Fax Forwarding number remotely.
Recording the Paging Outgoing Message (OGM)
Before paging can work, you should first record the Paging OGM.
1 Press Menu, 1, 8, 3. The screen prompts you to choose an OGM.
TAD MESSAGE
SELECT { } & SET
M E S S A G E M A N A G E R ( O N LY F O R M F C - 7 4 0 )
2 Press
or
109
to reach
PAGING MSG.
3
4
5
6
Press Set.
Press Record, then pick up the handset to record a message.
Press Stop. The Message Manager plays your OGM.
Press Stop.
Programming the Paging Number
1 Press Menu, 1, 8, 6.
2 Press or until the screen displays
PAGING
3 Press Set. The screen prompts you to enter your pager number.
PAG#:
ENTER & SET
4 Enter your paging number up to 20 digits. This is the telephone
number which your MFC must call.
5 Press Set.
6 Press Stop to exit.
You cannot change a Paging number remotely.
Remote Retrieval
You can call your machine from any fax machine using touch tone and
use a Remote Access Code and other button presses to retrieve voice (and
fax) messages. You can also program and change some settings for your
Message Manager.
110
C H A P T E R T W E LV E
Using the Remote Access Code
1 Dial your MFC phone number from a touch tone phone.
2 When your MFC answers and beeps, immediately enter your Remote
Access Code.
3 The MFC signals the kinds of messages received:
1 long beep—Fax message(s)
2 long beeps—Voice message(s)
3 long beeps—Fax and Voice message(s)
No beeps—No messages
4 The MFC then prompts you with two short beeps to enter a command.
If you wait longer than 30 seconds to enter a command, the MFC
hangs up. If you enter an invalid command, the MFC beeps three
times.
5 Press 9 0 to exit remote access mode when you have finished.
6 Hang up.
If your MFC is set to Manual Mode, you can access the Message
Manager remotely by phoning your MFC and letting it ring for about 100
seconds. Your MFC will answer the phone after 100 seconds of ringing,
and you then have 30 seconds to enter your Remote Access Code.
Changing the Remote Access Code
Enter your Remote Access Code when the MFC picks up your call, so
you can access features remotely. The access code is preset to 159 , but
you can change this.
1 Press Menu, 1, 8, 7.
2 Enter a three-digit number from 000 to 998. The cannot be
changed. Do not use the same digits that appear in your Remote
Activation or Deactivation Code.
3 Press Set.
4 Press Stop to exit.
When you call your MFC and enter the Remote Access Code, you must
press the fourth digit (three-digit number plus ).
M E S S A G E M A N A G E R ( O N LY F O R M F C - 7 4 0 )
Remote Control Commands
Follow the commands below to access features remotely. When you call
the MFC and enter your Remote Access Code (The factory setting is
159 ), the system will signal you with two short beeps to enter a remote
control command.
Remote control commands
91
Detail Operation
Playing voice messages
After one long beep, the MFC plays ICM and Memo.
1 { (Skip back)
Press 1 while listening to an ICM or Memo to play it again. If you press
1 before a message, you will hear the previous message.
2 } (Skip next)
While playing ICM and Memo, you can skip to next message.
9 STOP Playing
Stop playing the ICM and Memo.
92
Record Memo
After one long beep, you can record a memo. You can stop recording by
pressing 9.
93
Erase all ICM & Memo
If you hear one long beep, the erase is accepted. If you hear three short
beeps, you cannot erase because all voice messages have not been
played, or there is no voice message to erase.
*This code erases all recorded messages, not one at a time.
94
Play and Record OGM in
memory
1 Play
1 TAD MSG
2 F/T MSG
The MFC plays the selected OGM. You can stop playing OGMs by
pressing 9.
3 PAGING MSG
2 Record
1 TAD MSG
2 F/T MSG
After one long beep, you can record the selected OGM. You will hear the
message played once. You can stop recording the message by pressing 9.
3 PAGING MSG
95
Changing Fax Forwarding/
Paging setting
1 OFF
2 Fax Forwarding
3 Paging
4 FAX FWD NO.
96
Retrieve Fax
1 Memory Status List
If you hear one long beep, the change is accepted. If you hear three short
beeps, you cannot change it because the conditions have not been met
(Example: registering paging number).
You can register your fax forwarding number by using
4. FAX FWD NO (See “Changing Fax Forwarding Number” in this
chapter). Once you have registered the number, the MFC will
automatically turn to FAX FWD:ON mode. Then retrieve a Memory
Status List by entering 9 6 1 to make sure that the Fax Forwarding
number you registered is correct in the List.
Enter the number of a remote fax machine to receive a report or stored
fax messages. (See “Retrieving the Memory Status List” and “Retrieving
Fax Messages”.)
2 Retrieve all Fax
97
3 Erase Fax in the
memory
If you hear one long beep, you can erase the fax message from the
memory.
Check the receiving status
You can check whether your MFC has received any Document or Voice
messages. If yes, you will hear one long beep. If no, you will hear three
short beeps.
1 Document
2 Voice
98
Change Answer Mode
1 TAD
2 Fax/Tel
If you hear one long beep, you can change the answer mode. If you hear
three short beeps, you cannot change it. (Example: There is no TAD
MSG when you want to change to TAD mode.)
3 Fax
90
Exit
After a long beep, you can exit remote control.
111
112
C H A P T E R T W E LV E
Retrieving the Memory Status List
You can retrieve the Memory Status List from a remote fax machine to
see if you have any fax messages.
1 Dial your MFC’s number.
2 When you hear the beep, immediately enter your Remote Access
Code (The factory setting is 1 5 9 ).
3 When you hear two short beeps, use the dial pad to press 9 6 1.
4 Using the dial pad, enter the number (up to 20 digits) of the remote
fax machine where you want the Memory Status List forwarded, and
then press # #.
You cannot use
pause, press #.
and # as dial numbers. However, if you want to store a
5 After you hear your MFC beep, hang up and wait.
Your MFC calls the remote fax machine. Your MFC then sends the
Memory Status List to the fax machine that you are calling from.
Retrieving Fax Messages
1 Dial your MFC’s number.
2 When you hear the beep, immediately enter your Remote Access
Code (The factory setting is 1 5 9 ).
3 As soon as you hear two short beeps, use the dial pad to press 9 6 2.
4 Using the dial pad, enter the number (up to 20 digits) of the remote
fax machine where you want your fax messages forwarded, and then
press # #.
You cannot use
pause, press #.
and # as dial numbers. However, if you want to store a
5 After you hear your MFC beep, hang up and wait.
Your MFC calls the remote fax machine. The fax machine that you
are calling from prints your fax messages.
Changing the Fax Forwarding Number
You can change the default setting of your fax forwarding number from a
remote fax machine.
1 Dial your MFC’s number.
2 When you hear the beep, immediately enter your Remote Access
Code (The factory setting is 1 5 9 ).
M E S S A G E M A N A G E R ( O N LY F O R M F C - 7 4 0 )
3 When you hear two short beeps, use the dial pad to press 9 5 4.
4 Enter the new number of the remote fax machine (up to 20 digits)
where you want your fax messages forwarded, and then press # #.
You cannot use and # as dial numbers. However, if you want to store a
pause, press #. Also, if your MFC is connected to a PABX, you can press
# first before the fax machine’s number. The # works as well as R key.
5 To retrieve the Memory Status List, when you hear two short beeps,
use the dial pad to press 9 6 1.
6 Use the dial pad to enter the number of the remote fax machine (up
to 20 digits), and then press # #.
7 After you hear your MFC beep, hang up and wait.
Your MFC calls the remote fax machine. Your MFC then sends the
Memory Status List showing the new forwarding number to the fax
machine that you are calling from.
8 Check the forwarding number.
If the forwarding number is incorrect, return to Step 1 to reset it.
There are some fax machines which, having completely received the
MEMORY STATUS LIST from your MFC, will give an audible
“HANDSET UP” or similar alarm, if you keep the line held in readiness
for the next command.
In such cases, it may be possible to clear the alarm and enter the next
command (e.g. “962” for the RETRIEVE), by pressing the Stop once or
twice on the receiving machine during the alarm beeping time. If this
doesn’t work, simply replace the handset, pause, and redial the call,
using then the “962” command after your machine answers and accepts
your remote access code.
113
114
C H A P T E R T W E LV E
13
C H A P T E R
115
T H I R T E E N
Using MFC
as Printer
Features
The Multi-Function Center offers you many features you will find in a
high quality ink jet printer.
Fast Printing Speed—Using Draft mode, you can print 4 pages per
minute in full colour.
Brilliant 4-Colour Output at 360 dpi —Printing at 360 dpi
resolution on special coated paper or glossy paper gives you normal
resolution output.
Brilliant 4-Colour Output at 720 dpi —Printing at 720 dpi
resolution on special coated paper or glossy paper gives you high
resolution output.
Brilliant 4-Colour Output at 1440 dpi —Printing at 1440 dpi
resolution on special coated paper or glossy paper gives you highest
resolution output.
Low Running Cost—Whenever you run out of a particular colour ink,
you will replace only the cartridge that’s empty.
Suitable Uses—You can print from both Windows and DOS operating
systems. When you print from DOS, the MFC uses ESC/P.
Bi-directional Parallel Interface—The parallel interface allows bidirectional (IEEE 1284 compliant) communication with your computer.
This interface allows the MFC to communicate useful information, such
as the amount of memory installed and other printing setup conditions, as
the supplied Windows® 3.1, 3.11, 95, 98 or NT® Workstation Version 4.0
drivers support bi-directional mode. Printer status is also reported.
116
CHAPTER THIRTEEN
Straight Paper Path—The MFC can use various types of paper: plain
paper, coated paper, glossy paper, transparencies, and envelopes. Using
the appropriate paper reduces the occurrence of paper jams. For complete
information about what kinds of paper to use with the MFC, please read
Chapter 3 in this manual.
Printer Driver
You can change the following printer settings when you print from your
computer:
■ Quality - Speed/Media Setting
■ Colour Correction Control
■ Colour Adjustment
■ Brightness/Contrast Adjustment/Halftone Selection
■ Start Maintenance Program
(See Chapter 18, PC Printing.)
Choosing the Right Kind of Paper
To achieve high quality printing using your MFC, it’s very important to
select the right kind of paper. Be sure to read “Paper Specifications” in
Chapter 3 in this manual before selecting and purchasing paper for the
MFC.
Multi-purpose Sheet Feeder
The multi-purpose sheet feeder can feed plain paper, coated paper, glossy
paper, transparencies, envelopes, and organizer paper (K,L). When the
MFC receives data from your computer, it begins the print process by
loading paper from the multi-purpose sheet feeder.
1 Select the print command from your PC.
USING MFC AS PRINTER
2 Your PC sends a print command and data to the MFC. The screen
displays the date and time, and RECEIVING DATA.
3 If there are more pages, the MFC begins to print the next page
automatically.
4 When the MFC finishes printing all data, it returns to online status.
You can select paper source, paper size, and orientation in your
application software. If your application software does not support your
custom paper size, select the next larger paper size. Then adjust the print
area by changing the right and left margins in your application software.
Loading Paper
You can use plain paper, coated paper, transparencies, glossy paper, and
envelopes and organiser (K,L) in the multi-purpose sheet feeder. (See
Chapter 3 for more information about paper types.)
1 Open the top cover of the MFC. Turn the purple paper thickness
adjustment lever down toward the platen. When you want to print on
regular paper, keep the lever up. When you want to use thick paper,
move the lever down. Then, close the top cover.
(For regular paper)
(For thick paper)
Paper
Ajustment
Lever
2 Open the feeder. Remove any paper in the feeder, and load the new
paper. Fan the stack of paper before loading.
3 Load the paper stack with the printing (coated) side upwards. Adjust
the paper guide. Make sure the paper is stacked below the arrow. You
can load up to approximately 200 sheets of 75g/m2 plain paper.
117
118
CHAPTER THIRTEEN
4 Close the feeder cover.
Manual Feed Slot
You can use only one sheet at a time in the Manual Feed Slot. Paper
loaded in the Manual Feed Slot is printed first, even when there is some
paper left in the Feeder.
If you want to print more than one page using the Manual Feed Slot, on
your PC, in the printer driver Properties Paper tab, select “manual feed”.
1 Load one sheet of paper in the Manual Feed Slot, holding it with
both hands. Align the paper in the center of the feeder.
2 Gently push the paper all the way down in the slot.
3 Adjust the guides to make sure the paper is straight and centered to
prevent a paper jam or misfeed.
If you do not insert paper in the manual feed slot, the MFC will print
from the cassette.
Setup for Envelopes
You can use the manual feed slot to print one envelope at a time.
1
2
3
4
5
Adjust the paper setting in the printer driver.
Open the top cover.
Lift the purple paper thickness adjustment lever down panel.
Close the top cover.
Insert an envelope into the manual feed slot sideways, with the print
side face up.
USING MFC AS PRINTER
6 From your PC application, tell the MFC to begin printing. On
completion, you can place another envelope in the manual feed slot.
Simultaneous Printing/Fax
Your MFC can print data from your computer while sending or receiving
a fax, or while scanning information into the computer. However, when
the MFC is copying or receiving a fax on paper, it pauses the PC printing
operation, and resumes when copying or fax receiving is complete. Fax
sending will continue during PC printing.
Simultaneous Printing/Scanning is not available for MFC-730.
Printer Operation Keys
On/Off Line
Reset
Priority Ink Management
On/Off Line Key
This key toggles the MFC’s Online and Offline print status, which
appears on the display. If you press this key while printing, the MFC
immediately stops printing and goes offline. Press On/Off Line again to
resume printing.
119
120
CHAPTER THIRTEEN
Reset Key
If the screen displays REMAINED DATA, you can clear data remaining
in the printer memory by pressing On/Off Line, then pressing Reset.
Priority Key
When you press Priority, the MFC enters printer mode, and will not
print faxes on paper. Instead, faxes are stored in the memory until you
press Priority again.
Ink Management Key
When you press Ink Management, the screen will display
1.CLEANING
2.REPLACE INK
If you are having trouble with one of the ink colors, you may need to clean
the print head. (See “Troubleshooting and Maintenance” in Chapter 20 .)
If you got an error message NEAR EMPTY XXXX or INK EMPTY
XXXX, you will need to replace the ink cartridge for the appropriate
colour. (See Troubleshooting and Maintenance in Chapter 20.)
Turning Off Bi-directional Printing
You can further improve print quality by turning off bi-directional
printing and setting the MFC to print in one direction only. However, this
will reduce print speed by one half.
1
Press Menu, 2, 3. The screen displays
3.BI-DIR PRINT
2
Press 2 to select OFF (or 1 to select ON).
14
C H A P T E R
F O U R T E E N
Walk-Up
Video Printing
Walk-Up Video Printing lets you use your MFC, connected to your
camcorder, digital camera, video game, or VCR, to view a video on the
attached equipment. The video signal and the output you create from
your MFC are PAL compliant. This is not compatible with any other
standard.
Getting Started
With no documents in the feeder, plug the cable from your video
camera’s Video Out jack into the MFC’s RCA pin jack. Play the video.
Some camcorders, digital cameras, video games or VCRs do not
correctly conform with PAL standards. Then you would not be able to
capture video signals.
121
122
CHAPTER
FOURTEEN
Auto Switch
Whenever you connect video equipment to the MFC and turn the video
signal on, the MFC Paper Type and Copy Quality keys automatically
switch to video printing mode
Enlarge/
Reduce
Brightness
Mono Copy Colour Copy
Paper Type Copy Quality
and the screen displays
VIDEO:PRESS COPY
CAPTURE READY
As soon as you turn off the video equipment or disconnect it, the MFC
returns to normal copy mode for Paper Type and Copy Quality.
The Auto Switch will not work if you have too much in memory.
Colour Video Printing
1 With no documents in the feeder, plug the cable from your video
camera’s Video Out jack into the MFC’s RCA pin jack.
2 Play the video. When the MFC begins receiving the video signals,
the MFC screen displays
VIDEO:PRESS COPY
CAPTURE READY
3 Press Colour Copy when you see the picture you want to capture
and print. The MFC begins printing, and beeps when printing is
complete.
If the MFC is not receiving video signals, Colour Copy will not work.
However, if there is a document in the feeder, the MFC will print a
colour copy of the document.
WA L K - U P V I D E O P R I N T I N G
Black & White Video Printing
For Black and white video printing, follow the steps for Colour Video
Printing, using Mono Copy instead of Colour Copy.
Video Print Quality – Temporary
Settings
You can quickly improve the copy quality of video printouts by using the
Copy Quality, Paper Type and Brightness keys. These settings are
temporary, and the MFC returns to its default settings when you finish
printing. You might want to try different combinations of settings to see
which best suits your needs.
Using the Copy Quality Key
Your MFC allows you to customize the quality of your video copies by
letting you select the video print quality and paper type. You might want
to try different combinations of settings to see which best suits your
needs. The settings are temporary.
1 Make sure there is no document in the feeder. Plug the cable from
your video camera’s Out jack into the MFC’s RCA pin jack.
2 Press Copy Quality. The screen displays the current setting, for
example:
QUALITY:HIGH
ONLINE
3 Use
or
to select copy quality.
QUALITY:NORMAL
QUALITY:HIGH
If there is too much in memory, the print quality will be reduced.
4 When the screen displays your selection, press Set. The screen
displays a video type setting, for example:
VIDEO:MOVING
ONLINE
123
124
CHAPTER
FOURTEEN
5 Press
or
to select the video type.
VIDEO:MOVING
VIDEO:STILL
6 When the screen displays your selection, press Set.
The screen displays
PRESS COPY KEY
ONLINE
7 Press Mono Copy or Colour Copy
The screen shows
PRINTING
ONLINE
Using the Paper Type Key
If you use premium paper, video print quality is improved.
1 With no documents in the feeder, plug the cable from your video
camera’s Out jack into the MFC’s RCA pin jack.
2 Press Paper Type. The screen displays the current setting, for
example:
PAPER:PLAIN
ONLINE
SELECT { } & SET
ONLINE
3 Press
or
to select paper type.
PAPER:PLAIN
PAPER:INK JET
PAPER:GLOSSY
PAPER:TRNSPRNCY
If you are using Brother coated paper for 360 dpi (BP36CL) or 720
dpi (BP72CL), select INK JET, then select 360DPI or 720DPI. If
you are using non-Brother ink jet paper, select OTHER.
4 When the screen displays your selection, press Set.
The screen displays
PRESS COPY KEY
ONLINE
WA L K - U P V I D E O P R I N T I N G
5 Press Mono Copy or Colour Copy.
The screen shows
PRINTING
ONLINE
Using the Brightness Key
You can choose brightness setting before making a video copy.
1 With no documents in the feeder, plug the cable from your video
camera’s Out jack into the MFC’s RCA pin jack.
2 Press Brightness.
3 Press to make a darker copy.
—OR—
Press
to make a lighter copy.
4 Press Set when the screen displays your setting.
Changing Default Settings
Press Menu and 4 to change default settings for video printing.
DEFAULT SETTINGS
1. PAPER TYPE
2. QUALITY
3. VIDEO TYPE
4. PRINT SIZE
5. COLOUR ADJUST
6. BRIGHTNESS
PLAIN
HIGH
MOVING
(14.6 x 10.8)
R:–
G:–
B:–
–
+
+
+
+
By pressing Menu, 4 and a number, you can adjust video printing
settings as shown in the following chart. Press
or
to move through
the selection for each setting. Press Set to save your selection.
125
126
CHAPTER
FOURTEEN
Press Menu and 4.
1.PAPER TYPE
2.QUALITY
PAPER:PLAIN
PAPER:INK JET
INK JET:360DPI
PAPER:GLOSSY
INK JET:720DPI
PAPER:TRNSPRNCY
INK JET:OTHER
QUALITY:HIGH
QUALITY:NORMAL
3.VIDEO TYPE
VIDEO:MOVING
VIDEO:STILL
4.PRINT SIZE
SIZE:(14.6X10.8)
SIZE:(10X7.6)
SIZE:6X(10X7.6)
5.COLOUR ADJUST
6.BRIGHTNESS
COLOUR:RED
R: ±
+
COLOUR:GREEN
G: ±
+
COLOUR:BLUE
B: ±
+
±
+
is factory default
Setting Paper Type
1 Press Menu, 4, 1.
2 The screen displays
PAPER:PLAIN
PAPER:INK JET
PAPER:GLOSSY
PAPER:TRNSPRNCY
WA L K - U P V I D E O P R I N T I N G
3 Press
or
to select a paper type.
If you are using Brother coated paper for 360 dpi (BP36CA) or 720
dpi (BP72CA), select INK JET, then select 360DPI or 720DPI (in
Step 4).
If you are using non-Brother ink jet paper, select OTHER (in Step
4).
4 When the screen displays your selection, press Set.
5 Press Stop to exit.
Setting Video Printing Quality
1 Press Menu, 4, 2.
The screen displays 2. QUALITY.
2 Press
or
to select a quality.
QUALITY:NORMAL
QUALITY:HIGH
3 Press Set when the screen displays your selection.
4 Press Stop to exit.
Setting Video Type
Before you turn on the video signal, you must set the MFC to receive
either a moving or a still image. You can watch the video play on the
video camera and press Mono Copy or Colour Copy when you see
the frame you want to print.
1 Press Menu, 4, 3. The screen displays
3.VIDEO TYPE
2 Press
or
to select video type.
VIDEO:STILL
VIDEO:MOVING
3 Press Set when the screen displays your selection.
4 Press Stop to exit.
Note: You can press Clear in steps 2 and 3 return to the previous step.
127
128
CHAPTER
FOURTEEN
If you don’t have enough memory to process the selected video image,
the print quality may be poor even for a still frame.
Setting Print Size
1 Press Menu , 4, 4.
2 Press or to select print size:
SIZE: (14.6 X 10.8)
SIZE: (10 X 7.6)
SIZE: 6 X (10 X 7.6)
3 Press Set when the screen displays your selection.
4 Press Stop to exit.
Printed Position
① 14.6cm x 10.8cm
(5.75" x 4.25")
➁ 10cm x 7.6cm
➂ 6 x 10cm x 7.6cm
(4" x 3")
(6 x 4" x 3")
7.6cm
10.8cm
10cm
14.6cm
7.6cm
10cm
Video Printing Colour Adjustment
1 Press Menu, 4, 5.
2 Press or to select RED, GREEN, or BLUE.
3 Press Set.
Light
Dark
R: –
+
G: –
+
B: –
+
4 Press or
5 Press Set.
to adjust the degree of colour.
6 Return to Step 2 to select the next colour —OR—
Press Stop to exit.
WA L K - U P V I D E O P R I N T I N G
Video Printing Brightness
You can choose brightness setting before making a copy.
1 Press Menu, 4, 6.
2 Press to make a darker copy.
—OR—
Press
to make a lighter copy.
3 Press Set when the screen displays your setting.
4 Press Stop to exit.
129
130
CHAPTER
FOURTEEN
15
C H A P T E R
F I F T E E N
Printing
Reports
MFC Settings and Journal
You can print the following lists and reports:
1.XMIT REPORT
Choose if Transmission Verification
Report is printed after all Faxes are
sent.
2.JOURNAL
Journal lists information about the
last 50 incoming and outgoing
faxes. TX means Transmit; RX
means Receive.
3.QUICK-DIAL
Lists names and numbers stored in
One Touch and Speed Dial memory,
in numerical order.
4.TEL. INDEX
Quick-Dial list (above), in
alphabetical order.
5.SYSTEM SETUP
Lists settings for INITIAL SETUP,
SETUP RECEIVE, SETUP
SEND, PRINT REPORT,
REMOTE FAX OPT (for MFC730 only) SETUP TAD (for MFC740 only) and
MISCELLANEOUS.
6.MEMORY STATUS
Lists summary information and
amount of occupied memory.
131
132
CHAPTER FIFTEEN
To Print a Report
1 Press Menu, 1, 7.
2 Enter the number (see list above) of the report you want to print. For
example, press 4 to print the TEL. INDEX.
3 Press Start.
4 Press Stop to exit.
Transmission Verification (Xmit) Report
You can use the Xmit Report as confirmation that you sent a fax. This
report lists the name or fax number of the receiving party, the time and
date of transmission, and if the transmission was successful.
When the feature is OFF, the report is printed automatically only if
there’s an error during transmission. If the report indicates ERROR, send
the document again. If the report indicates you should check the
readability of certain pages, resend those pages.
When the feature is ON, the report is printed with every fax you send.
1
2
3
4
Press Menu, 1, 7, 1.
Press
or
to select ON or OFF.
Press Set.
Press Stop to exit.
When the MFC is idle, you can print the Transmission Verification
Report by pressing Verify when you wish to confirm the last
transmission was successful or not.
Journal Period
You can set the MFC to print activity reports at specific intervals (1, 3, 6,
12, 24 hours, 2, 4 or 7 days). If you set the interval to OFF, you can print
the report by following the steps in the previous section.
1 Press Menu, 1, 7, 2.
2 Press or to display
JOURNAL PERIOD
3 Press Set.
4 Press or
to choose your setting. If you choose 7 days, the
screen prompts you to choose a day at which to begin the 7-day
countdown.
PRINTING REPORTS
5 When the screen displays the setting you want, press Set.
6 Enter the time to begin printing, in 24-hour format. (For example,
enter 19:45 for 7:45 PM).
7 Press Set.
8 Press Stop to exit.
133
134
CHAPTER FIFTEEN
16
C H A P T E R
S I X T E E N
Setting Up the
MFC and
Computer to
Work Together
Before You Begin
1 Make sure you have an IEEE 1284 compliant, bi-directional parallel
interface cable.
2 Disconnect the telephone line cord, then unplug the MFC power cord
from the electrical outlet before connecting the parallel interface
cable.
3 Make sure your computer is unplugged from electrical power before
you connect the interface cable.
Connecting the MFC to Your Computer
1 Connect the interface cable to the parallel interface port on the back
of the MFC, and secure with the wire clips.
2 Connect the interface cable to the printer port of your computer, and
secure with the two screws. (To locate your computer’s printer port,
see your computer’s user guide.)
135
136
CHAPTER SIXTEEN
Notice to PC User
A small filter core and cable tie are enclosed in the vinyl bag with your
MFC. PLEASE SAVE THESE PARTS. You will need them in the future
if you connect MFC with a Personal Computer. And for optimal
performance, use the Double Shielded Parallel Interface Cable with
enclosed Filter core and Cable tie.
When you use a Personal Computer with your MFC, please attach the
enclosed Filter core to Double Shielded Parallel I/F Cable.
How to Attach the Filter Core to the Double Shielded
Parallel I/F Cable:
1 Attach the Cable tie 50mm or less from Parallel Interface connector.
Cable tie
Double shielded
Parallel I/F cable
Cable tie
Double shielded
Parallel I/f cable
50mm
to MFC
Parallel Interface
connector
2 Attach the Filter core, pressing until you hear a click, between the
Parallel Interface connector and the Cable tie.
Filter Core
to MFC
Cable Tie
Double shielded
Parallel I/F cable
Filter Core
SETTING UP THE
MFC AND COMPUTER TO WORK TOGETHER
Computer Requirements
Recommended system requirements for the communication software
suite provided are:
•
Windows® 3.1, 3.11, 95, 98, NT®Workstation Version 4.0
•
IBM PC Pentium 75 or higher
•
16 MB Ram [32 MB Highly Recommeded]
•
50 MB of Hard Disk Space [MFC-740 only]
•
Floppy Disk drive [MFC-730 only]
•
CD Rom Drive [MFC-740 only]
NOTE: Use only a shielded Interface cable that is IEEE 1284 compliant
and less than 2m (6.5 feet) long.
Installing Drivers for your MFC -730
in Windows®
Software / Drivers
The following software is provided to optimize the use of your MFC.
The software can run in Windows® 3.1, 3.11, 95, 98 and NT® Workstation
Version 4.0.
• Printer Driver*-
The printer driver creates the print data from the
applications, controls transmission and makes
settings for printing. It is necessary to install the
MFC-730 printer driver into your PC for printing.
137
138
CHAPTER SIXTEEN
Installing MFC-730 Printer Driver
If you are using Windows NT® Workstation
Version 4.0:
1 Click the Start button in the Taskbar.
2 Select Settings, then Printers.
3 Double-click on the Add Printer wizard.
The Add Printer Wizard window appears:
4 Select My Computer and click the Next button.
SETTING UP THE
MFC AND COMPUTER TO WORK TOGETHER
5 Select the Port you will use (we recommend LPT1), and click the
Next button.
6 Click the Have Disk button.
The Install From Disk window appears:
7 Insert the floppy disk for the MFC-730 printer driver into drive A,
and click the OK button.Follow the screen prompts to complete the
installation.
139
140
CHAPTER SIXTEEN
If you are using Windows® 3.1 or 3.11:
1 Insert the floppy disk for the MFC-730 printer driver into drive A.
2 From the Program Manager, click on File, then Run.
3 Enter A:\SETUP.
If you are using Windows® 95 or 98:
1
2
3
4
Insert the floppy disk for the MFC-730 printer driver into drive A.
Click the Start button in the Task bar.
Select Run
Enter A:\SETUP.
SETTING UP THE
MFC AND COMPUTER TO WORK TOGETHER
Installing Brother Drivers for your
MFC-740 in Windows®
Brother Drivers
The following software is provided to optimize the use of your MFC.
The software can run in Windows® 3.1, 3.11, 95, 98 and NT® Workstation
Version 4.0.
■ Printer Driver*- The Printer driver creates the print data from
applications, controls transmission and makes
settings for printing. It is necessary to install the
MFC-740 printer driver into your PC for printing.
■ Scanner Driver*- The MFC-740 scanner driver is TWAIN compliant.
You can use the scanner directly from TWAIN
compliant applications. In the scanner driver, you
can make settings for scanning.
■ Maintenance Utility for DOS-
This is utility software running in MS-DOS. If you
are not using Windows, you can use the MFC’s
ESC/P emulation to print. Some settings which are
unique to the MFC and maintenance operations can
be done from this utility.
■ MFL Pro Software-
This software allows you to send and receive faxes
with your PC, please refer to MFL-PRO Manual for
further information. The Brother Resource Manager
must be installed to use this software.
* These drivers are supplied within the Brother Resource Manager.
141
142
CHAPTER SIXTEEN
Installing Brother Drivers for your MFC-740
under Windows®
All the software and drivers are supplied on a single CD. An Auto-Install
program will guide you through most of the installation process.
1 Make sure that your MFC is connected to your computer and that the
MFC is plugged in.
2 Turn your computer on and start Windows®.
NOTE: (For Windows® 95)
If “Update Device Driver Wizard” appears, select “Do not
install a driver” and click OK.
—OR—If “Add New Hardware Wizard” appears, click Next
to bypass the screens, followed by Finish.
(For Windows® 98)
If “Add New Hardware Wizard” appears, follow the
instructions on the screen, then click Next to bypass the
screen, followed by Finish.
3 Insert the CD-ROM into your CD-ROM Drive. Windows® 95/98/
NT4.0 will be detected automatically, and if possible the AutoInstaller will run automatically. If the Auto-Installer does not run
after a few seconds, you can run it by:Win 3.1/3.11
A Choose Run from the File menu in Program manager
B Type“X:\SETUP.EXE” [where X is your CD-ROM Drive] in the
command line box.
C Click on OK.
SETTING UP THE
MFC AND COMPUTER TO WORK TOGETHER
Win95/98/NT4.0
A Click the START button and then select RUN from the Start Menu.
B Type “X:\SETUP.EXE” [where X is your CD-ROM Drive] in the
command line box.
C Click on OK.
YOU CAN EXIT FROM THE AUTO-INSTALLER AT ANYTIME BY
CLICKING ON THE ICON IS THE BOTTOM RIGHT HAND
CORNER OF YOUR SCREEN.
4 From the Auto-Installer select your preferred language by double
clicking on it with your mouse.
5 The MFC-740 is a parallel colour inkjet device so select this option,
again by double clicking.
6 Select STEP 1 and install the Brother Resource Manager. You can
either install the software now or make floppies* [to install the
software on another PC without a CD-ROM Drive]. Follow the
onscreen prompts and re-boot your PC when instructed to do so.
If you wish to install MFL Pro, repeat Steps 3 to 5, then select STEP 2 to
install MFL Pro. Again following the onscreen prompts and re-booting
your PC when instructed to do so.
7 When installation is complete remove the CD-ROM from the drive.
Installing the Maintenance Utility on
MS-DOS® (For MFC 740 only)
The Scanner driver and fax application work only in the Windows
environment, they cannot be used in DOS. You can use the MFC as a
printer by using an ESC/P printer driver.
To print from your application with the MFC-740, select an Epson ESC/
P compatible printer such as Epson LQ-510, LQ-810 or LQ-2550 in your
application’s printer selection menu. Epson LQ-510 and 810 supports
only monochrome printing. The settings for printing can be done in the
MAINTENANCE UTILITY for DOS.
143
144
CHAPTER SIXTEEN
Installing the MFC-740 Maintenance Utility for
DOS
Before you install the program, make sure you have the following
hardware and software to install the program:
DOS
Version 3.3 or later
Monitor
EGA/VGA or compatible
Option
Mouse; the mouse driver must be installed.
(You can also operate the program with the keyboard.)
Follow these steps to install the remote printer console program:
1 Make sure your machine is connected to your computer and it is set
to Online.
2 Start you computer and go to the DOS prompt. If you are in
Windows®, exit and return to the DOS prompt.
3 Insert the Brother CD-ROM into your CD-ROM drive (substitute
your appropriate drive letter for “X”).
4 At the DOS prompt (C:\>) type X: (X is the letter of your CD-ROM
drive) and press Enter.
c:\X:
5 Type CD DOS\INKJECT and press Enter.
X:\>CD DOS\INKJET
6 Type DOSETUP.EXE and press Enter.
X:\DOS\INKJET>DOSETUP.EXE
7 Follow the instructions from the installer.
Using the MFC-740 Maintenance Utility for
DOS
1 Select the directory you have chosen when you installed the program
by typing:
C:\>CD directory name
SETTING UP THE
MFC AND COMPUTER TO WORK TOGETHER
2 Type MFC7DOS and press the Enter key.
C:\directory name>MFC7DOS
The main screen will appear on your computer screen.
NOTE: ■ Make sure that you select the correct paper size in this utility
program before printing. Paper alignment is not compatible
with Epson printers, you cannot get the correct print output
unless you set the paper size in this utility.
■ Do not use this program from a DOS window running under
Windows.
145
146
CHAPTER SIXTEEN
147
17
C H A P T E R
S E V E N T E E N
Optional
Accessories
(Only for MFC-740)
Memory Board
The memory board is installed on the main controller board inside the
MFC. When you add the optional memory board, it increases the
performance for fax operations.
Optional Memory for the Fax Operations
The MFC can recognize 2MB (ME2000) of Optional Memory using a
special Brother memory board that is available from your Brother dealer.
Be careful to purchase the appropriate memory board.
Additional memory for the fax will expand the memory used for sending
and receiving faxes.
Model Name
MFC -740
4 MB (up to 300
pages)
Optional Memory
Total
2 MB (for Fax)
6 MB (up to 500 pages)
Using Brother #1 chart, with MMR coding and Standard Resolution.
148
CHAPTER SEVENTEEN
Installing the Optional Memory Board
1 Disconnect the telephone line cord, then unplug the power cord from
the AC socket and disconnect the interface cable.
2 Remove the two screws securing the paper output slot in the front of
the MFC.
Paper Output Slot
3 Pull out the paper output slot.
OPTIONAL ACCESSORIES
4 Hold the edge of the memory board and do not touch its surface.
Insert the memory board in the connector on the Main Board and
make sure it is securely seated.
5
6
7
8
9
Return the paper output slot to its normal position.
Secure it with the two screws.
Reconnect the interface cable.
Plug the power cord into the AC socket.
Connect the telephone line cord.
149
150
CHAPTER SEVENTEEN
18
C H A P T E R
E I G H T E E N
PC Printing
Printer Emulation
If you are printing from the Windows environment, it is best to choose
the GDI Brother MFC-730 or MFC-740 Series printer driver. Other
emulations may reduce performance. If you need to print from DOS, the
MFC will emulate EPSON LQ-510, LQ-850 and LQ-2550.
Using the Maintenance Utility
Program for Printing from DOS
(Only for MFC-740)
Before printing from DOS applications, you must use this DOS utility and
select the paper size. You can make the following selections through the
utility program.
Maintenance
Cleaning
Black
Yellow
Cyan
Magenta
151
152
CHAPTER EIGHTEEN
Data 1
Quality
Page Length
Character Set
Auto LF
Text Print Direction
Condensed
Data 2
Character Pitch
LF Pitch
Auto CR
Zero Font
Paper Size
Black Emphasis
Code Page
Before printing, you must set the paper size in this utility and in your
DOS application.
Using the Brother MFC-730/740
Printer Driver
The Brother MFC-730/740 printer driver enables you to change settings
and override defaults as you change your paper, document type, and
colours for printing. In the Brother MFC-730 or Brother MFC-740:
Properties dialog box there are three tabs: Paper, Quality/Colour, and
Control/Maintenance, so you can change print properties as needed.
PC PRINTING
153
The Paper Tab
The paper tab screen allows you to set up the Paper Size, Paper Source,
Orientation, Scaling, and Copies.
To access the Brother printer driver, select Print from the File menu. In
the Print dialog box, select Brother MFC-730 or Brother MFC-740
from the Name drop down list. Click the Properties button. The printer
Brother MFC-730 or Brother MFC-740: Properties dialog box will
appear:
(MFC-740)
Select the Apply button to apply your selected settings.
To return to the default settings, click the Default button, then click the
Apply button.
154
CHAPTER EIGHTEEN
Paper Size
You can select the size of paper and envelopes and also define other sizes of
paper.
A4 (International)
210 x 297 mm (8.3 x 11.7 inches)
Letter (US)
215 x 279.4 mm (8 1/2 x 11 inches)
Legal (US)
215 x 355.6 mm (8 1/2 x 14 inches)
Executive (US)
184.2 x 266.7 mm (7 1/4 x 10 1/2 inches)
A5 (International)
148 x 210 mm (5.8 x 8.3 inches)
Envelopes
B5 (International envelope)
176 x 250 mm (6.9 x 9.8 inches)
C5 (International envelope)
162 x 229 mm (6.4 x 9 inches)
COM-10
104.8 x 241 mm (4 1/8 x 9 1/2 inches)
DL (International envelope)
110 x 220 mm (4.3 x 8.7 inches)
Monarch (US envelope)
98.4 x 190.5 mm (3 7/8 x 7 1/2 inches)
Organizer J
69.9 x 127 mm (2 3/4 x 5 inches)
Organizer K
95.3 x 171.5 mm (3 3/4 x 6 3/4 inches)
Organizer L
139.7 x 215.9 mm (5 1/2 x 8 1/2 inches)
User Defined Paper Size
The printer can handle any paper size within the following range.
Minimum 70 x 127 mm
(2.75 x 5 inches)
Maximum 215.9 x 356 mm (8.5 x 14.02 inches)
In this option, you can specify a custom-sized paper and save it by
following this procedure.
1 Measure the paper size you want to use.
2 Select User Defined... in the paper size option.
3 Enter a unique name for your paper in the Custom Paper Size Name
box.
4 Select either inch or mm for the unit of measure.
5 Type in the length and width.
6 Click the Save button to store the size. If necessary, you can delete a
preset size by choosing the Delete button.
Your Windows application software may override this setting. Make sure
you have set the proper paper size in your application software. In
addition, check the margin settings when you select the smallest paper
size. If they are too large, it may result in nothing being printed.
PC PRINTING
155
Paper Source
For the MFC, you can choose Feeder or Manual.
Feeder
The multi-purpose sheet feeder is primarily used for printing on
standard-size paper and envelopes.
Manual Feed
If your paper has difficulty feeding from the sheet feeder, we recommend
using the Manual paper feed method. You will have to load paper sheet
by sheet. The MFC stops before printing and the Printer Driver shows
“Please load one sheet…” message. Insert a sheet into the manual feed
slot and click “OK” to resume printing.
Orientation
Print orientation may be Portrait or Landscape. Portrait orientation
means the page is taller than it is wide when you view the printed text
upright. Landscape orientation means the page is wider than it is tall
when you view the printed text upright.
Scaling
Use this function to reduce or enlarge your document, from 50% to
200%. We recommend the following percentages for the paper types
shown.
141%
A5 -> A4
115%
B5 -> A4
87%
A4 -> B5
71%
A4 -> A5, B4 -> B5
2 in 1
Two pages are printed on one sheet at a reduced size. If you selected the
“2 in 1”, you cannot specify the scaling percentage manually.
1 in N
One page is printed on multiple sheets at an enlarged size. If you selected
the “1 in N”, you cannot specify the scaling percentage manually.
156
CHAPTER EIGHTEEN
If your application software contains a similar function to this,
both settings will be effective. Do not use the two selections
simultaneously.
Copies
The Copies selection tells Windows how many copies you want to print
from a software application.
This setting is independent of the “copies selection” that may be
available within the print menus of your software application.
Do not use the two selections simultaneously.
Collate
In multiple page jobs that are uncollated, several copies of Page 1 are
printed followed by several copies of Page 2, followed by several copies
of Page 3, etc. For example, for 2 copies of a 3 page document, the MFC
prints Page 1, Page 1, Page 2, Page 2, Page 3, and Page 3 in order.
In multiple page jobs that are collated, a complete set of pages in a job
are printed followed by another complete set of pages. For example,
printing 2 copies of a 3 page document, the MFC prints Page 1, Page 2,
Page 3, then Page 1, Page 2, and Page 3 in order. In this case, the MFC
starts printing after processing all the print data so that it takes a longer
time for collated printing than uncollated printing.
Reverse Order
The MFC normally prints Page 1 and ejects it face-up so that the
following pages are stacked on top of previous pages. (Page 5, Page 4,
Page 3 ..... Page 1) When you want to get correct-ordered printouts, use
this function. The MFC spools the job in your computer and sends the
data starting from the last page to the printer. Since the MFC prints from
the last page forwards, the printouts are stacked Page 1, 2, 3, ...Page 5.
Please note that this function takes more time.
PC PRINTING
157
The Quality/Colour Tab
The Quality/Colour tab enables you to select the print quality, media,
colours (matched to PC monitor, custom colours, or mono), and
document type.
Click the Quality/Colour tab to display this screen:
(MFC-740)
Select the Apply button to apply your selected settings.
To return to the default settings, click the Default button, then click the
Apply button.
158
CHAPTER EIGHTEEN
Quality
Select the print quality. The print quality and speed are related. Higher
quality takes a longer time to print.
Draft :
360 x 180 dpi. The fastest print mode (approximately two
to four times faster than normal mode) and gives lower ink
consumption. Use this mode to print large volume
documents or a document for proofing.
Normal :
360 x 360 dpi. Recommended mode for ordinary printouts.
Good print quality with comfortable printing speed.
Fine :
720 x 720 dpi for colour. Better print quality than normal
and faster print speed than Super Fine.
Super Fine : 1440 x 720 dpi. Use this mode to print precise images such
as photographs. Since the print data is much larger than
normal mode, processing time, data transfer time, and
printing time will be longer.
Media
Select the media to print on. The MFC changes the way it places dots
depending on the selected media type. To get good print output, make
sure to select the correct media type.
Selecting media type changes the print quality selection to the most
suitable one as listed below. We recommend that you print with the
preset quality for best printing result.
Paper Type
Suitable print quality
Plain Paper
Coated(360) Paper
Coated(720) Paper
Glossy Paper
Transparency
Transparency (mirror)
Normal
Normal
Fine
Super Fine
Normal
Normal
Use only genuine Brother Coated Paper (Ink Jet), or Glossy Paper to get
the best print quality. Non-Brother special paper may not produce the
best quality.
PC PRINTING
159
Colour/Mono
Colour
When your document contains colour and you want to print it in colour,
select this mode. Only generic colours will appear on the printout.
(Unless you also select colour matching.)
Mono
Select this mode if your document has only black and gray scale text
and/or objects. Mono mode makes the print processing speed faster than
colour mode. If your document contains colour, selecting Mono mode
prints your document in 256 levels of gray scale.
Controlling the Colour
To get accurate colour matched output between the monitor and MFC,
the colour data should be adjusted for the MFC before printing.
Colour adjustment is provided by both Windows® 95 / 98 and this printer
driver. Using this feature, the colour data is adjusted by Win95 ICM or
the Brother MFC-740 printer driver and you can get colours more closely
matching those appearing on the PC monitor.
When you are using a software application that has its own colour
matching engine, turn this setting off. The colour matching system from
that application is then used.
Windows® 95 / 98 has a colour matching engine called “ICM - Image
Colour Matching” in its Operating System. ICM uses a profile of each
device (monitor, scanner, printer, MFC) to know the characteristics of
individual devices and correct the difference between them. When this is
set to off, the Brother MFC-730/MFC-740 printer driver will do the
colour adjustment. At present, the ICM feature is not supported by all the
monitor and printer vendors and if ICM does not have your PC monitor’s
profile, then ICM cannot work correctly. Moreover, ICM takes a longer
time.
When using Windows® 3.1, 3.11, NT, this selection is not available.
160
CHAPTER EIGHTEEN
Document
The printer driver will select the most suitable colour matching method
depending on your document type. Generally, text and business graphics
are printed vividly and photographic images are printed softly.
■ Auto
The printer driver automatically selects the document type. In most
cases, we recommend to use the Auto setting.
■ Photo
Select this mode for Photographic images.
■ Graphics
Select this mode for documents that contain text or business graphics
such as charts or clip art.
■ Custom
If you want to select the colour matching method and halftone
method manually, select this mode and press the “Custom setting”
button to access further settings.
Custom Setting
You can customize your settings by selecting the type of colour
matching, half tone, and effect that will be used.
Colour Matching
You can select the colour matching method manually. Since the way of
reproducing colour and the reproducible range of colour between the
monitor and the MFC are different, colour matching adjusts this
difference. There are several ways to adjust colour for your MFC. Select
the best one for your document. Execute PC monitor calibration to make
these settings and make the result effective.
■ Photo (Available only when ICM is turned On.)
Suitable for photographic images. When adjusting colour, colour
tone is kept as original as possible. All colours are adjusted evenly,
so you can get natural colour tones.
■ Graphics (Available only when ICM is turned On.)
Suitable for Graphics and text. When adjusting colour, colour
vividness is kept as much as possible. You can get vivid and clear
colour.
■ Logo (Available only when ICM is turned On.)
When you need an exact colour match such as for company logos
etc., use this selection.
PC PRINTING
■ Match Monitor (Available only when ICM is turned Off.)
Suitable for photographic images. Colour is adjusted to get the
closest colour match to the PC monitor.
■ Vivid Colour (Available only when ICM is turned Off.)
Suitable for business graphics such as charts, graphs, and text. The
colour is adjusted to give more vivid colour.
Halftone Pattern
The MFC can use several methods to arrange where to place dots to
express halftones. There are some predefined patterns used to place dots
and you can select which one is used for your document. Select the
appropriate method.
■ Cluster
This is suitable for business graphics such as charts, graphs and
drawings, since this creates more sharp printouts. Moreover, the
processing time is shorter.
■ Photo
This method creates smooth halftones so that this is suitable for
photographic images. It takes more time to process data, but this can
express more levels of halftones and creates more natural images.
Effect
■ Brightness
Change the brightness of the whole image lighter or darker. Moving
the scroll bar to the left makes your image darker and moving the
scroll bar to the right makes your image lighter.
■ Contrast
Change the contrast of an image. Darker sections will be more dark
and lighter sections will be more light as you increase the contrast.
Increase the contrast when you want an image to be clearer. Decrease
the contrast when you want an image to be more subdued.
■ Red
Increase the intensity of the Red colour to add red to the whole
image.
■ Green
Increase the intensity of the Green colour to add green to the whole
image.
■ Blue
Increase the intensity of the Blue colour to add blue to the whole
image.
161
162
CHAPTER EIGHTEEN
The Control/Maintenance Tab
Select the Control/Maintenance tab from the Brother MFC-730/740
printer driver dialog box:
(MFC-740)
Select the Apply button to apply your selected settings.
To return to the default settings, click the Default button, then click the
Apply button.
PC PRINTING
Monitor Calibration
If you want to get the closest colour to your PC monitor on the printouts,
calibrate your monitor by clicking this button.
The method used to express colour is different between monitors and the
MFC. The PC monitor uses the three primary colours—Red, Green,
Blue—to create full colours and the MFC uses four colours—Cyan,
Magenta, Yellow, and Black—to create full colours.
To get the closest colour match, the colour matching system should
adjust the colour by referring to the monitor’s characteristics and MFC’s
characteristics. To find out the monitor’s characteristics, this monitor
calibration program is used. As the printer driver knows the MFC’s
characteristics, it converts the colour on the monitor for the MFC.
Bi-Directional Printing
The MFC prints by moving its print head. Normally, it prints in both
directions. By turning this option OFF (default setting is ON), the MFC
prints (uni-directional) so that the print speed will be reduced to half.
Sometimes the moving speed of the print head may not be stable due to
temperature changes, etc., and the printed vertical line may not be
aligned exactly. If you encounter this problem, turn this option off or use
the Maintenance menu and adjust the vertical line.
Maintenance
Select the Maintenance button to display the Maintenance screen, where
you can do a test print on the MFC to check the colours. If the test print
shows a problem, you can clean the print head on the MFC.
The Cleaning Tab
Test Print
When you see some problems on printouts, print the test page by clicking
this button to check if any dots are missing or some ink cartridges are
empty.
Before printing the test page, make sure that A4 paper is loaded in the
MFC. Press the Test Print button to start printing of the test page.
163
164
CHAPTER EIGHTEEN
Cleaning
If you see some dots missing on the printout, clean the print head. Print
the test page and find out which colour has problems.
1 Select the colour to be cleaned.
2 Press the “Clean” button.
The MFC starts cleaning.
Wait until ONLINE shows again on the MFC display.
The Printer Adjustment Tab
Vertical Alignment
If you see poor print quality,
1 Please ensure that the printer is connected to the PC, turned ON and
loaded with A4 paper.
2 Click the button Vertical Alignment to print a set of Vertical
Alignment test patterns.
3 Select the best aligned print sample (1 to 9) for 360 and 720 dpi by
using the Up/Down scroll control.
The best aligned sample is where the printed vertical line is straight and
the upper and lower shaded squares are the same.
19
C H A P T E R
N I N E T E E N
Important
Information
Important Safety Instructions
1
2
3
4
Read all of these instructions.
Save them for later reference.
Follow all warnings and instructions marked on the product.
Unplug this product from the wall outlet before cleaning. Do not use
liquid or aerosol cleaners. Use a damp cloth for cleaning.
5 Do not place this product on an unstable surface, stand, or table. The
product may fall, causing serious damage to the product.
6 Slots and openings in the cabinet and the back or bottom are
provided for ventilation; to ensure reliable operation of the product
and to protect it from overheating, these openings must not be
blocked or covered. The openings should never be blocked by
placing the product on a bed, sofa, rug, or other similar surface. This
product should never be placed near or over a radiator or heater. This
product should not be placed in a built-in installation unless proper
ventilation is provided.
7 This product should be operated from the type of power source
indicated on the label. If you are not sure of the type of power
available, consult with your dealer or local power company.
8 This product is equipped with a 3-wire earthed plug. This plug will
fit into only an earthed socket. This is a safety feature. If you are
unable to insert the plug into the outlet, contact your electrician to
replace your obsolete socket. Do not defeat the purpose of an earthed
plug.
9 Do not allow anything to rest on the power cord. Do not locate this
product where people can walk on the cord.
10 Do not place anything in front of the machine that will block
received faxes. Do not place anything in the path of received faxes.
11 Do not touch a document during printing.
165
166
CHAPTER NINETEEN
12 Never push objects of any kind into this product through cabinet
slots, since they may touch dangerous voltage points or short out
parts resulting in a risk of fire or electric shock. Never spill liquid of
any kind on the product.
13 Do not attempt to service this product yourself, because opening or
removing covers may expose you to dangerous voltage points and/or
other risks. Refer all servicing to service personnel.
14 This product has no mains ON/OFF switch. It is therefore highly
important that access to the mains plug and the mains socket to
which the plug is connected, is never obstructed, in case for some
reason the mains power to the machine must be quickly
disconnected.
15 Unplug this product from the mains power and telephone line
sockets, and refer servicing to qualified Service Personnel under the
following conditions:
A When the power cord is damaged or frayed.
B If liquid has been spilled into the product.
C If the product has been exposed to rain or water.
D If the product does not operate normally when the operating
instructions are followed. Adjust only those controls that are
covered by the operating instructions. Improper adjustment of
other controls may result in damage and will often require
extensive work by a qualified technician to restore the product to
normal operation.
E If the product has been dropped or the cabinet has been damaged.
F If the product exhibits a distinct change in performance,
indicating a need for service.
BABT Approval
This apparatus has been approved by the British Approvals Board for
Telecommunications, for use of the following facilities:
INTEGRAL MODEM IN GROUP 3 FACSIMILE
LOUDSPEAKING FACILITY (CALL PROGRESS MONITOR)
STORAGE OF TELEPHONE NUMBERS FOR RETRIEVAL BY
PREDETERMINED CODE
CONNECTION TO AN APPROVED PBX (PRIVATE BRANCH
EXCHANGE)
OPERATION IN THE ABSENCE OF PROCEED INDICATION
AUTOMATIC STORAGE OF THE LAST NUMBER REDIALLED
SERIES CONNECTION FACILITY
I M P O RTA N T I N F O R M AT I O N
Any other usage will invalidate the approval of the apparatus, if as a
result it then ceases to comply with the standards against which approval
was granted.
The machine is approved for connection to a single exclusive direct
exchange line provided by BT, Kingston-upon-Hull Telecommunications
and CATV, and to approved Private Automatic Branch Exchanges
(PABXs).
The connection to the BT network must not be hard-wired.
This equipment is NOT approved for connection to the following:
I + I Carrier Systems;
Leased Lines;
Shared Service (“Party”) Lines;
As an extension to a Payphone;
Calls to the emergency services (999) DO NOT remain enabled on
the handset in the absence of mains power.
Stored telephone numbers are retained in the absence of mains power.
The loudspeaking facility (call progress monitor) will not function unless
the unit is plugged into the mains and switched on at the power socket of
the mains switch if applicable.
This owner’s manual has been provided with your machine to help you
make use of the functions provided.
This machine must not be connected in conjunction with parallel
extension telephones, unless those telephones are connected downstream
of this machine. This means that the cable to which any extension device
is connected, should be terminated on a BT modular jack plug type 431A
which in turn is inserted into the modular socket of the T-shaped line
cord connector of this machine. If these instructions are not followed, the
following conditions may occur:
1. The fax machine inadvertently auto-answers in response to outward
pulse dialling of an extension telephone.
2. Fax transmissions can be impaired or will fail entirely.
3. Remote activation from extension telephones may not work correctly.
If in doubt about any aspect of telephone extension cabling, contact BT,
Kingston upon Hull Telecommunications, your PBX maintainer, your
CATV company or a reputable telephone cabling company.
Radio Interference (220-240 V Model Only)
This machine complies with EN55022 (CISPR Publication 22)/Class B.
A shielded interface cable should be used to ensure compatibility with
the above specification.
167
168
CHAPTER NINETEEN
IMPORTANT-For Your Safety
To ensure safe operation the three-pin plug supplied must be inserted
only into a standard three-pin power point which is effectively grounded
through the normal household wiring.
Extension cords used with the equipment must be three-conductor and be
correctly wired to provide connection to ground. Incorrectly wired
extension cords are a major cause of fatalities.
The fact that the equipment operates satisfactorily does not imply that
the power is grounded and that the installation is completely safe. For
your safety, if in any doubt about the effective grounding of the power,
consult a qualified electrician.
Disconnect device
This machine must be installed near a power outlet, which is easily
accessible. In case of emergencies, you must disconnect the power cord
from the power outlet in order to shut off power completely.
20
C H A P T E R
169
T W E N T Y
Troubleshooting
and Maintenance
Troubleshooting
Error Messages
As with any sophisticated office product, errors may sometimes occur. If
this happens, your MFC often identifies the problem and displays an
error message. The table below explains the most common error
messages.
ERROR MESSAGES
ERROR MESSAGE
CAUSE
ACTION
CHECK CASSETTE
MFC cassette cover is open or MFC cassette is
not installed properly.
Close cassette cover or install cassette
properly.
CHECK PAPER
MFC is out of paper.
Add paper to cassette, or install cassette
properly.
CHECK PAPER SIZE
Paper Size is improper for fax receiving or
copying.
Load A4 paper in cassette.
COMM. ERROR
Poor phone line quality caused
communication error.
Try the call again. If problem continues,
call Telephone Company to check your
phone line.
CONNECTION FAIL
You tried to poll a fax machine that is not in
Polled Waiting mode.
Verify the other party’s polling setup.
COOLING DOWN
The print head has overheated.
Unplug the MFC and wait 30 minutes
for it to cool.
COVER OPEN
Top cover is not closed completely.
Open, then close, each cover.
DISCONNECTED
The other party or other party’s fax machine
terminated the call.
Try to transmit, calling the other party
to see what happened or receive again.
DOCUMENT JAM
Documents were not inserted or fed properly,
or document was longer than 40".
See Document Jam in this chapter.
INK EMPTY XXXX
One or more of the ink cartridges is out of ink.
Replace the ink cartridges. See
Replacing the Ink Cartridges in this
chapter.
170
CHAPTER TWENTY
ERROR MESSAGE
CAUSE
ACTION
MACHINE ERROR XX
MFC has a mechanical problem
Cut the power off. Then contact your
Brother dealer for service.
MEMORY FULL
You can’t store data in the memory.
See Memory Full Mesaage in chap. 10.
NEAR EMPTY XXXX
One or more of the ink cartridges is running
out of ink.
Order a new ink cartridge now.
NO RESPONSE/BUSY
The number you dialled does not answer or
is busy.
Verify the number and try again.
NOT ASSIGNED
You tried to access a One Touch or Speed Dial
number that is not programmed.
Set up the One Touch or Speed Dial
number. See chap. 8.
PRINTER JAM
The recording paper is jammed in the MFC.
See Printer Jam in this chapter.
SET CARTRIDGES
An ink cartridge is not installed properly.
Re-install the ink, seating it properly.
See Replacing Ink Cartridges in this
chapter.
WARMING UP
The print head detects low temperature.
Wait until the MFC warms up.
Document Jam
If the original document is jammed, follow the steps as below.
1
2
3
4
5
Remove any paper from the document feeder that is not jammed.
Lift the control panel cover.
Pull the jammed document out toward the front of the machine.
Close the cover.
Press Stop.
TROUBLESHOOTING AND MAINTENANCE
Printer Jam or Paper Jam
Remove the jammed paper depending on where it is jammed in the
MFC.
Paper is jammed in the multi-purpose sheet feeder.
1 Open the cassette cover and pull the jammed paper upwards and remove
it.
2 If the paper cannot be pulled out easily, remove the multi-purpose
sheet feeder.
3 Open the cassette and remove the paper from the multi-purpose
sheet feeder in the easiest direction.
Paper is jammed in the manual feed tray.
1 Pull the jammed paper upward and remove it.
2 If the paper cannot be pulled out easily, remove the multi-purpose sheet
feeder.
171
172
CHAPTER TWENTY
3 Holding the cassette, pull the jammed paper out of the multi-purpose
sheet feeder from underneath the cassette.
Paper is jammed inside the MFC.
1 Remove the multi-purpose sheet feeder.
Multi-purpose
Sheet
Feeder
TROUBLESHOOTING AND MAINTENANCE
2 Lift the top cover and make sure where the paper is jammed.
2
Top Cover
1
Paper is jammed inside the front of the MFC.
Release Lever (Blue)
1 Close the top cover.
2 Pull the paper towards you while you hold up the release lever at the
rear of the MFC.
173
174
CHAPTER TWENTY
Replace the multi-purpose sheet feeder.
Paper is jammed inside the back of the MFC.
Release Lever (Blue)
1 Pull the paper out of the back of the MFC while holding up the
release lever at the rear of the MFC.
2 Close the Top Cover.
3 Replace the multi-purpose sheet feeder.
If You Are Having Difficulty with Your MFC
If you think there is a problem with your MFC, make a copy first. If the
copy looks good, the problem is probably not your MFC. Check the chart
below and follow the troubleshooting tips.
DIFFICULTY
SUGGESTIONS
Printing or Receiving Faxes
Condensed Print and Horizontal
Streaks / Top and Bottom of
Sentences Are Cut Off
If your copy looks good, you probably had a bad connection, with
interference on the phone line.
Poor Quality Print
Make sure the Printer Driver matches the type of paper you are using
(see PrintMedia on chap.18). If you are using plain paper, try using
recommended special paper (see Chapter 3). Don’t handle the paper
until the ink is dry. Adjust the Vertical Alignment (see chap.18).
Printing Too Dark or Too Light
Make sure your ink cartridges are fresh and within their expiry dates.
Cartridge expiry dates are printed on the package. Make sure the
Printer Driver matches the type of paper you are using (see Print Media
on chap.18). Try using recommended special paper (see Chapter 3). The
recommended environment for your MFC is between 15 °C to 30 °C.
Printing Appears Dirty or Ink Seems
to Run
Make sure you are using the recommended paper (see Chapter 3).
Don’t handle the paper until the ink is dry.The recommended
environment for your MFC is between 15 °C to 30 °C.
TROUBLESHOOTING AND MAINTENANCE
DIFFICULTY
SUGGESTIONS
White Lines in Text or Graphics
Clean the print head (see Cleaning the Print Head in this chapter).
Stains Appear on the Reverse Side or
at the Bottom of the Page
Make sure the Printer Platen and Pick Up Roller are not dirty with ink
mist. (See Regular Maintenance in this chapter).
Vertical Black Lines When Receiving
The sender’s scanner may be dirty. Ask the sender to make a copy to see
if the problem is with the sending machine. Try receiving from another
fax machine.
Phone Line or Connections
MFC Does Not Answer When Called
Make sure the MFC is in the correct receiving mode for your setup
(either Fax, Fax/Tel). Check for dial tone. If possible, call your
MFC to hear it answer. If there is still no answer, check the telephone
line cord connection. Connect a standard telephone handset to the MFC
telephone socket. If there is no ringing when you call your
MFC, call your Telephone Company to check the line.
No Dial Tone on the Handset
Lift the handset. If you hear no dial tone, check telephone line cord
connections at the MFC and wall jack. Check that the handset is
connected to the MFC’s handset jack. Test the wall jack with another
single line telephone. If no dial tone on the wall outlet, call your
Telephone Company.
Sending Faxes
Poor Transmitting Quality
Try changing your resolution to FINE or S.FINE. Make a copy to
verify your MFC’s scanner operation.
Transmission Verification Report says
“Result:NG”again.
There is probably temporary noise or static on the line. Try sending the
fax If the problem continues, call the Telephone Company to check your
phone line.
Vertical Black Lines When Sending
If the copy you made shows the same problem, your scanner is dirty
(see Cleaning the Scanner in this chapter).
Handling Incoming Calls
Pseudo Ring in F/T Mode
The MFC knows the incoming call is not a fax so it is signaling you to
answer the telephone call. Pick up the MFC handset or answer from an
extension phone and press your MFC’s Remote Deactivation Code
(default setting is #51).
Transferring a Fax Call to the MFC
If you answered at the MFC, press Start and hang up immediately. If
you answered at an extension phone, press your Remote Activation
Code (default setting is 51). When your MFC answers, hang up.
Custom Features on a Single Line
If you have, Caller ID, RingMaster, Voice Mail, an answering machine,
alarm system or any other on a single phone line with your MFC, it may
create a problem sending or receiving fax data.For example: If you are
sending or receiving a fax message while a custom feature signal comes
through on the line, the signal can temporarily interrupt or disrupt the
fax data. Brother’s ECM feature should help overcome this problem.
This condition is related to the telephone system industry, and is
common to all devices that send and receive information on a single,
shared line with custom features. If avoiding a slight interruption is
crucial to your business, a separate line with no custom features is
recommended.
175
176
CHAPTER TWENTY
DIFFICULTY
SUGGESTIONS
Printer Difficulties
Horizontal lines appear in Text or
Graphics.
Clean the print head (see Cleaning the Print Head in this chapter).
You see the “New Hardware Found”
message on your PC screen (although
you have already installed the drivers
in Windows® 95/98).
Click on the ‘Do not install a driver. (Windows® will not prompt you again)’
and click ‘OK’.
The MFC does not print the data in
the correct position.
Select the correct paper size using the DOS Utility program. Since paper
adjustment is different between ESC/P (right) and the MFC (center), the
printing position should be adjusted for the MFC.
Cannot perform ‘2 in 1’ printing.
Check if the paper size setting in the application and in the printer driver
are the same.
Cannot print when using Paint Brush.
Try setting the Display setting to ‘256 colours’.
Cannot print when using Adobe
Illustrator.
Try to reduce the printing resolution.
Thick line and thin line appear
alternately.
Turn OFF ‘Bi-Directional Printing’ from the ‘Control/Maintenance’ tab
in the printer driver.
There are some dense lines.
Turn ON ‘Reverse Order’ from the ‘Paper’ tab in the printer driver.
When using ATM fonts, some
characters are missing or some
are printed in the same place.
If you are using Windows®95/98, select ‘Printer Settings’ from the ‘Start’
menu. Open‘Brother MFC-730’ or ‘Brother MFC-740’ properties. Click
‘Spool Setting’ on the characters ‘Details’ tab. Select ‘RAW’ from ‘Spool
Data Format’.
When using Power Point or Excel,
hatch pattern is not what you are
expecting.
Open the ‘Quality/Colour’ tab in the printer driver, and change the
‘Document’ type to ‘Photo’.
Video Capture
LCD does not show “VIDEO: PRESS Check the video cable connection to the MFC’s RCA pin jack. Check
COPY CAPTURE READY”
that the video equipment is sending a signal (video equipment is turned
on and set to the correct setting).
How to Improve Print Quality
Test Print
If the quality is not satisfactory, first print a test page to help you identify
settings you may want to change.
1 Press Menu, 2, 1. The screen displays
1.TEST PRINT
2 Press Set.
TROUBLESHOOTING AND MAINTENANCE
3 Press Start. The MFC begins printing.
4 Press Stop to exit.
Cleaning the Print Head
Clean the print head if you get a horizontal line in the text or graphics on
your printed documents. You can clean the four colour (black, cyan,
yellow, magenta) print heads (or a single colour) using the Ink
Management key or from the printer driver.
Caution
Do NOT clean the print head by touching it with your hand or a cloth.
1
2
3
4
Press Ink Management.
Press 1 to choose 1.CLEANING.
Press
or
to choose the colour you want to clean.
Press Set to clean the print head automatically.
When cleaning is finished, the MFC will go back online automatically.
WARNING
Do NOT touch the print head unless you are replacing it. Touching the
print head may cause permanent damage and may void the print head’s
warranty.
Aligning Ink Cartridges
This feature allows you to check and align the ink cartridges to assure
best print quality. Make sure there is paper in the cassette before you
start the alignment procedure.
1 Press Menu, 2, 2. The screen displays
2.VERTICAL ALIGN
177
178
CHAPTER TWENTY
2 Press Start. The MFC prints a sample page.
Study the alignment page and decide which sample numbers show
the most evenly printed ink lines for 360 and 720 dpi. The screen
displays
360DPI ADJUST
ENTER NO.(1-9)
3 Using the dial pad, enter the level of adjustment needed for 360 dpi (1 to
9).
4 The screen displays
720DPI ADJUST
ENTER NO.(1-9)
5 Using the dial pad, enter the level of adjustment needed for 720 dpi (1 to
9).
6 Print another sample Test Print and check it (see chap.18).
7 Press Stop to exit.
TROUBLESHOOTING AND MAINTENANCE
179
Turning Off Bi-directional Printing
You can further improve print quality by turning off bi-directional
printing and setting the MFC to print in one direction only. However, this
will reduce print speed by one half.
1 Press Menu, 2, 3. The screen displays
3.BI-DIR PRINT
2 Press 2 to select OFF (or 1 to select ON).
Don’t handle the paper until the ink is dry
Special ink jet, glossy and transparency paper will take longer to dry than
plain paper, so do not touch the printed copy until the ink has dried.
180
CHAPTER TWENTY
Packing and Shipping the MFC
Whenever you transport the MFC, use the packing materials that came with
your MFC. If you do not pack the MFC correctly, you could void your
warranty.
1 Unplug the MFC from telephone wall socket.
2 Unplug the MFC from the AC outlet.
NOTE: Do not unplug the MFC after a print job until you hear the
final click.
3 Remove the recording paper wire extension, recording paper support,
document tray, document plastic extension, and handset, and pack
them.
NOTE:Please remove the ink cartridges and fit the yellow shipping
cover. Damage to your print head resulting from packing
without the yellow shipping cover will void your warranty.
TROUBLESHOOTING AND MAINTENANCE
4 Wrap the MFC in the plastic bag and place it in the original carton
with the original packing material.
5 Place additional parts (such as cords and trays) and documents (such
as your manual) into the carton.
181
182
CHAPTER TWENTY
*
**
* ... Only for MFC-730
** ... Only for MFC-740
6 Close the carton.
TROUBLESHOOTING AND MAINTENANCE
Regular Maintenance
Cleaning the Scanner
Unplug the MFC and open the control panel cover. Clean the flat white
pressure bar and the glass strip under the bar with isopropyl alcohol on a
lint-free cloth. If the screen still displays a scanner error, please contact
your Brother dealer for service.
Cleaning the MFC Printer Platen
When you want to clean your MFC printer platen, wipe it with a lint free
cloth that is dry or lightly moistened with isopropyl alcohol.
Printer Platen
183
184
CHAPTER TWENTY
Cleaning the Pick-up Roller
1 Remove the Feeder from the printer platen.
2 Wipe the pick-up rollers with a cloth moistened with isopropyl
alcohol.
Multi-Purpose
Sheet Feeder
Pick-up Rollers
3 Refit the Feeder to the printer platen.
WARNING
■ Be sure to unplug the MFC from the main power outlet before
cleaning the printer platen and pick-up roller.
■ Be careful not to touch the paper feed star wheels and flat cable.
Replacing the Ink Cartridges
Your MFC is equipped with an ink dot counter that automatically
monitors the ink level in each colour cartridge. When the counter detects
an ink cartridge is running out of ink, the MFC will notify you by
lighting the “Ink Empty” LED.
Ink Empty LED Blinking =
One or more Ink Cartridges are low.
Ink Empty LED On
One or more Ink Cartridges are empty.
=
The display shows you which colour cartridges are low or empty. Be sure
to follow the display prompts so you replace the colour cartridges in the
appropriate order.
When the ink cartridges are running low, you must use Ink
Management to begin the cartridge replacement (Steps 1–3). If the
ink is empty, skip to Step 4.
TROUBLESHOOTING AND MAINTENANCE
1 Press Ink Management.
2 Press or to choose 2. REPLACE INK.
3 Press Set.
If one or more ink cartridges are empty, for example Black, the screen
displays INK EMPTY BLACK and PLS OPEN COVER.
4 Open the top cover.
5 Open the cartridge covers by pinching the clips as shown in the
illustration.
Clip
Cartridge
Cover
6 Remove the ink cartridge by lifting it up and then out of the print
head.
7 Open the new ink cartridge bag for the colour on the display and
remove the ink cartridge.
185
186
CHAPTER TWENTY
8 Hold the ink cartridge as shown in the illustration, and remove the
sealing tape from the side of the ink cartridge. Carefully peel the
tape in the direction away from you..
opening
IMPORTANT: To prevent spilling ink and staining your hands and
clothing, remove the sealing tape gently.
9 Each colour has its own correct position. Insert each new ink
cartridge into the carriage using the colour indicator on the print head
as a guide.
Please be careful not to push down the switch bar.
10 Close the cartridge cover until it clicks into place.
11 After installing the ink cartridges, close the top cover. Your MFC
prepares for a “head cleaning” and goes online. The display screen
prompts you to verify a new ink cartridge was inserted for each color
you removed. Example: DID YOU CHANGE BLCK 1. YES 2.
NO.
If the ink cartridge you installed is not a brand new one, please make
sure to select 2.
12 For each new cartridge, press 1 on the keypad to reset the ink dot
counter for that colour automatically. (The ink dot counter enables
the MFC to notify you when a colour is running low.)
The MFC will enter a cleaning cycle for approximately two minutes
for each replaced cartridge. The display screen alternately shows
CLEANING and PLEASE WAIT.
TROUBLESHOOTING AND MAINTENANCE
187
When the MFC completes the cleaning cycle, the display returns to
Standby mode (date and time).
WARNING
If ink gets in your eyes, irrigate them with water immediately and consult
a doctor if you are concerned.
Caution
■ DO NOT remove ink cartridges if you do not need to replace them.
If you do so, it may reduce the ink quantity and the printer will not
know the quantity of ink left in the cartridge.
■ DO NOT shake the ink cartridges. If you do so, the ink may spill
when you take off the sealing tape.
■ If ink stains your body or clothing, wash with soap or detergent
immediately.
■ If you install an ink cartridge in the wrong colour position, you must
clean the print head several times before you start printing, after
correcting the cartridge installation, because the colours were mixed.
■ Once you open an ink cartridge, install it in the MFC and use it up
within six months of installation. Use unopened ink cartridges within
two years of production.
■ DO NOT refill the ink cartridges. Attempting to use refilled
cartridges may cause damage to the print head and will void your
warranty.
Note: If the INK EMPTY XXXX error message is on the display after
you have installed ink cartridges, check that the ink cartridges are
installed correctly.
188
CHAPTER TWENTY
21
C H A P T E R
T W E N T Y - O N E
Specifications
Fax Specifications
Compatibility
ITU-T Group 3
Coding system
MH/MR/MMR
Modem speed
14400/12000/9600/7200/4800/2400; Automatic Fallback
Document input width
70 mm to 216 mm
Document input length
127 mm to 356 mm
Scanning/Printing width
208 mm
Paper Cassette
200 Sheets (75 g/m2)
Printer type
Ink Jet
Grey scale
256 levels (Error Diffusion)
Display
LCD, 16 characters x 2
Polling types
Standard, Secure, Delayed, Sequential
Contrast control
Automatic/Light/Dark (manual setting)
Resolution
• Horizontal 8 dot/mm
• Vertical Standard––3.85 line/mm
Fine, Photo––7.7 line/mm
Superfine, Photo (copy)––15.4 line/mm
Memory Capacity
2MB (up to 70 pages) (MFC-730)
4MB (up to 300 pages) (MFC-740)
One Touch Dial
12 x 2 stations
Speed Dial
56 stations (MFC-730)
100 stations (MFC-740)
Automatic redial
4 times at 2 minute intervals
189
190
C H A P T E R T W E N T Y- O N E
Speaker type
Full Duplex (Only for MFC-740)
Auto answer
1, 2, 3 or 4 rings
Communication source
Public switched telephone network
Operating environment
10-35°C (50-95°F)
Best Print Quality
20-33°C (68-91°F)
Power source
220 ~ 240V AC 50/60 Hz
Power consumpion
Standby: under 6 watts
Peak: under 75 watts
Dimensions
540 x 390 x 247 (mm)
Weight
9kg
* “Pages” refers to the “Brother Standard Chart No. 1” (a typical business letter, Standard
resolution). Specifications and printed materials are subject to change for improvement
without prior notice.
Printer Specifications
Printing
Print method
Piezo with 64 x 4 nozzles
Resolution
Monochrome/Colour Printing:
1440 x 720 dots per inch (DPI)
720 x 720 dots per inch (DPI)
360 x 360 dots per inch (DPI)
360 x 180 dots per inch (DPI)
Print speed
up to 6 pages / minute (Mono)
up to 4 pages /minute (Colour)
Print width
203.2 mm (8 inches)
Resident fonts
Bitmap fonts
■ Roman 10, 12, 15, PS
Disk-based fonts
35 (Only for MFC-740)
S P E C I F I C AT I O N S
Controller
Emulations
GDI/EPSON ESC/P (LQ-510, LQ-850, LQ2550)
Interface
A shielded cable to IEEE 1284 (bi-directional)
specification less than 2 m (6.5 feet) long
should be used.
Print Media
Paper input
Automatic loading from the Feeder or manual
loading from the Manual Feed Slot
■ Paper type:
Plain paper, coated paper, glossy paper,
transparancies, organizer paper and
envelopes.
■ Paper size:
A4, A5, B5, Letter, Legal Executive,
envelopes (commercial No. 10, DL, C4,
C5) organizer (J, K, L) organizer J only
from the Manual Feed Slo
Width 70–216 mm (2.75–8.5")
Length 127–356 mm (5–14")
Weight 60–120 g/m2 (16–32 lb)
■ Maximum feeder capacity: Approx. 200
sheets of 75 g/m2 plain paper.
Paper output
Approximately 75 sheets of plain paper
(Face up print delivery to the paper output
tray)
It is recommended that printed sheets are
taken from the paper output tray immediately
after printing.
Ink
Black and 3 individual colour ink cartridges
separate from the print head
Service life of ink cartridge Approximately 750 pages/Black cartridge at
5% coverage
Approximately 400 pages/Colour cartridge at
5% coverage
191
192
C H A P T E R T W E N T Y- O N E
Compilation and Publication Notice
Under the supervision of Brother Industries Ltd., this manual has been
complied and published, covering the latest product’s descriptions and
specifications.
The contents of this manual and the specifications of this product are
subject to change without notice.
Brother reserves the right to make changes without notice in the
specifications and materials contained herein and shall not be responsible
for any damages (including consequential) caused by reliance on the
materials presented, including but not limited to typographical and other
errors relating to the publication.
Trademarks
Multi-Function Link Pro is a trademark of Brother Industries, Ltd.
Brother is a registered trademark of Brother Industries, Ltd.
Windows is a registered trademark of Microsoft in the U.S. and other
countries.
MS-DOS is a registered trademark of Microsoft in the U.S. and other
companies.
Each company whose software title is mentioned in this manual has a
Software License Agreement specific to its proprietary programs.
The brother logo is a registered trademark of Brother Industries, Ltd.
Epson is a registered trademark and LQ-510, LQ-850 and LQ-2550 are
trademarks of Seiko Epson Corporation.
IBM, IBM PC and Proprinter are registered trademarks of International
Business Machines Corporation.
All other brand and product names mentioned in this User’s Guide are
registered trademarks of their respective companies.
193
Glossary
ADF (Automatic Document Feeder Capacity) Refers to the number of
pages that can be placed in the document feeder and fed one at a time
automatically.
Automatic Fax Transmission Sending a fax without picking up the
handset or pressing Speaker Phone.
Automatic Redial A feature that enables your fax machine to redial the
last fax number if the original fax did not go through because the line
was busy or there was no answer.
Backup Print Sets your MFC to print a copy of faxes that are received
and stored in memory.
Beeper The sound the keys make when they are pressed, an error occurs
or a document has been received or transmitted.
Beeper Volume Volume setting for the beep when you press a key or
make an error.
Brightness Changing the Brightness makes the whole image lighter or
darker.
Broadcasting The ability to send the same fax message to more than
one location.
Call Back Message Allows you to send a fax and then leave a message
for the other party to call you back.
Call Reservation Allows you send a fax and then at the end of
transmission, you can talk with the other party.
Caller ID A service purchased from the Telephone Company that lets
you see the number (or name) of the party calling you.
Cancel Job Cancels a programmed job, like Delayed Fax or Polling.
CNG tones The special tones (beeps) sent by fax machines during
automatic transmission to tell the receiving machine that they are
from a fax machine.
COMM. ERROR (Communication error) An error during fax
sending or receiving, usually caused by line noise or static.
Coding Method Method of coding the information contained in a
document. All fax machines must use a minimum standard of
Modified Huffman (MH). Your fax machine is capable of greater
compression method, Modified Read (MR) and Modified Modified
Read (MMR), if the receiving machine has the same capability.
194
GLOSSARY
Compatibility Group The ability of one fax unit to communicate with
another. Compatibility is assured between ITU-T Group.
Contrast Setting to compensate for dark or light documents, by
lightening dark documents or darkening light documents.
Cover Page Prints a page at the other party’s machine, that contains the
sender and recipient’s name and fax number, number of pages and
comment. You can generate an electronic cover page at the other end
with pre-programmed information from memory or you can print a
sample cover page to fax with your document.
Cover Page Message The comment that is on the Cover Page. This is a
programmable feature.
Delayed Transmission Sends your fax at a later time that day.
Dual Access Your machine can scan outgoing faxes or scheduled jobs
into memory at the same time it is sending a fax or receiving or
printing an incoming fax.
ECM (Error Correction Mode) Detects errors during fax transmission
and resends the parts of the document that had errors.
Electronic Cover Page A preprogrammed cover page that is transmitted
from the fax machine’s memory, eliminating the need for making up
cover pages manually.
Extension Phone A telephone on the fax number that is plugged into a
separate wall jack.
External Phone A TAD (telephone answering device) or telephone that
is plugged into the socket on the telephone line cord of your MFC.
F/T Ring Time The length of time the MFC rings (when the answer
mode setting is Fax/Tel) to notify you to pick up a voice call that has
been automatically answered.
Fax/Tel mode You can receive faxes and telephone calls. Do not use
Fax/Tel if you are using an external answering machine.
Fax Forwarding Sends a fax received in memory to another
preprogrammed fax number.
fax tones The signals sent by sending and receiving fax machines while
communicating information.
Fine Mode Resolution is 196 x 203 dpi. It is used for small print and
graphs.
Function Mode The programming mode for changing the setting of
your MFC.
grey scale The shades of grey available for copying and faxing
photographs.
group number A combination of One Touch and/or Speed Dial numbers
that are stored on a One Touch Dial key for Broadcasting.
GLOSSARY
ICM (incoming message) A recorded voice message received into an
external answering machine or the MFC-740’s digital Message
Manager.
Ink Management button Cleans the print head and / or resets the ink
dot counter after replacing an ink cartridge.
Interrupt Temporarily puts a waiting job on hold while you perform
another operation.
Journal Lists information about the last 50 incoming and outgoing
faxes. TX means Transmit. RX means Receive.
Journal Period The preprogrammed time period between automatically
printed Journal Reports. You can print Journal on demand without
interrupting this cycle.
LCD (Liquid crystal display) The display screen on the MFC that
shows interactive messages during On-Screen Programming and
defaults to the date and time when the machine is idle.
manual fax When you press Speaker Phone ––OR–– lift the MFC’s/
external telephone’s handset so you can hear the receiving fax
machine answer before you press Start to begin transmission.
Memory Status List Shows how much memory is being used, how
much is left, and the type of messages in memory.
Memory usage Instructs the MFC how to allocate the memory.
Message Manager (Only for MFC-740) The Message Manager is an
electronic messaging facility for faxes and voice mail. Callers can
send you faxes or leave voice messages for you, and you can retrieve
these from a remote location.
OGM (Outgoing Message) The message callers hear when you call
your Message Manager (MFC-740) or external answering machine.
One Touch Dial Keys on the MFC control panel where you can store
numbers for easy dialling. You must use a separate key for each
number.
Out of Paper Reception Receives faxes into the MFC’s memory when
the machine is out of paper.
Overseas Mode Makes temporary changes to the fax tones to
accommodate noise and static on overseas phone lines.
Paging (Only for MFC-740) Enables your MFC to call a programmed
phone number and play a pre-recorded message when a fax and/or a
voice message is received into its memory.
Pause Allows you to place a 3.5 second delay in the dialling sequence
stored.
Photo Mode A resolution setting that uses varying shades of grey for
the best representation of photographs.
195
196
GLOSSARY
Polling The process of a fax machine calling another fax machine to
retrieve waiting fax messages.
Pulse A form of dialling on a telephone line.
Print reduction reduces the size of incoming faxes.
Quick-Dial List A listing of names and numbers stored in One Touch
and Speed Dial memory, in numerical order.
Real Time transmission When memory is full, you can send documents
in real time.
Remaining Jobs You can check which jobs are waiting in memory and
cancel jobs individually.
Remote access The ability to access your MFC remotely from a touch
tone phone.
Remote activation allows you to transfer a fax call, answered at an
extension phone, to the MFC.
Remote access code The four-digit code that allows you to call and
access your MFC from a remote location.
Resolution The number of vertical and horizontal lines per inch. See:
Standard, Fine, Super Fine, Photo.
Ring Delay The number of telephone rings before the MFC answers a
call in F/T or Fax mode.
Ring Volume Volume setting for the fax machine’s ring.
Scanning The process of sending an electronic image of an original
paper document into your computer.
Speaker Volume You can set the volume when your machine is on
hook.
Speed dial A preprogrammed number for easy dialling. You must press
the Speed dial key and then two digit code to start the dialling
process.
Standard resolution 98 x 203 dpi. It is used for regular size text and
quickest transmission.
Station ID The stored information that appears on the top of faxed
pages. It includes the sender’s name and fax number.
Super fine resolution 392 x 203 dpi. Best for very small print and line
art.
System Setup List A printed report that shows the current setting of
your machine.
Tel-Index An electronic, alphabetical listing of stored One Touch, Speed
Dial and Group numbers.
Temporary Setting You can select certain options for each fax
transmission without changing the default settings.
GLOSSARY
Timer A feature that lets you program a fax to go out at a certain time,
such as Delayed Fax or Delayed Polling Receive.
Toll Saver (Only for MFC-740) A Message Manager setting that allows
the MFC to answer after two ring when a message(s) was received
and after four rings when there are no messages. The caller can hang
up (after two rings) without paying for the call if there are no
messages to retrieve.
Tone A form of dialling on the telephone line used for Touch Tone
telephones.
Transmission The process of sending documents over the phone lines
from your MFC to the receiving fax machine.
Xmit Report (Transmission Report) A listing of each transmission,
showing caller ID, date, time, and number of pages.
197
198
GLOSSARY
199
Index
A
Activation Code ........................................ 49
Alternating Displays ................................. 30
Answer Mode ........................................... 43
Answering Machine ............................ 23, 99
Assembly .................................................. 11
Automatic Transmission ........................... 61
B
Backup Printing ...................................... 105
Beeper Volume .......................................... 39
Bi-Directional Printing ........................... 163
Bi-directional Printing .................... 120, 179
Brightness ................................................. 91
Broadcasting (Set Up Group) ................... 75
Brother Drivers ....................................... 141
C
Call Back Message (Print) ........................ 67
Call Reservation ....................................... 66
Call Screening ........................................ 107
Caller ID ................................................... 51
Caller ID (Call Replay) ............................ 53
Caller ID (Clearing) .................................. 55
Caller ID (Printing Lists) .......................... 55
Caller ID (Set) .......................................... 51
Cancelling Job .......................................... 71
Cassette Capacity ...................................... 26
Chain Dialling .......................................... 79
CHECK PAPER ..................................... 169
Cleaning .................................................. 183
Cleaning (Print Head) ............................. 177
Cleaning Tab ........................................... 163
Coated Paper ............................................. 25
Collate ..................................................... 156
Colour Adjustment .................................... 96
COMM. ERROR .................................... 169
Computer Requirements ......................... 137
Connect (External Telephone Answering
Machine) ................................................... 23
Connect (External Telephone) .................. 24
Connect (Power Cord) .............................. 11
Connect (Telephone line cord) ................. 12
Connecting (Computer) .......................... 135
Connections ................................................ 9
Contrast ..................................................... 60
Control Panel .......................................... 4, 6
Control/Maintenance Tab ....................... 162
Controller ................................................ 191
COOLING DOWN ................................. 169
Copies (Printing) .................................... 156
Copy (Enlarging) ...................................... 89
Copy (Multiple) ........................................ 88
Copy (One Page) ...................................... 87
Copy (Reducing) ...................................... 89
Copy (Single Colour) ............................... 97
Copy Brightness ....................................... 96
Copy Contrast ........................................... 96
Copy Operations ....................................... 87
Copy Quality ...................................... 89, 95
Copy Quality (Default Settings) ............... 92
corrections ................................................ 38
COVER OPEN ....................................... 169
Cover Page ................................................ 63
Cover Page (composing) .......................... 63
Cover Page Message ................................. 65
200
INDEX
D
Date and Time ........................................... 35
Deactivation Code .................................... 49
Dialling Mode ........................................... 35
Document ............................................... 160
Document Jam ........................................ 170
Document Tray ......................................... 14
Document Wire Extension ........................ 13
Documents (Size) ..................................... 59
DOS ........................................................ 144
Drivers .................................................... 137
Dual Access .............................................. 61
Dust Cover ................................................ 16
Flexible memory settings ........................ 100
Full-Duplex Digital Speakerphone ........... 77
Function Mode .......................................... 29
Function Selection Table .......................... 30
G
Glossy Paper ............................................. 25
Grey scale ............................................... 189
H
Halftone .................................................. 161
Help ............................................................ 1
Hold ............................................................ 5
E
I
ECM (Error Correction Mode) ................... 3
Entering Text ............................................ 38
Envelopes ................................................ 118
Erasing Messages ................................... 105
Error Messages ....................................... 169
Extension Telephone ................................. 49
Extension Telephones ............................... 22
External Telephone ................................... 49
External Telephone Answering Device
(TAD) ........................................................ 23
ICM Recording Monitor ......................... 107
Important Safety Instructions ................. 165
Ink Cartridges ................................... 17, 184
Ink Management Key ............................. 120
Inserting Spaces ........................................ 38
International Calls .................................... 66
Interrupting ......................................... 70, 72
F
F/T (FAX/TEL) Mode .............................. 43
F/T (Fax/Tel) Ring Time ........................... 45
F/T Ring Time .......................................... 49
Fax Detect ................................................. 46
Fax Forwarding ................................. 81, 108
Fax Forwarding (Changing Number)
(MFC 740) ............................................. 112
Fax Mode ............................................ 43, 44
Fax Redial ................................................. 61
Fax Storage (MFC 730) ........................... 82
Fax Tones and Handshake .......................... 2
Fax/Tel Mode ............................................ 80
Feeder ..................................................... 155
Fine (Resolution) ...................................... 60
J
Job Status .................................................. 71
JOURNAL .............................................. 131
Journal Period ......................................... 132
L
Legal Limitations ...................................... 98
Loading Paper ........................................... 15
M
Maintenance ........................... 163, 169, 183
Manual Dialling ........................................ 77
Manual Feed Slot ............................. 118, 155
Manual Mode ...................................... 43, 44
Manual Transmission ................................ 61
Maximum Message Time ....................... 106
Media ...................................................... 158
Memory Board ........................................ 147
INDEX
MEMORY FULL ................................... 170
Memory Full Message .............................. 97
MEMORY STATUS ............................... 131
Memory Status List ................................ 112
Memory Storage ....................................... 41
Message Indicator ................................... 103
Message Manager Mode ........................... 99
Message Store ......................................... 100
Monitor Calibration ................................ 163
Multi-Line Connections ............................ 21
Multi-purpose Sheet Feeder ............. 13, 116
Multiple Resolution Transmission ............ 69
Mute .......................................................... 78
N
NO RESPONSE/BUSY .......................... 170
NOT ASSIGNED.................................... 170
O
On Hook Dialling ..................................... 79
On-Screen Programming .......................... 29
On/Off Line Key ..................................... 119
One Touch Dial (Changing)...................... 75
One Touch Dial (Storing) ......................... 73
One Touch Dialling................................... 78
Optional Memory ................................... 147
Outgoing Message .................................... 24
Outgoing Message (Erasing) .................. 102
Outgoing Message (Listening) ............... 102
Outgoing Message (Recording) .............. 101
Overseas Mode ......................................... 66
201
Paper Source ........................................... 155
Paper Specifications ................................. 26
Paper Tab ................................................ 153
Paper Tray ................................................. 14
Paper Type .................................... 26, 91, 94
Pause ......................................................... 78
PC Printing ............................................. 151
Photo (Resolution) .................................... 60
Pick-up Roller ......................................... 184
Plastic Extension ...................................... 14
Polling (Receive) ...................................... 55
Polling (Transmit) ..................................... 70
Print (Fax in Memory) (MFC 730) ........... 50
Print a Report .......................................... 132
Print Area .................................................. 27
Print Media ............................................. 191
Print Quality ........................................... 176
Printer ..................................................... 115
Printer Adjustment Tab ........................... 164
Printer Driver .................................. 116, 138
PRINTER JAM ....................................... 170
Printer Jam .............................................. 171
Printer Operation .................................... 119
Printer Platen .......................................... 183
Printing a Fax Message ........................... 104
Priority Key ............................................ 120
Product Description ................................ 189
Q
Quality .................................................... 158
Quality/Colour Tab ................................. 157
QUICK-DIAL (list) ................................ 131
P
PABX ........................................................ 39
Packing and Shipping ............................. 180
Packing List ................................................ 9
Paging ..................................................... 108
Paper ......................................................... 25
Paper (Loading) ................................ 15, 117
Paper Jam ................................................ 171
Paper Size ......................................... 26, 154
R
Real Time Transmission ........................... 62
Reception into Memory ............................ 48
Recording a Conversation ....................... 107
Recording a Memo ................................. 107
Reduction (Printing) ................................. 47
Remote Access Code ................... 82, 83, 110
Remote Code (changing) .......................... 50
202
INDEX
Remote Commands .......................... 83, 111
Remote Retrieval .............................. 83, 109
Reports .................................................... 131
Reset Key ................................................ 120
Resolution ................................................. 60
Resolution (Multiple) ............................... 69
Reverse Order ......................................... 156
Ring Delay ................................................ 45
Ring Volume ............................................. 41
Ringer Equivalence Number ..................... 21
S
Safety Instructions .................................. 165
Scaling .................................................... 155
Scroll ......................................................... 29
Setup ........................................................... 9
Simultaneous Printing/Fax ..................... 119
Software .................................................. 137
SORTING ................................................. 88
Speaker Phone .......................................... 80
Speaker Volume ........................................ 40
Special characters ..................................... 38
Specifications .......................................... 189
Speed Dial ................................................ 74
Speed Dial (Changing) ............................. 75
Speed Dialling .......................................... 78
STACKED ................................................ 88
Standard (Resolution) ............................... 60
Station ID .................................................. 36
Storing telephone number ......................... 73
Super Fine (Resolution) ............................ 60
SYSTEM SETUP ................................... 131
T
TAD .......................................................... 44
TAD Message (Recording) ..................... 101
Tel Key ...................................................... 80
TEL. INDEX .......................................... 131
Telephone Index ....................................... 79
Toll Saver ................................................ 106
Tone/Pulse .......................................... 35, 80
Trademarks ............................................. 192
Transmission Verification (Xmit) Report 132
Transparencies .......................................... 25
Troubleshooting ...................................... 169
Type of Original ........................................ 95
V
Vertical Black Lines ............................... 175
Video Printing ......................................... 121
Video Printing (Black & White) ............. 123
Video Printing (Brightness) ............ 125, 129
Video Printing (Changing Default Settings) .
............................................................ 125
Video Printing (Colour Adjustment) ...... 128
Video Printing (Colour) .......................... 122
Video Printing (Paper Type) ................... 124
Video Printing (Setting Paper Type) ....... 126
Video Printing (Setting Print Size) ......... 128
Video Printing (Setting Quality) ............. 127
Video Printing (Setting Video Type)....... 127
Voice Calls ................................................ 77
Voice Messages (Playing) ....................... 104
W
WARMING UP ...................................... 170
X
XMIT REPORT ...................................... 131
203
REMOTE CONTROL ACCESS CARD
Change Answer Mode
(For MFC-730) ➔
Press 9 8
then for TAD, press 1.
Fax/Tel (F/T), press 2.
Fax, press 3.
Using Remote Access Code
1 Dial your machine phone number from a
Exit Remote Operation
Press 9 0.
Change Remote Access Code
1 Press Menu, 1, 8, 3.
2 Enter the 3-digit number. The
(For MFC-740)
➔
changed.
3 Press Set.
4 Press Stop to exit.
cannot be
4
touch tone phone.
2 Enter your Remote Control Access Code
(159 ) after the beep.
3 Your machine signals the kinds of messages
received:
1 long beep — Fax message(s)
No beeps — no messages
4 After 2 short beeps, enter a command.
5 Press 9 0 to reset your machine when you
finish.
6 Hang up.
1
MESSAGE MANAGER
REMOTE CONTROL ACCESS CARD
Retrieve all faxes press 2, then
enter the number of remote fax
machine, and then # #. After the
beep, hang up and wait.
Erase all fax messages press 3.
Using Remote Access Code
1 Dial your MFC phone number from a
Check Receiving Status
touch tone phone.
2 Enter your Remote Control Access Code
(159 ) after the beep.
3 The MFC signals the kinds of messages
received:
1 long beep — Fax message(s)
2 long beeps — Voice message(s)
3 long beeps — Fax and Voice message(s)
No beeps — no messages
4 After 2 short beeps, enter a command.
5 Press 9 0 to reset the MFC when you
finish.
6 Hang up.
Press 9 7
then for Fax message, press 1.
Voice message, press 2.
1 long beep — received messages
3 short beeps — no messages
Change Answer Mode
Press 9 8
then for Message Manager (TAD mode),
press 1.
Fax/Telephone (F/T), press 2.
Fax Only, press 3.
Exit Remote Operation
Press 9 0.
5
6
1
204
Retrieve a Fax
Remote Commands
Change Fax Forwarding Setting
Press 9 5
then to Turn feature off press 1.
Enter Fax Forwarding press 2.
Program Fax Forward Number press
4. Enter the new number of the remote
fax machine where you want your fax
message forwarded and then press # #.
Press 9 6 1 after two short beeps, then
enter the number of remote fax
machine, and then # # to retrieve
Memory Status List.
Turn Fax Storage on press 6.
Turn Fax Storage off press 7.
2
Press 9 6
then to Print a Memory Status List press 1,
then enter the number of remote fax
machine, and then # #. After the beep,
hang up and wait.
Retrieve all faxes press 2, then enter the
number of remote fax machine, and
then # #. After the beep, hang up and
wait.
Erase all fax messages press 3.
Check the Receiving Status
Press 9 7 1.
1 long beep — Fax message(s)
3 short beeps — no messages
3
Changing Remote Access Code
Erase All Messages
Change Paging/Fax Forwarding Setting
1 Press Menu, 1, 8, 7.
2 Enter a three-digit number from 000 to
Press 9 3. If you hear three beeps, all
messages have not yet been heard, and the
messages will not be erased.
Press 9 5
then to Turn feature off press 1.
Enter Fax Forwarding press 2.
Enter Paging press 3.
Program Fax Forward Number
press 4.
Enter the new number of the
remote fax machine where you
want your fax messages
forwarded and then press ##.
Press 9 6 1 after two short beeps,
then enter the number of remote
fax machine, and then # # to
retrieve Memory Status List.
998. The cannot be used.
3 Press Set.
4 Press Stop to exit.
Play/Record Outgoing Message
Press 9 4
then to Play Message Manager OGM
press 1 1.
Play F/T OGM press 1 2.
Play Paging OGM press 1 3.
Record new Message Manager
OGM press 2 1, then speak after
beep. Press 9 to stop.
Record new F/T OGM press 2 2,
then speak after beep. Press 9 to
stop.
Record new Paging OGM press 2
3, then speak after beep. Press 9
to stop.
Remote Commands
Listen to Voice Messages
Press 9 1
then to Repeat a message press 1.
Skip to next message press 2.
Stop playing the message press 9.
Record a Memo
Press 9 2.
Wait for the beep, then speak.
then to Stop recording — Press 9.
2
Retrieve a Fax
Press 9 6
then to Print a Memory Status List press
1, then enter the number of
remote fax machine, and then # #.
After the beep, hang up and wait.
3
4
Declaration of Conformity
We
Brother International Europe Ltd.
Brother House,
1, Tame Street,
Audenshaw,
Manchester, M34 5JE
United Kingdom
declare that this product is in conformity with the following normative
documents:
Safety: EN 60950 : 1993
EMC: EN55022 1987 Class B
EN50082-1:1992
following the provisions of the Low Voltage Directive 73/23/EEC and the
Electromagnetic Compatibility Directive 89/336/EEC (as amended by 91/
263/EEC and 92/31/EEC)
®
This machine is approved for use in the country of purchase only, local
Brother companies or their dealers will only support fax machines purchased
in their own countries.
* Manufactured by Brother Industries Ltd., whose quality system
is registered by BSI and JQA.
BSI Certificate of registration No. FM27214
JQA Certificate of registration No. JQA-0367
UK
UU13620043
PRINTED IN JAPAN