1
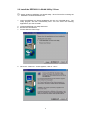
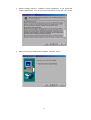
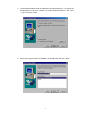
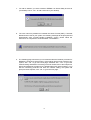
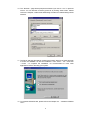
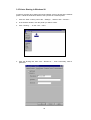
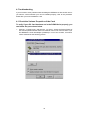
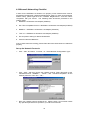
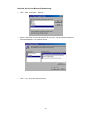
IEEE 802.11b WLAN PC Card
User’s Guide
Version: 1.3 — August 2001
Please install the Utility/Driver first before inserting the
PCMCIA Card.
FCC Class B Radio Frequency
Interference Statement
The manufacturer is not responsible for any radio or television interference caused by
unauthorized modification of this device or the substitution or attachment of connecting cables
and equipment other than specified. The correction of interference caused by such
unauthorized modification, substitution or attachment will be the responsibility of the user.
Built-in antennas, whether installed indoors or out, should be installed only by experienced
antenna installation professionals who are familiar with local building and safety codes and,
wherever applicable, are licensed by the appropriate government regulatory authorities.
FCC Radiation Exposure Statement
This equipment complies with FCC radiation exposure limits set forth for an uncontrolled
environment.
This equipment should be installed and operated with minimum distance 20cm between the
radiator & your body.
USA – Federal Communications Commission (FCC)
This equipment has been tested and found to comply with the limits for Class B Digital
Devices, pursuant to Part 15 of the FCC Rules. These limits are designed to provide
reasonable protection against harmful interference in a residential installation. This
equipment generates, uses and can radiate radio frequency energy and, if not
installed and used in accordance with the instruction, may cause harmful interference
to radio communications, However, there is no guarantee that interference will not
occur in a particular installation. If this equipment does cause harmful interference to
radio or television reception, which can be determined by turning the equipment off
and on, the user is encouraged to try to correct the interference by one or more of the
following measures:
-
Reorient or relocate the receiving antenna
-
Increase the separation between the equipment and the receiver
-
Connect the equipment into an outlet on a circuit different from that to which the
receiver is connected.
-
Consult the dealer or an experienced radio/TV technician for help.
Canada – Industry Canada (IC)
This class B digital apparatus meets all requirements of the Canadian Interference
Causing Equipment Regulations.
EU Declaration of Conformity (Europe)
PCMCIA Card conforms to the specifications listed below, following the provisions of
the Low Voltage Directive 73/23/EEC and the EMC Directive 89/336/EEC
Safety
EN60950/IEC950
EMC
EN55022/CISPR22 Class B
EN61000-3-2/EN61000-3-3
1
EN50082-1
Table of Contents
1. Introduction………………………………………………………………………..
3
2. Installation……………………………………………………………………….…
4
2.1 Overview………………………………………………………………….…..
4
2.2 Install the IEEE802.11b WLAN Utility/Driver…………………………….
5
2.3 Install the PCMCIA Card……………………………………………………… 14
2.4 Utility Startup Configuration……………………………………………..
15
2.4.1 Set Basic Parameters………………………………………………
15
2.4.1.1 Basic Setting for Infrastructure Mode……….………….
15
2.4.1.2 Basic Setting for 802.11 Ad Hoc Mode………………….
16
2.4.1.3 Basic Setting for Ad Hoc Mode………………………….
17
2.4.2 Advanced Settings…………………………………………………..
18
2.4.2.1 Configuration………………………………………………..
18
2.4.2.2 Wired Equivalent Privacy…………………………………
18
2.4.2.3 Country……………………………………………………….
19
2.5 How to Use Your Card……………………………………………………..
20
2.5.1 Wireless LAN Neighborhood………………………………………
20
2.5.1.1 Link Information…………………………………………….
21
2.5.1.2 About………………………………………………………….
21
2.5.2 Remove Your PC Card………………………………………………
22
2.5.3 Uninstall the IEEE802.11b WLAN Utility/Driver…………………
23
3. Application………………………………………………………………………..
26
3.1 File Sharing in Microsoft Windows 98………………………………….
26
3.2 Printer Sharing in Windows 98…………………………………………..
28
3.3 Using the Shared Folder…………………………………………………..
29
3.4 Using the Shared Network Printer………………………………………
29
4. Troubleshooting………………………………………………………………….
30
4.1 Check the Various Properties of the Card……………………………..
30
4.2 Microsoft Networking Checklist…………………………………………
32
4.3 Others………………………………………………………………………...
34
2
1. Introduction
Thank you for purchasing our IEEE802.11b WLAN PCMCIA Card. It will be
interoperable among IEEE 802.11b standard compliant products from other
manufacturers and allows you to build a wireless LAN. Besides, you can use your PC
to connect with an access point wirelessly to share the wired network resources. After
installing IEEE802.11b WLAN PCMCIA Card, you can:
a. Share your Internet access by using just one connection
b. Share printers and other peripheral devices
c. Share data and image files between networked PCs
d. Play multi-player games
IEEE802.11b WLAN can wirelessly transmit and receive data, minimizing the need
for wired connections, at a speed of up to eleven megabit per second. With
IEEE802.11b WLAN, you can locate your PC wherever you want without wires and
cables.
IEEE802.11b WLAN provide LAN users with great mobility, which are not available
under wired network, for real-time information access at anywhere within a
reasonable distance.
The IEEE802.11b WLAN configuration is easy to change from peer-to-peer networks,
suitable for a small number of users, to full infrastructure networks of thousands of
users that allow roaming around a broad area.
Please read this manual to get familiar with the IEEE802.11b WLAN. This manual
contains detailed instructions in operation of this product. Please keep this manual
for future reference.
Kit Contents
The IEEE802.11b WLAN PC Card kit includes the following items:
a. A PCMCIA Card
b. A CD includes: IEEE802.11b WLAN Utility & Driver software, Acrobat Reader 4.0
and user manual PDF file.
c. The User’s Manual (this document)
d. Quick Start Guide
To use friendly, click the Start Menu, choose Programs –> IEEE802.11b WLAN Utility,
and click User Manual for real time instructions after IEEE802.11b WLAN Driver &
Utility installation completed.
3
2. Installation
2.1 Overview
In this chapter we will cover how to install the IEEE802.11b WLAN PCMCIA Card.
To establish your wireless network connection, the following steps should be
executed.
1. Install the software by using the installation CD
2. Install the wireless LAN card.
3. Install the required network protocols to communicate with your network. Most
likely, you will need the TCP / IP protocol.
The product is designed to operate in Windows 98SE, Windows Me, Windows NT4.0
with Service Pack 3 or later and Windows 2000. And the installation procedure is
about the same. Please follow up the installation wizard that provided by your system
to install the software. The example here is based on Window 98SE.
4
2.2 Install the IEEE802.11b WLAN Utility / Driver
Please install the IEEE802.11b WLAN Utility / Driver first before inserting the
IEEE802.11b WLAN PCMCIA Card.
1. Insert the IEEE802.11b WLAN installation CD into your CD-ROM drive. The
setup program will then automatically start. You can select the following
applications you want to install.
a. Install the IEEE802.11b Utility and Driver.
b. Browse the User Manual.
c. Product Service Home Page.
2. When the “ Welcome ” screen appears, click on ” Next ”.
5
3. Please carefully read the “ Software License Agreement“. If you accept the
contract, please click “ Yes “ to move to the next screen. If not, click “ No “ to exit.
4. Please choose your wireless device adapter, and click “ Next “.
6
5. The default destination folder is displayed in the setup dialog box. To change the
default folder you can click “ Browse “ to set the destination folder or click “ Next
“ to go to the next screen.
6. Select the Program Folder for IEEE802.11b WLAN Utility and click “ Next “.
7
7. You will be asked if you want to add an IEEE802.11b WLAN Utility shortcut to
your desktop. Click “ Yes “ to add a shortcut to your desktop.
8. The user manual is published in Portable Document Format (PDF). If Acrobat
Reader doesn’t exist in your system, the following message will be prompted and
automatically enter Acrobat Reader installation screen, please follow the
instructions to complete the Acrobat Reader 4.0 installation.
9. The following page will remind you to install the Microsoft network protocols for
IEEE802.11b WLAN to work properly. If the network protocol has existed in your
system, click “ No “ to go to the next page, otherwise click “ Yes “ to go to the
network setting and add the necessary protocols. Please refer to the Chapter 4.2
Microsoft Networking Checklist for the detailed Microsoft network setting. If you
add the necessary protocols and finish the network setting, the system will
prompt a reboot request, click “ No “ to go to the next page.
8
10. The “ Network “ page will be prompted as follows if you click on “ Yes ” in previous
screen. You can add the necessary protocols by clicking “Add” button. Please
refer to the Chapter 4.2 Microsoft Networking Checklist for related settings about
Network.
11. The Driver and Help files will be copied to the system. Wait for the setup program
to finish the IEEE802.11b WLAN installation. Then select ” Yes “ and click
“ Finish “ to complete the installation. It’s recommended to close other
applications before rebooting your system.
12. To install the PCMCIA card, please refer to the Chapter 2.3. “ Install the PCMCIA
card. “
9
Additional Note for Windows NT4.0
The installation procedure under Windows NT4.0 will be a little different from
Windows 98 shown below. It will be change after step10 refer to the installation of
Windows 98.
2. Click “ OK “ and system will auto-select I/O address and IRQ and remind
you to choose the unused I/O address and IRQ from Windows NT
Diagnosis to prevent system resource conflict.
3. If the Ndis 3.0 packet driver has already existed in your system, the setup
message will be prompted as follows, just click “ OK “ .
4. A prompt of networking setting will appear as follows. It’s the same as
Windows 98 operating system.
10
5. The Network properties page will appear automatically in the screen if you
click “ Yes “ in the last step. You should choose “ AWLAN 11 Mb
IEEE802.11b Adapter “ in the Network Adapter of upper menu and add
necessary protocols, then click OK.
6. The Microsoft TCP/IP setting page will be prompted. You can use DHCP or
manual set the IP address. The related Microsoft Networking setting is like
Windows 98.
7. Click “ Yes “ and insert IEEE802.11b WLAN PC card before system reboot.
11
Additional Note for Windows 2000 to install the Packet Protocol
You should add Packet Protocol under Windows 2000. If the Packet Protocol doesn’t
exist in your system, the installation procedure will be a little different from Windows
98. A message will be prompted to guide you to auto-install Packet Protocol. Follow
the on–screen instructions as listed below to complete the IEEE802.11b WLAN Utility
and driver installation.
1. Please insert IEEE 802.11b Wireless Adapter (refer to the Chapter 2.3). If the
adapter installation is completed, click on “ Yes “.
2. If your wireless adapter installed successfully, you will enter “ Packet Protocol Auto
Installation “ frame, click on “ OK “ and system will auto-install the Packet
Protocol.
12
3. If Packet Protocol installed successfully, you have to reboot your system and the
IEEE802.11b Utility / Driver installation under Windows 2000 is complete.
4. If the Packet Protocol installation has failed, the message will be prompted as
follows. Click “ OK “ to continue to the next step.
5. System will give you an on-screen instruction as follows to install the Packet
Protocol. Remember and follow the procedure to complete the Packet Protocol
installation and then click “ OK “.
13
2.3 Install the PCMCIA card
The IEEE802.11b WLAN driver and utilities are included on the accompanying
installation CD. Please follow the installation procedures in Chapter 2.2. (Your
PCMCIA card will not work properly if the driver and utilities are not installed
correctly.)
Make sure that there is an empty PCMCIA slot for IEEE802.11b WLAN PC card.
Install the IEEE802.11b WLAN Utility / Driver first before inserting the PCMCIA
card.
1. Insert the PCMCIA Card and then the system will automatically start.
If you’re asked to insert a “ Windows 98 CD-ROM “ during the installation, insert
your “ Windows 98 CD-ROM “ and click “ Yes “. Once the setup task is
completed, the “ Microsoft Internet Explorer “ should start up. Please close it.
2.
When the PCMCIA card setup task is completed, you can start up the IEEE
802.11b WLAN Utility. To start up the utility, please refer to the Chapter 2.4
“ Utility Start up Configuration “.
14
2.4 Utility Startup Configuration
IEEE802.11b WLAN PCMCIA Card has its own management software. Users can
control all functions provided by the application named IEEE802.11b WLAN Utility.
The Utility icon will appear in the working bar by clicking the IEEE802.11b WLAN
Utility shortcut on your desktop.
The definition of the color of the Utility icon is as follows:
Connected (Green)
Low quality (Yellow)
Disconnected (Red)
To open IEEE802.11b Utility, double-click the icon in the working bar.
2.4.1 Set Basic Parameters
2.4.1.1 Basic Setting for Infrastructure Mode
If you want to connect with Access Point, use IEEE802.11b Utility window to:
•
Select the Mode as ” Infrastructure”.
•
Select the correct SSID.
! SSID is the group name that will be shared by every member of your wireless
network .You will only be able to connect with an Access Point (AP), which
has the same SSID. Note that the SSID will be case sensitivity.
•
Channel: If the Mode is Infrastructure, this parameter will not be active.
15
2.4.1.2 Basic Setting for 802.11Ad Hoc Mode
If you have more stations and just want to set them as local network, use
IEEE802.11b Utility window to:
•
Select the Mode as ” 802.11 Ad Hoc”.
•
Select the correct SSID.
! Every member of your wireless peer-to-peer network will share SSID. Every
member of your peer-to-peer network must have the same SSID, which
should be case sensitivity.
•
Select the correct Channel
! Channel shows radio channel numbers used for networking. Channel
number must be the same between stations so that computers can
communicate in the local LAN. It can be changed only under the 802.11 Ad
Hoc Mode and Ad Hoc Mode.
You have to select both SSID and Channel. If you only select Channel, the
following warning message will come out.
If you are unable to connect with other brand of IEEE 802.11b device on 802.11
Ad Hoc mode, please try Ad Hoc mode. The next section will show the basic
setting of Ad Hoc mode.
16
2.4.1.3 Basic Setting for Ad Hoc Mode
If you have more stations and just want to set them as local network, you can also
select Ad Hoc Mode on your WLAN Utility. The procedure is as follows.
•
Select the Mode as ” Ad Hoc”.
•
Select the correct channel.
! Channel shows radio channel numbers used for networking. Channel
number must be the same between stations so that computers can
communicate in the local LAN. It can be changed only under the 802.11 Ad
Hoc Mode and Ad Hoc Mode.
17
2.4.2 Advanced Settings
Only if connected to an existing network advanced parameters can be specified for an
IEEE802.11b PCMCIA card. Consult your LAN Administrator for information about
whether these parameters apply to your situation.
Click “ Advanced Setting “ and then the following advanced setting about your
IEEE802.11b WLAN will be displayed.
2.4.2.1 Configuration
It displays the configuration items that you can change under the Ad Hoc Mode:
Power Save Mode, Ethernet Conversion and TX Rate (Data Transmission Rate). If
the mode is Infrastructure, The Tx Rate will be fixed in “ Fully Auto “ and users can’t
change it.
2.4.2.2 Wired Equivalent Privacy
The Wired Equivalent Privacy enables you to define the encryption keys that your
IEEE802.11b PCMCIA should use to:
•
Decrypt wireless messages received via the wireless interface.
•
Encrypt data that will be transmitted via the wireless interface.
You may desire an additional measure of security in your wireless network, which can
be achieved by using the Wired Equivalent Privacy (WEP).
If you would like to enable WEP, the system will prompt a message to suggest
that you contact with your network administrator.
18
! Caution:
WEP needs to be the same for all IEEE802.11b stations.
Follow the steps below to set your WEP:
(1) Select the data privacy algorithm you want (64 or 128 bit WEP type)
(2) Type Passphrase
(3) Click “ Generate “ to generate automatically the corresponding WEP key.
If select 64 bit WEP type, 4 sets of WEP key will be generated; if select
128 bit WEP type, only one set WEP key will be generated.
(4) Choose one key (under 64 bit WEP type)
(5) Click “ Write “ and then press “ OK “. WEP encrypts each frame
transmitted from the radio, using one of the keys entered from this panel.
(6) If you select “ Manual “, you can type the 64bit WEP key manually.
Especially note that all the blanks of WEP key have to be filled by manual
typing. Click on “ Clear “ you can clean away all the settings of Ecryption.
2.4.2.3 Country
Every country has different legal frequency range. Please choose proper country
setting. Under the infrastructure mode, the setting value will be determined by the
Access Point and can’t be set by users.
19
2.5 How to use your card
2.5.1 Wireless LAN Neighborhood
If you want to know connecting status in Infrastructure Mode or Ad Hoc Mode, choose
Wireless LAN Neighborhood in IEEE802.11b Utility window.
1. Infrastructure Mode:
•
The Access Point SSID and Access Point MAC will appear in the screen if you
choose the Infrastructure Mode. (Please refer to the Chapter 2.4.1.1 to set your
Infrastructure Mode)
•
Double-click the Access Point SSID (under the Infrastructure Mode) to access to
the Microsoft Network Neighborhood folder to find other on-line computers.
•
You can see the status of the Link Quality and Signal Strength under the Wireless
LAN Neighborhood.
2. 802.11 Ad Hoc Mode / Ad Hoc Mode:
•
Your Station Name and MAC Address will appear if you choose the 802.11Ad
Hoc Mode (or Ad Hoc Mode).
•
Double-click your Station Name will display the content of your computer or
double-click Network Neighbors to access to the Microsoft Network
Neighborhood folder to find other on-line computers.
•
Click “ Rescan “ if you don’t find any other station.
•
Clicking “ More “ will spread the following information about your network.
20
2.5.1.1 Link Information
The link information, including the Channel, Transmission Rate, Transmission State,
and Wireless IP Address are revealed here.
2.5.1.2 About
From this dialog box, you can get the details such as the MAC Address and the
Version Information of each software.
21
2.5.2 Remove your PCMCIA Card
If you do not need the wireless connectivity of your IEEE802.11b PCMCIA Card, you
can follow the procedures mentioned below to remove the PC Card from its slot.
! Caution:
•
When removing the IEEE802.11b PCMCIA Card you will lose your connection to
the network. Prior to removing the PC Card, make sure you have closed all files
and network applications (such as e-mail).
•
You are advised to always disable the PC Card prior to removing the card from
the PC Card slot, or the system may be hurt seriously.
To stop using the IEEE802.11b PCMCIA Card:
1. Double-click “My Computer” to find the “Control Panel”.
8. Double-click the” Control Panel” and then the “PC Card”.
9. Select IEEE802.11b PC Card and click “Stop “ icon.
10. Wait a few seconds until the operating system displays a pop-up message to
indicate you can safely remove the PC Card.
22
2.5.3 Uninstall the IEEE802.11b WLAN Utility / Driver
1. First you should remove the IEEE802.11b WLAN PC card. To safely remove your
PC card, we suggest you should follow the procedure below.
Click the Start Menu, choose Settings –> Control Panel, and click the PC Card
(PCMCIA) icon. You will enter the PC Card (PCMCIA) Properties page as follows,
choose “ IEEE802.11b Wireless LAN Adapter “ and then click “ Stop “ button to
disable the PCMCIA socket. Wait for a few seconds until a pop-up message: “ You
may safely remove the device “ displayed, then you may allow removing your PC
card.
Additional Note for Windows Me
If you use Windows Me operating system, you may double-click the “ Unplug or Eject
Hardware “ icon at the lower right side of the screen to enter the dialog box as follows.
You may choose the IEEE802.11b Wireless LAN Adapter from Hardware devices list
and then click “ Stop “ button to remove this device. The procedure is likely on
Windows98 operating system.
23
2. To exit the IEEE802.11b WLAN Utility, you should click the right bottom on the
Utility icon in the working bar and select “ Exit “.
3. To uninstall the IEEE802.11b WLAN Utility and Driver, you can move to Start –>
Programs –> IEEE802.11b WLAN Utility, and click on “ IEEE802.11b
Un-Installation “.
4. You will be asked if you want to uninstall the IEEE802.11b WLAN Utility and all of
its components. Click “ Yes “ to start to uninstall or click “ No “ to exit.
24
5. Now please click “Finish” to complete the un-installation.
Additional Note for Windows 2000
The following items should be noted:
1. Please don’t remove your PC card unless the IEEE802.11b WLAN un-installation
is completed.
2. Make sure to exit the IEEE802.11b WLAN Utility before uninstalling.
3. If you are sure to uninstall the IEEE802.11b WLAN Utility and Driver, the system
will give you a prompt as below to execute “ Device Manager “ to remove the
IEEE802.11b WLAN Adapter, and then click “ OK “.
4. System will give you a prompt as below while waiting for “ Device Manager “.
Follow the instruction to uninstall IEEE802.11b WLAN adapter.
25
3. Application
To enable the sharing of the Internet access, you should set your IEEE802.11b
WLAN mode as “ Infrastructure “ and connect to the access point (please refer to the
Chapter 2.4.1 “ Setting “). When the procedure is completed, an access point will
appear on the Wireless LAN Neighborhood of IEEE802.11b WLAN Utility. Doubleclick it to enter the Network Neighborhood folder. This folder contains the links to all
computers in your workgroup on the entire network.
3.1 File Sharing in Microsoft Windows 98
IEEE802.11b WLAN allows the sharing of files between computers that are logged
onto the same wireless network. Let’s assume that you want your folder “ My
Documents “ to be shared with other computers and the wireless network:
1. First, locate the folder “ My Documents “ and right-click it.
2. Select “ Sharing “ from the available options.
3. Select “ Shared As “ to open your folder for file sharing. You can also select and
define the level of access you want for your folder.
26
•
If “ Read-Only “ is selected, the other users in the wireless network can only copy
files from your folder. Copying files into your folder is not allowed.
•
If “ Full “ is selected, the other users in the wireless network have full access into
your folder. They can copy to and from your folder as well as modify files.
•
You can also set the option to “ Depends on Password “ wherein the user in the
wireless network can access to your folder through a set password. The set
password will determine the user can only read your folder or has full access to
your folder.
4. Click “ Apply “ or “ OK “ to activate the options that you have set.
Now you can see the folder “ My Documents “ with a little hand under it. The folder is
now open for file sharing.
Files sharing in the IEEE802.11b WLAN wireless network will be like files shared on a
wired LAN.
27
3.2 Printer Sharing in Windows 98
In order for a printer to be shared across the network, it has to be set as the network
printer. Follow the instructions below to set a printer as a network printer:
1. Click the “ Start “ button, point to the “ Settings “ , and then click “ Printers “ .
2. In the Printers window, click the printer you want to share.
3. Click “ Sharing… “ on the “ File “ menu.
4. Click the Sharing tab, then click “ Shared As “ , and if necessary, enter a
password.
28
3.3 Using the shared folder
1. Double-click the “ Network Neighborhood “ icon, and then double-click the
computer where the shared folder is located.
2. Double-click the folder you want to connect to.
3. You may want to assign a drive letter for shared folder that you connect to.
4. In the “ Network Neighborhood “, double-click the computer where the shared
folder is located.
5. Click the folder you want to connect, and click “ File “ menu, and then click “ Map
Network Drive “.
6. Select an available drive, and then click “ OK ”.
Note: If a password is required, the Windows will prompt you. Then you need to enter
the password that had been assigned to this shared folder.
3.4 Using the shared network printer
1. In the “ Network Neighborhood “, locate and double-click the computer where the
printer you want to use is located.
2. Double-click the printer icon in the window.
3. To set up the printer, follow the instructions on the screen.
Note:
1. After you have set up a network printer, you can use it as if it were attached to
your computer.
2. If a password is required, the Windows will prompt you, and you need to enter the
password that had been assigned to this shared printer.
Whenever printing a document through the network, be sure to select the printer
that is set as the network printer.
29
4. Troubleshooting
If you encounter some problems while installing the IEEE802.11b WLAN PC card or
you want to confirm whether your card is installed properly, refer to the procedure
below after you have installed the card.
4.1 Check the Various Properties of the Card
To verify if your PC Card has been set in the PCMCIA slot properly, you
can follow the procedures below.
•
Click the “ Control Panel “ and then the “ PC Card “. Check the Socket Status of
PC Card Properties whether there is a PCMCIA card in one of the sockets. If you
find IEEE802.11b WLAN Adapter (PCMCIA) in one of the sockets, it means a
card is detected as the following picture.
30
To verify if the driver has been set in your computer properly, you can
follow the procedures below.
•
Right-click “ My Computer “ and then select “ Properties “ you will enter your
system properties. Select the Device Manager and click the Network Adapter.
You will find the IEEE802.11b WLAN PC Card if it is installed successfully.
•
If there are Question-mark (?) or Exclamation-mark (!) in yellow on your
IEEE802.11b Wireless LAN Adapter in previous picture (PC Card Properties &
System Properties), please make sure you have inserted the right PC Card, and
the proper driver and utility have been installed. If you are not sure, follow the
procedure below to reinstall (update) the driver.
a. Enter “System Properties” and click “Device Manager” on upper menu.
b. Click “Network Adapter” and choose IEEE802.11b Wireless LAN Adapter
c. Select “Driver” on the upper menu of IEEE802.11b Wireless LAN Adapter
properties, and then click on “ Update Driver” button.
d. Follow the Update Device Driver Wizard to complete the driver installation.
31
4.2 Microsoft Networking Checklist
In order for the IEEE802.11b WLAN to run properly, some network items must be
presented in the Microsoft “ Network Neighborhood “ setup. To check and activate the
network setup, please right-click the “ Network Neighborhood “ and then select
“Properties” with your mouse. The following items should be presented in the
network setup:
1. IEEE802.11b Wireless LAN Adapter (PCMCIA)
2. IPX / SPX-compatible Protocol ->IEEE802.11b Wireless LAN Adapter (PCMCIA)
3. NetBEUI -> IEEE802.11b Wireless LAN Adapter (PCMCIA)
4. TCP / IP -> IEEE802.11b Wireless LAN Adapter (PCMCIA)
5. File and printer sharing for Microsoft Networks
6. Client for Microsoft Networks
If any of these items are missing, please follow the instructions below to install them
properly:
Set up the Network Protocols:
•
Click “ Add “ and select “ Protocol “ on “ Select Network Configuration Type“.
•
Click “ Add “ and then choose the network protocol. Select Microsoft as the
manufacturer and “ NetBEUI “, “ TCP/IP “, and “ IPX/SPX-compatible “ for the
network protocols. Then click “ OK; “
•
Now your network protocol should be set. Please check if your network needs
any special requirements to operate in your office environment.
32
Network Service for Microsoft Networking:
•
Click “ Add “ and select “ Service “.
•
Select “ Microsoft “ as the manufacturer and choose “ File and printer sharing for
Microsoft Networks “ for network service.
•
Click “ OK “ to set the network service.
33
4.3 Others
Wired Equivalent Privacy (WEP)
If you set the WEP Passphrase, which is the same as the Access Point (AP) in your
IEEE802.11b WLAN PC card, but still can’t connect with the AP. It may be that the
key generated by your PC card is different from the key generated by the AP even if
the same Passphrase is used between your PC card and AP. Please follow the steps
below to set WEP manually.
1. Check the WEP type and WEP key generated from the AP.
2. Select “ Manual “ on Wired Equivalent Privacy in your IEEE 802.11b Utility
advanced setting.
3. Type a set of WEP key generated from the AP into the key1blank of your
Encryption frame, other space you can type anything you like, but make sure all
the blanks will be filled.
4. Remember to press the “ Write “ button and “ OK “ to finish the WEP setting.
Additional Note for Windows 98 earlier edition
If your system is running Windows 98 first edition, you may use one of the following
ways to make IEEE 802.11b WLAN Utility work properly.
1. Copy and replace the file MFC42.dll from c:\windows\system of Windows 98SE
to the same directory of your Windows 98 first edition.
2. Upgrade your system and IE from Microsoft web site.
Additional Note for Windows 2000
1. IEEE802.11b WLAN Utility error message
•
If the IEEE802.11b WLAN Utility and Driver installation has completed under
Windows 2000, but an error message appeared as follows, you should check
whether your adapter inserted successfully and packet protocol installed
successfully. (See Chapter 2.2 “ Install the IEEE802.11b WLAN Utility / Driver
“ -----Additional note for windows 2000 to install packet protocol, in the User
Guide for details.)
2. Uninstall failed
•
If you cannot uninstall IEEE802.11b WLAN Utility and Driver successfully. Please
follow the procedure below to reinstall the Utility and Driver.
(1) Find the file AWLAN.isu and delete it from the Programs files \
IEEE802.11bWLAN Utility folder.
(2) Reboot your system
(3) Reinstall IEEE802.11b WLAN Utility and Driver.
34