1
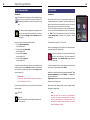
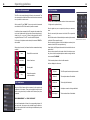
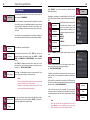
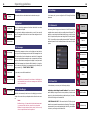
BLUETOOTH HANDS-FREE C ARCAR KIT KIT FREISPRECHEINRICHTUNG / HANDS-FREE CC 9060 GB Operating manual CC 9060 Index Introductory information 1. General 2. Security guidelines Installation of the hands-free car kit 3. Scope of supply CC 9060 4. Positioning and mounting 5. Connecting the Electronic box 6. Installation instructions for the fuses 7. Installation instructions switching box AC 5120 Operating guidelines 8. Initial operation of the hands free set ® 9. Establishing a Bluetooth connection 10. Handling possibilities 11. The display 12a. Accepting, making, ending calls 12b. Transferring Calls 12c. Conference Mode 13. Voice Dial 14. Voice dial commands 15. Head menu 16. Dial number 17. Phonebook 18. Redial 19. Call list 20. Messages 21. Dial Joe Bloggs 22. Settings 22.1 Bluetooth 22.2 Voice Dial 22.3 Audio 22.4 Display 22.5 Device 23. Handling via Touch screen Further Information 24. Service 2 2 2 4 4 5 8 9 10 14 14 14 15 15 16 17 18 19 20 20 21 22 24 24 24 24 25 25 25 26 27 28 28 29 29 2 Introductory information 1. General Dear customer, Congratulation on purchasing a BURY hands-free car kit. You have chosen a high quality product that is extremely easy to use. All aspects of BURY production through to sales and service are subject to strict quality management according to DIN EN ISO 9001. All BURY hands-free car kits meet CE and e1 security standards. Furthermore, we provide a two-year warranty on all components. Please read the operating manual carefully so that you can fully enjoy your BURY hands-free car kit. If you have any further questions concerning installation or operation of your car kit, please contact your dealer. He will be happy to give you reliable advice. You can also contact our hotline. Our phone and fax numbers are listed in the chapter Service at the end of the operating instructions. Have a good trip! 2. Security guidelines Installation – who and where The installation of this system can be carried out by yourself but please observe the installation requirements of the automotive manufacturer (VAS 1978). During the installation, park the car at a place where the road traffic is not impaired. We recommend to let a specialised workshop perform the installation. Power supply This system has been designed for the use in vehicles with an on-board supply system of 12 volts (passenger car). If you intend to install the device in a vehicle with an on-board supply system of 24 volts (lorry), please use a voltage converter. If you have queries regarding this subject, please contact our hotline. 3 Position, volume Install the components of the device in the vehicle so that your field of vision is not impaired and the components are not mounted in the impact zone of the passenger compartment or in the airbag inflation zones. The removal of coverings (with and without airbags) or components of the dashboard requires – in some cases – special tools and special knowledge. Intended use We shall not be liable for damages or malfunctions due to improper use of the navigation system. Therefore, do not expose the device to moisture, extreme temperatures or shocks and carefully follow the procedure described in the installation and operating guidelines. Use while driving Operate the system only when the situation allows it and when you do not endanger, harm, constrain, or annoy other road users. The volume of the device has to be set in a way that exterior noise is still audible. Faults Do not commission the device if you detect or assume a defect. In this case, contact a BURY specialised dealer or our hotline. Improper repair efforts can be dangerous for you. Therefore, only skilled personnel may perform inspections. Important: The driver is ultimately responsible for the safe operation and control of their vehicle at all times. You should never use a hand held phone, including sending or reading text or picture messages, while driving. Research indicates that there is a risk to safety when the driver of a motor vehicle is distracted and using a mobile phone while driving can be a distriction. The manufacturer strongly recommends that you use a hands-free solution when driving. Avoid exposure to long periods of direct sunlight when vehicle is parked as this can cause, among others, damage to the readability of the display. The sound functioning of the display is guaranteed up to a maximum temperature of 60° C. 4 Installation of the hands-free car kit 3. Scope of supply CC 9060 5 Description of the components: 1) Electronics box 2) Mounting pad 3) Display 4) Hook-and-loop fastener 5) Fixing screws for electronics box 6) Microphone with cable 7) Loudspeaker switching box AC 5120 4. Positioning and mounting Step 1: First of all, please choose the most convenient position for the monitor and the installation pad in your vehicle by attaching the monitor / hookand-loop fastener to the pad and checking different positions in the vehicle. After having found a suitable position for the monitor in the vehicle you can mount / attach the installation pad / hook-and-loop fastener accordingly. Please use the enclosed cleaning cloth for degreasing the surfaces you want to attach the installation pad to. Please note that in case of high variations in temperatures - depending on the structure and the features - decolourisations of the surfaces can occur during the subsequent utilisation. Important: When positioning the monitor please take care that the monitor does not impair the view onto the road, that it will not be installed in the impact zone of the passenger compartment (amongst others in the airbag inflation zones) and that cables may be laid without any problems. The installation pad / hook-and-loop fastener can be affixed just once, removing could damage the adhesive area. In case of high variations in temperatures - depending on the structure and the features - decolourisations of the surfaces can occur during the subsequent utilization. Installation of the hands-free car kit 6 Example of installation 1: 1 2 3 4 7 Step 2: Depending on the vehicle type and its equipment (e.g. airbags), it is reasonable to install the microphone either at the A-pillar, at the sun shield or at the roof interior. For details about the equipment features please refer to the vehicle documents. Please also observe the notes on distances to other components and to the driver / speaker, as specified in the installation manual. Step 3: Please lay the cables in a way that they do not lie/hang unsecured in the vehicle and that they may not influence the conducting of the vehicle. When laying a cable, please take care that it is not under traction stress but that it has some tolerance. Avoid crushing the cable as damages of the insulation can be caused by friction/rubbing. 5 6 Step 4: Install the electronics box at a convenient place in the vehicle. This can e.g. be behind the radio, in the glove box, or in the centre console. Please mind that you can access the connections of the box without difficulty. Before connecting the components to the electronics box you should branch off the battery for safety reasons. In doing so, take into account that there might be a radio coding (confer radio manual). Example of installation 2: 1 2 3 4 5 6 Important: Please install the electronics box behind a cover or somewhere you can only reach by opening or unfastening a protective cover/ a cover. The terminal box must not hang loosely in the vehicle. 8 Installation of the hands-free car kit 5. Connecting the Electronic box Please connect the switch box AC 5120 to the electricity supply of the radio and connect the Molex plug with the electronic box (see chapter: Connection of the loud speaker switch box AC 5120). 9 6. Installation instructions for the fuses If you install the CC 9060 without the switchbox AC 5120 please stick to the following instructions regarding the power supply safety. Now connect the microphone (connection 5) and the plug of the monitor (connection 6) to the electronic box. Through connection 4 the hands free set passes on the voice of the dialogue partner during the telephone call. You can connect a separate loud speaker (BURY accessories) or the AC 5120 to this connection. With the latter variation, you use the vehicle’s internal sound system for a voice return. Note: If the DIN ISO plug of the AC 5120 does not fit in your vehicle, numerous adapters are available from dealers. 1 2 3 4 5 Connection options: 1 Power supply 2 Aux Out 3 Port for Accessory 4 External loudspeaker 5 Mikrophone 6 Display 7 basePlate System 9 6 7 Please cut through the red, the black and the blue cable by means of a wire cutter or scissors. Now insert the two endings of the red cable resulting from the cut into one of the binders, then close it. If you hear two clicking noises, the clamp snapped in properly. Now insert one of the fuses and then repeat the procedure with the other cables. 10 Installation of the hands-free car kit 7. Installation instructions switching box AC 5120 11 After checking that all the cable lengths are sufficient, decide where you are able to attach the Audio switchbox. Now secure the Audio switchbox so that it isn’t able to flap about and/or rattle against other parts of your vehicle. Now connect the audio switchbox plug (1) to the hands-free car kit. (The other, smaller box is used by the audio switchbox plug for the microphone.) Now connect the white power out cable connector (2) of your Audio switchbox to the power supply socket of your hands-free kit. 2 6 1 Now disconnect the (a) and/or the (b) loudspeaker connector from the speaker socket on the radio at the back. Connect this connector with the suitable socket (3) on the AC 5120. Now connect the plug (4) with the radio. With the AC 5120 speaker switchbox, you get the possibility of being able to mute the feedback of your car radio / CD player etc. and to transfer the voice output of your conversation partner during a telephone call to your vehicle’s speakers. This means that the installation of additional speakers isn‘t required. If your radio has a mute function, then the vehicle speakers are turned onto mute using the radio. If your car radio doesn‘t have this function, then the signals will be suppressed by the speaker switchbox. You can use the AC 5120 through the connections that your BURY hands free car kit offers, which guarantee voltage supply via molex plugs and also have a speaker output. If you want to make a telephone call in the hands-free mode, your car radio will be automatically switched on to mute (for the exact operation of your hands free car kit, please read your HFCK user manual). The Audio switchbox now uses one or two loudspeakers in your car for the telephone conversation, even if your radio is switched off. This function will be automatically activated after the installation of the unit, there are no subsequent manual settings required. Some mobile phones do not support a radio mute function. Please read your telephone user manual for more details. You can find out more detailed information at your specialist retailer, in the internet under www.bury.com, or over our telephone hotline. Depending on the switcher position (5), the voice of your conversation partner will be fed back through either the front right speaker, the front left speaker, or through both of the front loudspeakers. The ‘OFF’ position is to be selected if you connect the switchbox to the radio using the ‘Phone-IN’ cable (6). Installation of the hands-free car kit 12 The two ‘Phone-In’ cables are marked accordingly and must be plugged into the appropriate connections on the radio (blue, green or yellow). In this regard, please refer to the instructions concerning the connection configuration of your car radio in your car radio handbook. In lots of radios, the volume level (feedback of your conversation partner) can be controlled via the phone input and the selection of the loudspeaker. Different connections of the ISO plug on the radio The layout of the pins on the ISO plug used in a car depends on the type of car. Before using the switchbox, you should make sure that the connections are correct in order to prevent possible damage to the device. 13 Configuration II If the assignment of pin 7 of the ISO plug is connected to the ignition, and pin 4 is connected to the DC power supply, the connection of the cables should look like the connection presented on the drawing below. Switchbox Switchbox Configuration I If the assignment of pin 7 of the ISO plug is connected to the DC Power Supply, and pin 4 is connected to the ignition, you should check if the connection looks like the connection presented on the drawing below. Switchbox 7 (red) blue 4 (blue) 7 (red) blue 4 (blue) red 7 (red) blue 4 (blue) Vehicle Vehicle In the operating manual of the radio device, you can find the pin assignment for the “mute” signal. This signal can occur on one of three cables marked with “mute1”, “mute2”, or “mute3”. mute 1 radio device red red mute 2 mute (yellow) Switchbox mute 3 Vehicle Connect the yellow “mute” cable to the switchbox using the correct cable from the car radio: “mute 1”, “mute 2” or “mute3”. ATTENTION: The positive wires and ignition wires are protected in the casing of the switchbox with 3A fuses. 14 Operating guidelines 8. Initial operation of the hands free set After power supply of the hands free Kit (HFK) is sucessful connected, the HFK is activated when you have started the vehicle. After that you have to select the user language. You can change the user language by selecting the entry lanuage. You will find the entry under more - head menue - settings - device- language (see chapter 22.5). 9. Establishing a Bluetooth® connection Startscreen without paired telephone If you would like to establish a Bluetooth® connection for the first time, you must activate the Bluetooth® function in your mobile telephone and start the search for Bluetooth® devices. Serach for a device with the description “CC 9060...“. If several devices have been found, please select and connected the 9060 and enter the PIN number `1234´. Up to ten Bluetooth® devices recognitions can be stored in the system. 15 Note: The telephone book on your mobile phone is generally synchronised by the hands-free car kit at regular intervals. For the duration of this short moment, the voice control will not be available to you and you will receive a corresponding message. 10. Handling possibilities The system can be operated in two ways: VOICE DIAL COMMANDS 1. Operation using voice control Touch screen 2. Handling via Touch screen Note: If the automatic connection is activated, no other mobile telephone can be paired. If you want to pair a new telephone, the automatic connection must be deactivated by pressing the Auto connect field (upper right). 11. The display Missed calls/ New messages Startscreen with paired telephone Volume ® With the operation field on the left, you have the possibility of deciding between the day or night mode (also see chapter: display). Active Bluetooth connection Mobile telephone in the A2DP mode The loading status In case a mobile telephone has been connected at some time, the recognition / names of the mobile telephones appear in the display. These are read one after the other by the HFK. With a connection which has successfully been made, the name of the coupled mobile telephone and of the provider will be shown and the data from the telephone book (SIM card) and the address book (storage of the telephone) are transmitted to the HFK. Depending on the amount of stored data, this can take a few seconds. If the synchronisation of the phone book is interrupted, e.g. though an incoming call, it is possible that all entries will not be transmitted. If this happens, the phone book should once again be manually synchronised (see chapter: device). Device connected of the battery of the mobile telephone Signal strength of the mobile telephone network Dial number Phonebook Activate Voice dial More functions Note: Please be sure to clean the display as necessary using a damp lint free cloth. Please do not use any detergent. 16 Operating guidelines 12a. Accepting, making, ending calls In order to inform the driver of an incoming call, in the display a telephone symbol is shown. At the same time the name and telephone number of the caller (if available) will be shown. The audio system is switched to mute and the ring tone is broadcast through the loudspeaker of the audio system. You can accept or reject the call using either the voice control (which has to be activated beforehand, see chapter 22.5) or the touch screen. Incoming call You will be asked whether you want to ‘accept’ or ‘reject’ the call. The call can be accepted (pushing the green symbol) or rejected (pushing the red symbol). A call will be ended by pushing the red telephone symbol. During the call, you have the possibility to regulate the volume of the voice of your discussion partner through the `minus(-)´ or `plus(+)´ field. 17 12b. Transferring Calls Introduction Transferring calls is to be understood as being the acceptance of a call during a telephone call and alternating between two conversations. Please note: The functions described in chapters 12b and 12c are exclusively valid for incoming calls. Please remember that your range of functions can vary depending on the type of mobile phone. Please find the relevant details in the instructions manual for your mobile phone. If you receive another call during an active telephone conversation, you will be informed of it via an acoustic signal. You now have the option of either rejecting the call (the red symbol) or accepting the call (the green symbol). If you accept the call your previous call will be put on hold. Your conversational partner will be indicated with gekennzeichnet. You now have the following options Active call Using this field, you access a submenu in which you are able on the one hand to select and send DTMF tones (e.g. to check your mailbox) and on the other to changeover into the private mode. In this mode, your conversation will be completed via mobile phone and is no longer audible to the other passengers in the vehicle. In addition you have the possibility to mute the microphone, e.g. for further inquiries with a passenger. Note: Please comply with the country-specific laws concerning in-car telephone calls. 1. Using swap you can switch between your different callers. 2. You can reject the active Call. 3. You can reject the held call. 4. You can activate the private mode. (also see chapter 12a) 5. You can activate the mute. (also see chapter 12a) 6. You can activate the keypad. (also see chapter 12a) 18 Operating guidelines 12c. Conference Mode Introduction The hands-free car kit provides you with the possibility of merging up to seven conversations to create a conference. This means that all participants can talk to each other at the same time. If you receive a further call during an active telephone conversation, you can merge both conversations into a conference. To this end select the merge command (conference is shown in the display). 19 13. Voice Dial Introduction With the help of the voice control, the telephone system can be operated through spoken commands. This section explains the essential functions which can be accessed through the voice control. Often a desired result can be reached in several ways. The HFK itself leads you through some of the expanded functions. If you are not sure which commands you can use in a specific menu, say `HELP´. Then all valid commands are then listed. The HFK has a `user training mode´ with which it can `get used to´ accents and dialects. During a conference, you have the following options 1. You can reject the active call. (the conference ends) 2. You can activate the private mode. (also see chapter 12a) 3. You can activate the mute. (also see chapter 12a) 4. You can activate the keypad. (also see chapter 12a) For information see chapter 22.2: Voice dial. If you receive a further call during a conference, you can add this to the conference using the add to conference command or switch between the conference and conversational partner using the swap command (also see chapter 12b). In order to deactivate the voice control, simply touch the touch screen shortly anew. The system answers with `Cancel´. Some voice commands can only be called up if a mobile telephone is connected with the HFS using Bluetooth In order to activate the voice control, please shortly touch this field on the touch screen. The system answers with `Head menu´. Speak after the tone clearly in the direction of the microphone. Please note: The current mobile telephone networks only permit the use of a maximum of two lines. When there is a longer break, the system reacts with the question `Please say a command now´ and asks `Pardon?´, if a command was not correctly understood. Eight seconds afterwards the voice dial will be deactivated and must be started new on the Touch screen. If you are using both lines and you receive a further call, you have the following options: When entering voice commands, please ensure you speak naturally, clearly and at a regular speed. Reject call Accept call Your active connection will be ended and replaced by the new connection. Note: With the use of the voice control it is recommended to turn down the volume of components which are independent of the audio system (e.g. a navigation system) or to switch off the broadcast of traffic jam warnings in order to avoid unintended voice entries. 20 Operating guidelines 14. Voice dial commands The HFK can be operated through the following voice commands. The voice commands are divided into different menus and some commands are only available in certain menus. With an active HFK, say `HELP´ if you are not sure which commands are available: the HFK will then name all possible commands. In addition to these commands, the HFK recognises the numbers from zero to nine. Numbers which are larger than nine must be spoken individually (e.g. 10 = one, zero). To search in the phone book, the HFK recognises the letters `A´ to `Z´ as well as the NATO alphabet. For the entry of telephone numbers abroad, the command `PLUS´ is also available. When using voice control, in all menus these four commands are always available. Cancel Head menu Breaks off the current action Back to Head menu Back One step back Help Names all commands which are available 15. Head menu Here you will find all menus which are necessary for the operation and configuration of the system. These can be selected through the touch screen or using voice control, in addition the HFK has two purely voice commands: `READ NEW MESSAGE´ and `DIAL JOE BLOGGS´. You can find explanations of these in the corresponding chapters. On the touch screen, the menus can be controlled through a simple touching of the respective field. In the following the individual menu points will be explained. 21 16. Dial number Dial number It makes sense to divide telephone numbers in short number blocks of 3-4 digits and to say them this way. After the signal tone you can respectively continue your announcement. Enter the area code (wait a moment so that the HFK can repeat the entry). Enter the first numbers of the actual telephone number (wait a moment so that the HFK can repeat the entry.) Enter the remaining numbers of the actual telephone number (wait a moment so that the HFK can repeat the entry). At each break, the HFK repeats the number block and waits for the next number block. When you have entered the last number block of the telephone number, you can check the complete telephone number once again with the voice command `PLAYBACK´. Numeric field in touch-screen mode To dial a number please use the voice dial commands which are displayed on the screen. Playback The HFK repeats the entire telephone number. Delete all The complete number will be deleted. Delete last The last digit will be deleted. Dial Delete group A telephone connection is being established. The last number block will be deleted. Operating guidelines 22 17. Phonebook Phonebook Press and release the button for the voice control shortly and use the voice command `PHONEBOOK´. Since your phonebook is scanned with the first coupling of your mobile phone with the system, it is immediately available to you and is stored until you delete the mobile phone from the list (see chapter: Bluetooth®). The telephone book data can of course only be seen or changed by you. After the first entry has automatically been read aloud, in addition to the standard commands the following voice commands are available: Playback Play list Dial Joe Bloggs The marked entry is read aloud again. The entire list is read aloud to you. With `STOP´ you can stop the process and select the respective entry. With `NEXT´ or `NEXT PAGE´ and `PREVIOUS´ or `PREVIOUS PAGE´ you can navigate in the list. With `DIAL´ the telephone connection will be made. You can also jump directly to one of the entries shown by activating the entry number. E.g.: `SELECT ENTRY THREE´. `Joe Bloggs´ is a placeholder for an entry from your phonebook. If you select a name, you go directly to the respective entry. Note: It is important that the stated name exactly corresponds with the recorded entry in the phonebook. Please note that telephone book entries, which are only shown in capital letters must be spelt out. Dial fast search Select Here you can search for entries through a letter field. Name a beginning letter and with the voice command `SELECT´ all entries are shown which begin with the respective letter. 23 Under `DETAILS´ you will find if necessary all telephone numbers listed under this entry Depending on the settings in the mobile telephone, you will be shown by the HFK either the SIM card contacts or the telephone contacts or both. If the SIM card contacts in the mobile telephone have been selected, for each Dial home name only one number is shown. If the telephone contacts are selected, up to Dial mobile four number categories can be shown*: `HOME´, `MOBILE´, Dial office `OFFICE´, `GENERAL´. Dial general Dial SIM *This function depends on your mobile phone. Details Details with SIM- and telephone contacts If you say `NUMBER´, all stored entries under this name will be read aloud. Number In case you have stored more than one telephone number under a name, you can also directly call through the category. e.g. `DIAL JOE BLOGGS HOME´. In addition you can allocate a phonebook entry with an own voice command (voice tag). This is recommended for names which are difficult to pronounce. Clearly speak the command into the microphone, the HFK repeats this and you can then make a call to the desired discussion partner from the head menu with e.g `DIAL CUSTOMER ONE´. In all the HFK can store 150 voice commands. This voice command (voice tag) is valid for all numbers which are allocated to this name. A corresponding inquiry follows about which of these numbers you want to call. Note: In order to make voice recognition easier for the HFK, please do not use voice commands for your voice commands (voice tags) which are also used by the HFK. Details only with SIM contacts Voicetags Store Playback Operating guidelines 24 18. Redial Redial The number which was last selected can be selected once again 19. Call list Dialled calls Missed calls Here in a chronologic sequence all calls are listed which have been made, missed or accepted. You can have the telephone number read to you and if you want call back. The navigation within the lists is carried out analogue to that of the phonebook. Received calls 25 22. Settings In this menu point, you can configure the HFK through five further submenus. 22.1 Bluetooth Here among other things you can determine if the HFK should automatically make a connection with your mobile phone via Bluetooth®. In addition you can delete the individual mobile phones or also the entire list of the paired mobile phones and change the PIN code (standard 1234). It is possible to set one mobile phone as default. The device will automaticly search first for the default phone and then search for other phones. 20. Messages All messages New messages Read messages Dial sender Read new message Settings Bluetooth Phone list Clear list Auto connect off Received text messages are shown on the display and read aloud to you. Up to 100 text messages can be stored. Both messages from the SIM card as well as from the telephone are read aloud. It is suggested that you regularly delete messages in order to ensure that you always are shown the newest text messages on the display. In case you cannot read all text messages (an information field is faded in) try it again later. You can also jump directly to a message shown by activating the entry number. E.g.: `SELECT ENTRY THREE´. Auto connect on Pin Code Accept If you want you can call the sender back. Note: With this voice command (is not shown on the display) you can immediately have a new text message read aloud with active voice control. Default 22.2 Voice Dial Voice Dial In this submenu you can carry out the following settings. Dial Joe Bloggs 21. Dial Joe Bloggs With this voice command (is not shown on the display) you can immediately call a contact from your telephone book with active voice control. Note: When doing so, it is important that the stated name exactly corresponds with the entry stored in the phonebook. Please note that telephone book entries, which are only shown in capital letters must be spelt out. Activating or deactivating the audio feedback: If you activate the audio feedback, during the touch screen operation you receive voice support (e.g. the phonebook entries are read aloud to you). Your selection is shown through an information field `ADDITIONAL HELP OFF´: This means that the HFK will only read aloud the most essential commands and confirmations. This setting is recommended if you are well acquainted with the HFK, your selection is shown to you through an information field. Audio feedback Additional help Operating guidelines 26 Speaker adaptation Description The HFK works in general independent from the speaker, that means it can immediately be operated without a `Voice training´. Then user training is only needed if you speak a strong dialect. The HFK reads twenty terms aloud to you which you have to repeat so that the system can “get used to” your voice. Here you will receive short instructions about the essential functions of the HFK. 22.3 Audio Audio DSP Phone DSP Device DSP Playback Accept Volume Language Ringtones 22.4 Display This menu point makes it possible for you to adjust the display in diverse manners. Display `SLEEP MODE´ In order to avoid the blinding effect especially when driving at night, you can activate this mode. This causes the display to shut off after either 15, 30 or 60 seconds. With an incoming call, the HFK activates the display automatically and you can accept the call. Sleep mode DSP The HFK has an integrated noise and echo suppression (DSP) which is activated as a standard and ensures the optimal voice quality for most mobile telephones. 15 seconds 30 seconds In this area you have the possibility to change the audio settings of the HFK. 60 seconds `ILLUMINATION´ Here the brightness of the display can be changed. As voice commands ´MORE´, `LESS´, `MINIMUM´ or `MAXIMUM´ are available. The confirmation follows with `SELECT´. Illumination Note: We recommend that you keep this setting. If you should still have an inferior voice quality, you have the possibility here to both deactivate the DSP of the HFK or the DSP of your mobile telephone. Ringtones 27 RINGTONES The HFK is sold with four ring tones from which you can respectively select one. With `NEXT´ or `PREVIOUS´ you can navigate in the list. With `ACCEPT´ the ring tone is selected. VOLUME Here you can change the volume of the voice replay and of the ring tones. Available as voice commands are `LOUDER´, `LOWER´, `MAXIMUM´, `MINIMUM´. `DAY NIGHT MODE´ The HFK has an automatic day/night mode with which the display automatically is adjusted to the changing lighting conditions. Here you can deactivate this automatic mode or decide for one mode. Automatic mode Day mode Night mode `COLOUR THEME´ Here the different colour themes (background and text colour) can be selected. Simply say the colour of the theme and confirm your selection with `ACCEPT´. `CALIBRATION´ This product was produced in compliance with the strictest quality criteria. Still in the course of time it can occur that the calibration of the display changes (e.g. if touch screen commands are no longer carried out correctly). Then you have the possibility of newly calibrating the display. If you call up the voice commands, a cross appears on the display which you should shortly touch. Please repeat this procedure 4x, then the HFK is newly calibrated and jumps back to the head menu. Please only carry out this process when the vehicle is standing still. Colour theme Calibration Operating guidelines 28 Device 22.5 Device Further Information 24. Service In case of general or technical queries, suggestions and comments, please do not hesitate to contact our team at any time: Call answering on Language Sync Phonebook System Version Info Software Update Factory setting In this sub menue you can choose, if incoming calls should be accepted automatically, manually or via voice. The following user languages are available: English, German, French, Italian, Spanish, Portuguese and Dutch. In this menu point the phonebook can be updated. Some mobile telephones also support the possibility of sending across the complete telephone book manually (OPP-function). If you use this function, automatic synchronisation is deactivated. In the menu point `SYSTEM´, you can update the HFK or set them back to the factory settings. The software version installed on the HFK is shown under `Version Info´. The latest software version can be downloaded under www.bury.com. Note: Do not interrupt the power supply during an update. We recommend to let the firmware update be carried out by a BURY specialised retailer. 23. Handling via Touch screen All displayed commands can also be operated intuitively via touch-screen and are self explaining. Except mere voice tags `READ NEW MESSAGE´ and `DIAL JOE BLOGGS´. The operation can be carried out via possibly existing arrow keys. With the red symbol you can cancel an action or go a step back. With the green symbol you can confirm actions. In certain menus speech support is available. You can activate the audio feedback (not implemented yet) by touching the field `Switch Audio´ in the menue voice tags. In addition the output volume and the brightness can be set through `Plus(+)´ and `Minus(-)´ on the screen with a touch. BURY GmbH & Co. KG Robert-Koch-Straße 1-7 32584 Löhne Hotline: +49(0)180 5 - 842 468* Faxline: +49(0)180 5 - 842 329* * 0.14 €/min. Deutsche Telekom AG landline E-Mail: [email protected] Service desk: In case of complaints, please return the product directly to our service desk: BURY GmbH & Co. KG Im Hause DPD Depot 103 Robinienweg D-03222 Lübbenau Suggestions and feedback are always welcomed. Notes on the disposal of electronic devices In compliance with the German law on electric and electronic devices, old electric and electronic devices must not be disposed of together with domestic garbage in Germany, beginning March 24, 2006. If you want to dispose of an old electric or electronic device you are required to take it to a designated collection point (“point of acceptance” or “communal collection point”). There old electric and electronic devices are taken back free of charge. Version 03/2008 25.1032.0-02-040308 Subject to change. Errors and ommissions excepted. 29