1
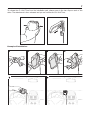
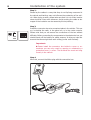
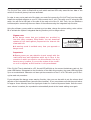
CL 1010 Time
Index
Introductory information
1. General
2. Security guidelines
Installation of the system
3.
4.
5.
6.
Scope of supply
Positioning and mounting
Establishing the power supply
Installation instructions for the fuses
Operating guidelines
7. Functions of the CL 1010 Time
Further Information
8. Service
2
2
2
4
4
5
9
9
10
10
12
12
2
Introductory information
1. General
Dear customer,
Congratulation on purchasing a BURY product. You have chosen a high
quality product that is extremely easy to use. All aspects of BURY production through to sales and service are subject to strict quality management according to DIN EN ISO 9001. All BURY products meet CE
and e1 security standards. Furthermore, we provide a two-year warranty on all components.
Please read the operating manual carefully so that you can fully enjoy
your BURY product. If you have any further questions concerning installation or operation of your car kit, please contact your dealer. He will
be happy to give you reliable advice. You can also contact our hotline.
Our phone and fax numbers are listed in the chapter Service at the end
of the operating instructions.
Have a good trip!
2. Security guidelines
Installation – who and where
The installation of this system can be carried out by yourself but please
observe the installation requirements of the automotive manufacturer
(VAS 1978). During the installation, park the car at a place where the
road traffic is not impaired. We recommend to let a specialised workshop perform the installation.
Power supply
The system is designed for use in both passenger vehicles and heavy
goods vehicles (HGVs). The operating voltage spans the 10 to 30 volts
range.
3
Position, volume
Install the components of the device in the vehicle so that your field of
vision is not impaired and the components are not mounted in the impact zone of the passenger compartment or in the airbag inflation
zones. The removal of coverings (with and without airbags) or components of the dashboard requires – in some cases – special tools and
special knowledge.
Intended use
We shall not be liable for damages or malfunctions due to improper use
of the device. Therefore, do not expose the device to moisture, extreme temperatures or shocks and carefully follow the procedure described in the installation and operating guidelines.
Use while driving
Operate the system only when the situation allows it and when you do
not endanger, harm, constrain, or annoy other road users. The volume
of the device has to be set in a way that exterior noise is still audible.
Faults
Do not commission the device if you detect or assume a defect. In this
case, contact a BURY specialised dealer or our hotline. Improper repair
efforts can be dangerous for you. Therefore, only skilled personnel may
perform inspections.
Installation of the system
4
3. Scope of supply
DVD
150 cm
5
Description of the components:
1) Connector box with power supply cable
2) CL 1010 Time and installation pad
3) Installation and Operating manual, software on DVD
4) Hook-and-loop fastener
5) Cleaning cloth
6) USB data cable
7) Fuses
Please note:
XXIf certain components are added or omitted you will receive the corresponding information on a separate enclosure.
4. Positioning and mounting
Step 1:
First of all, please choose the most convenient position for the monitor
and the installation pad in your vehicle by attaching the CL 1010 Time
to the pad and checking different positions in the vehicle.
The CL 1010 Time should be installed so that the installation pad, together with the cable, is positioned away from you, because the system
has a push-button on its top section. With this button you are able to
switch between private and business journeys. An alternative mounting
is possible but it makes operation more difficult.
If you would like to use the device during your journey, positioning it in
the front area on the driver’s side is advisable. Sit in the vehicle and
check whether you can reach the device without difficulty. It this is not
possible then you should refrain from using the device during your
journey and ensure you make the required settings prior to starting
each journey that you make.
Also make sure that the CL 1010 Time is able to receive GPS data optimally. The installation pad should therefore be attached to the dashboard in a way which is as level as possible. In certain vehicles the GPS
reception may be hampered because of windows with evaporated metal surfaces. In some vehicles, the installation in the glove box won’t
provide an optimum result either. Ask your garage about this or contact
us via our hotline if you have further questions.
6
Installation of the system
After having found a suitable position in the vehicle you can mount /
attach the installation pad / hook-and-loop fastener accordingly. Please
use a cleaning cloth for degreasing the surfaces you want to attach the
installation pad to.
The end of the cable with the small Molex plug is ideally suited for placing through small openings in the dashboard area. This facilitates a
practically invisible installation of the cable. Take the length of the cable
into account and make sure that it is of sufficient length to reach the
intended location of the connector box.
Important:
XXWhen positioning the monitor please take care that the
CL 1010 Time does not impair the view onto the road, that
it will not be installed in the impact zone of the passenger
compartment (amongst others in the airbag inflation zones)
and that cables may be laid without any problems.
XXThe installation pad can be affixed just once, removing
could damage the adhesive area. In case of high variations
in temperatures - depending on the structure and the features - decolourisations of the surfaces can occur during the
subsequent utilization.
7
To release the CL 1010 Time from the installation pad, please press in the two clips on each of the
sides. The attachment is then released and you can remove the CL 1010 Time.
Example of installation:
8
Installation of the system
Step 2:
Please lay the cables in a way that they do not lie/hang unsecured in
the vehicle and that they may not influence the conducting of the vehicle. When laying a cable, please take care that it is not under traction
stress but that it has some tolerance. Avoid crushing the cable as damages of the insulation can be caused by friction/rubbing.
Step 3:
Install the connector box at a convenient place in the vehicle. This can
e.g. be behind the radio, in the glove box, or in the centre console.
Please mind that you can access the connections of the box without
difficulty. Before connecting the components to the electronics box you
should branch off the battery for safety reasons. In doing so, take into
account that there might be a radio coding (confer radio manual).
Important:
XXPlease install the connector box behind a cover or somewhere you can only reach by opening or unfastening a
protective cover / a cover. The terminal box must not hang
loosely in the vehicle.
Step 4:
After this, connect the Molex plug with the connection box.
9
5. Establishing the power supply
The power supply of the system is established via a 3-core cable. Connect the black (clamp 31 – minus), the red (clamp 30 – steady plus) and
the blue cable (clamp 15 – ignition plus) to the power supply of your
radio (where required via the cigarette lighter or the fuse box).
Attention:
XXIf you also connect the blue cable to clamp 30, the system
will be permanently supplied with power. If the vehicle is not
running for a longer period, this could lead to a discharge
of the car battery.
6. Installation instructions for the fuses
Please cut through the red, the black and the blue cable by means of a
wire cutter or scissors. Now insert the two endings of the red cable
resulting from the cut into one of the binders, then close it. If you hear
two clicking noises, the clamp snapped in properly. Now insert one of
the fuses and then repeat the procedure with the other cables.
10
Operating guidelines
7. Functions of the CL 1010 Time
The CL 1010 Time is a system which serves the purpose of displaying the vehicle positions with the use
of GPS coordinates. Using road map data, these coordinates can then display a specific route along
which the vehicle has travelled. This serves the purpose of setting an electronic log book which you
can then subsequently edit or supplement with a special PC software programme. You can find this
software on the DVD.
Important:
XXMany German tax offices recognise this electronic log book as being proof of professional mobility. If problems with such recognition should occur within the scope of either
German or international laws however, the company BURY GmbH & Co. KG is not able to
accept an obligation for the provision, rectification or adaptation of the software that is
provided, or other software, in as far as you, as the user, present its data for settlement
/ as proof of your professional activity at a tax office.
XXWe are, however, prepared to assist you with any problems you experience with the tax
authorities in this context. Please contact us.
If the power supply has been connected correctly then the CL 1010 Time activates after you have
switched on the ignition. The system will then attempt to receive GPS data as quickly as possible.
Depending on the tour mode, either the green or the red LED will flash. The LEDs display the tour
mode which is currently activated (business or private journey). During the satellite search a short
search tone is emitted every three seconds. After sufficient satellites have been found to determine
the position, one longer acknowledgement tone is emitted with a business journey, and two long acknowledgement tones with a private journey.
You can change the mode by briefly pressing down on the button on the top of the main unit. If the
red LED then lights up, the private journey mode is activated. If the business journey is set, however,
the green LED lights up. The LEDs remain permanently illuminated unless you have selected an alternative setting in this context using the PC software. If this is the case then the LEDs will fade out after
approx. 10 seconds.
The internal memory capacity of the system is sufficient to save approx. 1 million separate sets of logdata. The saving of this information occurs on a dynamic basis and is based on, for e.g., the speed
travelled by, or the stationary nature of the vehicle. The advantage of this is that you don’t have to
complete a read-out of the data of the system on a daily or weekly basis. The storage capacity in this
context is sufficient for approx. 10,000 kilometres driven or for a minimum of 3 months. The following
data is saved:
- Date and time
- Vehicle position
- Speed
- Height above sea level
- The number of satellites located.
11
The CL 1010 Time, which is fitted with a push switch and two LEDs only saves the tour data of the
vehicle if a business journey has been activated.
In order to carry out a read-out of the data, you must first remove the CL 1010 Time from the cradle.
Install the enclosed software on your PC. Now connect the CL 1010 Time with your PC using the USB
cable. You will find a USB jack on the side of the main unit of the CL 1010 Time. You can initialise a
brief description concerning the menu items of the software using the integrated help function.
Using the software, you are able to complete your tour data, change the system setting, enter a driver
ID or activate the system’s integrated warning function prior to danger zones.
Please note:
XXThe danger zones that are included are provided by
the third party company Eifrig Media. You can download
updates to this data against payment at the internet site
www.scdb.info.
XXA warning sound is emitted every time you approach a
danger zone.
Important:
XXPlease ensure you pay attention to and comply with the
road traffic laws and regulations which are in force in the
countries in which you want to use this software! You don’t
have to worry, however, if you use the system in the condition as it is supplied, as this function is not yet activated.
If the CL 1010 Time is attached to a PC, the red LED will light up. As soon as the data are read out, the
green LED flashes. Subsequent to the conclusion of the read-out procedure, the green LED then lights
up on a constant basis. Please do not interrupt the connection of the CL 1010 Time with your PC during the read-out procedure.
If you activated the danger zones warning function, then you are also able to set the volume level
adjuster of the integrated Piezo (acoustic sound emitter). If you press down and hold the push button
for approx. three seconds, then the signal gets louder on a second-by-second basis. Once the maximum volume is reached, the reproduction automatically starts at the lowest setting once again.
12
Further Information
8. Service
In case of general or technical queries, suggestions and comments, please do not hesitate to contact
our team at any time. Suggestions and feedback are always welcomed:
BURY GmbH & Co. KG
Robert-Koch-Straße 1-7
32584 Löhne
Hotline: +49(0)180 5 - 842 468*
Faxline: +49(0)180 5 - 842 329*
* 0.14 €/min. Deutsche Telekom AG landline
E-Mail: [email protected]
Service desk:
In case of complaints, please return the product directly to our service desk:
BURY GmbH & Co. KG
Im Hause DPD Depot 103
Robinienweg
D-03222 Lübbenau
Notes on the disposal of electronic devices
In compliance with the German law on electric and electronic devices, old electric and electronic devices must not be disposed of together with domestic garbage in Germany, beginning March 24, 2006.
If you want to dispose of an old electric or electronic device you are required to take it to a designated
collection point (“point of acceptance” or “communal collection point”). There old electric and electronic devices are taken back free of charge.
Version 05/2009
25.1148.0-01-190509
Subject to change. Errors and omissions excepted.