1
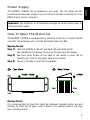
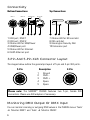
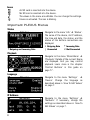
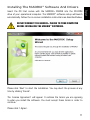
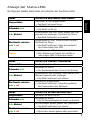
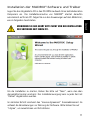
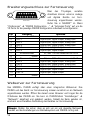
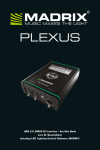
PLEXUS USB 2.0 DMX512 Interface / Art-Net Node Live Or Stand-Alone Including LED Lighting Control Software MADRIX® English MADRIX® PLEXUS – Quick Start Guide 2nd Edition, Last Update: July 2012 Thank You For Purchasing MADRIX® PLEXUS Please read this guide carefully and thoroughly before using the MADRIX® PLEXUS. Make sure that you fully understand all information. This MADRIX® PLEXUS Quick Start Guide and the MADRIX® PLEXUS User Manual are available in English and German. The MADRIX® software and its user manuals are available in English. Made in Germany Imprint inoage GmbH Fetscherplatz 5 01307 Dresden Germany Managing Directors: Christian Hertel, Sebastian Pinzer, Sebastian Wissmann HR B 29795 Phone +49 351 482 056 30 Fax +49 351 482 056 31 http://www.madrix.com [email protected] 1 Copyright Information And Disclaimer © 2012 inoage GmbH. All rights reserved. Information is subject to change at any time and without prior notice. Errors and omissions excepted. Reproduction, adaptation, or translation without prior written permission is prohibited. inoage GmbH does not grant guarantee on validity for a particular reason, the marketability, or other properties of the product. There is no way to assert a claim to inoage GmbH, neither in the legal way nor in other ways. inoage GmbH is not responsible for damages, including all disadvantages that are not just limited to the loss of sales, but that are caused due to the use of the product, due to the loss of serviceability of the product, due to misuse, happenings, circumstances, or actions that inoage GmbH does not have influence on, no matter if the damages as well as consequential damages are direct or indirect; whether they are special damages or others, nor if the damage is caused by the owner of the warranty or a third person. Trademark Credits Microsoft® and Windows® are U.S. registered trademarks of Microsoft Corporation. Kensington is a registered trademark of ACCO Brands. NEUTRIK® is a registered trademark of Neutrik AG. Art-Net™- Designed by and Copyright Artistic Licence (UK) Ltd. SD™, SDHC™ are trademarks. All other products mentioned herein may be trademarks of their respective companies. MADRIX® is a registered trademark of inoage GmbH. Package Contents 1x MADRIX® PLEXUS 1x 2GB SD card (inserted into the device) 1x USB power supply 1x USB cable 1x World power plug adapters kit 1x Quick start guide 1x CD-ROM with MADRIX® – software Please check the package contents and the condition of the interface after unpacking! Contact your supplier if something is missing or damaged. Do not use the device if it seems to be damaged! 2 Safety Instructions And Limited Warranty Please follow the instructions below to avoid mishandling, damage to the device, or personal injury: ▴ WARNING! HANDLE WITH CAUTION! THE POWER SUPPLY / THE DEVICE WORKS WITH MAINS VOLTAGE (100V – 240V). ▴ ▴ ▴ OK Beware that the interface works with electrical power. Only use the device in dry environments (indoor use). The IP Rating of the device ! is 20. Do not use the interface in humid environments and avoid contact with water or any other liquids. Turn off the power if you are not using the device for a long time. It is recommended to always use galvanic isolation (e.g. an opto-isolator/optocoupler splitter). Avoid unwanted voltage on the DMX lines/cables at all times. Do not remove any parts from the unit including the plug ground pin or connect to an ungrounded circuit. There are no user serviceable parts inside or outside the interface. Repair service lies only within the responsibilities of the manufacturer. If the interface appears to be defective, please contact your dealer. After expiration of the warranty period you may contact your supplier or the manufacturer to have the unit repaired against payment of an individual service fee, if possible. The interface has several ports and slots. Only connect or insert devices, cables, and connectors to the individual ports and slots using connectors of the same type as the port. Do not use inapplicable equipment. This device should be used by professionals. The device is not designed to be operated by non-professionals or children. 3 English Two years of limited manufacturer’s warranty are granted to the purchaser of this product. Warranty applies to constructional fault, material defect, or incorrect assembly the manufacturer has caused or is to be held responsible for. Warranty will be void if the interface is opened, modified, damaged through inappropriate handling and wrong usage, damaged through electric current (electricity), or damaged through any other cause. End-Of-Life This electrical device and its accessories need to be disposed of properly. Do not throw the device into normal trash or household waste. Please recycle packaging material whenever possible. Usage In general, this device is designed to be operated as a hardware control interface to be connected towards various types of controllable lights / lighting controllers via DMX512 (USB-to-DMX) or Art-Net (DMX-over-Ethernet). Do not use the interface for any other, deviant purpose. The device can be connected to and disconnected from the PC during use and without a reboot (Hot Swapping & Plug and Play). Multiple interfaces can be used at the same time. Please mind the correct supply of power in this case. Technical Details USB power supply: Power consumption: USB port: DMX512: DMX512 ports: Ethernet/Art-Net: Extension port: SD card slot: Case: Dimensions: Weight: External, AC 100V-240V ~ 60/50Hz input, 5.2V DC and 1000mA max. output over USB 2.5 Watts max. (500mA max.) USB 2.0, type B plug, Power over USB 2x 512 DMX channels, input or output 5-pin, XLR, female, NEUTRIK RJ45, Ethernet plug, NEUTRIK 15-pin, D-Sub, US, female SD and SDHC cards are supported Metal enclosure, IP20 154mm x 111mm x 45mm (length by width by height) 500g WHEN CONNECTING TO USB, ALWAYS USE AN ACTIVE USB 2.0 PORT OR A USB 2.0 HUB WITH ITS OWN POWER SUPPLY. THE DEVICE REQUIRES 5V DC TO WORK. DO NOT USE ANY OTHER VOLTAGE BECAUSE IT CAN DAMAGE THE DEVICE. 4 Power Supply Important: Pay attention to all individual warnings and instructions given in this quick start guide! How To Open The Metal Lid The MADRIX® PLEXUS is equipped with a metal lid at the top. It covers the SD card slot, the extension port, and the Kensington Security Slot. Opening The Lid Step 1) Hold the PLEXUS at the left and right side with both hands. You should face the display. Place your thumbs near the display. Step 2) Use both index fingers at the back of the device to push the lid towards you. Push at the upper edge of the device. Step 3) Use your thumbs to push the lid upwards. Closing The Lid It is recommended to close the metal lid whenever possible during use and storage. To close the lid again, push it down to its original position. You may hear a clicking sound. 5 English The MADRIX® PLEXUS can be powered in two ways. You can either use the provided external power supply or you can connect the device directly to a free USB 2.0 port of your computer. Connectivity Bottom Connections DMX 1 DMX 2 Top Connections USB/Power Ethernet Push to Eject SD Extension 1 2 3 4 5 6 7 8 9 10 7) Status LED for SD card slot 8) SD card slot 9) Kensington Security Slot 10) Extension port 1) XLR port, DMX 1 2) XLR port, DMX 2 3) Status LED for USB/Power 4) USB/Power port 5) Status LED for Ethernet 6) RJ45 Ethernet port 3-Pin And 5-Pin XLR Connector Layout The images below outline the general pin layout of 5-pin and 3-pin XLR ports. 5-Pin 2 1 3 Description 4 5 1 2 3 4 5 Ground DMX – DMX + Spare Spare 3-Pin 3 1 2 Please note: The MADRIX® PLEXUS features two 5-pin, female XLR connectors. Please use XLR adapters if necessary. Monitoring DMX Output Or DMX Input You can monitor incoming or outgoing DMX values in the PLEXUS menus ‘Tools’ à ‘Monitor DMX1’ and ‘Tools’ à ‘Monitor DMX2’. 6 SD Cards Please note: The package of the PLEXUS includes one SD card with 2GB capacity. The SD card is already inserted into the SD card slot when shipped. Inserting The SD Card Hold the SD card as shown on the device! The canted edge must point to the status LED and the pins must face towards the display. Now, carefully push the SD card into the SD card slot until it clicks and snaps into its position. Removing The SD Card Slowly and carefully press the already inserted SD card into the device a little further. Then, release the pressure. The implemented mechanism will automatically release the SD card, which will then stick out from the slot. Use two fingers to pull the card out of the slot. Kensington Security Slot In order to prevent unauthorized removal, you may use Kensington lock security equipment. Attach the cable around an immovable object, insert the compatible connector into the Kensington Security Slot of the PLEXUS and secure the lock according to the instructions provided with the lock, for example by turning the key or the combination lock. LCD Graphics Display How To Navigate Through Menus Click ‘OK’ to open the menu bar. Then, navigate with the help of the arrow buttons. When you have selected your target menu, press ‘OK’ to enter it. How To Edit Values Press ‘OK’ for two seconds. You can now change the value(s). Use the arrow keys for editing and navigation. Press ‘OK’ to apply the changes. 7 English The integrated SD card slot is located at the top of the device. In order to access it, please open the metal lid first (see ‘How To Open The Metal Lid’ on page 5). It supports SD or SDHC cards. SDHC cards are recommended. Icons An SD card is inserted into the device. No SD card is inserted into the device. The values in the menu are editable. You can change the settings. Freeze is activated. The icon is blinking. Important PLEXUS Menus Status Outgoing and Incoming Data Playback Language IP Address 8 Navigate to the menu ‘Info’ à ‘Status’. The name of the device, its IP address, the time and date, the status, and the status of the bottom connections are displayed. Outgoing Data Incoming Data | Connected X Not Connected Navigate to the menu ‘Stand-Alone’ à ‘Playback’. Details of the current Scene are displayed. And you may control playback. Learn more in the chapter ‘Control Buttons’ in this guide on page 17. Navigate to the menu ‘Settings’ à ‘Device’. Change the language as described above in ‘How To Edit Values’ on page 7. Navigate to the menu ‘Settings’ à ‘Network’. If necessary, change the settings as described above in ‘How To Edit Values’ on page 7. Description Of Status LED Codes English The following tables describe the status codes of the three status LEDs. COLOR Powered off Light green Blinking green Fading between green + red Orange STATUS LED USB/POWER USB/Power not connected. The device has no power. Connected to the external power supply. The power is on. Communicating over USB; Sending or receiving data over USB; The power is on. The interface works correctly. Connected to USB; Drivers installed correctly; The power is on. The interface works; No communication; No data is sent or received over USB. Connected to USB; No drivers installed. Please reinstall software and drivers or try using a different USB port. COLOR STATUS LED ETHERNET Powered off The device has no power. The device has power. The Ethernet port is ready to use. Communicating over Ethernet; Sending or receiving data over Ethernet. The interface works correctly. Connected to Ethernet. The interface works; No communication; No data is sent or received over Ethernet. Light green Blinking green Fading between green + red COLOR STATUS LED SD CARD SLOT Powered off The device has no power. The device has power. The SD card slot is ready to use. Reading or writing data from or to the SD card. The interface works correctly. SD card is inserted. The interface works; No data is read or written. Light green Blinking green Fading between green + red 9 Using The MADRIX® Software MADRIX® is a professional and advanced LED lighting control software. The PLEXUS already includes the software license for 1024 DMX channels. The data output (the license) is automatically activated when you connect the PLEXUS to a computer that has the MADRIX® software installed and the USB and/or Ethernet drivers enabled in MADRIX®. You can use MADRIX® for the PLEXUS Live Mode, to create PLEXUS Configurations and Stand-Alone Shows, or to configure your device further. Minimum System Requirements 2.0 GHz dual-core CPU, 1024 MB RAM, 500 MB free harddisk space, screen resolution of 1280 x 768, network card, USB 2.0. A sound card is optional (required for Sound2Light and Music2Light). To access the full range of features, it is recommended to install the MADRIX® software provided with the PLEXUS. MADRIX® 2.X software updates are free of charge for the purchaser of this product. The latest MADRIX® software, including drivers and documentation, and the latest quick start guide as well as the latest MADRIX® PLEXUS User Manual are available online at http://www.madrix.com PLEASE INSTALL THE SOFTWARE AND DRIVERS FROM THE CD BEFORE YOU CONNECT THE MADRIX® PLEXUS TO YOUR PC. Supported Operating Systems The MADRIX® PLEXUS comes with software and drivers for the following operating systems. Microsoft® Windows® XP (SP2) | Vista | 7 Windows® XP requires Service Pack 2 (SP2). 10 Compatible with 32 bit and 64 bit Installing The MADRIX® Software And Drivers DO NOT CONNECT THE MADRIX® PLEXUS TO YOUR COMPUTER BEFORE INSTALLING THE MADRIX® SOFTWARE. Please click ‘Next’ to start the installation. You may abort the process at any time by clicking ‘Cancel’. The ‘License Agreement’ will appear. It outlines the terms you are agreeing to when you install the software. You must accept these terms in order to continue. Please click ‘I Agree’. 11 English Insert the CD that comes with the MADRIX® PLEXUS into the CD-ROM drive of your operational computer. The MADRIX® software setup will launch automatically. Follow the on-screen installation instructions as described below. The next window offers the chance to select which components and which drivers you want to install. A description is given for each item. Please make sure to select ‘MADRIX’ and ‘Interface Driver’, which are the most important components for operating the MADRIX® PLEXUS. Please click ‘Next’. The next section called ‘Destination Folder’ allows you to select the location on your harddisk where the software will be installed. Please choose a location and then click ‘Install’. The installation process may take a few minutes. When the ‘Complete’ window appears, click ‘Next’. Afterwards, click ‘Finish’ to complete the installation process. 12 Manually Installing The PLEXUS Driver In Windows Vista or Windows 7, click ‘Start’ à ‘Control Panel’ à ‘System and Security’ (or just ‘System’) à ‘Device Manager’. Right-click on ‘MADRIX PLEXUS’ in the section ‘Other devices’ and choose ‘Update Driver Software…’. Then, navigate to the driver location on your harddisk: ‘C:\Program Files (x86)\MADRIX\madrixusbdriver\plexus\windows’ In Windows XP, click ‘Start’ à ‘Settings’ à ‘Control Panel’ à ‘Systems’ à tab ‘Hardware’ à ‘Device Manager’. Right-click on ‘MADRIX PLEXUS’ in the section ‘Other devices’ and choose ‘Update Driver Software…’. Then, navigate to the driver location on your harddisk: ‘C:\Program Files\MADRIX\madrixusbdriver\plexus\windows’ Enabling USB Drivers In MADRIX® In MADRIX®, please open the menu ‘Preferences’ à ‘Options…’. Select the tab ‘Devices (USB/PCI)’. Now, activate the option ‘MADRIX PLEXUS interfaces’. Press ‘OK’. Please note: Enabled USB drivers are required for Live Mode via USB and the USB connection from your PC to the device. Enabling Network Drivers In MADRIX® In MADRIX®, please open the menu ‘Preferences’ à ‘Options…’. Select the tab ‘Devices (Network)’. Now, activate the option ‘Enable PLEXUS Networking’ in the section ‘inoage – MADRIX’. Press ‘OK’. Please note: Enabled network drivers (PLEXUS Networking) are required for the Ethernet connection from your PC to the device. 13 English When Windows indicates that the hardware driver has not been installed correctly, please manually update the driver. Live Mode You can use this interface as a live controller to send DMX data via MADRIX®. You can either use 2x DMX-OUT, or 2x DMX-IN, or 1x DMX-OUT as well as 1x DMX-IN, or Art-Net in Live Mode. Please make sure to install the MADRIX® software first. Afterwards, please connect the PLEXUS directly to a free USB 2.0 port of your computer or use the USB power supply (or USB 2.0) and the network connection for Art-Net. If the MADRIX® PLEXUS driver has been installed properly, the status LEDs will light up accordingly, as described on page 9. Start the MADRIX® software now if not yet done. Configuration of the DMX-OUT or Art-Net functionality can be set up directly in MADRIX® using the ‘Device Manager’. In MADRIX®, navigate to the menu ‘Preferences’ à ‘Device Manager’ à ‘DMX Devices’, and à ‘Art-Net’ (if needed). Also remember to configure your virtual light matrix in the menu ‘Preferences’ à ‘Matrix Generator’ or ‘Preferences’ à ‘Patch’. For more information, please read the user manuals. Using MADRIX® PLEXUS As DMX-IN Interface You can use this interface to receive DMX data via MADRIX®. For DMX-IN, please use a Male to Male 3-pin or 5-pin XLR Gender Changer if necessary. Configuration of DMX input can be set up directly in MADRIX®. In MADRIX®, navigate to the menu ‘Preferences’ à ‘Device Manager’ and select the tab ‘DMX Devices’. Select your interface and activate ‘Enable’ as well as ‘Input’ in the ‘Settings’ section. Press ‘Apply’. In the next step, configure your PLEXUS to control MADRIX® remotely under ‘Preferences’ à ‘Device Manager’ à ‘DMX Input’. Choose an entry in the list (Universe 1 to 8), select your ‘DMX-IN Device’, and activate ‘Remote’. Then, choose one of the input protocols in the section ‘Remote Control’ and press ‘Apply’. Close the window with ‘OK’. For more information, please read the user manuals. 14 Stand-Alone Mode Several steps are required to create a Stand-Alone Show for your device. 1) Please configure your virtual matrix according to your LED installation. In MADRIX®, navigate to the menu ‘Preferences’ à ‘Matrix Generator’ or ‘Preferences’ à ‘Patch’ for this task. 2) Create the effects you wish to use with the help of the graphical user interface (GUI) of the software MADRIX®. 3) Navigate to the menu ‘Window’ à ‘Cue List’ in MADRIX® if you wish to create a playlist. A live record is also possible without a Cue List. 4) Recording your effects and thus creating a MADRIX Record File (*.mrec) is possible with the ‘Recording’ dialog (tab ‘Recording’ and tab ‘Edit Record’). In MADRIX®, open the menu ‘Window’ à ‘Recording…’. 5) Converting Record Files (*.mrec) into DMX Data Files (*.dxd) is also done with the help of the ‘Recording’ dialog (tab ‘PLEXUS Conversion’) in MADRIX®. 6) In order to create a PLEXUS Configuration, the Stand-Alone Show for your device, please use the ‘PLEXUS Configuration’ dialog. In MADRIX®, open the menu ‘Tools’ à ‘PLEXUS Configuration…’. 7) Export your show to the SD card or transfer the PLEXUS Configuration directly to the SD card in your device over USB or Ethernet. In MADRIX®, open the menu ‘Tools’ à ‘PLEXUS Configuration…’. 8) Manually activate playback on the device, in case you did not configure ‘AutoPlay’ in your PLEXUS Configuration. More information on each step is provided in the user manuals. 15 English Stand-Alone Mode is an important feature of the MADRIX® PLEXUS. 1x DMX-OUT, 2x DMX-OUT, or Art-Net is available in Stand-Alone Mode. The PLEXUS uses an SD card to run automatic light shows without the need for a computer. However, a MADRIX PC is required to preprogram the shows. Extension Port – Remote Control The MADRIX® PLEXUS features a 9 10 11 12 13 14 15 15-pin serial connector with 1 2 3 4 5 6 7 8 individually addressable ports. The extension port makes it possible to Extension connect external analog or digital devices for remote control. In MADRIX®, please open the menu ‘Preferences’ à ‘PLEXUS Configuration…’ à ‘Extension Ports’ to configure each port individually for the corresponding PLEXUS Configuration. 1 Pin 1 2 3 4 5 6 7 8 9 10 11 12 13 14 15 Assignment Available Settings Ground Port 1 Port 3 Port 5 Port 7 Port 9 Digital Input, Digital Output, Analog Input Digital Input, Digital Output, Analog Input Digital Input, Digital Output, Analog Input Digital Input, Digital Output Digital Input, Digital Output 5V, 100mA max. (shared with Pin 9) Power Ground Power 5V, 100mA max. (shared with Pin 7) Digital Input, Digital Output, Analog Input Digital Input, Digital Output, Analog Input Digital Input, Digital Output, Analog Input Digital Input, Digital Output Digital Input, Digital Output Port 2 Port 4 Port 6 Port 8 Port 10 Ground Web Server – Remote Control The PLEXUS provides an integrated web server. Connect your PLEXUS and the remote device accessing the PLEXUS to a network. Open a web browser and type in the IP address of your PLEXUS. The IP address can be found and changed in the PLEXUS menu ‘Settings’ à ‘Network’. Once loaded, the page will show an interactive illustration of your device for remote control. Please note: Make sure to use one and the same network and check if the settings of the operating system and the settings of the PLEXUS are correct. 16 Control Buttons You may skip to the next Scene or go back to the last Scene by manually using the ‘left’ and the ‘right’ button on the device. Pause playback by using the ‘down’ button and continue playback by pressing ‘down’ for the second time. Stop playback entirely by using ‘up’. Start playback again by pressing ‘down’. Managing Devices Further You can further manage and set up your device. In MADRIX®, please open the menu ‘Tools’ à ‘PLEXUS Configuration…’. More information is provided in the user manuals. Further Information Digital documentation files are automatically installed with the MADRIX® software. More information about the device is provided in the MADRIX® PLEXUS User Manual. More information about the software is provided in the MADRIX® Help And Manual (the software user manual). You can also open the MADRIX® Help And Manual by pressing ‘F1’ on your keyboard or by navigating to the menu ‘Help’ à ‘Help…’ while using the MADRIX® software. Support In case of further questions concerning handling of the MADRIX® PLEXUS or technical problems, please read the MADRIX® PLEXUS User Manual and the MADRIX® Help And Manual first, contact your dealer, or have a look at the website http://www.madrix.com You can also directly contact [email protected] 17 English The five control buttons can be used for manual control during stand-alone playback. Please navigate to the PLEXUS menu ‘Stand-Alone’ à ‘Playback’. Frequently Asked Questions (FAQs) Do I need a MADRIX® PLEXUS and a MADRIX® KEY? No. The MADRIX® software license for up to 1024 DMX channels data output is already included. The MADRIX® KEY is not necessary for operating the MADRIX® PLEXUS. However, you may connect both to your computer to use their output features together. Is it possible to use more than one MADRIX® PLEXUS? Yes. Multiple devices can be used together to control larger LED projects. Can I upgrade the PLEXUS software license? No. One PLEXUS includes a software license for 1024 DMX channels. But you may simply purchase another PLEXUS (or more) to access more channels. Can I use a mobile computer instead of a desktop computer? Yes. Mobile computers, such as laptops/notebooks, may be used to run the MADRIX® software. Please pay attention to the system requirements and the power saving options of your operating system. Can I use other software apart from MADRIX® to control lights? No. The recommended software is MADRIX®. Can I use this interface to control lasers, moving heads, or scanners? No. The MADRIX® software is not designed for such an area of application. What do the blinking LEDs mean? Please read the chapter ‘Description Of LED Status Codes’ in this quick start guide on page 9. Can I repair the MADRIX® PLEXUS myself? No. Do not attempt any repairs. Any attempt will void your warranty! Please contact your dealer or supplier if the device seems to be defective. What can I do if my interface does not work anymore during the warranty period? Please contact your dealer or supplier. 18 MADRIX® PLEXUS – Kurzanleitung 2. Edition, Stand: Juli 2012 Deutsch Vielen Dank, dass Sie sich für das MADRIX® PLEXUS entschieden haben! Bitte lesen Sie sich diese Kurzanleitung aufmerksam und sorgfältig vor der Erstbenutzung durch. Vergewissern Sie sich, dass Sie alle Informationen verstanden haben. Diese Kurzanleitung und das weiterführende MADRIX® PLEXUS Handbuch liegen in englischer und deutscher Sprache vor. Die Software MADRIX® und dazugehörige Handbücher liegen in englischer Sprache vor. Hergestellt in Deutschland Impressum inoage GmbH Fetscherplatz 5 01307 Dresden Deutschland Geschäftsführer: Christian Hertel, Sebastian Pinzer, Sebastian Wissmann Amtsgericht Dresden, HR B 29795 WEEE-Reg.-Nr. DE 26695213 USt-IdNr. DE276174128 Telefon +49 351 482 056 30 Fax +49 351 482 056 31 http://www.madrix.com [email protected] 1 Urheberrecht und Haftungsausschluss © 2012 inoage GmbH. Alle Rechte vorbehalten. Änderungen und Irrtümer vorbehalten. Reproduktion, Adaption oder Übersetzungen sind ohne vorherige, schriftliche Erlaubnis nicht gestattet. Dieses Handbuch wurde mit größter Sorgfalt verfasst. inoage GmbH gibt jedoch keine Gewähr hinsichtlich Richtigkeit, Marktfähigkeit oder Eigenschaften des Produkts. Es gibt keinen rechtlichen oder anderen Weg, Anspruch gegenüber inoage GmbH zu erheben. inoage GmbH schließt jede Haftung für Schäden, Nachteile sowie Folgeschäden aus, die durch Absatzausfall sowie durch die Benutzung des Produktes, durch den Verlust der Betriebsfähigkeit des Produktes, durch unsachgemäße Benutzung, Ereignisse, Umstände oder Handlungen, auf die inoage GmbH keinen Einfluss hat, ganz gleich, ob es sich um direkte oder indirekte Schäden und Folgeschäden, ob es sich um spezielle Schäden handelt oder ob diese vom Besitzer oder einer dritten Person verursacht wurden. Eingetragene Marken Microsoft®, Windows® sind eingetragene Marken der Microsoft Corporation. Kensington ist eine eingetragene Marke von ACCO Brands. NEUTRIK® ist eine eingetragene Marke der Neutrik AG. Art-Net™ - Entwicklung und Copyright Artistic Licence (UK) Ltd. SD™, SDHC™ sind Warenzeichen. Alle anderen genannten Produkte können eingetragene Marken der jeweiligen Firmen sein. MADRIX® ist eine eingetragene Marke der inoage GmbH. Verpackungsinhalt 1x MADRIX® PLEXUS 1x 2 GB SD-Karte (bereits in das Gerät eingesteckt) 1x USB-Netzteil 1x USB-Kabel 1x Set an internationalen Netzteilsteckern 1x Kurzanleitung 1x CD-ROM mit MADRIX® – Software Überprüfen Sie den Verpackungsinhalt und das Gerät nach dem Auspacken. Kontaktieren Sie bitte Ihren Händler, sollte der Inhalt unvollständig oder beschädigt sein. Verwenden Sie das Produkt nicht bei Beschädigung! 2 Sicherheitshinweise und Garantie Bitte beachten Sie die nachstehenden Hinweise, um falsche Handhabung, gesundheitliche Schäden oder Geräteschäden zu vermeiden: ▴ ACHTUNG, GEFAHR! DAS NETZTEIL / DAS GERÄT ARBEITET MIT NETZSPANNUNG (100V – 240V). ▴ ▴ ▴ OK Betreiben Sie das Gerät nur in trockener Umgebung (Gebrauch in geschlossenen Räumen). Die Schutzklasse des Gerätes ist IP20. ! Vermeiden Sie hohe Luftfeuchtigkeit und Kontakt mit Wasser und jeglichen anderen Flüssigkeiten. Es wird empfohlen, das Gerät immer durch galvanische Trennung abzusichern (z.B. durch Optokoppler). Es sollte zu keiner Zeit Fremdspannung auf den DMXKabeln anliegen. Entfernen Sie keine Teile vom Gerät oder andere Bauteile und verbinden Sie das Gerät niemals mit einem ungeerdeten Stromkreis. Trennen Sie das Gerät bei längerer Nichtbenutzung vom Netz. Es gibt keine vom Benutzer zu wartenden Teile innerhalb des Gerätes. Eventuelle Reparaturarbeiten obliegen dem Hersteller. Wenden Sie sich bei Defekt bitte an Ihren Händler. Nach Ablauf der Garantie können kostenpflichtige Reparaturen beim Händler bzw. Hersteller angefragt werden. V erbinden Sie nur Geräte, Kabel, Anschlüsse, o.Ä., die dem Typ des jeweiligen Anschlusses am Gerät entsprechen. Verbinden und benutzen Sie keine Gerätschaften mit falschen Anschlüssen. Das Gerät sollte fachmännisch betrieben werden. Es ist für den professionellen Gebrauch vorgesehen und nicht für Kinder bestimmt. 3 Deutsch Der Käufer dieses Produktes erhält zwei Jahre Herstellergarantie auf das Produkt hinsichtlich Konstruktions- und Designfehler, Materialfehler oder fehlerhafte Montage soweit diese durch den Hersteller verursacht wurden oder er diese zu verantworten hat. Die Garantie erlischt sobald das Gerät geöffnet, verändert, modifiziert oder durch unsachgemäße Handhabung, durch Elektrizität oder durch anderweitige Ursachen beschädigt wurde. Altgeräte und Entsorgung Das Gerät, sein Zubehör sowie Verpackungsmaterial müssen ordnungsgemäß entsorgt werden. Geben Sie nichts in den Hausmüll. inoage ist beim bundesweiten Rücknahmesystem für Elektronische Geräte (EAR) registriert (WEEE-Reg.-Nr. DE 2669521). Benutzung Das Gerät ist als Steuerungsgerät konzipiert und wird als Interface an verschiedene, steuerbare Leuchtprodukte/Controller mit Hilfe von DMX512 (USB-zu-DMX512) bzw. Art-Net (DMX-über-Netzwerk) angeschlossen. Verwenden Sie das Gerät nur zu seinem vorgesehenen Zweck. Das Gerät kann während der Benutzung und ohne Neustarten des PCs von diesem getrennt und an diesen angeschlossen werden (sogenanntes Hot Swapping und Plug & Play). Mehrere Geräte können zur selben Zeit betrieben werden. Dabei ist auch auf die richtige Stromversorgung zu achten. Technische Daten Extern, Einspeisung: 100 V - 240 V Wechselstrom, ~ 60/50 Hz, Ausgabe: 5,2 V Gleichstrom, max. 1000 mA Stromaufnahme: Max. 2,5 Watt (bei max. 500 mA) USB-Anschluss: USB 2.0, Stecker vom Typ B, Strom über USB 2x 512 DMX-Kanäle, Ein- und Ausgabe DMX512: DMX-Anschlüsse: 5-polig, XLR, weiblich, NEUTRIK Netzwerk/Art-Net: RJ45, Netzwerkstecker, NEUTRIK Erweiterung: 15-polig, D-Sub, US, weiblich SD- und SDHC-Karten werden unterstützt SD-Karten: Metallgehäuse, Schutzklasse IP20 Gehäuse: 154 mm x 111 mm x 45 mm (Länge x Breite x Höhe) Abmaße: Gewicht: 500 g USB-Netzteil: NUTZEN SIE BEI USB IMMER AKTIVE USB 2.0-ANSCHLÜSSE ODER USB 2.0-HUBS MIT EIGENER STROMVERSORGUNG. NUTZEN SIE AUSSCHLIESSLICH 5 V GLEICHSTROM FÜR DIE STROMVERSORGUNG DES GERÄTES. 4 Stromversorgung Das MADRIX® PLEXUS kann auf zwei Arten mit Strom versorgt werden. Nutzen Sie entweder das externe USB-Netzteil oder verbinden Sie das PLEXUS direkt mit einem freien USB 2.0-Anschluss Ihres Computers. Öffnen der Metallklappe Das MADRIX® PLEXUS ist mit einer soliden Metallklappe am oberen Ende des Gerätes ausgestattet. Diese schützt den SD-Kartensteckplatz, den Erweiterungsanschluss sowie den Kensington-Sicherheitsanschluss. Öffnen der Klappe Schritt 1) Umschließen Sie das Gerät mit beiden Händen. Platzieren Sie die Daumen neben dem Display. Dieses sollte zu Ihnen gerichtet sein. Schritt 2) Nutzen Sie beide Zeigefinger, um die Klappe von hinten in Ihre Richtung zu drücken. Drücken Sie dazu ganz oben am Gerät. Schritt 3) Schieben Sie die Klappe mit den Daumen nach oben. Schließen der Klappe Die Metallklappe sollte während des Betriebes des Gerätes und während der Lagerung möglichst geschlossen gehalten werden. Drücken Sie die Klappe dazu herunter und lassen Sie sie wieder in ihre Position einrasten. Dabei kann ein Klick-Geräusch entstehen. 5 Deutsch Wichtig: Beachten Sie unbedingt alle Hinweise und Warnungen in dieser Kurzanleitung! Anschlussmöglichkeiten Anschlüsse Unten DMX 1 DMX 2 Anschlüsse Oben USB/Power Ethernet Push to Eject SD Extension 1 2 3 4 5 6 7 8 9 10 7) Status-LED für den SD-Kartensteckplatz 8) SD-Kartensteckplatz 9) KensingtonSicherheitsanschluss 10) Erweiterungsanschluss 1) XLR-Anschluss, DMX 1 2) XLR-Anschluss, DMX 2 3) Status-LED für USB/Strom 4) Anschluss für USB/Strom 5) Status-LED für Netzwerk 6) RJ45-Netzwerkanschluss Allgemeine Pin-Belegung von XLR-Anschlüssen Hier findet sich die allg. Belegung von 5-poligen bzw. 3-poligen XLR-Steckern. 5-polig 2 1 3 Belegung 4 5 1 2 3 4 5 Masse DMX – DMX + Frei Frei 3-polig 3 1 2 Hinweis: Das PLEXUS hat zwei 5-polige, weibliche XLR-Stecker. Bitte nutzen Sie entsprechende Adapter, wenn nötig. Anzeige von DMX-Daten Ein- und ausgehende DMX-Daten können in den PLEXUS-Menüs “Werkzeuge” à “Anzeige DMX1” und “Werkzeuge” à “Anzeige DMX2” überprüft werden. 6 SD-Karten Der integrierte SD-Kartensteckplatz befindet sich oben am Gerät. Zugang erhält man durch die angebrachte Metallklappe (siehe Abschnitt “Öffnen der Metallklappe” auf Seite 5). Unterstützt werden sowohl SD- als auch SDHCKarten. SDHC-Karten werden empfohlen. Einstecken der SD-Karte Halten Sie die SD-Karte wie auf dem Gerät dargestellt! Die abgeschrägte Ecke muss zur Status-LED und die Kontakte müssen in Richtung Display zeigen. Drücken Sie im Anschluss die SD-Karte vorsichtig in den Steckplatz, bis diese einrastet. Entfernen der SD-Karte Drücken Sie die SD-Karte im Steckplatz vorsichtig mit dem Finger nach unten, bis Widerstand zu spüren ist. Der Mechanismus gibt dann die Karte automatisch frei, sobald man loslässt. Die Karte kann im Anschluss mit zwei Fingern entnommen werden. Kensington-Sicherheitsanschluss Der Kensington-Anschluss kann zur Diebstahlsicherung eingesetzt werden. Mit Hilfe von entsprechendem Zubehör sichert man das PLEXUS an unbeweglichen Objekten. Der Sicherheitsanschluss wird entsprechend der Anleitung, die dem Zubehör beiliegt, verwendet und beispielsweise per Schlüssel oder Zahlenschloss gesichert. LCD-Grafikdisplay Symbole Eine SD-Karte ist in das Gerät eingesteckt. Es befindet sich keine SD-Karte im Gerät. Die Werte in diesem Menü können bearbeitet werden. Einfrieren ist aktiviert. Das Symbol blinkt. 7 Deutsch Hinweis: Eine SD-Karte mit 2 GB Speicherplatz ist im Lieferumfang enthalten. Diese SD-Karte wurde bereits in das Gerät eingesteckt. Wie geht die Menü-Auswahl? Drücken Sie “OK”, um das Menü zu öffnen. Nutzen Sie dann die Pfeiltasten zur Navigation. Wenn der gewünschte Menüpunkt ausgewählt ist, drücken Sie “OK”, um ihn zu aktivieren. Wie bearbeitet man Werte? Halten Sie die “OK”-Taste für 2 Sekunden gedrückt. Nutzen Sie die Pfeiltasten, um zu navigieren oder die Werte zu ändern. Die Eingabe wird mit “OK” gespeichert. Sprache Status Ein- und ausgehende Daten Wiedergabe IP-Adresse 8 Öffnen Sie das Menü “Settings” à “Device” bzw. “Einstellungen” à “Gerät”. Ändern Sie die Sprache (“Language”) wie oben unter “Wie bearbeitet man Werte?” beschrieben. Öffnen Sie das Menü “Info” “Status”. Gerätename, IP-Adresse, Zeit und Datum, allgemeiner Status sowie der Status der unteren Anschlüsse werden daraufhin angezeigt und kontinuierlich aktualisiert. Ausgehende Daten Eingehende Daten X Nicht Verbunden | Verbunden Öffnen Sie das Menü “Standalone” “Wiedergabe”. Details zur Szene werden angezeigt und Sie können die Wiedergabe steuern. Mehr Informationen finden Sie auf S. 17: “Bedientasten zur Steuerung”. Öffnen Sie das Menü “Einstellungen” “Netzwerk”. Ändern Sie die Werte wie oben unter “Wie bearbeitet man Werte?” beschrieben, wenn nötig. Anzeige der Status-LEDs Die folgenden Tabellen beschreiben die Funktionen der drei Status-LEDs. FARBE Schwaches grün Grün blinkend Überblenden zwischen grün + rot Orange USB/Power ist nicht angeschlossen. Das Gerät hat keinen Strom. Das USB-Netzteil ist angeschlossen. Das Gerät hat Strom. Kommunikation über USB; Daten werden über USB gesendet oder empfangen; Das Gerät hat Strom. Das Gerät funktioniert und arbeitet. Angeschlossen an USB; Treiber korrekt installiert; Das Gerät hat Strom. Das Gerät funktioniert; Keine Kommunikation; Kein Datenverkehr über USB. Angeschlossen an USB; Treiber nicht installiert. Bitte Software und Treiber neu installieren oder anderen USB 2.0-Anschluss testen. FARBE STATUS-LED ETHERNET (NETZWERK) Ausgeschalten Das Gerät hat keinen Strom. Das Gerät hat Strom. Der Netzwerkanschluss ist bereit zur Nutzung. Kommunikation über Netzwerk; Daten werden über Netzwerk gesendet oder empfangen. Das Gerät funktioniert und arbeitet. Netzwerk ist angeschlossen. Das Gerät funktioniert; Keine Kommunikation; Kein Datenverkehr über Netzwerk. Schwaches grün Grün blinkend Überblenden zwischen grün + rot FARBE STATUS-LED SD-KARTENSTECKPLATZ Ausgeschalten Das Gerät hat keinen Strom. Das Gerät hat Strom. Der SD-Kartensteckplatz ist bereit zur Nutzung. SD-Kartendaten werden gelesen oder geschrieben. Das Gerät funktioniert und arbeitet. Eine SD-Karte ist in das Gerät eingesteckt. Keine Daten werden gelesen oder geschrieben. Schwaches grün Grün blinkend Überblenden zwischen grün + rot Deutsch Ausgeschalten STATUS-LED USB/POWER (USB/STROM) 9 Nutzung der MADRIX®-Software MADRIX® ist eine professionelle Software zur Steuerung von LEDs. Das PLEXUS bringt die Softwarelizenz für 1024 DMX-Kanäle bereits mit. Die Datenausgabe (die Lizenz) wird aktiviert, sobald das Gerät an einen Computer mit installierter und gestarteter MADRIX®-Software angeschlossen wird. Die USB- bzw. Netzwerktreiber müssen zudem in MADRIX® aktiviert sein. MADRIX® kann für den Live-Modus des PLEXUS, für die Erstellung von PLEXUSKonfigurationen und Standalone-Shows oder zur weiteren Konfiguration der Geräte verwendet werden. Mindestvoraussetzungen für Computer Zweikern-Prozessor mit 2,0 GHz, 1024 MB RAM, 500 MB freier Festplattenspeicherplatz, Monitorauflösung von 1280 x 768, Netzwerkkarte, USB 2.0. Eine Soundkarte ist optional (für Sound2Light- und Music2LightEffekte benötigt). Für eine einfache Installation und Zugang zu allen Funktionen des Gerätes wird empfohlen, die mitgelieferte Software MADRIX® zu installieren. MADRIX® 2.X-Software-Updates inkl. Treiber und die neueste Version dieser Kurzanleitung sowie weitere Dokumentation sind kostenlos im Internet erhältlich unter http://www.madrix.com INSTALLIEREN SIE BITTE DIE SOFTWARE UND TREIBER VON DER CD-ROM BEVOR SIE DAS GERÄT AN DEN PC ANSCHLIESSEN. Unterstützte Betriebssysteme Das PLEXUS wird mit Software und Treibern für die folgenden Betriebssysteme ausgeliefert. Microsoft® Windows® XP (SP2) | Vista | 7 Windows® XP setzt Service Pack 2 (SP2) voraus. 10 Kompatibel zu 32-bit und 64-bit Installation der MADRIX®-Software und Treiber Legen Sie die mitgelieferte CD in das CD-ROM-Laufwerk Ihres betriebsbereiten Computers ein. Die Installationsroutine von MADRIX® startet daraufhin automatisch auf Ihrem PC. Folgen Sie nun den Anweisungen auf dem Bildschirm, wie im Folgenden beschrieben. VERBINDEN SIE DAS GERÄT BITTE NICHT VOR DER INSTALLATION DER SOFTWARE MIT IHREM PC. Um die Installation zu starten, klicken Sie bitte auf “Next”, wenn das oben dargestellte Fenster erscheint. Der Installationsvorgang kann zu jeder Zeit mit “Cancel” abgebrochen werden. Im nächsten Schritt erscheint das “License Agreement” (Lizenzabkommen). Es umfasst die Vereinbarungen zur Nutzung der Software. Bitte klicken Sie auf “I Agree”, um zuzustimmen und fortzufahren. 11 Deutsch Das nächste Fenster stellt die Installationskomponenten zur Auswahl. Eine Beschreibung ist für jede Komponente gegeben. Bitte vergewissern Sie sich, dass mindestens “MADRIX” sowie “Interface Driver” ausgewählt wurde (Häkchen gesetzt). Diese Komponenten werden für den Gebrauch des MADRIX® PLEXUS benötigt. Klicken Sie nun auf “Next”. Im nächsten Fenster “Destination Folder” wird nach dem Installationsort gefragt. Bitte wählen Sie einen Ort auf Ihrer Festplatte aus und klicken Sie im Anschluss auf “Install”. Bitte warten Sie zunächst ab. Die Installation kann einige Minuten Zeit in Anspruch nehmen. Wenn das Fenster “Complete” erscheint, klicken Sie bitte auf “Next”. Im nächsten Fenster klicken Sie bitte auf “Finish”, um die Installation abzuschließen. 12 Der Gerätetreiber des MADRIX® PLEXUS Wenn Windows anzeigt, dass der Gerätetreiber nicht korrekt installiert werden konnte, so aktualisieren Sie den Treiber bitte von Hand. Rufen Sie in Windows XP “Start” “Einstellungen” “Systemsteuerung” “System” Reiter “Hardware” “Geräte-Manager” auf. Führen Sie unter “Andere Geräte” einen Rechtsklick auf “MADRIX PLEXUS” aus und wählen Sie “Treiber aktualisieren…”. Navigieren Sie zu diesem Treiber-Ordner: “C:\Programme\MADRIX\madrixusbdriver\plexus\windows” Aktivieren der USB-Treiber in MADRIX® Öffnen Sie bitte das Menü “Preferences” “Options…” in MADRIX®. Wählen Sie den Reiter “Devices (USB/PCI)” aus. Aktivieren Sie “MADRIX PLEXUS interfaces”. Bestätigen Sie mit “OK”. Hinweis: Aktivierte USB-Treiber sind zwingende Voraussetzung für den LiveModus über USB und die Verbindung vom PC zum Gerät über USB. Aktivieren der Netzwerktreiber in MADRIX® Öffnen Sie bitte das Menü “Preferences” “Options…” in MADRIX®. Wählen Sie den Reiter “Devices (Network)” aus. Aktivieren Sie “Enable PLEXUS Networking” in dem Bereich “inoage – MADRIX”. Bestätigen Sie mit “OK”. Hinweis: Aktivierte Netzwerktreiber sind zwingende Voraussetzung für die Verbindung vom PC zum Gerät über Netzwerk. 13 Deutsch Rufen Sie in Windows Vista oder Windows 7 “Start” “Systemsteuerung” “System und Sicherheit” (oder nur “System”) “Geräte-Manager” auf. Führen Sie unter “Andere Geräte” einen Rechtsklick auf “MADRIX PLEXUS” aus und wählen Sie “Treiber aktualisieren…”. Navigieren Sie zu diesem TreiberOrdner: “C:\Programme (x86)\MADRIX\madrixusbdriver\plexus\windows” Live-Modus Das Gerät kann als Live-Interface für die Ausgabe von DMX-Daten mit Hilfe von MADRIX® eingesetzt werden. Entweder 2x DMX-OUT, oder 2x DMX-IN, oder 1x DMX-OUT und 1x DMX-IN, oder Art-Net stehen im Live-Modus zur Verfügung. MADRIX® muss zunächst, wie auf Seite 11 beschrieben, installiert werden. Schließen Sie das Gerät anschließend direkt über USB 2.0 oder für Art-Net mit Hilfe des USB-Netzteiles (oder USB 2.0) sowie über Netzwerk an. Wenn die Installation der Software und des Treibers erfolgreich war, zeigen die Status-LEDs dies an, wie auf Seite 9 beschrieben. MADRIX® kann jetzt gestartet werden, falls noch nicht geschehen. Die Konfiguration der DMX-Ausgabe oder von Art-Net geschieht in MADRIX® im “Device Manager”. Öffnen Sie in MADRIX® das Menü “Preferences” “Device Manager” “DMX Devices” und “Art-Net” (wenn gebraucht). Bitte konfigurieren Sie auch die virtuelle Matrize über das Menü “Preferences” “Matrix Generator” oder “Preferences” “Patch”. Weitere Informationen finden Sie in den Benutzerhandbüchern. DMX-IN-Funktionalität Das Gerät kann zum Empfang von DMX-Daten via MADRIX® genutzt werden. Ein Adapter (5-polig männlich auf 3-polig oder auf 5-polig männlich) wird eventuell benötigt. Rufen Sie in MADRIX® das Menü “Preferences” “Device Manager” und den Reiter “DMX Devices” auf. Wählen Sie Ihr Gerät aus und aktivieren Sie in der Sektion “Settings” das Feld “Enable” sowie “Input”. Bestätigen Sie mit “Apply”. Wählen Sie danach den Reiter “DMX Input” aus. Aktivieren Sie dort “Enable”, wählen Sie Ihr “DMX-IN Device” in der Liste aus und schalten Sie “Enable” in der Sektion “Remote Control” ein. Wählen Sie jetzt ein Protokoll bei “Input Protocol”. Klicken Sie auf “Apply”. Schließen Sie das Fenster mit “OK”. Weitere Informationen finden Sie in den Benutzerhandbüchern. 14 Standalone-Modus 1. Konfigurieren Sie die Matrize Ihrer LED-Installation in MADRIX® über das Menü “Preferences” “Matrix Generator” oder “Preferences” “Patch”. 2. Erstellen Sie die gewünschten visuellen Effekte mit Hilfe der grafischen Benutzeroberfläche der Software MADRIX®. 3. Öffnen Sie in MADRIX® das Menü “Window” “Cue List” zum Erstellen einer Abspielliste. Eine Live-Aufnahme ohne Abspielliste ist ebenso möglich. 4. Nehmen Sie Ihre visuellen Effekte auf und erstellen Sie somit ein MADRIX Record File (*.mrec). Öffnen Sie dazu in MADRIX® das Menü “Window” “Recording…” (Reiter “Recording” und “Edit Record”). 5. Konvertieren Sie MADRIX Record-Dateien (*.mrec) in sogenannte DMX Data Files (*.dxd). Öffnen Sie dazu in MADRIX® das Menü “Window” “Recording…” (Reiter “PLEXUS Conversion”). 6. Erstellen Sie eine PLEXUS-Konfiguration, d.h. Ihre Standalone-Show. Öffnen Sie dazu in MADRIX® das Menü “Tools” “PLEXUS Configuration…”. 7. Exportieren Sie Ihre PLEXUS-Konfiguration direkt auf die SD-Karte oder übertragen Sie diese direkt über USB oder die Netzwerkverbindung zum Gerät. Nutzen Sie in MADRIX® das Menü “Tools” “PLEXUS Configuration…”. 8. Aktivieren Sie die Wiedergabe am Gerät per Hand, falls “AutoPlay” in der PLEXUS-Konfiguration nicht konfiguriert wurde. Weitere Informationen zu den einzelnen Schritten finden Sie in den Benutzerhandbüchern, wie auf Seite 17 beschrieben. 15 Deutsch Der Standalone-Modus ist eine wichtige Funktion des MADRIX® PLEXUS. 1x oder 2x DMX-Ausgabe oder Art-Net stehen in diesem Modus zur Verfügung. Das PLEXUS nutzt die eingesteckte SD-Karte, um automatisch Lichtshows ohne Computer abzuspielen. Jedoch wird ein PC mit installierter MADRIX®-Software zur Einrichtung und Vorbereitung benötigt. Mehrere Schritte sind nötig, um eine Standalone-Show einzurichten: Erweiterungsanschluss zur Fernsteuerung Über den 15-poligen, seriellen Anschluss können externe analoge 1 2 3 4 5 6 7 8 und digitale Geräte zur Fernsteuerung angeschlossen werden. Extension Rufen Sie in MADRIX® im Menü “Preferences” “PLEXUS Configuration…” “Extension Ports” auf, um die 10 Ports für die jeweilige PLEXUS-Konfiguration individuell zu konfigurieren. 9 10 11 12 13 14 15 1 Pin 1 2 3 4 5 6 7 8 9 10 11 12 13 14 15 Belegung Optionen Masse Port 1 Port 3 Port 5 Port 7 Port 9 Stromanschluss Masse Stromanschluss Port 2 Port 4 Port 6 Port 8 Port 10 Masse Digital Input, Digital Output, Analog Input Digital Input, Digital Output, Analog Input Digital Input, Digital Output, Analog Input Digital Input, Digital Output Digital Input, Digital Output 5V, max. 100 mA (zusammen mit Pin 9) 5V, max. 100 mA (zusammen mit Pin 7) Digital Input, Digital Output, Analog Input Digital Input, Digital Output, Analog Input Digital Input, Digital Output, Analog Input Digital Input, Digital Output Digital Input, Digital Output Webserver zur Fernsteuerung Das MADRIX® PLEXUS verfügt über einen integrierten Webserver. Das PLEXUS und das Gerät zur Fernsteuerung müssen zunächst an ein Netzwerk angeschlossen werden. Öffnen Sie danach einen Browser und tragen Sie die IP-Adresse des PLEXUS ein. Sie kann im PLEXUS-Menü “Einstellungen” “Netzwerk” abgefragt und geändert werden. Sobald die Seite geladen ist, erscheint eine interaktive Darstellung des Gerätes zur Fernsteuerung. Hinweis: Stellen Sie sicher, dass es sich um ein und dasselbe Netzwerk handelt und die Einstellungen von Betriebssystem und PLEXUS richtig sind. 16 Bedientasten zur Steuerung Während der Standalone-Wiedergabe kann über die Bedientasten gesteuert werden. Öffnen Sie dazu das PLEXUS-Menü “Standalone” “Wiedergabe”. Weitere Konfigurationsmöglichkeiten Es stehen weitere Konfigurationsmöglichkeiten zur Verfügung. Öffnen Sie dazu in MADRIX® das Menü “Tools” “PLEXUS Configuration…”. Weitere Informationen zum Thema finden Sie wie im Folgenden beschrieben. Weiterführende Informationen Weitere Handbücher werden automatisch mit der MADRIX®-Software installiert und somit digital bereitgestellt. Weiterführende Themen werden in dem MADRIX® PLEXUS Handbuch beschrieben. Mehr Informationen zur Software finden sich im MADRIX® Help And Manual, dem Software-Handbuch. Es kann während des Arbeitens mit MADRIX® durch die Taste “F1” auf der Tastatur oder über das Menü “Help” “Help…” aufgerufen werden. Hilfe und Support Sollten weitere Fragen zur Handhabung oder technische Probleme auftauchen, konsultieren Sie bitte die weiteren Benutzerhandbücher, kontaktieren Sie Ihren Händler oder besuchen Sie die Internetseite http://www.madrix.com Anfragen können auch direkt per Telefon oder per E-Mail erfolgen. 17 Deutsch Die linke bzw. rechte Pfeiltaste lassen das Gerät jeweils eine Szene zurück bzw. vor springen. Die Wiedergabe kann mit Hilfe der unteren Pfeiltaste pausiert werden. Wird die Taste daraufhin ein zweites Mal betätigt, wird die Wiedergabe fortgesetzt. Ein Druck auf die obere Pfeiltaste stoppt die Wiedergabe. Sie kann mit Betätigen der unteren Pfeiltaste im Anschluss wieder gestartet werden. Häufig Gestellte Fragen (FAQs) Brauche ich den MADRIX® KEY zusätzlich zum MADRIX® PLEXUS? Nein. Die MADRIX®-Softwarelizenz für 1024 DMX-Kanäle ist inbegriffen. Der MADRIX® KEY wird für den Betrieb des PLEXUS nicht benötigt. Jedoch kann man die Produkte und ihre Funktionen miteinander kombinieren. Ist es möglich, mehr als ein MADRIX® PLEXUS zu verwenden? Ja. Mehrere Geräte können problemlos für größere Projekte genutzt werden. Kann ich die PLEXUS-Softwarelizenz erweitern? Nein. Ein PLEXUS schaltet 1024 DMX-Kanäle in MADRIX® frei. Jedoch können weitere Geräte, und somit weitere Kanäle, zusätzlich angeschlossen werden. Kann ich einen mobilen Computer verwenden? Ja. Mobile Computer, wie z.B. Laptops/Notebooks, können für die Software MADRIX® genutzt werden. Bitte beachten Sie die Systemvoraussetzungen sowie die Energieoptionen des Betriebssystems bezüglich USB. Kann ich eine andere Software an Stelle von MADRIX® benutzen? Nein. MADRIX® ist die empfohlene Software. Kann ich das Gerät zur Steuerung von Lasern, Moving Heads oder Scannern einsetzen? Nein. Die MADRIX®-Software wurde für diesen Zweck nicht konzipiert. Was bedeuten die leuchtenden LEDs auf dem Gerät? Lesen Sie dazu bitte den Abschnitt “Anzeige der Status-LEDs” dieser Kurzanleitung auf Seite 9. Kann ich das MADRIX® PLEXUS selber reparieren? Nein. Versuchen Sie keine Reparaturarbeiten. Jeglicher Versuch führt zum Erlöschen der Garantie. Kontaktieren Sie Ihren Händler bei Gerätedefekt. Was mache ich, wenn mein Gerät während der Garantiezeit ausfällt? Kontaktieren Sie bitte Ihren Händler. 18