1
Operating Instructions
Printer Reference
For safety, please read this manual carefully before you use this product and keep it
handy for future reference.
Introduction
This manual contains detailed instructions on the operation and maintenance of this machine. To get
maximum versatility from this machine all operators should carefully read and follow the instructions in
this manual. Please keep this manual in a handy place near the machine.
Please read “Safety Information” in this manual before using this machine. It contains important information related to USER SAFETY and PREVENTING EQUIPMENT PROBLEMS.
Important
Contents of this manual are subject to change without prior notice. In no event will the company be liable for direct, indirect, special, incidental, or consequential damages as a result of handling or operating the machine.
Caution:
Use of controls or adjustment or performance of procedures other than those specified in this manual
might result in hazardous radiation exposure.
Do not attempt any maintenance or troubleshooting other than that mentioned in this manual. This
printer contains a laser beam generator and direct exposure to laser beams can cause permanent eye
damage.
Two kinds of size notation are employed in this manual. With this machine refer to the inch version.
For good print quality, the supplier recommends that you use genuine toner from the supplier.
The supplier shall not be responsible for any damage or expense that might result from the use of parts
other than genuine parts from the supplier with your office products.
Trademarks
Microsoft, Windows and Windows NT are registered trademarks of Microsoft
Corporation in the United States and/or other countries.
Novell, Netware, NDS are registered trademarks or Novell, Inc.
PostScript is a registered trademark of Adobe Systems, Incorporated.
PCL is a registered trademark of Hewlett-Packard Company.
AppleTalk, Apple, Macintosh, TrueType and LaserWriter are registered trademarks of Apple Computer, Incorporated.
IPS-PRINT Printer Language Emulation Copyright© 1999-2000 Oak Technology, Inc., All rights reserved.
Ethernet is a registered trademark of Xerox Corporation.
Other product names used herein are for identification purposes only and might
be trademarks of their respective companies. We disclaim any and all rights in
those marks.
• The product name of Windows® 95 is Microsoft® Windows® 95.
• The product name of Windows® 98 is Microsoft® Windows® 98.
• The product name of Windows® Me is Microsoft® Windows® Millennium
Edition (Windows Me).
• The product names of Windows® 2000 are as follows:
Microsoft® Windows® 2000 Advanced Server
Microsoft® Windows® 2000 Server
Microsoft® Windows® 2000 Professional
• The product names of Windows® XP are as follows:
Microsoft® Windows® XP Professional
Microsoft® Windows® XP Home Edition
• The product names of Windows NT® 4.0 are as follows:
Microsoft® Windows NT® Server 4.0
Microsoft® Windows NT® Workstation 4.0
Notes:
Some illustrations in this manual might be slightly different from the machine.
Certain options might not be available in some countries. For details, please contact your local dealer.
i
Manuals for This Printer
Manuals for This Printer
The following manuals describe the operational procedures and maintenance of
this machine.
To enhance safe and efficient operation of this printer, all users should read and
follow the instructions carefully.
❖ Quick Installation Guide
Describes how to install the printer.
❖ Setup Guide
Provides information about setting up the printer and its options. This manual is provided as a printed manual, and also on the CD-ROM labeled "Operating Instructions".
❖ Printer Reference (this manual)
Provides information about using the printer and its options. This manual
provided on the CD-ROM labeled “Operating Instructions”.
❖ Network Printing Guide
Provides information about setting up and using the printer in a network environment. This manual provided on the CD-ROM labeled “Operating Instructions”.
❖ PostScript 3 Operating Instructions Supplement
Describes the menus and features for the PostScript 3 printer driver. This
manual provided on the CD-ROM labeled “Operating Instructions”.
Note
❒ There are three CD-ROMs that come with this printer. “Operating Instructions”, “Printer Drivers and Utilities”, and “Document Management Utility”.
❒ Concerning UNIX information, please visit our Web site or consult your authorized reseller.
ii
How to Read This Manual
Symbols
In this manual, the following symbols are used:
R WARNING:
This symbol indicates a potentially hazardous situation which, if instructions
are not followed, could result in death or serious injury.
R CAUTION:
This symbol indicates a potentially hazardous situation which, if instructions
are not followed, may result in minor or moderate injury or damage to property.
* The statements above are notes for your safety.
Important
If this instruction is not followed, paper might be misfed, originals might be
damaged, or data might be lost. Be sure to read this.
Preparation
This symbol indicates the prior knowledge or preparations required before operating.
Note
This symbol indicates precautions for operation, or actions to take after misoperation.
Limitation
This symbol indicates numerical limits, functions that cannot be used together,
or conditions in which a particular function cannot be used.
Reference
This symbol indicates a reference.
[
]
Keys that appear on the machine's panel display.
Keys and buttons that appear on the computer's display.
{
}
Keys built into the machine's control panel.
Keys on the computer's keyboard.
iii
TABLE OF CONTENTS
1. Setting Up the Printer Driver and Canceling a Print Job
PCL 6/5e - Accessing the Printer Properties ........................................... 1
Windows 95/98/Me - Accessing the Printer Properties .................................. 1
Windows 2000/Windows XP - Accessing the Printer Properties.................... 2
Windows NT 4.0 - Accessing the Printer Properties ...................................... 4
RPCS - Accessing the Printer Properties................................................. 6
Windows 95/98/Me - Accessing the Printer Properties .................................. 6
Windows 2000/Windows XP - Accessing the Printer Properties.................... 7
Windows NT 4.0 - Accessing the Printer Properties ...................................... 9
PostScript - Setting Up for Printing ........................................................ 11
Windows 95/98/Me - Accessing the Printer Properties ................................ 11
Windows 2000/Windows XP - Accessing the Printer Properties.................. 12
Windows NT 4.0 - Accessing the Printer Properties .................................... 14
Macintosh - Setting Up for Printing .............................................................. 16
Canceling a Print Job............................................................................... 17
Windows 95/98/Me, Windows 2000, Windows XP,
Windows NT 4.0 - Canceling a Print Job ................................................... 17
Macintosh - Canceling a Print Job ............................................................... 18
2. Uninstalling the Printer Driver and Software
Uninstalling the PCL 6/5e Printer Driver ................................................ 19
Windows 95/98/Me - Uninstalling the PCL 6/5e Printer Driver..................... 19
Windows 2000/Windows XP - Uninstalling the PCL 6/5e Printer Driver ...... 19
Windows NT 4.0 - Uninstalling the PCL 6/5e Printer Driver ......................... 20
Uninstalling the RPCS Printer Driver...................................................... 21
Windows 95/98/Me - Uninstalling the RPCS Printer Driver.......................... 21
Windows 2000/Windows XP - Uninstalling the RPCS Printer Driver ........... 21
Windows NT 4.0 - Uninstalling the RPCS Printer Driver .............................. 22
Uninstalling the PostScript Printer Driver.............................................. 23
Windows 95/98/Me - Uninstalling the PostScript Printer Driver ................... 23
Windows 2000/Windows XP - Uninstalling the PostScript Printer Driver ..... 23
Windows NT 4.0 - Uninstalling the PostScript Printer Driver ....................... 24
Macintosh - Uninstalling the PostScript Printer Driver ................................. 24
3. Paper and Other Media
iv
Paper and Other Media Supported by This Printer ............................... 25
Paper Types and Sizes ................................................................................ 25
Paper Recommendations............................................................................. 33
Printable Area .............................................................................................. 36
Loading Paper and Other Media ............................................................. 37
Loading Paper in the Paper Tray ................................................................. 37
Loading Paper in the Bypass Tray ............................................................... 40
Loading Paper in the Optional Paper Tray................................................... 44
Loading Envelopes....................................................................................... 45
4. Sample Print/Locked Print
Sample Print.............................................................................................. 51
Printing a Sample Print File.......................................................................... 51
Deleting a Sample Print File......................................................................... 53
Checking the Error Log ................................................................................ 54
Locked Print.............................................................................................. 56
Printing a Locked Print File .......................................................................... 56
Deleting the Locked Print File ...................................................................... 58
Checking the Error Log ................................................................................ 59
5. Troubleshooting
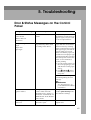
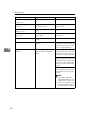
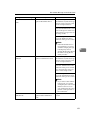
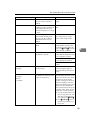
Error & Status Messages on the Control Panel..................................... 61
Getting Printer Information over the Network ............................................... 69
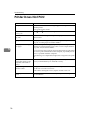
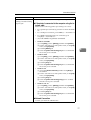
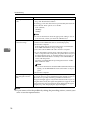
Printer Does Not Print .............................................................................. 76
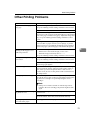
Other Printing Problems .......................................................................... 79
Removing Misfed Paper........................................................................... 82
When “Remove Misfeed Paper Tray” Appears ............................................ 82
When "Remove Misfeed Internal Path/Open Front Cover" Appears............ 83
When "Remove Misfeed Paper Exit Cover" Appears................................... 84
When "Remove Misfeed Duplex Unit" Appears ........................................... 87
When "Remove Misfeed Mailbox" Appears ................................................. 89
When "Remove Misfeed Upper Tray Unit" Appears .................................... 89
Replacing the Toner Cartridge ................................................................ 90
Cleaning and Adjusting the Printer ........................................................ 93
Cleaning the Friction Pad ............................................................................. 93
Cleaning the Paper Feed Roller................................................................... 94
Cleaning the Registration Roller .................................................................. 96
Adjusting the Image Density ........................................................................ 97
Adjusting the Registration of the Trays ........................................................ 98
6. Making Printer Settings with the Control Panel
Menu Chart.............................................................................................. 101
Accessing the Main Menu...................................................................... 104
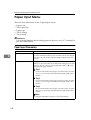
Paper Input Menu ................................................................................... 106
Paper Input Parameters ............................................................................. 106
Changing the Paper Input Menu ................................................................ 108
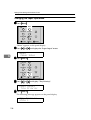
List/Test Print Menu ............................................................................... 110
List/Test Print Parameters.......................................................................... 110
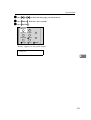
Printing a Configuration Page .................................................................... 110
Interpreting the Configuration Page ........................................................... 112
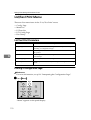
Maintenance Menu ................................................................................. 114
Maintenance Menu Parameters ................................................................ 115
Changing the Maintenance Menu .............................................................. 117
v
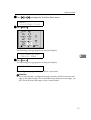
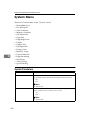
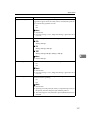
System Menu .......................................................................................... 124
System Parameters.................................................................................... 124
Changing the System Menu....................................................................... 128
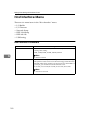
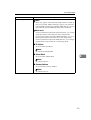
Host Interface Menu ............................................................................... 130
Host Interface Parameters ........................................................................ 130
Changing the Host Interface Menu ............................................................ 135
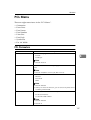
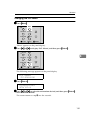
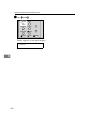
PCL Menu ................................................................................................ 137
PCL Parameters......................................................................................... 137
Changing the PCL Menu............................................................................ 139
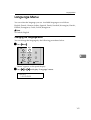
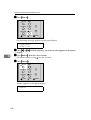
Language Menu ...................................................................................... 141
Changing the Language Menu................................................................... 141
7. Appendix
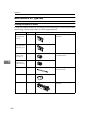
Replacing Parts ...................................................................................... 143
MAINTENANCE KIT Type 2600 ................................................................ 144
Replacing the Friction Pad ......................................................................... 145
Replacing the Paper Feed Rollers ............................................................. 146
Replacing the Transfer Roller .................................................................... 147
Replacing the Fusing Unit .......................................................................... 149
Collate and Shift Collate ........................................................................ 151
Spool Printing ......................................................................................... 152
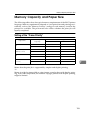
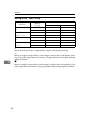
Memory Capacity and Paper Size ......................................................... 153
Setting of the “Frame Priority” .................................................................... 153
Setting of the “Font Priority” ....................................................................... 154
Moving and Transporting the Printer ................................................... 155
Moving the Printer ...................................................................................... 155
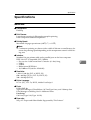
Specifications ......................................................................................... 157
Mainframe .................................................................................................. 157
Options....................................................................................................... 160
Consumables .......................................................................................... 164
Information about Installed Software ................................................... 165
expat .......................................................................................................... 165
JPEG LIBRARY ......................................................................................... 165
NetBSD ...................................................................................................... 166
INDEX....................................................................................................... 168
vi
1. Setting Up the Printer Driver
and Canceling a Print Job
PCL 6/5e - Accessing the Printer Properties
Windows 95/98/Me - Accessing the Printer Properties
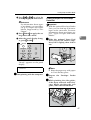
Changing the default printer settings
A Click [Start] on the taskbar, point to [Settings], and then click [Printers].
The [Printers] window appears.
B Click to select the icon of the printer whose default settings you want to
change.
C On the [File] menu, click [Properties].
The Printer Properties appear.
D Make any settings you require and click [Apply].
Note
❒ With some applications, the printer driver's settings are not used, and the
application's own default settings are applied.
E Click [OK].
Making printer settings from an application
To make the printer settings for a specific application, open the [Printer Properties]
dialog box from that application. The following example describes how to make
settings for the WordPad application that comes with Windows 95/98/Me.
Note
❒ The actual procedure you should follow to open the [Printer Properties] dialog
box may differ depending on the application. For more information, see the
documentation that comes with the application you are using.
❒ Any settings you make in the following procedure are valid for the current
application only.
A On the [File] menu, click [Print].
The [Print] dialog box appears.
B Select the printer you want to use in the [Name] list box, and then click [Properties].
The [Printer Properties] dialog box appears.
1
Setting Up the Printer Driver and Canceling a Print Job
C Make any settings you require and click [OK].
D Click [OK] to start printing.
1
Windows 2000/Windows XP - Accessing the Printer Properties
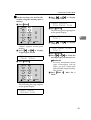
Changing the default printer settings - Printer Properties
Limitation
❒ Changing the setting of the printer requires Manage Printers permission.
Members of the Administrators and Power Users groups have Manage Printers permission by default. When you set up options, log on using an account
that has Manage Printers permission.
A Click [Start] on the taskbar, point to [Settings], and then click [Printers].
The [Printers] window appears.
Note
❒ With Windows XP, access the [Printers and Faxes] window from [Start] on
the taskbar.
B Click to select the icon of the printer whose default setting you want to
change.
C On the [File] menu, click [Properties].
The Printer Properties appear.
D Make any settings you require and click [OK].
Note
❒ Settings you make here are used as the default settings for all applications.
E Click [OK].
Changing the default printer settings – Printing Preferences Properties
Limitation
❒ Changing the setting of the printer requires Manage Printers permission.
Members of the Administrators and Power Users groups have Manage Printers permission by default. When you set up options, log on using an account
that has Manage Printers permission.
A Click [Start] on the taskbar, point to [Settings], and then click [Printers].
The [Printers] window appears.
2
PCL 6/5e - Accessing the Printer Properties
B Click to select the icon of the printer whose default settings you want to
change.
C On the [File] menu, click [Printing Preferences...].
1
The Printing Preferences Properties appears.
D Make any settings you require and click [Apply].
Note
❒ Settings you make here are used as the default settings for all applications.
E Click [OK].
Making printer settings from an application
To make the printer settings for a specific application, open the [Print] dialog box
from that application. The following example describes how to make settings for
the WordPad application that comes with Windows 2000/Windows XP.
Note
❒ The actual procedures you should follow to open the [Print] dialog box may
differ depending on the application. For more information, see the documentation that comes with the application you are using.
❒ Any settings you make in the following procedure are valid for the current
application only.
A On the [File] menu, click [Print...].
The [Print] dialog box appears.
B Select the printer you want to use in the [Select Printer] box.
Click the tab that you want to change its print setting.
Note
❒ With Windows XP, click [Preference] to open the Printer Preference window.
C Make any settings you require and click [Apply].
Note
❒ With Windows XP, make any settings you require and click [OK].
D Click [Print] to start printing.
3
Setting Up the Printer Driver and Canceling a Print Job
Windows NT 4.0 - Accessing the Printer Properties
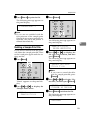
Changing the default printer settings - Printer Properties
1
Limitation
❒ Changing the setting of the printer requires Full Control access permission.
Members of Administrators, Server Operators, Print Operators, and Power
Users groups have Full Control permission by default. When you set up options, log on using an account that has Full Control permission.
A Click [Start] on the taskbar, point to [Settings], and then click [Printers].
The [Printers] window appears.
B Click to select the icon of the printer whose default settings you want to
change.
C On the [File] menu, click [Properties].
The Printer Properties appears.
D Make any settings you require and click [OK].
Note
❒ Settings you make here are used as the default settings for all applications.
Changing the default printer settings – Default Document Properties
Limitation
❒ Changing the setting of the printer requires Full Control access permission.
Members of the Administrators, Server Operators, Print Operators, and Power Users groups have Full Control permission by default. When you set up
options, log on using an account that has Full Control permission.
A Click [Start] on the taskbar, point to [Settings], and then click [Printers].
The [Printers] window appears.
B Click to select the icon of the printer whose default settings you want to
change.
C On the [File] menu, click [Document Defaults].
The Default Document Properties appear.
D Make any settings you require and click [OK].
Note
❒ Settings you make here are used as the default settings for all applications.
4
PCL 6/5e - Accessing the Printer Properties
Making printer settings from an application
To make the printer settings for a specific application, open the [Printer Properties]
dialog box from that application. The following example describes how to make
settings for the WordPad application that comes with Windows NT 4.0.
1
Note
❒ The actual procedure you should follow to open the [Printer Properties] dialog
box may differ depending on the application. For more information, see the
documentation that comes with the application you are using.
❒ Any settings you make in the following procedure are valid for the current
application only.
A On the [File] menu, click [Print].
The [Print] dialog box appears.
B Select the printer you want to use in the [Name] list box, and then click [Properties].
The Printer Properties appears.
C Make any settings you require and click [OK].
Click [OK] to start printing.
5
Setting Up the Printer Driver and Canceling a Print Job
RPCS - Accessing the Printer Properties
Windows 95/98/Me - Accessing the Printer Properties
1
Changing the default printer settings
A Click [Start] on the taskbar, point to [Settings], and then click [Printers].
The [Printers] window appears.
B Click to select the icon of the printer whose default settings you want to
change.
C On the [File] menu, click [Properties].
The printer properties appear.
D Make any settings you require and click [Apply].
Note
❒ With some applications, the printer driver's settings are not used, and the
application's own default settings are applied.
E Click [OK].
Making printer settings from an application
To make the printer settings for a specific application, open the [Printer Properties]
dialog box from that application. The following example describes how to make
settings for the WordPad application that comes with Windows 95/98/Me.
Note
❒ The actual procedure you should follow to open the [Printer Properties] dialog
box may differ depending on the application. For more information, see the
documentation that comes with the application you are using.
❒ Any settings you make in the following procedure are valid for the current
application only.
A On the [File] menu, click [Print].
The [Print] dialog box appears.
B Select the printer you want to use in the [Name] list box, and then click [Properties].
The [Printer Properties] dialog box appears.
6
C Make any settings you require and click [OK].
D Click [OK] to start printing.
RPCS - Accessing the Printer Properties
Windows 2000/Windows XP - Accessing the Printer Properties
Changing the default printer settings - Printer Properties
1
Limitation
❒ Changing the setting of the printer requires Manage Printers permission.
Members of the Administrators and Power Users groups have Manage Printers permission by default. When you set up options, log on using an account
that has Manage Printers permission.
A Click [Start] on the taskbar, point to [Settings], and then click [Printers].
The [Printers] window appears.
Note
❒ With Windows XP, access the [Printers and Faxes] window from [Start] on
the taskbar.
B Click to select the icon of the printer whose default settings you want to
change.
C On the [File] menu, click [Properties].
The Printer Properties appears.
D Make any settings you require and click [Apply].
Note
❒ Settings you make here are used as the default settings for all applications.
E Click [OK].
Changing the default printer settings – Printing Preferences Properties
Limitation
❒ Changing the setting of the printer requires Manage Printers permission.
Members of the Administrators and Power Users groups have Manage Printers permission by default. When you set up options, log on using an account
that has Manage Printers permission.
A Click [Start] on the taskbar, point to [Settings], and then click [Printers].
The [Printers] window appears.
B Click to select the icon of the printer whose default settings you want to
change.
C On the [File] menu, click [Printing Preferences...].
The Printing Preferences Properties appear.
7
Setting Up the Printer Driver and Canceling a Print Job
D Make any settings you require and click [Apply].
Note
❒ Settings you make here are used as the default settings for all applications.
1
E Click [OK].
Making printer settings from an application
To make the printer settings for a specific application, open the [Print] dialog box
from that application. The following example describes how to make settings for
the WordPad application that comes with Windows 2000.
Note
❒ The actual procedures you should follow to open the [Print] dialog box may
differ depending on the application. For more information, see the documentation that comes with the application you are using.
❒ Any settings you make in the following procedure are valid for the current
application only.
A On the [File] menu, click [Print...].
The [Print] dialog box appears.
B Select the printer you want to use in the [Select Printer] box.
Click the tab that you want to change its print setting.
Note
❒ With Windows XP, click [Preference] to open the Printer Preference window.
C Make any settings you require and click [Apply].
Note
❒ With Windows XP, make any settings you require and click [OK].
D Click [Print] to start printing.
8
RPCS - Accessing the Printer Properties
Windows NT 4.0 - Accessing the Printer Properties
Changing the default printer settings - Printer Properties
1
Limitation
❒ Changing the setting of the printer requires Full Control access permission.
Members of Administrators, Server Operators, Print Operators, and Power
Users groups have Full Control permission by default. When you set up options, log on using an account that has Full Control permission.
A Click [Start] on the taskbar, point to [Settings], and then click [Printers].
The [Printers] window appears.
B Click to select the icon of the printer you want to use.
C On the [File] menu, click [Properties].
The [Printer Properties] dialog box appears.
D Make any settings you require and click [OK].
Note
❒ Settings you make here are used as the default settings for all applications.
Changing the default printer settings – Default Document Properties
Limitation
❒ Changing the setting of the printer requires Full Control access permission.
Members of the Administrators, Server Operators, Print Operators, and Power Users groups have Full Control permission by default. When you set up
options, log on using an account that has Full Control permission.
A Click [Start] on the taskbar, point to [Settings], and then click [Printers].
The [Printers] window appears.
B Click to select the icon of the printer you want to use.
C On the [File] menu, click [Document Defaults].
The Default Document Properties appear.
D Make any settings you require and click [OK].
Note
❒ Settings you make here are used as the default settings for all applications.
9
Setting Up the Printer Driver and Canceling a Print Job
Making printer settings from an application
To make the printer settings for a specific application, open the [Printer Properties]
dialog box from that application. The following example describes how to make
settings for the WordPad application that comes with Windows NT 4.0.
1
Note
❒ The actual procedure you should follow to open the [Printer Properties] dialog
box may differ depending on the application. For more information, see the
documentation that comes with the application you are using.
❒ Any settings you make in the following procedure are valid for the current
application only.
A On the [File] menu, click [Print].
The [Print] dialog box appears.
B Select the printer you want to use in the [Name] list box, and then click [Properties].
The [Printer Properties] dialog box appears.
C Make any settings you require and click [OK].
D Click [OK] to start printing.
10
PostScript - Setting Up for Printing
PostScript - Setting Up for Printing
Windows 95/98/Me - Accessing the Printer Properties
1
Changing the default printer settings
Note
❒ With some applications, the printer driver's settings are not used, and the application's own default settings are applied.
A Click [Start] on the taskbar, point to [Settings], and then click [Printers].
The [Printers] window appears.
B Click to select the icon of the printer whose default settings you want to
change.
C On the [File] menu, click [Properties].
The [Printer Properties] dialog box appears.
D Make any settings you require and click [Apply].
E Click [OK].
Making printer settings from an application
To make the printer settings for a specific application, open the [Printer Properties]
dialog box from that application. The following example describes how to make
settings for the WordPad application that comes with Windows 95/98/Me.
Note
❒ The actual procedure you should follow to open the [Printer Properties] dialog
box may differ depending on the application. For more information, see the
documentation that comes with the application you are using.
❒ Any settings you make in the following procedure are valid for the current
application only.
A On the [File] menu, click [Print].
The [Print] dialog box appears.
B Select the printer you want to use in the Name list box, and then click [Properties].
The [Printer Properties] dialog box appears.
C Make any settings you require and click [Apply].
D Click [OK] to start printing.
11
Setting Up the Printer Driver and Canceling a Print Job
Windows 2000/Windows XP - Accessing the Printer Properties
Changing the default printer settings - Printer Properties
1
Limitation
❒ Changing the setting of the printer requires Manage Printers permission.
Members of the Administrators and Power Users groups have Manage Printers permission by default. When you set up options, log on using an account
that has Manage Printers permission.
A Click [Start] on the taskbar, point to [Settings], and then click [Printers].
The [Printers] window appears.
Note
❒ With Windows XP, access the [Printers and Faxes] window from [Start] on
the taskbar.
B Click to select the icon of the printer whose default settings you want to
change.
C On the [File] menu, click [Properties].
The Printer Properties appear.
D Make any settings you require and click [Apply].
Note
❒ Settings you make here are used as the default settings for all applications.
E Click [OK].
Changing the default printer settings – Printing Preferences Properties
Limitation
❒ Changing the setting of the printer requires Manage Printers permission.
Members of the Administrators and Power Users groups have Manage Printers permission by default. When you set up options, log on using an account
that has Manage Printers permission.
A Click [Start] on the taskbar, point to [Settings], and then click [Printers].
The [Printers] window appears.
B Click to select the icon of the printer whose default settings you want to
change.
C On the [File] menu, click [Printing Preferences...].
The Printing Preferences Properties appears.
12
PostScript - Setting Up for Printing
D Make any settings you require and click [Apply].
Note
❒ Settings you make here are used as the default settings for all applications.
1
E Click [OK].
Making printer settings from an application
To make the printer settings for a specific application, open the [Print] dialog box
from that application. The following example describes how to make settings for
the WordPad application that comes with Windows 2000/Windows XP.
Note
❒ The actual procedures you should follow to open the [Print] dialog box may
differ depending on the application. For more information, see the documentation that comes with the application you are using.
❒ Any settings you make in the following procedure are valid for the current
application only.
A On the [File] menu, click [Print...].
The [Print] dialog box appears.
B Select the printer you want to use in the [Select Printer] box.
Click the tab that you want to change its print setting.
Note
❒ With Windows XP, click [Preference] to open the Printer Preference window.
C Make any settings you require and click [Apply].
D Click [OK] to start printing.
13
Setting Up the Printer Driver and Canceling a Print Job
Windows NT 4.0 - Accessing the Printer Properties
Changing the default printer settings - Printer Properties
1
Limitation
❒ Changing the setting of the printer requires Full Control access permission.
Members of Administrators, Server Operators, Print Operators, and Power
Users groups have Full Control permission by default. When you set up options, log on using an account that has Full Control permission.
A Click [Start] on the taskbar, point to [Settings], and then click [Printers].
The [Printers] window appears .
B Click to select the icon of the printer whose default settings you want to
change.
C On the [File] menu, click [Properties].
The [Printer Properties] dialog box appears.
D Make any settings you require and click [OK].
Note
❒ Setting you make here are used as the default settings for all applications.
Changing the default printer settings - Default Document Properties
Limitation
❒ Changing the setting of the printer requires Full Control access permission.
Members of the Administrators, Server Operators, Print Operators, and Power Users groups have Full Control permission by default. When you set up
options, log on using an account that has Full Control permission.
A Click [Start] on the taskbar, point to [Settings], and then click [Printers].
The [Printers] window appears.
B Click to select the icon of the printer you want to use.
C On the [File] menu, click [Document Defaults].
The Default Document Properties appear.
D Make any settings you require and click [OK].
Note
❒ Settings you make here are used as the default settings for all applications.
14
PostScript - Setting Up for Printing
Making printer settings from an application
To make the printer settings for a specific application, open the [Printer Properties]
dialog box from that application. The following example describes how to make
settings for the WordPad application that comes with Windows NT 4.0.
1
Note
❒ The actual procedure you should follow to open the [Printer Properties] dialog
box may differ depending on the application. For more information, see the
documentation that comes with the application you are using.
❒ Any settings you make in the following procedure are valid for the current
application only.
A On the [File] menu, click [Print].
The [Print] dialog box appears.
B Select the printer you want to use in the [Name] list box, and then click [Properties].
The [Printer Properties] dialog box appears.
C Make any settings you require and click [OK].
D Click [OK] to start printing.
15
Setting Up the Printer Driver and Canceling a Print Job
Macintosh - Setting Up for Printing
Making paper settings from an application
1
A Open the file you want to print.
B On the [File] menu, click [Page Setup].
The [AdobePS Page Setup] dialog box appears.
C Confirm that the printer you want to use is shown in the [Format for:] box.
Note
❒ If the printer is not shown in the [Format for:] box, use the pop-up menu to
display a list of available printers.
Reference
The actual appearance of the Page Setup depends on the application you
are using. See the documentation that comes with the Macintosh for more
information.
D From the [Paper:] box, select the paper size.
E Make any settings you require and then click [OK].
Setting up for printing from an application
A Open the file you want to print.
B On the [File] menu, click [Print].
The Printer Settings appears.
C Confirm that the printer is selected in the [Printer :] box.
D Make any settings you require and click [Print] to start printing.
16
Canceling a Print Job
Canceling a Print Job
Windows 95/98/Me, Windows 2000, Windows XP, Windows NT 4.0
- Canceling a Print Job
1
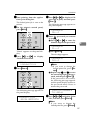
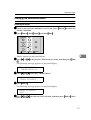
A Double-click the printer icon on the Windows taskbar.
A window appears, showing all the print jobs that are currently queuing to
be printed. Check the current status of the job you want to cancel.
B Select the name of the job you want to cancel.
C On the [Document] menu, click [Cancel Printing].
Note
❒ You can also open the print job queue window by double-clicking the
printer icon in the [Printer] window.
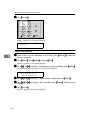
D Press {Job Reset}} on the control panel.
The message appears on the panel display indicating that the print job is being canceled.
Important
❒ When the printer is being shared by multiple computers, be careful not to
accidentally cancel someone else's print job.
Note
❒ This procedure cancels the print job that is being processed by the printer.
In some cases, the printer may already be processing data for the next series of print jobs following the one currently being output. In this case, the
next print jobs are also canceled when you press {Job Reset}
}.
❒ A print job that contains a large volume of data may take considerable time
to stop.
17
Setting Up the Printer Driver and Canceling a Print Job
Macintosh - Canceling a Print Job
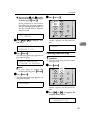
A Double-click the printer's icon on the desktop.
1
A window appears, showing all the print jobs that are currently queuing to
be printed. Check the current status of the job you want to cancel.
B Select the name of the job you want to cancel.
C Click the pause icon, and then click the trash icon.
D Press {Job Reset}} on the control panel.
The message appears on the panel display indicating that the print job is being canceled.
Important
❒ When the printer is being shared by multiple computers, be careful not to
accidentally cancel someone else's print job.
Note
❒ This procedure cancels the print job that is being processed by the printer.
In some cases, the printer may already be processing data for the next series of print jobs following the one currently being output. In this case, the
next print jobs are also canceled when you press {Job Reset}
}.
❒ A print job that contains a large volume of data may take considerable time
to stop.
18
2. Uninstalling the Printer
Driver and Software
Uninstalling the PCL 6/5e Printer Driver
This section describes how to uninstall the printer driver. The actual procedure
may differ depending on the operating system.
Follow one of the appropriate procedures below.
Windows 95/98/Me - Uninstalling the PCL 6/5e Printer Driver
A Close all applications that are currently running.
B Click [Start] on the taskbar, point to [Settings], and then click [Printers].
The [Printers] window appears.
C Click to select the icon of the printer you want to remove.
D On the [File] menu, click [Delete].
A confirmation dialog box appears.
E Click [Yes] to uninstall the printer driver.
Windows 2000/Windows XP - Uninstalling the PCL 6/5e Printer
Driver
Limitation
❒ Uninstalling a printer driver requires Manage Printers permission. Members
of the Administrators and Power Users groups have Manage Printers permission by default. When you uninstall a printer driver, log on using an account
that has Manage Printers permission.
A Close all applications that are currently running.
B Click [Start] on the taskbar, point to [Settings], and then click [Printers].
The [Printers] window appears.
Note
❒ With Windows XP, access the [Printers and Faxes] window from [Start] on
the taskbar.
C Click to select the icon of the printer you want to remove.
D On the [File] menu, click [Delete].
A confirmation dialog box appears.
19
Uninstalling the Printer Driver and Software
E Click [Yes] to uninstall the printer driver.
Note
❒ Before upgrading the printer driver, restart your computer after uninstalling the old version of the printer driver.
Windows NT 4.0 - Uninstalling the PCL 6/5e Printer Driver
2
Limitation
❒ Uninstalling a printer driver requires Full Control access permission. Members of the Administrators, Server Operators, Print Operators, and Power Users groups have Full Control Permission by default. When you install a
printer driver, log on using an account that has Full Control permission.
A Close all applications that are currently running.
B Click [Start] on the taskbar, point to [Settings], and then click [Printers].
The [Printers] window appears.
C Click to select the icon of the printer you want to remove.
D On the [File] menu, click [Delete].
A confirmation dialog box appears.
E Click [Yes] to uninstall the printer driver.
Note
❒ Before upgrading the printer driver, restart your computer after uninstalling the old version of the printer driver.
20
Uninstalling the RPCS Printer Driver
Uninstalling the RPCS Printer Driver
This section describes how to uninstall the printer driver. The actual procedure
may differ depending on the operating system.
Follow one of the appropriate procedures below.
2
Windows 95/98/Me - Uninstalling the RPCS Printer Driver
A Close all applications that are currently running.
B Click [Start] on the taskbar, point to [Settings], and then click [Printers].
The [Printers] window appears.
C Click to select the icon of the printer you want to remove.
D On the [File] menu, click [Delete].
A confirmation dialog box appears.
E Click [Yes] to uninstall the printer driver.
Windows 2000/Windows XP - Uninstalling the RPCS Printer Driver
Limitation
❒ Uninstalling a printer driver requires Manage Printers permission. Members
of the Administrators and Power Users groups have Manage Printers permission by default. When you uninstall a printer driver, log on using an account
that has Manage Printers permission.
A Close all applications that are currently running.
B Click [Start] on the taskbar, point to [Settings], and then click [Printers].
The [Printers] window appears.
Note
❒ With Windows XP, access the [Printers and Faxes] window from [Start] on
the taskbar.
C Click to select the icon of the printer you want to remove.
D On the [File] menu, click [Delete].
A confirmation dialog box appears.
E Click [Yes] to uninstall the printer driver.
Note
❒ Before upgrading the printer driver, restart your computer after uninstalling the old version of the printer driver.
21
Uninstalling the Printer Driver and Software
Windows NT 4.0 - Uninstalling the RPCS Printer Driver
Limitation
❒ Uninstalling a printer driver requires Full Control access permission. Members of the Administrators, Server Operators, Print Operators, and Power Users groups have Full Control Permission by default. When you install a
printer driver, log on using an account that has Full Control permission.
2
A Close all applications that are currently running.
B Click [Start] on the taskbar, point to [Settings], and then click [Printers].
The [Printers] window appears.
C Click to select the icon of the printer you want to remove.
D On the [File] menu, click [Delete].
A confirmation dialog box appears.
E Click [Yes] to uninstall the printer driver.
Note
❒ Before upgrading the printer driver, restart your computer after uninstalling the old version of the printer driver.
22
Uninstalling the PostScript Printer Driver
Uninstalling the PostScript Printer Driver
This section describes how to uninstall the PostScript printer driver.
The actual procedure may differ depending on the operating system.
Follow one of the appropriate procedures below.
2
Windows 95/98/Me - Uninstalling the PostScript Printer Driver
A Close all applications that are currently running.
B Click [Start] on the taskbar, point to [Settings], and then click [Printers].
The [Printers] window appears.
C Click to select the icon of the printer you want to remove.
D On the [File] menu, click [Delete].
A confirmation dialog box appears.
E Click [Yes] to uninstall the printer driver.
Windows 2000/Windows XP - Uninstalling the PostScript Printer Driver
Limitation
❒ Uninstalling a printer driver requires Manage Printers permission. Members
of the Administrators and Power Users groups have Manage Printers permission by default. When you uninstall a printer driver, log on using an account
that has Manage Printers permission.
A Close all applications that are currently running.
B Click [Start] on the taskbar, point to [Settings], and then click [Printers].
The [Printers] window appears.
Note
❒ With Windows XP, access the [Printers and Faxes] window from [Start] on
the taskbar.
C Click to select the icon of the printer you want to remove.
D On the [File] menu, click [Delete].
A confirmation dialog box appears.
E Click [Yes] to uninstall the printer driver.
Note
❒ Before upgrading the printer driver, restart your computer after uninstalling the old version of the printer driver.
23
Uninstalling the Printer Driver and Software
Windows NT 4.0 - Uninstalling the PostScript Printer Driver
Limitation
❒ Uninstalling a printer driver requires Full Control access permission. Members of the Administrators, Server Operators, Print Operators, and Power Users groups have Full Control Permission by default. When you uninstall a
printer driver, log on using an account that has Full Control permission.
2
A Close all applications that are currently running.
B Click [Start] on the taskbar, point to [Settings], and then click [Printers].
The [Printers] window appears.
C Click to select the icon of the printer you want to remove.
D On the [File] menu, click [Delete].
A confirmation dialog box appears.
E Click [Yes] to uninstall the printer driver.
Note
❒ Before upgrading the printer driver, restart your computer after uninstalling the old version of the printer driver.
Macintosh - Uninstalling the PostScript Printer Driver
A Drag the “AdobePS” file from the [Extensions] folder in [System Folder] to
[Trash].
B Drag the PPD file and plug-in file from the [Printer Descriptions] folder in the
[Extensions] folder in [System Folder] to [Trash].
24
3. Paper and Other Media
Paper and Other Media Supported by This
Printer
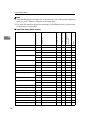
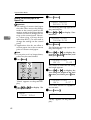
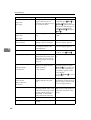
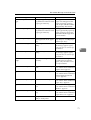
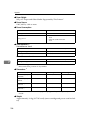
Paper Types and Sizes
This section describes the type, size, feed direction, and maximum amount of paper that can be loaded into each paper tray in this printer.
Important
❒ If you use damp or curled paper, a misfeed might occur. In this case, try turning over the paper stack in the paper tray. If there is no improvement, change
to paper with less curl.
Note
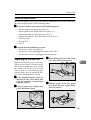
❒ The following symbols and terminology are used to represent the feed direction.
In this manual
K ↑ (Feed direction)
L ↑ (Feed direction)
On the panel display
A4 (210 × 297)
Letter (81/2×11)
A4 (297 × 210)
Letter (11 × 81/2)
Paper feed direction
Short-edge feed direction
Long-edge feed direction
❒ It is recommended that you load paper of the size and direction you frequently use in the tray selected with “Tray Priority”. For more information about
Tray Priority, see p.106 “Paper Input Menu”.
❒ When loading paper of the same size in more than one tray, it is recommended that you load paper in the same direction in each tray.
Reference
For more information about loading each type of paper, see p.37 “Loading Paper and Other Media”.
Important
❒ Be sure to set the paper size dial to match the actual paper size loaded in the
tray. When the actual paper size is not shown on the dial, set the dial to “p”
and select the paper size using the control panel.
❒ For Tray 1, 2 and 3, the dial setting overrides the setting made with the control
panel.
❒ The optional Envelope Feeder Unit requires the installation of the optional
Paper Feed Unit. Up to two Paper Feed Units can be installed to the printer at
the same time. The Envelope Feeder Unit must be used in the top-most Paper
Feed Unit (Tray2).
25
Paper and Other Media
Note
❒ The printable paper size depends on the memory size of the printer and print
data, see p.153 “Memory Capacity and Paper Size”.
❒ For more information about the meanings of the abbreviations, see the notes
at the bottom of each table.
Size (mm)
Paper Feed Unit
(Tray 2/3)
Envelope Feeder
Unit
K
297 × 420
❍
✩
✩
X
B4 JIS
K
257 × 364
❍
★
★
X
A4
K
210 × 297
❍
✩
✩
X
L
297 × 210
❍
✩
✩
X
K
182 × 257
❍
★
★
X
L
257 × 182
❍
★
★
X
K
148 × 210
❍
X
X
X
L
210 × 148
❍
✩
★
X
A6
K
105 × 148
❍
X
X
X
11 × 17
K
279 × 432
❍
★
✩
X
Legal (LG, 81/2 × 14)
K
216 × 356
❍
★
✩
X
Letter (LT, 8 /2 × 11)
K
216 × 279
❍
✩
✩
X
L
279 × 216
❍
✩
✩
X
K
140 × 216
❍
X
X
X
K
184 × 276
❍
X
★
X
L
276 × 184
❍
★
★
X
Folio (8 /4 × 13)
K
210 × 330
❍
★
★
X
Foolscap (F4, 81/2 × 13)
K
216 × 330
❍
★
★
X
F/GL (8 × 13)
K
203 × 330
❍
★
★
X
Com#10 Env (4 /8 × 9 /2)
K
104.8 × 241.3
❍
X
X
❍
C5 Env (6.38 × 9.02)
K
162 ×229
❍
X
X
❍
C6 Env (4.49 × 6.38)
K
114 ×162
❍
X
X
❍
DL Env (4.33 × 8.66)
K
110 × 220
❍
X
X
❍
Monarch Env (37/8 × 71/2)
K
98.4 × 190.5
❍
X
X
❍
B5 JIS
A5
1
5 /2 × 8 /2
1
1
Executive (Exec.,
71/
4
×
101/
1
1
1
2)
Bypass Tray
Feed direction
A3
3
26
Paper Tray (Tray1)
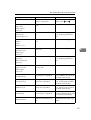
❖ Input Paper Sizes (Metric version)
Envelope Feeder
Unit
Paper Feed Unit
(Tray 2/3)
Size (mm)
Custom Size
—
—
❍*
X
★**
X
8K (10 /2 × 15.35)
K
267 × 390
❍
★
★
X
16K (7.68 × 101/2)
K
195 × 267
❍
★
★
X
L
267 × 195
❍
★
★
X
1
Bypass Tray
Feed direction
Paper Tray (Tray1)
Paper and Other Media Supported by This Printer
3
• ❍
Means that the size is supported but the paper size should be set with the control panel. There is no dial on the tray.
See p.40 “Loading Paper in the Bypass Tray”
See p.47 “Loading envelopes into the Envelope Feeder Unit”
• ✩
Means that the size is supported and indicated on the tray dial. Be sure to set
the paper size dial to match the actual paper size loaded in the tray.
• ★
Means that the size is supported but not indicated on the tray dial. You
should set the tray dial to “p”, and select the paper size with the control panel.
• ❍*
Means that the supported size is approximately 90 - 305 mm in width, and approximately 148 - 432 mm in length. The supported size may differ depending
on the printer language you use. Use the printer driver to set custom sizes. Set
custom sizes with the control panel.
• ★**
Means that the supported size is approximately 182-297 mm in width, and approximately 148-432 mm in length. The supported size may differ depending
on the printer language you use. Use the printer driver to set custom sizes. Set
custom sizes with the control panel.
• X
Means that the size is not supported.
Envelope Feeder
Unit
❍
Paper Feed Unit
(Tray 2/3)
11 × 17
Paper Tray
(Tray1)
K
Bypass Tray
Size (inch)
11 × 17
Feed direction
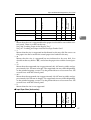
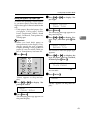
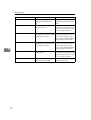
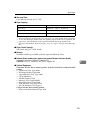
❖ Input Paper Sizes (Inch version)
✩
✩
X
27
Paper Tray
(Tray1)
Paper Feed Unit
(Tray 2/3)
Envelope Feeder
Unit
Legal (LG)
K
81/2 × 14
❍
✩
✩
X
Letter (LT)
K
8 /2 × 11
❍
✩
✩
X
L
11 × 81/2
❍
✩
✩
X
51/2 × 81/2
K
51/2 × 81/2
❍
X
X
X
Executive (Exec.)
K
71/
2
❍
X
★
X
L
101/2 × 71/4
❍
★
★
X
A3
K
11.26 × 16.54
❍
★
✩
X
B4 JIS
K
10.12 × 14.33
❍
★
★
X
A4
K
8.26 × 5.83
❍
★
✩
X
L
5.83 × 8.26
❍
✩
✩
X
K
7.17 × 10.12
❍
★
★
X
L
10.12 × 7.17
❍
★
★
X
K
5.83 × 8.26
❍
X
X
X
L
8.26 × 5.83
❍
★
★
X
A6
K
4.13 × 5.63
❍
X
X
X
Folio
K
8 /4 × 13
❍
★
★
X
Foolscap F4
K
81/2 × 13
❍
✩
★
X
F/GL
K
8 × 13
❍
★
★
X
Com#10 Env
K
41/8 × 91/2
❍
X
X
❍
C5 Env
K
6.38 × 9.02
❍
X
X
❍
C6 Env
K
4.49 × 6.38
❍
X
X
❍
DL Env
K
4.33 × 8.66
❍
X
X
❍
Monarch Env
K
37/8 × 71/2
❍
X
X
❍
Custom Size
—
—
❍*
X
★**
X
8K
K
101/2 × 15.35
❍
★
★
X
16K
K
7.68 × 10 /2
❍
★
★
X
L
101/2 × 7.68
❍
★
★
X
B5 JIS
A5
28
Bypass Tray
Size (inch)
3
Feed direction
Paper and Other Media
1
4
×
101/
1
1
Paper and Other Media Supported by This Printer
• ❍
Means that the size is supported but the paper size should be set with the control panel. There is no dial on the tray.
See p.40 “Loading Paper in the Bypass Tray”
See p.47 “Loading envelopes into the Envelope Feeder Unit”
• ✩
Means that the size is supported and indicated on the tray dial. Be sure to set
the paper size dial to match the actual paper size loaded in the tray.
• ★
Means that the size is supported but not indicated on the tray dial. You
should set the tray dial to “p”, and select the paper size with the control panel.
• ❍*
Means that the supported size is approximately 3.55 - 12.00 inches in width,
and approximately 5.83 - 17.00 inches in length. The supported size may differ depending on the printer language you use. Use the printer driver to set
custom sizes. Set custom sizes with the control panel.
• ★**
Means that the supported size is approximately 7.16 - 11.7 inches in width,
and approximately 5.8 - 17 inches in length. The supported size may differ depending on the printer language you use. Use the printer driver to set custom
sizes. Set custom sizes with the control panel.
• X
means that the size is not supported.
3
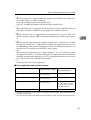
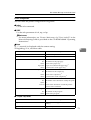
❖ Paper weight and number of sheets to be set
Supported paper weight
Maximum number of
sheets (plain paper) *1
Paper Tray
60 - 105 g/m2
(16 - 28 lb. bond)
250 (80 g/m2, 20 lb. bond)
Paper Feed Unit Type 2600 (option)
60 - 105 g/m2
(16 - 28 lb. bond)
500 (80 g/m2, 20 lb. bond)
Bypass Tray
52 - 162 g/m2
(14 - 43 lb. bond)
100 (80 g/m2, 20 lb. bond)
Envelope Feeder Type 2600 *2
*1
*2
For other kind of papers,
see p.33 “Types of Paper
and Other Media”.
p.33 “Types of Paper and Other Media”.
Confirm that the top of the stack is not higher than the limit mark indicated on the
side fence of the tray.
The Envelope Feeder Unit requires the installation of the optional Paper Feed Unit.
29
Paper and Other Media
K
297 × 420
❍
❍
❍
❍
B4 JIS
K
257 × 364
❍
❍
❍
❍
A4
K
210 × 297
❍
❍
❍
❍
L
297 × 210
❍
❍
❍
❍
K
182 × 257
❍
❍
❍
❍
L
257 × 182
❍
❍
❍
❍
K
148 × 210
❍
X
X
X
L
210 × 148
❍
❍
❍
❍
K
105 × 148
❍
X
X
X
K
279 × 432
❍
❍
❍
❍
Legal (LG, 8 /2 × 14)
K
216 × 356
❍
❍
❍
❍
Letter (LT, 8 /2 × 11)
K
216 × 279
❍
❍
❍
❍
L
279 × 216
❍
❍
❍
❍
K
140 × 216
❍
X
X
X
Executive (Exec., 71/4 × 101/2) K
184 × 276
❍
❍
❍
X
L
276 × 184
❍
❍
❍
❍
Folio (8 /4 × 13)
K
210 × 330
❍
❍
❍
❍
Foolscap (F4, 8 /2 × 13)
K
216 × 330
❍
❍
❍
❍
F/GL (8 × 13)
K
203 × 330
❍
❍
❍
❍
Com#10 Env (4 /8 × 9 /2)
K
104.8 × 241.3
❍
X
X
X
CA Env (6.38 × 9.02)
K
162 ×229
❍
X
X
X
C6 Env (4.49 × 6.38)
K
114 ×162
❍
X
X
X
K
110 × 220
❍
X
X
X
Monarch Env (3 /8 × 7 /2)
K
98.4 × 190.5
❍
X
X
X
Custom Size
—
—
❍
X
X
X
8K (10 /2 × 15.35)
K
267 × 390
❍
❍
❍
❍
16K (7.68 × 10 /2)
K
195 × 267
❍
❍
❍
❍
L
267 × 195
❍
❍
❍
❍
A5
A6
11 × 17
1
1
51/2 × 81/2
1
1
1
1
DL Env (4.33 × 8.66)
7
1
1
1
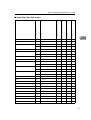
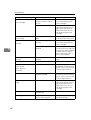
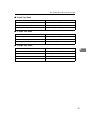
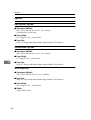
• ❍
Means that the size is supported.
• X
Means that the size is not supported.
Mailbox
Duplex Unit
Size (mm)
A3
B5 JIS
30
1-bin Shift Sort Tray
Feed direction
3
Output Tray
(Standard Tray)
❖ Output Paper Sizes (Metric version)
Paper and Other Media Supported by This Printer
11 × 17
K
11 × 17
❍
❍
❍
❍
Legal (LG)
K
81/2 × 14
❍
❍
❍
❍
Letter (LT)
K
81/2 × 11
❍
❍
❍
❍
L
11 × 8 /2
❍
❍
❍
❍
51/2 × 81/2
K
51/2 × 81/2
❍
X
X
X
Executive (Exec.)
K
71/4 × 101/2
❍
❍
❍
X
L
10 /2 × 7 /4
❍
❍
❍
❍
A3
K
11.26 × 16.54
❍
❍
❍
❍
B4 JIS
K
10.12 × 14.33
❍
❍
❍
❍
A4
K
8.26 × 5.83
❍
❍
❍
❍
L
5.83 × 8.26
❍
❍
❍
❍
K
7.17 × 10.12
❍
❍
❍
❍
L
10.12” × 7.17
❍
❍
❍
❍
K
5.83 × 8.26
❍
X
X
X
L
8.26 × 5.83
❍
❍
❍
❍
A6
K
4.13 × 5.63
❍
X
X
X
Folio
K
81/4 × 13
❍
❍
❍
❍
Foolscap F4
K
81/
× 13
❍
❍
❍
❍
F/GL
K
8 × 13
❍
❍
❍
❍
Com#10 Env
K
4 /8 × 9 /2
❍
X
X
X
C6 Env
K
4.49 × 6.38
❍
X
X
X
C5 Env
K
6.38 × 9.02
❍
X
X
X
DL Env
K
4.33 × 8.66
❍
X
X
X
Monarch Env
K
37/8 × 71/2
❍
X
X
X
Custom Size
—
—
❍
X
X
X
8K
K
10 /2 × 15.35
❍
❍
❍
❍
B5 JIS
A5
1
1
1
1
2
1
1
Mailbox
Duplex Unit
Size (inch)
1-bin Shift Sort Tray
Feed direction
Output Tray (Standard Tray)
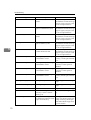
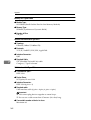
❖ Output Paper Sizes (Inch version)
3
31
1-bin Shift Sort Tray
7.68 × 101/2
❍
❍
❍
❍
L
101/2 × 7.68
❍
❍
❍
❍
Duplex Unit
K
Mailbox
Size (inch)
3
Feed direction
16K
Output Tray (Standard Tray)
Paper and Other Media
• ❍
Means that the size is supported and that the paper size should be set with
the control panel. There is no dial on the tray.
• X
Means that the size is not supported.
32
Paper and Other Media Supported by This Printer
Paper Recommendations
Note the following suggestions when handling or selecting paper used with this
printer.
Loading Paper
• Confirm the paper types of the printer. For more information, see p.33 “Types
of Paper and Other Media”. Print quality cannot be guaranteed if other paper
types are used.
• Do not use paper that is already printed on.
• If you load paper into the paper tray, be sure not to stack over the limit mark.
• If you load paper onto the Bypass Tray, be sure that paper fits under the side
guide.
• If you load paper into the paper tray, confirm that the print side is facing
down.
• If you load paper onto the Bypass Tray, confirm that the print side is facing
up.
3
Storing Paper
Paper should always be stored properly. Improperly stored paper might result
in poor print quality, paper misfeeds or printer damage.
Recommendations are as follows:
• Avoid storing paper in humid areas.
• Avoid exposing paper to direct sunlight.
• Store on a flat surface.
• Keep open reams of paper in the package in which the paper came.
Types of Paper and Other Media
❖ Plain paper
• If you print on paper heavier than 105 g/m2 (28 lb. bond), use the Bypass
Tray. The Bypass Tray can hold paper up to 162 g/m2 (43 lb. bond) in
weight.
• If you load paper heavier than 155 g/m2 (41 lb. bond) onto the Bypass
Tray, set the printer to Thick Paper mode using the control panel.
• If paper is curled or bent, correct it before loading.
33
Paper and Other Media
❖ OHP transparencies
• Load only one OHP transparency at the same time onto the Bypass Tray.
• When loading an OHP transparency onto the Bypass Tray, set the printer
to Transparency mode with the control panel.
• Be careful not to touch the print side of the OHP transparencies, otherwise
the print side gets dirty or damaged, and results in poor print quality.
• When printing on an OHP transparency that has a print side, load it facing
down onto the Bypass Tray.
❖ Adhesive labels
• Load only one adhesive label at the same time onto the Bypass Tray.
• Use adhesive labels in which the whole side can be printed on.
• Do not use adhesive labels having exposed glue.
• If the print side is coated, print quality might be reduced, as the toner
might not fuse well.
3
❖ Envelopes
• When printing on envelopes, use the Bypass Tray or the Envelope Feeder
Unit.
• Even when the optional Envelope Feeder Unit is not installed, you can select the sizes for the Envelopes for Tray 2 using the control panel. However, you cannot load the envelopes until optional Envelop Feeder Unit is
installed.
To use the Envelope Feeder Unit, installation of the optional Paper Feed
Unit is required. See “Envelope Feeder Type 2600” in the Setup Guide.
• Specifications of envelopes are as follows:
Metric version
2
Inch version
19 – 24 lb. bond
Weight
72 – 90 g/m
Recommended weight
and size
72 g/m2, 114 × 162 mm
24 lb. bond, 37/8 × 71/2 inches
(C6 Env)
(Monarch)
• You can load up to 10 envelopes (72 – 90 g/m2, 19 – 24 lb. bond) onto the
Bypass Tray at the same time, without forcibly pressing them. Confirm
that the envelopes are not damp, and that the top of the stack is not higher
than the limit mark on the side guide. See p.45 “Loading envelopes onto
the Bypass Tray”.
• You can load up to 60 envelopes (72 – 90 g/m2, 19 – 24 lb. bond) into optional Envelope Feeder Unit at the same time, without forcibly pressing
them. Confirm that the envelopes are not damp, and that the top of the
stack is not higher than the limit mark on the side guide. See p.47 “Loading
envelopes into the Envelope Feeder Unit”.
• Confirm that the print side is facing up when loading onto the Bypass
Tray, and facing down when loading into the optional Envelope Feeder
Unit.
34
Paper and Other Media Supported by This Printer
• Load the envelopes with the flaps aligned to the left side fence. The flaps
should be securely folded up.
• Confirm that there is no air in the envelopes before loading.
• To get better print quality, it is recommended that you set the right, left,
top, and bottom print margin, to at least 15 mm (0.6 inches) each.
• Do not print on both sides of envelopes.
• Load only one size and type of envelopes at the same time.
• Before loading envelopes, flatten the leading edges (the side being fed into
the printer) of them by running a pencil or ruler across them.
• Before loading envelopes, confirm that they are rectangular in shape.
• Do not use the non-supported envelopes listed on p.29 “Paper weight and
number of sheets to be set”.
3
Paper not supported by this printer
Avoid using the following types of paper that are not supported by this printer:
• Paper whose weight is heavier or lighter than the limitation. See p.25 “Paper
Types and Sizes”.
• Bent, folded or creased paper
• Curled or twisted paper
• Torn paper
• Wrinkled paper
• Damp paper
• Paper stuck together
• Paper that is dry enough to emit static electricity
• Paper that has already been printed on, with the exception of preprinted letterhead
Note
❒ Ink on paper from an earlier print job, another copier, an inkjet printer or
other device could damage the fusing unit of this printer due to a difference in fusing temperatures.
• Coated paper
• Special paper like thermal paper, aluminum foil, carbon paper and conductive paper
• Heavily textured paper
• Glued paper
• Label paper on which glue or base paper is exposed
• Paper with clips or stapled
• Paper with tape or ribbons attached
• Envelopes in the following conditions:
35
Paper and Other Media
•
•
•
•
•
•
•
•
•
•
•
3
damp
excessively curled or twisted
stuck together
damaged in any way
with stamps attached
with windows, holes, perforations, cutouts or embossing
with metal clasps, string ties or metal folding bars
designed to be interlocked
with nicked edges or bent corners
with rough, wrinkled or laid finishes
with any exposed adhesive, when the flap is in the sealed or closed position
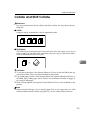
Printable Area
The following shows the printable area for this printer. Be sure to set the print
margins correctly by the application.
4.2mm(1/6 inches)
4.2mm(1/6 inches)
4.2mm
(1/6 inches)
1
4.2mm
(1/6 inches)
4.2mm(1/6 inches)
A
4.2mm(1/6 inches)
: printable area
Important
❒ The maximum printable length is 432 mm (17 inches) in the paper feed direction.
Note
❒ The printable area may vary depending on the paper size, printer language
and printer driver settings.
36
Loading Paper and Other Media
Loading Paper and Other Media
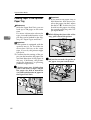
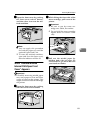
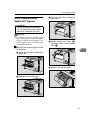
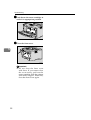
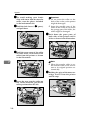
Loading Paper in the Paper
Tray
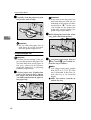
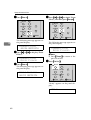
B While lifting the front side of the
tray, pull it out of the printer.
Load paper in the optional Paper
Feed Unit by following the procedures below.
Reference
With the paper tray, you can load
up to 250 pages and with the optional Paper Feed Unit, you can
load up to 500 pages at the same
time. For more information about
the type, size and feed direction of
paper that can be loaded in the
tray, see p.25 “Paper Types and
Sizes”.
3
ZCEY140J
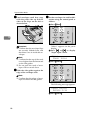
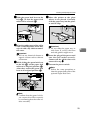
C Load paper into the tray with the
print side down.
When you change the paper size
see p.38 “Changing the paper
size”.
A Lift the paper tray slightly then
pull it out until it stops.
ZCEY130J
Important
❒ Confirm that the top of the stack
is not higher than the limit mark
inside the tray.
❒ Confirm that paper fits under
the rear guide.
ZCEY430J
37
Paper and Other Media
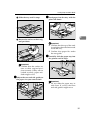
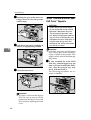
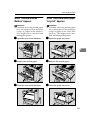
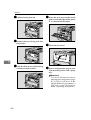
D Carefully slide the paper tray into
the printer until it stops.
Important
❒ If you want to use the paper size
and feed direction that are not
indicated on the paper size dial,
set the dial to “p”. In this case,
you should set the paper size
using the control panel. See
p.106 “Paper Input Menu”.
B While lifting the front side of the
tray, pull it out of the printer.
3
ZCEY150J
Important
❒ Do not slide the paper tray in
with force. If you do, the front
and side guides might move.
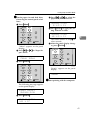
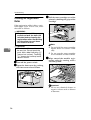
Changing the paper size
ZCEY140J
Important
❒ Confirm that the setting of the paper size dial matches the paper size
and feed direction of the paper in
the tray, otherwise the printer
might be damaged, or printing
problems might occur.
A Lift the paper tray slightly then
pull it out until it stops. Adjust
the paper size dial to match the
size and feed direction of paper in
the paper tray.
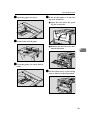
C If you load paper larger than A4
1
K or 8 /2 × 11 K, you should extend the tray as follows:
Note
❒ You cannot load paper smaller
than A4 K or 81/2 × 11 K, if the
tray is extended. In this case, return the tray to its standard
length.
A Slide the catches inwards to
unlock the tray.
ZCEY110J
ZCEY160J
38
Loading Paper and Other Media
B Slide the tray until it stops.
E Load paper into the tray with the
print side down.
3
ZCEY170J
C Return the catches to their original positions.
ZCEY130J
Important
❒ Confirm that the top of the stack
is not higher than the limit mark
inside the tray.
❒ Confirm that paper fits under
the rear guide.
F Carefully slide the paper tray into
the printer until it stops.
ZCEY180J
Important
❒ Confirm that the catches return to their original positions securely. If they are not
locked securely, paper misfeeds might occur.
D Adjust the rear and side guides to
ZCEY150J
the paper size you want to load.
Important
❒ Do not slide the paper tray in
with force. If you do, the front
and side guides might move.
ZGDY120J
39
Paper and Other Media
Loading Paper in the Bypass
Tray
Reference
With the Bypass Tray, you can
load up to 100 pages at the same
time. For more information about
the type, size and feed direction of
paper that can be loaded in the
tray, see p.25 “Paper Types and
Sizes”.
3
Note
❒ If you set custom size paper, you
should set the paper size using the
printer driver. Also, use the control panel to set the custom size setting.
Note
❒ If you load A4K or lager, or
81/2 × 11 Kor larger, slide out
the Bypass Tray extension (A)
and then flip it open (B).
ZGDY210J
C Adjust the side guides to the paper width.
A Open the Bypass Tray.
ZGDY220J
ZGDY190J
B Slide
the side guides outward,
and load paper until it stops with
the print side up.
ZGDY200J
40
Important
❒ Confirm that paper fits under
the side guides.
Loading Paper and Other Media
D Set the paper size and feed direction using the control panel as follows:
A Press {Menu}
}.
On Line
Job Reset
Form Feed
Power
Menu
E Press {T} or {U} to select the
paper size you want to use.
Bypass Size:
8 1/2 x 11
F Press {Enter #}
} to apply the setting. Wait for a while.
Escape
Bypass Size:
*8 1/2 x 11
Enter
Error
Data In
“Menu” appears on the panel
display.
B Press {T} or {U} to “Paper Input” menu.
Menu
Paper Input
3
The screen returns to step C in
a few seconds.
G After the panel display changes, press {On Line}
}.
On Line
Menu
Job Reset
Escape
Form Feed
Enter
Power
Error
C Press {Enter #}
}.
On Line
Data In
Menu
Job Reset
Escape
Form Feed
Enter
Power
Error
"Ready" appears on the panel
display.
Ready
Data In
E Start printing with the computer.
The following message appears
on the panel display.
Paper Input:
Bypass Size
D Press {Enter #}
}.
Bypass Size:
*11 x 17
41
Paper and Other Media
Loading custom sized paper in the
Bypass Tray
Important
❒ The settings of custom sized paper
that take effect are not the settings
made on the control panel but the
settings made in the printer driver.
There is no need to change the settings on the control panel. However, when using a printer driver
other than RPCS, you will need to
change the settings on the control
panel.
3
❒ Applications that do not allow a
custom paper size to be set cannot
print on custom sized paper.
Note
❒ If you print on A3 or longer sheets,
prints may become blurred.
A Press {Menu}}.
On Line
Escape
Form Feed
Enter
Power
Error
D Press {T} or {U} to display "Custom Size".
Bypass Size:
Custom Size
E Press {Enter #}}.
The following message appears on
the panel display.
F Press {T} or {U} to display the
length in the feed direction, and
then press {Enter #}
}.
G Press {T} or {U} to display the
size along the length of the feed
direction, and then press { Enter
#}
}.
Data In
B Press {T} or {U} to display "PaMenu
Paper Input
The following message appears on
the panel display.
The screen to enter the size along
the length appears.
"Menu" appears on the panel display.
per Input" menu.
Paper Input:
Bypass Size
Custom Size:
Horiz.
11.69 "
Menu
Job Reset
C Press {Enter #}}.
Custom Size:
Vert.
8.27 "
The screen returns to step D in a
few seconds.
H Press {On Line}}.
Ready
"Ready" appears on the panel display.
42
Loading Paper and Other Media
Setting the Bypass Tray Paper Type
To make sure printing is done correctly, you must specify one of the following for the type of sheets loaded in the
tray:
• Plain paper, Recycled paper, Special paper, Color paper, Letterhead, Preprinted, Labels, Bond
paper, Cardstock, Transparencies,
Thick paper
Important
❒ When you load thick paper or
transparencies in the Bypass Tray,
always specify the type of paper.
Duplex printing is not possible on
paper in a tray for which Thick paper or Transparency has been set.
A Press {Menu}}.
On Line
D Press {T} or {U} to display "Paper Type".
Paper Input:
Paper Type
E Press {Enter #}}.
The following message appears on
the panel display.
F Press {T} or {U} to display "By-
3
pass Tray", and then press {Enter
#}
}.
Paper Type:
Bypass Tray
The screen to select the paper type
appears.
G Press {T} or {U} to display the
type of paper you have loaded,
and then press {Enter #}
}.
Menu
Job Reset
Escape
Form Feed
Enter
Power
Error
Bypass Tray:
Thick Paper
The screen returns to step F in a
few seconds.
Data In
"Menu" appears on the panel display.
B Press {T} or {U} to display "Paper Input" menu.
H Press {On Line}}.
Ready
"Ready" appears on the panel display.
Menu
Paper Input
C Press {Enter #}}.
The following message appears on
the panel display.
43
Paper and Other Media
Loading Paper in the Optional
Paper Tray
Reference
With the Paper Feed Unit, you can
load up to 500 pages at the same
time.
For more information about the
type, size and feed direction of paper that can be loaded in the tray,
see p.25 “Paper Types and Sizes”.
3
Important
❒ If you want to use paper sizes or
feed directions that are not listed on the paper size dial, adjust
the dial to “p”. In this case, you
should set the paper size using
the control panel. See p.106 “Paper Input Menu”.
B While lifting the front side of the
tray, pull it out of the printer.
Important
❒ If the printer is equipped with the
optional tray(s), do not slide out
more than one tray at the same
time. If you do, the printer might
fall down.
❒ Confirm that the setting of the paper size dial matches the paper size
and feed direction of the paper in
the tray. If different, the printer
might be damaged, or printing
problems might occur.
ZDDP330E
C Adjust the rear and side guides to
the paper size you want to load.
A Lift the paper tray slightly then
pull it out until it stops. Adjust
the paper size dial to match the
size and feed direction of paper in
the Paper Feed Unit.
ZGDY250E
ZCEY230J
44
Loading Paper and Other Media
D Load
paper into the paper tray
with the print side down.
Loading Envelopes
As there are many kinds of envelopes,
be sure to check if those to be used are
supported by this printer.
Reference
For more information about envelopes, see p.33 “Types of Paper and
Other Media”.
ZCEY260J
Important
❒ Confirm that the top of the stack
is not higher than the limit mark
inside the tray.
❒ Confirm that paper fits under
the rear guide.
E While lifting the front of the tray,
place the tray into the printer.
Then slide it inside until it stops.
3
Important
❒ Even when the optional Envelope
Feeder Unit is not installed, you
can select the sizes for the envelopes for Tray 2 using the control
panel. However, you cannot load
the envelopes until the optional
Envelope Feeder Unit is installed.
❒ To install the Envelope Feeder
Unit, the optional Paper Feed Unit
must be installed. See “Envelope
Feeder Type 2600” in the Setup
Guide.
Loading envelopes onto the Bypass Tray
ZDDP340E
Important
❒ Do not slide the paper tray in
with force. If you do, the front
and side guides might move.
Reference
With the Bypass Tray, you can
load up to 10 envelopes at the same
time. For more information about
envelopes, see p.33 “Types of Paper and Other Media”.
A Open the Bypass Tray.
ZGDY190J
45
Paper and Other Media
B Load
envelopes until they stop,
with the print side up and the
sides of the flaps on the left as
shown below.
D Set the envelope size and feed direction using the control panel as
follows:
A Press {Menu}
}.
On Line
3
Menu
Job Reset
Escape
Form Feed
Enter
Power
Error
Data In
ZGDY411J
Important
❒ Confirm that the envelope flaps
are securely folded down, and
that there is no air inside the envelopes.
Note
❒ Confirm that the top of the stack
is not higher than the limit mark
on the side guides.
❒ Do not push the stack of envelopes with too much force.
C Slide the side guides against the
“Menu” appears on the panel
display.
B Press {U} or {T} to display
“Paper Input” menu.
Menu:
Paper Input
C Press {Enter #}
}.
On Line
Menu
Job Reset
Escape
Form Feed
Enter
Power
Error
edge of the envelope stack.
Note
❒ Confirm that the edges of envelopes fit under the side guides.
Data In
The following message appears.
Paper Input:
Bypass Size
D Press {Enter #}
}.
46
Loading Paper and Other Media
E Press {U} or {T} to select the
envelope type you want to use.
Reference
For information about types
of envelopes you can select,
see p.25 “Paper and Other
Media Supported by This
Printer”.
F Press {Enter #}
} to apply the settings. Wait for a while.
G After the panel display changes, press {On Line}
}.
On Line
Menu
Job Reset
Escape
Form Feed
Enter
Power
Error
Loading envelopes into the Envelope
Feeder Unit
Important
❒ With the optional Envelope Feeder
Unit, you can load up to 60 envelopes at the same time. For more
information about envelopes, see
p.33 “Types of Paper and Other
Media”.
3
A Slide
the optional Paper Feed
Unit (Tray 2) out until it stops.
Next, lift it slightly, then slide it
out.
Data In
"Ready" appears on the panel
display.
Ready
E Start printing with the computer.
ZDDP330E
Note
❒ Keep the paper tray with paper
in a cool and dry place.
B Prepare
the
Envelope
Feeder
Unit.
C While pinching the side guides,
slide them outward until they
stop. While pinching the rear
guide, slide it toward the back.
ZGDY260E
47
Paper and Other Media
D Push the bottom plate down until
it locks into place.
F While pinching the side guides,
slide them along the edge of the
envelope stack.
3
ZDDP360E
E Load envelopes into the Envelope
Feeder Unit, with the print side
down and the flap on the left as
shown in the illustration.
ZDDP380E
Important
❒ Confirm that the envelope flaps
are securely folded down, and
that there is no air inside the envelopes.
Note
❒ Confirm that the top of the stack
is not higher than the limit mark
on the side guides.
❒ Confirm that the envelopes fit
under the side guides.
❒ Do not push the stack of envelopes with too much force.
48
ZGDY370E
G While
pinching the rear guide,
slide it along the edge of the envelope stack.
ZGDY390E
H While lifting the front of the tray,
place it into the printer. Then
slide it until it stops.
Important
❒ Do not slide the paper tray in
with force. If you do, the front
and side guides might move.
Loading Paper and Other Media
I Set the envelope size and feed direction using the control panel as
follows:
A Press {Menu}
}.
On Line
Menu
Job Reset
Escape
Form Feed
Enter
Power
Error
D Press {U} or {T} to display
“Tray Paper Size”.
Paper Input:
Tray Paper Size
E Press {Enter #}
}.
The following message appears
on the panel display.
Tray Paper Size:
Tray 1
Data In
“Menu” appears on the panel
display.
B Press {U} or {T} to display
“Paper Input” menu.
Menu:
Paper Input
F Press {U} or {T} to display
“Tray 2”.
Tray Paper Size:
Tray 2
G Press {Enter #}
}.
H Press {U} or {T} to select the
envelope type you want to use.
Escape
Reference
For more information about
types of envelopes you can
select, see p.25 “Paper and
Other Media Supported by
This Printer”.
Form Feed
Enter
I Press {Enter #}
}. Wait for a
while.
Power
Error
C Press {Enter #}
}.
On Line
Job Reset
Menu
3
Data In
The following message appears
on the panel display.
Paper Input
Bypass Size
49
Paper and Other Media
J After the panel display changes, press {On Line}
}.
On Line
3
Menu
Job Reset
Escape
Form Feed
Enter
Power
Error
Data In
"Ready" message appears on
the control panel.
Ready
J Start printing with the computer.
50
4. Sample Print/Locked Print
Sample Print
Use this function to print only the first
set of a multiple-set print jobs. The remaining sets are saved on the optional Hard Disk Drive in the printer. The
saved job can be printed or canceled
from the printer's control panel.
Important
❒ Turning the printer off deletes any
documents or error logs stored on
the optional hard disk drive.
Limitation
❒ To use this function, the optional
Hard Disk Drive must be installed
on the printer.
Note
❒ If the application has a collate option, confirm that it is not selected
before sending a print job. By default, sample print jobs are automatically collated by the printer
driver. If the collate option is selected from the application print
dialog box, more pages than intended may be printed.
❒ You can identify the file you want
to print by the User ID and the
time when the job was stored.
❒ The actual number of pages the
printer can save depends on the
contents of the print images. For
example, the printer can save up to
30 jobs or 1,000 pages. It depends
on the data volume.
❒ If the first set of the sample print
file is not as you expected and you
do not want to print the remaining
sets, delete the sample print file using the control panel. If you print
the remaining sets of the sample
print file, the job in the printer is
deleted automatically.
Printing a Sample Print File
The following procedure describes
how to print a sample print file with
the PCL printer driver. For information about how to print a sample print
file with the PostScript printer driver,
see the PostScript 3 Operating Instructions Supplement included on
the CD-ROM. For more information
about RPCS printer driver, see Help.
A From
an application, select the
menu command to print.
The print dialog box appears.
B Open the Printer Properties.
C From the [Job Type:] box on
the
[Setup] tab, select [Sample Print].
D Click the [Details...] button.
E In the [User ID:] box, type a User ID
of up to eight alphanumeric characters.
Note
❒ This is used to identify the user
associated with a job.
❒ The User ID can consist of up to
eight alphanumeric (a-z, A-Z, 09) characters.
51
Sample Print/Locked Print
F Click [OK].
G After making all desired settings,
L Press {Enter #}}.
On Line
Menu
click [OK].
H Start
printing from the application's print dialog box.
The sample print job is sent to the
printer and the first set is printed.
Job Reset
Escape
Form Feed
Enter
Power
Error
I Check
the print job to confirm
whether the settings are acceptable.
If the settings are fine, go to step J
to print the rest of the print job.
If not, you can delete the saved job.
See p.53 “Deleting a Sample Print
File”
4
J On
the printer's control panel,
press {Menu}
}.
On Line
Job Reset
Data In
The following message appears on
the panel display.
Sample Print:
08:56 ABCD1234
M Press {T} or {U} to display the
file you want to print, and then
press {Enter #}
}.
Menu
Select Action:
Print File
Escape
Form Feed
Enter
Power
Error
Note
❒ If you want to cancel the sample
print file, press {Escape}
}.
Data In
“Menu” appears on the panel display.
K Press {T} or {U} to display the
“Sample Print“ menu.
Menu:
Sample Print
N Press {Enter #}}.
The following message appears on
the panel display.
Qty: 1(1-999)
Press # to Print
O Press
{U} or {T} to enter the
number of sets.
Note
❒ You can enter up to 999 sets.
Qty: 6(1-999)
Press # to Print
52
Sample Print
P Press {Enter #}} to print the file.
The following message appears on
the panel display.
Processing...
Note
❒ If you are not satisfied with the
first printout of the sample print
file and do not want to print the remainder, the job in the printer is
deleted automatically.
Deleting a Sample Print File
If you are not satisfied with the printout, delete the sample print file. Then
revise it and print again until the settings are fine.
A Press {Menu}}.
On Line
C Press {Enter #}}.
On Line
Menu
Job Reset
Escape
Form Feed
Enter
Power
Error
Data In
The following message appears on
the panel display.
4
Sample Print:
08:56 ABCD1234
D Press {T} or {U} to display the
file you want to delete, and then
press {Enter #}
}.
The following message appears on
the panel display.
Menu
Job Reset
Escape
Form Feed
Enter
Power
Error
Select Action:
Print File
Data In
"Menu" appears on the panel display.
B Press {T} or {U} to display the
"Sample Print" menu .
Menu:
Sample Print
Note
❒ If you want to cancel the deletion of a sample print file, press
{Escape}
}.
E Press {T} or {U} to display "Delete File", and then press {Enter #}
}.
08:56 ABCD1234
Press# to Delete
F Press {Enter #}} to delete the file.
The following message appears on
the panel display.
Deleted
53
Sample Print/Locked Print
G Press {On Line}}.
On Line
C Press {Enter #}}.
Menu
On Line
Job Reset
Escape
Job Reset
Escape
Form Feed
Enter
Form Feed
Enter
Power
Error
Power
Error
Data In
"Ready" appears on the panel display.
4
Menu
Ready
Checking the Error Log
Limitation
❒ You can view only the latest 20 error logs of all.
A Press {Menu}}.
"Menu" appears on the panel display.
B Press {T} or {U} to display the
"Sample Print" menu.
Menu:
Sample Print
Data In
The following message appears on
the panel display.
Sample Print:
08:56 ABCD1234
D Press {T} or {U} to display “Error
File(s)”.
Sample Print:
Error File(s)
E Press {Enter #}}.
The following message appears on
the panel display.
Error File(s):
06:52 ABCD1234
Note
❒ You can check the other error
logs by using {T} or {U}.
F Press {T} or {U} to check "Error
File(s)", and then press {Enter #}
}.
The following message appears on
the panel display.
Sample Print:
Error File(s)
54
Sample Print
G Press {On Line}}.
On Line
Menu
Job Reset
Escape
Form Feed
Enter
Power
Error
Data In
"Ready" appears on the panel display.
4
Ready
55
Sample Print/Locked Print
Locked Print
Use this function to maintain privacy
when printing confidential documents. Documents will not be printed
out automatically, unless a password
is entered, using the control panel after sending the print job.
Important
❒ Turning the printer off deletes any
documents or error logs stored on
the optional hard disk drive.
4
Limitation
❒ To use this function, the optional
Hard Disk Drive must be installed
on the printer.
Note
❒ If the application has a collate option, confirm that it is not selected
before sending a print job. By default, locked print jobs are automatically collated by the printer
driver. If the collate option is selected from the application print
dialog box, more pages than intended may be printed.
❒ You can identify the file you want
to print by the User ID and the
time when the job was stored.
❒ The actual number of pages the
printer can save depends on the
contents of the print images. For
example, the printer can save up to
30 jobs or 1,000 pages. It depends
on the data volume.
❒ After the locked print file is printed, the job in the printer is deleted
automatically.
Printing a Locked Print File
The following procedure describes
how to print a locked print file with
the PCL printer driver. For information about how to print a locked print
file with the PostScript printer driver,
see the PostScript 3 Operating Instructions Supplement included on
the CD-ROM. For more information
about RPCS printer driver, see Help.
A From
an application, select the
menu command to print.
The print dialog box appears.
B Open the Printer Properties.
C From the [Job Type:] box on
the
[Setup] tab, select [Locked Print].
D Click the [Details:] button.
E In the [User ID:] box, type a User ID
of up to eight alphanumeric characters.
Note
❒ This is used to identify the user
associated with a job.
❒ The User ID can consist of up to
eight alphanumeric (a-z, A-Z, 09) characters.
F In the [Password:] box, type a password of four digits.
Note
❒ The password must be four digits (0-9).
G Click [OK].
H After making all desired settings,
click [OK].
56
Locked Print
I Start
printing from the application's print dialog box.
The locked print job is sent to the
printer.
J On
the printer's control panel,
press {Menu}
}.
On Line
Menu
Job Reset
Escape
Form Feed
Enter
Power
Error
Data In
{T} or {U} to display
"Locked Print" menu.
Menu:
Locked Print
L Press {Enter #}}.
Menu
Escape
Form Feed
Enter
Power
Error
Password:
[0---]
in step F.
A Press {U} or {T} to enter the
leftmost digit of the password.
K Press
Job Reset
you want to print, and then press
{Enter #}
}.
The following message appears on
the panel display.
N Enter the password you entered
"Menu" appears on the panel display.
On Line
M Press {T} or {U} to display a file
Data In
The following message appears on
the panel display.
Locked Print
08:56 ABCD1234
4
Password:
[1---]
B Press {Enter #}
}.
The next digit appears.
Password:
[*2--]
Note
❒ If you want to change the
locked print file, press {Escape}
}.
C Repeat steps A and B to enter
the remaining digit of the password, and the press {Enter #}
}.
If the password is not correct,
the following message appears
and the panel display returns to
the password menu. Reset or
reenter the password.
Invalid Password
Try Again
O Press {T} or {U} to display "Print
File", and then press {Enter #}
}.
Note
❒ If you want to change the
locked print file, press {Escape}
}.
57
Sample Print/Locked Print
P Press {Enter #}}.
C Press {Enter #}}.
The following message appears on
the panel display.
08:56 ABCD1234
Press # to Print
Q Press {Enter #}} to print the file.
Processing...
4
Deleting the Locked Print File
Job Reset
Escape
Form Feed
Enter
Power
Error
Data In
Locked Print:
08:56 ABCD1234
file you want delete, and then
press {Enter #}
}.
Menu
Job Reset
Escape
Form Feed
Enter
Power
Menu
D Press {T} or {U} to display the
A Press {Menu}}.
On Line
On Line
Error
Password:
[0---]
E Enter the password of the locked
Data In
"Menu" appears on the panel display.
B Press {T} or {U} to display the
"Locked Print" menu.
Menu:
Locked Print
print file.
A Press {U} or {T} to enter the
leftmost digit of the password.
Password:
[1---]
B Press {Enter #}
}.
The next digit appears.
Password:
[*2--]
Note
❒ If you want to change the
locked print file, press {Escape}
}.
58
Locked Print
C Repeat steps A and B to enter
the remaining password digits,
and then press {Enter #}
}.
If the password is not correct,
the following message appears
and the panel display returns to
the password menu. Reenter
the password.
Invalid Password
Try Again
F Press {T} or {U} to display “Delete File”.
Select Action:
Delete File
G Press {Enter #}}.
The following message appears on
the panel display.
08:56 ABCD1234
Press# to Delete
Note
❒ If you want to change the
locked print file, press {Escape}
}.
H Press {Enter #}}.
The following message appears on
the panel display.
Deleted
I Press {On Line}}.
On Line
Menu
Job Reset
Escape
Form Feed
Enter
Power
Error
Data In
"Ready" appears on the panel display.
4
Ready
Checking the Error Log
Limitation
❒ You can view only the latest 20 error logs of all.
A Press {Menu}}.
On Line
Menu
Job Reset
Escape
Form Feed
Enter
Power
Error
Data In
"Menu" appears on the panel display.
B Press {T} or {U} to display the
"Locked Print" menu.
Menu:
Locked Print
59
Sample Print/Locked Print
C Press {Enter #}}.
On Line
F Press {T} or {U} to check "Error
File(s)", and then press {Escape}
}.
Menu
On Line
Job Reset
Escape
Form Feed
Power
Job Reset
Escape
Form Feed
Enter
Power
Error
Enter
Error
Data In
The following message appears on
the panel display.
4
Menu
Locked Print:
08:56 ABCD1234
D Press {T} or {U} to display “Error
File(s)”.
Locked Print:
Error File(s)
E Press {Enter #}}.
The following message appears on
the panel display.
Error File(s):
06:52 ABCD1234
Data In
ZDDS024N
The following message appears on
the panel display.
Locked Print:
Error File(s)
Note
❒ Press {Escape}
} to return to the
previous menu.
G Press {On Line}}.
On Line
Menu
Job Reset
Escape
Form Feed
Enter
Power
Error
Data In
"Ready" appears on the panel display.
Ready
60
5. Troubleshooting
Error & Status Messages on the Control
Panel
Messages/Second messages
Call Service: EC
Power Off On
Description
An error has occurred in the
printer.
First, turn the power switch
off and then on. If the message
appears again, call your sales
or service representative.
The paper type and size setting on the tray differs from
the setting on the driver.
Load { paper size and type }
paper with the selected feed
direction into tray. Printing
will not automatically resume
if the paper type, size and direction setting is incorrect.
Make sure that the paper size,
feed directions and paper type
set in the printer driver and on
the control panel are the same.
There are two methods to
resume printing.
/If Error Reoccur
Call Service
Change Setting
Tray #
/Paper Size:
Solution
Paper Type:
A Use the control panel to set
the correct paper type, size
and direction of the paper
in tray.
B Press {Form Feed}
} and se-
lect the tray with the control panel.
You can make to setting to
print disregarding the error
message.
Reference
See “Ppr.Size Error” in
p.115 “Maintenance Menu
Parameters”.
Cannot Check
Signal in Ad hoc
Close Duplex
Unit Cover
The signal strength for the
wireless LAN cannot be
checked because "Ad hoc" is
selected in "Comm.Mode" for
"IEEE 802.11b" in the Host Interface menu.
Change the Transmission
mode to [Infrastructure] in the
Host Interface settings.
The cover of the optional Duplex Unit is open.
Close the cover of the optional
Duplex Unit.
61
Troubleshooting
Messages/Second messages
Close
Description
Solution
The front cover is open.
Close the front cover.
The paper exit cover or the
rear cover is open.
Close the paper exit cover or
the rear cover.
The cover of the Mailbox is
open.
Close the cover of the Mailbox.
The cover of the output 1-bin
Tray is open.
Close the cover of the output
1-bin Tray.
Energy Save Mode
The printer is in Energy Saver
mode.
Wait for a while.
Hardware Problem DIM
An error has occurred in the
printer.
First, turn the power switch
off and then on. If the message
appears again, call your sales
or service representative.
Hardware Problem
An error has occurred in the
optional Network Interface
Board.
First, turn off the power
switch and then on. If the message appears again, call your
sales or service representative.
Front Cover
Close Rear/Paper
Exit Cover
Close
Mailbox Cover
Close Upper
Tray Cover
5
Ethernet
Turn off the power switch .
Replace the Network Interface
Board and turn on the power
switch. See “Network Interface
Board Type 2610” in the Setup
Guide.
Turn off the power switch, remove the Network Interface
Board and turn on the power
switch.
Note
❒ If you remove the Network Interface Board, you
cannot print over the network. You can send a print
jobs to the printer only via
a parallel cable connection.
62
Error & Status Messages on the Control Panel
Messages/Second messages
Hardware Problem
HDD
Description
An error has occurred in the
optional Hard Disk Drive.
Solution
First, turn the power switch
off and then on, If the message
appears again, call your sales
or service representative.
Turn off the power switch. Replace the Hard Disk Drive and
turn on the power switch. See
“Hard Disk Drive Type 2600” in
the Setup Guide.
Turn off the power switch. Remove the Hard Disk Drive
and turn on the power switch.
Note
❒ If the Hard Disk Drive is
not installed, you cannot
send the sample print job,
locked print job and
download the font to Hard
Disk Drive using the PS
Utility for Mac.
Hardware Problem
IEEE1394
An error has occurred in the
optional 1394 Interface Unit.
5
First, turn the power switch
off and then on, If the message
appears again, call your sales
or service representative.
Turn off the power switch. Replace the 1394 Interface Unit
and turn on the power switch.
See “1394 Interface Unit Type
4510” in the Setup Guide.
Turn off the power switch, remove the 1394 Interface Unit
and turn on the power switch.
Note
❒ If you remove the 1394 Interface Unit, you cannot
send print jobs via the 1394
Interface Unit. You can
only send print jobs to the
printer via the parallel cable connection.
Hardware Problem
IEEE 802.11b
An error has occurred in the
optional 802.11b Interface
Unit.
Replace the IEEE 802.11b
board.
63
Troubleshooting
Messages/Second messages
Hardware Problem
NV-RAM
Hardware Problem
Option RAM
Description
Solution
An error has occurred in the
printer.
First, turn the power switch
off and then on. If the message
appears again, call your sales
or service representative.
An error has occurred in the
optional Memory Unit.
First, turn the power switch
off and then on. If the message
appears again, call your sales
or service representative.
Turn off the power switch, Replace the Memory Unit, and
then turn on the power
switch. See "Memory Unit
TypeB 64MB" in the Setup
Guide.
Turn off the power switch, remove the Memory Unit, and
then turn on the power
switch.
5
Note
❒ If you remove the Memory
Unit, you must set up the
option with the printer
driver. If you are using
Windows 95/98/Me, Windows 2000/Windows XP
and Windows NT 4.0, see
"Installing the Printer Driver
and Software" in the Setup
Guide.
❒ In this case, you might not
be able to print complex
print jobs.
Hardware Problem
Shift Tray
Hardware Problem
Parallel I/F
Hardware Problem
USB
64
An error has occurred in the
shift motor of the shift tray.
First, turn the power switch
off and then on. If the message
appears again, call your sales
or service representative.
An error has occurred in the
parallel I/F.
If you use the parallel I/F, replace the interface cable that
caused the error. If the message appears again, contact
your sales or service representative.
There is a problem related to
the Universal Serial Bus Connection and Hardware.
First, turn the power switch
off and then on, If the message
appears again, call your sales
or service representative.
Error & Status Messages on the Control Panel
Messages/Second messages
Description
Solution
HDD Full
The maximum HDD area size
for form/font has been exceeded.
Delete the disused form/font
types.
HDD Full
The optional Hard Disk Drive
is full. The sample print job or
locked print job to be sent
from the computer is too large
to store.
Delete any unnecessary stored
files.
HDD Not Installed
You cannot print the sample
print and the locked print
jobs, because the optional
Hard Disk Drive is not installed.
Install the Hard Disk Drive.
See “Hard Disk Drive Type
2600” in the Setup Guide.
Hex Dump Mode
The printer is in Hex Dump
Mode.
Wait for a while. If the "Hex
Dump Mode" message does
not change, on the panel display press {On Line}
} to return
to the "Ready" condition.
I/O Buffer Overflow
There is too much data for the
I/O buffer to handle.
5
Make sure the interface cable
is inserted into the printer and
your computer securely.
Make sure the interface cable
is not damaged or broken.
Increase the size of the I/O
buffer.
Invalid Password
Try Again
Load Correct
Size Paper
/Press #
to Continue
The password was not entered correctly.
Wait for two seconds until the
previous display appears.
Then enter the password correctly.
The paper size setting on the
tray differs from that of actual
paper size in the tray.
Load { paper size } paper of
the selected feed direction and
paper size into the tray. Printing will not automatically
resume if the paper size and
direction setting is incorrect.
Make sure that the paper feed
directions set in the printer
driver and on the control panel are the same. There are two
methods to resume printing.
A Use the control panel to set
the correct paper size and
direction of the paper in
tray. Then press {Enter #}
}.
B Press {Form Feed}
} and se-
lect the tray with the control panel.
65
Troubleshooting
Messages/Second messages
Description
Solution
The paper type and size settings for this tray do not
match the size and type of paper actually loaded.
Load paper into the tray indicated, then press {Enter #}
} to
resume printing. Or press
{Form Feed}
} and select the tray
that holds a different type of
paper. To cancel printing,
press {Job Reset}
}. Then press
{Enter #}
}.
There is no paper left in this
tray.
Load paper into the tray indicated.
The menu is protected and the
settings cannot be changed.
Wait for two seconds until the
previous display appears.
No Files Exist
There are no files available for
the sample print job or the
locked print job.
Wait for two seconds until the
previous display appears.
Offline
The printer is offline.
If you want to bring the printer online. Press {On Line}
}.
Output Tray Changed
The output tray has been
changed. The tray in the paper
feed path is not set correctly
when the printer receives the
print job.
Select the output tray correctly.
Paper Invalid for Duplex:Tray
#
/Change Setting
A paper setting for the selected tray is not supported for
duplex printing.
or Form Feed
#: tray number
Change the paper setting with
the control panel. Or press
{Form Feed}
} several times until a tray with supported paper settings appears on the
panel display.
Load Paper
/Paper Size:
Paper Type:
Load Paper Tray #
/Paper Size:
Paper Type:
Menu Protected
Cannot Change
5
Or press {Job Reset}
} to cancel
the print job.
A controller error. The SC
number indicates the problem.
First, turn the power switch
off and then on. If the message
appears again, call your sales
or service representative.
Print Overrun
A Print overrun occurred on a
file being printed. Only a part
of the data on the page will be
printed, and the print job is
suspended, or the current
print job has been canceled.
To print the image correctly,
add memory to the printer or
reduce the resolution of the
image.
Printing...
———
Wait for a while.
Processing...
The printer is processing internally.
Wait for a while.
P= XX I= XXXXXXXX
Power Off On
/If Error Reoccur
Call Service
66
Error & Status Messages on the Control Panel
Messages/Second messages
Description
Solution
Ready
The printer is online and
ready to make prints.
If you want to take the printer
offline, press {On Line}
}.
Remove Misfeed
There is misfeed in the Duplex
Unit.
Remove the misfed paper.
Duplex Unit
/Open Duplex
Unit Cover
Remove Misfeed
Internal Path
/Open Front Cover
Remove Misfeed
Mailbox
There is a misfeed in the print- Remove the misfed paper. See
er.
p.82 “Removing Misfed Paper”.
There is a misfeed in the Mail- Remove the misfed paper.
box.
/Open
Mailbox Cover
Remove Misfeed
Paper Exit Cover
There is a misfeed in the paper
exit cover.
Remove the misfed paper.
5
/Open Paper
Exit Cover
Remove Misfeed
Paper Tray
/Remove Misfeed
There is a misfeed in the print- Remove the misfed paper. See
er.
p.82 “Removing Misfed Paper”.
Paper Tray
Remove Misfeed
Upper Tray Unit
There is a misfeed in the upper tray unit.
Remove the misfed paper.
All output trays are full, and
the print job is suspended.
Remove paper from all output
trays, and the print job will be
resumed automatically.
The upper tray is full, and the
print job is suspended.
Remove paper from the upper
tray, and the print job will be
resumed automatically.
The Mailbox is full, and the
print job is suspended.
Remove paper from the Mailbox, and the print job will be
resumed automatically.
The standard tray is full, and
the print job is suspended.
Remove paper from the standard tray, and the print job will
be resumed automatically.
It is time to replace parts included in the Maintenance
Kit.
Replace parts. See p.144
“MAINTENANCE KIT Type
2600”.
/Open Upper
Tray Cover
Remove Paper
All Output Trays
Remove Paper
from Upper Tray
Remove Paper
Mailbox Tray #
Remove Paper
Standard Tray
Replace
Maintenance Kit
67
Troubleshooting
Messages/Second messages
Replace
Description
The toner cartridge is not set
correctly or toner is almost
run out.
Set the toner cartridge correctly. See p.90 “Replacing the
Toner Cartridge”.
The toner dust is full.
Prepare a new toner cartridge.
If the image density gets too
light, replace the toner cartridge with a new one. See
p.90 “Replacing the Toner
Cartridge”.
The fusing unit is not set correctly.
Set the fusing unit correctly,
or set the proper fusing unit.
The toner cartridge is not set
correctly.
Set the toner cartridge correctly. See p.90 “Replacing the
Toner Cartridge”.
The toner cartridge is not set
installed.
If the cartridge is installed,
close the front cover and turn
the off power switch and then
on. If the message appears
again, contact your sales or
service representative.
Correctly
The input paper tray is not set
correctly.
Set the input paper tray correctly.
Resetting Job...
The print job is being reset.
Wait for a while.
SC XXX-X
An error has occurred.
First, turn the power switch
off and then on. If the message
appears again, call your sales
or service representative.
SC2001
An error has occurred in the
resident font RAM.
First, turn the power switch
off and then on. If the message
appears again, call your sales
or service representative.
Toner Is Almost
The toner is almost run out.
Prepare a new toner cartridge.
If the image density gets too
light, replace the toner cartridge with a new one. See
p.90 “Replacing the Toner
Cartridge”.
Waiting...
The printer is waiting for the
next print job.
Wait for a while.
Warming Up...
The printer is warming up or
toner is being supplied.
Wait until the panel display
change the "Ready".
Toner Cartridge
Reset Fusing
Unit Correctly
Reset Toner
Cartridge
5
Reset Tray #
Power Off On
If Error Reoccur
Call Service
Empty
68
Solution
Error & Status Messages on the Control Panel
Getting Printer Information over the Network
Printer current status
You can check the printer's status using the telnet command.
❖ telnet
Use the status command.
❖ UNIX
Use the lpq or lpstat command or stat parameter of rsh, rcp, or ftp.
Reference
For more information, see “Remote Maintenance by Telnet (mshell)” in the
Network Printing Guide is provided on the CD-ROM labeled “Operating
Instructions”.
Messages
Description
Call Service Center
There is a malfunction in the
printer.
Turn the printer off and on.
Cover Open: Duplex Unit
The cover of the optional Duplex Unit is open.
Close the cover of the optional
Duplex Unit.
Cover Open: Front Cover
Close the front cover.
Close the front cover.
Cover Open: Mailbox
The cover of the Mailbox is
open.
Close the cover of the Mailbox
cover.
Cover Open: Paper Exit/Rear
The paper exit cover or the
rear cover is open.
Close the paper exit cover or
the rear cover.
Cover Open: Upper Tray
The upper tray cover is open.
Close the upper tray cover.
Empty: Toner
The toner cartridge is empty.
Replace the new toner cartridge.
Energy Saver Mode
The printer is in Energy Save
Mode.
Wait for a while.
Error: HDD Board
An error has occurred in the
optional Hard Disk Drive.
First, turn the power switch
off and then on. If the message
appears again, call your sales
or service representative.
IEEE 802.11b Card Error
The optional IEEE 802.11b
board or the optional IEEE
802.11b card is not installed.
Install the optional IEEE
802.11b board or the optional
IEEE 802.11b card.
IEEE 802.11b Card or Board
Error
An error has occurred in the
optional IEEE 802.11b board
or the optional IEEE 802.11b
card
First, turn the power switch
off and then on. If the message
appears again, set the optional
IEEE 802.11b board. If the
message still appears, call
your sales or service representative.
Energy Saver Mode 1
5
Comments
69
Troubleshooting
Messages
5
70
Description
Comments
NVRAM Error
An error has occurred in the
printer.
First, turn the power switch
off and then on. If the message
appears again, call your sales
or service representative.
Error: IEEE 1394 Board
An error has occurred in the
optional 1394 Interface Unit.
First, turn the power switch
off and then on. If the message
appears again, call your sales
or service representative.
Error: Memory Switch
An error has occurred in
printer.
First, turn the power switch
off and then on. If the message
appears again, call your sales
or service representative.
Error: Optional RAM
An error has occurred in the
optional Memory Unit.
First, turn the power switch
off and then on. If the message
appears again, call your sales
or service representative.
Error: Parallel I/F Board
An error has occurred in the
parallel interface board.
First, turn the power switch
off and then on. If the message
appears again, call your sales
or service representative.
Full: Mailbox Tray 1
The output tray 1 of the optional Mailbox is full.
Remove paper from the output tray 1 of the optional Mailbox.
Full: Mailbox Tray 2
The output Tray 2 of the optional Mailbox is full.
Remove paper from the output Tray 2 of the optional
Mailbox.
Full: Mailbox Tray 3
The output Tray 3 of the optional Mailbox is full.
Remove paper from the output Tray 3 of the optional
Mailbox.
Full: Mailbox Tray 4
The output tray 4 of the optional Mailbox is full.
Remove paper from the output tray 4 of the optional Mailbox.
Full: Output Tray(s)
All output trays are full.
Remove paper from all output
trays.
Full: Standard Output Tray
The output tray is full.
Remove paper from output
trays.
Full: Waste Toner
The toner is almost run out.
Prepare a new toner cartridge.
Low: Toner
The toner cartridge is not set
correctly or toner is almost
running out.
Set the toner cartridge correctly.
Mismatch: Paper Size
The paper size setting of the
tray differs from that of actual
paper size in the tray.
Load paper of the indicated
paper size into the paper tray
being used. See p.25 “Paper
and Other Media Supported
by This Printer”.
Error & Status Messages on the Control Panel
Messages
Description
Comments
Mismatch: Paper Size and
Type
The paper type setting of the
tray differs from that of actual
paper type in the tray.
Load paper of the indicated
paper size and type into the
paper tray being used. See
p.25 “Paper and Other Media
Supported by This Printer”.
Mismatch: Paper Type
The paper type setting of the
tray differs from that of actual
paper type in the tray.
Load paper of the indicated
paper type into the paper tray
being used. See p.25 “Paper
and Other Media Supported
by This Printer”.
No Paper: Input Tray(s)
There is no paper of the indicated paper size in the paper
tray.
Load paper into the paper
tray. See p.37 “Loading Paper
in the Paper Tray”.
Not Detected: Fusing Unit
The fusing unit is not set correctly.
Set the fusing unit correctly. If
the message appears again,
call your sales or service representative.
Not Detected: Input Tray(s)
The input tray is not set correctly.
Set the input tray correctly. If
the message appears again,
call your sales or service representative.
Not Detected: Toner Cartridge
The toner cartridge is not set
correctly.
Set the toner cartridge correctly. If the message appears
again, call your sales or service representative.
Paper Misfeed: Duplex Unit
There is misfeed in the Duplex
Unit.
Remove the misfed paper. See
p.87 “When "Remove Misfeed
Duplex Unit" Appears”.
Paper Misfeed: Front Cover
There is misfeed in the printer. Remove the misfed paper. See
p.83 “When "Remove Misfeed
Internal Path/Open Front
Cover" Appears”.
Paper Misfeed: Input Tray
There is misfeed in the printer. Remove the misfed paper. See
p.82 “When “Remove Misfeed
Paper Tray” Appears”.
Paper Misfeed: Mailbox
There is misfeed in the Mailbox.
Remove the misfed paper. See
p.89 “When "Remove Misfeed
Mailbox" Appears”.
Paper Misfeed: Output Tray
There is misfeed in output
tray.
Remove the misfed paper. See
p.84 “When "Remove Misfeed
Paper Exit Cover" Appears”.
Ready
The printer is on line and
ready to make prints.
———
5
71
Troubleshooting
Messages
5
72
Description
Comments
Replace Maintenance Kit
It is time to replace parts included in the Maintenance
Kit.
Replace parts. See p.144
“MAINTENANCE KIT Type
2600”.
Shift Tray Error
An error has occurred in the 1- First, turn the power switch
bin Shift Sort Tray.
off and then on. If the message
appears again, call your sales
or service representative.
Size Media Mismatch
The paper size setting of the
tray differs from that of actual
paper type in the tray.
Load paper of the indicated
paper size and type into the
paper tray being used. See
p.25 “Paper and Other Media
Supported by This Printer”.
Size Mismatch
The paper size setting of the
tray differs from that of actual
paper type in the tray.
Load paper of the indicated
paper size and type into the
paper tray being used. See
p.25 “Paper and Other Media
Supported by This Printer”.
USB I/F Error
An error has occurred in the
USB interface.
First, turn the power switch
off and then on. If the message
appears again, call your sales
or service representative.
Warming Up/Adjusting...
The printer is warming up or
toner is being supplied.
Wait until the panel display
change the "Ready".
Error & Status Messages on the Control Panel
Printer configuration
You can check the printer configuration using telnet.
❖ telnet
Use the info command.
❖ UNIX
Use the info parameter of rsh, rcp, or ftp.
Reference
For more information, see “Remote Maintenance by Telnet (mshell)” in the
Network Printing Guide is provided on the CD-ROM labeled “Operating
Instructions”.
Note
❒ “*” (asterisk) is displayed with the current setting.
❒ Regarding *1–*6, see below table.
5
Item
Description
Printer System
Version of the printer
Network Board
Version of the network board
Input Tray
No. ID number of the paper tray
Name Name of the paper tray*1
PaperSize Paper size loaded in the paper tray*2
Status Current status of the paper tray*3
Output Tray
No. ID number of the output tray
Name Name of the output tray*4
Status Current status of the output tray*5
Emulation
No. ID number of the emulation used by the printName er
Version Name of the emulation used in the printer
Version of the emulation
Program
No. ID number of the program
Name Name of the program
❖ *1 Input Tray: Name
Name
Description
Tray X
Name of installed paper tray. (X is the number
of tray.)
Bypass Tray
Bypass Tray
73
Troubleshooting
❖ *2 Input Tray: Paper Size
Paper Size
5
74
Description
A3 (297 × 420)
A3 K
B4JIS (257 × 364)
B4K
A4 (297 × 210)
A4L
A4 (210 × 297)
A4K
B5JIS (257 × 182)
B5L
B5JIS (182 × 257)
B5K
A5 (210 × 148)
A5L
A5 (148 × 210)
A5K
A6 (105 × 148)
A6K
11 × 17
279 × 432K
81/2 × 14
LG/216 × 356K
11 × 81/2
LT/279 × 216L
81/2 × 11
LT/216 × 279K
51/2 × 81/2
140 × 216K
FRI
Custom Size
101/2 × 71/4
101/2 × 71/4L
71/4 × 101/2
71/4 × 101/2K
81/4 × 13
81/4 × 13K
81/2 × 13
81/2 × 13K
41/8 × 91/2
41/8 × 91/2K
37/8 × 71/2
37/8 × 71/2K
110 × 220
41/3 × 83/4K
C5 Env(162 × 229)
C5 EnvK
8 × 13
203 × 330K
C6 Env(114 × 162)
C6 EnvK
8K (267 × 390)
8KK
16K (267 × 195)
16KL
16K (195 × 267)
16KK
NCS
There is no tray.
**
The paper size is not selected.
Error & Status Messages on the Control Panel
❖ *3 Input Tray: Status
Status
Description
Normal
NoTray
There is no paper tray
PaperEnd
There is no paper in the paper tray
❖ *4 Output Tray: Name
Name
Description
Standard Tray
Output Tray
1-bin Shift Tray
1-bin Shift Sort Tray
Mailbox Tray 1-4
Mailbox output tray 1-4
❖ *5 Output Tray: Status
Status
Description
Normal
----
PaperExist
There is paper in the output tray
OverFlow
Output tray is full of paper
Error
Other error
5
75
Troubleshooting
Printer Does Not Print
Possible Cause
Is the power on?
Solutions
Confirm that the cable is securely plugged into the power outlet
and the printer.
Turn on the power switch.
Does the On Line indicator stay on?
Press {On Line}
} so the indicator lights.
Does the Error indicator
stay red?
Check the error message on the panel display and take the required action.
Is paper loaded?
Load paper into the paper tray or on the Bypass Tray.
See p.37 “Loading Paper and Other Media”.
Can you print a configura- If you cannot print a test page, it probably indicates a printer maltion page?
function. You should contact your sales or service representative.
See p.110 “List/Test Print Menu”.
5
If you can print a test page but cannot get the printer to print when
you issue a print command from the computer, it probably means
there is a problem with the computer.
Note that large or complex data might take a long time to be printed.
Is the interface cable connecting the printer to the
computer connected securely?
Connect the interface cable properly. If there are any connectors or
screws, confirm that they are fastened securely.
Are you using the correct
interface cable?
The type of interface cable you should use depends on the computer. Be sure to use the correct one.
If the cable is damaged or worn, replace it with a new one.
Is the paper feed roller
clean?
76
Clean the paper feed roller if it is dirty. See p.94 “Cleaning the Paper Feed Roller”.
Printer Does Not Print
Possible Cause
Is the Data In indicator
blinking or lit after starting
the print job?
Solutions
If not blinking or lit, the data is not being sent to the printer.
❖ If the printer is connected to the computer using the interface cable
Make sure the following printer port settings are correct:
• For a parallel port connection, port LPT1 or LPT2 should be
set.
• For a USB port connection, port USB00 (n) *1 should be set.
• For a IEEE 1394 (SCSI print) port connection, port
1394_00(n) *1 should be set.
*1
(n) is the number of printers connected.
• Windows 95/98/Me
A Click [Start], point to [Settings] and then click [Printers].
B Click to select the icon of the printer. Next, on the [File]
menu, click [Properties].
C Click the [Details] tab.
5
D Check the [Print to the following port] box to confirm that
the correct port is selected.
• Windows 2000
A Click [Start], point to [Settings] and then click [Printers].
B Click to select the icon of the printer. Next, on the [File]
menu, click [Properties].
C Click the [Port] tab.
D Check the [Print to the following port] box to confirm that
the correct port is selected.
• Windows XP
A Access the [Printers and Faxes] window from [Start] on
the taskbar.
B Click to select the icon of the printer. Next, on the [File]
menu, click [Properties].
C Click the [Port] tab.
D Check the [Print to the following port(s).] box to confirm
that the correct port is selected.
• Windows NT 4.0
A Click [Start], point to [Settings] and then click [Printers].
B Click to select the icon of the printer. Next, on the [File]
menu, click [Properties].
C Click the [Port] tab.
D Check the [Print to the following port] box to confirm that
the correct port is selected.
❖ Network Connection
Contact your network administrator.
77
Troubleshooting
Possible Cause
Do you print via a network?
Solutions
Confirm that the "Ethernet" setting is correct from the control panel. See p.130 “Host Interface Menu”.
The setting governs the data transfer speed used by the Network
Interface Board. Three options are available:
• Auto (default)
• 100 Mbps
• 10 Mbps
Note
❒ For more information about the appropriate setting to use on
your network, contact your network administrator.
If you use IEEE 1394, check
for the followings.
A Make sure the 1394 Interface Unit is installed properly.
B Make sure the IEEE 1394 cable is connected properly.
C Restart the computer.
If the problem still exists when SCSI print is used with Windows 2000 and Windows XP, go to step D.
5
D Disconnect all the IEEE 1394 cables from the computer.
E If you uninstall the printer driver when the printer is connect-
ed to a computer with "SCSI print", the printer driver may not
be uninstalled properly. To uninstall the driver properly, use
the IEEE 1394 Printer Removal Utility on the CD-ROM that
comes with the printer.
Stored in: CD-ROM labeled "Operating Instructions"\DRIVERS\ UTILITY\1394\
Note
❒ For more information about the IEEE 1394 Printer Removal
Utility, see the README file in the same folder as the program.
F Restart the computer.
How is the signal strength
when using the wireless
LAN?
Check the signal strength from the Maintenance menu. If the signal is weak, move to a place with better signal strength or remove
objects that are possibly interfering with data transmission.
The signal strength appears only in infrastructure mode. If you are
using the ad hoc mode, the signal strength does not appear on the
control panel. For more information about displaying the signal
strength, see p.120 “Displaying the Signal Strength”.
Note
❒ If you cannot solve the problem by taking the preceding actions, contact your
sales or service representative.
78
Other Printing Problems
Other Printing Problems
Status
The print side of the page is a
hazy gray.
Possible Causes, Descriptions, and Solutions
Adjust the image density.
See p.101 “Making Printer Settings with the Control Panel”.
If paper is curled, correct it.
If you continuously print data that contains extremely small
amount of words or images in the printable area, the printed
side of the page could be a hazy gray. Adjust the image density. See p.101 “Making Printer Settings with the Control
Panel”.
Shaking the toner cartridge after pulling out the toner seal
can cause dirt on paper surfaces, toner spillage, or printer
failure. If you have accidentally shaken the toner cartridge,
print some pages (about 50 pages) until the dirt disappear.
Image quality varies when
printing on thick paper or on
OHP transparencies.
5
Switch to Thick Paper mode.
• When toner is not fused enough, set it to “On”.
• When the image is blurred, set it to “----”.
See p.101 “Making Printer Settings with the Control Panel”.
Some parts of the print image
are not clear.
Make the image density darker.
See p.101 “Making Printer Settings with the Control Panel”.
If Toner Saving mode is selected using the control panel, the
whole image gets lighter.
The print image is not clear.
Due to a sudden change in temperature, condensation might
appear inside the printer, reducing print quality. If this occurs, when you move the printer from a cold room to a
warmer room, do not use the printer until it acclimatizes to
the temperature.
Nothing is printed on the paper. Check if the tape of the toner cartridge is completely removed. Be sure to remove the tape completely when replacing the toner cartridge. See p.90 “Replacing the Toner
Cartridge”.
Note
❒ If the power switch is turned on with the tape still attached to the toner cartridge, the printer might be damaged.
Multiple pages are fed through
the printer at once.
Clean the friction pad if it is dirty. See p.93 “Cleaning the
Friction Pad”.
Remove all paper from the tray and fan it gently to get air between the sheets. After that, load it back into the tray.
The image is printed on the reverse side of the paper.
Set the paper the other way up.
79
Troubleshooting
Status
Possible Causes, Descriptions, and Solutions
Paper misfeeds occur frequently.
Check the paper size settings. The size set with the paper size
dial might be different from the actual paper size. Make the
correct dial setting.
See p.37 “Loading Paper and Other Media”.
Use the recommended paper. Avoid using curled, folded,
wrinkled, perforated or glossy paper. See p.35 “Paper not
supported by this printer”.
Clean the paper feed roller, friction pad and/or registration
roller, if they are dirty. See p.94 “Cleaning the Paper Feed
Roller”.
Thin paper, if printed on both sides, may curl up at the corners and get wrinkled and clogged. Select [Curl Prevention]
[ON] from the [Maintenance] menu.
The control panel error message Open the front cover of the printer and then close it. See p.82
stays on after removing the mis- “Removing Misfed Paper”.
fed paper.
5
Output are not delivered to the
selected tray you require.
Check the paper size settings. The size selected with the paper size dial might be different from the actual paper size.
Make the correct dial setting.
See p.37 “Loading Paper and Other Media”.
When using the Bypass Tray, set the paper size using the
control panel.
See p.37 “Loading Paper and Other Media”.
When you are using a Windows operating system, the printer driver settings override those set using the control panel.
Set the desired output tray using the printer driver. See the
driver's online Help file.
The printed image is different
from the image on the computer.
When you use some functions, such as enlargement and reduction, the layout of the image might be different from that
shown in the computer display.
It takes too much time to resume
printing.
The data is so large or complex that it takes time to process
it. If the Data In indicator is blinking, the data processing is
being done. Just wait until it resumes.
Changing the paper feed direction may sometimes reduce
the time to resume printing.
The image is printed in the
wrong orientation.
Set the correct orientation under the “PCL Menu” with the
control panel. See p.137 “PCL Menu”.
Confirm that the setting of orientation has been set in the application you use.
Set the correct paper size and feed direction that matches
tray settings on the RPCS printer driver.
Part of the image cannot be
printed.
80
A paper size which is smaller than that selected in the application is used for printing. Load the correct size of paper.
Other Printing Problems
Status
Possible Causes, Descriptions, and Solutions
Network configurations you
Print a configuration page and check the network settings.
have made do not become effective.
Printing from a Macintosh with
the network standard model is
slow.
Set the Ethernet speed of the machine to 10Mbps. If you want
to use the machine with Macintosh at the Ethernet speed of
100Mbps, call your sales or service representative.
See "Ethernet" in the Network Setup menu.
Note
❒ If the problem cannot be solved, contact your sales or service representative.
5
81
Troubleshooting
Removing Misfed Paper
When a paper misfeed occurs, an error message appears on the panel display.
The procedure you should follow to remove misfed paper depends on the location of the misfeed, which is indicated on the panel display.
R CAUTION:
• When removing misfed paper, do not touch the fusing section because it
becomes very hot.
Important
❒ Check the following points if paper continues to misfeed.
• Confirm that the setting of the paper size dial matches the size and feed direction of the paper loaded in the paper tray.
• If the friction pad or the paper feed roller is dirty, clean it. For more information, see p.93 “Cleaning the Friction Pad”.
• Confirm that the toner cartridge is set correctly.
❒ If a paper misfeed still occurs, contact your sales or service representative.
❒ Forcefully removing misfed paper may cause paper to tear and leave scraps
of paper in the printer.
❒ Do not leave any scraps of paper in the printer.
5
When “Remove Misfeed Paper
Tray” Appears
B Carefully slide the paper tray into
the printer until it stops.
Important
❒ Forcefully removing misfed paper
may cause paper to tear and leave
scraps of paper in the printer. This
might cause a misfeed and damage
the printer.
A Lift the paper tray slightly. Pull it
out until it stops, and then remove the misfed paper.
82
ZCEY280J
ZGDY290J
Important
❒ Do not slide the paper tray in
with force. If you do, the front
and side guides might move.
Removing Misfed Paper
C Open the front cover by pushing
the front cover release button,
and then close it to reset the misfeed condition.
B While lifting the front side of the
toner cartridge, pull it out of the
printer.
Important
❒ Be sure to put the toner cartridge on a stable, flat surface.
❒ Do not hold the toner cartridge
upside down or stand it vertically.
ZGDY300J
Note
❒ You can apply this procedure
for both the paper tray and the
optional Paper Feed Unit.
❒ To reset the misfeed condition,
open and close the front cover,
then the indicator will be off.
When "Remove Misfeed
Internal Path/Open Front
Cover" Appears
Important
❒ Forcefully removing misfed paper
may cause paper to tear and leave
scraps of paper in the printer. This
might cause a misfeed and damage
the printer.
5
ZGDT110J
C Pull
out the misfed paper by
holding both sides of paper. Be
careful not to get toner dust on
your hands or clothes.
ZGDY520J
A Open the front cover by pushing
the front cover release button.
ZCEH120J
83
Troubleshooting
D Holding the grips of the toner car-
tridge, insert it into the printer
until it stops.
When "Remove Misfeed Paper
Exit Cover" Appears
R CAUTION:
• When removing misfed paper,
do not touch the fusing section
because it becomes very hot.
ZGDT120J
E Push down the toner cartridge to
• The fusing unit becomes very
hot. When installing the new fusing unit, turn off the printer and
wait about an hour. After that, install the new fusing unit. Not
waiting for the unit to cool down
can result in a burn.
settle it in appropriate position.
Important
❒ Forcefully removing misfed paper
may cause paper to tear and leave
scraps of paper in the printer. This
might cause a misfeed and damage
the printer.
5
A If
ZGDT140J
F Close the front cover.
you installed the 1-bin Shift
Sort Tray, slide the upper tray out
from it. If you installed the Mailbox, slide the output tray into
lower slide out from it.
The following procedures are example of Mailbox.
ZGDH130J
Important
❒ If paper is fed from the Bypass
Tray, be sure to remove all the
paper from the Bypass Tray and
close it before opening the front
cover.
84
ZGDY370J
Removing Misfed Paper
B Open the paper exit cover.
E If the misfed paper is in the fusing unit, remove it.
A Open the rear cover by pushing the two knobs.
ZGDY390J
C Remove the misfed paper.
ZGDX210J
B Remove the rear cover in a horizontal direction.
5
ZGDY380J
D Close the paper exit cover until it
clicks.
ZGDX220J
F Lift the lock levers of the fusing
unit as shown in the illustration.
ZGDY400J
ZGDX222N
85
Troubleshooting
G Pull the fusing unit out.
J Push the lock levers of the fusing
unit down until it clicks.
ZGDX223N
H While
ZGDX225N
holding the tab, remove
the misfed paper.
K Insert the rear cover to the inside
grooves on both sides of the printer in a horizontal direction.
5
ZGDY410J
Important
❒ Do not touch the metal part of
the fusing unit. It becomes very
hot. Touching it could result in a
burn.
I Insert
ZGDX221J
L Close the rear cover.
the fusing unit until it
stops.
ZGDX211N
ZGDX224N
86
Removing Misfed Paper
C Close the rear cover of the Duplex Unit.
When "Remove Misfeed
Duplex Unit" Appears
R CAUTION:
• When removing misfed paper,
do not touch the fusing section
because it becomes very hot.
Important
❒ Forcefully removing misfed paper
may cause paper to tear and leave
scraps of paper in the Dupelx Unit.
This might cause a misfeed and
damage the printer.
A
ZGDY330J
D While lifting the lever (A
A),
open the cover of the Duplex
Unit (B
B).
Remove the misfed paper inside
of the cover.
A Open the rear cover of the Duplex Unit.
5
ZGDY340J
E Remove the misfed paper.
ZGDY310J
B Remove the misfed paper.
ZGDY350J
ZGDY320J
87
Troubleshooting
F Close the cover of the Duplex
Unit.
If the error message appears
again, go to step B.
ZGDY360J
B Pull the Duplex Unit out of the
printer until it stops, and remove
the misfed paper.
A Push down the lever on the
right side of the Duplex Unit
(A
A) and pull it out until it stops
(B
B).
5
Important
❒ When A5L paper misfeeds,
you might not be able to remove it by pulling the Duplex Unit out. In this case,
pull the paper tray out and
remove the paper.
C While aligning the power cord
with the groove of the left slide
of the Duplex Unit, insert the
Duplex Unit into back of the
printer aligning the rails inside
of the printer until it is connected.
If the error message appears
again, the misfed paper might
be left in the printer. Confirm
that any torn paper scraps are
not in the inside of the printer.
For more information, see p.83
“When "Remove Misfeed Internal Path/Open Front Cover"
Appears”.
ZGDX320J
B Lift the guide board inside the
Duplex Unit, and remove the
misfed paper.
ZGDY440J
88
ZGDX240J
Removing Misfed Paper
When "Remove Misfeed
Mailbox" Appears
When "Remove Misfeed Upper
Tray Unit" Appears
Important
❒ Forcefully removing misfed paper
may cause paper to tear and leave
scraps of paper in the Mailbox.
This might cause a misfeed and
damage the printer.
Important
❒ Forcefully removing misfed paper
may cause paper to tear and leave
scraps of paper in the 1-bin Shift
Sort Tray. This might cause a misfeed and damage the printer.
A Open the cover of the Mailbox.
A Open the upper tray cover.
5
ZCEY460J
B Remove the misfed paper.
ZCEY490J
B Remove the misfed paper.
ZCEY470J
C Close the cover of the Mailbox.
ZCEY480J
ZCEY500J
C Close the upper tray cover.
ZCEY510J
89
Troubleshooting
Replacing the Toner Cartridge
R WARNING:
• Do not incinerate spilled toner
or used toner. Toner dust
might ignite when exposed to
an open flame.
• Disposal can take place at our
authorized dealer or at appropriate collection sites.
• If you dispose the used toner
cartridges yourself, dispose
of them according to your local regulations.
R CAUTION:
• The inside of the machine could
be very hot. Do not touch the
parts with a label indicating "v"
(means hot surface). Touching
"v" (means hot surface) could
result in a burn.
5
• Do not eat or swallow toner.
• Keep toner (used or unused) and
toner cartridges out of reach of
children.
Important
❒ Do not expose the toner cartridge
to light for a long time. Do not
leave the front cover open for a
long time. If the toner cartridge is
exposed to a light for a long time,
the toner cartridge might be damaged and print quality might be reduced.
Note
❒ Do not stand or place the toner cartridge upside-down.
❒ The actual number of printed pages you get from a particular toner
cartridge depends on the type and
size of paper you are using, the
contents of the print images, and
printing environment conditions.
All this means that a toner cartridge might require replacement
sooner than the normal life described on p.164 “Consumables”.
A Open the front cover by pushing
the front cover release button.
• Our products are engineered to
meet the highest standards of
quality and functionality. When
purchasing expendable supplies, we recommend using only
those specified by an authorized
dealer.
When “Replace Toner Cartridge” appears on the panel display, the toner
is almost empty. Prepare a new toner
cartridge. If the image density gets
too light, replace the toner cartridge
with a new one.
90
ZCEH120J
Replacing the Toner Cartridge
B Be sure to put the toner cartridge
on a stable, flat surface.
Note
❒ Do not put the toner cartridge
on an unstable or tilted surface.
E Place the toner cartridge on a flat
surface. Pull out the tape inside
the unit horizontally while holding the cartridge with one hand as
shown in the illustration.
ZCET151J
ZGDT110J
C Wipe
around the metallic registration roller by turning with a
soft damp cloth.
ZCEX461J
Important
❒ Do not use chemical cleaner or
organic solvent such as thinner
or benzene.
D Take the new toner cartridge from
the box.
Note
❒ Be sure to remove the tape completely before installing the new
toner cartridge, otherwise the
printer might be damaged.
❒ Keep the toner cartridge horizontal when pulling out the toner seal. Pulling out the toner seal
with the cartridge upright or
tilted can cause printer failure.
❒ Be careful not to get toner dust
on your hands or clothes.
❒ Do not shake or shock the toner
cartridge after pulling out the
toner seal to avoid dirt on paper
surfaces, toner spillage, or
printer failure.
5
F Holding the grips of the cartridge,
insert it into the printer until it
stops.
ZGDT120J
91
Troubleshooting
G Push down the toner cartridge to
settle it in appropriate position.
ZGDT140J
H Close the front cover.
5
ZGDH130J
Important
❒ Do not close the front cover
with force. If you cannot close
the cover easily, pull out the
toner cartridge from the printer
and insert it again. After that,
close the front cover again.
92
Cleaning and Adjusting the Printer
Cleaning and Adjusting the Printer
D Load
Cleaning the Friction Pad
If the friction pad is dirty, a multifeed or a misfeed might occur. In this
case, clean the pad as follows:
paper into the paper tray
with the print side up. Carefully
slide the paper tray into the printer until it stops.
A Lift the paper tray slightly then
pull it out until it stops, and while
lifting the front side of the tray,
pull it out of the printer.
5
ZCEY150J
Important
❒ Do not slide the paper tray in
with force. If you do, the front
and side guides might move.
ZCEY140J
B Place
the tray on a flat surface.
When there is paper in the tray,
remove paper.
C Wipe the brown part of the fric-
tion pad with a soft damp cloth.
After that, wipe it with a dry cloth
to remove the water.
Note
❒ If misfeeds or multi-feeds of paper occur after cleaning the friction pad, contact your sales or
service representative.
❒ Follow the same procedure to
clean the friction pad of the optional Paper Feed Unit and the
Envelope Feeder Unit.
TS3Y250E
Important
❒ Do not use chemical cleaner or
organic solvent such as thinner
or benzene.
93
Troubleshooting
C Lift the paper tray slightly then
Cleaning the Paper Feed
Roller
If the paper feed roller is dirty, a misfeed might occur. In this case, clean
the roller as follows:
pull it out until it stops, and while
lifting the front side of the tray,
pull it out of the printer.
R CAUTION:
• When lifting the printer, use the
grips on both sides of the printer,
otherwise the printer might fall
and cause personal injury.
• When you move the printer, unplug the power cord from the wall
outlet to avoid a fire or an electric
shock.
5
• When you pull out the plug from
the socket, grip the plug to avoid
damaging the cord and causing
a fire or an electric shock.
Important
❒ The following are examples of
cleaning the paper feed roller on
the paper tray.
❒ You can clean the paper feed roller
on the optional Paper Feed Unit by
following the procedures below.
The paper feed roller on the optional Paper Feed Unit differs from
the one on the paper tray. Confirm
the type of paper feed roller you
are installing.
For the paper tray
For the Paper Feed Unit
ZCEM200E
A Turn off the power switch.
B Pull out the plug from the socket.
Remove all the cables from the
printer.
94
ZCEY140J
D Move the printer to the edge of a
stable table or desk.
ZGDM110J
Important
❒ Do not put the printer on an unstable or tilted surface.
❒ If the printer is equipped with
the optional Paper Feed Unit,
do not move the printer and
unit together as they are not securely attached.
❒ When lifting the printer, confirm that the optional Paper
Feed Unit is not attached to the
printer.
Cleaning and Adjusting the Printer
E Slide the green lock lever to the
left (A
A ), so that the paper feed
roller can be released (B
B).
H Move
the printer to the place
where it was placed. Carefully
slide the paper tray into the printer until it stops.
ZGDM120J
F Wipe the rubber part of the roller
with a soft damp cloth. After that,
wipe it with a dry cloth to remove
the water.
Important
❒ Do not use chemical cleaner or
organic solvent such as thinner
or benzene.
G While sliding the green lock lever
to the left (A
A), set the paper feed
roller to its original position (B
B).
After that, return the green lock
lever to its original position (C
C).
ZCEY150J
Important
❒ Do not slide the paper tray in
with force. If you do, the front
and side guides might move.
5
I Insert the plug of the power cord
into the wall socket securely.
Connect all the cables that were
removed in step B.
J Turn on the power switch.
Note
❒ Follow the same procedure to
clean the paper feed roller of the
optional Paper Feed Unit.
ZCEM130J
Note
❒ Confirm that the green lock lever secures the roller correctly
by confirming that the roller rotates smoothly.
95
Troubleshooting
C Pull the toner cartridge out of the
Cleaning the Registration
Roller
printer by holding the grips of the
cartridge.
If the registration roller is dirty, a misfeed might occur. In this case, clean
the roller as follows:
R WARNING:
• Be sure to turn off the power
switch and wait for about 30
minutes before cleaning the
registration roller. Not waiting
for the printer to cool down
can result in a burn.
R CAUTION:
• The inside of the machine could
be very hot. Do not touch the
parts with a label indicating "v"
(means hot surface). Touching
"v" (means hot surface) could
result in a burn.
5
A Turn off the power switch.
B Open the front cover by pushing
ZGDT110J
Note
❒ Do not hold the toner cartridge
upside down or stand it vertically.
❒ Do not put the toner cartridge
on an unstable or tilted surface.
D Wipe
around the metallic registration roller by turning with a
soft damp cloth.
the front cover release button.
ZCEX461J
ZCEH120J
96
Important
❒ Do not use chemical cleaner or
organic solvent such as thinner
or benzene.
Cleaning and Adjusting the Printer
E Holding the grips of the toner car-
tridge, insert it into the printer
until it stops.
Adjusting the Image Density
You can adjust the image density
when the print side of the page is a
shaded or print image is too light.
Important
❒ Extreme settings may create printouts that appear dirty.
❒ Image density settings should be
made from the application or the
printer driver whenever possible.
ZGDT120J
F Push down the toner cartridge to
settle it in appropriate position.
ZGDT140J
A Press {Menu}}.
On Line
Menu
Job Reset
Escape
Form Feed
Enter
Power
Error
5
Data In
"Menu" appears on the panel display.
B Press {U} or {T} to display the
G Close the front cover.
"Maintenance" menu, and then
press {Enter #}
}.
On Line
Menu
Job Reset
Escape
Form Feed
Enter
Power
Error
ZGDH130J
Important
❒ Carefully close the front cover.
If you cannot close the cover
easily, pull the toner cartridge
out of the printer and insert it
again. After that, close the front
cover again.
H Turn on the power switch.
Data In
The following message appears on
the panel display.
Maintenance:
Image Density
97
Troubleshooting
C Press {Enter #}}.
Image Density:
(-3 +3)
0
D Press {U} or {T} to set the image
density value.
Note
❒ To maintain a darker image under high volume printing conditions, we highly recommended
that you select 3 from the control panel.
❒ You can adjust the image density in seven steps from -3 to +3.
Increasing the value makes the
printouts darker and decreasing
the value makes the printouts
lighter.
5
E Press {Enter #}}.
F Press {On Line}}.
On Line
Menu
Job Reset
Escape
Form Feed
Enter
Power
Error
98
You can adjust the registration of
each tray. The vertical adjustment is
used for all trays. Normally, you need
not update the registration. But when
the optional Paper Feed Unit or the
Duplex Unit is installed, updating the
registration is useful in some case.
The following procedure describes
how to adjust Tray 1. You can use the
same procedure to adjust the other
tray as well.
A Press {Menu}}.
On Line
Menu
Job Reset
Escape
Form Feed
Enter
Power
Error
Data In
"Menu" appears on the panel display.
Data In
"Ready" appears on the panel display.
Ready
Adjusting the Registration of
the Trays
Cleaning and Adjusting the Printer
B Press {U} or {T} to display the
"Maintenance" menu, and then
press {Enter #}
}.
On Line
Menu
Job Reset
Escape
Form Feed
Enter
Power
Error
A After confirming that "Prt. Test
Sheet" is on the panel display,
press {Enter #}
}.
The following message appears
on the panel display.
Prt. Test Sheet
Tray 1
B Press {U} or {T} to display the
tray you want to adjust, and
then press {Enter #}
} to print the
test sheet. Wait for a few seconds.
The following message appears
on the panel display.
Data In
Maintenance:
Image Density
C Press {U} or {T} to display "Reg-
istration", and then press {Enter
#}
}.
The following message appears on
the panel display.
Registration:
Prt. Test Sheet
D Print the test sheet to preview the
settings you have made.
5
Printing...
E Adjust
the registration by confirming the position of the printed image of the test sheet.
The following is an example of adjusting the margin on the test sheet
equally.
A Press {U} or {T} to display
"Adjustment", and then press
{Enter #}
}.
The following message appears
on the panel display.
Adjustment:
Horiz.: Tray 1
ZCEX480J
B Press {U} or {T} to display the
tray you want to adjust, and
then press {Enter #}
}.
The following message appears
on the panel display.
Horiz.: Tray:
(-4.0 +4.0)
0
99
Troubleshooting
C Press {U} or {T} to set the digit of the registration value
(mm).
Feed direction
The vertical
The
horizonal
Printable area
TS3X001N
Note
❒ Increase the value to shift the
print area to the positive direction, and decrease to shift
to the negative direction.
❒ Pressing {U} or {T} makes
the value increase or decrease by 0.5 mm step.
D Press {OK}
}.
5
F Print the test sheet to check the
settings you have made.
G Repeat steps C and D to adjust the
registration if necessary.
H Press {On Line}}.
On Line
Menu
Job Reset
Escape
Form Feed
Enter
Power
Error
Data In
“Ready” appears on the panel display.
Ready
100
6. Making Printer Settings with
the Control Panel
Menu Chart
This section describes how to change the default settings of the printer and provides information on the parameters included in each menu. Some items in the
menu appear only when certain options are installed.
Category
Function menu
⇒ p.51
Select Action / Error File(s)
Locked Print *1 ⇒ p.56
Select Action / Error File(s)
Paper Input⇒ p.106
Bypass Size
Sample Print
*1
Tray Paper Size
Paper Type
Tray Locking
Tray Priority
List/Test Print⇒ p.110
Config. Page
Menu List
PS Font List
PCL Config.Page
Hex Dump
Maintenance⇒ p.114
Image Density
Registration
Curl Prevention
ROM Update *2
HDD Format
WL.LAN Signal *3
WL.LAN Defaults
Key Repeat
Menu Protect *4
Series Prnt.Job *4
Ppr.Size Error *4
101
Making Printer Settings with the Control Panel
Category
System⇒ p.124
Function menu
MisfeedRecovery
Prt. Err Report
Auto Continue
Memory Overflow
Sub Paper Size
Page Size
Edge-Edge Print
Duplex *5
Output Tray
Job Separation
Energy Saver
Memory Usage
Unit Of Measure
Edge Smoothing
6
Resolution
Toner Saving
Spool Printing
Host Interface⇒ p.130
I/O Buffer
I/O Timeout
Network Setup
IEEE 1394 Setup *6
IEEE 802.11b *7
USB Setting *4
PCL Menu⇒ p.137
Orientation
Form Lines
Font Source
Font Number
Point Size
Font Pitch
Symbol Set
Ext. A4 Width
Language⇒ p.141
*1
*2
102
The “Sample Print” menu and the “Locked Print” menu appear only when the optional Hard Disk Drive is installed.
ROM Update is not currently used.
Menu Chart
*3
*4
*5
*6
*7
The "WL.LAN Signal" menu appears only when "IEEE 802.11b" is selected in "LAN
Type" in the Host Interface menu.
While the printer is On Line, press {Enter #}
}, and then press {Escape}
}. Finally, press
{Menu}
}. You can access the "Menu Protect", "Series Prnt.Job", "Ppr.Size Error", and
"USB Setting" on the panel display.
The “Duplex” menu appears only when the optional Duplex Unit is installed.
The “IEEE 1394 Setup” menu appears only when the optional 1394 Interface Unit is
installed.
The “IEEE 802.11b Setup” menu appears only when the optional 802.11b Interface
Unit is installed.
6
103
Making Printer Settings with the Control Panel
Accessing the Main Menu
Press {Menu}
}, and “Menu” appears on the panel display.
On Line
Menu
Job Reset
Escape
Form Feed
Enter
Power
Error
Data In
This menu shows the following nine items which can be displayed one by one
pressing {U} or {T}.
• Sample Print
• Locked Print
• Paper Input
• List/Test Print
• Maintenance
• System
• Host Interface
• PCL Menu
• Language
6
Note
❒ "Sample Print" and "Locked Print" appear only when the optional Hard Disk
Drive is installed.
❒ {T}: Press to go to the next page.
❒ {U}: Press to go back to the previous page.
104
Accessing the Main Menu
❒ After making the printer settings, be sure to return to the previous menu by
pressing {Escape}
}.
On Line
Menu
Job Reset
Escape
Form Feed
Enter
Power
Error
Data In
ZDDS024N
❒ After making the printer settings, press {On Line}
} to return to the “Ready”
condition.
On Line
Menu
Job Reset
Escape
Form Feed
Enter
Power
Error
6
Data In
❒ The revised settings are not canceled even if the power switch is turned off.
105
Making Printer Settings with the Control Panel
Paper Input Menu
There are five menu items in the “Paper Input” menu.
• Bypass size
• Tray Paper Size
• Paper type
• Tray Locking
• Tray Priority
Reference
For more information about loading paper in the tray, see p.37 “Loading Paper and Other Media”.
Paper Input Parameters
Menu
Bypass Size
6
Description
The paper size for the Bypass Tray.
For more information about paper sizes that can be set in the Bypass Tray, see p.25 “Paper and Other Media Supported by This
Printer”.
Tray Paper Size
The paper size for each tray.
When you select sizes that are not indicated on the paper size dial
of Tray 1, Tray 2 or Tray 3, you should set the dial to “p” and
then select the paper size here.
❖ Tray 1
For more information about paper sizes that can be set in the
Tray 1, see p.25 “Paper and Other Media Supported by This
Printer”.
❖ Tray 2
For more information about paper sizes that can be set in the
Tray 2, see p.25 “Paper and Other Media Supported by This
Printer”.
❖ Tray 3
For more information about paper sizes that can be set in the
Tray 3, see p.25 “Paper and Other Media Supported by This
Printer”.
Note
❒ Only the installed trays appear on the panel display.
106
Paper Input Menu
Menu
Paper Type
Description
If you use different kinds of paper, you set the paper type for Tray
1, Tray 2, Tray 3 or Bypass Tray.
❖ Tray 1, Tray 2, Tray 3
Plain Paper, Recycled Paper, Special Paper, Color Paper, Letterhead, Preprinted, Prepunched, Bond paper, Cardstock
❖ Bypass Tray
Plain Paper, Recycled Paper, Special Paper, Color Paper, Letterhead, Preprinted, Prepunched, Labels, Bond paper, Cardstock, Transparency, Thick Paper
Note
❒ Default : Plain Paper
❒ Only the installed trays appear on the panel display.
Tray Locking
If you use different kinds of paper, you can lock a tray to prevent
printing on wrong paper such as letterhead or colored paper.
When "Auto Select" is selected in the Paper Source selections from
the printer driver, the locked tray will not be used.
Tray 1, Tray 2, Tray 3, Bypass Tray
6
Note
❒ Only the installed trays appear on the panel display.
❒ You cannot lock multiple trays.
❒ If you want to use the locked tray, you must select the tray
from the printer driver.
❒ When a locked tray is selected from the printer driver, the
printer does not search for another tray.
Tray Priority
You can set priority tray for paper feed when "Auto tray Selected"
is selected in the Paper Source selections from the printer driver.
When printing from DOS, the tray selected here is used when no
tray is selected for a print job.
Tray 1, Tray 2, Tray 3, Bypass Tray
Note
❒ Default : Tray 1
❒ Only the installed trays appear on the panel display.
❒ It is recommended that you load paper of the size and direction you most frequently use in the tray selected with "Tray
Priority".
107
Making Printer Settings with the Control Panel
Changing the Paper Input Menu
A Press {Menu}}.
On Line
Menu
Job Reset
Escape
Form Feed
Enter
Power
Error
Data In
“Menu” appears on the panel display.
B Press {U} or {T} to display the “Paper Input” menu.
Menu:
Paper Input
6
C Press {Enter #}}.
On Line
Menu
Job Reset
Escape
Form Feed
Enter
Power
Error
Data In
D Press {U} or {T} to display “Tray Priority”.
Paper Input:
Tray Priority
E Press {Enter #}}.
The following message appears on the panel display.
Tray Priority:
*Tray 1
108
Paper Input Menu
F Press {U} or {T} to select the tray type you want to use.
G Press {Enter #}}. Wait for a few seconds.
H Press {On Line}}.
On Line
Menu
Job Reset
Escape
Form Feed
Enter
Power
Error
Data In
“Ready” appears on the panel display.
Ready
6
109
Making Printer Settings with the Control Panel
List/Test Print Menu
There are five menu items in the “List/Test Print” menu.
• Config. Page
• Menu List
• PS Font List
• PCL Config.Page
• Hex Dump
List/Test Print Parameters
Menu
6
Description
Config. Page
You can print the current configuration of the printer. See p.110
“Printing a Configuration Page”.
Menu List
You can print the Menu List which shows the function menus of
this printer.
PS Font List
You can print the current configuration and installed PS font list
of PostScript.
PCL Config.Page
You can print the current configuration of PCL.
Hex Dump
You can print the data sent by the computer using the Hex Dump
mode.
Printing a Configuration Page
Reference
For more information, see p.112 “Interpreting the Configuration Page”.
A Press {Menu}}.
On Line
Menu
Job Reset
Escape
Form Feed
Enter
Power
Error
Data In
“Menu” appears on the panel display.
110
List/Test Print Menu
B Press {T} or {U} to display the “List/Test Print” menu.
Menu:
List/Test Print
C Press {Enter #}}.
On Line
Menu
Job Reset
Escape
Form Feed
Enter
Power
Error
Data In
The following message appears on the panel display.
List/Test Print:
Config. Page
6
D Press {Enter #}}.
The following message appears on the panel display.
Printing...
The configuration page will be printed in a short time.
Important
❒ If you cannot print a configuration page correctly, check for an error message on the panel display. For more information about error messages, see
p.61 “Error & Status Messages on the Control Panel”.
111
Making Printer Settings with the Control Panel
E Press {On Line}}.
On Line
Menu
Job Reset
Escape
Form Feed
Enter
Power
Error
Data In
“Ready” appears on the panel display.
Ready
Interpreting the Configuration Page
6
System Reference
❖ Printer ID
Shows the serial number assigned to the board by its manufacturer.
❖ Firmware Version
• Firmware
Shows the version number of the printer firmware.
• Engine
Shows the version number of the printer engine.
• NCS
Shows the version number of the Network interface.
❖ Pages Printed
Shows the total number of pages printed by the printer to date.
❖ Total Memory
Shows the total amount of memory (SDRAM) installed on the printer.
❖ Printer Language
Shows the version number of the printer driver language.
❖ Controller Option
The item(s) appears when the controller option(s) is installed.
❖ Options
Shows the optional trays that you installed.
112
List/Test Print Menu
Paper Input
Shows the settings made under the “Paper Input” menu.
Reference
For more information, see p.106 “Paper Input Menu”.
Maintenance
Shows the settings made under the “Maintenance” menu.
Reference
For more information, see p.114 “Maintenance Menu”.
System
Shows the settings made under the “System” menu.
Reference
For more information, see p.124 “System Menu”.
6
PCL Menu
Shows the settings you made under the “PCL Menu”.
Reference
For more information, see p.137 “PCL Menu”.
Host Interface
Shows the settings you made under the “Host Interface” menu.
When DHCP is active on the network, the actual IP Address, Subnet Mask and
Gateway Address appear in parentheses on the configuration page.
Reference
For more information about “Host Interface” menu, see p.130 “Host Interface
Menu”.
Interface Information
Shows the interface information.
Error Log
Shows the log of printer errors.
113
Making Printer Settings with the Control Panel
Maintenance Menu
There are 11 menu items in the “Maintenance” menu.
• Image Density
• Registration
• ROM Update
• Curl Prevention
• HDD Format
• WL.LAN Signal
• WL.LAN Defaults
• Key Repeat
• Menu Protect
• Series Prnt.Job
• Ppr.Size Error
Note
❒ “HDD Format” appears only when the optional Hard Disk Drive is installed.
For more information, see “Hard Disk Drive Type 2600” in the Setup Guide.
6
114
Maintenance Menu
Maintenance Menu Parameters
Menu
Image Density
Description
You can select the print image density.
-3 to 3
Reference
For more information, see p.97 “Adjusting the Image Density”.
Registration
❖ Prt. Test Sheet
You can print the registration test sheet.
Tray 1, Tray 2, Tray 3, Bypass Tray, Duplex backside
Note
❒ Default : Tray 1
❒ Only the installed trays appear on the panel display.
❖ Adjustment
You can select the start position for printing on a page.
Horiz.: Tray 1, Horiz.: Tray 2, Horiz.: Tray 3, Horiz.: Bypass,
Horiz.: Dup.Back, Vert.: All Trays, Vert.: Dup.Back
-4 to 4
6
Note
❒ Default : Horiz.: Tray 1
❒ The registration value is not a default.
❒ Only the installed trays appear on the panel display.
Reference
For more information, see p.98 “Adjusting the Registration
of the Trays”.
Curl Prevention
You can control the fuser temperature to prevent paper from curling.
Note
❒ Default: Off
❒ Use this mode only when paper misfeed occurs frequently
during duplex printing.
ROM Update
This menu is not currently used.
HDD Format
After installing the Hard Disk Drive, format it.
Note
❒ This menu appears only when the optional Hard Disk Drive is
installed.
Reference
For more information about formatting the Hard Disk Drive,
see p.119 “Formatting Hard Disk Drive Type 2600”.
115
Making Printer Settings with the Control Panel
Menu
WL. LAN Signal
Description
You can check the signal strength when using the wireless LAN.
Reference
For more information about displaying the signal strength, see
p.120 “Displaying the Signal Strength”.
WL. LAN Defaults
You can reset the wireless LAN settings to the default.
Key Repeat
You can scroll through the menu by holding this key down.
Note
❒ Default: On
Menu Protect *1
This procedure lets you protect menu settings against accidental
changes. It makes it impossible to change the menu settings you
make with the normal procedure unless you perform the required
key operation. In a network environment, protecting settings restricts who can change menu settings to network administrators.
• Level 1
• Level 2
• Off
Series Prnt.Job
6
*1
You can print series of print jobs without time intervals between
them when jobs are sent from the same computer, PDL, and interface.
Note
❒ Default: On
❒ When the Job Reset key is pressed, all jobs sent to the machine
will be canceled.
Ppr.Size Error *1
You can select whether to have an error report printed when the
paper size setting for the tray differs from the actual size of the paper in the tray. You can also select whether to have an error message displayed when feeding paper from the tray.
Note
❒ Default: Do not detect
❒ When it is "Detect", it prints with the paper size that was set
when the error message appeared.
*1
116
While the printer is Online, press {Enter #}
}, and then press {Escape}
}. Finally, press
}. You can access the "Menu Protect", “Series Prnt.Job” and “Ppr. Size Error”
{Menu}
menu on the panel display.
Maintenance Menu
Changing the Maintenance Menu
Protecting the menus
A Check if the On Line indicator is on. If not, press {On Line}} to enter the
"Ready" condition.
B Press {Enter #}}, then {Escape}}, and then {Menu}}.
On Line
Menu
Job Reset
Escape
Form Feed
Enter
Power
Error
Data In
ZDDS025N
6
"Menu" appears on the panel display.
C Press {U} or {T} to display the “Maintenance” menu, and then press {Enter
#}
}.
The following message appears on the panel display.
Maintenance:
Image Density
D Press {U} or {T} to display “Menu Protect”.
Maintenance:
Menu Protect
E Press {Enter #}}.
The following message appears on the panel display.
Menu Protect:
*Off
F Press {U} or {T} to select the levels desired, and then press {Enter #}}. Wait
for a few seconds.
117
Making Printer Settings with the Control Panel
G Press {On Line}}.
On Line
Menu
Job Reset
Escape
Form Feed
Enter
Power
Error
Data In
"Ready" appears on the panel display.
Ready
Canceling the protection
A Check if the On Line indicator is on. If not, press {On Line}} to enter the
6
"Ready" condition.
B Press {Enter #}}, then {Escape}}, and then {Menu}}.
“Menu” appears on the panel display.
C Press {U} or {T} to display “Maintenance” menu, and then press {Enter #}}.
The following message appears on the panel display.
Maintenance:
Image Density
D Press {U} or {T} to display “Menu Protect”, and then press {Enter #}}.
E Press {U} or {T} to display “Off”, and then press {Enter #}}. Wait for a few
seconds.
F Press {On Line}}.
“Ready” appears on the panel display.
118
Maintenance Menu
Formatting Hard Disk Drive Type 2600
If you are formatting the Hard Disk Drive for the first time, follow the procedures below using the control panel.
A Press {Menu}}.
“Menu” appears on the panel display.
B Press {U} or {T} to display “Maintenance” menu.
Menu:
Maintenance
C Press {Enter #}}.
The following message appears on the panel display.
Maintenance:
Image Density
D Press {U} or {T} to display “HDD Format”.
6
Maintenance:
HDD Format
E Press {Enter #}}.
The following message appears on the panel display.
HDD Format:
Press# to Start
F Press {Enter #}}.
Important
❒ Do not turn off the printer while formatting the Hard Disk Drive. Turning
off the printer while formatting the Hard Disk Drive can damage the Hard
Disk Drive.
If you successfully format the Hard Disk Drive, the following message appears on the panel display.
Completed
Restart Printer
G Turn off the power switch, and then turn it back on.
119
Making Printer Settings with the Control Panel
Displaying the Signal Strength
If you need to check the IEEE 802.11b (Wireless LAN) signal, select "WL.LAN
Signal" in the "Maintenance" menu.
A Press {Menu}}.
On Line
Menu
Job Reset
Escape
Form Feed
Enter
Power
Error
Data In
“Menu” appears on the panel display.
B Press {T} or {U} to display the “Maintenance” menu.
6
Menu:
Maintenance
C Press {Enter #}}.
On Line
Menu
Job Reset
Escape
Form Feed
Enter
Power
Error
Data In
The following message appears on the panel display.
Maintenance:
Image Density
D 4 Press {T} or {U} to display "WL.LAN Signal".
Maintenance:
WL.LAN Signal
120
Maintenance Menu
E Press {Enter #}}.
One of the following messages appears on the panel display.
WL.LAN Signal
Good
100%
WL.LAN Signal
Fair
50%
WL.LAN Signal
Poor
30%
WL.LAN Signal
Unavailable 18%
Note
❒ If "WL.LAN Signal" is not displayed, "IEEE 802.11b" has not been selected
for "LAN Type" in "Network Setup" of the Host Interface menu. Select
"IEEE 802.11b" for "LAN Type", and then check the "WL.LAN Signal" in
the Maintenance menu again.
❒ If "Ad hoc" in "Comm. Mode" of "IEEE 802.11b" in the Host Interface menu
is selected, you cannot check the signal. Select "Infrastructure" and then
check it again.
❒ Every time you press {Enter #}
}, the signal is updated.
❒ The signal is indicated as "Good" if the signal strength is 76-100%, "Fair" if
the strength is 41-75%, "Poor" if the strength is 21-40%, and "Unavailable"
if the strength is 0-20%. If the signal is unstable or unavailable, remove obstacles or move the printer to a place where the signal can be received.
❒ Using wireless devices or microwave sources near the printer might affect
the signal.
6
F Press {Escape}}.
121
Making Printer Settings with the Control Panel
G Press {On Line}}.
On Line
Menu
Job Reset
Escape
Form Feed
Enter
Power
Error
Data In
“Ready” appears on the panel display.
Ready
Resetting the IEEE 802.11b (Wireless LAN) Settings
If you need to reset the wireless LAN setting, select "WL.LAN Defaults" in the
Maintenance menu.
6
Note
❒ The four items that can be reset in "IEEE 802.11b" of the Host Interface menu
are "Comm.Mode", "Channel", "Trans. Speed", and "WEP Settings". Other
items that can be reset are the SSID settings, the WEP key settings, and the
wireless LAN settings that can be made with telnet.
A Press {Menu}}.
On Line
Menu
Job Reset
Escape
Form Feed
Enter
Power
Error
Data In
“Menu” appears on the panel display.
B Press {T} or {U} to display the “Maintenance” menu.
Menu:
Maintenance
122
Maintenance Menu
C Press {Enter #}}.
On Line
Menu
Job Reset
Escape
Form Feed
Enter
Power
Error
Data In
The following message appears on the panel display.
Maintenance:
Image Density
D Press {T} or {U} to display "WL.LAN Defaults".
Maintenance:
WL.LAN Defaults
6
E Press {Enter #}}.
WL.LAN Defaults
Reset->Defaults?
F Press {Enter #}}.
The following message appears on the panel display.
Defaults reset
The wireless LAN setting value is reset.
“Ready” appears on the panel display.
Ready
123
Making Printer Settings with the Control Panel
System Menu
There are 17 menu items in the “System” menu.
• MisfeedRecovery
• Prt. Err Report
• Auto Continue
• Memory Overflow
• Sub Paper Size
• Page Size
• Edge-Edge Print
• Duplex
• Output Tray
• Job Separation
• Energy Saver
• Memory Usage
• Unit Of Measure
• Edge Smoothing
• Resolution
• Toner Saving
• Spool Printing
6
System Parameters
Menu
MisfeedRecovery
Description
You can select whether Misfeed Recovery is enabled. When it is
on, printing restarts after the misfed paper has been cleared.
• On
• Off
Note
❒ Default: On
Prt. Err Report
You can select whether or not to have an error report printed
when a printer error or memory error occurs.
• On
• Off
Note
❒ Default: Off
124
System Menu
Menu
Auto Continue
Description
You can set whether Auto Continue is enabled. When it is on,
printing continues after a system error occurs.
• Off
• 0 minute
• 1 minute
• 5 minutes
• 10 minutes
• 15 minutes
Note
❒ Default: Off
❒ When it is on and certain types of error occur, the current job
might be canceled, and the next job started automatically.
Memory Overflow
You can select whether the memory overflow error report is printed when the data is too large and cannot be processed.
• Not Print
• Error List
Note
6
❒ Default: Not Print
Sub Paper Size
You can select whether the printer automatically selects the paper
tray containing paper of the specified size.
• Off
• Auto
Note
❒ Default: Off
Page Size
You can specify the default paper size.
11 x 17, 8 1/2 x 14, 11 x 8 1/2, 5 1/2 x 8 1/2, 7 1/4 x 10 1/2, 8 x 13,
8 1/2 x 13, 8 1/4 x 13, A3, B4, A4, B5, A5, A6, 8K, 16K, 4 1/8 x 9
1/2, 3 7/8 x 7 1/2, C5 Env, C6 Env, DL Env, Custom Size
Note
❒ Default: 11 x 8 1/2
Edge-Edge Print
You can print on the complete area of an A4 sheet leaving no border on any edge.
Note
❒ Default: Off
Duplex
You can select whether you want to print on both sides of each page.
• Off
• Short Edge Bind
• Long Edge Bind
Note
❒ Default: Off
❒ This menu appears only when the optional Duplex Unit is installed.
125
Making Printer Settings with the Control Panel
Menu
Output Tray
Description
You can select the default output tray. When you select "Auto
Tray Sw.", the printer automatically changes to another output
tray if an output tray becomes full. This function is available only
when the Mailbox or the 1-bin Shift Sort Tray is installed.
Standard Tray, Mailbox Tray 1, Mailbox Tray 2, Mailbox Tray 3,
Mailbox Tray 4, Upper Tray, Auto Tray Sw.
Note
❒ Default: Standard Tray
❒ Only the installed trays appear on the panel display.
Job Separation
You can enable Job Separation.
• On
• Off
Note
❒ Default: Off
❒ This menu appears only when the optional 1-bin Shift Sort
Tray is installed.
Energy Saver
6
You can set how many minutes the printer waits before switching
to Energy Saver mode. Energy Saver mode reduces electric power
consumption.
On, Off
1 minute, 5 minutes, 15 minutes, 30 minutes, 45 minutes, 60 minutes
Note
❒ Default: On
❒ Default: 30 minutes
❒ If there is an error with the printer, the printer will not switch
to Energy Saver mode.
❒ When the printer switches to Energy Saver mode, the Power
indicator turns off while the On Line indicator stays on.
Memory Usage
You can select memory to be used from "Font Priority" or "Frame
Priority" according to the paper size, resolution or printer language.
• Font Priority
This setting uses memory for registering fonts.
• Frame Priority
This setting uses memory for high speed printing.
Note
❒ Default: Frame Priority
Reference
For more information, see p.153 “Memory Capacity and Paper
Size”.
Unit Of Measure
126
You can select "mm" or "inch" for the custom paper sizes.
System Menu
Menu
Edge Smoothing
Description
You can set whether Edge Smoothing is enabled. When it is on,
jagged lines appear more smoothly. Set it to off when the print image contains fine gradation in tone.
• On
• Off
Note
❒ Default: On
❒ If "Toner Saving" is "On", "Edge Smoothing" is ignored even if
it is "On".
Resolution
You can set the print resolution in dots per inch.
❖ PCL
300 dpi, 600 dpi
❖ PS
300 dpi, 600 dpi, 1200 dpi
❖ TIFF
200 dpi, 300 dpi, 400 dpi, 600 dpi, 1200 dpi
6
Note
❒ Default: 600 dpi
Toner Saving
You can select whether or not Toner Saving is enabled.
• On
• Off
Note
❒ Default: Off
❒ If "Toner Saving" is "On", "Edge Smoothing" is ignored even if
it is "On".
Spool Printing
You can select whether all of the print data is spooled to the Hard
Disk Drive before printing.
• On
• Off
Note
❒ Default: Off
❒ Spooling stores the print job sent by a computer temporarily in
the printer, transfers the print job, and then prints it.
❒ This menu appears only when the optional Hard Disk Drive is
installed.
127
Making Printer Settings with the Control Panel
Changing the System Menu
A Press {Menu}}.
On Line
Menu
Job Reset
Escape
Form Feed
Enter
Power
Error
Data In
“Menu” appears on the panel display.
B Press {U} or {T} to display the “System” menu.
Menu:
System
6
C Press {Enter #}}.
On Line
Menu
Job Reset
Escape
Form Feed
Enter
Power
Error
Data In
The following message appears on the panel display.
System:
MisfeedRecovery
D Press {U} or {T} to display “Energy Saver”.
System:
Energy Saver
128
System Menu
E Press {Enter #}}.
The following message appears on the panel display.
Energy Saver:
E.Saver On/Off
F Press {U} or {T} to display "E. Saver Timer".
Energy Saver:
E. Saver Timer
G Press {Enter #}}.
The following message appears on the panel display.
Energy Saver:
*30 minutes
H Press {U} or {T} to select how many minutes the printer waits before
switching to Energy Saver mode.
6
I Press {Enter #}}.
The screen returns to step F in a few seconds.
J Press {On Line}}.
On Line
Menu
Job Reset
Escape
Form Feed
Enter
Power
Error
Data In
“Ready” appears on the panel display.
Ready
129
Making Printer Settings with the Control Panel
Host Interface Menu
There are six menu items in the “Host Interface” menu.
• I/O Buffer
• I/O Timeout
• Network Setup
• IEEE 1394 Setup
• IEEE 802.11b
• USB Setting
Host Interface Parameters
Menu
I/O Buffer
Description
You can set the size of the I/O Buffer. Normally it is not necessary
to change this setting.
16 KB, 32 KB, 64 KB, 128 KB, 256 KB, 512 KB
6
Note
❒ Default: 128 KB
I/O Timeout
You can set how many seconds the printer waits before ending a
print job if more data is not received when using parallel interface
and USB. If data from another port often appears in the middle of
a print job, you should increase the timeout value.
10 seconds, 15 seconds, 20 seconds, 25 seconds, 60 seconds
Note
❒ Default: 15 seconds
130
Host Interface Menu
Menu
Network Setup
Description
Note
❒ Items only appear in the Network Setup when the related options are installed. "IEEE 1394 Setup" appears only when the
optional IEEE 1394 board is installed. "IEEE 802.11b" appears
only when the optional IEEE 802.11b board is installed.
Reference
For more information about the "Network Setup", see "Configuring the Printer for the Network" in the Setup Guide.
For more information about the "IEEE 1394 Setup", see "Configuring the Printer for the Network" in the Setup Guide.
For more information about the "IEEE 802.11b", see "Configuring the Printer for the Network" in the Setup Guide.
❖ IP Address
You can set the IP Address.
Note
❒ Default: 011.022.033.044
❖ Subnet Mask
6
You can set the Subnet Mask.
Note
❒ Default: All zero
❖ Gateway Address
You can set the Gateway Address.
Note
❒ Default: All zero
131
Making Printer Settings with the Control Panel
Menu
Network Setup
Description
❖ Network Boot
You can set how the Network Interface Board acquires
TCP/IP settings.
Note
❒ Default: None
❖ Frame Type (NW)
You can set the Frame Type for NetWare.
Note
❒ Default: Auto
❖ Active Protocol
You can set the active protocol.
TCP/IP, NetWare, NetBEUI, AppleTalk
Note
❒ Default: All Active
❖ Ethernet
6
You can select the speed of the network to which the printer is
connected.
Auto, 10 Mbps, 100Mbps
Note
❒ Default: Auto
❖ LAN Type
You can select Ethernet or IEEE 802.11b for the LAN type.
Note
❒ Default: Ethernet
❒ Appears only when the optional 802.11b Interface Unit is
installed in the Network standard model.
Reference
For more information about Network Setup, see "Configuring the Printer for the Network" in the Setup Guide.
132
Host Interface Menu
Menu
IEEE 1394 Setup *1
Description
You can make settings for using IEEE 1394. This menu appears
only when the optional IEEE 1394 board is installed.
❖ IP Address1394
You can set the IP address for IEEE 1394 (IP over 1394).
Note
❒ Default: All zero
❖ Subnet Mask1394
You can set the Subnet Mask for IEEE 1394 (IP over 1394).
Note
❒ Default: All zero
❖ IP over 1394
You can activate IP over 1394.
Note
❒ Default: Active
❖ SCSI print
6
You can activate SCSI print.
Note
❒ Default: Activate
❖ Bidi-SCSI print
You can activate bidirectional transmission for SCSI print.
Note
❒ Default: Activate
133
Making Printer Settings with the Control Panel
Menu
IEEE 802.11b *2
Description
You can make settings for using the wireless LAN. This menu appears only when the optional IEEE 802.11b board is installed.
❖ Comm.Mode
You can set the transmission mode for IEEE 802.11b.
Note
❒ Default: Ad hoc
❖ Channel
The selectable channels are 1-11 (Inch version) and 1-13 (Metric version).
Note
❒ Default: 11
❖ Trans. Speed
You can set the transmission speed for IEEE 802.11b.
Note
❒ Default: Auto
6
❖ WEP Settings
You can set the code for IEEE 802.11b.
Note
❒ Default: Not Active
❒ You need to set the WEP code key from the network before
making this setting. Without the key, transmission cannot
be performed.
❒ Be sure to set the key before setting the code to "Active".
USB Setting *3
You can set the transmission speed for USB.
Note
❒ Default: Auto
*1
*2
*3
134
Appears only when the 1394 Interface Unit board is installed.
Appears only when the 802.11b Interface Unit board is installed.
While the printer is Online, press {Enter #}
}, and then press {Escape}
}. Finally, press
{Menu}
} . You can access the "USB Setting" menu on the panel display.
Host Interface Menu
Changing the Host Interface Menu
A Press {Menu}}.
On Line
Menu
Job Reset
Escape
Form Feed
Enter
Power
Error
Data In
“Menu” appears on the panel display.
B Press {U} or {T} to display the “Host Interface” menu.
Menu:
Host Interface
6
C Press {Enter #}}.
On Line
Menu
Job Reset
Escape
Form Feed
Enter
Power
Error
Data In
The following message appears on the panel display.
Host Interface:
I/O Buffer
D Press {U} or {T} to display “I/O Timeout”.
Host Interface:
I/O Timeout
135
Making Printer Settings with the Control Panel
E Press {Enter #}}.
The following message appears on the panel display.
I/O Timeout:
*15 seconds
F Press {U} or {T} to select how many minutes the printer waits before ending a print job.
G Press {Enter #}}.
The screen returns to step D in a few seconds.
H Press {On Line}}.
On Line
6
Menu
Job Reset
Escape
Form Feed
Enter
Power
Error
Data In
“Ready” appears on the panel display.
Ready
136
PCL Menu
PCL Menu
There are eight menu items in the “PCL Menu” .
• Orientation
• Form Lines
• Font Source
• Font Number
• Point Size
• Font Pitch
• Symbol Set
• Ext. A4 Width
PCL Parameters
Menu
Orientation
Description
You can set the page orientation.
6
• Portrait
• Landscape
Note
❒ Default: Portrait
Form Lines
You can set the number of lines per page.
5-128
Note
❒ Default: 64 (Metric version), 60 (Inch version)
Font Source
You can set the location of the default font.
• Internal
• Download
• HDD
Note
❒ Default: Internal
❒ When you select "Download", you can select only fonts downloaded to printer RAM.
Font Number
You can set the ID of the default font you want to use.
• 0 to 50 (for Internal)
• 1 to downloaded number
Note
❒ Default: Internal
❒ Default: 0
137
Making Printer Settings with the Control Panel
Menu
Point Size
Description
You can set the point size you want to use for the default font.
4 to 999.75 by 0.25
Note
❒ Default: 12.00
❒ This setting is effective only for a variable-space font.
Font Pitch
You can set the number of characters per inch you want to use for
the default font.
0.44 to 99.99 by 0.01
Note
❒ Default: 10.00
❒ This setting is effective only for a fixed-space font.
Symbol Set
You can specify the set of print characters for the default font. The
available options are as follows.
Roman-8, ISO L1, ISO L2, ISO L5, PC-8, PC-8 D/N, PC-850, PC852, PC8-TK, Win L1, Win L2, Win L5, Desktop, PS Text, VN Intl,
VN US, MS Publ, Math-8, PS Math, VN Math, Pifont, Legal, ISO 4,
ISO 6, ISO 11, ISO 15, ISO 17, ISO 21, ISO 60, ISO 69, Win 3.0
6
Note
❒ Default: Roman-8
Ext. A4 Width
You can extend the width of the printable area for an A4 sheet
leaving a narrow margin on the sides.
Note
❒ Default: Off
138
PCL Menu
Changing the PCL Menu
A Press {Menu}}.
On Line
Menu
Job Reset
Escape
Form Feed
Enter
Power
Error
Data In
"Menu" appears on the panel display.
B Press {U} or {T} to display "PCL Menu", and then press {Enter #}}.
On Line
Menu
Job Reset
Escape
Form Feed
Enter
Power
Error
6
Data In
The following message appears on the panel display.
PCL Menu:
Orientation
C Press {Enter #}}.
Orientation:
*Portrait
D Press {U} or {T} to select the orientation desired, and then press {Enter #}}.
Wait for a few seconds.
The screen returns to step B in a few seconds.
139
Making Printer Settings with the Control Panel
E Press {On Line}}.
On Line
Menu
Job Reset
Escape
Form Feed
Enter
Power
Error
Data In
"Ready" appears on the panel display.
Ready
6
140
Language Menu
Language Menu
You can select the language you use. Available language as are follows:
English, French, German, Italian, Spanish, Dutch, Swedish, Norwegian, Danish,
Finnish, Portuguese, Czech, Polish, Hungarian
Note
❒ Default: English
Changing the Language Menu
You can change the language by the following procedures below.
A Press {Menu}}.
On Line
Menu
Job Reset
Escape
Form Feed
Enter
Power
Error
6
Data In
”Menu” appears on the panel display.
B Press {U} or {T} to display “Language” menu.
Menu:
Language
141
Making Printer Settings with the Control Panel
C Press {Enter #}}.
On Line
Menu
Job Reset
Escape
Form Feed
Enter
Power
Error
Data In
The following message appears on the panel display.
Language:
*English
D Press {U} or {T} until the language you want to select appears on the panel
display.
E Press {Enter #}}. Wait for a few seconds.
6
The screen returns to step B in a few seconds.
F Press {On Line}}.
On Line
Menu
Job Reset
Escape
Form Feed
Enter
Power
Error
Data In
"Ready" appears on the panel display.
Ready
142
7. Appendix
Replacing Parts
The maintenance kit contains parts necessary for maintaining the printer. When
“Replace Maintenance Kit” appears on the panel display, install the replacement
parts included in the maintenance kit.
R WARNING:
• It is dangerous to handle the plug with wet hands. An electric shock
might occur.
R CAUTION:
• The inside of the machine could be very hot. Do not touch the parts with a
label indicating "v" (means hot surface). Touching "v" (means hot surface) could result in a burn.
• When you pull the plug out of the socket, grip the plug to avoid damaging
the cord and causing a fire or an electric shock.
• Be sure to turn off the printer and wait for about an hour before replacing
parts. Not waiting for the printer to cool down can result in a burn.
Note
❒ If you dispose of the used parts yourself, dispose of them according to local
regulations.
143
Appendix
MAINTENANCE KIT Type 2600
Checking the contents of the box
Check the contents of the box according to the following list. If one or more items
are missing, contact your sales or service representative.
Description
7
144
Quantity
Friction pad for
the paper tray
(Tray 1)
1 pc
Friction pad for
the Paper Feed
Unit (Tray 2, 3)
2 pcs
Paper feed roller
for the paper
tray (Tray 1)
1 pc
Paper feed roller
for the Paper
Feed Unit (Tray
2, 3)
2 pcs
Transfer roller
1 pc
Gloves
1 pair
Fusing Unit
1 pc
See p.145 “Replacing the Friction Pad”.
See p.146 “Replacing the Paper Feed Rollers”.
See p.147 “Replacing the
Transfer Roller”.
See p.149 “Replacing the Fusing Unit”.
Replacing Parts
Preparing to replace the parts
You should replace all the parts included in Maintenance Kit at the same time.
Be sure to replace them in the following order:
A Check the contents of the box for the following items:
•
•
•
•
•
•
•
Friction pad for the paper tray (Tray 1)
Friction pad for the Paper Feed Unit (Tray 2, 3)
Paper feed roller for the paper tray (Tray 1)
Paper feed roller for the Paper Feed Unit (Tray 2, 3)
Transfer roller
Fusing Unit
Gloves
B Confirm that the followings are true:
• The power switch is turned off.
• The power cord is unplugged from the wall outlet.
• The interface cable is unplugged from the printer.
C While lifting the front side of the
Replacing the Friction Pad
tray, pull it out of the printer.
7
Replace all friction pad of the tray.
There are two kinds of friction pads.
One is for the paper tray (Tray 1), and
the other are for the Paper Feed
Unit(s) (Tray 2, 3). The following procedure shows how to replacing friction pad of the paper tray (Tray1).
A If the optional Duplex Unit, the
Mailbox or the 1–bin Shift Sort
Tray are installed, uninstall them
from the printer.
B Lift the paper tray slightly then
pull it out until it stops.
ZCEY430J
ZCEY140J
D Remove
paper from the paper
tray. Place the tray upside down
on a flat surface.
ZCEM160J
145
Appendix
E Use a sharp-pointed item like a
ball-point pen, to release the two
catches that lock the friction pad.
H Push the friction pad until it locks
securely.
I If your printer is equipped with
the optional Paper Feed Unit(s),
follow the same procedure when
replacing the friction pad.
Replacing the Paper Feed
Rollers
ZCEM170J
F Return the paper tray to its original position, and remove the friction pad from the tray.
Replace all feed rollers including the
printer and the optional Paper Feed
Unit(s). The following procedure
shows how to replacing the paper
feed rollers of the printer.
R CAUTION:
• When lifting the machine, use
the inset grips on both sides.
Otherwise the printer could
break or cause injury if dropped.
A Move the printer to the edge of a
7
sturdy and stable table or desk.
ZCEM180J
G Insert the new friction pad in the
paper tray.
Attach the center projection of the
new friction pad to the spring and
align the projection of both sides of
the friction pad to the holes of the
paper tray. Then push the friction
pad as shown in the illustration
until it clicks.
146
ZCEM190J
ZGDM110J
Important
❒ Be sure to move the printer horizontally. Moving the printer
facing up on down may cause
the toner to scatter.
❒ Do not put the printer on an unstable or tilted surface.
Replacing Parts
Note
❒ If the printer is equipped with
the optional Paper Feed Unit,
do not move the printer and the
unit together, they are not securely attached.
B Slide the green lock lever to the
right (A
A), remove the paper feed
roller (B
B).
D If the printer is equipped with the
optional Paper Feed Unit(s), follow the same procedure when replacing the paper feed roller.
If you installed two Paper Feed
Units, also replace both paper feed
rollers.
E Leave the paper
tray pulled out
and go to p.147 “Replacing the
Transfer Roller”.
Replacing the Transfer Roller
A Open the front cover by pushing
the front cover release button.
ZGDM120J
C While sliding the green lock lever
to the right (A
A), set the new roller
(B
B ). After that, return the green
lock lever to its original position
(C
C).
7
ZCEH120J
B Pull the toner cartridge out of the
printer, while lifting the front
side.
Note
❒ Be sure to place the used cartridge on the level place.
ZCEM130J
Note
❒ Confirm that the green lock lever secures the roller correctly
by checking if the new roller rotates smoothly.
ZGDT110J
147
Appendix
C To
avoid making your hands
dirty with toner from the transfer
roller, wear the gloves included
in the maintenance kit.
Important
❒ Do not insert the roller on the
back of the socket, or the printer
might be damaged.
$” parts),
D Hold the lock levers (“$
❒ Insert the metallic part of the
roller on the socket. If you insert
the sponge part of the roller, the
roller might be damaged.
and pull them.
G Push
down the green parts of
both sides of the printer until it
clicks as shown in the illustration.
ZCEM200J
E Hold the green parts of the roller
on both sides, and remove the
roller from the printer as shown
in the illustration.
7
ZCEM221J
Note
❒ When the transfer roller is set,
the transfer roller cover will return to its original position automatically.
H Holding the grips of the toner carZCEM210J
tridge, insert it into the printer
until it stops.
F Insert the new transfer roller on
the socket with the gear of the
roller positioned on the left.
ZGDT120J
ZCEM220J
148
Replacing Parts
I Push down the toner cartridge to
insert it in its appropriate position.
A Open the rear cover by pushing the two knobs.
ZGDX210J
ZGDT140J
J Close the front cover.
B Remove the rear cover in a horizontal direction.
7
ZGDX220J
ZGDH130J
K Take
the gloves off and go to
p.14 9 “Replacing the Fusing
Unit”.
B Lift the lock levers of the fusing
unit as shown in the illustration.
Replacing the Fusing Unit
R CAUTION:
• The fusing unit becomes very
hot. When installing the new fusing unit, turn off the printer and
wait about an hour. After that, install the new fusing unit. Not
waiting for the unit to cool down
can result in a burn.
ZGDX222N
A If the rear cover is attached to the
printer, remove it.
149
Appendix
C Pull the fusing unit out.
F Insert the rear cover to the inside
grooves on both sides of the printer in a horizontal direction.
ZGDX223N
D Replace the new fusing unit into
the printer.
ZGDX221J
G Close the rear cover.
7
ZGDX224N
E Push the lock levers of the fusing
unit down until it clicks.
ZGDX211N
H Print a configuration page to confirm that the printer works properly.
Reference
For more information about
printing the configuration page,
see “List/Test Print Menu” in the
Printer Reference provided as a
PDF file on the CD-ROM labeled “Operating Instructions”.
ZGDX225N
150
Collate and Shift Collate
Collate and Shift Collate
Reference
For more information about collate and shift collate, see the printer driver's
Help file.
❖ Collate
Outputs can be assembled as sets in sequential order.
1
2
3
1
2
3
1
2
3
1
2
3
❖ Shift Collate
The shift tray moves backward or forward each time the copies of one set or
those of each job are delivered, and makes the next copy to shift when delivered to differentiate each set or jobs.
2
3
7
123
123 123
1
Limitation
❒ To use these functions, the optional Memory Unit of at least 96 MB or the optional Hard Disk Drive must be installed on the printer.
❒ Up to 200 pages can be sorted using RAM. If the optional Hard Disk Drive is
installed, up to 1000 pages can be sorted. The maximum number of pages to
be sorted is 200 pages.
❒ Shift Collate requires the optional 1-bin Shift Sort Tray to be installed on the
printer.
Note
❒ When using PostScript 3, if you select Upper Tray as an output tray, it is shift
collated automatically. When using RPCS, you can select collate function.
151
Appendix
Spool Printing
With spool printing, the whole data of a print job is saved in the Printer Hard
Disk before printing. To use this function, set it from the menu. See p.124 “System Menu”.
Important
❒ Do not turn off the printer or the computer when a print job is being spooled
and the Data In indicator is blinking. If you do, the print job will remain in
the Printer Hard Disk and be printed when the printer is turned on.
Limitation
❒ Spool printing does not appear unless the optional Hard Disk Drive is installed.
❒ Data that has been received in the protocol other than LPD or IPP cannot be
spooled.
❒ Up to 50 jobs (approximately 500 MB) can be spooled at a time.
❒ When spool printing is on, the size of a single print job cannot exceed 500 MB.
❒ When sending spooled print jobs from more than one computer at the same
time, up to five LPR jobs and one IPP job can be spooled. Jobs exceeding the
maximum number cannot be spooled. Wait until the number of spooled print
jobs falls below the maximum.
7
Note
❒ When "On" is selected, the first print will take time.
❖ Confirm or delete the spooled job from a Web browser.
The spooled job can be seen or deleted from a Web browser. Start a Web
browser, and then input the IP address of the printer for URL to show the top
page. Click [Admin Info.], and then click [Spool Printing]. Select the file, check for
delete, input the password, and then click the delete button. (The default
password is "password".)
152
Memory Capacity and Paper Size
Memory Capacity and Paper Size
The following tables show the typical memory requirements of the RPCS printer
language. Memory requirements depend on your print data and printing environment, such as the "Memory Priority" setting or total memory size that the
printer has available. The print mode also effects whether the print job will
equally completed.
Setting of the “Frame Priority”
Paper Size
Resolution (dpi)
Memory
Capacity
600 x 600
1200 x 1200
32MB
❍
❍
96MB
❍
❍
A4 (210 × 297)
32MB
❍
❍
Letter (8 /2×11)
96MB
❍
❍
32MB
❍
❍
96MB
❍
❍
A3
32MB
❍
❍*
(11 × 17)
96MB
❍
❍
B5
1
B4
7
❍
Means that the print job is supported by simplex and duplex printing.
❍*
Means it might be impossible to print images complex data with duplex printing. Even with simple date, the number of pages printed with duplex printing
might be limited.
153
Appendix
Setting of the “Font Priority”
Paper Size
Resolution (dpi)
Memory
Capacity
600 x 600
1200 x 1200
32MB
❍
❍
96MB
❍
❍
32MB
❍
❍*
96MB
❍
❍
32MB
❍
❍*
96MB
❍
❍
A3
32MB
❍
$*
(11 × 17)
96MB
❍
❍
B5
A4 (210 × 297)
Letter
(81/
B4
2×11)
❍
Means that the print job is supported by simplex and duplex printing.
❍*
Means it might be impossible to print images complex data with duplex printing. Even with simple date, the number of pages printed with duplex printing
might be limited.
$*
Means it might be impossible to print images complex data with printing. Even
with simple data, the number of pages printed with printing might be limited.
7
154
Moving and Transporting the Printer
Moving and Transporting the Printer
R CAUTION:
• When lifting the machine, use
the inset grips on both sides.
Otherwise the printer could
break or cause injury if dropped.
• When you move the printer, remember to unplug the power
cord from the wall outlet to avoid
a fire or an electric shock.
Moving the printer in the short distance
A Confirm
that the followings are
true:
• The power switch is turned off.
• The power cord is unplugged
from the wall outlet.
• The interface cable is unplugged from the printer.
• When you pull out the plug from
the socket, grip the plug to avoid
damaging the cord and causing
a fire or an electric shock.
B If you installed external options,
Repack the printer in its original
packing materials for transporting.
Removing the Mailbox or the 1bin Shift Sort Tray
Important
❒ Be sure to disconnect all cables
from the printer before transporting it.
❒ The printer is a precision piece of
machinery. Take care to avoid
damage during shipment.
The following procedure shows
how to remove the Mailbox as an
example.
A Pull all the upper trays out.
remove them.
7
Moving the Printer
R CAUTION:
• The machine weight is approximately 18 kg (39.7 lb. bond).
• When lifting the machine, use
the inset grips on both sides.
Otherwise the printer could
break or cause injury if dropped.
ZGDY370J
B While pushing the lock buttons
(A
A), pull the Mailbox out (B
B).
• Before moving the machine, unplug the power cord from the outlet. If the cord is unplugged
abruptly, it could become damaged. Damaged plugs or cords
can cause an electrical or fire
hazard.
ZCEX470J
155
Appendix
D Lift the printer and move it to the
Removing the Duplex Unit
A Push down the lever on right
side of the Duplex Unit (A
A)
and pull it out until it stops
(B
B).
place where you want to install it.
R CAUTION:
• When lifting the machine, use
the inset grips on both sides.
Otherwise the printer could
break or cause injury if dropped.
ZGDX320J
B Push the under board levers
(A
A) and pull the Duplex Unit
out of the printer (B
B).
ZGDH221J
Important
❒ Be sure to move the printer horizontally. Moving the printer facing
up on down may cause the toner to
scatter.
7
ZCEY450J
C Be sure to close the Bypass Tray
and the front cover.
156
❒ If the Paper Feed Unit(s) is installed, detach and move the printer separately. Never move the
printer with the Paper Feed Unit(s)
attached.
Specifications
Specifications
Mainframe
❖ Configuration:
Desktop
❖ Print Process:
Laser beam scanning & Electrophotographic printing
Dual component toner development
❖ Printing Speed:
Maximum 26 pages per minute (A4L, 81/2 × 11L)
Note
❒ Continuous printing on sheets with a width of 230 mm or smaller may decrease the printing speed depending on the temperature control of the fusing unit.
❖ Interface:
Standard 36–pin printer cable and a parallel port on the host computer
IEEE 1284 I/F (Compatible, ECP, Nibble)
• Do not use a cable more than 2.5 meters (8.2 feet) long.
• USB1.1
• USB2.0
• Bidirectional IEEE1284
• 10/100Base-TX(std.for AP2610N)
7
❖ Resolution:
1,200 × 1,200 dpi (PCL 6, RPCS, PS)
600 × 600 dpi (PCL 6, PCL 5e, RPCS, PS)
300 × 300 dpi(PCL5e)
❖ Printer Language:
PCL 6 (XL) , PCL 5e, RPCS, Adobe PostScript 3
❖ Fonts:
PCL 6, PCL 5e
Agfa Font Manager 35 Intellifonts, 10 TrueType fonts, and 1 bitmap font
Font Manager available, plus 31 additional fonts.
PostScript
136 fonts(Type 2:24, Type 14:112)
❖ Paper size:
See p.25 “Paper and Other Media Supported by This Printer”
157
Appendix
❖ Paper Weight:
See p.25 “Paper and Other Media Supported by This Printer”
❖ Power Source:
120V, 60 Hz, 8.4A or more
❖ Power Consumption:
Maximum
870 W or less
Printing
610 W or less
• Basic model:
12 W
Energy Saver
• Network standard model:
13 W
❖ Noise Emission *1 :
Sound Power Level
Mainframe only
During Printing
63 dB (A)
Stand-by
40 dB (A)
Sound Pressure level *2
Mainframe only
7
During Printing
*1
*2
52 dB (A)
The following measurements are actual values made in accordance with ISO7779.
Measured at the position of a bystander.
❖ Dimensions: *1
Width
Printer only (tray not
extended)
Depth
Height
478 mm (18.4 inches) 437 mm (17.2 inches) 305 mm (12.0 inches)
Printer only (tray ex- 478 mm (18.4 inches) 555 mm (21.9 inches) 305 mm (12.0 inches)
tended)
With one optional
feed unit
478 mm (18.4 inches) 555 mm (21.9 inches) 434 mm (17.1 inches)
With two optional
feed units
478 mm (18.4 inches) 555 mm (21.9 inches) 562 mm (22.1 inches)
*1
Measurement conditions: With paper tray, Bypass Tray and output tray extension
closed.
❖ Weight:
Approximately 18 kg (39.7 lb. bond) (toner cartridge and power cord included)
158
Specifications
❖ Warm-up Time:
Less than 19 seconds (23°C, 73F)
❖ Paper Capacity:
Standard paper tray
250 sheets *1 (80g/m2, 20 lb.bond)
Bypass Tray *2
100 sheets *1 (80g/m2, 20 lb.bond)
Optional Paper Feed Unit × 2
500 sheets × 2 *1 (80g/m2, 20 lb.bond)
Optional Envelope Feeder *3
60 envelopes *4
*1
*2
*3
*4
Paper weight: 60 – 105 g/m2 (16 – 28 lb. bond)
You can load up to 10 envelopes (55 – 157 g/m2, 14 – 42 lb. bond) at the same time.
To use the Envelope Feeder Unit, the optional Paper Feed Unit is required. The
paper tray of the feed unit can be replaced with the Envelope Feeder Unit.
For more information about envelopes, see p.33 “Types of Paper and Other Media”.
❖ Paper Output Capacity:
250 sheets (80 g/m2, 20 lb. bond)
❖ Memory:
Standard 32MB, up to 96MB (with the optional Memory Unit)
❖ Network (Basic model printer requires the optional Network Interface Board):
Topology: Ethernet (10BaseT/100BaseTX)
Protocol: TCP/IP, NetBEUI, IPX/SPX, AppleTalk
7
❖ Optional Equipment:
Common for the Basic model printer and the Network standard model
printer
• Paper Feed Unit Type 2600
• Envelope Feeder Type 2600
• 1-bin Shift Sort Tray Type 2600
• CS380 (Mailbox)
• AD410 (Duplex Unit)
• Memory Unit TypeB 64MB
• Hard Disk Drive Type 2600
• 1394 Interface Unit Type 4510
• 802.11b Interface Unit Type A
Unique for the Basic model printer
• Network Interface Board Type 2610
159
Appendix
Options
Paper Feed Unit Type 2600
❖ Dimensions (W×
×D×
×H):
468 × 545 × 130 mm (18.4 × 19.7 × 5.1 inches)
(without pins on the unit)
❖ Paper Weight:
60 – 105 g/m2 (16 – 28 lb. bond)
❖ Paper Size:
See p.25 “Paper and Other Media Supported by This Printer”.
Envelope Feeder Type 2600
❖ Dimensions (W×
×D×
×H):
468 × 410 × 130 mm (18.4 × 16.1 × 5.1 inches)
❖ Paper Weight:
72 – 90 g/m2 (19 – 24 lb. bond)
7
❖ Paper Size:
See p.25 “Paper and Other Media Supported by This Printer”.
AD410 (Duplex Unit)
❖ Dimensions (W×
×D×
×H):
380 × 150 × 220 mm (15.0 × 5.9 × 8.7 inches)
❖ Paper Size:
See p.25 “Paper and Other Media Supported by This Printer”.
❖ Paper Weight:
60 – 105 g/m2 (17 – 28 lb. bond)
❖ Weight:
5 kg (11.0 lb. bond)
160
Specifications
1-bin Shift Sort Tray Type 2600
❖ Dimensions (W × D × H):
465 × 395 × 160 mm (18.3 × 15.6 × 6.3 inches)
❖ Paper Size:
See p.25 “Paper and Other Media Supported by This Printer”.
❖ Paper Weight:
60 – 105 g/m2 (16 – 28 lb. bond)
❖ Stack Capacity:
250 sheets / bin (80 g/m2, 20 lb. bond)
❖ Weight:
3.5 kg (7.7 lb. bond)
CS380 (Mailbox)
❖ Dimensions (W × D × H):
465 × 395 × 285 mm (18.3 × 15.6 × 11.2 inches)
❖ Paper Size:
See p.25 “Paper and Other Media Supported by This Printer”.
7
❖ Paper Weight:
60 – 105 g/m2 (16 – 28 lb. bond)
❖ Stack Capacity:
50 sheets / bin (80 g/m2, 20 lb. bond)
❖ Weight:
5.5 kg (12.1 lb. bond)
Hard Disk Drive Type 2600
❖ Storage Capacity (Formatted):
6 GB
You can install PostScript fonts with this optional Hard Disk Drive. With a
Macintosh, types of fonts supported are PostScript Type 1 and PostScript
Type 2. To download them, use PS Utility for Mac.
161
Appendix
Memory Unit TypeB 64MB
❖ Module Type:
SO-DIMM (Small Outline Dual-in-line Memory Module)
❖ Memory Type:
SDRAM (Synchronous Dynamic RAM)
❖ Number of Pins:
144 pins
Network Interface Board Type 2610
❖ Topology:
Ethernet (10BaseT/100BaseTX)
❖ Protocols:
TCP/IP, NetBEUI, IPX/SPX, AppleTalk
❖ Interface Connector:
RJ45
❖ Required Cable:
STP (Shielded Twisted-Pair) cable
Category / Type5 or better
7
1394 Interface Unit Type 4510
❖ Transmission Spec.:
IEEE 1394
❖ Device Class:
SCSI print, IP over 1394
❖ Interface Connector:
IEEE 1394 (6 pins × 2)
❖ Required cable:
1394 interface cable (6 pins x 4 pins, 6 pins x 6 pins)
Important
❒ You cannot plug devices together to create loops.
❒ Do not use a cable more than 4.5 meters (14.8 feet) long.
❖ Connectable number of device in a bus:
Maximum 63
162
Specifications
❖ Allowed cable hops in a bus:
Maximum 16
❖ Power supply:
Nonpower supply
Cable Power repeated (IEEE 1394a-2000 compliant)
802.11b Interface Unit TypeA (R-WL11)
❖ Transmission Spec.:
Based on IEEE 802.11b (Wireless LAN)
❖ Protocol:
TCP/IP, NetBEUI, IPX/SPX, AppleTalk
Note
❒ SmartNetMonitor and WebStatusMonitor are supported.
❖ Data Transfer Speed:
Auto select from below speed
1Mbps, 2Mbps, 5.5Mbps, 11Mbps
❖ Frequency Range:
• Inch version:
2412-2464 Mhz (1-11 channels)
• Metric version:
2412-2472 Mhz (1-13 channels)
7
❖ Transmittable Distance:
1Mbps 400m *1
2Mbps 270m *1
5.5Mbps 200m *1
11Mbps 140m *1
*1
These figures are a guideline for outdoor use. In general, the transmittable distance indoors is 10-100 m, depending on the environment.
❖ Transmission Mode:
ad hoc mode and infrastructure mode
163
Appendix
Consumables
R CAUTION:
• Our products are engineered to meet the highest standards of quality and
functionality. When purchasing expendable supplies, we recommend using
only those specified by an authorized dealer.
❖ Toner Cartridge
Printable number of pages per cartridge *1
Toner Cartridge
*1
20,000 pages
A4, 5% test chart
Note
❒ The actual number of printed pages you get from a particular toner cartridge depends on the type and size of paper you are using, the contents of
your print images, and printing environment conditions. All this means
that a toner cartridge might require replacement sooner than the normal
life described above.
❒ The number of printable pages that can be expected from the starter toner
cartridge included in the printer is about 6,000 pages (A4, 5% chart).
❖ Maintenance Kit
MAINTENANCE KIT Type 2600
It is required to change the maintenance kit after every 90,000 pages have
been printed. However, it may be necessary to change the parts earlier depending on their operating period.
7
164
Information about Installed Software
Information about Installed Software
expat
Expat(Version 1.1). Copyright 1998, 1999 James Clark. All rights reserved.
• The software installed on this product includes the expat application software Version 1.1 (hereinafter "expat 1.1").
• The product manufacturer has not made any modification to the source code
of the expat 1.1.
• The product manufacturer provides warranty and support to the software of
the product including the expat 1.1 and the product manufacturer makes Mr.
James Clark, the initial developer of the expat 1.1, free from these obligations.
• The expat 1.1 is made available under Mozilla Public License Version 1.1
(hereinafter "MPL 1.1"), and controller software of the product equals the
Larger Work as defined in MPL 1.1. The software of this product except the
expat 1.1 is licensed to the product manufacturer under separate agreement(s).
• The source code of the expat 1.1 is available at:
ftp://ftp.jclark.com/pub/xml/expat1_1.zip
• MPL 1.1 is also available at:
http://www.mozilla.org/MPL/MPL-1.1.html
• Information relating to the expat 1.1 is available at:
http://www.jclark.com/xml/expat.html
7
JPEG LIBRARY
• The software installed on this product is based in part on the work of the Independent JPEG Group.
165
Appendix
NetBSD
Copyright Notice of NetBSD
For all users to use this product:
This product contains NetBSD operating system:
For the most part, the software constituting the NetBSD operating system is not
in the public domain; its authors retain their copyright.
The following text shows the copyright notice used for many of the NetBSD
source code. For exact copyright notice applicable for each of the files/binaries,
the source code tree must be consulted.
A full source code can be found at http://www.netbsd.org/.
Copyright © 1999, 2000 The NetBSD Foundation, Inc.
All rights reserved.
Redistribution and use in source and binary forms, with or without modification, are permitted provided that the following conditions are met:
A Redistributions of source code must retain the above copyright notice, this list
of conditions and the following disclaimer.
B Redistributions in binary form must reproduce the above copyright notice,
this list of conditions and the following disclaimer in the documentation
and/or other materials provided with the distribution.
C All advertising materials mentioning features or use of this software must
display the following acknowledgment:
This product includes software developed by the NetBSD Foundation, Inc.
and its contributors.
D Neither the name of The NetBSD Foundation nor the names of its contributors may be used to endorse or promote products derived from this software
without specific prior written permission.
THIS SOFTWARE IS PROVIDED BY THE NETBSD FOUNDATION, INC. AND
CONTRIBUTORS ''AS IS'' AND ANY EXPRESS OR IMPLIED WARRANTIES,
INCLUDING, BUT NOT LIMITED TO, THE IMPLIED WARRANTIES OF MERCHANTABILITY AND FITNESS FOR A PARTICULAR PURPOSE ARE DISCLAIMED. IN NO EVENT SHALL THE FOUNDATION OR CONTRIBUTORS
BE LIABLE FOR ANY DIRECT, INDIRECT, INCIDENTAL, SPECIAL, EXEMPLARY, OR CONSEQUENTIAL DAMAGES (INCLUDING, BUT NOT LIMITED TO, PROCUREMENT OF SUBSTITUTE GOODS OR SERVICES; LOSS OF
USE, DATA, OR PROFITS; OR BUSINESS INTERRUPTION) HOWEVER
CAUSED AND ON ANY THEORY OF LIABILITY, WHETHER IN CONTRACT, STRICT LIABILITY, OR TORT (INCLUDING NEGLIGENCE OR OTHERWISE) ARISING IN ANY WAY OUT OF THE USE OF THIS SOFTWARE,
EVEN IF ADVISED OF THE POSSIBILITY OF SUCH DAMAGE.
7
166
Information about Installed Software
Authors Name List
All product names mentioned herein are trademarks of their respective owners.
The following notices are required to satisfy the license terms of the software
that we have mentioned in this document:
• This product includes software developed by the University of California,
Berkeley and its contributors.
• This product includes software developed by Jonathan R. Stone for the NetBSD Project.
• This product includes software developed by the NetBSD Foundation, Inc.
and its contributors.
• This product includes software developed by Manuel Bouyer.
• This product includes software developed by Charles Hannum.
• This product includes software developed by Charles M. Hannum.
• This product includes software developed by Christopher G. Demetriou.
• This product includes software developed by TooLs GmbH.
• This product includes software developed by Terrence R. Lambert.
• This product includes software developed by Adam Glass and Charles Hannum.
• This product includes software developed by Theo de Raadt.
• This product includes software developed by Jonathan Stone and Jason R.
Thorpe for the NetBSD Project.
• This product includes software developed by the University of California,
Lawrence Berkeley Laboratory and its contributors.
• This product includes software developed by Christos Zoulas.
• This product includes software developed by Christopher G. Demetriou for
the NetBSD Project.
• This product includes software developed by Paul Kranenburg.
• This product includes software developed by Adam Glass.
• This product includes software developed by Jonathan Stone.
• This product includes software developed by Jonathan Stone for the NetBSD
Project.
• This product includes software developed by Winning Strategies, Inc.
• This product includes software developed by Frank van der Linden for the
NetBSD Project.
• This product includes software developed for the NetBSD Project by Frank
van der Linden
• This product includes software developed for the NetBSD Project by Jason R.
Thorpe.
• The software was developed by the University of California, Berkeley.
• This product includes software developed by Chris Provenzano, the University of California, Berkeley, and contributors.
7
167
INDEX
H
Hard Disk Drive Type 2600, 161
HDD Format, 114
Hex Dump, 110
Host Interface, 104, 130
1394 interface cable, 162
1394 Interface Unit Type 4510, 162
1-bin Shift Sort Tray Type 2600, 161
A
AD410, 160
adhesive labels, 34
Adjusting the image density, 97
Adjusting the Registration, 98
Auto Continue, 124
B
I
IEEE 1394 Setup, 130
IEEE 802.11b, 130
Image density, 114
I/O Buffer, 130
I/O Timeout, 130
J
Bypass size, 106
Job Separation, 124
C
Collate, 151
Config. Page, 110
CS380, 161
Curl Prevention, 114
D
Data In indicator, 77
Duplex, 124
E
Edge-Edge Print, 124
Edge Smoothing, 124
Energy Saver, 124
Envelope Feeder Type 2600, 160
envelopes, 34
envelopes, loading, 45
error, 61
Error indicator, 76
Escape key, 105
Ethernet cable, 162
Ext. A4 Width, 137
F
168
Font Number, 137
Font Pitch, 137
fonts, 157
Font Source, 137
Form Lines, 137
friction pad, 145
friction pad, cleaning, 93
fusing unit, 149
K
Key Repeat, 114
L
Language, 104, 141
List/Test Print, 104, 110
List/Test Print Parameters, 110
Locked Print, 56, 104
M
Macintosh
uninstall, PostScript, 24
Maintenance, 104, 114, 115
MAINTENANCE KIT Type 2600, 144
media, 25
memory, 153, 159
Memory Overflow, 124
Memory Unit TypeB 64MB, 162
Memory Usage, 124
menu, accessing, 104
menu, changing, 141
Menu Chart, 101
Menu key, 104
Menu List, 110
Menu Protect, 114
messages, 61
misfeed, 82
MisfeedRecovery, 124
N
Network Interface Board, 159, 162
Network Printing Guide, ii
Network Setup, 130
NIB, 159
O
OHP transparencies, 34
On Line indicator, 76
On Line key, 76, 105
options, 159, 160
Orientation, 137
Output Tray, 124
P
Page Size, 124
panel display, messages, 61
paper, 25
paper feed roller, 146
paper feed roller, cleaning, 94
Paper Feed Unit Type 2600, 160
Paper Input, 104, 106
paper, loading, 37
paper, sizes, types, 25
Paper type, 106
Parallel cable, 157
PCL, 137
PCL 5e
Windows 2000, uninstalling, 19
Windows 95/98/Me, uninstalling, 19
Windows NT 4.0, uninstalling, 20
Windows XP, uninstalling, 19
PCL 6
Windows 2000, uninstalling, 19
Windows 95/98/Me, uninstalling, 19
Windows NT 4.0, uninstalling, 20
Windows XP, uninstalling, 19
PCL Config.Page, 110
PCL Menu, 104
plain paper, 33
Point Size, 137
PostScript
Macintosh, uninstall, 24
Windows 2000, uninstalling, 23
Windows 95/98/Me, uninstalling, 23
Windows NT 4.0, uninstalling, 24
Windows XP, uninstalling, 23
Ppr.Size Error, 114
Printer Reference, ii
Prt. Err Report, 124
PS Font List, 110
Q
Quick Installation Guide, ii
R
Registration, 114
registration roller, cleaning, 96
Resolution, 124
ROM Update, 114
RPCS
Windows 2000, uninstalling, 21
Windows 95/98/Me, uninstalling, 21
Windows NT 4.0, uninstalling, 22
Windows XP, uninstalling, 21
S
Sample Print, 51, 104
SDRAM, 159, 162
Series Prnt.Job, 114
Setup Guide, ii
Shift Collate, 151
specifications, 157
Spool Printing, 124
Sub Paper Size, 124
Symbol Set, 137
System, 104, 124
T
toner cartridge, replacing, 90
Toner Saving, 124
transfer roller, 147
Tray Locking, 106
Tray Paper Size, 106
Tray Priority, 106
troubleshooting, 61
U
Unit Of Measure, 124
USB Setting, 130
169
W
Windows 2000
PCL 5e, uninstalling, 19
PCL 6, uninstalling, 19
PostScript, uninstalling, 23
printer properties, PCL, 2
printer properties, PostScript, 12
printer properties, RPCS, 7
RPCS, uninstalling, 21
Windows 95/98/Me
PCL 5e, uninstalling, 19
PCL 6, uninstalling, 19
PostScript, uninstalling, 23
printer properties, PCL, 1
printer properties, PostScript, 11
printer properties, RPCS, 6
RPCS, uninstalling, 21
Windows 95/98/Me, Windows 2000,
Windows XP, Windows NT 4.0
canceling a job, 17
Windows NT 4.0
PCL 5e, uninstalling, 20
PCL 6, uninstalling, 20
PostScript, uninstalling, 24
printer properties, PCL, 4
printer properties, PostScript, 14
printer properties, RPCS, 9
RPCS, uninstalling, 22
Windows XP
PCL 5e, uninstalling, 19
PCL 6, uninstalling, 19
PostScript, uninstalling, 23
printer properties, PCL, 2
printer properties, PostScript, 12
printer properties, RPCS, 7
RPCS, uninstalling, 21
WL.LAN Defaults, 114
WL.LAN Signal, 114
170
UE
USA G073
Copyright © 2001
UE USA G073-8617