1
User’s Manual
(WT-206 PRO SERIES)
INTRODUCTION
Congratulations! You have just purchased a new remarkable
product in communications. The Zartek Pro is one of the smallest
and lightest two-way radios in the world. This is due to the use of Li-ION battery
technology and micro-circuitry. With the Zartek Pro you can talk instantly to
as large a group as required and as often as you like without airtime charges, giving
you, family, friends, commercial and industrial colleagues many years of free quality
communications. The Zartek Pro uses a Lithium Ion battery (Li-ION), the most
advanced and ecologically friendly rechargeable battery available (most advanced
mobile phones also use a Li-ION battery).
New legislation allows you now to own and use this relatively powerful
equipment without an operator’s annual license from ICASA. This applies in most
European countries (using the Pro-8 ) as well as in all SADC (Southern African
Development Community) countries (using the Pro-8 or Pro-5 )
To obtain maximum performance from your personal two-way radio, please
take a few minutes to carefully read this user’s manual. The Zartek Pro is a
lightweight, palm-sized wonder communication device, so small you can carry
anywhere and talk to any person who is set on the same channel, as long as they are
within range. The range of the Zartek Pro is anything from 1km indoors to
20kms outdoors, depending on terrain and environment. The signal will bounce
around and penetrate materials at the speed of light, bearing in mind the greater the
barriers the more attenuation i.e. weakening of the signal.
The Zartek Pro is our exciting new generation series and comes in two
frequency versions, Pro-5 and Pro-8. The Pro-8 sits in the 446MHz band of
frequencies often called the PMR (Public Mobile Radio) band. It is pre-programmed
with 8 frequencies and is therefore channel compatible to the original Zartek Eco.
The Pro-5 is programmed with 5 frequencies in the 463MHz band. It is therefore
channel compatible to the original Zartek model no. 21-1860-AF sometime also
referred as the ZA-200. The Pro-5 is not compatible to the Pro-8 as they
operated in different frequency bands.
MAIN FEATURES
• PLL (Phase Lock Loop) Controlled Circuitry
• Ultra Slim size (19mm)
• Ultra light weight (67g with battery)
• Li-ion rechargeable battery
• 5 or 8 UHF (Ultra High Frequencies) Frequencies
• 38 Quiet (CTCSS-Continuous Tone Coded Sub-audible Squelch) Codes
• 190 channels (PRO-5) or 304 channels (PRO-8)
• Digital Volume Control (15 levels)
• Channel Scanning
• VOX (Voice Operated Transmit) Function (3 levels of sensitivity)
• Scramble Function ( 4 formulae )
• Baby Monitor (3 levels of sensitivity)
• FM Radio 88~108MHz
• Stop Watch with Lap Time
• Roger Beep On/Off
• Call Function (10 different tones)
• Auto Squelch Control
• Back lighted LCD (Liquid Crystal Display)
• Keypad Lock
• Memory Retention Function
• Auto Power Off (APO)
• Power Saving Circuitry
• Battery Charge/Drain Indication
• External Mic/Headset (PTT or VOX) included
• Transmit indicator icon and light
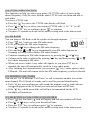
INSTALLING BATTERIES
Use the Li-ION rechargeable battery provided.
Press battery cover release button slightly
down and then slide the battery door off.
Follow "This Side Face Up" and +/- polarity to
install the Li-ION battery pack into the
compartment
.
Slide the battery door on to close.
WARIG
• Make sure the polarity of battery is correct.
• When the battery is damaged or not working, dispose of it safely. Never discard
them or put them close to heat, otherwise, it may explode.
This radio is designed to use a 3.7v Li-ION rechargeable battery. The battery
included is well designed to function with this equipment and has built-in protection
circuitry for internal short circuit and overcharge.
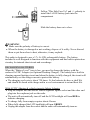
RECHARGING BATTERIES
When the “Battery Level” icon is low, you need to charge the battery with the
enclosed AC/DC Adaptor (or Optional Desktop Charger). The battery has a built-in
charging current limiting circuit and when the battery is fully charged, the circuit will
automatically cut the charge current to protect the battery.
• The charging cycle rate is about 750 times. Li-Ion batteries do have a shelf life
and should be stored with charge and in a cool environment to extend their life.
With AC/DC Adaptor & vehicle cigarette lighter Adaptor:
• Plug the adapter into the wall or vehicle cigarette lighter socket and the other end
plug into the earphone jack on the radio.
• The unit will automatically turn off and the LCD backlight will turn RED to
indicate charging.
• To charge fully from empty requires about 4 hours.
• When fully charged the LCD backlight will turn GREE.
• Unplug the adapter from the socket and the radio will automatically turn on.
WARIG:
• Only use vehicle cigarette lighter adaptor with standard 13.6vDC socket.
• The unit will warm up slightly during charging.
With Desk Top Charger
• Plug the AC/DC adaptor into wall and other end plug into the desk-top charger.
• Place the radio into the desk-top charger.
• While charging, the Red LED on the charger will remain ON
• Unlike the direct adaptor, the radio remains ON and does not turn auto OFF.
• A full charge requires about 6 hours. The Red LED of the charger will then turn
OFF and the radio’s Red LED will turn ON, indicating full charge.
WARNING: To avoid damage to the radio use only original accessories.
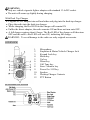
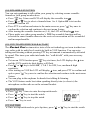
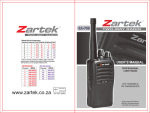
OVERVIEW
1.
2.
3.
4.
5.
6.
7.
8.
9.
10.
11.
12.
LCD DISPLAY ICONS
Microphone
Earphone & Mains/Vehicle Charger Jack
Keypad Lock key
Menu key
Up key
Down key
Call Tone key
Scan / Monitor key
Power On / Off key
Speaker
Desktop Charger Contacts
PTT Button
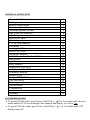
GENERAL OPERATION
Power On/Off the unit
Making communication
Speak to other radios
Listen to other radios
Adjusting speaker volume
Talk Time-Out Function
Talk Range
Menu Flow chart
Select channel
CTCSS code function
FM Radio
Sending Call Tones
Select Call Tones
Scramble Function
VOX “Hands-Free Walk & Talk”
Stop Watch
Lap Time
Baby Monitor
Roger Beep (ON/OFF)
Auto Power Off (APO)
Scanning Channels
Keypad Lock
Using a PTT/VOX Earphone
Care and Safety
Warning
Specifications
Compatibility
Accessories
Warranty
1
2
3
4
5
6
7
8
9
10
11
12
13
14
15
16
17
18
19
20
21
22
23
24
25
26
27
28
29
(1) POWER ON/OFF
• To power ON the radio, press Power On/Off key " " for 2 seconds until a beep is
heard and the LCD screen displays the channel and battery level icon
• To power OFF the radio, press Power On/Off key " " for 2 seconds until LCD
display turns off.
(2) MAKING COMMUNICATIONS
The radio has 5 or 8 main frequencies (large numbers) & 38 CTCSS codes (small
numbers) effectively giving you 190 or 304 channels respectively. You can
communicate with any other user who is using the same combination, providing they
are within range.
(3) SPEAK TO ANOTHER RADIO
• Press & hold the PTT key, the RED LCD backlight turns on and shows the icon
indicating the radio is transmitting.
• Hold the radio in a vertical position with the microphone 3-5 cm from your mouth
and then speak.
• When you finish speaking, release the PTT key and a beep tone will be heard.
(4) LISTEN TO ANOTHER RADIO
• The radio will automatically sound received transmissions from the same channel.
• When you press the PTT key, you can’t listen to other radios. Make sure you do
not press the PTT key for listening.
• Adjust volume control if necessary.
(5) ADJUSTING SPEAKER VOLUME (15 LEVELS)
• Press the " " key to increase the volume.
• Press the " " key to decrease the volume.
(6) TALK TIME-OUT FUNCTION
• Time-out function can avoid transmitting by chance and prolong the battery life.
• The radio will stop transmitting and sound a warning tone when PTT is held over
60 seconds. You then need to release PTT and press again for further
transmission.
• In VOX mode, the unit will stop transmitting and sound a warning tone after
continuous talk for 60 seconds. You can re-activate VOX after the time-out.
(Please refer to VOX function for detailed VOX operation)
(7) TALK RANGE
The range will depend on the type of terrain that you are communicating across.
The Zartek Pro uses the UHF (Ultra High Frequency) band and will be subject
to similar obstacle interference as cellular phones. The radio works indoors as well as
outdoors. Typical rough estimate ranges for different terrains are:
• Shopping centre 300m-1000m
•
•
•
•
•
Building 5-30 stories,
City centre & dense bush 500m-2km,
Residential & over water 2-4km,
Farmland 3-5km,
Top of mountain or building (line-of-sight) 10-30km.
When you press the PTT talk button a signal is transmitted and the signal floods the
area in all sideway directions. The signal travels in 3 different ways:
1) Penetration: The signal can go through materials such as wood, plastic, cement
and fabric. The denser the material or more built up the environment the weaker the
signal will become. The signal cannot go through solid metal or very large solid land
structures such as a hill or mountain. Metal acts like a shield and that is why the
performance from the inside of a vehicle (car or 4x4) will be less than outside.
2) Reflection: The signal cannot go through metal or very large structures such as a
hill or mountain, but it can bounce off (like a mirror), go around and reflect in other
directions as well. This happens at the speed of light.
3)Line-of-sight: Line-of-sight is when there are no obstructions in the path between
the communicating parties. The higher up you go the further you can see, so the
larger the line-of-sight distances will be. Generally you can talk to wherever you can
see, which is why the coverage in a valley is much less than the coverage from on top
of a hill.
Ensure that there is nothing blocking the antenna .The less metal in close proximity
(0-2m) the better the range. There may be external interference from electrical
equipment (power lines or factories) or natural causes (moisture in the air or storms)
that may vary depending on the location and the weather.
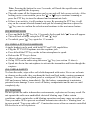
(8) MENU FLOW CHART
Press " " once to enter main channel selection, press " " again for next function
selection etc.
Main screen Main Frequency CTCSS FM Radio Call tone Scramble
VOX Stop Watch Baby Monitor Roger Beep APO Main screen
(9) SELECT CHANNEL
To set the Main Frequency
• Press the " " key once, 1 of the 8 “frequency numbers” displayed will flash.
• Press" " or " " key to select your required main frequency.
• Press the "PTT" key to confirm or press " " to continue.
• You have 12 seconds to decide before auto-reverting back to the main screen.
(10) CTCSS CODE FUNCTION
This function can help you select your group (38 CTCSS codes) of users on the
shared frequency. Only the users with the same CTCSS code can listen and talk to
each other.
To select a CTCSS code
• Press the " " key twice, the CTCSS code display will flash.
• Press " " or " " key to select your required CTCSS code (1~38, " 0 " is off).
• Press the "PTT" key to confirm or press " " to continue.
• You have 12 seconds to decide before auto-reverting back to the main screen.
(11) FM RADIO
You can listen to FM Radio with the speaker or through earphone.
• Press " " key 3 times to enter FM radio mode.
• LCD will display the FM radio frequency.
• Press " " or" " key to change the FM radio frequency.
• Press and hold " " or" " key to automatically scan FM radio frequencies.
Scanning will stop when it finds a FM radio channel
• Continue scanning for FM radio frequencies by pressing the " " or" " key.
• Volume on the radio is adjusted by pressing " " key and then pressing " " or " "
key whilst listening to FM radio.
• When you receive other 2-way radio call signals, or you press PTT key to
transmit, the unit will automatically switch to 2-way radio mode.
• After finishing the communication, you can press " " key 3 times again to enter
FM mode. The unit will remain on the last FM radio frequency you have selected.
(12) SENDING CALL-TONES
You can use 1 of 10 different “Call Tones” to call to attention another user on the
same channel. The 10 kinds of sounds can be used for personal identification
and call tone
• Pulse “ ” key once and the tone will sound, the transmit icon
icon will appear on the LCD and your selected call tone will be sent.
• If the “ ” key is held pressed the call will not be transmitted but the LCD
backlight will remain on.
(13) SELECTING A CALL-TONE (10 AVAILABLE)
• Press " " key four times, icon will appear and call tone number will flash.
• Press" " or " " key to select your desired call tone.
• Press the "PTT" key to confirm or press " " to continue.
• You have 12 seconds to decide before auto-reverting back to the main screen.
(14) SCRAMBLE FUNCTION
You can enjoy privacy to talk within your group by selecting a same scramble
formula as your group member does.
• Press " " key 5 times and LCD will display the scramble icon .
• Press " " or " " key to select a formula from 1 to 4. Option OF is to turn the
scramble function off.
• Press PTT to confirm and return to the main screen or press " " key once to
confirm the selection and continue to the next menu feature.
icon.
• After turning the scramble function on (1-4), the LCD will display
• Please make sure other group member’s PMR has scramble function and has
selected the same formula otherwise the received conversation will be scrambled
and incomprehensible.
(15) VOX “HANDS FREE WALK & TALK”
The Zartek Pro has innovative state-of-the-art technology not seen in other twoway radios with its multi-level sensitivity built-in VOX function. You can enjoy
talking and listening without pressing PTT key as transmit is automatically activated
by sound. This turns your radio into hands free “walk & talk” with your accessory
earphone.
• To turn on VOX function press " " key six times, the LCD displays the icon
and the VOX sensitivity digit display will flash.
• Press" " or " " key to select OF, 1, 2 & 3 for OFF, low, medium & high
sensitivity.
• After turning on VOX the LCD will display icon, and press PTT to confirm and
quit or press " " key once to confirm the selection and continue to the next menu
feature.
• You can plug in the earphone for hands-free talking & listening.
• The VOX feature works best when speaking directly into (or close to) the
microphone on the radio or on the external headset.
(16) STOPWATCH
• Press " " key 7 times to enter the stopwatch mode.
• Press " " or " " key to start the watch.
• Press " " or " " key to stop the watch.
• Press " " key to reset.
(17) LAP TIME
• Once in stopwatch mode to get a lap time, press " " or " " key to start the watch.
• Press the " " key to stop and show the lap time while the watch is running.
• Press the" " key again to switch back to stopwatch mode and show the running
time.
• Press the " " or " " key to stop and press " " key to reset.
• Press the" " key 4 times to exit to the main screen.
Whilst in stopwatch mode the user can transmit and receive on the stored channel.
(18) BABY MONITOR
• Press the" " key 8 times and the LCD will display the "Baby" icon.
• Press the " " or " " key to monitor sensitivity level from 1 to 3 (low to high
level), OF is turn OFF this function.
• Press PTT to confirm and quit or press " " key once to confirm the selection and
continue to the next menu feature.
• After turning on this function the LCD will display "Baby" icon on the main
screen.
(19) ROGER BEEP (ON/OFF)
The Roger beep notifies the receiving radio that the conversation has ended by
sounding a beep when the transmitter has finished.
• To activate the roger beep press the " " key 9 times and the LCD will display
"RGR".
• Press the " " or " " key to turn on ("O" icon) or turn off ("OF" icon) the Roger
beep.
• Press PTT to confirm and exit to the main screen or press the " " key once to
confirm the selection and continue to the next menu feature.
• After turning on the Roger beep, LCD will display RGR icon.
(20) AUTO POWER OFF (APO)
• Press the " " key 10 times the LCD displays the icon.
• Press " " or " " key to select auto power off time from 0 to 12 hours.
• Press PTT button to confirm and return to the main screen or press the" " key
once to confirm the selection.
• After turning on this function the LCD will display the " " icon and
automatically turn off at designated time.
(21) SCANNING CHANELLS
• Press " " key once and the " " icon will appear and radio will start scanning
through the 190/304 channels automatically.
ote: Pressing the button for over 2 seconds, will break the squelch noise and
open (un-squelch) the frequency.
• The radio scans all the frequencies one by one and will lock on any activity. After
locking-on to a conversation, press the " " or " " key to continue scanning or
press the PTT key to store the channel and communicate back.
• If there is no activity, it will continue to scan. By pressing the PTT key, it will
stay on the current selected channel and quit the scanning function or press the
" " key once to confirm the selection and continue to the next menu feature.
(22) KEYPAD LOCK
• Press and hold the" " key for 1.5 seconds, the keypad lock " " icon will appear.
• This will lock all keys except the PTT and " " keys
• To unlock, press " " key again for 1.5 seconds.
(23) USING A PTT/VOX EARPHONE
A single headset can be used with both PTT and VOX capabilities.
• Plug the PTT/VOX Earphone into the earphone jack
• Press & hold the PTT key on the in-line microphone to speak.
• Release the PTT key to listen.
• Adjust volume control if necessary.
• Set up VOX on the radio using the menu " " key (see section 15 above).
• Speak into the in-line microphone to activate the transmitter and listen though the
earpiece.
(24) CARE & SAFETY
To clean the radio, wipe with a soft cloth dampened with water. Never use solvents
or cleaners on the radio, they can harm the body and leak inside, causing permanent
damage. Your radio is not splash proof or waterproof. If the radio gets wet, turn it
OFF and remove battery immediately. Dry the battery compartment to minimize
potential water damage. Leave cover off battery compartment and do not use until
completely dry.
(25) WARNING
Do not operate the radio in hazardous environments, explosion or fire may result. Do
not operate the radio near unshielded electrical blasting caps. Under certain
conditions, radio can interfere with blasting operations and may cause an explosion.
Turn your radio OFF to prevent accidental transmission when in a “blasting area” or
in areas posted “Turn your radio off”. Construction crews often use remote controlled
RF devices to set off explosives.
(26) SPECIFICATIONS
Operating Frequency Range
PRO-5
PRO-8
umber of Frequencies
Modulation
Frequency Control
RF Output Power
Power Supply
Antenna Impedance
Operating Temperature
463.975 ~ 464.375 MHz
446.00625 ~ 446.09375 MHz
5 or 8 (12.5KHz spacing)
FM
PLL
500mW e.r.p
3.7v 720mAh Li-Ion rechargeable battery
50 Ohm
-20 to +60C
(27) COMPATIBILITY
There are two different frequency bands for handheld public UHF two-way radios in
South Africa, a 5 and an 8 frequency band. The Pro-8 is pre-programmed with 8
frequencies and is therefore channel compatible to the original Zartek Eco and
other radios also using this band. The Pro-5 is programmed with 5 frequencies
and is therefore channel compatible to the original Zartek model no. 21-1860-AF
sometime also referred as the ZA-200. The Pro-5 is thus not compatible to the
Pro-8 as they operated in different frequency bands.
(28) ACCESSORIES
GE-244……….Ear-bone microphone (high noise environments)
GE-245 ………Desk-top dual battery charger (PRO)
GE-246 ………PTT (and VOX) Earphone with in-line microphone
(29) WARRANTY
This product is warranted by Zartek against manufacturing defects in materials and
workmanship under normal use for a 12 month period from date of purchase via our
authorized appointed dealers.
Manufactured for Zartek of South Africa to meet ICASA technical requirements.
For further information contact us via email: [email protected] or visit our website
http://www.zartek.co.za/
AUTHORISED DEALER