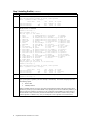
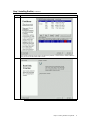
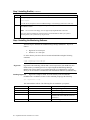
1
MegaRAID IDE (ATA/66) and
MegaRAID IDE 100 (ATA/100)
Linux Installation
User's Guide
MAN-795-LNX
12/13/00
© Copyright 2000 LSI Logic Corporation
All rights reserved.
LSI Logic Corporation
RAID Storage Adapters Division
6145-D Northbelt Parkway
Norcross, GA 30071
This publication contains proprietary information which is protected by copyright. No part of this publication can be reproduced,
transcribed, stored in a retrieval system, translated into any language or computer language, or transmitted in any form whatsoever
without the prior written consent of the publisher, LSI Logic Corporation. LSI Logic Corporation acknowledges the following
trademarks:
Intel is a registered trademark of Intel Corporation.
Sytos Plus is a registered trademark of Sytron Corporation.
MS-DOS, and Microsoft are registered trademarks of Microsoft Corporation. Windows 95, Microsoft Windows and Windows NT
are trademarks of Microsoft Corporation.
SCO, UnixWare, and Unix are registered trademarks of the Santa Cruz Operation. Inc.
Novell NetWare is a registered trademark of Novell Corporation.
IBM, AT, VGA, PS/2, and OS/2 are registered trademarks and XT and CGA are trademarks of International Business Machines
Corporation.
MegaRAID is a registered trademark of LSI Logic Corporation.
NEC is a registered trademark of Nippon Electric Corporation.
Sony is a registered trademark of Sony Corporation.
Toshiba is a registered trademark of Toshiba America Corporation.
Archive and Python are registered trademarks of Archive Corporation.
Quantum is a registered trademark of Quantum Corporation.
Seagate is a registered trademark of Seagate Corporation.
SyQuest is a trademark of SyQuest Corporation.
Panasonic is a registered trademark of Panasonic Corporation.
Hewlett-Packard is a registered trademark of Hewlett-Packard Corporation.
Amphenol is a trademark of Amphenol Corporation.
Siemens is a registered trademark of Siemens Corporation.
Oki is a trademark of Oki Products International.
Hitachi is a registered trademark of Hitachi Corporation.
AMP is a trademark of AMP Corporation.
Fujitsu is a registered trademark of Fujitsu Corporation.
MaxOptix is a registered trademark of MaxOptic Corporation.
Wangtek is a trademark of Wangtek Corporation.
Revision History
11/1/00 Initial Linux Installation Documentation.
12/13/00 Changed name of product from HyperDisk to MegaRAID IDE.
ii
MegaRAID IDE Linux Installation User's Guide
Table of Contents
1
Overview ........................................................................................ 1
2
Installing RedHat on MegaRAID IDE ............................................ 3
Step 1 Download the Required Files .......................................................................................3
Step 2 Create Installation Diskettes .........................................................................................3
Step 3 Installing RedHat...........................................................................................................6
Step 4 Installing the Monitoring Software............................................................................ 10
3
Running Hyperconf...................................................................... 11
Working with MegaRAID IDE.............................................................................................. 11
RAID Options ........................................................................................................................ 11
Information............................................................................................................................. 12
4
Installing MegaRAID IDE on an Existing Installation ................ 13
Installing MegaRAID IDE on an Existing Installation......................................................... 13
How to Upgrade the Kernel................................................................................................... 21
Installing MegaRAID IDE Driver ......................................................................................... 13
Installing the Monitoring software........................................................................................ 15
5
Trouble Shooting ......................................................................... 17
Common Problems................................................................................................................ 17
Preface
iii
Preface
The MegaRAID IDE PCI Bus Master IDE RAID Disk Array Controller provides a
cost-effective way to achieve higher transfer rates and reliability. LSI Logic's
MegaRAID IDE controller supports two IDE channels and up to four drives. It
supports the following drive modes: PIO 0-4, DMA 0-2, and Ultra DMA 0-4. The
RAID levels supported are RAID 0, and RAID 1. The highest data transfer rate
in UDMA mode 4 is 66 MBs, and in UDMA mode 5 is 100 MBs. This manual
describes the MegaRAID IDE (ATA/66) and MegaRAID IDE 100 (ATA/100) IDE
controller.
Limited Warranty The buyer agrees if this product proves to be defective, that LSI Logic is obligated only to repair or
replace this product at LSI Logic’s discretion according to the terms and conditions of the warranty
registration card that accompanies this product. LSI Logic shall not be liable in tort or contract for
any loss or damage, direct, incidental or consequential resulting from the use of this product. Please
see the Warranty Registration Card shipped with this product for full warranty details.
Limitations of Liability LSI Logic shall in no event be held liable for any loss, expenses, or damages of any kind
whatsoever, whether direct, indirect, incidental, or consequential (whether arising from the design or
use of this product or the support materials provided with the product). No action or proceeding
against LSI Logic may be commenced more than two years after the delivery of product to Licensee
of Licensed Software.
Licensee agrees to defend and indemnify LSI Logic from any and all claims, suits, and
liabilities (including attorney’s fees) arising out of or resulting from any actual or alleged
act or omission on the part of Licensee, its authorized third parties, employees, or agents,
in connection with the distribution of Licensed Software to end-users, including, without
limitation, claims, suits, and liability for bodily or other injuries to end-users resulting from
use of Licensee’s product not caused solely by faults in Licensed Software as provided
by LSI Logic to Licensee.
Cont’d
iv
MegaRAID IDE Linux Installation User's Guide
Preface, Continued
Package Contents You should have received:
•
•
•
•
•
a MegaRAID IDE RAID Adapter Card
a MegaRAID IDE User's Guide
software license agreement
CD/diskette(s) with the MegaRAID IDE software
a warranty registration card
Technical Support If you need help installing, configuring, or running the MegaRAID IDE Controller, call
LSI Logic technical support at 770-246-8600. Before you call, please complete the
MegaRAID IDE Problem Report form on the next page.
Web Site
We invite you to access the LSI Logic world wide web site at:
http://www.lsilogic.com.
Preface
v
MegaRAID IDE Problem Report Form
Customer Information
Name
Company
Address
City/State
Country
email address
Phone
Fax
Motherboard:
Operating System:
Op. Sys. Ver.:
MegaRAID IDE
Driver Ver.:
Network Card:
Other disk controllers
installed:
Description of problem:
MegaRAID IDE Information
Today’s Date
Date of Purchase
Invoice Number
Serial Number
Number of Channels
Cache Memory
Firmware Version
BIOS Version
System Information
BIOS manufacturer:
BIOS Date:
Video Adapter:
CPU Type/Speed:
Steps necessary to re-create problem:
1.
2.
3.
4.
MegaRAID IDE Configuration
MegaRAID IDE Primary Master
MegaRAID IDE Primary Slave
MegaRAID IDE Secondary Master
MegaRAID IDE Secondary Slave
Raid Mode, Stripe Size
Array #0 Configuration
Array #1 Configuration
vi
MegaRAID IDE Linux Installation User's Guide
System Memory:
Other adapter cards
installed:
Preface, Continued
Disclaimer
This manual describes the operation of the LSI Logic MegaRAID IDE RAID Disk Array Controller.
Although efforts have been made to assure the accuracy of the information contained here, LSI
Logic expressly disclaims liability for any error in this information, and for damages, whether direct,
indirect, special, exemplary, consequential or otherwise, that may result from such error, including
but not limited to the loss of profits resulting from the use or misuse of the manual or information
contained therein (even if LSI Logic has been advised of the possibility of such damages). Any
questions or comments regarding this document or its contents should be addressed to LSI Logic at
the address shown on the cover.
LSI Logic provides this publication “as is” without warranty of any kind, either expressed or
implied, including, but not limited to, the implied warranties of merchantability or fitness for a
specific purpose.
Some states do not allow disclaimer of express or implied warranties or the limitation or exclusion of
liability for indirect, special, exemplary, incidental or consequential damages in certain transactions;
therefore, this statement may not apply to you. Also, you may have other rights which vary from
jurisdiction to jurisdiction.
This publication could include technical inaccuracies or typographical errors. Changes are
periodically made to the information herein; these changes will be incorporated in new editions of the
publication. LSI Logic may make improvements and/or revisions in the product(s) and/or the
program(s) described in this publication at any time.
Requests for technical information about LSI Logic products should be made to your LSI
Logic authorized reseller or marketing representative.
Disclaimer
LSI Logic certifies only that this product will work correctly when this
product is used with the same jumper settings, the same system
configuration, the same memory module parts, and the same
peripherals that were tested by LSI Logic with this product. The
complete list of tested jumper settings, system configurations,
peripheral devices, and memory modules are documented in the LSI
Logic Compatibility Report for this product. Call your LSI Logic sales
representative for a copy of the Compatibility Report for this product.
Preface
vii
FCC Regulatory Statement
This device complies with Part 15 of the FCC Rules. Operation is subject to the following two conditions:
(1) this device may not cause harmful interference, and (2) this device must accept any interference received,
including interference that may cause undesired operation.
Warning: Changes or modifications to this unit not expressly approved by the party responsible for
compliance could void the user's authority to operate the equipment.
Note: This equipment has been tested and found to comply with the limits for a Class B digital device,
pursuant to Part 15 of the FCC Rules. These limits are designed to provide reasonable protection against
harmful interference in a residential installation. This equipment generates, uses and can radiate radio
frequency energy and, if not installed and used in accordance with the instructions, may cause harmful
interference to radio communications. However, there is no guarantee that interference will not occur in a
specific installation. If this equipment does cause harmful interference to radio or television reception,
which can be determined by turning the equipment off and on, try to correct the interference by one or more
of the following measures:
1)
2)
3)
4)
Reorient or relocate the receiving antenna.
Increase the separation between the equipment and
the receiver.
Connect the equipment into an outlet on a circuit different from
that to which the receiver is connected.
Consult the dealer or an experienced radio/TV technician
for help.
Shielded interface cables must be used with this product to ensure compliance with the Class B FCC
limits.
LSI Logic MegaRAID IDE PCI IDE RAID Disk Array Controller
Model Number:
Series 795
FCC ID Number:
viii MegaRAID IDE Linux Installation User's Guide
1
Overview
The purpose of this document is to provide clear instructions on how to install RedHat 6.1
or 6.2 on IDE drives attached to the LSI Logic IDE RAID Controller known as MegaRAID
IDE. This document caters to all levels of Linux users. This includes beginning to
advanced Linux users. For this reason, advanced users will find parts of this document
elementary.
Chapter 1 Overview
1
2
MegaRAID IDE Linux Installation User's Guide
2
Installing RedHat on MegaRAID IDE
The following steps are required to successfully install the RedHat based Linux Operating
System on MegaRAID IDE:
Step
1
2
3
4
Description
Download the required files
Create installation diskettes (two)
Installing RedHat
Installing the monitoring software
Step 1 Download the Required Files
Download the required files from the LSI Logic web site located at
http://www.lsilogic.com. The files are listed below:
File
HYPERCONF-1.0-3.I386.RPM
Boot.img
Post.img
Postsmp.img
KERNEL-2.2.16-22-i686.RPM
Note:
Description
This file is a RedHat Package Manager (RPM) file. It
contains the MegaRAID IDE Monitoring software. RPM
files are discussed in depth in Chapter 4.
These files are used to create the boot floppies used for
the installation. They are the following:
This file is a RedHat Package Manager (RPM) file. It
contains modules required to complete the installation of
the Operating System.
New versions of the above files will be made available. The new files will have the same
basic name. For example: HYPERCONF-1.0-2.I386.RPM will be replaced by
HYPERCONF-1.0-4.I386.RPM.
Step 2 Create Installation Diskettes
Step 2 requires a second system with either Microsoft Windows 95/98 or a UNIX based
Operating System and two formatted floppy diskettes. The required Installation Diskettes
are created on this second system.
Chapter 2 Installing RedHat On MegaRAID
3
Step 2 Create Installation Diskettes, Continued
Windows 95/98 , Continued
Steps
1
Description
Go to the directory were the files are located.
DIR<enter>
The following is an example of what will appear:
Volume in drive C has no label
Volume Serial Number is XXXX-XXXX
Directory of C:\LINUX_BOOT\
.
<DIR>
10-11-00
..
<DIR>
10-11-00
boot.img
1,474,560
10-05-00
post.img
1,474,560
10-05-00
postsmp.img
RAWRITE
14,305
07-28-96
4 file(s)
2,966,128 bytes
2 dir(s)
9,929,000 bytes free
C:\LINUX_BOOT\
The files listed should be as follows:
2
Boot.img
Post.img
Postsmp.img
Rawrite.exe
Once you have confirmed the files are in the same directory, type the following
command followed by <enter> to create the two installation diskettes:
RAWRITE<enter>
You will then be prompted to enter the name of the boot image file. Type
BOOT.IMG<enter>
Next, you will be prompted for the target disk drive. Insert a floppy disk into
the floppy disk drive and type
A<enter>
Do not remove the disk until the command prompt returns and the floppy disk
drive light goes out.
Cont’d
4
MegaRAID IDE Linux Installation User's Guide
Step 2 Create Installation Diskettes, Continued
Windows 95/98 , Continued
Steps
3
Description
After you have successfully created the first diskette, insert the second disk.
You can now start to create the post installation disk. Type the same command
again followed by <enter> to create the second installation diskette:
RAWRITE<enter>
You will again be prompted to enter the name of the boot image file. This time
type
post.IMG<enter>
Next, you will be prompted for the target disk drive. Insert a floppy disk into
the floppy disk drive and type
A<enter>
4
Once again, do not remove the disk until the command prompt returns and the
floppy disk drive light goes out.
If you have a dual processor system use postsmp.img instead of post.img
Congratulations! You should now have two floppies. Windows 95/98 can no
longer access these floppies. Proceed to Step 3 Installing RedHat.
Linux
Steps
1
Description
Create the boot floppy using the following command:
dd if=/dev/fd0 of=boot.img
[root@localhost install]# dd if=/dev/fd0 of=boot.img
2880+0 records in
2880+0 records out
[root@localhost install]#
2
Create the Post Installation floppy using the following command:
dd if=/dev/fd0 of=post.img
[root@localhost install]# dd if=/dev/fd0 of=Oct5/amiboot.img
2880+0 records in
2880+0 records out
[root@localhost install]#
3
Congratulations! You should now have two floppies. Proceed to Step 3
Installing RedHat.
Chapter 2 Installing RedHat On MegaRAID
5
Step 3 Installing RedHat
Steps
1
2
3
4
5
6
Description
Create a RAID array using the MegaRAID IDE BIOS.
Remove all hard disk drives from your system not physically attached to MegaRAID IDE.
In your system BIOS, change the boot sequence in such a way that the first boot device is the floppy and
the second boot device is the SCSI device.
Boot your system using the boot floppy and the RedHat CD disc in your CD-ROM drive.
Note: The boot floppy is the first disk you created using the AMIBOOT.IMG image. Make sure you
are booting from the floppy. Check the light on the floppy drive is on during boot up. Do not interrupt the
boot process until you reach the first part of the installation (the language selection screen). If you cannot
use the mouse do not continue with these instructions but proceed to section Installing the Operating
System in TEXT mode.
At the first screen, which prompts you to select your language preference, do not click “Next” but instead
press the <CTRL><ALT><F2> keys at the same time. This will bring you to a shell prompt bash#.
Note: This is the only way to partition the array. It cannot be done later in the installation.
At the shell prompt bash#, use FDISK to partition the drive. Type the following command to partition the
array:
Bash# fdisk /dev/mr0
This will prompt you with the following screen:
The number of cylinders for this disk is set to 19589.
There is nothing wrong with that, but this is larger than 1024,
and could in certain setups cause problems with:
1) software that runs at boot time (e.g., LILO)
2) booting and partitioning software from other OSs
(e.g., DOS FDISK, OS/2 FDISK)
Command (m for help):
7
Type <m> and hit <enter> for a list of commands. This will return the following screen
Command action
a
toggle a bootable flag
b
edit bsd disklabel
c
toggle the dos compatibility flag
d
delete a partition
l
list known partition types
m
print this menu
n
add a new partition
o
create a new empty DOS partition table
p
print the partition table
q
quit without saving changes
s
create a new empty Sun disklabel
t
change a partition's system id
u
change display/entry units
v
verify the partition table
w
write table to disk and exit
x
extra functionality (experts only)
Command (m for help):
Cont’d
6
MegaRAID IDE Linux Installation User's Guide
Step 3 Installing RedHat, Continued
Steps
8
Description
Select the <p> command to see if any partitions exist in the array. If any partitions exit, you must
delete them and create three new partitions. The example below shows the <p> command to see
the partition(s) in the RAID and the <d> command to delete the previous partition(s). To confirm
that no partitions exist, use the <p> command again.
Command (m for help): p
Disk /dev/amiraid/ar0: 16 heads, 63 sectors, 19589 cylinders
Units = cylinders of 1008 * 512 bytes
Device Boot
/dev/amiraid/ar0p1
Start
1
End
19589
Blocks
9872824+
Id
83
System
Linux
Command (m for help): d
Partition number (1-4): 1
Command (m for help): p
Disk /dev/amiraid/ar0: 16 heads, 63 sectors, 19589 cylinders
Units = cylinders of 1008 * 512 bytes
Device Boot
Start
End
Blocks
Id
System
Command (m for help):
9
Create three (3) new partitions on the array. Two will be native Linux partitions. One of the two
will be greater than 750 MB and will be used to hold the system files. The other will be less than
250 MB and will be used to hold the boot files. The third partition will be a SWAP partition and
will be less than 250 MB.
To create a partition, use the <n> command. In the example given below, it shows the use of the
<n> command to create three primary partitions. One 2000 MB and two 250 MB in size.
Command (m for help): n
Command action
e
extended
p
primary partition (1-4)
p
Partition number (1-4): 1
First cylinder (1-19589, default 1):
Using default value 1
Last cylinder or +size or +sizeM or +sizeK (1-19589, default 19589): +2000M
Command (m for help): n
Command action
e
extended
p
primary partition (1-4)
p
Partition number (1-4): 2
First cylinder (4065-19589, default 4065):
Using default value 4065
Last cylinder or +size or +sizeM or +sizeK (4065-19589, default 19589): +250M
Command (m for help): n
Command action
e
extended
p
primary partition (1-4)
p
Partition number (1-4): 3
First cylinder (4573-19589, default 4573):
Using default value 4573
Last cylinder or +size or +sizeM or +sizeK (4573-19589, default 19589): +250M
Cont’d
Chapter 2 Installing RedHat On MegaRAID
7
Step 3 Installing RedHat, Continued
Steps
Description
Command (m for help): p
Disk /dev/amiraid/ar0: 16 heads, 63 sectors, 19589 cylinders
Units = cylinders of 1008 * 512 bytes
Device Boot
/dev/amiraid/ar0p1
/dev/amiraid/ar0p2
/dev/amiraid/ar0p3
10
Start
1
4065
4573
End
4064
4572
5080
Blocks
2048224+
256032
256032
Id
83
83
83
System
Linux
Linux
Linux
You should now have three partitions. You must convert one of these partitions to a SWAP partition. To
do this, use the <t> command.
Command (m for help): t
Partition number (1-4): 2
Hex code (type L to list codes): l
0 Empty
1 FAT12
2 XENIX root
3 XENIX usr
4 FAT16 <32M
5 Extended
6 FAT16
7 HPFS/NTFS
8 AIX
9 AIX bootable
a OS/2 Boot Manag
b Win95 FAT32
c Win95 FAT32 (LB
e Win95 FAT16 (LB
f Win95 Ext'd (LB
10 OPUS
11 Hidden FAT12
12 Compaq diagnost
14 Hidden FAT16 <3
16 Hidden FAT16
Hex code (type L to
Changed system type
17 Hidden HPFS/NTF 5c Priam Edisk
18 AST Windows swa 61 SpeedStor
1b Hidden Win95 FA 63 GNU HURD or Sys
1c Hidden Win95 FA 64 Novell Netware
1e Hidden Win95 FA 65 Novell Netware
24 NEC DOS
70 DiskSecure Mult
3c PartitionMagic 75 PC/IX
40 Venix 80286
80 Old Minix
41 PPC PReP Boot
81 Minix / old Lin
42 SFS
82 Linux swap
4d QNX4.x
83 Linux
4e QNX4.x 2nd part 84 OS/2 hidden C:
4f QNX4.x 3rd part 85 Linux extended
50 OnTrack DM
86 NTFS volume set
51 OnTrack DM6 Aux 87 NTFS volume set
52 CP/M
93 Amoeba
53 OnTrack DM6 Aux 94 Amoeba BBT
54 OnTrackDM6
a0 IBM Thinkpad hi
55 EZ-Drive
a5 BSD/386
56 Golden Bow
list codes): 82
of partition 2 to 82 (Linux swap)
a6
a7
b7
b8
c1
c4
c6
c7
db
e1
e3
e4
eb
f1
f4
f2
fd
fe
ff
OpenBSD
NeXTSTEP
BSDI fs
BSDI swap
DRDOS/sec (FATDRDOS/sec (FATDRDOS/sec (FATSyrinx
CP/M / CTOS / .
DOS access
DOS R/O
SpeedStor
BeOS fs
SpeedStor
SpeedStor
DOS secondary
Linux raid auto
LANstep
BBT
Command (m for help): p
Disk /dev/amiraid/ar0: 16 heads, 63 sectors, 19589 cylinders
Units = cylinders of 1008 * 512 bytes
Device Boot
/dev/amiraid/ar0p1
/dev/amiraid/ar0p2
/dev/amiraid/ar0p3
11
Start
1
4065
4573
End
4064
4572
5080
Blocks
2048224+
256032
256032
Id
83
82
83
System
Linux
Linux swap
Linux
The final command that we will use is <w> and that will write the partition table.
Command (m for help): w
12
Press <CTRL><ALT><F7> to return to the installation window. Proceed to load RedHat. Stop when it
gives you the option to partition your drive manually or automatically. The window will prompt you with
the following options:
•
•
Remove data
Manually Partition
Select to manually partition your drive. Click Next and the Disk Druid window will appear showing all the
partitions in your array. If you created a RAID 1 array spanning across two drives with three partitions, you
will see a total of six partitions even though you only created three (using FDISK). The reason for this is
because a RAID 1 array exists when you mirror the information on one drive to another. Since you have
created a partition in a RAID 1 array, what you actually did is create a partition on each of the drives.
Cont’d
8
MegaRAID IDE Linux Installation User's Guide
Step 3 Installing RedHat, Continued
Steps
13
14
Description
Click on Edit and assign mount points to the first three partitions. Continue with the normal installation
until you come to the boot disk creation screen.
Press <CTRL><ALT><F2> when you reach the following boot disk creation screen:
Cont’d
Chapter 2 Installing RedHat On MegaRAID
9
Step 3 Installing RedHat, Continued
Steps
15
Description
At the prompt type
Bash# runpinst
You will then be prompted to enter the AMIPINST floppy. Insert this floppy and hit the <enter> key.
When the prompt returns and the floppy drive light turns off, press <CTRL><ALT><F7> to return to
the installation window.
16
Note:
Do not create a boot floppy. It is not supported by MegaRAID IDE at this time.
Click Next, then Exit and Reboot. Remove the floppy and the RedHat CD while your system is
rebooting. When your system boots-up, log in as root.
Step 4 Installing the Monitoring Software
The final step is to install the two RedHat Package Manager (RPM) files. Thy are as
follows:
•
•
Hyperconf-1.0-2.i386.rpm
Kernel-2.2.16-3.i386.rpm.
Go to the directory were these files are located and install them using the following
command:
# rpm –I Kernel-2.2.16-3.i386.rpm.
# rpm –I Hyperconf-1.0-2.i386.rpm
Hyperconf
Hyperconf is the monitoring software that is use to keep track of your RAID array. It is
installed when you install hyperconf-1.0.2.rpm using the RedHat Package Manager
(RPM). This software allows you to monitor the status of you RAID array. It will also
allow you to set a number of variables that will determine the behavior of you RAID array.
Installing Hyperconf
Hyperconf is simple to install. Go to the directory where the RPM file
HYPERCONF-1.0.2.RPM is located. At the command prompt type the following:
rpm –I hyperconf-1.0.2.rpm
This will install the software. The following files are installed on your system:
File
10
Location
HYPERCONF8.RZ
README
HYPERCONF
SPY
USR/MAN8/
USR/DOC/HYPERCONF-1.0.2/
/USR/SBIN/
/RC.D/INIT.D/
SPYD
/USR/SBIN/
MegaRAID IDE Linux Installation User's Guide
Description
Man Page for Hyperconf
README for Hyperconf
Executable for Hyperconf
Batch file that loads SPYD (Soft link is
created to RC3.D to start the service in
run level 3)
Damon for Hyperconf
3
Running Hyperconf
To run MegaRAID IDE simply log on as super user and type the following at the
command prompt:
Hyperconf
Getting Help
The easiest way to get help on Hyperconf is to access the Man Page. This can be done by
typing the following at the command prompt:
Man Hyperconf
Working with MegaRAID IDE
To activate the menu in Hyperconf, press the <F10> key on your keyboard.
Note:
Hyperconf cannot be navigated using the mouse
RAID Options
You cannot create or delete a RAID array using Hyperconf. This can only be done in the
BIOS utility during boot-up. However, there are a number of options that you can set to
determine the behavior of you RAID array. For example, if one of your drives in a Mirror
RAID array fails, you can choose the action that will take place.
File Menu Select Options This will show you the options that are available and their current status.
Option
Error Polling Interval [] sec
Error Threshold []
When Error Threshold Is Reached
Fail Drive []
Start Automatic rebuilding []
Check Array for Rebuild at Start up
[]
When Rebuilding error threshold is
reached stop rebuilding []
When consistency error found
Delete activity log file []
Activity log file size [] KB
Description
The length of time that can elapse between each status check of the RAID array.
Enter a value for the number of compare errors a drive can have before it is marked as
having failed.
Check this box if you want a drive to be marked as having failed when it has reached the
error threshold + 1.
Start to rebuild a drive automatically if a drive fails.
Check the status of the array at start up to see if a drive has failed and a Rebuild is
required.
Check this box if you wish to stop rebuilding if the error threshold has been surpassed.
Make the contents of all drives identical. A consistency check will examine both drives in
RAID 1 to ensure that the information on both drives are identical. If they are not
identical, checking this box will synchronize the information on both drives.
Check this box to delete the activity log file.
Enter a value for the maximum size (in KB) the activity log file can grow.
Chapter 3 Running Hyperconf
11
Information
To obtain information about your system, press the <F10> and <Tab> keys to access
Information.
Item
Controller
Array
Physical Drives
Error Log
Activity Log
Mirror
12
Description
Here you will find information concerning the controller. The fields areas follows:
This is model of the MegaRAID IDE controller that you
• Model
have in your system
The BUS number
• PCI BUS
The PCI number
• PCI number
The version of the driver software
• Driver Version
The
Primary Base Address
• Primary Base Address
The Primary Control Address
• Primary Control Address
The Secondary Base Address
• Secondary Base Address
The Secondary Control Address
• Secondary Control Address
The IRQ that is assigned to your device
• IRQ Level
Here you will find information concerning the Array. The fields areas follows:
The RAID level
• Model
The status of the RAID. Online, Degraded or FAIDED.
• Status
The stripe size on the RAID.
• Stripe size
The capacity of the RAID.
• Capacity
The directory where the RAID is mounted.
• Mount Point
The controller that the RAID belongs to.
• Controller
The drives that are in the RAID.
• Physical Drives
Here you will find information concerning the Physical Drives. The fields areas follows:
The manufacture model of the drive.
• Model
The Serial number of the drive.
• Serial Number
The Version of the firmware that is on the drive.
• Firmware Revision
The status of the drive. It will read online or offline
• Status
depending on whether on not the drive is available.
The total number of compare errors on the drive.
• Error Count
The controller that the drive is attached to.
• Controller
The array to which the drive belongs
• Array
The capacity of the drive in gigabytes
• Capacity
The transfer mode of the drive e.g. UDMA 2 = 33Mb/s
• Transfer Mode
Log the RAID errors
Logs activity on the RAID such as the RAID going degraded.
Mirror options include the following:
Allows the user to start a manual rebuild if a RAID has
• Rebuild
gone degraded
Allows for a manual start of a consistency check.
• Consistency Check
Log the status of a rebuild or consistency Check.
• Activity status
MegaRAID IDE Linux Installation User's Guide
4
Installing MegaRAID IDE on an Existing
Installation
Installing MegaRAID IDE on an Existing Installation
If you have RedHat installed on your system and want to add additional storage, these are
the steps that you should follow.
•
•
•
Upgrade the Linux Kernel to provide support for MegaRAID IDE
Install MegaRAID IDE drive(s)
Install the monitoring software
How to Upgrade the Kernel
The standard Redhat installation installs kernel 2.2.14-5. Redhat Linux kernel 2.2.14-5.0
does not come with support for the CMD chip on the MegaRAID IDE Card. The kernel
must be updated to kernel 2.2.16-22-MegaIDE. This kernel is only available on the LSI
Logic web site at http://www.lsilogic.com.
To upgrade the kernel, follow the steps below:
Step 1
Log on to your system as a super user and go to the /usr/src directory. Find a soft link
called "Linux" and remove it by using "rm Linux". Once the soft link is removed, copy the
2.2.16-MegaIDE kernel to this directory. Extract the file using “tar –zxvf
linux-2.2.16-MegaIDE.tgz. Create a softlink to this directory with the command
ln –s linux-2.2.16-MegaIDE linux
Step 2
In the directory /usr/src/linux run the command "make menuconfig". Under block devices
make sure the following options are selected:
<*>CMD640 chipset bugfix/support
<*>CMD640 enhanced support
<*>Generic PCI bus-master DMA support
<*>CMD64X chipset support
Exit menuconfig saving the configuration. Run the following commands:
"make clean"
"make depend"
"make bzImage"
"make modules"
"make modules_install"
"cp /usr/src/linux/arch/i386/boot/bzImage /boot/2.2.16-MegaIDE"
Step 3
The final steps involves editing the file lilo.conf. This file can be found in the directory
/etc. Open the file using the vi editor with the following command "vi /etc/lilo.conf" and
add the following lines to the file:
image =/boot/2.2.16
label =2.2.16
read-only
root=/dev/hda5
Chapter 4 Installing MegaRAID IDE on an Existing Installation
13
How to Upgrade the Kernel, Continued
The line root=/dev/hda5 will not be correct if you are booting from a different partition.
Look for a previous entry in the file for the correct partition.
root=/dev/hda?
Exit and save lilo.conf.
Run the command "lilo –v"
Reboot.
At the boot prompt hit the tab key. This should give you the option to boot to the new
kernel.
14
MegaRAID IDE Linux Installation User's Guide
Installing MegaRAID IDE Driver
Download the zipped driver file for RedHat 6.1 and 6.2 from the LSI Logic web site
(http://www.lsilogic.com ). It contains the following files:
•
•
Amiraid.o
MAKEDEV
Create a directory called /usr/src/linux/drivers/block/amiraid and copy the above files to it.
Run the following command:
"./MAKEDEV"
To load Hyperconf driver run the command:
"insmod amiraid.o"
To unload the driver run the command:
"rmmod amiraid"
Note:
The driver will not load unless you have created a RAID.
Installing the Monitoring software
The monitoring software is contained in the zipped driver you download in the last
section.
Install the monitoring software using the command:
"rpm –I hyperconf-1.0-x.i386.rpm"
Note:
Substitute x for the version number.
For instructions on how to use the monitoring software see Chapter 3 Running Hyperconf.
Chapter 4 Installing MegaRAID IDE on an Existing Installation
15
16
MegaRAID IDE Linux Installation User's Guide
5
Trouble Shooting
Common Problems
Problem
Hyperconf does not show any
information.
I have saved my options in
Hyperconf but it does not do
what I ask of it.
When I load the driver amiraid.o I
get an error that the driver was
not compiled for this kernel.
Possible Solution(s)
Make sure you have created a RAID, Hyperconf cannot report on what
does not exist.
Check to make sure the daemon (spyd) is running. You can do this but
entering the following command pidof spyd . The number of the
process should be return. If no number is returned the spyd is not
running. Spyd can be started by entering the command spyd. Spyd is
only started at boot time for run level 3.
Force the driver to load using the command insmod –f amiraid.o
Chapter 5 Troubleshooting
17
18
MegaRAID IDE Linux Installation User's Guide