1
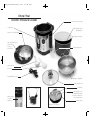
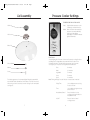
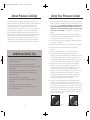
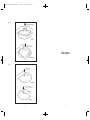
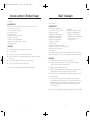
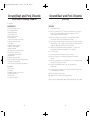
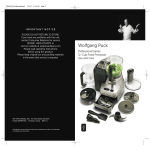
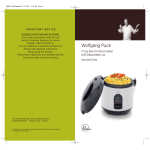
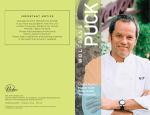
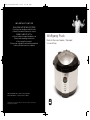
TSCDIST_PressureCooker manual
7/20/07
11:29 AM
Page 1
I M P O R TA N T N OT I C E
PLEASE DO NOT RETURN TO STORE.
If you have any problems with this unit,
contact Consumer Relations for service
PHONE: 1-800-275-8273 or
visit our website at wppotsandpans.com
Please read operating instructions
before using this product.
Please keep original box and packing materials
in the event that service is required.
W.P. APPLIANCES, INC. Toll Free (800) 275-8273
Model WPPCR005C Printed in China REV 1.0
All trademarks, service marks and trade names (collectively the “Marks”) are proprietary
to Wolfgang Puck World Wide.
1
Wolfgang Puck
Electric Pressure Cooker / Stockpot
Use and Care
TSCDIST_PressureCooker manual
7/20/07
11:29 AM
Page 1
IMPORTANT SAFEGUARDS
1
Read all instructions carefully.
18 Always attach power cord to appliance first, and then plug cord into
wall outlet. To disconnect, turn unit off, grasp plug, and pull from the
wall. Never yank on cord.
2
Do not touch hot surfaces. Use handles or knobs and a potholder.
19 Always check the pressure release devices for clogging before use.
3
Do not close or clog the safety valves under any circumstance.
4
To protect against risk of electrical shock, do not put power cord,
plug or body of the appliance in water or other liquid.
5
Close supervision is necessary when any appliance is used by or
near children.
20 Do not open the pressure cooker until has cooled and internal
pressure has been released. If the lid is difficult to open, this
indicates that the cooker is still pressurized - do not force it open.
Any pressure in the cooker can be hazardous. See “Using Your
Pressure Cooker” section of this manual.
6
Unplug from outlet when not in use and before cleaning. Allow to
cool before putting on or taking off parts.
7
Do not operate any appliance with a damaged cord or plug or
after the appliance malfunctions or is dropped or damaged in any
manner. Return the appliance to an authorized service facility for
examination, repair, or electrical or mechanical adjustment.
When using pressure cookers, basic safety precautions should always
be followed:
8
9
Do not fill the unit over 2/3 full. When cooking foods that expand
during cooking such as rice or dried vegetables, do not fill the unit
over 1/2 full. Over filling may cause a risk of clogging the vent pipe
and developing excess pressure. See “Using Your Pressure Cooker”
section of this manual.
Be aware that certain foods, such as applesauce, cranberries,
pearl barley, oatmeal or other cereals, split peas, noodles, macaroni,
rhubarb, or spaghetti can foam, froth, and sputter, and clog the
pressure release device (steam vent). These foods should not be
cooked in a pressure cooker.
10 The use of attachments not recommended or sold by the appliance
manufacturer may cause fire, electric shock, or injury.
11
21 Do not operate this appliance in the presence of explosives and/or
flammable fumes.
22 Do not use pressure cooking for pressure frying with oil.
SAVE THESE INSTRUCTIONS
HOUSEHOLD USE ONLY
This appliance has a polarized plug (one blade is wider than the other). As a
safety feature, this plug will fit in a polarized outlet only one way. If the plug does
not fit fully in the outlet, reverse the plug. If it still does not fit, contact a qualified
electrician. Do not attempt to defeat this safety feature.
A short power-supply cord is provided to reduce the hazards resulting from
entanglement or tripping over a longer cord. An extension cord may be used
with care; however, be sure the marked electrical rating is at least as great
as the electrical rating of this appliance. The extension cord should be positioned such that it does not drape over the counter or tabletop where it can be
pulled on by children or tripped over. The electrical rating of this appliance is
listed on the bottom panel of the unit.
Do not use outdoors.
12 Do not place the appliance on or near hot gas or electric burners,
or in a heated oven.
13 Do not let cord hang over edge of table or counter or touch hot
surfaces, including the stove.
14 Extreme caution must be used when moving an appliance
containing hot contents or liquids.
Before Your First Use
Carefully unpack the pressure cooker and parts, and remove all packaging
materials. Wash the removable cooking pot, lids and gasket in warm, soapy
water to remove any dust that may have accumulated during packaging. Wipe
cord and pressure cooker housing with a dry cloth. Do not immerse the cord
or plug in water or other liquid.
15 This appliance cooks under pressure. Improper use may result in
scalding injury. Make certain unit is properly closed before operating.
See “Using Your Pressure Cooker” section of this manual.
16 Do not use this appliance for other than intended use.
17 To reduce the risk or electric shock, cook only in removable
container.
1
Additional Safety Information
•
Do not use the pressure cooker without liquid; this could damage
the pressure cooker severely.
•
Do not use pressure cooker for storage purposes nor insert
any utensils.
2
TSCDIST_PressureCooker manual
7/20/07
11:29 AM
Page 3
Table of Contents
Wolfgang Puck,
owner of the famous
Spago restaurants and
one of the most influential
chef-restauranteurs in
America, is credited with
reviving California’s rich
culinary heritage. His
cooking innovations,
a result of blending fresh
California ingredients with his classical French techniques, are enjoyed
by world leaders, stars and fellow chefs alike. He established other
trend-setting restaurants like Postrio in San Francisco, Chinois on
Main in Santa Monica, Vert and Trattoria del Lupo, and his latest creation,
Cut, a gourmet steakhouse in the Beverly Wilshire Hotel. Home chefs
can also share Mr. Puck’s talents through his cookbooks and, of
course, through his appliances!
3
Important Safeguards
1
Before Your First Use
2
About Wolfgang Puck
3
Know Your Electric Pressure Cooker
5
Lid Assembly
7
Pressure Cooker Settings
8
About Pressure Cooking
9
Additional Safety Tips
9
Using Your Pressure Cooker
10
Helpful Hints
13
Care & Cleaning
14
Recipes
16
Pressure Cooker Cooking Chart
57
Limited Warranty
62
Contact Information
back cover
TSCDIST_PressureCooker manual
7/20/07
11:29 AM
Page 5
Know Your
Electric Pressure Cooker
Pressure Cooker Housing
Control Panel
Plastic Storage Lid for
Removable Pot
Pressure Cooker Lid Handle
Removable Cooking Pot
Pressure Release Device
(Steam Vent)
See inset
photo below
Rice Measuring Cup
Serving Spoon
Rice Scoop
Detachable Power Cord
Steaming/Cooking Rack
Tempered Glass Lid
Pointer
Float Valve
Finger Grip
Anti-Blockage Cover
for Steam Release Valve
(prevents food particles
from enterning valve)
Water Collector
(on back of
appliance)
Sealing Gasket
5
Underside of Cooker Lid
6
TSCDIST_PressureCooker manual
7/20/07
11:29 AM
Page 7
Lid Assembly
Pressure Cooker Settings
TEMPERATURE INDICATOR LIGHTS
Lid Knob
Heat
Light indicates pressure cooker
is heating to selected function
Warm
When the timer has expired, the
pressure cooker automatically
switches to Keep Warm
temperature. The Warm indicator
light will illuminate.
Lid Cover
Glass Lid
FUNCTIONS
Your Wolfgang Puck Pressure Cooker has five preset cooking functions
including specific temperature, pressure and times for each of the
following selections. This takes all the guesswork out of pressure
cooking for you! The preset cooking times are listed below:
Silicon Washer
Washer
Screw
For shipping purposes, the tempered glass lid must be assembled
upon arrival. Please assemble as shown above. This lid is to be used
when using cooker as a stockpot or when storing food in removable
cooking pot.
7
Rice
6 minutes
Meat
20 minutes
Vegetable
3 minutes
Soup
5 minutes
Stew
20 minutes
Note: Timing will begin for each function once pressure is reached.
Delay Time
Use to delay pressure cooking
for up to 9 hours.
Time
Use to add cooking time to any
preset function.
Keep Warm/Cancel
Press this button to stop
cooking process and switch to
Keep Warm mode.
On/Off
Press to Start or Cancel
cooking process.
8
TSCDIST_PressureCooker manual
7/20/07
11:29 AM
Page 9
About Pressure Cooking
Pressure cooking is an ideal way to make fast, tasty meals for your
family! This method of cooking makes it easy for even the busiest cooks
to prepare meals from scratch. Use your pressure cooker for fish,
chicken, fresh vegetables, rice, legumes, and even dessert – and
everything can be cooked to perfection in minutes. The pressure cooker
will save you time, energy and money, as well as valuable nutrients.
Boiling liquid inside the tightly sealed pot produces steam, which is
trapped inside to create pressure. The very hot temperature produced
reduces cooking time. The steam helps break down the fibers of
whatever you’re cooking and infuse the food with flavors. This also
captures all of the water-soluble nutrients, making the food higher in
flavor and more nutritious than with conventional cooking methods.
Additional Safety Tips
•
Always keep hands and face away from Pressure Release Device
when reducing pressure.
•
Use extreme caution when removing lid after cooking.
Always tilt the lid away from you, so any remaining steam is blocked
from your face.
•
Never attempt to open lid while cooking, or before pressure
indicator has dropped. Do not attempt to defeat this safety
feature by forcing it.
•
Do not cover or block the pressure valves.
•
Do not touch the pot or lid except for the handle immediately
after using.
•
To avoid burns, allow food to cool before tasting.
The temperature of the food gets considerably hotter than
with conventional cooking.
9
Using Your Pressure Cooker
1
Gather all ingredients and be familiar with your recipe. Pour required
amount of liquid into removable cooking pot, then add food. Use the
cooking rack, if desired. Except when cooking rice, never load cooker
above the maximum ingredient level line marked “2/3 MAX PC” on
cooking pot. Foods that expand while cooking (i.e. legumes) should
never go above the 3/5 mark. See instructions for cooking rice on
page 11.
2
Make sure gasket is securely positioned in the inner lid. Always
examine the gasket before installing and before each use. Make sure
it is in good working order and free of any tears.
3
Secure lid on pressure cooker by grasping the handle and twisting
clockwise to lock in place.
4
Set the Pressure Release Device to the SEAL position. (See Figure 1).
5
Plug power cord into unit first and then into a 120-volt 60 Hz AC
only outlet.
6
Press the round ON/OFF button once. The display will flash.
7
Press the FUNCTION button until desired cooking function is
displayed. The pressure cooker will begin to heat and reach pressure.
The HEAT light will illuminate. Once pressure has been achieved,
pressure will automatically be maintained. Cooking time begins at
this point, and the time will begin counting down in the display.
8
After pressure cooking is complete, pressure can be released
manually or on its own. If a recipe states "let pressure drop on
its own," press the ON/OFF button and unplug the cooker. When
recipe states "reduce pressure at once" or “reduce pressure
manually”, turn the Pressure Release Device to the VENT position to
release steam and reduce pressure. (See Figure 2). Use caution
when manually releasing pressure as hot steam will be released.
It is not recommended to release steam manually with recipes
containing lots of liquid, such as soups and stews.
9
Pressure is completely reduced when the Steam Release Dial is in
the Vent position, (see Figure 2) and you no longer hear steam
escaping from the valve, and the lid opens freely with no force. Only
then is it safe to remove pressure cooker lid and serve food. Remove
lid by grasping the handle and twisting lid counter-clockwise. As a
safety feature, the lid will not open unless all pressure is reduced. DO
NOR forrce the lid open if it does not open freely, this means that
the unit is still under pressure.
Figure 1
Figure 2
10
TSCDIST_PressureCooker manual
7/20/07
11:29 AM
Page 11
Using Your Pressure Cooker
(cont.)
Adding Time
After selecting the desired cooking function,
you can add cooking time by pressing the
TIME button until total cooking time is
displayed. You can increase total cooking time
up to 20 minutes for Rice, 1 hour for Meat,
45 minutes for Vegetable, 1 hour for Soup
and 1 1/2 hours for Stew.
Delaying Time
After selecting the desired cooking function,
you can delay the start time for up to 9 hours by
pressing DELAY TIME until total delay time is
displayed. Countdown will begin once colon
starts flashing.
Keep Warm/Cancel
When pressure cooking is complete, the
pressure cooker will automatically switch to
Keep Warm. The WARM indicator light will
illuminate. To manually switch to Keep Warm
and/or cancel any cooking process, press the
Keep Warm/Cancel button. The maximum Keep
Warm time is 4 hours.
Cooking Pot
Markings
Inside the removable cooking pot are two sets
of markings. One side is marked “2/3 MAX PC”,
which indicates the maximum fill line when
cooking any food, other than rice in the pressure
cooker. The other side has markings for cooking
rice. When pressure cooking rice, never fill the
pressure cooker more then 1/2 full. To cook rice
greater then 1/2 full, utilize the glass lid and not
the pressure cooking lid.
11
Using Your Pressure Cooker
(cont.)
Preparing White Rice
When measuring rice, ONLY USE THE RICE
MEASURE CUP PROVIDED; DO NOT USE A
STANDARD MEASURING CUP. Use the Rice
Measure Cup, along with the pot markings to
make perfect rice every time. For example, when
making 6 cups rice, use 6 rice cup measures of
rice and fill with water to the “6” mark. When
pressure cooking rice, do not go past the 6-cup
“RC” marking, as indicated on the inside of the
removable cooking pot. The combined volume
of rice and water must not exceed the 6-cup
marking as shown under “RC” markings on the
inside of the removable cooking pot. If you
desire a greater volume of rice, follow the
recommended water-to-rice ratio and use the
glass lid, select Rice, and cook for 30- 40
minutes. Check for doneness after 30 minutes.
Do not use the rice cooker timer as the timer is
only applicable when cooking under pressure.
Since you are using the glass lid and not the
pressure lid, you must use a separate timer.
As a general rule, when cooking 2 cups (or
below) of uncooked rice, use 1 tablespoon of
butter or oil. For measurements greater than 2
cups, use 2 tablespoons of butter or oil. This will
prevent foaming during the cooking process.
12
TSCDIST_PressureCooker manual
7/20/07
11:29 AM
Page 13
Helpful Hints
•
Read this manual thoroughly and follow all recommendations.
•
Be familiar with the recipe and have all ingredients ready before you begin.
•
Be sure the lid is secured properly before beginning.
•
You may wish to brown some meats before cooking with
other ingredients. To do so, select any cooking function and preheat
pressure cooker without lid. Add oil and brown meat. Do not cover
when browning.
Helpful Hints (cont.)
•
Remember if you are not using the basket while pressure cooking the
liquid will flavor what you are cooking. Try using fresh herbs or
aromatic vegetables like onions or garlic, wine or stock. The flavor
transference will be wonderful.
•
Do not attempt to boil pasta with pressure lid on; the foam can
clog the pressure valve.
•
Cut foods into uniform-size pieces to promote even cooking. In recipes
that call for various ingredients, cut those that cook more quickly into
larger pieces and those that cook more slowly into smaller pieces.
When cooking under pressure, never fill above teh fill line of PC
markings. If you are making soup and you are at the fill line, do not
release pressure manually because hot liquid could spurt out.
•
•
Many different cooking liquids can be used in a pressure cooker:
wine, beer, bouillon, fruit juices, water and more.
Never attempt to open lid while under pressure!!! Always open
pressure cooker with the lid facing away from you.
•
•
After becoming familiar with your pressure cooker, you can
convert conventional recipes for pressure cooking. In general,
reduce cooking times by two thirds. The amount of liquid used may
also have to be adjusted because there is very little evaporation from
the pressure cooker. Reduce the amount of liquid so there is only
about 1/2 cup more than desired in the finished product. Remember,
however, there must always be some liquid in the pressure cooker to
form the necessary steam. Try this formula ; 1 cup of liquid for the
first 15 minutes of pressure cooking then 1/3 cup of liquid for each
subsequent 15 minutes.
When releasing steam manually, evaporation of some liquid may
occur (i.e. when making rice or risotto). This is normal, but caution
must be used to prevent injury.
•
•
Since flavors are more concentrated, reduce amounts of herbs and
seasonings when converting conventional recipes. Fresh herbs are
better for pressure cooking than dried herbs.
•
Generally speaking, pressure cookers cook foods in about 1/3 the
time of conventional cooking methods.
•
Increase cooking times by about ten percent when cooking in high
altitudes over 3,500 feet.
•
If you wish to cook food for less time than the pre-programmed
amount, watch the timer and press CANCEL when desired cooking
time has elapsed.
•
When you are using frozen meats in your recipes, the cooking time
does not need to be altered. Pressure will not be achieved until the
internal temperature in the pot is 40 degrees higher than the boiling
point of water. The cooking time will not begin until pressure is
achieved; it will just take longer to come to pressure.
•
Always check to make sure your gasket and float valve are clean and
in good working order.
13
Care & Cleaning
1
Allow pressure cooker to cool completely before cleaning. Unplug
the power cord from the outlet and then from the pressure cooker.
2
Wash the pressure cooker removable pot, sealing gasket and lids by
hand with warm, soapy water. Dry all parts thoroughly. (See Figure 1
for removing and installing sealing gasket).
3
If necessary, wipe the power cord clean with a damp cloth. Dry
thoroughly. Never immerse the power cord or plug.
4
Replace sealing gasket securely in lid. After each use, check gasket
for any tears and make sure the pressure regulator dial and valve are
in good working order. Also remove the anti-blockage cover, steam
release dial, and clean the steam vent thoroughly (See Figure 2).
Ensure that there are no food particles or any other foreign matter
are blocking the steam vents prior to putting the anti-blockage
cover and steam release dial back on the lid. The anti-blockage cover
helps prevent food particles from entering Steam Release Valve.
You must ensure that this is cleaned after each use. It is important
to check the steam vent thoroughly and use a narrow utensil, if
necessary, to poke through the steam vent and ensure that it is clear
and that no food particles adhere to the walls, thus blocking the
steam from being able to be freely released.
5
Do not store pressure cooker with lid locked in place. If you store the
lid locked onto the pressure cooker it will reduce the life of the
gasket since it will stay compressed during non-use.
14
TSCDIST_PressureCooker manual
7/20/07
11:29 AM
Page 15
Figure 1
Recipes
Figure 2
15
16
TSCDIST_PressureCooker manual
7/20/07
11:29 AM
Page 17
Greek Lemon Chicken Soup
Beef Goulash
6 Servings
INGREDIENTS
6 - 8 Servings
6 boneless, skinless chicken breast halves, cut into 1-inch cubes
1 medium onion, chopped
1 cup fresh spinach, chopped
6 cups chicken stock
1/2 cup arborio rice
4 tablespoons fresh lemon juice
1 teaspoon kosher salt
1 teaspoon freshly ground pepper
1 tablespoon fresh mint leaves, chopped
2 large eggs, beaten
INGREDIENTS
1
Place all ingredients, except eggs, in cooking pot.
2
Lock lid in place.
3
Select Soup function, and set timer for 15 minutes.
2 tablespoons vegetable oil
1 cup water
1 pound onions, finely chopped
2 tablespoons balsamic vinegar
1 tablespoon sugar
1 tablespoon caraway seeds,
3 tablespoons sweet paprika
toasted in a dry skillet over
3 tablespoons hot paprika
medium-low heat until fragrant,
3 tablespoons tomato paste
1 to 2 minutes, and then
1 tablespoon minced garlic
coarsely ground
1 tablespoon chopped
fresh marjoram
1/2 teaspoon chopped fresh thyme
2 teaspoons kosher salt (or more to taste)
1/2 teaspoon freshly ground
black pepper
3 pounds boneless beef shank, well trimmed and cut into 1-inch cubes
3 cups homemade chicken stock or good quality canned chicken broth
4
When cooking cycle is complete and all pressure has been released,
remove lid.
METHOD
5
Pour beaten eggs slowly into hot soup while stirring.
1
Select Stew function, and set timer for 35 minutes.
Serve hot with fresh chopped mint garnish.
2
Add oil to cooking pot. When oil is hot, add onions and sugar.
Sauté, uncovered, until onions are golden.
3
Add beef cubes and sear both sides.
4
Add sweet and hot paprika, tomato paste, garlic, marjoram, thyme,
salt and pepper. Sauté, stirring continuously for 1 minute
5
Add chicken stock, water, balsamic vinegar, and caraway seed. Stir.
6
Lock lid in place.
7
The Goulash will be done when timer goes off, but it will stay in
keep warm mode until unit is turned off. Turn off heat and skim off
liquid fat glistening on the surface. Taste and add more salt and
pepper, if desired. Serve hot with spaetzle, dumplings, potatoes,
rice, or Kaiser rolls.
METHOD
6
Recipe courtesy Debra Murray, Wolfgang Puck HSN Host
Recipe courtesy Wolfgang Puck Makes it Easy, Rutledge Hill Press, 2004
17
18
TSCDIST_PressureCooker manual
7/20/07
11:29 AM
Page 19
Pressure Cooker Barbecued
Pulled Pork
Chicken Stock
Approximately 2 Quarts
4 Servings
INGREDIENTS
INGREDIENTS
5 to 6 pounds chicken bones, including necks and feet,
coarsely chopped
1 medium carrot, peeled, trimmed, and cut into 1-inch slices
1 medium onion, peeled, trimmed, and quartered
1 small celery stalk, trimmed and cut into 1-inch slices
1 small leek, cleaned, trimmed and cut into 1-inch slices
1 sprig of fresh thyme
3 sprigs of fresh parsley with stems
1 bay leaf
1/2 teaspoon whole white peppercorns
Enough cold water to cover chicken and other ingredients
1 1/2 pounds pork butt, cut crosswise into 1/4-inch thick slices
Kosher salt and freshly ground black pepper
3 tablespoons commercial barbecue rub
1 tablespoon extra-virgin olive oil
1 cup good-quality canned chicken broth
1/2 cup good-quality bottled barbecue sauce
METHOD
1
Select Meat function, and set timer for 40 minutes.
2
Season pork with salt, pepper and barbecue rub.
3
Add oil to cooking pot and brown pork slices on both sides
in batches.
METHOD
1
Place all ingredients in cooking pot.
4
Add chicken stock.
2
Lock lid in place.
5
Lock lid in place.
3
Select Soup function, and set timer for 30 minutes.
6
When cooking cycle is complete and all pressure has been released,
remove lid.
4
When cooking cycle is complete and all pressure has been released,
remove lid.
7
Using a fork and knife, shred the pork.
5
8
Add barbecue sauce, and stir well.
Carefully strain stock through a fine mesh strainer into a clean bowl
and cool.
9
To serve, pile high on a soft sandwich roll and top with coleslaw,
if desired.
6
Refrigerate stock, covered, for several hours, until the fat from the
stock forms a hard, removable surface.
7
Remove hardened fat and discard before using or freezing.
Note: If the pork is not falling apart after the barbecue sauce
has been added, secure the lid again and cook on the Meat function
for 10 minutes longer.
Recipe courtesy Wolfgang Puck Pizza, Pasta, and More!,
Random House, 2000
Recipe courtesy Wolfgang Puck Makes it Easy, Rutledge Hill Press, 2004
19
20
TSCDIST_PressureCooker manual
7/20/07
11:29 AM
Page 21
Creamy Cauliflower Soup
Chicken Enchilada Casserole
Makes 3 Quarts
6 - 8 Servings
INGREDIENTS
INGREDIENTS
2 large heads cauliflower (about 5 pounds), trimmed and washed
2 tablespoons unsalted butter
1/4 cup extra-virgin olive oil, plus more for serving
1 yellow onion (about 1/2 pound), peeled, trimmed, and sliced
3 garlic cloves, peeled and chopped
Kosher salt
1 medium tomato (about 1/2 pound), blanched, peeled, seeded, and diced
1 1/2 teaspoons ground cumin
Pinch of sugar
Freshly ground white pepper
1 bay leaf
2 to 3 sprigs of fresh thyme
2 quarts homemade chicken or vegetable stock, or store-bought
1 cup heavy cream
Chopped fresh chives, for garnish
1 can light red kidney beans, drained
2 cups chicken stock
1 jar (17.35 ounces) mild enchilada sauce
8 - 10 whole frozen chicken tenders
1 cup diced onion
1 cup diced peppers
1 tablespoon fresh cilantro
1 package (1.12 ounces) cheesy taco seasoning mix
1 cup frozen corn
2 cups tortilla chips
1 cup Mexican-flavored shredded cheese
Sour cream, to garnish
Green onions, to garnish
METHOD
1
Add beans, stock, sauce, frozen chicken tenders, onion, peppers,
cilantro, taco seasoning mix, and frozen corn to cooking pot.
2
Lock lid in place. Select Meat setting, but cancel cooking after
15 minutes (5 minutes earlier than preset time).
3
When cooking cycle is complete and all pressure is released,
open lid.
4
Select Meat function again, while adding tortillas and cheese. Stir,
uncovered, and bring to a boil.
5
Serve with sour cream and green onions.
METHOD
1
Cut heads of cauliflower into thin slices and set aside.
2
Select Meat function.
3
Add butter and olive oil to cooking pot. Add onions and garlic.
Sauté, uncovered, until translucent. Stir in cauliflower. Season with
salt and pepper.
4
Add tomatoes, cumin, sugar, bay leaf, thyme sprigs, and
chicken stock.
5
Lock lid in place.
6
Select Vegetable function, and set timer for 10 minutes.
7
When cooking cycle is complete and all pressure is released,
remove lid and discard bay leaf and thyme sprigs.
8
Add cream to hot soup.
9
Using an immersion blender with a stainless wand, pureé the soup
on low at first, then tilting the wand away from you, increase the
power and pureé to desired consistency.
Recipe courtesy Debra Murray, Wolfgang Puck HSN Host
10 Taste for additional seasoning.
11
Serve soup hot, drizzled with olive oil and sprinkled with chives.
Recipe courtesy Wolfgang Puck Pizza, Pasta, and More!,
Random House, 2000
21
22
TSCDIST_PressureCooker manual
7/20/07
11:29 AM
Page 23
Ground Beef and Pork Chipotle
Chili with Kidney Beans
Ground Beef and Pork Chipotle
(cont.)
6 Servings
INGREDIENTS
METHOD
1/4 cup extra-virgin olive oil
2 pounds ground beef
1 pound ground pork
1 cup chopped onion
3 garlic cloves, minced
2 to 3 tablespoons
chipotle chili powder (or to taste)
2 tablespoons pure ground
chili powder
2 tablespoons ground cumin
1 teaspoon dried oregano
1 teaspoon paprika
1 can (28 ounces) crushed tomatoes
2 cups beef or chicken stock
or good-quality canned broth
1 cup dark beer
3 tablespoons tomato paste
Kosher salt and freshly ground black pepper
3 tablespoons masa harina
1 can (15 ounces) red kidney beans, drained
1
Select Meat function.
2
When hot, add half of the oil and the beef and pork to cooking pot.
Sauté, stirring and breaking up meat into small pieces with a
wooden spoon, until evenly browned.
3
Remove cooking pot from pressure cooker and drain fat from
cooked meat. Remove cooked meat and set aside.
4
Place empty cooking pot back into pressure cooker. When hot again,
add remaining oil, onion, garlic, chipotle powder, chili powder, cumin,
oregano and paprika. Sauté until onions are tender.
5
Add cooked meat and all remaining ingredients – except for the
masa harina, kidney beans and garnish – to cooking pot.
6
Lock lid in place.
7
Select Soup function, and set timer for 20 minutes.
8
When cooking cycle is complete and all pressure is released,
open lid.
9
Place the masa harina in a bowl. Add some of the hot liquid from the
cooking pot, and stir until smooth.
10 Using a fork, add masa harina to the chili, along with the
kidney beans.
For Garnish:
Tomato salsa
Sour cream
Shredded cheddar or Jack cheese
Chopped sweet onion
Sliced avocado
Chopped fresh cilantro
11
Select Meat function again, and cook uncovered until the sauce has
thickened, about 10 minutes.
12 Taste for additional seasonings.
13 Ladle chili into bowls and serve with garnishes.
Recipe courtesy Wolfgang Puck Makes it Easy, Rutledge Hill Press, 2004
23
24
TSCDIST_PressureCooker manual
7/20/07
11:29 AM
Page 25
Braised Lamb Shanks with
Squash and Peas
Braised Lamb Shanks
(cont.)
6 Servings
INGREDIENTS
6 lamb shanks, 1/2- to 3/4-pound each
Kosher salt and freshly ground black pepper
1 teaspoon chopped fresh rosemary
2 tablespoons extra-virgin olive oil
1 medium or large onion, chopped
2 medium carrots, peeled and chopped
2 teaspoons minced fresh garlic
1/2 cup dry red wine
1 cup drained canned diced tomatoes
3 cups beef stock or good-quality canned beef broth
1 cup peeled fresh pearl onions or frozen pearl onions
3/4 pound pattypan squash, cut into 1/2-inch cubes
(about 1 heaping cup)
1/2 cup frozen tiny peas
Fresh rosemary sprigs for garnish
2 tablespoons chopped fresh flat-leaf parsley for garnish
12 Add pattypan squash and peas to cooking pot. Select Meat function
and cook until peas and squash are heated through, about 2-3
minutes.
13 Remove shanks and vegetables to a platter and keep warm by
covering with foil.
14 Remove as much fat from pot as you can.
15 While still on Meat function, bring sauce to a boil and skim off fat
that rises to surface.
16 Taste sauce for added seasoning.
17 Pour sauce over lamb shanks and vegetables. Garnish with rosemary
sprigs and parsley.
Recipe courtesy Wolfgang Puck Makes it Easy, Rutledge Hill Press, 2004
METHOD
1
Select Meat function.
2
Season shanks with salt, pepper and rosemary.
3
Add olive oil to cooking pot. When oil is hot, brown shanks evenly in
batches. Set browned shanks aside.
4
Remove cooking pot and drain fat .
5
Replace cooking pot and add onion, carrots and garlic. Cook for a
couple of minutes.
6
Add red wine and begin scraping the bits up from the bottom of the
pan.
7
Add shanks back to cooking pot.
8
Add tomatoes, beef broth, and pearl onions.
9
Lock lid in place.
10 Select Meat function, and set timer for 40 minutes.
11
When cook cycle is complete and all pressure has been released,
remove lid.
25
26
TSCDIST_PressureCooker manual
7/20/07
11:29 AM
Page 27
Savory Squash Soup
Cranberry Relish
6 Servings
Makes 1 1/3 Cups
INGREDIENTS
INGREDIENTS
2 butternut squash (about 3 3/4 pounds)
1 acorn squash (about 1 3/4 pounds)
6 tablespoons unsalted butter
1 white onion (about 4 ounces), peeled, trimmed, and finely diced
1/2 teaspoon kosher salt
1/8 teaspoon freshly ground white pepper
1/4 teaspoon ground nutmeg
1/4 teaspoon ground ginger
1/8 teaspoon ground cardamom
4 cups homemade chicken or vegetable stock, or store-bought, heated
1 cup heavy cream
1 sprig of fresh rosemary
2 cups fresh cranberries
1/2 cup sugar
1/2 cup verjus or 3 tablespoons lemon juice
Garnish:
1 recipe Cranberry Relish (page 28)
1 recipe Cardamom Cream (page 29)
1/2 recipe Spiced Caramelized Pecans (page 30)
4 tablespoons pumpkin seed oil
METHOD
1
In small saucepan, combine all ingredients. Bring to a boil, and
then lower to a simmer. Continue to cook until the mixture is thick
and berries are glazed. Allow to cool.
2
Transfer to a covered container and refrigerate until needed.
Note: Relish will keep up to 2 weeks, refrigerated.
Recipe courtesy Wolfgang Puck Pizza, Pasta, and More!,
Random House, 2000
METHOD
1
Cut squash in half and discard seeds.
2
Cut off outside peeling from squash and cut into 2-inch pieces.
3
Place all soup ingredients, except cream, in cooking pot.
4
Select Soup function, and set timer for 20 minutes.
5
When cook cycle is complete and all pressure has been released,
remove lid and discard the rosemary sprig.
6
Using an immersion blender with a stainless steel wand, pureé soup
on lowest setting while adding cream.
7
To serve, ladle soup into heated bowls. Place a tablespoon
of Cranberry Relish in center; top with a dollop of Cardamom
Cream; then sprinkle with chopped pecans. Drizzle pumpkin seed
oil over soup.
Recipe courtesy Wolfgang Puck Pizza, Pasta, and More!,
Random House, 2000
27
28
TSCDIST_PressureCooker manual
7/20/07
11:29 AM
Page 29
Cardamom Cream
Spiced Caramelized Pecans
Makes 2 cups
INGREDIENTS
INGREDIENTS
2 cups heavy cream
1 tablespoon black cardamom seeds
3 cups peanut oil
2 cups pecan halves
1 teaspoon kosher salt
1/2 teaspoon cayenne pepper
1 cup sifted confectioners' sugar
METHOD
1
In a small saucepan, bring 1 cup of heavy cream and the cardamom
to a boil. Reduce until only 1/4 cup remains. Allow to cool. Reserve.
2
Whip remaining 1 cup of heavy cream until stiff peaks form. Stir into
the reserved mixture. Chill until ready to serve.
Recipe courtesy Wolfgang Puck Pizza, Pasta, and More!,
Random House, 2000
METHOD
1
In a deep-fryer or a deep pot, heat the oil to 350 degrees F. (A deepfrying thermometer can be clipped to the side of the pan so that you
can tell when the proper temperature has been reached).
2
Meanwhile, in a large saucepan bring 2 quarts of water to a boil. Add
the pecans and boil for 2 minutes. Drain in a large strainer, shaking
off all excess water. Sprinkle the salt and cayenne pepper over the
nuts and then coat with the confectioners' sugar, a little at a time,
allowing the sugar to melt into the pecans. Toss the nuts by shaking
the strainer, adding a little more sugar each time, until all the sugar is
used and all the nuts are coated. Do not use hands or a spoon to
toss. The nuts should have a glaze of sugar.
3
Carefully add the nuts to the heated oil, keeping the oil at 350
degrees F. Cook until golden brown, about 3 minutes, stirring
occasionally. Remove with a slotted spoon to a baking tray to cool.
Recipe courtesy Wolfgang Puck, Pizza, Pasta & More!,
Random House, 2000
29
30
TSCDIST_PressureCooker manual
7/20/07
11:30 AM
Page 31
Tortilla Soup
Tortilla Soup (cont.)
6 - 8 Servings
INGREDIENTS
2 ears of fresh corn, husks removed
4 or 5 large garlic cloves, peeled
1 small onion (about 3 ounces), peeled, trimmed and quartered
1 small jalapeño pepper, trimmed and seeded
2 tablespoons corn oil
2 corn tortillas, cut into 1-inch squares
2 large ripe tomatoes (1 pound), peeled, seeded, and coarsely chopped
2 tablespoons tomato paste
2 to 3 teaspoons ground cumin
8 cups chicken stock
Garnish
2 corn tortillas
1 ripe avocado
1 large chicken breast, cooked, boned, and skinned
1/2 cup grated cheddar cheese
1/4 cup chopped fresh cilantro leaves
4
Add tomatoes, tomato paste, and 2 teaspoons of the cumin.
Continue to simmer for about 10 minutes to maximize flavor.
Slowly pour in the stock and add the corn cobs.
5
Lock the lid in place, and set timer for 15 minutes.
6
When cooking cycle is complete and all pressure is released,
open lid. Discard corn cobs and purée the soup with an immersion
blender set on low until desired consistency is reached. Taste for salt,
pepper or additional cumin.
7
Prepare the garnish: Preheat oven to 350 degrees. Cut tortillas
into thin strips and arrange on a small baking tray. Bake until strips
are crisp, 10 to 15 minutes. Peel and dice avocado. Cut chicken
into thin strips.
8
To serve, add chicken and avocado to soup and reheat over low
heat. Ladle the soup into 6-8 warm bowls and garnish with the
baked tortilla strips, cheddar cheese, and chopped cilantro.
Serve immediately.
METHOD
1
Using a large knife, carefully scrape the kernels off the cobs and set
aside, reserving cobs.
2
Using a food processor fitted with the steel blade, or a large
knife, coarsely chop the garlic, onion, jalapeño pepper, and
corn kernels. Reserve.
3
Select Vegetable function. Allow pressure cooker to get hot
(a couple of minutes), and add oil. When oil is hot, add tortilla
squares. Cook over low heat until slightly crisp. Stir in chopped
vegetables and simmer just until vegetables are coated with oil.
Do not brown.
31
Notes: If desired, the soup can be further reduced to intensify flavors.
After discarding corn cobs and before puréeing, select Vegetable
function again and, with the lid off, reduce soup by one-third.
For a very smooth consistency, pass soup through a fine strainer
after puréeing.
Recipe courtesy Wolfgang Puck, “Pizza, Pasta & More!,”
Random House, 2000
32
TSCDIST_PressureCooker manual
7/20/07
11:30 AM
Page 33
Cream of Root Vegetable Soup
Beef Burgundy
6 - 8 Servings
6 - 8 Servings
INGREDIENTS
INGREDIENTS
6 cups chicken stock
2 medium stalks celery, chopped
1 large leek, white part only, sliced
1 large russet potato, peeled and chopped
1 large turnip, peeled and chopped
1/2 large rutabaga, peeled and chopped
2 medium parsnips, peeled and chopped
2 large carrots, peeled and chopped
2 tablespoons flat-leaf parsley, chopped
1 teaspoon kosher salt
1/2 teaspoon white pepper
1 pinch ground coriander
2 tablespoons whipping cream
1 tablespoon butter
2 tablespoons olive oil
Salt and pepper
3 pounds lean beef stew meat, cut into 1-inch pieces
1 medium onion, chopped
3 cloves garlic, minced
1 cup button mushrooms
2 large carrots, diced
1 cup frozen pearl onions
1 cup dry red wine
2 cups beef stock
2 tablespoons tomato paste
3 sprigs fresh thyme
1 whole bay leaf
1 tablespoon flour
1 tablespoon butter, room temperature
1 tablespoon fresh parley, chopped
Salt and pepper, to taste
METHOD
1
Put stock, all vegetables, parsley, salt, pepper, and coriander in
cooking pot.
2
Lock lid in place. Select Soup function, and set timer for 15 minutes.
3
When cooking cycle is complete and all pressure is released,
open lid.
4
Purée soup to desired consistency with an immersion blender with a
stainless wand set on low. Add cream and butter while puréeing.
5
Taste for seasoning. Serve hot or cold.
PRESENTATION
This soup is delicious served with a dollop of sour cream and chopped
green onions on top.
Recipe courtesy Debra Murray, Wolfgang Puck HSN Host
METHOD
1
Season beef chunks by sprinkling with salt and pepper.
2
Select Meat function. Add oil to cooking pot. When oil is hot, brown
the beef chunks on all sides in batches.
3
Add onion, garlic and mushrooms to cooking pot; sauté for a few
more minutes.
4
Add browned beef, carrots, pearl onions, red wine, beef stock,
tomato paste, thyme and bay leaf.
5
Lock lid in place. Select Soup function, and set timer for 30 minutes.
6
When cooking cycle is complete and all pressure is released,
open lid.
7
Blend butter with flour to form a paste. Ladle some of the hot stock
from the cooking pot into butter mixture. Mix until very smooth. Add
butter mixture to hot stew, stirring constantly.
8
Select Soup function again and bring stew back to a boil, uncovered,
to thicken and cook out flour flavor.
9
Taste for seasoning and serve with chopped fresh parsley.
Recipe courtesy Debra Murray, Wolfgang Puck HSN Host
33
34
TSCDIST_PressureCooker manual
7/20/07
11:30 AM
Page 35
Quick Chicken Pot Pie
Minestrone Soup
6 Servings
6 - 8 Servings
INGREDIENTS
INGREDIENTS
1 package (10 ounces) frozen puff pastry shells
2 cups chicken stock
15 whole frozen chicken tenders
2 sprigs fresh thyme
1 bag (16 ounces) frozen pearl onions
1 bag (16 ounces) frozen mixed vegetables with peas and carrots
1 can (10 3/4 ounces) condensed cream of chicken soup
1
Bake puff pastry shells according to package instructions.
2
Add chicken stock, chicken tenders, pearl onions and thyme to
cooking pot.
3
Lock lid in place. Select Meat function, and set timer for 12 minutes.
3 tablespoons olive oil
1 large onion, chopped
4 slices pancetta (or bacon), chopped
2 stalks celery, thinly sliced
1/2 cup baby carrots
2 small potatoes, cubed
1 can (28 ounces) diced tomatoes in juice
4 cups liquid (white wine, stock, or water)
1/2 cup dried great northern beans, washed
3 sprigs fresh thyme
salt and pepper
1/4 cup chopped fresh spinach
1 medium zucchini, halved and sliced
1/2 cup small pasta shells
4
When cooking cycle is complete and all pressure is released, open
lid. Remove thyme sprigs.
METHOD
5
Add frozen mixed vegetables and soup.
1
6
Select Meat function again and bring back to a boil, uncovered. Make
sure the vegetables are cooked through, and use a wooden spoon to
break up the chicken tenders. Taste for seasoning.
Select Soup function. Add oil to cooking pot. When oil is hot, add
onion and pancetta. Cook, uncovered, until brown.
2
Add all remaining ingredients, except for spinach, squash and pasta.
3
Lock lid in place. Select Soup function again, and set timer for
30 minutes.
4
When cooking cycle is complete and all pressure is released,
open lid.
5
Add spinach, zucchini and pasta.
6
Lock lid in place. Select Vegetable function, and set timer for 5
minutes.
7
When cooking cycle is complete and all pressure is released, open
lid. Taste for seasoning before serving.
METHOD
7
Ladle chicken stew into baked pastry shells; garnish with freshly
chopped parsley or chives.
Recipe courtesy Debra Murray, Wolfgang Puck HSN Host
PRESENTATION
This low-calorie and low-fat soup is wonderful hot or cold. Try
dropping a teaspoon of fresh pesto and some olive oil in each bowl
of soup right before serving.
Recipe courtesy Debra Murray, Wolfgang Puck HSN Host
35
36
TSCDIST_PressureCooker manual
7/20/07
11:30 AM
Page 37
Beef Bolognese
Paella
6 Servings
4 Servings
INGREDIENTS
INGREDIENTS
2 tablespoons extra virgin olive oil
1 pound lean ground beef
Kosher salt and fresh ground black pepper, to taste
2 shallots, minced
2 cloves garlic, minced
1 medium onion, peeled and chopped
1 medium carrot, peeled and chopped
1 stalk celery, trimmed and chopped
1 cup red wine
5 pounds roma tomatoes, cored, blanched, peeled, seeded and chopped
1/4 cup tomato paste
1 tablespoon sugar
1 spice sachet (1 spring of each: rosemary, basil, oregano, and parsley; 1
bay leaf and 1/2 teaspoon of whole black peppercorns, wrapped
together in cheesecloth, tied together in a bundle)
2 cups chicken stock
1 pinch red pepper flakes
2 cups water or stock
3/4 cup white wine
1 small onion chopped
1 clove garlic, minced
12 large shrimp, peeled and deveined
12 small clams, scrubbed
12 black mussels, scrubbed
18 strands of saffron
1 cube chicken bouillon
1 pinch black pepper
1 pinch red pepper ground
1/4 cup tender young peas, fresh or frozen
2 tablespoons red pimiento
2 tablespoons chopped fresh cilantro
1 cup arborio rice
METHOD
METHOD
1
Place all ingredients in cooking pot. Stir to mix.
2
Lock lid in place. Select Rice function, and set timer for 12 minutes.
3
When cooking cycle is complete and all pressure is released,
open lid.
Stir once and serve hot.
1
Select Meat function. Add olive oil to cooking pot. When oil is hot,
add ground beef and brown, uncovered, while crumbling with spoon.
Season with salt and pepper.
2
Add shallots, garlic, onion, carrot and celery. Sauté until tender.
4
3
Add red wine, tomatoes, tomato paste, sugar, spice sachet, stock
and red pepper flakes. Taste again for salt and pepper.
Recipe courtesy Debra Murray, Wolfgang Puck HSN Host
4
Lock lid in place. Select Meat setting, but cancel cooking after 15
minutes (5 minutes earlier than preset time).
5
When cooking cycle is complete and all pressure is released,
open lid.
6
Taste for additional seasoning, and remove the sachet.
Use as desired.
Recipe courtesy Wolfgang Puck
37
38
TSCDIST_PressureCooker manual
7/20/07
11:30 AM
Page 39
Stuffed Peppers
Braised Red Cabbage
4 Servings
12 Servings
INGREDIENTS
INGREDIENTS
1 pound ground beef, cooked
1 cup cooked white rice
salt and pepper
1 small onion, diced
1/2 cup mozzarella cheese
4 medium peppers, stem tops and insides removed
3 cups beef stock
1 can (14.5 ounces) tomato sauce
1/4 cup peanut oil
1 medium red onion, sliced
1 cup brown sugar
2 Granny Smith apples, sliced
1/2 cup red wine vinegar
2 cups red wine
2 cups orange juice
1 cinnamon stick
3 teaspoons ground ginger
salt and pepper, to taste
4 pounds red cabbage, julienned
A few gold leaves for decoration
(optional, available at specialty stores)
METHOD
1
Combine cooked ground beef, rice, onions, cheese, salt and pepper
in a bowl.
2
Stuff peppers with meat-rice mixture.
3
Add beef stock to cooking pot. Add stuffed peppers.
METHOD
4
Lock lid in place. Select Meat function, but cancel cooking after
15 minutes (5 minutes earlier than preset time).
1
Select Vegetable function. Add oil to cooking pot. When oil is hot,
add red onion and cook, uncovered, until translucent.
5
When cooking cycle is complete and all pressure is released,
open lid.
2
Sprinkle in the brown sugar and cook for a few minutes until it starts
to caramelize.
6
Remove peppers from cooking pot and keep warm on a platter.
3
7
Select Meat function again. Add tomato sauce to cooking pot.
Reduce sauce and broth by half. Check for seasoning.
Add sliced apples and deglaze with red wine vinegar. Bring mixture
to a boil.
4
Add remaining ingredients except for gold leaves. Stir ingredients.
Pour sauce over peppers. Serve hot.
5
Lock lid in place. Select Vegetable function, and set timer for 15
minutes.
6
When cooking cycle is complete and all pressure is released,
open lid.
7
Taste for seasoning. Serve as an accompaniment to your favorite
pork dish.
8
Recipe courtesy Debra Murray, Wolfgang Puck HSN Host
Recipe courtesy Wolfgang Puck
39
40
TSCDIST_PressureCooker manual
7/20/07
11:30 AM
Page 41
Green Risotto
6 Servings
Stuffed Artichokes
4 Servings
INGREDIENTS
INGREDIENTS
1/2 cup olive oil
1 medium onion, finely chopped
1 1/2 cups Arborio rice
3 cups chicken stock
1 cup fresh spinach leaves, pureed
1 teaspoon salt
METHOD
2 cups chicken stock
2 tablespoons lemon juice
1 pinch salt
4 jumbo artichokes
2 cloves garlic, minced
2 tablespoons fresh mint leaf or basil
1 cup fresh bread crumbs
2 tablespoons olive oil
1 tablespoon Parmesan cheese
1 teaspoon salt
1 teaspoon fresh ground pepper
1
Select Vegetable function. Add oil to cooking pot. When oil is hot,
add onion and cook, uncovered, until translucent.
2
Stir in remaining ingredients.
3
Lock lid in place. Select Rice function, and set timer for 15 minutes.
METHOD
4
When cooking cycle is complete and all pressure is released,
open lid.
1
Place stock, lemon juice and salt in cooking pot.
5
Stir risotto. If there is too much liquid, select Rice function again and
cook, uncovered, stirring until additional liquid evaporates.
2
Trim artichokes by removing stems and trimming outer sharp tips.
Let artichokes soak upside down in the stock mixture.
3
Combine remaining ingredients in separate bowl.
4
Turn artichokes tips up. Stuff artichokes by pressing bread mixture
into leaves.
5
Lock lid in place. Select Vegetable function, and set timer for
20 minutes.
6
When cooking cycle is complete and all pressure is released,
open lid.
7
Remove artichokes to serving platter, keeping juices in cooking pot.
8
Select Vegetable function again. Bring sauce to a boil, uncovered,
until reduce by half. Pour over artichokes.
Recipe courtesy Debra Murray, Wolfgang Puck HSN Host
Recipe courtesy Debra Murray, Wolfgang Puck HSN Host
41
42
TSCDIST_PressureCooker manual
7/20/07
11:30 AM
Page 43
Spicy Honey-Glazed
Baby Pork Ribs
4 Servings
Corned Beef and Cabbage
6 - 8 Servings
INGREDIENTS
INGREDIENTS
3 pounds corned beef brisket with seasoning packet
1 bottle (12 ounces) beer
2 medium onions, cut in half lengthwise
2 whole garlic cloves
2 cups beef stock
4 medium red potatoes, scrubbed, peeled and halved
1 large head cabbage, cut into 8 wedges
1 cup baby carrots
6 tablespoons sesame oil
1 cup chicken stock or water
2 slabs baby pork ribs
1 cup soy sauce
1 cup sake
1 teaspoon dried chile flakes
4 tablespoons honey
2 tablespoons minced fresh ginger
2 tablespoons minced fresh garlic
METHOD
METHOD
1
Rinse corned beef and trim any excess fat.
2
Add brisket, contents of seasoning packet, beer, onion, garlic, and
stock to cooking pot.
3
Lock lid in place. Select Meat setting, and set timer for 60 minutes.
After time is up, select Meat setting again and set timer for an
additional 30 minutes.
4
When cooking cycle is complete and all pressure is released,
open lid.
1
Cut slab of ribs in half.
2
Select Meat function. Add oil to cooking pot. When oil is hot, brown
ribs one slab at a time.
3
Stack ribs flesh-side down in cooking pot.
4
Mix remaining ingredients together and pour over ribs.
5
Lock lid in place. Select Meat function, and set timer for 25 minutes.
6
When cooking cycle is complete and all pressure is released,
open lid.
5
Add remaining vegetables. Lock lid in place. Select Vegetable
function, and set timer for 10 minutes.
7
Cut ribs into individual servings and keep warm on serving platter.
6
8
Select Meat function again and reduce the sauce by one-third.
When cooking cycle is complete and all pressure is released,
open lid.
9
Serve ribs with sauce in the center for dipping.
7
Serve on a platter covered with hot stock. Serve mustard and
horseradish on the side.
Recipe courtesy Wolfgang Puck
Recipe courtesy Debra Murray, Wolfgang Puck HSN Host
43
44
TSCDIST_PressureCooker manual
7/20/07
11:30 AM
Page 45
Pot Roast
Coconut Rice Pudding
4 - 6 Servings
4 Servings
INGREDIENTS
INGREDIENTS
2-2 1/2 pounds beef roast
(such as California chuck, roast bone-in or out),
trimmed of excess fat
1/2 tablespoon salt
1 teaspoon pepper
1 teaspoon garlic powder
1 tablespoon olive oil
2 cups beef stock
1 can (5.5 ounces) V-8 juice
1 medium onion, quartered
2 cloves garlic
3 sprigs fresh thyme (or 1 tablespoon dry)
3 stalks celery, cut into 1-inch pieces
8 medium creamer potatoes halved
1 pound baby carrots
1 tablespoon flour
1 tablespoon butter, room temperature
1 1/2 cups coconut milk
1 1/2 cups milk
1/2 cup sugar
1/4 teaspoon kosher salt
1 cup arborio rice
1 tablespoon almond essence
1/2 cup golden raisins
1/4 teaspoon ground cinnamon, optional
METHOD
1
Combine coconut milk, milk, sugar and salt in uncovered
cooking pot.
2
Add rice and almond essence. Stir until well blended. Lock lid
in place.
3
Select Rice function, and set timer for 20 minutes.
4
When cooking cycle is complete and all pressure has been released,
remove lid.
5
Stir in raisins and cinnamon until well incorporated. Cover and allow
to cool for 10 minutes. Serve warm or cold.
METHOD
1
Season roast with salt, pepper and garlic powder.
2
Select Meat function. Add oil to cooking pot. When oil is hot, add
the roast and sear well on both sides.
3
Add stock, V-8 juice, onion, garlic, thyme and celery.
4
Lock lid in place. Select Meat function, and set timer for 60 minutes.
5
When cooking cycle is complete and all pressure is released,
open lid.
6
Add potatoes and carrots. Lock lid in place. Select Vegetable
function, and set timer for 5 minutes.
7
When cooking cycle is complete and all pressure is released,
open lid.
8
In a separate bowl, mix flour with butter until paste is formed.
Add a half cup of hot stock to flour mixture; mix until smooth.
9
Remove pot roast and vegetables to a platter and keep warm.
Recipe courtesy Wolfgang Puck
10 Slowly add butter mixture back into cooking pot, stirring constantly.
Select Vegetable function again and bring to a boil, uncovered, to
thicken sauce. Pour sauce over roast or serve on the side.
Recipe courtesy Debra Murray, Wolfgang Puck HSN Host
45
46
TSCDIST_PressureCooker manual
7/20/07
11:30 AM
Page 47
Flan
Chocolate Truffle Crème Brulee
4 - 6 Servings
6 Servings
INGREDIENTS
INGREDIENTS
3 cups water
3/4 cup of sugar
3 large eggs, beaten
1 can (14 ounces) sweetened condensed milk
1 can (12 ounces) evaporated milk
1 tablespoon vanilla
2 cups heavy whipping cream
1 cup bittersweet chocolate pieces or chips
1/3 cup granulated sugar
2 teaspoons excellent quality pure vanilla extract
5 large egg yolks
METHOD
1
In nonstick skillet over medium heat, melt sugar until caramel-like in
color. Pour caramel evenly into an 8-inch round baking pan. Spray
with cooking spray.
Heat cream in microwave until very hot, about 2 minutes. Pour hot
cream over chocolate pieces in a large bowl. Whisk until chocolate is
completely melted.
2
Whisk in remaining ingredients. Divide between 6 ramekins.
2
Place 2 cups of water in cooking pot.
3
3
Combine eggs, milks and vanilla. Pour into baking pan on to
of caramel.
4
Top baking pan with a piece of paper towel. Wrap well with
aluminum foil. Place into cooking pot of pressure cooker.
Place a folded kitchen towel in bottom of pressure cooker removable
pot. Pour in 3 cups water. Place ramekins on towel taking care to
keep them level. You may be able stack them all in the pressure
cooker by building the ramekins up, pyramid style. If not, cook them
in two batches.
4
Lock lid in place. Select Rice setting.
5
Lock lid in place.
5
6
Select Rice function, and set timer for 12 minutes.
7
When cooking cycle is complete and all pressure has been released,
remove lid.
When cooking cycle is complete, allow pressure to release naturally.
When all pressure has been released, remove lid, tilting it away from
you to avoid steam. Carefully remove ramekins using tongs or
potholders.
8
Carefully remove baking pan from pressure cooker, and refrigerate
flan until ready to serve.
6
9
To serve, run a knife around the inside of baking pan, place a plate
over, and invert flan onto plate.
Sprinkle an even layer of granulated sugar over tops of each
ramekin. Place them on a heatproof surface and burn the tops to a
nice amber color using a blowtorch. I do not find that caramelizing
the sugar works well under the oven broiler. If you do not have a
torch, make the Microwave Caramel recipe on page 55, or omit the
caramelized sugar step.
1
METHOD
Recipe courtesy Debra Murray, Wolfgang Puck HSN Host
Recipe courtesy Marian Getz, Wolfgang Puck Chef
47
48
TSCDIST_PressureCooker manual
7/20/07
11:30 AM
Page 49
Creamy Dreamy Rice Pudding
White Chocolate Cheesecake
4 - 6 Servings
6 - 8 Servings
INGREDIENTS
INGREDIENTS
2 cups water
1 cup rice, such as long grain (my favorite is baby basmati)
1 tablespoon unsalted butter (important to control foaming)
1/2 teaspoon kosher salt
1 split vanilla bean, Tahitian preferred
1/2 cups half and half
3/4 cups granulated sugar
1 teaspoon fresh lemon juice
3 packages (8 ounces each) cream cheese
1/2 cup powdered sugar
3 large eggs
1 tablespoon vanilla
1 pinch salt
6 ounces white chocolate, melted in microwave until smooth
3 cups water
Raspberry Sauce (page 54)
METHOD
METHOD
1
Combine water, rice, butter, salt and vanilla bean in cooking pot.
1
2
Lock lid in place. Select Rice setting, but cancel cooking after
5 minutes (1 minute earlier than preset time.)
Prepare a 7-inch springform pan by lining the bottom with
parchment paper or wax paper. Assemble the springform around the
paper-coated bottom. Spray interior with cooking spray.
3
When cooking cycle is complete, allow pressure to release naturally.
When all pressure has been released, remove lid, tilting it away from
you to avoid steam.
2
In a mixing bowl, cream together sugar and cream cheese with an
electric mixer until smooth. (This can also be done with a food
processor fitted with a metal chopping blade.) Add eggs one at a
time. Add vanilla, salt, and melted white chocolate. Pour batter into
prepared pan.
3
Top pan with a paper towel. Wrap well with aluminum foil.
4
Add water to cooking pot. Place assembled springform pan in
cooking pot. Lock lid in place.
5
Select Rice function, and set timer for 30 minutes.
6
When cooking cycle is complete, leave cheesecake in the pressure
cooker for an additional 30 minutes before removing.
7
Chill cheesecake for at least 3 hours before serving. Serve with
Raspberry Sauce and garnish with mint and fresh raspberries.
4. Add remaining ingredients and stir thoroughly.
5
The pudding will be quite runny, but that is how I prefer it since it
thickens up considerably as it cools. If you like it thick, select Rice
setting again but do not lock on lid. Bring to a full boil and turn off.
6
Serve warm. Add dried fruit, fresh fruit, cinnamon or other spices
as desired.
Recipe courtesy Marian Getz, Wolfgang Puck Chef
Recipe courtesy Debra Murray, Wolfgang Puck HSN Host
49
50
TSCDIST_PressureCooker manual
7/20/07
11:30 AM
Page 51
Raspberry Sauce
Easy Individual
Banana Baby Cakes
8 Four-Ounce Servings
INGREDIENTS
6 Servings
2 cups fresh or frozen raspberries
2 tablespoons granulated sugar
1 teaspoon lemon juice
INGREDIENTS
METHOD
1
Place all ingredients in a small saucepan over medium heat. Cook for
10 - 15 minutes, until sauce reduces and sugar dissolves.
2
To remove seeds, press through a sieve.
3
When cool, serve to decorate your dessert plate or drizzle over
White Chocolate Cheesecake.
Recipe courtesy Debra Murray, Wolfgang Puck HSN Host
1 1/4 cups all-purpose flour
1 1/2 teaspoons baking powder
1/2 teaspoon kosher salt
6 tablespoons unsalted butter
3/4 cup granulated sugar
2 teaspoons excellent quality pure vanilla extract
3 large egg yolks
3/4 cup sour cream
3 ripe bananas
6 tablespoons brown sugar
METHOD
1
Sift together the flour, baking powder and salt in a small bowl.
Set aside.
2
In mixer fitted with paddle attachment, cream butter and sugar
until pale and fluffy, about 5 minutes. Scrape bowl. Add vanilla and
egg yolks. Mix until smooth. Scrape bowl. Add sour cream and mix
again. Scrape bowl. Add flour mixture and fold in by hand until
just combined.
3
Spray or butter 6 ramekins. Divide batter evenly among prepared
ramekins, filling just below the half-way point. Smooth batter.
4
Top with banana slices using up to 1/2 of a banana per ramekin.
Top each with 1 tablespoon of brown sugar.
5
Place a folded kitchen towel in bottom of the pressure cooker
removable pot. Pour in 3 cups water. Place ramekins on towel taking
care to keep them level. You may be able stack them all in the
pressure cooker by building the ramekins up, pyramid style. If not,
cook them in two separate batches.
7
Lock lid in place. Select Rice setting, and set timer for 8 minutes.
8
When cooking cycle is complete, allow pressure to release naturally.
When all pressure has been released, remove lid, tilting it away from
you to avoid steam. Carefully remove ramekins using tongs or
potholders.
9
The banana slices will now have a pink tinge to them. This is normal.
Enjoy warm with slightly sweetened whipped cream if desired.
Recipe courtesy Marian Getz, Wolfgang Puck Chef
51
52
TSCDIST_PressureCooker manual
7/20/07
11:30 AM
Page 53
Lively Lemon Cheesecake
Microwave Caramel
4 - 6 Servings
Makes enough to coat 8 ramekins
INGREDIENTS
INGREDIENTS
2 tablespoons unsalted butter, melted
1/2 cup vanilla wafer crumbs
2 packages (8 ounces each) cream cheese
1/2 cup granulated sugar
zest and juice from 1 lemon
2 large eggs
1/2 cup granulated sugar
1/4 cup light corn syrup
5 drops fresh lemon juice
METHOD
METHOD
1
Place all ingredients in a 2- or 4-cup glass measuring cup. Stir until
all sugar is moistened.
2
Cook in microwave until bubbles start piling up on top of each other
and mixture turns amber in color, approximately 3 minutes. The time
it takes depends on the wattage of your microwave.
Carefully remove and divide between ramekins. Use caution; sugar
mixture is extremely hot. Let cool until hard.
1
Combine butter and wafer crumbs in the bottom of a 6-inch springform pan. Press and flatten to cover bottom. Set aside.
2
Combine cream cheese and sugar in food processor. Pulse and
scrape down until smooth. Add zest, juice and eggs. Pulse only until
no visible egg remains. Do not over mix.
3
3
Scrape mixture into prepared pan.
4
Place a folded kitchen towel in bottom of pressure cooker removable
pot. Pour in 3 cups water. Place springform pan on top of towel.
Notes: This recipe is a great topping for the Chocolate Truffle Crème
Brulee on page 51, if you do not own a blow torch. Simply pour the
hot caramel over the top of the cooled brulee and let harden.
5
Lock lid in place. Select Rice setting, and set timer for 12 minutes.
6
When cooking cycle is complete, allow pressure to release
naturally. When all pressure has been released, remove lid, tilting it
away from you to avoid steam. Carefully remove springform pan
using potholders.
7
Cool until warm and then cover and refrigerate for at least 4 hours
or overnight. Serve with lemon slices, crushed lemon drop candies
and sweetened whipped cream, if desired.
Extra caramel can be used to make pretty garnishes. Simply pour out
in a lacy pattern onto aluminum foil, preferably the nonstick
aluminum foil that is now available. Allow to harden and then
carefully remove to top ice cream, cakes and other desserts.
Recipe courtesy Marian Getz, Wolfgang Puck Chef
Notes: Because of the specialty type of steam cooking, the
cheesecake surface will appear lumpy. This is normal and is only
on the very surface.
The easiest way to slice a cheesecake is with a length of dental floss
held taught between your hands.
Recipe courtesy Marian Getz, Wolfgang Puck Chef
53
54
TSCDIST_PressureCooker manual
7/20/07
11:30 AM
Page 55
Raspberry White Chocolate
Bread Pudding
Silky Flan with
Microwave Caramel
4 Servings
4 Servings
INGREDIENTS
INGREDIENTS
1 cup granulated sugar
4 large eggs
1/2 teaspoon kosher salt
1 tablespoon fresh lemon juice
2 teaspoons excellent quality pure vanilla extract
2 cups heavy whipping cream
2 tablespoons unsalted butter, melted
3 croissants, cut into 2-inch pieces (stale is fine)
1/2 cup fresh or frozen raspberries
2 tablespoons white chocolate chips
1 recipe Microwave Caramel, page 54
1 cup whole milk
1 cup heavy whipping cream
2/3 cup granulated sugar
1/8 teaspoon kosher salt
1 teaspoon excellent quality pure vanilla extract
2 large eggs
3 large egg yolks
METHOD
1
Place all ingredients in large mixing bowl and whisk until smooth.
Pour mixture over 4 caramel-lined ramekins.
METHOD
1
Spray or grease a 6-cup baking mold or pan. Set aside.
2
In a large bowl, whisk together sugar, eggs, salt, lemon juice, vanilla,
cream and melted butter. Whisk until sugar is dissolved. Gently fold
in croissant pieces.
2
Place a folded kitchen towel in bowl of pressure cooker removable
pot. Pour in 3 cups water. Place ramekins on towel taking care to
keep them level.
3
Pour one-third of mixture into prepared pan. Scatter a layer of
raspberries and white chocolate over mixture. Repeat layers twice.
3
Lock lid in place. Select Rice setting, but cancel cooking after
3 minutes (3 minutes earlier than preset time.)
4
Place a folded kitchen towel in bottom of pressure cooker
removable pot. Pour in 3 cups water. Place pan of bread pudding
on top of towel.
4
5
Lock lid in place. Select Rice setting, and set timer for 11 minutes.
When cooking cycle is complete, release pressure manually.
When all pressure has been released, carefully remove lid, tilting it
away from you to avoid steam. Carefully remove ramekins using
tongs or potholders.
6
When cooking cycle is complete, allow pressure to release
naturally. When all pressure has been released, remove lid, tilting it
away from you to avoid steam. Carefully remove pan of bread
pudding, using potholders.
5
Serve warm or cold. Remove flan from ramekin by first running a
thin-bladed knife around edge of custard to loosen it. Invert onto
serving plate, letting the now liquid caramel dribble over top.
7
Serve warm with additional raspberries and slightly sweetened
whipped cream, if desired.
Recipe courtesy Marian Getz, Wolfgang Puck Chef
Recipe courtesy Marian Getz, Wolfgang Puck Chef
55
56
TSCDIST_PressureCooker manual
7/20/07
11:30 AM
Page 57
Pressure Cooker Cooking Chart
Ingredient
Amt
Function
Setting
Time
Liquid
(Minutes) Suggested
(Cups)
3 med
1 cup
1 cup
1 cup
1 cup
1 cup
1 cup
1 lb
6 med
2 cups
2 cups
1 med
2 cups
2 cups
1 cup
6 ears
2 cups
2 cups
4 halves
8 slices
Vegetable
Vegetable
Vegetable
Vegetable
Rice
Rice
Rice
Vegetable
Vegetable
Vegetable
Vegetable
Vegetable
Vegetable
Vegetable
Vegetable
Vegetable
Vegetable
Vegetable
Vegetable
Vegetable
14
12
15
8
15
12
20
3
15
3
7
10
5
3
20
4
4
4
13
4
2
2
2
2-2 1/2
3
2
3 1/2
1
2
1
1
2
1
1
3
1 1/2
1
1 1/2
2
1 1/2
3 lbs
6 whole
Meat
Meat
90
30
2-3
2
4 pounds
4 whole
1
Up to 6
3 lbs
3 lbs
1 dozen
3 lbs
2
2 slabs
2 6 oz
1-2” thick
2-3 lbs
1–2 lbs
Meat
Meat
Meat
Meat
Meat
Meat
Meat
Meat
Meat
Meat
Meat
Meat
Meat
Meat
5
20
20
15
20
75
2
90
20
20
5
4
30
5
2
2
2
2
3
2-3
1
3
2
2
1
1 1/2
2
2
Pressure Cooker Cooking Chart
Ingredient
Amt
Function
Setting
Time
Liquid
(Minutes) Suggested
(Cups)
or 3” pieces
Pork chops (8-10 oz ea)
Pork Loin
Rump Roast
Short Ribs
Shrimp, large
Spare Ribs
Squid 1” Rings
Stew Meat 1” Pieces
Turkey Breast
Veal Shanks (8 oz ea)
2 cups
3 to 4
2 lbs
3 lbs
3 lbs
Up to 30
1 slab
2 lbs
3 lbs
5 lbs
3
Meat
Meat
Meat
Meat
Meat
Meat
Meat
Meat
Meat
Meat
Meat
16
12
22
75
35
2
30
12
18
45
30
3
2
3
3
2
1
2
2
4
3
2
4 large
Up to 20
3 cups
Vegetable
Vegetable
Vegetable
15
7
5
2
2
1 1/2
VEGETABLES
Artichokes, trimmed
Beans, Black (soaked)
Beans, Lima
Beans, Navy
Beans, Pinto
Beans, Soy
Beans, Red Kidney
Beans, String
Beets
Broccoli flowerets
Brussels Sprouts
Cabbage head, quartered
Carrots 2 “ pieces
Cauliflowerets
Chick Peas
Corn, on the cob
Okra, large
Parsnips, cubed
Squash, Acorn, halved
Squash, Butternut, 1/2” slices
POTATOES
Potatoes, Baking
Potatoes, Red Bliss (2 oz ea)
Potatoes, White, cubed
MEATS, POULTRY, SEAFOOD
Beef Brisket
Beef Ribs
Chicken, boneless,
skinless pieces, frozen
Chicken Legs
Chicken, quartered
Chicken, split breast bone-in
Chicken, whole
Chuck Roast
Clams, in shells
Corned Beef
Cornish Game Hens
Baby Back Ribs
Fish Fillets
Fish Steaks
Lamb shanks
Lobster
Octopus, whole baby
57
58
TSCDIST_PressureCooker manual
7/20/07
11:30 AM
Page 59
Recipe Notes
Recipe Notes
59
60
TSCDIST_PressureCooker manual
7/20/07
11:30 AM
Page 61
Recipe Notes
Limited Warranty
This warranty covers all defects in workmanship or materials in the
mechanical and electrical parts, arising under normal usage and care, in
this product for a period of 12 months from the date of purchase
provided you are able to present a valid proof-of-purchase. A valid
proof-of-purchase is a receipt specifying item, date purchased, and cost
of item. A gift receipt with date of purchase and item is also an
acceptable proof-of-purchase. Product is intended for household use
only. Any commercial use voids the warranty.
This warranty covers the original retail purchaser or gift recipient.
During the applicable warranty period within normal household use, we
will repair or replace, at our discretion, any mechanical or electrical
part which proves defective, or replace unit with a comparable model.
To obtain service under the terms of this warranty,
call Toll Free (800) 275-8273.
THIS LIMITED WARRANTY COVERS UNITS PURCHASED AND USED
WITHIN NORTH AMERICA AND DOES NOT COVER:
61
•
Damages from improper installation.
•
Defects other than manufacturing defects.
•
Damages from misuse, abuse, accident, alteration, lack of proper
care and maintenance, or incorrect current or voltage.
•
Damage from service by other than an authorized dealer or
service center.
62