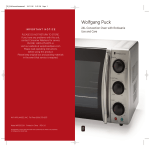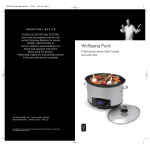
1
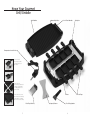
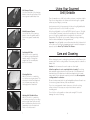
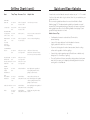
I M P O R TA N T N OT I C E
PLEASE DO NOT RETURN TO STORE.
If you have any problems with this unit,
contact Consumer Relations for service
PHONE: 1-800-275-8273.
Please read operating instructions
before using this product.
Please keep original box and packing materials
in the event that service is required.
W.P. APPLIANCES, INC. Toll Free (800) 275-8273
Website: www.wppotsandpans.com
Model BRGG0060
Printed in China
REV 1.0
All trademarks, service marks and trade names (collectively the “Marks”) are proprietary
to Wolfgang Puck World Wide.
Wolfgang Puck
Universal Gourmet Grill and Griddle
manual
Important Safeguards
When using electrical appliances, basic safety precautions should always
be followed, including the following:
1
Read all instructions.
2
Do not touch hot surfaces. Use handles or knobs.
3
To protect against electric shock, do not immerse cord or plug in
water or other liquid.
4
Close supervision is necessary when any appliance is used by or
near children.
5
Unplug from outlet when not in use and before cleaning. Allow to
cool before putting on or taking off parts, and before cleaning
the appliance.
6
Do not operate any appliance with a damaged cord or plug or after
the appliance malfunctions, or has been damaged in any manner.
Return appliance to the nearest authorized service facility for
examination, repair or adjustment.
7
The use of accessory attachments not recommended by the
appliance manufacturer may cause injuries.
8
Do not let cord hang over the edge of table or counter, or touch hot
surfaces.
9
Do not place on or near a hot gas or electric burner, or in a
heated oven.
10 Extreme caution must be used when moving an appliance
containing hot oil or other hot liquids.
11
Always attach plug to appliance first, then plug cord in the outlet.
To disconnect, remove plug from wall outlet.
12 Do not use outdoors.
13 Use only with plug provided.
14 Do not use appliance for other than intended use.
1
A short power-supply cord is provided to reduce the hazards
resulting from entanglement or tripping over a longer cord. An
extension cord may be used with care; however, be sure the marked
electrical rating is at least as great as the electrical rating of this
appliance. The extension cord should be positioned such that it does
not drape over the counter or table top where it can be pulled on by
children or tripped over. The electrical rating of this appliance is listed on
the bottom panel of the unit.
This appliance has a polarized plug (one blade is wider than the
other). As a safety feature, this plug will fit in a polarized outlet only
one way. If the plug does not fit fully in the outlet, reverse the plug. If it
still does not fit, contact a qualified electrician. Do not attempt to
defeat this safety feature
Save These Instructions
HOUSEHOLD USE ONLY
Before Your First Use
The grill/griddle is designed for indoor use only. Carefully unpack the
grill and remove all packaging materials. To remove any dust that may
have accumulated during packaging, wipe the cooking surface and base
with a clean, damp cloth. Dry thoroughly. Do not use harsh or abrasive
cleaners on any part of the grill.
Warning: Do not immerse the cord or plug in water or other liquid.
Do not use metal scouring pads on any part of the appliance.
Place the grill on a dry, stable surface away from an open flame or hot
burners. This appliance requires 1800 watts and should be the only
appliance operating on the circuit. Plug the grill into a 120 volt 60 Hz AC
only outlet.
Before using, condition the nonstick surface. Spread 2 teaspoons of
vegetable oil with a soft cloth or folded paper towel over the entire grill
and griddle cooking surfaces. Assemble grill and set temperature to
250°. When the grill has reached 250°, turn off and cool completely.
The grill is now ready to use.
2
Table of Contents
Wolfgang Puck,
owner of the famous
Spago restaurants and
one of the most influential
chef-restauranteurs in
America, is credited with
reviving California’s rich
culinary heritage. His
cooking innovations, a
result of blending fresh
California ingredients with his classical French techniques, are
enjoyed by world leaders, stars and fellow chefs alike. He established
other trend-setting restaurants like Postrio in San Francisco, Chinois
on Main in Santa Monica, Granita, Vert and Trattoria del Lupo. Home
chefs can also share Mr. Puck’s talents through his cookbooks and,
of course, through his appliances!
3
Important Safeguards
1
Save These Instructions
2
Before Your First Use
2
About Wolfgang Puck
3
Know Your Gourmet Grill/Griddle
5
Using Your Gourmet Grill/Griddle
8
Care & Cleaning
8
Grilling Tips
9
Grilling Guide & Charts
10
Quick & Easy Kabobs
12
Guide to Great Kabobs
13
Griddle Cooking Guide
14
Tips and Helpful Hints
15
Recipes
16
Limited Warranty
38
Know Your Gourmet
Grill/Griddle
• Grill Surface
• Grease Drip Holes
• Cool-Touch Handles
• Drip Pan
Temperature Control Probe •
Shown left is the
correct way to place
food trays into food
tray holders
Shown left is the
incorrect way to place the
food trays (underneath
the heating plate of the
Gourmet Grill)
• Base
Shown left is the correct
way to place the food tray
(underneath the heating
plate of the Gourmet Grill)
Food Tray Holder •
5
• Scraper/Cleaner
• Food Tray Spatula
6
• Food Trays
Grill Scraper Cleaner
Use the slotted side of the cleaning
blade to clean the grill surface. Push
excess grease towards drip holes
Using Your Gourmet
Grill / Griddle
Place the appliance on a flat, level surface, such as a countertop or table.
Place the cooking surface onto the base with either the grill or griddle
surface up, according to your recipe.
Insert power point into the power point holder on the grill/griddle plate.
Plug the cord into a 120 volt 60 Hz AC only outlet.
Griddle Scraper Cleaner
Use the flat side of the cleaning
blade to clean the griddle surface.
Push excess grease towards drip
holes
When the grill/griddle is on, the red READY light will come on. This light
is in the shape of an arrow, located on the power point. When the light
goes out, the grill or griddle surface is preheated to the selected
temperature. This light will cycle on and off during cooking, indicating
that the surface temperature is being maintained.
Important: Your grill/griddle comes with a patented safety feature which
will not allow you to plug the temperature probe in unless the drip pan is
properly in place. Never Try To Defeat This Feature.
Switching Grill Plate
Wait for the unit to completely
cool before moving. Grasp both
handles and lift cooking plate
straight up. Flip over and place
back onto the base
Care and Cleaning
Before cleaning, be sure to unplug the cord from the outlet. Remove the
power point from the cooking surface. If necessary, wipe the cord with a
damp cloth.
Caution: Do not immerse the cord in water or other liquid.
Cleaning Drip Pan
Wait for the unit to completely
cool before moving any parts. The
drip tray should be hand washed
only in warm soapy water. Dry
thoroughly when completed
Washing Grill / Griddle & Base
Wait for the unit to completely
cool before moving. Your cooking
plate and grill base (without drip
pan) is dishwasher safe without the
temperature controller attached.
Place on the bottom rack
7
Allow the appliance to cool completely before cleaning.The cooking
plate and base can be placed in the bottom rack of the dishwasher, or
washed by hand. The drip tray should be hand washed only in warm
soapy water. Dry the drip pan completely when finished.Do not put hot
cooking surface in cold water.
Be sure to always wash both the grill and griddle surfaces after each use
to remove any grease that may have accumulated.
Do not use scouring pads or harsh cleaners on either the cooking
surface or base. If necessary, use a nylon bristle brush or plastic
scrubbing pad.
Do not let the cooking surface or base soak overnight. This could
damage the nonstick coating.
8
Grilling Tips
1
2
The nonstick cooking surface is metal utensil safe. However care
should be taken when using metal utensils with this product. Only
use the enclosed scraper to clean the griddle
Be careful not to transfer germs from raw meat to cooked meat.
Use separate utensils and platters for raw and cooked meat or wash
platter used for raw meat before placing cooked meat on it.
3
Use a long-handled brush for basting foods during grilling.
4
Tender meat cuts, such as sirloin and tenderloin, are generally
more suitable for grilling than less-tender meat cuts, such as round
or rump.
5
Many less-tender meat cuts can be grilled, but they benefit from the
tenderizing effects of marinating in an acid-based wet marinade.
6
A marinade is a seasoned mixture (wet or dry) in which foods are
soaked in order to absorb flavor and/or become more tender. The
flavor grows stronger the longer the marinade is left on the food
before cooking. The amount of time usually ranges from 1 hour to
24 hours.
Grilling Guide
Follow these guidelines for successful grilling:
1
Set the temperature control dial to the desired temperature.
Preheat the grill until the READY arrow light goes out, approximately
10 minutes.
2
Marinate meats before grilling for extra flavor and tenderness, if
desired. (Marinades with added sugar will cause meats to brown
more quickly.)
3
Before grilling, partially cook bone-in chicken, ribs and uncooked
smoked or fresh sausages for best results. If not partially cooked,
these meats may become overbrowned on the outside before the
center is done.
4
Turn food once during grilling unless otherwise directed.
5
If desired, brush with barbecue or other sauce during last 5 to 10
minutes of grilling.
6
Unplug from outlet and allow grill to cool completely before
disposing of drippings that have accumulated in the drip channel.
A wet marinade usually consists of oil (vegetable or olive) to give
moisture, an acid (lemon juice, vinegar, wine, tomatoes or yogurt)
to tenderize, and flavorings (herbs and spices) to enhance or
add flavor.
A dry marinade, or spice rub, is a mixture of herbs, spices and salt
that is rubbed onto the food after the food has been lightly brushed
with vegetable oil. Generally, use 1 to 2 tablespoons dry marinade
per pound of meat.
7
Always marinate in a tightly covered nonmetal dish, and turn the
food occasionally. Be sure to refrigerate all meats while marinating.
Heavy plastic bags are also convenient for marinating – add the food
and marinade, then tightly seal the bag. Turn the bag now and then
to redistribute the marinade.
8
If leftover wet marinade is to be used as a sauce with the cooked
food, be sure to place it in a small pan and heat it to a rolling boil
before serving to eliminate any bacterial growth.
9
Grease from high fat foods, such as bacon or sausage, may splatter
on countertop. Protect countertop as necessary.
10 When grilling fish, use a large flat spatula or turner to turn the fish.
9
Grilling Chart
Meat
Time/Temp. Doneness Test
Helpful Hints
BEEFSTEAKS
1” thick
3 ⁄4” thick
10 - 15 min.
MAX
Medium rare - 145˚
Medium - 160˚
Well done - 170˚
Slash fat around edge to prevent
curling (avoid cutting into meat).
14 - 16 min.
400°
Medium (160°) or
Until no longer pink
15 - 20 min.
400°
in center
10 - 12 min.
12 - 15 min.
12 - 15 min.
350°
Until slightly pink
in center or 160°.
BURGERS
(3 ⁄4” thick)
Hamburgers
Turkey burgers
PORK CHOPS
Rib and loin
1 ⁄ 2” thick
3 ⁄4” thick
10
Slash fat around edge to prevent
curling (avoid cutting into meat).
Grilling Chart (cont.)
Meat
PORK RIBS
Spare ribs
Country-style
Time/Temp. Doneness Test
Helpful Hints
25 - 30 min.
350°
Until no longer pink
in center or 160˚.
Turn ribs every 5 minutes.
25 to 35 min.
350°
Until no longer pink
in center or 160˚
SAUSAGE LINKS
Hot dogs and
4 - 6 min.
other cooked,
400°
Bratwurst and
other
uncooked
smoked or
fresh sausages
12 - 15 min.
300°
Until hot (140˚)
Pierce 2 or 3 times to prevent skin
from bursting.
Until no longer pink
in center (180˚)
Turn 3 or 4 times while grilling.
CHICKEN PIECES
Bone-in
25 - 35 min.
350°
Until juice in center
is no longer pink
Boneless breast
half with skin
20 - 35 min.
350°
Until juice in center
is no longer pink
Boneless, skinless 15 - 20 min.
breast half
350°
Until juice in center
is no longer pink
SHRIMP
Large raw,
shelled
and deveined
Grill bone-in chicken meaty
side down for the first 10 minutes,
then turn every 5 minutes until done.
8 - 12 min.
350°
Until pink and firm
10 min. per
1/2” thick
350°
Until fish flakes
Measure fish at thickest point.
easily with fork (160˚) Brush all fish lightly with vegetable
oil before grilling and twice while
grilling to retain moisture.
Steaks, 3⁄4” thick 15 - 20 min.
350°
Until fish flakes
Brush grill lightly with vegetable oil
easily with fork (160˚) before grilling.
Fillets
Until fish flakes
If fillets have skin, grill skin sides
easily with fork (160˚) up first.
FISH
Whole, drawn
and scaled
10 min. per
1/2” thick
350°
11
Quick and Easy Kabobs
Sensational, succulent kabobs are quick and as easy as 1 - 2 - 3 to make!
Use these tips and charts to get started, then let your palate be your
guide. Here’s how:
Choose meat, vegetable and brush-on sauce from Guide to Great
Kabobs (page 12). Thread meat and vegetables on bamboo or metal
skewers. Grill, turning and brushing occasionally with sauce, until meat
and vegetables are done. Use the Grilling Kabobs chart (page 12) as a
guide. Grill tasty kabobs in no time!
Kabob Success Tips
•
Soak bamboo skewers in water at least 30 minutes to
prevent burning.
•
Leave a little space between foods threaded on skewers
(tightly packed food will not cook evenly).
•
To prevent sticking (and to make cleanup easier), brush cooking
surface with vegetable oil before grilling.
•
Sauces that contain sugar burn easily. Brush them on kabobs only
during last 5 to 10 minutes of grilling.
•
To avoid food-borne illnesses caused by eating undercooked or raw
meat, boil the sauce you’ve dipped your basting brush into before
serving with cooked kabobs.
Brush lightly with vegetable oil
before grilling and twice while
grilling to retain moisture
12
Guide to Great Kabobs
Griddle Cooking Guide
Meat
Vegetable
Sauce
Follow these guidelines for successful griddle cooking:
1 1⁄2” pieces Franks
Mushrooms
Italian Dressing
1
1 1⁄2” pieces fully
cooked Sausages
Cherry Tomatoes
French Dressing
1” cubes Beef Bottom
or Round Steak
1” pieces Bell Pepper
Italian Dressing
If you prefer cooking foods without added butter or oil, first season
the griddle surface to prevent any sticking. Season the griddle
surface after each cleaning or before initial use. To season, brush the
cool surface with a light coating of vegetable oil. Wait a few minutes;
then wipe the surface dry with a paper towel. The griddle is now
seasoned and ready for use.
1” pieces Chicken
or Turkey Breast meat
1 1⁄2” pieces Green Onion
or Leek
Honey-Mustard
Dressing
2
1” pieces Turkey, Beef
or Pork Tenderloin
Whole Water Chestnuts
Italian Dressing
Set the temperature control dial to the desired temperature.
Preheat the griddle until the READY arrow light goes out,
approximately 10 minutes.
1 1⁄4” cubes Boneless
Lamb Shoulder
Pimiento-stuffed
or pitted Ripe Olives
Spaghetti Sauce
3
1” cubes fully cooked
Smoked Ham
Cauliflowerets
or Broccoli Flowerets
Chili Sauce
When cooking with butter or oil, place on cold griddle before
preheating. Do not use more than 2 tablespoons of butter or oil.
4
1” pieces Fish Fillet
or Steak (1” thick)
3⁄4” slices Zucchini
Steak Sauce
Foods may be kept warm on the griddle prior to serving. Reduce
temperature to 200°.
Large Raw Shrimp,
peeled and deveined
1” pieces partially
cooked Potato
Soy Sauce
Sea Scallops
2” pieces
Corn-on-the-Cob
Teriyaki Sauce
Grilling Kabobs
Food
Time (min)
Temp
Eggs
3-5
300°
Pancakes
4-6
375°
Breakfast sausage links
3-6
325°
Canadian bacon
15 - 20
325°
Standard bacon strips
3-5
350°
Ham Steaks
25 - 30
325°
Vegetables
5 - 10
325°
Sausages
12 - 15
325°
Meat
Time (min/temp.)
Doneness Test
Fully cooked
Meat or Sausage
7 - 10, 350°
Until hot
Beef, Veal, Lamb
12 - 15, 425°
Until desired doneness
Pork
15 - 20, 350°
Until no longer pink
Cheese sandwiches
4-6
350°
Chicken and Turkey
15 - 20, 350°
Until no longer pink in center
French toast
8 - 10
375°
Fish
12 - 16, 350°
Until fish flakes easily with
fork
Shrimp
8 - 12, 350°
Until pink and firm
Sea Scallops
12 - 16, 350°
Until white
13
14
Tips and Helpful Hints
1
Corn Flake Coated French Toast
Throughout this booklet, you will notice the terms grill side
and griddle side. The grill side has ridges or bumps. The griddle
side is smooth.
4 servings
2
When salt is an ingredient, always use kosher salt. If you are using
iodized table salt, use half of what the recipe calls for.
3
Always preheat your gourmet grill for at least 15 minutes before use.
Preheat food trays for 5 minutes.
4
Use caution and pot holders with you gourmet grill, it gets very hot.
5
Don’t over fill food trays. They hold slightly more than 1/4 cup.
6
Use non-stick spray for food trays to aid in easy removal.
8 slices bread (Challah, French, or white bread), cut 1" thick
3 large eggs, beaten
1/4 teaspoon salt
2 cups milk
1 tablespoon sugar
1 teaspoon vanilla
2 cups corn flakes, crushed
2 tablespoons butter
7
Using accurate timers and a reliable thermometer will help ensure
perfectly cooked food.
8
Clean up is so easy after entertaining or using your gourmet grill.
Everything except the electrical plug goes right into the dishwasher.
9
If baked goods in your gourmet grill are pale on the bottom once
removed, simply place the food tray on the top surface of the grill
for approximately 30 seconds. This will help brown the bottom and
help complete the baking process.
INGREDIENTS
METHOD
1
Beat the eggs, milk, salt sugar and vanilla with a whisk until
well incorporated.
2
Preheat griddle side on high for at least 10 minutes.
3
Soak the bread slices in the egg mixture.
4
Place the crushed corn flakes on a plate, press the french toast into
the corn flakes on each side. Shake to remove excess flakes
5
After the griddle has been preheated add the french toast.
6
Cook for 3 minutes per side or until golden brown and cooked
thoroughly.
PRESENTATION
To serve, cut french toast slices diagonally, serve with berry compote
and dust with powdered sugar.
Recipe courtesy Debra Murray, Wolfgang Puck HSN Guest Host
15
16
Baby Pork Chops
with Cranberry Sauce
Citrus Marinated Swordfish
4 servings
4 servings
INGREDIENTS
INGREDIENTS
4 tablespoons unsalted butter
12 ounces fresh or frozen cranberries
3 tablespoons sugar
1 cup dry red wine
1 cup beef or chicken stock
salt & pepper
12 baby pork chops 3/8 to 1/2 inch thick
4 medium Swordfish steaks (approx 3/4 inch thick)
6 cloves garlic, minced
1 bunch fresh cilantro, chopped
1/2 cup olive oil
3 small serrano chiles, chopped
1 medium lime zest, grated
3 medium limes, juiced
METHOD
METHOD
1
Heat a saute pan. Add 2 tablespoons of butter. Stir in the cranberries
and sugar. Cook the cranberries for several minutes over moderate
heat until they begin to rupture. Remove from the heat.
1
Place the swordfish steaks and all the ingredients in a large Ziploc
bag for at least 1 hour or overnight in the refrigerator.
2
2
In a seperate saucepan reduce the wine by two thirds. Add the stock
and cream and reduce until slightly thickened. Add to the
cranberries and reduce to make a light sauce. Whisk in the remaining
butter.
When ready to prepare, preheat the grill for at least 10 minutes on
high.
3
Cook the swordfish for approx 6 minutes per side.
4
The swordfish will be flaky in the center when cooked thoroughly.
3
Salt and pepper to taste.
4
Preheat the grill side on high for 10 minutes. Season the pork chops
with a light dusting of salt and pepper.
5
Grill pork chops for 3 minutes per side for medium.
6
To serve, nap the sauce on warmed plate, top with three pork chops,
by overlapping the bones. Serve immediately.
PRESENTATION
This Swordfish is wonderful served over rice or a mixed lettuce salad
with a fresh salsa topping.
Recipe courtesy Debra Murray, Wolfgang Puck HSN Guest Host
Recipe courtesy of the "Wolfgang Puck Cookbook",
Random House, 1996
17
18
Eggplant Antipasto Stacks
Ginger Teriyaki Scallops
4 servings
4 servings
INGREDIENTS
INGREDIENTS
1 large Eggplant, cut into 1/4 inch rounds
2 large eggs, beaten
1 cup grated parmesan cheese
1/2 pound hard salami, shaved
1/4 pound sandwich pepperoni, sliced thin
8 slices provolone cheese, sliced thin
2 tablespoons pesto sauce
1 tablespoon grated onion
3 small garlic cloves, minced
1 tablespoon fresh ginger, grated
1 cup soy sauce
1 teaspoon sesame oil
1/2 cup sake or dry sherry
1/3 cup brown sugar
1 pound sea scallops
METHOD
1
2
3
Slice the eggplant and let soak in the beaten egg. Preheat griddle on
high for 10 minutes.
Divide the meat and cheese in four equal stacks, spreading a tiny bit
of pesto between each slice.
Place the Parmesan cheese onto a plate, press the eggplant rounds
into the cheese and coat both sides. Place on griddle and cook for
2 - 3 minutes.
4
Turn the slices over and add the meat and cheese to half of
the slices.
5
Place the other eggplant slices on top. Cook for 2 - 3 minutes, then
turn sandwich and cook remaining unbrowned side.
PRESENTATION
These wonderful slices of eggplants dipped in egg and cheese
make a carbohydrate free alternative to bread. Use them for your
favorite sandwiches.
METHOD
1
Place all the ingredients except scallops into a small sauce pan and
warm gently until sugar has dissolved. Let cool.
2
Place scallops and half the liquid in a Ziploc bag and marinate in the
refrigerator for 1-3 hours.
3
Preheat griddle side on high for 10 minutes.
4
The scallops can be skewered or just placed individually onto the
griddle. Cook for 2 minutes on one side, then turn cook for 2 - 3
minutes longer. Do not over cook.
PRESENTATION
The scallops can be served on skewers, with sauce on the side for
dipping. Or stir fry some snow peas and red pepper strips, and place
scallops on top with extra sauce.
Recipe courtesy Debra Murray, Wolfgang Puck HSN Guest Host
Recipe courtesy Debra Murray, Wolfgang Puck HSN Guest Host
19
20
Grilled Lamb Chops
Grilled Shrimp
with Ginger and Lime
4 Servings
4 servings
INGREDIENTS
INGREDIENTS
1/2 cup olive oil
6 cloves garlic, minced
1/2 cup dry red wine
1 bunch rosemary, leaves removed
2 tablespoons chopped fresh thyme
12 baby lamb chops (Have butcher trim to lollipop cut), 1 inch thick
1/2 teaspoon kosher salt
1/2 teaspoon freshly cracked pepper
3 tablespoons fresh lime juice
3 tablespoons extra virgin olive oil
1 tablespoon fresh ginger, minced
1 tablespoon brown sugar
1 teaspoon lime zest, grated
1 teaspoon sesame oil
1 large garlic clove, minced
1 pound large shrimp, peeled and deveined
2 whole limes, cut into 4 wedges
2 tablespoons fresh cilantro, chopped
METHOD
1
Place all the ingredients in a large Ziploc bag, marinate in the
refrigerator for at least 2 hours.
METHOD
2
Prepare grill by preheating on high for at least 10 minutes.
1
3
Place lamb chops on grill and cook for 3 minutes per side for
med rare.
In a large bowl, whisk together the lime juice, olive oil, ginger, brown
sugar, lime zest, sesame oil, and garlic. Add the shrimp. Cover and
marinate for 1-3 hours in the refrigerator
2
Preheat the grill side on high for ten minutes. Thread the shrimp
and lime wedges onto 8 skewers, dividing them evenly and
alternating them.
3
Place the skewers onto grill, 3 minutes on one side, flip, and cook for
2-3 minutes more until shrimp are bright pink and curled.
PRESENTATION
This is wonderful served with a Balsamic Vinegar reduction for dipping.
Place 1/2 cup Balsamic vinegar in a small non reactive saucepan, reduce
by half, add 1/2 cup beef or chicken stock, reduce by half again. Add 1
tablespoon of butter while still simmering. When sauce is thick enough
to coat the back of a wooden spoon, almost syrup consistency, sauce
is done.
PRESENTATION
Serve these shrimp as a light main course with rice or grilled vegetables,
or as an appetizer atop a bed of mixed greens.
Recipe courtesy Debra Murray, Wolfgang Puck HSN Guest Host
Recipe courtesy Debra Murray, Wolfgang Puck HSN Guest Host
21
22
Grilled Tuna
with Mint Vinaigrette
Quick and Easy Grilled Shrimp
on Rosemary Skewers
4 servings
5 servings
INGREDIENTS
INGREDIENTS
1 1/2 pounds fresh tuna in 4 equal steaks
fresh ground white pepper
2 tablespoons fresh mint or basil (Plus 4 sprigs for garnish) – chopped
1/2 cup extra virgin olive oil
1 tablespoon lime juice
1 tablespoon white or red wine vinegar
1 tablespoon fresh parsley – minced
2 medium shallot – minced
6 ripe plum tomatoes – peeled, seeded and diced
2 cloves garlic – chopped
1 pound large shrimp (36-40) – peeled and deveined
2 cups bottled italian dressing
1/4 cup chopped fresh parsley
10 large branches fresh rosemary
METHOD
1
Peel and devein shrimp and place into a large Ziploc bag with italian
dressing and chopped parsley. Marinate for 1 hour, in the refrigerator.
2
When ready to prepare, begin by preheating grill side on high on
high for 10 minutes. Beginning with the bottom of the rosemary,
with rosemary leaves pointing down, spear the shrimp and slide
down the rosemary branch. Repeat with 3 more shrimp per skewer.
3
Place skewers onto grill, cook for approx 3 minutes per side. Flip and
continue to cook till shrimp are pink, and curled.
METHOD
1
Sprinkle the Tuna steaks with pepper, then marinate in 1 tablespoon
of mint and 2 tablespoons of olive oil for 1-3 hours in the refrigerator.
2
In a bowl, combine the remaining ingredients, taste for correct
seasoning. Reserve.
3
To prepare, preheat grill side on high for 10 minutes.
Sprinkle the Tuna steaks with salt, and place on the grill.
4
Cook for 4 minutes per side for med. rare. To serve, nap the individual
serving plates with vinaigrette, place steak on top and garnish with
mint sprig.
PRESENTATION
These skewers are wonderful as an appetizer, or try them on top of a
greek salad.
Recipe courtesy Debra Murray, Wolfgang Puck HSN Guest Host
Recipe courtesy "Live, Love, Eat! The Best of Wolfgang Puck, Random
House 2002
23
24
Sesame Crusted Tuna
Spicy Tomato and Basil
Bruschetta
4 Servings
INGREDIENTS
1 1/2 pounds fresh tuna for equal steaks
1 teaspoon soy sauce
1 tablespoon sesame oil
sprinkle garlic salt
sprinkle white pepper
1/2 cup black and white sesame seeds (Or you can use just one of
the colors)
METHOD
1
Preheat the griddle side on high for 10 minutes. Mix the soy sauce
and sesame oil and brush the steaks with the combined mixture.
Sprinkle both sides of steaks modestly with garlic salt and
white pepper.
2
Place sesame seeds on a plate. Press the steaks into the seeds to
coat completely.
3
Place the steaks on griddle and cook for 4 minutes per side for
medium rare.
PRESENTATION
Serve this is wonderful served with a mayonnaise tinted with wasabi on
a bed of mixed field greens or a ginger vinegarette.
Recipe courtesy Debra Murray, Wolfgang Puck HSN Guest Host
25
12 Slices
INGREDIENTS
4 large ripe tomatoes, cored, and cut into 1/2 inch dice
1/2 cup chopped oven dried tomatoes (Or drained canned ones)
1/2 cup basil leaves, julienne
1/2 teaspoon salt
1/4 teaspoon freshly ground pepper
1/4 teaspoon crushed red pepper flakes
12 slices country style italian bread, slice 3/4 inch thick
3 tablespoons extra virgin olive oil
1 tablespoon roasted garlic
METHOD
1
Preheat griddle or grill surface on high for 10 minutes. Place
tomatoes, 1/3 cup basil salt and peppers in a med size bowl, toss
well & set aside.
2
Grill the bread until golden on both sides, approx 2 minutes per side.
Place toast onto a serving dish or platter.
3
In a small bowl mix together the olive oil and roasted garlic. Brush
this over both sides of bread. Using a slotted spoon, drain off excess
liquid, divide tomato mixture evenly between the bread slices.
Garnish with remaining basil.
Recipe courtesy "Live, Love, Eat! The Best of Wolfgang Puck, Random
House 2002
26
Western Omelette
Pepper Rings
1-2-3 Cheesecake
4 Servings
INGREDIENTS
INGREDIENTS
8 oz cream cheese
1/4 cup sugar
1 egg
2 large bell peppers, cut into 1/2 inch rings(All remaining pieces diced)
2 whole green onion, sliced
1/2 cup ham center slice, diced
1/2 cup shredded American cheese
8 large eggs, beaten
METHOD
1
Preheat grill at 400 for 15 minutes.
2
Preheat food trays for 5 minutes.
METHOD
3
Place cream cheese in microwave safe cup or bowl.
1
Preheat the griddle side for 10 minutes. Place the 8 pepper rings on
the griddle.
4
Microwave cream cheese for 30 seconds on high.
2
Toss the peppers, onions and diced ham. Divide mixture evenly
between the pepper rings.
5
Stir with a fork and cook for an additional 20 seconds.
6
Add sugar and stir until smooth.
3
Sprinkle the cheese evenly between pepper rings.
7
Add egg and stir.
8
Divide mixture between 4 hot food trays.
9
Place under grill and set timer for 12 minutes.
4
Pour the beaten eggs into the pepper rings. If any egg leaks from
the bottom, scrape up and place back inside.
5
Cook eggs for 2 minutes, then flip. Cook for 2 minutes longer until
eggs are cooked through.
PRESENTATION
Serve the pepper ring omelettes two per person with fresh salsa for
a brunch or breakfast idea.
Recipe courtesy Debra Murray, Wolfgang Puck HSN Guest Host
27
10 Check for doneness by gently tapping the side of the food tray with
a pot holder. If you notice ripples or waves, cook for an additional
3 - 5 minutes
TIPS
You can add fresh strawberries or raspberries to your cheesecake before
baking. Be sure not to fill past the top of the food tray.
Recipe courtesy of Marian Getz
28
Cheesy Breakfast Sandwich
Chocolate Chip Cookies
Serves 4
Serves 4
INGREDIENTS
INGREDIENTS
4 large eggs
4 English muffins
4 slices Canadian bacon
8 ounces medium cheddar cheese
Salt to taste
Pepper to taste
1
Preheat griddle side to 350 F for 5 minutes.
1 cup all purpose flour
1/2 teaspoon baking soda
1/2 teaspoon kosher salt
1/2 cup unsalted butter (softened)
1/2 cup sugar
1/4 cup packed brown sugar
1 teaspoon vanilla extract
1 egg
1 cup semi sweet chocolate chips
2
Place 2oz of cheese in a food tray and place under griddle (repeat
times 4)
METHOD
3
Place English muffins on griddle to brown.
4
Place Canadian bacon on griddle to brown.
5
Cook eggs to desired liking.
6
When eggs are done, place bacon on English muffin and egg on
top of bacon.
7
When plated, carefully remove cheese and pour over egg.
METHOD
TIPS
Cheese may need a few extra minutes to get to desired consistency.
1
Preheat grill to 400F for 15 minutes.
2
Preheat 4 food trays for 5 minutes.
3
In a large mixing bowl, cream butter and then add each ingredient
in the order listed, being sure to stir after each addition. Place
2 tablespoons of cookie dough in each food tray making sure to
push the dough below the rim of the food tray. Place under grill
and bake for 8-9 minutes or until puffed and golden brown.
Note: You may save the remaining cookie dough in the refrigerator
(up to 3 days)
Recipe courtesy of Marian Getz
Recipe courtesy of Marian Getz
29
30
Cornbread
Easy Cup Custard
Serves 4
Serves 4
INGREDIENTS
INGREDIENTS
1 cup all purpose flour
1 cup stone-ground yellow corn meal
2 teaspoons baking powder
3/4 teaspoons kosher salt
2 tablespoons sugar
1 cup milk
1 egg
1 cup corn kernels (fresh or frozen)
1/3 cup vegetable oil
3/4 cup heavy cream
1/4 cup whole milk
1/4 cup sugar
1 teaspoon vanilla extract
2 egg yolks
1 egg
Pinch of kosher salt
METHOD
1
Preheat grill to 400F for 15 minutes.
2
Preheat food trays for 5 minutes.
3
Combine all ingredients in large mixing bowl in order listed until
smooth.
4
Place 1/4 cup of batter into each food tray.
5
Place under grill, and set timer for 15 minutes.
6
Corn bread is done when puffed up and light golden brown on top
METHOD
1
Preheat grill to 400F for 15 minutes.
2
Preheat food trays for 5 minutes.
3
Whisk all ingredients together in mixing bowl until smooth.
4
Divide mixture between 4 hot food trays.
5
Place under grill and set timer for 12 minutes.
6
To test for doneness, tap the side of the food tray with a pot holder.
If you notice ripples or waves, cook for an additional 3 - 5 minutes.
7
Remove and serve warm or cold
Recipe courtesy of Marian Getz
31
32
Hot Oil Fondue
S’mores
Serves 4
Serves 4
INGREDIENTS
INGREDIENTS
4 cups peanut or other vegetable oil
1 New York strip cut into 1” cubes
12 medium shrimp peeled and deveined
2 boneless, skinless chicken breast cut into 1”cubes
Dipping sauce as desired
Salt to taste
Pepper to taste
1 cup semi sweet chocolate chips
1 cup mini marshmallows
8 graham crackers
METHOD
1
Divide chocolate chips into 4 even amounts and place in food tray.
2
Divide marshmallows into 4 even amounts and place in food tray.
(Chocolate chips and marshmallows go in separate trays).
Preheat griddle to 400 F for 15 minutes.
3
Place trays under grill and set timer for 2 minutes.
2
Skewer meats using long skewers.
4
Remove chocolate chips after 2 minutes.
3
Pour oil into 3 quart sauce pan and place on griddle top.
5
Allow marshmallows to cook for another 1 minute.
4
Heat oil to 350 to 375 (this will take about 30 minutes).
6
Place 4 graham crackers on desert plate.
5
Adjust griddle to maintain this temperature.
7
Scrape chocolate onto graham cracker.
6
Use a thermometer for accuracy.
8
Top each with marshmallow.
9
Place remaining graham cracker on top
METHOD
1
TIPS
Let your guest cook their own meats using the following guide:
Steak
1 minute for rare
2 minutes for medium
3 - 4 minutes for well done
Shrimp
2 minutes
Chicken
4 minutes
Recipe courtesy of Marian Getz
Add salt and pepper to taste after removing from oil
Recipe courtesy of Marian Getz
33
34
Recipe Notes
Recipe Notes
35
36
Recipe Notes
Limited Warranty
This warranty covers all defects in workmanship or materials in the
mechanical and electrical parts, arising under normal usage and care,
in this product for a period of 12 months from the date of purchase
provided you are able to present a valid proof-of-purchase. A valid
proof-of-purchase is a receipt specifying item, date purchased, and
cost of item. A gift receipt with date of purchase and item is also an
acceptable proof-of-purchase. Product is intended for household use
only. Any commercial use voids the warranty.
This warranty covers the original retail purchaser or gift recipient.
During the applicable warranty period within normal household use,
we will repair or replace, at our discretion, any mechanical or electrical
part which proves defective, or replace unit with a comparable model.
To obtain service under the terms of this warranty, call Toll Free
(800) 275-8273.
THIS LIMITED WARRANTY COVERS UNITS PURCHASED AND USED
WITHIN THE UNITED STATES AND DOES NOT COVER:
• Damages from improper installation.
• Defects other than manufacturing defects.
• Damages from misuse, abuse, accident, alteration, lack of proper
care and maintenance, or incorrect current or voltage.
• Damage from service by other than an authorized dealer or service
center.
This warranty gives you special legal rights and you may also have other
rights to which you are entitled which may vary from state to state.
37
38