1
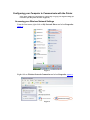
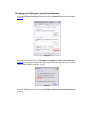
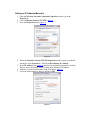
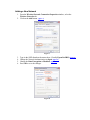
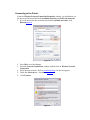
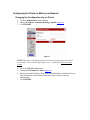
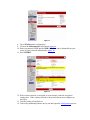
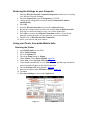
Epson MobilLink TM-P60 Configuration
Please note that this manual is provided by New West Technologies as an additional service for our
partners, and by no means should be considered an authoritative guide. Please refer to the Technical
Reference Guide for the TM-P60 for further information on the printer specifications. Because the
Epson TM-P60 is an 802.11b-based printer, you may need to be familiar with wireless networking
technology and generic networking principles to configure this device.
Requirements:
1. An available wireless network:
• WPA encryption is not supported with the Epson TM-P60 at this time.
WEP encryption (64-bit and 128-bit) and open networks (without
encryption) are supported.
• If the network is using a MAC filter, please add the MAC address from
the printer to the list of permitted devices.
2. Information on an available wireless network:
• ESSID (or SSID, as it’s commonly known)
• Encryption key (if the network is encrypted)
• Subnet mask
• An available IP address for use with the printer.
• Router login information (in case an alteration needs to be made to the
wireless network configuration.)
3. A laptop or PC with wireless networking capability for configuration of the
device
Your Epson TM-P60 printer arrived configured with default settings from the factory. To
use your printer, you will need to configure a computer with wireless access (such as a
modern laptop) to match the printer before you can change the printer settings.
NOTE: You should only configure one printer at a time, as all have the same settings
installed at the factory. Leave any additional unconfigured Mobillink printers turned off.
Preparing to Connect to the Printer
Printing out the Current Printer Status
1.
2.
3.
4.
Turn on the printer and then open the paper roll cover.
Hold down the FEED button until the printer beeps.
Close the paper roll cover.
Note the SSID, Network Mode, and IP Address
NOTE: Realign the paper properly so that it may leave the printer housing each
time you close the roll cover.
Configuring your Computer to Communicate with the Printer
(Note: These settings are only temporary. Please keep a copy of your original settings for
restoration after the printer has been configured.)
Accessing your Wireless Network Settings
From the Start menu, right-click on My Network Places and select Properties.
(figure 1)
Figure 1
Right-click on Wireless Network Connection and select Properties. (figure 2)
Figure 2
Changing your Settings to use Ad-hoc Networks
Go to the Wireless Networks tab and press the Advanced button near the bottom.
(figure 3)
Figure 3
Select the radio button next to Computer-to-computer (ad-hoc) networks only.
(figure 4) If your printer arrived direct from the factory the network mode (from the
status sheet) should say ad-hoc as well.
Figure 4
Press the Close button to return to the Wireless Network Connection Properties
window.
Setting an IP Address Manually
1. From the Wireless Network Connection Properties window, go to the
General tab.
2. Click on Internet Protocol (TCP/IP). (figure 5)
3. Press the Properties button. (figure 5)
Figure 5
4. When the Internet Protocol (TCP/IP) Properties window opens, you should
already be at the General tab. Select Use the following IP Address.
5. In the IP Address field, (figure 6) enter the four numbers (separated by periods)
that you received from the printer’s status sheet labeled as IP Address.
6. Add one (1) to the fourth number in the IP Address. (figure 6)
7. Leave the other settings as they are and press OK.
Figure 6
Adding a New Network
1. From the Wireless Network Connection Properties window, select the
Wireless Networks tab.
2. Click on the Add button. (figure 7)
Figure 7
3.
4.
5.
6.
Type in the SSID found on the status sheet. (Usually EpsonNetIBSS) (figure 8)
Change the Network Authentication to Open. (figure 8)
Change the Data Encryption to Disabled. (figure 8)
Press OK to save the changes.
Figure 8
Connecting to the Printer
From the Wireless Network Connection Properties window, you should now see
the new network listed under both Available networks and Preferred networks.
1. If you do not see the new network listed under Available networks, click
Refresh.(figure 9)
Figure 9
2. Press OK to save the changes.
3. From the Network Connections window, double-click on Wireless Network
Connection.
4. Select the new network. Refer to troubleshooting if it does not appear.
5. Check the Allow me to… checkbox. (figure 10)
6. Click Connect.
Figure 10
7. Open your web browser and type in the IP Address and press ENTER.
8. When the login window appears, click OK without any User name or
password. (figure 11)
Figure 11
9. Your browser should now open the configuration page. (figure 12)
Figure 12
10. If your browser displays neither the login window nor the configuration page,
verify the computer’s network settings to see that they match what was printed
earlier.
Configuring the Printer to Match your Network
Changing the Configuration of your Printer
1. Click on Administrator under Options.
2. Change IP Address resolution printing to Enable. (figure 13)
3. Click SUBMIT.
Figure 13
NOTE: The printer will always inform you when the settings have been saved
successfully. They will take effect after a reset. At this point, do not reset the
printer.
4. Go to the TCP/IP configuration.
5. Change Get IP Address to Static. (figure 14)
6. Enter the desired IP address, along with the Subnet Mask and default Gateway.
This information can be obtained from your router or from a network
administrator.
7. Click SUBMIT.
Figure 14
8. Go to Wireless under configuration.
9. Click on the Infrastructure radio button. (figure 15)
10. Enter your network SSID into the SSID field. This can be obtained from your
router or from a network administrator. (figure 15)
11. Press SUBMIT.
Figure 15
12. If the wireless network is encrypted on your network, enter the encryption
settings now. If the wireless network is unsecured, then no more changes are
necessary.
13. Turn the printer off and back on.
14. Turn on any additional printers one by one and repeat the configuration process.
Restoring the Settings on your Computer
1. Enter the Wireless Network Connection Properties window.(see Accessing
your Wireless Network Settings)
2. From the General tab, open the Properties for TCP/IP.
3. Change the IP settings back to normal (usually Obtain an IP address
automatically)
4. Press OK.
5. From the Wireless Networks tab, press the Advanced button.
6. Restore the settings to their previous state (usually Any available network)
7. Keep the new network settings in case you reset the printer later.
8. Press OK to return to the Network Connections window. (If you do not
normally connect through a wireless network, you are now finished)
9. Double-click on Wireless Network Connection.
10. Select your network and press connect.
Using your Printer from within Mobile Suite
Selecting the Printer
1.
2.
3.
4.
5.
6.
7.
Open Mobile Suite on your PDA.
Select Label Printing.
Go to the Options tab.
Tap on the Setup button by Printer.
Under Printer, select Epson TM-P60. (figure 16)
Under Port, select Network: IP Printer. (figure 16)
Color should automatically be set to Monochrome, and the paper orientation
and size should self-adjust to the default paper size.
8. Tap on Set Printer IP (at the bottom). (figure 16)
9. Enter the IP address under IP Printer Address. (figure 17)
10. Tap Save.
11. Press Save Settings to return to the Options tab.
Figure 16
Figure 17
Selecting a Label Template File
1. Tap on the Setup button by Label Template File.
2. Select a template file from the list.
3. Mobile Suite will return automatically to the Options tab.
4. Verify that Raw Text is unchecked.
NOTE: Label Templates can be made from RMS Store Operations Manager and
used within Mobile Suite. These template files must be placed within the My
Documents folder or a subfolder of My Documents on your PDA.
Keep in mind that labels should be chosen and designed according to the size of the
paper used by the printer.
Printing from within Mobile Suite
Please refer to the official Mobile Suite documentation for further instructions on
printing
Appendix: Troubleshooting
Turning on Wireless Networking
If you are using a laptop to configure your wireless network, be sure that the
wireless feature is turned on. Many laptops have a switch on the outside case to
disable wireless and save battery power.
Disabling and Enabling Wireless Networking
If your computer constantly refuses to display the printer’s ad-hoc network after
double-clicking on the Wireless Network Connection (figure 10) you may need to
right-click on the icon and select Disable. Wait 1 minute, and then right-click
again and select Enable.
Disabling security
If you cannot get the printer to connect to your wireless network and retrieve an IP
number, you may have to disable any security keys and authorization on your
network. Have someone who has access to your access point or router disable the
security temporarily until you can set up the printer. If several computers access
the network through this wireless access point or router consider doing this after
hours. Then, slowly re-introduce your security scheme until you can pinpoint what
is preventing network access. Be sure to update your other computers if you
change any settings.
Resetting the printer
If, in the installation process, your printer becomes unresponsive and inaccessible,
you may reset it to the factory default state by following this sequence.
1.
2.
3.
4.
5.
While the printer is in the off state, open the paper roll cover.
Turn on the printer while holding down the FEED button.
Press the FEED button 6 times.
Shut the paper roll cover.
The printer will now print its current configuration and the remainder of the
procedure. To continue with the reset, open the paper roll cover and press the
feed button exactly one (1) time. Close the paper roll cover and the printer will
reset itself to the factory default state.