1
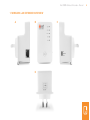
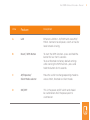
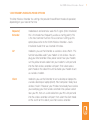
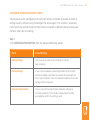
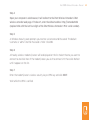
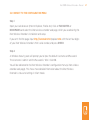
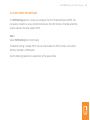
300N Wireless Extender
Manual
COPYRIGHT
Copyright © 2012 - iiNet Limited. All rights reserved. No part of this
publication may be reproduced, transmitted, transcribed, stored in a retrieval system, or translated
into any language or computer language, in any form or by any means, electronic, mechanical,
magnetic, optical, chemical, menu or otherwise, without the prior written permission of iiNet Limited.
iiNet Limited makes no representations or warranties, either expressed or implied, with respect to the
contents herein and specifically disclaims any warranties, merchantability or fitness for any particular
purpose. Any software described in this User Manual is sold or licensed ‘as is’.
Further, iiNet Limited reserves the right to revise this publication and to make changes from time to
time in the contents thereof without obligation to notify any person of such revision or changes.
Copyright applies to written, audio or visual intellectual property, ie. contents of this manual, not the
actual product.
Trademark or Registered Trademark is effectively the copyright on a product, ie. a patent.
iiNet 300N Wireless Extender - Manual
Contents
1. Welcome to iiNet’s Wireless Extender
3
1.1
Wireless LAN Extender Overview
4
1.2
System Requirements
6
1.3
Extender’s Wireless Mode Options
7
2. Overview of the advanced settings in the ‘extender’ mode
8
2.1
Connect to iiNet wireless extender web page
8
2.2
Mac Address Filtering
13
2.3
Finding Unknown MAC Addresses
16
2.4
Advanced Settings - System Utility18
2.5
Backup Configuration Settings
22
2.6
Upgrading the iiNet Wireless Extender
23
1
iiNet 300N Wireless Extender - Manual
3. Client Mode24
3.1
Web Browser Quick Setup
24
3.2
Connect to the Configuration Menu
27
3.3
Client Mode: Home settings
28
3.4
Client Mode: WPS Settings
29
3.5
Client Mode: Advanced Settings
32
4. AP Mode33
4.1
AP Mode: Web Browser Quick Setup
33
4.2
Connect to the Web Configuration Menu
33
4.3
AP Mode: Home
35
4.3
AP Mode: WPS Setting
35
5. 300N Wireless Extender Specification
38
6. Glossary39
2
1
iiNet 300N Wireless Extender - Manual
Welcome to The iiNet Wireless Extender
Hi,
The Extender is a portable device that will provide you with excellent
network performance and extend your Wi-Fi signal. You can now boost
the wireless coverage in any weak signal spots around your home.
This User Manual describes the Extender’s functionality in more detail
and its other modes and advanced settings.
If you want a quick and basic installation of the Extender, and be up
and running in no time, refer to the Quick Installation Guide first.
Its capacity as an 802.11b/g/n wireless extender with in-built power,
gives you more freedom to scale up your wireless network.
Inside your installation pack, you’ll find everything you need to set-up
your wireless connection to your Extender using your computer and
modem/router.
Enjoy your extended wireless coverage!
3
iiNet 300N Wireless Extender - Manual
1.1 WIRELESS LAN EXTENDER OVERVIEW
A
B
D
C
4
iiNet 300N Wireless Extender - Manual
View
Feature
Desciption
A
LAN
Ethernet LAN Port - 10/100M with Auto-MDI/
MDI-X. Connects to computer, switch or hub for
local network sharing.
B
Reset / WPS Button
To start the WPS function - press and hold the
button for less than 5 seconds.
To reset Extender to factory default settings
while starting the WPS function - press and
hold the button for 10 seconds.
C
AP/Repeater/
Client Mode selector
Move the switch to change operating mode to
Access Point, Extender or Client mode.
D
ON/OFF
This is the power on/off switch and should
be switched on after the power-point is
switched on.
5
iiNet 300N Wireless Extender - Manual
1.2 SYSTEM REQUIREMENTS
Check you have the following computer system requirements necessary for the installation:
• A wireless network card which is compatible with 802.11b/g/n wireless network standard.
• Operating System – Windows 2000, 2003, XP, Vista, or Windows 7.
• CD-ROM drive
• At least 100MB of available disk space.
6
iiNet 300N Wireless Extender - Manual
1.3 EXTENDER’S WIRELESS MODE OPTIONS
The iiNet Wireless Extender has settings that provide three different modes of operation,
depending on your need at the time:
Repeater/
Extender
mode boosts and extends a weak Wi-Fi signal. (After installation,
this is the mode most frequently used as a starting point). This
is the most common function. For assistance in setting up this
option please refer to the ‘300N Wireless Extender – Quick
Installation Guide’ that was inserted in the box.
AP
mode lets you use the Extender as a wireless Access Point. This
function would be used if your modem is not wireless. You can
plug your iiNet extender into a power socket near your modem;
run the yellow network cable from your modem’s LAN port and
into the iiNet wireless extender LAN port. Then select access
point mode on the side of the unit to enable your modem to act
as a wireless modem.
Client
mode lets you use the Extender to turn a desktop or laptop into
a wireless desktop or laptop (client). Most computers today have
wireless in built. If however your PC does not already have wireless
you could plug your iiNet wireless extender into a power socket
near your PC, then run a LAN cable from your PC LAN port and
into the wireless extender LAN port; then select the client mode
on the switch on the side of your iiNet wireless extender.
7
2
iiNet 300N Wireless Extender - Manual
Overview of the advanced settings in the ‘extender’ mode
To access the advanced features of the iiNet wireless extender you first need to follow the
steps in the ‘300N Wireless Extender – Quick Installation Guide’ that was inserted in the box.
2.1 CONNECT TO IINET WIRELESS EXTENDER WEB PAGE
If you want to change the advanced settings and configure your Extender beyond the
normal functionality as shown in the quick install guide, you will need to access the
extenders’s user interface.
Step 1
Open your web browser and select the extender’s Quick Setup web page from your
Favorites or Bookmarks list (if you saved it successfully during the Quick setup). Double
click that link.
If you didn’t save the web page during the quick setup procedure then you’ll need to type
the following URL into your web browser’s address bar and press Enter.
Type: http://iiextender1234 and press enter
(replace ‘1234’ with the last four digits of your Extender’s MAC serial number).
You made a note of this in the previous step in this guide
The default IP address of the iiNet wireless extender is 192.168.2.254
In order to access this IP address you will need to manually configure your laptop to have
an IP address in the range of 192.168.2.x
8
iiNet 300N Wireless Extender - Manual
Step 2
The Windows Security dialogue box opens; this is where you enter the default Username
and Password.
Type: admin for the User name 1234 for the Password
Click OK to Continue
The iiNet wireless extender advanced settings web page opens.
9
iiNet 300N Wireless Extender - Manual
Repeater Mode - Advanced Settings
Field
Value Meaning
Fragment Threshold
Sets the maximum fragment threshold of wireless radio. Default
value is 2346.
RTS Threshold
Sets the maximum Request to Send (RTS) threshold of wireless
radio. Default value is 2347.
Beacon Interval
Sets the beacon interval - a periodic unit of binary data sent out
on the air to announce its presence and name - of a wireless
ration. Default value is 100.
DTIM Period
Configures the DTIM (Delivery Traffic Indication Message) send
period. Default value is 3.
Data Rate
You can select the wireless data transfer speed. When you select
a value, the Extender won’t connect with other wireless clients
using other speeds. This should be set to Auto to enable the
Extender to adjust its speed automatically.
N Data Rate
You can select the wireless data transfer speed by MCS0 to MCS7.
MCS stands for Modulation and Coding Scheme, which represents
different speeds when the bandwidth is 20MHz or 40MHz. Select
Auto and the Extender will adjust the speed automatically.
10
iiNet 300N Wireless Extender - Manual
Field
Channel Width
Value Meaning
You can select the wireless channel width - 20MHz or 40MHz.
Bandwidth 40MHz provides a better network speed for 802.11n
standard wireless clients.
If there are 802.11b/g clients connecting to the Extender, it will
switch to 20MHz mode automatically.
Preamble Type
Sets the type of preamble of wireless radio. Default setting is
Short Preamble.
Broadcast ESSID
Extended Service Set ID (ESSID) is the identifying name of a
wireless network. When set to ‘Enabled’, every wireless device
can scan and find the Extender. When the broadcast ESSID
is set to ‘Disabled’, only wireless clients who know the exact
SSID of your Extender can connect to it. To keep your Extender
secure, keep this Disabled.
WMM
Wireless Multi Media - allows you to ‘Enable’ or ‘Disable’ Wireless
Multi-Media. When enabled, the Extender will give priority to
multi-media related network applications.
CTS Protect
Clear To Send - protection when transferring data. The default
setting for this function is Auto
11
iiNet 300N Wireless Extender - Manual
Field
Value Meaning
TX Power
Can select a wireless transmitting power level from 10 to 100
percent. As long as your laptop or wireless computer isn’t far
away from the Extender, you don’t have to select a higher
power level.
Enable LED off mode
This mode enables or disables LED lights. Click Enable LED OFF
mode to setup LED behavior:
•
•
Turn off all LED mode will disable all LED lights.
Turn off all LED except POWER LED mode will disable all
LED lights, except the POWER LED.
12
iiNet 300N Wireless Extender - Manual
Step 3
When you finish changing settings on any of the feature in the advanced section, click
Apply in the bottom right hand corner of the page.
You’ll be prompted to wait for 30 seconds before you can reconnect to the Extender.
2.2 MAC ADDRESS FILTERING
You can use wireless security to allow only those you know to use the iiNet Wireless
Extender. The MAC Filtering function under Advanced Settings permits wireless users
with certain MAC addresses to use the iiNet Wireless Extender.
13
iiNet 300N Wireless Extender - Manual
ADVANCED SETTINGS – MAC ADDRESS FILTERING
Field
Value Meaning
Enable Wireless Access
Control
Check this box to enable MAC filtering. If this box is left unchecked, anyone who knows the wireless password can connect
to your iiNet Wireless Extender.
MAC Address
Input the MAC address of the computer you wish to deny or
allow access to your iiNet Wireless Extender into the MAC
address list. The MAC address is made up of 12 HEX characters.
Comment
Input any descriptive text about this rule so you can remember
the purpose of this rule. You can input up to 20 alphanumerical
characters in this field.
Add
Allows you to add a MAC address to the list.
Clear
Clears the MAC Address and Comment fields.
Delete Selected
Allows you to delete MAC address(es) that you select by checking
their Select box.
14
iiNet 300N Wireless Extender - Manual
Field
Value Meaning
Delete All
To delete all MAC addresses in the list. You’ll be prompted to
confirm the deletion first.
Reset
Allows you to uncheck all checked boxes.
Select
You can list all existing MAC addresses. To delete a MAC address
from the list, check the box of the MAC address you wish to
delete first. You can select more than one MAC address.
Step 1
If you’ve finished and want to save the changes and make them take affect immediately,
click APPLY. The system will reboot.
You’ll be prompted to wait for 30 seconds before you can reconnect to the iiNet Wireless Extender.
15
iiNet 300N Wireless Extender - Manual
2.3 FINDING AN UNKNOWN MAC ADDRESSES
If you don’t know the MAC address of your computer or any other wireless device, here’s
what you can do:
Step 1
For wireless devices and computers already connected to the iiNet Wireless Extender, select
Home from menu number 4 in the top bar of the iiNet wireless extender website page.
Step 2
Click SHOW ACTIVE CLIENTS. You will see a range of 12 digits separated by a colon, for
example this image shows a laptop with the MAC address 00:19:d2:a0:35:77.
All computer or wireless device MAC addresses will be displayed in the MAC Address field.
16
iiNet 300N Wireless Extender - Manual
Step 3
If you still can’t identify the MAC address of a computer, click the network icon in the
computer’s lower-right hand corner.
Step 4
In the pop-up window that opens, click Open Network and Sharing Center.
Step 5
Click on the connection that you’ll use to connect to the iiNet Wireless Extender - in this
case, Local Area Connection.
Step 6
The Local Area Connection Status window opens. Click Details.
Step 7
Click on the connection that you’ll use to connect to the iiNet Wireless Extender - in this
case, Local Area Connection.
17
iiNet 300N Wireless Extender - Manual
2.4 ADVANCED SETTINGS - SYSTEM UTILITY
You can change the settings of several parameters on the iiNet Wireless Extender, including
the administrator’s password, and the IP address.
Step 1
Click SYSTEM UTILITY under the Advanced Settings option.
ADVANCED SETTINGS – SYSTEM UTILITY
Field
Value Meaning
Password Settings
The default password of the iiNet Wireless Extender is 1234. It’s
displayed on the login prompt when accessed from the web
browser. It’s important you change the default password to
ensure your security, particularly when you have the wireless
function enabled.
Current Password
To change the current password, you have to input the current
password first.
New Password
This is where you input your new password using a combination
of letters, numbers, and symbols up to 20 characters long.
18
iiNet 300N Wireless Extender - Manual
Re-Enter Password
Input your new password here, again, to confirm it’s the same as
the New Password.
Management IP
The default is set to enable the DHCP client to obtain the IP
address automatically from your broadband modem.
IP Address
To set up the IP address of this iiNet Wireless Extender, input the
default IP address of the LAN / Wi-Fi port of the iiNet Wireless
Extender: 192.168.2.254.
Important Note:
If you assign one static IP to the iiNet Wireless Extender and you forget that IP, open your web
browser. To login to the iiNet wireless extender web page, input http://iiextender1234 in the address bar. But remember to replace “1234” with the last four digits of your iiNet Wireless Extender’s MAC serial number.
Or, to reset to the factory default settings, press the iiNet Wireless Extender’s WPS button and
hold it for 10 seconds.
Subnet Mask
A number that defines a range of IP addresses that can be used
in a network as a sub-set of the IP address you’re using.
Gateway Address
Input the gateway’s IP address of your network. Generally
you can use the default address 0.0.0.0 as the iiNet Wireless
Extender will access the Internet via the WAN port.
19
iiNet 300N Wireless Extender - Manual
Field
Value Meaning
DHCP Server
A network server uses Dynamic Host Configuration Protocol
(DHCP) to dynamically assign IP addresses to networked
computers. Your iiNet Wireless Extender is able to act as a DHCP
server for your network, but this function is disabled by default.
If you want to activate this function, select Enabled in the DHCP
Server option, and follow the detailed instructions.
If you don’t want to use the DHCP server function or there’s
another DHCP server on the network that the iiNet Wireless
Extender connects to, select Disable.
Important Note:
If you select Disable in the DHCP Server option, all DHCP-related fields will be grey-ed out, and
you won’t be able to input any DHCP parameters.
Default Gateway IP
Input the IP address of the default gateway of your network.
Domain Name Server IP
Enter the IP address of the domain name server (DNS).
Start IP
Input the start IP address of the IP range.
20
iiNet 300N Wireless Extender - Manual
Field
Value Meaning
End IP
Input the end IP address of the IP range here.
Domain Name
An optional function, you can enter the domain name for your
network here.
Lease Time
Choose a lease time (that’s the length of time a computer can
keep a specific IP address) for every IP address assigned by
the iiNet Wireless Extender from the drop-down menu.
If you still need to make changes to the iiNet Wireless Extender’s settings, click CONTINUE.
If you’ve finished and want to save the changes, click APPLY. The system will reboot.
21
iiNet 300N Wireless Extender - Manual
2.5 BACKUP CONFIGURATION SETTINGS
You can back-up the configuration of your iiNet Wireless Extender to be able to recall all
settings quickly without having to configure the device again. This function is especially
useful when you need to move the iiNet Wireless Extender to different places around your
home or when you’re travelling.
Step 1
Click CONFIGURATION SETTING, from the Advanced Settings option.
Field
Value Meaning
Backup Settings
Click Save to save the current settings to a file on
your computer.
Restore Settings
If you want to upload a saved configuration file to the iiNet
Wireless Extender, click Browse to search for and select the
file on your computer. Then click Upload to replace the current
settings with the new one.
Reset to Factory Default
You can reset all the iiNet Wireless Extender settings to
the factory defaults. This includes the password. You’ll be
prompted to confirm the settings reset:
22
iiNet 300N Wireless Extender - Manual
2.6 UPGRADING THE IINET WIRELESS EXTENDER
Firmware
The software (or firmware) running your iiNet Wireless Extender can be upgraded.
Go to the iiNet website to look for the latest firmware file. Download it to your computer
then upload it to the iiNet Wireless Extender.
The Browse button, when clicked, allows you to search for and select a firmware file saved
on your computer.
When you’ve found and selected your file, click APPLY to start the firmware upgrade.
23
3
iiNet 300N Wireless Extender - Manual
Client mode
Client mode allows the iiNet Wireless Extender to connect to another wired access point
or modem.
3.1 WEB BROWSER QUICK SETUP
Before you can connect to the iiNet Wireless Extender via the web browser you need to
ensure your computer can get an IP address automatically (a dynamic IP address).
You also need your modem/router’s wireless security key (or WPA key) and the last four
digits of your iiNet Wireless Extender’s MAC serial number.
Step 1
Switch the mode selector to Client mode
Step 2
Plug the iiNet Wireless Extender into a power point. Use the Ethernet cable to connect
your computer to the iiNet Wireless Extender.
Step 3
Switch on the power point and the switch on your iiNet Wireless Extender. The Power
LED will light up.
24
iiNet 300N Wireless Extender - Manual
Step 4
Open your computer’s web browser, it will redirect to the iiNet Wireless Extender’s iiNet
wireless extender web page. If it doesn’t, enter the default address http://Iiextender1234
(replace 1234 with the last four digits of the iiNet Wireless Extender’s MAC serial number).
Step 5
A Windows Security pane prompts you to enter a Username and Password. The default
Username is ‘admin ‘and the Password is ‘1234’. Click OK.
Step 6
All nearby wireless modems/routers will be displayed on the list. Select the one you want to
connect to and click Next. If the modem/router you wish to connect isn’t there click Refresh
until it appears on the list.
Step 7
Enter the modem/router’s wireless security key or WPA key and click NEXT.
Wait while the WPA is verified.
25
iiNet 300N Wireless Extender - Manual
The parameter Connected Access Point SSID is the SSID of the modem/router you selected
earlier. Check that all the information is correct.
If you need to change anything, press Back to select again. If everything’s fine, click APPLY
and wait a few seconds for the iiNet Wireless Extender to reboot.
If your computer doesn’t save the iiNet wireless extender URL (web page) automatically, it
will prompt you to save it manually.
Click OK and revisit Step 4 and Step 5 until you get to the iiNet wireless extender page and
manually Save the page to your Favourites or Bookmark list.
When the iiNet Wireless Extender’s reboot is complete, the amber Signal status light on the
iiNet Wireless Extender remains steady, the WLAN status light flashes and the Power light is on.
Set up has been successful. Well done!
After the iiNet Wireless Extender has been set up, it will get the IP address from your
broadband router/modem automatically.
26
iiNet 300N Wireless Extender - Manual
3.2 CONNECT TO THE CONFIGURATION MENU
Step 1
Open your web browser (Internet Explorer, Firefox etc). Click on FAVOURITES or
BOOKMARKS and select the iiNet wireless extender web page, which you saved during the
iiNet Wireless Extender’s installation and setup.
If you can’t find the page, input http://Iiextender1234 (replace 1234 with the last four digits
of your iiNet Wireless Extender’s MAC serial number, and press ENTER.
Step 2
A Windows Security pane will prompt you to input the default Username and Password.
The Username is ‘admin’ and the Password is ‘1234’. Click OK.
You will be redirected to the iiNet Wireless Extender’s configuration menu (a iiNet wireless
extender web page). This shows more detailed information about the iiNet Wireless
Extender’s status and settings in Client mode.
27
iiNet 300N Wireless Extender - Manual
3.3 CLIENT MODE: HOME SETTINGS
Step 1
Select Home from the menu on the left pane of the iiNet wireless extender web page.
The Home configuration page contains status of your system, wireless and LAN
configurations. The contents might vary depending on your computer’s settings:
28
iiNet 300N Wireless Extender - Manual
3.4 CLIENT MODE: WPS SETTINGS
The WPS Setting option is where you configure the Wi-Fi Protected Setup (WPS). You
can quickly establish a secure connection between the iiNet Wireless Extender and other
wireless devices that also support WPS.
Step 1
Select WPS Setting from the left pane
The default setting is Enable WPS. You can also Disable the WPS function via the iiNet
Wireless Extender’s WPS button.
See the following table for an explanation of the above fields:
29
iiNet 300N Wireless Extender - Manual
CLIENT MODE – ENABLE WPS
Field
Value Meaning
WPS Status
This shows the security setting status of WPS. If the wireless
security (encryption) function of this device is set properly,
you’ll see Configured here. If the wireless security function has
not been set, you’ll see Unconfigured.
Self PinCode
This displays an eight digit number for WPS PIN-style
configuration. When you want to connect other WPScompatible wireless devices to the iiNet Wireless Extender,
input this eight digit number into the wireless device to
establish a connection.
SSID
Service Set Identifier - the SSID of your Wireless iiNet
Wireless Extender.
Authentication Mode
Shows the authentication mode of the iiNet Wireless Extender.
The default is set to Disable.
Passphrase Key
This will show-up as asterisks - *** - to indicate wireless security
is properly set.
30
iiNet 300N Wireless Extender - Manual
Field
Value Meaning
Config Mode
Client mode only supports Enrollee mode. You will need to
enter the Client mode PIN code into the modem/router.
Start PBC button
Click this button to start the WPS auto set-up process. The
iiNet Wireless Extender will wait for WPS requests from
another wireless device for two minutes. During that time the
WPS status light on the iiNet Wireless Extender will flash for
two minutes.
Start PIN button
Click this button and enter the PIN code of the router/modem
you want to connect to. The WPS status light on the iiNet
Wireless Extender will flash while the iiNet Wireless Extender
waits for the incoming WPS request.
Note: WPS 2.0 requirements
WEP and WPA-PSK security protocols cannot support a WPS connection. To avoid
problems, we recommend that you DO NOT use WEP and WPA-PSK.
31
iiNet 300N Wireless Extender - Manual
3.5 CLIENT MODE: ADVANCED SETTINGS
You can configure your iiNet Wireless Extender’s advanced wireless settings.
Step 1
Select Advanced Settings from the menu in the left pane.
32
4
iiNet 300N Wireless Extender - Manual
AP Mode
To build a wireless networking environment for your home or small office, switch the iiNet
Wireless Extender to AP (Access point) mode and connect it to your modem/router.
Anyone in your home will be able to access the internet wirelessly via this access point.
4.1 AP MODE: WEB BROWSER QUICK SETUP
Before you can connect to the iiNet Wireless Extender via the web browser you need
to ensure your computer can get an IP address automatically (a dynamic IP address).
If you’re unsure, read the 5: Configuring TCP/IP on Your PC to set your PC to use the
dynamic IP address.
4.2 CONNECT TO THE WEB CONFIGURATION MENU
Step 1
Open your web browser (Internet Explorer, Firefox etc). Click on Favorites or Bookmarks
and select the iiNet wireless extender web page, which you saved during the iiNet
Wireless Extender’s installation and setup.
If you can’t find the page, input http://iiextender1234 (replace 1234 with the last four
digits of your Extender’s MAC serial number,) into the address bar and press ENTER.
33
iiNet 300N Wireless Extender - Manual
Step 2
A Windows Security pane will prompt you to input the default Username and Password.
The username is ‘admin’ and the password is ‘1234’. Click OK.
The iiNet wireless extender web page opens at the configuration menu in AP mode.
A description of the menu’s settings and functions follows.
34
iiNet 300N Wireless Extender - Manual
4.3 AP MODE: HOME
This option gives detailed information about the iiNet Wireless Extender’s status in
AP mode.
Step 1
Select the Home option by selecting the button from the top menu.
4.4 AP MODE: WPS SETTING
This is where you configure the Wi-Fi Protected Setup (WPS).
WPS will provide you with a swift and secure connection between the iiNet Wireless
Extender and other wireless devices that also support WPS.
Step 1
Select WPS Setting, from the menu of the iiNet wireless extender web page.
ENABLE WPS
This function allows you to Enable the WPS function by clicking in the box.
Or, Disable it by clicking in the box to remove the tick.
(The default setting is Enable WPS.)
You can also Disable the WPS function via the iiNet Wireless Extender’s WPS button.
35
iiNet 300N Wireless Extender - Manual
Field
Value Meaning
WPS Status
Displays the security status of the WPS:
Configured - means the wireless security (encryption) function
of this device is properly set.
Unconfigured – means the wireless security function has not
been set.
Self PinCode
An eight-digit number for the WPS PIN-style configuration.
When you want to connect the iiNet Wireless Extender to
other WPS-compatible devices, enter this number into the
wireless device to set up a connection.
SSID
Shows the Service Set Identifier of the Wireless iiNet
Wireless Extender.
Authentication Mode
Shows the authentication mode of the iiNet Wireless
Extender.
Passphrase Key
The asterisks *** indicate wireless security is properly set.
Config Mode
Client mode only supports Enrollee mode. You will need to
enter the Client mode PIN code into the modem/router.
36
iiNet 300N Wireless Extender - Manual
Field
Value Meaning
Configure via Push Button
Click the Start PBC button to initiate the WPS auto button
set-up process. The iiNet Wireless Extender’s WPS status light
will flash for two minutes as it waits for the WPS requests
from another wireless device.
Input client PIN
Enter the PIN code of the router/modem you want to connect
to and click the Start PIN button.
The WPS status light will flash while the iiNet Wireless
Extender waits for the incoming WPS request.
Note: WPS 2.0 requirements
WEP and WPA-PSK security protocols can’t support a WPS connection.
Some wireless devices may follow the latest WPS 2.0 specification. To avoid problems
we recommend that you steer clear use WEP and WPA-PSK.
37
5
iiNet 300N Wireless Extender - Manual
300N iiNet Wireless Extender Specification
SoC + RF
Realtek RTL8196CS+ RTL8192CE
Flash
2MB
SDRAM
6MB
LAN Port
10/100M UTP Port x 1
Power
5VDC, 1A Switching Power Module Inside
Dimension
46.5(W) x 73(H) x 41(D) mm excluding power plug
Transmit Power
11n: 13dBm±1.5dBm, 11g: 14dBm±1.5dBm, 11b:
17dBm±1.5dBm
Temperature
32~104°F (0 ~ 40°C)
Humidity
10-90% (NonCondensing)
Certification
FCC, CE
38
6
iiNet 300N Wireless Extender - Manual
Glossary
AD-HOC INTEGRATED WIRELESS LAN
An Ad-hoc integrated wireless LAN network is a group of computers located close
to each other. Each computer has a Wireless LAN card. Ad-hoc mode is a way for the
computers to talk directly to each other and it can be used within a department or in a
small or home office.
AES
Advanced Encryption Standard (AES) is chip-based security that has been developed to
ensure the highest degree of security and authenticity for digital information, regardless of
how it is communicated or stored.
BSS ID
The Basic Service Set (BSS) is the building block of an 802.11 wireless LAN. A Basic Service
Set Identification (BSS ID) is the MAC address (an identification number that uniquely
identifies each device on a network) of a wireless access point.
DHCP SERVER
A network server uses Dynamic Host Configuration Protocol (DHCP) to dynamically assign
IP addresses to networked computers.
DSSS
Direct Sequence Spread Spectrum (DSSS) is one of two approaches to spread spectrum
modulation for digital signal transmission over the airwaves. Spread spectrum was
developed for use by the US military because it uses wideband signals that are difficult to
detect and that resist attempts at jamming. Recently, spread spectrum has been used for
more commercial purposes, such as local area wireless networks.
39
iiNet 300N Wireless Extender - Manual
ESSID
Extended Service Set ID (ESSID) is the identifying name of a wireless network.
When set to ‘Enabled’, every wireless device can scan and find the iiNet Wireless Extender.
FHSS
Frequency Hopping Spread Spectrum (FHSS) is a technique for the radio transmission of
electromagnetic signals by jumping the carrier between various frequency channels on a
wide frequency band.
IEEE 802.11B STANDARD
The IEEE 802.11b is a Wi-Fi (Wireless LAN) standard. It’s used for wireless internet purposes
- mainly to connect to the internet or a network wirelessly in small or home offices.
IEEE 802.11G STANDARD
802.11g is the new IEEE standard for high-speed wireless LAN communications that
provides for up to 54 Mbps data rate in the 2.4 GHz bandwidth. 802.11g is quickly becoming
the next mainstream wireless LAN technology for the home, office and public networks.
IEEE 802.11 SUPPORTS THE FOLLOWING FUNCTIONS:
•
•
•
•
•
•
CSMA/CA plus Acknowledge Protocol
Multi-Channel Roaming
Automatic Rate Selection
RTS/CTS Feature
Fragmentation
Power Management
40
iiNet 300N Wireless Extender - Manual
INFRASTRUCTURE
Infrastructure is the hardware used to interconnect computers and users. It includes
telephone lines, cable television lines, satellites and antennas, and also routers, modems
and other devices that control transmission paths. It also includes the software used to
send, receive, and manage the signals that are transmitted. Infrastructure can also refer to
interconnecting hardware and software.
MAC ADDRESS
MAC stands for Media Access Control Address. A MAC address is a hardware identification
number that uniquely identifies each device on a network. You’ll find one on your iiNet
Wireless Extender. The MAC address is also manufactured into every network card, such as
an ethernet or Wi-Fi card, and can’t be changed.
SOHO
Short for Small Office/Home Office, the term refers to the small or home office environment
and business culture.
SSID
This stands for Service Set Identifier. An SSID is a unique ID that consists of 32 characters
and is used for naming wireless networks.
SPREAD SPECTRUM
Spread Spectrum is a wideband radio frequency technique developed by the American
military for use in reliable, secure, mission-critical communication systems. There are two
types of spread spectrum: Direct Sequence Spread Spectrum (DSSS) and Frequency
Hopping Spread Spectrum (FHSS).
41
iiNet 300N Wireless Extender - Manual
SUBNET MASK
A subnet mask is a number that defines a range of IP addresses that can be used in a
network. If your system is connected to a network, you can typically view the network’s
subnet mask number in the Network control panel (Windows) or System Preference (Mac OS X).
TCP/IP
TCP/IP stands for Transmission Control Protocol/Internet Protocol. These two protocols
were developed in the early days of the Internet by the American military. Their purpose
was to allow computers to communicate over long distance networks. The TCP relates to
verifying the delivery of data packets. The IP part refers to the moving of data packets
between nodes. TCP/IP software is built into major operating systems, like Windows and
the Mac OS.
TKIP
TKIP is a quick-fix method to quickly overcome the weaknesses in WEP security, especially
the reuse of encryption keys. TKIP is part of the IEEE 802.11i WLAN security standard.
WAP
A Wireless Access Point (WAP) is a device that lets wireless devices connect to a wired
network using Wi-Fi or Bluetooth. The WAP usually connects to a router (via a wired
network) if it’s a standalone device, or is part of a router itself.
42
iiNet 300N Wireless Extender - Manual
WEP
A WEP key is a security code used on some Wi-Fi networks to allow a group of devices on
a local network (such as a home network) to exchange encoded messages with each other.
The messages can’t be seen by anyone outside the network.
WPS
WPS stands for Wi-Fi Protected Setup. It provides a simple way to establish unencrypted
or encrypted connections between wireless clients and access points automatically. Users
can press a software or hardware button to activate WPS function - as you did to setup
your iiNet Wireless Extender - and WPS-compatible wireless clients and access points
will establish a connection by themselves. There are two types of WPS: Push-Button
Configuration (or PBC) and PIN code.
43
300N Wireless Extender
Manual
To contact our friendly support staff ring:
iiNet
13 22 58
Westnet
1300 786 068
Internode
13 66 33
Transact
13 30 61