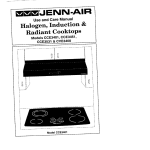
1
o
o
o
_,:MAYFA(_
Model:
MGC5430
• MGC6430
IMPORTANT
Welcome.....................
Congratulations
on your choice of a Maytag cooktop.
complete satisfaction is very important to us.
Readthis
user's guide carefully.
operate and maintain
It is intended
• MGC6536
Your
to help you
your new cooktop.
In addition, you will find a booklet entitled "Cooking Made
Simple." It contains information on selecting cookware, pan
sizes and heat setting recommendations.
INSTRUCTIONS,........,.,
Read and follow all instructions
before using this a[
pliance to prevent the potential risk of fire, electric shoct
personal injury or damage to the appliance as a result (
improper usage of the appliance.
WARNING:
If the information
in this [
manual is not followed exactly, a fire or
explosion
may result causing property
damage, personal injury or death.
Save time and money. Check the "Before You Call" section
of this guide. It lists causes of minor operating problems that
you can correct yourself.
However, should you need service, it is helpful to have the
model and serial numbers available. This information can be
-
Do not store or use gasoline
flammable vapors and liquids
cinity of this or any appliance.
-
WHAT TO DO IF YOU SMELL
found on the data plate located on the bottom of the cooktop.
These numbers are also on the Product Registration card that
came with your appliance. Before sending in this card, record
these numbers along with the purchase date below.
SAFETY
or other
in the vi-
GAS:
• Do not try to light any appliance.
Model Number
• Do not touch any electrical
* Do not use any phone in your
building.
Serial Number
• Immediately call your gas supplier from
a neighbor's phone. Follow the gas
supplier's instructions.
Date of Purchase
IMPORTANT:
Keep this guide and the sales receipt in a
safe place lbr future reference. Proof of original purchase
date is needed for warranty service.
If you have questions, write us (include your model number
and phone number) or call:
Maytag Appliances Sales Company
Attn: CAIR sMCenter
switch.
* If you cannot reach your gas supplier,
call the fire department.
-
Installation
and service must be performed by a qualified installer, service
agency or the gas supplier.
P.O. Box 2370
Cleveland, TN 37320-2370
1-800-688-9900
(USA)
1-800-688-2002
(CANADA)
1-800-688-2080
( U.S. TTY for deaf, hearing
impaired or speech impaired)
(Mon. - Fri., 8 am-8 pm Eastern Time)
Internet:
http:/iwww.maytag.com
For service information,
see page 10.
NOTE: In our continuing effort to improve the quality
and performance
of our cooking products, it may be
necessary to make changes to the appliance
without
revising this guide.
To ensure proper and safe operation: Appliance m_
be properly installed and grounded by a qualified install
Have the installer show you the location of the gas shut,
valve and how to shut it off in an emergency.
Always
disconnect
power to appliance
before servicing
To ensure proper operation and avoid possible injury
damage to unit do not attempt to adjust, repair, service,
replace any part of your appliance unless it is specifice
recommended
in this guide. All other servicing should
referred to a qualified servicer.
To Prevent Fire or Smoke Damage
About Your Appliance
Be sure all packing materials
before operating it.
NEVER use appliance as a space heater to heat or warm
a room to prevent potential hazard to the user and damage to the appliance. Also. do not use the cooktop as a
storage area for food or cooking utensils.
are removed from the appliance
Do not store combustible
materials, gasoline,
mable vapors and liquid near cooktop.
and other flam-
If appliance is installed near a window, proper precautions
should be taken to prevent curtains from blowing over burners.
Cooking
Always place a pan on a surface burner before turning it
on. Be sure you know which knob controls which surface burner. Make sure the correct burner is turned on
Do not touch surface burner areas or any areas near burners.
During and after use, these areas may be hot enough to cause
burns. Avoid contact with these areas by clothing or other flammable materials until they have had sufficient time to cool.
Many
parts
leave
if left
and that the burner has ignited. When cooking is completed, turn burner off before removing pan to prevent
exposure to burner flame.
plastics are vulnerable to heat. Keep plastics away from
of the appliance that may become warm or hot. NEVER
plastic items on the cooktop as they may melt or soften
too close to a lighted surface burner.
Always adjust surface burner flame so that it does not
extend beyond the bottom edge of the pan. An excessive
flame is hazardous, wastes energy and may damage the
appliance, pan or cabinets above the appliance.
To eliminate the hazard of reaching over hot surface burners,
cabinet storage should not be provided directly above a unit,
If storage is provided, it should be limited to items which are
used infrequently and which are safely stored in an area subjected to heat from an appliance. Temperatures may be unsafe
for some items, such as volatile liquids, cleaners or aerosol
sprays.
NEVER leave a surface cooking operation unattended
especially when
using a high heat setting or when deep
fat frying. Boilovers cause smoking
and greasy spillovers
may ignite.
Clean up greasy spills as soon as possible. Do not use high heat for extended cooking operations.
In Case of Fire
Use dry, sturdy potholders.
Damp
potholders
may cause burns from
steam. Dishtowels
or other substi-
Use dry chemical or foam-type extinguisher or baking soda to
smother fire or flame. Never use water on a grease fire.
Child
_,,: ..........
",%
':_......
I_i
L_!,_
......
NEVER heat an unopened container on a surface burner.
Pressure build-up may cause container to burst resulting
in serious personal injury or damage to the appliance.
Turn off appliance and ventilating hood to avoid spreading the
flame. Extinguish flame then turn on hood to remove smoke
and odor.
If fire is in a pan on the surface burner, cover
pan with lid or cookie sheet. Never attempt
to pick up or move a flaming pan.
Safety
,_S_,-_,,,"_*_',.__,_,,,_
._'
tutes should
never be used as I:,__
potholders
because they can trail .,_!_......
across hot surface burners and ignite
or get caught on appliance parts.
,:_
'_
_"_
Do not let cooking grease or other flammable materials
accumulate in or near the appliance, hood or venl fan,
Clean hood frequently to prevent grease from accumulating on hood or filter. When flaming foods under the
hood turn the tan on.
Safety
NEVER leave children alone or unsupervised
near the appliance when it is in use or is still hot. NEVER allow children to
sit or stand on any part of the appliance.
NEVER
wear garments
made of
_,f_v'_<_ia,,,.
flammable material or loose fitting
,p.....
or long-sleeved apparel while cook- i',ii'
ing. Clothing may ignite or catch _i:.
utensil handles.
Children must be taught that the appliance and utensils in it
can be hot. Let hot utensils cool in a safe place, out of reach of
small children. Children should be taught that an appliance is
not a toy. Children should not be allowed to play with controls
or other parts of the unit.
CAUTION:
NEVER
store items of interest to children in cabi-
nets above an appliance. Children climbing
to reach items could be seriously injured.
on the appliance
2
SAFETY
INSTRUCTIONS
(continued),,.,°,,,,,°,,,,,.,,°°°,,°.
Utensil Safety
Cleaning
Use pans with flat bottoms and handles that are easily grasped
and stay cool. Avoid using unstable, warped, easily tipped or
loose-handled
pans. Also avoid using pans, especially small
pans, with heavy handles as they could be unstable and easily tip. Pans that are heavy to move when filled with food
may also be hazardous.
Turn off all controls and wait for appliance parts to coo
before touching or cleaning them. Do not touch the burne
grates or surrounding
areas until they have had sufficien
time to cool.
Safety
Clean appliance with caution. Use care to avoid steam burn_
if a wet sponge or cloth is used to wipe spills on a ho
surface. Some cleaners can produce noxious fumes if ap
plied to a hot surface.
To minimize burns, ignition of flammable materials and spillage due to unintentional contact with the utensil, do not extend handles over adjacent surface burners. Always turn pan
handles toward the side or back of the appliance, not out into
the room where they are easily hit or reached by small children.
Clean only parts listed in this guide
recommended.
Important
Never let a pan boil dry as this could damage the utensil and
the appliance.
and use procedure
Safety Notice and Warning
The California Safe Drinking Water and _Ibxic Entbrce
merit Act of 1986 (Proposition 65) requires the Governc
of California to publish a list of substances known to th
State of California to cause cancer or reproductive
harrr
and requires businesses to warn customers of potential er
posures to such substances.
Only certain types of glass, glass/ceramic,
ceramic or glazed
utensils are suitable for cooktop or oven usage without breaking due to the sudden change
in temperature.
Follow
manufacturer's
instructions when using glass.
This appliance has been tested for sate performance
using
conventional cookware. Do not use any devices or accessories that are not specifically recommended
in this guide. Do
not use eyelid covers for the surface units or stovetop grills.
The use of devices or accessories that are not expressly recommended in this manual can create serious safety hazards,
result in performance
problems, and reduce the life of the
components of the appliance.
Usel3 of this appliance are hereby warned that the burnin
of gas can result in low-level exposure to some of the liste
substances, including benzene, formaldehyde and soot, d_
primarily to the incomplete combustion of natural gas
liquid petroleum (LP) fuels. Properly adjusted burners wi
minimize incomplete combustion. Exposure to these sut
stances can also be minimized by properly venting the bun
ers to the outdoors.
Deep Fat Fryers
WARNING
Always let quantities of hot fat used for deep fat frying cool
before attempting to move or handle.
Electrical
Be sure utensil is large enough to properly contain food and
avoid boilovers. Pan size is particularly important in deep fat
frying. Be sure pan will aceomodate the volume of food that
is to be added as well as the bubble action of the fat.
Save
These
Instructions
Grounding
The appliance is equipped
Instructions
with a three-
prong grounding plug for your protection
against shock hazard and should be
plugged directly into a properly
grounded three-prong receptacle.
Do not cut or remove
the
grounding prong from this plug.
for
3
Future
Reference
_
©
('¥-,_
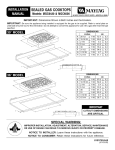
Model MGC5430
1. Left Rear
(11,000
3. Left Front
BTUs)
(9,200 BTUs)
4. Right Front
(12,000 BTUs)
2. Right Rear
(7,200 - 850 BTUs)
Model MG06430
1. Left Rear
(9,200
3. Left Front
BTUs)
(9,200 BTUs)
2. Right Rear
(7,200 - 850 BTUs)
4. Right Front
(9,200 BTUs)
4
Using
Your
Cooktop...............................
Setting the Controls
A
•
•
CAUTIONS:
1. Place a pan on the burner grate.
If flame should go out during a cooking operation, turn
the burner off. If a strong gas odor is detected, open a
window and wait five minutes before relighting the
burner.
eliminates the need for a constant standing
surface burner has a spark ignitor. When
the surface burner use care. If cleaning cloth
ignitor, it could damage it preventing igni-
If the surface burner does not light, check if ignitor is broken,
soiled or wet. If clogged, clean the small port beneath the
ignitor using straight pin.
BURNER
HEAD
• The ignitor will continue to spark until the knob i_,
turned past the LIGHT position.
Suggested
flame settings,
IGNITOR
Surface Control Knobs
Use to turn on the surface
burners.
An infinite choice of heat settings
is available
from LOW to
HIGH.
At the HIGH setting
•
•
"
•
Graphics next to the knob identify which
burner the knob controls. For example,
shows the left rear burner location..--_
refer to "Cooking
Made
Simple".
Uses
to a boil or reach
.......
pressure
in a liquid
pressure
Use
to bring
to .@,
cooker, Always reduce
°"
setting to a lower heat
when liquids begin to
boil or foods begin to
cook.
._
-- ........
HIGH
p,-
a detent or notch may be felt,
The knobs can be set on or between any of the settings.
will affect the flame setting
and other factors affecting
An intermediate flame size is used to continue
cooking. Food will not cook any faster when a
higher flame setting is used than needed to
maintain a gentle boil, Water boils at the same
temperature whether boiling gently or vigorously
•
LOW
Heat Settings
The size and type ofcookware
For information on cookware
HIGH
BELOW
setting.
3. After the burner lights, urn the knob to the desired flame
size.
Setting
PORT
:e
,,./
OFF
the graphic
to the
. A clicking (spark) sound will be heard and the burner
will light. (All four ignitors will spark when any
surface burner knob is turned to the LIGHT
position.)
Ignition
Pilotless ignition
pilot light. Each
cleaning around
should catch the
tion.
2. Push down and turn the knob counterclockwise
LIGHT
Be sure all surface controls are set in the OFF position
prior to supplying gas to the cooktop.
Pilotless
, The burner flame may lift off or appear separated
from the port if a pan is not placed on tbe grate.
below
LOW
Use m simmer foods,
keep foods warm
and melt chocolate
or butter.
•
*
•
°
Sealed Burners
NOTES...
The sealed burners of your cooktop are secured to the cooktop
and are not designed to be removed.
Since the burners are
A properly adjusted burner with clean ports will light
within a few seconds. If using natural gas the flame
will be blue with a deeper blue inner cone.
sealed into the cooktop, boilovers or spills will not seep
underneath the cooktop. The cooktop does not lift up.
However,
If the burner flame is yellow or is noisy the air/gas
mixture may be incorrect. Contact a service technician
the burner heads should be cleaned after each use.
The head portion of the burner has a removable cap that is
easily removed
for cleaning.
(See page 8 for cleaning
directions.)
The burner will operate effectively
cap.
High
Performance
(12,000
BTU*
to adjust.
ranty.)
Burner
Burner
normal operating
f-'---'l
POWER
BOOST
position,
sound of the burner.
wait several seconds and relight the burner.
• Refer to page 7 to adjust the Low setting, if needed.
Select cooktop models offer one simmer burner.
This burner is located in the right rear position. The
simmer burner offers a lower BTU flame for delicate
* BTU ratings
tips on the flames are
and adjustment
is not
• If the control knob is turned very quickly from HIGH
to LOW, the flame may go out, particularly
if the
burner is cold. If this occurs, turn the knob to the OFF
(850 BTU* - select models)
sauces or melting chocolate.
by the war-
° With some types of gas, you may hear a "popping"
sound when the surface burner is turned off. This is a
select models)
There is one high speed burner on your cooktop located in the
Simmer
are not covered
With LP gas, some yellow
acceptable.
This is normal
necessary.
with or without the burner
right front position. This burner offers higher speed
cooking that can be used to quickly bring water to a
boi! and for large-quantity
cooking.
(Adjustments
° The flame should be adjusted
beyond the edge of the pan.
so it does not extend
SIMMER
will va_. when using LP gas.
Burner Grates
Operating
The grates must be properly positioned before cooking.
Improper installation of the grates may result in chipping of
the cooktop,
During a Power Failure
1. Hold a lighted match to the desired surface
burner head.
2. Push in and turn the control knob slowly to LIGHT.
Do not operate the burners without a pan on the grate.
The grate's porcelain finish may chip without a pan to
absorb the heat from the burner flame.
3. Adjust the flame to the desired
Although the burner grates arc durable, they will gradually
lose their shine and/or discolor, due to the high temperatures of the gas flame,
level.
sure all of the controls are in the OFF position. Strike the
match first and hold it in position before turning the knob
_CAUTION:
When lighting the surface burners, be
to LIGHT.
6
Care
and Cleaning
................................,
Valve Adjustment
NOTE: All gas adjustments
servicer only.
How to Remove Appliance
Cleaning and Servfcing
should
be done by a qualified
When necessary, follow these procedures
appliance for cleaning or servicing.
The LOW setting should produce a stable flame when turning
the knob from HIGH to LOW. The flame should extend to the
1, Shut offgas
outer edge of the lip of the burner cap on the LOW setting and
must be stable on all ports on the LOW setting.
To adjust: Operate burner on HIGH
for about five minutes to preheat
burner cap. Turn knob to LOW;
remove knob, and insert a small
screwdriver
into the center of the
_o,_o_A_
o,
ooKw,SF,
o_o_
to remove
supply to appliance.
2. Disconnect
electrical
3. Disconnect
gas supply tubing to appliance.
4, Remove
Remove
Cou_r[E_CLOCKW¢_[
FLAME
for
supply to appliance.
screws that secure appliance
appliance from cabinet.
to cabinet
SIZE
5. Reverse procedure to reinstall. Ifgas has been discon
nected check for gas leaks after reconnection.
(Se_
installation instructions for gas leak test method.)
valve stem. Adjust the flame size by
turning adjustment screw in either
direction, while holding the valve
stem securely.
NOTE: A trained servicer should make the gas installa
tion, disconnection
and reconnection of the gas supply t<
the appliance.
Flame must be of sufficient size to be stable on all burner ports.
If flame adjustment is needed, adjust ONLY on the LOW
setting. Never adjust flame size on a higher setting.
7
Cleaning CAUTIONS:
• Be sore appliance is off and all parts are cool before
handling or cleaning.
This is to avoid damage and
possible burns•
•
To prevent staining
after each use.
•
If a part is removed,
or discoloration,
clean appliance
be sure it is correctly
replaced.
Cleaning Chart
Parts
Cleaning
Burner Caps
and Sealed Gas
• Allow burner to cool. Remove burner cap and wash in soapy water with a plastic scouring pad
or in the dishwasher. Wash burner head with soapy water and aplastic scouring pad. For stubborn
Burners
Procedure
soils on the burner cap or head, clean with a soap-filled,
Creme (Part #20000001)
nonabrasive
Cleaning
and a sponge.
• For burned on soil, place removeable burner cap on newspapers
cleaner. Follow manufacturer's
directions.
• Clean gas ports with a straight pin especially
distort holes.
and spray with commercial
oven
the port below the ignitor. Do not enlarge or
, Be careful not to get water into burner ports when cleaning
• When cleaning,
pad or Cooktop
burner head.
use care to prevent damage to the ignitor. If the ignitor is soiled, wet or damaged
the surface burner will not light.
Burner Grates
(porcelain
cast iron)
on
• Wash grates with warm, soapy water and a nonabrasive,
plastic scrubbing
pad. For stubborn
soils, clean with a soap-filled, nonabrasive pad or Cooktop Cleaning Creme (Part #2000_01)
and a sponge. If soil remains, reapply Cooktop Cleaning Creme, cover with a damp paper towel
and soak _br 30 minutes. Scrub again. Rinse and dry.
, For burned on soils, remove grates, place on newspapers and carefully spray with commercia!
oven cleaner. (Do not spray surrounding surfaces.) Place in plastic bags for several hours or
overnight.
Control
Knobs
• Remove
Wearing
rubber gloves, remove from bags. Wash, rinse, dry and replace on cooktop.
knobs in the OFF position by pulling up.
• Wash, rinse and dry. Do not use abrasive
cleaning
agents as they may scratch the finish.
• Turn on each burner to be sure the knobs have been correct!y
Cooktop
brushed
replaced.
• When cool, wash with soap and water, rinse and buff the surface.
chrome
(select models)
• For heavier soil use a mild abrasive
streaking
• To prevent
cleaner
such as Soft Scrub*, rubbing
with the grain to avoid
the surface.
scratching,
do not use abrasive
or caustic
agents.
• To restore luster and remove streaks, follow with Stainless Steel Magic Spray (Part #20000008).
Chrome
will permanently
discolor
if soil is allowed
to hake on.
lnore
8
. . .
Care
and
Cleaning
(continued)..............................
Cleaning Chart (continued)
Part_
Cleaning
Cooktop
• When cool, clean with glass cleaner
glass
(select models)
' Do not use abrasive materials
They will damage glass.
Procedure
or a damp, soapy cloth, followed
such as scouring
pads, steel wool, or powdered
• To prevent staining of glass, never use excessive
behind glass.
Cooktop
porcelain enamel
select models)
by a clean, dry cloth,
amounts
cleaning
agents.
of water which may seep under or
Porcelain enamel is glass fused on metal and may crack or chip with misuse. It is acid resistant,
not acid proof. All spillovers, especially acid or sugar spillovers, should be wiped up immediately
with a dry cloth.
• When cool, wash with soapy water, rinse and dry.
• Never wipe off a warm or hot surface with a damp cloth. This may cause cracking
. Never use oven cleaners,
* Brand names are trademarks of the respective
abrasive
or caustic cleaning
manufacturers.
i! iii
i!
!!!
i!i_'i
iii:!
i
i)
i
i
? :
x?c
;n ;
2
,
!
i
? !
?
:
;
i?
h,i
}?:7
:
}
:}
[ i}£i
i
)i
,
i! i
i
;
,
:
':}
'
'}
{
?
i,:}{!; i}
9
agents on exterior
or chipping.
finish of cooktop.
Before
i i iii ¸
You Call for Service
• Check to be sure unit is properly
Surface burner
fails to light.
...........................
connected
to power supply.
• Check for a blown circuit fuse or a tripped main circuit breaker.
• Check to be sure burner ports or ignition
ports are not clogged.
See page 5.
• Check to be sure ignitor is dry and clicking. Burner will not light if ignitor is damaged,
or wet. If ignitor doesn't click, turn control knob OFF.
The flame
• Burner ports may be clogged.
is uneven.
• Flame setting may need to be adjusted.
Surface burner flame
lifts off ports•
If surface burner
flame is yellow
in color•
soiled
• Check to be sure a pan is sitting on the grate above.
• Contact
an authorized
Maytag Servicer.
• Some yellow tips on the flames are acceptable
when using LP gas.
ff You Need Service:
Call the dealer from whom your appliance was purchased or call Maytag Appliances
Sales Company, Maytag
Customer Assistance at 1-800-688-9900,
USA or 1-800-688-2002,
CANADA to locate an authorized servicer.
Be sure to retain proof of purchase to verit), warranty status. Refer to WARRANTY
tion on owner's responsibilities
for warranty service.
If the dealer or service company cannot resolve the problem,
CAIR sM Center, RO. Box 2370, Cleveland, TN 37320-2370,
CANADA.
U.S. customers
using TTY for deaf, hearing
impaired
write to Maytag Appliances
Sales Company, Attn:
or call 1-800-688-9900,
USA or 1-800-688-2002,
or speech impaired,
NOTE: When writing or calling about a service problem,
a. Your name, address and telephone number;
b. Model number and serial number;
(last page) for further informa-
call 1-800-688-2080.
please include the following
information:
c. Name and address of your dealer or servicer;
d. A clear description of the problem you are having;
e. Proof of purchase (sales receipt).
User's guides, service manuals
Maytag Customer Assistance.
and parts catalogs
are available
10
from Maytag Appliances
Sales Company,
Maytag Cooktop Warranty...........................
Full One Year Warranty
- Parts and Labor
For one (1) year from the original retail purchase date, any part which fails in normal home use will be repaired or replaced
free of charge.
Limited
Warranties
- Parts Only
Second Year- After the first year from the original purchase date, parts which fail in normal home use will be repaired or
replaced free of charge for the part itself, with the owner paying all other costs, including labor, mileage and transportation.
Third Through Fifth Year - From the original purchase date, parts listed below which fail in normal home use will be
repaired or replaced free of charge for the part itself, with the owner paying al! other costs, including labor, mileage and
transportation.
•
Electronic
Controls
Third Through Tenth Year - From the original purchase date, parts listed below which fat! in normal home use will be
repaired or replaced free of charge for the part itself, with the owner paying all other costs, including labor, mileage and
transportation.
• Sealed Gas Burners
Canadian
Residents
The above warranties only cover an appliance installed in Canada that has been certified or listed by appropriate test agencies for compliance to a National Standard of Canada unless the appliance was brought into Canada due to transfer of
residence from the United States to Canada.
Limited Warranty Outside the United States and Canada - Parts Only
For two (2) years from the date of original retail purchase, any part which :tails in normal home use will be repaired or
replaced free of charge for the part itself, with the owner paying all other costs, including labor, mileage and transportation.
The specific warranties expressed above are the ONLY warranties provided by the manufacturer. These warranties ,give you
specific legal rights, and you may also have other rights which vary from state to state.
What is Not Covered By
These Warranties:
1. Conditions and damages resulting from any of the
following:
a. Improper installation, delivery, or maintenance.
b. Any repair, modification, alteration, or adjustment
not authorized by the manufacturer or an
authorized servicer.
c. Misuse, abuse, accidents, or unreasonable use.
d. Incorrect electric current, voltage, or supply.
e. Improper setting of any control,
2. Warranties are void if the original serial numbers have
been removed, altered, or cannot be readily
determined.
4. Products purchased for commercial or industrial use.
5. The cost of service or service call to:
a. Correct installation errors.
b. Instruct the user on the proper use of the product.
c. Transport the appliance to the servicer.
6. Consequential or incidental damages sustained by any
person as a result of any breach of these warranties.
Some states do not allow the exclusion or limitation of
consequential or incidental damages, so the above
exclusion may not apply.
3, Light bulbs.
MAYTAG
12Jg8/A
Part No 8111P389
60
• 403 West Fourth Street
_
North
http://www
• Newton,
maytag
corn
Iowa 50208
Litho U _,,A