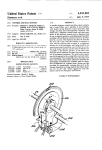
1
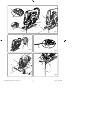
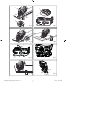
CJS-180L GB FR DE ES IT NL PT DK SE FI NO RU PL CZ HU RO LV LT EE HR SI SK GR TR CORDLESS JIGSAW WITH LASER SCIE SAUTEUSE SANS FIL AVEC GUIDE LASER AKKU-STICHSÄGE MIT LASER SIERRA DE CALAR INALÁMBRICA CON GUÍA LÁSER SEGHETTO ALTERNATIVO A BATTERIA CON GUIDA LASER ACCU-DECOUPEERZAAG MET LASERGELEIDER SERRA DE RECORTE SEM FIO COM GUIA LASER BATTERIDREVEN STIKSAV MED LASERSTYR SLADDLÖS STICKSÅG MED LASER JOHDOTON KUVIOSAHA JA LASEROHJAIN OPPLADBAR STIKKSAG MED LASERMARKØR ãéÅáàäéÇÄü ÄääìåìãüíéêçÄü èàãÄ ë ãÄáÖêçõå åÖíóàäéå AKUMULATOROWA WYRZYNARKA Z LASEROWYM PROWADNIKIEM AKUMULÁTOROVÁ LISTOVÁ PILA S LASEROVÝM ZAMOVAEM SZÚRÓFRÉSZ, VEZETÉK NÉLKÜLI, LÉZERES VÁGÁSVEZETVEL FERSTRU DE CONTUR FR FIR CU GHID LASER BEZVADU FINIERZ IS AR LZERU BEVIELIS SIAURAPJKLIS SU LAZERIU LASERIGA AKU-TIKKSAAG BEÆI»NA UBODNA PILA S LASERSKOM VODILICOM BREZŽINA VBODNA ŽAGA Z LASERSKIM VODILOM BEZDRÔTOVÁ LISTOVÁ PÍLA S LASEROM OO Z LAZER REHBERL KABLOSUZ DARBEL TESTERE USER’S MANUAL MANUEL D’UTILISATION BEDIENUNGSANLEITUNG MANUAL DE UTILIZACIÓN MANUALE D’USO GEBRUIKERSHANDLEIDING MANUAL DE UTILIZAÇÃO BRUGERVEJLEDNING INSTRUKTIONSBOK KÄYTTÄJÄN KÄSIKIRJA BRUKSANVISNING 1 6 11 17 22 27 32 37 42 47 52 êìäéÇéÑëíÇé èé ùäëèãìÄíÄñàà 57 INSTRUKCJA OBSUGI NÁVOD K OBSLUZE HASZNÁLATI ÚTMUTATÓ MANUAL DE UTILIZARE LIETOTJA ROKASGRMATA NAUDOJIMO VADOVAS KASUTAJAJUHEND KORISNI»KI PRIRU»NIK UPORABNIŠKI PRIRONIK NÁVOD NA POUŽITIE KULLANiM KILAVUZU 62 67 72 77 82 87 92 97 102 107 112 118 DE ÜBERSETZUNG DER ORIGINALANLEITUNG ES TRADUCCIÓN DE NL VERTALING VAN DE ORIGINELE INSTRUCTIES PT TRADUÇÃO DAS INSTRUÇÕES ORIGINAIS DK OVERSÆTTELSE AF DE ORIGINALE INSTRUKTIONER SE ÖVERSÄTTNING AV DE URSPRUNGLIGA INSTRUKTIONERNA FI ALKUPERÄISTEN OHJEIDEN SUOMENNOS NO OVERSETTELSE AV DE ORIGINALE INSTRUKSJONENE RU PL TUMACZENIE INSTRUKCJI ORYGINALNEJ CZ PEKLAD ORIGINÁLNÍCH POKYN HU AZ EREDETI ÚTMUTATÓ FORDÍTÁSA RO TRADUCEREA INSTRUCIUNILOR ORIGINALE LV TULKOTS NO ORI INLS INSTRUKCIJAS LT ORIGINALI INSTRUKCIJ VERTIMAS EE ORIGINAALJUHENDI TÕLGE HR PRIJEVOD ORIGINALNIH UPUTA SI PREVOD ORIGINALNIH NAVODIL SK PREKLAD POKYNOV V ORIGINÁLI GR !" !#$!" %" TR ORIJINAL TALIMATLARIN TERCÜMESI GB ORIGINAL INSTRUCTIONS FR LAS INSTRUCCIONES ORIGINALES TRADUCTION DES INSTRUCTIONS ORIGINALES IT TRADUZIONE DELLE ISTRUZIONI ORIGINALI 961075062-03(CJS-180L)_EU.indd A1 1/5/10 1:37:36 PM 1 7 9 8 2 3 10 4 6 5 Fig. 1 13 12 5 11 3 Fig. 2 Fig. 3 1 9 10 14 2 6 5 Fig. 4 961075062-03(CJS-180L)_EU.indd A2 Fig. 5 1/5/10 1:37:41 PM 1 7 8 17 15 2 4 Fig. 7 Fig. 6 16 17 Fig. 9 Fig. 8 7 4 35 0 17 15 Fig. 10 18 17 Fig. 11 19 20 Fig. 12 961075062-03(CJS-180L)_EU.indd A3 10 Fig. 13 1/5/10 1:37:41 PM Important! It is essential that you read the instructions in this manual before operating this machine. Attention ! Il est indispensable que vous lisiez les instructions contenues dans ce manuel avant la mise en service de l’appareil. Achtung! Bitte lesen Sie unbedingt vor Inbetriebnahme die Hinweise dieser Bedienungsanleitung. ¡Atención! Es imprescindible que lea las instrucciones de este manual antes de la puesta en servicio. Attenzione! Prima di procedere alla messa in funzione, è indispensabile leggere attentamente le istruzioni contenute nel manuale. Let op ! Het is van essentieel belang dat u de instructies in deze gebruiksaanwijzing leest vooraleer u dit toestel in gebruik neemt. Atenção! É indispensável que leia as instruções deste manual antes de utilizar a máquina. OBS! Denne brugsanvisning skal læses igennem inden ibrugtagning. Observera! Det är nödvändigt att läsa instruktionerna i denna bruksanvisning innan användning. Huomio! On ehdottoman välttämätöntä lukea tässä käyttöohjeessa annetut ohjeet ennen käyttöönottoa. Advarsel! Det er meget viktig at du leser denne brukerveiledningen før du tar maskinen i bruk. ÇÌËχÌËe! èee‰ Ò·ÓÍÓÈ Ë Á‡ÔÛÒÍÓÏ ËÌÒÚÛÏeÌÚ‡ ÌeÓ·ıÓ‰ËÏÓ ÔÓ˜eÒÚ¸ ËÌÒÚÛ͈ËË ËÁ ̇ÒÚÓfl˘e„Ó ÛÍÓ‚Ó‰ÒÚ‚‡. Uwaga! Przed przystpieniem do uytkowania tego urzdzenia, naley koniecznie zapozna si z zaleceniami zawartymi w niniejszym podrczniku. D'ležité upozorn(ní! Nepoužívejte tento pístroj díve, než si petete pokyny uvedené v tomto návodu. Figyelem! Feltétlenül fontos, hogy a jelen használati útmutatóban foglalt elírásokat az üzembe helyezés eltt elolvassa! Aten)ie! Este esenial s citii instruciunile din acest manual înainte de operarea acestui aparat. Uzmanību! Svargi, lai js pirms mašnas darbinšanas izlastu instrukcijas šaj rokasgrmat. Dėmesio! Prieš praddami eksploatuoti š prietais, svarbu, kad perskaitytumte šiose instrukcijose pateiktus nurodymus. Tähtis! Enne trelli kasutama hakkamist tuleb käesolevas juhendis esitatud juhised kindlasti läbi lugeda. Upozorenje! Neophodno je da proitate ove upute prije uporabe ovog ureaja. Pomembno! Pred uporabo tega stroja, obvezno preberite navodila iz tega prironika. Dôležité! Pre prácou s týmto zariadením je dôležité, by ste si preítali pokyny v tomto návode. *+.+/:! " #" $ %& #& ' *+ ;#%. Dikkat! Cihaz<n çal<=t<r<lmas<ndan önce bu k<lavuzda bulunan talimatlar< okuman<z zorunludur. Subject to technical modifications / Sous réserve de modifications techniques /Technische Änderungen vorbehalten / Bajo reserva de modificaciones técnicas / Con riserva di eventuali modifiche tecniche /Technische wijzigingen voorbehouden / Com reserva de modificações técnicas / Med forbehold for tekniske ændringer / Med förbehåll för tekniska ändringar / Tekniset muutokset varataan / Med forbehold om tekniske endringer / åÓ„ÛÚ ·˚Ú¸ ‚ÌeÒeÌ˚ ÚeıÌ˘eÒÍËe ËÁÏeÌeÌËfl / Z zastrzeeniem modyfikacji technicznych / Zm>ny technických údaj? vyhrazeny / A m@szaki módosítás jogát fenntartjuk / Sub rezerva modificaiilor tehnice / Paturam tiesbas maint tehniskos raksturlielumus / Pasiliekant teis daryti techninius pakeitimus / Tehnilised muudatused võimalikud /Podloæno tehniËkim promjenama /Tehnine spremembe dopušene/ Technické zmeny vyhradené / GK QR;V W'& X$ / Teknik deYi=iklik hakk< sakl<d<r 961075062-03(CJS-180L)_EU.indd A4 1/5/10 1:37:41 PM GB FR DE ES IT NL PT DK SE FI NO RU PL CZ HU RO LV LT EE HR SI SK GR TR English SPECIFIC SAFETY RULES Q SPECIFICATIONS Motor Switch No Load Speed Cutting Angle Maximum Cutting Thickness(Wood ) Blade Stroke Shank capacity Orbital Motion Laser Guide Hold power tool by insulated gripping surfaces, when performing an operation where the fastener may contact hidden wiring. Fasteners contacting a "live" wire may make exposed metal parts of the power tool "live" and could give the operator an electric shock. SAFETY RULES FOR LASER GUIDE The laser guide radiation used in saw is Class 2M with maximum <5mW and 650nm wavelengths. These lasers do not normally present an optical hazard, although staring at the beam may cause flash blindness. MODEL WARNING: DO NOT stare directly at the laser beam. A hazard may exist if you deliberately stare into the beam, please observe all safety rules as follows; Q Q Q Q Q Q The laser shall be used and maintained in accordance with the manufacturer’s instructions. Never aim the beam at any person or an object other than the work piece. The laser beam shall not be deliberately aimed at personnel and shall be prevented from being directed towards the eye of a person for longer than 0.25s. Always ensure the laser beam is aimed at a sturdy work piece without reflective surfaces. i.e. wood or rough coated surfaces are acceptable. Bright shiny reflective sheet steel or the like is not suitable for laser use as the reflective surface could direct the beam back at the operator. Do not change the laser guide assembly with a different type. Repair must only be carried out by the laser manufacturer or an authorised agent. Save these instructions. Refer to them frequently and use them to instruct others who may use this tool. If you loan someone this tool, loan them these instructions also. CJS-180L 18V Variable Speed 0-2,100 min-1 0º to 45º(Right) 40 mm 19 mm 6.35 mm 4 Settings Class 2M,5mW max, 650nm BATTERY PACK (not included) BPP-1815 BPP-1815M BPP-1817 BPP-1817M BPL-1820 BPL-1815 BPP-1815 BPP-1815M BPP-1817 BPP-1817M CHARGER (not included) BCL-1800 BCS618 BCL1418 BC-1815S BC-1800 DESCRIPTIONS 1. 2. 3. 4. 5. 6. 7. 8. 9. 10. 11. 12. 13. 14. 15. 16. 17. 18. 19. 20. LASER RADIATION DO NOT STARE INTO THE BEAM OR VIEW DIRECTLY WITH OPTICAL INSTRUMENTS CLASS 2M LASER PRODUCT CAUTION: Use of controls or adjustments or performance of procedures other than those specified herein may result in hazardous radiation exposure. Lock-off button Switch trigger Blade storage Orbital adjustment knob T-shank saw blade Toolless blade clamp Hex key Hex key storage area Laser guide switch Laser guide Battery pack( not included) Latches Depress latches torelease Battery pack Blade clamp lock Base pivot screw Edge guide screw Base Scale Moves the laser beam in a rotational direction Moves the laser beam laterally left to right 1 961075062-03(CJS-180L)_EU.indd Sec1:1 1/5/10 1:37:41 PM GB FR DE ES IT NL PT DK SE FI NO RU PL CZ HU RO LV LT EE HR SI SK GR TR English features that protect the lithium-ion cells and maximize battery life. Under some operating conditions, these built-in features may cause the battery and the tool it is powering to act differently from nickel-cadmium batteries. OPERATION WARNING: Do not allow familiarity with tools to make you careless. Remember that a careless fraction of a second issufficient to inflict serious injury. During some applications, the battery electronics may signal the battery to shut down, and cause the tool to stop running. To reset the battery and tool, release the trigger and resume normal operation. WARNING: Always wear safety goggles or safety glasses with side shields when operating tools. Failure to do so could result in objects being thrown into your eyes, resulting inpossible serious injury. NOTE: To prevent further shut down of the battery, avoid forcing the tool. If releasing the trigger does not reset the battery and tool, the battery pack is depleted. If depleted, the battery pack will begin charging when placed on the lithium-ion charger. WARNING: Do not use any attachments or accessories not recommended by the manufacturer of this tool. The use of attachments or accessories not recommended can result in serious personal injury. BLADE STORAGE(Fig.3) The blade storage compartment is located on the back of the saw. It is convenient for storing extra blades and storing blades when not in use. APPLICATIONS Q You may use this tool for the purposes listed below: Q Cutting wood surfaces Q Cutting thin sheet metal Q Cutting plastics and laminates Q WARNING: Battery tools are always in operating condition. Therefore, switch should always be locked when not in use or carrying at your side. TO INSERT BATTERY PACK(NOT INCLUDED) Fig.2 Q Q Q Lock the switch trigger by releasing it all the way. Place the battery pack on the tool. Make sure the latches on each side of the battery pack snap into place and the battery pack is secured on the tool before beginning operation. LASER GUIDE(Fig.4) Depress the laser guide switch to generate a red laser beam on the work surface in front of the saw. Use the laser to guide the saw along the line of cut. LOCK-OFF BUTTON(Fig.4) CAUTION: When placing battery pack in the tool, be sure raised rib on battery pack aligns with the grooves in the saw and latches into place properly. Improper installation of the battery pack can cause damage to internal -components. The lock-off button is located on the handle above the switch trigger. You must depress the lock-off button in order to pull the switch trigger. The lock resets each time the trigger is released. NOTE: You can depress the lock-off button from either the left or right side. TO REMOVE BATTERY PACK(NOT INCLUDED) Fig.2 Q Q Q To open: Push the door down with your thumb or finger. Place blades in blade storage compartment. To close: Push the door up with your thumb or finger. Lock the switch trigger by releasing it all the way. Depress the latches on the side of battery pack. Remove the battery pack from the tool. SWITCH TRIGGER(Fig.4) To turn the saw ON, depress and hold lock-off button, then depress the switch trigger. To turn it OFF, release the switch trigger. BATTERY PROTECTION FEATURES Ryobi 18 V lithium-ion batteries are designed with 2 961075062-03(CJS-180L)_EU.indd Sec1:2 1/5/10 1:37:42 PM GB FR DE ES IT NL PT DK SE FI NO RU PL CZ HU RO LV LT EE HR SI SK GR TR English don’t cut halfway and complete the cut from the opposite end. OPERATION WARNING: This tool is designed to work with T-shank blades. Use with non-T-shank blades may result in blades coming loose from tool, resulting in personal injury or property damage. SPLINTER-FREE CUTTING(Fig.7) The base of the jig saw has a narrow slot to permit splinter-free cutting. It is especially useful when cutting plywood. This feature should only be used when making straight cuts or circle cuts. It is not for bevel cutting or plunge cutting. BLADE SELECTION To obtain the best performance from the saw, it is important to select a specific blade for the particular application and type of material you wish to cut. By doing this you will get a smoother, faster cut and prolong blade life. NOTE: This tool is designed to work with T-shank blades. Other types of saw blades are not guaranteed to work properly and may come loose from the tool. NOTE: The non-orbital setting also helps reduce splintering when cutting plywood. positioning the base in the splinter-free cutting position Q Remove battery pack Q Using the 3 mm. hex key provided, loosen base pivot screws and slide base forward. Q Always set the cutting angle at 0° for splinter-free cutting. To set cutting angle at 0°, align the 0° mark on the scale with the edge of the motor housing. NOTE: When setting angle at 0° for splinter-free cutting, the positive stop notches on the rear of the base are not used. Q Tighten base pivot screws securely. Q Remove hex key and return it to the storage area. Q Replace battery pack. INSTALLING BLADES(Fig.5) Q Q Q Q Q Remove battery pack. Lift blade clamp lock located on front of saw. Insert saw blade between blade clamp and saw bar. Close blade clamp lock. Replace battery pack. GENERAL CUTTING(Fig.6) OPTIONAL EDGE GUIDE(Fig.8) Rest the front of the saw base on the workpiece and align cutting edge of the blade with the line on your workpiece. Start the saw and move it forward on the work surface. Apply downward pressure to keep the saw steady and only enough forward pressure to keep the blade cutting. Do not force the saw. Forcing the saw may overheat the motor and break saw blades. Broken saw blades must be replaced with new saw blades. An optional edge guide is available for use with the saw. It can be used for making crosscuts and rip cuts. Q Remove battery pack. Q Insert the arm through the two slots in the base of the saw as shown. Q Adjust edge guide to the desired width and lock in place with the edge guide screw. Q Replace battery pack. ORBITAL MOTION(Fig.6) The blade of the saw cuts in orbital motion. This feature is adjustable and provides faster, more efficient cutting. With orbital motion, the blade cuts through your work in the upstroke but does not drag across your work in the downstroke. The higher settings should be used when fast cutting in soft material is desired. The lower settings should be used when cutting materials with more resistance. SCROLL CUTTING(Fig.9) Scroll cuts can be made with the jig saw by guiding the direction of the cut with applied pressure on the handle as shown. WARNING: Excessive side pressure to the blade could result in broken blades or damage to the material being cut. STRAIGHT CUTTING(Fig.6) A straight cut can be made by clamping a piece of wood or straightedge to the workpiece and guiding the edge of the saw against it. Make the cut from one direction only; 3 961075062-03(CJS-180L)_EU.indd Sec1:3 1/5/10 1:37:42 PM GB FR DE ES IT NL PT DK SE FI NO RU PL CZ HU RO LV LT EE HR SI SK GR TR English OPERATION Q ANGLE CUTTING (Bevel Cutting) (Fig.10Fig.11) WARNING: Use of controls or adjustments or performance of procedures other than those specified herein could result in hazardous radiation exposure. Bevel cutting angles may be adjusted from 0° to 45° right or left. Angles for cuts from 0° to 45° in 15° increments are marked on a scale on both the left and right side of the base. Notches on the rear of the base provide positive stops at each of the above mentioned 15° increments. A protractor is recommended when accurate cuts are required. Q Q Q Q Q ADJUSTING THE LASER(Fig.13) The laser can be realigned by adjusting the two screws located in the front of the saw. The top screw moves the laser beam laterally from left to right. The bottom screw moves the laser beam in a rotational direction. Remove battery pack. Using the 3 mm. hex key provided, loosen the base pivot screws until the base can be moved. Slide base backward until base pivot screws can move freely in slots in base. Align the mark, on the base, of the desired angle with the edge of the motor housing. Once the desired angle is reached, slide base forward until tab on motor housing aligns with the appropriate notch on rear of base. NOTE: Draw a pencil line on scrap workpiece parallel to the long edge of the base as a straight line guide to aid in the adjusting process. Q Remove the blade from the saw. Q Turn laser on. Q Rest base of saw on scrap workpiece. Q Adjust screws as necessary. Q Since blade thicknesses vary, always make a trial cut in scrap workpiece to ensure an accurate cut. Q Check for proper alignment. Q Repeat as necessary until laser is aligned. NOTE: When making a set-up for accurate cuts with a protractor, or for angles other than the preset 15° increments, the positive stop notches on the rear of the base are not used. Q Tighten the base pivot screws securely. Q Return hex key to storage compartment. Q Replace battery pack. NOTE: The wide slot in the base must be used when making bevel cuts, scroll cuts, plunge cuts, and when cutting metal. MAINTENANCE WARNING: When servicing, use only identical replacement parts. Use of any other parts may create a hazard or cause product damage. WARNING: Always wear safety goggles or safety glasses with side shields during power tool operation or when blowing dust. If operation is dusty, also wear a dust mask. PLUNGE CUTTING(Fig.12) Q Q Q Q Q Continue lowering the blade into the workpiece until the base rests flat on the work surface, then move the saw forward to complete the opening. WARNING: To avoid loss of control, broken blades, or damage to the material being cut, always use extreme caution when making plunge cuts. We do not recommend plunge cutting on materials other than wood. Mark the line of cut clearly on the workpiece. Set the cutting angle at 0°. Tilt the saw forward so that it rests on the front edge of the base and blade will not come in contact with the workpiece when the saw is turned on. Make sure the blade is inside the area to be cut. Using high speed, start the saw and slowly lower the blade into the workpiece until the blade cuts through the wood. WARNING: To avoid serious personal injury, always remove thebattery pack from the tool when cleaning or performing any maintenance. GENERAL MAINTENANCE Avoid using solvents when cleaning plastic parts. Most plastics are susceptible to damage from various types of commercial solvents and may be damaged by their use. Use clean cloths to remove dirt, dust, oil, grease, etc. 4 961075062-03(CJS-180L)_EU.indd Sec1:4 1/5/10 1:37:43 PM GB FR DE ES IT NL PT DK SE FI NO RU PL CZ HU RO LV LT EE HR SI SK GR TR English MAINTENANCE SYMBOL WARNING: Do not at any time let brake fluids, gasoline, petroleum-based products, penetrating oils, etc., come in contact with plastic parts. Chemicals can damage, weaken ordestroy plastic which may result in serious personal injury. Safety Alert V Volts min-1 Revolutions or reciprocations per minute Direct current Only the parts shown on the parts list are intended to be repaired or replaced by the customer. All other parts should be replaced at an Authorized Service Center. CE Conformity ENVIRONMENTAL PROTECTION Please read the instructions carefully before starting the machine. Recycle raw materials instead of disposing as waste.The machine, accessories and packaging should be sorted for environmentalfriendly recycling. Recycle unwanted Waste electrical products should not be disposed of with household waste. Please recycle where facilities exist. Check with your Local Authority or retailer for recycling advice. 5 961075062-03(CJS-180L)_EU.indd Sec1:5 1/5/10 1:37:43 PM