1
Total pages scanned:
Workflow:
I
.
I
Rece,ve__d _ Batched
L
Initial and Date each section
below as it is completed:
_Scanned
L °6015
Batch #
Title
Chassis
Product Type #
Doc Type
Date Received
Date Published
Publication #
Pricing - Div
Pricing - Source
Figure Properties
DISHWASHER
0130000
SERVM
[]
REFER
[]
TECHM
[]
INSTL []
PROC
[]
SALES []
MODEL INFORMATION
REG
STD X
ACTIVE X
PARTS OF MANUAL
Document1 01/26/00
OWNM
1-21-00
1-1-00
1794
N/A
N/A
Model Numbers:
SHU4000
Type
Mfr Class
Status
Brand # 1794
Comments:
[]
REG
SBP
NPA
REG
STD
ACTIVE
ARE IN FRENCH AND SPANISH.
REG
SBP
NPA
t
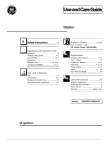
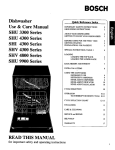
BOSCH
Dishwasher
Lave-vaisselle
Lavadora de platos
SHU 4000
Use and care manual
Read this manual
for important safety and operating
instructions
Guide d'utilisation et
d'entretien
Lire ce guide
I1 contient d'importantes instructions
de s6curit6 et de fonctionnement
Manual de uso y cuidado
Lea este manual
Para instrucciones importantes de
seguridad y operaci6n.
BOSCH
Quick Reference Index
Dishwasher
Use & Care Manual
for SHU 4000 Series
IMPORTANT
GROUNDING
SAFETY INSTRUCTIONS
INSTRUCTIONS
ABOUT YOUR DISHWASHER
GETTING TO KNOW YOUR DISHWASHER
3
3
BEFORE USING FOR THE FIRST TIME
GETTING STARTED
4
4
PREPARATIONS
4
SPECIAL
FOR WASHING
INSTRUCTION,
TABLE
1
LOADING
LOADING THE TOP RACK
LOADING THE LOWER RACK
6
6-7
RACK HEIGHT ADJUSTMENT
EXTRA TALL ITEMS
7
7-8
USING THE DISPENSERS
DETERGENT
USE
DETERGENT
DISPENSER
RINSE AGENT INDICATOR
RINSE AGENT DISPENSER
RINSE AGENT REGULATOR
8
8-9
9
9
9
CYCLE
SELECTION
CYCLE
SELECTION
OPERATION
TO INTERRUPT
10
CHART
OR RESET
PROGRAM
UNLOADING
CARE & CLEANING
SERVICE
READ THIS MANUAL
for important
safety and operating
instructions
and REPAIR
11-12
13
SELF-HELP
14
WARRANTY
15
IMPORTANT
SAFETY
INSTRUCTIONS
WARNING
-- When using your dishwasher, basic safety precautions should always be followed
reduce Ihe risk of fire, electric shock, and/or injury to persons, including the lollowing:
I.
2.
3.
4.
Bosch dishwashers are provided with two manuals; one, lnstallatioo
Instruction Manual and
one, Care and Use Manual. Read all instructions betore using the dishwasher.
Use the dishwasher only for its intended |unction.
Use only detergents or wetting agents recomunended lbr use in a dishwasher and keep them out
of the reach of children.
When loading items to be washed:
a. Locate sharp items so that they are not likely to damage
and
the door seal,
5.
b. Load sharp knives with the handle up to reduce the risk of cut-type injuries.
Do not wash plastic items unless marked "dishwasher safe" or the equivalent. For plastic
not so marked, check the manufacturer's
recommendations.
6.
7.
8.
9.
Do
Do
Do
Do
10.
I I.
12.
to
not
not
not
not
touch the heating element during or immediately
after use.
operate your dishwasher unless all the enclosure panels are properly
tamper with controls.
abuse, sit on, or stand on the door or dish rack of the dishwasher.
items
in place.
To reduce the risk of injury, do not allow children to play in or on the dishwasher.
Under certain conditions,
hydrogen gas may be produced in a hot water system that has not
been used for two weeks or more. Hydrogen gas is explosive. If the hot water system has not
been used for such a period, before using the dishwasher turn on all hot water faucet s and let
the water flow from each for several minutes. This will release any accumulated
hydrogen gas.
As the gas is flammable, do not smoke or use an open flame during this time.
Remove the door to the washing compartment
when removing an old dishwasher
or discarding.
from service
WARNING -- This dishwasher must be grounded in accordance with the National Electrical Code
and/or local codes. These must be carefully followed in all cases. See Installation Instructions
provided with this dishwasher for complete installation information. Make sure this dishwasher has
been properly grounded and installed by a qualified installer before using.
SAVE THESE
GROUNDING
INSTRUCTIONS
INSTRUCTIONS
This _ppliance must be connected to a grounded metal, permanent wiring system; or an equipment
grounding conductor musl be run with the circuit ccmductors and connected to the equipment
grounding terminal or lead on the dishwasher.
HOUSEHOLD
USE ONLY
ABOUT YOUR DISHWASHER
Congratulations on having selected a BOSCH
dishwasher, the choice of those that demand quiet and
exceptional cleaning performance from their dishwasher.
The Bosch SHU 4000 series dishwashers offer the
following standard features:
•
Stainless steel inner liner and inner door
•
Exceptionally low water consumption
•
Four spraying levels
•
Height adjustable upper rack
(SHU 4022 UC, SHU 4026 UC and SHU 4036 UC
only)
•
•
Flow-Through HeaterTM for temperature boosting
Triple filter system
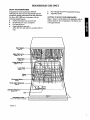
GETTING TO KNOW YOUR DISHWASHER
Figure 1, below, is an illustration of the dishwasher with its
features called out. For an explanation of the feature turn
to the page indicated.
Upper Spray Arm
(pages4, 11, 12)
Upper Rack
(pages6,7)
Lower Spray Arm
(pages 4t 1 I, 12)
Lower Rack
(pages6, 7, 8)
(page 11)
Silverware Basket
(page 7)
Rfnse Agent Dispenser
(pages)
Detergent
Dispenser
(pages8, 9)
Name/Rating
(at top or side of door. as indicated)
Figure
1.
3
BEFORE USING FOR THE FIRST TIME
Before beginning to use your dishwasher for the first
time:
I. Check to make sure that the voltage on which the
dishwasher is to operate is the same as shown on
the rating plate.
$_rt
i_l
n_
2. Check to make sure that the water valve to the
dishwasher is open. The installer may have cloud
the valve upon completing the installation.
K_
BOSCH
Wash
WiSh
g _ld
SHU 4000 series
control panel
Figure 2.
GETTING
STARTED
The operation of your Bosch dishwasher
below:
1. Load the dishwasher.
is summarized
Refer to Table l for items suitable for washing in the
dishwasher. The dishwasher should be loaded with
pots, pans, dishes and silverware according to the
instructions
provided under the following section
titled LOADING.
2.
3.
Add detergent and check rinse agent.
Detergent must be placed in the detergent dispenser
compartment
as described in the following section
titled DETERGENT
USE. The use of a rinse agent is
required to ensure good cleaning and drying result.
See section titled RINSE AGENT DISPENSER.
Check motion of wash arms.
The wash arms must be free to move and should not
4.
be blocked by any item extending so far above lower
rack as to block upper arm or by any items hanging
below either the upper or lower rack to obstruct the
motion of the wash arms. See following section titled
OPERATION.
Close the dour of the dishwasher.
Make sure that the door is completely
latched.
5.
6.
closed and
Select a wash cycle, see Table 2, and depress
corresponding
cycle button, see Figure 2
Start the dishwasher.
clockwise as the dishwasher cycle progresses. By
noting where the knob is pointing to it is possible to
4
where in the cycle the dishwasher
PREPARATIONS FOR WASHING
Very little preparation is required before placing dishes,
pots, pans, etc. into the dishwasher. However, some
preparation is required:
•
Large solids, such as, hones, large seeds, shells, skins,
leafy vegetables, meat trimmings, etc. should be
removed either by scraping into a wastebasket, or into
your food disposer.
•
Large amounts of any type of leftover food should
also be scraped into a wastebasket or into your food
disposer.
•
Pots and pans that have burned-on food, the food is
blackened, should be pre-soaked and scoured. The
dishwasher cannot remove burned-on food.
•
Do not place the following items in the dishwasher:
> toothpicks
> small bones and bone slivers
> paper products such as paper plates and paper
napkins
> plastic bags or plastic packaging material.
the
Turn "Start and Run Knob" to "START" and depress
the On/Off button. The indicator light above On/Off
button will become illuminated and the the dishwasher
will start. The "Start and Run Knob" will rotate
discern
time.
To stop dishwasher.
Depress the On/Off button. The indicator light above
the On/Off button will turn off. See the following
section titled TO INTERRUlrf OR RESET CYCLE.
7,
is at any
In general, try to remove loud scraps and place the items
to be washed in the dishwasher before the food has had a
chance to dry-un. Dried-on food is more difl_cuh to
remove. If there will be an extended period of time belore
the dishwasher
will be run il is recommended
that the
RINSE & HOLD cycle be used.
Other than the above, no special preparation or prc-rinsing
is required fi)r dishes, pots and pans or utensils with
normal amounts of fi)od soil.
MATERIAL
DISHWASHER
USE
COMMENTS AND/OR SPECIAL INSTRUCTIONS
ADHESIVE
JOINED ITEMS
NOT
RECOMMENDED
Items joined by adhesives, whether plastic, wood, bone, steel, copper or
tin, etc. may be loosened.
ALUMINUM
USUALLY SAFE
Colored anodized aluminum may fade over time. Minerals in the water ma3
cause spotting or darkening of aluminum. This can usually be removed by
scouring with a soap filled steel wool pad.
BONE
HANDLED
UTENSILS
NOT
RECOMMENDED
Handles may separate.
CHINA &
STONEWARE
USUALLY SAFE
It is highly recommended however that "on-glaze" decorated china,
handpalnted and gold or platinum trimmed, or antique china or stoneware
be hand washed. If there is any doubt, please check with the manufacturer
of your set or test by washing one piece with each load for a month and
comparing this piece with the rest of the set to determine if there has been
any fading or discoloration.
CRYSTAL
USUALLY SAFE
Decorated crystal, those handpalnted, "on-glaze", or metal trimmed, may
discolor, fade, or spot. It is recommended that these be hand washed. Also,
fragile glassware is highly breakable, be sure to set the pieces so that they
do not topple during washing and so that they do not knock against other
)ieces.
GLASS
USUALLY SAFE
Milk glass may yellow.
NON-STICK
COATINGS
USUALLY SAFE
After drying the non-stick
vegetable oil.
IRON
NOT
RECOMMENDED
Iron will rust. Wash by hand and dry immediately.
PEWTER
NOT
RECOMMENDED
Pewter will tarnish. Wash by hand and dry immediately.
PLASTIC
USUALLY SAFE
Only wash "dishwasher safe" plastic items.
STAINLESS
STEEL
USUALLY SAFE
Do not let stainless steel items contact copper or sterling silver or
silverplate items.
STERLING
SILVER &
SILVERPLATE
USUALLY SAFE
Do not allow to come in contact with stainless steel or copper items.
TIN
NOT
RECOMMENDED
Tin will rust. Wash by hand and dry immediately.
WOOD
NOT
RECOMMENDED
Wooden bowls, wooden utensils and wood handled utensils can warp, crack
or lose their finish.
NONDISHWARE
ITEMS
NOT
RECOMMENDED
The Bosch dishwasher is only intended
household dishware items.
Table 1.
coating should be covered
with a light coating
for use in cleaning
standard
of
LOADING
China, crystal and other delicate items must be placed
so that they do not touch each other during dishwasher
operation. Chipping or other damage may occur if
items can touch each other while dishwasher is
LOADING THE TOP RACK
The top rack is designed for glasses, cups, plates, bowls
and saucers. Glasses, cups, plates, bowls, saucers and
small pots may be loaded in many different positions to
fit your needs. Figure 3, shows a typical mixed load for
an upper rack washing load.
running.
Large serving spoons and forks, spatulas, tongs and
large knives can be placed in top rack. Be sure to
space these large utensils so that water may flow
freely over them and so that water does not collect in
them; - - - serving spoons and ladles should be placed
facing downward so as not to collect water.
The dishwasher should be loaded so that water can
circulate freely and reach every part of every item that is
to be cleaned:
•
Cups, glasses and containers should be placed in upper
rack upside down so that water drains off of them and
does not collect in them. Tall narrow vessels, such as a
vase or tall glass, should be placed in the lower rack,
near the middle, for the best cleaning result.
At completion of loading of the upper rack check to
make sure that nothing is protruding through or
hanging beneath the bottom of the rack, which could
block the rotation of the spray ann.
Figure 3.
The Bosch dishwashers have a special feature
incorporated into the flip down cup shelves on the side
of the upper rack. The ends of these shelves are
specially formed to help maintain spacing between
stemmed glasses. When in the flipped down position
long stemmed glasses may be placed in the second
row from the edge and placed so their stems rest in the
"V" formed ends of the shelves. When the cup shelves
are in the up position long stemmed glasses may be
placed in the first row with their stems placed to rest
between the tooth like projections of the shelves.
6
_4.
LOADING THE LOWER RACK
•
Large and/or heavily soiled items should be placed in
the lower rack of the dishwasher. Heavily soiled pots
and pans should be placed face down. See figure 4.
I'he I)LN series dish,,\ashers (SHe 4022 L£'. SHL
4026 tic
and SHU 4036 UC) crone with a Io\_er rack
that has two sets of flipped down tines. Wilh Ihese
models, if more space is needed l_:wr_)ts and pans. Ille
rear two sets of tines can be I+oldcd to the down l_sitkm. Figure 5 shows Ihe lower basket with the rear sClS
of tines in the down posdion
to a,.'comodate
large pots.
Figure 6.
Extra Tall Items
Figure 5.
Silverware should be mixed when placed in the
silverware basket. The purpose of mixing the
silverware is to avoid having them nest together, for
example if spoons would be placed together they
could nest together so that water could not properly
circulate across them to clean the surfaces.
If you have extra tall items that cannot fit in the lower rack
without interfering with the upper spray arm or without
hitting the upper rack, the upper rack may be removed. A
special "Extra Tall Item Sprinkler" is provided with the
dishwasher to allow use of the dishwasher
with upper rack
removed. See figure 7.
Silverware should be placed in the silverware basket
with the handles down. with the exception of the
knives, which in order to avoid accidentally cutting
oneself, should be placed
with the handles
up.
If >ou do inadverlemly
load the silxerware bw, ket with
lhc knilE blades up it is recommended,
to awfid cutting
.,,ourself _hen unloading, that you remove the silverware
ba.,kel from the dishwasher
and tip the content_ out onto
a cutting board
RACK
HEIGHT
AI)JUSTMENT
The upper rack height of the The DLX series dishwashers
tSttU 4022 UC, Sill' 4026 UC and SHU 4036 UC) is
aditlslablc. There are two po-,itions, see fignl'e 6:
I. Thc upper posili,m is used Io prmidc nlore room [kll"
Ilenlh to be i',laccd ill
the lower rack.
2
The hnxer fJoMlinn
is u.t:d
Io pr.; idc nlorc room Ior
ilClnS to be phlccd ill Ihc upper ra,zk.
"1i, icpnsilion
:l
I.ilnl
upllcr
Pull Iht: lack
RCIIIhCll
i hHIIItC!
rack and pull
i:lt k cilll hu hllcd
Ulq_cr ilhlslraliHn
uHmpJe!cl}
To allow washing of extra tall items:
I.
With upper rack empty, remove it from the dishwasher
by pulling the rack partially nut t,, the p,,inl where
rack can bc lilied upward and out to disemgage the
wheel'., IYinn side rails
rack:
clnply
p_finl _ he]c
b
Figure 7.
lack
parlia]l}
tlp_ald
as shn_n
out If,
ill
ol I:i::,,_." ".
I,,i\_:lltl
and IhCll tip tmlil
iollci_
;uc
lice HI cllalJhv]n
Ihc I_l_ t wilh
_J:c _mlhcl ,el _1 I'ollcls
iiII Ihc
7
Figure 9.
DETERGENT DISPENSER
The detergent dispenser on the Bosch dishwasher is
located on the inside of the door, see figure 1 as well as
figure 9 and 10. The detergent dispenser cover may be
opened by pulling the release tab (figure 10) toward you.
Figure 8.
Place the "Extra Tall Item Sprinkler" over the upper
rack spray outlet at the back of the dishwasher tub
(refer to figure 7) and turn clockwise to lock sprinkler
head in place.
2,
Extra tall items may now be placed in lower rack for
washing, as shown in figure 8. To remove "'Extra Tall Item
Once the cover is open you will see two level marks:
"25" and "15". These refer to the volume when filled level
in milliliters. 15 milliliters is equivalent to 3 teaspoons. If
the detergent dispenser is completely filled it can hold
45 milliliters, or roughly 9 teaspoons.
Sprinkler", to again allow use of upper rack, reverse
actions used to insert it.
USING THE DISPENSERS
For the best washing
result it is important
amount
and rinse agent.
of detergent
DETERGENT
to use the correct
I L:J
USE
Use only fresh dishwashing
detergent (powder is
recommended)
manufactured
specifically for dishwasher
use. Use of other types of detergents will result in
excessive suds. Be sure to check the phosphate content of
the detergent t_) be used. Phosphate helps prevent the
minerals in hard water from forming a film or spots on
dishes. Hard water requires your detergent to work harder.
In hard water areas you will find that detergents with high
phosphate levels will provide a better result. If the
phosphate level is Inw, below 8.7_, you may have to use
cxlra detergenl in hard water area',.
Release
Figure 10.
The amnunt of detergent to be used depends on the cycle
selected and the water hardness:
•
For water (d medium hardness and REGULAR WASH
•
}:Ic,,ure t_) I_lh_w the di,,hwasher 0clcrgcnt nlanuJacturcr's
in',lructions
whcll
usin_ the detcr_eulN.
C()nccntratcd
0ctenucnts ustlally call I_]" h_wcr usage than do standard
delcrgcnts.
Nole:
[)t_ tn_i H,,e t!elel_clll
\_hcrl
_.'y_.']c
II;n_
hccn _cl_'clcd
the RINSI_
& IIt)I.D
•
cycle it is recommended
that the detergent dispenser
be lilled to the 25 milliliters, (5 tsp.) level.
With hard water, or with the POWER SCRUB cycle.
it is recomnTlended that the detergent dispenser be
completely lilled, roughly 9 teaspoon_,.
With ",_)l'twater the tLm_unt (_1dctcrgcnl may hc
reduced.
II y_)tl
0i,,he,,
ca',c',,
unttch.
NII[I
()l
",ht_tll(I
care
(]elcl_ciiI
I)ll_)'_])h_llt'
lJt:lUl_trrll
8
",peci[ll
W;llel"
_lll)()llln
I(_
have water ol medinun <)rhi_zhcr ha]dnc',s and the
oh) I/<)l COllie cle_ltl tile _';t[l_,C, Ill Ihe lual<)rity
of
i,_the tl'_C ()1 tl)() litllc t]clergcnl
i_llhe]
[hLin
1()(9
II y_al h[nve vcly ",_)11w:acr, i)l chcnlically Ileatctl
I:l_l
(leluI,ut'nl
tl(lllll_illell
lhc_r
hr.' ItLkcl] I(_
%iltl_lli()l)_
I_ it.c_)nnllCll(leiI.
wilh
%_11
k_;llt:l
lINe
"li)(i
II!iiy
Ihc luiUillltnn
;i hl_2h
t';lll%C
qt_:llily,
nlnt.'h
L'lt'llill_
(_!
k,o.I
lil_tLl_
[llt_
U_:Ak'J_tZlIL
t. OILI_)ILILIII_.'LH
L. IkA_,L. '
UiC
,klkL'l
b) diding it over the detergent chamber and pressing
down on Ihe button until it clicks sitar. The detergent '.,.'ill
be dispensed automatically
during the wash porlion of tile
c) cle.
If the cover of the delergenl
dispcllser
is oh)sing fully but
it \von'l huch Ibis is inosl likely duL' to the dishwasher
ha',iag been stopped in mid cycle. Cheek the position of
II1,:"'Slarl and Run Knob", see Figure 2, to see if cycle has
been completed. If the cycle is not completed please ret_r
m section of this manual titled TO INTERRUPT
OR
RESET
CYCLE
to reset cycle.
RINSE AGENT
I
Figure 12.
INDICATOR
There is level indicator on the dispenser, see Figure I I
and 13. This indicator shows the level of rinse agent that is
m the rinse agent reservoir. As recei\ed, and when empty.
the level indicator on the dispenser will appear blank,
When the rinse agent reservoir is full the level indicator on
the dispenser will appear dark.
RINSE AGENT
DISPENSER
REGULATOR
The rinse agent reservoir of the Bosch dishwasher
is
provided with a regulator calibrated from I to 6. See
Figure 13. This regulator controls the amount of rinse
agent dispensed. The dishwasher
leaves the factory
preset to 3/-'. This has been chosen as the average setting,
however:
•
if you see streaks, it is recommended that the regulator
be turned to a lower number.
if water spots appear, it is recommended that the
regulator be turned to a higher number.
•
indicator
Rinse agent level indicator
Figure
!1.
IMPORTANT
Rinse agent, or a rinse aid. is used to diminish water
spoiling and I0 provide optimum drying results. Rinse
agenl must
bc m,ed at all times with the Bosch
dishwasher.
Dosage control
Figure 13.
RINSE AGENT
DISPENSER
TO ADJUST SETTING:
The rinse agent dispenser is located next to Ihe detergent
dispenser. See ligmc 12. Rinse agent is available in liquid
or ,.olid I_)rm. I)o u_t use the ,,(did t,.pe of rinse agent in
Ihe Bosch dishwasher.
1o fill Ihc rinse il_2CJllrcser\_m trch:r t(_ Figure
•
Open the dislhwa,,her tl(_Jr hill 3.
•
()pell
lhtg
•
,\dd
l in_u
c(_\('l
zt_'t'lll
iin,,c
<11 the
I<> the
il_2t.'rlt
rc_elv()il
•
('he,
u' Ihe
",lilt'
th_ll
t.'t_\_'l ol
il Is htl_ily
lilt:
IJll_c
,,rl_q)l)cd
a_,u:nl
level
reser\on-is
hdl
di_,pcn_,cl.
clw, cd
•
(/lose the cover of the rinse agent dispenser.
sure thai it is lirrnly snapped closed.
CYCI,E
Llrllil lilt." clear
the
Open the cover o[ the rmsc agent dispenser.
Turn the setting indicalor Io _he desired setting.
Figure 13.
12):
dJspt_*n_ur
imlicat<n luln,,tfmll'dclcl
3 dark
\_ hell the lexcl mdical_)r is dark
•
•
Make
See
Make
SEI,ECTION
The di_,hwashcr will wash alld dl} Ihc t;onlcnls based Oil
cycle _,clcclion inadc Ruler I_1Ihc ('Y('I.I{
SEI,I;('IIt)N
('ItART, Tahlc 2 The nio_,l ul_prf_prialc cycle lilt the load
Io bc washed can be sc]cclcd lic_ili this lahlc by ¢cmlpaniug
Ihc hind type
Iht'
IIcIIIS
hi
i,rul the
Ihc
inllOOll[
anti
C]1;11"1% ic({llllfnt'nthlliOn%
condiliOli
ol
the
food
on
Cycle Selection Chart for SHU 4000
Type of dishware
e.g.china,
cutlery,
glasses,
etc.
Type of food
remains
/l_lon-oell-/
[.. cate/
Soups, casseroles,
sauces, potatoes,
pasta, rice, eggs,
roast or fried food
Amount of
food remains
Soups, potatoes,
pasta, rice, eggs,
roast or fried food
__]
a lot
!!
Condition of
food remains
Wash
cycle
stuck on hard
4!,
Coffee, cakes, milk,
salami, cold drinks,
salads
•
L 1
a,,tt,el
[a.,..e
•
•
!!
loosely attached
4!, 4,
[P=l
l Wash
Cycle
sequence
4,
& Hold
I Rinse t
Pre-rinse I
Rinse-aid L
Drying
J
Cycle
details
Duration in
minutes
Water consumption
in gallons
Water consumption
=n litres
85
78
83
7
6.55
6.55
5.36
1.19
24.75
20.25
4.5
24.75
Shown above are the range of values that may be obtained while running the dishwasher under normal
conditions• Actual values may vary. The actual cycle duration, water and energy usage are dependent upon
inlet water lemperature.
'lahlt'
ll)
2.
OPERATION
Once detergent has been added and before closing the d_mr
of the dishwasher check the wash arms to ensure that Ihcy
are free Io rn,ave. With Ihc detergent in the dishwasher and
arnls free to move:
•
Close the door of the dishwasher
door latches closed.
making
sure thut
•
Depress the button for the cycle you desire.
Turn the "'Start and Run Knob" to "START- and
depress the On/Off button. See figure 2. The indicator
light above the On/Off button will become illuminated
to indicate that the dishwasher is on and the cycle will
Coarse/microfilter
Fi_le Filter
begin.
Figure 14.
TO INTERRUPT OR RESET CYCLE
To interrupt cycle simply depress the On/Off button to stop
operation. If you are interrupting the cycle during a wash
or rinse cycle please wait until the water noises stop before
opening the door. After opening the door leave it ajar for a
few minutes. The cycle then may be resumed by closing
the door and depressing the on/off button.
As a safety feature the dishwasher will automatically turn
itself off whenever the door is unlatched. However, if the
door is opened quickly while in a wash or rinse cycle some
water may splash out of the dishwasher. For this reason it
is recommended that the machine always be switched to
off before opening the door.
If you wish to reset the cycle to its beginning after
stopping the dishwasher:
I. Close the door of the dishwasher. Make sure that the
door is completely
closed and latched.
2.
Turn the "Start and Run Knob" to "Start".
3.
The dishwasher is no,a reset and ready to run your
selected wash cycle.
UNLOADING
When unloading Ihc dish,gasher always unload the lower
ruck lirst and then unload the upper rack. This will
rainimize the chance of drops from the upper rack falling
on the dishes in Ihc lower rack. The glverwarc
basket
ol the Bosch dishwasber
unloading.
A]',_.
,._.hen uul_mtlin_,
be alhJwcd
iil111c quickly
Ill c_l
ma_. he rem_wed
for easy
CARE and CLEANING
The Bosch dishwashers have a triple filter system
comprised of: a microfilter, a fine filter and a coarse filter.
The microfilter is self-cleaning, but the coarse filter and
fine filter will sometimes be found to have collected items,
from bones to toothpicks or straws that been left on the
plates or in the glasses. For this reason the following
maintenance should be observed:
Filters
The filters should be checked on a regular basis. To
remove the filters, turn the knuded ring handle of the
coarse/microfilter
'/4turn counter-clockwise,
see figure
14, and lift out the coarse/microfilter.
After removing
the coarse/microfilter
the fine filter should also be
inspected from time to time. Examine the filters. If
large solids, such as bones, or large seed(s) are present
remove the filters and dispose of the large solids by
emptying into a waste basket. If any other items have
been trapped by the filters, paper labels for examp]e.
these should also be removed while you have the filters out of the dishwasher. These smaller items can
usually be flushed out under running
trouble removing them by hand.
After cleaning, reinsert the filters in the dishwasher
making sure to press the filters firmly into positkm,
and then turning the knurled ring ¼ turn clockwise
until locked. Pull gently on the knurled ring to make
sure the filters are again locked in place.
Other areas requiring
arms
and the stainless
it Is rcc_mmlcnded
hclllre
han01iug.
il lilt' d{utr is ,,pc!led
thai
l hc dishes
hligllll 3,
the dishes
will c_l_[
water if you have
periodic
steel
mainlenance
tank
and
inner
are Ihe wash
door
alld
tht{ll
gasket:
•
Wa,,h arlllS
The wash arms should bc checked
Ill
_LS%LU'C Ihai
tuliibMrucled.
;lYe easily
the
splay
II the
(_liiiccs
"¢,a_h
_llnls
_llt,
on a regular bm, i',
clear
require
_lnd
{Icilllitl[2
Iht'_,
rt, llnlv_lhlc:
!1
Figure 15.
> The lower wash arm simply snaps into place and
can be removed by pulling upwards.
> The upper wash arm is held in position by a locking
ring that can be released by turning it approximately
I/8 turn. See figure 15.
After cleaning, reattach the wash arms by reversing
the action used to remove them.
Stainless
Steel Tank and Door
The outer edges of the inside door panel should be
cleaned on a regular basis to remove food particles
that can gather there from normal loading. If spots
begin to appear on the stainless steel door or tank
check to make sure that the RINSE AGENT
RESERVOIR has rinse agent in it. Also it is possible
that the wash arms are blocked, which prevented the
door as well as your dishware fl'om being properly
washed and rinsed. Check the wash arms to make sure
they are nlllving hotly. I1 not.clear the obstruction
away so Ihal the arms may rotate freely and then
rewash Ihc load of dishes in the dishwasher.
Spots thai appear on the stainless steel door may be
removed hy wiping gently with a sponge sprinkled
with a stainless steel cleaner, l)o not use metal
scouring pads to clean the stainless steel surlktccs
as these can ",cratch the SUllace and ]ea'+e []ICILtl
Irkl_ll_Ull['_
Door
Ihc
[h(I[
ih+ol },;t-,kcl
!_l_ldil}_
i,a,
IriS[
(ia,,kct
I_1IClll_\t '
dalnp
till]
IIl_ltl
vlt++uh] hc i.[Clllled
I_l/liclc
II IlCCt.!s',at\
,+h_lh
_, I[l_l[
c;in
_111{t i+e_ltl[[tl ha,d-,
_llhcl
h(llll
t. lc_ll