1
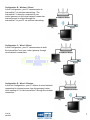
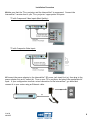
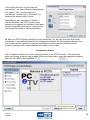
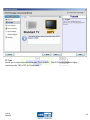
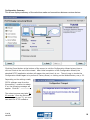
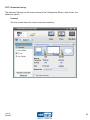
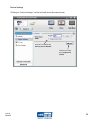
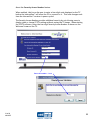
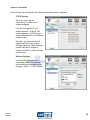
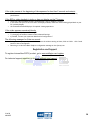
InternetVue™
IV-2020
User Manual
Table of Contents
Introduction .................................................................................................................................... 3
Product Specifications ........................................................................................................................ 3
Retail Box Contents ........................................................................................................................... 4
Ports and Connectors ......................................................................................................................... 4
Overall Requirements......................................................................................................................... 5
Configuration Options ........................................................................................................................ 6
Configuration A: Wireless / Wireless ................................................................................................... 6
Configuration B: Wireless / Wired ...................................................................................................... 7
Configuration C: Wired / Wired ......................................................................................................... 7
Configuration D: Wired / Wireless ...................................................................................................... 7
Installation Procedure ........................................................................................................................ 8
Configuration Wizard ....................................................................................................................... 10
TV Type..................................................................................................................................... 11
Connection Summary..................................................................................................................... 12
Password Setup ........................................................................................................................... 13
Device Name (SSID)....................................................................................................................... 14
Wireless Network ......................................................................................................................... 15
Configuration A......................................................................................................................... 15
Configuration B......................................................................................................................... 17
Configuration C......................................................................................................................... 17
Configuration D......................................................................................................................... 17
Configuration Summary.................................................................................................................. 18
Factory Reset ................................................................................................................................ 19
PC2TV Software.............................................................................................................................. 19
Main PC2TV Window...................................................................................................................... 20
PC2TV Advanced Settings ............................................................................................................... 20
PC2TV Advanced Settings ............................................................................................................... 21
Summary................................................................................................................................. 21
Device Settings ......................................................................................................................... 22
About the Security Access Number feature .................................................................................... 23
TV Type .................................................................................................................................. 24
TV Type .................................................................................................................................. 24
Internet Connection ................................................................................................................... 25
TCP/IP Settings ...................................................................................................................... 25
Wireless Settings .................................................................................................................... 25
Advanced ................................................................................................................................ 26
Password Setup ...................................................................................................................... 26
Upgrade ............................................................................................................................... 26
Video Settings ....................................................................................................................... 26
Pan and Scan ...................................................................................................................... 26
Troubleshooting Tips........................................................................................................................ 27
If InternetVue does not appear on the list of available wireless networks .................................................... 27
If you cannot connect to the Internet while projecting ........................................................................... 27
If your video performance is sluggish ................................................................................................. 27
If your InternetVue™ fails to connect on repeated attempts ..................................................................... 27
If you see black border on the TV ..................................................................................................... 27
If the video pauses at the beginning of the sequence for less than 2 seconds and restarts ................................ 28
If the DVD or video playback is jerky or does not display on the TV screen ................................................... 28
If the video appears excessively blocky .............................................................................................. 28
The following messages for Vista are normal........................................................................................ 28
Registration and Support................................................................................................................... 28
3.04.58
NOV0507
2
Introduction
Congratulations, and thank you for your InternetVue™ purchase. InternetVue™ will allow you to
display your PC’s screen contents on any TV or projector wirelessly. You will be able to view
videos, digital photos, websites, and just about anything on your PC, will be shown on your TV.
Moreover, your PC’s audio will also be heard from your TV or audio system.
c
b
d
a
Internet
e
InternetVue™ is a two-part solution – a software component and a hardware receiver/decoder
module. The software running on the PC (a) captures the audio stream and video display
information, then sends that data to the receiver (b) as standard TCP/IP packets. The receiver box
becomes a node on the network, either wired or wireless. The receiver not only decodes the
incoming packets back to analog audio and video signals for the TV (c), but it can also serve as a
wireless bridge (d), relaying your internet connection between the PC and your wireless gateway
(e).
Product Specifications
Maximum Output Resolution
Composite Video Formats
Interfaces and Ports
Networking Standards
Max. Wireless Data Rate
Wireless Frequency Band
Wireless Security Standards
3.04.58
NOV0507
1280 x 720 @ 60 Hz (Photo
mode)
NTSC, PAL
RJ45 10/100Base-TX
Component Video
Composite Video
3.5mm stereo jack
Reverse SMA Antenna
IEEE 802.11b/g, IEEE 802.3
54 Mbps
2.4 GHz ISM band
WEP 64/128-bit HEX/ASCII,
WPA, WPA-PSK
Industry
Certifications
Wireless Encryption
Operating System
Support
Input Power
Dimensions
Weight
RoHS, UL, cUL, FCC Part 15 Class
B, CE
TKIP only
Windows XP Home and
Professional (32-bit and 64-bit)
SP2, Windows 2000 Professional
SP4, Windows Vista (32-bit and
64-bit)
5V DC
1.38” x 5.91” x 3.15”
7.5 oz
3
Retail Box Contents
Ensure that your InternetVue™ kit has all the following items. Otherwise, contact Tech
Support for more information.
InternetVue™
Receiver
AC Power Adapter
Application CD
Audio Cable
Quick Start Guide
Video Cable
Ethernet Cable
Ports and Connectors
InternetVue™ has two sets of output video connectors, and one audio output connector. For video,
there are the Component Video and Composite video outputs.
Composite Video (CVBS) is an older standard, and is very common in all kinds of display devices. Its
connector is denoted by a yellow center insulator. Composite Video carries a specific video format
depending on the country of usage. In the USA, the video format is NTSC. NTSC video frames
consist of 525 lines of vertical resolution, shown at 29.97 frames per second.
Component Video (Y-Pr-Pb) is a newer standard, capable of carrying signals from 480i up to 1080p.
InternetVue™ can output up to 720p using this interface. Component Video is commonly used in
high-definition TVs and projectors, and is the preferred interface for maximum image clarity, color
vibrancy, and sharpness.
Audio output is through a 3.5mm
stereo mini-jack. An included audio
cable has dual stereo RCA connectors
on the opposite end.
The RJ45 connector is for wired
10/100Base-T networking. This
interface will not affect the wireless
networking operation of the unit.
The factory reset button must only be
used when necessary. To perform a
factory reset, depress the button for
at least 10 seconds, remove power,
wait 10 seconds, then re-attach power.
3.04.58
NOV0507
Power
Audio
CVBS Pr Y Pb
RJ45
Antenna
Factory Reset Button
4
Overall Requirements
1. TV, projector, or other display device with component or composite video inputs.
For the best possible InternetVue™ experience, an HDTV with component inputs is best. PCs
with dual/quad-core processors and/or faster speed and more memory will result in smoother
video playback especially when viewing content from the web.
2. PC Configuration:
o Windows XP Home/Pro SP2, 2000 SP4, Vista (all versions) with administrator privileges
o Pentium 4 or M, 1.8 GHz or faster
o 512MB RAM or more
o Wired (10/100BT) or wireless (802.11 b/g) network connection; WEP, WPA/WPA-PSK with
TKIP encryption supported. For AES encryption support, please check the InternetVue™
support website.
Recommended PC Configuration:
These recommendations are for optimized viewing of full-motion video through InternetVue™.
Pentium 4 or M, 2.0 GHz or newer, dual or quad-core CPU
Wired (100BT) or wireless (802.11 g)
No unnecessary applications running in the background
If using a notebook, laptop, or tablet, Power Scheme should be set to “Desktop”, or
attach power supply for maximum performance.
Optional:
• Wired or wireless internet connection for internet access while using InternetVue™
3.04.58
NOV0507
5
Configuration Options
There are four possible ways to interface the InternetVue™, your PC, and your internet connection.
However, keep in mind that the internet connection is not necessary. Select which Configuration
works best for you from the table below.
Configuration
PC Network
Connection Type
Internet Router
Type
A
Wireless
B
Wireless
C
Wired
D
Wired
Wireless
Wired
Wired
Wireless
Configuration A: Wireless / Wireless
In this Configuration, your PC communicates to
InternetVue™ via wireless networking. The
InternetVue™ then enables its “AP+” feature which
allows it to connect your PC to your existing wireless
router/gateway at the same time. Any form of wireless
security enabled on your router/gateway will be
automatically detected and used between the
InternetVue™ and your PC. You may be asked to
provide wireless security passwords/passkeys. Write it
down here for future reference:
3.04.58
NOV0507
6
Configuration B: Wireless / Wired
In this Configuration, your PC communicates to
InternetVue™ via wireless networking. The
InternetVue™ is directly connected to your
router/gateway via the wired network connection.
Internet access is relayed through the
InternetVue™ to your PC via wireless networking.
Configuration C: Wired / Wired
In this Configuration, your PC communicates to both
the InternetVue™ and your router/gateway through
wired network connections.
Configuration D: Wired / Wireless
In this last Configuration, your PC utilizes its wired network
connection for internet access from the gateway/router,
while sending A/V to the InternetVue™ through the wireless
connection.
3.04.58
NOV0507
7
Installation Procedure
Make sure that the TV or projector and the InternetVue™ is unpowered. Connect the
InternetVue™ receiver box to your TV or projector’s appropriate AV inputs.
TV with Component Video Inputs (Best Quality):
TV with Composite Video Input:
Connect the power adapter to the InternetVue™ DC power jack input first (a), then plug in the
power adapter into an AC outlet (b). Turn on your TV or projector and select the appropriate AV
input. If your configuration involves a wired connection to the InternetVue™, go ahead and
connect it to your router using an Ethernet cable.
(b)
(a)
3.04.58
NOV0507
8
The InternetVue™ will autodetect which output is being used
to connect to the TV. In about
30-60 seconds, it will be fully
initialized, and the following
“Welcome Screen” will come up
on your TV or projector:
PC2TV-HD
PC2TV Welcome Screen
shown on your TV
This confirms the connection between the
InternetVue™ receiver and the TV or projector. Now,
you can begin installation of the PC2TV software on
your computer by inserting the CD into your PC’s CDROM drive. Follow all onscreen instructions and
prompts.
NOTE: If you have an existing PC2TV software installation, please UNINSTALL IT FIRST.
To do this, click on START ALL PROGRAMS PC2TV UNINSTALL. Follow the
instructions. A system reboot may be required.
Launch the PC2TV application by
double-clicking its icon on
your Windows desktop.
Typically, the PC2TV will connect to
your InternetVue™ receiver
automatically when there are no other
receivers on the wired LAN or within
wireless range.
3.04.58
NOV0507
9
In the event that there is more than one
InternetVue™, the Select Output Display window
will appear. Here, you can select the
InternetVue™ receiver by its “Wireless ID” as
shown in the image of step 3 above.
Depending on your InternetVue™ receiver’s
internal firmware, the PC2TV software may
prompt you to upgrade its firmware to the latest
version for optimal performance. Simply follow
the instructions as this is done automatically.
When the PC2TV software connects to the InternetVue™ for the very first time after initial
installation, it automatically launches the Configuration Wizard. The Configuration Wizard allows
you to select various options for Internet Connections as well as personal preferences and
protection settings such as user passwords and display access codes.
Configuration Wizard
The Configuration Wizard runs after initial installation of the PC2TV software. The wizard will
guide you through a step-by-step process. Follow the instructions, select the appropriate options,
and then click NEXT until completed.
3.04.58
NOV0507
10
TV Type
Allows you to select between a standard TV or an HDTV. The HDTV setting supports higher
resolutions like 1280 x 720 for Photo mode.
3.04.58
NOV0507
11
Connection Summary
This shows the video output options, and allows you to select between composite and component.
3.04.58
NOV0507
12
Password Setup
This screen allows you to create a password to prevent others from changing your configuration.
This is completely optional.
3.04.58
NOV0507
13
Device Name (SSID)
This allows you to change the “Wireless ID” broadcasted by the InternetVue™. This is useful when
multiple receivers are present. You can assign any four-character alphanumeric suffix to each
InternetVue™ box. The InternetVue™ receiver will then have an SSID of “PC2TV-xxxx” where the
“xxxx” is the four-character alphanumeric name entered.
3.04.58
NOV0507
14
1
Wireless Network
Select the correct settings here for internet access while connected to the InternetVue™ receiver.
The correct option here is based on your configuration as described in the beginning of this
manual.
Configuration A
Select “Connect to external networks using wireless”
Select the wireless gateway/router you wish to connect to for internet access. If wireless
security is present, the icon next to the SSID will have a padlock icon and the security type
shown:
If you are connecting to a wireless
gateway/router with security, you will
be prompted to enter the passkey
The same exact key, encryption type,
channel, and security will be
automatically detected, must and will
be used by the InternetVue™ receiver.
AES encryption compatibility is not guaranteed. Please disable AES encryption on your
wireless gateway/router if problems arise.
3.04.58
NOV0507
15
You can also manually enter the wireless gateway/router SSID, channel, security and
encryption details by clicking on this button (1 – see previous page). The following window
will appear:
If the entered passkey, channel, SSID, or security type is incorrect, PC2TV will prompt you to
try again. Click YES:
3.04.58
NOV0507
16
Configuration B
Select “Connect to external networks using wired ethernet”
Configuration C
Select “None”
Configuration D
Select “None”
In configurations B and D, only your PC and the InternetVue™ communicate wirelessly; the internet
connection to the gateway/router is wired. Wireless security can be enabled between the PC and
the InternetVue™ by clicking on the “Enable Display Encryption” checkbox (1).
1
The following window will appear. Enter 8 to
23 characters here. This will create a secure
connection between the InternetVue™ and
your PC.
3.04.58
NOV0507
17
Configuration Summary
This screen displays summary of the selections made and connections between various devices.
Click the Cancel button at the bottom of the screen to exit the Configuration Wizard at any time or
click on Finish at the end of the wizard. After initial completion of the Configuration Wizard, the
standard PC2TV application window will appear the next time it is run. The only way to invoke the
Configuration Wizard again is to perform a Factory Reset, or clicking on the Wizard Button, see p. 22.
Depending on the settings made,
PC2TV software may force the
InternetVue™ receiver to reboot.
If so, the following message will
appear. Click OK.
The reboot process may take 3060 seconds. Once the Welcome
screen is up on your TV, you now
can start the PC2TV software.
3.04.58
NOV0507
18
Factory Reset
Sometimes a factory reset is necessary to clear all settings in the
InternetVue™ receiver. It will be brought back to the factory default
state. The SSID may change, and starting the PC2TV software will
invoke the Configuration Wizard once again.
Factory Reset Button
To perform a factory reset, make sure the InternetVue™ receiver is
powered on and running for a few minutes. This is to ensure that it is not initializing. Press
the Factory Reset Button for 10 seconds continuously, then release. After 30-60 seconds,
the Welcome Screen will appear on the TV. Otherwise, try removing the power adapter
from the InternetVue™ for 10 seconds, then re-attach the power jack.
PC2TV Software
Click on the PC2TV icon on the Windows desktop (or from Start/All Programs).
Shutting down PC2TV can be done by clicking on the X
on the upper-right corner of the application.
The application automatically scans for InternetVue™ devices. If there is only one InternetVue™,
you will be connected to that unit automatically. Otherwise, you will be presented with the
“PC2TV Display List” window. Here, you can select which InternetVue™ receiver to connect to:
3.04.58
NOV0507
19
Main PC2TV Window
The Title Bar shows
the name of the
InternetVue™ receiver
currently connected
Click here to toggle the
Advanced Settings.
Click here to select a
different InternetVue™
receiver. You will be shown
the “PC2TV Display List”
window (see previous page).
Signal Strength meter of
connected wireless
gateway/router
Click VIDEO to increase frame
rate at a reduced resolution.
This will switch you to 800x600
for smoothest playback. Best
for videos and movies.
Click PHOTO to sharpen image
quality and increase the
resolution, but at a reduced
frame rate. Best for viewing
photographs, reading text, or
slow-moving images.
Click Hide/Mute to blank the
video and mute the audio.
3.04.58
NOV0507
20
PC2TV Advanced Settings
The Advanced Settings are the same as those in the Configuration Wizard, aside from a few
additional options.
Summary
The first screen shows the overall connection summary:
3.04.58
NOV0507
21
Device Settings
Clicking on “Device Settings” on the left side shows the next screen:
Click here to enable the
Security Access Number
Click here to start
the Configuration
Wizard
3.04.58
NOV0507
22
About the Security Access Number feature
When enabled, this forces the user to enter a four-digit code displayed on the TV
before the InternetVue™ will allow the PC to connect to it. This code changes each
time the InternetVue™ receiver is power-cycled.
The Security Access Number provides additional security by not allowing users to
display video or change PC2TV settings without seeing the TV image. When starting
the PC2TV software, enter the four digit Security Access Number as shown on the
Welcome Screen on the TV.
PC2TV-HD
0.0.0.0
192.168.1.187
8086
Enter this number … here
3.04.58
NOV0507
23
TV Type
You can change the TV Type here,
either standard or HDTV:
Connection Summary
Here, you can select which output
connectors to use, either composite or
component video:
3.04.58
NOV0507
24
Internet Connection
In this screen, the settings for the internet connection can be changed.
TCP/IP Settings
There are two ways for
InternetVue™ to have its IP
address assigned.
First the through DHCP, the
default method. In DHCP, the
router/gateway, or DHCP server
assigns InternetVue™ an IP address
automatically.
Secondly, you can enter the IP
address, and all other related
settings manually. When doing so,
ensure that the IP address is
unique, and that all other settings
are accurate.
Wireless Settings
In this screen, the method of
connecting to the internet and
wireless security settings can be
changed. See p. 15-16 for details.
3.04.58
NOV0507
25
Advanced
More advanced options can be set here.
Password Setup
Optional password setting. See
p.13 for more info.
Upgrade
This screen allows you to perform a manual
firmware upgrade. It is recommended not
perform any manual firmware upgrades unless
instructed by Addlogix support.
Video Settings
The Quality Settings are similar
to the VIDEO and PHOTO buttons
at the top of the application
window.
Pan and Scan
This setting allows your PC to
maintain a higher resolution,
while the image displayed on the
TV is a cropped portion of the PC
screen, shown at a lower
resolution. Improves frame rate,
and increases size when watching
windowed video.
3.04.58
NOV0507
26
Troubleshooting Tips
If InternetVue does not appear on the list of available wireless networks
•
•
•
InternetVue™ is powered off, its wireless signal is too weak, or the antenna has come loose. Check for these
conditions, or try moving the PC closer to it.
If you are using Microsoft wireless utility:
1. Exit the PC2TV application.
2. Open the utility and view available wireless networks. Press the Refresh button to update the list of
available APs. If the InternetVue™ still does not appear in the available list, perform the following:
3. Exit the PC2TV application. See p.19 if the PC2TV application refuses to completely shut down.
4. Disable the wireless adapter from Windows “Network and Dialup Connections” dialog box.
5. Enable the wireless adapter again.
6. Re-launch the PC2TV application.
If you are using a non-Microsoft wireless utility:
1. Exit the PC2TV application.
2. Open the utility and connect to InternetVue™.
3. Re-launch the PC2TV application.
4. After exiting the PC2TV application, you can use the wireless utility to reconnect to your network.
If you cannot connect to the Internet while projecting
•
•
Make sure that the Welcome screen, displays a valid IP address in either the "Wireless Internet ID" or "Direct
Connect ID" boxes. If there is no IP address, or it reads "0.0.0.0" the Internet connection will not be successful.
If this is the case, do the following:
1. Exit the PC2TV application and try to connect the PC to the Internet in the normal fashion.
2. If the PC does not connect, the problem may be with your PC or broadband router.
3. If the PC connects to the Internet directly, launch the PC2TV software and run the wizard again. Make
sure that you configure for Wired Internet connectivity or Wireless Internet connectivity properly using
the IP address displayed on the Welcome screen
If your PC is projecting to the TV, and the Welcome screen had displayed a valid IP address, try connecting
again by closing and restarting the PC2TV application software. Ensure than the security, channel, and
encryption type between the PC2TV software and the router/gateway precisely match.
If your video performance is sluggish
•
•
•
•
•
Update your PC’s video card, storage, and any CPU optimization drivers
Check your PC documentation and disable settings that bring down CPU performance when operating on
battery power.
In Windows XP, go to CONTROL PANEL > SYSTEM > ADVANCED > PERFORMANCE SETTINGS, to tune the settings
to the following:
o Battery Power Setting – maximum performance
o CPU – maximum performance
o Backlight – lower-power mode
o Virtual Memory – maximum number
o Power Options – maximum performance\
Reduce screen resolution or enable Pan and Scan
You PC hardware is not powerful enough
If your InternetVue™ fails to connect on repeated attempts
•
•
•
Refer to p.19 and perform a Factory Reset.
Uninstall the PC2TV software by clicking on START > ALL PROGRAMS > PC2TV > UNINSTALL. Follow the
instructions. A system reboot may be required.
Reinstall the PC2TV software from the CD.
If you see black border on the TV
•
•
This is normal behavior.
Due to variations in the TV settings when using (analog) component and composite inputs, the PC2TV display is
sized so that any information at the bottom and top end of the PC screen is not cut off.
3.04.58
NOV0507
27
If the video pauses at the beginning of the sequence for less than 2 seconds and restarts
•
This is normal behavior. The system is optimizing settings to optimize video compression and display
performance.
If the DVD or video playback is jerky or does not display on the TV screen
•
•
•
Check your video playback software documentation, and try disabling “Overlay”
In the event that your PC has more than one display enabled, make sure video is being played back on your
PC’s primary display
We recommend PowerDVD player for optimal viewing experience
If the video appears excessively blocky
•
•
•
Check the quality of your wireless signal
Try changing the wireless channel under Advanced Settings
If possible, connect your system as described in Configuration C
The following messages for Vista are normal
•
•
Dialog box that prompts if you would like to save the wireless setting as Home, Work or Public – click Cancel
button if this screen appears.
Reverting to 16 bit Vista Basic Graphics configuration message on the Systray icon.
Registration and Support
To register InternetVue PC2TV product, go to www.addlogix.com/register
For technical support inquiries, go to www.addlogix.com/support
3.04.58
NOV0507
28
FCC Notice (USA)
This equipment has been tested and found to comply with the limits for a Class
B digital device, pursuant to Part 15 of the FCC Rules. These limits are
designed to provide reasonable protection against harmful interference in a
commercial environment. This equipment generates, uses, and can radiate
radio frequency energy and, if not installed and used in accordance with the
manufacturer’s instructions, may cause interference to radio communications.
Operation of the equipment in a residential area is likely to cause harmful
interference in which the user will be required to correct the interference at
the user’s own expense.
There is no guarantee that interference will not occur in a particular
installation. If this equipment does cause interference to radio or television
reception, which can be determined by turning the equipment off and on, the
user is encouraged to try to correct the problem by one or more of the
following measures:
o
Reorient or relocate the receiving antenna.
o
Increase the separation between the equipment and receiver.
o
Connect the equipment into an outlet on a circuit different from that to
which the receiver is connected.
o
Consult an experienced radio-TV technician for help.
o
Use shielded I/O cables when operating this equipment.
This device complies with Part 15 of the FCC rules. Operation of this device is
subject to the following two conditions:
o
This device must not cause harmful interference.
o
This device must accept interference which may cause undesired
operation.
NOTICE: Changes or modifications not expressly approved by the party
responsible for compliance could void the user's authority to operate the
equipment.
Addlogix Inc.
459 Wald, Irvine, CA 92618, USA
Technical support: www.addlogix.com/support
Copyright © 2007, Addlogix, all rights reserved.
InternetVue is a trademark of Addlogix. PC2TV is a trademark of Quartics, Inc. Windows and Internet Explorer
are registered trademarks and Windows Vista is a trademark of Microsoft Corporation in the United States and
other countries. Other brand and product names may be registered trademarks or trademarks of
their respective holders.
3.04.58
NOV0507
29