1
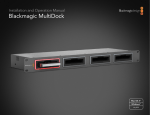
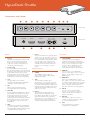
HyperDeck Shuttle
Connections and Control
1
2
4
3
5
6
7
DISP
+12V POWER
HDMI IN
HDMI OUT
SDI IN
8
9
10
Front View
VIDEO
SDI OUT
Back View
11
Buttons
1.Record
HyperDeck Shuttle will instantly record
the moment you press the Record
button, even if you’re playing back
a clip. This means you’ll never miss a
good take that’s happening.
2. Previous Clip
If you hold down the Previous Clip,
the clip will rewind at 2x speed. Pressing
the button again will increase the speed
to 4x and 8x. If you want to resume
playing back at normal speed, just press
the Play button. Or you can press the
Stop button to pause when rewinding.
3.Stop
The Stop button also switches
HyperDeck Shuttle between playback
and video loop through mode.
4. Play
When a clip is playing, pressing
Play again will loop it continuously.
5. Next Clip
If you hold down Next Clip, the clip will
fast forward at 2x speed. Pressing the
button again will increase the speed
to 4x and 8x. If you want to resume
playing back at normal speed, just press
the Play button. Or you can also press
the Stop button to pause when fast
forwarding.
6.DISP
This button isn’t currently used but will
soon be enabled by a software update.
You will be able to download this for free
at www.blackmagic-design.com/
12
13
14
15
7.Power
The Power button turns the HyperDeck
Shuttle on or off. To prevent someone
from accidentally switching off the unit,
you must hold the Power button down
for 2 seconds to turn it off. If you’re
running off the built-in batteries, the
unit will turn itself off after 8 minutes
if you’re not recording to conserve
power.
Status Indicators
8. VIDEO
The VIDEO indicator lights up
when a video signal is detected by
HyperDeck Shuttle.
9. SSD
The SSD indicator lights up in
green when it is accessing a correctly
formatted SSD and lights red when an
incorrectly formatted SSD is detected.
During recording or playback, the SSD
indicator illuminates as data is being
written to the SSD.
10. Battery
The four green battery indicators
display the internal battery charge
level. When all the LEDs go off, there’s
approximately 4 minutes of battery
power left. So you should plug in your
external power source or switch to
another charged HyperDeck Shuttle.
16
Connectors
11. +12V POWER
You can use the power adapter
supplied with HyperDeck Shuttle or
power it off an external camera battery
as the connector supports an input
range of 12V to 18V. When a power
source is connected, the built-in
internal battery will also be charged.
12. HDMI IN
You can connect your HDMI video
sources to this input – such as a camera,
games console and the output of an
ATEM switcher.
13. HDMI OUT
Connect an HDMI display or TV to
this output to monitor your video while
recording or playing back clips. You can
also connect this output to the HDMI
input of capture cards, production
switchers and other recording devices.
14. SDI IN
You can connect your SDI video
sources, such as cameras, routers,
capture cards, switcher outputs or
decks to this input.
15. SDI OUT
Connect this output to monitors,
routers, production switchers, decks
or other recording devices.
16.USB
Use the USB port for software
configuration and updates.
Learn more at www.blackmagic-design.com/products/hyperdeckshuttle
HyperDeck Shuttle
Getting Started
Welcome to the incredible quality of uncompressed recording and playback with HyperDeck
Shuttle! Your new HyperDeck Shuttle is quick and simple to use. Please follow these simple
steps to start recording the highest quality uncompressed video!
How to Record
How to Prepare the SSD
Step 1. Turn on the HyperDeck Shuttle.
SSDs used by HyperDeck Shuttle must be HFS+ formatted. Simply
connect the SSD to your computer via an external dock or cable
adapter and format them as you would a regular disk. Make sure
you check there’s nothing important on your disks as you will lose
everything on it when you format it.
Step 2. Insert a HFS+ formatted SSD into the HyperDeck Shuttle.
You can format a HFS+ SSD on a Mac or a PC using thirdparty software such as MacDrive or Paragon HFS+. As it
mounts the disk, the SSD light on the unit will light up.
When the light goes off, HyperDeck Shuttle is ready to
record.
Step 3. Connect your video source to the HyperDeck Shuttle’s
input. It doesn’t matter if you use the HDMI or SDI
input,as HyperDeck Shuttle will automatically detect
which one is connected. You can also connect the video
output of the HyperDeck Shuttle to your HDMI or SDI
monitor. All outputs are active so you can use either one
connection or both SDI and HDMI outputs together.
Step 4. If you see the Video status LED light up, it means that
HyperDeck Shuttle has detected a valid video input.
Step 5. If you don’t see your source video on the output, press
the Stop button to switch HyperDeck Shuttle between
video input loop through and playback.
Step 6. Press Rec button and HyperDeck Shuttle will start
recording to the SSD instantly. The SSD light will also
flash to indicate the SSD activity. Once you’ve finished
recording, just hit the Stop button.
If the Stop button starts flashing while recording, there
are only 3 minutes of recording time left on the SSD.
Make sure you have another empty SSD ready so you
don’t miss the next take.
How to Playback
Playing back a clip is simple. If you’re recording, press the Stop
button once to stop recording. Press it again to switch to playback.
Then simply press Play. You can also skip between clips by pressing
the Previous Clip or Next Clip button. The controls of HyperDeck
Shuttle work just like a CD player so pressing Next Clip will skip to
the start of the next clip and continue playing.
If you’re reviewing a long clip and need to rewind or fast forward
to a particular section, just hold down the Previous Clip or Next
Clip button. This will allow you to rewind or fast forward through
the clip at 2x speed. To go faster, press the Previous Clip or Next
Clip button again and the speed will increase to 4x and then 8x.
Once you’ve found the section you want to review, press Play and
playback will resume at normal speed.
Connecting the SSD to your Computer
If you’re using a Mac, the Disk Utility application that ships with
OS X will format a drive in the HFS+ format. If you’re using a PC,
software such as MacDrive or Paragon HFS+ will allow you to
create and read HFS+ formatted disks.
How to Access the Clips
HyperDeck Shuttle captures clips in QuickTime format – this
requires QuickTime™ to be installed on your computer. QuickTime
for Mac is built into Mac OS X™. QuickTime for Windows™ can be
downloaded free from Apple’s website.
Important Notes About SSD Speed
Some models of SSD can’t save video data at the speed the
manufacturer claims. This is due to the disk using hidden data
compression to attain higher write speeds. This data compression
can only save data at the manufacturer’s claimed speed when
storing data such as blank data or simple files. Video data includes
video noise and pixels which are more random so compression will
not help, therefore revealing the true speed of the disk.
Some SSDs can have up to 50% lower write speed than the
manufacturer’s claimed speed. So even though the disk
specifications claim an SSD has speeds fast enough to handle
video, in reality the disk isn’t fast enough when used to store video
data for real time capture. However, this mostly affects HD capture
and often these disks can still be used for playback.
Use Blackmagic Disk Speed Test to accurately measure whether
your SSD will be able to handle uncompressed video capture and
playback. Blackmagic Disk Speed Test uses data to simulate the
storage of video so you get results similar to what you’ll see when
capturing video to a disk. During Blackmagic testing, we have
found newer, larger models of SSD and larger capacity SSDs are
generally faster.
SSD’s are certified for use with HyperDeck Shuttle include the OCZ
240GB Vertex 3, Crucial 256GB C300, Kingston 64GB SSDNow
V+ and Kingston 128GB SSDNow V+. Check the tech notes on
the Blackmagic Design web site for more information. More disk
brands will be listed as they are certified.
If you only need to format the disks or transfer clips to, or from it,
then a USB to SATA adapter will be perfectly fine. However, if you
want really fast file transfers, then use an eSATA docking station. It
will be fast enough to edit the clips directly off the SSD.
Learn more at www.blackmagic-design.com/products/hyperdeckshuttle