1
A149K21
(96136200)
Owner's
431609 Rev. 2 04.12.10
Manual
BY
, EspaSol, p. 18
Printed in U.S.A.
Safety Rules .......................................... 2-4
Product Specifications .............................. 4
Assembly / Pre-Operation ........................ 5
Operation ............................................... 6-9
Maintenance Schedule ........................... 10
IMPORTANT: This cutting machine is
capable of amputating hands and feet and
throwing objects. Failure to observe the
following safety instructions could result in
serious injury or death.
Maintenance ...................................... 10-12
Service and Adjustments ........................ 13
Storage .............................................. 14-I5
Troubleshooting ................................. 15-16
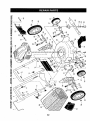
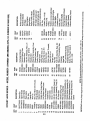
Repair Parts ....................................... 32-33
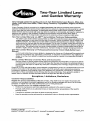
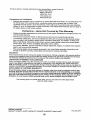
Warranty ............................................ 34-35
1. GENERAL OPERATION
• Read, understand, and follow all
instructionson the machine and in the
manual(s) before starting. Be thoroughly
familiar with the controls and the proper
use of the machine before starting.
•,Look for this symbol to point out impor• Do not put hands or feet near or under
tant safety precautions.
It means
rotating parts. Keep clear of the disCAUTION!!!
BECOME ALERT!i!
charge opening at all times.
YOUR SAFETY IS INVOLVED.
• Only allow responsible individuals, who
are familiar with the instructions, to oper_, WARNING: In order to prevent acate the machine.
cidental starting when setting up, trans• Clear the area of objects such as rocks,
porting, adjusting or making repairs,
toys, wire, bones, sticks, etc., which
always disconnect spark plug wire and
could be picked up and thrown by blade.
place wire where it cannot come in contact
° Be sure the area is clear of other people
with plug.
before mowing. Stop machine if anyone
enters the area.
_,WARNING: Engine exhaust, some of its • Do not operate the mower when bareconstituents, and certain vehicle components
foot or wearing open sandals. Always
contain or emit chemicals known to the State
wear substantial foot wear.
of California to cause cancer and birth defects
• Do not pull mower backwards unless
or other reproductive harm.
absolutely necessary. Always look down
and behind before and while moving
•°_WARNING: Battery posts, terminals and
backwards.
related accessories contain lead and lead
° Never direct discharged material toward
compounds, chemicals known to the State
anyone. Avoid discharging material
of California to cause cancer and birth
against a wall or obstruction. Material
defects or other reproductive harm. Wash
may richochet back toward the operahands after handling.
tor. Stop the blade when crossing gravel
surfaces.
CAUTION: Muffler and other engine
• Do not operate the mower without
parts become extremely hot during
proper guards, plates, grass catcher or
operation and remain hot after engine
other safety protectivedevices in place.
has stopped. To avoid severe burns on
• See manufacturer's instructions for
contact, stay away from these areas.
proper operation and installation of
accessories. Only use accessories approved by the manufacturer.
• Stop the blade(s) when crossing gravel
ddves, walks, or roads.
o Stop the engine (motor) whenever you
leave the equipment, before cleaning the
mower or unclogging the chute.
• Shut the engine (motor) off and wait until
the blade comes to complete stop before
removing grass catcher.
• Mow only in daylight or good artificial
2 light.
• Do not operate the machfne while under
the influence of alcohol or drugs.
• Never operate machine in wet grass.
Always be sure of your footing: keep a
firm hold on the handle; walk, never run.
• Disengage the self-propelted mechanism or drive clutch on mowers so
equipped before starting the engine.
• If the equipment should start to vibrate
abnormally, stop the engine (motor) and
check immediately for the cause. Vibration is generally a warning of trouble.
• Always wear safety goggles or safety
glasses with side shields when operating
mower.
II. SLOPE OPERATION
Slopes are a major factor related to slip &
fall accidents which can result in severe
injury.All slopes require extra caution. If
you feel uneasy on a slope, do notmow it.
DO:
• Mow across the face of slopes: never
up and down. Exercise extreme caution
when changing direction on slopes.
• Remove obstacles such as rocks, tree
limbs, etc.
• Watch for holes, ruts, or bumps. Tall
grass can hide obstacles.
DO NOT:
• Do not trim near drop-offs, ditches or
embankments. The operator could lose
footing or balance.
• Do not trim excessively steep slopes.
• Do not mow on wet grass. Reduced
footing could cause slipping.
II!. CHILDREN
Tragic accidents can occur if the operator
is not alert to the presence of children.
Children are often attracted to the machine
and the mowing activity. Never assume
that children will remain where you last
saw them.
° Keep children out of the trimming area
and under the watchful care of another
responsible adult.
• Be alert and turn machine off if children
enter the area,
• Before and while walking backwards,
look behind and down for small children.
• Never allow children to operate the
machine.
• Use extra care when approaching blind
comers, shrubs, trees, or other objects
that may obscure vision.
IV. SAFE HANDLING OF GASOLINE
Use extreme care in handling gasoline.
Gasoline is extremely flammable and the
vapors are explosive.
• Extinguish all cigarettes, cigars,pipes
and other sources of ignition.
• Use only an approved container.
• Never remove gas cap or add fuel with
the engine running. Allow engine to cool
before refueling.
• Never refuel the machine indoors.
° Never store the machine or fuel container where there is an open flame, spark
or pilot light such as a water heater or
on other appliances.
• Never fill containers inside a vehicle, on
a truck or trailer bed with a plastic liner.
Always place containerson the ground
away from your vehicle before filling.
• Remove gas-powered equipment from
the truck or trailer and refuel it on the
ground. If this is not possible, then
refuel such equipment with a portable
container, rather than from a gasoline
d{spenser nozzle.
• Keep the nozzle in contact with the rim
of the fuel tank or container opening at
all times until fueling is complete. Do
not use a nozzle lock-open device.
• If fuel is spilled on clothing,change
clothing immediately.
° Never overfill fuel tank. Replace gas
cap and tighten securely.
V. GENERAL SERVICE
• Never run a machine inside a closed
area.
° Never make adjustments or repairs with
the engine (motor) running. Disconnect
the spark plug wire, and keep the wire
away from the plug to prevent accidental
starting.
• Keep nuts and bolts, especially btade
attachment bolts, tight and keep equipment in good condition.
• Never tamper with safety devices.
Check their proper operation regularly.
• Keep machine free of grass, leaves, or
other debris build-up. Clean oil or fuel
spillage. Allow machine to cool before
storing.
• Stop and inspect the equipment if you
strike an object. Repair, if necessary,
before restarting.
° Never attempt to make wheel height
adjustments while the engine is running.
• Grass
catcher
components
aresubject ° Mower
blades
aresharp
andcancut.
towear,
damage,
anddeterioration, Wrap
theblade(s)
orweargloves,
and
which
couldexpose
moving
partsor
useextracaution
whenservicing
them,
allowobjects
tobethrown.
Frequently • Donotchange
theengine
governor
setcheck
components
andreplace
with
tingoroverspeed
theengine.
manufacturer's
recommended
parts, • Maintain
orreplace
safety
andinstrucwhennecessary.
tionlabels,
asnecessary.
AWARNING:
Thislawnmower
isequipped
withaninternal
combustion
engine
and
should
notbeused
onornearanyunimproved
forest-covered,
brush-covered
or
grass-covered
landunless
theengine's
exhaust system is equipped with a spark
arrester meeting applicable local or state laws (if any). If a spark arrester is used, it
should be maintained in effective working order by the operator,
In the state of California the above is required by law (Section 4442 of the California
Public Resources Code). Other states may have similar laws. Federal laws apply on
federal lands.
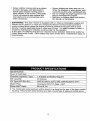
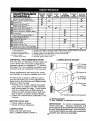
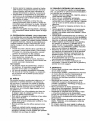
t.5 Quarts (Unleaded Regular)
20 Ounces
Spark PIug:
Blade Bolt Torque:
SAE 30 (above 32°F); SAE 10W-30 (below 32_F)
Champion RC12YC (Gap: .030")
35-40 ft. Ibs.
• The model and serial numbers will be found on a decal on the rear of the lawn mower
housing. Record both serial number and date of purchase in space provided above.
Read these instructionsand this manual in
its entirety before you attempt to assemble
or operate your new lawn mower.
IMPORTANT: This lawn mower is shipped
WITHOUT OIL OR GASOUNE inthe engine.
Your new lawn mower has been assembled at the factory with the exception of
those parts left unassembled for shipping
purposes. To ensure safe and proper
operation of your lawn mower, all parts
and hardware you assemble must be tightened securely. Use the correct tools as
necessary to ensure proper tightness. All
parts such as nuts, washers, bo_ts,etc.,
necessary to complete the assembly have
been ptaced in the parts bag.
TO REMOVE MOWER FROM CARTON
1. Remove loose parts included with
mower.
2. Cut down two end corners of carton
and lay end panel down fiat.
3. Remove all packing materials except
padding between upper and lower
handle and padding holding operator
presence control bar to upper handle,
4. Roll lawn mower out of carton and
check carton thoroughly for additional
loose parts.
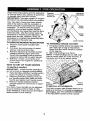
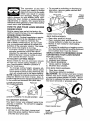
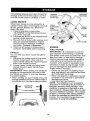
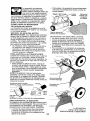
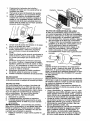
HOW TO SET UP YOUR MOWER
TO UNFOLD HANDLE
IMPORTANT: Unfold handie carefully so
as not to pinch or damage control cables.
1, Raise handles until lower handle section
locks into place in mowing position.
2. Remove protective padding, raise upper handle section into place on lower
handle and tighten both handle knobs.
3, Remove handle padding holding
operator presence control bar to upper
handle.
Your lawn mower handle can be adjusted
for your mowing comfort. Refer to "ADJUST HANDLE" in the Service and Adjustments section of this manual.
MOWING
POSITION
control bar
uP
Upper
handle
Handte
knob
Lower handle
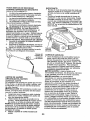
TO ASSEMBLE GRASS CATCHER
1. Put grass catcher frame into grass bag
with rigid part of bag on the bottom.
Make sure the frame handle is outside
of the bag top.
2. Slip vinyl bindings over frame.
NOTE: If vinyl bindings are too stiff, hold
them in warm water for a few minutes, If
bag gets wet, let it dry before using,
Frame
VinyJ
bindings
Frame
opening
TO INSTALL ATTACHMENTS
Your lawn mower was shipped ready to be
used as a mulcher. To convertto bagging or
discharging, see "TO CONVERT MOWER"
in the Operation section of this manual.
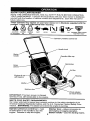
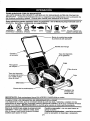
KNOW YOUR LAWN MOWER
READ THIS OWNER'S MANUAL AND ALL SAFETY RULES BEFORE OPERATING
YOUR LAWN MOWER. Compare the illustrations with your lawn mower to familiarize
yourself with the location of various controls and adjustments. Save this manual for
future reference.
....
..........................................................................
These
symbols may appe a'ron your
lawn mower or in literature supplied with the
product. Learn and understand their meaning.
CAUTION
OR WARNING
i
ENGINE
ON
ENGINE
OFF
ii
ii
FAST
ii
SLOW
iiiiiiiiiiiiiiiiiiiii
iii
CHOKE
,i
FUEL
OJL
DANGER, KEEP HANDS
AND FEET AWAY
,,,,,,,,,,,,,,
,,,,,,,,,
,,,,,,,,,,,,,,,
,,, ,,,,,
Operator presence controI bar
Starte=
handle
Gasoline filler cap
olug
Grass
catche
Air filter
Housing
with dipstick
Mufti,
Mulcher door
Wheeladjuster
(oneachwheel)
IMPORTANT: This lawn mower is shipped
WITHOUT OIL OR GASOLINE in the engine.
iii
iiiiiiiiiiiiiiiiiiii I
iiiiiiiiiiiiiiiiiiiiiii
iiii
i
iiiiiiiiiiiiiiiiiiiiii
MEETS CPSC SAFETY REQUIREMENTS
Our rotary walk-behind power lawn mowers conform to the safety standards of the
American National Standards Institute and the U.S. Consumer Product Safety Commission. AWARNING: The blade turns when the engine is running.
iiiiiiiiii i I
be held down to the handle to start the
engine, Release to stop the engine.
ii
IIIIIII
Mulcher door - allows conversionto
discharging or bagging operation.
Starter handle - used for starting engine.
Theoperation
ofanylawn •
mower
canresult
inforeign
objects
thrown
intotheeyes,
whichcanresultinsevere
eye damage. Always wear
safety glasses or eye shields while opeP
ating your lawn mower or performing any
adjustments or repairs. We recommend a
standard safety glasses or wide vision safety
mask worn over spectacles.
HOW TO USE YOUR LAWN MOWER
ENGINE SPEED
Engine speed was set at the factory for
optimum performance, it is not adjustable.
ENGINE ZONE CONTROL
_,CAUTION: Federal regulationsrequire
an engine control to be installed on this
lawn mower in order to minimize the
risk of blade contact injury. Do not under
any circumstances attempt to defeat the
function of the operator control, The blade
turns when the engine is running.
° Your lawn mower is equipped with an
operator presence control bar which
requires the operator to be positioned
behind the lawn mower handle to start
and operate the lawn mower.
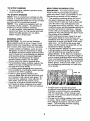
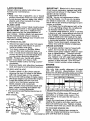
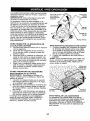
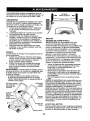
TO ADJUST CUTTING HEIGHT
Raise wheels for low cut and lower wheels
for high cut, adjust cutting height to suit
your requirements. Medium position is
best for most lawns.
• To change cutting height, squeeze adjuster lever toward wheel. Move wheel
up or down to suit your requirements, Be
sure all wheels are in the same setting.
NOTE: Adjuster isproperly positioned when
plate tab inserts into hole in lever, Also, 9position adjusters (if so equipped) allow lever
to be positioned between the plate tabs.
LEVERBACKWARD
Platetab
TO LOWERMOWER
LEVER
FORWARD
TO RAISE
MOWER
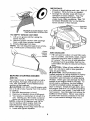
To convert to mulching or discharging
operation, remove grass catcher and
close rear door.
Pivot "
Rear
Grass
catcher
handle
Catcherframe hook
SIDE DISCHARGING
* Rear door must be closed.
. Open mulcher door and install discharge deflector under door as shown.
- Mower is now ready for discharging
operation.
o To convert to mulching or bagging operation, discharge deflector must be removed
and mulcher door must be closed.
SIMPLE STEPS TO REMEMBER WHEN
CONVERTING YOUR LAWN MOWER
FOR MULCHING 1. Rear door closed.
2. Mulcher door closed.
FOR REAR BAGGING 1. Grass catcher installed.
2. Mulcher door closed.
FOR SIDE DISCHARGING 1. Rear door closed.
2. Discharge deflector installed.
_CAUTION:
Do not run your lawn mower
without rear door closed, clippingdeflector
or approved grass catcher in piace. Never
attempt to operate the lawn mower with the
rear door removed or propped open.
Lever
TO CONVERT MOWER
Your lawn mower was shipped ready to be
used as a mulcher. To convert to bagging
or discharging:
REAR BAGGING
• Lift rear door of the lawn mower and
Install
discharge
place the grass catcher frame hooks
7 deflector
onto the door pivot pins.
IMPORTANT;
• Check oil level before each use. Add oil
if needed. Fill to full line on dipstick.
• Change the oil after every 25 hours of
operation or each season. You may
need to change the oil more often
under dusty, dirty conditions. See "TO
CHANGE ENGINE OIL" in the Maintenance section of this manual.
filler cap
MOWERtS NOWREADYFOR
DISCHARGINGOPERATION
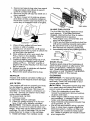
TO EMPTY GRASS CATCHER
1. Lift up on grass catcher using the
frame handle.
2. Remove grass catcher with clippings
from under lawn mower handle.
3. Empty clippings from bag.
NOTE: Do not drag the bag when emptying; it will cause unnecessary wear.
Grass
catcher
frame
handle
BEFORE STARTING ENGINE
ADD OIL
Your lawnmower is shipped withoutoil in
the engine. For type and grade of oil to
use, see "ENGINE" in the Maintenance
section of this manual.
dt_CAUTION: DO NOT overfill engine with
oil, or it wilt smoke heavily from the muffler
on startup,
1. Be sure lawnmower is level.
2. Remove oil dipstick from oil fill spout.
3. You receive a container of oil with the
unit. Slowly pour the entire container
down the oil fill spout into the engine.
NOTE: Initial oil fill requires only 18 oz.
due to residual oil in engine from the
manufacturers 100% quality testing.
When changing oil you may need 20 oz.
4. Insert and tighten dipstick.
Engine
oil cap
ADD GASOLINE
- Fill fuel tank to bottom of tank filler neck.
Do not overfill. Use fresh, clean, regular
unleaded gasoline with a minimum of
87 octane. Do not mix oil with gasoline.
Purchase fuel in quantities that can be
used within 30 days to assure fuel freshness.
dl_ CAUTION: Wipe off any spilled oil or
fuel. Do not store, spill or use gasoline
near an open flame.
_i, CAUTION: Alcohol blended fuels
(called gasohol or using ethanol or methanol) can attract moisture which teads to
separation and formation of acids during
storage, Acidic gas can damage the fuel
system of an engine while in storage, To
avoid engine problems, the fuel system
should be emptied before storage of 30
days or longer, Empty the gas tank, start
the engine and let it run until the fuel lines
and carburetor are empty. Use fresh fuel
next season. See Storage Instructions for
additional information, Never use engine
or carburetor cleaner products in the fuel
tank or permanent damage may occur.
TO STOP ENGINE
• To stop engine, release operator presence control bar.
TO START ENGINE
NOTE: Due to protectivecoatingson the
engine, a small amount of smoke may be
present during the initial use of the product
and should be considered normal
NOTE: Your engine is equipped with an
automatic choke system. No priming or
choking is required before starting.
° To start engine, hold operator presence
control bar down to the handle and pull
starter handle quickly. Do not allow
starter rope to snap back.
MOWING TIPS
CAUTION: Do not use de-thatcher
blade attachments on your mower. Such
attachments are hazardous, will damage
your mower and could void your warranty.
• Under certain conditions, such as very
tall grass, it may be necessary to raise
the height of cut to reduce pushing effort
and to keep from overloading the engine
and leaving clumps of grass clippings.
It may also be necessary to reduce
ground speed and/or run the lawn
mower over the area a second time.
° For extremely heavy cutting, reduce the
width of cut by overlapping previously
cut path and mow slowly.
• For better grass bagging and most cutting conditions, the engine speed should
be set in the FAST position.
• Pores in cloth grass catchers can
become filled with dirt and dust with use
and catchers will collect less grass. To
prevent this, regularly hose catcher off
with water and let dry before using.
• Keep top of engine around starter clear
and clean of grass clippings and chaff•
This will help engine air flow and extend
engine life.
MULCHING MOWING TIPS
IMPORTANT: For best performance,
keep mower housingfree of buUt-up
grass and trash. See "CLEANING" in the
Maintenance section of this manual.
° The special mulching blade wil!recut
the grass clippings many times and
reduce them in size so that as they fall
ontothe lawn they will disperse into
the grass and not be noticed. Also, the
mulched grass will biodegrade quicklyto
provide nutrientsfor the lawn. Always
mulch with your highest engine (blade)
speed as this will providethe best recutting action of the blades.
• Avoid cuttingyour lawn when it is wet.
Wet grass tends to form clumps and
interfereswith the mulchingaction. The
best time to mow your lawn is the eady
afternoon. At thistime the grass has
dried, yet the newly cut area will not be
exposed to direct sunlight.
• For best results, adjust the lawn mower
cutting height so that the lawn mower
cuts off only the top one-third of the
grass blades. If the lawn is overgrown
it wiltbe necessary to raise the height of
cut to reduce pushing effortand to keep
from overloading the engine and leaving
clumps of mulched grass. For extremely
heavy grass, reduce your width of cut
by overlappingpreviously cut path and
mow slowly. _
MAX 1/3
° Certain types of grass and grass
conditions may require that an area be
mulched a second time to completely
hide the clippings. When doing a second cut, mow across (perpendicular) to
the first cut path.
• Change your cutting pattern from week
to week. Mow north to south one week
then change to east to west the next
week. This will help prevent matting
and graining of the lawn.
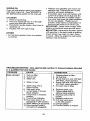
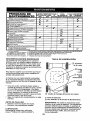
MAINTENANCE
SCHEDULE
i
H
Check for Loose Fasteners
AFTER
BEFORE
EACH
EACH
USE USE
EVERy
10
HOURS
,ll
i,'
i/
v'3
v'
v"
W Check [ Sharpen ! Replace Blade
R ILubrication
Batte_'y I**
Check Engine Oil 'l'evel ....
Vls
V_.2
El Change Engine Oil
Clean Air Filter
"
inspect
IP" Replace
v_
=/
Mf, jffI_lt
N Replace'Spark
v_
Plug
Air F!lter
Paper
Cartridge
Empty fuel system or add Stabilizer
* (if so equipped)
** Electric-Start
mowers
***
****
Power-Propelled
mowers
Use a scraper
to clean under deck
Jaw
t/
O Check Drive Belt/P,u, lleys' *';*
_l
J
V_
Ctean Lawn Mower ....
M Clean under Drive Cover***
and Recharge
EVERY
BEFORE
lOO
HOURS i STORAGE
V _
L "Ciean/Inspect Grass Catcher *
Check Tires ....
Clean
EVERY
25HOURS
OR SEASON
t - Change
2 - Service
I/
more often ff operating
more often if operating
under a heavy load or in high outdoor temperatures.
in dim/or dusty conditions.
3 - Replace blades more often when mowing
4 - Charge 48 hours at end of season,
5 - And after each 5 hours of use.
GENERAL RECOMMENDATIONS
The warranty on this lawn mower does not
cover items that have been subjected to
operator abuse or negligence. To receive
full value from the warranty, operator must
maintain unit as instructedin thismanual.
in sandy
soil.
LUBRICATION
CHART
(_ Wheel
adjuster (on
each wheel)
Some adjustments will need to be made
periodically to properly maintain your unit.
At least once a season, check to see if
you should make any of the adjustments
described in the Service and Adjustments
section of this manual.
• At least once a year, replace the spark
plug, clean or replace air filter element
and check blade for wear. A new spark
plug and clean/new air filter element
assure proper air-fuel mixture and help
your engine run better and last longer.
• Follow the maintenance schedule in this
manual.
BEFORE EACH USE
• Check engine oil level.
• Check for loose fasteners.
LUBRICATION
Keep unit well lubricated
(See "LUBRICATION CHART").
Engine oil
Mulcher
door hinge
(_) Rear door
hinge
(_ Handle bracket mounting pins
_ Spray
lubricant In Maintenance section,
See "ENGINE"
IMPORTANT: Do not oil or grease plastic
wheel bearings. Viscous lubricants will
attractdust and dirtthat willshorten the life of
the self-lubricating bearings. Ifyou feelthey
must be lubricated, use only a dry, powdered
1 0graphite type lubricant sparingly,
LAWN MOWER
Always observe safety rules when performing any maintenance.
TIRES
• Keep tires free of gasoline, oil, or insect
control chemicals which can harm rubber,
° Avoid stumps, stones, deep ruts, sharp
objects and other hazards that may
cause tire damage,
BLADE CARE
For best results, mower blade must be kept
arp, Replace bent or damaged blades.
CAUTION: Use only a replacement
blade approved by the manufacturer of
your mower. Using a blade not approved
by the manufacturer of your mower is
hazardous, could damage your mower and
void your warranty.
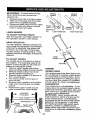
TO REMOVE BLADE
1. Disconnect spark plug wire from spark
plug and place wire where it cannot
come in contact with plug.
2. Turn lawn mower on its side. Make
sure air filter and carburetor are up,
3. Use a wood block between blade and
mower housing to prevent blade from
turning when removing blade bolt.
NOTE: Protect your hands with gloves
and/or wrap blade with heavy cloth.
4. Remove blade bolt by turning counterclockwise.
5. Remove blade and attaching hardware
(bolt, Iockwasherand hardened washer).
TO REPLACE BLADE
t. Position blade on the blade adapter
aligning the two (2) holes in the blade
with the raised lugs on the adapter,
2. Be sure the trailing edge of blade (opposite sharp edge) is up toward the engine.
3. Install the blade bolt with the lock
washer and hardened washer into
blade adapter and crankshaft,
4. Use block of wood between blade and
lawn mower housing and tighten the
blade bolt, turning clockwise.
° The recommended tightening torque is
35-40 ft. Ibs.
Blade adapter
Crankshaft
washer
Trailing
IMPORTANT: Blade bolt is heat treated.
tf bolt needs replacing, replace only with
approved bolt shown in the Repair Parts
section of this manual.
TO SHARPEN BLADE
NOTE: We do not recommend sharpening the blade - but if you do, be sure
the blade is balanced. An unbalanced
blade will cause eventual damage to lawn
mower or engine.
• The blade can be sharpened with a file
or on a grinding wheel. Do not attempt
to sharpen while on the mower.
• To check blade balance, drive a nail into
a beam or wall. Leave about one inch of
the straightnail exposed. Place center
hole of blade over the head of the nail,
If blade is balanced, it should remain in
a horizontal position. If either end of the
blade moves downward, sharpen the
heavy end until the blade is balanced.
GRASS CATCHER
° The grass catcher may be hosed with
water, but must be dry when used.
• Check your grass catcher often for damage or deterioration. Through normal
use it will wear. If catcher needs replacing, replace only with approved replacement catcher shown in the Repair Parts
section of this manual. Give the lawn
mower model number when ordering.
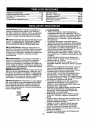
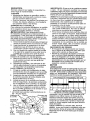
ENGINE
LUBRICATION
Use only high quality detergent oil rated
with API service classification SJ-SL.
Selectthe oil's SAEviscosity grade according
to your expected operating temperature.
SAE VISCOSITY
,O
.c_:o -$
TEMPERATURE
GRADES
m
m
-1'°
RANGE
_
EXPECTED
1;0..............
_:0 ,;,
BEFORE
.';°
NEXT OIL CHANGE
Change the oil after every 25 hours of
operation or at least once a year if the
lawn mower is not used for 25 hours in
one year.
Check the crankcase oil level before
starting the engine and after each five (5)
hours of continuous use. Tighten oit plug
securely each time you check the oil level.
TO CHANGE ENGINE OIL
NOTE: Before tipping lawn mower to
drain oil, empty fuel tank by running enCrankshaft11 gine until fuel tank is empty.
1. Disconnect
spark
plugwirefromspark
plugandplace
wirewhere
itcannot
come
incontact
withplug,
2, Remove
engine
oilcap;layaside
ona
cleansurface.
3. Tiplawnmower
onitssideasshown
anddrainoil into a suitable container.
Slot
Rock lawn mower back and forth to remove any oil trapped inside of engine.
Back plate
4. Wipe off any spilled oil from lawn
mower or side of engine.
5. Slowly pour oil down the oil fill spout,
stopping every few ounces to check the
oil level with the dipstick.
6, Stop adding oil when you reach the
FULL mark on the dipstick. Wait a
minute to allow oil to settle,
7. Continue adding small amounts of oil,
rechecking the dipstick until oil level
settles at FULL. DO NOT overfill, or
engine will smoke heavily from the muffler on startup.
8. Always be sure to retighten oil dipstick
before starting engine.
9. Reconnect spark plug wire to plug.
MUFFLER
Inspect and replace corroded muffler as it
could create a fire hazard and/or damage.
IN-LINE FUEL FILTER
The fuel fitter shoutd be replaced once
each season. If fuel filter becomes
clogged, obstructing fuel flow to carburetor, replacement is required,
1. With engine cool, remove filter and
plug fuel line sections.
2, Place new fuelfilterin position in fuel line
with arrow pointing towards carburetor.
3+ Be sure there are no fuel line leaks
and clamps are properly positioned.
4. Immediately wipe up any spilled gasoline.
SPARK PLUG
Replace spark plug at the beginning of
each mowing season or after every 100
hours of operation, whichever occurs
first. Spark plug type and gap setting
are shown in the "PRODUCT SPECIFICATIONS" section of this manual.
CLEANING
IMPORTANT: For best performance,
keep mower housing free of built+grass
and trash, Clean the undersldeof your
mower after each use.
AIR FILTER
ACAUTION: Disconnect spark plug wire
Your engine wilt not run properly and may
from spark plug and place wire where it
be damaged by using a dirty air filter.
cannot come in contact with plug.
Replace the air filter every 100 hours of
operation or every season, whichever oc• Clean the underside of your lawn
curs first. Service air cleaner more often
mower by scraping to remove build-up
under dusty conditions.
of grass and trash,
TO CLEAN AJR FILTER
• Clean engine often to keep trash from
1. Remove cover.
accumulating. A clogged engine runs
2. Carefully remove cartridge.
hotter and shortens engine life.
3. Clean by gently tapping on a fiat sur° Keep finished surfaces and wheels free
face. If very dirty, replace cartridge.
of all gasoline, oil, etc.
_CAUTION"
Petroleum solvents, such as • We do not recommend using a garden
kerosene, are not to be used to clean carhose to ctean lawn mower unless the
tridge. They may cause deterioration of the
electrical system, muffler, air filter and
cartridge. Do not oi! cartridge, Do not use
carburetor are covered to keep water
pressurized a{r to clean or dry cartridge.
out. Water in engine can result in short4. Install cartridge, then replace cover.
I2
ened engine life.
_IbWARNING: To avoid serious injury,
before performing any service and
adjustments:
1. Release control bar and stop engine.
2. Make sure the blade and all moving
parts have completely stopped.
3. Disconnect spark plug wire from spark
plug and place wire where it cannot
come in contact with plug.
LAWN MOWER
Mowing f-<4
,_ position _
.z_
Mowing
position
I
i
_._,
/ /
t
I
,,
I
/
/,
_ 7t t
Mou ti g,<
pin
b okotf
LOW POSITION
-° LU
HIGH POSITION
TO ADJUST CUTTING HEIGHT
See "TO ADJUST CUTTING HEIGHT" in
the Operation section ofthis manual.
REAR DEFLECTOR
The rear deflector, attached between the
rear wheels of your mower, is provided to
minimize the possibility that objects will
be thrown out of the rear of the mower
into the operator mowing position. If the
deflector becomes damaged, it shouldbe
replaced.
TO ADJUST HANDLE
The handle can be mounted in a high or
low position. The mounting holes in the
bottom of lower handle are off center for
raising or lowering the handle.
1. Remove upper handle and all wire
tie(s) securing cable(s) to lower handle.
2. Remove hairpin cotters from lower
handle bracket mounting pin,
3. Squeeze lower handle in to remove it
from mounting pins,
4. Turn tower handle over to raise or
lower handle.
5. Squeeze lower handle in and position
holes onto mounting pins on handle
bracket.
6. Reassemble upper handle and all
parts removed from lower handle.
SQUEEZE
TOADJUST
Handle
\
'\
Lower
ROTATE
ENGINE
ENGINE SPEED
"four engine speed has been factory set.
Do not attempt to increase engine Speed
or it may result in personal injury, tf you
believe that engine is running too fast or
too slow, take your mower to a qualified
service center for repair and adjustment.
CARBURETOR
Your carburetor is not adjustable. If your
engine does not operate properly due to
suspected carburetor problems, take your
lawn mower to a qualified service center
for repair and!or adjustment,
IMPORTANT; Never tamper with the
engine governor, which is factory set for
proper engine speed, Overspeeding
the engine above the factory high speed
setting can be dangerous. If you think
the engine-governed high speed needs
adjusting, contacta qualified service
center, which has proper equipment and
experience to make any necessary adjustments,
13
Immediately prepare your lawn mower for
storage at the end of the season or if the
unit will not be used for 30 days or more.
LAWN MOWER
When lawn mower is to be stored for a
period of time, clean it thoroughly, remove
all dirt, grease, leaves, etc. Store in a
clean, dry area.
1. Clean entire lawn mower (See
"CLEANING" in the Maintenance section of this manual).
2. Lubricate as shown in the Maintenance
section of this manual.
3. Be sure that all nuts, bolts, screws, and
pins are securely fastened. Inspect
moving parts for damage, breakage
and wear. Replace if necessary.
4. Touch up all rusted or chipped paint
surfaces; sand lightly before pa{nting,
HANDLE
"Youcan fold your lawn mower handle for
storage.
1. Squeeze the bottom ends of the lower
handle toward each other until the
lower handle clears the handle bracket,
then move handle forward.
2. Loosen upper handle mounting bolts
enough to allow upper handle to be
folded back.
IMPORTANT: When folding the handle for
storage or transportation, be sure to fold
the handle as shown or you may damage
the control cables,
• When setting up your handle from the
storage position, the lower handle will automatically lock into the mowing position.
_
QUEEZE
TO FOLD
Lower
MOWING
POSITION
control bar
FOLD
FORWARD
FOR
STORAGE
Upper
handle
Handle
knob
Lower handle
ENGINE
FUEL SYSTEM
IMPORTANT: It is importantto prevent
gum deposits from forming in essential
fuel system parts such as carburetor, fuet
filter, fuel hose, or tank during storage.
Alcohol blended fuels (called gasohol or
using ethanol or methanol) can attract
moisture which leads to separation and
formation of acids during storage. Acidic
gas can damage the fuel system of an
engine while in storage.
• Empty the fuel tank by starting the engine and letting it run until the fuel lines
and carburetor are empty.
° Never use engine or carburetor cleaner
products in the fuel tank or permanent
damage may occur.
° Use fresh fuel next season.
NOTE: Fuel stabilizer fs an acceptable
alternative in minimizing the formation of
fuel gum deposits during storage. Add
stabilizer to gasoline in fuel tank or storage container. Always follow the mix ratio
found on stabilizer container. Run engine
at least 10 minutes after adding stabilizer
to allow the stabilizer to reach the carburetor. Do not empty the gas tank and
carburetor if using fuel Stabilizer.
14
ENGINE OIL
Drain oil (with engine warm) and replace
with clean engine oil. (See "ENGINE" in
the Maintenance section of this manual),
CYLINDER
1. Remove spark plug,
2. Pour one ounce (29 mi) of oil through
spark plug hole into cylinder.
3. Pull starter handle slowly a few times to
distribute oil.
4. Replace with new spark plug.
OTHER
• Do not store gasoline from one season
to another.
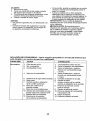
TROUBLESHOOTING
- See appropriate
to a qualified Service Center.
PROBLEM
CAUSE
.....
Does not start
• Replace your gasoline can if your can
starts to rust. Rust and/or dirt in your
gasoline will cause problems.
• If possible, store your unit indoors and
cover it to protect it from dust and dirt.
• Cover your unit with a suitable protective cover that does not retain moisture.
Do not use plastic. Plastic cannot
breathe, which allows condensation to
form and will cause your unitto rust,
IMPORTANT: Never cover mower while
engine and exhaust areas are still warm.
_CAUTION:
Never store the lawn mower
with gasoline in the tank inside a building
where fumes may reach an open flame
or spark. Allow the engine to cool before
storing in any enclosure.
section in manual unless directed
1. Dirty air filter.
2. Out of fuel.
3, Stale fuel.
CORRECTION
Cleanireprace air filter.
2. Fill fuel tank.
3. Empty fuel tank and refill tank
with fresh, clean gasoline.
4. Empty fuel tank and refilltank
with fresh, clean gasoline,
5. Connect wire to plug.
1o
4. Water in fuel,
5. Spark plug wire is
disconnected,
6. Bad spark plug.
7. Loose blade or broken
blade adapter.
8. Control bar in released
position.
9. Control bar defective.
10. Fuel valve lever (if so
equipped) in OFF position.
11. Weak battery (if equipped).
12. Disconnected battery
connector (if equipped).
15
6. Replace spark plug.
7. Tighten blade bolt or
replace blade adapter,
8. Depress control bar to
handle,
9, Replace control bar.
10.Turn fuel valve lever
to the ON position.
11. Charge battery.
12. Connect battery to engine.
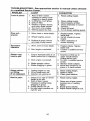
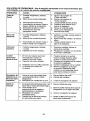
TROUBLESHOOTING - See appropriate section in manual unless directed
to a qualified
PROBLEM
Loss of power
Poor cutuneven
Service Center.
I
CAUSE
CORRECTION
1. Rear of lawn mower
housing or cutting blade
dragging in heavy grass.
2. Cutting too much grass.
3. Dirty air filter.
4. Buildup of grass, leaves,
and trash under mower.
5. Too much oil in engine.
6. Walking speed too fast.
1. Worn, bent or loose btade.
2. Wheel heights uneven.
3. Buildup of grass, leaves
and trash under mower.
Excessive
vibration
1. Worn, bent or loose blade.
2. Bent engine crankshaft.
Starter rope
hard to pull
1. Engine flywheel brake is on
when control bar is released.
2. Bent engine crankshaft.
3. Blade adapter broken.
4. Blade draggingin grass,
Grass catcher
not filling
(if so equipped)
1, Cutting height too low,
2. Lift on blade worn off.
3. Catcher not venting air.
Hard to push
I.
Grass is too high or wheel
height is too low.
2. Rear of lawn mower
housing or cutting blade
dragging in grass,
3. Grass catcher too full.
4, Handle height position not
right for you.
16
1. Raise cutting height.
2. Raise cutting height.
3. Clean/replace air filter.
4. Clean underside of mower
housing.
5. Check oil level.
6. Cut at slower walking speed.
Replace blade. Tighten
blade bolt.
2. Set all wheels at same
height.
!3.
Clean underside of
mower housing,
1.
I,
Replace blade, Tighten
blade bolt,
2. Contact a qualified service
center.
1, Depress control bar to
upper handle before
pulling starter rope,
2.
Contact a qualified service
center.
3. Replace blade adapter,
4. Move lawn mower to cut
grass or to hard surface.
1.
2.
3.
Raise cutting height.
Replace blade.
Clean grass catcher.
1,
Raise cutting height.
Raise rear of lawn mower
housing one (1) setting
higher,
3_
Empty grass catcher,
4. Adjust handle height to suit.
2.
Reglas de Seguridad ................................ 17-19
Especifioaciones del Producto ....................... 19
Montaje / Pre-Operaci6n ............................... 20
Operaci6n ................................................. 21-24
Programa de Mantenimiento ......................... 25
Mantenimiento.......................................... 25-27
Servicio y Adjustes ........................................ 28
Almacenamiento ....................................... 29-30
ldentificaci6n de problemas ...................... 30-31
Partes de repuesto .................................. 32-33
Garant[a .................................................... 36-37
IMPORTANTE: Esta maquina cortadaora es
capaz de amputar las manos y los manos y
los pies y de lanzar objetos. Si no se observan
las Jnstrucciones de seguddad siguientes se
pueden producir lesiones graves o ]a muerte.
L OPERACION
• Antes de empezar, debe familiarizarse
completamente con los controles y el uso
correcto de Ia maquina. Para esto, debe leer
y comprender todas Ias instrucciones qua
aparecen en fa maquina yen los manuales
de operaci6n.
• No ponga las manos o los pies cerca o
debajo de Ias partes rotatorias. Mant_ngase
siempre lejos de la abertura de la descarga.
• Permita qua solamente las personas responsables que estdn familiarizadas con las
instruccionesoperen la m_quina.
° Despeje el &rea de objetos tales como piedras, juguetas, alambres, huesos, palos, etc.
qua pueden ser recogidos y Ianzados pot las
cuchilias.
• Aseg_rese qua el drea no se hallen personas, antes de segar. Pare la mSquina si
atguien entra en el &tea.
• No opera la maquina sin zapatos o con
sandalias abiertas. P6ngase siempre zapatos
s61idos.
° No tire de la segadora hacia atr,_s a menos
qua sea absolutamente necesario. Mire
siempre hacia abajo y hacia detr&s antes y
mientras qua se mueve hacia atr&s.
• Nunca dirigir el material descargado hacia
las personas. Evitar descargar material
contra parades o barreras, El material puede
retomar al operador. Para la cuchilla cuando
se pasa por superficies de grava.
• No opera la segadora sin los respectivos
resguardos, las placas, el recogedor de
c_sped u otros aditamentos dise ados para
su proteccJ6ny seguridad.
• Refi_rase alas instrucciones del fabricante
para el funcionamiento e instalacibn de
accesorios. Use Onicamente accesor[os
aprobados pot el fabdcante.
• Detenga la cuchilta o las cuchillas cuando
cruce pot calzadas, callas o caminos de
grava.
• Parar el motor cada vez qua se abandona el
aparato, antes de Iimpiar la segadora o de
remover residuos de! tubo.
° Apagar el motor y esperar hasta qua las
cuchillas est_n completamente paradas
antes de remover el receptor de hierba.
Segar solamente con luz del alia o con una
buena luz artificial.
No opera la mdquina bajo la influencia de]
alcohol o de las drogas.
_,Busque este s(rnbolo qua seSala las precauciones de seguridad de importancia. Quiere
declr - iiiATENCION!!! iiiESTE ALERTO!!!
SU SEGURIDAD ESTA COMPROMETIDA.
_LADVERTENCIA: Siempre desconecte el
alambre de la bujia y p6ngalo donde no pueda
entrar en contacto con Ia bujia, para evitar el
arranque por accidente, du_ante Ia preparaci6n,
el transporte, et ajuste o cuando se hacen
reparaciones,
_ADVERTENCIA:
Los bomes, termina]es y
accesorios relativos de la baterta contienen
plomo o compuestos de plomo, productos
qu[micos conocidos en el Estado de California
como causa de c_ncer y defectos aI nacimiento
u otros dafios reproductivos, Lavar ias manos
_spu_s de manipularios.
PRECAUCION: Et tubo de escape del motor,
algunos de sus constituyentes y algunos componentes del vehiculo contienen o desprenden
productos quimicos conocidos en el Estado de
California como causa de c_ncer y defectos aI
nacimiento u otros dafios reproductivos.
_PRECAUCI(_N:
El silenciador y otras piezas
dei motor flegan a sre extremadamente calientes durante la operaci6n y siguen siendo calientes despu6s de qua e| motor haya parade.
Para evitar quemaduras severas, permanezca
lejos de estas &teas.
17
• Nunca opere la maquina cuando la hierba
est_ mojada AsegL_rese siempre de tener
buena traccidn en sus pies; mantenga el
mango firmemente y camine; nunca corra
• Desconectar el mecanismo de propulsi6n
aut6noma o el embrague de transmisi6n en
las segadoras que Io tienen antes de poner
en marcha el motor
• Si eJequipo empezara a vibrar de una
manera anormal, pare el motor y revise de
inmediato para averiguar Ia causa General
mente la vibraci6n suele indicar que existe
afguna averia
• Siempre use gafas de seguridad o anteojos
con proteccidn lateral cuando opere Ia sega
dora
II. OPERACION
SOBRE LAS CUESTAS
Los accidentes ocurren con m_s frecuencia en
las cuestas Estos accidentes ocurren debido a
resbafadas o caidas, fas cuales pueden resultar
en graves Iesiones Operar la recorladora en
cuestas requiere mayor concentraci6n Si se
siente inseguro en una cuesta, no la recorte
HACER:
• Puede recortar a trav6s de la superficie de
Ia cuesta, nunca hacia arriba y hacia abajo
Proceda con extrema precaucJ6n cuando
cambie de direccion en las cuestas
• Renueva todos los objetos extrafios tales
como guijarros, ramas, etc
• Debe prestar atenci6n a hoyos, baches o
protuberancias Recuerde que la hierba alta
puede esconder obstaculos
NO HACER:
- No recorte cerca de pendientes zanjas o
terraplenes Et operador puede perder la
traccidn en los pies o el equilibrio
• No recorte cuestas demasiado inclinadas
• No recorte en hierba mojada La reducci6n
en Ia tracci6n de Ia pisada puede causar
resbalones
ill
NINOS
Se pueden producir accidentes tr_gicos si el
operador no presta atenci6n a la presencia
de los nifios A menudo, los nifios se sienten
atrafdos pot Ia m_quina y por la actividad de
ia siega Nunca suponga que los nifios van a
permanecer en el mismo Iugar donde los vio
por _ltima vez
• Mantenga a los niSos alejados del _rea de
la siega y bajo el cuidado estdcto de otra
persona adutta responsable.
• Est_ alerta y apague Ia m_quina si hay nifios
que entran al &rea
• Antes y cuando este retroeediendo, mire
hacia atr&s y hacia abajo para verificar si hay
nifios pequefios
• Nunca permita que los nifios operen la m&
quina
• Tenga un cuidado extra cuando se acerque
a esquinas donde no hay visibi]idad, a los
arbustos, &rboles u otros objetos que pueden
interferir con su Ifnea de visi6n
18
IV. MANEJO SEGURO DE GASOLtNA
Usar mucha atenci6n cuando se rnaneja gaso
Iina La gasolina es extremamente inflamable y
los vapores son explosivos
• Apagar todos los cigarrillos, cigarros, pipas y
otras fuentes de ignici6n
• Usar solo un contenedor apropiado
- Nunca quitar el tap6n de la gasolina o afiadir
carburante con el motor en marcha Esperar
que el motor se enfrfe antes de repostar la
gasolina
• Nunca repostar la maquina al interior de un
local
• Nunca guardar la m_quina o el contenedor
de gasolina donde hay una llama abierla,
chispa o Iuz piloto como una caldera u otros
dispositivos
• Nunca tlenar contenedores en un vehfculo, en
un camibn o caravana con un forte de pl&stico
Colocar siempre los contenedores en el suelo
lejos de su vehieulo antes de Ilenar
• Quitar equipos que funcionan con gasolina
del camidn o caravana y repostar en el
suelo Si esto no es posible, repostar dicho
equipo con un contenedor port_,til, m_s bien
que con una tobera de gasolina
• Mantener Ia tobera en contacto con el bordo
de] dep6sito de carburante o de la apertura
de! contenedor siempre hasta terminar el
abastecimiento No usar un dispositivo de
cierre apertura de la tobera
• Si el carburante cae en la ropa que se lteva,
cambi&rseta inmediatamente
• Nunca Ilenar en exceso el dep6sito de
carburante Colocar el tap6n de fa gasolina y
apretar de modo seguro
V. SERVICIO
- Nunca haga funcionar una m_quina dentro
de un area cerrada
• Nunca haga ajustes o reparaciones mientras
el motor est6 en marcha Desconecte el
cable de la bujfa, y mant6ngalo a cierta
distancia de @stapara prevenir un arranque
accidental
• Mantenga las tuercas y los pernos, espe
ciatmente los pernos del accesorio de Ia
cuchilla, apretados y mantenga el equipo en
buenas condiciones
• Nunca manipule de forma indebida los
dispositivos de seguridad Controle regular
mente su funcionamiento correcto
• Mantenga Ia maquina libre de hierba, hojas
u otras acumulaciones de desperdicio
Limpie los derrames de aceite o combustible
Permita que la m&quina se enfrfe antes de
almacenarla
- Pare e inspeccione el equipo si le pega a un
objeto Rep&relo, si es necesario, antes de
hacerlo arrancar.
• En ningdn caso hay que regular la altura de
las ruedas mientras el motor est& en marcha.
• Los componentes del receptor de la hierba
van sujetos a desgaste, daSos y detedoro,
que pueden exponer las partes en rnovimiento o permitir que objetos sear} dfsparados, Contro}ar frecuentemente y cuando sea
necesario sustituir con partes aconsejadas
pore] fabdcante.
•
Las cuchillas de la segadora estdn afiladas
y pueden cortar. Cubrir las hojas o Ilevar
guantes, y utilizar precauciones especiates
cuando se efectLia mantenWmientosobre las
mismas.
° No cambie el ajuste del regu]ador del motor
ni exceda su velocidad.
• Mantener o sustituir las etiquetas de
seguddad e instrucciones,cuando sea
necesado,
_kADVERTENCIA:
Este segadora viene equipado con un motor de combustibninterna y no se
debe usar sobre, o cerca, de un terreno no desarrollado cubierto de bosques, de arbustos o de
c_sped, o menos queef sistema de escape deI motor venga equipado con un amortiguador de
chispas que cumpla con las leyes Iocafes o estatales (si existen). $i se usa un amortiguador de
chispas, eFoperador debe mantenedo en condiciones de trabajo eficientes.
En el estado de California, la ley exige Io anterior (SecciSn 4442 de! "California Public Resources Code"). Otros estados pueden contar con otras leyes parecidas. Las Ieyes federales
se aplican en la tierras federales.
N_mero de Serie:
Fecha de Compra:
Capacidad y Tipo de Gasolina:
!.5 Cuartos (Regular sin Plomo)
Tipo de Aceite (API SG-SL):
Capacidad de Aceite:
SAE 30 (Sobre 32°F); SAE 10W-30 (Debajo 32_F)
20 Onzas
Bujia (Abertura: .030")
TorsiSn del Perno de ]a Cuchilla:
Champion RC12YC
35-40 ft. Ibs,
El ndmerodel nodelo y el de serie se encuentranen Ia cafcomaniaadjuntaa la partetrasera
de la caja de lasegadora. Debe registrartanto el n_merode seriecomela fecha de compray
mantengalosen un [ugarseguropara refenciaen el futuro,
19
Lea estas instrucciones y este manual completamente antes de tratar de montar u operar su
segadora nueva.
IMPORTANTE: Este cortacesped viene SIN
ACEITE O GASOLINA en el motor,
Su segadora nueva ha sido montada en la
f&brica con Ia excepci6n de aquellas partes que
se dejaron sin montar por razones de env/o.
Todas las partes como [as tuercas, las arandelas, los pernos, etc., qua son necesarias para
completar el montaje ban sido colocadas en Ia
bolsa de partes. Para asegurarse que su segadora funcione en forma segura y adecuada,
todas las partes y los articulos de ferreteria que
se monten tienen queser apretados seguramente. Use las herramientas correctas, como
sea necesado, para asegurar que se aprieten
adecuadamente.
qua sxige la
presencia del
operador
LEVANTAR
Ivlango
superior
Manilla de]
mango
Mango Inferior
PARA REMOVER
LA SEGADORA
DE
LA CAJA DE CARTON
1. Remueva las parses sueltas que se incluyen
con la segadora.
2. Corte las dos esquinas de los extremos
de la oaja de cart6n y tienda el panel deI
extremo piano.
3. Remueva todo el material de empaque, excepto fa cuSa entre et mango superior y 61
inferior, y la cuRa que sujeta la barra de los
control que exige la presencia del operador
junto con el mango superior.
4. Haga rodar la segadora hacia afuera de la
caia de cart6n y revisela cuidadosamente
para verificar si todav/a quedan partes
sueltas adicionales.
COMO PREPARAR
SU SEGADORA
PARA DESDOBLAR EL MANGO
IMPORTANTE: Despliegue el mango con
mucho cuidado para no peltizcaro daSar los
cables de control
1. Levante los mangos hasta que Ia secci6n
del mango inferior se asegure en su Iugar,
en la posici6n para segar.
2. Remueva la cu_a protectora, levante la secci6n deI mango superior basra su lugar en
el mango inferior, y apriete ambas manillas
del mango.
3. Remueva la cufa del mango que sujeta fa
barra de los control qua exige la presencia
del operador junto con el mango superior,
El mango de ta segadora puede ajustarse
segt_n Ie acomode para segar. Refi_rase a
"AJUSTE DEL MANGO" en la secciOn de
Servicio y Ajustes de este manual.
POSICKSN
PARA
SEGAR
PARA MONTAR EL RECOGEDOR DE ClaSPED
1. Ponga el bastidor del recogedor de c_sped
en la boLsa del c_sped con la parte rigida
de la bolsa en la parte inferior. Aseg_rese
que el mango del bastidor est_ en el exterior de la parte superior de la bolsa.
2. DesJice los sujetadores de viniJo sobre el
basfidor,
AVlSO: Si los sujetadores de vinilo est&n muy
duros, m6talos en agua ca_iente pot algunos
minutos. Si se moja la bolsa, d_jela qua se
seque antes de usada.
Mango deI
bas_idor del
re_ogedor
SL
de vinilo
delbastidor
PARA INSTALAR LOS ACCESORIOB
Su segadora fue enviada tistapara usarse
como una acolchadora de capa vegetal. Para
convertir ia de modo qua pueda ensacar o
descargar, refi_rase a "PARA CONVERTIR LA
SEGADORA '_en la secci6n de Operaci6n de
este manual.
2O
FAM|LIARICESE
CON SU SEGADORA
LEA ESTE MANUAL DEL DUENO Y LAS REGLAS DE SEGURIDAD ANTES DE OPARAR SU
SEGADORA, Compare las ilustracionescon su segadora para familiadzarse con [a ubicacl6n de
los diversos controles y ajustes, Guarde este manual para referencia en el futuro.
,,m,,ll
ii i i
ill
i
iHlll
,,,,ill, ii
Estos sfmbolos pueden apareser sobre su segadora o en la llteratura proporcionada con el
producto. Aprenda y comprenda sus significados.
ATTENCI6N O
ADVERTENC|A
MOTOR
MOTOR
ENCENDtDO
APAGADO
Hm
R/t.P|DO
LENTO
ESTRANGU
LACI(_N
COM-
ACEITE
BUSTIBLE
,H,= ,
PELIGRO, GUARDE LAS
MANOSYLOSPIESLFJOS
H=, ,
Barra de control que exige
Ia presencia del operador
Maniila de] mango
Tapa del deposito
de la gasolina
arrancador
Bujfa
Recogedor
de c6sped
Filtro de aire
Tapa deI deposito
de aciete del
con variila indic,adora de nivet
Caja
Puerta de la acolchadora
la rueda (en
cada rueda)
IMPORTANTE: Este eor_acespedviene SIN ACEITE O GASOLINA en motor.
IIIIII
IIIIIII
I
IIIIII
III
IIIIII
IIII
I
CUMPLE CON LOS REQUISITOS DE SEGURIDAD DE LA cPsC
Las segadoras a motor, que se conducen desde la parte de atr,_s, rotatorias, cumplen con los
estdndares de segurid,addel American National Standards Institute y de ta U.S. Consumer Product
Safety Commission. 4tPRECAUClON: La cuchilla gira cuando el motor estd funoionando,
I/llJll
IIII
II
I
Barra de control que exige la presencla del
operador - tiene que sujetarse abajo, junto
con el mango, para hacer arrancar el motor,
Su_ltela para parar el motor,
IIIII IIIIII
II
IIII
I
II
_L_
Cord6n arrancador - se usa para hacer arrancar el motor.
Puerta de la acolchadora- permite la conversi6n
para la operaci6n de descarga o ensacado.
21
La operaci_n de cualquier
segadora puede hacer que
salten objetos extraSos dentro de
sus ojos, Io que puede producir
da_,os graves en _,stos. Siempre
use anteojos de seguridad o protecci6n para
los ojos mientras opere su segadora o cuando
haga ajustes o reparaciones. Recomendamos
galas o una mascara de seguridad de visi6n
amplia de seguridad usada sobre las galas.
COMO USAR SU SEGADORA
VELOCIDAD DEL MOTOR
La velocidad deI motor se estableci6 en Ia f_brica para un rendimfento 6ptimo. La velocidad
no se puede ajustar.
NTROL DE ZONA DEL MOTOR
PREOAUCION: Las regulaciones federales
exigen que se instale un control para el motor
en esta segadora para reducir a un rninimo el
desgo de ]esionarse debido al contacto con la
cuchilla. Pot ning0n motivo trate de etiminar
la funci6n del control deI operador. La cuchilla
gira cuando el motor est& funcionando.
* Su segadora viene equipada con una barra
de controles que exigen la preeencia de]
operador, to que requiere que el operador
est_ detr&s del mango de la segadora para
hacerla arrancar y operarla.
PARA AJUSTAR LA ALTLIRA DE CORTE
Levante las ruedas para el co_le bajo y baje las
ruedas para el corte alto., ajuste Ia altura de
torte para que se acomode a sus requisitos. La
posici6n del medio es la mejor para la mayorfa
de los c_spedes.
o Para camb}ar la attura de corte, empuje }a
palanca deI ajustador hacia la rueda. Mueva
Ia rueda hacia ardba o hacia abajo de modo
que se acomode a sus requisitos. Asegt_rese
que todas las ruedas queden igualmente
ajustadas.
AVISO" E_ajustador esta correctamente
colocado cuando las orejas de la placa est&n
insertadas en el agujero del mango. Tambi6n,
los ajustes de 9 posieiones (si equipado) permiten que el mango pueda set movido entre las
orejas de la placa.
HACIA
ADEELANTE
PARA
LEVANTAR
• Para pasar a la operaci6n de acolchamiento,
remover |a recolectora de hierba y cerrar la
puerta trasera.
Mango del
ba_idorde|
_cogedor
de c_sped
Gancho Iatera] det
bastidor del recogedor
SEGADORAS CON DESCARGA LATERAL
• La puerta trasera t[ene que estar cerrada,
, Abra ]a protecci6n contra la descarga y
instate el desviador de contra la descarga
debajo de la protecci6n como se muestra.
, La segadora esta ]ista para ta operaci6n de
Ia descarga.
° Para convertir a Ia operaci6n de ensacado
o de descarga, e! desviador de |a descarga
debe set removido y la protecci6n contra la
descarga debe estar cerrada.
Abra ta protecc/6{_
contra Jadescarga
EL CORTACESPED
PARA CONVERTIR LA SEGADORA
Su segadora rue enviada lista para usarse come
acolchadora de capa vegetal. Para convertirla a
una operaci6n de ensacado o de descarga:
SEGADORAS CON DESCARGA TRASERA
, Levantar la puerta trasera de cortac_sped
y colocar los ganchos deI armaz6n de la
recoleetora de hierba en los pasadores del
quicio de Japuerta.
22
LA SEGADORA
ESTA LISTA PARA LA
OPERACK_N
DE LA DESCARGA
PASOS StMPLES DE RECORDAR
CUANDO CONVIERTA SU SEGADORA
PARA ACOLCHAMIENTO 1. La plancha acotchadora trasera insta[ada.
2. La protecci6n contra la descarga eerrada.
PARA ENSACAMIENTO TRASERO -
IMPORTANTE:
• Revise el nivel del aceite antes de cada uso.
Agregue aceite si es necesado. Uene hasta
la lfnea de Ileno en Ia varitla medidora de
nivel.
• Gambie el aceite despu_s de 25 horas de
operaci6n o una vez por temporada. Puede
necesitar cambiar eJaceite m&s a menudo
¢uando Jascondicionesson po]vorosaso su*
cias. Vea "PARA CAMB_AR EL AGE_TE DEL
MOTOR" en la seccion de Mantenimiento de
este manual.
1. La plancha acolchadora trasera removida.
2. Recogedor del c_sped instalado.
3. La protecciOn contra ta descarga cerrada.
PARA DESCARGA LATERAL1. La plancha acolchadora trasera instalada.
,_La desviador de la descarga instalada.
PRECAUCION: No haga funcionar su
segadora sin la placa de la acolchadora, el
desviador de recortes o sin el recogedor
o_sped aprobados en su [ugar. Nunca trate de
operar la segadora cuando se halta removido
la puerta trasera o cuando se ha removido a
puerta trasera o cuando est& un poco abierta.
PARA VACIAR EL RECOGEDOR DE ClaSPED
1. Levante el recogedor de c_sped usando el
mango de] bastidor.
2. Remueva eI recogedor de c6sped, con los recortes, de debajo del mango de la segadora.
3. Vacfe tos reeortes de la bolsa.
AVlSO: No arrastre la bolsa cuando ta vac[e;
se producir& un desgaste innecesario.
Lpadel
de
gasolina
Tapa del
deposito
de aCeite
AGREGUE GASOLINA
• Llene el estanque de combustible hasta la
parte infedor de! cuello de relleno del estanque de gasolina. No Io llene demasiado.
Use gasolina regular, sin plomo, nueva y limpia con el minimo de 87 octanos. No mezcle
el aceite con Jagasolina. Para asegurar
que Ia gasolina utilizada sea fresca compre
estanques los cuales puedan ser utilizados
durante
los I_dmeros 30 dfas,
PRECAUCION: Limpie e! aceite o el
combustible derramado, No almacene, derrame
o use gasolina eerca de una llama expuesta.
_PRECAUCI6N:
Los combustibles
mezclados con alcohol (eonocldoscomo
gasohol, o el use de etanol o metanol) pueden
atraer la humedad, la que conduce a ta
separaci6n y formaci6n de &cidos durante el
aImacenamiento. La gasolina acfdica puede
daSar el ststema del combustible de un motor
durante el almacenamiento. Para evitar los
problemas con e] motor, se debe vaciar el
sistema deI combustible antes de guardado
pot un per(odo de 30 d(as o re&s. Vao(e el
estanque del combustible, haga arrancar el
motor y h,_gaIo funcionar hasta que las Ifneas
del combustible y el carburador queden vaelos.
La pr6xima temporada use combustible nuevo.
Vea las Instruceiones Para El Almacenamiento
para m&s inforrnaci6n. Nunca use productos de
limpieza para el motor o para el carburador en
el estanque del combustible pues se pueden
producir daSos permanentes.
ANTES DE HACER
ARRANCAR
EL MOTOR
AGREGUE ACEITE
Su segadora fue envtada sin aceite en el motor.
Para el tipo y el grado del aceite a utilizar,yea
el "MOTOR" en la secci6n del Mantenimiento
e ste manual.
PRECAUCI6N: NO sobrellene el motor con
aceite, o fumar& pesa demante del silenciador
cuando Io valla a arrancar.
1. AsegL1rese que ta segadora est_ nivelada.
2. Remueva la varila medidora de aceite del
tubo de desarga de aceite.
3. Usted recibe un envase de aceite con la
unidad, Vierta lentamente el envase entero
de aceite en el tubo de reileno del motor.
AVISO, El terrap[_n initial del aceite requIere
solamente 18 onzas debido al aceite residual
en el motor de la prueba de calidad de 100%
del fabdcante. At cambiar el aceite puede
necesitar 20 onzas,
4. Inserte y apriete la vadlla medidora de
aceite.
23
PARA PARAR EL MOTOR
• Para parar el motor, suelte la barra de controles que exigen la presencia det operador.
PARA HACER ARRANCAR
EL MOTOR
AVISO: Debido a tas capas protectoras del motor, un9 cantidad pequeffa de humo puede estar presente durante el uso inici91 del producto
y se debe considerar normal
AVISO: Su motor viene equipado con un
sistema de estrangulaci6n autom_tico. No
requiere set cebado o obturado antes de
arrancar.
• Para hater arrancar un motor, sujete ]a barra
de controles que exigen la presenci9 del
operador abajo en el mango y tire el mango
deI arrancador r_pidamente. No permita que
el cord6n arrancador se devuelv9 abruptamente.
CONSEJOS
PARA SEGAR
_PRECAUCI6N'No utilizar dispositivos antipgja de la hoja en la segadora ya que estos
9ccesorios son peligrosos, pueden daffar su
segador9 y anular su garantia.
• Bajo ciertas condiciones, tal como c_sped
muy alto, puede ser necesgrio el elevar
la altura de] corte para reducir el esfuer-zo
necesario para ernpujar ]a segadora y para
evitar sobrecargar el motor, dejando morttones de recortes de c_sped. Puede que sea
necesario reduc[r la velocidad del recorrido
y/o haga funcionar la segadora sobre el _rea
pot segunda vez.
• Para un corte muy pesado, reduzca el ancho
deI corte pasando parcialmente por encim9
deI Iugar anteriormente cortado y siegue
lentamente.
- Para un mejor ensacado del c_sped y para la
mayorfa de las condiciones de corte, la velocidad de[ motor debe ajustarse a la posiciSn
de RAPtDO.
• Los poros en tos recogedores de c6sped de
tela pueden llenarse con mugre y polvo con
el uso y los recogedores recaudar_n menos
c_sped. Para evitar _ste, rocfe el recogedor
con la manguera de agua regularmente y
d_jelo secarse antes de usado.
• Mantenga ta parte superior del motor, alrededor del arrancador, despejada y sin recortes
de c6sped y paja. Esto ayudar& el flujo del
aire del motor y extender& su duraci6n.
24
CONSEJOS PARA SEGAR Y ACOLCHAR
IMPORTANTE: Par9 obtener el mejor
rendimiento mantenga la caj9 de la segadora
sin acumulacion de cesped y basura. Vea
"LIMPIEZA" en la seccion de Mantenimento de
este manual.
• La cuchilla acolchadora especial va a volver
a cortar los recortes de c_sped muchas
veces, y los reduce en tgmaffo, de modo que
si se caen en el c6sped se van a dispesar
entre 6ste y no se van 9 notar. Tambien, el
c_sped acofchado se va a deshacer rapidamente entregando substancias nutritivas
para e] c6sped. Siempre acolche con la
velocidad del motor {cuchilla) m_is aJta, pues
asf se obtendr& I9 mejor acci6n de recorte de
las cuchillas.
• Evite cortar el c6sped cuando est_ mojado.
El c_sped mojado t[ende a formar montones
e intediere con Ia acci6n de aco]chado.
La mejor hora para segar el c_sped es
temprano en la tarde. A esa hora _ste se ha
secado y el _rea reci_n cortada no quedgra
expuesta al sot directo.
• Para obtener los mejores resu[tados, ajuste
la altura deI corte de la segadora de modo
que esta corte solamente el tercio superior
de ]as hojas de cesped. En el caso de que el
cesped haya crecido demasiado, puede ser
necesario el elevar [a altura del corte para
reducir el esfuerzo necesa_o para empujar [a
segadora y para evitar sobrecargar el motor,
dejando montones de recortes de c_sped.
Para un c_sped muy pesado, reduzca el ancho deI corte pasando por encima del lugar
anteriormente cortado y siegue Ientamente.
MAXI_
• Ciertos tipos de c6sped y sus condiciones
pueden exigir que un _re9 tenga que ser
acolchada por segunda vez para esconder
completamente los recortes. Cuando se
haga el segundo corte, siegue atrgvesado
(en forma perpendicular) 9 la pasada del
primer corte.
° Cambie su patr6n de corte de semana a
semana. Siegue de norte a sur una semana
y luego cambie de este a oeste la pr6xim9
semana. Esto evitar_ que e! c_sped se
enrede y cambie de direcci6n.
DESPU
CAO CA.A CA.A
PROGRAMA
DE
MANTENIMIENTO
iiiii
i
Rsvisar si hay Su_Btadores
iiii
ANTES
DE CADADE CADA lO
25 HORASO 100
ALMACEUSO
USO HOP,AS TEMPORADAHORAS NAMIENTO
S
Umpi_rllnspecctonarelRec'o'gederdeO6sped*
E
controlar toeNeurndti_s
Umplar
debajo la Cubieda
O
Reviser
lie
R _Ftevisar
A
Coffees
M
....V'
v'
v'
i#'
*'"
y ,!=s Pc,leas Impulsadas,***
! Aflllir I Cambiar
lull
v'
de b T_nsmisi_n
,,,V'
....
'"'
V'3
i,'
la ClIchilIa
Lubricaci6n
Limpiar / Re_rgar
la Bateria
I, ll I
R_vis tit el nTvel citI Acttite
iO
i
I
v'
A umpi_i_
Segadora
....
D
III
v'
V'
Sueltos
......
*"
v'
C,a,mb,lar el Aceite daI meier
UmpiareI
v_
v'
FllÁ;o de Alre
T
Inspeccionar eI Silenciador
O
Gambler
b fluJl_
R
Cembiar
el Cartucho
....
it,
v_
de PapeI del Fllln0 de Aire
Va;iar el sisleme deI carburanta
o _Sadir t_n eslab]lizador
de cetburaele.
INI
" '
* (si visne equlpacto)
** Segader,_ o_,n Arranque El_ctr_o
***SegedorasconPoderPtoputsot
****
UliliZar ut_a re_queta pare llmpia r
debajo de Ia cubierta del c_rtac_spsd
v'
"Ul
I
I
1 - Camblar m_,s e rnenudo et_t P.do se opere bale carga pesada o en a,mbieiltes con alta_ temperatures.
2 - Dar servicio m_s a menude ¢uaedo se opere ee _,ndic'_ones
sucks c, polvorosas.
3 - Cembie las _-uchilla_ m&s e menL_do cua.r'_o eiegue en te_rto
a,renoso.
4 - Cm'gar per 48 bores al tlr_ de la tempor'a, da.
5.Yde._pu_sdeShorasdefur,
cionarniento.
RECOMENDACIONES
GENERALES
La garantfa de esta segadora no cubre los
artfculos que ban estado sujetos al abuse o a
la negligencia del operador. Pare reoibir todo
el valor de la garant{a, el operador tiene que
mantener la segadora seg_n las instrucciones
descritas en este manual.
TABLA DE LUBRICACION
(_) Ajustador
de la rueda
1_) Aceite
del
motor
Hay algunos ajustes que se lienen que hacer
en forrna peri6dica pare poder mantener su
unidad adecuadamente.
Puerta
de la
acotchadora
AI menos una vez cada estaci6n comprobar
si es necesario efectuar los ajustes descritos
en las secciones de Servicio y Ajustes de este
manual.
Bisagra
de la
puerta
traser
• Una vez al aSo, cambie la bujia, Iimpie o
cambie el elemento del fiftrode a{re y revise
si Ia cuchilla est,. desgastada, Una bujla
nueva y un elemento del filtro de aim limpioi
nuevo aseguran la mezcla de aire-combustible adecuada y ayudan a que su motor
funcione meier y que dure rods.
• Siga el programa de mantenimiento en este
manual.
(_ Clavija de montaje del puntaI deI mango
(_) Rocie el lubrlcante
_) Vea "MOTOR" en la section
ANTES DE CADA use
• Revise el nivel det aceite de[ motor.
. Revise si hay sujetadores suettos.
de Mantenim|ento
IMPORTANTE: No aoelte o engrase los rodamientos de la rueda de plastico. Los iubdcantes
viscosos atearan po{voy mugre, 1oacortara la
duracion de los rodamientos autolubdcantes, Si
cree que tienen que lubr{carse, use !osamente
un lubdcante tipo crafito, de polvo seco, en
forma moderada.
LUBRICACION
Mantenga la unidad bien lubricada
(yea ]a "TABLA DE LUBRICACION").
25
SEGADORA
Siempre observe Ias reglas de seguddad cuando haga el mantenimiento,
LLANTAS
• Mantenga las Ilantas sin gasolina, aceite o
substancias quimicas para control de insectos que pueden daSar Ia goma.
• Evite los tocones, Ias piedras, las grietas profundas, los objetos afilados y otros peligros
que pueden daSar a las Ilantas.
CUIDADO DE LA CUCHILLA
Para obtener los mejores resultados, Ia cuchilla
de la segadora tienen que mantenerse afilada.
Cambie la cuchilla doblada o daSada.
_t_PREOALICI(_N: Usar solamente Ia hoja
de repuesto aprobada per eI fabricante de su
cortacesped. Usar una hoja no aprebada per el
fabricante de su cortac_sped es peligroso, puede daSar su cortacesped y anular su garantia.
PARA REMOVER LA CUCHILLA
1. Desconecteelatambredelabujfayp6ngaloen
donde no pueda entrar en contacto con 6sta.
2. Haga descansar la segadora en su lade.
AsegOrese que el filtro de aire y que el
carburador queden mirando hacia arriba.
3. Use un bloque de madera entre la cuchilla
y la caja de fa segadora para evitar que la
cuchilla gire cuando se le quite el perno.
AVISO: Proteja sus manes con guantes y/o
envuelva la cuchifla con una tela gruesa.
4. Remueva et perno de la cuchilla gir_indolo
en el sentido contrado en que giran Ias
manillas del reloj.
5. Remueva Ia cuchilla y los artieuIos de ferreteria adjuntadores (el perno, la arandela
de seguridad y la arandela endurecida).
PARA CAMBIAR LA CUCHILLA
!. Ponga Ia cuchilla en el adaptador de _sta
alineando los dos (2) agujeros en la cuchilla
con las salientes elevadas en eI adaptador.
2. Aseg0rese de que el borde de salida de
la cuchilia (opuesto al borde afilado) est_
hacia arriba hacia el motor.
3. Instale eI perno de Ia cuchilla con la arandela de seguridad y la arandela endurecida
en eJadaptador de Ia cuchilla y eI cigueSal.
4. Use un bloque de madera entre Ia cuchilla
y Ia caja de la segadora y apriete el pemo
de Ia cuchilla gir_ndolo en el sentido en que
giran las manillas del reloj.
J
La torsi6n para apretar recomendada es de
35 - 40 pies libras.
Ranura
Chaveterodel
Adaptadorde
la cuchilla
Arandela de
seguridad
Borde
AVISO: No recomendamos elafilarla cuchilla-pero
si Io hace, aseg_rese de que quede balanceada.
Se tiene que tener cuidado de mantenerla
balanceada. Una cuchilla que no est_ balanceada va a producir eventualmente daSo en
Ia segadora o an e] motor.
• La cuchi]la puede afifarse con una lima o en
una rueda rectificadora. No trate de afilar_a
mientras se encuentra en Jasegadora.
• Para revisar eI ba{ance de la cuchilla, clave un
clave en una riga o en la pared. Deje alrededor
de una pulgada de un ctavo recto expuesto.
Ponga eI agujero central de la cuchilla sobre ]a
cabeza deI clave. Si la cuchilla est_ balanceada
debe permanecer en la posici6n horizontal. Si
cualquiera de los extremes de la cuchilla se
mueve hacia abajo, afile el extreme pesado
hasta que _sta quede balanceada.
REOOGEDOR DE CF_SPED
• El recogedor de c_sped puede ser rociado
con el agua de ia manguera pero tiene que
estar seco cuando se vaya a usar.
• Revise su recogedor de c6sped a menudo
para verificar si est_ daSado o deteriorado.
Se va a desgastar con el use normal. Si se
necesita cambiar el recogedor, c_mbielo
solamente per uno que sea aprobado per el
fabricante. D_ el n0mero det modelo de la
segadora cuando Io ordene,
MOTOR
LUBRICAC!ON
Use solamente aceite de detergente de alta catidad clasificado conla clasificaci6nSJ-SL de servicioAPL Seleccione {a calidad de viscosidadSAE
seg0n su temperatura de operaci6n esperada.
Cambie el aceite despu_s de 25 horas de
CALIDADES DE VISCOSIDAD DE SAE
i'c_o
.2,o .1o
?
to
so
_
'8o
3'o
_o
_0
GAMA DE TEMPERATURA
ANTICIPADA
A_,,q'ES DEL PROXIMO CAMBIO DE ACEITE
operaci6n o per Io menos una vez al aSo si la
segadora se utiliza menos 25 horas el aSoo
Revise eI nivel de] aceite deJc__rterantes de
arrancar eI motor y despu6s de cada cinco (5)
horas de use continuado. Apriete el tap6n del
aceite en forma segura cada vez que revise el
niveI del aceite.
PARA CAMBIAR EL ACEITE DEL MOTOR
AVtSO: Antes de inolinar Ia segadora para drenar el aceite, drene el tanque de combustible
haciendo correr el motor hasta que el tanque
est_ vacio,
Arandeta
de ]a
cuchilIa
IMPORTANTE: EI perno de la cuchiltaes tratado
a ealo. Si es necesario sustituir los pernos,
sustituidos s6!o con pemos aprobados mostrados
en lasecci6n Partesde Reparaci6n deeste manual
PARA AFILAR LA CUCHILLA
igu6naI26
1. Desconecte
elalambre
delabujfa
y
p6ngalo
demodo
quenopueda
entrar
en
contacto
con_sta.
2. Remueva
la tapa del dep6sito de] aceite;
3.
Cartucho Ranuras
d_jela a un lado en una supefficie limpia.
Incline la cortadora de c6sped por este
costa(to tal como se muestra y purgue el
aceite en un recipiente id6neo, Mueva la
segadora de atr_s para adelante para remover todo el aceite que se haya quedado
atrapado dentro del motor.
Plancha trasera
4.
Limpie tode el aoeite derramado en la segadora yen el lado del motor.
5. Echar aceite despacio en el conducto del
aceite, par&ndose a intervatos regulates
para controlar el nivel del aceite con la
varilla.
6. Parar de aSadir aceite cuando se atcanza la
seSal de tleno (FULL) en la variI]a. Esperar
un minuto para dejar que el aceite se arregle.
7. ContinSe agregando cantidades pequeas
de aceite y vue]va a inspeccionar la variI]a
medidora settles del nivel de aciete en Ileno
(FULL). NO sobrellene el motor con aceite,
o fumar_ pesa demante deI silenciador
cuando Io valla a arrancar,
8. AsegLirese de apretar la varilla medidora
de[ aceite antes de arrancar el motor.
9. Vuelva a conectar el alambre dela bujfa a 6sta.
SILENCtADOR
Inspeccione y cambie e[ silenciadorsi est_ corro_do puede producir un peligrode incendioy/o dafio.
FILTRO DE COMBUSTIBLE EN LINEA
El filtro de combustible debe cambiarse una
vez carla temporada. Si el filtm de combustible
se tapona, obstruyendo el flujo del combustible
hacia el carburador, es necesario cambiarlo.
1. Con el motor frfo, ramueva el filtroy tapone
tas secciones de la Ifnea de combustible.
2. Ponga el filtrode combustible nuevo en su
posici6n en la Ifnea de combustible con la
ffecha seSalando hacia el carburador.
3. Aseg_rese de que no hayan fugas en la
linea det combustible y que las grapas
est_n co!ocadas en forma adecuada.
4. Inmediatamente limpie toda Ia gasolina tier*
ramada.
Abmzadera"
\
/'),"
_--_-..J
__._._.._.__/_
Filtrode
_ combustible
°
BUJIA
Cambie el bujfa a! comienzo de cada temporada de siege o despu_s de cada 100 horas de
operaci6n, Io que suceda primero. Et tipo de
bujia y el ajuste de la abertura apareeen en "ESPECIFICACIONES DEL PRODUCTO" secci6n
de este manual
LIMPIEZA
IMPORTANTE, Paraobtenerel mejot rendimineto,
mantenga la caja de Ia segadora sinacumulacion
de cesped y basura. Limpie Ia parte de abajo de
su segadora despues de carla uso.
_IbPRECAUCION: Desconecte el elambre de
la bujfa y p6ngalo en donde no pueda entrar en
contacto con _sta.
FILTRO DE AIRE
Su motor puede sufrir avedas y funcionar de
manera incorrecta con un fiitro del aire sucio.
Sustituir el pape] del cartucho una vez at afio o
tras 100 horas de funcionamiento, rods a menu•
do si se utiliza en condiciones de suciedad y
polvo particulares. No lave el filtro de aire.
PARA LIMPtAR EL FILTRO DE AIRE
1. Remueva ia cubierta.
2. Cuidadosamente, remueva el cartucho.
•
3. Limpielo golpeandolo suavemente en una
superficie plana. Si _st& muy sucio cambie
el carlucho.
•
,t_PRECAUCI(SN: Los solventes de petr6leo,
tales como el keroseno, no se deben usar para
•
limpiar el cartucho, Pueden producirel deterioro de dste. No aceite el cartucho. No use aire
a presi6n para limpiado o secado,
4, Instale el cartucho, luego vuetva a poner la
cubierta.
27
Haga descansar la segadora en su lado.
AsegL_reseque el filtro de aire y que el carburador queden mirando hacia ardba. Limpie la
parte inferior (_e su segadora rasp_,ndola para
remover la acumulaci6n de c_sped y basura.
Umpie el motor a menudo para evitar que
se acumu[e la basura. Un motor tapado funciona m_s caliente y se acorta su duraciSn.
Mantenga las superficies pulidas y las ruedas sin gasolina, aceite, etc.
No recomendamos el uso de una manguera
de jerd|n para limpiar la segadora a menos
que el sistema el_ctdco, el silenciador, el
•tro de aire y el carburador est6n tapados
para evitar que les entre el agua. Et agua en
el motor puede acortar la duraci6n de _ste.
_ADVERTENCIA:
Para evitar
lesi6nes serias,
antes de dar calquier servico o de hacer
ajustes:
1. Suelte la barra de control y pare el motor.
2. AsegSrese que la cuchilla y que todas las
partes movibles se hayan detenido completamente.
3. Desconecte el alambre de la bujfa y p6ngalo en donde no pueda entrar en contacto
con 6sta.
Posici6n _"_
I
de
Posici6n
II
/
\\\%J_'--_ _
montaje POSICIONBAJA
SEGADORA
/'_
it
\\';-._,, _;
POSICIC)NALTA
PARA AJUSTAR LA ALTURA DE CORTE
Vea "PARA AJUSTAR LAALTURA DE CORTE"
en ]a secci6n de Operacibn de este manual.
DESVIADOR TRASERO
Se proporciona un desviador trasero, adjunto
entre las ruedas traseras de su segadora, para
reducir a un minimo la posibilidad que objetos
sean lanzados hacia afuera de la parte trasera
de {a segadora, en la posici6n en donde se
encuentra el operador. Si se daSa el desviador
debe cambiarse.
M_.go_"
PARA AJUSTAR EL MANGO
El mango puede ser montado a una posici6n
alta o baja. Losagujeros de montaje en el
mango inferior est_n fuera del centro para
levantar y bajar el mango.
1. Remueva el mango superior y conexi6ne(s)
el asegurar _l (los) cable(s) at mango inferior.
2. Remueva las clavijas de horquilla de Ia
clavija de montaje del puntaI (:{elmango.
3. Apreite e] mango inferior hacia dentro para
removerlo de las clavijas de montaje.
4. Gire el mango inferior por encima para
levantar o bajar el mango.
5, Vuelva a montar las clavijas de horquilla por
encima de Ias davijas de montaje.
6. Vuelva a montar el mango supedor y todas
Ias partes removidas deI mango inferior,
I1_
APRIETE
_1_
E_
PARA
--_
AJUSTE
Mangoinferior
I1_
..31a'ja de monte
F _pun_aI
;""_deI mango Clavijade horquilIa
28
"_..
inferior---__
GIRAR'k_
MOTOR
VELOCIDAD DEL MOTOR
La velocidad del motor ha sido ajustada en
ta f&bdca, No trate de aumentar la velocidad
deI motor pues se pueden producir lesiones
personales. Si cree que e] motor est& funcionando demasiado rapido o demasiado lento, ]leve
su segadora amas con su centro de servicio
cualificado.
CARBURADOR
Su carburador tiene un chorro principal fijo no
ajustable para controlar la mezcla. Si su motor
no est,. funcionando en forma adecuada debido
a problemas que se sospecha vienen de[
carburador, lleve su segadora a contacto con
su centro de servicio cualificado para repararla
y/o ajustarla.
IMPORTANTE: Nunca manipule e] regulador
de[ motor, el que ha sido ajustado en la fAbrica
para la velocidad de{ motor adecuada. Puede
ser peligroso hacer funcionar el motor a una
velocidad por sobre el ajuste de alta velocidad
de Ia f_ibrica. Si cree que la velocidad alta
regulada deemotor necesita ajuste,contacto con
su centro de servicio cuatificado, el que cuenta
con el equipo adecuado y la experiencia para
hacer los ajustes necesarios.
Inmediatamente prepare su segadora para el
almacenamiento al final de carla temporada osi
la unidad no se va a usar per30 dfas o mds.
APRIETE
PARA DOBLAR
Mang{
SEGADORA
Cuando se va a guardar Ia segadora per cierto
perfodo de tiempo, irmpiela cuidadosamente,
remueva toda la rnugre, la grasa, las hojas, etc.
Gudrdela en un ,irea limpia y seca.
1. Limpie toda {a segadora (Yea "LIMPIEZA"
en la secciSn de Mantenimento de este
manual).
2. Lubriquela segLin se muestra en la seccibn
de Mantenimento de este manual.
3. Aseg_rese de que todas las tueroas y
c]avijas y redes los pemos y tornillos est_n
apretados en foma segura. {nspeccione
tas partes que se mueven para vedficar si
estdn dafiadas, quebradas o desgastadas.
C&mbielas si es necesario.
4. Retoque todas tas superficies que est_n
oxidadas o con ta pintura picada; use una
lija antes de pintar.
MANGO
Puede doblar el mango de su segadora para el
almacenarniento.
1. Apriete los extremes infedores del mango
inferior entre s{ basra que el mango inferior
quede separado del puntal del mango,
luego rnu_valo hacia adelante.
2. Suelte los pemos de montaje del mango
superior io suficiente come para permitir
que el mango superior se pueda doblar
hacia atr&s.
IMPORTANTE: Cuando dobie el mango para e]
almacenamiento o el transporte, asegtlrese que
Io doble segt_n se muestra o purde daSar los
cables de control.
• Cuando prepare sus mangos a partir de
la posicibn de almacenamiento, el mango
inferior autom_ticamente se asegurar'& en fa
posici6n para segar.
Barrade control
que
presenciadel
POSIOI6N
PARA
SEGAR
oDBrador
DOBLAR
HAClA
ADELANTE
PARA
ALMACENAR
Mango
superior
Manilla dal
mango
MOTOR
SISTEMA DE COMBUSTIBLE
IMPORTANTE: Es irnportante evitar que
se formen depositos de coma en partes
fundamentales del sistemade combustible tales
come el carburador, eI filtro del combustible,
Ia mangura del combustible o en el estanque
durante et almacenamiento. Los combustibles
mezclados con alcohol (cono¢ido come
gasohoI o que tienen etanol e metanol)
Pueden atraer humedad, Io que conduce a la
separacion y a la formaci6n de acidos durante
el almacenarniento. La gasoiina acida puede
danar et sistema de combustible de un motor
durante el perido de almacenamiento.
• Vaciar el dep6sito de] carburante poniendo
en marcha el motor y dej_ndolo funcionar
hasta que el carburante termine y el
carburador est_ vaoio.
° Nunca use los productos para limpieza del
earburador odel motor en el estanque de
combustible pues se pueden producir daSos
permanentes.
• Use combustible nuevo la pr6xima temporada.
AMISO: El estabilizador de combustible es una
atternativa aceptable para reduoir a un mfnimo
la formaci6n de dep6sltos de goma en eI combustible durante el perfodo de alraacenamiento.
Agregue estabilizador a la gasolina en el
estanque de combustib{e o en el envase para el
almacenamiento. Siempre siga ia proporciSn de
rnezcla que se encuentra en el envase del estabilizador. Haga funcionar el motor per to menos
10 minutes despu_s de agregar e{ estabilizador,
para permitir que este llegue al carburador. No
drone {a gasol{na del estanque de gasolina y el
carburador sise est_ usando estabilizador de
cornbustibIe.
ACEITE DEL MOTOR
Drene el aceite (con el motorcaliente)y cdmbielo
¢on aceite de motor Iimpio. {Vea "MOTOR" en Ia
secci6n de Mantenimento de este manual.)
29
CILINDRO
1. Remueva la bujia.
2. Vacre una onza (29 ml) de aceite a tray,s
deI agujero de la bujfa en el cilindror
3. Tire Ia manilla de arranque lentamente unas
cuantas veces para distribuir e! aceite.
4. Vuelva a montar ta nueva bujia.
OTROS
• No guarde la gasolina de una temporada a la
otra.
• Cambie el envase de la gasolina si se empieza a oxidar. La oxidaciSn y/o la mugre en
su gasolina producirdnproblemas.
o Si es posibfe, guarde su unidad en un recinto
cerrado y c_brala para protegerla contra el
polvo y la mugre.
• Cubra su unidad con un forro protector
adecuado que no retenga Ia humedad. No
use pldstico.El pldstico no puede respirar, Io
que permite Ia formaci6n de condensaci6n,
Io que produoir&la oxidaci6n de su unidad.
IMPORTANTE: Nunca cubra la segadora
mientras el motor y tas areas de escape todavfa
estan calienteso
_PRECAUOI(3N: Nunca almacene la
segadora con gasolina en el estanque dentro
de un edificio en donde los gases pueden
alcanzar una llama expuesta o una chispa.
Permita que se enfrfe el motor antes de
almacenada en algL1nrecinto cerrado.
SOLUCION
DE PROBLEMAS
- Vea la secci6n apropiada
est_ dirigido a un centro de servico cualificado.
PROBLEMA
No arranca
CAUSA
amenos
que
CORRECCi6N
1. Fiitro de aire sucio.
2. Sin combustible.
3. Combustible rancio.
4.
en el manual
Agua en el combustible.
5. Alambre de Ia bujra desconectado.
6. Bujia mata.
7. Cuchilla suelta o adaptador
de la cuchilla quebrado.
8. Barra de control en la
posiciOn suelta.
9. Barra de control defectuosa.
10. V&lvula del combustible (si equipada) est_ en Ia posicJSnOFF.
11. Bateria d6bi (si equipada).
12. Desconecte el conector
de ta batefia (si equipada).
3O
1. Limpie/cambie el filtro de aire.
2. Llene el estanque de combustible.
3, Vaciar el estanque y vuelva a
]lenarlo con combustible IJmpio
y nuevo,
4. Vaciar el estanque y vuelva a
I]enarlo con combustible rimpio
y nuevo,
5. Conecte el atambre a la bujia.
6. Cambie la bujia.
7. Apriete el perno de ]a cuchilta
cambie el adaptador de la cuchilla.
8. Presione la barra de control
hacia el mango.
9. Cambie la barra de control.
10. Gire a ta v_lvula det combustible
a la posiciSn ON.
11. Cague Ia baterfa.
12. Conecte la bateria al motor.
SOLUCION DE PROBLEMAS - Vea la secci6n apropiada en el manual amenos que
est_ dirigido a un centro de servico cualificado.
PROBLEMA
Falia de
fuerza
CAUSA
t.
2.
CORRECCION
Cuchi]la desgastada, doblada
o suelta.
Altura de ]as ruedas dispareja.
3.
4.
Velocidad de[ motor lenta.
Acumulaci6n de c_sped, hojas o
basura debajo de la segadora.
5. Demasiado aceite en motor.
6. VeIocidad de recorddo
demasiado r&pida.
Ma! cortedispareJo
Vibraci6n
excesiva
1. Cuchilla desgastada, doblada
o suelta.
2. Altura de las ruedas dispareja.
1.
Cuchilta desgastada, doblada
o suelta.
Ciguefial del motor dobiado.
1.
El freno del volante del motor
est& aplicado cuando se
suelta la barra de control.
CiguefiaI del motor doblado.
1.
1.
3.
4.
Diffcil de
empuJar
: 1. Cambie la cuchilla. Apriete el perno
de Ia cuchilla.
2. Ajuste todas las ruedas a Ia misma
altura.
3. Limpie la parte inferior de la
caja de ta segadora.
AcumuWaci6n de c6sped, hojas o
basura debajo de ta segadora>
2,
cdsped no se
Ilena (sl viene
equipado)
2. Ajuste a Ia posici6nde
"Corte m&s alto."
3. Limpieicambie el filtro de aire.
4. Umpie la parle inferior de Ja
caja de la segadora.
5. Revise el nivel del aceite.
6. Corte a una velocidad de
recorrido mas lenta.
3.
2.
Cord6n
arrancador
diffcil de tirar
1. Ajuste a la posici6n de
"Corte m_.s alto."
Adaptador de la cuchilla quebrado.
La cuchilla se arrastra en
el c_sped.
1.
2.
Altura de corte demasiado baja.
Levantamiento de la cuchilla
desgastado.
3. Recogedor sin venti]aei6n de aire.
I.
2.
3.
4.
Et c6sped estd demasiado alto o la
altura de la rueda demasiado baja.
Parte trasera de ]a
caja/cuchilla de la segadora
arrastrdndose en el crisped.
Recogedor de c_sped
demasiado Ileno.
Posici6n de la altura del mango
no adecuada para usted.
31
Camble la cuchUla. Apriete el
pemo de la cuchilla.
2. P6ngase en contacto con su centro
de servlcio cualfficado.
Presione la barra de control
hacia el mango superior antes
de tirar el cord6n arrancador.
2. P6ngase en contacto con su centro
de servicio cualificado.
3. Cambie el adaptador de ta cuchilla.
4. Mueva ta segadora a un lugar
en donde el ¢esped ha sido
cortado o a una supefficie firme
para hacer arrancar el motor.
=1. Eleve la altura de corte.
2. Carnbie las cuchillas.
i 3.
Limpie et recogedor de c6sped.
1.
Eleve ta attura de corte.
2.
Eleve la parte trasera de la caja de
la segadora (1) un lugar m_.s alto.
3. Vacfe el recogedor de c_sped.
4.
Ajuste fa altura del mango de
modo que le acomode.
/
\
\
\
\
W
Z
/
\
0
/
W
0
Z
,J
0
82
o_
o
o
z
o
T-
o
o
Q
_o
z
E
o
LU
m
_o
o
d
_z
i,
O
z
o
_
c..c,
_ ×_<
=..o
r',C]
o
_8
@
¢_,^
no
I,Ll
Q
o _
.i
en
_o
Z
.J
LU
_z
..
_
_C
E
g_
IllO
o
0
!
!
{
Q:
I,
Ll
E
0
z
o
Z
e_
.J
_J
Q
P,
u,l
o
g
8
x
__
0
_6
_z
_,_==R,--_._,___o,_
_
,--,--_
83
o
oo
z
iI:
o
Two-Year Limited Lawn
and Garden Warranty
This warranty
statement
applies only to 21-1nch Walk Behind Lawn Mowers, Wide Area
Walks, AMP Wide Area Walks, Tillers, String Trimmers, Log Splitters, Edgers and Power
Brushes
Ariena Company (Adens) warrants to the original purchaser that Adens and Gravety brand consumer
products manufactured end sold by Ariens will be free from defects in material and workmanship for a period
of two years after the date of purchase. An authorized Adens dealer (Adeas brand products)or Gravely
dealer (Gravely brand products) witl repair any defect in material or workmanship, and repa{r or replace any
defective part, subject to the conditions, limitations and exclusions set forth herein, Such repair or
replacement will be free of charge (labor and parts) to the original purchaser except as noted below.
Two-'tear Limited Warranty on AMP TM Series Battery Packs and Subassemblies
The battery pack and!or battery subassemblies on AMP series electric mowers is/are warranted to the
original purchaser for two years from the date of purchase. Ariens will replace, free of charge to the
original purchaser, any battery pack and/or battery subassembly that fails due to defect in material or
workmanship for one year after the date of purchase. For the next 12 months, Athenswill cover the prorated cost of replacing a battery pack and!or battery subassembly that fails due to defect in matedai or
workmanship. This warranty does not apply to battery packs or battery subassemblies that fail due to
accident, neglect, abuse, improper maintenance, improper storage or improper charging procedures,
One-Year
Mowers
LimHed
Warranty
on Professional/Commercial
21-inch
Walk-Behind
Lawn
21-inch walk-behind lawn mowers labeled or designated by Ariens as a Professional/Commercia_product put to any business use, agricultural, commercial, or industrial, are warranted to the original purchaser to be free from defects in materiat and workmanship for a period of one year after the date of
purchase.
90-Day Limited
Warranty
on Service Parts and Accessories
Genuine Ariens or Gravely brand service parts and accessories are warranted to be free from defects
in material and workmanship for a period of 90 days after the date of purchase. An authorized Ariens or
Gravely deater will repair or replace any such part or accessory free of charge, except for labor, during
that period.
Except for 2%inch walk-behind lawn mowers labeled or designated by Ariens as a Professional/Commercial
pi'oduct, the duration of ai_ warranties herein applies only if the product is put to personal use around a
household or residence. If the product is put to any business use, agricultural, commercial, or industrial,then
the duration of these warranties shall be 90 days after the date of purchase. If any product is rented or
leased, then the duration of these warranties shall be 90 days after the date of purchase.
Exceptions,
Customer
Limitations,
Exclusions
Responsibilities
Register the product immediately at the time of sale. If the dealer does not register the product, the
customer must complete the product registration card in the literature package and return it to the Ariens
Company, or register the uait online at www.ariens.com or www.gravely.com.
To obtain warranty service, the original purchaaer must:
Perform the maintenance and minor adjustments explained in the owner's manual
Promptly notify Ariens or an authorized Ariens or Gravely service representative of the need for
warranty service,
•
Transport the product to and from the place of warranty service.
Have the warranty service performed by an authorized Ariens or Gravely service representative.
ARIENS COMPANY
GRAVELYeI STENS®I LOCKE®I NAT|ONAL® [ BYNORM_ I EVERP,
IDE'_[ GREATDANEe
34
Con L&G 2(t10
To find an Ariens or Grave]y authorized service representative, contact Adens at:
655 W. Ryan Street
grUlion,W154i_0
(920) 756 - 2141
www.ariens.com
www.gravely.com
Exceptions
and Limitations
Batteries are warranted only for a period of 12 months after date of purchase, on a prorated basis. For
the first 90 days of the warranty period, a defective baJtery will be replaced free of charge, if the
applicable warranty period is more than 90 days, Ariens will cover the prorated cost of any defective
baltery, for up to 12 months after the date of purchase. This battery limited warranty does not apply to
the battery packs on AMP series products.
Exclusions
- Items
Not Covered
by This Warranty
Engines and engine accessories are covered only by the engine manufacturer's warranty and are not
covered by this warranty.
,
•
Parts that are not genuine Ariens or Gravely service parts are not covered by this warranty.
The following maintenance, service and replacement items are not covered by Ibis warranty unless
they are noted in the Limitations section above: lubricants, spark plugs, oil, oil Iillers, air filters, fue!
filters, brake linings, brake arms, brake shoes, runners, scraper blades, shear bolts, mower blades,
mower vanes, tines, brushes, headlights, light bulbs, knives° cL,t_ers.
•
Any misuse, alteration, improper assembly, improper adjustment, neglect, or accident which requires
repair is not covered by thiswarranty.
•
This warranty applies only to products purchased In the United States (including Puerto Rico) and
Canada. In all other countries, contact place of purchase for warranty information.
Disclaimer
Ariens may from time to time change the design of its products. Nothing contained in this warranty shall be
construed as obligating Arlene to incorporate such design changes into previously manufactured products,
nor shall such changes be construed as an admission that previous designs were defective.
LIMITATION
OF REMEDY" AND DAMAGES
Aliens Company's Ilability under thiswarranty, and under any impliedwarranty that may exist, is l!mrted to
repair of any defect in workmanship, and repair or replacement of any defective part. Adens shall not be
liable for incidental, special, or consequential damages (including test profits). Some states do not aUow the
exclusion of incidental or consequential damages, so the above limitation or exclusion may not apply to you.
DISCLAIMER
OF FURTHER
WARRANTY
Ariens Company makes no warranty, express or implied, other than what is expressly made In this
warranty. If the law of your state provides that an implied warranty of merchantabllity_ or an implied
warranty of fitness for particular purpose, or any other implied warranty_ applies to Aliens Company,
then any such implied warranty is limited to the duration of this warranty. Some states do not allow
limitations on how tong an implied warranty lasts, so the above limitation may not apply to you.
This warranty gives you specific legal rights, and you may also have other rights which
vary from state to state.
ARIENS COMPANY
®
GRAVELY_I STENS® I LOCKE_ JNATIONAl.
I BYNORM_ I EVERRIDE_I GREATDANE_
35
Con L&G 20t0
Garantia limitada de dos a os
de la gama C sped y Jardin
Esta garantia se aplica dnicamente
a cortac_sped
de empuje manual de 21 pulgadas,
plataformas
de gran anchura, plataformas
de gran anchura serie AMP, cultivadoras,
recortadoras
de cadena, partidoras
de trances, bordeadoras
y escobil/as el_ctricas
Adens Company (Arlene) garanfiza al comprador origina! qua los productos comerciales de la marca
Ariens y Gravely fabricados y vendidos per Adens se halar,_n libres de defectos en materiales y fabricaci6n
per un periodo de dos aries a partir de [a fecha de compra. Un concesionado autodzado Arlene (productos
de la marca Ariens) o Gravely (prodactos de Ia marca Gravely) roparar& eualquier defecto en los matedates
o en la fabricaciSn, y reparar& o sustituir& cualquier plaza defectuosa, sujeto alas condiciones, IJmitaciones
y e×ciusiones expuestas en [a presente garantia. Dicha reparaci6n o suatituci6nse har,_ sin cargo alguno
(mane de obra y piezas) al comprador original, excepto en los cases indicados m&s adelante.
Garantia limitada de dos a_os sobre bloques de baterias Serie AMP TM y subconjuntos
EI bloque de baterlas y/o los subconjuntos de cortacesped con operador sentado serie AMP est,_n
garantizados aI comprador original durante un periodo de dos aSos a con_ardesde la fecha de compra.
Ariens sastituir_, sincargo alguno pare el comprador original, cuaiquier bloque de baterlas yio subconjunto
que presente argon fallo per defectos on matedales o fab_icaci6n durante un aria a center desde la fecha
de compra, burante los 12 mesas siguientes, Ariens asumi_ e} caste prorrateado generado per Ia
sustitaci6n de un bloque de baterla y/o subconjunto qua preeente alg_n fallo per defecto de materiales
o de fabricaci6n. Esta garantia no se aplica a btoques de bateria o subconjuntos qua fallen debido
a accidente, negligencia, abuse, mantenimiento inadecuado, almacenamiento inadecuado u oparaciones
de carga inadecuadas.
Garantia limitada
de un a_o sabre cortac_sped
profesionales/comerciales
de empuje
manual de 21 pulgadas
Se garantiza aI comprador original qua los cortacesped de empuje manual de 21 pu]gadas etiquetados
o designados per Arlene come productos profesionales/comerc}ales pare use profesionaI, agricola,
comercial o industrial se hallaran libres de defectos de material y de fabricaci6n darante un periodo
de un a£_oa partir de la fecha de compra.
Garantia
Iimitada
de 90 alias sabre plazas de servicio y accesorios
Se garantiza que las plazas de servicio originales y accesorios de marca Adens o Gravely est&n Iibres
de dgfectosen material y mane de obra durante un pedodo de 90 dies a center desde la fecha de compra.
Un distribuidor autedzado Ariens o Gravely reparar& o sustituir& cualquier pieza o accesorios en estos
cases sin cargo algune, excepto mane de obra, durante dicho periodo.
Excepto pare cortac6sped de empuje manual de 21 pulgadas etiquetados o designados per Atiens come
preducto profesionalIcomorcial, la duraci6n de lodes los garantias estipuladas se aplica 0nicamente sise
daaI producto un use personal en un hogar o residencia. Si so usa el producto pare fines profesionales,
agricolas, comerciales o induetriales, ta duraci6n de estas garantias sara de 90 dies a partir de la fecha
do compra. Si se arrienda o se alquila un producto, la duraci6n de estas garantias ser_ de 90 dias a partir
de Ia fecha de compra.
Excepciones, limitaciones, exclusiones
Responsabilidades
de los c/ientes
Registre el producto ]nrnediatamente en el memento de la venta, Si el distribuidorno registra el producto,
el ctiento debe reitenar la tarjeta de registro deI aparato y devolverJa a Ariens Company, o debera registrarse
online en www,ariens.com o www.gravely.com.
Pare conseguir un ser¢icio bajo garant'_a, el compradar orig,.hal debe:
Llevar a cabo el mantenimiento y ajustes menores seg_n el manual dot propietario.
Notificar puntualmente a Ariens o a un representanle de servicio autorizado de Adens o Gravely de Ja
necesidad de reparaci6n bajo garantia.
Transporter deI producto a y desde eI lugar de reparaci6n cubierto per Ia garant[a.
Lea repareciones bajo garantia deben set realizadas per un representante de servicio Ariens o Gravely.
ARIENS COMPANY
GRAVEL"_ I STENS®{ LOCKEeI NATIONAL®
i BYNORM_I EVERRID_ JGREATOANI_
36
Con_L&G 2010
Pare encontrar un representante autorizado de servicio t_coico Ariens o Gravely, pbngase coetacto
con Arises en:
655 W. Ryan Street
8ritlion, Wt 54110
(920) 756 - 2141
v_Nw.adens.com
www.gravely.com
Excepciones
y Limitaciones
Las baterias sS[o se garantizan per un perioda de 12 mesas a partir de Ia fecha de compra, en base
a prorratec. Durante los pdmeros 90 dies deI periodo de garantia, se sustituir& una baterfa defectuosa
sin cargo alguno. Si el pedodoaplicab]e de garantfasupera los 90 dies, Adens asumtr,_el costaprorrateado
de cualquier bateda defectuosa, haste Ilegar a los 12 mesas a partir de la fecha de la compra. Esta
garantia [imitada pare baterias no so aplica para bloques de baterfas o productos serie AMP.
Exclusiones - Piezas no cubiertas per esta garantia
'
Los motoras y acoecorios deI motor est_n cubiertos sole per la garantfa del fabricante de] motor, y no
est_n cubiertos per esta garantla.
•
Las plezas qua no son piezes origina[es de las marcas Ariens o Gravely no estdn cubist,s
garantia.
per esta
Las siguientas piezas de mantenimiento, servicio y recambio no est_n cubierlas per esta garantla a
manes qua figure en la secoibn Limitaciones anterior: lubricantes, bujias, aceite, filtros de aceite, filtras
de airs, filtms de combustible, guemiciones de francs, palancas del franc, zapatas, guias, cuchillas
raspadoras, pemos de seguridad, cuchiilasde] cortac_sped, aspas deI cortac_sped, brazes, escobillas,
fares delanteros, bombilles, cuchillos, cuchillas.
Cualquier defecto que sea resuRadodel use indebido, alteracibn, montaje incorrecto, negligencia
o accidents qua" requiera reparacibn, no est_ cubierto per esta garantia.
Esta garant[a solo aplica a praductos adquiridos en Estados Unidos (incluyendo Puerto Rico) y Canada.
En el taste de paises, pOngase en contacto con el punto de compra para obtener informaci6n sobre
ta garant|a.
Renun¢ia
Adens puade modificar con cierta frecuencia el diset_o de sus productos. Nada incluido en esta garantla se
inlerpratar_ de tel mode que ob]iguea Arises Company a inco_orar tales eatables de diseff,o en los productos
fabricados pmviamente, ni se interpretar_n tales cambios come una admisibn de qua tales diseffos eran
defeotuosos,
LIMITAClON
DE REMEDIOS
Y DANOS
La responsabi]idadde Arises Company bajo esta garantla y bajo cualquier garantfa imp]fcitaque pueda existir
se limita a la mparaciSn o sustitucibn de cualquier defacto de fabricaclOn, y a fa reparaciOn o sustitucibn
de cualquier pieza defectuosa. No podr&hacerse rasponsable a Adens Company de ningt3n daito fortuito,
especial o indiracto (incluyendo la p_rdida de beneficios). Algunos Estades no permiten la exclusion
de dafios fortuitos o lndirectes, per Io qua la anterior limitaciOn podrfa no aplicarse a usted.
RENUNCIA
DE GARANTiA
ADICIONAL
Arises Company no proporciona ninguna garantia, expresa o implicita, aparte de la expuesta de
manera expresa er_ la presente garantia. Si las leyes de su Estado determinan la aplicaciOn a Ariens
de una garant_a impltcita de aptitud o de idoneidad pare un propOsito particular, o de cualquier otto
tipo de garantia implicita, dicha garantia implicita estar_ limitada a la duraciOn de la presents garantia.
Algunos Estados no parmiten limitaciones a la duraeiOn de dichas garantias implicitas, per to qua
la anterior limitaciOn podtia no aplicerse a usted.
Esta garanti a le proporciona derechos /egales especificos y puede tenet tambiOn otros detaches que varian
de Estado a Estado.
ARIENS COMPANY
GRAVELY_JSTENSeI LOCKEeJNATIONAL
® I BYNORM_ t EVERRIDEeI GREATDANE_
37
Con L&G 20t0
SERVICE
NOTES
38
SERVICE
39
NOTES