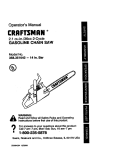
1
Operator's Manual
CRRFTSMRNo
24cc 2-Cycle
GASOLINE
EDGER
Model No.
358.797750
WARNING:
Read and follow all Safety Rules and Operating
Instructions before first use of this product.
For answers to your questions about this product,
call 7 a.m.-7 p.m., Mon-Sat; Sun, 10 a.m.-7 p.m.
1-800-235-5878
Sears, Roebuck
530-084654
03/13/97
and Co., Hoffman
Estates, IL 60179 USA
Warranty Statement
Safety Rules
Assembly
Operation
Maintenance
Service & Adjustments
2
2
4
6
9
10
Storage
Troubleshooting Chart
lllustrated Parts List
Spanish
Parts Ordering
12
14
15
18
Back Cover
FULL ONE YEAR WARRANTY ON CRAFTSMAN EDGER
For one year from the date of purchase, when this CRAFTSMAN EDGER is maintained, lubricated, and tuned up according to the instructions in the operator's
manual, Sears will repair, free of charge, any defect in material or workmanship.
If this Edger is used for commercial purposes, this warrant,/applies for only 90
days from the date of purchase.
If this Edger is used for rental purposes, this warranty applies for only 30 days
from the date of purchase.
THIS WARRANTY"DOES NOT COVER:
Expendable items which become worn during normal use, such as rotary and/or
edger blades, blade guides, blade adaptors, air cleaners, spark plugs, tire chains,
and shear pins.
Repairs necessary because of operator abuse or negligence, including bent
crankshafts and the failure to maintain the equipment according to the instructions contained in the Operator's manual.
WARRANTY SERVICE IS AVAILABLE BY RETURNING THE CRAFFSMAN EDGER TO
THE NEAREST SEARS SERVICE CENTER IN THE UNITED STATES.
This warranty gives you specific legal rights, and you may also have other rights
which vary from state to state.
Sears, Roebuck and Co. DI817WA Hoffman Estates, IL 60179
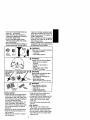
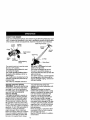
OPERATOR SAFETY
• Dress properly. Always wear safety
glasses or similar eye protection
when operating, or performing maintenance on your unit. (Safety glasses
are available.) Always wear face or
dust mask if operation is dusty. Always wear heavy, long pants, long
sleeves, boots, and gloves. Do not
go barefoot or wear sandals.
• Secure hair above shoulder length.
Secure or remove loose clothing and
jewelry or clothing with loosely hanging ties, straps, tassels, etc. They
can be caught in moving parts.
• Being fully covered also helps protect
you from debris and pieces of toxic
plants thrown by spinning blade.
• Stay Alert. Do not operate unit when
you are tired, ill, or under influence
of alcohol, drugs, or medication.
Watch what you are doing; use common sense.
• Wear hearing protection when using
this unit.
• Never start or run the unit inside a
closed room or building. Breathing
exhaust fumes can kill.
• Keep handles free of oil and fuel.
• Always use the handle.
UNIT SAFETY
• Inspect entire unit before each use.
Replace damaged parts. Check for
fuel leaks. Make sure all fasteners
are in place and securely fastened.
• Maintain the unit according to recommended procedures.
• Throw away blades that are bent,
warped, cracked, broken, or damaged in any other way. Replace parts
that are cracked, chipped, or damaged before using the unit.
• Use only Craftsman replacement
blades. Never use wire, rope, string
etc.
2
• Use only recommended Craftsman
parts and accessories.
• Disconnect the spark plug before
performing maintenance (except for
carburetor adjustments).
• Be sure the blade stops turning
when the engine idles. See "Carburetor Adjustments."
• Remove the blade before making carburetor adjustments. Herd the unit by
Safety
Glasses
A
WARNING
Blade can throw objects violently.
• You can be blinded
or injured.
• Wear safety glasses.
,_
WARNING
Hazard zone for thrown objects
• Blade can throw objects
violently.
• Others can be blinded or
injured.
• Keep people and animals
50 feet (15 m) away.
f
Boots
Blade rotates
after the
hand. Do not make carburetor adjustments from the blade side of the unff.
• Keep others away when making carburetor adjustments.
• Never start the unit with the gearbox
removed. The clutch can fly off and
cause serious injury.
• Have all maintenance and service not
explained in thLs manual performed by
an Authorized Service Dealer.
Allow blade to stop
before removing it
from the cut.
WARNING
Blade rotates momentarily after
the trigger is released.
• The blade can seriously cut
you or others.
• Allow blade to stop
before removing it from the cut.
WARNING
Read Operator's Manual.
• Follow all warnings and
instructions.
• Failure to do so can
result in serious injury.
EDGING SAFETY
,, Inspect the area to be edged before
each use. Remove objects (rocks,
broken glass, nails, wire, string, etc.)
which can be thrown by the blade or
can wrap around the shaft.
• Keep others including children, animals, bystanders, and helpers at
least 50 feet (I5 meters) away. Stop
the unit immediately if you are approached.
• Hold the unit firmly with both hands.
• Keep firm footing and balance. Do
not overreach.
• Always keep the wheels in contact
with the ground.
• Keep all parts of your body away
from the blade and muffler.
• Always push the unit slowly over the
ground. Stay alert for uneven sidewalks, holes in the terrain, large
roots, etc.
• Use only for jobs explained in this
manual.
FUEL SAFETY
• Mix and pour fuel outdoors and
where there are no sparks or flames.
• Use a container approved for fuel.
• Do not smoke or allow smoking near
fuel or the unit; do not smoke while
using the unit.
• Wipeupallfuelspillsbefore
starting
ud_o
• Move
atleast10feet(3meters)
away
fromfueling
sitebefore
startingunit.
• Stop engine and allow unit to cool
before removing the fuel cap.
, Do not store the unit with fuel in the
fuel tank; use up fuel left in the carburetor and fuel lines by starting the
unit and letting it run until it stops.
• Store unit and fuel in an area where
fuel vapors cannot reach sparks or
open flames from water heaters, ele¢.
tric motors or switches, furnaces, etc.
TRANSPORTING & STORAGE
• Stop unit before Heaving work area,
• Allow unit to cool, run fuel out of the
fuel tank, and secure the unit before
storing or transporting it in a vehicle.
• Before storing, use up fuel left in the
carburetor by starting the unit and
letting it run until it stops. Always allow the unit to cool before storage.
• Store unit and fuel in an area where
fuel vapors cannot reach sparks or
open flames from water heaters, electric motors or switches, furnaces, etc.
• Store unit so the blade cannot accidentally cause injury.
• Store unit out of reach of children.
If situations occur which are not covered in this manual, use care and
good judgment. If you need assistance, contact your nearest Sears Service Center or call the 1-800 number
listed on the back page of this manual.
SAFETY NOTICE: Exposure to vibrations through prolonged use of gasoline
powered hand units cou}d cause b_ood
vessel or nerve damage in the fingers,
hands, and joints of people prone to circulation disorders or abnormal swellings. Prolonged use in cordweather has
been linked to blood vessel damage in
otherwise healthy people, If symptoms
occur such as numbness, pain, loss of
strength, change in skin color or texture,
or loss of feeling in the fingers, hands, or
joints, discontinue the use of this unit
and seek medical attention. An anti-vibration system does not guarantee the
avoidance of these problems. Users
who operate power tools on a continual
and regular basis must monitor closely
their physical condition and the condition of this unit.
SAVETHESErNSTRUCTIONS
CARTON CONTENTS
Model 358.797750
Edger
Screws
Locknuts
Tube
Cabie Ctamp
Hex Wrench
Container of Oit
Examine parts for damage. Do not use
damaged parts.
ASSEMBLY
WARNING: If received assembled,
repeat all steps to ensure your unitis
properlyassembledand all fasteners
are secure.
This Operator's Manualhas been developedto help you assemble the unit
and to provideitssafe operation.It is
importantthat you read theentiremanual to become familiar with theunitbeforeyou begin assembly.
NOTE: If you need assistance or find
parts missing or damaged, call the
1-800 number found on the front page
of this manual.
Read your Operator's Manual.
Tools you will need:
• Screwdriver
• Adjustable Wrench
• Hex Wrench(provided)
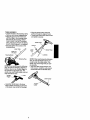
TUBE ASSEMBLY
o Loosen screws in the housing clamp.
• Remove and discard shipping plug,
° Nign the groove in the lower tube
with the ridge in the housing; insert
the tube into the housing. FIRMLY
PUSH LOWER TUBE INTO HOUSING
UNTIL THE BOLD LINE ON THE DECAL
IS NOT VISIBLE (about 2-1/4 inches),
• Securely tighten the screws in the
housing clamp,
Lower Tube
E_ld Line
On Decal
, Align the screw holes; insert the
screws through the aligned holes.
° Thread one Iocknut onto each screw
and tighten securely.
Handle Tube
Screws
.\
Lower
Tube
Starter Rope
\
Locknuls
Housing Clamp
Shipping Plug
NOTE: When performing the following
step, be sure the handle is aligned as
follows: label on top, throttle trigger to
the operator's right hand side. The
starter rope and throttle cable must not
wrap around the tube.
Trigger
Throttle_abe|
• Assemble handle tube to the lower
tube (it will be necessary to pull some
of the starter rope out of the housing).
NOTE: When performing the following
step, be sure the starter rope is not
caught under the cable clamp. The
starter rope must hang freely to operate properly,
• Align the cable clamp between the
tube screws. Install the cable clamp
around the tube and throttle cable.
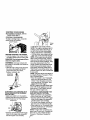
KNOW YOUR EDGER
READ THIS OPERATOR'S MANUAL AND SAFETY RULES BEFORE OPERATING YOUR
UNIT. Compare the illustrations to your unit to familiarize yourself with the location
of the various controls and adjustments. Save this manual for future reference.
Starter Ro_
On/Off
Fuel/Oil
Switch
Mix Cap
Choke
/
Trigger
Air inlet
Holes
Dep_Control
Lever
Spark Plug
Primer
Bulb
_k_
Muffler
and Guard
Air Filter
Depth Adjusting
Wheel
The ON/OFF SWITCH is used to select
the ON or OFF position.
The STARTER ROPE HANDLE is used
for starting the engine.
The CHOKE provides additional fuel to
the engine when starting a cold or refueled engine.
The PRIMER BULBcirculatesfuel to the
carburetor.Activate the primer bulb by
pressingit fully,
The THROTTLETRIGGER controlsen-
BEFORE STARTING ENGINE
WARNING: Be sure to read the fuel
information in the safety rulesbefore
you begin. If you do not understand
the safety rules,do not attemptto fuel
your unit. Call 1-800-235-5878.
FUELING ENGINE
Thisengine is certifiedto operateon
unleadedgasoline.Beforeoperation,
gasolinemustbe mixed witha good
quality2-cycle air.cooled engineoil.
We recommendCraftsmanbrandoil.
Mix gasolineand oil at a ratioof40:1
(A 40:I ratiois obtainedby mixing 3.2
ouncesof oilwith 1 gallon of unleaded
gasoline). DONOTUSEautomotiveoil
or boat oil.These oilswillcause
enginedamage. When mixing fuel,
followinstructions printed on container.
Once oilis addedto gasoline, shake
containermomentarily to assure that
the fuel is thoroughlymixed. Always
Blade Guard
Blade
gine speed. It is designed to be activated by the right hand.
The BLADE is designed to cut sod.
The DEPTH ADJUSTING WHEEL removes the blade from the cut when the
unit is not in use.
The DEPTH CONTROL LEVER regulates
the cutting depth, Move the lever forward for full depth edging, rearward for
half depth edging.
read and follow the safety rules
relating to fuetbefore fueling your unit.
IMPORTANT
Experience indicates that alcohol
blended fuels (called gasohol or using
ethanol or methanol) can attract moisture which leads to separation and
formation of acids during storage.
Acidic gas can damage the fuel system of an engine while in storage.
To avoid engine problems, empty the
fuel system before storage for 30 days
or longer. Drain the gas tank, start the
engine and let it run until the fue! lines
and carburetor are empty. Use fresh
fue! next season.
Never use engine or carburetor cleaner products in the fuel tank or perma*
nent damage may occur.
See the STORAGE section for additional information.
STARTING
YOUR ENGINE
(For location of controls, refer to
"KNOW YOUR UNIT.")
STOPPING YOUR ENGINE:
TO stop a running engine, move the
switch to the OFF position.
ON/OFF Switch
• Pull starter rope sharply 5 times.
NOTE: The engine may sound as if it
is trying to start before the 5 th pull. if
so, go to the next step immediately.
• Move choke lever to "Half Choke."
• Pull the starter rope sharply until engine runs, but no more than 6 pulls.
NOTE: If the engine has not started
after 6 pulls (at half choke), check to
make sure the switch and the choke
lever are in the proper positions. Then,
move the choke lever to the "Full
Choke" position and press the primer
bulb 6 times; pull the starter rope 2
more times. Move the choke lever to
"Half Choke" and pul! the starter rope
until the engine runs, but no more than
6 more pulis.
NOTE: If engine still has not started, it
is probably flooded. Proceed to "Starting a Flooded Engine."
• Allow the engine to run 10 seconds,
then move the choke lever to "Off
Choke." Allow the unit to run for 30
more seconds at "Off Choke," then
release the throttle trigger.
NOTE: If engine dies with choke lever
at the "Off Choke" position, move the
choke lever to "Half Choke" and pu!l
the rope until the engine runs.
STARTING A WARM ENGINE THAT
HAS NOT RUN OUT OF FUEL:
• Make sure switch is in ON position.
• Move choke lever to "Half Choke."
° Squeeze and hold the throttle trigger.
Keep throttle trigger fully squeezed
until the engine runs smoothly.
• Pull starter rope sharply until the engine runs, but no more than 5 pulls.
• Allow engine to run 10 seconds, then
move the choke lever to "Off Choke."
Release the throttle trigger.
NOTE: If engine has not started, pull
starter rope 5 more pulls. If engine still
does not run, it is probably flooded.
Proceed to "Starting a Flooded Engine."
BEFORE STARTING THE ENGINE:
• Fue!the engine.Then move 10 feet
(3 meters)away from the fueling site.
DANGER: The cutting blade will turn
when the engine starts.
WARNING: Avoid anycontactwith
the muffler.A hot muffler can causeseriousburns.
• Rest the uniton theground.Support
the unitso the blade isoff ofthe
groundand away fromtrees,
bushes, onlookers,etc.
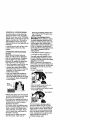
STARTING
POSITION
STARTING A COLD ENGINE, OR A
WARM ENGINE AFTER RUNNING
OUT OF FUEL:
• Make sure switch is in ON position.
• Slowly press the primer bulb 6 times.
• Move choke lever to "Full Choke."
ChokeLever
Full
Half
- Squeeze and hold the throttle trigger.
Keep throttle trigger fully squeezed
until the engine runs smoothly,
7
STARTING A FLOODED ENGINE:
blade has completely stopped turning, and disconnect the spark plug
before cleaning.
SETTING THE EDGING DEPTH
WARNING: Never attempt to adjust
the depth adjusting wheel when the
engine is running. Always release the
throttle trigger, wait until the blade
stops turning, move the On/Off switch
to the OFF position, and disconnect
spark plug before making adjustments.
"Youredger is equipped with two
edging depths:
• Half depth for shallow edging (1").
Flooded engines can be started by
placing the switch in the ON position
and the choke lever in the "Off Choke"
position; then, pull the rope to clear the
engine of excess fuel. This could require pulling the starter rope many
times depending on how badly the unit
is flooded.
If unit still doesn't start, call the 1-800
number listed on the front of this
manual.
OPERATING INSTRUCTIONS
EDGING
As you becomefamiliar withyour
edger,you willbe able to determine
yourownoperatingpace. Conditions
suchas depthof cutand material
beingcutwillregulatethe speed and
time required for youredgingjob.
• Allowthe engineto warm up for one
minute beforeyou beginedging.
• Increase the enginespeed before
placingthe btadein thecut. Forbest
operation,runthe engineat full
throttle whilecutting.
• Keep your edgingpath straightby
aligningthe blade guideribon the
rearof the blade guardwiththe edge
of thesidewalk. Keep all wheelsflat
on the walkway.
• Full depth for deep edging (2").
The depth used will depend on your
personal edging preference and the
condition of the area where the edging
operation is to be done.
NOTE: tf the area to be edged has
never been cut or several weeks have
passed since the last cut, the first edging should be done at no more than
half depth.
TO SET THE DEPTH
HALF DEPTH
Blade
Guide Rib
• Move the depth control lever rearward for half depth edging.
• Move the depth control lever forward
for fult depth edging,
• Always work going away from people
and solid objects such as walls, large
stones, trees, automobiles, etc.
• Be careful when edging near trees or
valuable plants. The high speed metal blade may cut roots and cause
damage to the plants.
• if the blade stalls, immedfately move
the unit rearward slightly to allow the
blade to restart. If the blade continues to stall, stop the engine, disconnect the spark plug, and inspect for
blockage or damage.
• Always keep the blade area clean.
Stop the engine, make sure the
FULL DEPTH
The front wheel is spr{ng loaded to
remove the blade from the cut when
the unit is not in use. When edging, the
trigger handle must be raised until the
unit bottoms out at the selected depth
level. The trigger handle must be held
in the raised position during the entire
edging operation to maintain a
consistent edging depth.
8
EDGING TIPS
• inspect unit before each use.
• Inspect area to be cut before each
use.
•
•
•
°
Keep unit in front of yourbody.
Cut at full throttle.
Keep wheelsin contactwith ground,
Always workgoingawayfrom others.
CUSTOMER RESPONSIBILITIES
CARE & MAINTENANCE
TASK
WHEN TO PERFORM
Before each use
Check for damaged.or worn parts
Before each use ...........
Check !or..Loose fasteners
.......
and pa_s..
clean unit and labels
After each use
Clean air filter
Every 5 hours of operation
.........
Check or replace blade
...............
"R'eplace spark PJUgl
......
I
yearly
GENERAL RECOMMENDATIONS
assure that engine stops, then restart your engine and continue.
The warranty on this unit does not cov• Fuel Tank- discontinue use of edger
er items that have been subjected to
if fuel tank shows signs of damage or
operator abuse or negligence. To releaks.
ceive full value from the warranty, the
° Blade Guard - Discontinue use of
operator must maintain unit as instructed in this manual.
unit if blade guard is damaged.
CHECK FOR LOOSE
Various adjustments will need to be
FASTENERS AND PARTS
made periodically to properly maintain
• Blade nut
your unit.
• Muffler
All adjustments in the "Service and Ad• Cylinder shield
justments" section of this manual
•
Clutch
should be checked at least once each
• Throttle trigger
season.
• Handle Screws
• Once each year, replace the spark
• Fasteners
plug, replace air filter element and
AFTER USE
check blade for wear. A new spark
CLEAN UNIT AND LABELS
plug and a dean/new air filter ele• Clean the unit using a damp cloth
ment assures proper air/fuel mixture
with a mild detergent.
and helps your engine run better and
last longer.
° Wipe off unit with a clean dry cloth.
• Follow the Care & Maintenance Task
EVERY 5 HOURS
schedule above,
CLEAN AIR FILTER
WARNING: Disconnect the spark
NOTE: A dirty air filter decreases the
plug before performing maintenance
life and performance of the engine and
except for carburetor adjustments.
increases fuel usage.
Clean the Air Filter:
Inspect the entire unit. replace damaged parts, check for fuel leaks and
• Always after 5 tanks of fuel or 5
make sure all fasteners are in place
hours of operation, whichever is less.
and securely fastened,
• More frequently in dusty conditions.
CAUTION: Do not clean the air filter
BEFORE EACH USE
with gasoline or other flammable solCHECK FOR DAMAGED OR
vent to avoid creating a fire hazard.
WORN PARTS
• Remove the two screws and the air
Refer replacement of damaged/worn
filter cover from the engine
parts to your Sears Service Center.
• Remove air filter.
° ON/OFF Switch - Ensure ON/OFF
• Wash filter in soap and water.
switch functions properly by moving
• Squeeze filter dry.
the switch to the OFF position and
• Add 4 or 5 drops of oil to the air filter.
9
Eyery
s hours
0f op i tion
NOTE: Do not soak air filter withoil
• Squeeze air filter to distribute theoil.
• Reinstallair filter in housing.
• Reinstallthe air filter cover.
tf replacingair filter,conL_ct
yourSears
Service Centerfor the properpart.
CAUTION' Make sure air filteris fitted
intothe cornersofthe housingto keep
dustfrom enteringengineand causing
enginedamage.
Air Filter
spect for flatness. Throw away a
blade thatis not fiat.
BLADE REPLACEMENT
CAUTION: Wear protective gloves
when handlingor performingmaintenance on the btade to avoidinjury.
• To removethe blade,inserta screwdriver intothe holein the gearbox;
then,removethe nut,washer,and
blade from the blade shaft.
Cover
Cover
Screws
[cupped (concave)
BLADE MAINTENANCE
WARNING: The blade willcontinueto
spin afterthe engine stops or afterthe
throttletriggerhas been released.Make
surethe blade hasstoppedcoasting
anddisconnect
the sparkplugbefore
performing
workon the blade.
Alwaysreplacea bladethat isbent,
warped,cracked,broken,or damagedin
anyotherway.Neverattemptto
straighten
and rousea damagedblade.
Useonlyspecifiedreplacement
blade.
Wear protectivegloveswhen handling
or performingmaintenance on the
blade to helpavoid injury.
Blade
• The Blade is reversible. When the
cutting edge on one side becomes
worn, turn the blade over.
• Check blade for flatness periodically.
Lay the blade on a fiat surface to in-
CARBURETOR ADJUSTMENTS
NOTE: Properly adjusting the carburetoris a complicatedtask. Read all
side toward b{ade]
• Align the fiat area of the blade opening with the flat side of the shaft.
Place the new blade on the shaft.
• Instal] washer, making sure to install
cupped (concave) side facing blade.
• Install nut counterclockwise on the
blade shaft.
• Bind the btade by inserting a screwdriver into the hole in the gearbox;
then, tightenthe nut with a wrench
until the washer is flattened firmly
against the blade.
YEARLY
REPLACE SPARK PLUG
The sparkplug should be repiaced
each year to ensure the engine starts
easier and runsbetter. Set sparkplug
gap at .025 in.
• TwistthenpulIoffthesparkplugboot.
• Removeand discardthe spark plug.
• Replace withChampion RCJ*8Y
spark plugand tightenwithwrench.
Spark
Plug
'__g
Boot
warnings and instructions thoroughly
before starting adjustments. If you do
not think that you completely under10
standallwarnings
andinstructions,
let
yourAuthorized
Service
Dealer
performtheseadjustments.
WARNING:
Serious injury to the operator and others can occur if the carburetor is not property adjusted. Keep
others away when making carburetor
adjustments. The blade shaft wil! be
spinning during most of this proc_'.__
Wear your protective equipment _:
observe all safety instructions.
Remove blade before making carburetor adjustments. Do not make adjustments from the blade side of the unit.
Hold the unit with your hand.
Recheck idle speed after each adjustment. The blade shaft must not turn at
idle speed to avoid serious injury to the
operator or others.
• Poor engine performance can be resuit of other causes such as dirty air
filter, carbon build-up on muffler outlets, etc. See "Troubleshooting
Chart" before proceeding with carburetor adjustments.
• For best results, it is recommended
that you have your Sears Service
Center make all carburetor adjustments. Your dealer has the training,
experience, and tools necessary to
properly adjust your unit to meet our
factory performance specifications.
This service is not covered by warranty. If it becomes necessary for
you to make carburetor adjustments
yourself, follow the described procedures very carefully.
• Very small adjustments can affect
engine performance, it is important
to turn the screw a very small
amount per adjustment and test performance before making further adjustments. Each adjustment should
be no more than the width of the slot
in the adjusting screw.
• This is a complicated task. Follow
instructions in sequence as indicated.
TROUBLESHOOTING
SUGGESTIONS
° Engine will not continue to run at idle
position. See "Idle Speed Adjustment" and "Low Speed Mixture Adjustment."
• Blade continues to spin when engine
idles. See "Idle Speed Adjustment."
• Engine dies or hesitates when it
should accelerate. See =Acceleration
Check."
• Loss of cutting power which cannot
be corrected by cleaning the air filter.
See "High Speed Mixture Adjustment."
• Engine will not run. See
"Troubleshooting Chart." Then, if the
carburetor requires adjustment, begin with "Basic carburetor Settings."
BASIC CARBURETOR SETrlNGS
NOTE: Usually, your engine can be
made to run properly with minor carburetor adjustments. Refer to
"Troubleshooting Suggestions" in the
left column for the condition you are
experiencing and follow the instructions. The basic carburetor settings are
provided below.
• Turn the low speed mixture screw
and the high speed mixture screw
fully counterclockwise. Do not attempt to turn screws beyond the stops
as damage can occur.
High Speed __
Low Speed
Screw _.
Screws with
LimiterCaps
H L
Idle Speed
Adjustment Screw
ADJUSTING
PROCEDURE
PREPARATION
• Use fresh fuel mix. See Fueling Your
Engine.
11
• Start the engine. Edge for 3 minutes
to warm the engine. The engine
must be at operating temperature before carburetor adjustments can be
performed correctly.
IDLE SPEED ADJUSTMENT
• Allow engine to idle.
• Adjust idle speed screw until the engine continues to run without stalling
and without the blade shaft moving,
•Tum screw clockwise to increase engine speed if the engine stallsor dies,
• Turn screw counterclockwise
to
slow engine down and/or to keep
blade shaft from turning.
o Follow instructions in "Acceleration
Check,"
• No further adjustments are necessary if blade shaft does not turn at
idle speed and if performance is satis factory,
ACCELERATION
CHECK
,' Allow engine to idle.
• Squeeze throttle trigger fully.
• if performanceissatisfactory,proceed
to "Low Speed Mixture Adjustment."
• If the engine does not accelerate
smoothly, turn the low speed mixture
screw counterclockwise a small
amount (no more than the width of
the slot in the adjusting screw). Repeat step until smooth acceleration
is obtained. Do not attempt to turn
the screws beyond the stops as
damage can occur.
NOTE: It may be necessary to repeat
"Idle Speed Adjustment" through "Acceleration Check" to obtain correct adjustments.
LOW SPEED MIXTURE
ADJUSTMENT
• Allow engine to idle.
• Turn the low speed mixture screw
slowly clockwise until the speed
starts to drop. Do not attempt to turn
the screws beyond the stops as
damage can occur.
Prepare unit for storage at the end of
the season or if it wilt not be used for
30 days or more.
WARNING:
• Turn low speed mixture screw counterclockwise until the speed increases and then starts to drop
again. Do not attempt to turn the
screws beyond the stops as damage
can occur.
= Set low speed mixture screw at the
midpoint between the two positions.
• Readjust idle speed (see Idle Speed
Adjustment).
HIGH SPEED MIXTURE
ADJUSTMENT
CAUTION: Do not operate engine at
full throttle for prolonged periods while
making high speed adjustments as
damage to the engine can occur.
• Support the unit so the blade will not
make contact with any object, Do not
make adjustments from the blade
side of the unit.
° Allow the engine to idle, then
squeeze the throttle trigger fully.
NOTE= Perform the next two steps at
full throttle.
• Turn high speed mixture screw very
slowly counterclockwise until it stops.
Do not attempt to turn screws beyond
the stops as damage can occur.
° Turn the screw the minimum amount
clockwise until the engine runs
smoothly. Do not attempt to turn
screws beyond the stops as damage
can occur.
• If the engine accelerates and runs
smoothly, no further adjustments are
necessary.
• Recheck and follow steps in "Acceleration Check."
CAUTION: If the engine does not operate according to these instructions
after repeating the adjusting steps, do
not use the unit. Take it to your Sears
Service Center.
IGNITION TIMING
Ignitiontimingis fixed, nonadjustable.
• Allow the engine to cool, and secure
unit before storing or transporting.
• Store unit and fuel in an area where
fuel vapors cannot reach sparks or
12
openflames
fromwater
heaters,
elec- gasohol or oxygenated fuel), can attricmotors
orswitches,
furnaces,
etc. tract moisture and form acidic gas
which will damage your engine. To
• Storeunitwithallguards
inplace.
Position
unitsothatanysharpobject avoid engine problems, the fuel system should be emptied before storage
cannot
accidentally
causeinjury.
• Storeunitwelloutofthereach
of
for 30 days or longer.
children.
Fuel stabilizer is an acceptable alter• Wearprotective
gloves
whenhandling native in minimizing the formation of
blade.
Thebladeissharp
andcancut fuel gum deposits during storage. Add
youevenwhenitisnotmoving.
stabilizer to the gasoline in the fuel
EDGER STORAGE
• Clean the entire unit.
• Clean air filter (see instructions).
CAUTION: Wear protective gloves
when handling the blade. The blade is
sharp and can cut you even when it is
not moving.
• Inspect the guard area and clean
any dirt, grass, leaves, or debris that
has collected. Inspect the blade and
blade guard; replace a blade that is
bent, warped, cracked, broken, or
damaged in any other way.
• Lightly oil external metal surfaces.
• Apply a coating of oil to the entire
surface of the blade; wrap it in heavy
paper or cloth.
• Be sure all handles and guards are
in place and are securely fastened.
Replace any damaged parts.
• Check entire unit for loose screws,
nuts, and bolts. Replace any damaged, worn, or broken parts.
• Do not cover with plastic. Plastic
cannot breathe and will induce condensation and eventual rust or corrosion.
FUEL SYSTEM
Never use engine or carburetor cleaner products in the fue! tank or permanent damage may occur to fuel system
components. Follow these instructions.
• Drain the fuel from the unit into an
approved fuel container.
• Drain the fuel lines and carburetor by
starting the engine and letting it run
until it stops.
• Allow engine to cool before storage.
IMPORTANT: It is important to prevent
gum deposits from forming in essential
fuel system parts such as the carburetor, fuel filter, fuel hose, or tank during
storage. Also, experience indicates
that alcohol blended fuels, those that
use ethanol or methanol (called
tank or fuel storage container. Always
follow the mix instructions found on
stabilizer containers. Run engine at
least 5 minutes after adding stabilizer
to allow the stabilizer to reach the cap
buretor.
CRAFTSMAN 40:1 2-cycle engine oil
(AIR COOLED) is blended with fuel stabilizer, if you do not use this Sears oil,
you can add a fuel stabilizer (such as
Craftsman No. 33500) to you fuel tank.
INTERNAL
ENGINE
• Remove spark plug and pour I teaspoon of 40:1 2-cycle engine oil (AIR
COOLED) through the spark plug
opening. Slowly pull the starter rope
8 to t0 times to distribute oil to inner
engine surfaces.
• Replace spark plug with a new one of
recommended type and heat range.
• Clean air filter. Refer to Customer
Responsibilities.
• Re-insta!l all covers and hardware
removed for access; tighten all
screws and fasteners.
• Check entire unit for loose screws,
nuts, and bolts. Replace any damaged, broken, or worn parts.
• User fresh fuel next season.
OTHER
• Do not store gasoline from one season to another.
° Replace your gasoline can if your
can starts to rust. Rust and/or dirt in
your fuel system wilt cause problems.
° Store your unit in a well ventilated
area and covered, if possible, to prevent dust and dirt accumulation. Do
not cover with plastic. Plastic cannot
breathe and wilt induce condensation and eventual rust or corrosion.
IMPORTANT: Never cover unit while
engine and exhaust areas are still
warm.
13
TROUBLESHOOTING
SYMPTOM
Engine will
not start or
will run only
! for a few
seconds after starting.
CHART
CAUSE
1.Fuel tank empty,
2. Engineflooded,
3.Spark plug not firing.
4, Fuel not reaching carburetor.
5. Carburetor requires adjustment.
6.None of the above.
I REMEDY
I.Filltankwithcorrectfuel mixture
2.See "Starting Instructions."
3. Install newplug/checkignition
system,
4.Replacefuel filter;Inspect fuel line.
5.See"Carburetor Adjustments."
6.Contactyour Sears Service Center.
Engine will
notidle
properly
1,Carburetor requires adjustment. 1.See "Carburetor Adjustments."
2, Other.
2. Contact your Sears Service Center.
Enginewitl
not accelerate, lacks
_ower,oldies
undera load
1.Air filter dirty.
..................
t,Clean or replaceair filter.
2.Spark plugfouled.
2. Replacesparkplug.
3.Carburetorrequiresadjustment. 3.See "Carburetor Adjustments."
4.Muffleroutletsplugged.
4.Contact yourSearsServiceCenter.
5,None ofthe above,
5. ContactyourSearsServiceCenter.
Engine
smokes
excessively
1.Air filter dirty.
1.Clean or replaceair filter.
2, Fuelmixture incorrect.
2. Refuelwithcorrectfuel mixture,
3.Carburetorrequiresadjustment, 3.See "Carburetor Adjustments."
Engine
runshot
1.Fuel mixture incorrect.
I. See "Fueling YourUnit."
2.Carburetorrequiresadjustment. 2.See "Carburetor Adjustments."
3.Sparkptugincorrect,
3.Replace withcorrect plug,
4.None of the above.
4.Contactyour SearsServiceCenter.
Blade turns
at idle speed
1.Carburetorrequires adjustment. 1.See "Carburetor Adjus_ents'"
2.Throttle cable binding.
2. Replace or repair throttle cable.
3.Clutch requires repair,
3.Contact your Sears Service Center,
Bladestops
undera load
or does not
turn when
engine is
accelerated
1,Blade not engaged.
1.Check gearbox.
2. Carburetor requires adjustments. 2.See "Carburetor Adjustments."
3.Clutch requires repair.
3.Contact your Sears Service Center,
14