1
Pinnacle Studio Plus 11 Video Editing Software
Reviewed by Tony Hawes
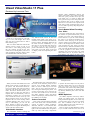
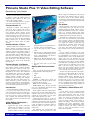
detection appear as thumbnails at the top left
and centre of the Album screen; top right is
the preview screen of the currently running
clip and below is the Storyboard showing clips
you’ve dragged down from the imported clips
at the top.
At last I’ve had a chance to review Pinnacle Studio 11 Plus, the middle edition of
Pinnacle’s latest editions of their well
known video editing program.
Its worth reminding ourselves of what’s
new in the Pinnacle Studio 11 line-up.
The Album
Pinnacle Studio 11
Designed to simplify video editing for
entry level users or those who want to
move beyond the capabilities of free solutions, Pinnacle Studio contains several
automated and time-saving features that let
customers archive their video memories or
create entertaining movies in a few easy
steps. The new one-click Web publishing
feature enables users to quickly publish
their videos to Yahoo! Video for public
viewing.
Pinnacle Studio 11 Plus
Pinnacle Studio Plus includes all of the
intuitive features of Pinnacle Studio, and
adds a host of advanced editing, effects and
authoring options. The extensive range of
features includes a complete HD workflow,
with native HDV and AVCHD editing, and
HD DVD disc burning. Users can burn
discs on a standard DVD burner using standard DVD discs, and depending on the
format, can play them on the latest HD
DVD players.
Pinnacle Studio 11 Ultimate
New to the Pinnacle Studio family, Pinnacle Studio Ultimate combines Pinnacle
Studio Plus with a selection of fully integrated professional audio and video tools.
Designed for the serious video enthusiasts
who demand more control over the quality
and look of their video creations, Pinnacle
Studio Ultimate includes BIAS Inc.’s
SoundSoap audio cleaning tools, dramatic
lighting and ‘film look’ effects from ProDAD VitaScene, precision Panning and
Zooming with StageTools MovingPicture,
and a Chroma Key green screen backdrop
for easy-to-achieve professional results.
Introduction
I looked at Pinnacle’s Studio 10 last year
so I won’t go too deeply into the ins and
outs of video editing (except superficially),
but concentrate on what's new and show
how easy it can be to create a simple home
vide, complete with transitions, titles and
music using solely the tools that come with
the program.
Video Editing Techniques —
What’s Involved?
1. Capture the video. From a camcorder
(digital video or analogue), via a FireWire connection, which is the most
common method. Or from a non-copy
ROM August — September 2007
2.
3.
4.
5.
protected DVD, an external hard drive.,
or from a video on your hard disk.
Convert the video to a DVD / MPEG
video.
Edit the video by adding and arranging
clips, trimming and rearranging as necessary. Add transitions, still pictures,
sounds and DVD menus.
Make Movie: Burn the authored video,
usually directly after authoring in step
3.
Play the burnt video on your DVD
Player.
Editing With Pinnacle Studio
11
Once you open the program the interface
is simple with three tabs along the top:
1. Capture
2. Edit
3. Make Movie.
‘Capture’ is simple and is where you
import your video footage from DV camera, DVD or file for editing.
‘Edit’ accesses the editing screen
‘Make Movie’ tab is the last and used
once you’ve finished the edit and are ready
to burn your project to DVD.
In the Capture mode when importing DV
footage from your DV camera Studio automatically looks for the breaks where you
pressed the record button on your video
camera when shooting your video.
If importing from a DVD or a video on
your hard disk scene detection allows your
computer to automatically split the footage
into individual scenes based on changes in
colour or brightness in adjacent frames to
determine where to split the video into
usable clips.
The imported clips which Studio has
automatically split using camera or scene
Having imported your footage you’re ready
to start editing your work. You can see your
imported clips in the Album, either as a storyboard with thumbnails of each clip, or alternatively as a ‘timeline showing clips, audio
tracks, either the original imported audio track
or added audio such as narration, music etc.
The Album also contains the tools for transitions, titles, and menu-effects. The Album
isn’t a true bin or library, like those found in
some programs that saves the imported assets
in a project file, Studio’s project file only
records the file locations of the assets used
and accesses these as necessary to compile
your video. The Album simply displays the
files available in the currently selected directory.
For my example I imported a very small
two-minute long video, containing ten clips of
my grandchildren shot around my pool and
selected Studio 11 Plus’s Create Smart Movie
option. This sorts your imported clips into
random order or you can leave it in its original
chronological order. Having selected random
order this then re-arranged and split my ten
original clips into 38 individual clips, it then
adds a title and closing credits (you can
choose you own wording), suggests you add
music from the ScoreFitter menu and once
you’ve done this you can create your movie.
Overall I was quite impressed. From importing clips to an edited Smart Movie took minutes. However, the final result can be outstanding or rather ‘cheesy’, depending on your
point of view. For a quick video this feature is
excellent, but as soon as you have a longer
and more comprehensive video project to edit,
such as a wedding, family outing, holiday trip
etc. the traditional (and longer) method of
editing would be my choice.
Transitions, Video Effects & Titles
As with earlier versions of Studio, Studio
comes with a wide variety of transitions (the
effects placed between video clips to help
smooth the transition from one scene to another). Two classes of video effects: curative
effects, to fix underlying problems with the
video and artistic effects, which modify or
enhance the footage. Curative filters include
brightness and colour adjustments, while
among the many artistic enhancements are the
options to convert your video to black and
white, or sepia and slow-motion or fastmotion effects and more.
(Continued on page 12)
Page 11