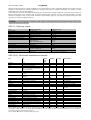
1
FROG
manual
riese und müller GmbH
Haasstraße 6
64293 Darmstadt
Germany
phone: 0049 6151 366 86 0
fax: 0049 6151 366 86 20
email: [email protected]
riese und müller GmbH
Frog Manual
PAGE 0
Dear customer,
Congratulations on the purchase of your Frog. riese und müller is building light and easy riding full suspension bikes.
You’ve joined the folding revolution – full suspension, easy-riding and extremely light. Your Frog comprises a selection of
thoroughly-developed and manufactured components chosen with care. Your specialist dealer will have completed final assembly
and will have performed a final functional test, so that you can pedal away happily from the very first foot.
In this manual we’ve gathered together plenty of tips about using your bike, along with valuable information about cycle
technology, care and maintenance.
If you have any questions after reading this manual just contact your dealer or directly us.
Your riese und müller team.
PAGE 1, Contents
2
4
5
6
8
9
10
11
16
17
18
19
20
21
24
26
28
28
32
33
34
36
39
41
42
44
About this manual
Before the first journey
Before every journey
How to fold the Frog
How to unfold the Frog
Transporting the Birdy
Legal requirements for street use
Fitting the Frog to the rider
Adjusting the suspension
How to use a quick-release?
Front stem hinge tension adjuster
Rear swing-arm catch
Front swing-arm catch
Braking system
Hub gears on the Frog
Wheels and tyres
Wheel attachments with axle nuts
Fixing a puncture
Steering or headset bearings
Suspension pivot bearings
Lighting system
General care and inspection tips
Warranty
Recommended tightening torques
Service and maintenance interval planner
Documents, service record and the Bicycle Passport
(all page numbers refer to the German language version)
Danger: In this manual we collected many tightening torques in Nm. Never trust only your feeling: “thightened”not equals
“tightened”. ONLY a torque wrench guarantees exact tightening torques. So please always use this tool if there are any tightening
torques named in this manual. Wrong tightened bolts could lead to misfunction, failure or accidents.
PAGE 1, Contents
riese und müller bikes take advantage of unusually innovative technology, so even if you’re an ‘old hand’ who has been riding
bikes for a lifetime, do read and observe the following tips carefully before you first use the bike. So that every ride is a
pleasure, and for your own safety, the quick check procedure should be performed before every ride. You can read how to do
this check on page 5 of this booklet.
Danger: Do not ride if the bike doesn’t pass the check 100%!
There are a whole series of maintenance and assembly procedures described in this manual. If you carry out any of these, you must
always remember that the instructions apply only to the Frog and not to any other bike.
It’s also possible that because of the wide range of models, and regular model changes, that the instructions are not entirely
complete.
riese und müller GmbH
Frog Manual
Also consider that the explanations may, depending on your level of experience and mechanical aptitude, be insufficient, and may
also require special tools and knowledge of common (not described here) mechanical operations.
Warning: This manual containts assembly and maintenance work that may be necessary before the service interval (see page 4243).In the interests of your own safety, don’t go beyond your limits. If you are in any doubt consult your dealer!,
PAGE 2
To conclude this introduction, a few things important for any cyclist. In traffic, always ride with full attention, so that you do not
endanger yourself or others. Observe traffic laws and regulations, so that you don’t attract the anger of other road users. Respect
nature when you’re riding in the countryside. Ride only on marked and surfaced roads. Observe any laws and regulations for the
use of bicycles off-road – including regional or local bye-laws. Never ride without a helmet, and always ride in suitable cycling
clothing.
We hope you have great fun on your new Frog!
First, we’ll tell you about the parts of your Frog. Fold the front cover flap of this brochure out. Here you’ll find a Frog with all of
the relevant parts clearly shown.
Tip: Unfold the front cover foldout. It’ll make everything clearer!
In this manual we tried to explain all relevant work to keep you happy with your new Frog. Please watch the following signs:
Attention: Here you find information about how to use your bike.
Danger: This sign means danger for your life and health if you do not follow the instructions. Please read the manual for your
own safety.
Tip: These signs give you hints and useful informations.
PAGE 4, Before the first ride
1.
2.
3.
4.
5.
Load capacity
The Frog is designed for a maximum rider height of around 1.95m (6’ 5“) – depending on leg length – and for a maximum
loading (rider weight and luggage weight) of 100kg (225lbs).
Use the Frog only on streets and surfaced roads
We can take no responsibility for the consequences of inappropriate use, assembly errors, accidents, racing, jumping or
similar activities.
Are you confident using the brakes?
Check whether the front brake is operated with the lever you usually use. If this isn’t the case, you should get used to the
arrangement thoroughly, as an unintended application of the front brake can lead to a fall. Alternatively, let your dealer reassemble the brakes the other way round. Modern brakes are much more powerful than old ones! Take care! In any case,
before you take to the streets, test your brakes and get familiar with them away from the traffic! You can read more about
the braking system on pages 21-23.
Are you confident that you know how to change gear, and how the gears work?
Ensure that you’re familiar with the gears somewhere where there’s no traffic. You can read more about gearing systems on
pages 24-25.
Are saddle and handlebars correctly adjusted?
The saddle should be adjusted so that with the pedal in its lowest position, you can just reach it with your heel. Check that
you can stay in the saddle and still reach the ground with your tiptoes. Your dealer will be able to help you if you’re not
happy with your saddle position. You can read more about seating position on pages 11-15.
riese und müller GmbH
Frog Manual
PAGE 5, Before every journey you must check the following points:
·
·
Are the quick-releases and nuts on front and rear wheels, on the height-adjustment on the stem and on the seatpost clamp
all correctly fastened? Read more on pages 17, 28-31 and 11-13 of this manual.
Is the tension lever on the stem hinge closed correctly? More information on page 18. Are both hinge bolts for the stem
hinge present, and secured with spring-clips? Is the upper part of the handlebar stem locked by its pin (see arrow)?
Danger: Never grease the adjustable stem at the heigt adjustment area. Grease could reduce the fixation of the stem and could
lead to accidents.
·
Are the rear swing-arm catch and the front swing-arm catch both correctly engaged? More about this on pages 19-20.
Danger: If quick-releases and securing nuts are not correctly fastened, parts of the bike could come loose. This could result in a
dangerous fall!
·
·
·
Are the tyres in good condition, do they run round and are they at the correct pressure? More on this topic on pages 26-27.
Perform a stationary brake test by pulling the levers hard towards the handlebar. The brake blocks should press with their
full area against the rims, without touching the tyre. You should not be able to pull the lever right up to the handlebar!
Further tips on braking on pages 21-23.
Does the light illuminate properly? More on lighting on pages 34-35.
Danger: Do not ride the bike if your bike fails any of these checks! In case of doubt, always consult your dealer. A defective bike
can lead to serious accidents!
·
As you ride, always listen out for unusual rattling noises or unusual handling – these could indicate a problem. If this occurs,
check bearings, pivots, all fastenings and parts of the folding mechanism.
PAGE 6, How to fold the Frog
With a little practice you can easily fold the Frog in a short time. Please note the following rules:
·
·
·
·
·
·
·
·
·
Fold the kickstand.
Ensure the right-hand pedal points upwards (the crank should be in line with the seatpost).
Now undo the upper seatpost quick-release, press the pin and push the saddle down as far as it will go (1). Close the quickrelease again.
Lift the bike a little by the saddle and open the rear swing-arm catch with a light pull outwards (2).
Now fold the rear swing-arm forwards and hold it with your right hand at the rear wheel (3). Open the quick release of the
segment clamp and pull down the complete seatpost (4).
Close the quick release ofthe segment clamp again.
Hold the Frog with one hand at the main tube.
Press the front swing-arm catch with the other hand, so that it releases the spring from the fork (5). Fold the front swing-arm
right under until the front wheel rests to the right side of the main frame tube (6).
To minimize the folding dimensions it may be useful to rotate the front wheel until the shifter cable roll is situated between
the spokes.
PAGE 7
·
·
·
·
Now, open the stem hinge lever (7) and fold the handlebars down (8).
To minimize the folding dimensions you additionally can fold the pedals and push down the handlebar.
Folding pedals: push the pedal towards the crank and fold it (9).
Push down the handlebar: open the height-adjustment quick-release, press the pin (see page 5) and push down the stem.
PAGE 8, How to unfold the Frog
Make your Frog ready to ride by following this procedure:
·
·
·
Fold the stem and handlebars up and close the hinge lever. Take care for correct position of foling hinge cone (see picture 7
at page 7).
Unfold the front wheel and make sure that the front spring audibly engages in the front swing-arm catch (see picture 5 at
page 6).
Now open the segment clamp quick-release. Pull out the seatpost until the correct height (see scale at seatpost). Hold the
rear swingarm at the same time to prevent that it unfolds unintended (see picture 3 at page 6).
riese und müller GmbH
·
·
·
·
·
Frog Manual
Unfold the rear swingarm and engage the rear swing-arm catch (see picture 2 at page 6).
Turn the saddle so it is in line with the bike and close the quick release of the segment clamp. Open the upper quick release
and pull out the saddle until the pin engages in the hole of the lower seatpost. Close the quick release again (see picture 1 at
page 6).
Unfold the pedals.
Before riding check all pins and quick releases.
Finished!
PAGE 9, Transporting your Frog
Folded up, your Frog is easily transported in the boot of a car, and also on trains, buses, aeroplanes or on ferries.
Train travel
Some train services require that your Frog is covered up in a bag, especially if it is carried on as normal luggage, rather than
placed in the luggage van or special storage area.
The protective cover slides over the Frog in one easy motion, and is closed at the bottom with a pull on the drawcord. The cover is
made from tear-resistant nylon. Like a poncho, it can fold up very small into its integrated mesh pouch, and can then be fastened
to the bike.
PAGE 10, Legal Requirements
When you ride your bike on the road, it must comply with national legislation and guidelines. These will vary from country to
country. In general, there are minimum standards for brakes, reflectors and lighting systems, as well as usually a general duty to
ensure that your vehicle is in roadworthy and safe condition. There will also be a duty to ride in a safe and responsible manner. If
you ride your Birdy in traffic you should be sure to observe all relevant laws and regulations which apply. Please ask your local
dealer for current law information.
Brakes
In most countries, including Germany and the UK, two independent braking systems are required. Do not ride with only one brake
working!
Lights
Bicycle lighting systems need to comply with the relevant national standards: in Britain this is the relevant British Standard.
Lights complying with this will have the BS symbol moulded or printed onto each light unit. In Britain both dynamo and battery
lights are permitted. The front light must be white and the rear light must be red.
PAGE 11, Fitting the Frog to the rider
How can I check my seating position?
A good riding position is important for your comfort and for optimal performance on the bike. You need to adjust saddle and
handlebars as precisely as possible to fit. Several components on the Frog are designed to adjust the fit to suit your body
dimensions. These include the seatpost, the stem assembly and the brake levers.
Danger: All of the procedures we are about to describe require a certain degree of skill, suitable tools and mechanical aptitude.
After any assembly operation perform the Quick Check (see page 5) and take a short test-ride somewhere quiet, away from traffic.
This lets you check in safety that everything works properly. If you have any doubts, it’s best just to do the riding position check, and
then to explain any changes you’d like to your specialist dealer. They can carry out your requests with all the proper tools and skills,
perhaps in conjunction with the first inspection.
Tip: To prevent corrosion at bolts, nuts and special parts we recommend to apply wax spray to all of them. Take care not to
contaminate brake pads and rims.
Adjusting for the correct saddle height
The need for a comfortable pedalling action determines the saddle height. It’s important that when you pedal, the ball of the foot
should be over the centre of the pedal axle. When the pedal is at its lowest position your leg should not be quite fully extended. If
the saddle is too high, it’s hard to get round this lowest point, and the pedalling action becomes uneven. If the saddle is too low,
you’re likely to experience knee pain.
riese und müller GmbH
Frog Manual
PAGE 12
Check the seat height using the following simple procedure. Use shoes with a flat sole for this check:
·
Pull out the upper seatpost until the pin engages in the hole and close the quick release.
·
Sit on the saddle and put your heel on the pedal, so that it moves to its lowest position. In this position the leg should be
fully extended. Note that the hips should stay straight and level. To adjust the seat height, you need to undo the quickrelease of the segment clamp (please read page 17 first).
·
Do not pull the seatpost out beyond the marking on the tube surface.
·
The loosened seatpost can now be adjusted for height. Make sure that the seatpost isn’t greased. If it doesn’t slide smoothly
in the frame, clean out and remove all grease from inside the frame and on the seatpost. If you have further problems,
consult your dealer. In no event use force to move the seatpost.
·
Set the saddle straight, by lining up the saddle nose either with the bottom bracket or the main frame tube.
·
Re-fasten the quick-release.
·
Check that the seatpost is securely fixed by grasping the front and rear of the saddle and attempting to twist it. If it doesn’t
move at all, it’s secure.
·
Does the leg extension seem correct when you repeat the test? Check it by moving your foot to the ideal pedalling position,
with the ball of the foot above the pedal axle. The knee should now be slightly bent – if this is so, you’ve reached the correct
saddle height.
·
Check that you can stay in the saddle and still reach the ground with your tiptoes. If this isn’t the case, put the saddle a
little lower.
·
Remember the scale at the seatpost. After unfolding the Frog later on, you immediately know the correct position.
PAGE 13
Danger: Do not ride if the seatpost is withdrawn beyond the ‘MINIMUM INSERTION’ mark! The Frog seatpost is not designed for
the assembly of carriers or panier bags. This could lead to overload and failure of the seatpost.
Adjusting the handlebars
You can adjust the height of the handlebar stem by undoing the quick-release and pushing the pin.
·
Check that everything is secure on the stem, by holding the front wheel between your legs and attempting to twist the
handlebars with your hands. If it doesn’t turn, it’s secure.
Danger: Do not ride if the quick release of the handlebar stem is not closed or if the pin did not engagein one of the holes. Never
undo the quick release during riding the bike.
Adjusting reach and setting the saddle angle
The distance between the handlebar grips and the saddle (reach), and the angle of the saddle, are important factors when it
comes to how much you’re leaning forwards, and hence for your riding comfort and performance.
The reach can be adjusted over a short distance using the saddle rails, by sliding the saddle forwards or back on the seatpost
clamp. This will also affect pedalling: if the saddle is right back, you’ll be pedalling more ‘from behind’, and vice versa.
The geometry of the Frog was designed so that for normal use, the saddle is positioned as far forwards as possible. This
minimises folded size.
The saddle should in general be set dead level.
·
Undo both seatpost clamp bolts, turning each of them at most two or three turns anticlockwise. No more, or the whole
assembly can fall apart.
·
Move the saddle forwards or backwards as required. Often a sharp slap to the saddle is needed. Re-tighten the bolts, turning
them clockwise.
·
Depending on which of the bolts is done up first, the saddle angle may change. Observe the recommended tightening torque
of 9-12 Nm for the bolts.
PAGE 14
·
When you’ve tightened everything, check whether the saddle tilts, by pushing alternately on the front and back.
Danger: When you change saddles, check that the saddle rails are designed for a 7mm clamp. Other types of saddle rail may
cause failure of the seat clamp and a nasty accident.
Adjusting the reach of the brake levers
The distance between brake levers and handlebar grips is adjustable. The levers can be brought closer to the bars, making them
easier to use for riders with small hands. The lever position where the brakes start to ‘bite’ also needs to be adjusted for finger
length.
riese und müller GmbH
·
·
·
Frog Manual
Check when the brake blocks hit the rim. If this ‘bite point’ comes after just a short movement of the levers, you’ll have to
adjust the cable if you want to adjust lever reach (see page 23). Otherwise, the brakes may rub on the rims after the reach
adjustment. If, however, the brakes only bite after the levers are halfway to the bars, you have some ‘play’ with which to
adjust lever reach.
There’s a small adjuster screw just near where the cable goes into the lever housing (see arrow on diagram). Screw this
adjuster in, and observe how the lever position changes.
When you’ve reached the desired position, you must check that there’s still enough available motion so that there’s a little
lever movement before the brakes ‘bite’.
Danger: You shouldn’t be able to pull the levers all the way to the handlebar! Maximum braking power should be reached before
this!
Adjusting angle of handlebars, bar ends and brake levers
The handlebars ends on the Frog bend at a slight angle. Adjust the handlebars so that your wrist joints and hands are relaxed and
are not too sharply angled outwards. To adjust the handlebar position by turning the handlebar:
·
Open the hex bolt on the front of the stem.
·
Turn the handlebar until it reaches the desired position.
·
Check that the stem clamp is exactly in the middle of the handlebars.
·
Re-tighten the hex bolt with a torque of 12-14Nm.
Once you’ve adjusted the handlebar angle, you need to adjust the brake lever position.
·
Loosen the hex-key bolt on the lever housing clamps.
·
Turn the lever on the handlebar. Sit on the saddle and grip the levers with your fingers. Check that your hand makes a
straight line with your forearm.
·
Re-tighten the bolts and check that the brake lever housings don’t twist!
Danger:
Always be sure that securing bolts on stem, handlebars, bar ends and brakes are tightened with the appropriate
tightening torque. The appropriate values are listed on page 41. Otherwise, it’s possible that parts may come loose or break. This can
lead to serious accidents.
PAGE 16, Adjusting the suspension
Changing the rear elastomer
The Frog is fitted as standard with a red elastomer, which is suitable for a very wide range of conditions. It can, however,
sometimes make sense to fine-tune the riding qualities to your personal taste by changing the rear elastomer to reflect your
particular weight, riding style and the state of your local roads. A softer yellow elastomer and a harder, green one are available. To
change it over, move the rear swing-arm clear and pull the elastomer off with your hand. The following table may help you select
the correct elastomer. Please note that elastomers get ‘harder’ at low temperatures. It could therefore be a good idea to change to
a ‘softer’ elastomer in winter.
(graph head: Choice of rear elastomer)
(graph columns: Comfort, All-round, Sporty)
Changing the front elastomer
The front elastomer can also be exchanged for a harder version. The standard version is hollow, while the harder version is solid.
The elastomer can be pushed out of the spring with a screwdriver.
PAGE 17, How do I use a quick-release?
Quick-releases hold both seatposts and the height-adjustable stem in position.
Danger: an incompletely or improperly closed quick-release can result in parts coming loose, and hence in a crash, possibly
resulting in serious injury!
A quick-release consists of two basic parts:
·
The lever on one side of the hub – this provides the clamping force.
·
The adjusting nut on the other side: by adjusting this on the screw thread, the clamping tension can be adjusted.
·
Open the quick-release. The inscription ‘Open’ should be visible on the lever.
·
To close the quick-release, move the lever inverse. At the start of the lever’s motion, for, say, half of its movement, the lever
should move very easily, without any clamping action.
·
In the second half of the lever’s movement, the force on the lever should rise considerably. At the end, it should be hard to
move. Use the ball of your hand. In its final position the lever should lie parallel with the bike, and should not stick out to
one side.
·
Check the security of the lever by attempting to twist the lever. Press on the end of the lever from above.
riese und müller GmbH
·
·
·
Frog Manual
If the lever can be made to pivot around in a circle, you can’t guarantee that the seatpost, wheels or stem height-adjustment
is secure. You must re-open the quick-release and increase the clamping tension. Do this by screwing the adjusting nut on
the other end of the quick-release half a turn clockwise.
Repeat the closing procedure and check that the lever is secure. If the lever can’t be rotated, it’s clamping properly.
Like all other clamping parts follow the rule: as few clamping force as possible, as much as necessary. To high clamping forces
could lead to damage .
Tip: Components secured by quick-release are more susceptible to theft. Secure your wheels and if necessary saddle with an extra
lock, if you’re leaving your Frog unattended.
PAGE 18, Stem hinge lever adjustment
How do I use the lever on the stem hinge?
When it’s closed, the lever of the stem closure mechanism should point straight up. You should be able to close the lever without
great force, and when it’s closed, there should be no play in the hinge. If this isn’t the case, the closure mechanism needs
adjusting. The lever shouldn’t be adjusted too tight, either: this can bend the closing lever and will lead to play when the joint is
closed. A technically-minded person can adjust the hinge mechanism as follows:
1. Close the hinge and undo locknut A
2. Undo 2.5mm hex bolt B
3. Open the hinge
4. The mechanism is adjusted by turning the tension rod C. Turning clockwise makes it stiffer, anticlockwise makes it softer.
Because locknut A is self-locking, the tension rod can be rotated by turning the locknut. The tension rod C is also fitted with
a 4mm hex socket, which can be used for adjustment.
5. Close the hinge
6. Close the 2.5mm hex bolt B gently (1 Nm torque)
7. Do up the locknut A gently (3-4 Nm torque), holding the tension rod C in place with the 4mm hex key.
PAGE 19, The rear swing-arm catch
The rear swing-arm is attached to the frame when it’s unfolded with a black plastic catch. You should adjust the position of this
catch so that it engages automatically when you unfold the Frog, and so that there’s no play.
To adjust it, you must loosen the locknut (arrowed on the diagram) inside the rear swing-arm beam. The catch can then be pushed
inwards or outwards. Finally, re-tighten the locknut with a torque of 4-6Nm.
The M6 x 12 bolt is secured into the main frame with threadlock adhesive. The bolt should be screwed in just far enough that
when the catch is engages, it’s under slight tension inwards.
If the tension is no longer sufficient for the catch to engage, you need to pre-tension the catch: fold the rear swing-arm slightly
forwards, remove the elastomer and bend the plastic catch firmly inwards for a few seconds.
PAGE 20, The front swing-arm catch
When you unfold the Frog the front suspension spring engages in the front swing-arm catch. This catch consists of a metal hook,
which pivots on a shaft mounted on the fork crown, and it’s kept in tension with a small spring. If this hook doesn’t move or if it
is not being pulled back properly by the spring, the two fork clamping bolts may be done up too tightly, or the spring may have
failed. In this case, please ask your dealer to help. The hook should engage in the last turn of the spring and should fix it in
position. To fold, press down on the suspension catch: this moves the hook clear of the spring.
The plastic cap on which the end of the spring rests is fixed in place with an asymmetrically-placed Allen bolt. The cap should be
fixed so that it is central with the fork. The fixing bolt should be tightened to 3-4 Nm.
If the catch hook doesn’t engage cleanly in the first turn of the spring, the spring must be rotated. Loosen the fastening at the
bottom of the spring with a long 5mm hex key, which you should insert from the free end of the spring. Only turn the spring far
enough to ensure that the top turn of the spring ends in the seven-o-clock position, and engages the catch hook without play.
The spring must be carefully lined up with the black plastic cap so that it slides easily onto the cap and engages with the catch.
Finally re-fix the spring in place with a tightening torque of 6-8 Nm.
If the fork spring doesn’t engage play-free, both the spring position and that of the black plastic cap can be adjusted. Exact
adjustment can require some experience, and any problems should be referred to your Frog dealer.
PAGE 21, Brakes
The Frog is equipped with particularly powerful brakes. Braking distance is, however, very much determined by the rider’s skill, and
can be improved with practice. Weight is transferred from the rear to the front when you brake, and loading on the rear wheel
reduces. This is why braking distance is determined first by the tendency of the bike to flip you over the bars, and only as a
second order effect by the limits of adhesion of the tyre. This problem becomes particularly acute when descending steeply. If you
use full braking, ensure that your weight is placed as far back as possible.
The Frog is available in two different brake options: either with a front and rear V-brake and freewheel or with additional coaster
brake.
riese und müller GmbH
Frog Manual
Use both brakes simultaneously and note that because of the weight transfer effect, the front brake needs to provide the vast
majority of the braking power. But you also need to avoid locking the front wheel, which could lead to going over the bars or an
uncontrolled slide.
When your Frog is delivered, the left brake lever will activate the front brake. Be sure to get familiar with this arrangement, or
ask your dealer to swap the brakes over to your preferred set-up.
Danger: be careful as you get used to your brakes! Practice emergency stops away from traffic, until you have the bike under
complete control. This can be vital for avoiding accidents in traffic.
How they work, and how they get worn out:
When you apply the brakes, using a hand-operated lever or a back-pedal (coaster) brake, a fixed brake pad presses against a
rotating braking surface, and friction occurs. The bike is slowed down through this friction. Alongside the force with which the
blocks push against the rim, another important factor is the so-called coefficient of friction between the two surfaces.
If water, dirt or oil get onto the braking surface, this coefficient of friction will change. This is why a rim brake has poorer
performance when it’s wet, and doesn’t stop you as quickly.
Friction also causes wear on both brake blocks and rim. This wear is accelerated if you ride a lot in the wet. If the rim wall is worn
away far enough, the pressure of the tyre can blow the rim apart. The wheel can then lock up, and the inner tube split: in either
case it can lead to a crash.
Once the wear indicator on the rim is not visible anymore, you should take the bike to your dealer and let him change the rims.
Warning: Wet conditions diminish braking performance. You need longer braking distances when it’s raining! When you change
brake blocks, use only approved brands compatible with your rims. Your dealer will be happy to advise. Ensure that your braking
surfaces remain absolutely free of wax, grease and oil. Watch the wear indicator at the rims. Worn-out rims can lead to blow-out
punctures and dangerous accidents!
PAGE 22
To ensure effective stopping at all times, brakes should be checked often and, if necessary, adjusted.
Danger: Damaged brake cables, with, for example, individual strands poking out, must be replaced immediately, to prevent brake
failure and possible accidents. Ask your dealer for advice!
Checking, adjusting and balancing brakes
V-brakes consist of left and right-hand arms, mounted separately each side of the wheel. When you use the brake, the two arms
are drawn together by the cable. The arms pivot inwards on their mounting points and the blocks rub against the rim walls.
Function check:
·
Check that the brake blocks are aligned precisely with the rim, and have plenty of braking material left. If the grooves in the
block are worn away, it’s time to replace them.
·
The brake blocks should touch the rim with the front part of the block making contact first. The rear part of the block should
at that point be one or two millimetres from the rim. Seen from above, the brake blocks should make a V-shape. This Vshaped adjustment helps avoid squealing brakes.
·
The brake blocks should both hit the rim at the same time when you pull the lever.
·
The brake lever must have some movement in reserve – when applying full braking power it must not reach the handlebar.
Danger: Adjusting brake blocks against the rim requires a good degree of mechanical skill. Errors could lead to brake failure and
accidents. If in any doubt, leave the adjustment of brakes or changing brake blocks to your dealer. Poorly adjusted brakes can lead to
serious accidents!
PAGE 23
To balance the brakes, use the adjustment screw in the side of the brake arm body. Adjust this screw until the blocks are the same
distance from the rim on each side.
To adjust the brakes, loosen the knurled locknut where the cable enters the handlebar brake lever. Turn the knurled and slotted
adjustment screw out by a few turns. The ‘dead’ lever motion before the brakes bite will be reduced.
Hold the adjustment screw in place, and turn the knurled locknut tight against the brake lever housing. This stops the adjustment
screw vibrating loose.
Check that the slot in the screw does not face upwards or forwards, as this can allow water and dirt to get in.
Danger: It is essential after any brake adjustment that you carry out a static brake test, and that you ensure that the brakes are
hitting the rim with their full area. Brake failure or a locked-up wheel could otherwise cause an accident.
riese und müller GmbH
Frog Manual
After you’ve adjusted the brakes, it is essential that you test them away from traffic, so as to get used to their performance after
adjustment.
Tip:A regular cleaning of the rim surfaces ensures optimum brake performance.
Coaster brake
As an option the Frog is equipped with a coaster brake. The brake is activated by turning back the cranks. Best brake performance
is reached with horizontal position of the cranks and kicking the rear pedal.
Tip:Because of the chain tensioner the
brake function starts after tunring the cranks back a little bit. This is not dangerous but
should be trained away from traffic through sometest braking.
PAGE 24, Gear Hub Frog
A bike’s gears have the job of matching your power output to the gradient and to your desired speed. The amount of physical work
you need to do won’t be reduced by the gears, because this remains constant for the same distance covered at the same speed.
What does change is the power input per turn of the cranks. In other words, this means that in a ‘smaller’ gear you can get up
steep hills without undue effort, but to do so you’ll have to turn the pedals more often.
Going downhill you can choose a higher ratio. This means that each turn of the cranks takes you several metres, so you speed can
be high.
To ride energy-efficiently, you need to change gear often. Just like a motor vehicle, you must keep you ‘motor’ running in its
‘cruising’ rev-band, to ensure you get the best performance.
On the flat, a pedalling frequency, also known as ‘cadence’, of around 60 turns per minute is reasonable. Racing cyclists increase
this on the flat to around 90-110 revolutions per minute. When climbing, the cadence naturally falls somewhat – but you should
always be able to pedal smoothly.
The fine steps between gears and the easy action of modern gearing systems put you in the best position to ride efficiently. In
addition, wear on chain and sprockets, as well as the loading on your knee joints, can all be much reduced.
One advantage of hub gears is that they are enclosed: the mechanism is almost completely hidden away inside. Dirt has little
chance of getting at it. The transmission on the Frog, which is equipped with hub gears, will last considerably longer than a
derailleur system – if properly cared for. The disadvantage is the somewhat higher level of power losses within the hub.
PAGE 25
How they work, and how to use them.
A twist-grip controls the gears. The chosen gear is clearly displayed. When changing gear on the SRAM hub gear of the Frog, you
should pedal not or just lightly.
Danger: Practice changing gear on a traffic-free street. Make yourself familiar with the functioning of the twist-shifters. Getting
used to the gears in traffic could distract your attention from possible dangers.
Check the instructions from the gear manufacturer, which accompany your bike.
Adjustment and checking
The various gears are selected via the gear cable. Read the accompanying instruction booklets from the hub gear manufacturer
carefully. If you have questions, consult your dealer.
Check regularly, and particularly after removing a wheel, that the rear axle washers with fixing tabs (which fit into the frame
dropouts) are properly in place, and that the axle nuts are tightened to the appropriate torque. Also check the bolt securing the
brake reaction arm.
PAGE 26, Wheels and tyres
The wheels of a bike are your points of contact with the ground. They are highly loaded with the weight of the rider, luggage, and
by bumps on the road surface. Although the wheels are carefully manufactured and centred before delivery, they will ‘settle in’ in
the first few kilometres of riding. After an initial running-in period of 200 to 400 km (125 to 250 miles) you should get your
wheels trued by your dealer. After this running-in period you should regularly check the wheels, though in general re-truing is
seldom necessary.
The wheels consist of hubs, spokes and rim. The tyre is mounted on the rim, with the inner tube inside it. To protect the delicate
inner tube a rim tape is glued over the often-sharp edges of the spoke holes and over the ends of the spokes.
Tyres, tubes, rim tape, valves and air pressure
Tyres are responsible for traction on the riding surface, vital for braking, accelerating and turning. They should also have low
rolling resistance. Both street tyres (road) and knobblies (MTB) for rough tracks are available. Tyres can only function well when
riese und müller GmbH
Frog Manual
inflated to the correct pressure. Puncture resistance is also improved when running at the correct pressure. In particular, rupturing
of the inner tube when going over a sharp edge (so-called ‘snake-bike’ punctures) are caused by too little pressure.
The pressure recommended by the manufacturer is marked on the side of the tyre. The following table shows pressure in Bar:
PSI
40
50
60
70
BAR
2.8
3.5
4.1
4.8
Danger: Never pump your tyres up above the maximum recommended pressure! The tyre could blow away from the rim as you
ride, or explode. Accident danger!
The tyres and rim alone are not airtight. To retain the internal pressure the inner tube is placed inside the tyre. It is filled through
a “Schrader” valve (like automobile tyres) and can be refilled at every gas station.
If the valve body of the Presta valve isn’t properly screwed down, this can lead to air loss. Check the location of the valve body in
the valve shaft.
Hand-pumps are often not suitable for achieving high pressure. Track pumps with a gauge are better, as you can check the
pressure as you pump.
Danger: Always ride with the recommended tyre pressure, and check it at regular intervals.
PAGE 27
Check that the valve is an appropriate diameter for the hole in the rim, and that it always stands up straight!
Tyres with the tread worn away, or with damaged side-walls, should be replaced. The interior of the tyre can be damaged should
moisture or dirt get in. Defective rim tape should be replaced immediately.
Damage to tyres can in extreme cases lead to sudden blow-outs, which could cause serious accidents!
Rim truing, spoke tension.
The spokes keep the hub in the centre of the rim. Even spoke tension is necessary for the true running of the wheel. If the tension
of one spoke changes, for example after hitting a step at speed, or because of spoke breakage, the tension forces go out of
balance and the rim will no longer run true.
Even before you notice this imbalance through wobbling, the functioning of your bike will already be impaired.
The side-walls of the rims are usually contacted by the brake blocks simultaneously. If the wheel is no longer running true, braking
performance can be affected.
Check the roundness of your wheels from time to time. Lift the wheel off the ground and give it a spin by hand. Watch the gap
between brake blocks and rim. If this gap varies by more than a millimetre, the wheel should be re-trued by an expert.
Hint: Truing wheels is a difficult business, which should definitely be left to your dealer!
PAGE 28, Securing wheels with axle nuts, Fixing a puncture
Wheels are fixed to the frame via the hub axles. The axle will be fitted with six-sided axle nuts to secure it in the ‘drop-outs’.
Danger: Never ride a bike if you haven’t first checked that the wheels are secure. If a wheel comes loose as you are riding, you’ll
have a nasty crash!
The axle nuts on the Frog should be tightened or loosed with a 15mm spanner. This tool should be carried with you on rides,
because without it punctures can only be repaired with considerable difficulty.
Fixing a puncture
A puncture is a pain for any rider. But the dreaded hiss need not mean the end of a day’s cycling, so long as you carry with you
the tools needed to replace tyre and inner tube, and a spare tube or puncture-kit.
Wheel removal
·
With V-brakes, you must first unhook the cable. To do this, put one hand around the tyre and pull the brake pads or brake
arms together. When this is done the cable can be unhooked easily.
·
Now the air has to be released from the tyre. Just turn off the cap of the valve and press with the cap onto the valve.
·
On the Frog with coaster brake, you must also undo the reaction arm, which transmits drive and braking loads to the frame.
riese und müller GmbH
·
·
·
Frog Manual
The gear-change mechanism for the hub gear must also be uncoupled. Follow the instructions from the hub gear
manufacturers. Undo the axle nuts with a 15mm spanner.
Lift the bike a little and give the wheel a slap – it should fall out and down.
It may be helpful to lift the chain off the sprocket for better wheel removal.
PAGE 29
Removing the tyre
·
Press the tyre from the edges of the rim towards the middle, around the whole tyre. This makes removal easier.
·
Put the tyre levers to the left and right of the valve, and hook them under the bead of the tyre. Lift the edge of the tyre over
the rim edge. Hold the levers in this position.
·
Push the second lever about 10 cm from the first and again lift the tyre bead over the rim.
·
After part of the tyre bead is over the rim, the rest of the bead can usually be lifted off just by pushing the tyre lever around
the rim.
·
Now you can remove the inner tube. Take care that the valve doesn’t get caught in the rim, and that the inner tube isn’t
damaged.
·
Repair the punctured inner tube, following the instructions from your puncture repair kit.
·
If you have removed the tyre, you should check the rim tape. The tape should be seated evenly, and should not be damaged
or torn, and must cover all the spoke holes. If you are in any doubt, consult your dealer.
·
If necessary, the second tyre bead can be easily pulled off the rim.
Fitting the tyre
When you re-fit the tyre, be careful that no foreign bodies like sand or mud get into the inside, and that you do not damage the
inner tube.
·
Put the rim over one tyre bead. Push this bead completely into the rim using your thumbs. This process should be possible
without tools for any tyre. Then put the valve through the hole in the rim.
·
Pump up the inner tube slightly, so that it goes into shape, and place it completely inside the tyre. Check that it’s not folded
or creased anywhere.
·
Start pushing the final tyre bead onto the rim, starting opposite the valve. Push the bead over the rim with your thumbs as
far as you can.
PAGE 30
·
·
·
·
·
·
·
·
Check that the inner tube isn’t caught between tyre and rim, where it could get pinched. Push the inner tube back to the
centre of the tyre with your index finger.
Work evenly around both sides, moving towards the valve. At the end you should pull the tyre forcefully downwards, so that
the part you’ve already mounted can move into the deeper centre of the rim. This makes getting the last few centimetres on
noticeably easier.
Check the position of the inner tube again, and push the tyre over the rim with the ball of your hand.
If this doesn’t work, you will need to use a tyre lever. Be careful that the blunt edge is towards the inner tube, and that the
inner tube is not damaged.
Push the valve inwards, so that the inner tube does not get pinched under the tyre bead.
Is the valve straight? If not, you need to take off one side of the tyre and re-arrange the inner tube. If you want to be totally
sure that the inner tube isn’t getting caught under the bead, you should half-pump up the tyre and push it back and forth
around the whole rim. This also lets you check that the rim tape hasn’t moved.
Pump the tube up to the desired pressure. The maximum allowable pressure is printed on the side of the tyre (see page 32).
Check that the tyre is properly seated using the mounting line on the tyre side-wall. It is important that the line is a
constant distance from the top of the rim the whole way round the tyre.
PAGE 31
Mounting the wheels
Mounting the wheels follows the reverse procedure to their removal. Ensure that the wheels fit perfectly into the dropouts, and
run centrally in the front forks or rear swing-arm. Note that the plate of the kickstand has to be at the inner face of the drop out
and the washer at the outer face of the drop out. Do not inflate the tyre before mounting the wheel.
Danger: Re-hook the brake cable in position and check before you ride that the brake blocks make proper contact with the rims. -
Check the axle bolts. - Check that after the repair the braking surfaces are still free from grease or other lubricants. - It is essential
that you test your brakes! - Errors in mounting wheels can lead to loss of control, and could lead to serious accidents.
Finally check that the tabbed fixing washers are correctly in position, and tighten the axle nuts to the correct torque (40Nm).
Tighten the reaction arm bolt with a torque of at least 6Nm. Mount the shifhter cable.
riese und müller GmbH
Frog Manual
Danger:
Incorrect assembly can lead to poor functioning or failure of the brakes. Proceed in strict accordance with the
manufacturer’s instructions. You absolutely must test your brakes! Errors in mounting wheels can lead to loss of control, and could
lead to serious accidents.
Tip: When you are on the road with your Frog always take a spare tube and the necessary tool with you. So you easily can fix a
puncture.
PAGE 32, Steering bearings or headset
The fork, stem, handlebar and front wheel are fixed to the frame by the steering bearings, also known as the headset. So that the
bike can self-stabilise and have good straight-line handling, this bearing must be able to turn easily. Road shocks and bumps
impose heavy loads on this bearing, and it can come loose and go out of adjustment.
Danger: If you ride with a loose headset, extremely high loads are imposed on fork and bearings. Damage to the bearings or even
a fork breakage could be the result, with possibly serious consequences.
Checking
·
Check for play by putting your fingers around the upper bearing shell.
·
Hold the front brake with your other hand, and push the bike firmly forwards and backwards.
·
If the bearing has play, you will feel noticeable movement between upper and lower parts.
·
To check that the bearing is turning easily, lift the frame up with one hand, so that the front wheel loses contact with the
ground. Move the handlebar from left to right. The front wheel should move easily from far left to far right, without
‘indexing’. If the handlebar is lightly touched, the wheel should move as if of its own accord from the straight-ahead
position.
Caution: Adjusting the headset bearings requires a degree of experience, so this work should be left to your dealer.
Adjustment
The headset bearings consist of an inverted Aheadset arrangement. The ‘steerer tube’ goes from the stem hinge downwards. At its
lower end the fork pushes onto it, and is fixed by two clamp screws A (similar to the way an Aheadset stem is fixed). In addition,
the fork is held in place from below with a fixing cap secured by bolt B.
·
To adjust the headset, the two clamping screws A must first be loosened.
PAGE 33, Suspension pivot bearings
·
The play can now be adjusted out using the recessed bolt B. Tighten this up gently ‘by feel’.
Caution: Do not completely tighten up this bolt, or you will be ‘dialling in’ play.
·
·
·
Align the stem again so that the handlebars are straight.
Re-tighten the side clamp bolts A. Apply a torque of 5Nm.
Carry out the test for play as described above. Also, make sure that the bearing isn’t adjusted too tight.
Danger: Check that the stem is completely secure against turning after you’ve adjusted the headset bearings! A loose stem could
lead to a crash!
Front suspension bearings
The front wheel swing-arm on the Frog is supported by maintenance-free IGUS ‘Iglidur’ bearings. The pivot bolts can be adjusted
from the outside with an 8mm hex key. The inner part of the bolt is secured to the fork against rotation and cannot be moved. If
the front suspension develops play and starts to wobble or oscillate as you ride, the outer pivot bolt can be tightened somewhat.
If the front suspension is hard to fold, the outer pivot bolt can be slightly loosened. If the bearing is completely disassembled,
please secure the thread of the pivot bolt with thread-lock adhesive.
Rear suspension bearings
The Birdy’s rear swing-arm is supported on a very precise and maintenance-free INA sealed cartridge needle bearing, which
requires neither adjustment nor maintenance. However, the position of the pivot axle and its corresponding clamp bolts should be
checked regularly. Should the axle have moved over to left or right, so that it is no longer completely locked into the swing-arm
on both sides, please consult your dealer. The clamp bolts must be tightened to 3.5 Nm torque.
riese und müller GmbH
Frog Manual
PAGE 34, Lighting
In many countries an effective lighting system is a legal requirement for using a bicycle on public roads. See page 10 for more
details.
To switch on the handlebar light just press the two buttons once. Another press onto the buttons will switch on the flash light
mode. To switch it off press buttons again.
The tail light is actuated by a little switch at the bottom of the saddle.
If the light becomes weaker the batteries may be empty.
How to change the batteries
To change the batteries the caps at both ends of the handlebar have to dismantled with a Phillips-tip screwdriver. The tail light
has a lid underneath the saddle which can be opened for a battery change.
PAGE 35
About the light handlebar
At the moment of printing this manual the light handlebar was not available yet. So it be happen that your Frog is equipped with
a standard battery light which is mounted on the handlebar.
Danger: Never use your bike if the lights aren’t working! You will be very easily overlooked by other road users. You could also
end up not seeing road hazards. Serious accidents could result!
Danger: Accessories fitted after sale can affect the functioning of your bike. You could even lose control of the bike when riding.
Always consult your dealer before you add any accessories to your bike. Your dealer will have available many accessories developed
specifically for the Birdy. You will find plenty of information about this in this handbook. In particular, stem and handlebar should
always be changed in a specialist workshop.
PAGE 36, General care and inspection tips
The bicycle you now own is a high-quality product. When you collect your bike from your dealer, he will have assembled it ready to
ride. Nevertheless, like any other vehicle, your bike needs regular care and must be serviced at intervals by your dealer. Only in
this way can the reliable and safe functioning of all parts be guaranteed, so that you will be able to cycle safely and enjoyably for
many years.
Caution! Only attempt maintenance work for which you have the necessary expertise and the correct tools.
Washing and care
Dried sweat, mud and road salt from winter riding, or sea air, can all attack your bike. You should carry out regular cleaning and
corrosion protection of all parts of your bike.
Easiest is to blow away all dirt and deposits with a steam cleaner. This express cleaning method has serious drawbacks: the very
strong, high-pressure water jet can push past bearing seals and reach the inside of bearings, where it can displace lubricant and
increase friction. In the longer term, the bearing surfaces can be destroyed and the bearing will refuse to turn smoothly. Steam
cleaners also often loosen frame stickers.
Caution! Do not clean your bike with a very strong water jet or with a steam cleaner.
Far more appropriate is to wash the bike with a gentle flow of water, or from a bucket, using a damp cloth or a large paintbrush –
for example a wallpaper brush. Hand-washing has another beneficial side-effect: you can detect early signs of damaged paintwork, worn-out components, loose bolts, slack spokes or other problems. As you carry out this regular cleaning you should check
tyre pressure, functioning of brakes and lights, and generally check the bike for damage or problems.
Caution: As you clean, check for cracks, scratches, any deformed material or discoloration. If in any doubt contact your dealer.
Replace any damaged parts immediately, and touch up any damaged paintwork.
When the bike has dried, you should treat the paintwork and metal surfaces with wax polish. Also protect spokes, hubs, nuts and
bolts etc with a wax film. Polish the waxed surfaces with a soft cloth, so that they shine, and water will bead and run off.
riese und müller GmbH
Frog Manual
PAGE 37
Hint: protect areas where cables could touch paintwork, such as underneath the chainstays, with a plastic film or similar. This
avoids unsightly scratches and damage to paintwork.
Care of the anodised finish
A special anodised finish protects the aluminium parts of your Birdy. This is a protective film which is part of the material itself,
and which is created using an electro-chemical process. This film is particularly hard, and so is scratch-resistant. Despite this, the
anodised finish also requires care.
Clean using just water, with, if necessary, a little washing-up liquid to shift grease. After drying, treat the surfaces with anodised
aluminium polish, which your dealer can supply. Distribute the polish evenly over the surface using a clean cloth – this lets you
remove paint, tar or oil traces.
Finally, rub the parts with a clean, soft cloth, so that excess polish is removed and does not attract dust.
Hint: After cleaning is completed you should if necessary lubricate your chain (see page 33).
Danger: Make sure that you get no cleaning polish and no chain oil on the brake blocks or rim braking surface! Brake failure can
lead to serious accidents!
Storage
If you use your bike regularly, you need take no particular precautions, except against theft, when storing it for short periods. We
recommend that the bike be stored in a dry, well-ventilated room.
Should you wish to store the bike for the winter, please note:
During long periods of storage the inner-tubes lose pressure. If the bike stands for long periods on flat tyres, the tyre carcass can
be damaged. So it’s best to hang the bike up, or regularly check tyre pressure.
·
Clean the bike and protect against corrosion, as described above.
·
Store the bike in a dry room.
·
Change gear onto the smallest sprocket. This ensures that cables and springs are under the least possible tension. With the
Birdy green hub gear, change to first gear. On the Birdy blue, change the hub to third gear.
Hint: Often, cycle dealers have very short waiting times in the winter, and many have special offers for servicing. Use this slack
period to take your bike for inspection!
PAGE 38
Hint: Do not store the folded Froglonger than weeks because the fenders could gewt deformed.
Servicing and maintenance intervals
As it is ‘run in’, the spokes ‘settle’, cables stretch, and bearings run in. The first inspection, when all important functions will be
checked and adjusted, should be carried out by your dealer after a short run-in period (4 to 8 weeks, or after 200 to 400 km, 125
to 150 miles). Arrange an appointment with your dealer for the servicing of your new bike.
Regular check-ups on your bicycle guarantee reliable functioning and riding pleasure. As with a car, annual inspections mean that
you can often avoid expensive remedial work. Adjustment of bearings and timely replacement of worn parts can avoid serious
damage to your machine, so after the run-in phase, you should have your bike serviced at regular intervals. The service intervals
recommended in the appendix (page 63) are for cyclists who cover between 1000 and 2000 km per year. If you regularly cover
greater distances, or often ride on bad roads or off-road, shorten the service intervals to reflect the harder use. This also applies if
you ride often in the rain or in a damp climate.
Caution: For your own safety, take your bike to your dealer for its first inspection after 200 to 400 km (125 to 250 miles), or
after 4 to 8 weeks, or at the latest after three months.
PAGE 39, Warranty
Your cycle dealer is obliged by law to ensure, amongst other things, that your bike is not affected by defects, which materially
diminish its value or fitness for purpose. The exact details will vary according to country. In Germany, this guarantee ends two
years after purchase. We offer a guarantee, in addition to you statutory rights, of two years on all parts, and twentyfive years on
the Frog frame. This additional guarantee is only applicable when the accompanying Bicycle Passport is filled out completely,
including inspection reports from your dealer, and in cases of guarantee claims this must be sent, together with a copy of the
receipt, to riese und müller. The guarantee only applies to the original purchaser.
Frog Manual
riese und müller GmbH
Damage through wear and tear, neglect (inadequate care and maintenance), crashes, overloading through excess weight, incorrect
assembly, or modifications to the bike (additional or changed components) is excluded. Competitive use, jumping or similar
overloading is also not covered by guarantee.
In the interest of long life and component reliability, the manufacturer’s assembly instructions (including torque settings for
bolts) and the correct service intervals must be precisely observed. The guarantee is void if assembly instructions or service
intervals are neglected. Carry out the checks indicated in this handbook (page 42), and replace any safety-critical parts when
necessary, for example handlebar, brakes etc.
Caution: Your authorised dealer must make your bike rideable, so that safe functioning is guaranteed. The dealer must do a final
safety check and carry out a test ride.
PAGE 41, Tightening torques
Part
Rear derailleur
Twist-grip
Brake lever
Hub
Crankset
Sealed-bearing bottom bracket
V-brakes
Seatpost
Rear swing-arm
Front swing-arm
Stem hinge
Stem
Bar ends
Threaded component
Mounting bolt
Securing bolt (hex key)
Securing bolt (hex key)
Axle nut for hub gears
Crank bolt
Housing
Brake socket bolts
Cable clamp nut
Brake shoe fastening bolt
Saddle rail clamp bolts
Clamp bolts
Fork clamp bolt to ‘steerer tube’
Tension rod adjuster M3
Tension rod locknut M5
Handlebar clamp bolt
Clamp bolts
Tightening torque
8-10 Nm
1-2 Nm
5-6 Nm
40-45 Nm
35 Nm
49-69 Nm
5-9 Nm
6-8 Nm
8-9 Nm
9-12 Nm
3.5 Nm
5 Nm
1 Nm
3-4 Nm
12-14 Nm
See manufacturers’ instructions
PAGE 42/43, Service and maintenance intervals
Part
Job
Lighting
Tyres
Tyres
Brakes
Check
Check pressure
Check tread and side walls
Check brake lever movement, block
wear, and position on the rims. Do
stationary brake test.
Visual inspection
Snap-rings on the bolts? Hinge lever
closed?
Check wall wear indicator, change if
necessary.
Check for play
Check, lubricate if necessary
Check, change if necessary
Check, re-tighten if necessary
Wax
Check trueness and spoke tension
Check, replace if necessary
Brake cables
Stem hinge
Rims (aluminium)
Bottom bracket bearing
Chain
Chain
Cranks
Paintwork
Wheels/spokes
Handlebar, aluminium
Before
every
ride
=
=
Monthly
Annually
Other interval
=
=
=
=
At the latest after the second set
of brake blocks
=
=
=
After 1000 km
=
At least every 6 months
=
=
Change handlebar at least every
two years
=
Headset bearings
Check for play
<
Headset bearings
Re-grease
Metallic surfaces
Wax
At least every 6 months
=
Hubs
Check for play in bearings
=
Pedals
Check for play in bearings
=
Quick-releases
Check
=
Nuts and bolts
Check, re-tighten if necessary
=
Valves
Check
<
Front swing-arm catch
Check for play and proper functioning
<
Rear swing-arm catch
Check for play and proper functioning
<
Stem hinge
Check for play, grease
<
Front swing-arm
Check for play
<
Brake and gear cables
Disassemble, re-grease or replace
The jobs marked = you can carry out yourself, provided that you have a certain amount of mechanical competence, experience, and suitable tools
(for example, a torque spanner). If any checks indicate something wrong, take suitable remedial measures immediately. If you are in any doubt, or
if something is unclear, please consult your dealer.
The jobs marked < should be carried out only by your dealer.
Frog Manual
riese und müller GmbH
PAGE 44, Which documents are important?
In the appendix of this handbook you will find:
·
The riese und müller Bicycle Passport, in which service inspections carried out by your dealer will be recorded. The extra
guarantees provided by riese und müller over and above your statutory rights are only valid when claims are accompanied by
a completely filled-out Bicycle Passport, together with a copy of your purchase receipt. The appropriate service inspections
must have been carried out by your dealer and recorded in the Bicycle Passport.
·
The riese und müller dealer maintenance record. This document is intended for the dealer’s records.
·
A service and maintenance interval planner on page 42-43.
·
A list of recommended tightening torques for all important parts of your bike is on page 41. The cycle workshop which
carries out repairs and inspection will need this.
Alongside this manual we you will find included:
·
User instructions from component manufacturers. This handbook refers several times to these specialised, detailed
documents. Here you will find full details of use, care and maintenance. Ensure that you are provided full instructions with
clipless pedals, gear and brake system components, and that you keep them, together with this handbook, in a safe place.
·
Your receipt, which proves that the bike belongs to you, and when you bought it.
We wish you and your Birdy a very pleasant ride. If you do have any further questions, your dealer will be delighted to help. If you
do have any problems which your dealer can’t help you with, please feel free to call us at any time.
Your riese und müller team
PAGE 45, riese und müller Bicycle Passport
(This Bicycle Passport is intended for the customer)
Model: Frog
c
Frame number:
Date of purchase:
The bike was handed over:
Place:
Dealer’s stamp:
Date:
Dealer’s signature:
Please ensure that all inspections and servicing carried out by your dealer are recorded in this Passport. The extra guarantees
provided by riese und müller over and above the statutory guarantee are only valid when claims are accompanied by a completely
filled-out Bicycle Passport, together with a copy of your purchase receipt. The appropriate service inspections must have been
carried out by your dealer and recorded in the Bicycle Passport.
riese und müller GmbH
Frog Manual
PAGE 46 to 47
First service inspection
After at most 400 km (250 miles) or at latest three months
after purchase.
Fourth service inspection
After at most 6000 km (4000 miles) or three years after
purchase.
Job number:
Job number:
Dealer’s stamp and signature
Dealer’s stamp and signature
Date:
Date:
Parts replaced or repaired:
Parts replaced or repaired:
Second service inspection
After 2000 km (1250 miles) or one year after purchase.
Fifth service inspection
After at most 8000 km (5000 miles) or four years after
purchase.
Job number:
Job number:
Dealer’s stamp and signature
Dealer’s stamp and signature
Date:
Date:
Parts replaced or repaired:
Parts replaced or repaired:
Third service inspection
After at most 4000 km (2500 miles) or two years after
purchase.
Job number:
Dealer’s stamp and signature
Dealer’s stamp and signature
Date:
Date:
Parts replaced or repaired:
Parts replaced or repaired:
Separate Booklet
riese und müller dealer maintenance record
(This document is meant for the dealer)
Model: Frog
Sixth service inspection
After at most 10000 km (6000 miles) or five years after
purchase.
Job number:
c
Frame number:
Date of purchase:
The bike was handed over:
Customer name:
Customer address:
Postcode:
Customer’s signature:
riese und müller GmbH
Birdy Manual
Dear dealer,
Please record all service inspections you carry out in this Maintenance Record. The extra guarantees provided by riese und müller
over and above the statutory guarantee are only valid when claims are accompanied by a completely filled-out Bicycle Passport or
this Maintenance Record, together with a copy of your purchase receipt, and when the appropriate service inspections have been
carried out by you and recorded in the Bicycle Passport or Maintenance Record
First service inspection
400 km (250 miles) or three months
Fourth service inspection
6000 km (4000 miles) or three years
Job number:
Job number:
Date:
Date:
Mechanic:
Mechanic:
Second service inspection
2000 km (1250 miles) or one year
Fifth service inspection
8000 km (5000 miles) or four years
Job number:
Job number:
Date:
Date:
Mechanic:
Mechanic:
Third service inspection
4000 km (2500 miles) or two years
Sixth service inspection
10000 km (6000 miles) or five years
Job number:
Job number:
Date:
Date:
Mechanic:
Mechanic: